[Article] How to Model BPMN Business Processes with WSO2 Business Process Server

- Hasitha Abeykoon
- Associate Technical Lead - WSO2
Table of contents
- Applies to
- Introduction
- Scenario description
- Deployment overview
- Modeling with BPMN
- Roles and permissions needed
- External invocations
- Listening for external message events
- Error handling
- Assigning tasks to the same user
- Assigning roles to user tasks
- Creating a data service using WSO2 DSS
- Configuring Salesforce for WSO2 ESB
- Creating APIs in WSO2 ESB
- Deploying artifacts
- Testing the setup
- Conclusion
- References
- Appendix
Applies to
| WSO2 Business Process Server | Version 3.5.1 |
| WSO2 Enterprise Service Bus | Version 4.9.0 |
| WSO2 Data Services Server | Version 3.5.0 |
| WSO2 Developer Studio | Version 3.8.0 or later |
Introduction
Users can use either BPMN or BPEL to model business processes. BPMN (business process model and notation) is a graphical representation that uses a standard set of rules to plot out depictions of business processes in a business process model. Analysts use these diagrams to show business owners how their processes tie in together and pass on information to each other. In contrast, BPEL uses eXtensible Markup Language, or XML, as a Web-based notational system to organize business processes. Compared to BPEL, BPMN is easy to understand and use. It is emerging as the preferred choice for organisations seeking to enact their business processes.
In this article we’ll demonstrate how BPMN can be used to model a simple business process. We’ll be using WSO2 Data Services Server (WSO2 DSS) and WSO2 Enterprise Service Bus (WSO2 ESB) to build exposed REST services that we can call from WSO2 Business Process Server (WSO2 BPS) to perform actions.
Scenario description
Following is the scenario that is modeled and discussed in this article:
- A customer calls a call center with a requirement. Let us call it a service request (SR).
- The SR is assigned to a supervisor or technician.
- If it is a minor fix, they complete the SR (level 1 fix).
- If it is a major fix, they request items needed for it from the inventory.
- The inventory manager confirms the availability of the requested items.
- If items are in stock, the technician or supervisor can complete the SR (level 2 fix).
- If items are not in stock, the technician or supervisor raises an inventory request.
- When the items arrive, the technician or supervisor is notified so that he can complete the SR (level 3 fix).
- After completing the SR, the customer information is added to Salesforce.
Deployment overview
When the BPMN workflow is deployed and started, the WSO2 BPS will call external services. All the heterogeneous services are fronted by WSO2 ESB. WSO2 ESB accepts the REST invocations made by WSO2 BPS, transforms them if needed and forwards them to the relevant backend services. Hence, the overall server deployment would look figure 1.

Figure 1
Modeling with BPMN
Figure 2 is the BPMN diagram that we can model for the above scenario.

Figure 2
You can use WSO2 Developer Studio to create a BPMN worlfow since it’s bundled with Activiti support for modeling BPMN. It is always better to update the Activiti plugin before you start.
- In WSO2 Developer Studio navigate to Help > Install new software and add https://activiti.org/designer/update/ as a site.
- Select and install Activiti BPMN Designer.
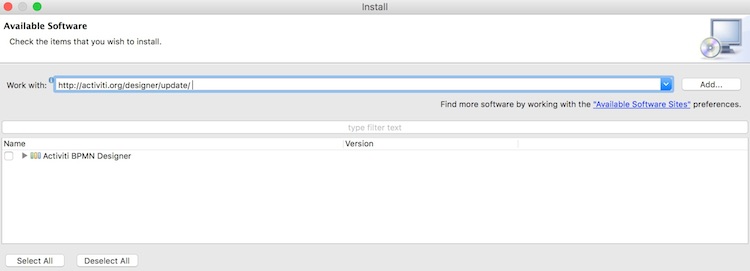
Figure 3
- Create a new Activiti diagram. Now you can drag and drop items into the workplace and model the workflow shown in figure 2. Documentation regarding this can be found here. There is also a descriptive tutorial published here. If you are new to BPMN modeling, go through the tutorial first.
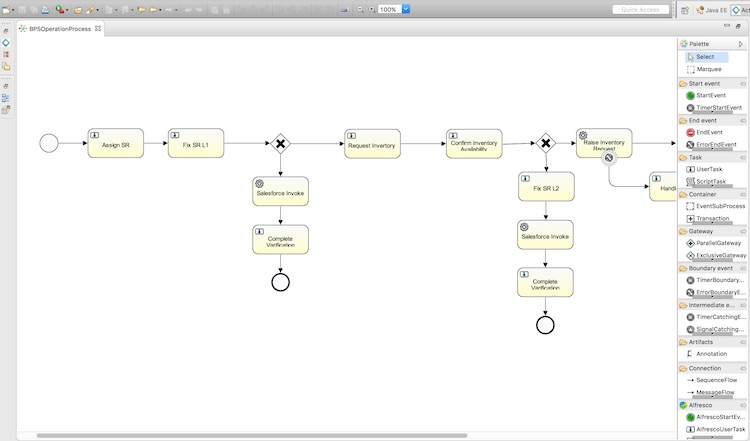
Figure 4
- Finally, after the design is done, you need to export the BPMN workflow as a deployable archive (.bar file). To do that make sure you are in Activiti Perspective and you have selected the Package Explorer panel. Right click on the project and select Create deployment artifacts. Then you will notice a .bar file created under the deployment folder.
- The BPMN designer generates an xml file as the source. Please find this attached in the appendix.
Roles and permissions needed
According to the scenario described earlier, we need to have several roles in the system. Let us define them as follows:
- operationsstaff: receives customer call and assigns task for supervisor/technician
- supervisor: supervisor role
- technician: technician role
- Inventorystaff: manages inventory
- Bpsprocessmanager: has permission to start, stop and manage WSO2 BPS processes

Figure 5
External invocations
In the above workflow, WSO2 BPS does two external invocations. Both of them are REST calls to WSO2 ESB as discussed previously. When you design BPMN workflow, you need to get the service task under Task of the design palette.
- Place
org.wso2.carbon.bpmn.4.x.x.jarfile (can be found at[BPS_HOME]/repository/components/pluginsfolder) as an external jar to the project. - In Main Config of the service task add
- Task Type: Java Class
- Class Name:
org.wso2.carbon.bpmn.extensions.rest.RESTTask
- Under Documentation you can add fields related to the service invocation. In the above workflow, one REST call is done to the Salesforce API to add the customer record to Salesforce after resolving the service request. The other one is done to the Estimation Request API to add an estimation request for an inventory item.
- Salesforce API
Field Name String Value Expression serviceURL https://localhost:8280/esb/salesforce/add?name=${customerName} method GET outputMappings id:createResponse.result.id,success:createResponse.result.success - Estimation Request API
Field Name String Value Expression serviceURL https://localhost:8280/estimationRequest method POST outputMappings id:GeneratedKeys.Entry[0].ID headers Accept:application/json,Content-Type:application/json input {"addEstimationRequest": { "itemName":"${itemName}", "quantity":"${quantity}", "unitPrice":"${unitPrice}" }}
- Salesforce API
Listening for external message events
In this use case, if the inventory manager finds out the requested item is not in stocks, he raises an inventory request. It can take a long time for new stock to reach the premises. Suppose the supplier sends a notification when new inventory items are issued. Then there is no need to assign the task and keep it in the system until stocks are supplied. When the system gets the message from the supplier, the BPMN process should be started again automatically.
To cater to this requirement there is a building block in the Activiti palette called messagestartevent. We need to configure this to listen to a particular message.
Click on the empty white space on Activiti designer and define a message called materialReceiveMessage.

Figure 6
And then you can associate materialReceiveMessage with the defined messagestartevent.

Figure 7
Error handling within BPMN processes
When external APIs are invoked with service tasks, there might be a situation where errors occur. The backend servers may be down, or servers can send error responses rather than the actual response payload, or even network timeouts can happen. In such situations, we might need to inform the user and let him retry. Also, if an error has occurred after several sequential service invocations, we might need to rollback the operations we made in the reverse order.
Now let's discuss how we can configure a very simple error handler. This will detect if some error has occurred while invoking the REST endpoint and notify the user of this. At the same time it would end the BPMN work flow.

Figure 8
- In the Activiti designer palette, under Boundary Events hold and drag ErrorBoundaryEvent onto the boundary of Raise inventory request service task.
- Under Main config, for Error code enter RestInvokeError.
- Add a user task as the next flow item. Under Documentation, specify the error message as below.

Figure 9
In order to test this shut down WSO2 ESB server that is exposing the REST service we are calling. You need to do this after deploying the BPMN workflow in WSO2 BPS and the control is at raise inventory. At that point, we should be able to observe that the error flow is invoked.
Assigning tasks to the same user
In the scenario, there are instances where we want to assign the task to the same user who owned the task earlier. For example, the supervisor/technician who raised the inventory should continue completing the service request after inventory is raised. This is easily achievable with an extension.
WSO2 BPS has various extension points where users can plug their implementations and trigger them where necessary. org.activiti.engine.delegate.TaskListener is such an interface.
Consider following code segment.
package org.wso2.carbon.bpmn.tasks.utils.assignee;

import org.activiti.engine.delegate.DelegateTask;
import org.activiti.engine.delegate.TaskListener;

public class TaskAssigneeListener implements TaskListener {

    @Override
    public void notify(DelegateTask delegateTask) {
        String assignedUser = delegateTask.getAssignee();
        System.out.println(delegateTask.getName() + " is assigned to " + assignedUser);
        delegateTask.setVariable("sruser", assignedUser);
    }
}
Here we are assigning the user of the current task as a delegate task’s user.
You can build the bpmnTaskUtils project and place the built .jar file at [BPS_HOME]/repository/components/lib directory and restart the server to apply it. Please find the appendix attached herewith.
For this to work, we need to define Assignee as ${sruser} in the respective user task’s main configs.
Assigning roles to user tasks
In the scenario, when data is passing from one stage to the next, the tasks are assigned to various people, sometimes statically and sometimes programmatically. They should be performed by various roles who have necessary privileges in the organization. When modeling the workflow, we need to assign each user task to a relevant role or user under Main Config.

Figure 10
| User Task | Assignee | Candidate Group |
|---|---|---|
| Assign SR | operationsstaff | |
| Fix SR L1 | ${srrole} | |
| Complete verification | ${sruser} | |
| Request inventory | ${sruser} | |
| Confirm inventory availability | inventorystaff | |
| Fix SR L2 | ${sruser} | |
| Handle error | bpsprocessmanager | |
| Fix SR L3 | ${sruser} |
Creating a data service using WSO2 DSS
In the above workflow, to simulate raising an inventory request, we invoke WSO2 ESB’s estimationRequest REST API. It forwards the request to WSO2 DSS and finally records it in a MySQL database.
- Create a database called
dss_demo_dbin MySQL. - Create a table called
estimation_requestwith the following structure.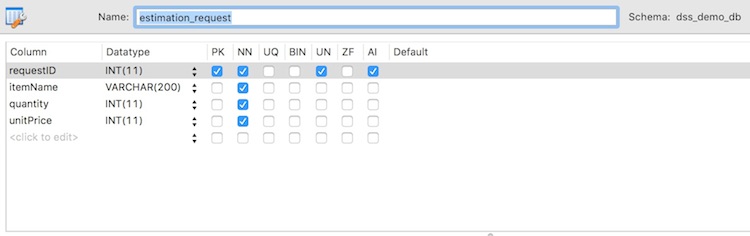
Figure 11
- Start WSO2 DSS with the offset = 2 and log into the Management Console. Navigate to Configure > Data Sources and create a data source as shown below.
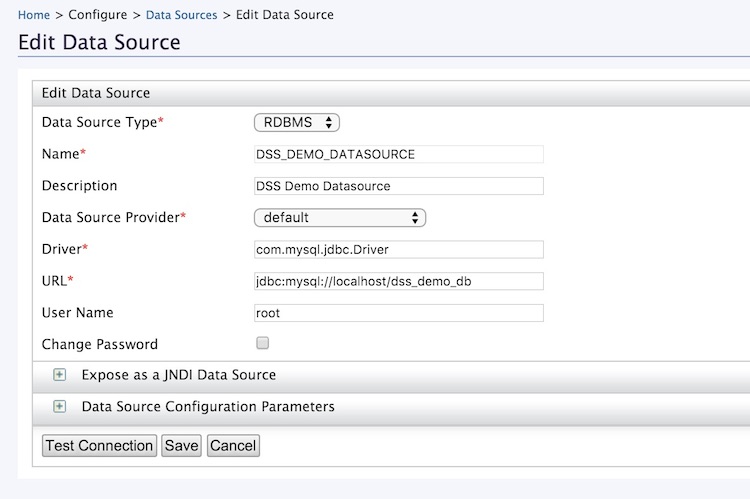
Figure 12
- Now navigate to Main > Upload and upload the estimationRequest.dbs file attached in the appendix.
Configuring Salesforce for WSO2 ESB
Salesforce is one of the world’s best customer relationship management (CRM) software. We can use APIs provided by Salesforce to deal with the system programmatically. WSO2 has developed a connector that can be used with WSO2 ESB. It allows users to call the ESB with data to be sent or queried from Salesforce. It can then forward it in an appropriate format to Salesforce.
Let us configure an API in WSO2 ESB so that users can call that API with a customer name. We can use WSO2 Developer Studio to develop all the artifacts and deploy it to WSO2 ESB as a .CAR file.
- Create a composite application project. Under that a create an ESB config project.
- Right click the ESB config project and select Add or remove connector and proceed to adding the Salesforce connector. WSO2 Developer Studio can connect to the connector store online and include the connector in the .CAR file.
- Create a local entry called MySFConfig and add the Salesforce account details there as shown below.
			<salesforce.init>
    			<username>[email protected]</username>
   			 	<password>xxxxyyyyy</password>
    			<loginUrl>https://login.salesforce.com/services/Soap/u/36.0</loginUrl>
			</salesforce.init>
Note that xxx is the password you use to login to Salesforce and yyyy is the key you get from Salesforce (sent to your email used to register for Salesforce). Also note that you need to create a developer account at https://developer.salesforce.com/ in order to have permissions to invoke Salesforce APIs.
- Create a sequence called
salesForceInvokeSequenceand inject the Salesforce connector there. You can use the payloadFactory mediator to create the necessary payload for the connector. - Create an API called
salesforceAPI, which invokes the above sequence. - Click on the composite application project you created earlier. Then, create a connector exporter project under it by right clicking New then clicking Other > Connector Exporter Project. Add the Salesforce connector into that project by following documentation . Make sure you are in the WSO2 ESB graphical perspective in WSO2 Developer Studio.
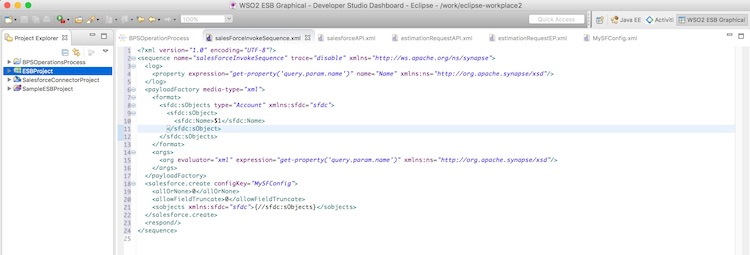
Figure 13
Export the composite application project to a CAR file archive, which is directly deployable to WSO2 ESB. To do that that right click the project and export it. In the wizard select both sub projects. All the above necessary artifacts are included in the CAR file attached herewith. Please refer to the appendix.
Creating APIs in WSO2 ESB
According to the deployment, WSO2 BPS calls to WSO2 ESB, which forwards the calls to the necessary back-end services. Two APIs are created at WSO2 ESB for this. WSO2 Developer Studio can be used to create all these artifacts. Please find the completed artifacts in the ESBConfigProject.zip attachment in the appendix.
estimationRequest API
- We have implemented a data service using WSO2 DSS. It’s accessible using the following URL https://127.0.0.1:9765/services/estimationRequestService/addEstimationRequest.
- Create an http endpoint under the ESB config project with the above URL.
<endpoint name="estimationRequestEP" xmlns="http://ws.apache.org/ns/synapse"> <http trace="disable" uri-template="https://127.0.0.1:9765/services/estimationRequestService/addEstimationRequest"/> </endpoint> - Create an API in WSO2 ESB with the below configuration:
<api context="/estimationRequest" name="estimationRequestAPI" xmlns="http://ws.apache.org/ns/synapse"> <resource methods="POST" protocol="http"> <inSequence> <send> <endpoint key="estimationRequestEP"/> </send> </inSequence> <outSequence> <send/> </outSequence> <faultSequence/> </resource> </api> - When deployed, the above API can be accessed through the following URL: https://127.0.01:8280/estimationRequest.
Salesforce API
- Create a sequence called
salesForceInvokeSequencewith the below configuration:<sequence name="salesForceInvokeSequence" trace="disable" xmlns="http://ws.apache.org/ns/synapse"> <payloadFactory media-type="xml"> <format> <sfdc:sObjects type="Account" xmlns:sfdc="sfdc"> <sfdc:sObject> <sfdc:Name>$1</sfdc:Name> </sfdc:sObject> </sfdc:sObjects> </format> <args> <arg evaluator="xml" expression="get-property('query.param.name')" xmlns:ns="https://org.apache.synapse/xsd"/> </args> </payloadFactory> <salesforce.create configKey="MySFConfig"> <allOrNone>0</allOrNone> <allowFieldTruncate>0</allowFieldTruncate> <sobjects xmlns:sfdc="sfdc">{//sfdc:sObjects}</sobjects> </salesforce.create> <respond/> </sequence> - Create an API using the above sequence.
<api context="/esb/salesforce" name="salesforceAPI" xmlns="http://ws.apache.org/ns/synapse"> <resource inSequence="salesForceInvokeSequence" methods="POST GET"protocol="http" uri-template="/add?name={value}"> <outSequence/> <faultSequence/> </resource> </api> - Once deployed, the above API is accessible through the following URL: https://127.0.0.1:8280/esb/salesforce/add?name=<customer name>.
Deploying artifacts
- Start the MySQL server and create the necessary databases and tables.
- Start WSO2 DSS (port offset = 2) and upload the
estimationRequest.dbsfile. Make sure it’s deployed successfully. - Extract the ESB config project and modify the Salesforce connector account details.
- Start WSO2 ESB (port offset = 0) and deploy the exported CAR file.
- Start WSO2 BPS (port offset = 1) and deploy the
BPSOperationProcess.bar(exported project fromBPSOperationProcessproject).
Testing the setup
- Log into the WSO2 BPS management console and create a user called “hasitha” with all the role permissions.
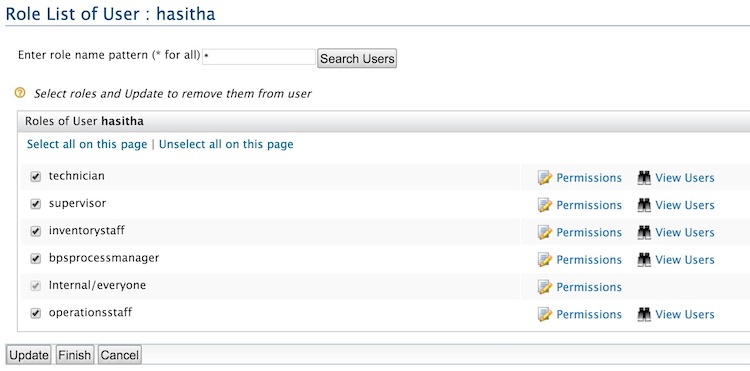
Figure 14
- Navigate to the BPMN Explorer through https://127.0.0.1:9444/bpmn-explorer.
- Log in using the user “hasitha”.
- Navigate to Processes and click on Start.


Figure 15
- Navigate to Claimable Tasks and click on the record to assign it to yourself. As there is more than one user this task can be assigned to, you need to claim the task first.

Figure 16
After claiming the task it will be assigned to you (logged in user = hasitha). You can assign the work to a technician or supervisor.
- Navigate to Claimable Tasks again and claim Fix SR L1.
- Complete it stating it is not fixed.
- Then raise an inventory task that should be assigned to you. Let’s raise a request for a laptop screen.
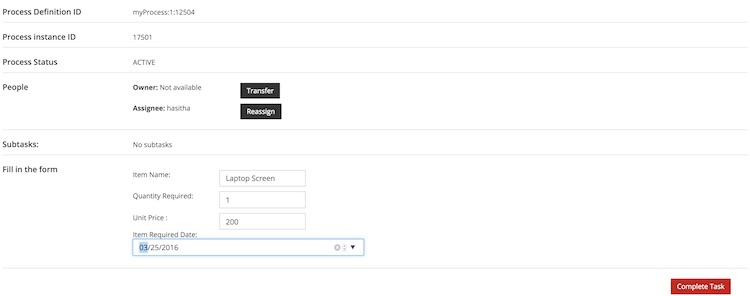
Figure 18
- Now go and claim the Confirm Inventory Availability task. Since the user hasitha has the role of inventory staff this task is claimable. When it is assigned, complete it by stating that inventory is not available.
- In case of a database error or ESB error the following error page will be displayed.
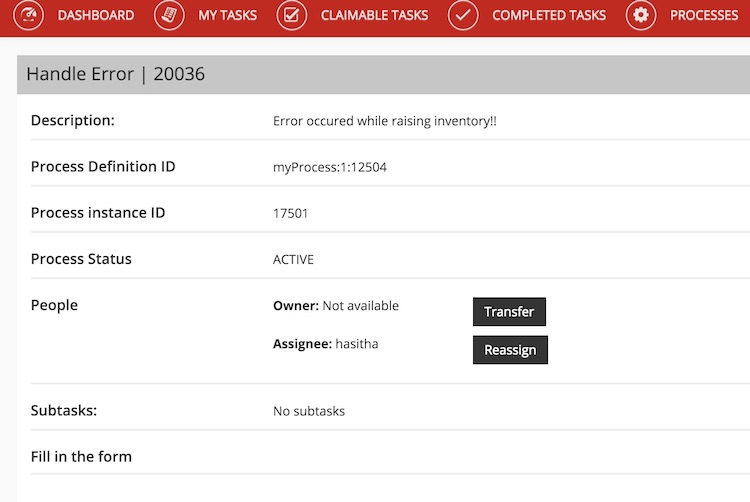
Figure 19
- In case of a successful inventory request, a DB record will be inserted into estimation_request table in MySQL.

Figure 20
- In case of a database error or ESB error the following error page will be displayed.
- Now we have raised the inventory. Here an external inventory management system of the company notifies them when goods arrive at the stores. This is a long running task. Log into the management console of WSO2 BPS and navigate to Main > Instances > BPMN and select the process ID. You will notice where the flow is in control now.

Figure 21
- To simulate external inventory arrival notification, use SOAP UI and invoke the endpoint using the following message:
Method POST URL https://localhost:9444/bpmn/runtime/receive Message { "processDefinitionId":"myProcess:1:12504", "messageName":"materialReceiveMessage", "action":"messageEventReceived", "correlationVariables": [ { "name" : "srid", "value" : "200", "type" : "string" } ], "variables": [ ] }Headers Basic Auth: admin/admin
Content-Type: application/json
Accept: application/jsonprocessDefinitionId: you can get this by navigating to Main > Processes > List > BPMN > Deployed Processes
materialReceiveMessage: this is the message name we set when we modeled BPMN messagestartevent.
srid: value we set for service request ID

Figure 22
If you check on the BPMN instance view, the focus will be moved onto the Fix RS L3 box (indicated by a red border).
- Now navigate to the BPMN explorer. You will see task Fix SR L3 directly assigned to user “hasitha”. This is because of the extension we placed when assigning the user of the previous task. Complete the task.

Figure 23
- Now we have completed the service request. Here, the Salesforce invoke is performed and the customer record is inserted to the table.
- Click on Complete Request. You will see the Salesforce record URL there.
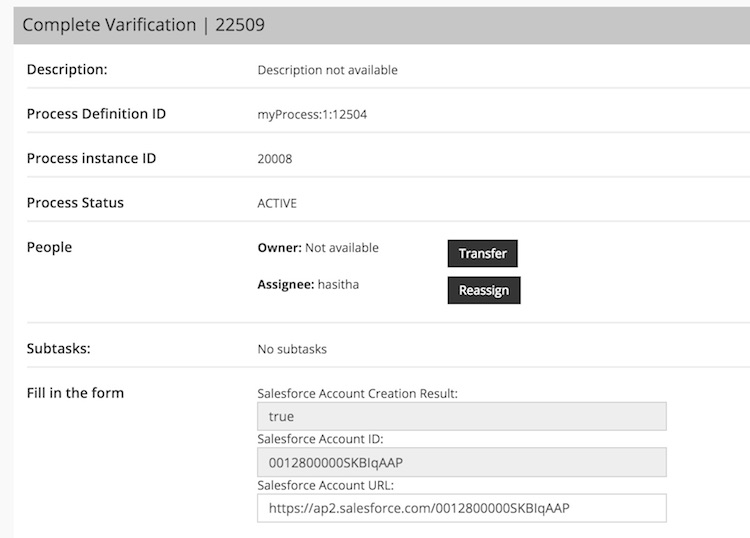
Figure 24
- When you complete this task, you are done with that particular service request.

Figure 17
In this testing scenario we used one login user with all privileges but in a real life system, you will have many different users with vivid permissions who can log in and perform only certain operations that are allowed to them. You have to keep in mind that a service request can only be completed when several people in the organization are involved.
Conclusion
BPMN is an easy language to model complex workflows. The Activiti extension for Eclipse makes it even easier to do so with drag and drop constructs. WSO2 BPS makes it convenient to deploy, view and monitor BPMN processes. With other products like WSO2 ESB and WSO2 DSS, you can build a powerful system for process handling within an organization.
References
- [1] https://soatechflicks.blogspot.com/2016/02/bpmn-rest-tasks-with-wso2-bps.html
- [2] https://www.activiti.org/userguide/#bpmn20
Appendix
The following files (in order of reference) are in the attached zip file: Modeling-BPMN.zip. You will also need to download the following resource: https://wso2.com/files/bpmntaskutils.zip.
- [1] BPSOperationsProcess.zip
- [2] BPSOperationProcess.bar
- [3] esb_projects
- [4] ESBProject_1.0.0.car
- [5] Download separately: