[Article] JMS 2.0 Support with WSO2 Enterprise Integrator

- WSO2 Team
- Content Writer - WSO2
By Eranda Rajapakshe and Dilshani Subasinghe
The 100% open source WSO2 Enterprise Integrator is a lightweight, high performance, and comprehensive integration solution. WSO2 Enterprise Integrator effectively addresses integration standards and supports all integration patterns, enabling interoperability among various heterogeneous systems and business applications. Java Messaging Service (JMS) is one of the most popular and widely used messaging standards between Java powered software application components. Prior versions of WSO2 Enterprise Service Bus (WSO2 ESB) supported JMS 1.0.2b and JMS 1.1. JMS 2.0 support was introduced with WSO2 ESB 5.0 and WSO2 Enterprise Integrator 6.0.0.
Java Messaging Service (JMS)
In today’s connected environment, software applications should possess the ability to communicate with external systems. In simpler terms applications should be able to send and receive messages. Having a separate entity to handle the intermediary role in message passing has become quite popular lately due to its many advantages, mainly the asynchronicity in communication.
The pattern of having a separate entity for message communication is often referred to as Message Oriented Middleware (MOM). This has become essential in current online business environments. If you simplify this abstract MOM concept, it can be seen as a set of messaging clients (message senders and receivers) connected to one central message handling server (message broker) where all the message routing happens.
In general, there are mainly two types of message routing that can take place. Those include:
- Point-to-Point (PTP) messaging
- Publish-Subscribe (Pub/Sub) messaging
Since this MOM concept is widely used in current software applications, having a standard API can be highly beneficial because there can be different types of message brokers and different types of underlying data communication layer implementations. A standard messaging API would give more flexibility and portability to the software client, where it can switch between different communication implementations without any extra effort.
Basically, this is what JMS is all about. JMS introduces a common API for Java software clients to follow in order to communicate with intermediate message handling servers. There are many message brokers that support JMS, including ActiveMQ, IBM MQ, HornetQ, etc. Java applications can connect to any of these message brokers using the standard JMS API without considering product-specific implementations. Switching between these message brokers is just a matter of changing a few parameters.
From then to now there has been three JMS versions introduced, JMS 1.0.2b, JMS 1.1 and JMS 2.0. All of them came with new APIs and new messaging features.
JMS 2.0 in a nutshell
JMS 2.0 comes with new API called Simplified API and several new messaging features. The purpose of these changes is to make the programmer’s life easy by havito develop and maintain code and to support extra use cases.
Simplified API
JMS API has not been changed for a long time and even though the API was verbose, it has not stopped developers from using it quite often. But with the new Simplified API, the number of lines of code that a JMS API user needs to write has been reduced considerably. The timeline leading to this is as follows:
- JMS 1.0.2b (June 25, 2001) — Introduces two domain-specific APIs for PTP model and for pub/sub model while satisfying the most basic communication requirements.
- JMS 1.1 (April 12, 2002) — Introduces single message communication API (Classic API) for both messaging models and includes many extra features over initial JMS version. For more information refer here1
- JMS 2.0 (May 21, 2013) — Introduces a simplified API to reduce the amount of code that should be written by a user when compared to the earlier APIs. But creators have mentioned JMS users are free to use both classic and simplified APIs because all the new features are added to existing APIs as well2
Features introduced in JMS 2.0
Shared topic subscription
Shared subscription was introduced to increase the scalability of Java applications. A shared subscription will forward the copy of the original message received from the topic, to only one message consuming client. The method of message distribution (how the messages are distributed among shared consumers) is not defined by the JMS API, therefore it should be handled by the JMS Provider.
JMS message delivery count
In JMS messages there is a property defined by the JMS API called JMSXDeliveryCount. The purpose of it is to maintain a counter to indicate the number of times a message has been (re)delivered to a particular JMS consumer client. Even though this property existed in versions prior to JMS 2.0, setting it was not mandatory for the JMS providers. But from JMS 2.0 onwards it has been mentioned as a mandatory property.
Delayed delivery
This feature allows users to define a delay on messages. The delay value is set by the JMS producer and the JMS provider waits until the delay is elapsed before forwarding the message to its consumers.
Sending messages asynchronously
In synchronous send, the JMS producer client will be blocked after sending a persistent message to the server until the server replies back. But with JMS 2.0 asynchronous send, the message producer will not be blocked and all the acknowledgments will happen through callbacks.
JMS 2.0 features with WSO2 Enterprise Integrator
With the introduction of JMS 2.0, three new features were added to the existing JMS feature set:
- JMS delivery delay
- JMS shared topic subscription
- JMS message delivery count
JMS delivery delay
Messages that are sent to the JMS message broker won’t be forwarded to the message consumer until the given delay timeout is elapsed. This delivery delay is set at the message producer level, therefore every message that is being sent using this particular message producer will be delayed for the specified time interval.
The following sample explains how you can set and observe the delivery delay on WSO2 Enterprise Integrator JMS transport sender. HornetQ is used as the message broker for every sample as it supports JMS 2.0 implementation.
- To configure WSO2 Enterprise Integrator for HornetQ with JMS 2.0 please refer the Appendix.
- Configuring WSO2 Enterprise Integrator for the sample
- Update the following in the EI_HOME/conf/axis2/axis2.xml
<transportSender name="jms" class="org.apache.axis2.transport.jms.JMSSender"> <parameter name="myQueueConnectionFactory" locked="false"> <parameter name="java.naming.factory.initial" locked="false">org.jnp.interfaces.NamingContextFactory</parameter> <parameter name="java.naming.provider.url" locked="false">jnp://localhost:1099</parameter> <parameter name="transport.jms.ConnectionFactoryJNDIName" locked="false">QueueConnectionFactory</parameter> <parameter name="transport.jms.ConnectionFactoryType" locked="false">queue</parameter> <parameter name="transport.jms.Destination">queue/mySampleQueue</parameter> <parameter name="transport.jms.JMSSpecVersion">2.0</parameter> </parameter> <parameter name="default" locked="false"> <parameter name="java.naming.factory.initial" locked="false">org.jnp.interfaces.NamingContextFactory</parameter> <parameter name="java.naming.provider.url" locked="false">jnp://localhost:1099</parameter> <parameter name="transport.jms.ConnectionFactoryJNDIName" locked="false">QueueConnectionFactory</parameter> <parameter name="transport.jms.ConnectionFactoryType" locked="false">queue</parameter> <parameter name="transport.jms.Destination">queue/mySampleQueue</parameter> <parameter name="transport.jms.JMSSpecVersion">2.0</parameter> </parameter> </transportSender> - Start WSO2 Enterprise Integrator.
- Create the following WSO2 Enterprise Integrator proxy:
<proxy xmlns="http://ws.apache.org/ns/synapse" name="JMSDelivery" startOnLoad="true" transports="https http">
<description/>
<target>
    <inSequence>
        <property name="OUT_ONLY" value="true"/>
        <property name="FORCE_SC_ACCEPTED" scope="axis2" value="true"/>
        <property action="remove" name="Content-Length" scope="transport"/>
        <property action="remove" name="MIME-Version" scope="transport"/>
        <property action="remove" name="Transfer-Encoding" scope="transport"/>
        <property action="remove" name="User-Agent" scope="transport"/>
        <property action="remove" name="Content-Type" scope="transport"/>
        <log level="full"/>
        <clone>
            <target>
                <endpoint>
                    <address uri="jms:transport.jms.ConnectionFactory=myQueueConnectionFactory"/>
                </endpoint>
            </target>
            <target>
               <sequence>
		  <property name="JMS_MESSAGE_DELAY" scope="axis2" value="10000"/>
                   <call>
                      <endpoint>
                          <address uri="jms:transport.jms.ConnectionFactory=myQueueConnectionFactory"/>
                      </endpoint>
                   </call>
   	       </sequence>
            </target>
        </clone>
    </inSequence>
</target>
</proxy>
This configuration creates a proxy service (JMSDelivery). The proxy service forwards a copy of the message to the endpoint and another copy will be passed to the same endpoint but with a delivery delay of 10 seconds.
- Update the following in the EI_HOME/conf/axis2/axis2.xml
- Run QueueConsumer.java which consumes messages from the queue.
- Run the following command to publish a message to the JMSDelivery proxy
curl -H "Content-Type: application/json" -X POST -d '{"Name":"Eranda","Company":"WSO2"}' https://localhost:8280/services/JMSDelivery
Observation
QueueConsumer will receive two messages, (two copies of the same message) and the time difference in receiving those two messages will be 10s.
JMS shared topic subscription
In earlier versions of JMS if multiple consumers are connected to a topic subscription, all the messages that come to that particular topic will be forwarded to each consumer in every subscription.
With the introduction of JMS 2.0, there is a new type of subscription that can be used called shared topic subscription. Messages that comes to a shared topic subscription will not be broadcasted, it will only be forwarded to one single subscriber client. Figure 1 explains a sample scenario.

Figure 1: JMS shared topic subscription sample configuration
The following sample explains how you can set and observe shared topic subscription on a WSO2 Enterprise Integrator JMS inbound endpoint.
- To configuring WSO2 Enterprise Integrator for HornetQ with JMS 2.0 please refer the Appendix
- Configuring WSO2 Enterprise Integrator for the sample:
- Create two sequences as follows.
Sequence 1:
<sequence name="request_1" onError="fault" xmlns="http://ws.apache.org/ns/synapse">
    <log level="custom">
        <property name="inbound_ep_name" value="one"/>
    </log>
    <drop/>
</sequence>
Sequence 2:
<sequence name="request_2" onError="fault" xmlns="http://ws.apache.org/ns/synapse"> <log level="custom"> <property name="inbound_ep_name" value="two"/> </log> <drop/> </sequence> - Create two inbound endpoints using the following configurations.
Inbound endpoint 1:
  <inboundEndpoint name="jms_inbound_1" onError="fault" protocol="jms"
        sequence="request_1" suspend="false">
        <parameters>
            <parameter name="interval">1000</parameter>
            <parameter name="transport.jms.Destination">/topic/exampleTopic</parameter>
            <parameter name="transport.jms.CacheLevel">3</parameter>
            <parameter name="transport.jms.ConnectionFactoryJNDIName">TopicConnectionFactory</parameter>
            <parameter name="sequential">true</parameter>
            <parameter name="java.naming.factory.initial">org.jnp.interfaces.NamingContextFactory</parameter>
            <parameter name="java.naming.provider.url">jnp://localhost:1099</parameter>
            <parameter name="transport.jms.SessionAcknowledgement">AUTO_ACKNOWLEDGE</parameter>
            <parameter name="transport.jms.SessionTransacted">false</parameter>
            <parameter name="transport.jms.ConnectionFactoryType">topic</parameter>
            <parameter name="transport.jms.JMSSpecVersion">2.0</parameter>
            <parameter name="transport.jms.SharedSubscription">true</parameter>
            <parameter name="transport.jms.DurableSubscriberName">mySubscription</parameter>
        </parameters>
    </inboundEndpoint>

Figure 2
Inbound endpoint 2:
   <inboundEndpoint name="jms_inbound_2" onError="fault" protocol="jms"
        sequence="request_2" suspend="false">
        <parameters>
            <parameter name="interval">1000</parameter>
            <parameter name="transport.jms.Destination">/topic/exampleTopic</parameter>
            <parameter name="transport.jms.CacheLevel">3</parameter>
            <parameter name="transport.jms.ConnectionFactoryJNDIName">TopicConnectionFactory</parameter>
            <parameter name="sequential">true</parameter>
            <parameter name="java.naming.factory.initial">org.jnp.interfaces.NamingContextFactory</parameter>
            <parameter name="java.naming.provider.url">jnp://localhost:1099</parameter>
            <parameter name="transport.jms.SessionAcknowledgement">AUTO_ACKNOWLEDGE</parameter>
            <parameter name="transport.jms.SessionTransacted">false</parameter>
            <parameter name="transport.jms.ConnectionFactoryType">topic</parameter>
            <parameter name="transport.jms.JMSSpecVersion">2.0</parameter>
            <parameter name="transport.jms.SharedSubscription">true</parameter>
            <parameter name="transport.jms.DurableSubscriberName">mySubscription</parameter>
        </parameters>
    </inboundEndpoint>

Figure 3
These configurations will create two shared topic subscribing inbound endpoints on the same topic subscription. Therefore these two inbounds will share the message consumption on that subscription. Inbound endpoint 1 will forward its consumed messages to sequence 1 and inbound endpoint 2 will forward it to sequence 2.
- Now run TopicPublisher.java which will publish five messages to the HornetQ topic.
Observation
You will be able to observe on WSO2 Enterprise Integrator’s console that a total of five messages will be shared between the two inbound endpoints.
Note: If you are using durable shared topic subscription on the WSO2 Enterprise Integrator JMS inbound endpoint, you have to set “true” for transport.jms.SubscriptionDurable parameter and don’t need to set the transport.jms.DurableSubscriberClientID parameter. Even if you set a client ID it will be ignored in durable shared topic subscription.
JMS message delivery count
In JMS messages that are consumed by clients, there is a property defined by the JMS-API called JMSXDeliveryCount. The purpose of this is to maintain a counter to indicate the number of times a message has been (re)delivered to a particular JMS consumer client.
The following sample explains how you can access this property inside WSO2 Enterprise Integrator Synapse configuration and use it inside the mediation flow.
- To configure WSO2 Enterprise Integrator for HornetQ with JMS 2.0 tlease refer the Appendix.
- Configuring WSO2 Enterprise Integrator for the sample:
- Create the following in memory message store.
<messageStore name="JMS-Redelivered-Store"/>
- Create the following sequence.
<sequence name="request" onError="fault" xmlns="http://ws.apache.org/ns/synapse"> <log level="full"/> <filter regex="1" source="get-property('default','jms.message.delivery.count')" xmlns:ns="https://org.apache.synapse/xsd"> <then> <log> <property name="DeliveryCounter" value="1"/> </log> </then> <else> <store messageStore="JMS-Redelivered-Store"/> <log> <property name="DeliveryCounter" value="more than 1"/> </log> </else> </filter> <drop/> </sequence> - Create the following inbound endpoint.
<inboundEndpoint name="jms_inbound" onError="fault" protocol="jms"
  sequence="request" suspend="false">
  <parameters>
      <parameter name="interval">1000</parameter>
      <parameter name="transport.jms.Destination">queue/mySampleQueue</parameter>
      <parameter name="transport.jms.CacheLevel">1</parameter>
      <parameter name="transport.jms.ConnectionFactoryJNDIName">QueueConnectionFactory</parameter>
      <parameter name="sequential">true</parameter>
      <parameter name="java.naming.factory.initial">org.jnp.interfaces.NamingContextFactory</parameter>
      <parameter name="java.naming.provider.url">jnp://localhost:1099</parameter>
      <parameter name="transport.jms.SessionAcknowledgement">AUTO_ACKNOWLEDGE</parameter>
      <parameter name="transport.jms.SessionTransacted">false</parameter>
      <parameter name="transport.jms.ConnectionFactoryType">queue</parameter>
  </parameters>
</inboundEndpoint>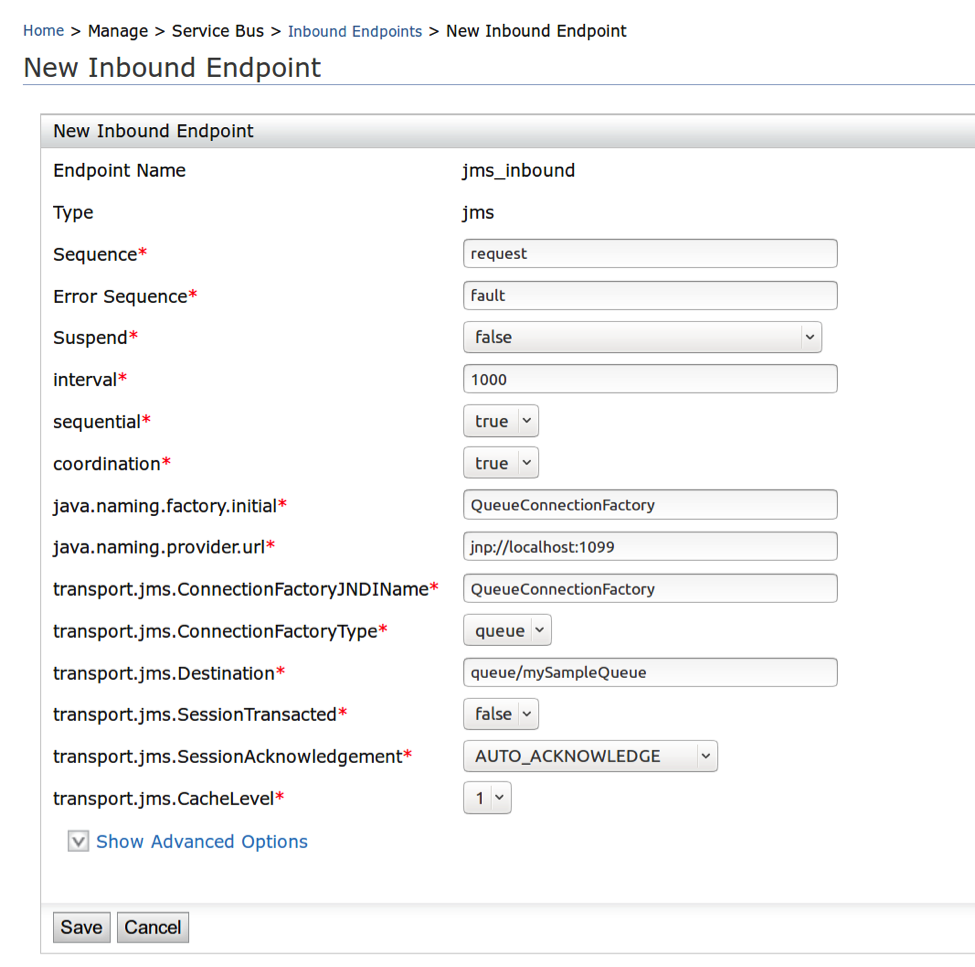
Figure 4
The above configuration will create a JMS inbound endpoint that consumes messages from a queue and injects those to the configured sequence. This sequence will use the JMS message delivery count value to mediate the message. It will put a copy of each message that has a delivery count of more than one so that those messages can be examined later.
- Create the following in memory message store.
- Now run SOAPPublisher.java to publish a message to the JMS queue.
Observation
A log will be printed on WSO2 Enterprise Integrator’s console containing the delivery count of the message. If the count is more than one, a copy of that message will be sent to the configured message store.
Note: Under these conditions, you won’t generally observe redelivered messages. But you can set this sample with ActiveMQ (with JMS 1.1) in transaction mode and when a transaction fails redelivery of messages can be observed.
Conclusion
This article explores how to use JMS 2.0 features with WSO2 Enterprise Integrator. The initial part of the article provided a brief explanation about JMS 2.0 and its new features. Then examined each of the WSO2 Enterprise Integrator JMS 2.0 features in detail by providing examples and step-by-step guides on configuring them.
References
- [1] https://download.oracle.com/otndocs/jcp/7195-jms-1.1-fr-spec-oth-JSpec/
- [2] https://download.oracle.com/otndocs/jcp/jms-2_0-fr-eval-spec/
Appendix: Configuring WSO2 Enterprise Integrator with HornetQ to support JMS 2.0
Configuring the WSO2 Enterprise Integrator
- Copy hornetq-all-new.jar to <EI_HOME>/lib/ directory.
- Go to the directory <EI_HOME>/repository/lib/endorsed/ and replace geronimo-jms_1.1_spec-1.1.0.wso2v1.jar with javax.jms-api-2.0.1.jar
Configuring and starting the HornetQ message broker
- HornetQ can be downloaded here https://hornetq.jboss.org/downloads.
- Extract the .tar.gz and go to the directory <HornetQ_HOME>/config/stand-alone/non-clustered/. Add the following to the hornetq-jms.xml file:
<connection-factory name="QueueConnectionFactory"> <xa>false</xa> <connectors> <connector-ref connector-name="netty"/> </connectors> <entries> <entry name="/QueueConnectionFactory"/> </entries> </connection-factory> <connection-factory name="TopicConnectionFactory"> <xa>false</xa> <connectors> <connector-ref connector-name="netty"/> </connectors> <entries> <entry name="/TopicConnectionFactory"/> </entries> </connection-factory> <queue name="wso2"> <entry name="/queue/mySampleQueue"/> </queue> <topic name="sampleTopic"> <entry name="/topic/exampleTopic"/> </topic> - Now, start the HornetQ broker.
Linux: Run the file <HornetQ_HOME>/bin/run.sh with root privileges [ sudo ./run.sh ].
JMS 2.0 sample clients can be found here.