Configure VPNs on the API Platform Cloud Data Plane
Secure access to private networks from the API Platform cloud data plane is an essential use case for cloud data plane users.
API Platform allows this secure connection using Tailscale. For this, API Platform provides a prebuilt Tailscale image component that can act as a forward proxy, which you can deploy in your API Platform project. This tailscale deployment allows you to forward traffic to your external networks via Tailscale’s peer-to-peer WireGuard network.
The following diagram illustrates the high-level deployment architecture of the Tailscale pre-installed forward proxy:
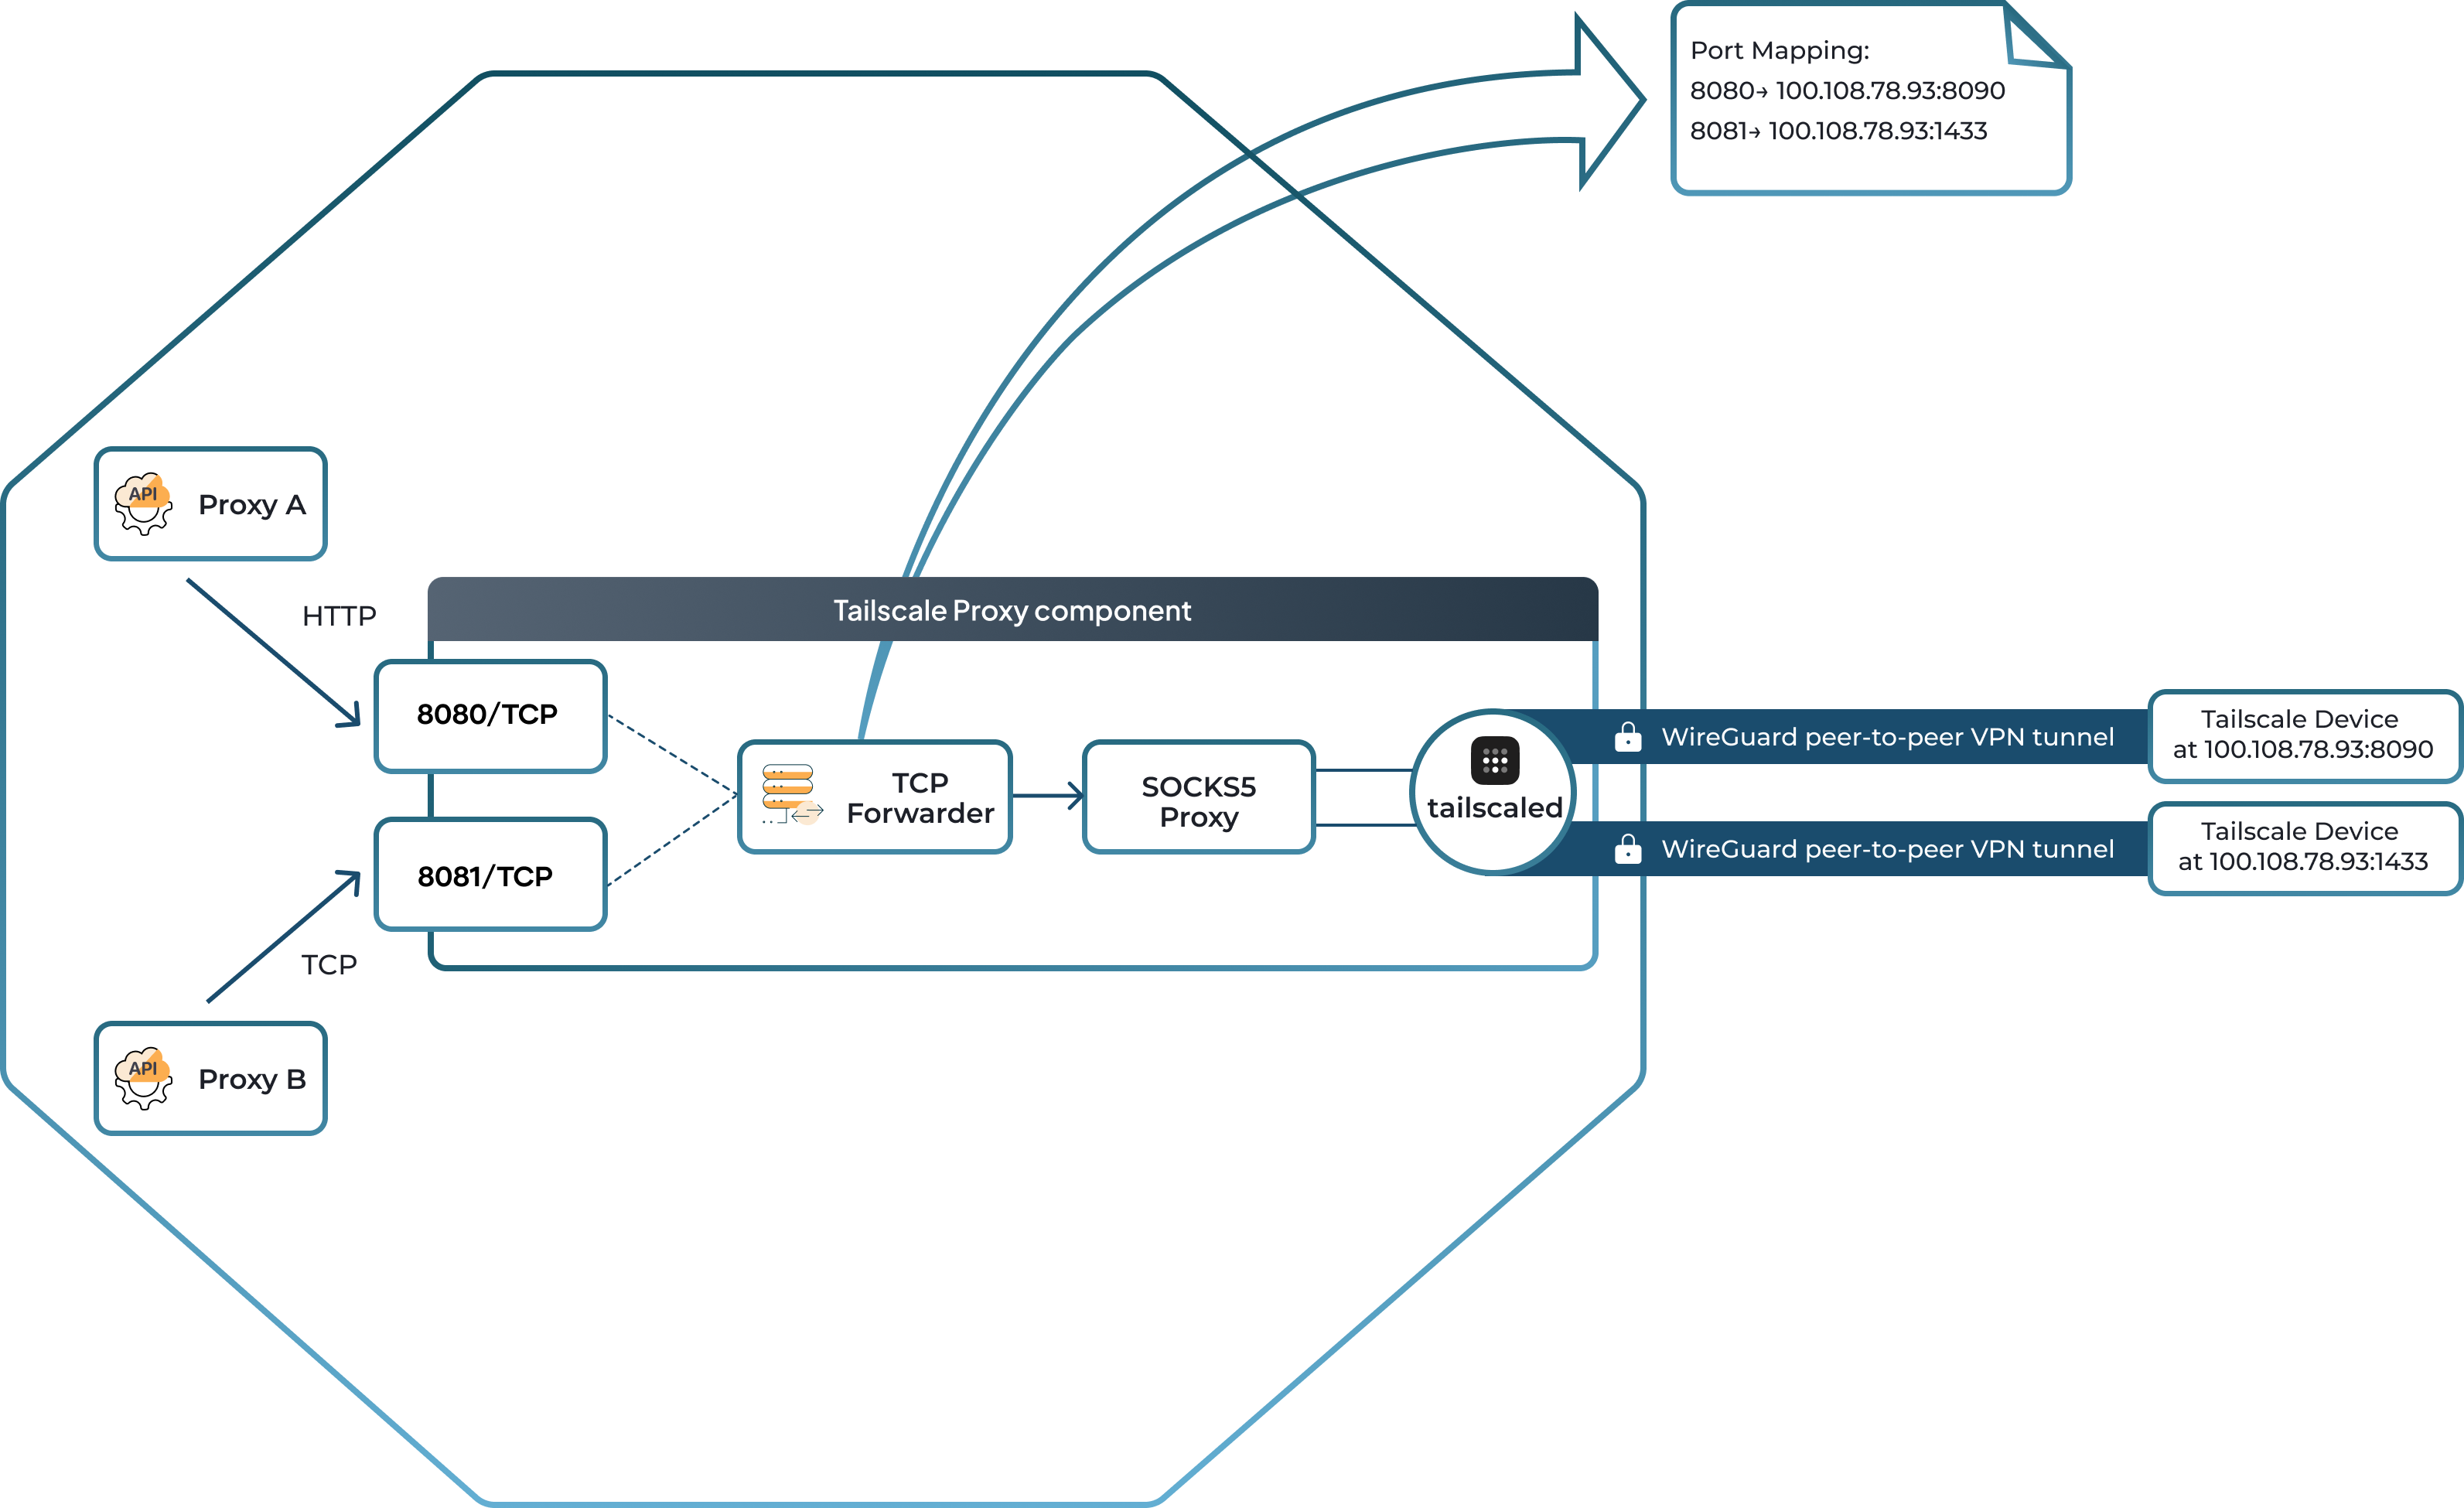
Let's take a look at the specifics of each part to understand the deployment architecture.
-
API Platform project
In API Platform, a project groups API Proxies and MCP Servers. For more information on what a project in API Platform is, see the documentation on Project.
-
Tailscale proxy
This acts as the Tailscale pre-installed forward proxy, facilitating secure peer-to-peer WireGuard connections from the API Platform cloud data plane to private networks. It includes a Tailscale Daemon, SOCKS5 proxy, and a configurable TCP forwarder.
-
Tailscale daemon
This is the core component of Tailscale. It is a software service that provides secure network connectivity and private networking solutions. For more details see the Tailscale documentation.
-
SOCKS5 proxy
This uses Tailscale’s userspace networking mode, rather than the kernel mode. Therefore, the inbuilt SOCKS5 proxy handles the forwarded traffic and directs it through the Tailscale network.
-
TCP forwarder
Forwards inbound TCP (transmission control protocol) traffic from the Tailscale proxy container’s network interface to the SOCKS5 proxy, ensuring it reaches its destination via the secured WireGuard tunnel.
-
API Proxies and API Platform API gateway
API proxies within the same project as the Tailscale proxy can send their traffic to the ports exposed on the Tailscale proxy. The Tailscale proxy then forwards this traffic to the correct target node and IP address in your Tailscale network that is defined in the port mapping of the endpoint configuration
Now that you understand the deployment architecture, let’s explore how you can use Tailscale to secure connections to your private networks.
Configure and use Tailscale to access private network endpoints
This section walks you through the steps to create, configure, deploy, and use the Tailscale proxy component.
Prerequisites
- Understand the basics of how Tailscale works.
- Have a Tailscale account (Tailnet). There are multiple plans available for you to set up your Tailscale network. For details, see Tailscale plans.
- Install Tailscale and connect your private data center or server to it, so that your private services are accessible via your Tailscale network. To quickly get started with Tailscale, see the Tailscale quickstart.
Step 1: Create the Tailscale proxy component
- Sign in to the API Platform Console.
- In the API Platform Console top navigation menu, select the Organization, and then the Project.
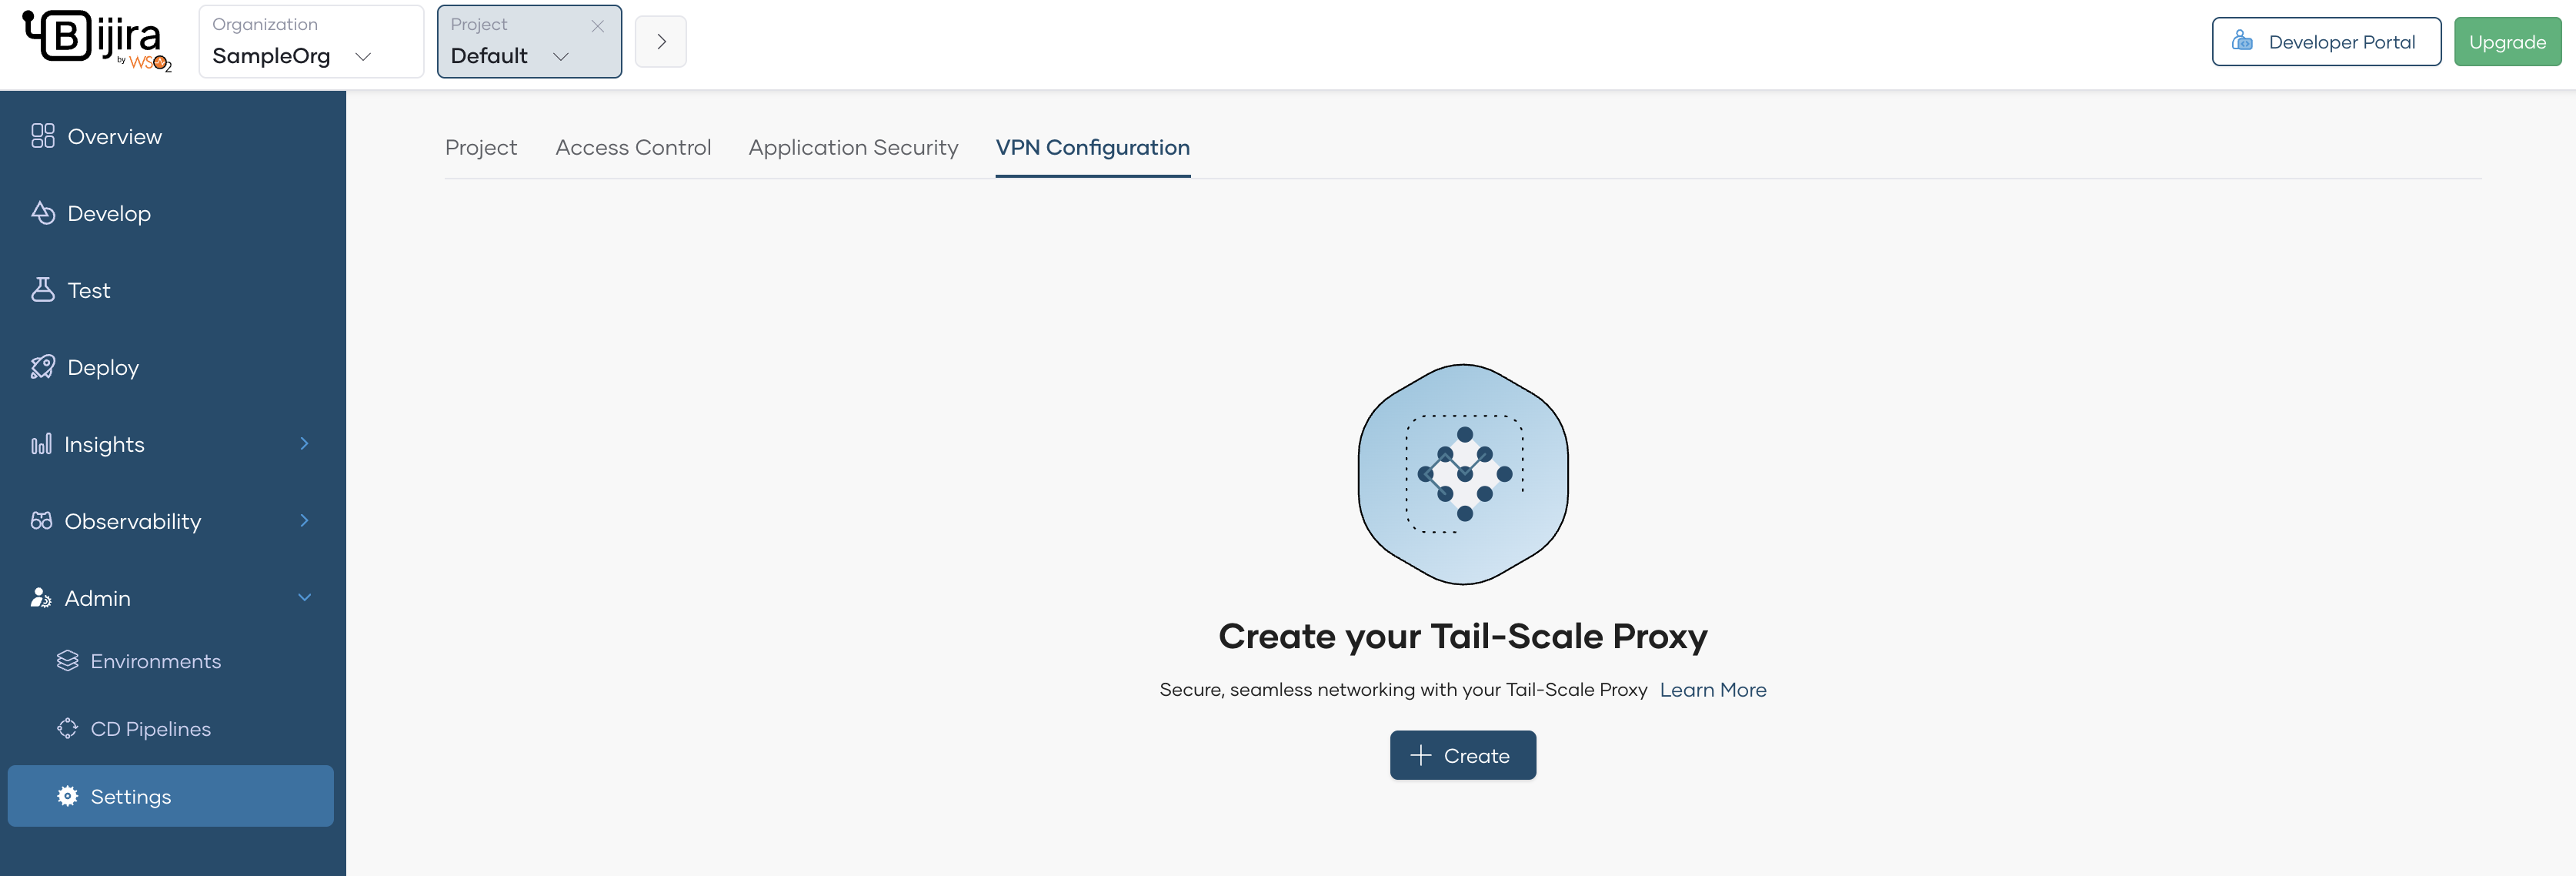
- On the project home page, click Admin menu, and select the Settings sub menu.
- Click on the VPN Configuration tab and then click the Create button
-
Enter a name, identifier, and a description for the tailscale proxy. For this guide, let's enter the following values:
Field Value Name Tailscale proxy Identifier tailscale-proxy Description Tailscale proxy component -
Click Create.
Now you have successfully created the Tailscale proxy. You can proceed to configure and deploy it.
Step 2: Configure and deploy the Tailscale proxy
Here, you will set the Tailscale authentication key, configure endpoints, and deploy the Tailscale proxy.
Follow the steps given below:
Step 2.1: Configure and deploy the Tailscale proxy
To configure and deploy the tailscale proxy, follow the steps given below:
-
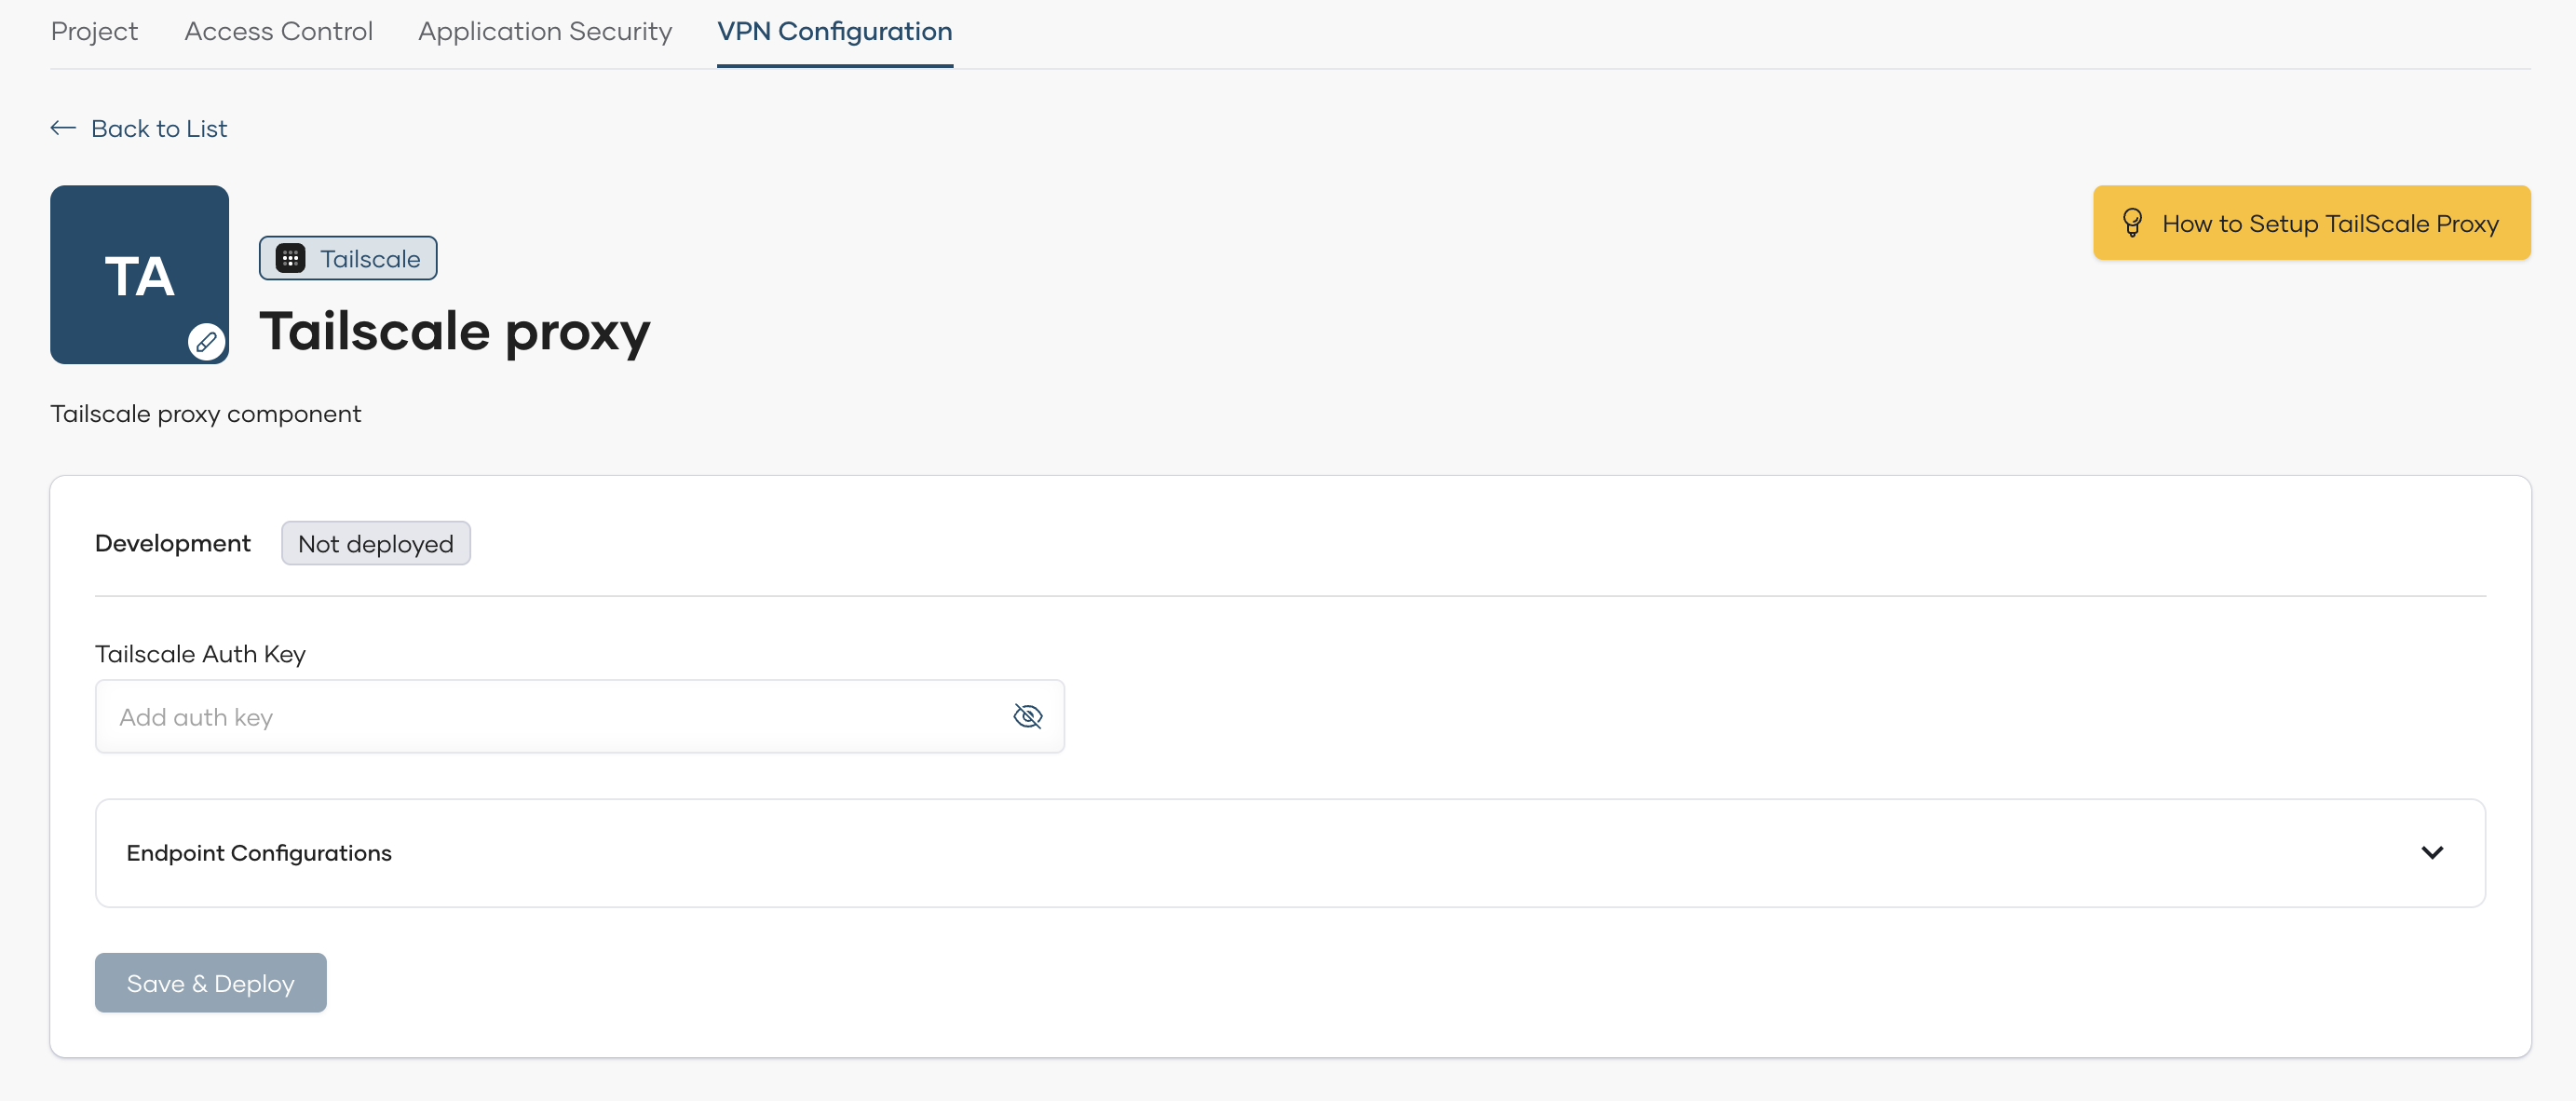
Enter Your Tailscale Auth Key
To connect your system to Tailscale, you need an Auth Key. Follow the steps below to generate one:
- Visit the Tailscale Admin Keys page: https://login.tailscale.com/admin/settings/keys
- Click on the Generate Auth Key button to create a new key.
Note
When generating an Auth Key, you can configure various properties such as expiration, reusability, and ephemeral settings. For detailed guidance, refer to the official Tailscale documentation: Auth Keys Guide
-
Configure Endpoints
To forward traffic from the Tailscale proxy to external devices, follow these steps:
i. Identify the external Tailscale device (node) and port that you want to make accessible via the Tailscale proxy. You can view your Tailscale devices in the Tailscale machines page.
- Example: Device IP
192.168.1.1, port9000.
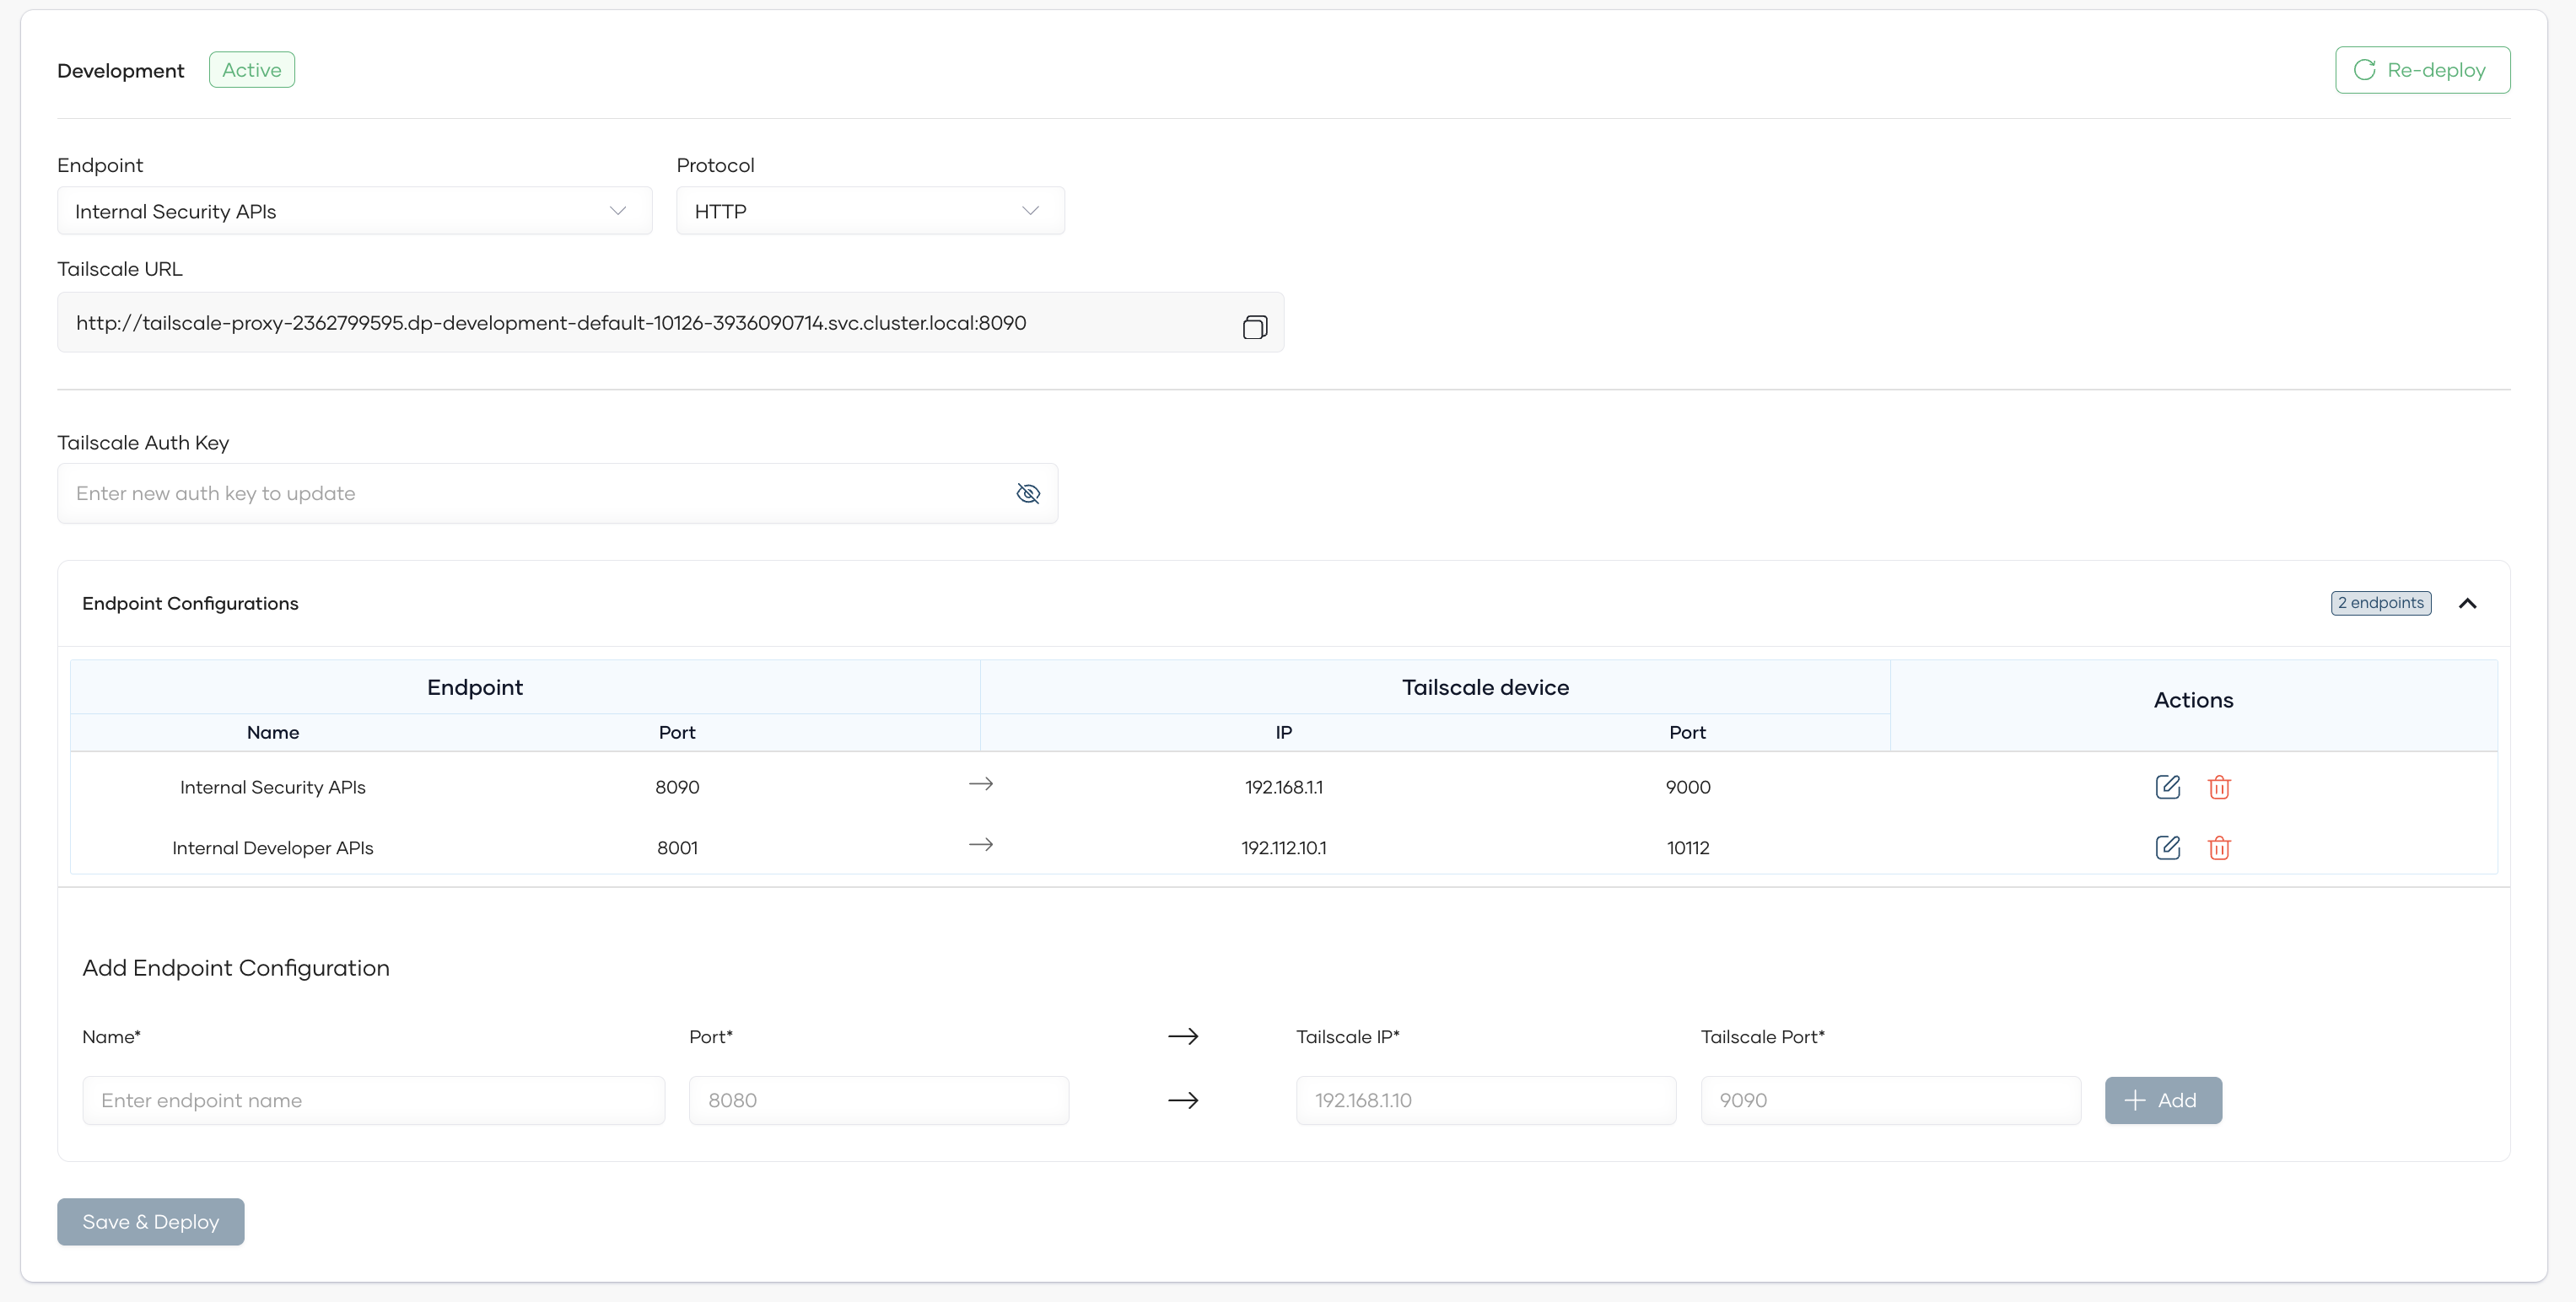
ii. In the "Add Endpoint Configuration" section of the Tailscale proxy interface, fill in the following fields:
- Endpoint Name: A descriptive name for the endpoint (e.g.,
Internal Security APIs). - Port: The port on the Tailscale proxy that will receive incoming API traffic (e.g.,
8090). - Target IP: The IP address of the external device where the traffic should be forwarded (e.g.,
192.168.1.1). - Target Port: The port on the external device that should receive the traffic (e.g.,
9000).
iii. Click the Add button to save the endpoint and the port mapping.
iv. Repeat the process for any additional endpoints you want to configure.
Example Mappings
- API Traffic sent to port 8090 on the Tailscale proxy is forwarded to port 9000 on the external tailscale node with IP 192.168.1.1.
- API Traffic sent to port 8001 on the Tailscale proxy is forwarded to port 10112 on the external tailscale node with IP 192.112.10.1.
By completing these steps, you ensure that incoming traffic to the Tailscale proxy is properly routed to the intended external devices and ports.
- Example: Device IP
-
Click Save & Deploy to apply configurations and deploy the tailscale proxy.
Note
When the Tailscale proxy is deployed, you can observe a new node connected to your Tailscale network. To view this, go to the Tailscale machines page of your Tailscale coordination server.
Note
You can configure multiple endpoints and port mappings on the same Tailscale device, and also across multiple Tailscale devices. This allows you to forward traffic from different ports to different external devices as needed.
Step 3: Configure API Proxy to forward traffic to Tailscale proxy
After the deployment is complete, the Tailscale proxy URL will be displayed in the environment view.
-
From the dropdown menus, select the desired Endpoint and Protocol (HTTP or HTTPS).
-
The Tailscale URL will automatically update based on your selections.
-
Copy the generated URL and set it as the target endpoint in your API proxy's configuration. This will route the API traffic through the Tailscale proxy.
Post-deployment actions
Handle node key expiry
Tailscale nodes have a default node key expiry time of 180 days. Nodes require re-authentication after key expiry to avoid connection losses and application downtime. There is an option to disable node key expiry if necessary. For more details, see Node key expiry documentation.
Handle auth key expiry
Auth keys are used to register new nodes into your Tailscale network. The default expiry time for auth keys is 90 days, but nodes remain connected even after auth key expiry. This becomes an issue only if the Tailscale Proxy component is redeployed or restarted.
Update port mapping configurations
If you want to add a new private endpoint to your network and access it via the same Tailscale proxy within API Platform, you must add a new port mapping entry in the endpoint configuration of your Tailscale proxy deployment.
Best practices
Use Tailscale ACLs
You can use Tailscale ACLs to precisely manage permission for users and devices on your Tailnet.
Security best practices
Before deploying the Tailscale proxy in production environments, it is recommended to follow the Tailscale production best practices and security best practices.
Note
API Platform blocks incoming connections from other nodes in your Tailnet to the Tailscale proxy to prevent access to your project’s namespace in the API Platform cloud data plane.