Onboard users
You can use one of the following methods to onboard users to your organization in Asgardeo:
-
The user can self-register via the My Account portal or the login page of an application if self-registration is enabled in the organization. Learn how to configure self-registration.
-
An administrator can onboard users from a secondary user store by configuring a secondary user store in Asgardeo.
Note
If the secondary user store access type is read-only, you cannot update the user profiles of users onboarded from this read-only user store.
-
An administrator can onboard users from the Asgardeo Console.
Let's look at how administrators can onboard users from the Asgardeo Console.
Onboard single user
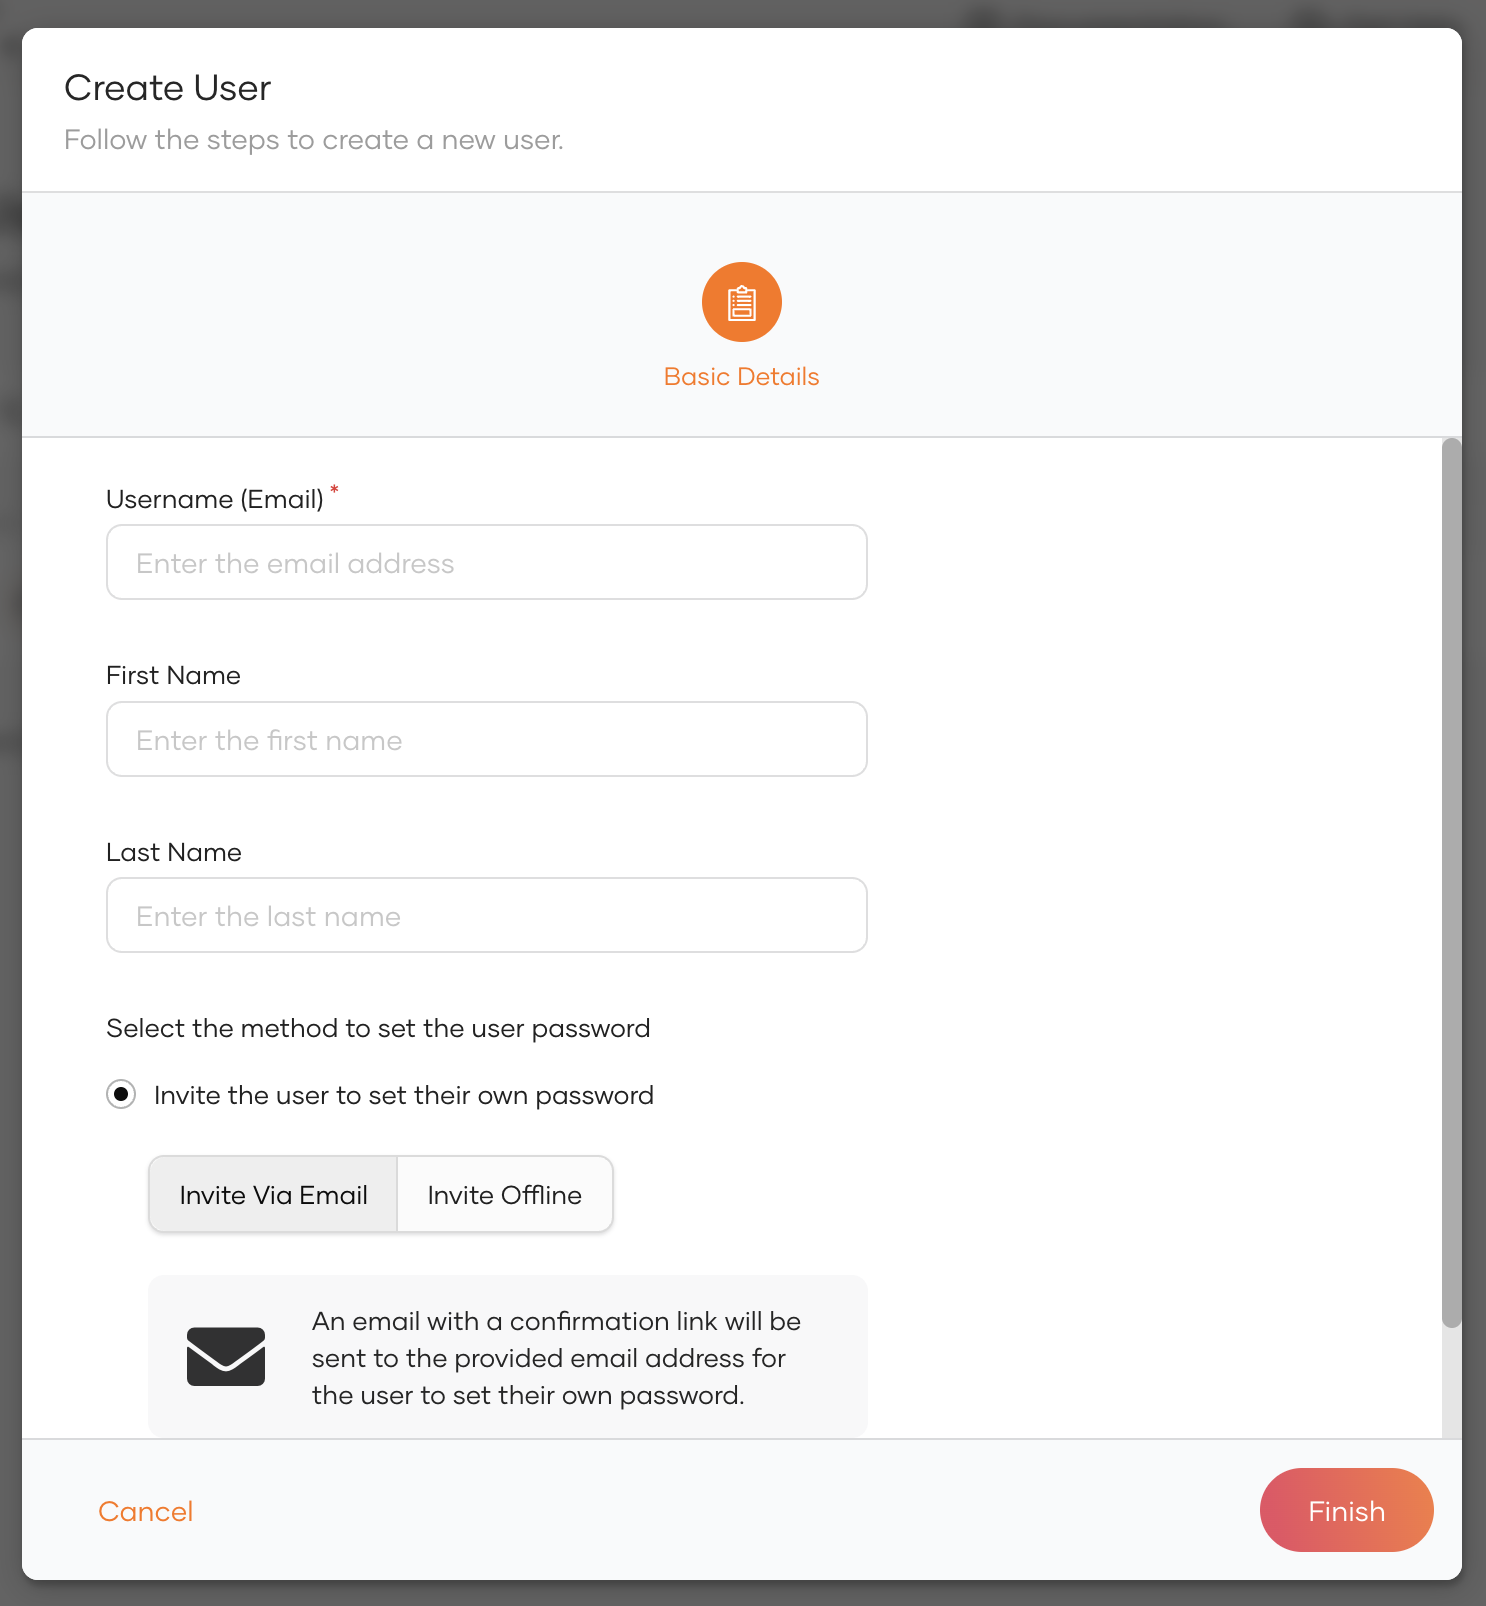
- On the Asgardeo Console, go to User Management > Users.
-
Click Add User button and select Single User option and provide the user's details.
Note
The user's username is always unique to the organization and you can't change the username once it is created.
Add additional fields to the user onboarding form
The default form requests for basic information of the user. If you wish to include additional details, such as the user's phone number, address, and other custom attributes, you need to make these attributes available in the Administrator Console. Learn how to do so in attribute configurations.
-
You can either request the user to set the password or set one on the user's behalf.
-
Invite user to set their own password:
-
Invite via email: If this option is selected, an email with a confirmation link will be sent to the provided email address. The user can use this link to set up a new password.
Note
You need to enable the Invite user to set password feature if you haven't done so already to use this option. Learn how to configure invite user to set password.
-
Invite offline: If this option is selected, the administrator will receive an invitation link at the end of the user registration process. This link can then be shared with the user.
-
-
Set a password for the user: If this option is selected, the administrator can set a password for the user. The user will have the option to change this password from the My Account Portal.
-
-
Add the user to a group in the next step. You will not see this option if you haven't created any groups in Asgardeo.
-
Review the summary and click Finish.
Note
If you have selected Invite offline or decided to set a password for the user, you can copy the corresponding information at the Summary page of the wizard and share with the user.
Onboard multiple users
In addition to adding a single user, you can onboard multiple users at once, either manually or by using a CSV file. This is especially useful for large organizations where bulk operations can save time and reduce the effort of adding users one by one.
Note
You need to enable the Invite user to set password feature if you haven't done so already to add multiple users. Learn how to configure invite user to set password.
Add multiple users manually
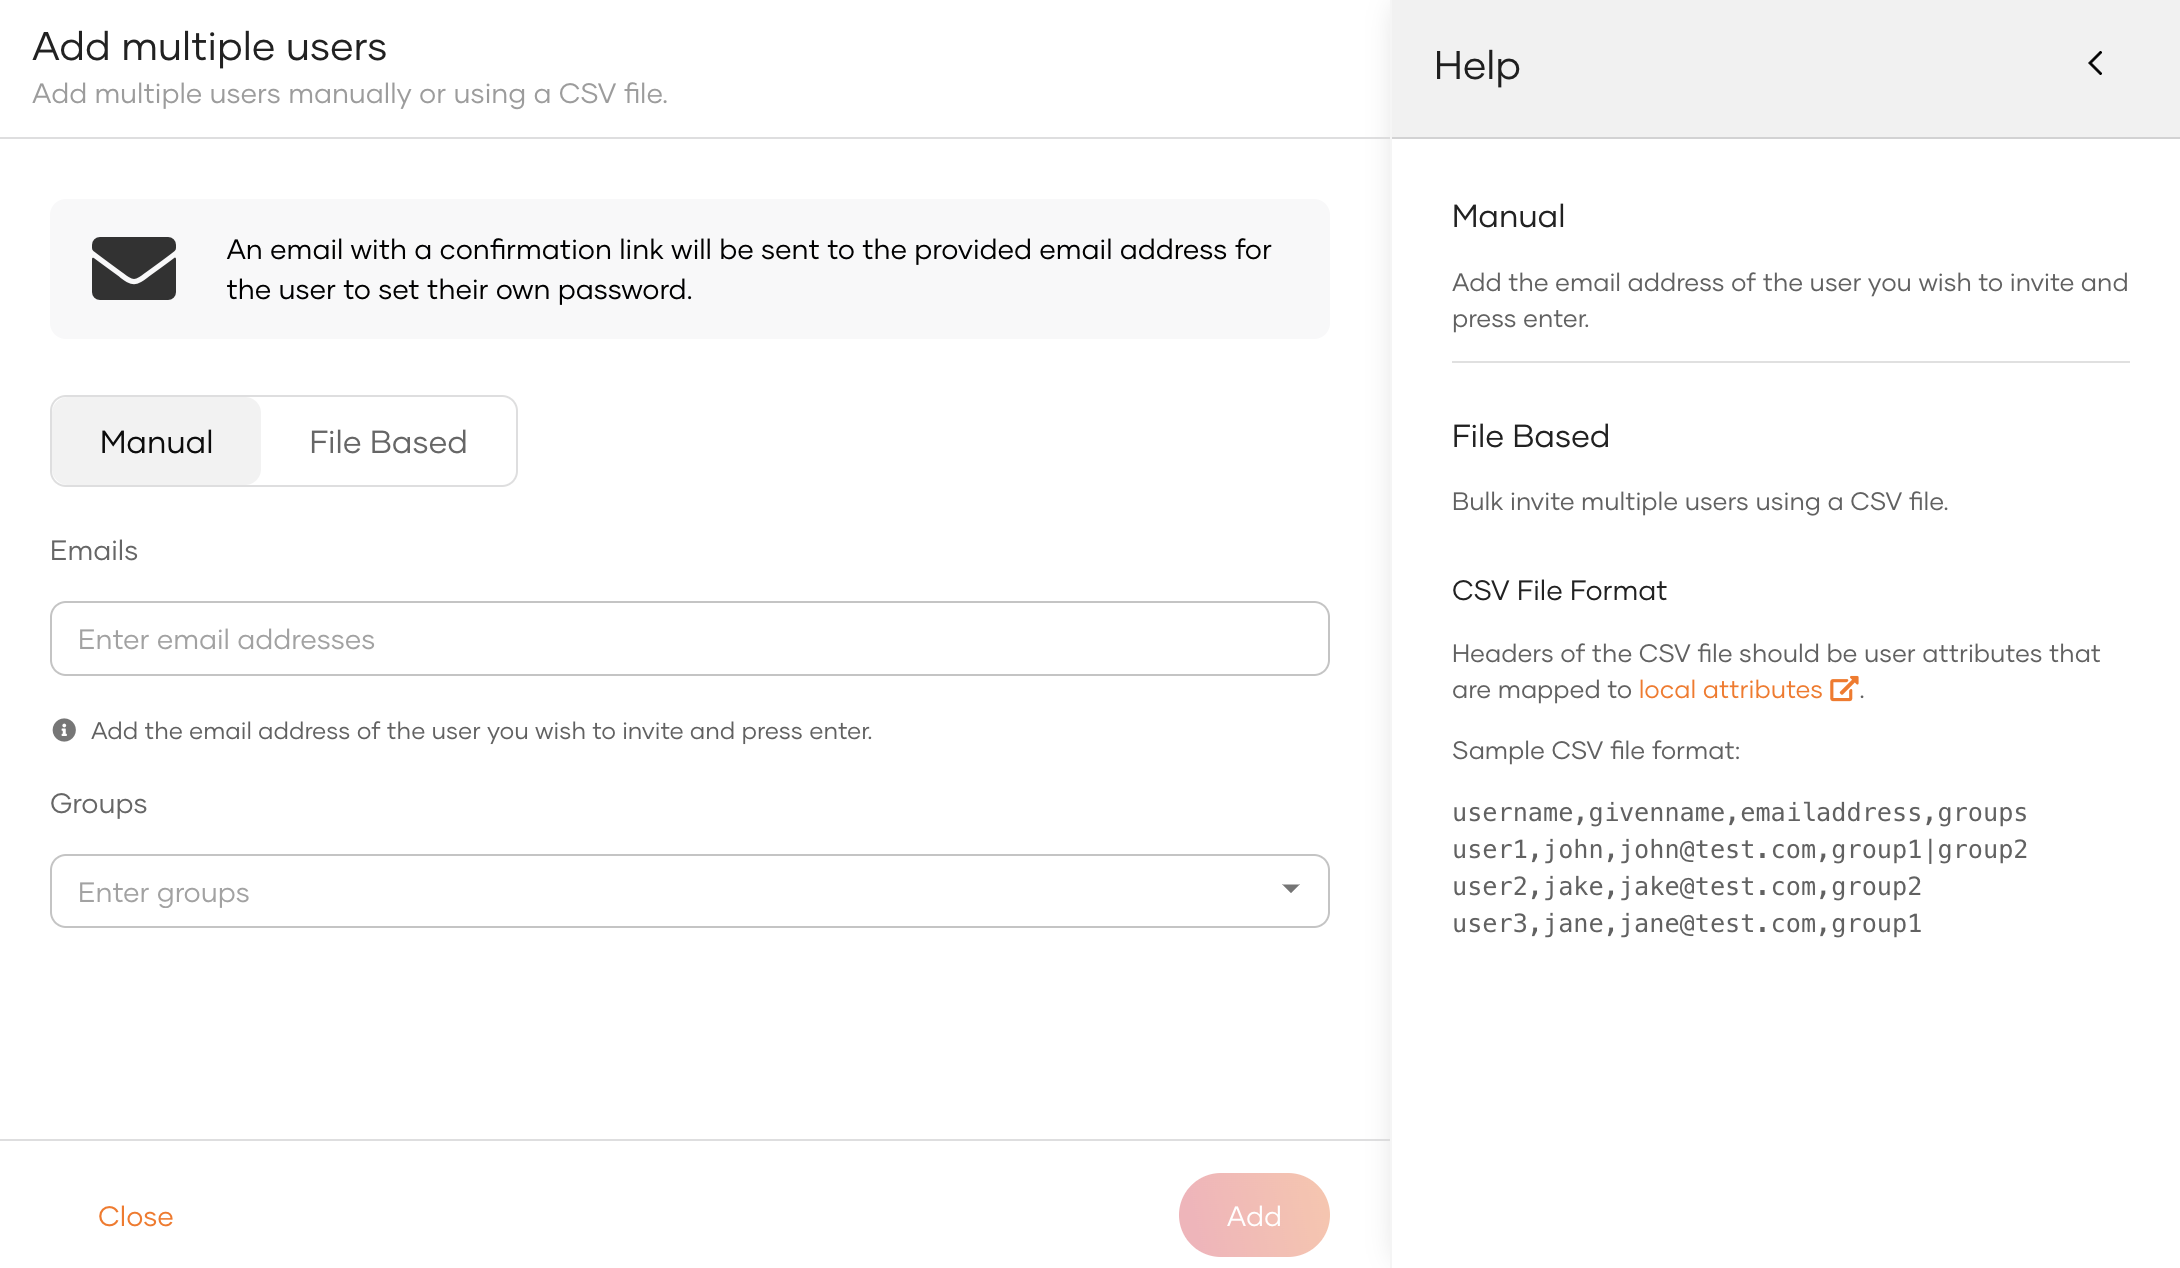
- On the Asgardeo Console, go to User Management > Users.
- Click on the Add User button and select Multiple Users option.
- Switch to the Manual tab.
- Enter the email addresses of the users you want to invite. Press Enter after each email to add it to the list.
- Specify the groups for the users by entering the group names. Press Enter after each group to add it to the list.
- Click Add to send out the invitations.
- An email with a confirmation link will be sent to the provided email addresses, allowing the users to set their own passwords.
Add multiple users using a CSV file
-
On the Asgardeo Console, go to User Management > Users.
-
Click on the Add User button and select Multiple Users option.
-
Switch to the File Based tab.
-
Click Upload CSV File or drag and drop a CSV file into the designated area.
-
Ensure your CSV file is formatted correctly, with headers that correspond to user attributes. These attributes must be mapped to local attributes.
- A sample CSV file format would include:
username, givenname, emailaddress, groups - For example:
username,givenname,emailaddress,groups user1,john,[email protected],group1|group2 user2,jake,[email protected],group2 user3,jane,[email protected],group1 - A sample CSV file format would include:
-
Click Import to add the users to the system.
-
An email with a confirmation link will be sent to the provided email addresses, allowing the users to set their own passwords.
Onboard users with email verification
During user onboarding, you can enforce email verification to confirm the provided email address. This improves security and ensures the accuracy of user data. Follow these steps to add users with email verification.
-
Run the following cURL command to enable email verification.
curl -X 'PATCH' \ 'https://api.asgardeo.io/t/<org_name>/api/server/v1/identity-governance/VXNlciBPbmJvYXJkaW5n/connectors/dXNlci1lbWFpbC12ZXJpZmljYXRpb24' \ -H 'Authorization: Bearer <access_token>' \ -H 'Content-Type: application/json' \ -d '{ "operation": "UPDATE", "properties": [ { "name": "EmailVerification.Enable", "value": true } ] }' -
(Optional) By default, Asgardeo sends a link to the user's registered email. You can change this to a one-time code (OTP).
curl -X 'PATCH' \ 'https://api.asgardeo.io/t/<org_name>/api/server/v1/identity-governance/VXNlciBPbmJvYXJkaW5n/connectors/dXNlci1lbWFpbC12ZXJpZmljYXRpb24' \ -H 'Authorization: Bearer <access_token>' \ -H 'Content-Type: application/json' \ -d '{ "operation": "UPDATE", "properties": [ { "name": "EmailVerification.OTP", "value": true } ] }' -
You can now create a user with email verification enabled.
curl -X 'POST' \
'https://api.asgardeo.io/t/<org_name>/scim2/Users' \
-H 'Authorization: Bearer <access_token>' \
-H 'Content-Type: application/json' \
-d '{
    "userName": "<USERNAME>",
    "emails": [
        {
            "primary": true,
            "value": "<EMAIL>"
        }
    ],
    "password": "<PASSWORD>",
    "urn:scim:wso2:schema": {
        "verifyEmail": "true"
    }
}'
curl -X 'POST' \ 'https://api.asgardeo.io/t/<org_name>/scim2/Users' \ -H 'Authorization: Bearer <access_token>' \ -H 'Content-Type: application/json' \ -d '{ "userName": "DEFAULT/bob", "emails": [ { "primary": true, "value": "[email protected]" } ], "password": "P@ssw0rd", "urn:scim:wso2:schema": { "verifyEmail": "true" } }'
Response
Note
Newly created users with pending email verification will remain locked until they complete the verification.
-
(Optional) The following curl command resends the verification code to the user's email if the user didn't receive it the first time or the code expired.
curl -X 'POST' \
'https://api.asgardeo.io/t/<org_name>/api/identity/user/v1.0/resend-code' \
-H 'accept: application/json' \
-H 'Authorization: Bearer <access_token>' \
-H 'Content-Type: application/json' \
-d '{
    "user": {
        "username": "<username>",
        "realm": "<user_store_domain>"
    },
    "properties": [
        {
            "key": "RecoveryScenario",
            "value": "EMAIL_VERIFICATION_OTP"
        }
    ]
}'
curl -X 'POST' \ 'https://api.asgardeo.io/t/<org_name>/api/identity/user/v1.0/resend-code' \ -H 'accept: application/json' \ -H 'Authorization: Bearer <access_token>' \ -H 'Content-Type: application/json' \ -d '{ "user": { "username": "[email protected]", "realm": "DEFAULT" }, "properties": [ { "key": "RecoveryScenario", "value": "EMAIL_VERIFICATION_OTP" } ] }'
Response
-
If you selected the confirmation link option, users can click the link to verify. If you configured OTP, validate it by submitting the OTP using the following API.
Response