Integrate Mod Auth OpenIDC with WSO2 Identity Platform
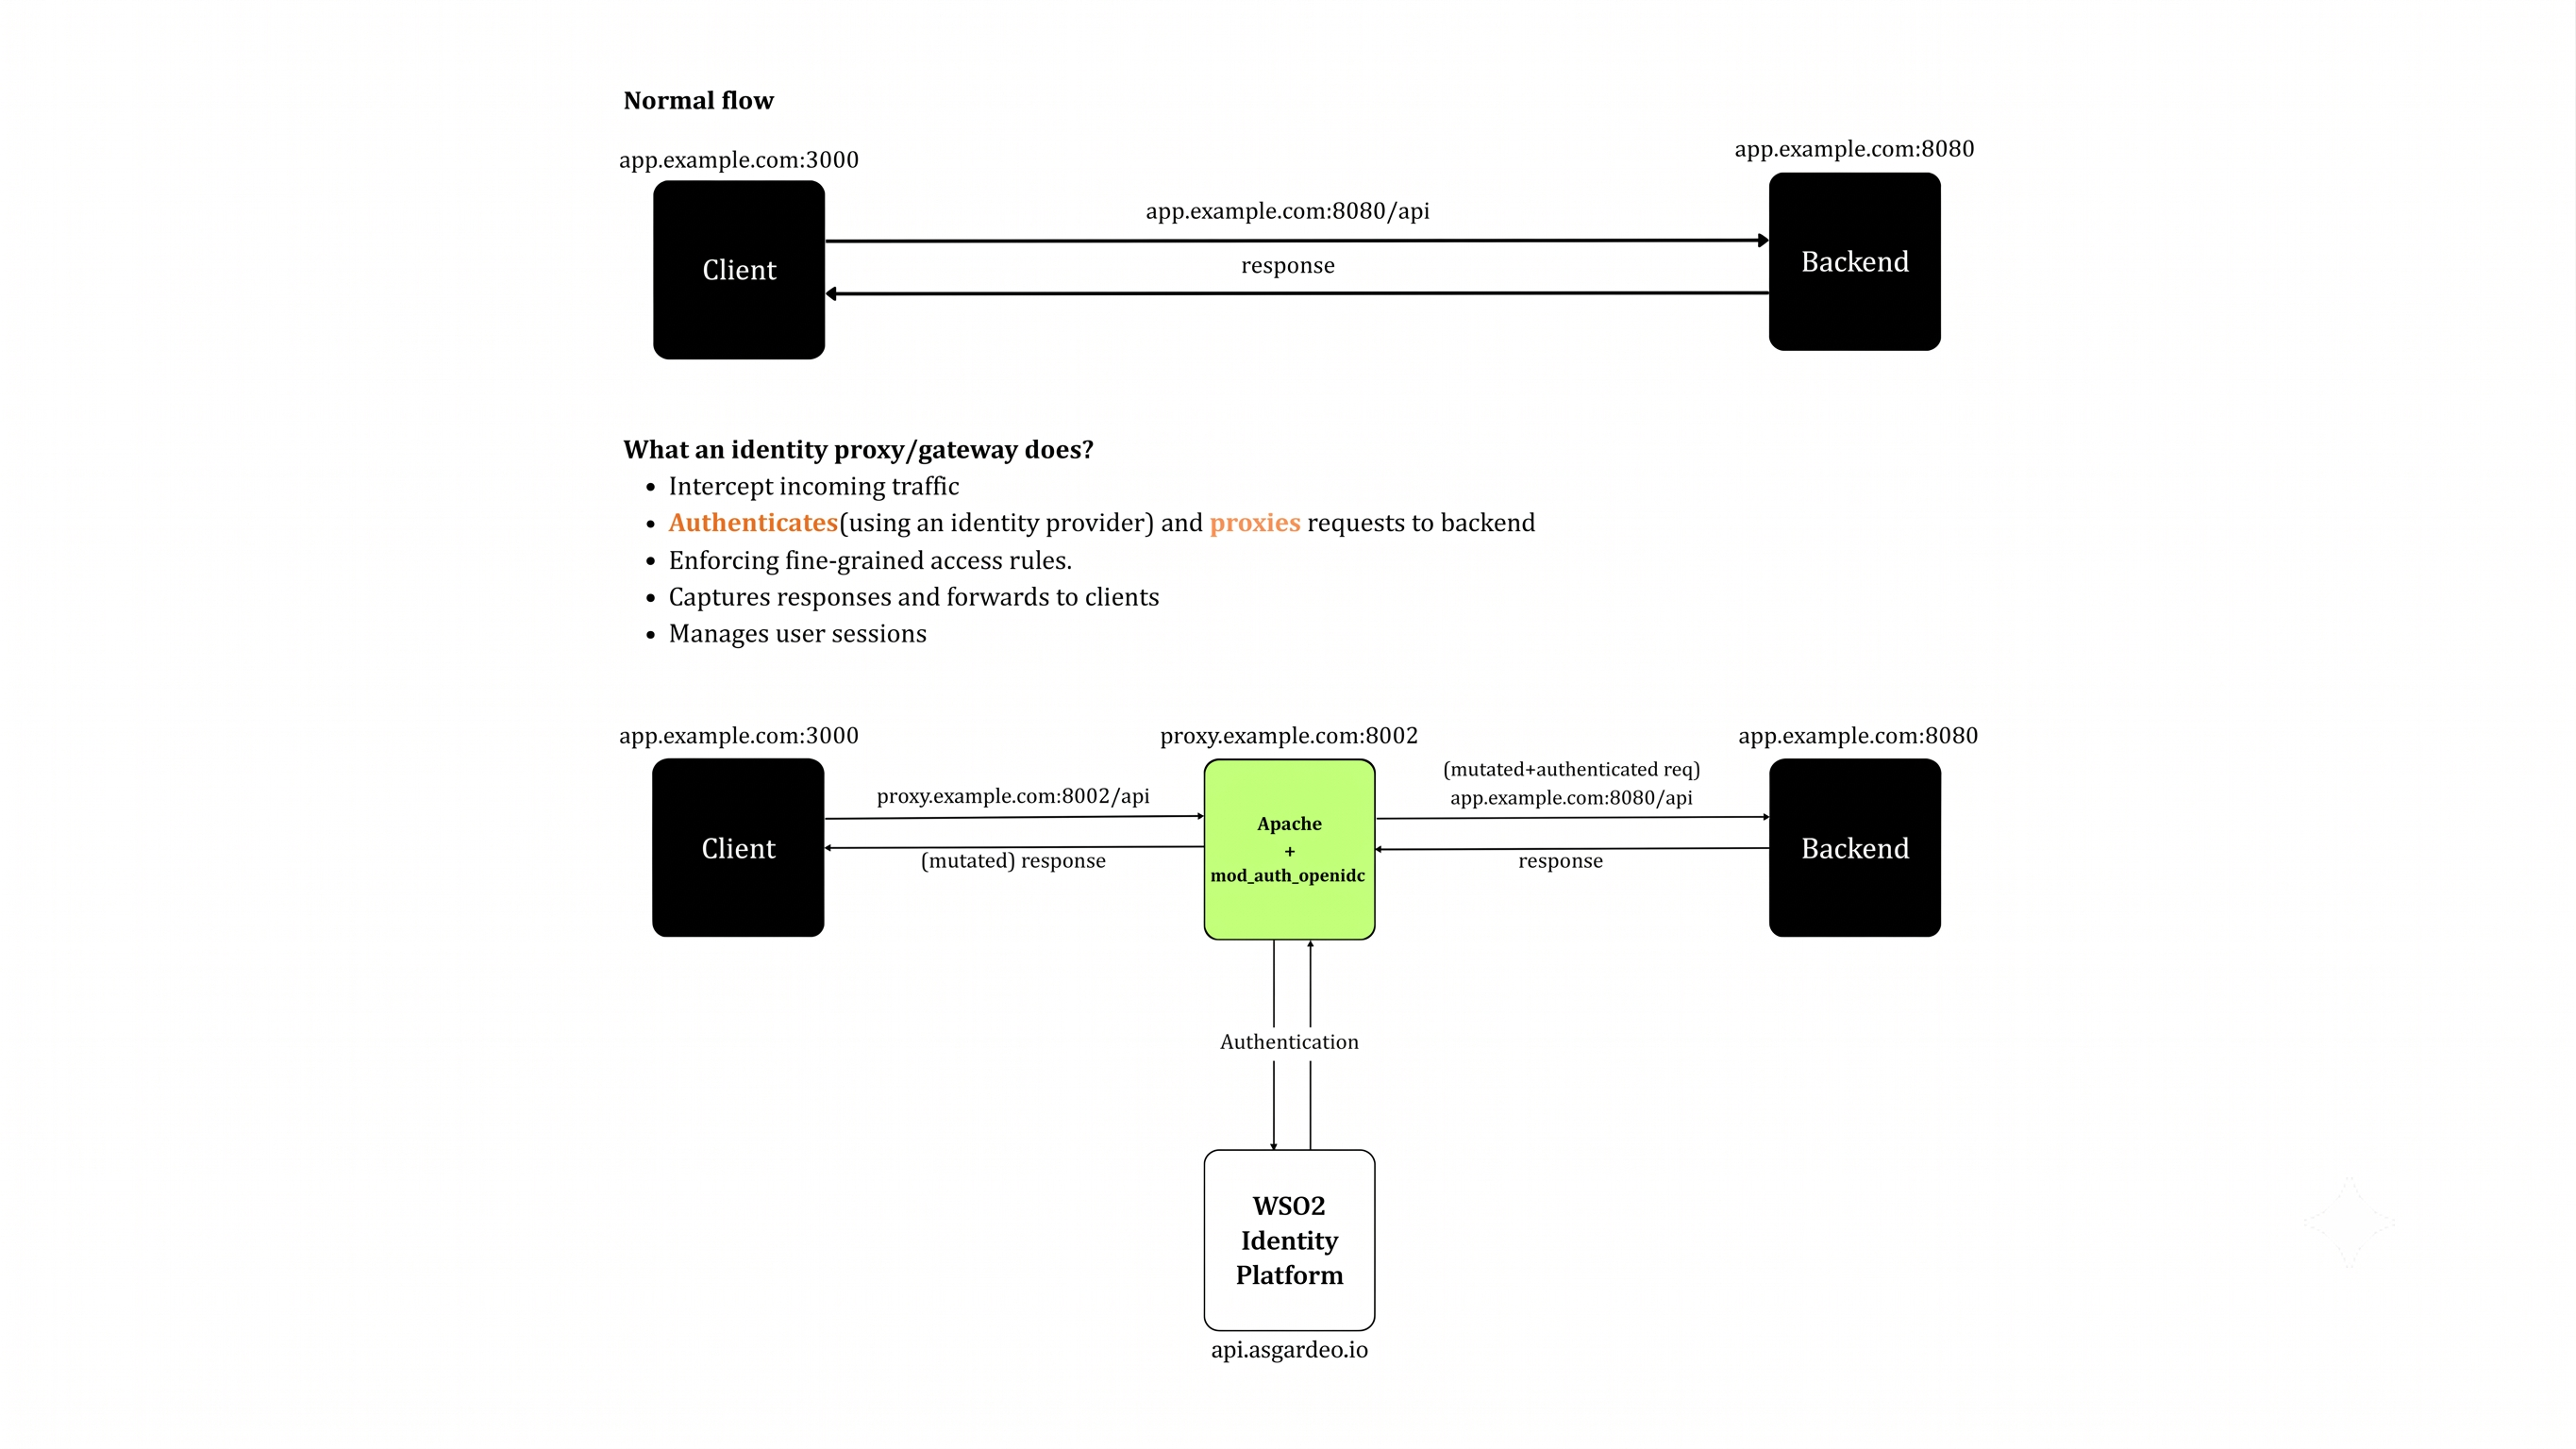
Mod Auth OpenIDC is an Apache HTTP Server module that provides OpenID Connect authentication. It acts as a reverse proxy that authenticates users via an external OIDC provider (like WSO2 Identity Platform) and forwards identity information to your back-end app via HTTP headers. This guide explains how you can connect WSO2 Identity Platform with Mod Auth OpenIDC.
Prerequisites
-
A WSO2 Identity Platform organization. If you don't have one, create a free account.
-
A package manager (for example apt, yum, Homebrew) to install Apache HTTPD.
-
An application with a back-end. If you don't have one, you can use this sample application.
Step 1: Register an OIDC application
To connect your Mod Auth OpenIDC Apache HTTPD module to WSO2 Identity Platform, you need to register it as an application. To do so,
-
Sign in to the WSO2 Identity Platform Console and go to your organization.
-
Register a Traditional Web Application with the OpenID Connect protocol and the following details:
- Name - mod-auth-app
- Authorized redirect URL - The URL where WSO2 Identity Platform sends the authentication response after login. For example:
http://localhost:8002/oauth2/callback(or your proxy callback URL).
-
Take note of the Client ID and Client Secret generated for your application.
Step 2: (Optional) Set up sample application
If you have your own application, you can skip this step. If you want to use the sample Java application, follow the steps below to set it up.
-
Download the sample application.
-
Use the following command to run the application.
-
Go to
http://localhost:8080and verify that the application works.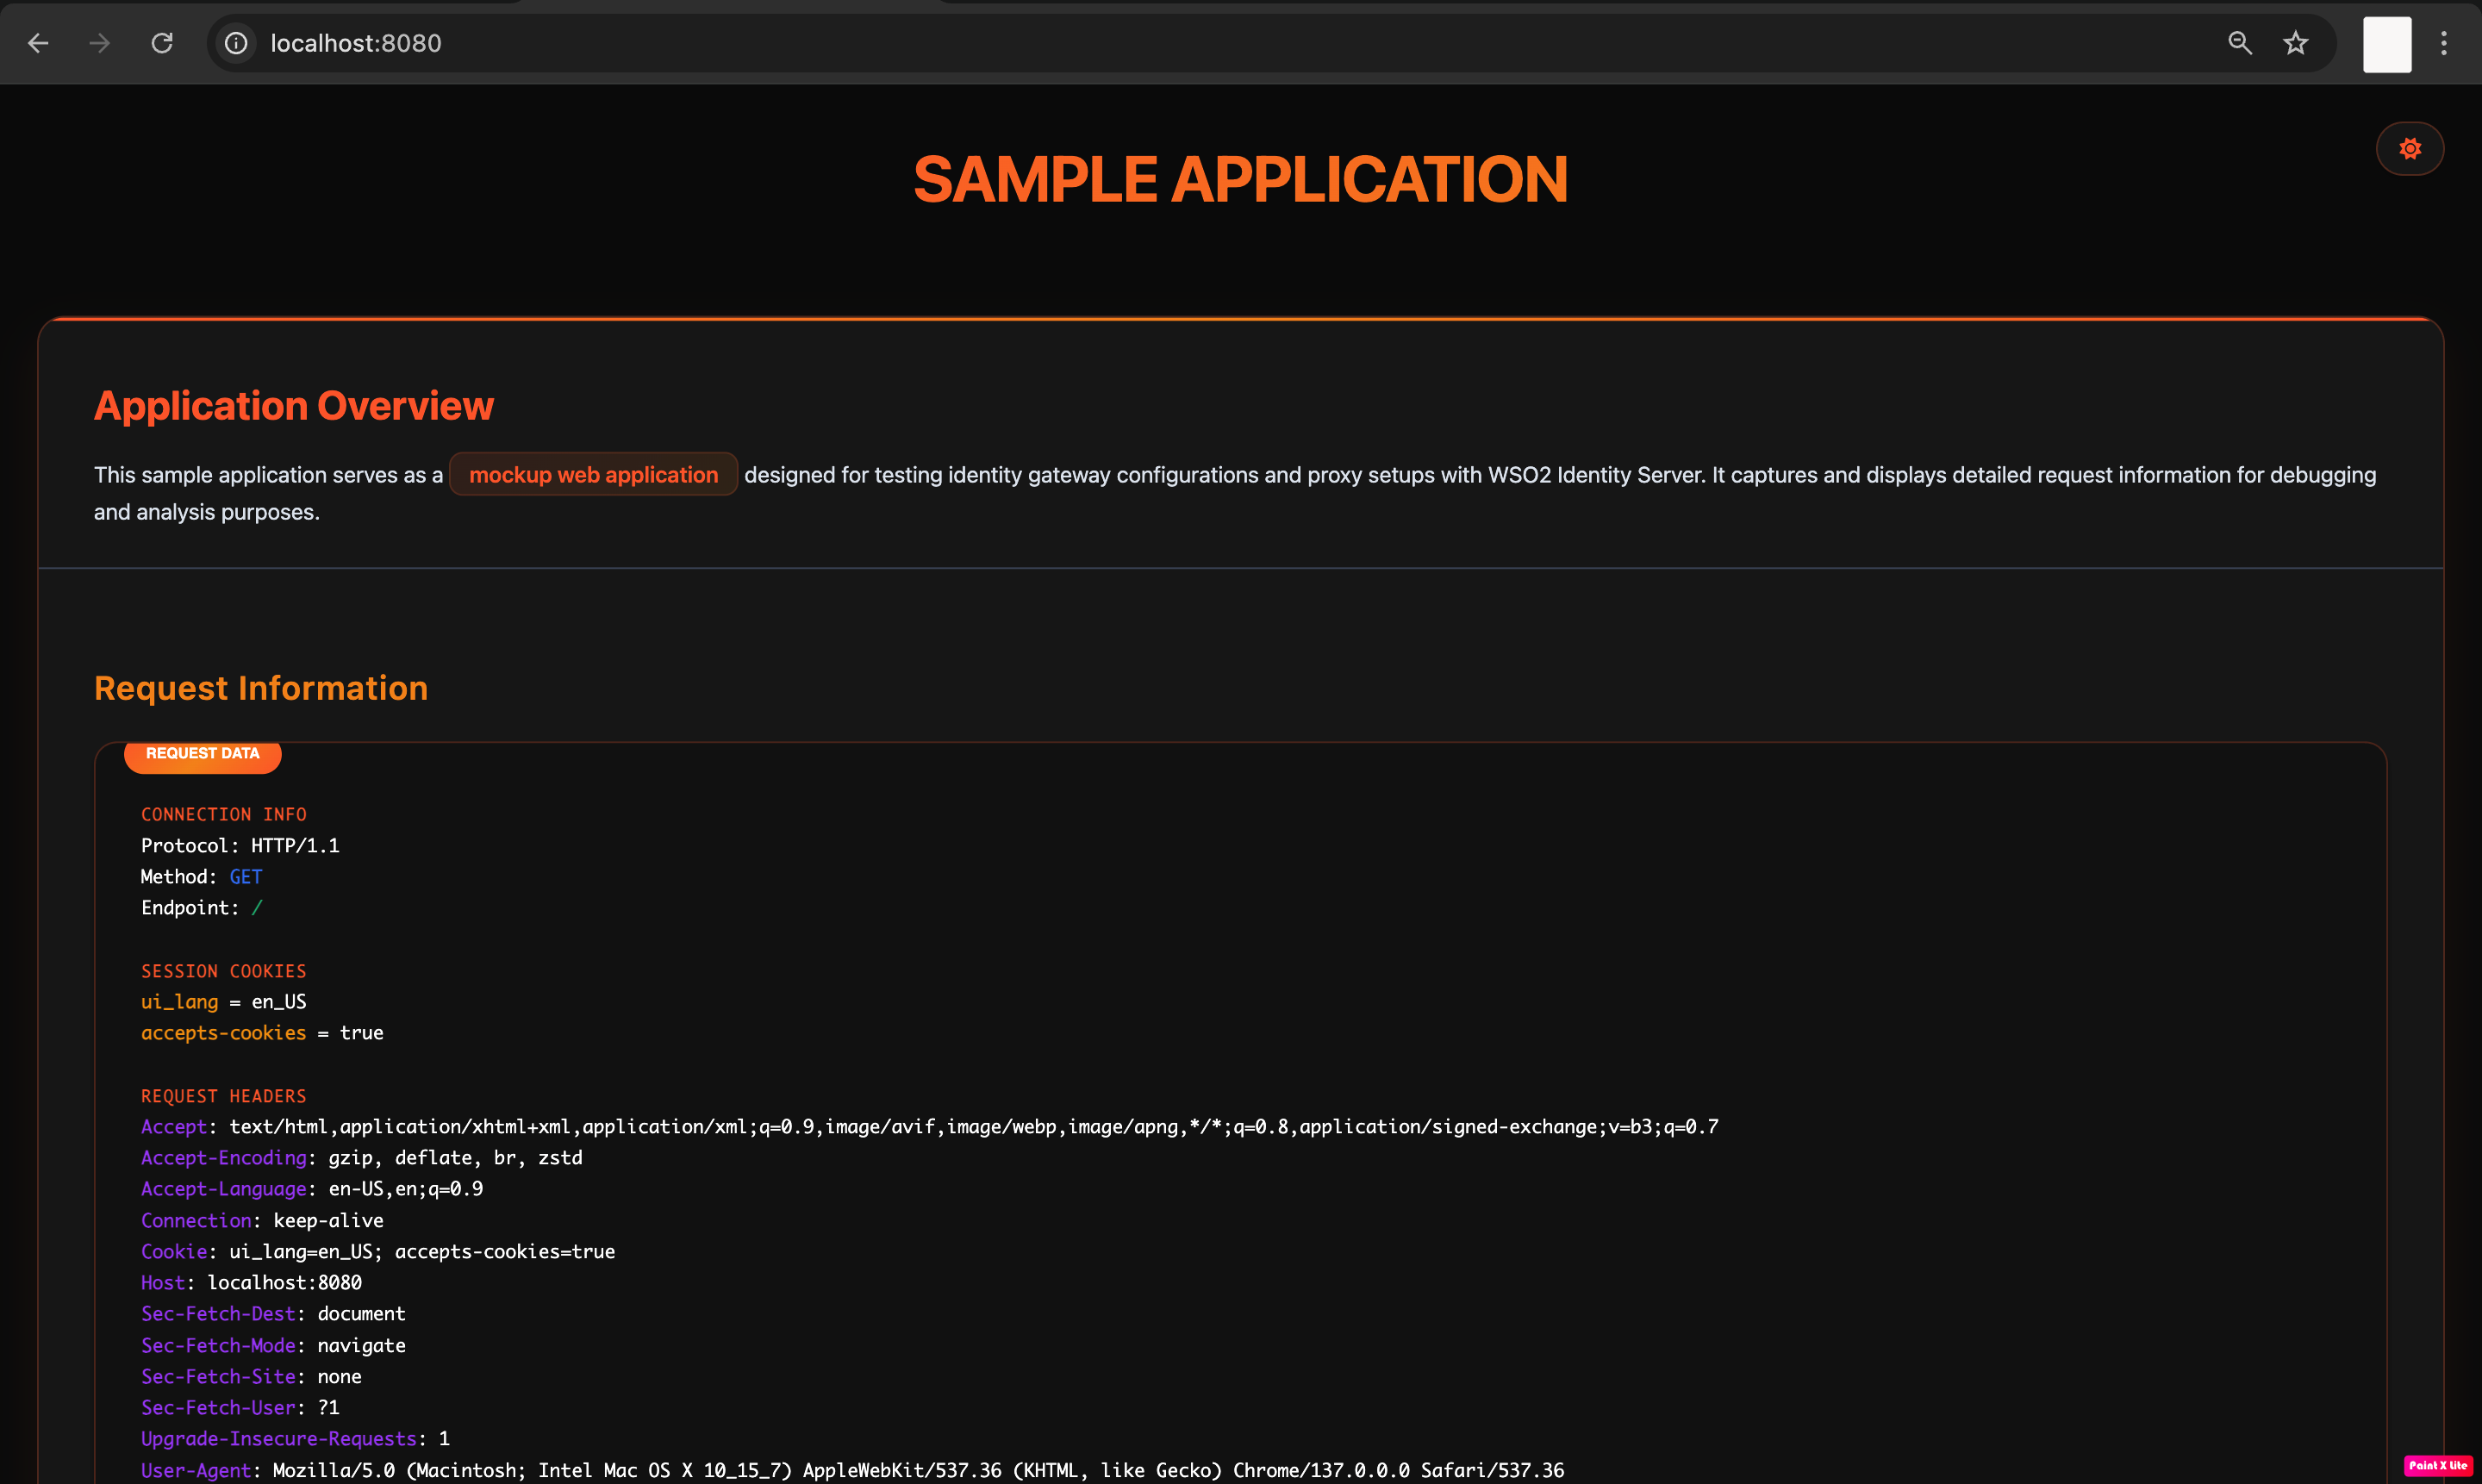
Step 3: Install Apache and Mod Auth OpenIDC
Follow the steps below to install Apache httpd and the required dependencies.
Note
The commands below assume a macOS environment. Use the corresponding package manager in your environment for installations. To learn more, refer to the Apache httpd documentation.
-
Install Apache httpd if you don't have it already.
-
Install the following dependencies required by Mod Auth OpenIDC.
-
Clone and build Mod Auth OpenIDC.
git clone https://github.com/zmartzone/mod_auth_openidc.git
cd mod_auth_openidc
./autogen.sh
./configure --with-apxs=$(which apxs)
make
make install
Troubleshoot build errors
Homebrew may install dependencies in non-standard locations, which can cause the installation to fail.
If the
./configure --with-apxs=$(which apxs)command fails, try specifying the exact paths to the dependencies:./configure --with-apxs2=/opt/homebrew/bin/apxs \ --with-openssl=/opt/homebrew/opt/openssl@3 \ --with-jansson=/opt/homebrew/opt/jansson \ --with-cjose=/opt/homebrew/opt/cjose make make installAfter building, the .so module should appear in
/opt/homebrew/lib/httpd/modules/mod_auth_openidc.so.
Step 4: Configure Apache to use Mod Auth OpenIDC with WSO2 Identity Platform
The following steps explain how to configure Mod Auth OpenIDC to act as a reverse proxy and authenticate users via WSO2 Identity Platform.
-
Open your Apache configuration file at
/opt/homebrew/etc/httpd/httpd.confand add the following line to load the Mod Auth OpenIDC moduleTip
Load this module only once to avoid conflicts.
-
Create a new file at
/opt/homebrew/etc/httpd/extra/httpd-oidc.confand add the following content. This file will contain the VirtualHost configuration for OIDC authentication.Listen 8002 <VirtualHost *:8002> ServerName localhost OIDCCryptoPassphrase a-random-secret-value OIDCProviderMetadataURL https://api.asgardeo.io/t/<organization_name>/oauth2/token/.well-known/openid-configuration OIDCClientID YOUR_CLIENT_ID OIDCClientSecret YOUR_CLIENT_SECRET OIDCRedirectURI http://localhost:8002/callback OIDCRemoteUserClaim sub OIDCSSLValidateServer On ProxyPass / http://localhost:8080/ ProxyPassReverse / http://localhost:8080/ <Location /> AuthType openid-connect Require valid-user </Location> </VirtualHost>Note
-
Replace
<organization_name>with the name of your WSO2 Identity Platform organization. -
Replace
YOUR_CLIENT_IDandYOUR_CLIENT_SECRETwith the client ID and the client secret you received earlier when registering the application in WSO2 Identity Platform. -
This sample configuration file assumes that the following services run on the specified endpoints. If your setup differs, adjust the configuration accordingly.
- WSO2 Identity Platform:
https://api.asgardeo.io/t/<organization_name> - Apache with Mod Auth OpenIDC:
http://localhost:8002 - Back-end Service (API or Web application):
http://localhost:8080
- WSO2 Identity Platform:
-
-
Open the Apache configuration file at
/opt/homebrew/etc/httpd/httpd.confand include the following line to include the VirtualHost configuration file you created above. -
Start Apache.
Try it out
Now that you’ve set up WSO2 Identity Platform, the sample application (or your own), and Mod Auth OpenIDC Apache HTTPD module, follow the steps below to test them in action.
-
Log in to your app through the Apache server by visiting
http://localhost:8002. You will be redirected to the login page of WSO2 Identity Platform. -
Log in with an existing user.
-
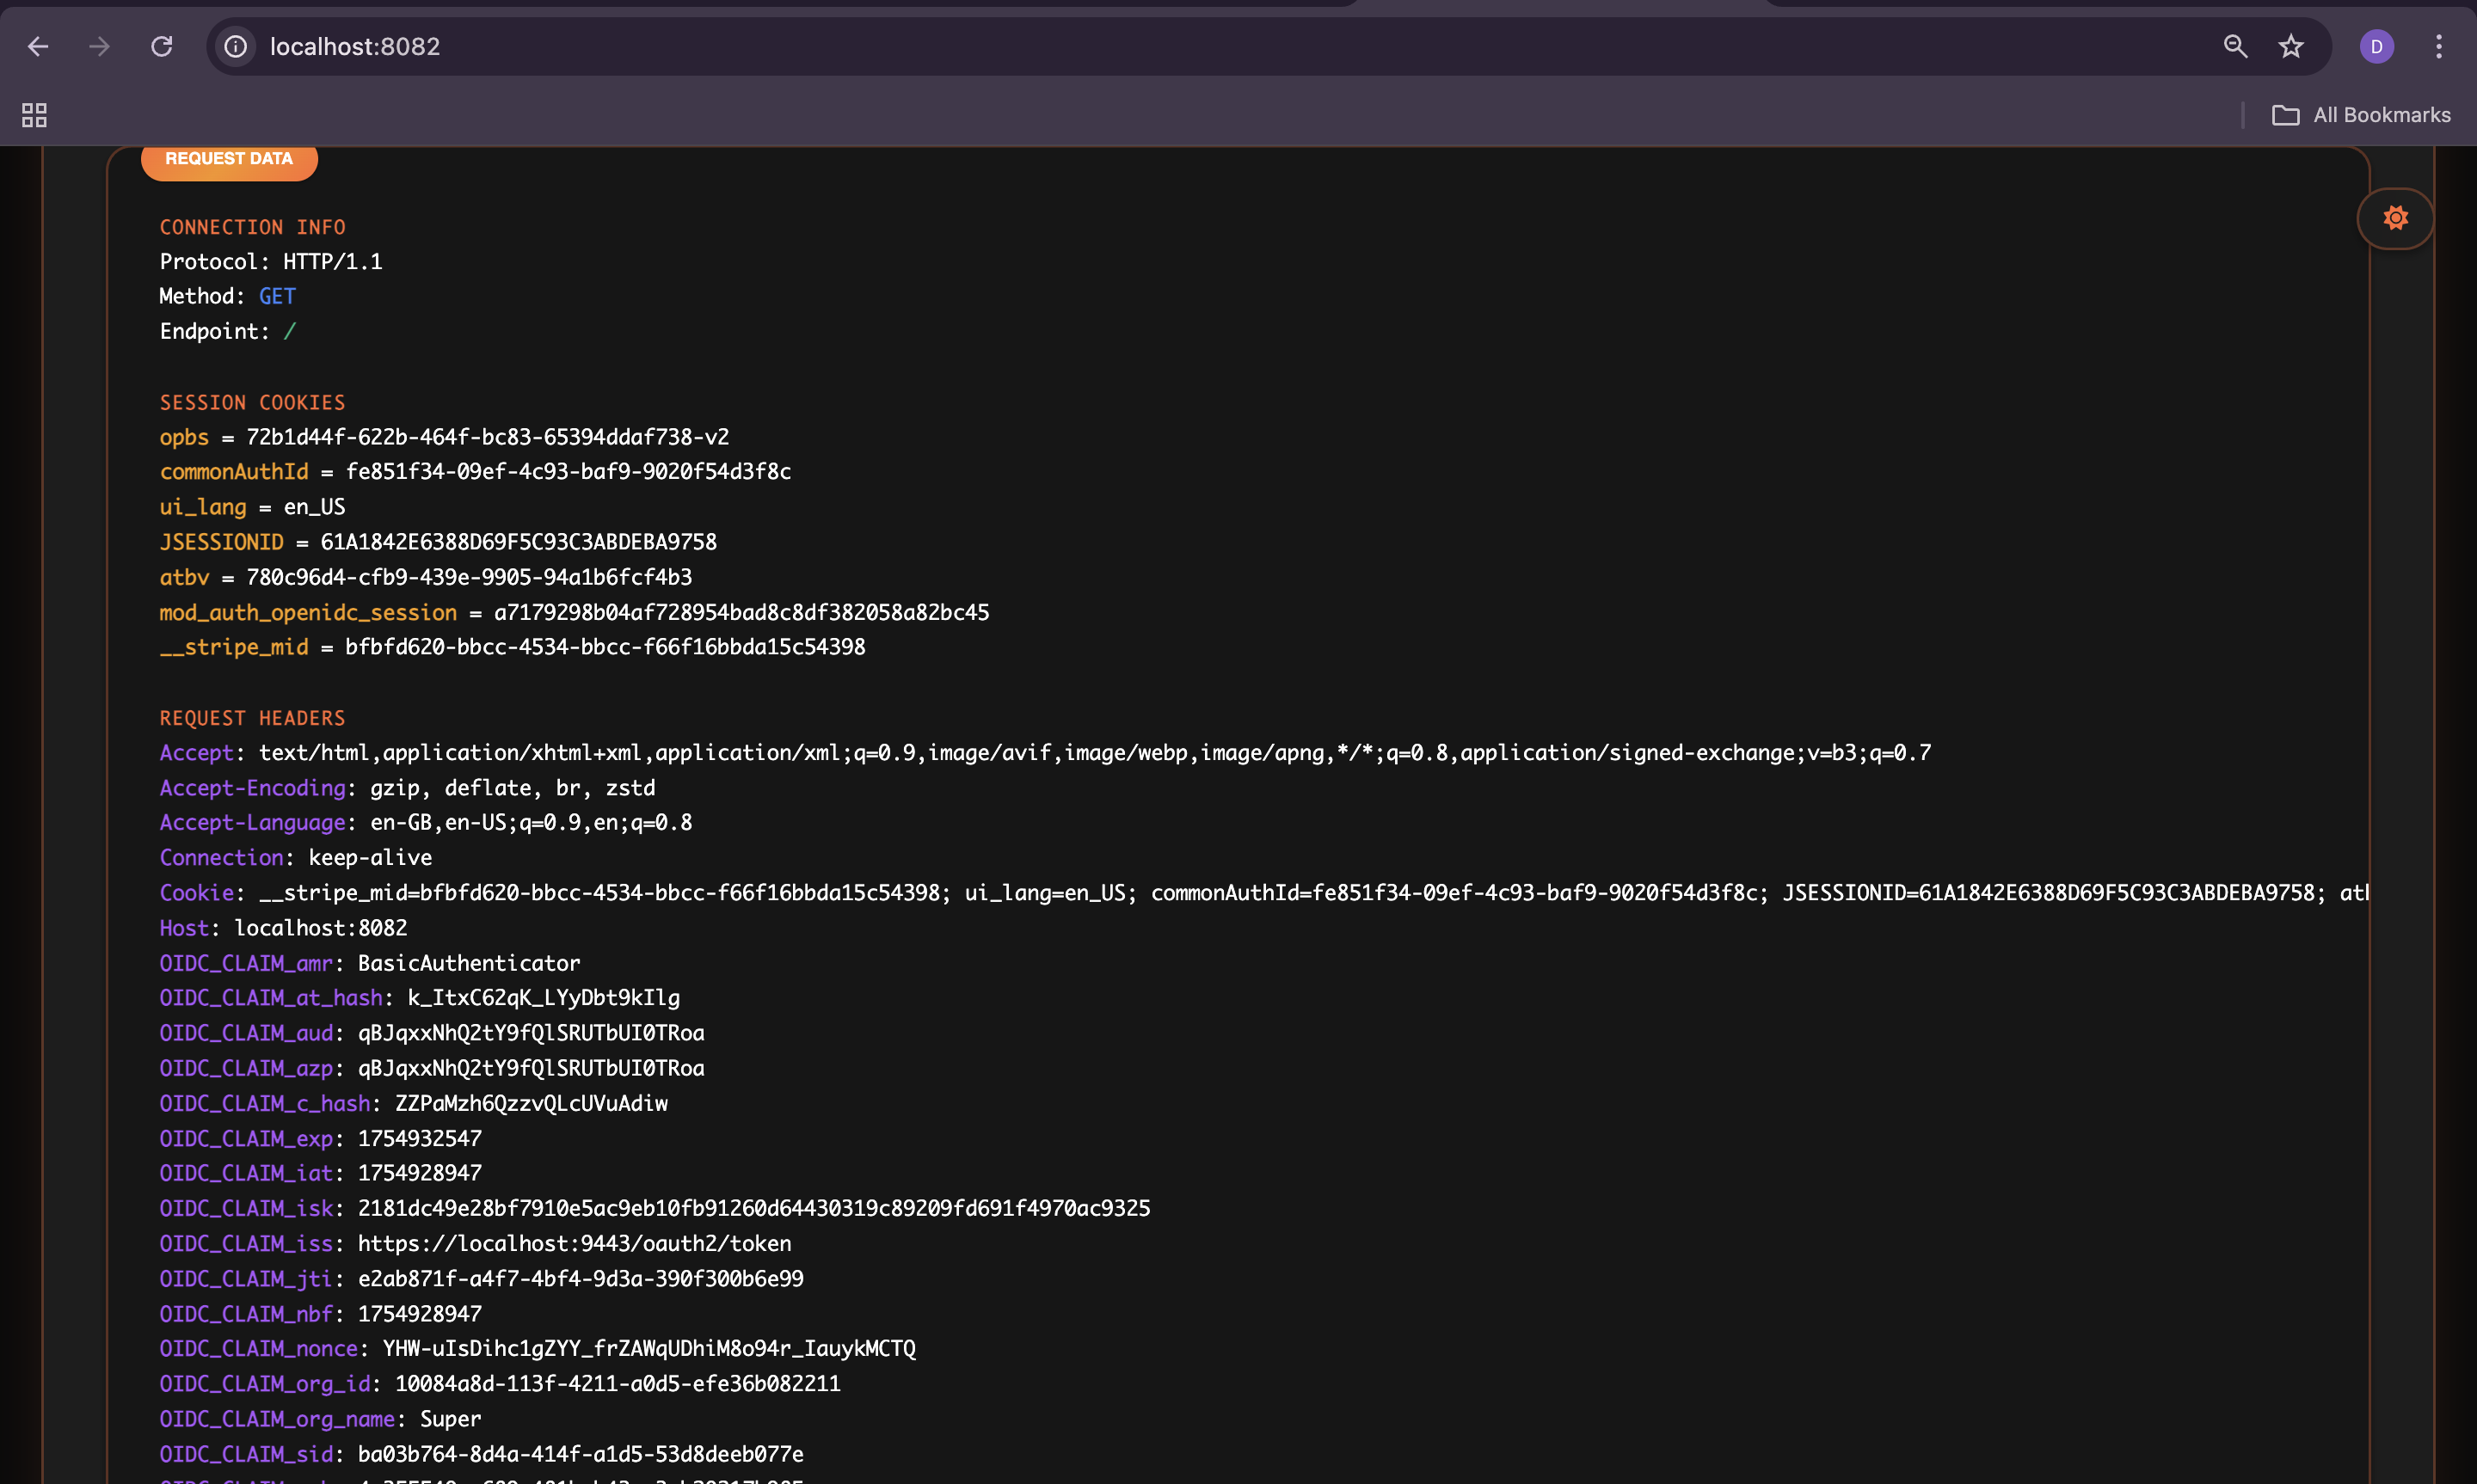
After successfully logging in, the Mod Auth OpenIDC module automatically injects OIDC claims into HTTP headers for your back-end application. You can access user information through headers like:
OIDC_CLAIM_sub: User identifierOIDC_CLAIM_org_name: Organization nameOIDC_access_token: Access tokenOIDC_id_token: ID token
Tip
Include these configurations in your
httpd-oidc.confVirtualHost file to control which claims Mod Auth OpenIDC forwards to the application.Learn more about these configurations in the Apache documentation.
Advanced configurations
You can enhance the integration between WSO2 Identity Platform and Mod Auth OpenIDC with the following advanced options.
Encrypt connections with TLS
To encrypt communication between clients and Mod Auth OpenIDC, you can enable TLS. To do so, add the following to your httpd-oidc.conf VirtualHost configuration file:
<VirtualHost *:443>
    SSLEngine on
    SSLCertificateFile /path/to/cert.pem
    SSLCertificateKeyFile /path/to/cert.key

    # ... rest of your OIDC configurations
</VirtualHost>
Configure sessions handling
To manage user sessions for Mod Auth OpenIDC, add the following directives to your httpd-oidc.conf VirtualHost configuration:
OIDCSessionInactivityTimeout 3600
OIDCSessionMaxDuration 86400
OIDCCookieHTTPOnly On
OIDCCookieSecure Off  # Set to On for production HTTPS
Learn more about these configurations in the Apache documentation.
Now that you’ve successfully connected WSO2 Identity Platform with Mod Auth OpenIDC module, you can leverage this integration to:
-
Add authentication to applications that lack native OIDC support.
-
Replace custom or insecure authentication methods.
-
Centralize and simplify authentication logic.
This setup secures dashboards, microservices, and legacy apps, improving stack security, scalability, and maintainability.