Integrate Ory Oathkeeper with WSO2 Identity Platform
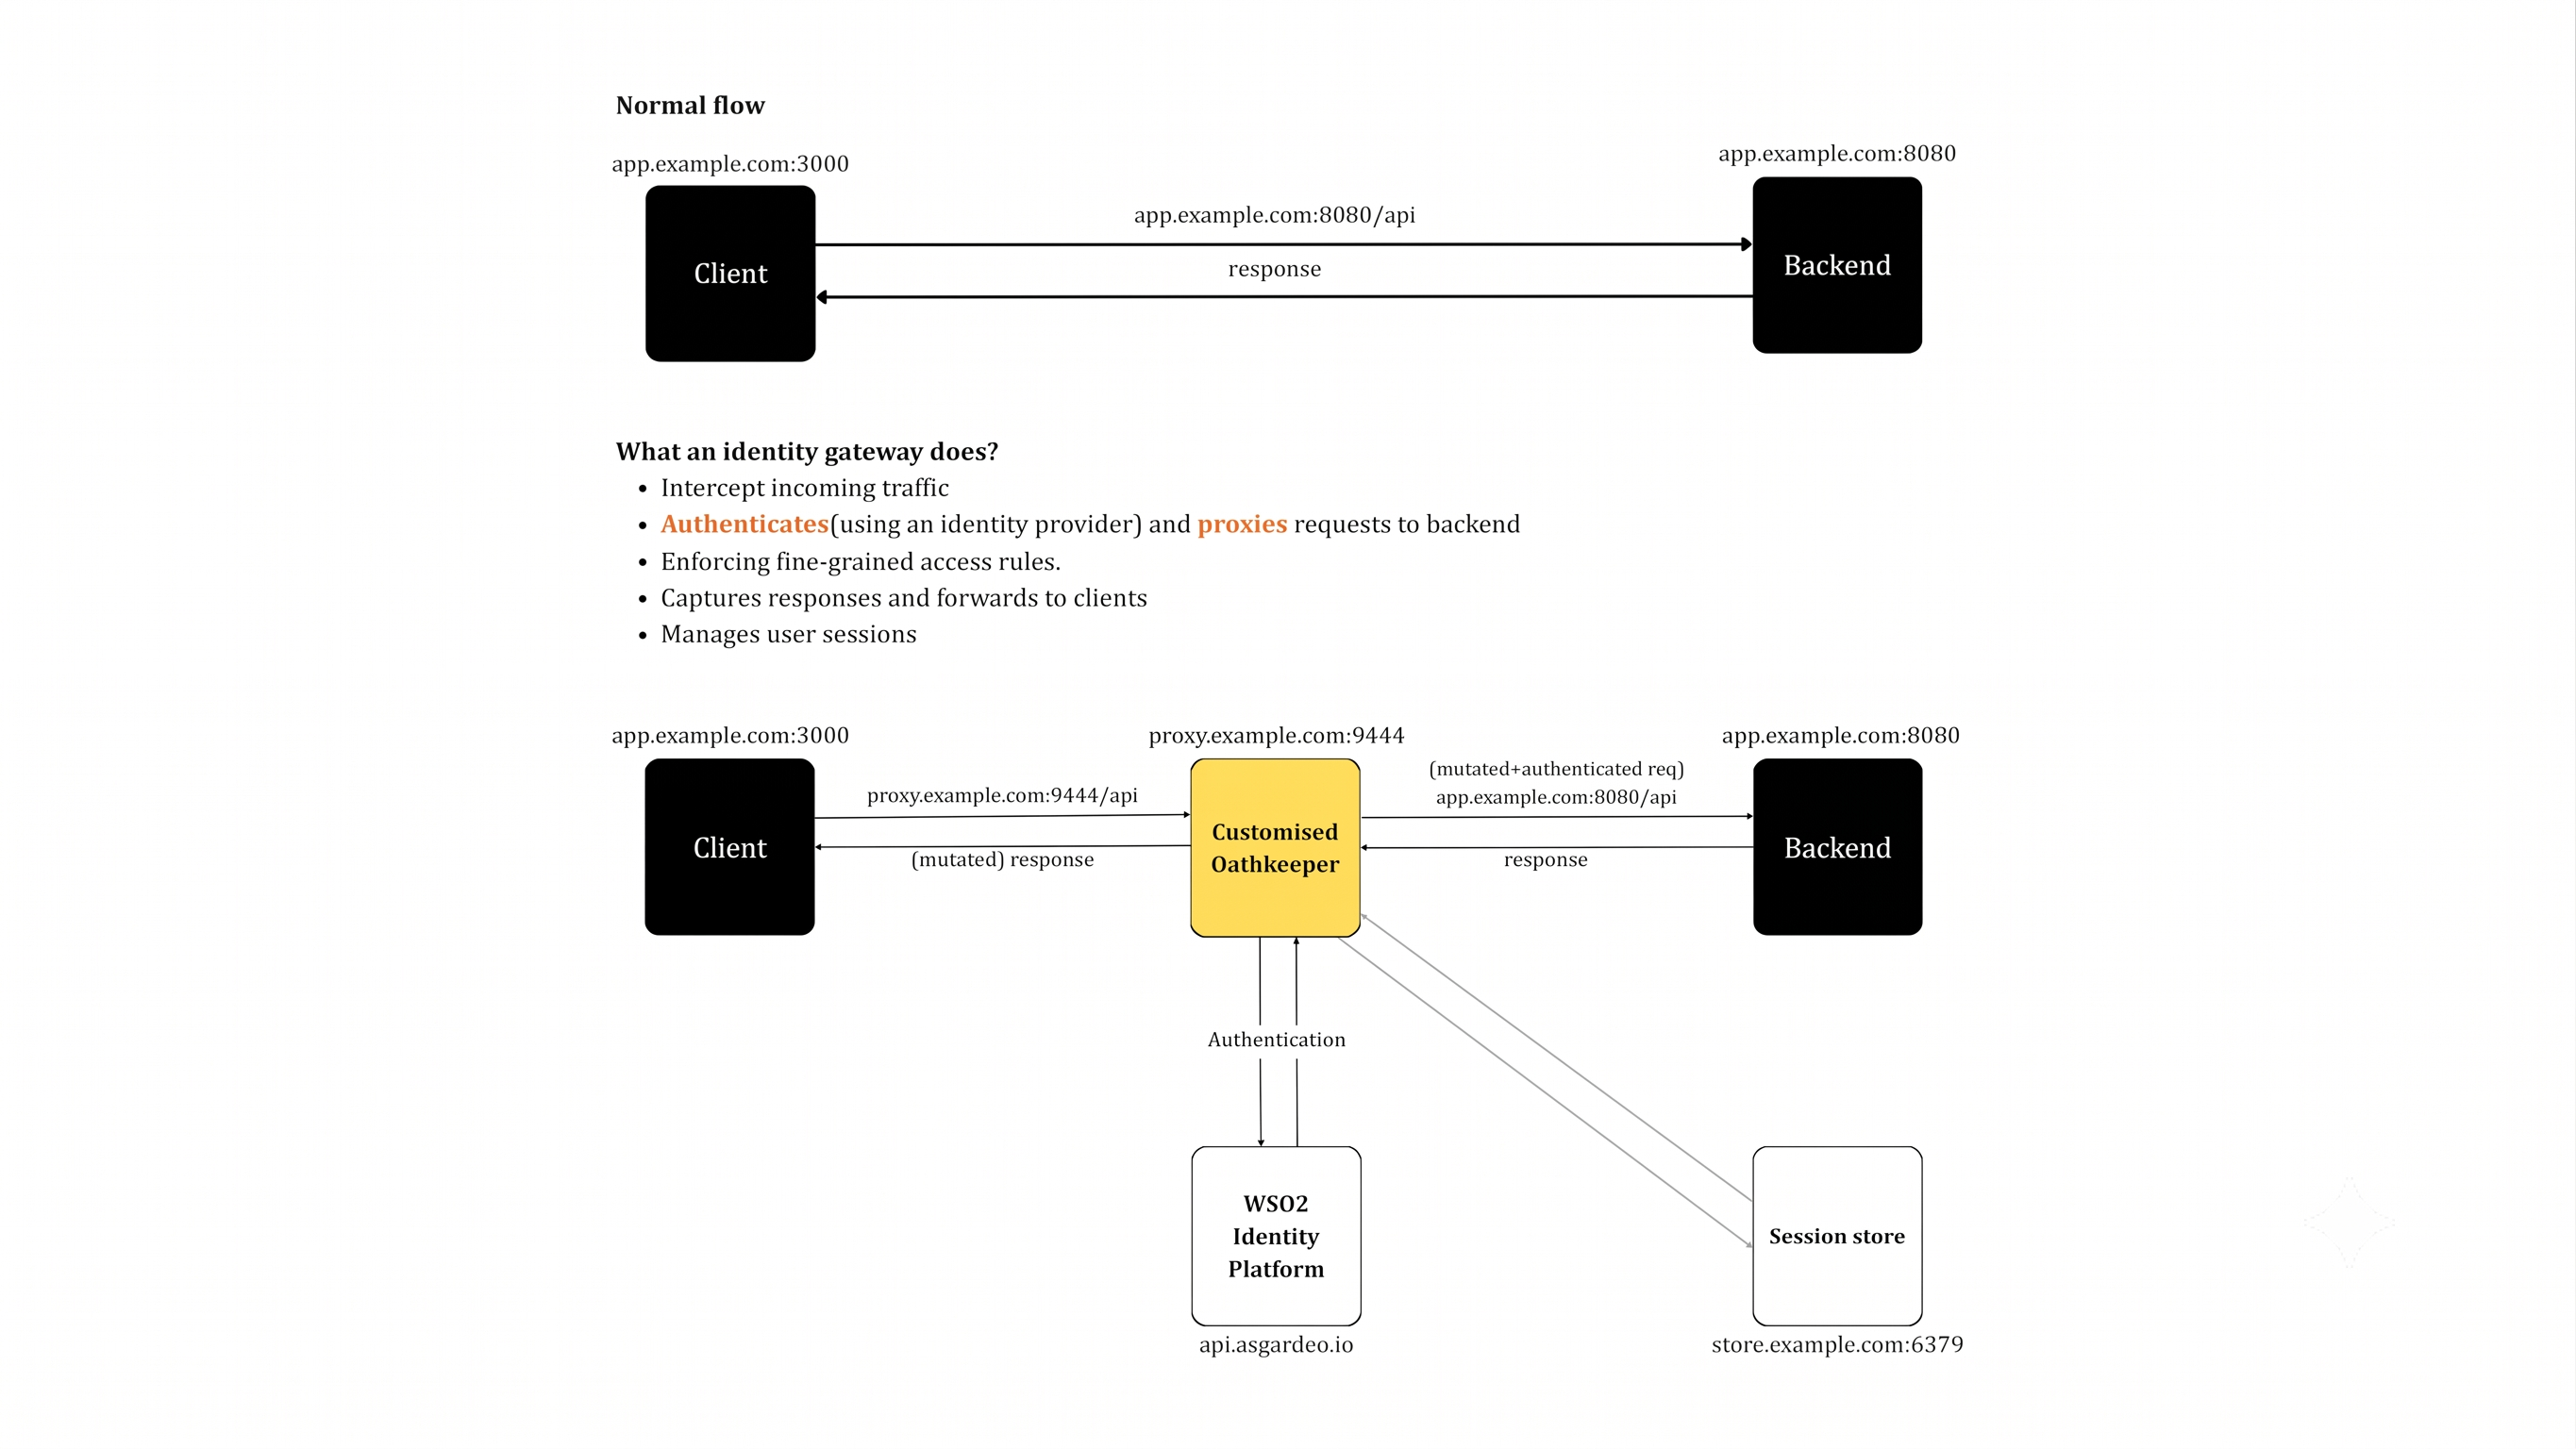
Oathkeeper is an open-source identity gateway that authenticates users through an external identity provider (such as WSO2 Identity Platform) and forwards user identity and session information to your back-end services via HTTP headers and cookies. This guide explains how you can connect WSO2 Identity Platform with Oathkeeper.
Prerequisites
-
A WSO2 Identity Platform organization. If you don't have one, create a free account.
-
Go 1.16 or later. To install Go, follow the steps in the Go documentation.
-
An application with a back-end. If you don't have one, you can use this sample application.
-
(Optional) Redis server for session storage.
Step 1: Register an OIDC application
To connect Oathkeeper to WSO2 Identity Platform, you need to register it as an application. To do so,
-
Sign in to the WSO2 Identity Platform Console and go to your organization.
-
Register a Traditional Web Application with the OpenID Connect protocol and the following details:
- Name - oathkeeper-app
- Authorized redirect URL - The URL where WSO2 Identity Platform sends the authentication response after login. For example:
http://localhost:9444/oauth2/callback(or your proxy callback URL).
-
Take note of the Client ID and Client Secret generated for your application.
Step 2: (Optional) Set up sample application
If you have your own application, you can skip this step. If you want to use the sample Java application, follow the steps below to set it up.
-
Download the sample application.
-
Use the following command to run the application.
-
Go to
http://localhost:8080and verify that the application works.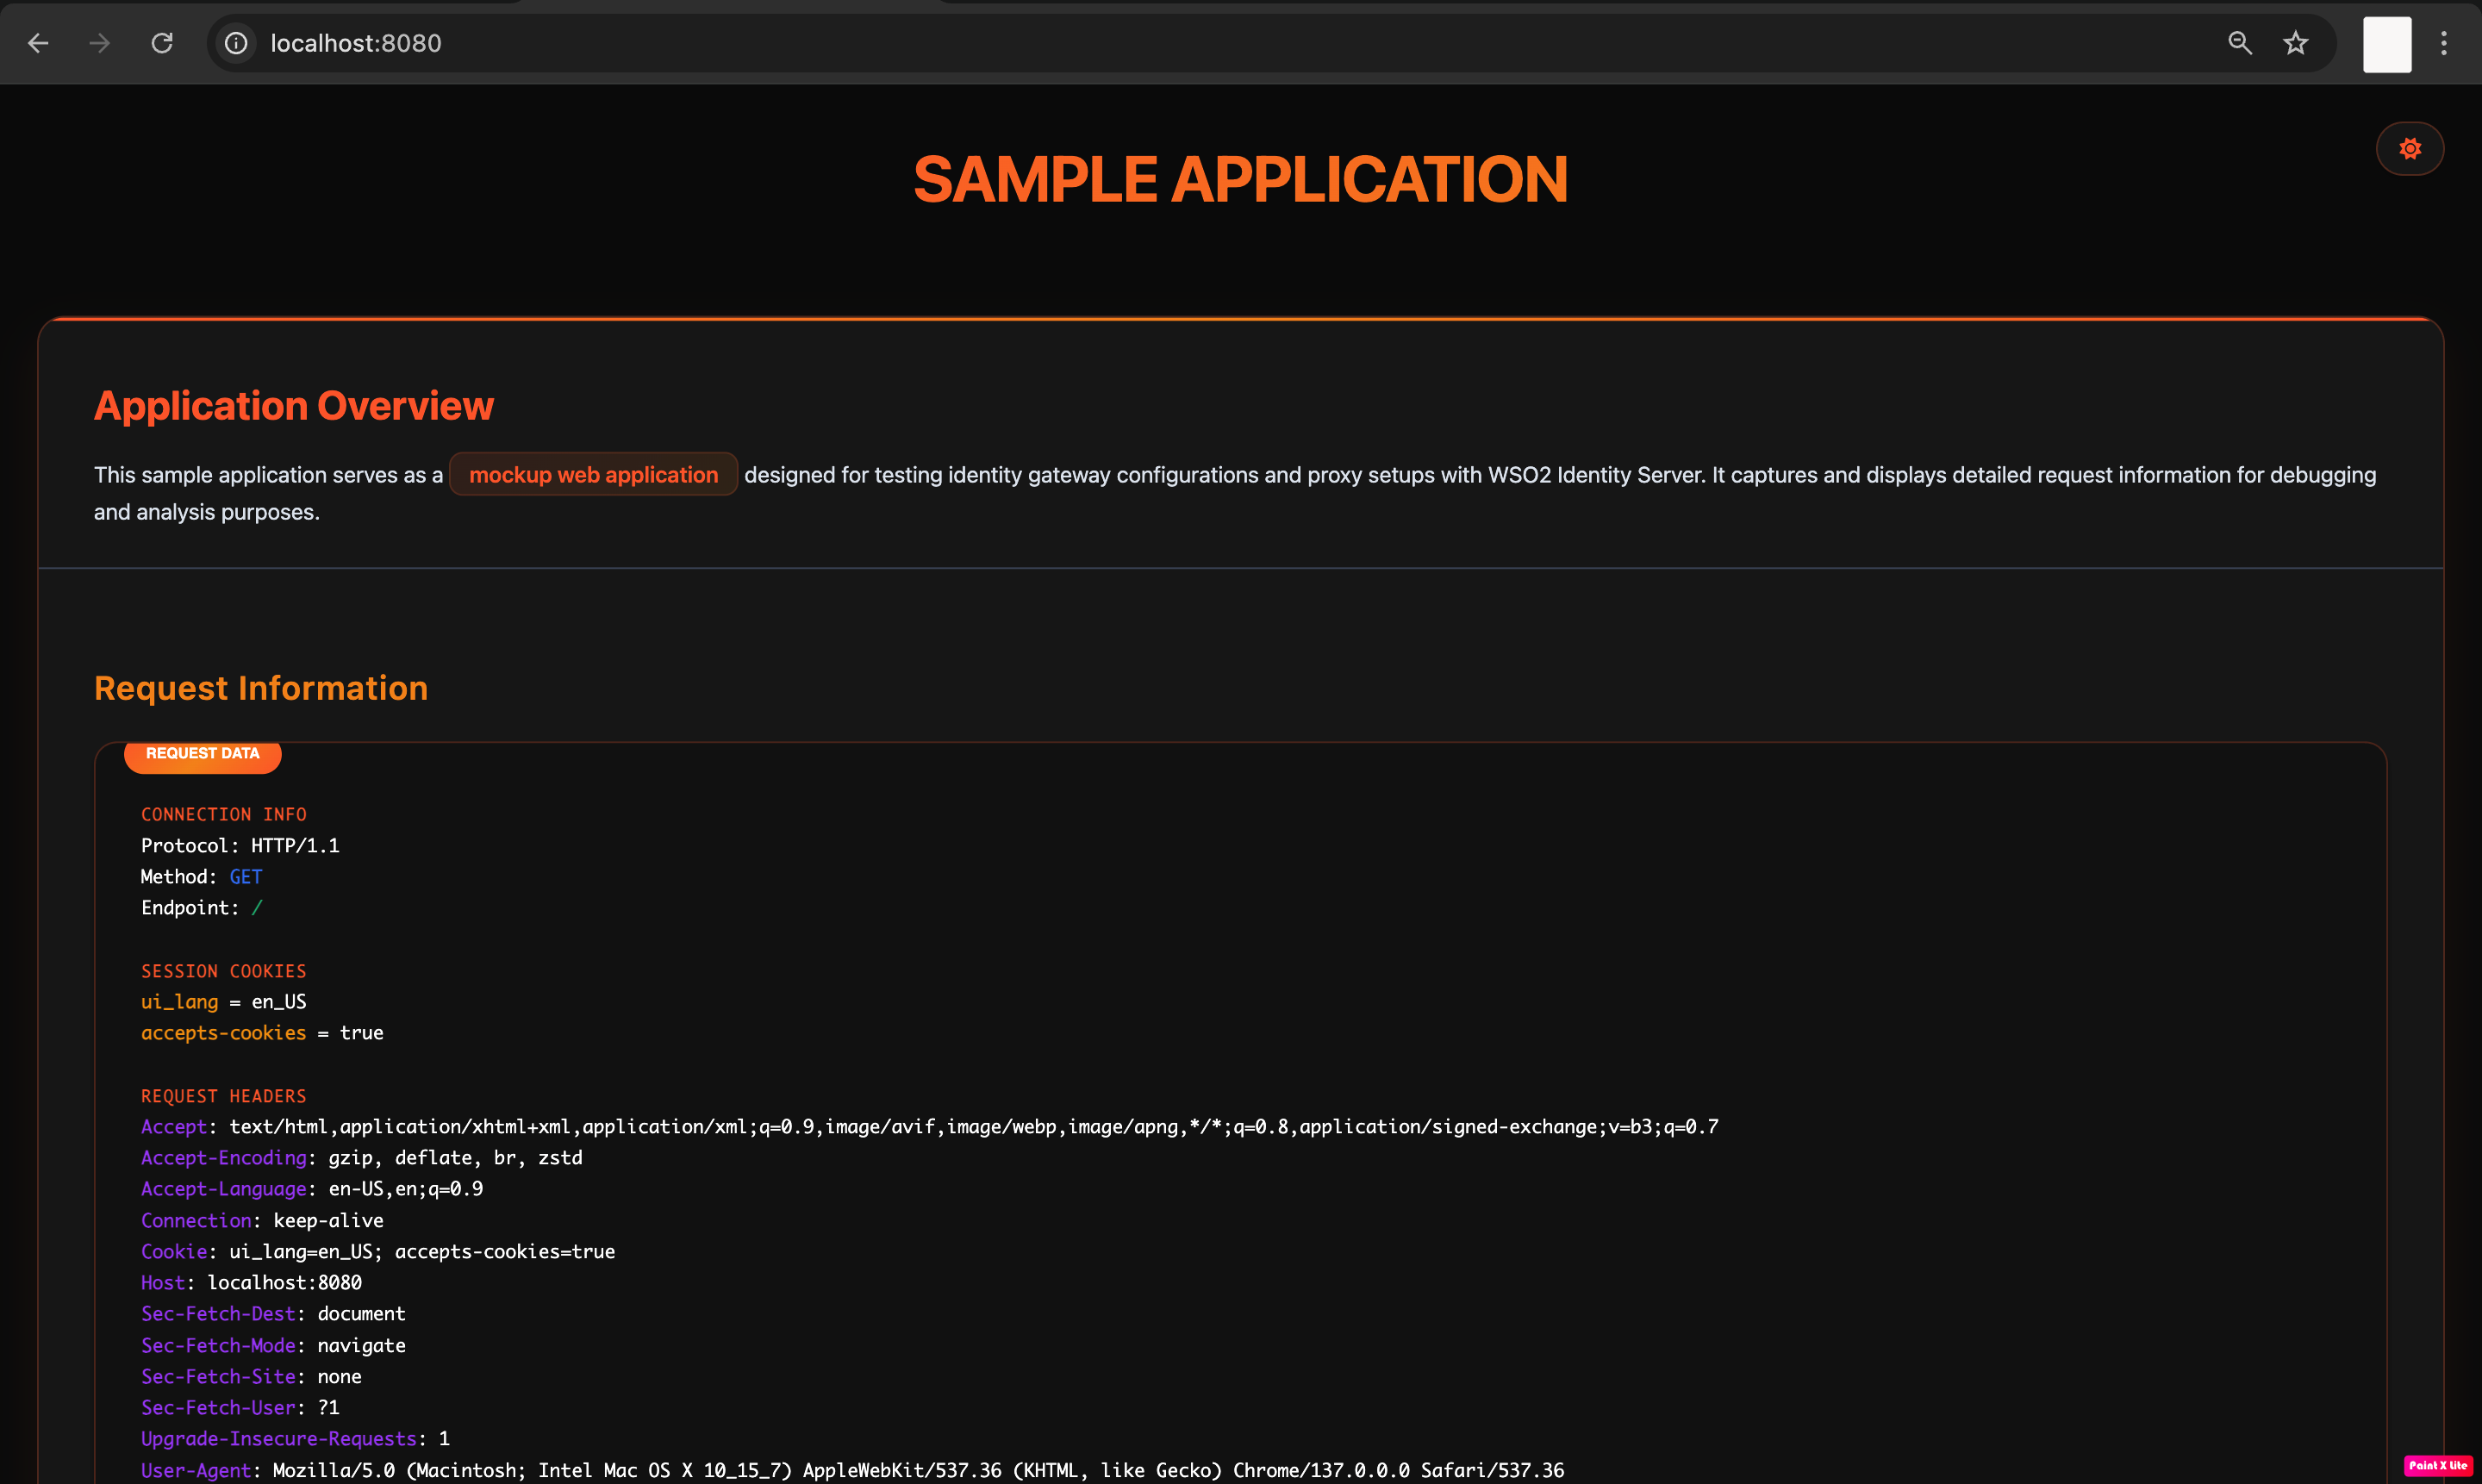
Step 3: Install and configure Oathkeeper
Follow the steps below to set up Oathkeeper with WSO2 Identity Platform.
-
Create a new directory and navigate to it.
-
Fork and clone the Oathkeeper repository.
-
Download all the customization files created for Oathkeeper from this repository.
-
Make the following changes to your original Oathkeeper clone using the customization files you downloaded earlier, keeping the same file names.
Note
In the following files and folders:
<OATHKEEPER_HOME>refers to the root directory of your Oathkeeper clone.<CUSTOM_HOME>refers to the root directory of the customization files.
-
Replace the following folders in
<OATHKEEPER_HOME>with the corresponding folders from<CUSTOM_HOME>in the same relative path.<OATHKEEPER_HOME>/proxy/<OATHKEEPER_HOME>/pipeline/errors/
-
Replace the following files in
<OATHKEEPER_HOME>with the corresponding files from<CUSTOM_HOME>in the same relative path.<OATHKEEPER_HOME>/driver/configuration/provider_koanf.go<OATHKEEPER_HOME>/driver/configuration/provider.go<OATHKEEPER_HOME>/driver/registry_memory.go<OATHKEEPER_HOME>/rule/rule.go
-
Add these files from
<CUSTOM_HOME>/pipeline/authnto<OATHKEEPER_HOME>/pipeline/authnauthenticator_callback.goauthenticator_callback_test.goauthenticator_session_jwt.goauthenticator_session_jwt_test.go
-
Add these configuration schema from
<CUSTOM_HOME>/spec/pipeline/to<OATHKEEPER_HOME>/spec/pipeline/Authenticators.callback.schema.jsonAuthenticators.session_jwt.schema.jsonErrors.redirect.schema.jsonSession_store.schema.json
-
Replace the configuration file
<OATHKEEPER_HOME>/spec/config.schema.jsonwith<CUSTOM_HOME>/spec/config.schema.json. -
To add Redis support, add the
<CUSTOM_HOME>/pipeline/session_store/folder to<OATHKEEPER_HOME>/pipeline/folder.
-
To use a Redis server for advanced session or cache storage, install the Redis client library in your Oathkeeper project root.
-
Run the following command in the root directory of your Oathkeeper clone to compile the binary:
-
Download the sample configuration and rule files.
-
Update the downloaded
config.ymlfile with the following values.-
This sample configuration file assumes that the following services run on the specified endpoints. If your setup differs, adjust the configuration accordingly.
- WSO2 Identity Platform:
https://api.asgardeo.io/t/<organization_name> - Oathkeeper:
http://localhost:9444 - Back-end Service (API or Web Application):
http://localhost:8080
- WSO2 Identity Platform:
-
Replace the WSO2 Identity Platform endpoints in the configuration file with your organization's endpoints under
https://api.asgardeo.io/t/<organization_name>/oauth2/, where<organization_name>is the name of your WSO2 Identity Platform organization. -
Replace
<your_client_id>,<your_client_secret>with the client ID and the client secret you received earlier when registering the application in WSO2 Identity Platform. -
Under
access_rules, specify the path to the rules file. You can use the sample rules file if you don't have your own. -
The sample configuration file assumes a system with a Redis server. If you don't have one, remove the session store configurations and add this:
-
The sample configuration file also assumes TLS encryption. If you don't use it, make the following changes.
-
Change the proxy port to
4455. The default port9444uses TLS. -
Remove TLS-related configurations:
-
-
-
Start Oathkeeper:
Learn more
Refer to the Oathkeepr documentation for more information on Oathkeeper configurations.
Try it out
Now that you’ve set up WSO2 Identity Platform, the sample application (or your own), and Oathkeeper, follow the steps below to test them in action.
-
Log in to your app through Oathkeeper by visiting
http://localhost:9444/home. You will be redirected to the login page of WSO2 Identity Platform. -
Log in with an existing user.
-
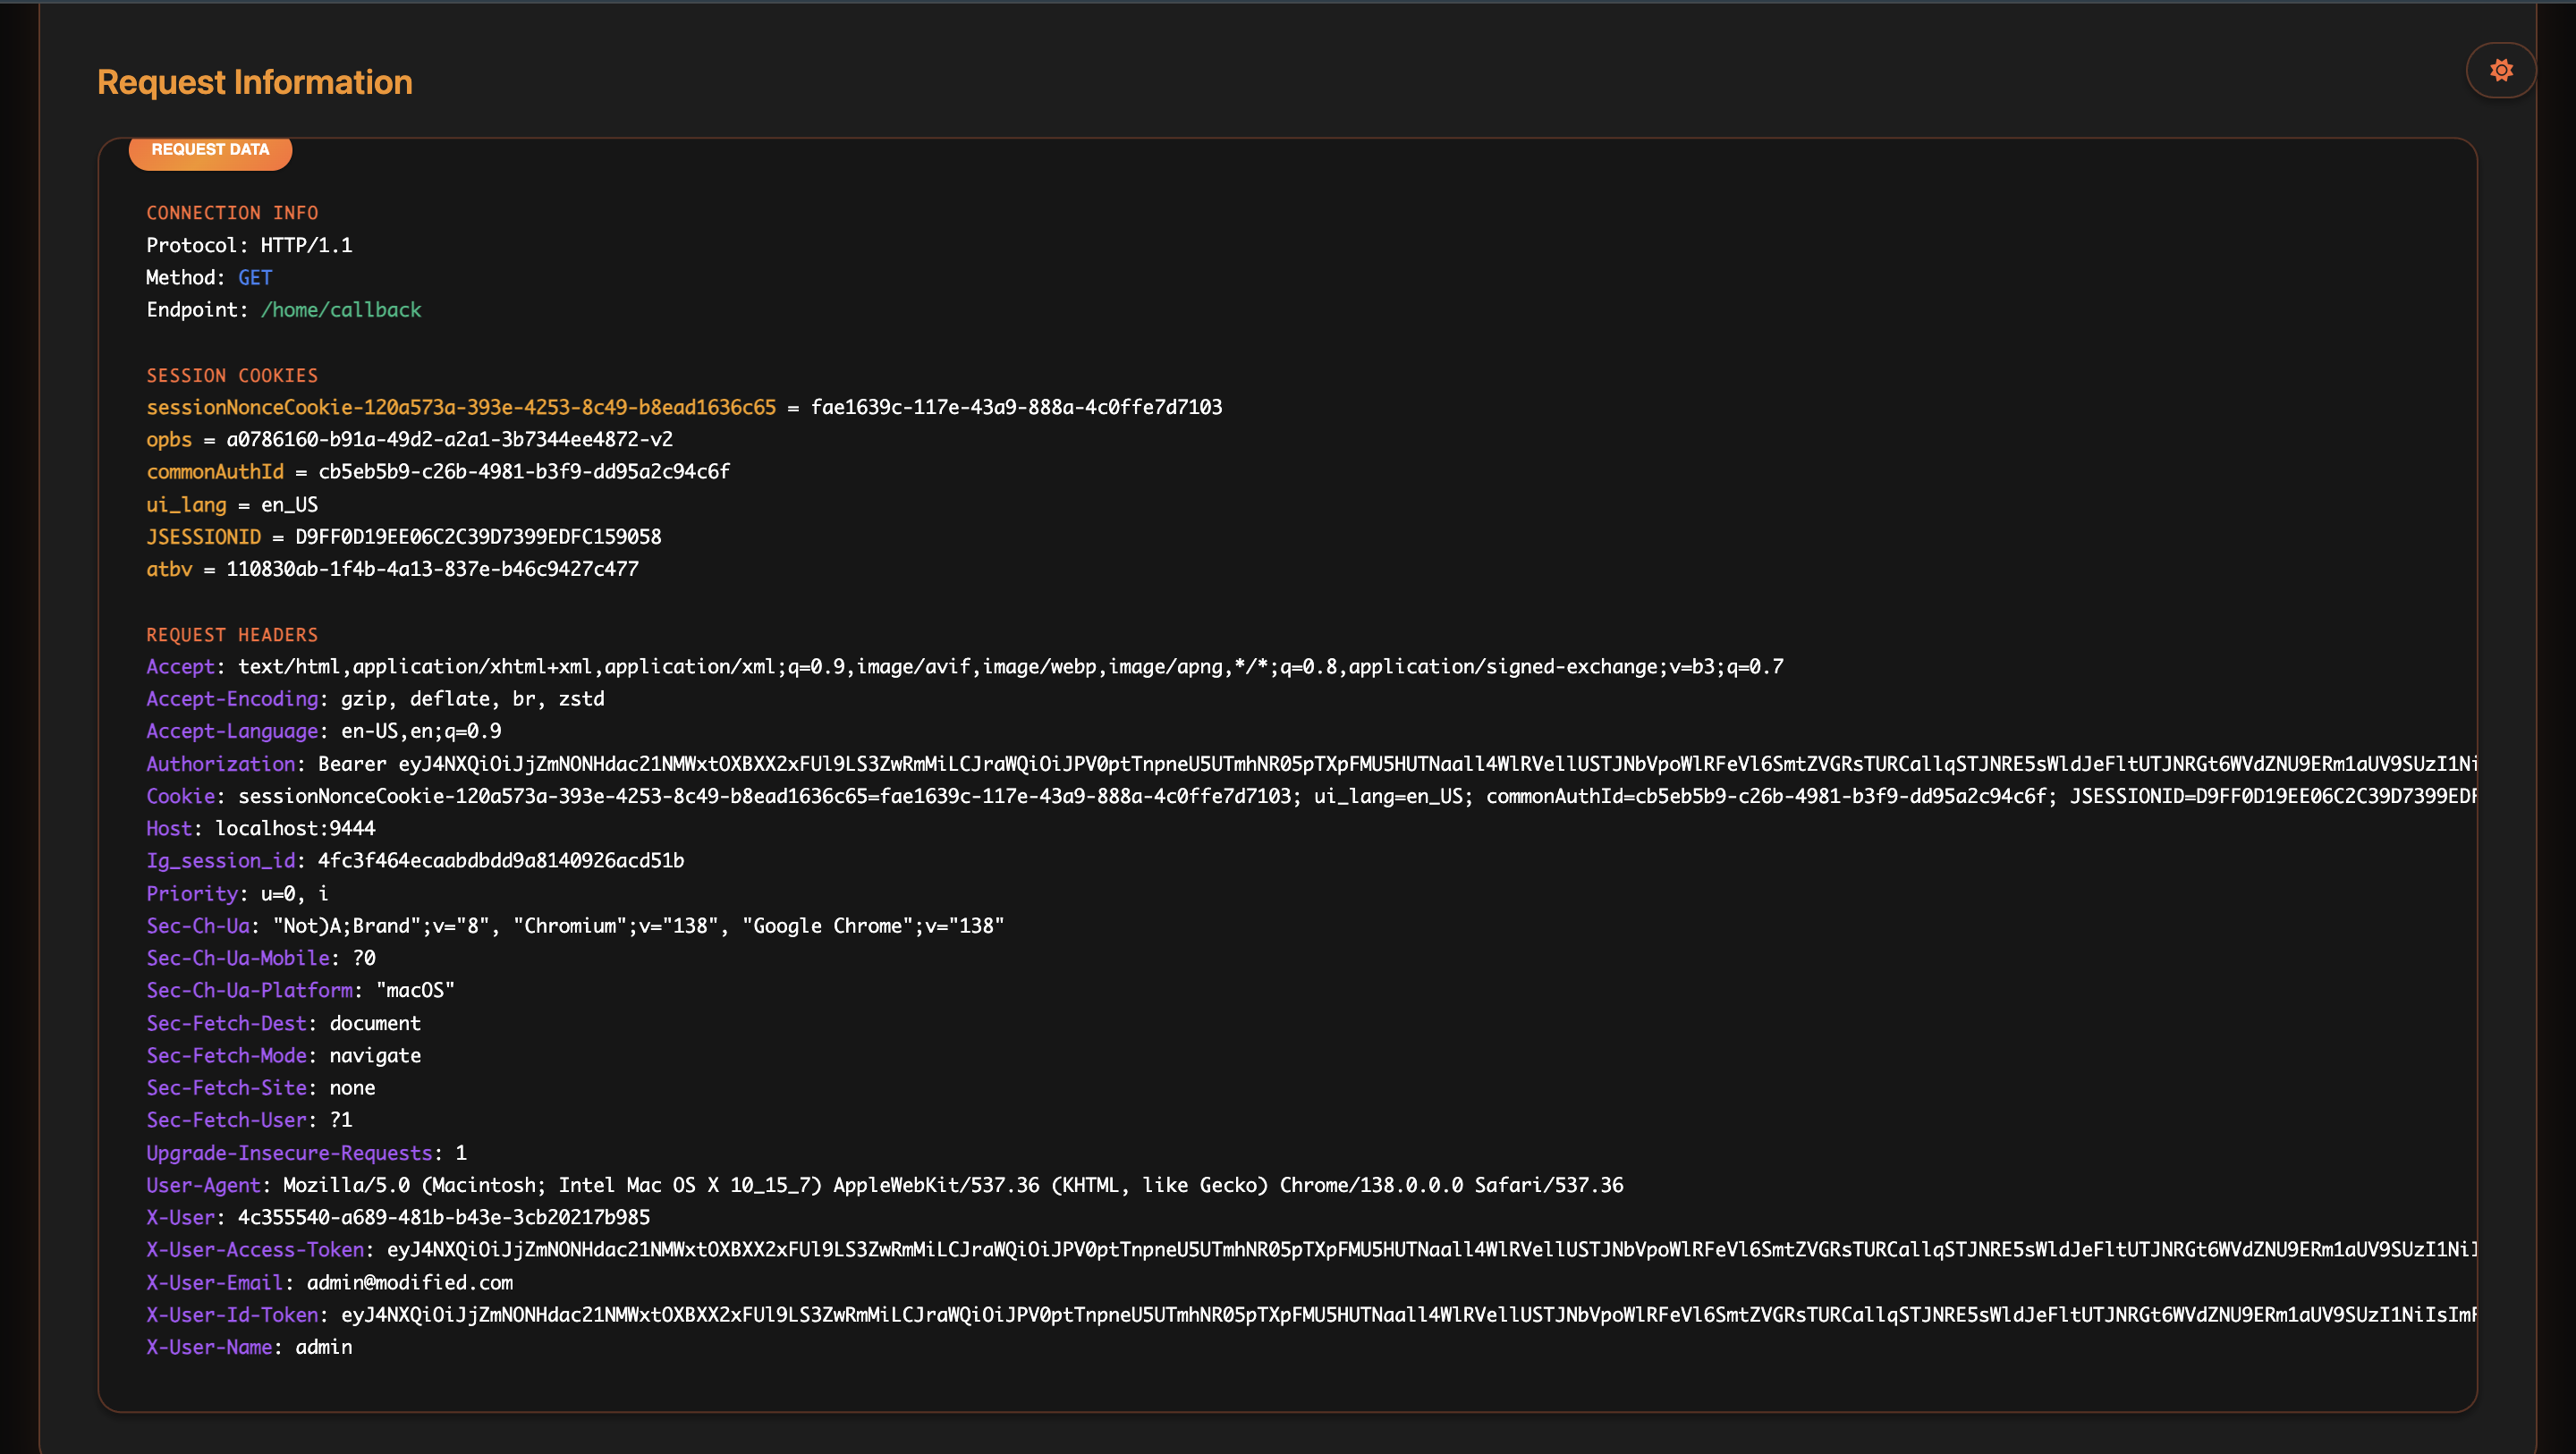
After successfully logging in, Oathkeeper forwards identity headers (for example X-User, X-User-Name, X-User-Email) to your application.
Advanced configurations
You can enhance the integration between WSO2 Identity Platform and Oathkeeper with the following advanced options.
Integrate a Redis server for storing sessions
By default, Oathkeeper keeps sessions in memory. While this works for single-instance deployments, using Redis as a central session store provides better performance and consistency across multiple instances.
If you have a Redis server, add the following to your config.yml configuration file to connect it.
Before you begin
In Step 3, make sure the Oathkeeper binary is built with all necessary files and libraries required for Redis support.
session_store:
  type: redis
  redis:
    addr: "127.0.0.1:6379"
    password: "<your_redis_password>"
    db: 0
    session_prefix: "session:"
    state_prefix: "state:"
    ttl: "24h"
Encrypt connections with TLS
To encrypt communication between clients and Oathkeeper, you can enable TLS. To do so, add the following to your config.yml configuration file:
Generate a self-signed TLS certificate
To create a self-signed TLS certificate for development purposes, run the following command. For production environments, always use a certificate issued by a trusted Certificate Authority (CA), such as Let's Encrypt.
Now that you’ve successfully connected WSO2 Identity Platform with Oathkeeper, you can leverage this integration to:
-
Add authentication to applications that lack native OIDC support.
-
Replace custom or insecure authentication methods.
-
Centralize and simplify authentication logic.
This setup secures dashboards, microservices, and legacy apps, improving stack security, scalability, and maintainability.