OAuth 2.0 and OIDC in React: The Authorization Code Flow with PKCE, Explained

Introduction
Every time a user clicks a "Sign In" button in your React app, it creates a small storm.
The browser jumps between URLs. Random-looking values appear in query parameters. Requests fly off to an identity server. Tokens come back. And a few seconds later, your app somehow knows exactly who the user is.
With a modern SDK like the WSO2 Identity Platform React SDK, all of that sits behind a single <SignInButton /> component. This is exactly the point of SDKs. Every time you need authentication, you shouldn't have to rebuild an entire authentication protocol.
In this article, we'll pull back the curtain and show you what's happening behind the scenes, not to bore you with facts, but to show you exactly what's happening so the next time someone asks you why your login page is safe, you'll have a much better answer than "the SDK handles it".
The flow we'll be following is Authorization Code Flow with PKCE, the OAuth 2.0 and OpenID Connect flow every React SPA needs to get right.
What is OAuth 2.0 and how is it different from OpenID Connect
We're getting a little ahead of ourselves. Before we get into the Authorization Code Flow and PKCE, let's start with the basics: What is OAuth 2.0, and what is OpenID Connect?
These two terms are often mentioned together and sometimes even used interchangeably. But while they're closely related, they solve two very different problems.
Let's clear this up once and for all: OAuth 2.0 is about authorization, while OpenID Connect is about authentication.
The next two points will make that distinction a little easier to see.
-
OAuth 2.0 is an authorization framework. It answers the question: "Can this application access this resource on behalf of this user?" The output of an OAuth 2.0 flow is an access token: a credential your app attaches to API requests to prove that the user has the permission to access this resource and perform the requested action.
-
OpenID Connect (OIDC) is an identity layer built on top of OAuth 2.0. It answers a different question: "Who is this user?" OIDC standardizes how an app requests and verifies a user's identity, and its output is an ID token: a token containing claims like the user's name, email, and a unique subject identifier.
Your React application needs both. You use OIDC to establish who's logged in (populate a user profile, decide what to render) and OAuth 2.0 access tokens to make authenticated calls to your backend APIs on that user's behalf.
To summarize,
| OAuth 2.0 | OpenID Connect | |
|---|---|---|
| Answers | Can this app access this resource on behalf of this user? | Who is this user? |
| Concern | Authorization | Authentication |
| Primary output | Access token | ID token |
| Consumed by | Your API, as a credential | Your React app, to establish identity |
What is the Authorization Code flow?
The OAuth 2.0 specification defines several "flows", known formally as grant types, for obtaining tokens.
A grant type defines how your application communicates with the token issuer, such as an identity server, to get those tokens.
We won't go deep into every grant type defined in the OAuth 2.0 specification. Instead, we'll focus on the Authorization Code Flow, the subject of this article. Along the way, you'll also get a sense of how some older, less secure grant types worked and how the Authorization Code Flow addresses many of their shortcomings.
Before we get into the nitty-gritty, let's first look at how the Authorization Code grant works at a high level.
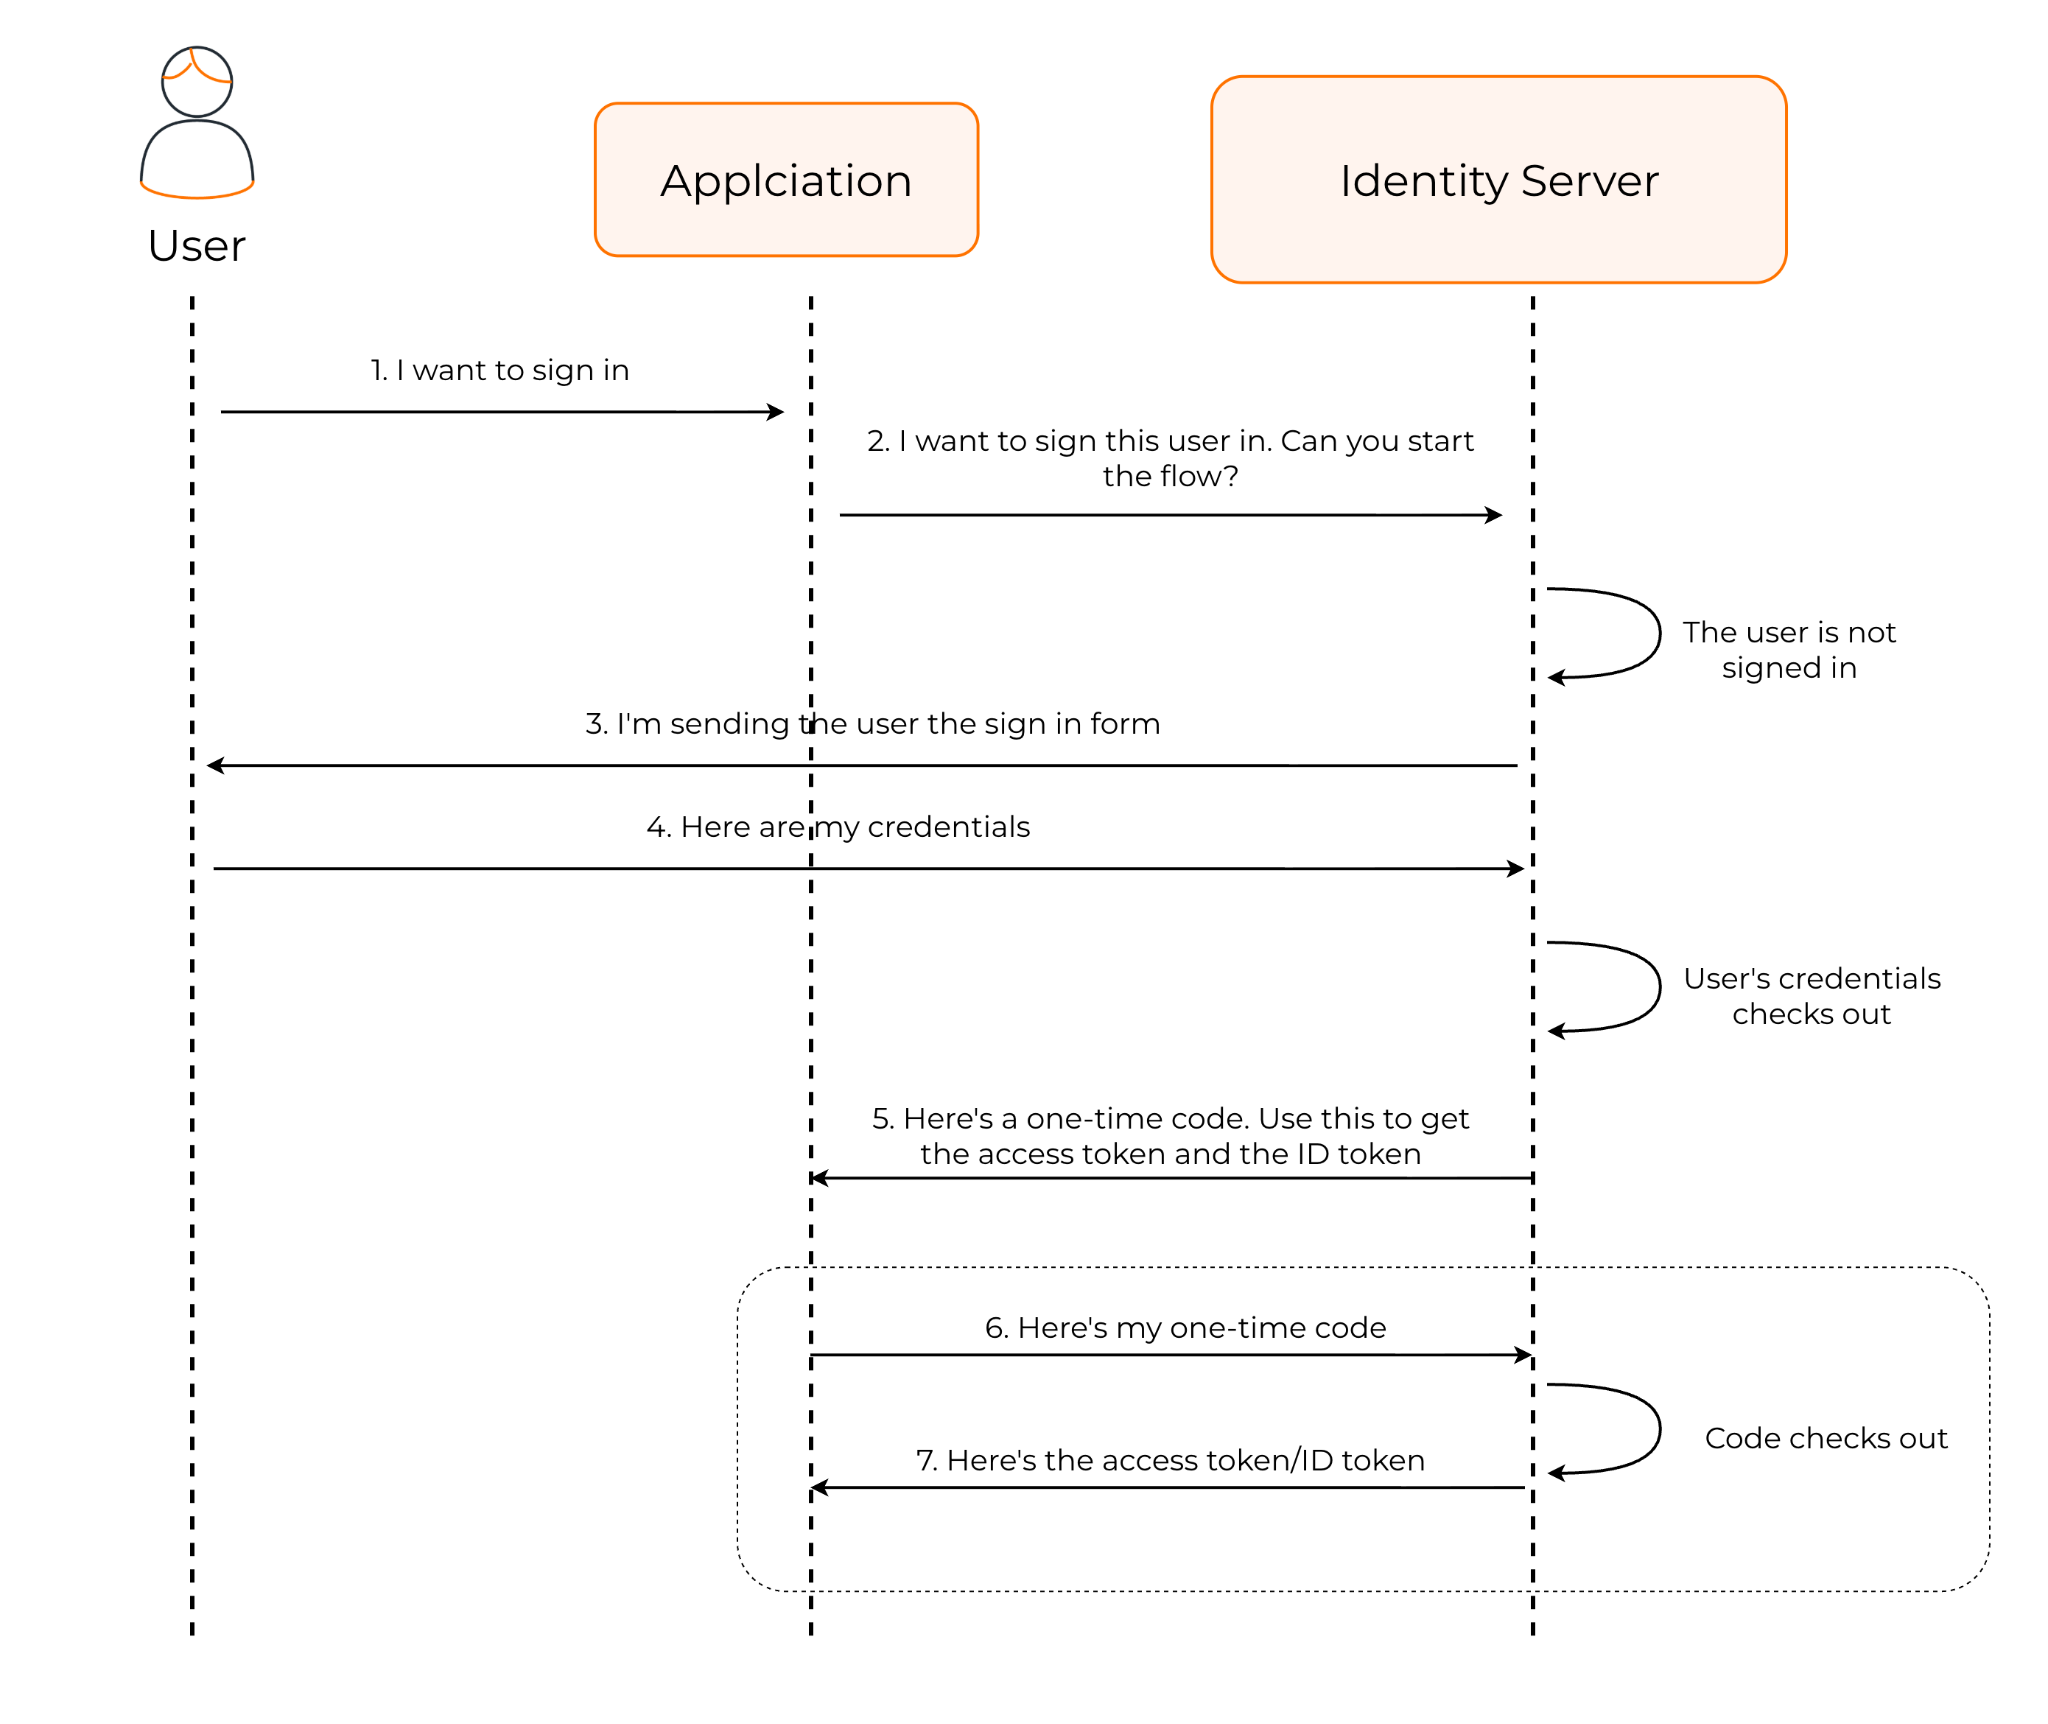
One thing you may have noticed in the flow diagram above is that the Authorization Code Flow doesn't send the access token or ID token directly to the application.
Instead, it first returns a short-lived authorization code, which the application then exchanges for tokens.
Why the two step flow?
When a user clicks sign in, the authorization request happens through the user's browser. If the access token returns from the browser-based flow, it could be exposed in the URL and potentially end up in places such as the browser history or referrer data.
A legacy grant type called the Implicit grant worked this way. Instead of returning an authorization code, it returned the access token directly through the browser redirect.
The Authorization Code Flow avoids that. Rather than sending the token through the redirect, the authorization server returns a short-lived, single-use authorization code. The application then exchanges that code for the actual tokens in a separate request.
How is this more secure?
The key difference is how the two steps travel.
The authorization code is returned through the browser redirect, where values can appear in the URL. The token exchange, however, is a separate HTTP request to the token endpoint. The tokens come back in the response body, not in the browser's address bar.
That means the access token and ID token stay out of the redirect URL, browser history, and referrer data. The only thing exposed on that first browser-facing leg is the short-lived authorization code.
But..if that code travels through the browser, what stops someone from stealing it and exchanging it for the tokens? If that was your first thought, you're already one step ahead. For browser-based apps like React SPAs, the Authorization Code Flow alone isn't quite enough. It needs one more piece: PKCE.
The public client problem, and how PKCE solves it
For conventional applications, the Authorization Grant Flow alone can be enough on its own. These applications can safely hold a secret, which the authorization server verifies along with the authorization code before issuing tokens.
But, anything shipped in a React app's JavaScript bundle is visible to anyone who opens their browser's devtools. If you embedded a client secret in your frontend code, it wouldn't be a secret anymore. This is why single-page applications are called public clients: clients that, by design, cannot hold a confidential secret.
Without a secret, the Authorization Code Flow has a gap: if an attacker somehow got hold of your app's authorization code they could exchange it for tokens themselves.
This is exactly the gap PKCE (Proof Key for Code Exchange, defined in RFC 7636, pronounced "pixy") closes. Let's look at how PKCE solves this problem.
-
Before sending the authorization request, your app generates a random secret in memory called the code verifier.
-
It then derives a code challenge from that verifier by hashing it with SHA-256 and Base64URL-encoding the result. Only the challenge is sent with the authorization request. The verifier stays with the app.
-
When the app later exchanges the authorization code for tokens, it sends the original code verifier along with the code.
-
The authorization server applies the same transformation to the verifier and compares the result with the code challenge from the original request. If they don't match, the token exchange is rejected.
Because the code verifier never leaves your app until that final exchange, a stolen authorization code is useless to an attacker who doesn't also have the verifier. That four-step handshake is the entire React PKCE flow, and it's what lets a public client prove its identity without ever holding a secret.
PKCE was originally introduced to protect public clients like SPAs. The OAuth 2.1 draft, still an Internet-Draft and not yet a finalized standard, proposes to go further and require PKCE for all clients using the Authorization Code Flow, adding an extra layer of protection even when a client secret is available.
That, though, is a discussion for another day.
The Authorization Code Flow with PKCE, step by step
By now, you should have a good idea of how the Authorization Code Flow with PKCE works at a high level. In this section, we'll take it one step further and look at what those requests actually look like.
Before we jump into the more detailed flow diagram, this time with the user's browser in the picture, let's quickly go over a few key pieces of information the application and identity server rely on.
-
client_id- The identity server uses this to recognize your application. -
redirect_uri- The URL the identity server sends the browser back to after authorization is complete. This is often called the callback URL. -
state- A random value your app creates before the flow starts. When the identity server sends it back, your app checks that it's the same value it started with. It protects against cross-site request forgery: without it, an attacker could trick a user into completing someone else's login flow. -
nonce- Another random value, but this one belongs to OpenID Connect. If the application sends a nonce with the authentication request, the identity server includes that same value in the ID token. The application can then check that the ID token belongs to the login attempt it started.
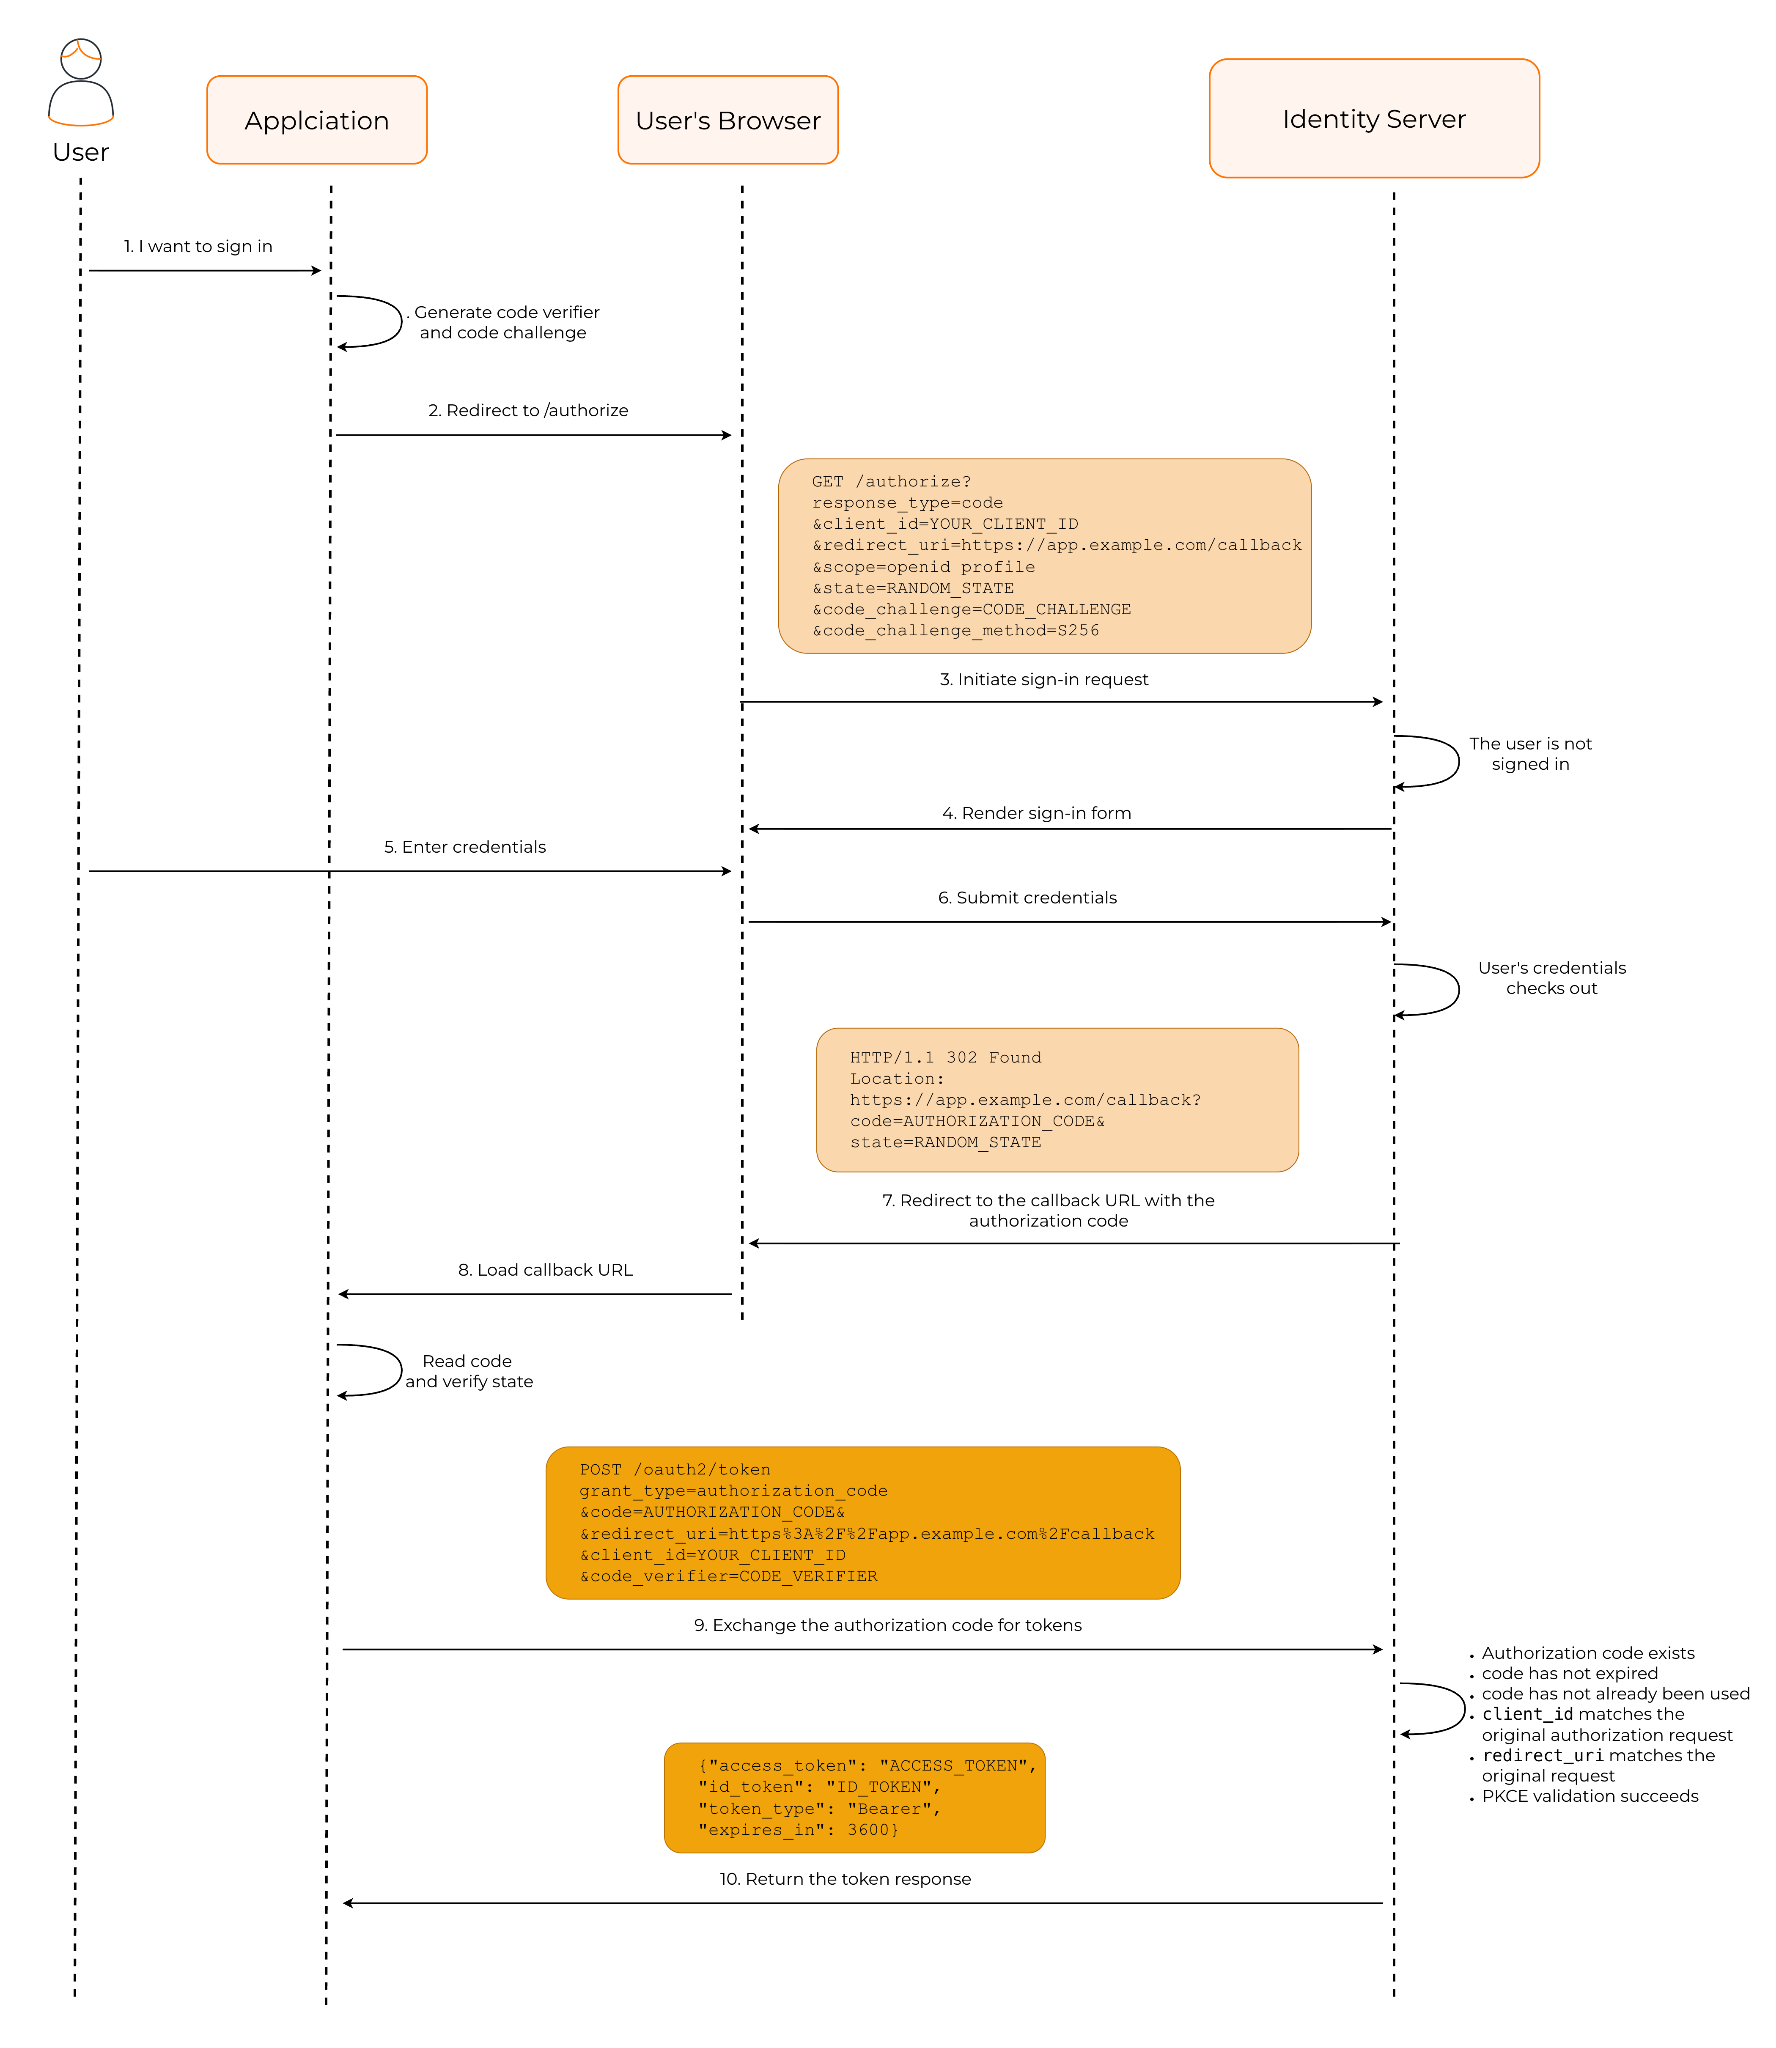
Let's slow things down and dissect the two most important requests in this flow.
First, the browser talks to the identity server to request an authorization code. Later, the application talks to the identity server again to exchange that code for tokens.
I want an authorization code
The user's browser, called the user agent in OAuth, sends this request to the identity server to formally kick off the flow.
GET /authorize?
  response_type=code
  &client_id=YOUR_CLIENT_ID
  &redirect_uri=https://app.example.com/callback
  &scope=openid profile
  &state=RANDOM_STATE
  &code_challenge=CODE_CHALLENGE
  &code_challenge_method=S256
Let's map the concepts you already know to the actual parameter names in this request:
-
response_type=code- Tells the identity server that the application wants an authorization code back. -
scope- Describes the permissions the application is requesting. Including theopenidscope turns the OAuth 2.0 request into an OpenID Connect authentication request. -
code_challenge- The PKCE challenge derived from the code verifier and sent with the authorization request. -
code_challenge_method=S256- Tells the identity server that the challenge was created using SHA-256.
In plain terms, this request says, Here's who I am, I want an authorization code, and when you're done, send it back to this URL.
I want my tokens
Once the browser lands back on your redirect URI with the authorization code, the browser's part is done. The application takes over from here and calls the identity server directly, not through the browser, to exchange that code for tokens.
POST /oauth2/token
Content-Type: application/x-www-form-urlencoded

grant_type=authorization_code&code=AUTHORIZATION_CODE&redirect_uri=https://app.example.com/callback&client_id=YOUR_CLIENT_ID&code_verifier=CODE_VERIFIER
-
grant_type- Tells the identity server which OAuth grant the application is using to request tokens. -
code_verifier- The original random PKCE value the application created before starting the flow. It sends this now so the identity server can verify that the same app that started the authorization request is the one exchanging the code for tokens.
If the code, the verifier, and everything else on the identity server's checklist line up, the response carries the tokens your application has been waiting for:
{
  "access_token": "ACCESS_TOKEN",
  "id_token": "ID_TOKEN",
  "token_type": "Bearer",
  "expires_in": 3600
}
token_type- Tells the application how the access token should be used when making API requests. A value ofBearermeans the app sends the token as a bearer token, typically in the Authorization header:Authorization: Bearer ACCESS_TOKEN.
See the flow in your own React app
If you've followed the Mastering React Auth tutorial, you already have a React app wired up with <AsgardeoProvider /> and <SignInButton /> from the @asgardeo/react OIDC React client. That's the entire OAuth2 React setup, in two components.
Let's use that same setup to watch this flow happen in your own application.
Open your app, open the browser devtools, switch to the Network tab, and filter requests by typing authorize. Now click the sign-in button.
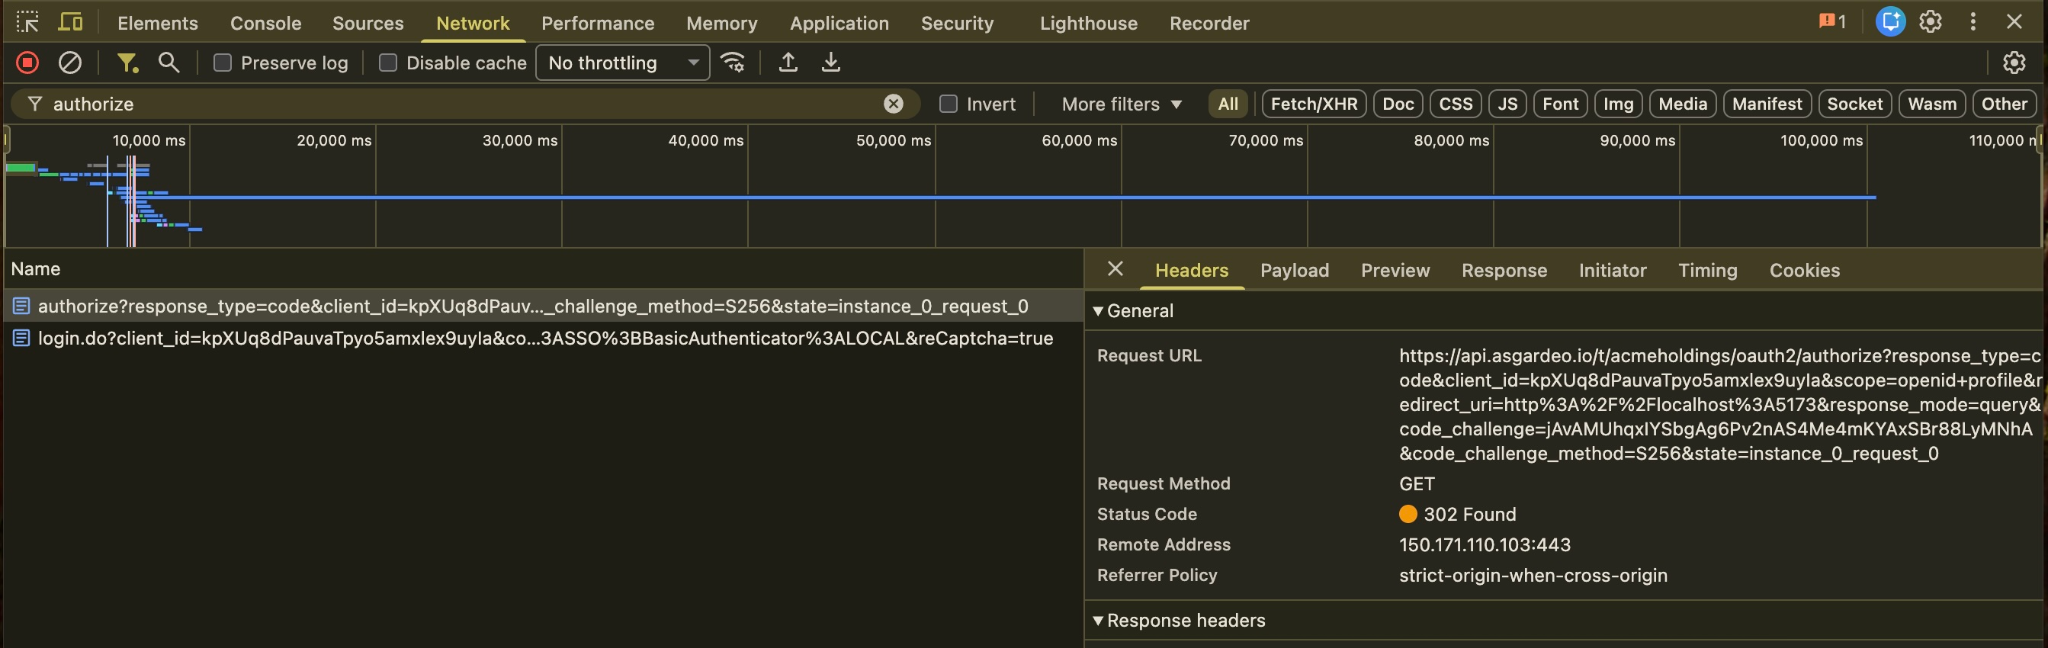
Switching to the Payload tab breaks that same request down into its individual query string parameters, which is easier to read than parsing the raw URL:
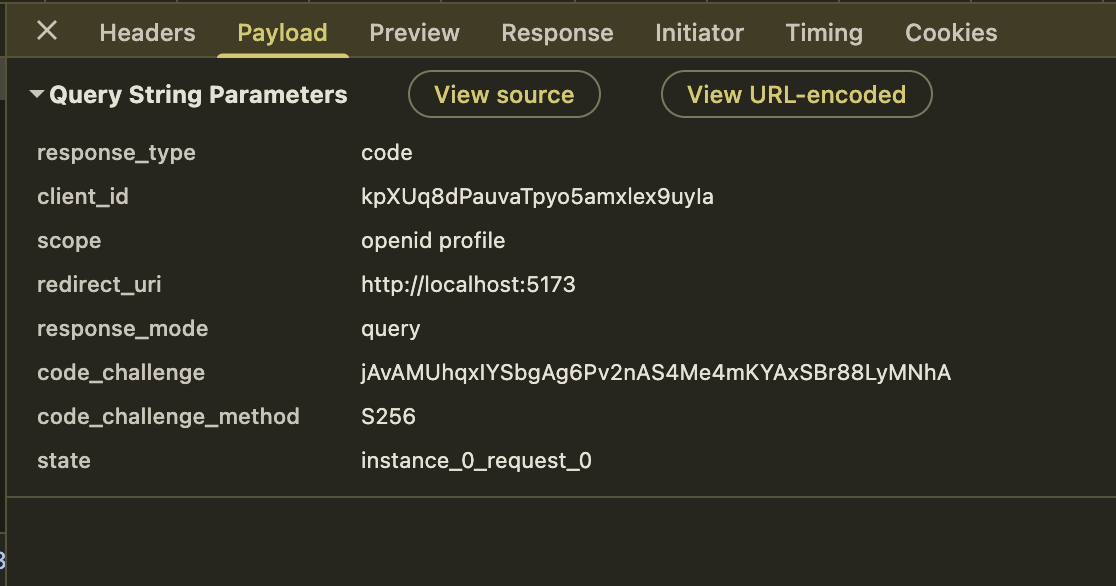
You'll find every parameter we discussed appear in the request: response_type=code, scope=openid profile, redirect_uri, code_challenge_method=S256, and a code_challenge value. The SDK generated the code verifier, derived this challenge, and attached it here without you having to do any of the work.
After you complete the login form, filter the network tab by typing token instead. Click the request that fired right after you click sign in and switch to its Payload tab.
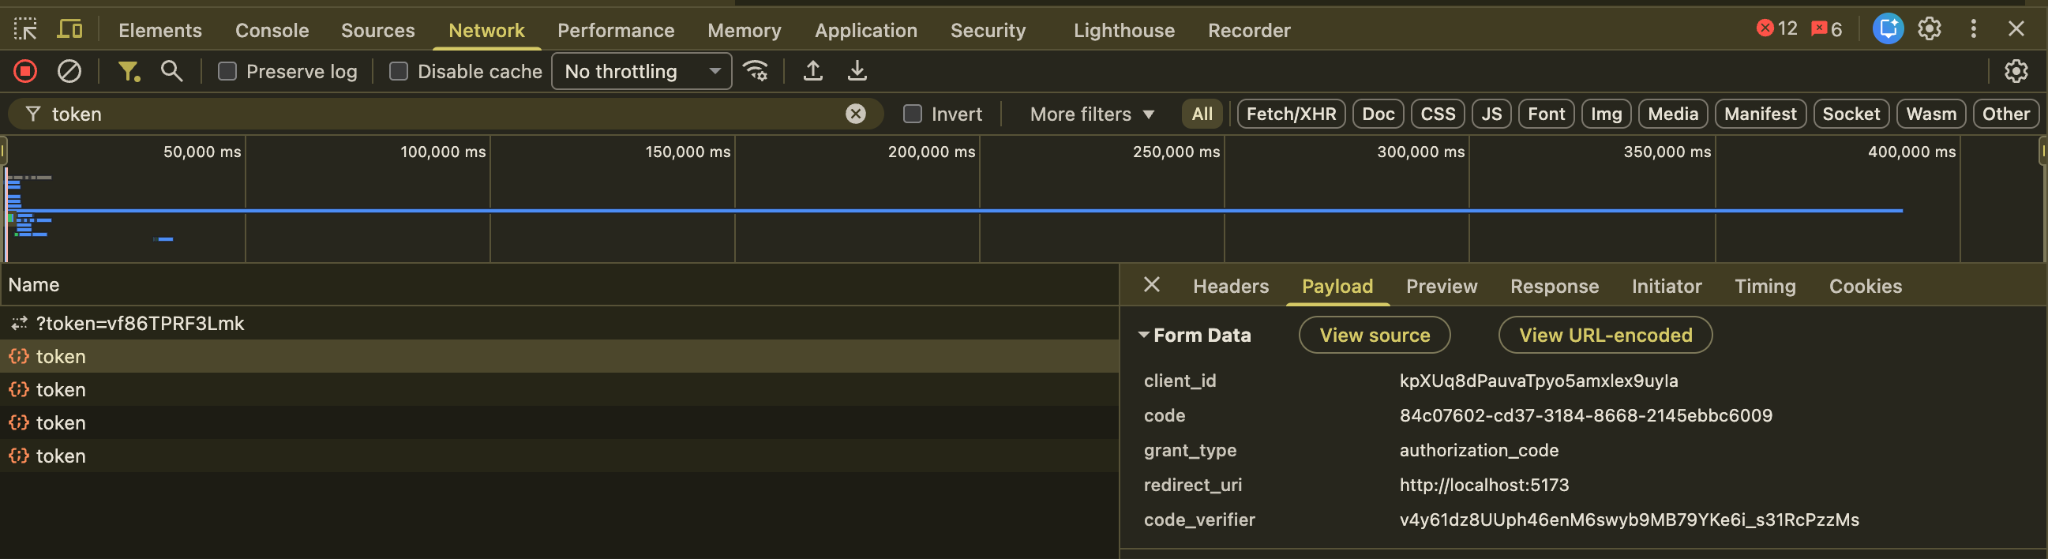
There it is: grant_type=authorization_code, the code from the redirect, and, critically, a code_verifier value, proving this is the same app instance that started the login.
Switch over to the Response tab on that same request, and you'll find what the application was waiting for:
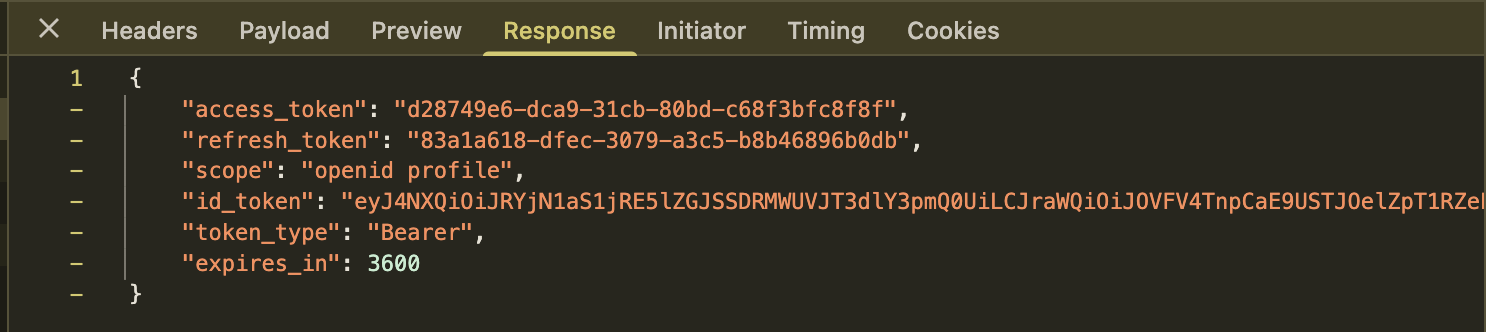
The access token and ID token come back here, in the response body.
- You may see more than one token request in the filtered list. The SDK reuses the same token endpoint later on to silently renew tokens using the refresh token grant, which we will cover elsewhere.
- You'll also notice a
refresh_tokenin the response, which is exactly what the SDK uses for the silent renewal mentioned above.
Scopes, claims and the userinfo endpoint
We briefly touched on scopes earlier, but they deserve a little more attention because they show up in almost every OAuth and OpenID Connect request.
At a high level, a scope is a way for the client to say:
"This is the access I'm asking for."
For example:
scope=openid profile email
Each value adds something to the request.
-
openidtells the authorization server that this is an OpenID Connect request, not just a plain OAuth 2.0 authorization request. -
profileandemailask for access to related information about the user.
In OpenID Connect, pieces of information about the user are represented as claims.
A claim is a name-value pair that describes something about the user or the authentication event. For example:
{
  "name": "Alex",
  "email": "[email protected]"
}
Here, name and email are claims.
Depending on the provider and how it is configured, requested claims may be returned in the ID token or made available through the UserInfo endpoint, an OpenID Connect endpoint your application can call when it wants additional information about the signed-in user.
The application calls it using the access token it already has:
GET /userinfo HTTP/1.1
Host: identity.example.com
Authorization: Bearer ACCESS_TOKEN
The provider can then return claims associated with that user:
{
  "sub": "248289761001",
  "name": "Alex",
  "email": "[email protected]"
}
So scopes describe what the client is asking for, while claims are the actual pieces of information returned about the user.
Validating tokens correctly, and the shortcuts that break
By the time your React application gets an ID token back, the job is not done. In order for the application to trust the received token, it needs answers for the following questions.
- Did this token come from the identity provider I trust?
- Was it actually issued for my application?
- Does it belong to the authentication request I started?
- Can I trust the contents inside it?
We already saw that the aud claim tells the client who the ID token was issued for.
Most of the time, it is straightforward:
{
  "aud": "react-client"
}
If your client ID is react-client, that is exactly what you expect to see.
But OpenID Connect also allows an ID token to have more than one audience:
{
  "aud": ["react-client", "another-client"],
  "azp": "react-client"
}
When that happens, another claim can appear: azp, which stands for authorized party.
azp identifies the client the token was issued to when there is more than one audience involved. So if azp is present, the client checks that it contains its own client ID.
Earlier in the authorization request, we introduced another random value called nonce. When the client sends a nonce with the OpenID Connect request, the identity provider includes that same value in the ID token. So the client can compare:
Authorization request
  nonce = abc123

ID token
  nonce = abc123
If the values match, the ID token belongs to the authentication request the client started. If they do not, the token should not be accepted.
There is one more part of ID token validation we have not really talked about yet: the signature.
An ID token is normally represented as a JSON Web Token, or JWT. We do not need to go deep into JWTs here, but in short, the identity provider signs the ID token using a private key. The client can then verify that signature using the corresponding public key.
A valid signature is not the end of validation
This is where one of the easiest shortcuts appears.
Suppose the token has:
- ✓ valid signature
- ✓ not expired
- ✗ wrong audience
That token still needs to be rejected. Claims such as iss, aud, exp, and nonce answer different questions about whether that token is acceptable for this client and this login.
So far, we have been talking about ID tokens because the OIDC client consumes them. An access token could be an opaque value:
2YotnFZFEjr1zCsicMWpAA
There may be nothing useful for your React application to decode. The API may validate that token using a mechanism such as token introspection, depending on how the authorization server is configured.
In a production React application, a well-tested OIDC client normally handles ID token validation for you, while the API independently validates the access token it receives. The SDK removes a lot of protocol code from your application. The validation rules underneath it still remain the same.
Conclusion
There you have it.
The Authorization Code Flow with PKCE looks complicated at first because a lot of small pieces move together: redirects, authorization codes, state, nonce, PKCE values, and finally the tokens themselves.
But each piece has a specific job.
The Authorization Code Flow keeps tokens out of the browser-facing authorization response.
PKCE makes sure that stealing the authorization code alone is not enough to exchange it for tokens.
OpenID Connect adds the identity layer on top of OAuth 2.0, giving the client an ID token and a standard way to work with user claims.
And once the tokens arrive, validation makes sure they came from the issuer you trust, were intended for the right client or API, and belong to the flow you actually started.
In a real React application, you normally do not want to implement all of this yourself. A well-tested OIDC SDK handles most of the protocol work for you.
But understanding what sits underneath the SDK changes how you debug authentication problems and how you reason about the security of the flow.
A <SignInButton /> may be all you write in React.
Behind it, there is a carefully coordinated protocol making sure the right user gets the right tokens, and that those tokens are only accepted where they are supposed to be.

