React Authentication: The Complete Guide

Most React authentication tutorials open by installing a package. That's the wrong first move, because the install command you run is the last decision in the chain, not the first. Before it you have to decide something more basic: who your app trusts to vouch for a user's identity, where the proof of that gets stored once you have it, what the browser is allowed to know, and which server actually enforces the answer. Later sections put names to these decisions, OAuth 2.0, OpenID Connect, PKCE, but the decisions themselves come first, and you can reason about all four before you know a single one of those names.
This guide is for React developers who want to understand that chain rather than copy it. We'll cover what frontend authentication actually means inside a single-page app, why React authentication differs from server-rendered login, the four real ways to get it, the sequence OAuth 2.0 and OpenID Connect now require, where tokens should live, and how to wire a working sign-in.
What "authentication" actually means in a React app
Authentication is the process of proving who a user is. In a React application, that proof never happens in React, because React is a frontend library that runs entirely in the user's browser. The browser gets handed off to whoever is going to vouch for the user, call that party the identity provider, which might sit alongside your own backend or might be a separate identity service you don't run at all. That party checks the user's identity and hands back proof of it, calls that proof the credential, and only then does control return to your React code, which carries that credential to an API that decides what the user may do.
That distinction is the whole subject. Your React app bundle ships to the user's device, where they can read it, modify it, and run it under a debugger, so anything it contains is public and anything it decides can be overridden. The React app is not a security boundary. React user authentication is a client that requests proof from one server and presents it to another, and the honest way to read every code sample below is as user experience wrapped around a decision made somewhere else.
That framing also explains a class of bug that looks like a security hole and isn't. If you hide an admin button behind a role check and someone opens dev tools to un-hide it, nothing has been breached. The breach happens only if the API behind that button also trusts the client. That's worth pinning down precisely, since authentication and authorization get used almost interchangeably and they are not the same thing in a React app.
Authentication vs authorization in one table
| Authentication | Authorization | |
|---|---|---|
| Question answered | Who is this user? | What may this user do? |
| Produces | Proof of who someone is | A yes or no on one action |
| Standard involved | OpenID Connect | OAuth 2.0 scopes, plus your own policy |
| Where it runs | Identity provider | Resource server, your API |
| Safe to do in React? | No, delegate it | No, mirror it for UX only |
OpenID Connect answers the first question, OAuth 2.0 answers the second, and neither name needs more explanation yet. The row that matters is the last one. Both belong on a server, and both get mirrored into your React code so the interface makes sense.
What the browser can and cannot be trusted with
The browser protects you in one direction only, and knowing which direction explains most of this guide. It does stop other websites from reading your page's data. What it cannot do is protect your page from code running inside your page. If an attacker gets a script onto your site, through a comment field, a dependency, or an ad, the browser treats that script as part of your page, so it can read anything your own code can read. That attack is called cross-site scripting, usually shortened to XSS.
Other sites, kept out but your own page, wide open. When you reach the argument later about where to keep a login token, that gap is the only reason the argument exists.
One consequence lands right away. A server-side application usually proves its identity to a login service with a password that belongs to the application itself rather than to any user, and that password stays safe because it never leaves the server. A React app cannot use one, because shipping it to the browser publishes it to everyone who loads your site. OAuth 2.0 has a name for applications in that position, public clients, and every browser app is one. It is also why the sign-in sequence in the next section carries an extra step that server-side apps skip. That step exists to replace the password your app cannot keep.
The four options, and when each is wrong
Here's the gap in most of the guides on this topic: they teach one path. In practice there are four, and picking the wrong one costs more than a bad afternoon of coding. Each verdict below includes the case where it's the wrong answer, because that's the part vendors leave out.
-
Roll your own: You own a users table, hash passwords yourself, and issue your own sessions or tokens. This is fine for a prototype, a hackathon, or an internal tool with 12 users behind a VPN. Avoid it in production. Without realizing it, you end up designing, implementing, running, and maintaining an identity provider by yourself. The list of things you now maintain is longer than it looks: password reset, email verification, session revocation, account lockout, credential stuffing defense, audit logging, and eventually someone asking for single sign-on.
-
A library: A React authentication library such as Auth.js or Better Auth runs inside your own application, with a backend component that handles the mechanics, without introducing a separate service. You keep your data and your deployment story stays simple. While this is lighter than rolling your own, you're still responsible for that backend component's updates and its security posture. It's the wrong answer when you need federation to enterprise identity providers, when compliance asks for an audit trail you didn't build, or when a second application needs to share the same login and the library only ever ran inside the first one.
-
A self-hosted identity provider: Open source software such as WSO2 Identity Server and Keycloak, or their proprietary equivalents, gives you a full identity provider that you run yourself, speaking the same standards as any commercial service. You keep data residency and you can deploy anywhere, including networks with no internet access. Compared to the previous two options, you're still running and maintaining it, but you get more support from maintainers and vendors than a library gives you, especially around scaling, performance, compliance, and deployment artifacts. It's the wrong answer when nobody on your team wants to own upgrades, certificate rotation, and a pager alert at three in the morning, and it's an expensive answer if you pick it for a five-person side project.
-
A hosted identity service (IDaaS): A third party runs the identity provider and delivers it to you as a service. Providers such as WSO2 Identity Platform and Auth0 own the installing, the patching, the scaling, and the on-call rotation, and none of it is yours. That makes this the most straightforward of the four and by a distance the fastest to a working login, which is why so many teams start here and why it is usually the right place to start. What you give up is ownership. Identity runs on somebody else's infrastructure rather than inside yours, and you pay by usage rather than for servers, so the bill tracks how well your product is doing. It's the wrong answer when identity has to live inside your own infrastructure, whether for data residency, for a network with no route to the internet, or for a regulator who wants to know exactly where the data sits, and it's the wrong answer when usage-based pricing at your scale costs more than operating it yourself would.
Decision table: control, effort, cost at scale, compliance
| Roll your own | Library | Self-hosted provider | IDaaS | |
|---|---|---|---|---|
| Control over data | Total | Total | Total | Provider's terms |
| Time to first login | Days to weeks | Days to weeks | Hours to days | Hours to days |
| Ongoing effort | Highest, forever | Low | Moderate, ops-shaped | Lowest |
| Cost shape | Staff time | Staff time | Infrastructure plus staff time | Per active user/capabilities |
| Federation and SSO | Build it | Sometimes | Yes | Yes |
| Air-gapped deployment | Possible | Possible | Yes | No |
| Standards conformance | Yours to prove | Usually | Yes | Yes |
The build-versus-buy tipping point
The tipping point isn't user count, which is the metric everyone reaches for first. It's the arrival of the second requirement that isn't login. One application with email and password is a weekend. The same application plus "our enterprise customer wants SAML", plus "security wants MFA on admin accounts", plus "legal wants to know who accessed what" is a quarter of engineering time you didn't plan for, and it recurs.
So the useful question is not "can we build this?" It's "do we want to be maintaining an identity provider in three years?" If the honest answer is no, choose a provider now, while migrating is still cheap.
The standard flow: Authorization Code with PKCE
Before naming the exact steps, it's worth stopping to say what OAuth 2.0 and OpenID Connect actually are, since you met their names earlier and everything below assumes you know what they cover.
OAuth 2.0 solves a narrow problem: how does one application get permission to act on a user's behalf against a second service, without the user ever handing that first application their password. As an example, you've used this yourself every time an app showed you a "Continue with Google" screen that then listed exactly what it wanted access to. You approve it at Google, not at the app, and Google hands the app a limited pass rather than your actual Google password. That limited pass is a token, and OAuth 2.0 is the rulebook for how an app requests one, how the user approves it, and how the app uses it afterward.
OpenID Connect is built directly on top of that same mechanism, and it answers a different question. OAuth 2.0 asks "can this app do this one thing for the user." OpenID Connect asks "who is this user, at all," and it answers that by adding one more thing to what comes back: a signed statement of identity, called an ID token, alongside the permission token OAuth 2.0 already provides. In other words, OAuth 2.0 gets your app permission, and OpenID Connect gets it a name to go with that permission, which is what lets it show a name instead of letting an anonymous visitor through.
Both standards describe their exchange as a flow, a fixed, numbered sequence of redirects and requests that your app, the browser, and the identity provider all follow in the same order. The word sounds abstract, but the reason it exists is concrete. If every login service invented its own redirect sequence, no two of them could be trusted the same way, and no library could support more than one. A shared flow is what lets any React app talk to any conformant identity provider using the same steps.
For a React single-page app, one flow is correct: the OAuth 2.0 authorization code flow with PKCE, defined in the OAuth2 core standard (RFC 6749) and extended for public clients like yours by Proof Key for Code Exchange by OAuth Public Clients standard - PKCE (RFC 7636). It's the same base flow that OpenID Connect layers identity on top of, so OAuth and OIDC describe the same exchange here.
Stripped down, that base flow is two redirects and one direct request. Your app sends the browser to the identity provider's sign-in page. The user proves who they are there. The identity provider sends the browser back to your app carrying a short-lived voucher, called an authorization code, rather than the actual tokens. Your app then contacts the identity provider a second time, directly rather than through the browser, hands over that code, and gets the real tokens back in exchange. A browser hop, then a direct request: that is the whole shape of it, and it is what "authorization code flow" refers to.
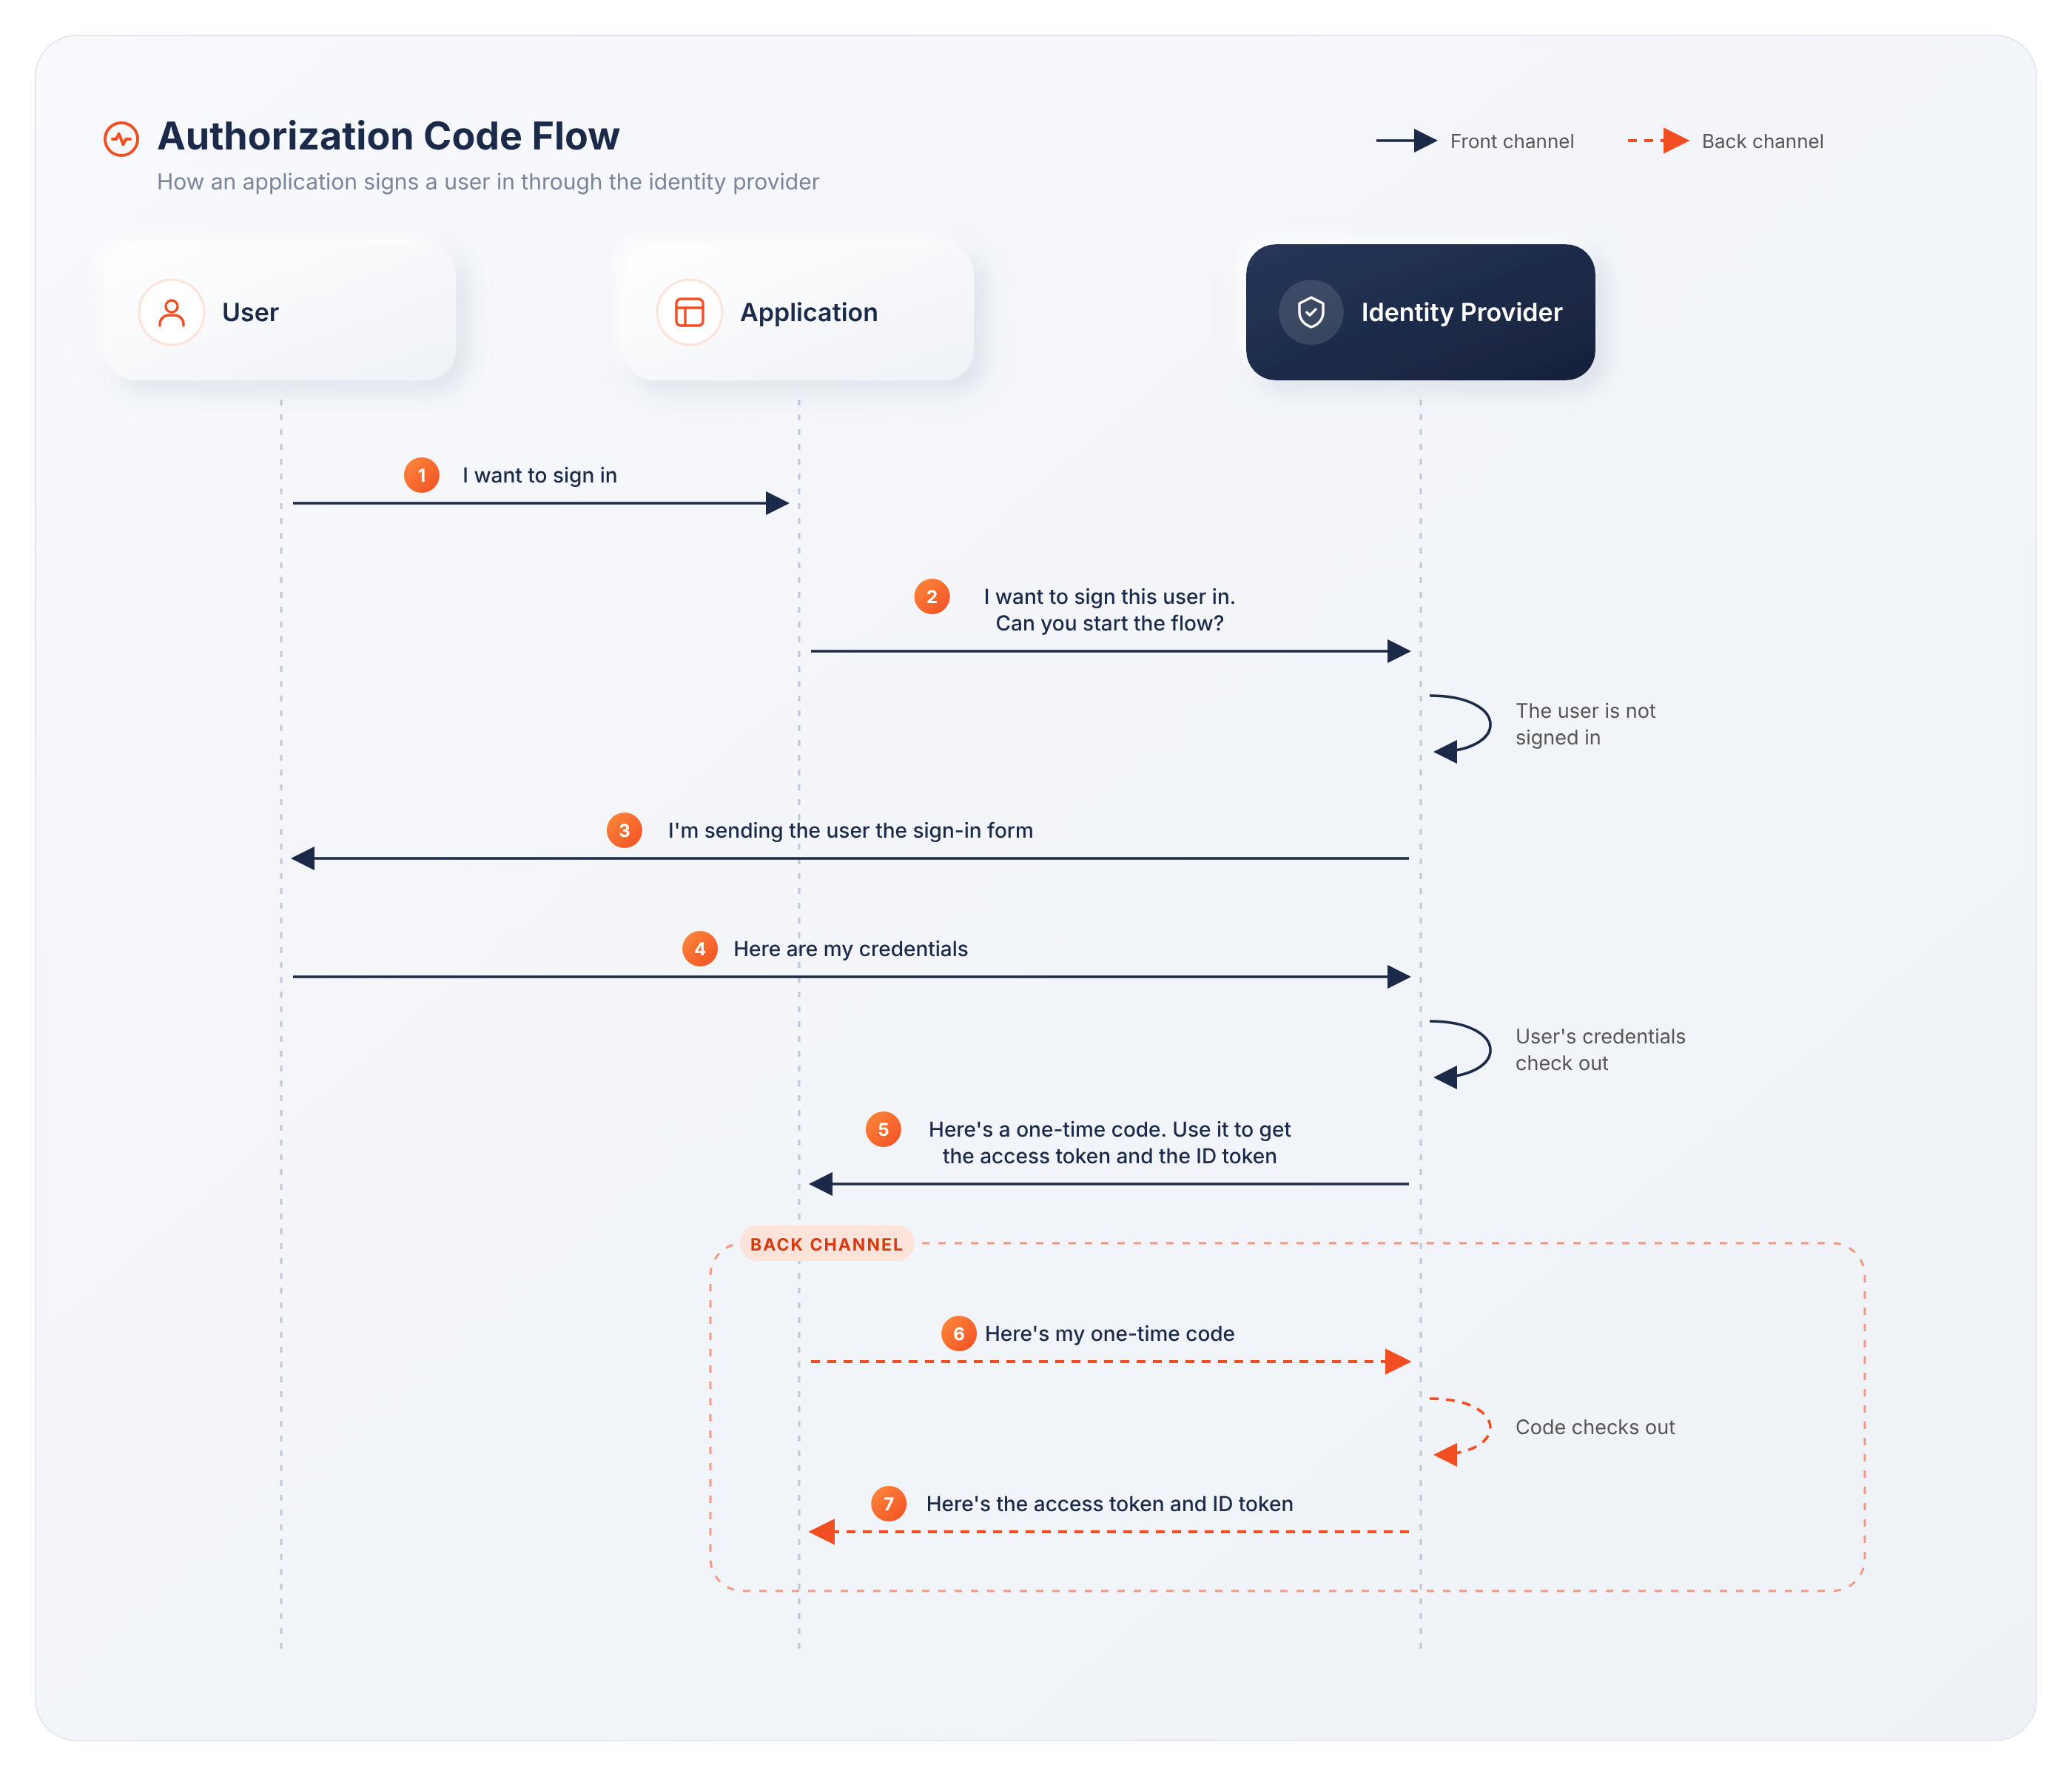
PKCE is what gets added to that shape for an application like yours that cannot hold a secret. At a high level, it replaces the password or client secret a server-side app would use with something your React app can safely generate on the spot: a value only it knows, and proof that it knows that value, checked by the identity provider before it hands over any tokens, which is what makes the flow above safe to run entirely in a browser.
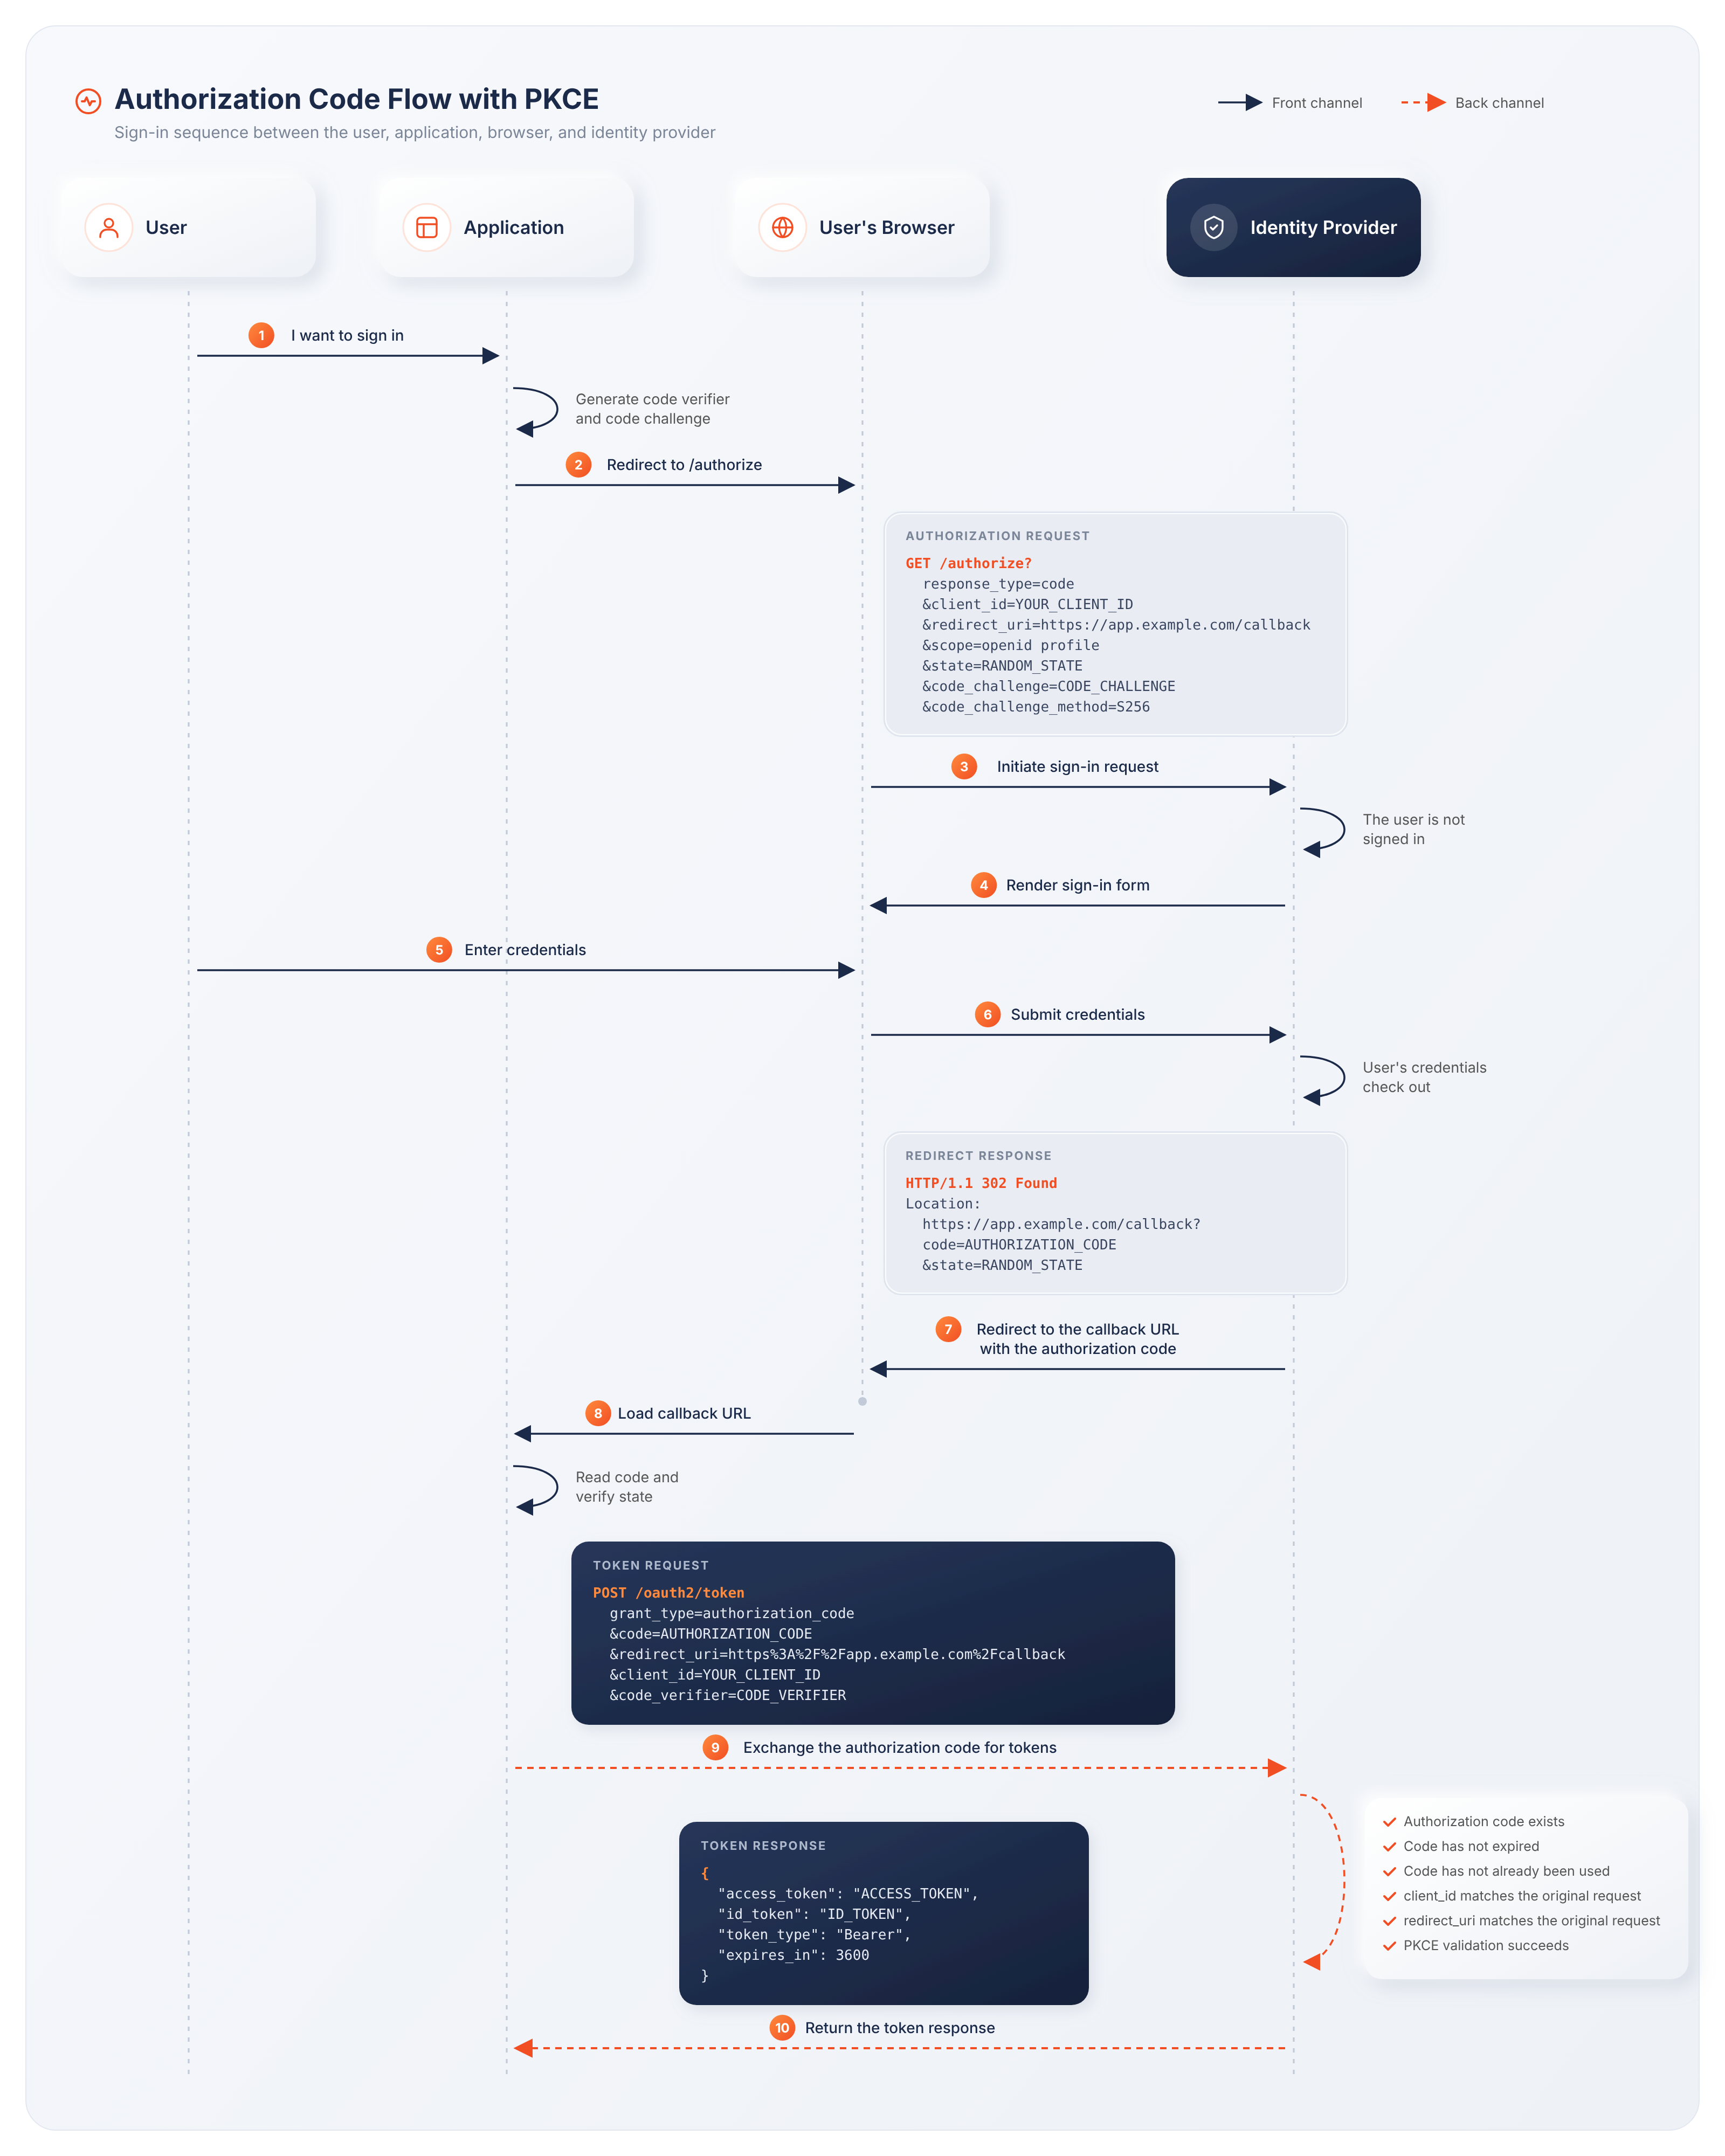
The exact step-by-step mechanics of this exchange, including why the proof travels over two separate channels, get their own walkthrough in a future post in this series, "OAuth 2.0 and OIDC in React: The Authorization Code Flow with PKCE, Explained." What matters here is that this is the one flow to use, and the two sections below cover the two mistakes that actually happen in practice.
Why the implicit flow is gone
Older tutorials use the implicit flow from OAuth 2.0, where the authorization server returns an access token directly in the redirect, in one step, skipping the two-step exchange described above. Best Current Practice for OAuth 2.0 Security (RFC 9700), published in January 2025 as the current security best practice for OAuth 2.0, is direct about it. Response types that issue access tokens in the authorization response "are vulnerable to access token leakage and access token replay," and clients "SHOULD NOT use the implicit grant ... unless access token injection in the authorization response is prevented and the aforementioned token leakage vectors are mitigated." In a browser you are not going to meet that exception, so read it as no.
The same document sets the floor for browser apps in one line: "Public clients MUST use PKCE," and "Authorization servers MUST support PKCE." A React app is a public client, so that MUST is yours. If a guide doesn't mention PKCE, it predates the requirement, whatever its publication date says.
What PKCE actually protects against
PKCE has one job, and it isn't the one most developers assume. It doesn't protect the token, it protects the code. Where it came from matters here, because the reason a browser app needs it is not the reason it was invented.
PKCE standard was originally written for native and mobile apps, where a malicious app on the same device can register the same custom URI scheme and grab the code out of the redirect. PKCE standard is explicit that the browser's own redirect is TLS-protected and "cannot be intercepted." For a React app the threat PKCE closes is the one RFC 9700 names: authorization code injection, where an attacker feeds your app a code obtained somewhere else and lets your app redeem it. Without PKCE your app has no way to tell that the code it's exchanging is the code it asked for, which is why PKCE is a MUST for public clients rather than a native-app nicety.
Where tokens live, and why localStorage is usually wrong
Access tokens are usually JWTs, and where to store JWTs in the browser is the most argued question in React authentication. Every option trades persistence against blast radius. localStorage persists across browser sessions, so it survives a closed browser entirely. sessionStorage lasts for the page session and clears when the tab closes. A web worker isolates tokens from the DOM, which makes it the most defensible of the three.
The short version: anything readable by JavaScript on your page is readable by injected JavaScript on your page. A React localStorage token is convenient and survives a refresh, and it's also the first place a cross-site scripting payload looks. That's not an argument for never using it, it's an argument for knowing what you accepted.
Stop at the first question you can answer yes to. Every step down the staircase costs you something.
| Storage | Survives refresh | Exposure to XSS | Reasonable when |
|---|---|---|---|
| In-memory variable | No | Yes, while the tab is open | Paired with a rotated refresh token |
| Web worker | No | Isolated from the DOM | You can add the worker plumbing |
| httpOnly cookie | Yes | Not readable, still usable | You have a backend to set it |
| sessionStorage | Yes, in that tab | Yes | Short sessions, lower risk apps |
| localStorage | Yes | Yes | Convenience outweighs the exposure |
No row in that table says "safe from XSS," and httpOnly is the row people misread. It stops a payload from reading the cookie, but not from making requests the browser attaches the cookie to, so the attacker still gets every authenticated action the user has without ever seeing the credential. The same caveat applies to the worker, since injected code in the main thread can ask the worker to make the call. Storage choice bounds what an attacker walks away with. It doesn't stop them acting as the user while the page is open.
One architecture is missing from that table because it removes the question rather than answering it. If your React app is served alongside a backend, the backend can hold the tokens and expose the session to the browser as an httpOnly cookie, which is the backend-for-frontend pattern. The IETF's browser-based-apps draft "strongly recommend[s]" it "for business applications, sensitive applications, and applications that handle personal data." It costs you a server. It buys you a browser that never holds a token at all.
Connecting your React app to an identity provider
Everything so far has been about picking a provider. This section is about the seam between that provider and your code, and there are three distinct ways to build it. They are not three products. They are three levels of abstraction over the same OpenID Connect exchange, and the level you pick decides how much of that exchange stays your responsibility.
One thing to hold on to before the details, because it is what makes this choice low risk: all three speak the same protocol to the same identity provider. Moving between levels later means rewriting your integration code, not re-architecting your identity.
Level 1: Wire it at the protocol level
You implement the OpenID Connect flow yourself. The dependency list is short, an OAuth 2.0 or OpenID Connect client library and something to parse and validate JSON web tokens, and past that the code is yours.
This is the minimalist option in dependency terms and the maximalist one in every other sense. You write the redirect to the authorization endpoint, the handling of the code that comes back, the exchange at the token endpoint, and the validation of what you receive. Then you own the part that outlasts the initial build: deciding where tokens live, noticing when an access token is about to expire, refreshing it without stranding in-flight requests, and clearing everything correctly on sign-out.
In practice, the cost is time, code you have to maintain, and a specific expertise your team has to keep. What you get back is that nothing is hidden from you and nothing ties you to one vendor's package. AI code generation can take some of that burden off you, but the expertise gap remains, because someone still has to know whether the generated code is right.
Pick this when you need to work against arbitrary OIDC providers rather than one, when a security review requires reading every line in the authentication path, or when no usable SDK exists for your provider. Avoid it when nobody on the team has implemented OIDC before, because the failure modes here are quiet ones that look like working software.
Level 2: A headless React SDK
A vendor-provided or community React SDK that handles the protocol and leaves the interface to you. "Headless" is already the word React developers use for a library that ships behavior without markup, and it fits this exactly.
At this level the OIDC flow, token storage, and the token lifecycle all stop being yours. The SDK exposes hooks and utility functions you call from your own event handlers: something to start sign-in, something to sign out, and state telling you whether a user is signed in and who they are. Expiry and refresh happen underneath, and where the provider rotates refresh tokens the SDK absorbs that too, without your components ever knowing it happened.
What stays yours is every pixel. There are no components in the box, so the sign-in button, the profile panel, the loading state, and the error handling are all things you design and build.
Pick this when you have a design system that authentication has to live inside, or when the sign-in experience is part of your product rather than a doorway in front of it. Avoid it when what you would build is the ordinary set of components anyway, because then you are hand-making what the next level hands you.
Level 3: A React SDK with drop-in components
The highest level of abstraction, and the least common of the three. Alongside the hooks, this kind of SDK ships finished React components: a sign-in component, a sign-out component, a user profile component, often named something like <SignIn />, <SignOut />, and <UserProfile />, styled and working the moment you place them in your tree. Configure your identity provider details once, drop the components where you want them, and you have a working authenticated application.
Styling is not the trade it sounds like, because these components are built to be restyled with your own stylesheet, so ready-made does not mean stuck with someone else's design. The real trade sits elsewhere. Your JSX now contains a vendor's component names, which is the tightest coupling of the three levels.
Two things stop that from becoming a trap. Anything the components do not expose can usually be reached by extending them, and the hooks from level two are still there underneath, so a single screen that needs full control can drop a level without the rest of your application following it.
Pick this when you want a working authenticated application in days rather than weeks, which is most of the time. Avoid it when you already know your requirements exceed what the components expose, because you will end up at level two having paid for the detour.
Comparing the three levels:
| Level 1: Protocol | Level 2: Headless SDK | Level 3: Drop-in components | |
|---|---|---|---|
| What you install | An OIDC client library, plus a JWT library | The provider's React SDK | The provider's React SDK |
| Who implements the OIDC flow | You | The SDK | The SDK |
| Who stores and refreshes tokens | You | The SDK | The SDK |
| Who builds the sign-in interface | You | You | The SDK, restyled by you |
| What you actually write | The flow, the token layer, and the interface | The interface | Configuration |
| Knowledge required | OAuth 2.0 and OIDC in depth | The SDK's API | The SDK's API |
| Time to a working sign-in | Weeks | Days | Hours |
| Coupling to one vendor | Lowest | Higher | Highest |
| If you outgrow it | Nothing to outgrow | Drop to level one | Drop to level two |
The pattern in that table is worth saying out loud. Moving up a level never buys you a different protocol. It buys you fewer things you are responsible for, and it charges you in coupling. That is the whole trade, and it is why the escape hatch in the last row matters more than the time saving in the row above it.
The rest of this guide works at level three and drops to level two wherever a section needs the raw state.
Wiring it up with WSO2 React SDK
Now the code, because authentication in React JS ultimately comes down to a provider, a couple of hooks, and a redirect you have to respect. WSO2 Identity Platform publishes the Asgardeo React SDK under the @asgardeo npm scope, licensed Apache-2.0.
Install and configure React SDK
The shape is a provider near the root of the tree holding configuration and session state, and two ways to read it. There are drop-in components for the common cases, and a hook when you want the state directly. The following commands show how to scaffold a React application and install the WSO2 React SDK.
npm create vite@latest wso2-react -- --template react
npm install @asgardeo/react
The React SDK provides the components and hooks required to integrate WSO2 Identity Platform into your application. Now that you have installed the React SDK in your project, the next step is to connect your React application to WSO2 Identity Platform by configuring the <AsgardeoProvider />.
The <AsgardeoProvider /> acts as the context provider for the React SDK. To integrate it, wrap your root component in the main.jsx file with <AsgardeoProvider />, as shown in the following code segment.
import { StrictMode } from 'react'
import { createRoot } from 'react-dom/client'
import './index.css'
import App from './App.jsx'
import { AsgardeoProvider } from '@asgardeo/react'

createRoot(document.getElementById('root')).render(
  <StrictMode>
    <AsgardeoProvider
      clientId="your-app-client-id"
      baseUrl="https://api.asgardeo.io/t/your-organization-name"
    >
      <App />
    </AsgardeoProvider>
  </StrictMode>
)
Two things to get right here rather than later. Redirect URLs must match what you registered on the application exactly, including trailing slashes, because a mismatch fails at the authorization server with an error that reads like a configuration bug somewhere else. And the scopes you request determine which claims come back, so if a username renders as undefined the fix is usually a missing scope, not a missing hook.
Sign in, sign out, and reading the user
Now, let's use the drop-in components provided by the WSO2 Identity Platform React SDK to add login and logout functionality. Simply replace the contents of your App.jsx file with the following code:
import { SignedIn, SignedOut, SignInButton, SignOutButton, UserProfile } from '@asgardeo/react'
import './App.css'

function App() {
  return (
    <>
      <header>
        <SignedIn>
          <SignOutButton />
        </SignedIn>
        <SignedOut>
          <SignInButton />
        </SignedOut>
      </header>
      <main>
        <UserProfile />
      </main>
    </>
  )
}

export default App
The detail worth internalizing is that sign-in is a redirect, not a function call that returns a user. Your component unmounts, the browser leaves, and your app boots again on the way back with a code in the URL. Any state you were holding is gone unless you deliberately preserved it, which is why "my form data disappeared after login" is such a common first bug.
Protecting routes
React protected routes are the most-copied pattern in React authentication and the least understood. Both React Router and TanStack Router give you the same primitive: a wrapper or loader that checks authentication state and redirects when it's absent.
The WSO2 SDK provides pluggable utilities that work with popular routing libraries such as React Router and TanStack Router. You can install one of these packages to secure the routes in your application by running one of the following commands:
npm install react-router-dom @asgardeo/react-router
In the following code, we use the <BrowserRouter>, <Routes>, and <Route> components to define the routing.
import { BrowserRouter, Routes, Route } from 'react-router-dom';
import { ProtectedRoute } from '@asgardeo/react-router';
import Dashboard from './pages/Dashboard';
import MyProfile from './pages/MyProfile';
import './App.css'

function App() {
  return (
    <header>
      <BrowserRouter>
        <Routes>
          <Route path="/" element={<Dashboard />} />
          <Route
            path="/profile"
            element={
              <ProtectedRoute>
                <MyProfile />
              </ProtectedRoute>
            }
          />
        </Routes>
      </BrowserRouter>
    </header>
  )
}

export default App
Preserving the intended destination is the part most implementations skip. If a user lands on a deep link, gets bounced to sign-in, and then arrives at your dashboard instead of the page they wanted, the flow technically works and still feels broken.
Calling a protected API from React
Signing in is not the feature. The feature is the dashboard that lists this user's orders, the settings page that writes to this user's profile, and the export button only some accounts are allowed to press. React runs in the browser with no database connection of its own, so every one of those screens is an HTTP request to an API that has to decide whether to answer. Most React authentication guides stop at the login button, which is the point where the real work starts.
Who is responsible for what
There are two sides to every authenticated request, and only one of them enforces anything.
| Responsibility | Your React app | Your API |
|---|---|---|
| Obtain an access token for the signed-in user | Yes | No |
Send it as an Authorization: Bearer header | Yes | No |
| Validate the token signature | No | Yes |
| Check the issuer, the audience, and expiry | No | Yes |
| Check the token carries the required scope | No | Yes |
| Decide whether this user may do this | No | Yes |
| Render the result | Yes | No |
The React column is transport. The API column is a decision. Your app proves who is asking, and your API works out what that person gets, by validating the token's signature against the provider's published signing keys, confirming the issuer and audience match what it expects, confirming the token has not expired, and confirming it carries the scope this endpoint requires. An API that skips those checks makes every other section of this guide irrelevant, because then an attacker can present a token you never issued.
The ID token is not the access token
This is the most common bug in this part of the stack, and it deserves naming plainly because it usually ships undetected. Authentication returns two tokens and they have different audiences.
The ID token is about the user and it is for your application. It tells you who signed in and carries their claims, so decode it to render a name, an avatar, or a role-conditional menu. The access token is for your API. It is the credential your app presents to prove it may act on the user's behalf.
Sending an ID token to your API is wrong even on the days it appears to work. The ID token's audience is your React client and not your API, so an API that validates the audience correctly rejects it, and an API that accepts it has just told you it does not check. The SDK keeps the two apart on purpose: getIdToken and getDecodedIdToken return the identity, and getAccessToken returns the credential for the call.
There are three ways to attach a token to a request, and they are really three stages of the same realization.
The first is manual. You read the access token, build the header yourself, and call fetch. It works, it is what you would write against any OpenID Connect provider, and it is worth writing once so the mechanism is not magic. It is also where the bugs breed, because the moment you have a second component you have two copies of the expiry handling.
The second is a shared client. One module owns the token, attaches the header, and handles a 401 in a single place. Every application that starts with the first approach arrives here eventually.
The third is to use the client your SDK already ships, which is the second approach written for you. useAsgardeo returns an http object, and http.request attaches Authorization: Bearer with the current access token automatically, so a call looks close to the fetch you already write. There is also http.requestAll for firing several requests together.
import { useState } from 'react'
import { useAsgardeo } from '@asgardeo/react'

function MyProfile() {
  const { http, isSignedIn } = useAsgardeo();
  const [userData, setUserData] = useState(null);

  const getProfile = async () => {
    const response = await http.request({
      url: 'https://api.asgardeo.io/t/your-organization-name/scim2/Me',
      method: 'GET',
      headers: {
        'Accept': 'application/json',
        'Content-Type': 'application/scim+json',
      },
    });
    setUserData(response.data);
  };

  if (!isSignedIn) {
    return <div>Please sign in to view your profile.</div>;
  }

  return (
    <div>
      <h2>My Profile</h2>
      <button onClick={getProfile}>Get My Profile</button>
      {userData && (
        <div>
          <p>Given Name: {userData.name.givenName}</p>
          <p>Family Name: {userData.name.familyName}</p>
        </div>
      )}
    </div>
  )
}

export default MyProfile
In the above code apart from useState hook, we have imported useAsgardeo hook which is provided by the WSO2 React SDK and gives us access to authentication state and a built-in HTTP client.
Then we have received two important constants by calling the useAsgardeo hook.
- isSignedIn – tells us whether the user is authenticated.
- http – a secure HTTP client provided by the SDK. This automatically attaches the current OAuth2 access token to outgoing requests.
Then, we added a button. When the button is clicked, we call our API by executing the following function, which the function body closely resembles a standard fetch API call. And finally, we simply display the user profile data.
One habit to build early: token attachment is on by default, so turn it off deliberately when a request should not carry your credential. Calling a third-party API from the same client with attachment left on sends your user's access token to somebody else's server, and that is a leak nobody notices because nothing breaks.
Four things that go wrong here:
- CORS, which is not an authentication problem but presents as one. Adding an Authorization header makes the request preflighted, so your API must return your origin in Access-Control-Allow-Origin and Authorization in Access-Control-Allow-Headers. Miss the second and the browser blocks a request your API never sees, which reads exactly like a rejected token.
- Scopes, which are decided at sign-in. An access token carries only the scopes you asked for during the authorization request. A 403 on a valid token almost always means a scope missing from your application configuration, not a defect in your React code.
- Storage, which constrains how you read the token. The SDK's storage option takes sessionStorage, localStorage, browserMemory, or webWorker, and those correspond to the trade-offs in the storage section above. The interaction to know about: getAccessToken does not work under webWorker storage. That is the point of the worker rather than a limitation of it, because a token the main thread can read is a token injected script can read. On that setting, route calls through the SDK's HTTP client, which runs the request where the token already lives.
- Expiry, which is the next section's problem. Access tokens are short-lived by design, so a 401 mid-session is normal operation and not a sign-in failure. Refresh once, retry the request, and only send the user back to sign-in if the refresh itself fails.
Sessions, refresh, and silent authentication
Access tokens are deliberately short-lived, so at some point one expires while your user is reading a page and clicking nothing. What happens next is the difference between an app that feels stable and one that logs people out at random.
The mechanism is a refresh: your app exchanges a React refresh token for a new access token in the background, and the user sees nothing. One requirement comes attached to that. Best Current Practice for OAuth 2.0 Security (RFC 9700) states that "Refresh tokens for public clients MUST be sender-constrained or use refresh token rotation." A React app is a public client, so the refresh token it holds should be single-use, with every refresh returning a new one and invalidating the old.
Rotation changes how you handle concurrency, and this is where implementations quietly break. If 6 API calls fail at once because one token expired and each fires its own refresh, five of them present a token that has already been spent, the authorization server reads that as replay, and it revokes the session. So queuing is not an optimization. It's what stops rotation from logging your user out.
Silent authentication is the other pattern you'll read about, and it deserves a warning rather than a recommendation. It re-runs the authorization request against the existing session at the identity provider, historically in a hidden iframe. Treat that as legacy. The provider's session cookie is a third-party cookie inside that iframe, so Safari and Brave block it by default and Firefox partitions it, and the request comes back with login_required rather than an error you can handle cleanly. The IETF's browser-based-apps draft makes the same point from the other direction, noting that third-party cookie blocking is exactly why "the use of refresh tokens has become significantly more attractive." If you need renewal without a refresh token, use a popup or a full redirect.
Roles and permissions in the UI
One rule carries this section: the UI is never the enforcement point. Hiding a button is user experience, not security.
React role based access control means reading role or permission claims from the token and rendering accordingly, and it makes your product coherent. A user shouldn't see an admin panel link they can't use. But every one of those checks is cosmetic, and the API behind each action has to make the same decision independently, because a client-side check protects nothing.
There's also a staleness trap worth knowing. Role claims are baked into a token at issue time, so a permission revoked at 10:00 can still be present in a token until it expires. If your product needs faster propagation, shorten token lifetimes or fetch permissions from an endpoint rather than reading them from a claim.
Going further: social login, MFA, passkeys, and enterprise SSO
Everything above is the foundation. The features users actually notice sit on top of it, and here's the property that makes learning the standards worth it: each of the four below is a change to your identity provider configuration, not to your React code. That's also the test to run on any vendor you're evaluating. If adding MFA means editing components, the abstraction leaked.
Social login lets users sign in with an existing account from a provider like Google, Microsoft, or GitHub. The connection is federated at the identity provider, so your React app still runs the same authorization code flow and receives the same tokens.
Multi-factor authentication adds a second proof. When it's adaptive, the second factor is conditional, prompted on a new device or an unusual location rather than on every sign-in, which is what keeps it from becoming friction users route around.
Passkeys replace passwords with a key pair bound to the user's device, built on FIDO2 and WebAuthn. For most consumer applications this is the highest-value upgrade on the list, because it removes the credential that phishing depends on. WSO2 Identity Platform documents this under passkeys.
Enterprise single sign-on is the requirement that arrives with your first large customer, usually as "we use Okta" or "we need SAML." Your identity provider handles it through single sign-on and federation, and it lands in your React app as no change at all.
Self-hosted or cloud: what changes in your React code
At the protocol layer, the answer is nothing, and that's the point of building on standards rather than on an SDK. A conformant OpenID Connect (OIDC) provider publishes a discovery document, your app reads the endpoints from it, and the authorization code flow with PKCE runs identically whether the provider is running in a managed cloud or on a server in your own rack. Change the issuer, keep the protocol.
WSO2 Identity Platform is built on that premise. It runs as multi-tenant SaaS, and Enterprise adds a single-tenant private cloud instance and a self-hosted option where you download the components and run them on your own servers, on Kubernetes, or on an air-gapped network. The pricing page puts it plainly: "the platform is the same in all three."
Where to go from here
Authentication in React is a client-side ceremony around a server-side decision. Your React app never decides who a user is. It proves to an API that a decision was made, and almost every mistake in this area comes from forgetting which side of that line you're standing on.
Three things to take from this guide. Pick your option deliberately instead of installing the first SDK you find. Use the authorization code flow with PKCE, because the standards now require it for public clients. And treat every client-side check as user experience that your API still has to re-enforce.
To try it, sign up free and follow the React quickstart, which gets you from an empty project to a working sign-in in a few minutes. If your requirements point toward running the identity provider yourself, download WSO2 Identity Server and start there instead. The protocol work you did above carries over unchanged. The SDK layer doesn't yet, so budget an afternoon for the provider and hook rename, or write against the OIDC endpoints and skip the question entirely.

