Building an IT Helpdesk AI Agent with Persistent Memory
What you will build
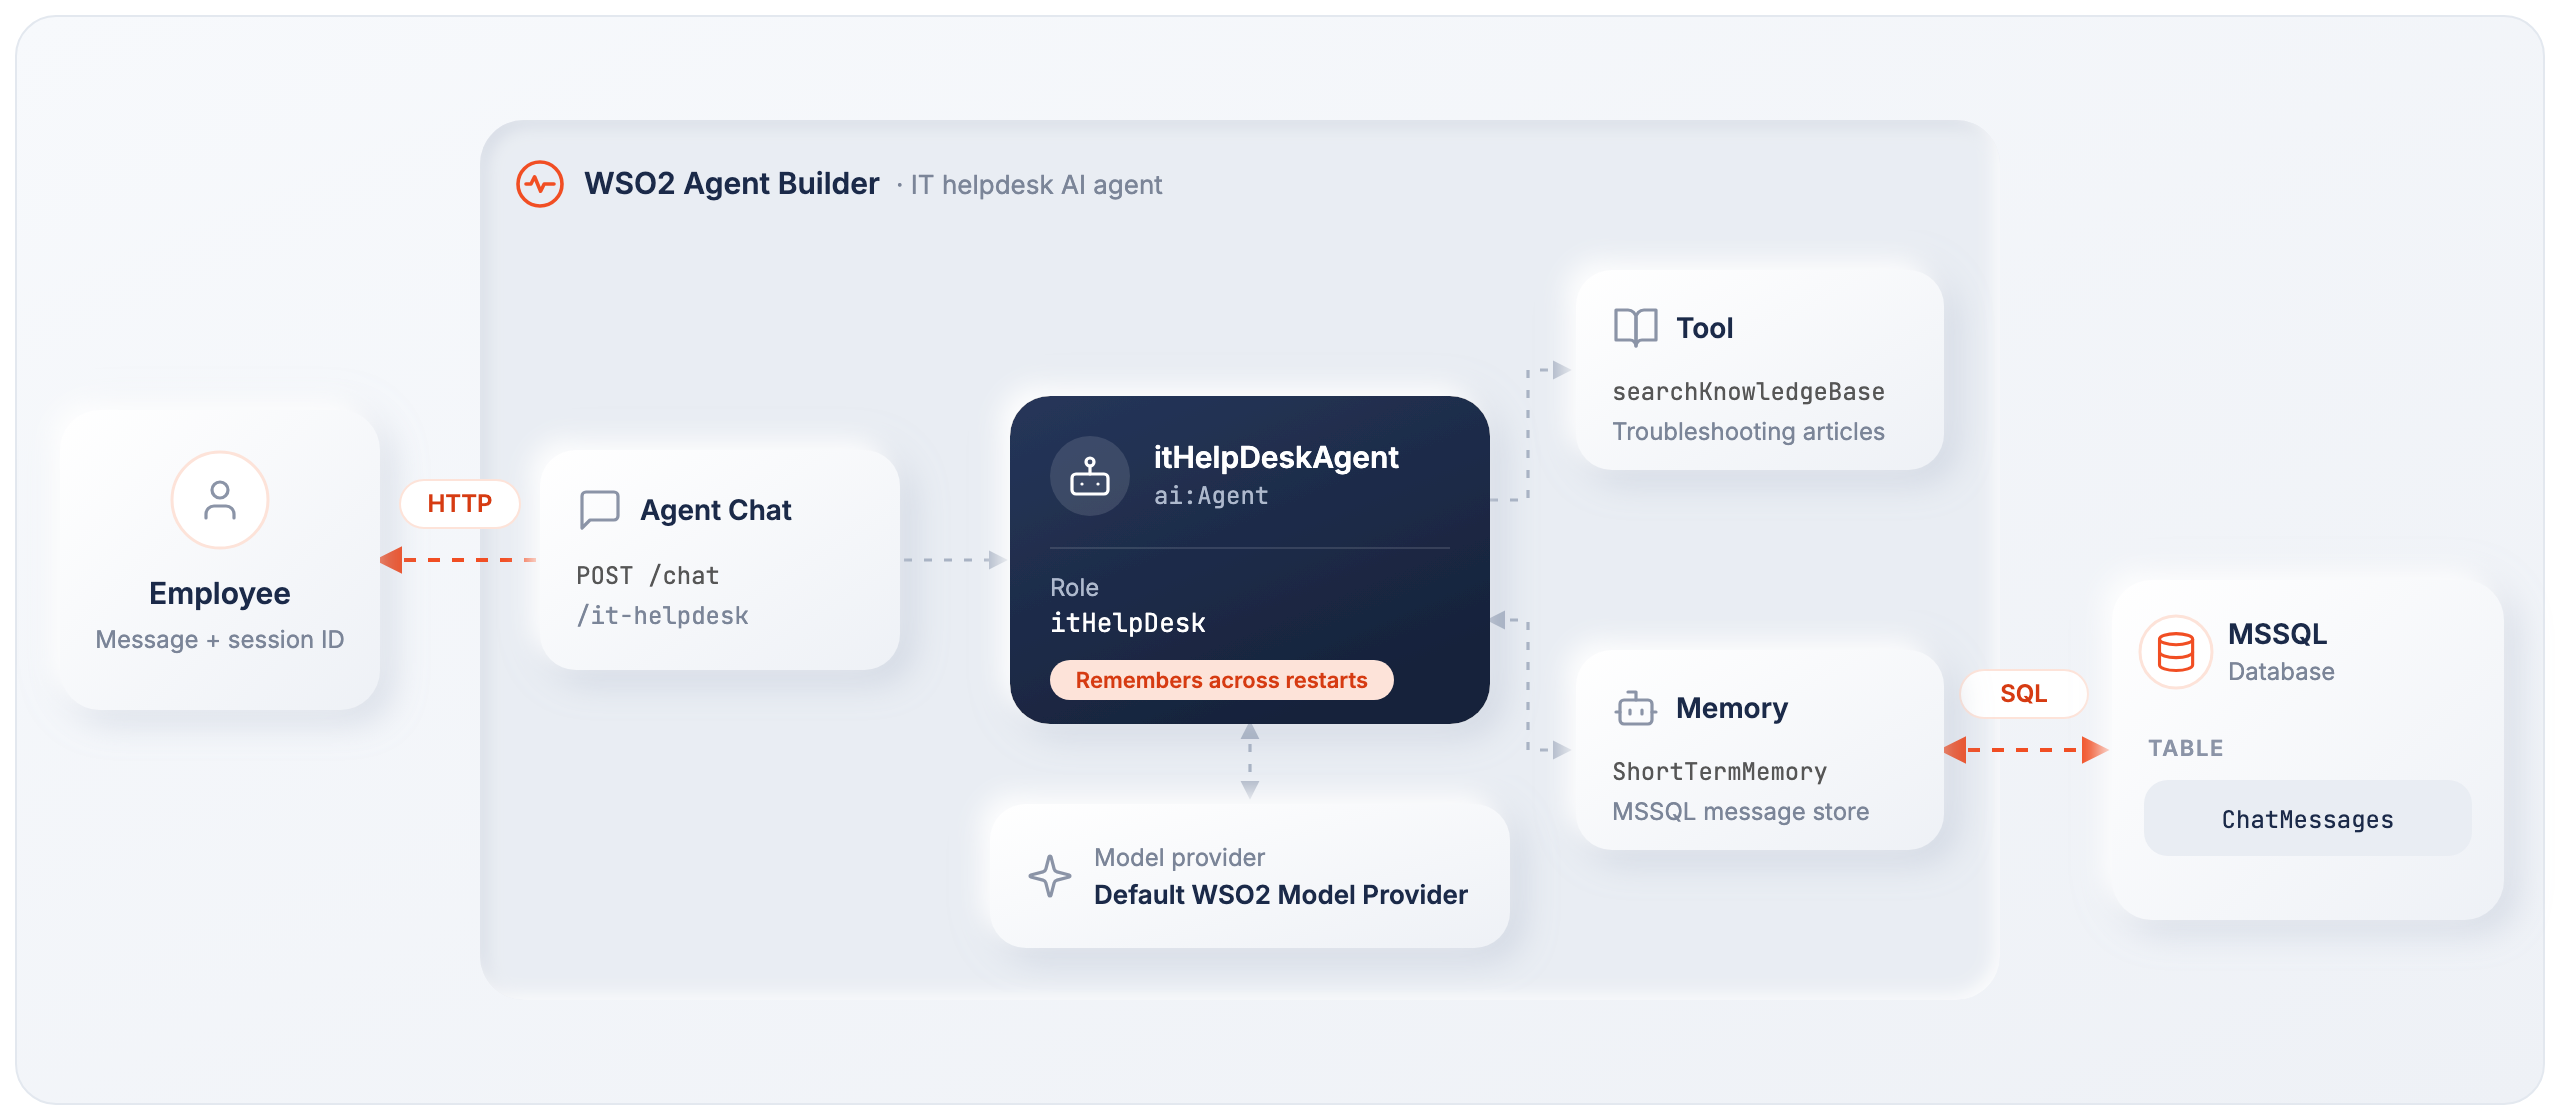
In this tutorial, you will build an IT helpdesk AI agent in WSO2 Agent Builder that assists employees with technical support issues and remembers conversations across service restarts using persistent MSSQL-backed memory.
The agent responds to employee questions through an Agent Chat trigger, searches an internal knowledge base for troubleshooting guidance, and keeps its conversation history in an MSSQL database using ballerinax/ai.memory.mssql.
Because the chat history is persisted in a database, employees can continue a conversation using the same session ID without repeating information they already shared, even after the integration restarts.
What you will learn
In this tutorial, you will learn how to:
- Create an AI agent with a custom tool in WSO2 Agent Builder
- Store connection details as configurable values
- Persist conversation history across service restarts using MSSQL-backed memory
- Expose the agent through an Agent Chat trigger and keep employee-specific conversations using a session ID
Prerequisites
Before getting started, ensure that the following requirements are met:
-
WSO2 Agent Builder is installed.
-
An MSSQL database is reachable (host, port, user, password). Create the chat messages table ahead of time:
CREATE TABLE ChatMessages (
    Id INT IDENTITY(1,1) PRIMARY KEY,
    MessageKey NVARCHAR(100) NOT NULL,
    MessageRole NVARCHAR(20) NOT NULL CHECK (MessageRole IN ('user', 'system', 'assistant', 'function')),
    MessageJson NVARCHAR(MAX) NOT NULL,
    CreatedAt DATETIME2 NOT NULL DEFAULT SYSDATETIME()
);
If you plan to use human-in-the-loop, also create the checkpoint table. See Memory for the schemas.
To try this tutorial locally, you can run SQL Server in Docker:
docker run -d --name helpdesk-mssql -e ACCEPT_EULA=Y -e MSSQL_SA_PASSWORD='<password>' \
  -p 1433:1433 mcr.microsoft.com/mssql/server:2022-latest
Then create a database (for example helpdesk) and the ChatMessages table in it.
Architecture
Build the integration
In this section, you will create the agentic integration and configure the AI agent for the IT helpdesk system.
Step 1: Create the agentic integration
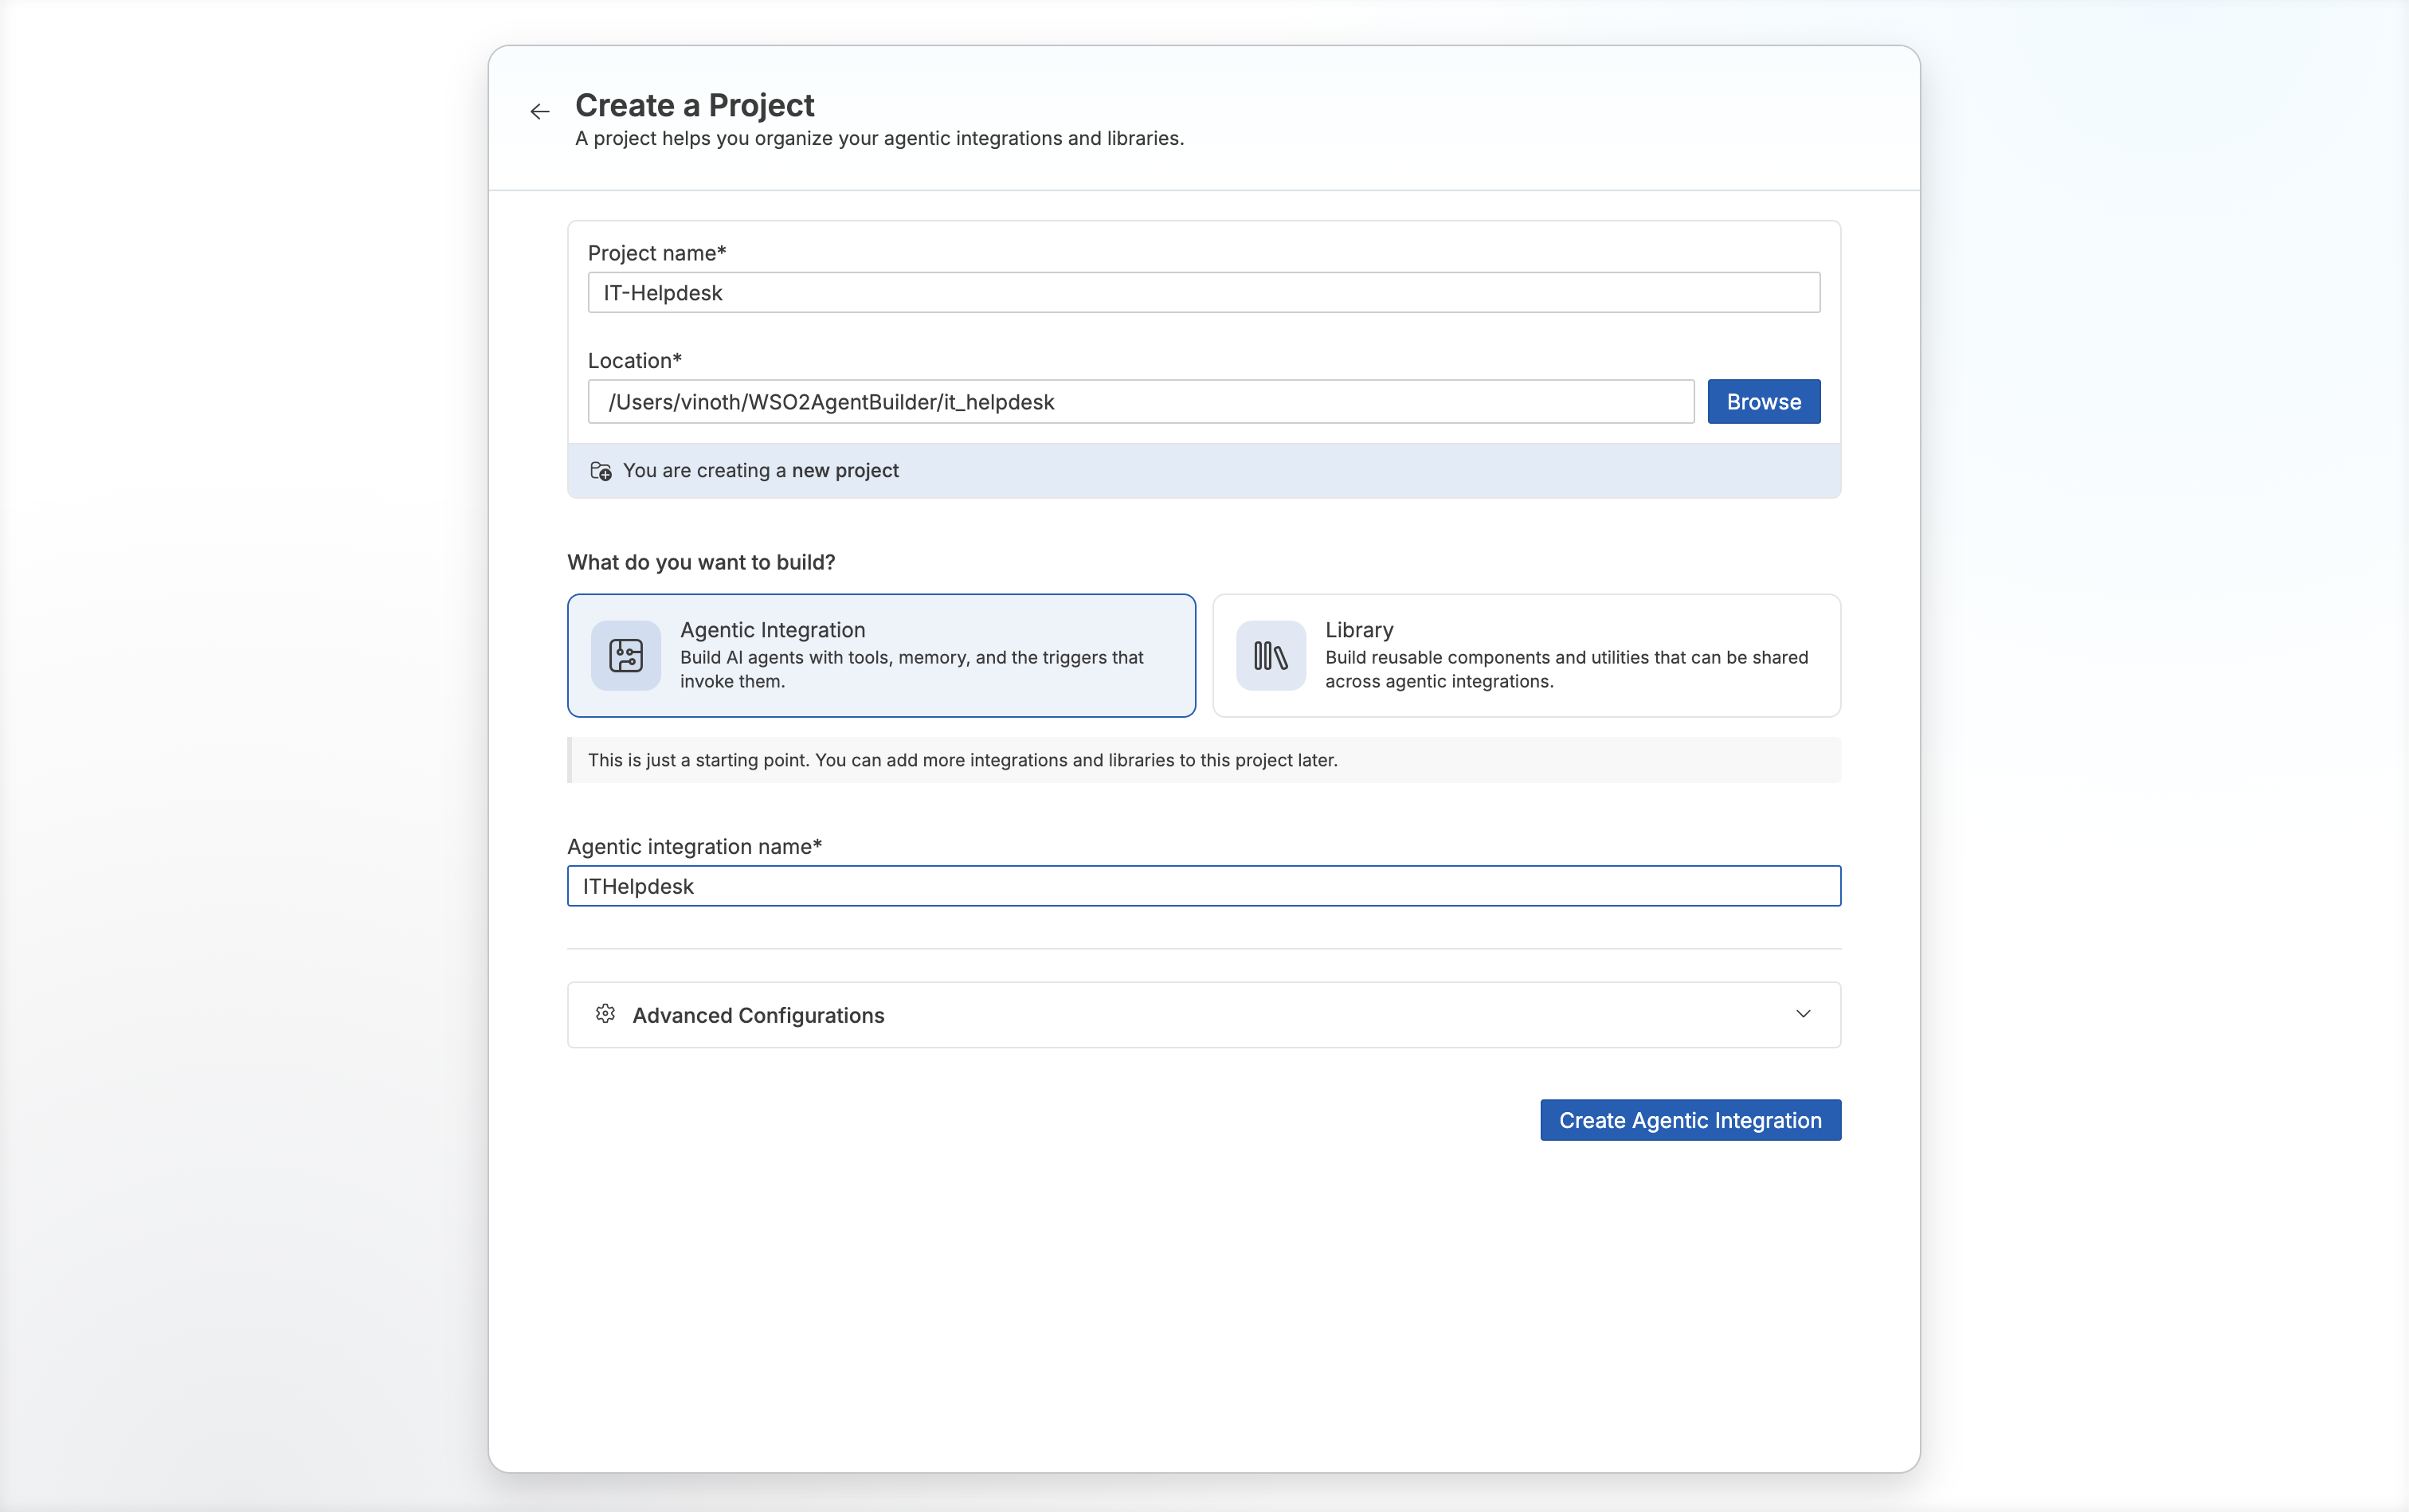
- Open WSO2 Agent Builder and select Create under Start Building your Agent.
- Set Project name to
IT-Helpdeskand choose a Location. - Under What do you want to build?, keep Agentic Integration selected.
- Set Agentic integration name to
ITHelpdesk. - Select Create Agentic Integration.
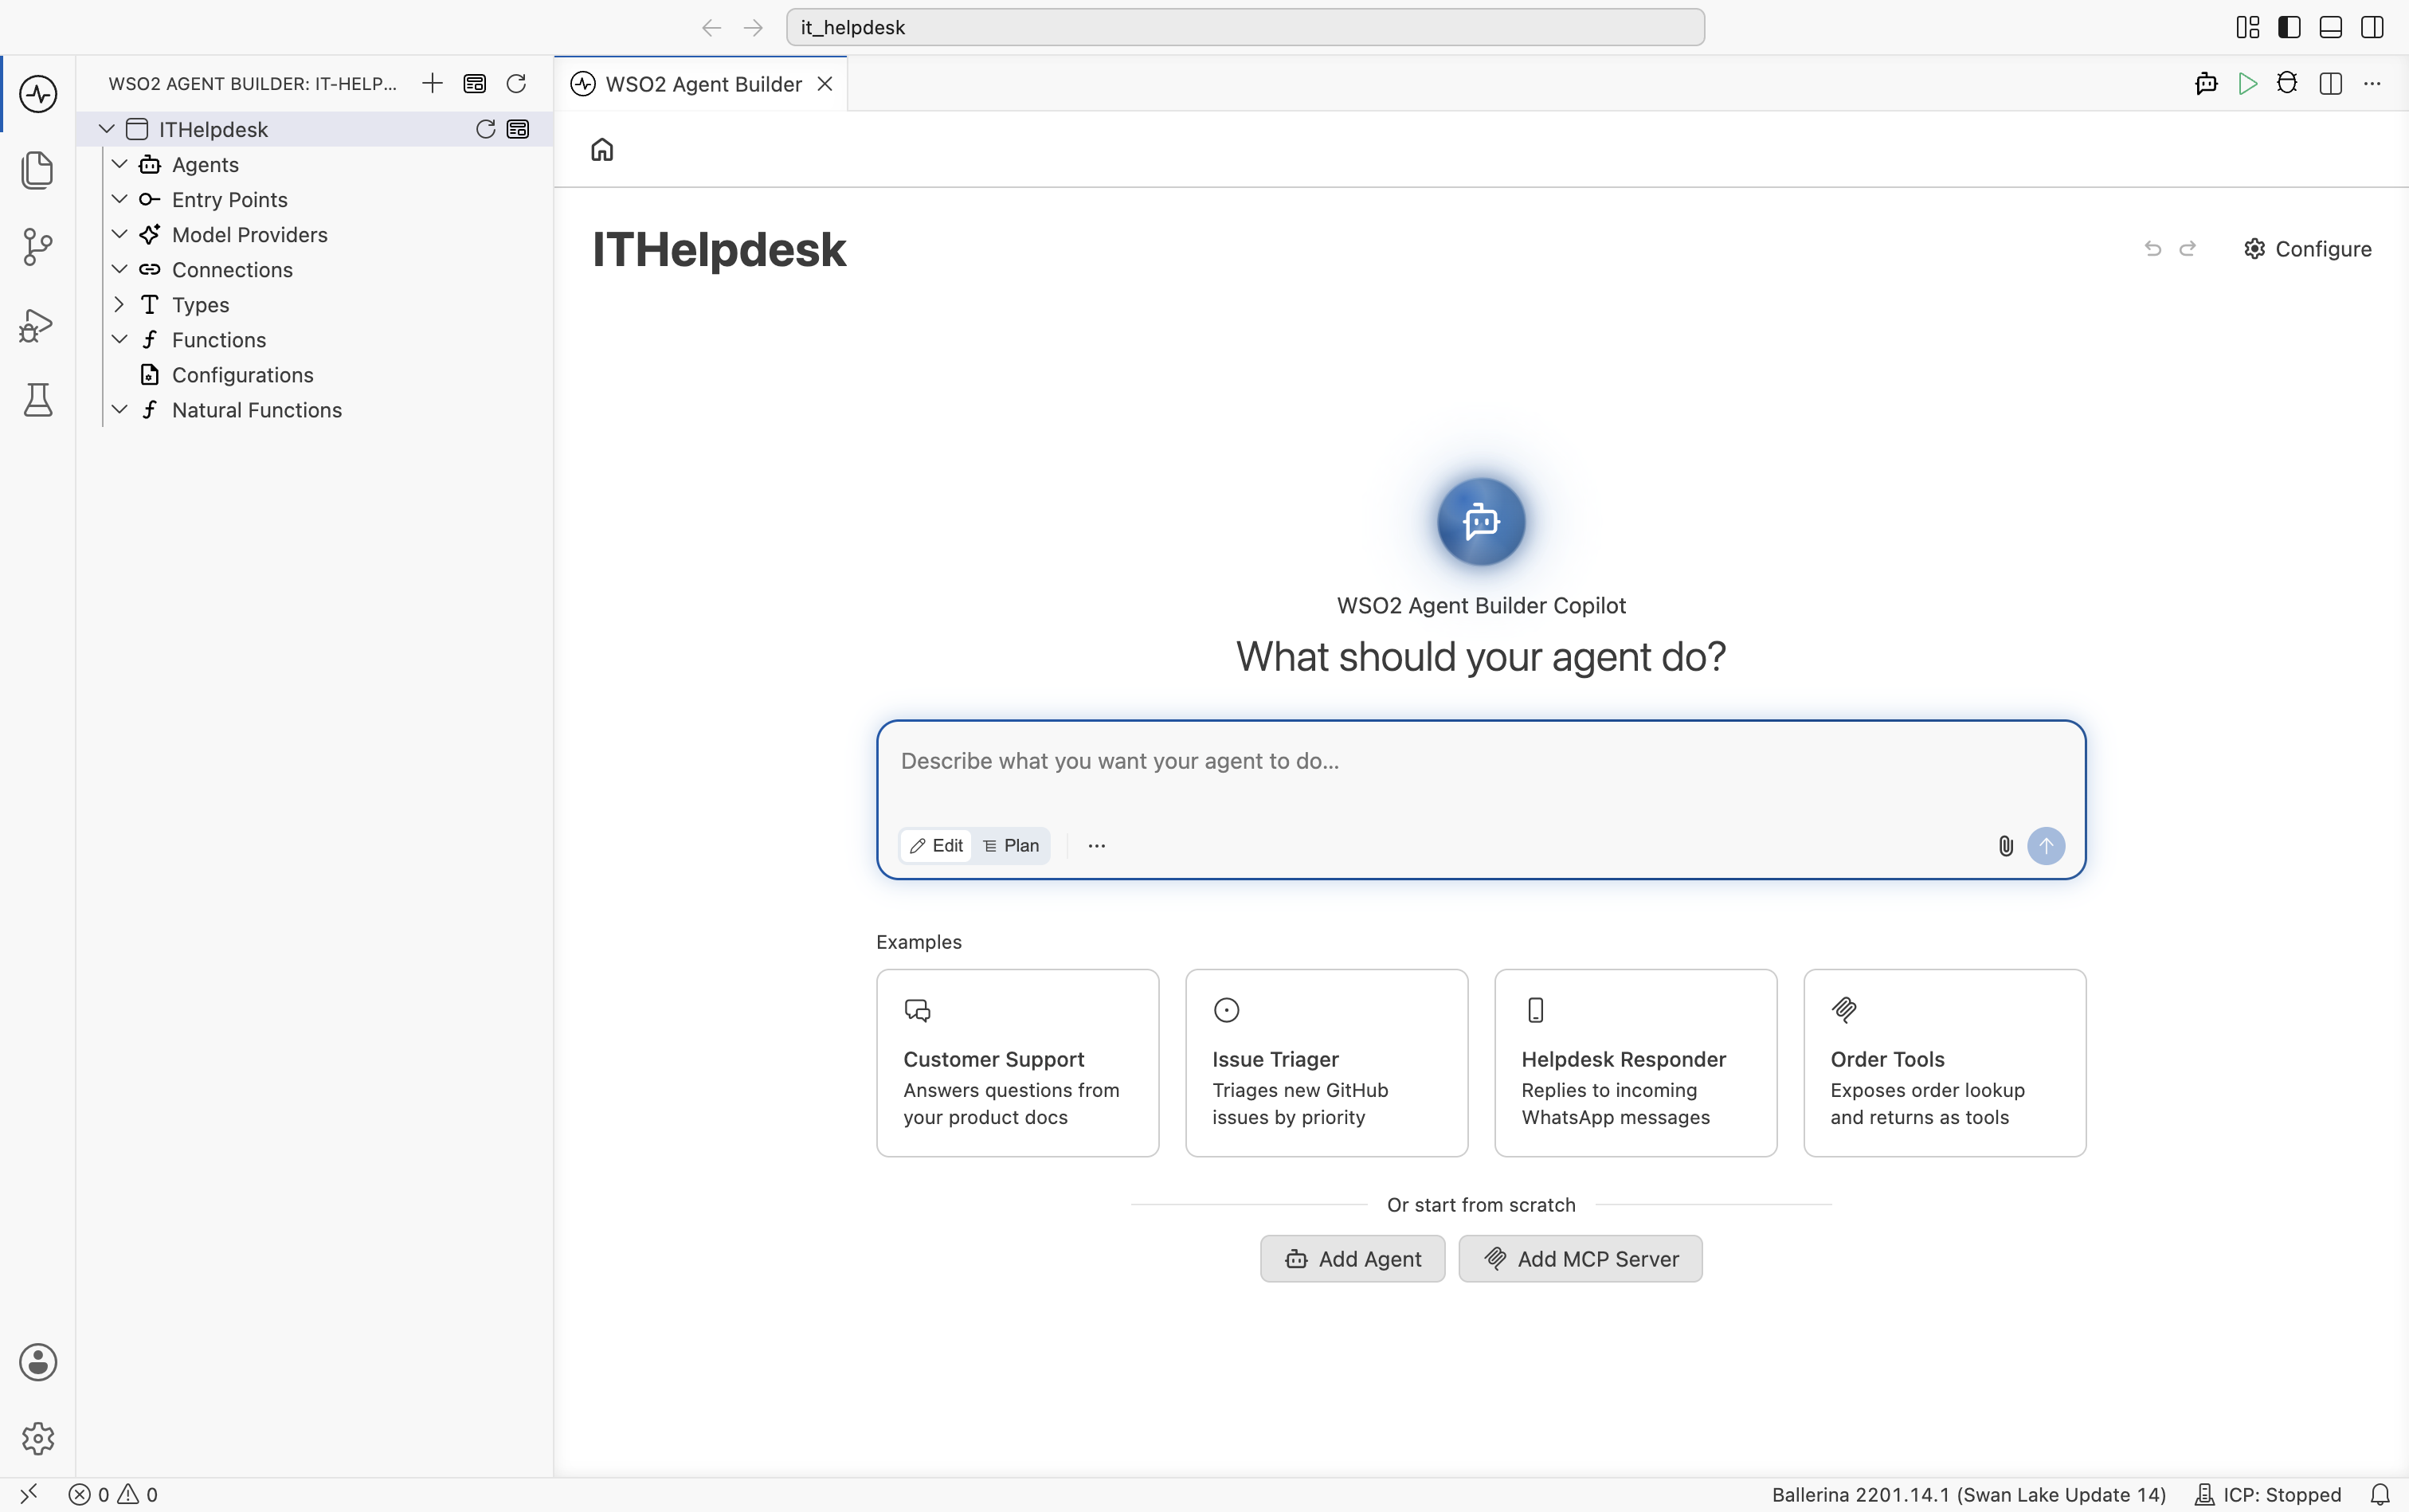
The integration opens with the WSO2 Agent Builder Copilot. Skip it for this tutorial and build the integration manually.
Step 2: Define the data type and knowledge base
Define the KbArticle type in types.bal:
type KbArticle record {|
    string articleId;
    string title;
    string content;
    string category;
    string[] tags;
    float relevanceScore;
|};
Add the knowledge base articles in a new file, for example kb_articles.bal:
final KbArticle[] & readonly kbArticles = [
    {
        articleId: "KB-101",
        title: "VPN Troubleshooting",
        content: "Restart the VPN client and reconnect.",
        category: "network",
        tags: ["vpn"],
        relevanceScore: 0.95
    },
    {
        articleId: "KB-102",
        title: "Password Reset",
        content: "Use the self-service password reset portal.",
        category: "account",
        tags: ["password"],
        relevanceScore: 0.9
    }
];
The tool you add in Step 4 searches kbArticles by matching tags against the employee's query, and returns the content of the highest-relevanceScore match.
Step 3: Create the agent
- Visual Designer
- Ballerina Code
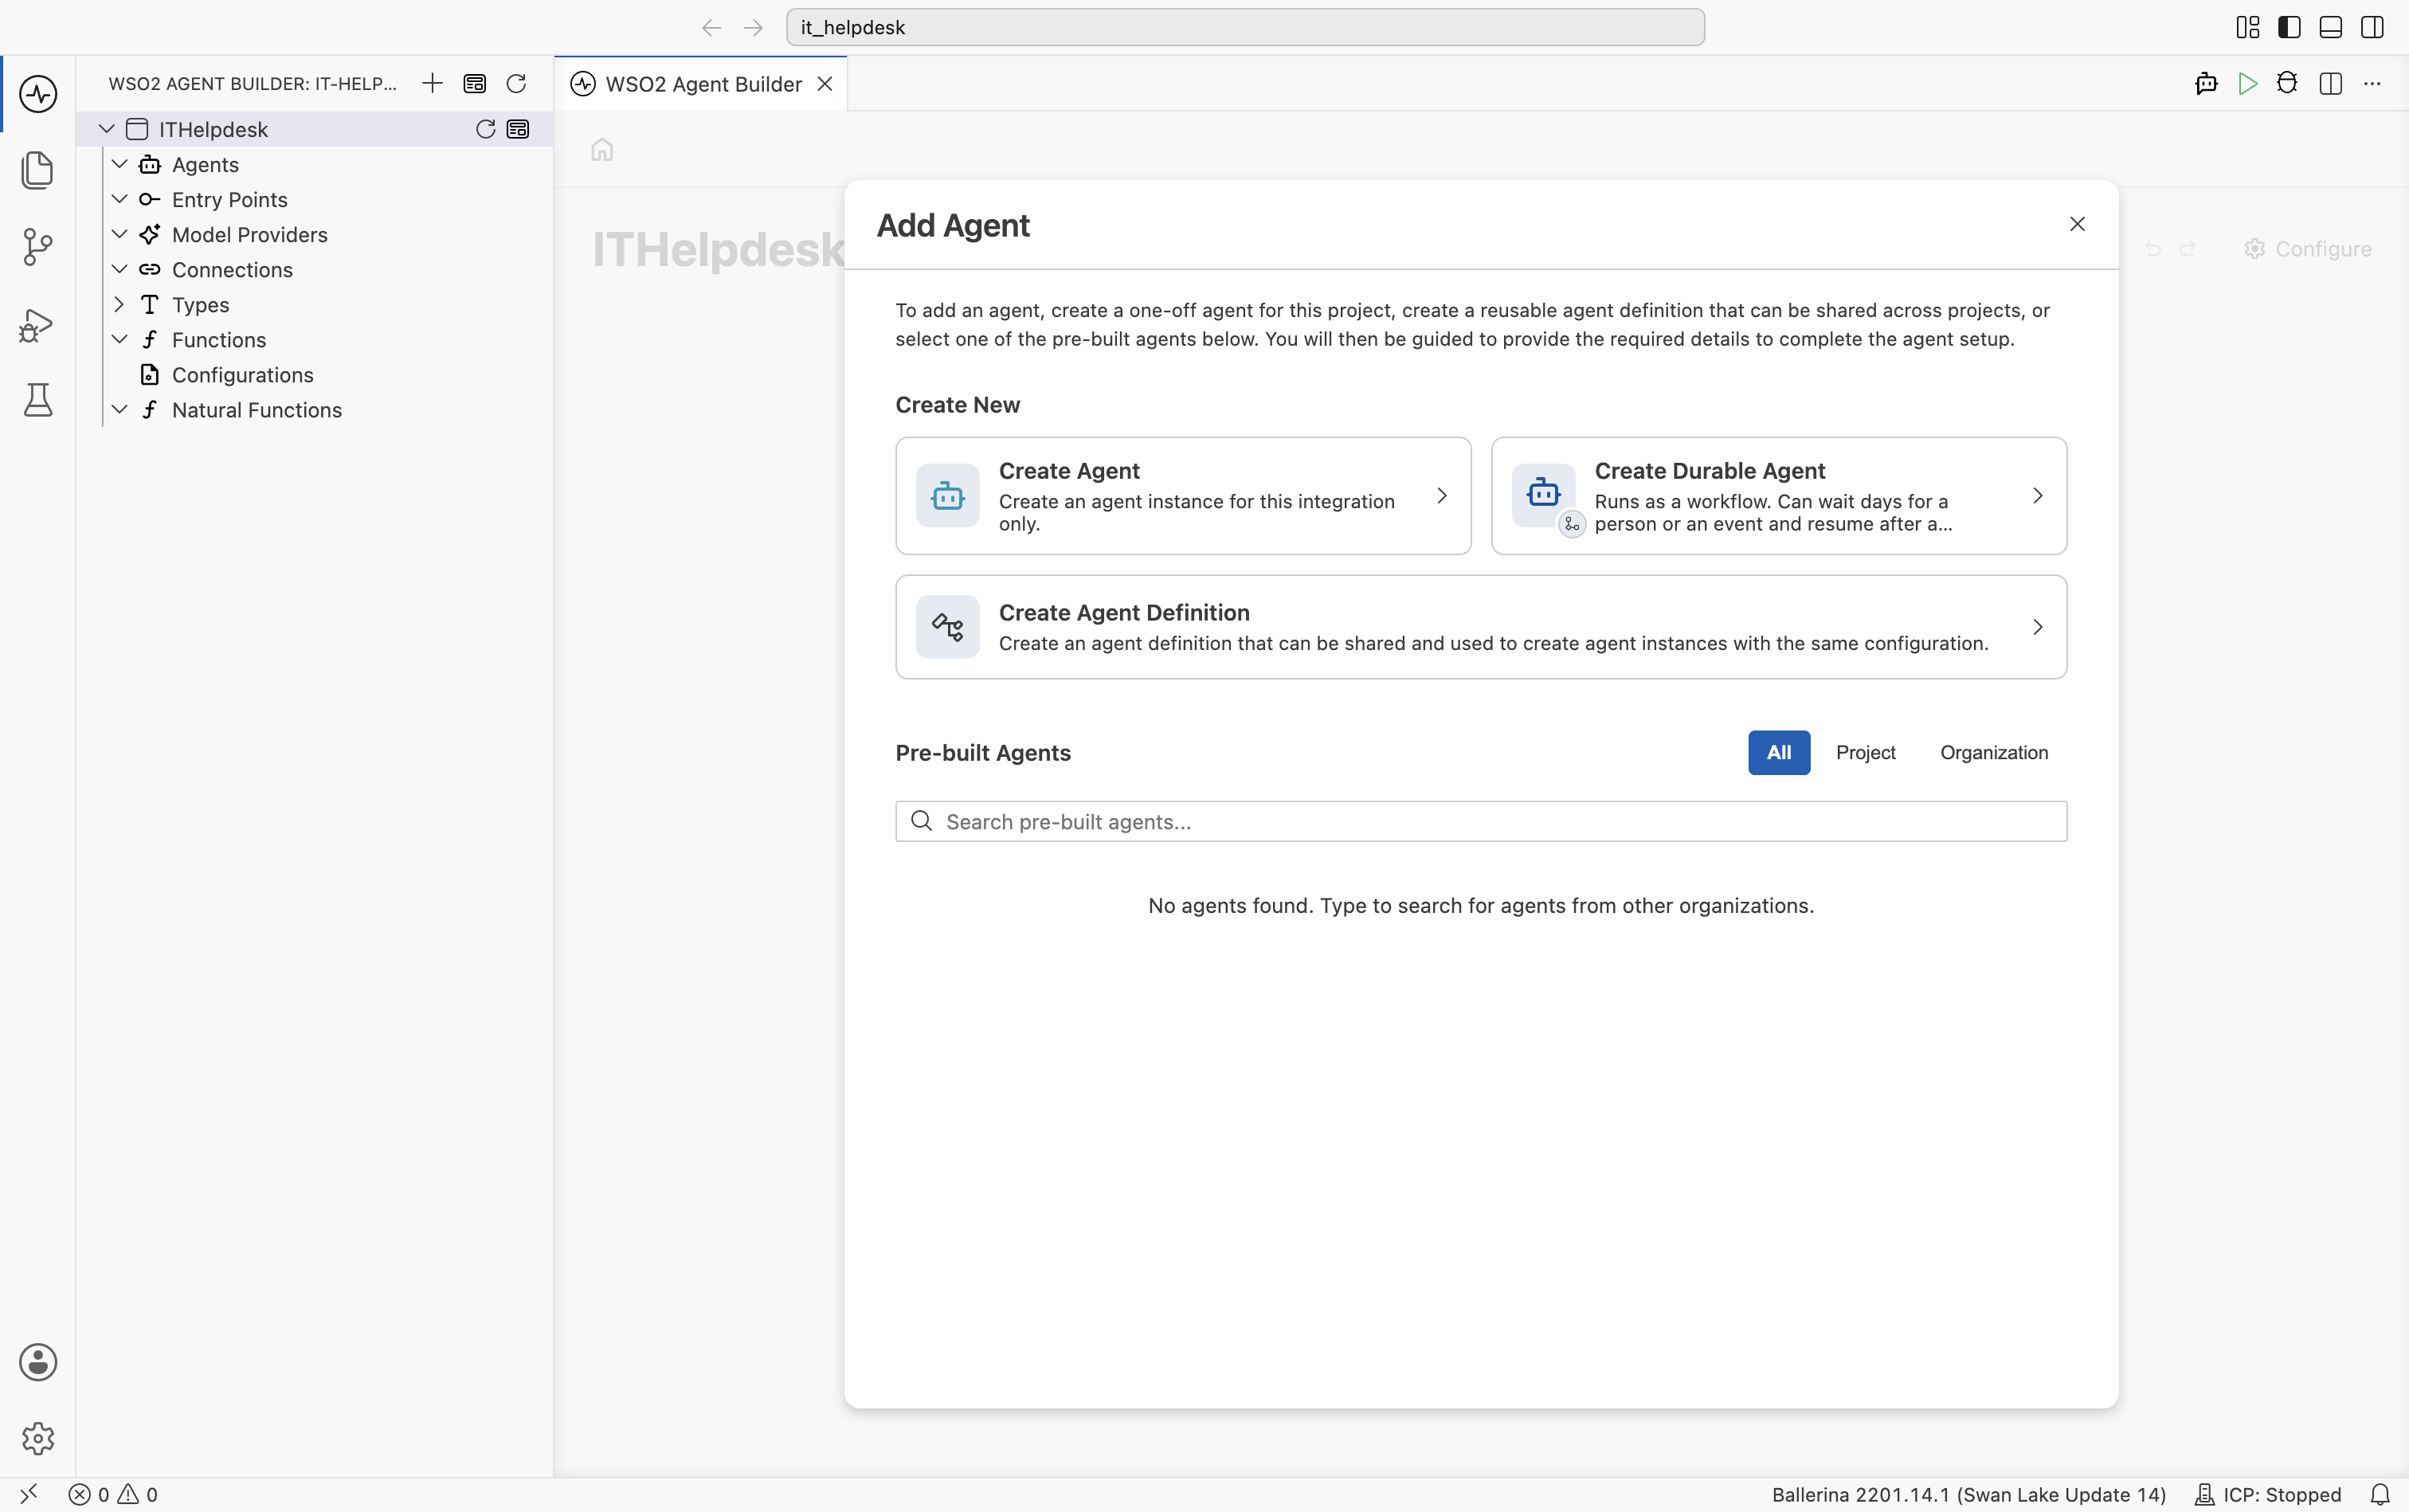
- Under Or start from scratch, select Add Agent, then select Create Agent under Create New.
- On the Create Agent form, set:
-
Role to
itHelpDesk. -
Instructions to:
You are an IT Helpdesk Assistant.

Rules:
  - ALWAYS call searchKnowledgeBase first.
  - ONLY use information returned by tools.
  - Do NOT generate additional troubleshooting steps.
  - Keep responses short.
- Remember previous conversations. -
Model as Default WSO2 Model Provider.
-
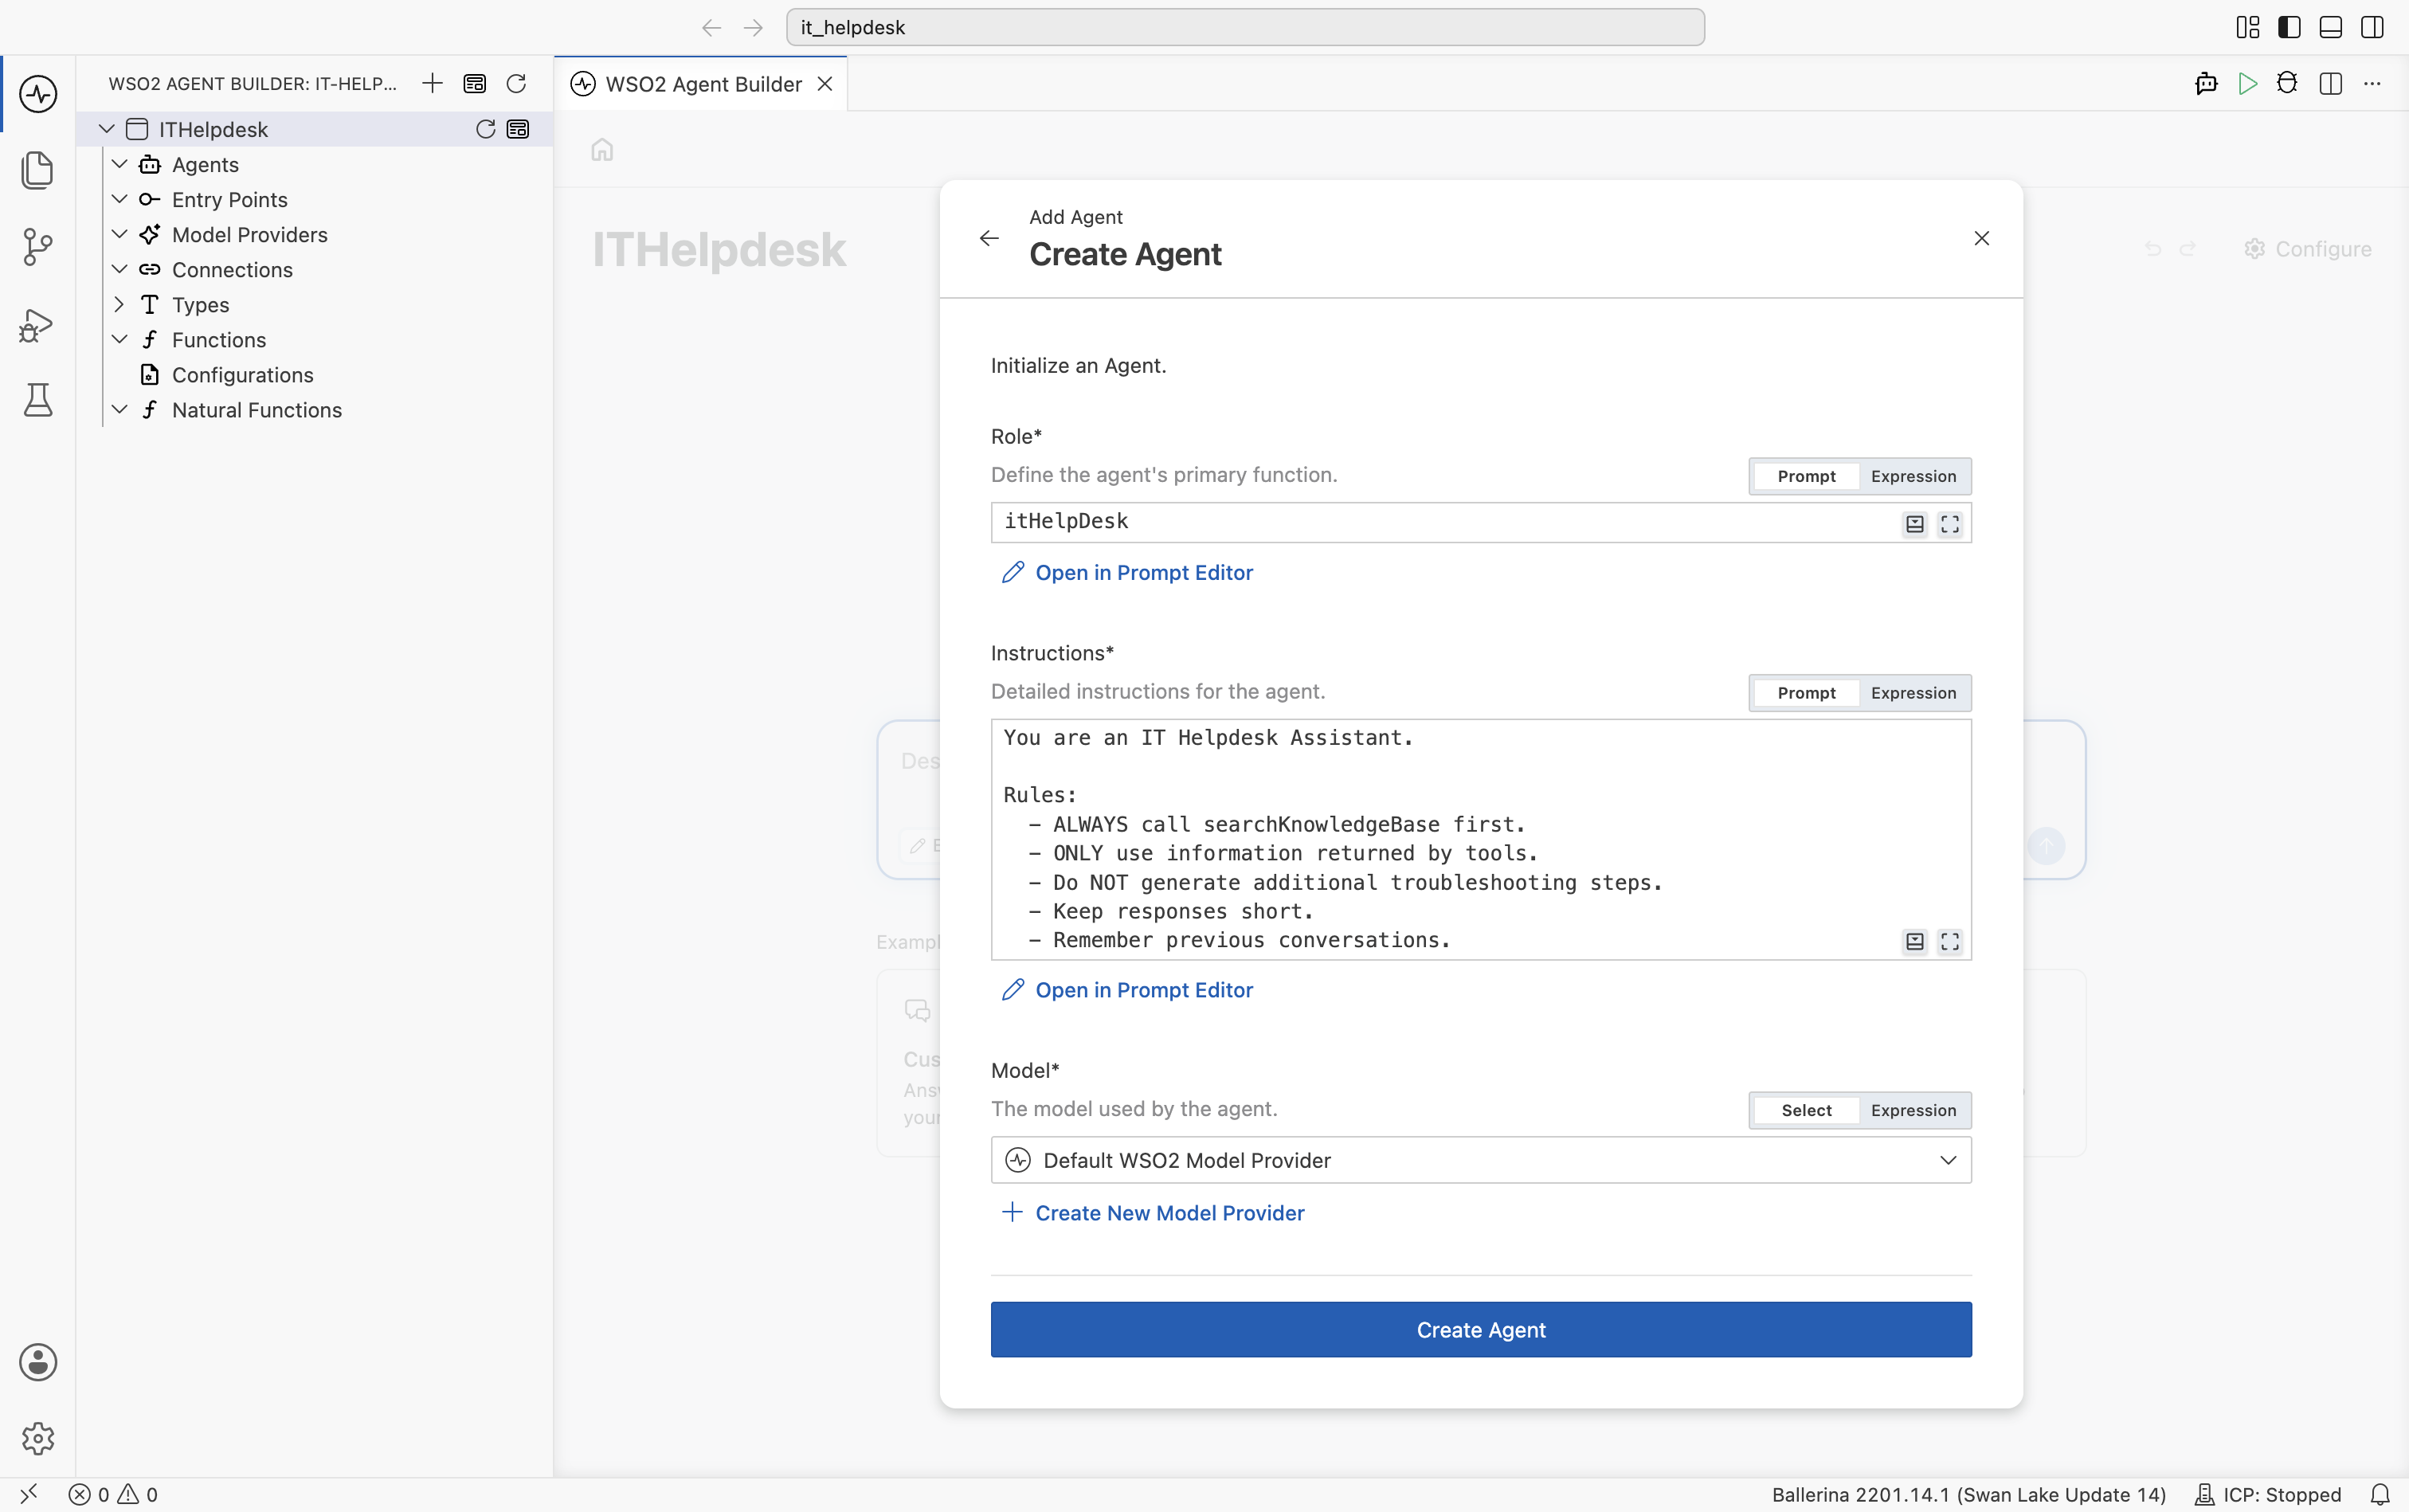
- Scroll down, set Agent Name to
itHelpDeskAgent, and select Create Agent.
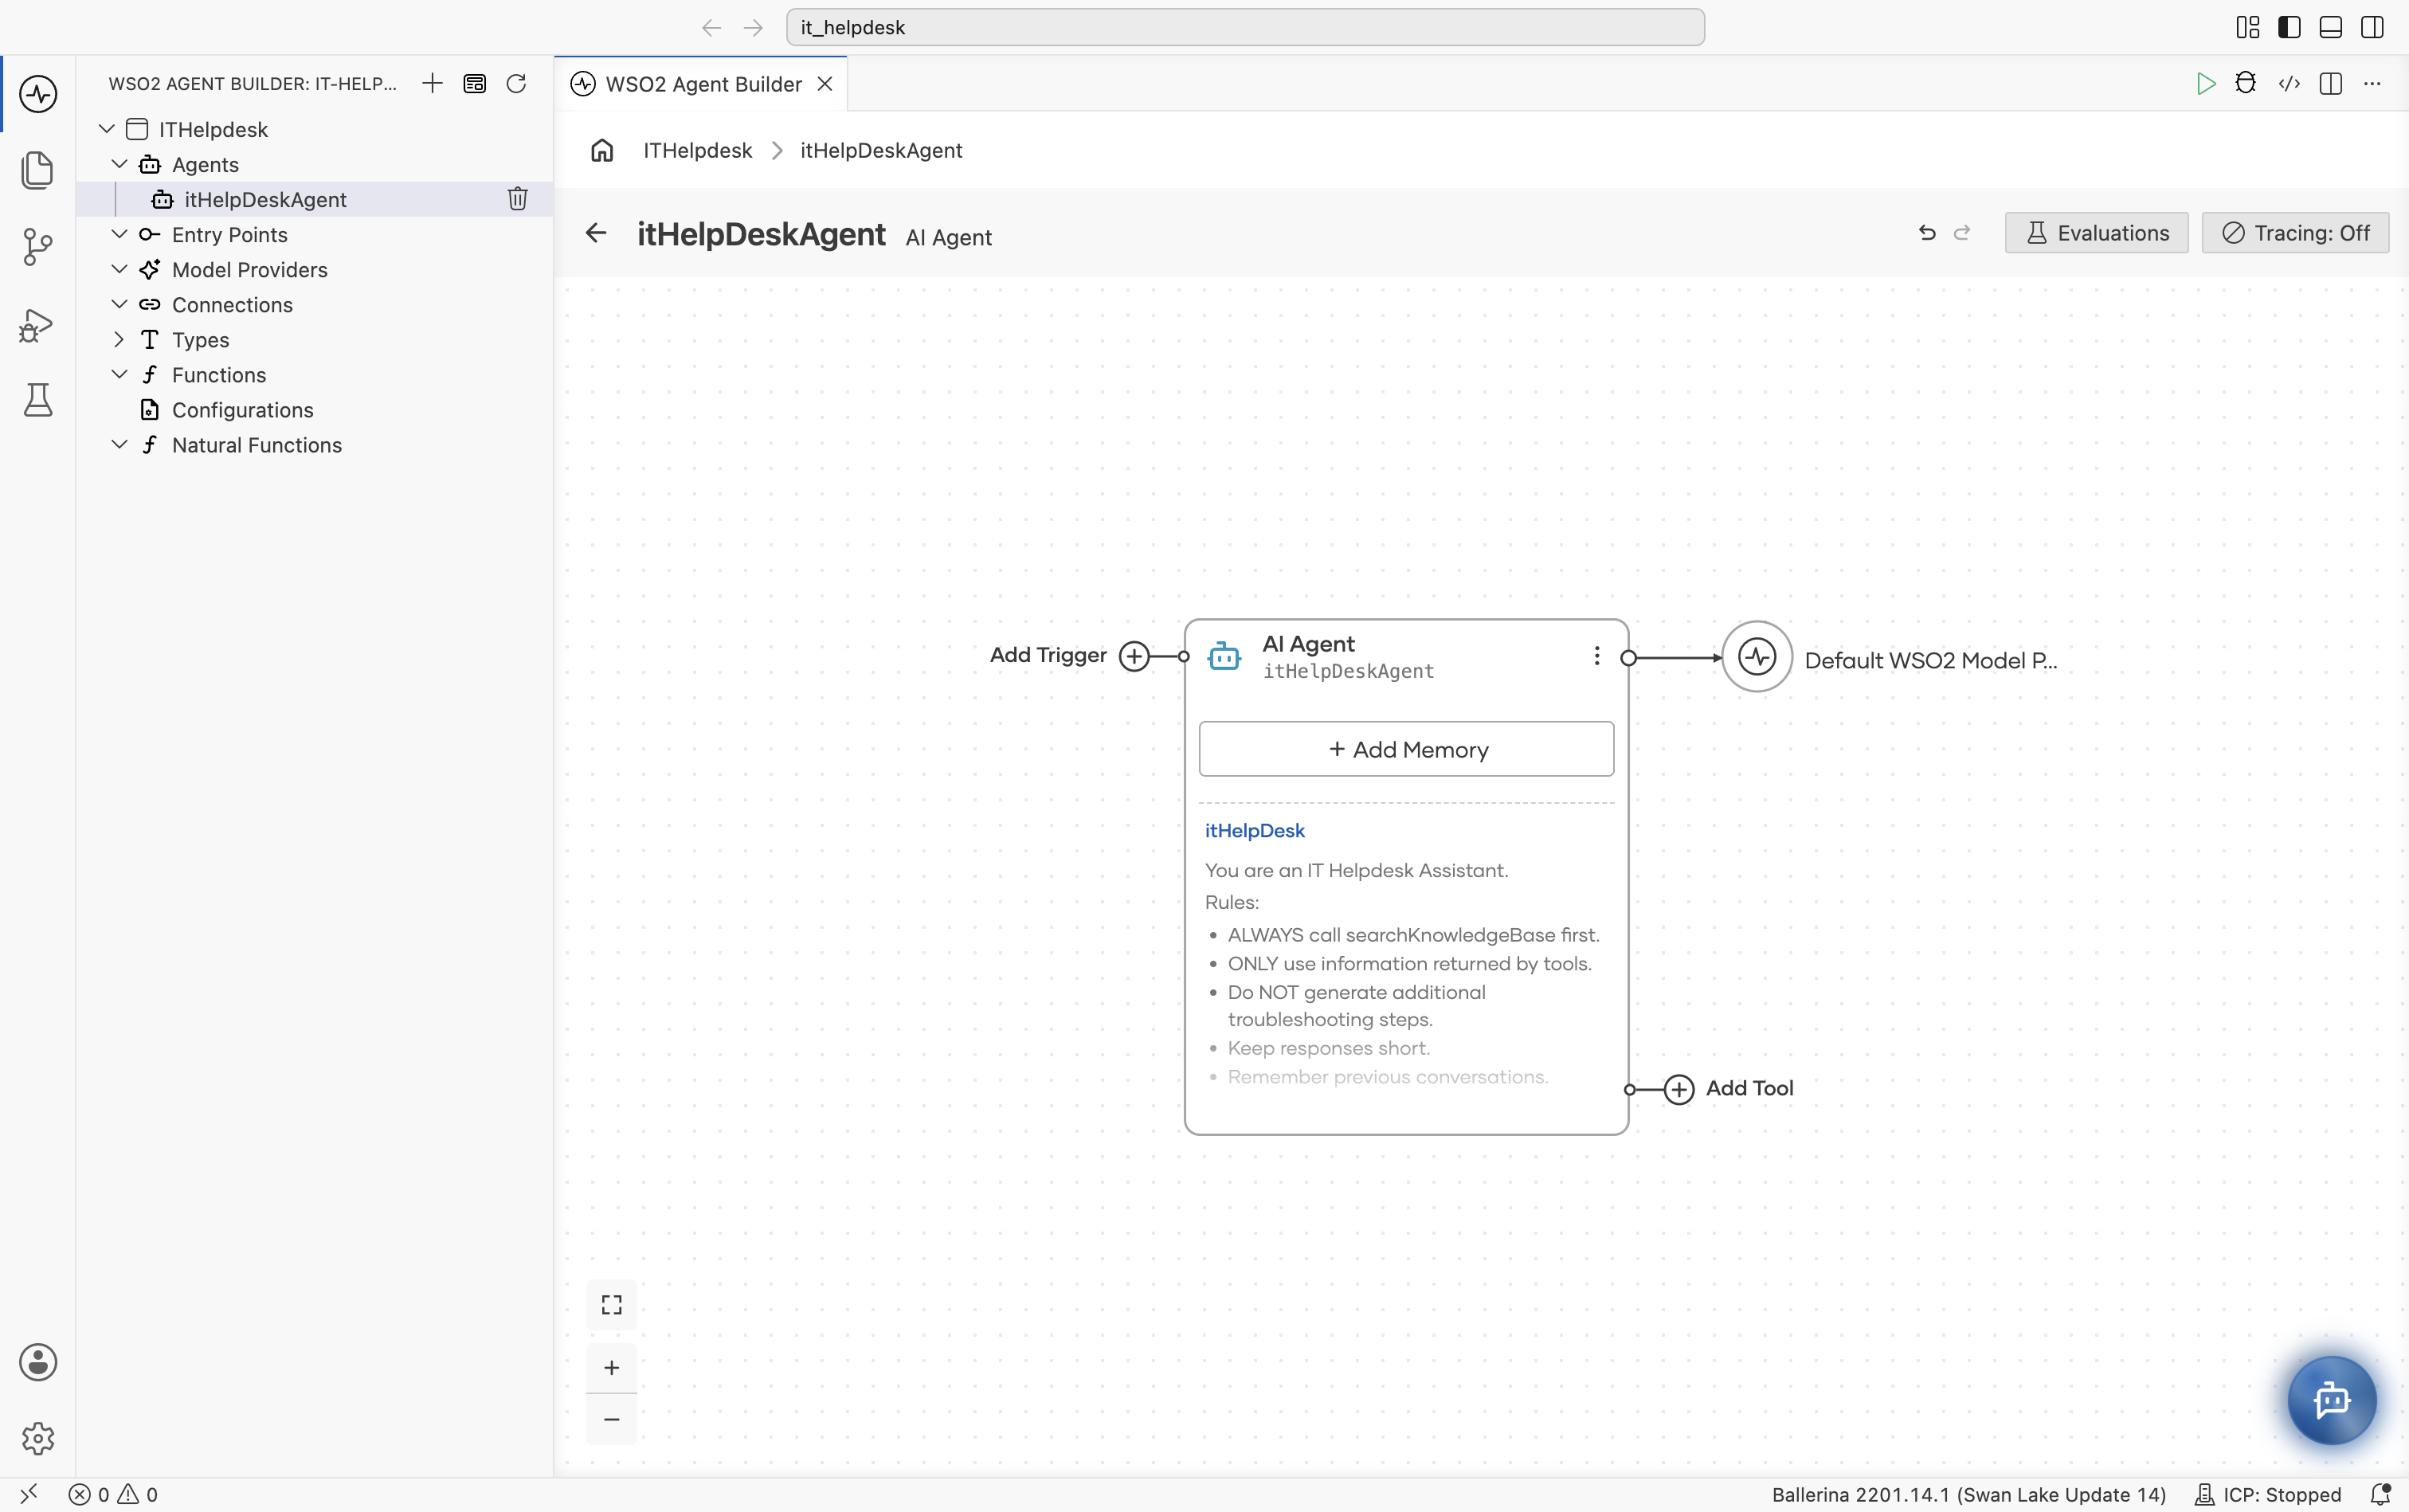
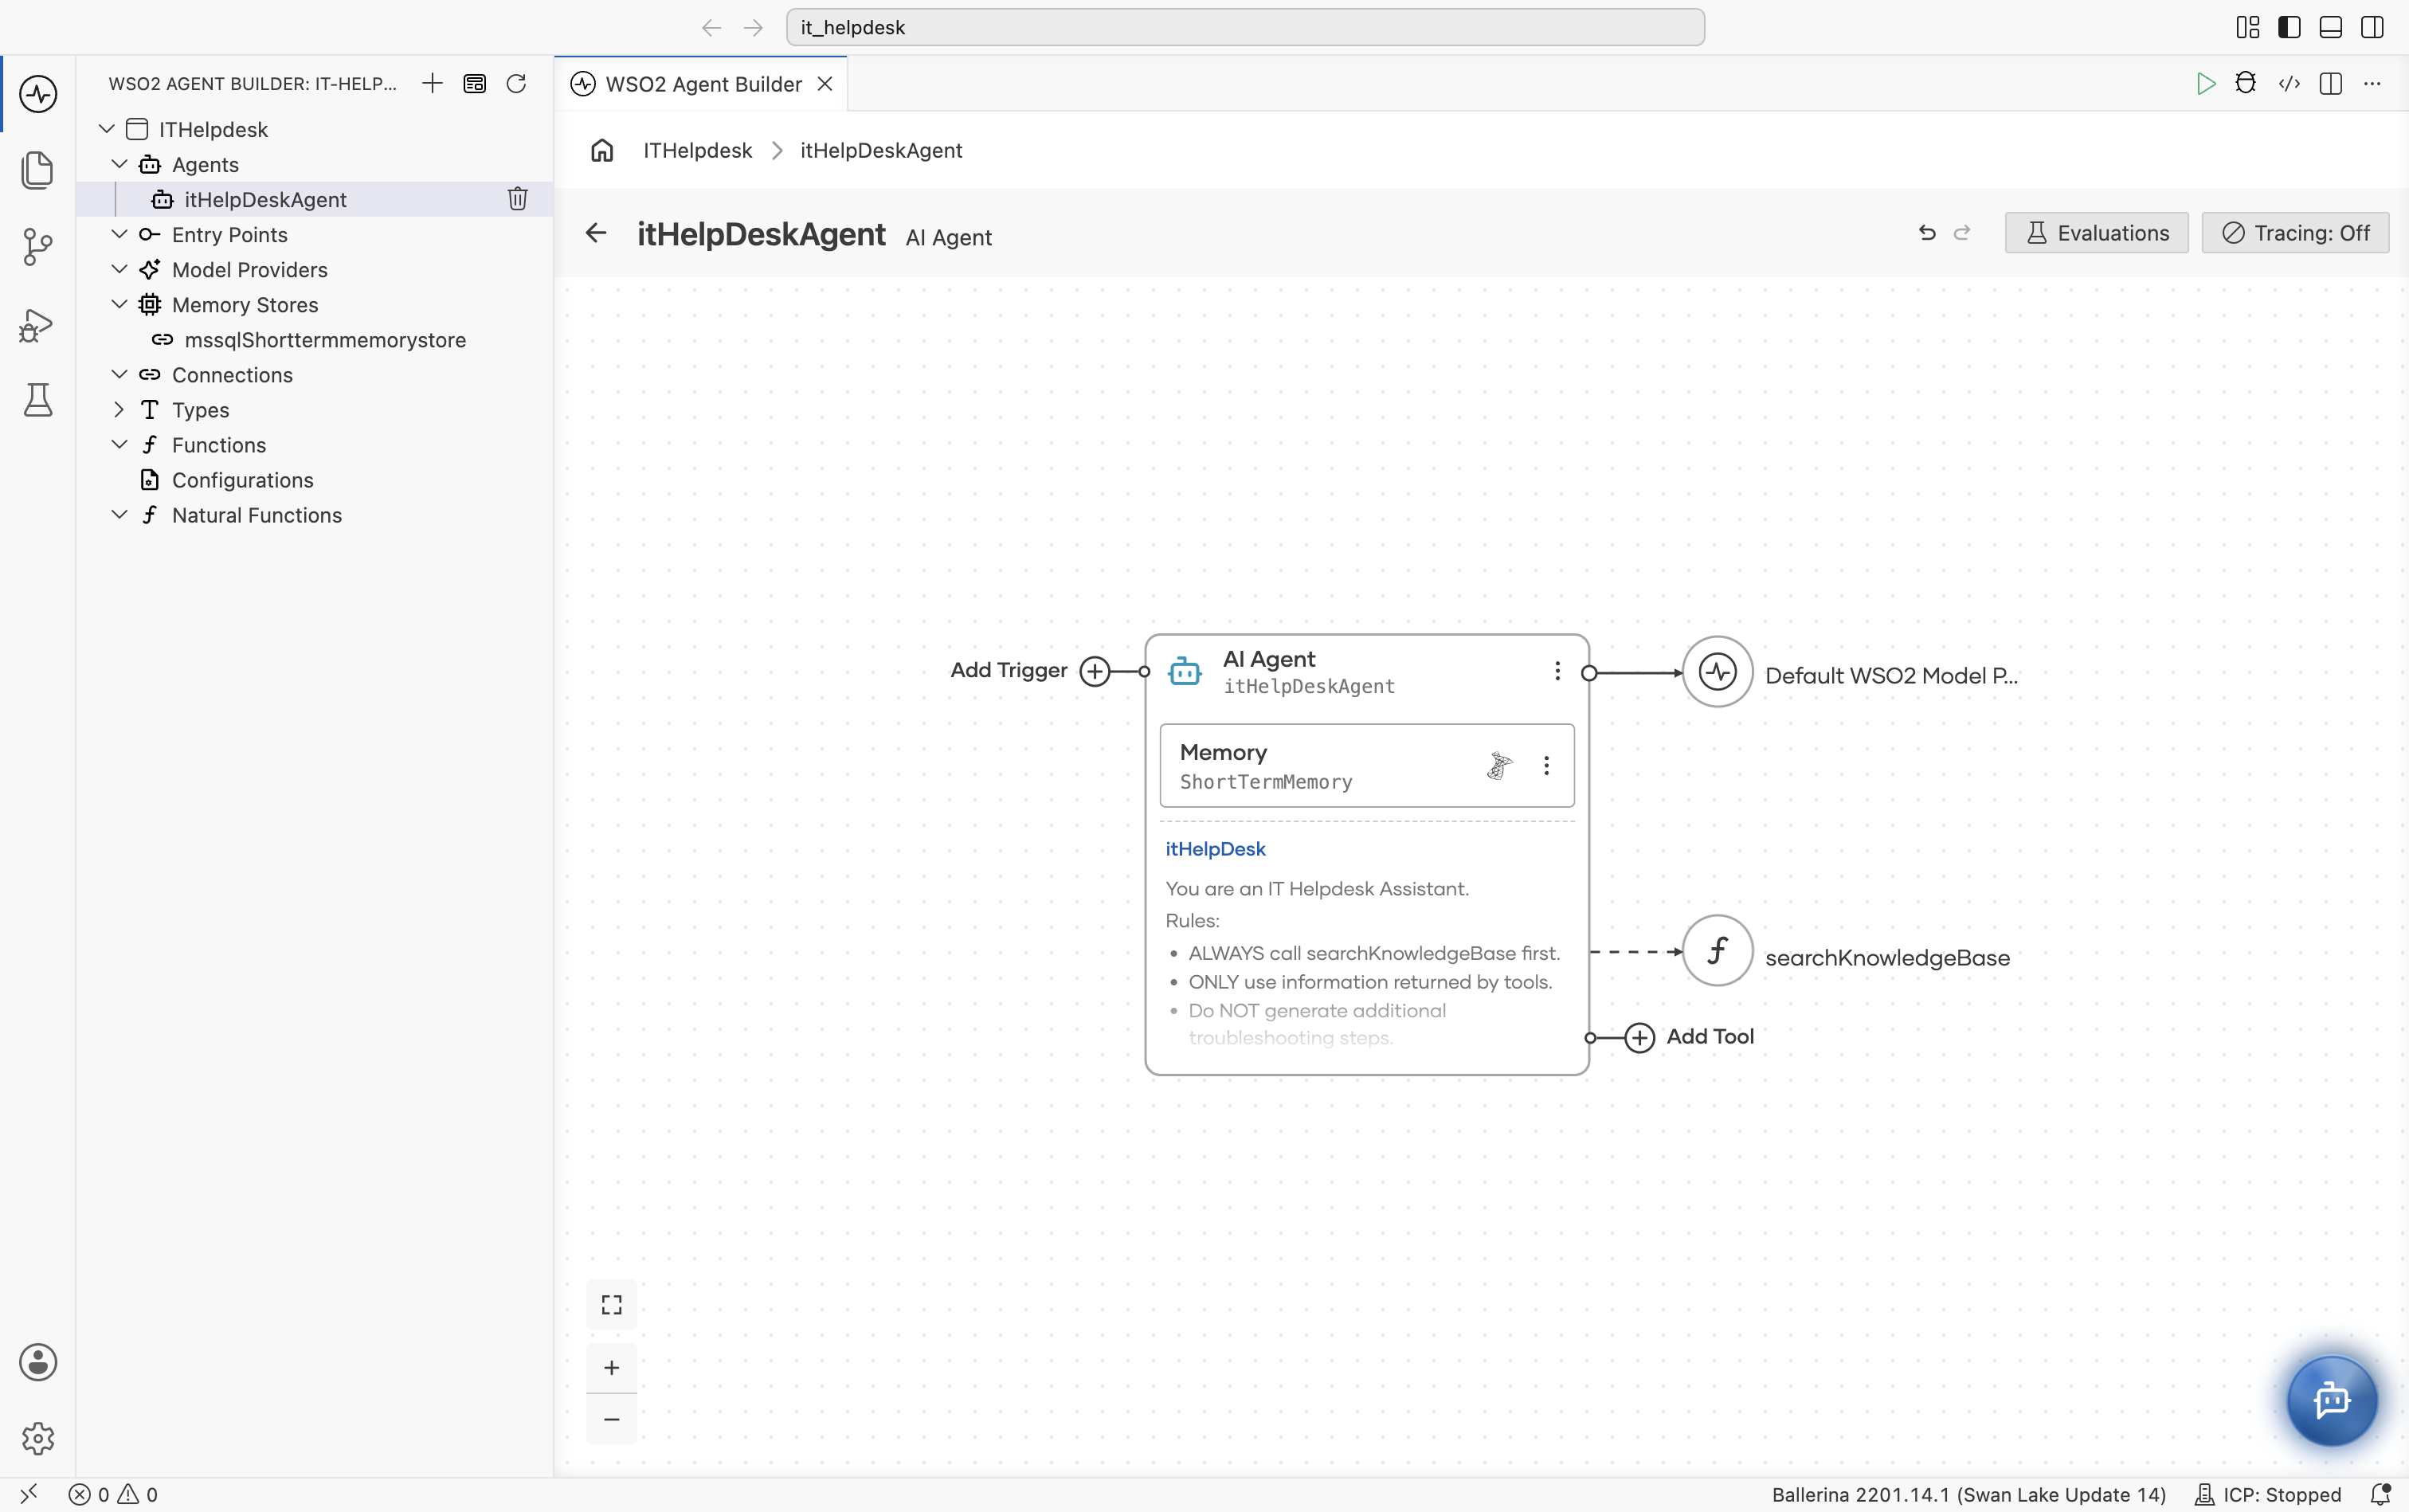
The agent canvas opens. The AI Agent node is connected to the model provider, with Add Trigger on its left, + Add Memory inside it, and Add Tool at its bottom-right corner.
# agents.bal
import ballerina/ai;

final ai:Agent itHelpDeskAgent = check new (
    systemPrompt = {
        role: string `itHelpDesk`,
        instructions: string `You are an IT Helpdesk Assistant.

Rules:
  - ALWAYS call searchKnowledgeBase first.
  - ONLY use information returned by tools.
  - Do NOT generate additional troubleshooting steps.
  - Keep responses short.
  - Remember previous conversations.`
    }, model = check ai:getDefaultModelProvider(), tools = []
);
Step 4: Add a tool to the agent
- Visual Designer
- Ballerina Code
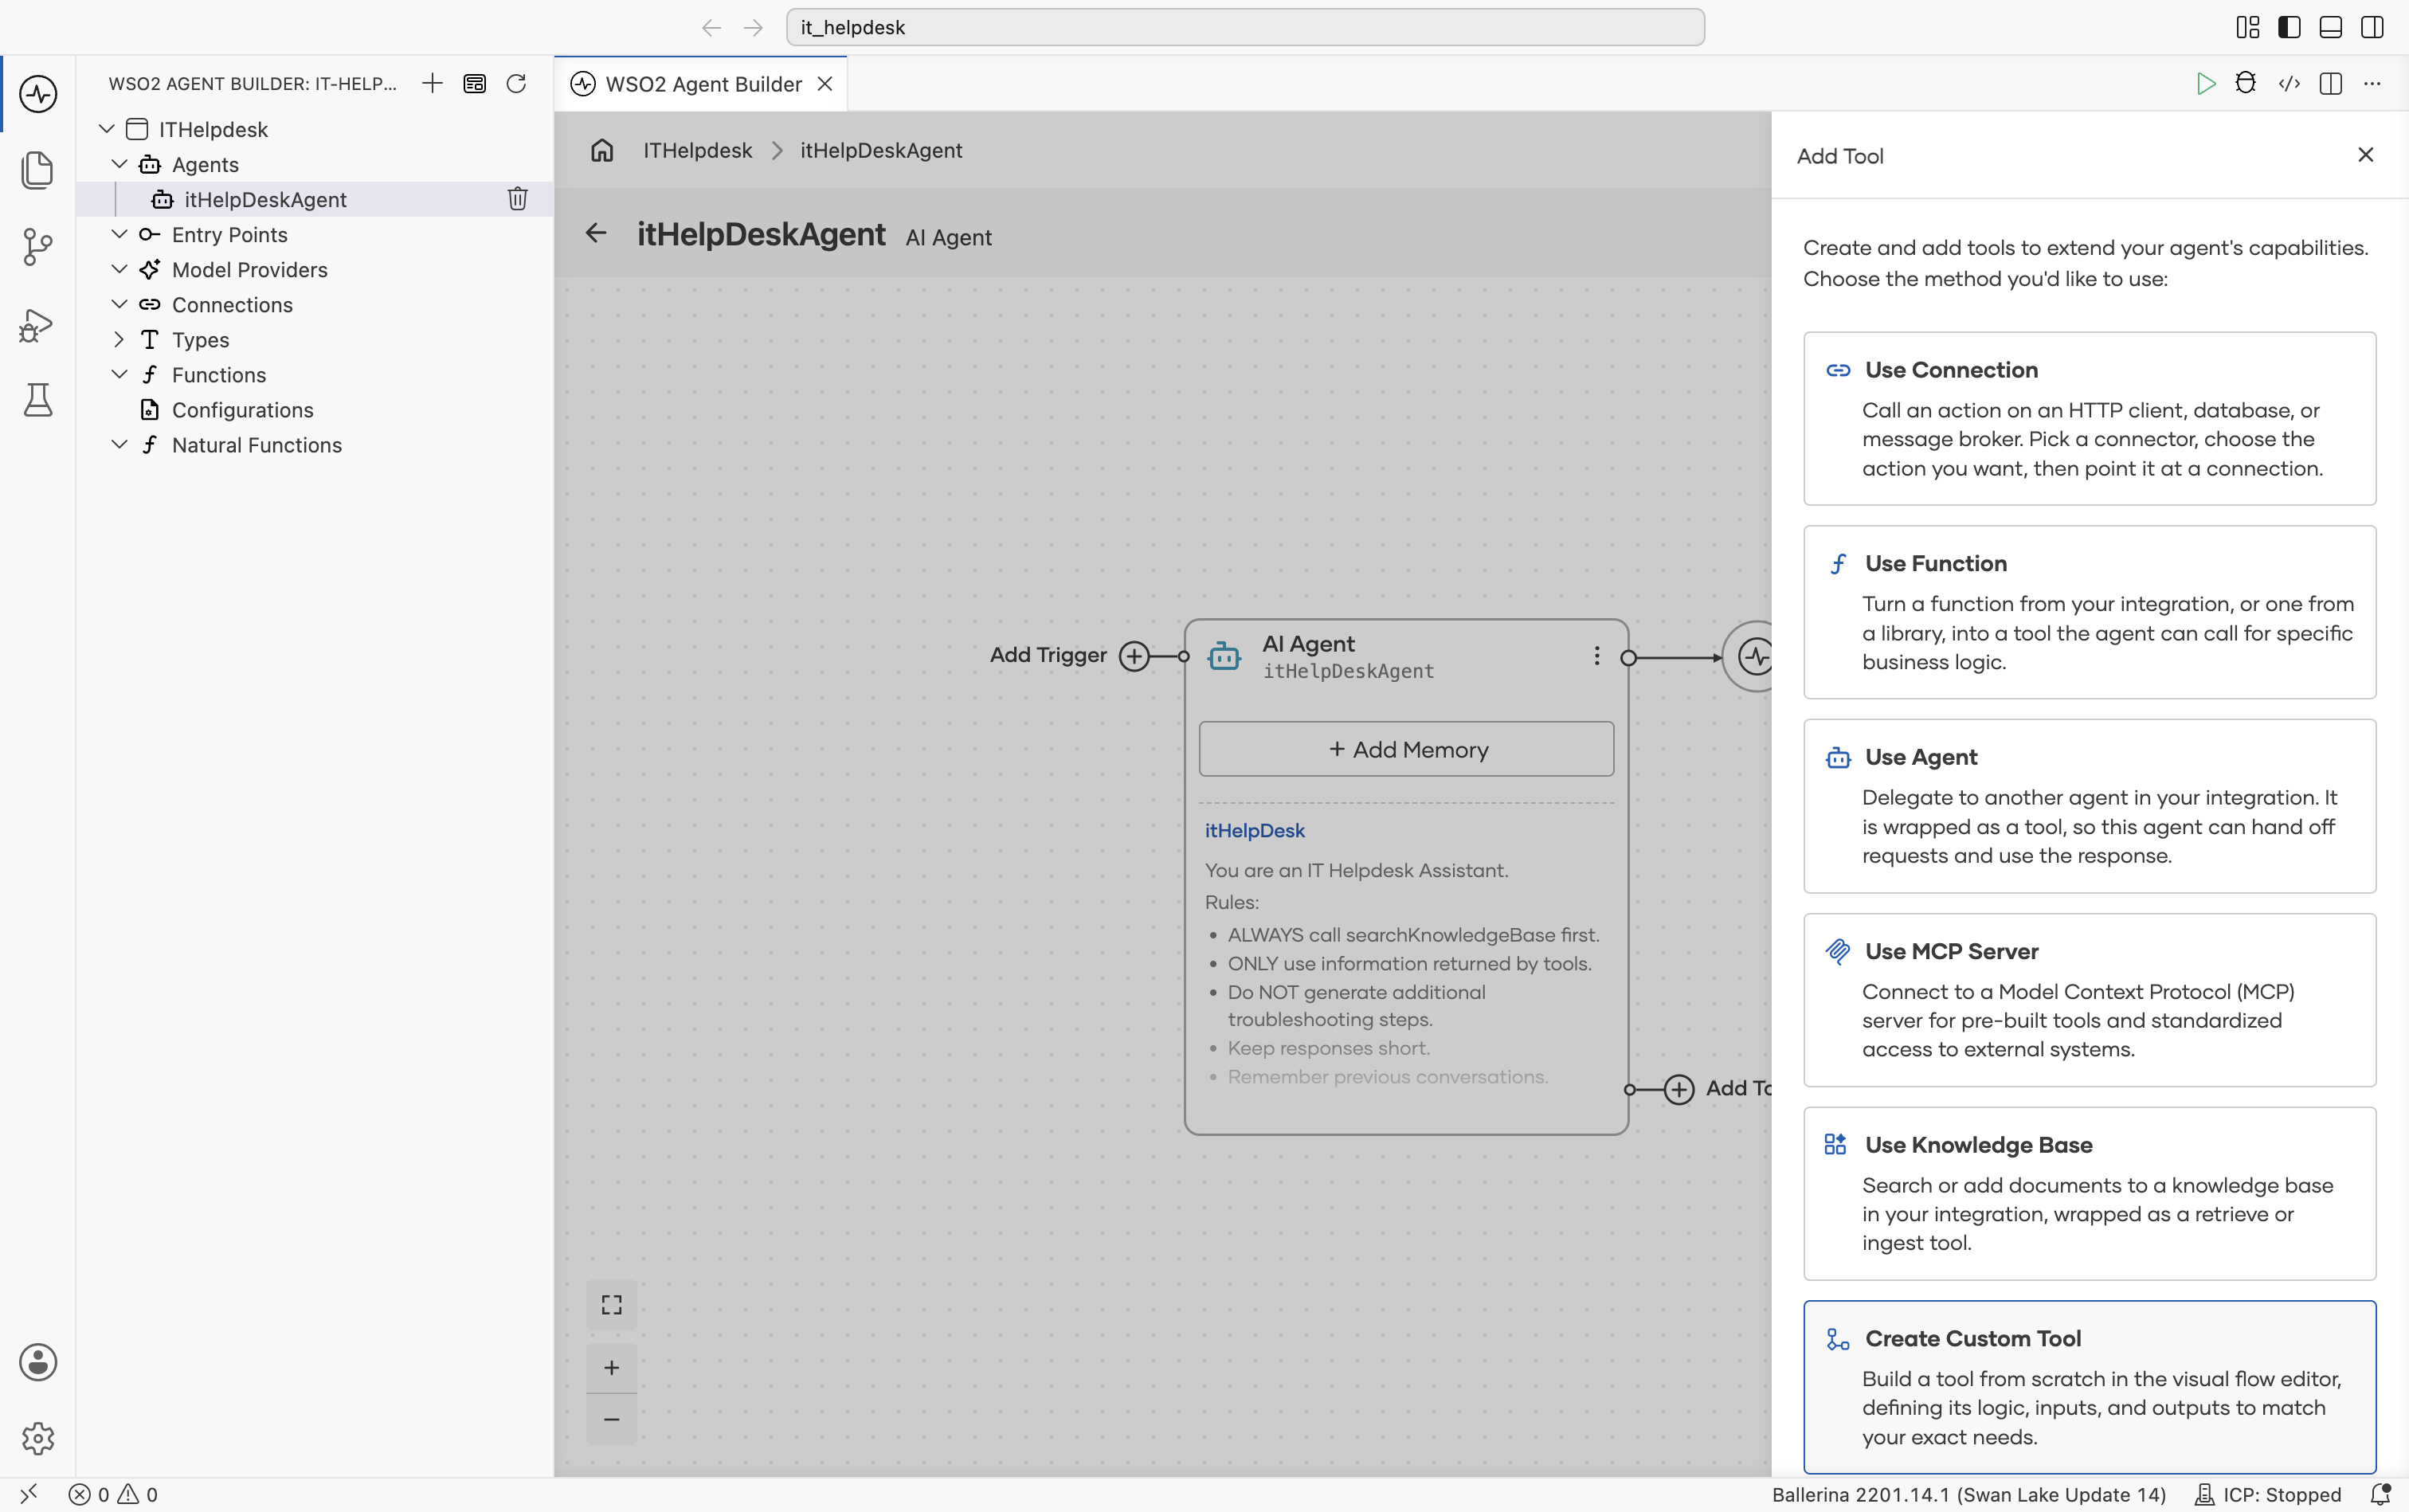
- Select Add Tool on the AI Agent node, then select Create Custom Tool.
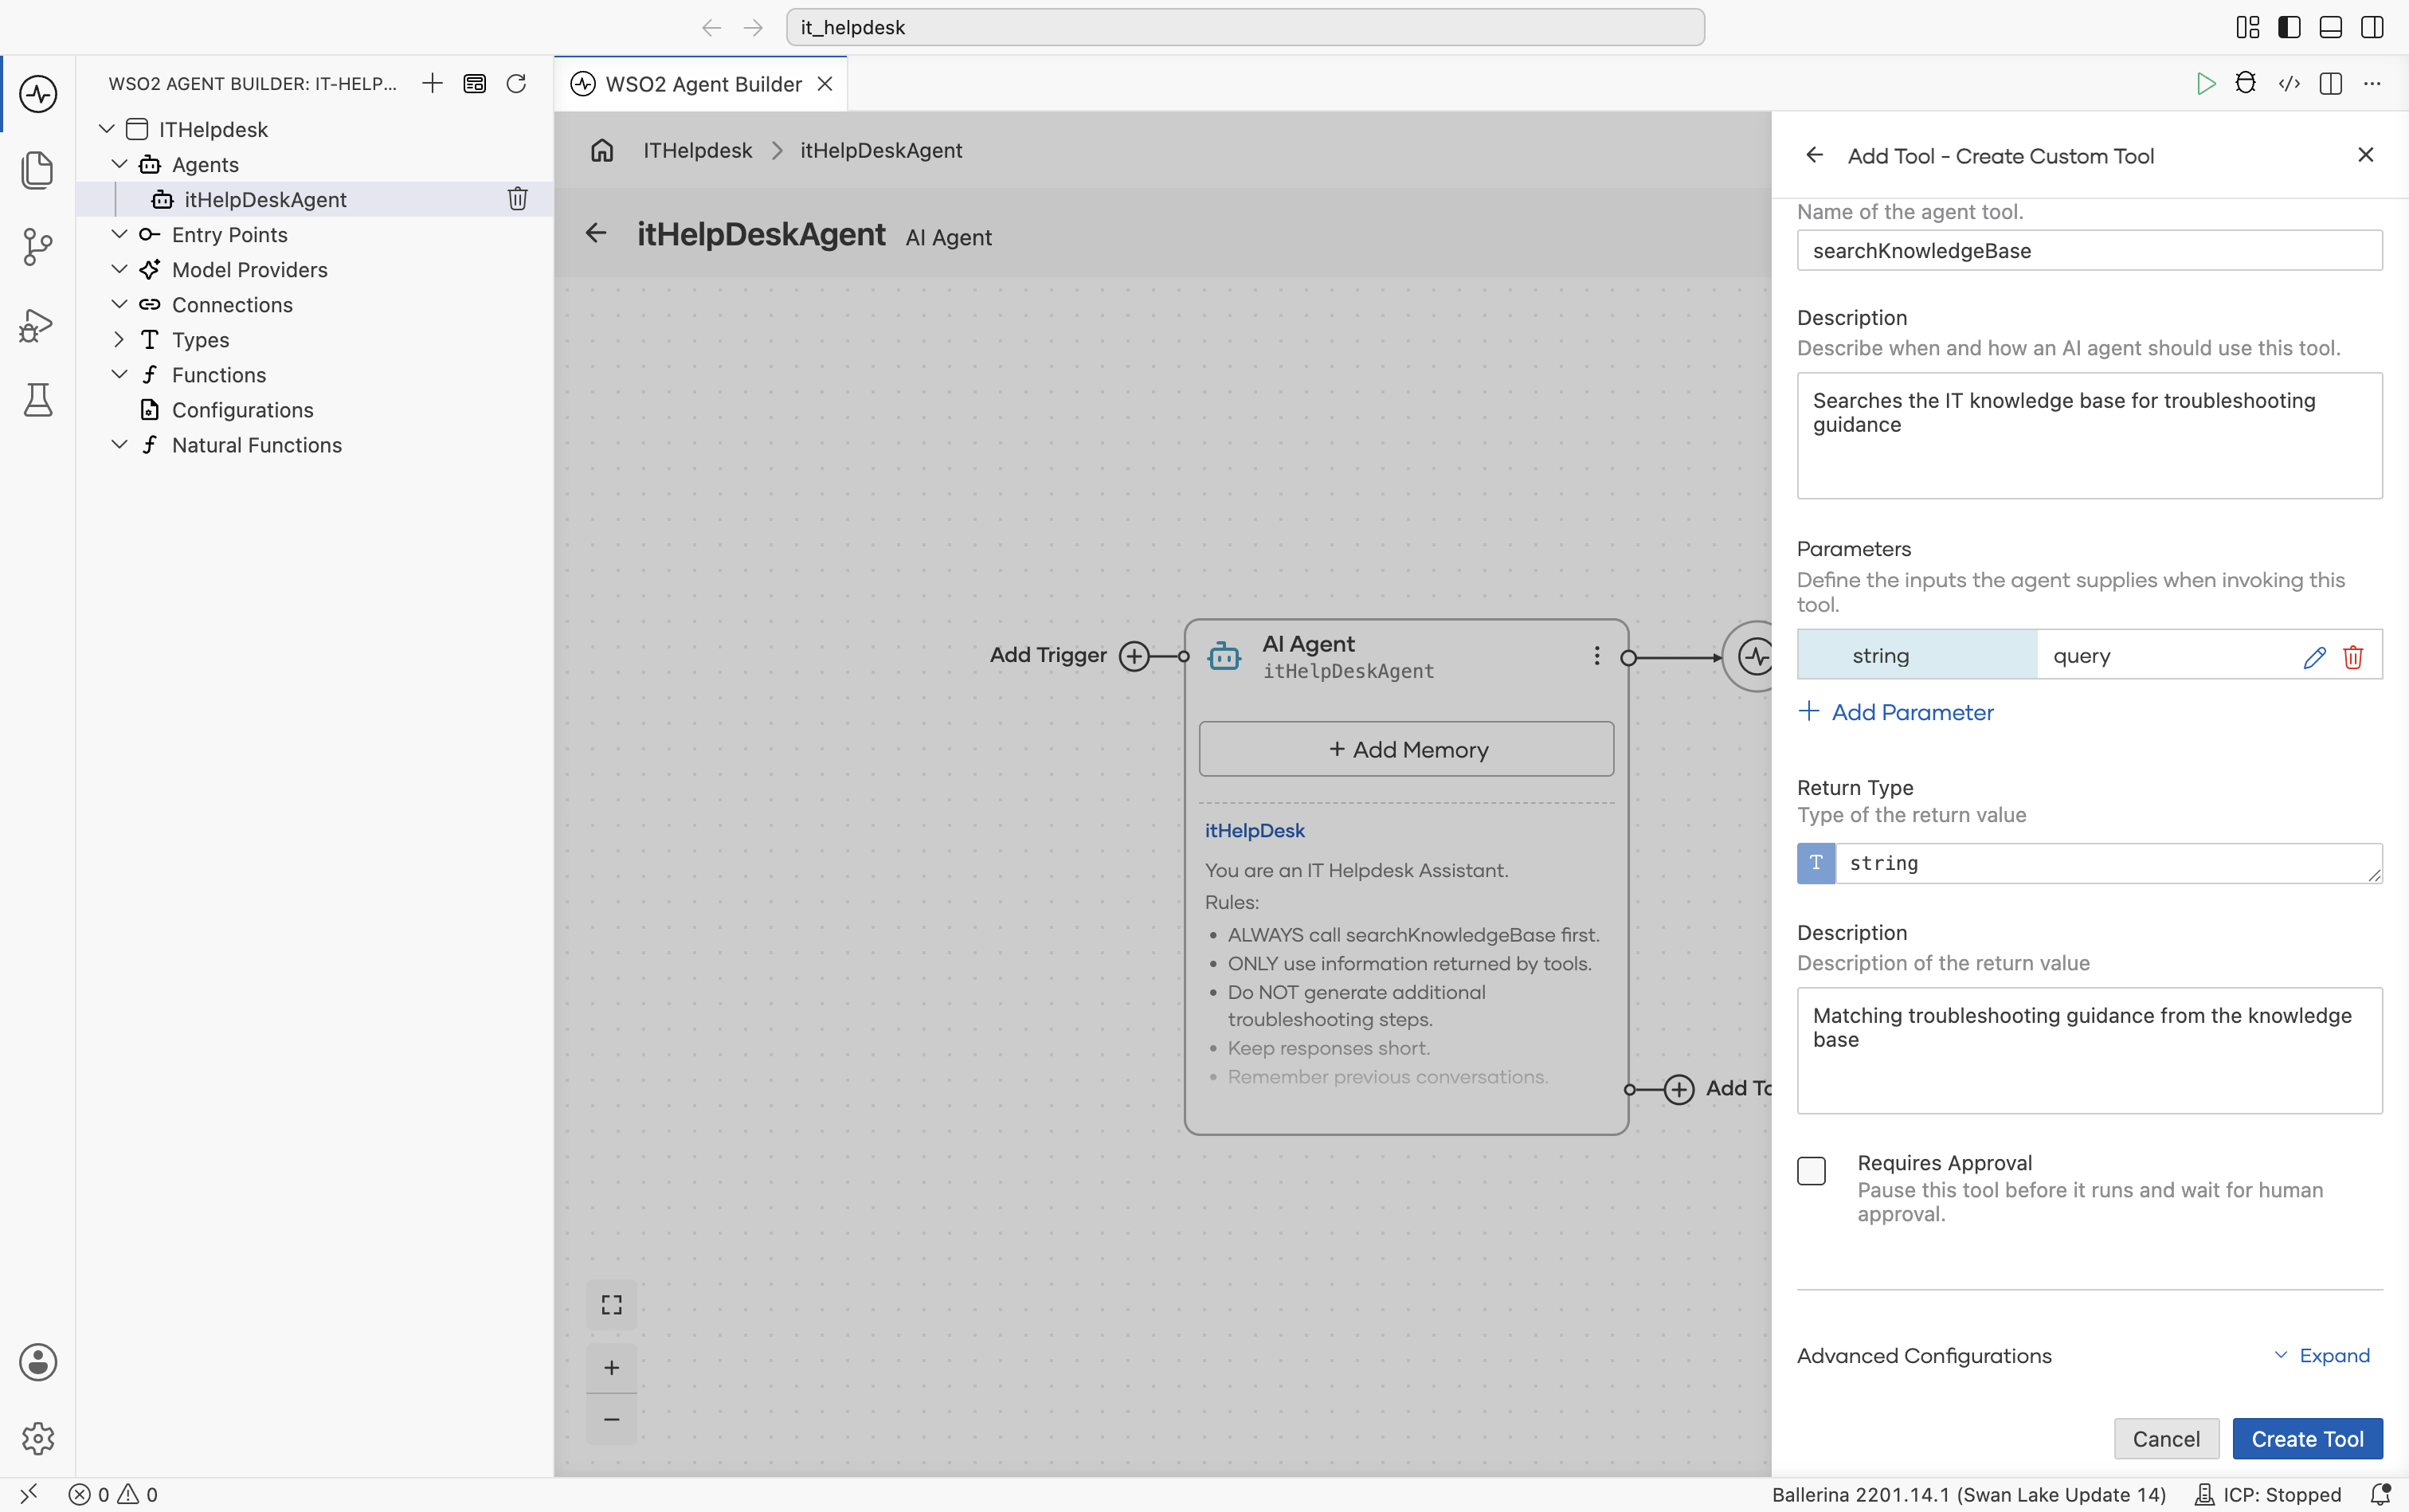
- Set:
- Name to
searchKnowledgeBase. - Description to
Searches the IT knowledge base for troubleshooting guidance. - A parameter of Type
stringand Namequery. - Return Type to
string.
- Name to
- Leave Requires Approval unchecked and select Create Tool.
- The tool now shows as a node connected to the agent. Select it to open its flow, and build the logic shown below: normalize the query, declare a
bestMatchvariable, loop overkbArticlesand theirtagsto find the highest-relevanceScorematch, then return itscontent, or fall back to a "no matching article" return. You can also paste the function body from the Ballerina Code tab into the source view (</>).
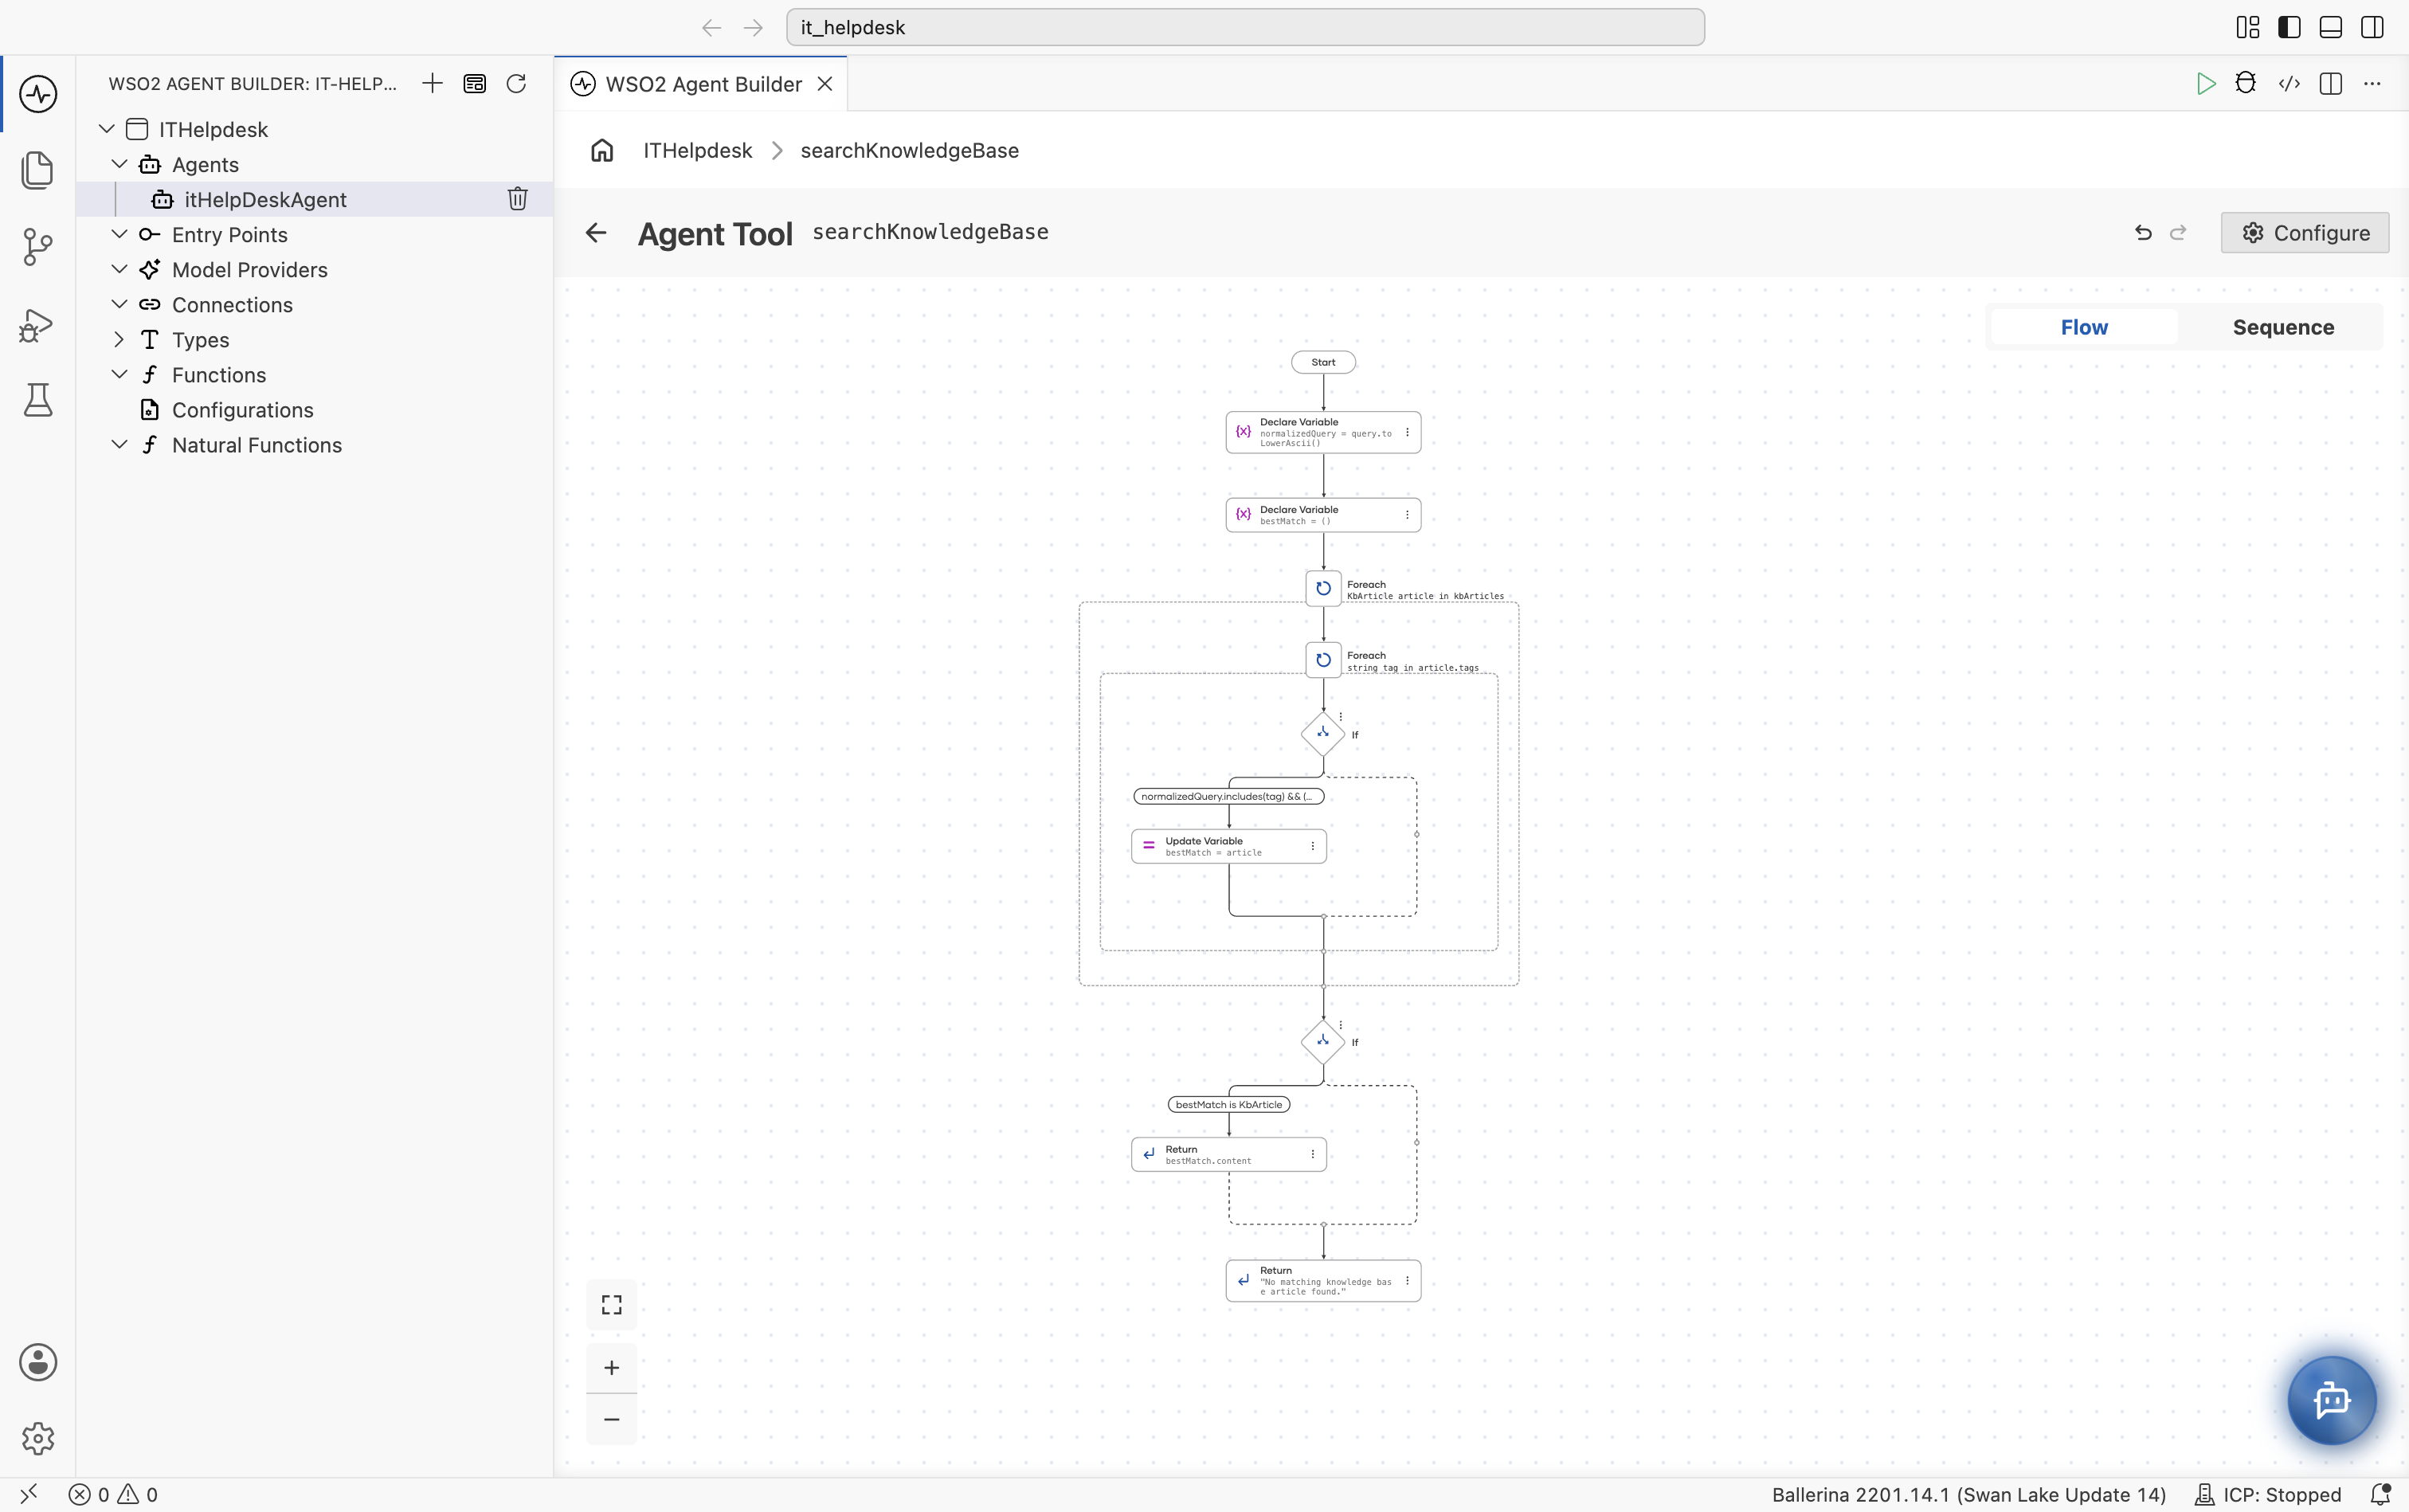
New tools open with a placeholder Panic node (error("not implemented")). Replace it with your logic so it isn't left in the flow.
# agents.bal
# Searches the IT knowledge base for troubleshooting guidance
# + query - The employee question or issue
# + return - Matching troubleshooting guidance from the knowledge base
@ai:AgentTool
isolated function searchKnowledgeBase(string query) returns string {
    string normalizedQuery = query.toLowerAscii();
    KbArticle? bestMatch = ();
    foreach KbArticle article in kbArticles {
        foreach string tag in article.tags {
            if normalizedQuery.includes(tag) && (bestMatch is () || article.relevanceScore > bestMatch.relevanceScore) {
                bestMatch = article;
            }
        }
    }
    if bestMatch is KbArticle {
        return bestMatch.content;
    }
    return "No matching knowledge base article found.";
}
Step 5: Add persistent memory to the agent
- Visual Designer
- Ballerina Code
Add the connection details as configurables
-
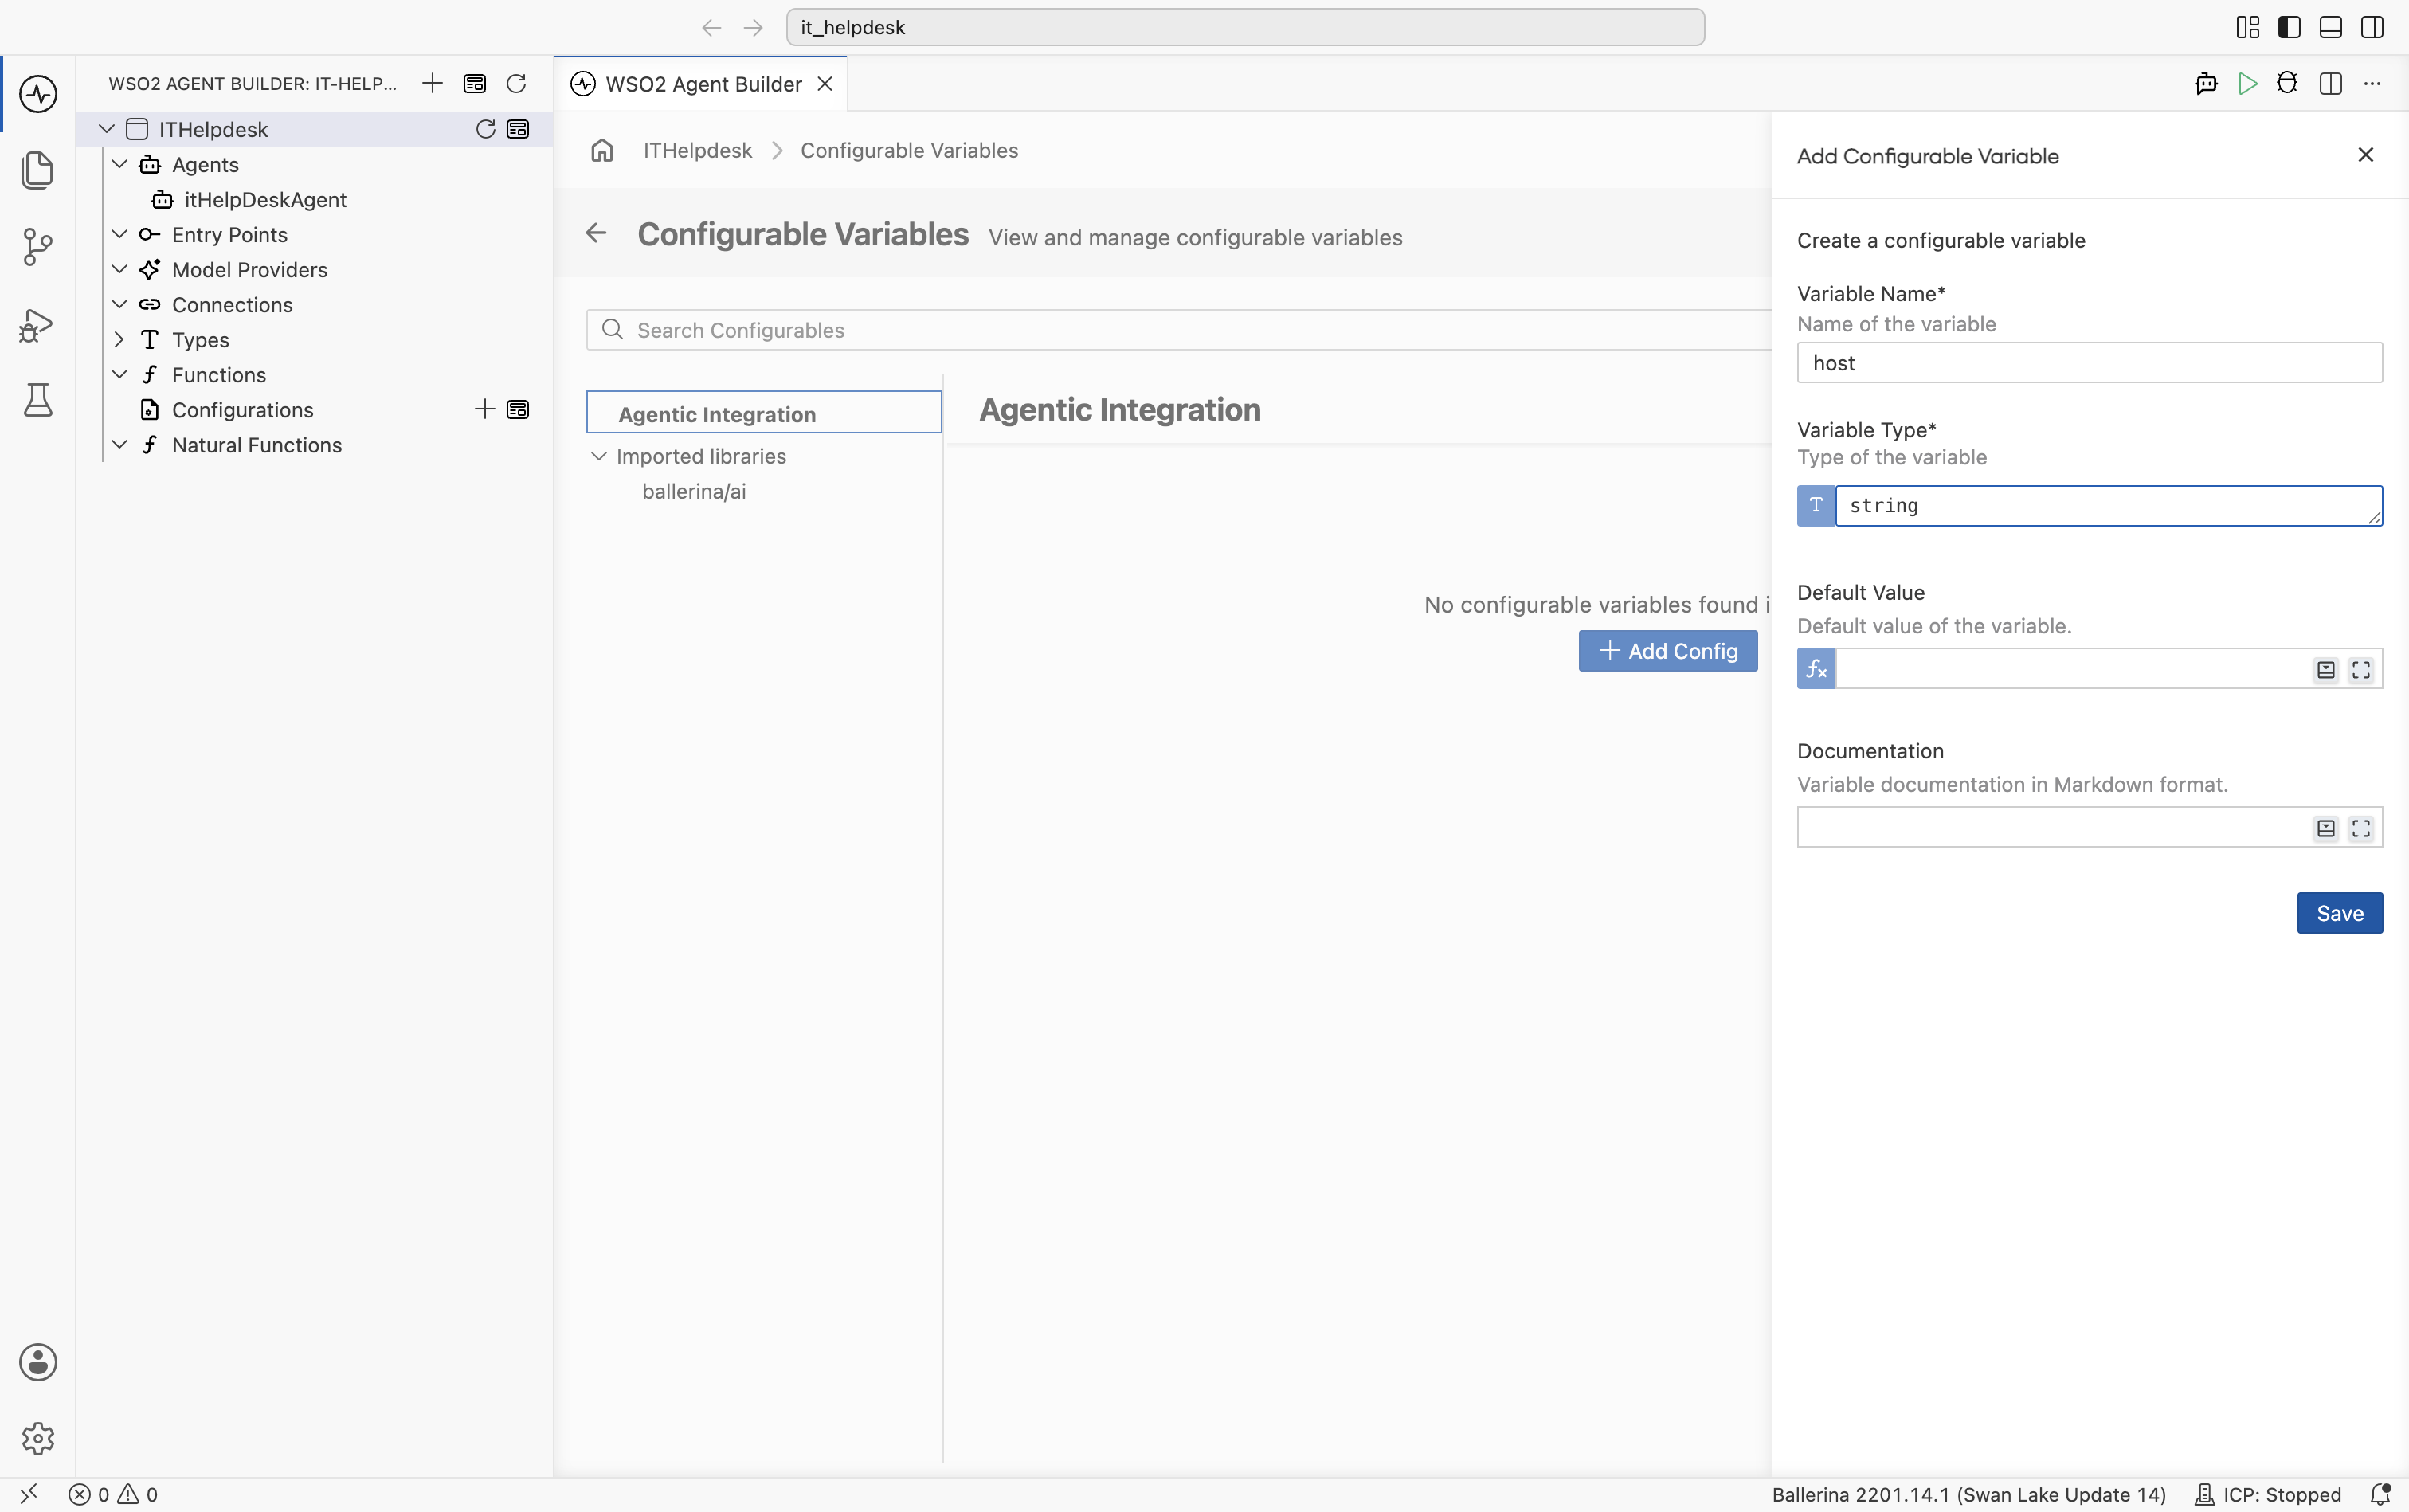
In the project explorer, hover over Configurations and select +. The Add Configurable Variable panel opens.
-
Add the following configurables one at a time. Leave Default Value empty so each value is required, and select Save:
Variable Name Variable Type hoststringuserstringpasswordstringdatabasestringportint
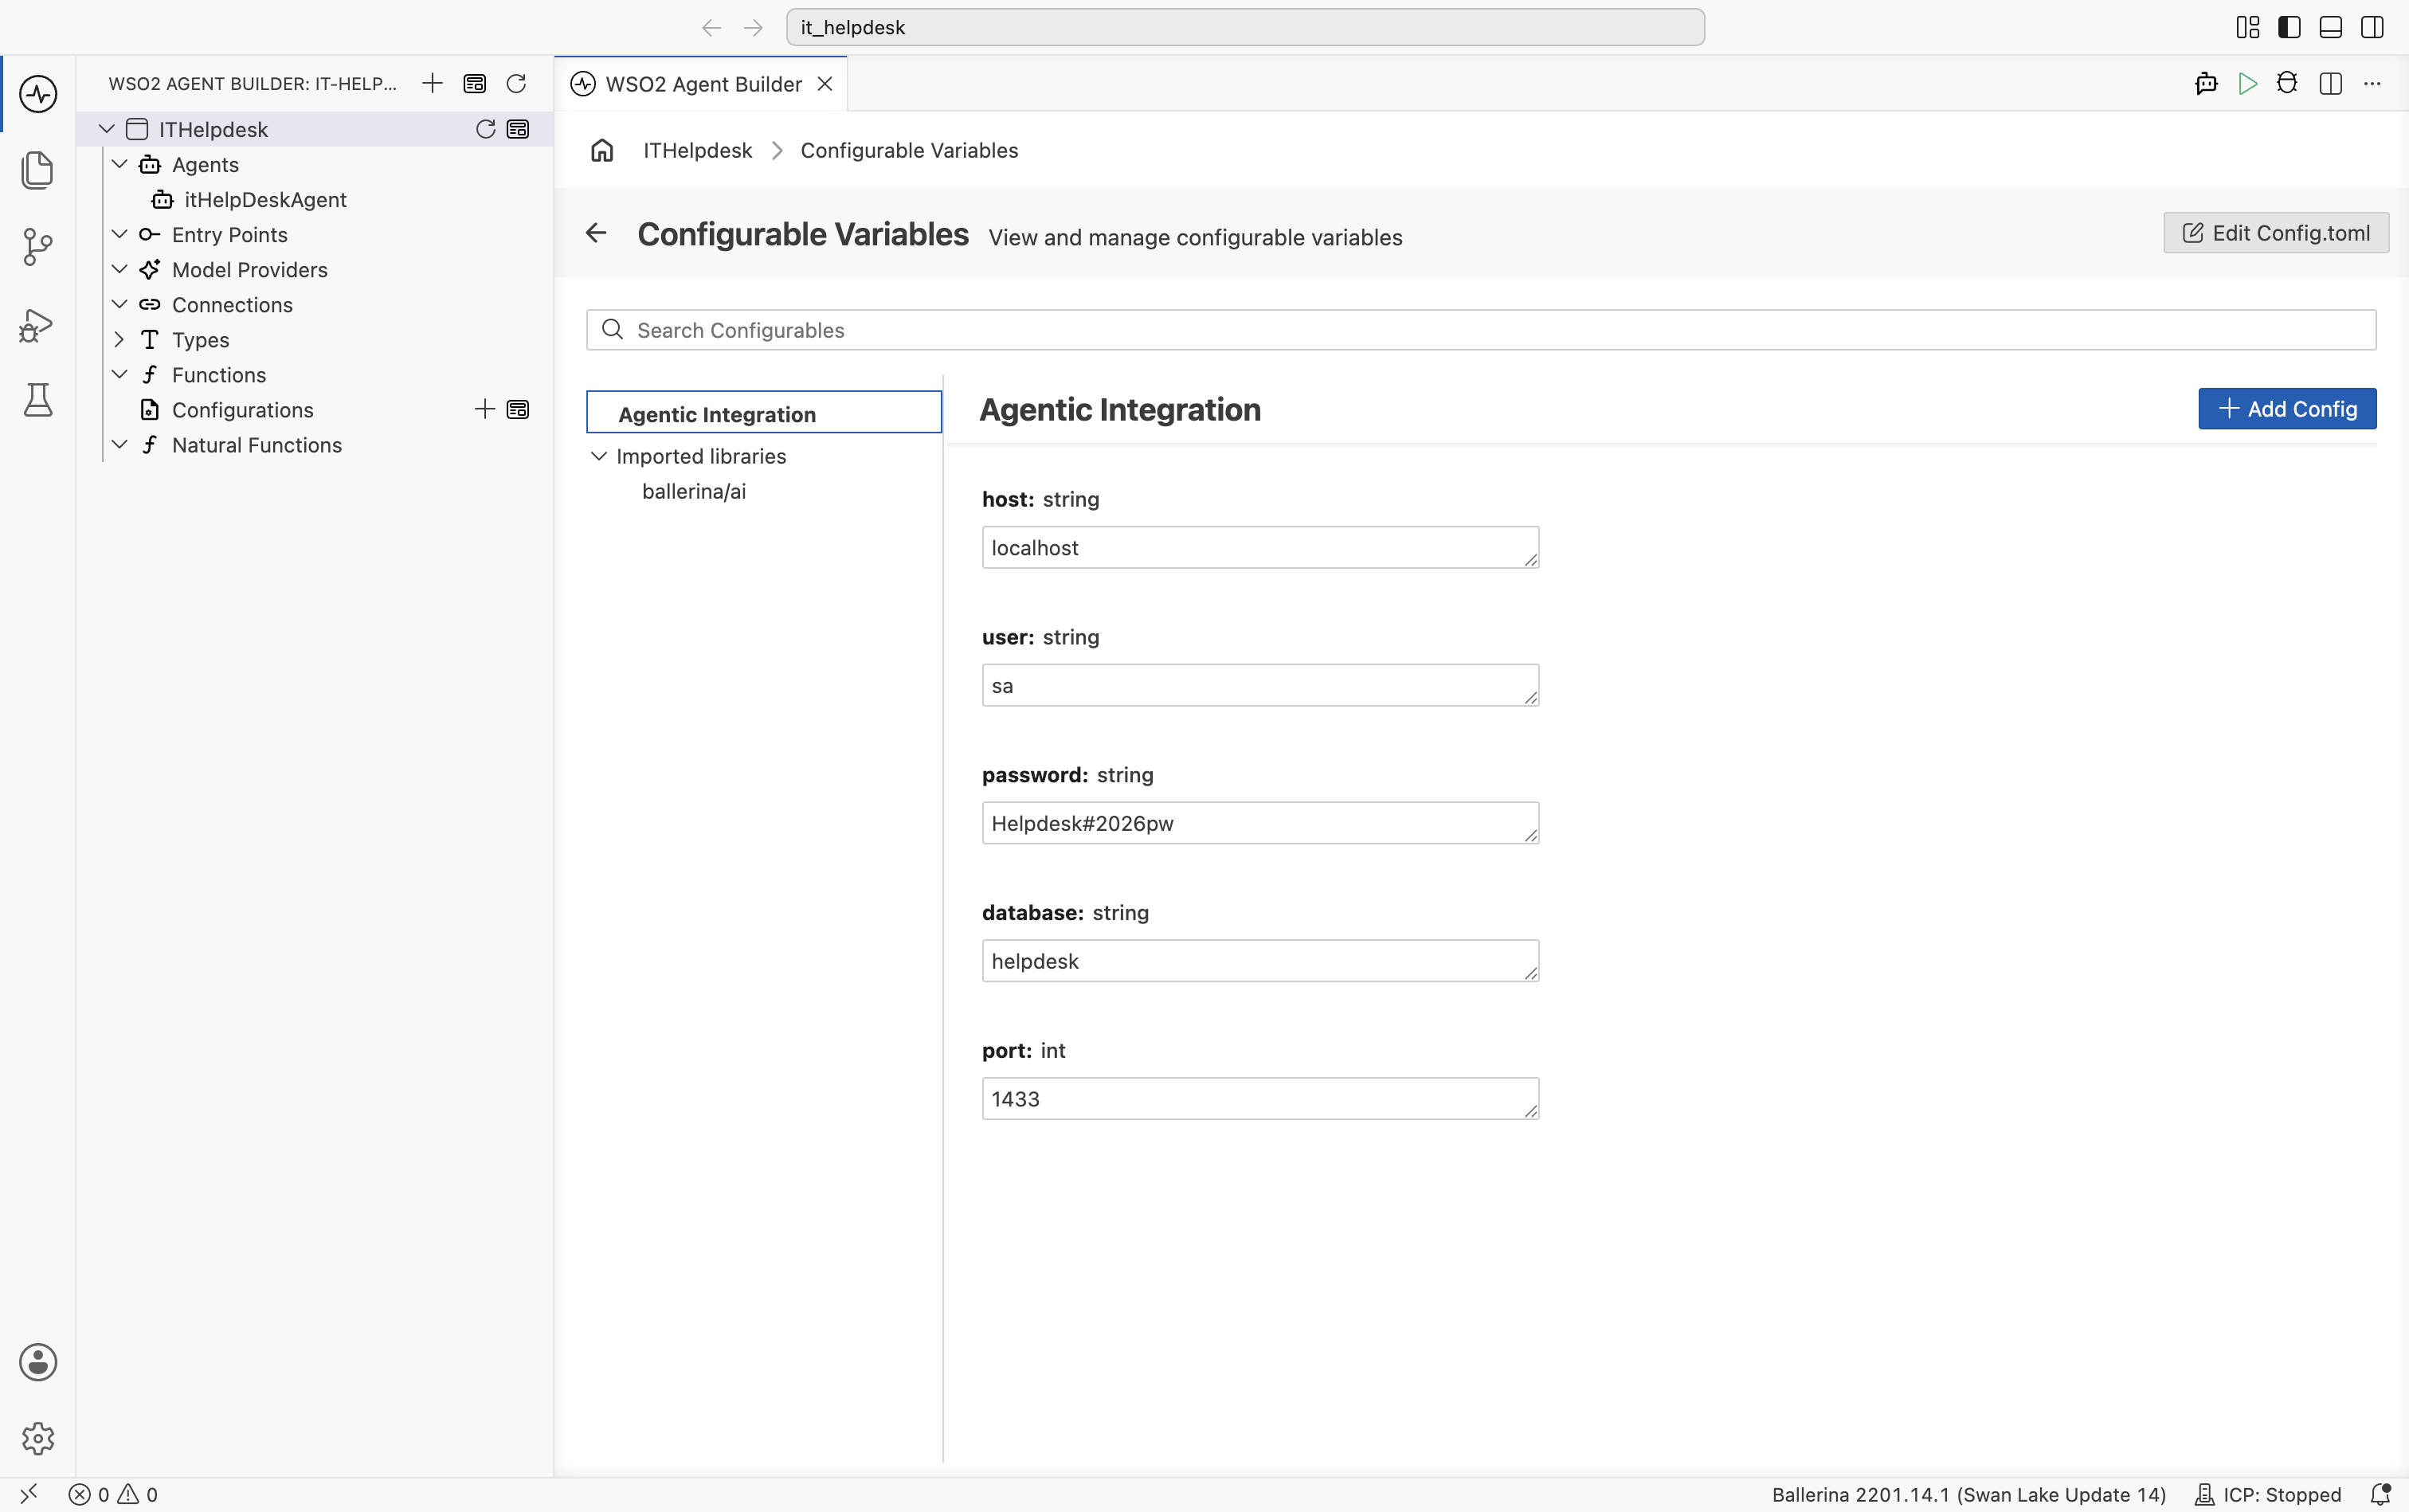
- On the Configurable Variables page, enter the values for your MSSQL database. WSO2 Agent Builder saves them to
Config.toml.
Create the MSSQL memory store
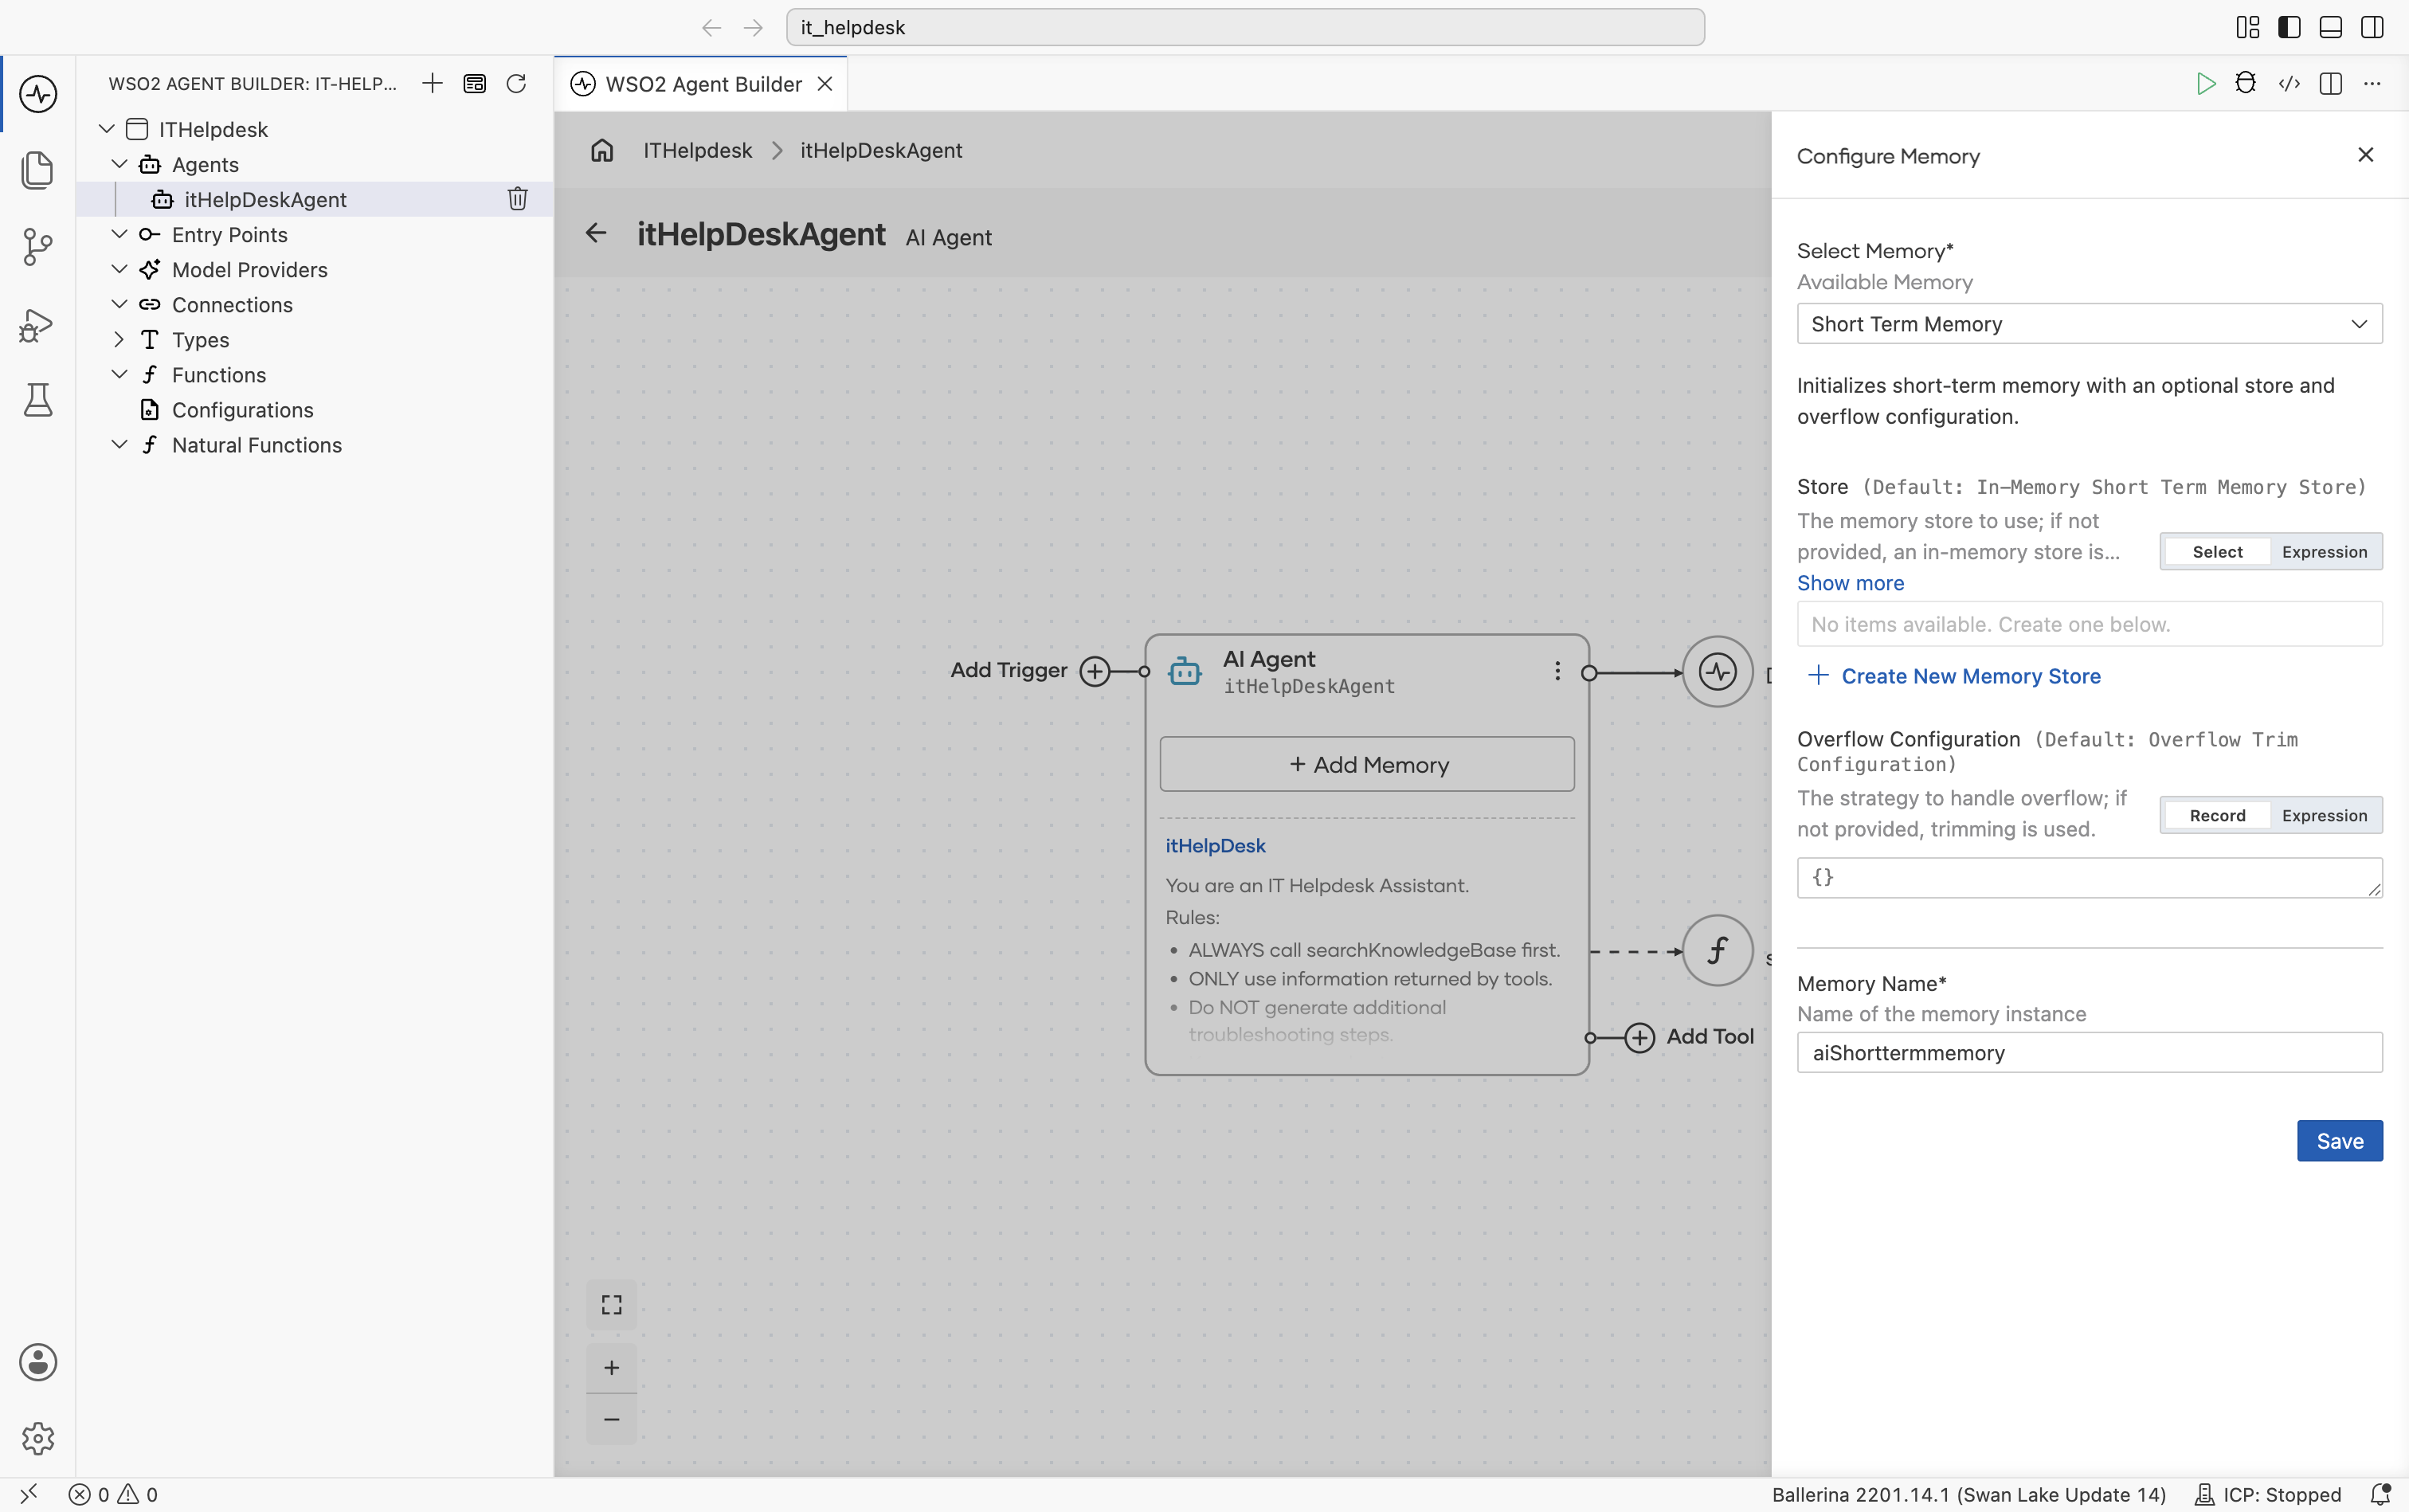
- Open the itHelpDeskAgent canvas and select + Add Memory on the AI Agent node. The Configure Memory panel opens with Select Memory set to Short Term Memory.
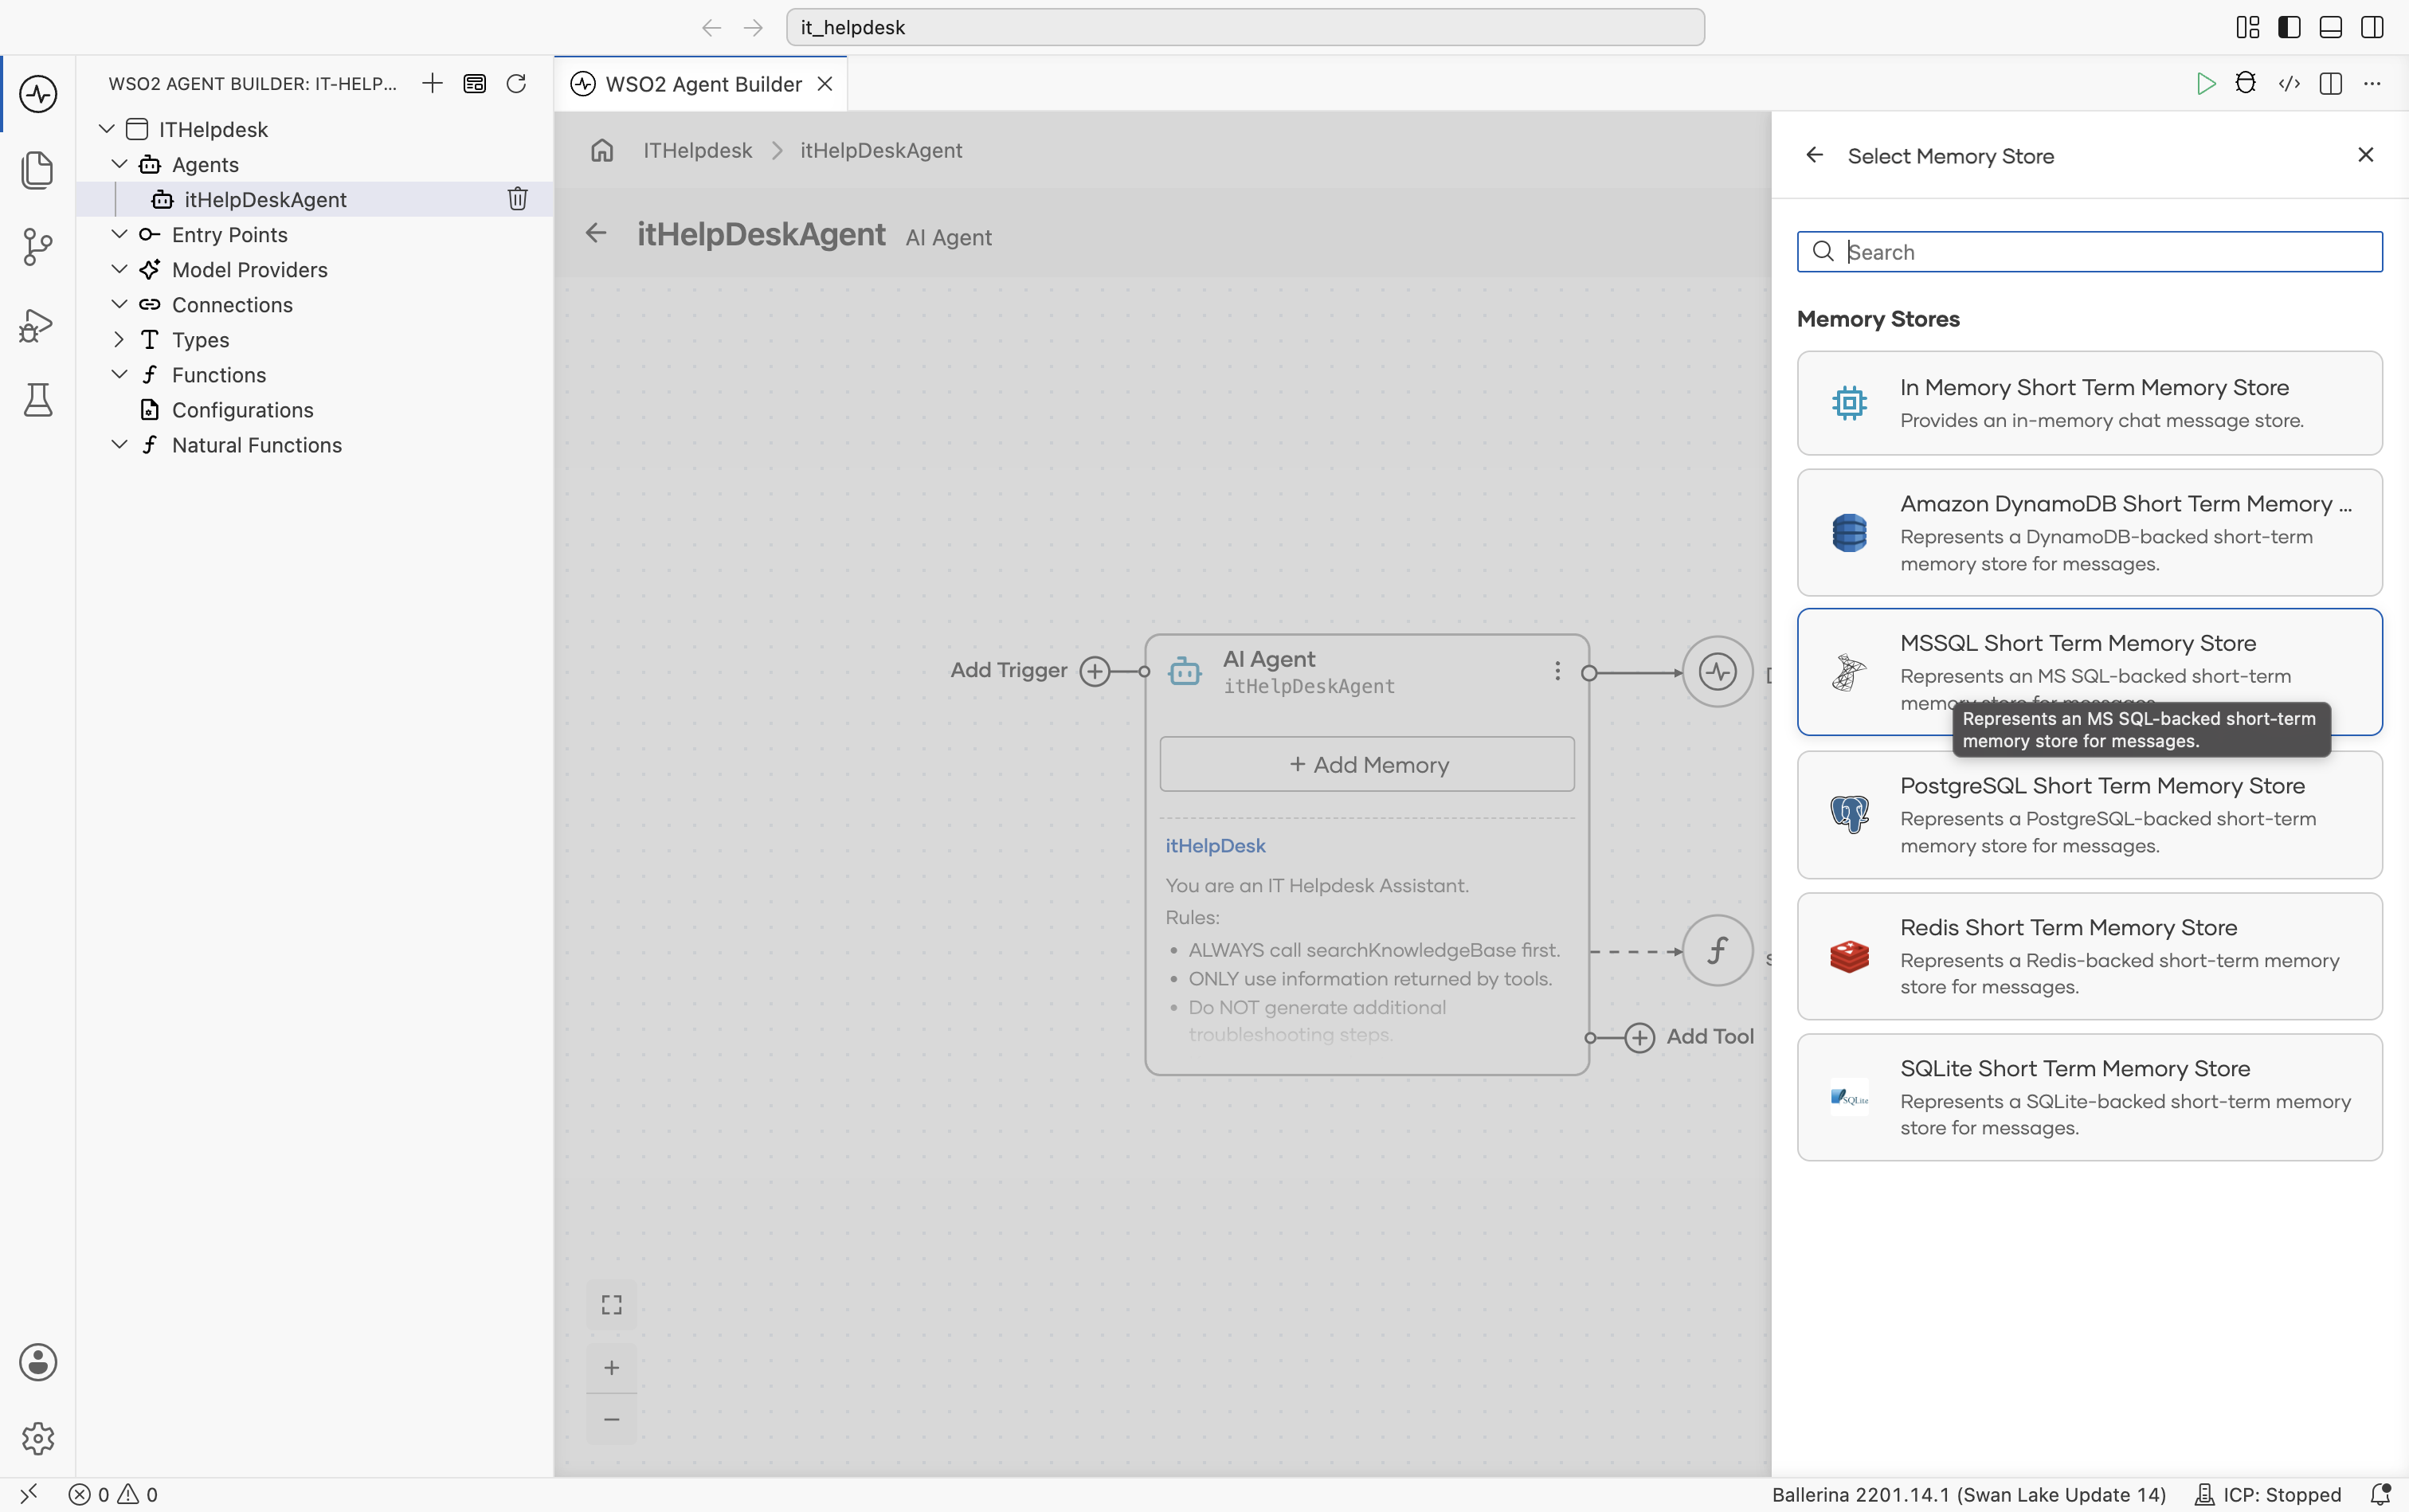
- Select + Create New Memory Store, then select MSSQL Short Term Memory Store.
-
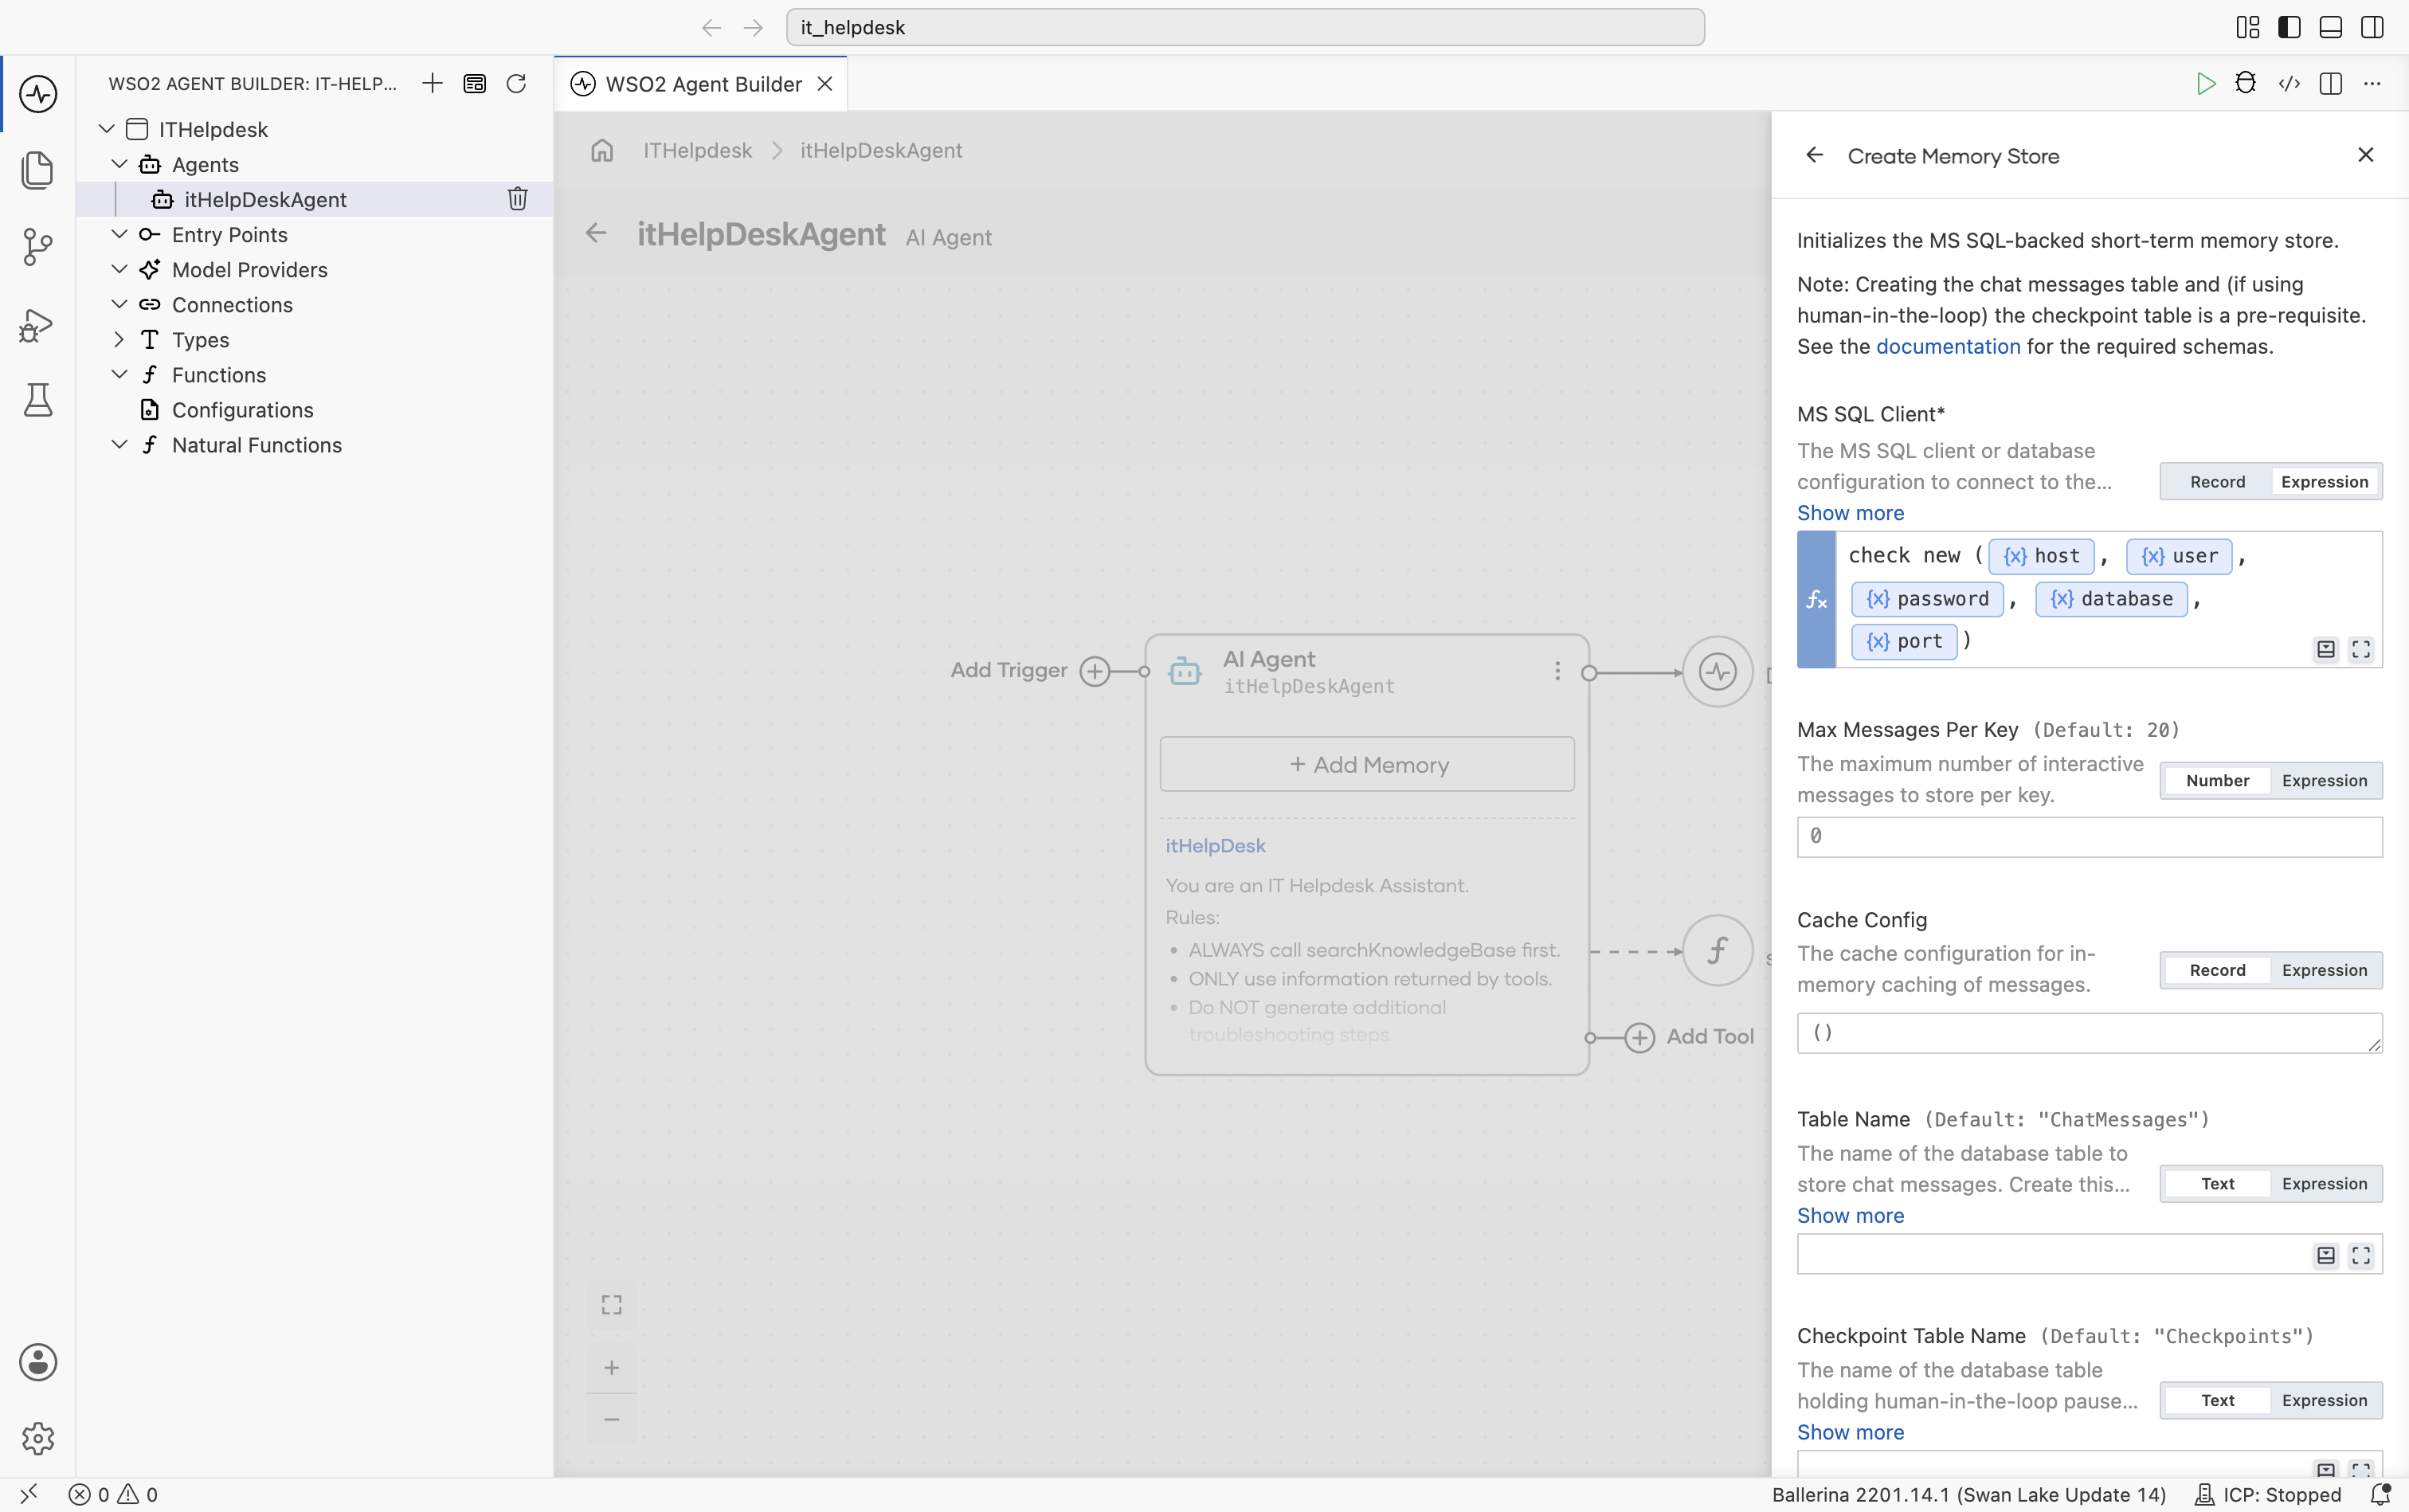
Switch MS SQL Client to Expression and set it to:
check new (host, user, password, database, port)Leave Max Messages Per Key, Cache Config, Table Name (
ChatMessages), and Checkpoint Table Name at their defaults.
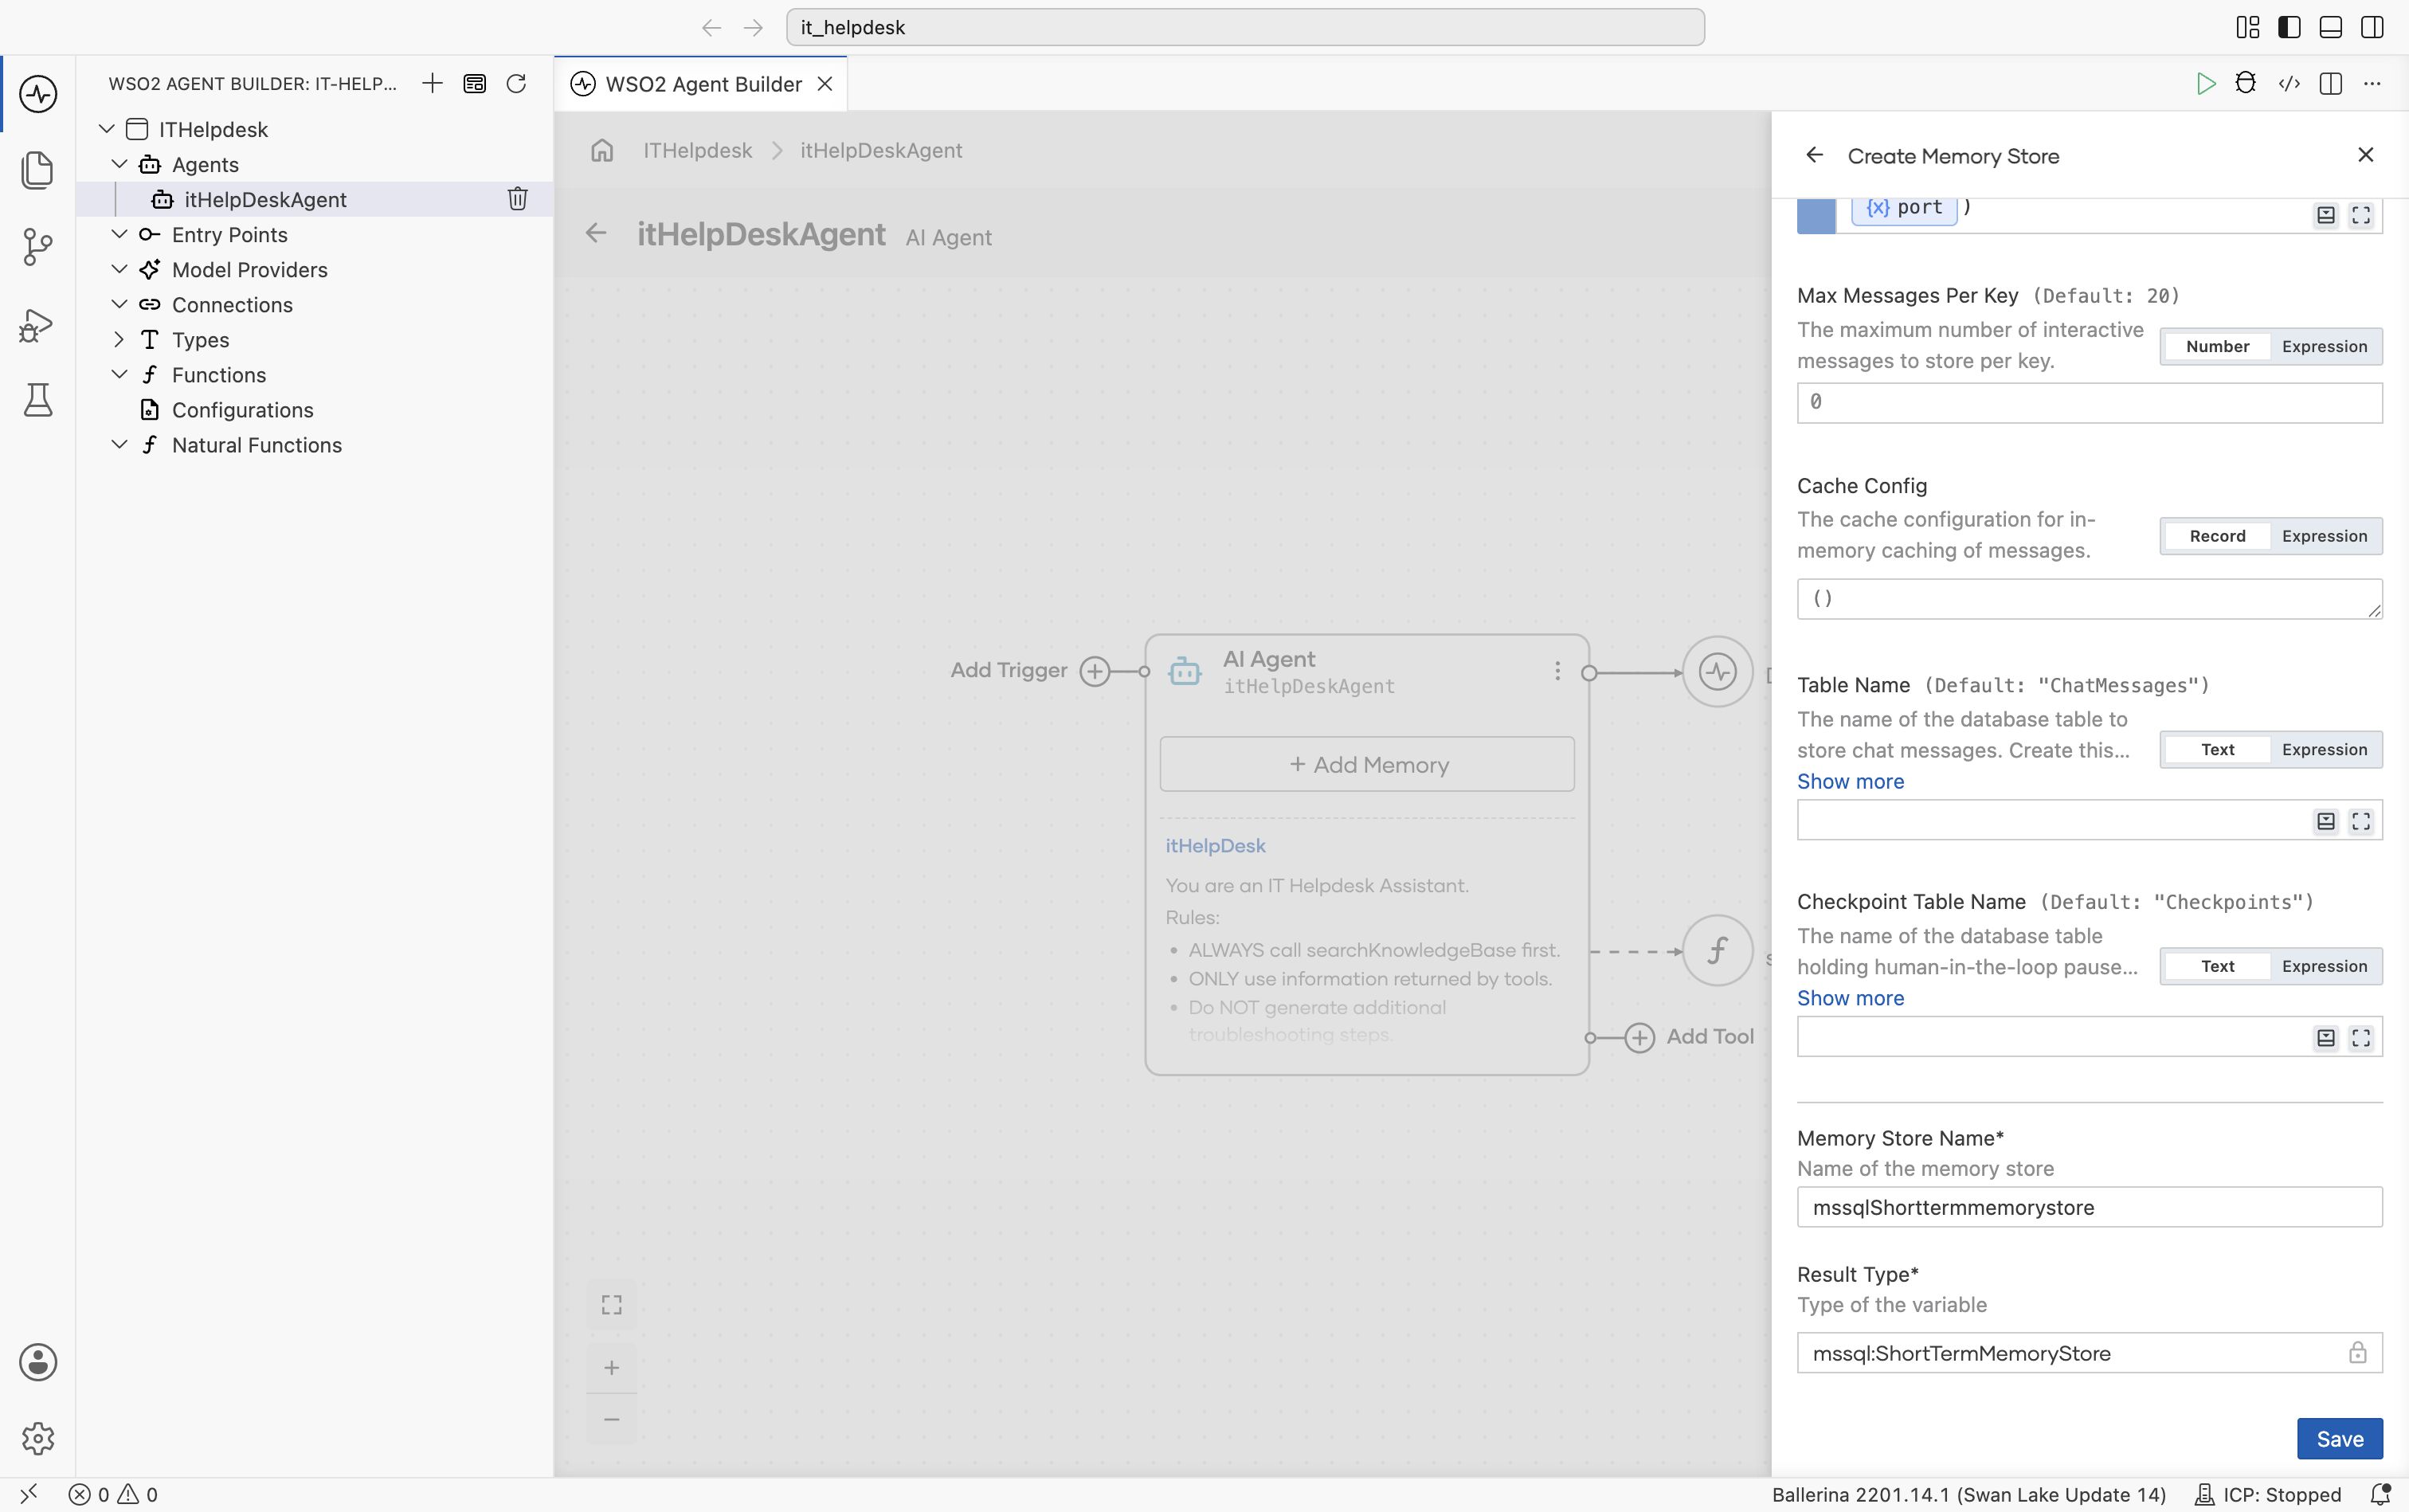
- Leave Memory Store Name at its default (
mssqlShorttermmemorystore). Result Type is fixed tomssql:ShortTermMemoryStore. Select Save.
- Back in the Configure Memory panel, the new store is selected under Store. Leave Memory Name at its default (
aiShorttermmemory) and select Save.
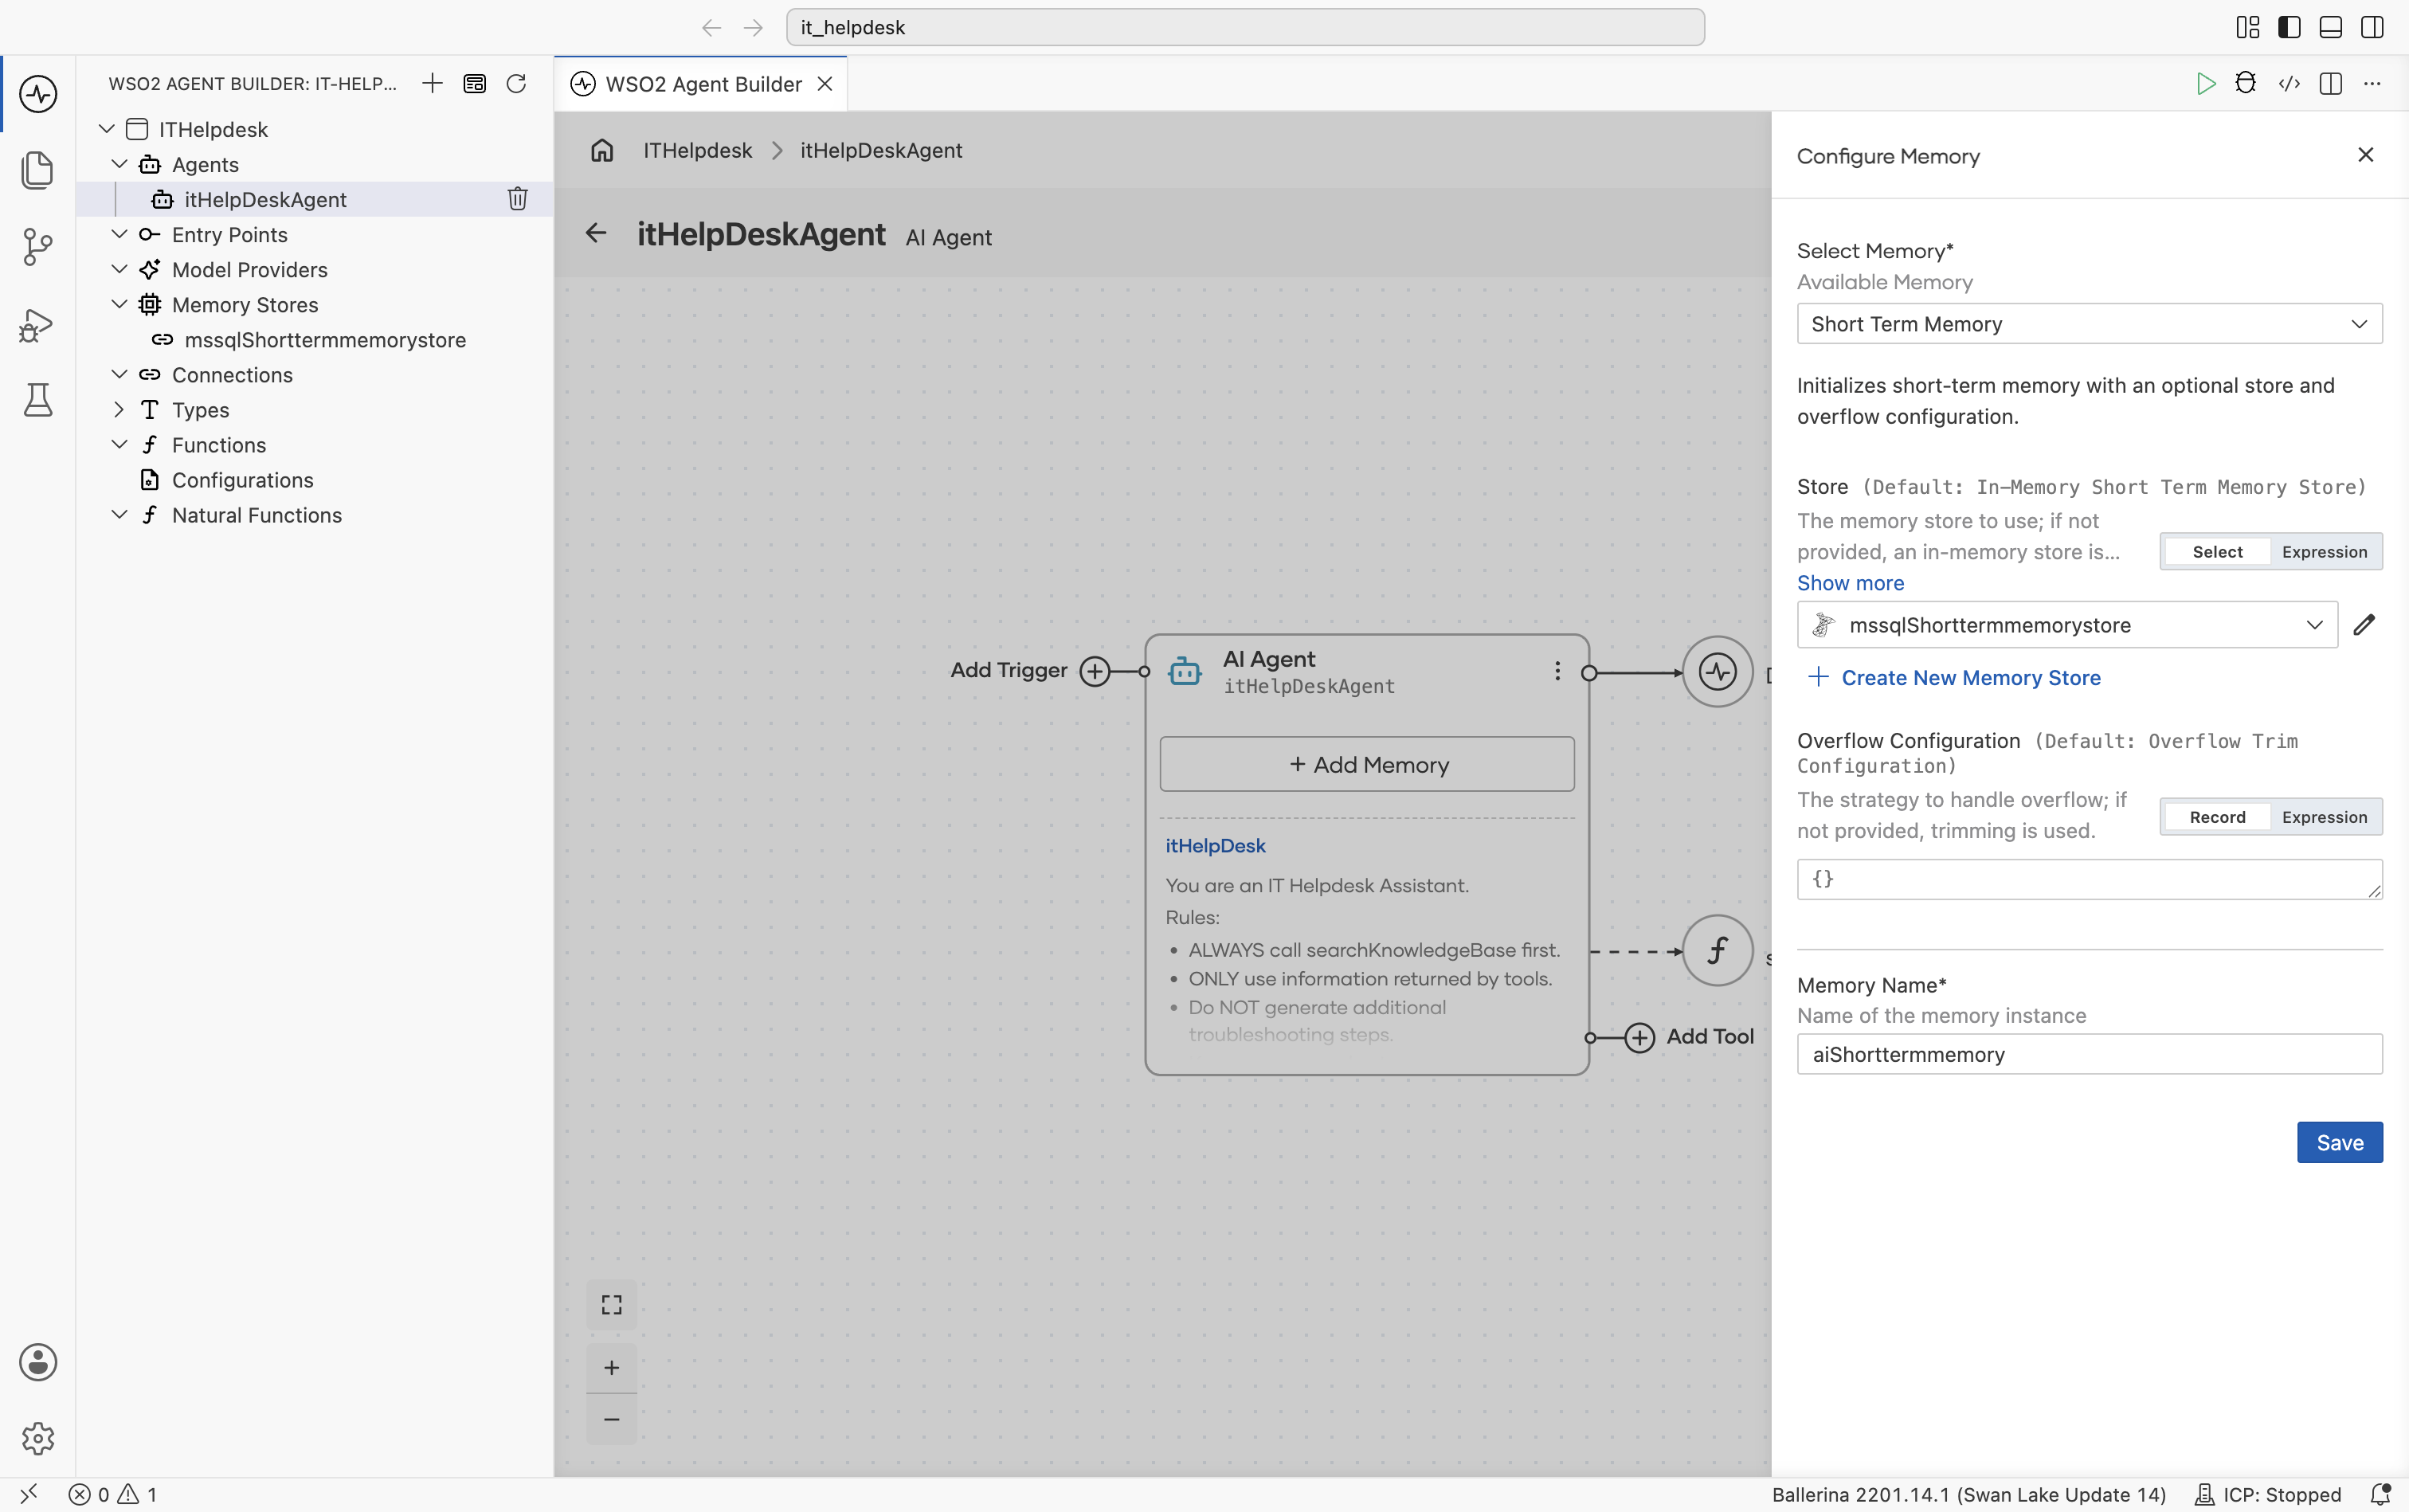
The AI Agent node now shows a Memory section (ShortTermMemory), alongside the model provider and the searchKnowledgeBase tool.
config.bal: configurable values for the MSSQL connection.
configurable string host = ?;
configurable string user = ?;
configurable string password = ?;
configurable string database = ?;
configurable int port = ?;
Config.toml: the values for your database.
[<org>.ithelpdesk]
host = "<hostName>"
user = "<userName>"
password = "<password>"
database = "<databaseName>"
port = 1433
Add the MSSQL-backed memory store to agents.bal and wire it into the agent:
# agents.bal
import ballerina/ai;
import ballerinax/ai.memory.mssql;

final ai:Agent itHelpDeskAgent = check new (
    systemPrompt = {
        role: string `itHelpDesk`,
        instructions: string `You are an IT Helpdesk Assistant.

Rules:
  - ALWAYS call searchKnowledgeBase first.
  - ONLY use information returned by tools.
  - Do NOT generate additional troubleshooting steps.
  - Keep responses short.
  - Remember previous conversations.`
    }, model = check ai:getDefaultModelProvider(), tools = [searchKnowledgeBase], memory = aiShorttermmemory
);

// searchKnowledgeBase tool from Step 4

final mssql:ShortTermMemoryStore mssqlShorttermmemorystore = check new (check new (host, user, password, database, port));
final ai:ShortTermMemory aiShorttermmemory = check new (mssqlShorttermmemorystore);
Step 6: Expose the agent through an Agent Chat trigger
- Visual Designer
- Ballerina Code
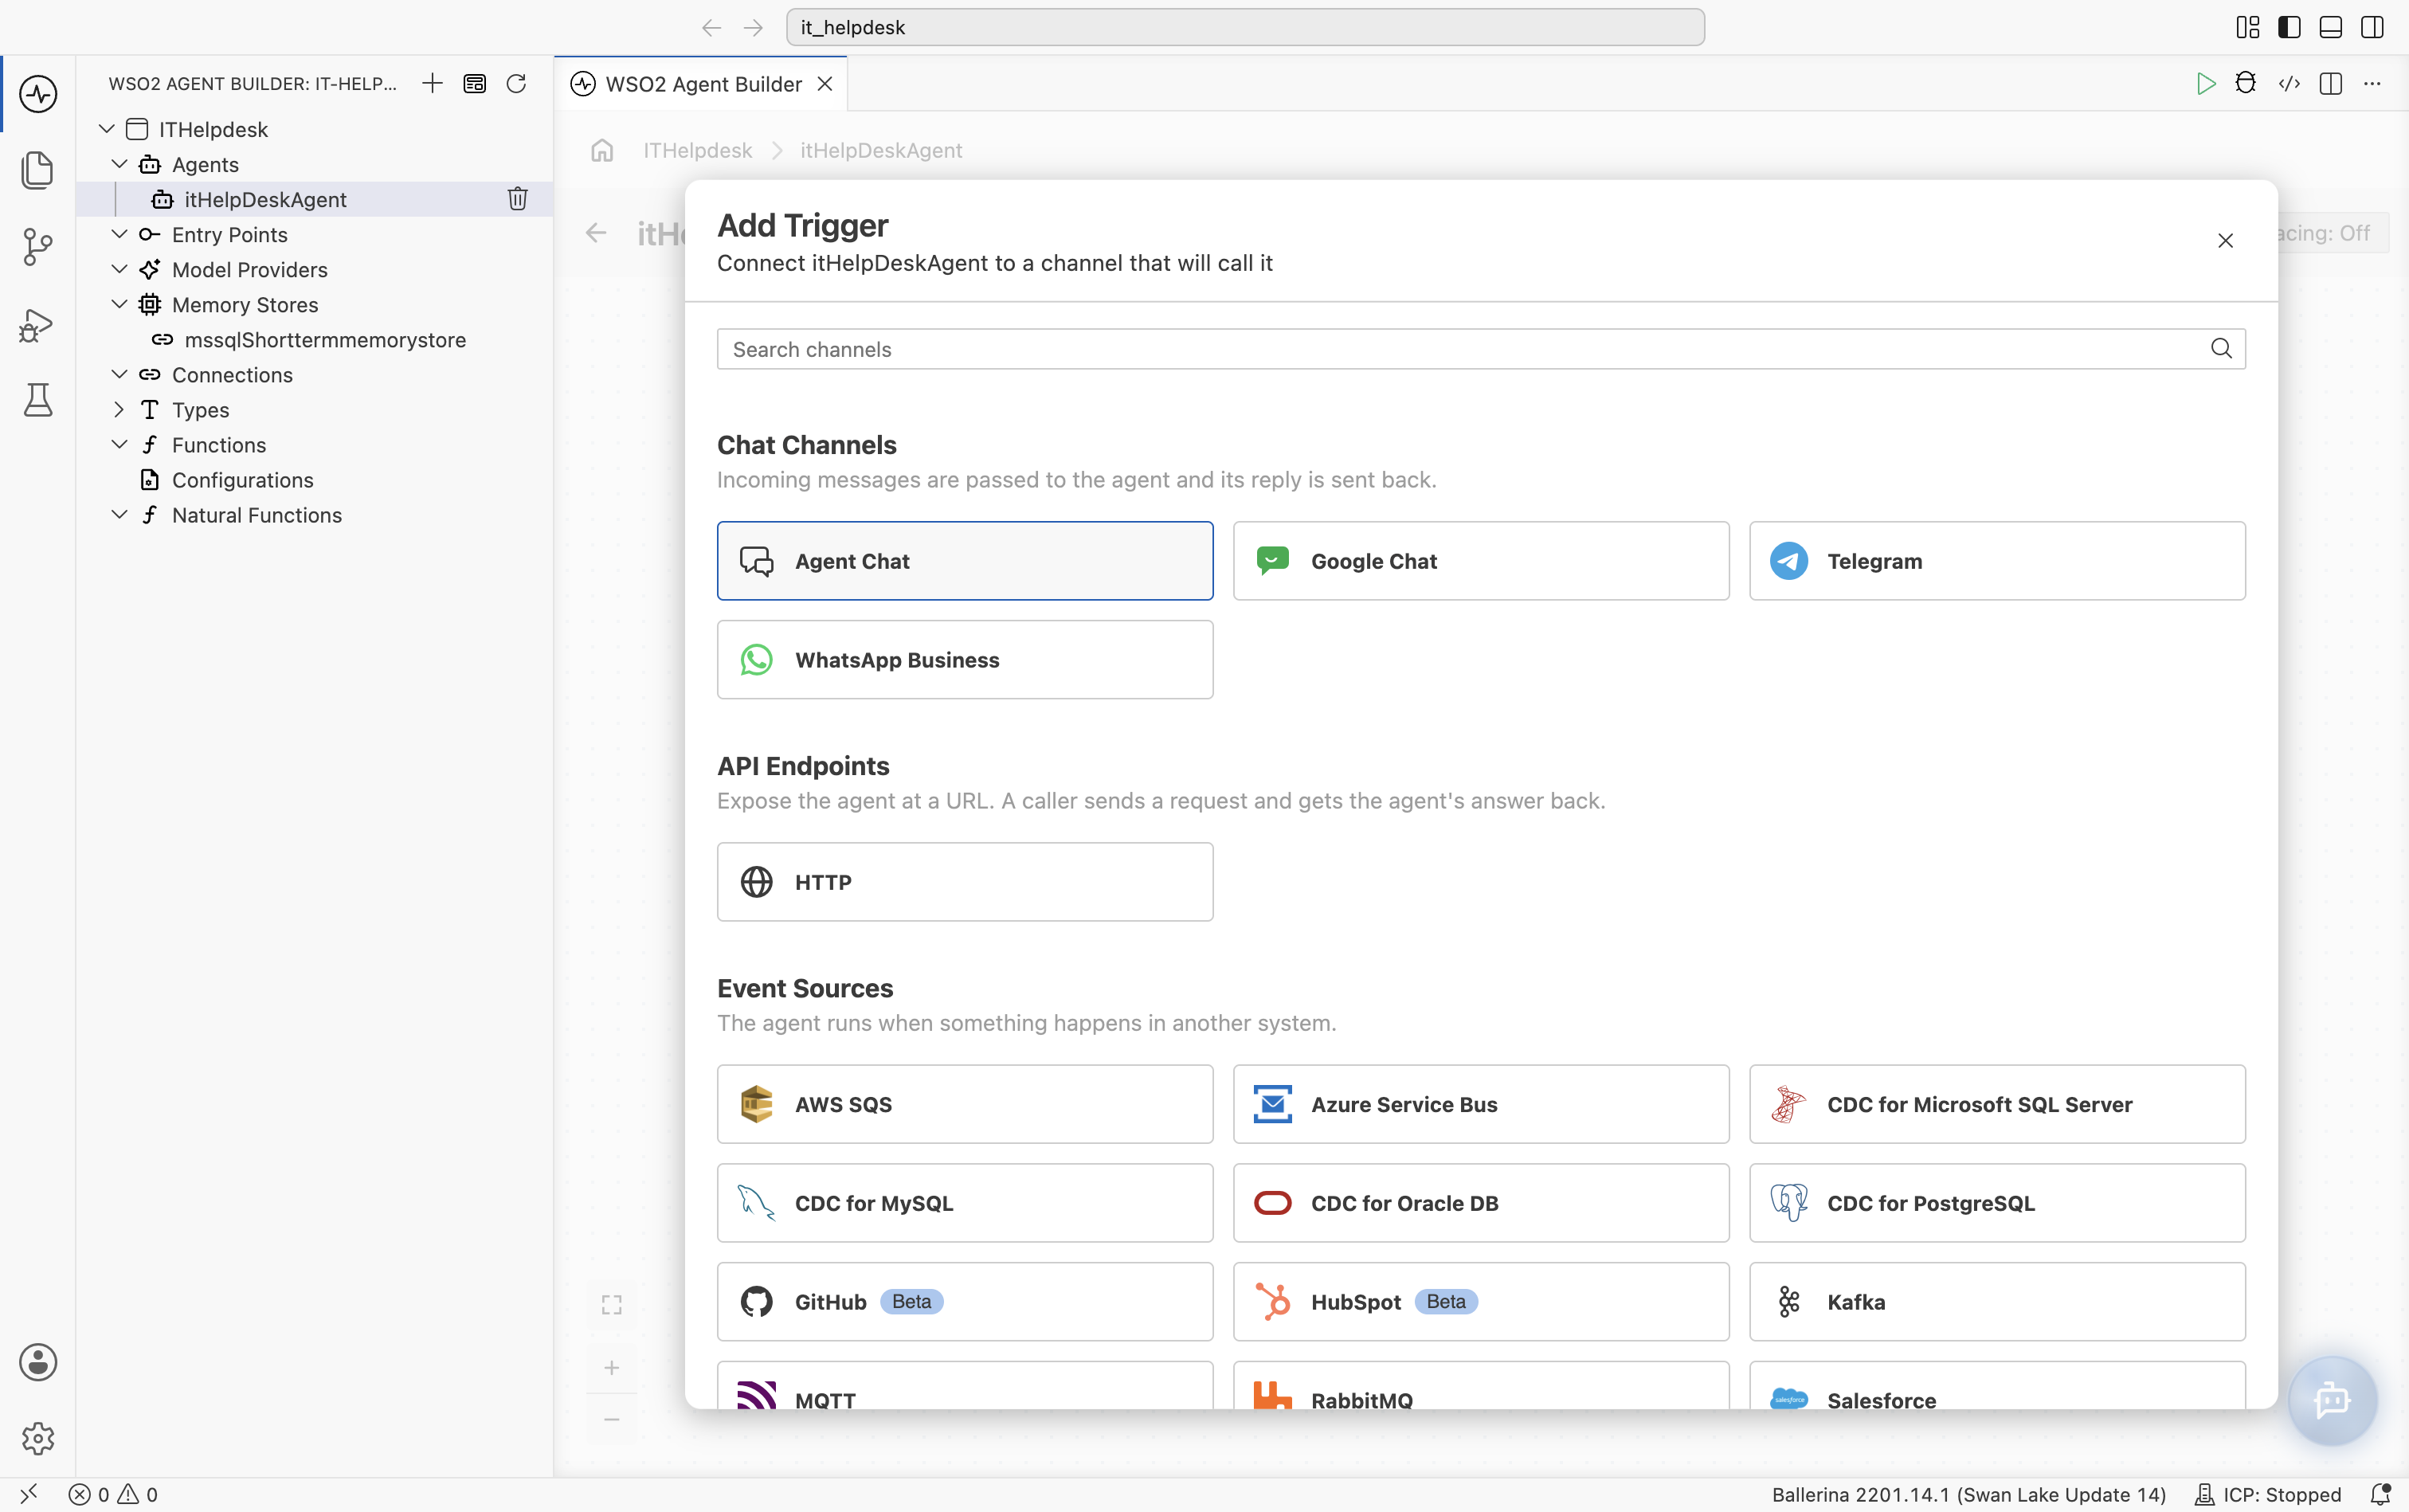
- Select Add Trigger on the left of the AI Agent node, then select Agent Chat under Chat Channels.
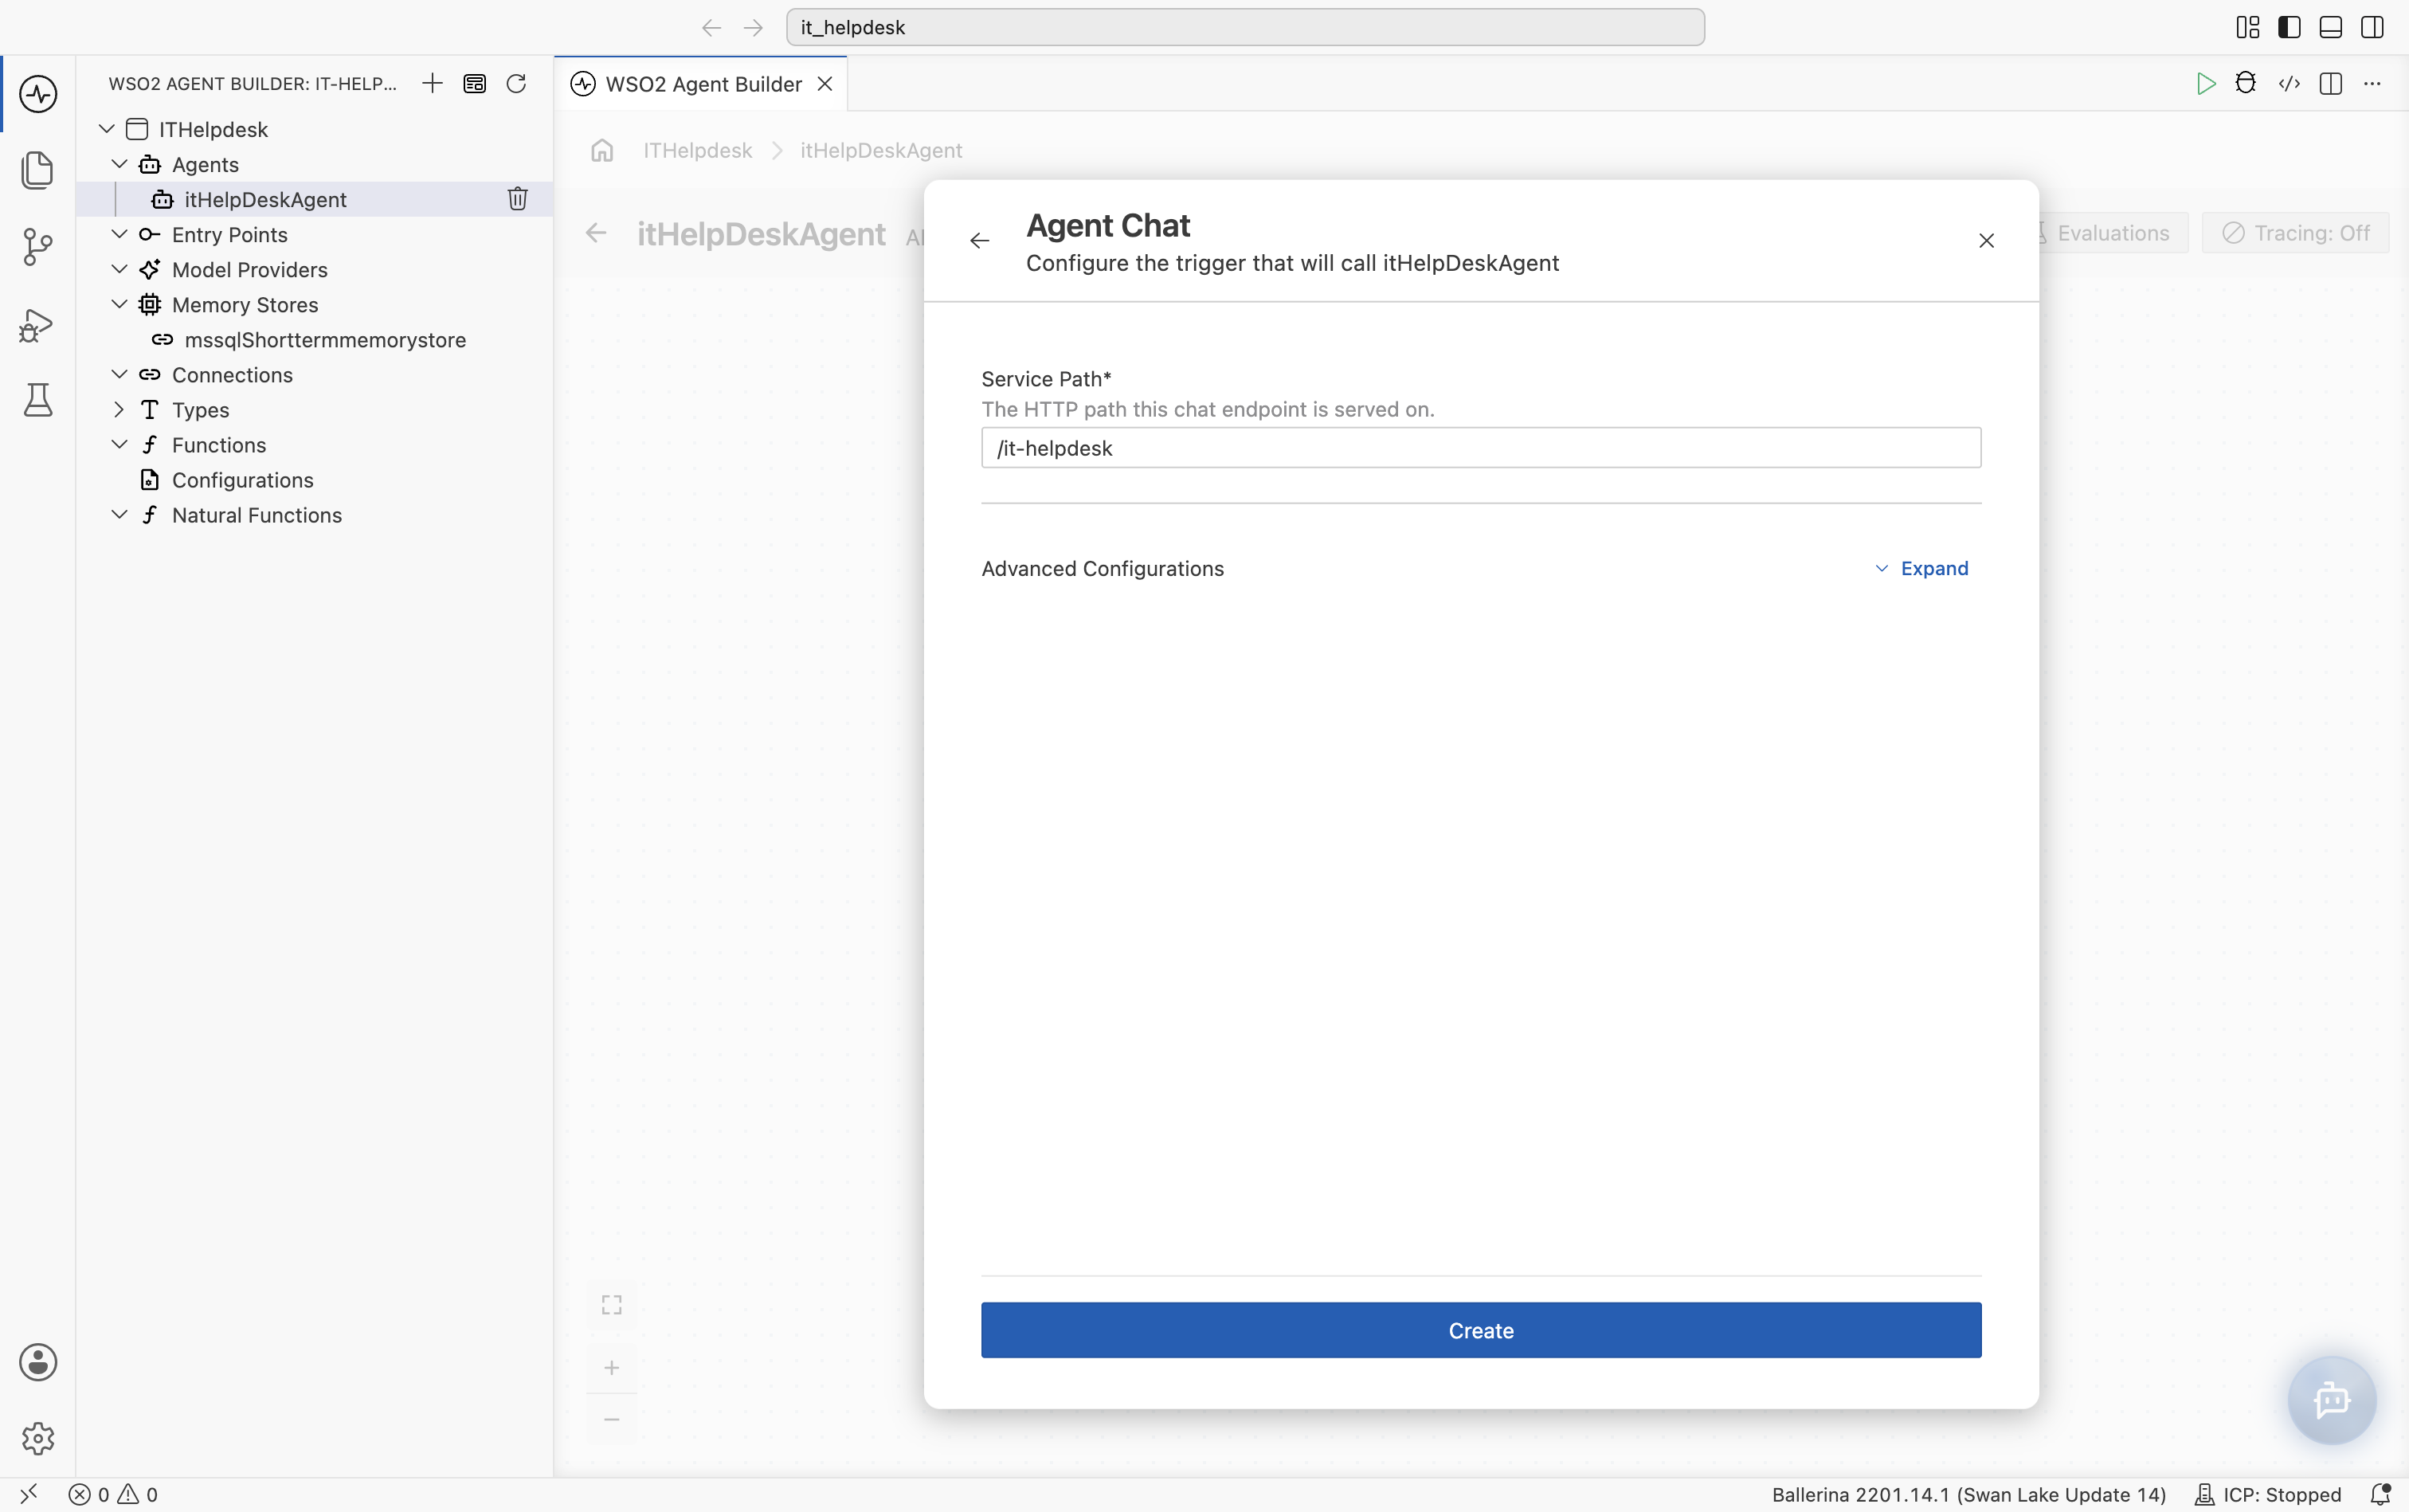
- Set Service Path to
/it-helpdeskand select Create.
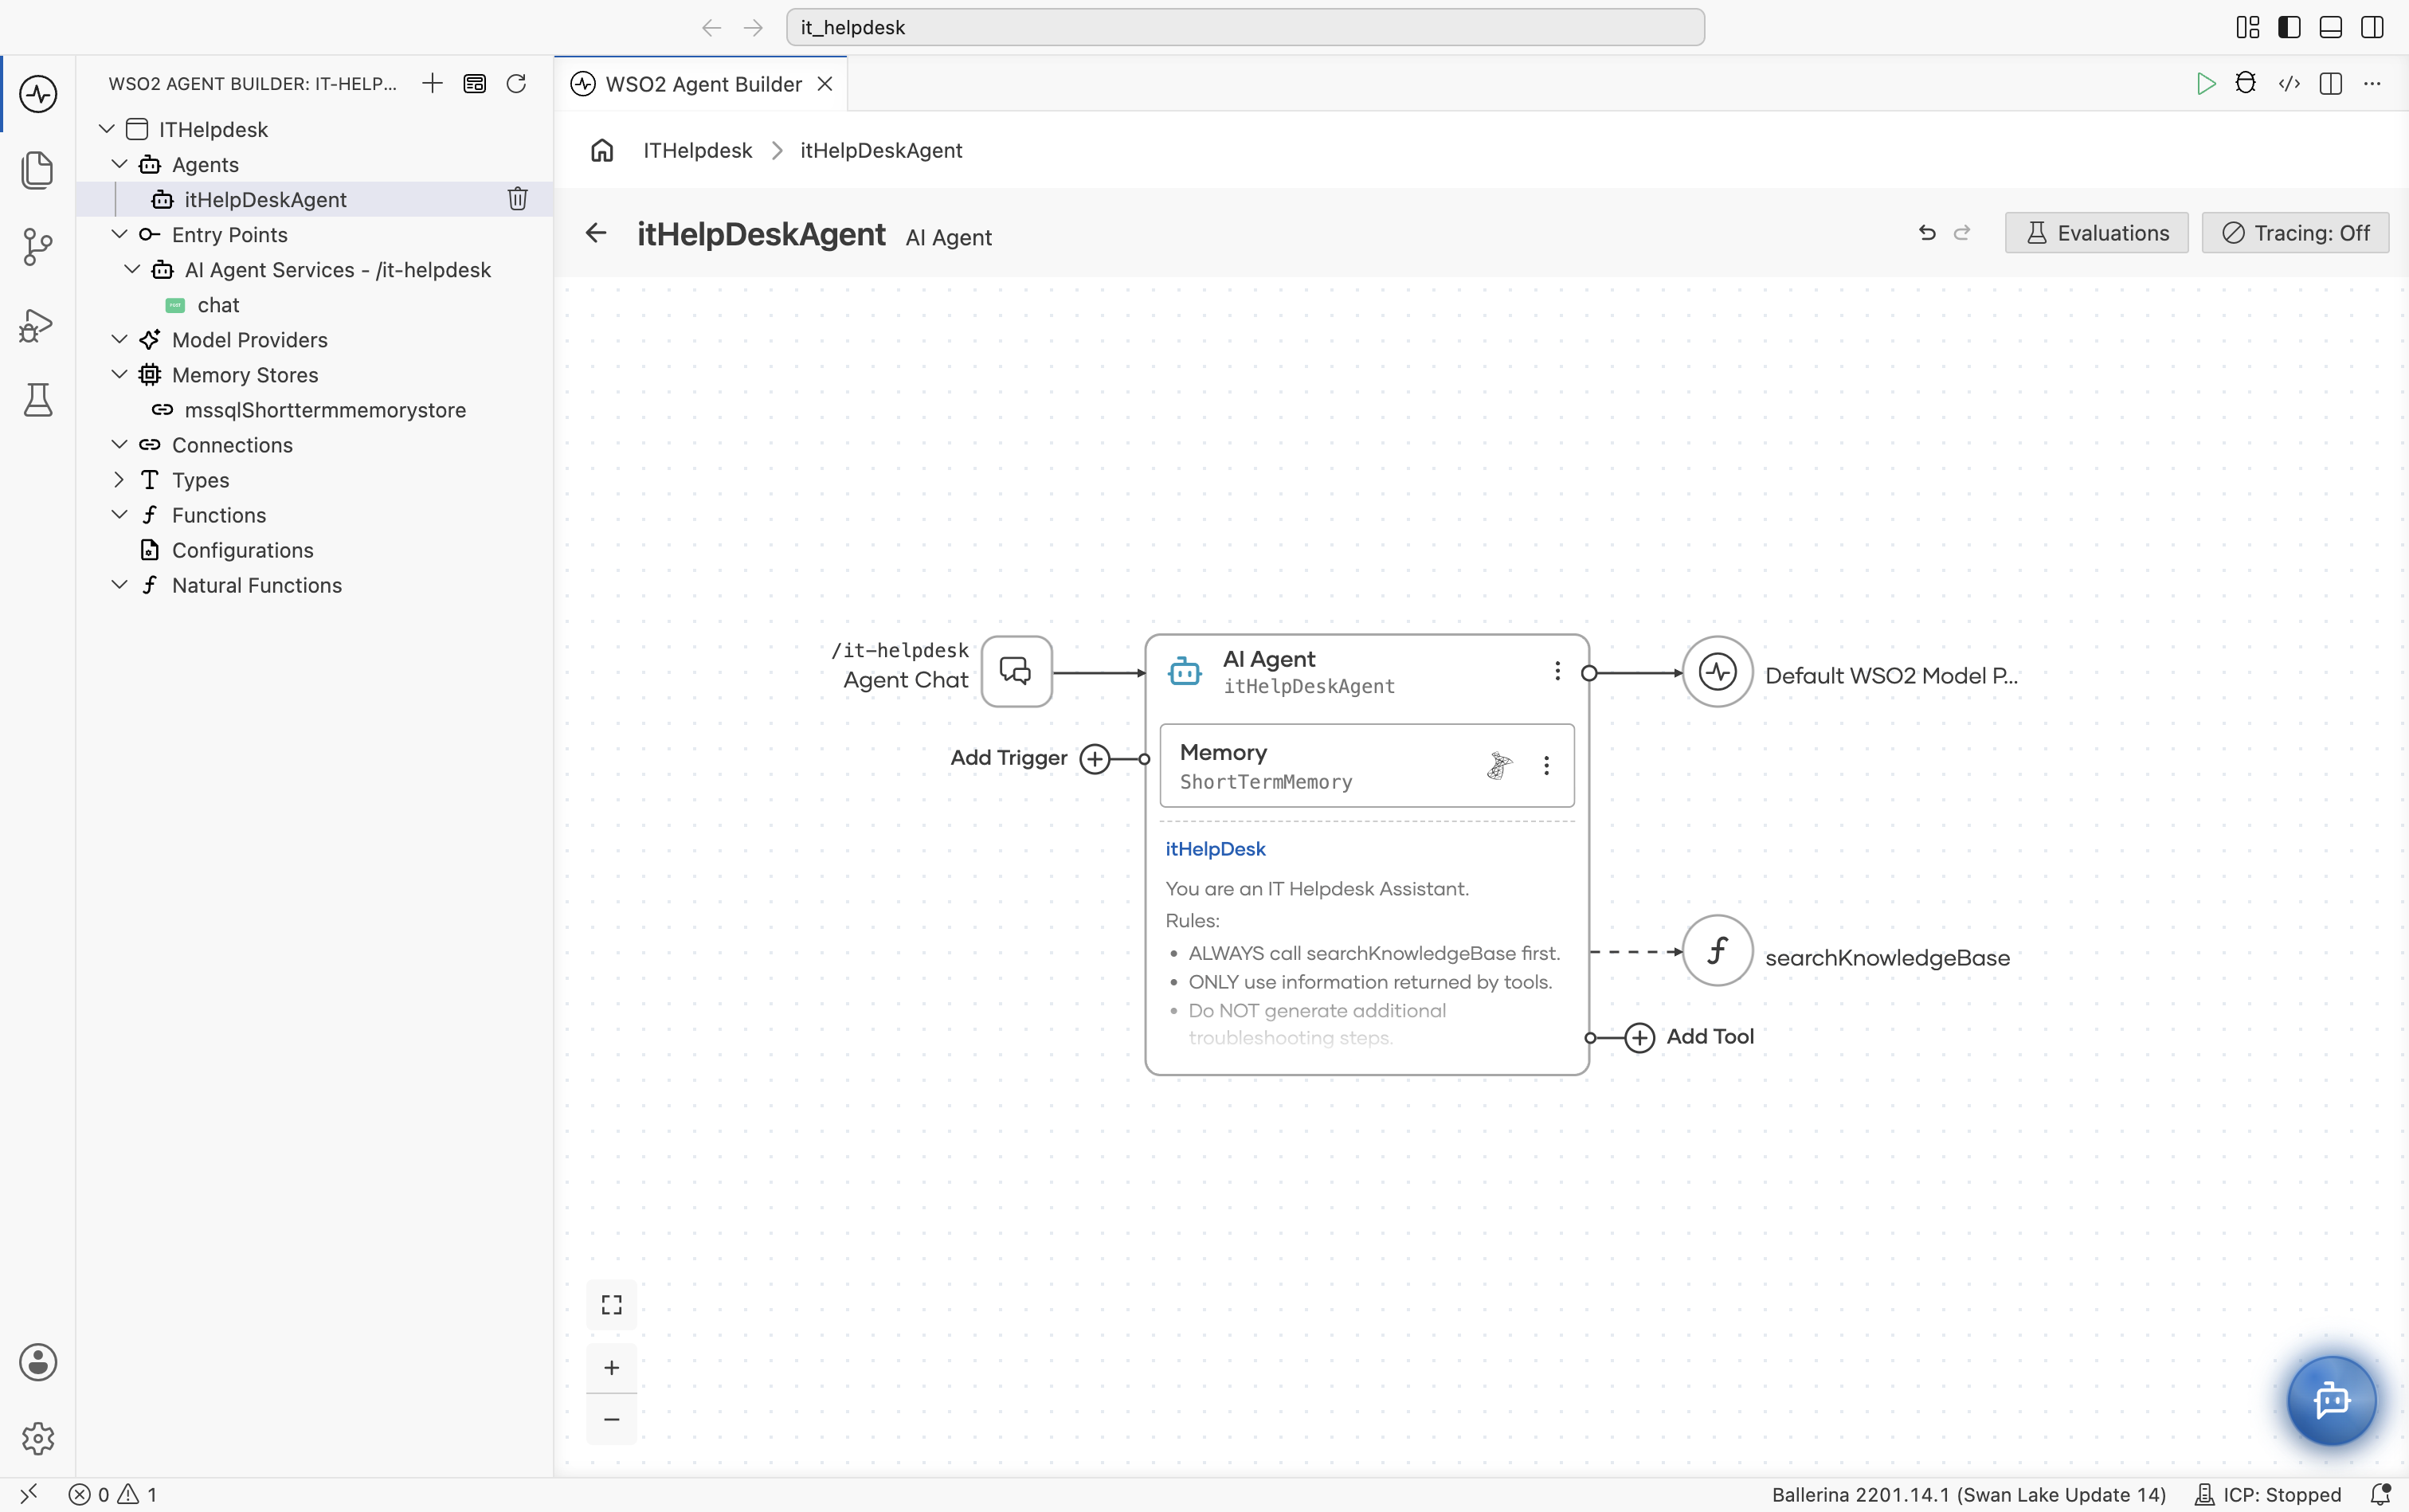
This creates an AI Agent Services - /it-helpdesk entry point with a chat resource. The canvas shows the complete agent: the /it-helpdesk Agent Chat trigger, the memory, the model provider, and the searchKnowledgeBase tool.
# main.bal
import ballerina/ai;
import ballerina/http;

listener ai:Listener agentChatListener = new (listenOn = check http:getDefaultListener());

service /it\-helpdesk on agentChatListener {
    resource function post chat(@http:Payload ai:ChatReqMessage request)
            returns ai:ChatRespMessage|error {
        string stringResult = check itHelpDeskAgent.run(request.message, sessionId = request.sessionId);
        return {message: stringResult};
    }
}
Step 7: Run and test the integration
- Visual Designer
- Ballerina Code
- Select Run Integration. WSO2 Agent Builder compiles and starts the integration, with progress shown in the integrated terminal.
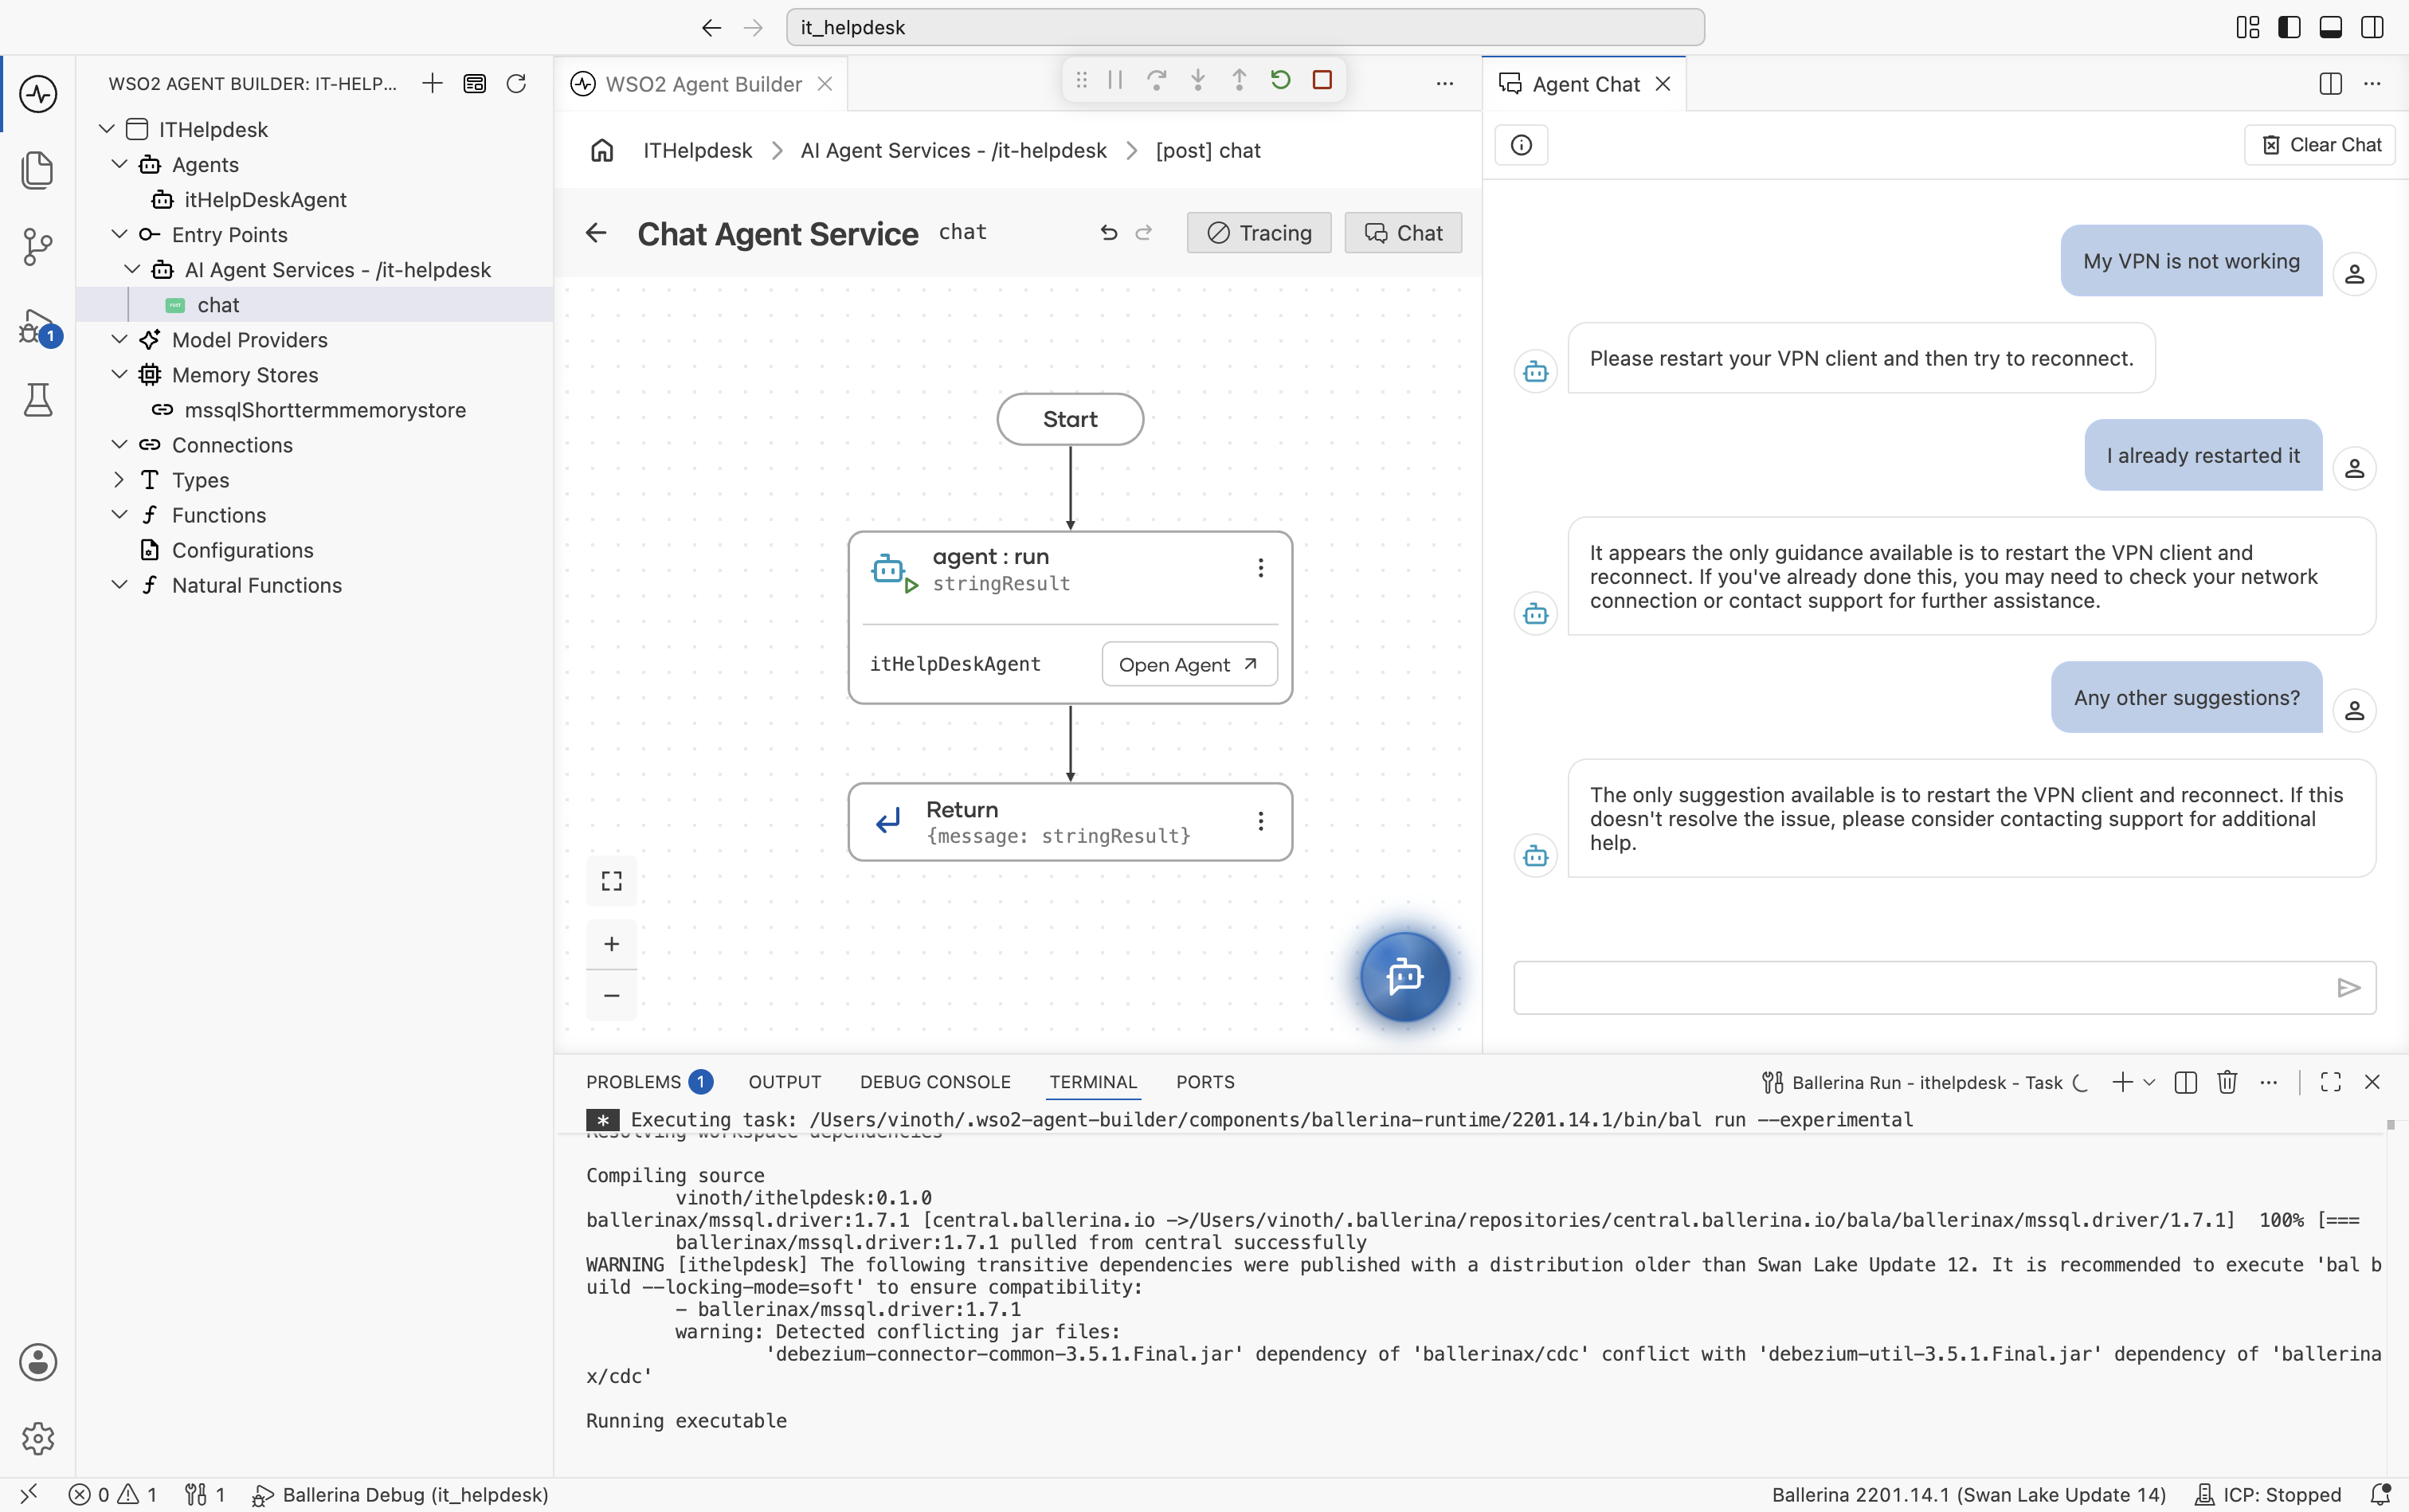
- Under Entry Points, expand AI Agent Services - /it-helpdesk, select the
chatresource, and then select Chat to open the Agent Chat panel. Try the conversation below to exercise the tool and confirm the agent remembers earlier turns in the same session:
- "My VPN is not working"
- "I already restarted it"
- "Any other suggestions?"
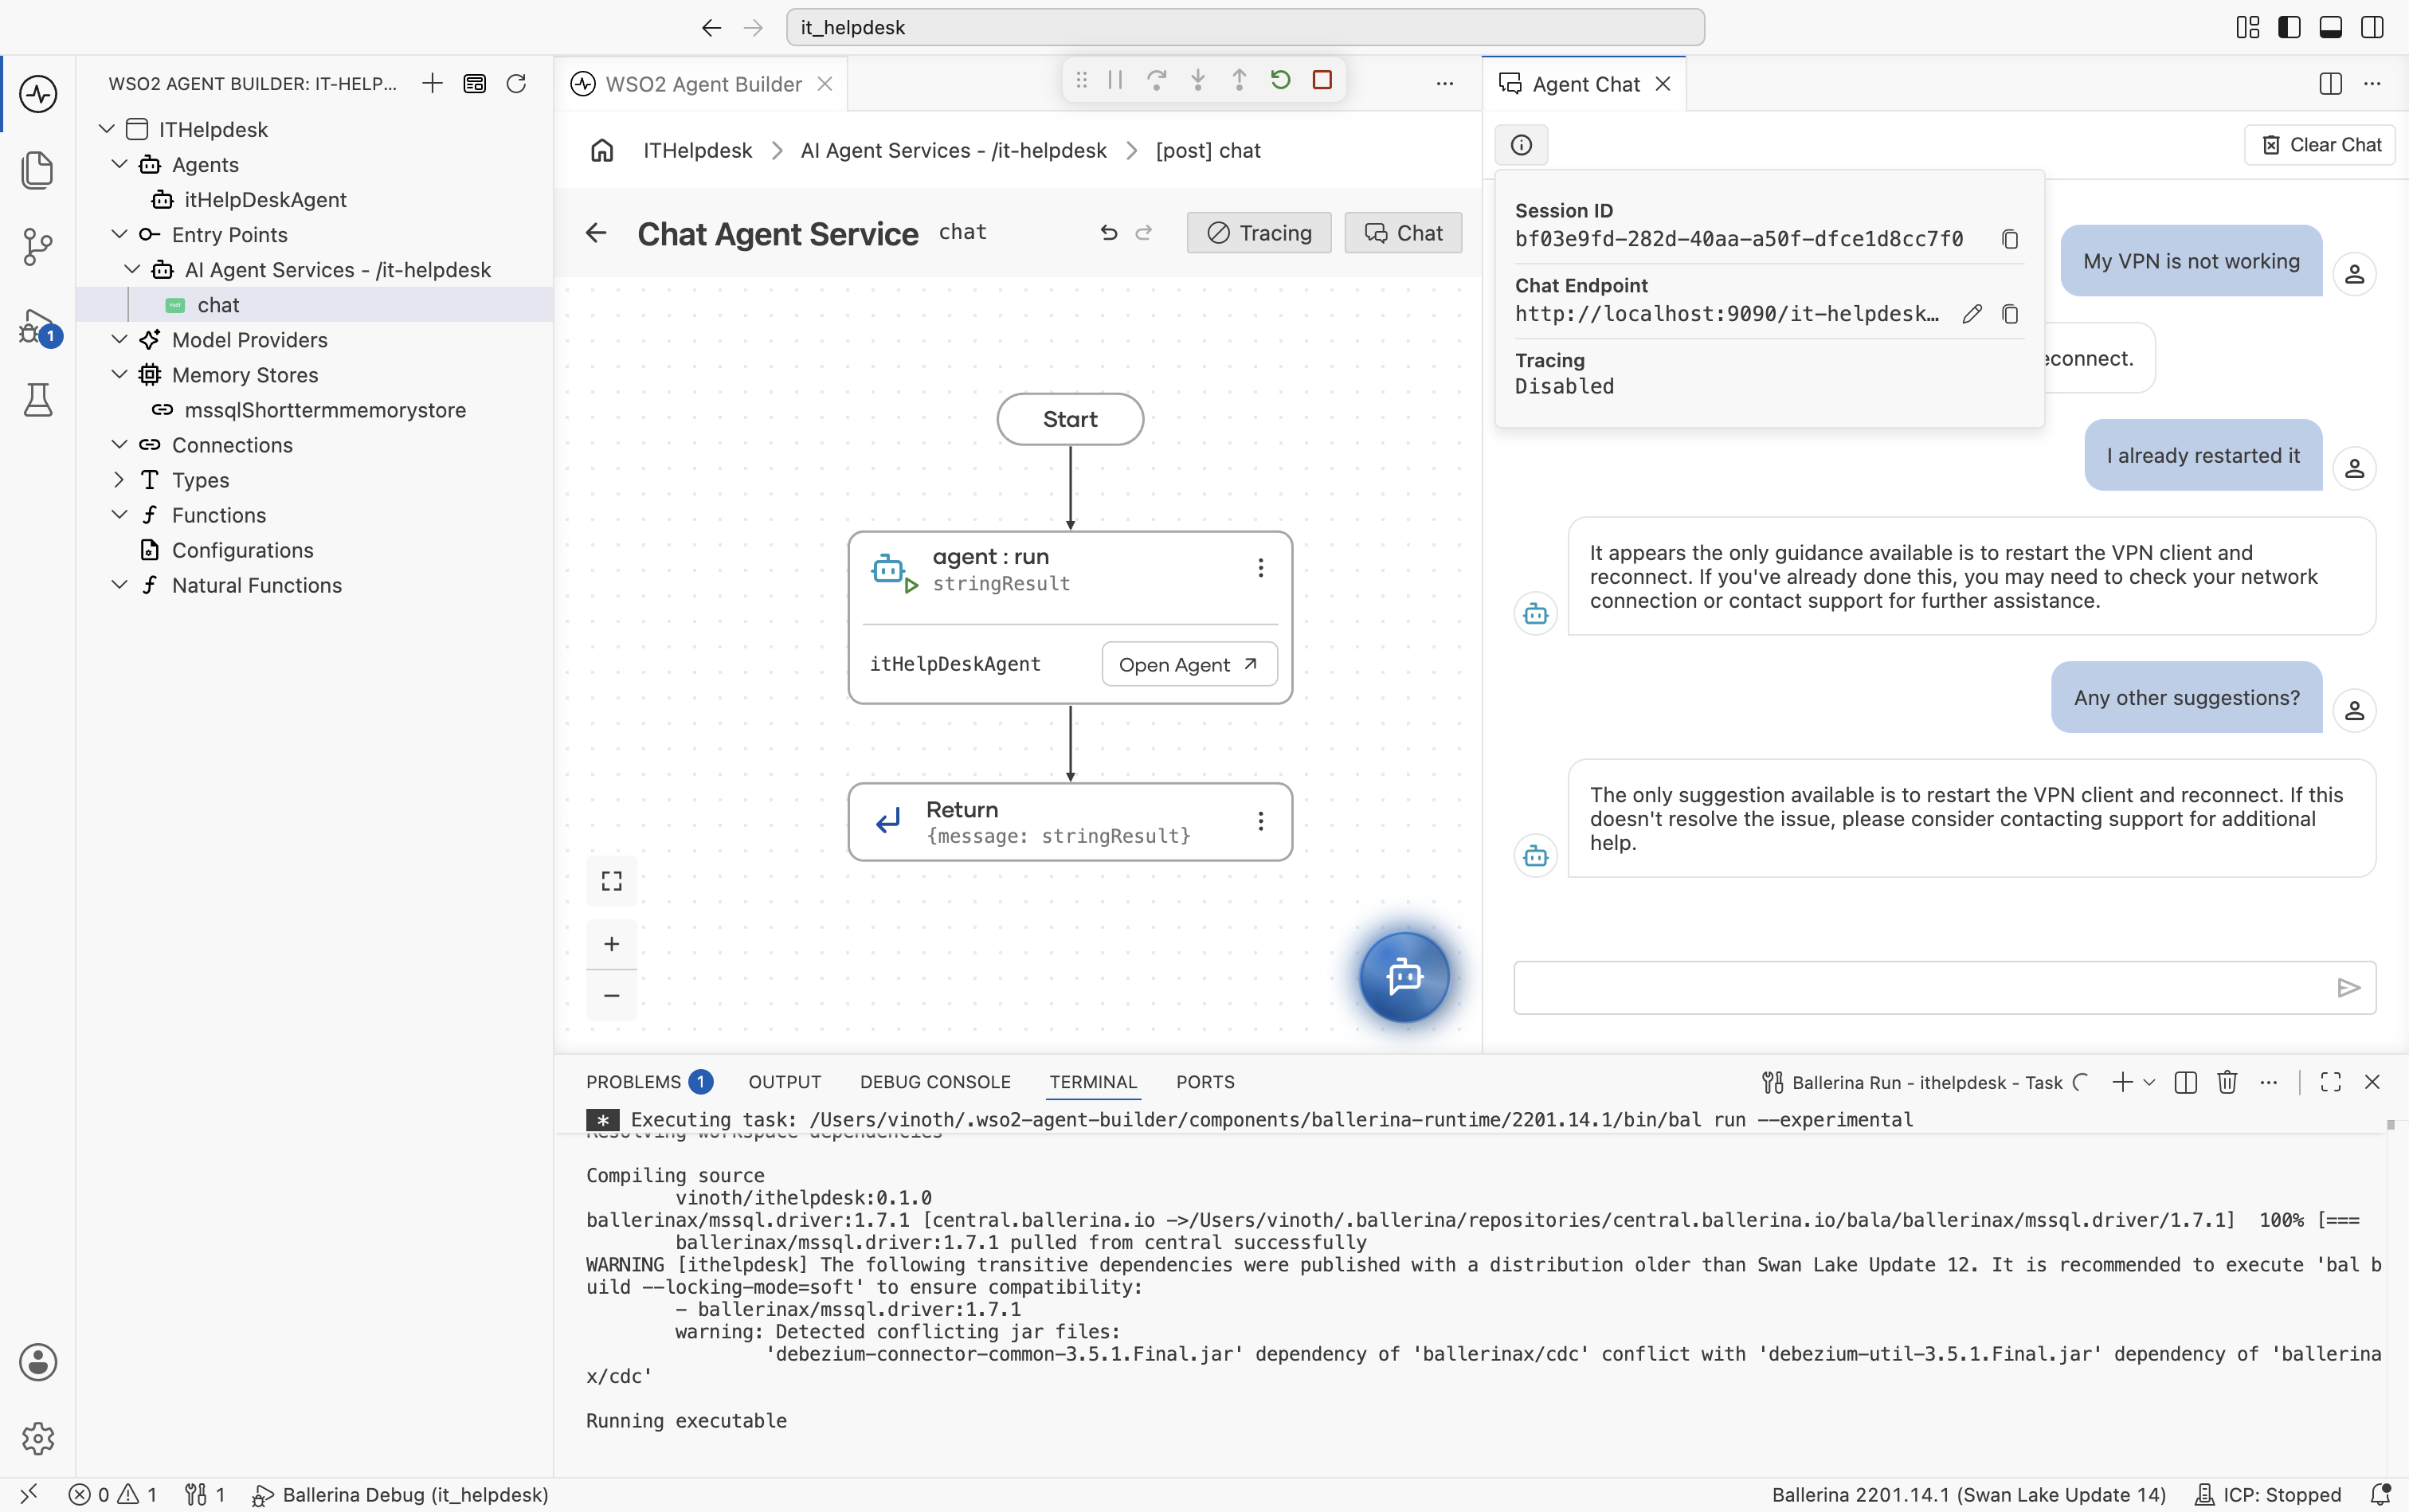
- To prove that memory survives a service restart, you need the session ID the Chat panel uses. Select the ⓘ icon at the top-left of the Agent Chat panel. It shows the Session ID and Chat Endpoint for the current conversation.
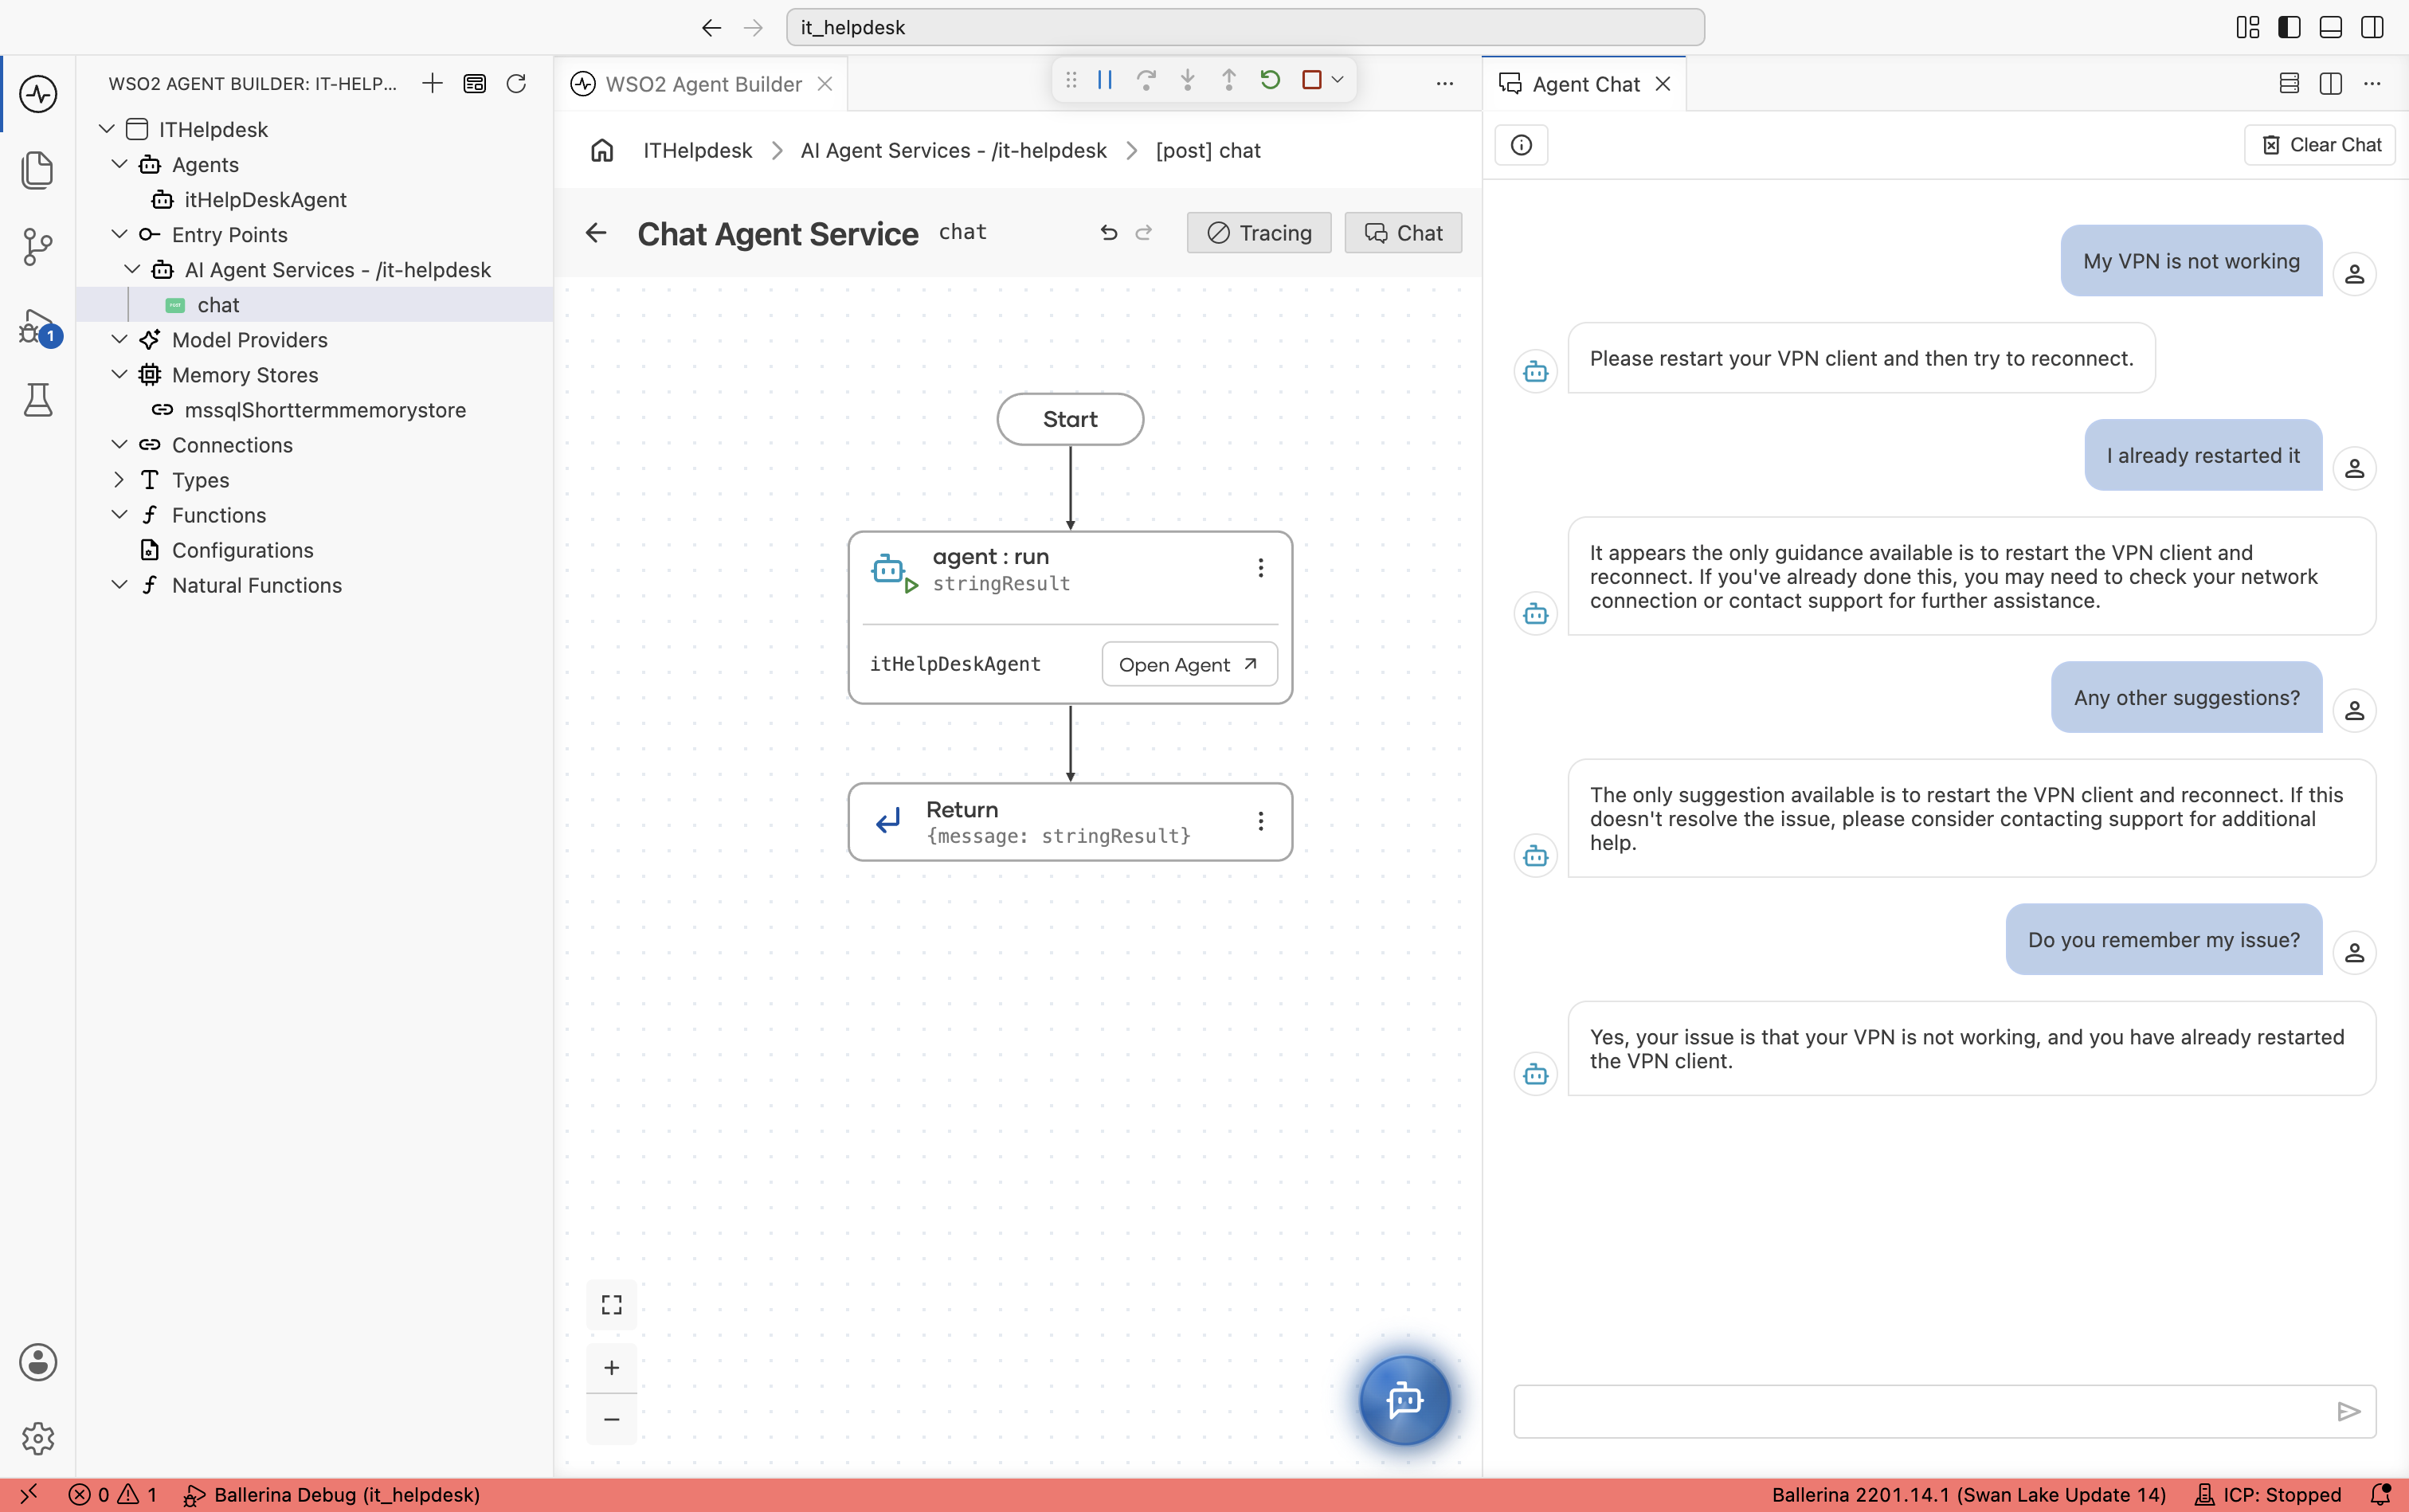
- Stop the integration, then run it again. Once it's back up, ask "Do you remember my issue?" in the same Agent Chat panel, which still uses the same session ID.
You can also send the request with curl, using the session ID from the info popover:
curl -X POST http://localhost:9090/it-helpdesk/chat \
  -H "Content-Type: application/json" \
  -d '{"sessionId": "<your session ID>", "message": "Do you remember my issue?"}'
The response confirms that the agent remembers the VPN issue and that you'd already restarted the client. This proves the conversation history survived the restart, because it's persisted in MSSQL rather than held in process memory.
- Run the integration.
- Ask a question as an employee:
- Curl Command
curl -X POST http://localhost:9090/it-helpdesk/chat \
  -H "Content-Type: application/json" \
  -d '{
        "sessionId": "EMP-1001",
        "message": "My VPN is not working"
      }'
- Response
{
  "message":"Try restarting your VPN client and then reconnecting."
}
- Continue the conversation using the same session ID:
- Curl Command
curl -X POST http://localhost:9090/it-helpdesk/chat \
  -H "Content-Type: application/json" \
  -d '{
        "sessionId":"EMP-1001",
        "message":"I already restarted it"
      }'
- Response
{
  "message":"Since restarting the VPN client didn't work, please provide more details about the issue for further assistance."
}
- Continue the conversation again using the same session ID:
- Curl Command
curl -X POST http://localhost:9090/it-helpdesk/chat \
  -H "Content-Type: application/json" \
  -d '{
        "sessionId":"EMP-1001",
        "message":"Any other suggestions?"
      }'
- Response
{
  "message":"The only information available suggests restarting the VPN client and reconnecting. If that hasn't resolved the issue, please check your internet connection or consider contacting your network administrator."
}
- Restart the service and reconnect using the same session ID:
- Curl Command
curl -X POST http://localhost:9090/it-helpdesk/chat \
  -H "Content-Type: application/json" \
  -d '{
        "sessionId":"EMP-1001",
        "message":"Do you remember my issue?"
      }'
- Response
{
  "message":"Yes, your VPN is not working, and you've already restarted the client."
}
The AI agent remembers previous conversations because the conversation history is stored in persistent MSSQL-backed memory and retrieved using the same session ID.