Convert a REST API into an MCP Tool and Use It in Claude Desktop
Overview
This guide shows you how to expose an existing REST API as a governed MCP server that AI clients can query in natural language. Without this, every AI client that needs your API requires custom integration code with no authentication or rate limiting. By the end, you'll have a deployed MCP server reachable from Claude Desktop, with OAuth2 enforced by WSO2 API Platform at every tool call.
Note
Claude Desktop only supports local stdio servers natively. This guide uses mcp-remote, a community-maintained local bridge, to connect Claude Desktop to the remote WSO2 MCP Gateway. If Claude Desktop adds native remote server support in the future, Step 9 will become simpler.
Key Concepts
Before you start, here are the WSO2 API Platform terms this guide uses:
WSO2 API Platform is the platform you'll use to create and manage your MCP server. The API Platform Console at console.bijira.dev is the web interface where you do this work.
MCP server is the logical API resource you create in WSO2 API Platform. It wraps your REST API and exposes it as a set of tools that AI clients can call.
WSO2 MCP Gateway is the infrastructure component that hosts and governs your MCP server — enforcing authentication, rate limits, and audit logging on every tool call.
Application is a client identity in the WSO2 API Platform. You create an application to represent Claude Desktop, subscribe it to your MCP server, and generate the OAuth2 credentials it uses to authenticate.
Subscription links an application to a specific MCP server, giving that application permission to call the server's tools.
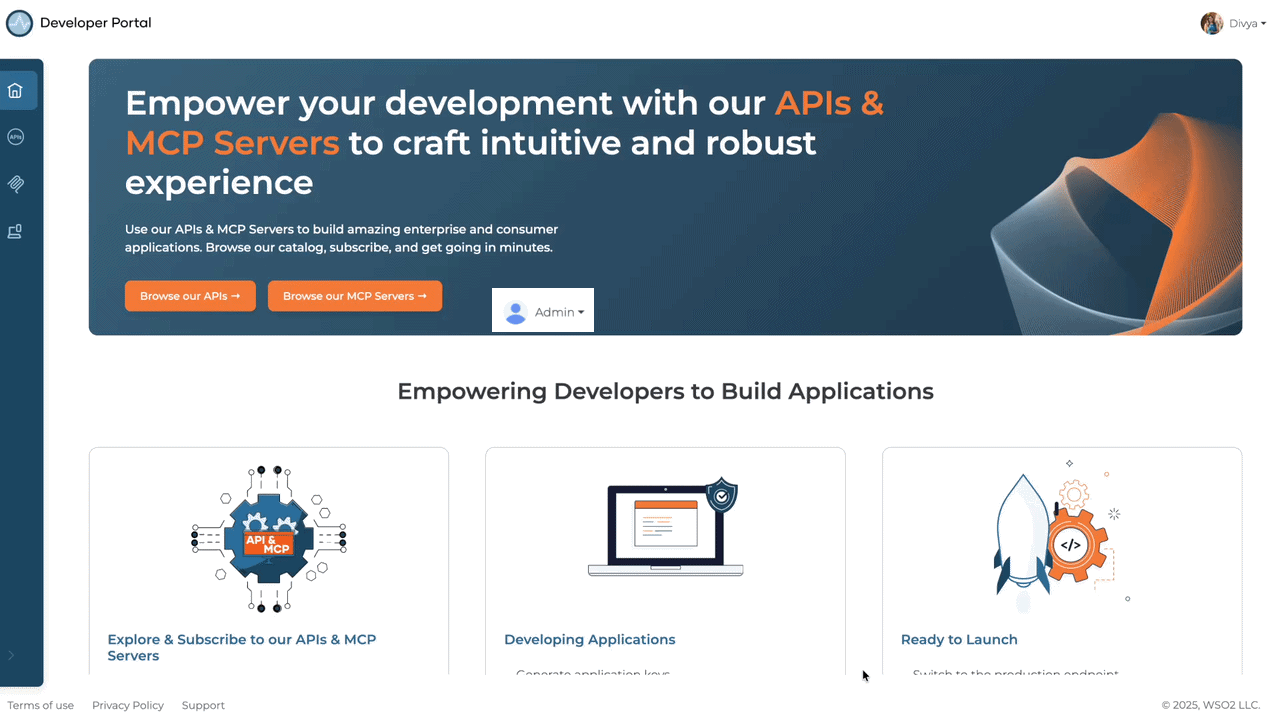
Developer Portal provides a self-service hub where consumers discover published MCP servers, create applications, and manage subscriptions.
Lifecycle is the set of states an MCP server moves through — Created, Deployed, Published — before it's reachable by consumers.
Prerequisites
- A WSO2 API Platform account. Sign up for free.
- Claude Desktop installed. Download from claude.ai/download.
- Node.js 18 or later installed. mcp-remote, the local bridge between Claude Desktop and your remote MCP server, requires it. Download from nodejs.org/download.
- curl or Postman for testing.
Architecture
Claude Desktop

    |  stdio
    v

+---------------------------+
|  mcp-remote (local proxy) |
|  translates stdio → HTTPS |
+---------------------------+

    |  HTTPS + OAuth2 bearer token
    v

+---------------------------+
|     WSO2 MCP Gateway      |
|  auth · rate limit · audit|
+---------------------------+

    |  HTTP
    v

Reading List API backend
Claude Desktop only supports local stdio servers. mcp-remote runs locally and bridges this gap: it receives stdio calls from Claude Desktop and forwards them to the WSO2 MCP Gateway over HTTPS with your OAuth2 bearer token attached. The gateway validates the token, applies rate limits, and logs every tool invocation before forwarding the request to your backend.
Step 1: Create an Organization and Project
Go to the API Platform Console and sign in with your Google, GitHub, or Microsoft account.
If this is your first time signing in, you'll be prompted to create an organization. Enter sampleorganization as the name, accept the privacy policy and terms of use, and click Create.
Once you're on the organization home page, create a project:
- Click + Create Project.
-
Enter the following details:
Field Value Display Name Sample Project Identifier sample-project Description My sample project -
Click Create.
Expected result: The project home page opens.
Step 2: Create the MCP Server
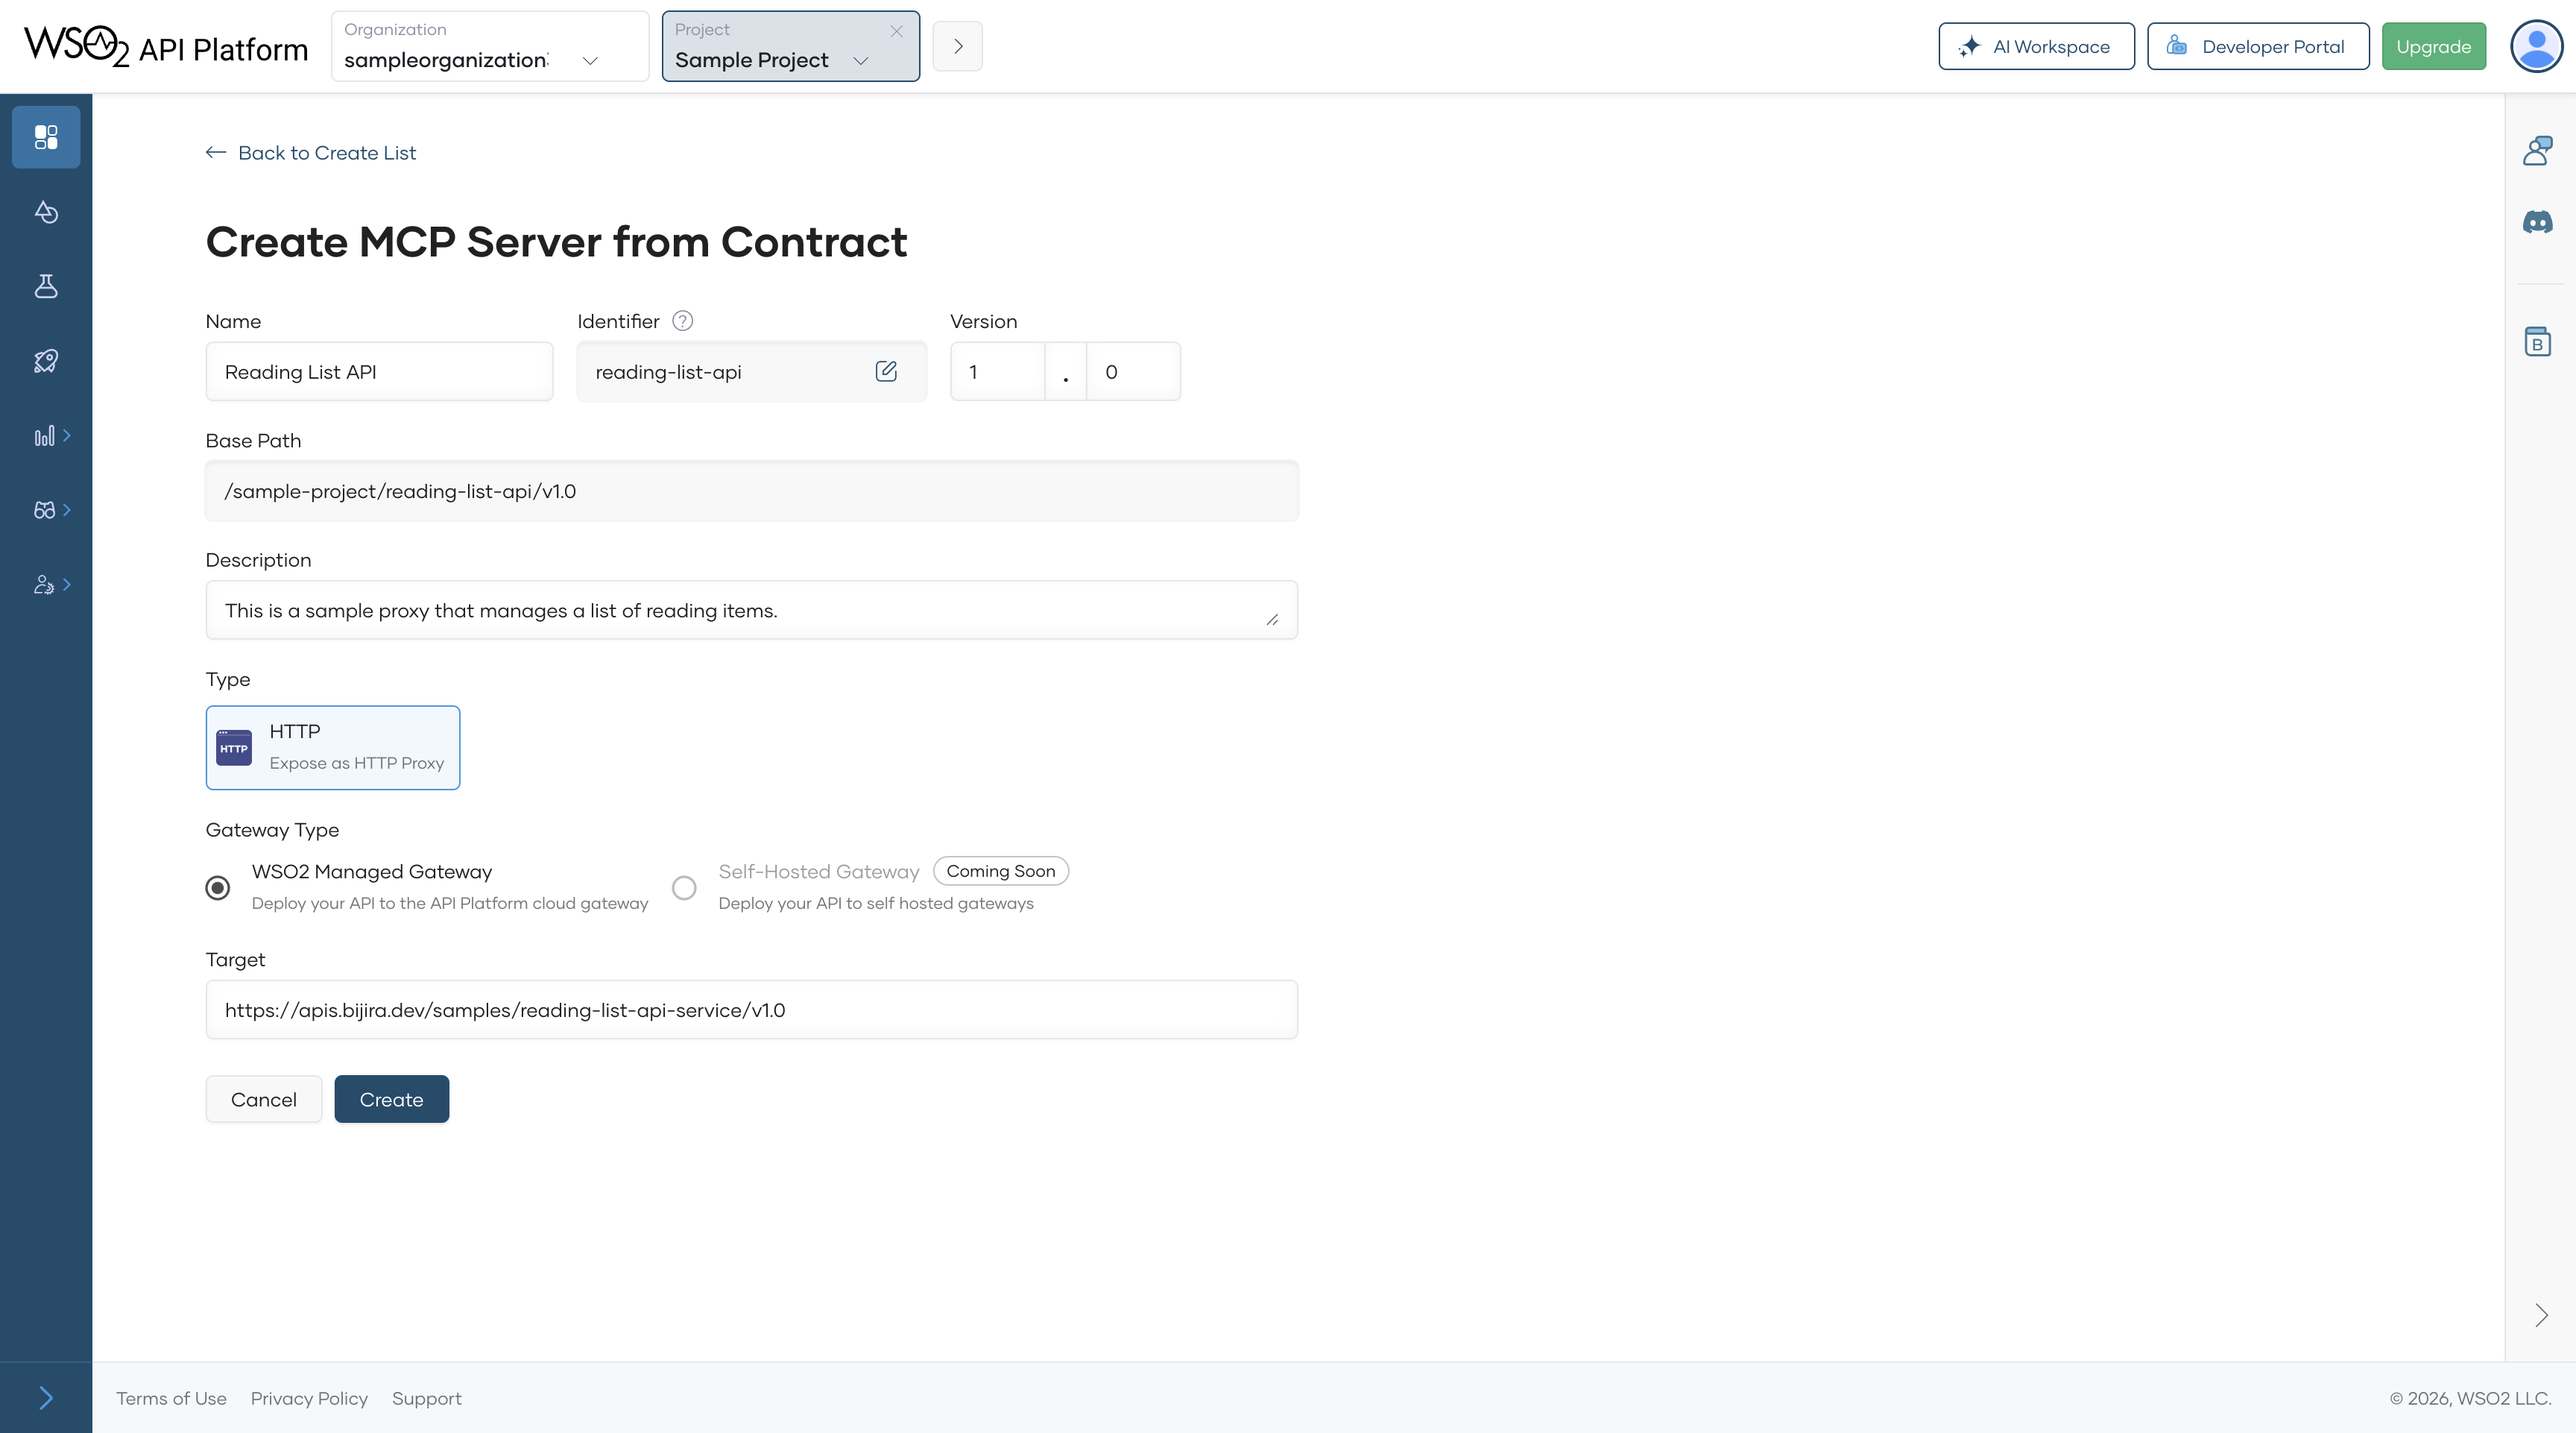
In this guide, you'll use the Reading List API — a sample REST API that manages a list of books — to create your MCP server. WSO2 API Platform reads the API's OpenAPI spec and generates one tool per operation. No custom server code is required.
When you complete this step, WSO2 API Platform automatically deploys the MCP server to a development environment so you can test it before promoting it to production.
- On the project home page, select MCP Server.
- Under Expose APIs as MCP Servers, click Import API Contract.
-
Click URL for API Contract, paste the following URL, and click Next:
-
On the Create MCP Server from Contract page, click Create.
Expected result: The MCP server is created with tools auto-generated from the Reading List API spec — one tool per operation, such as listing books, adding a book, and deleting a book. You can see them in Develop > Policies.
Note
If you have an existing REST API, select Start from Existing Proxy instead. Enter a name and description and select an API proxy already deployed in WSO2 API Platform. See the MCP Servers for existing API Proxies for that path.
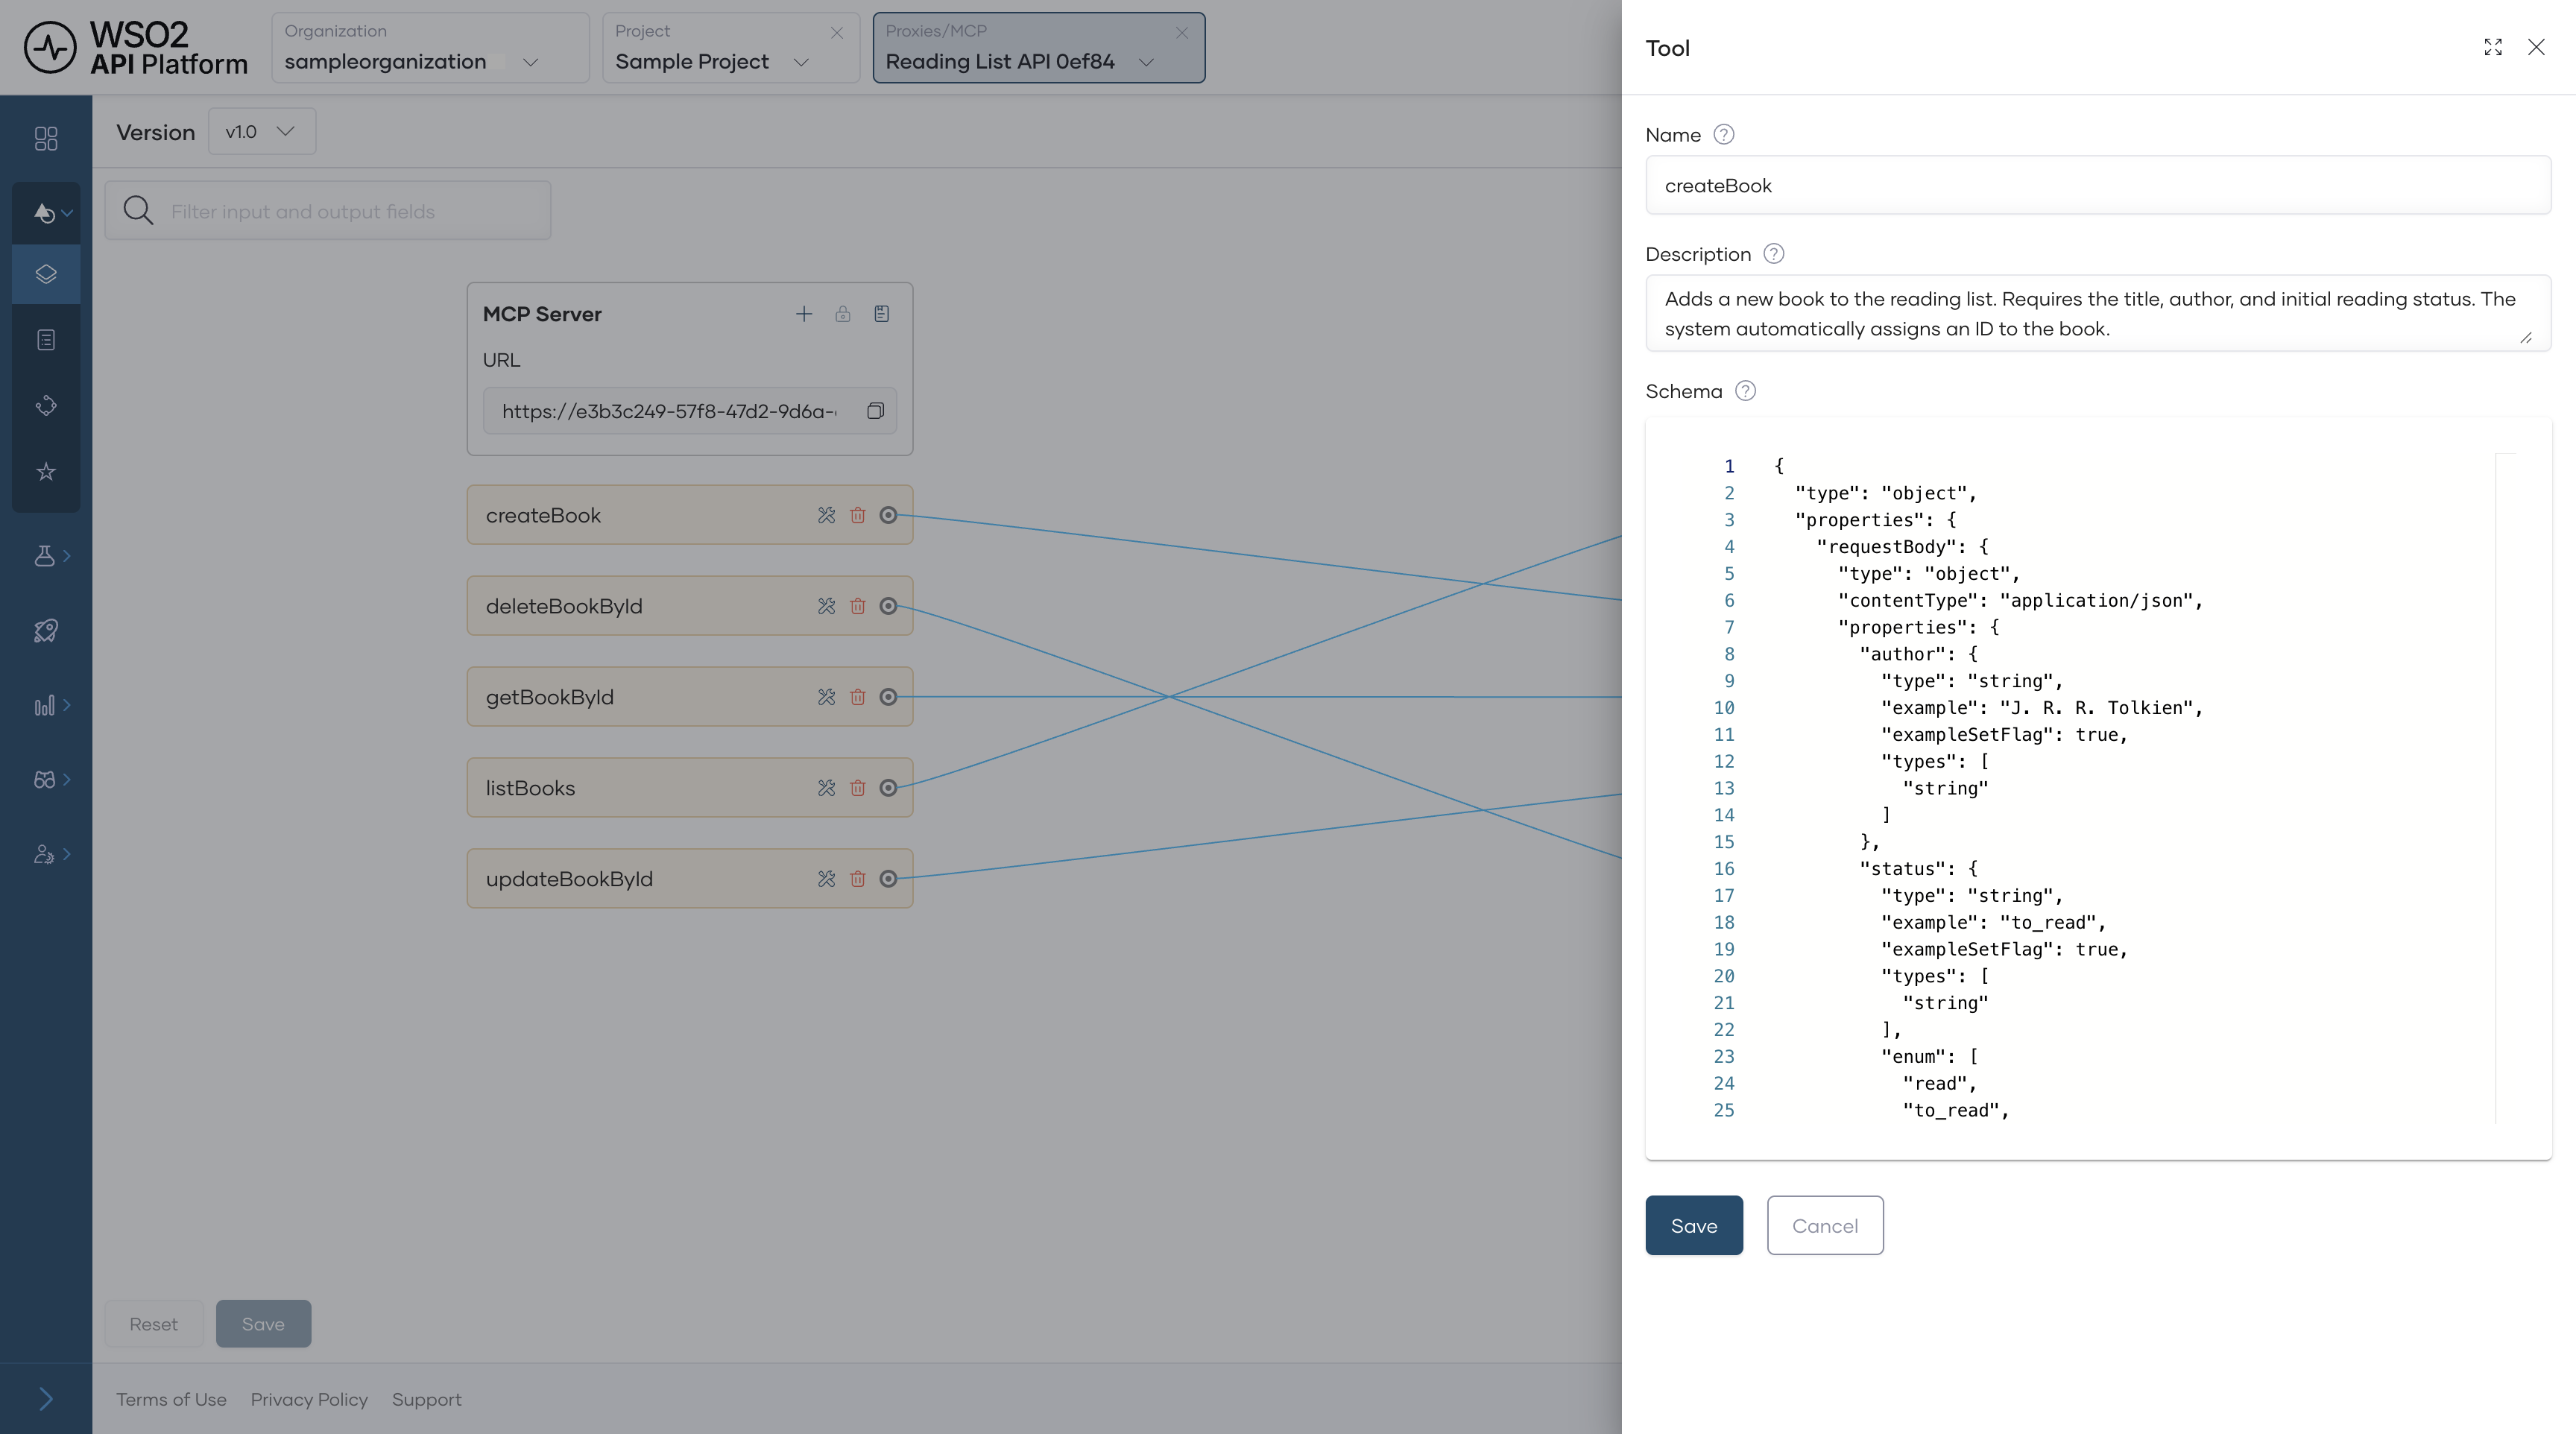
Step 3: Configure Tool Descriptions
Tool descriptions tell Claude what each tool does and when to use it. The auto-generated descriptions come from the OpenAPI spec's operationId, summary, and description fields — update any that are too technical or too brief.
In the Develop menu, click Routing. Each tool has an edit option on the right — click it to open the description editor. For the Reading List API, update the descriptions as follows:
| Tool | Description to use |
|---|---|
| List books | Get all books currently on the reading list. |
| Add a book | Add a new book to the reading list by providing the title, author, and status. |
| Delete a book | Remove a book from the reading list by its ID. |
Click Save. Then click Deploy from the navigation menu and select Deploy for the changes to take effect on the gateway.
Expected result: Each tool shows your updated description, and the MCP server status returns to Deployed.
Tip
Write descriptions as if you're telling a colleague what the tool does. Claude uses these descriptions to decide which tool to call, so natural language outperforms technical API names.
Step 4: Enable OAuth2 Authentication
Enabling OAuth2 tells the WSO2 MCP Gateway to reject any tool call that doesn't include a valid bearer token. Unauthenticated requests never reach your backend.
In the side menu, scroll to Deploy and select Security Settings. Toggle OAuth2 on and click Apply.
Expected result: The toggle shows as enabled.
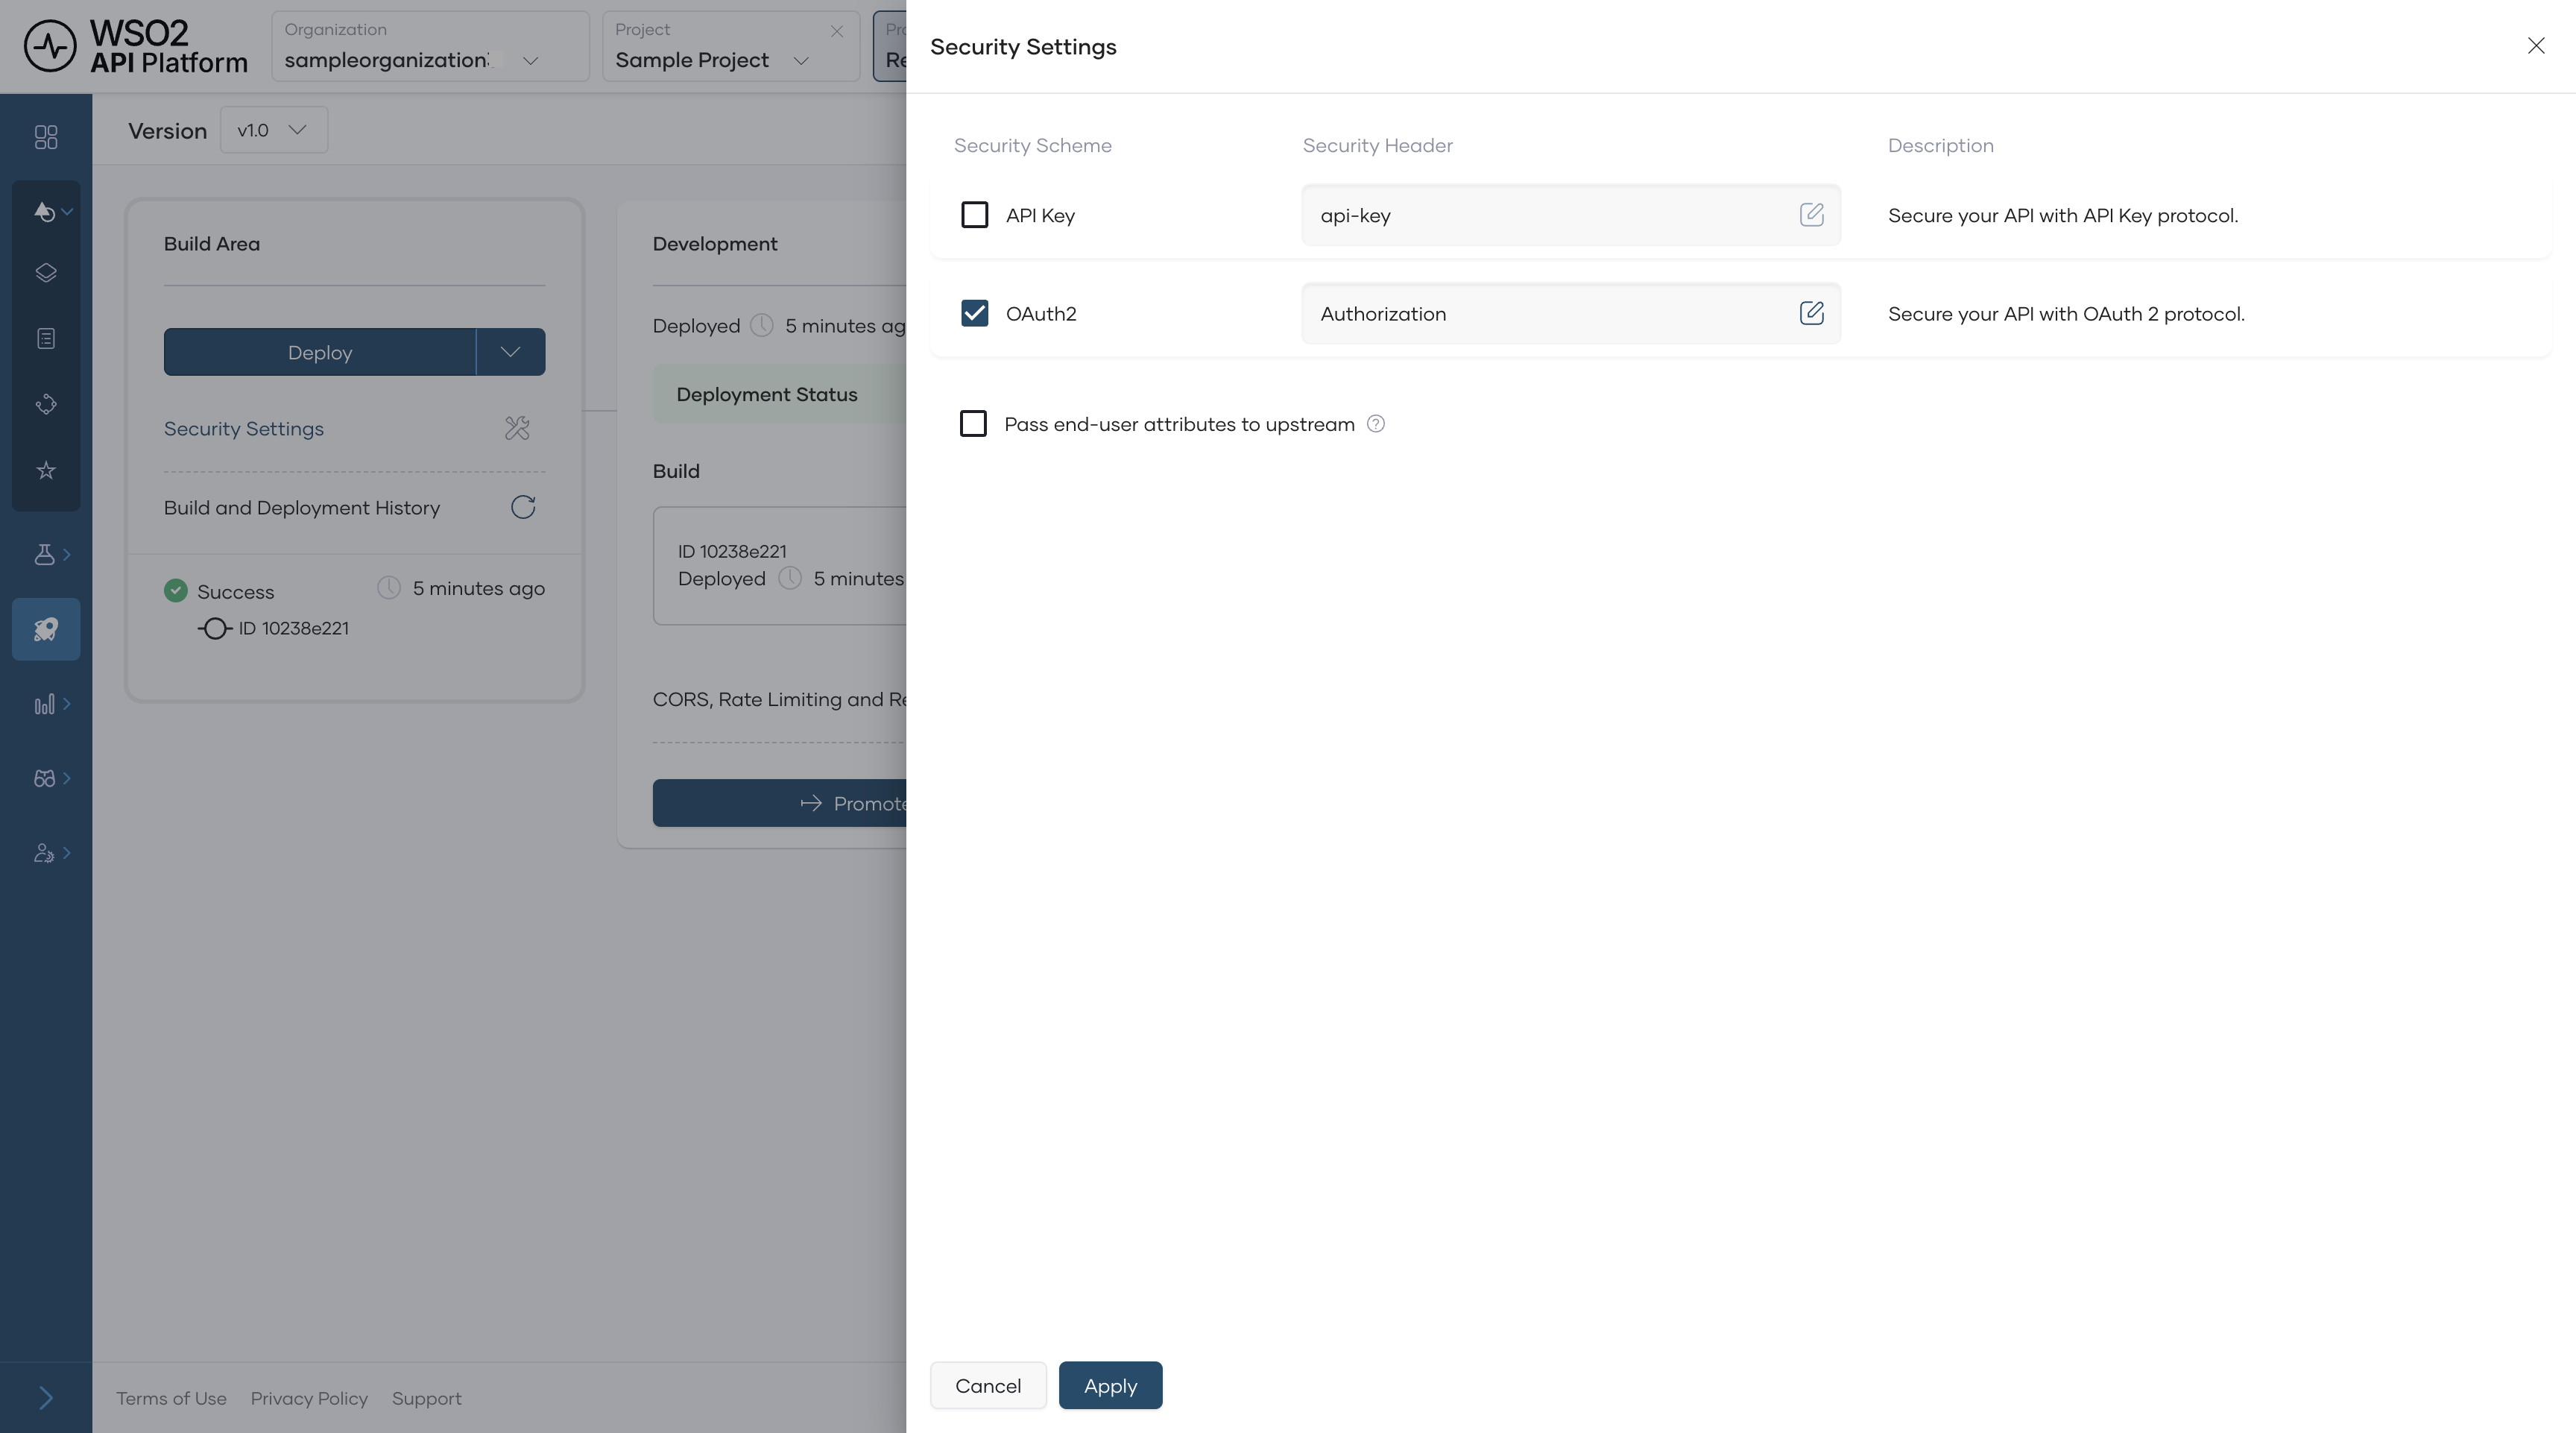
Warning
Don't disable OAuth2 in production. Without it, any client that knows your MCP server URL can call your backend directly.
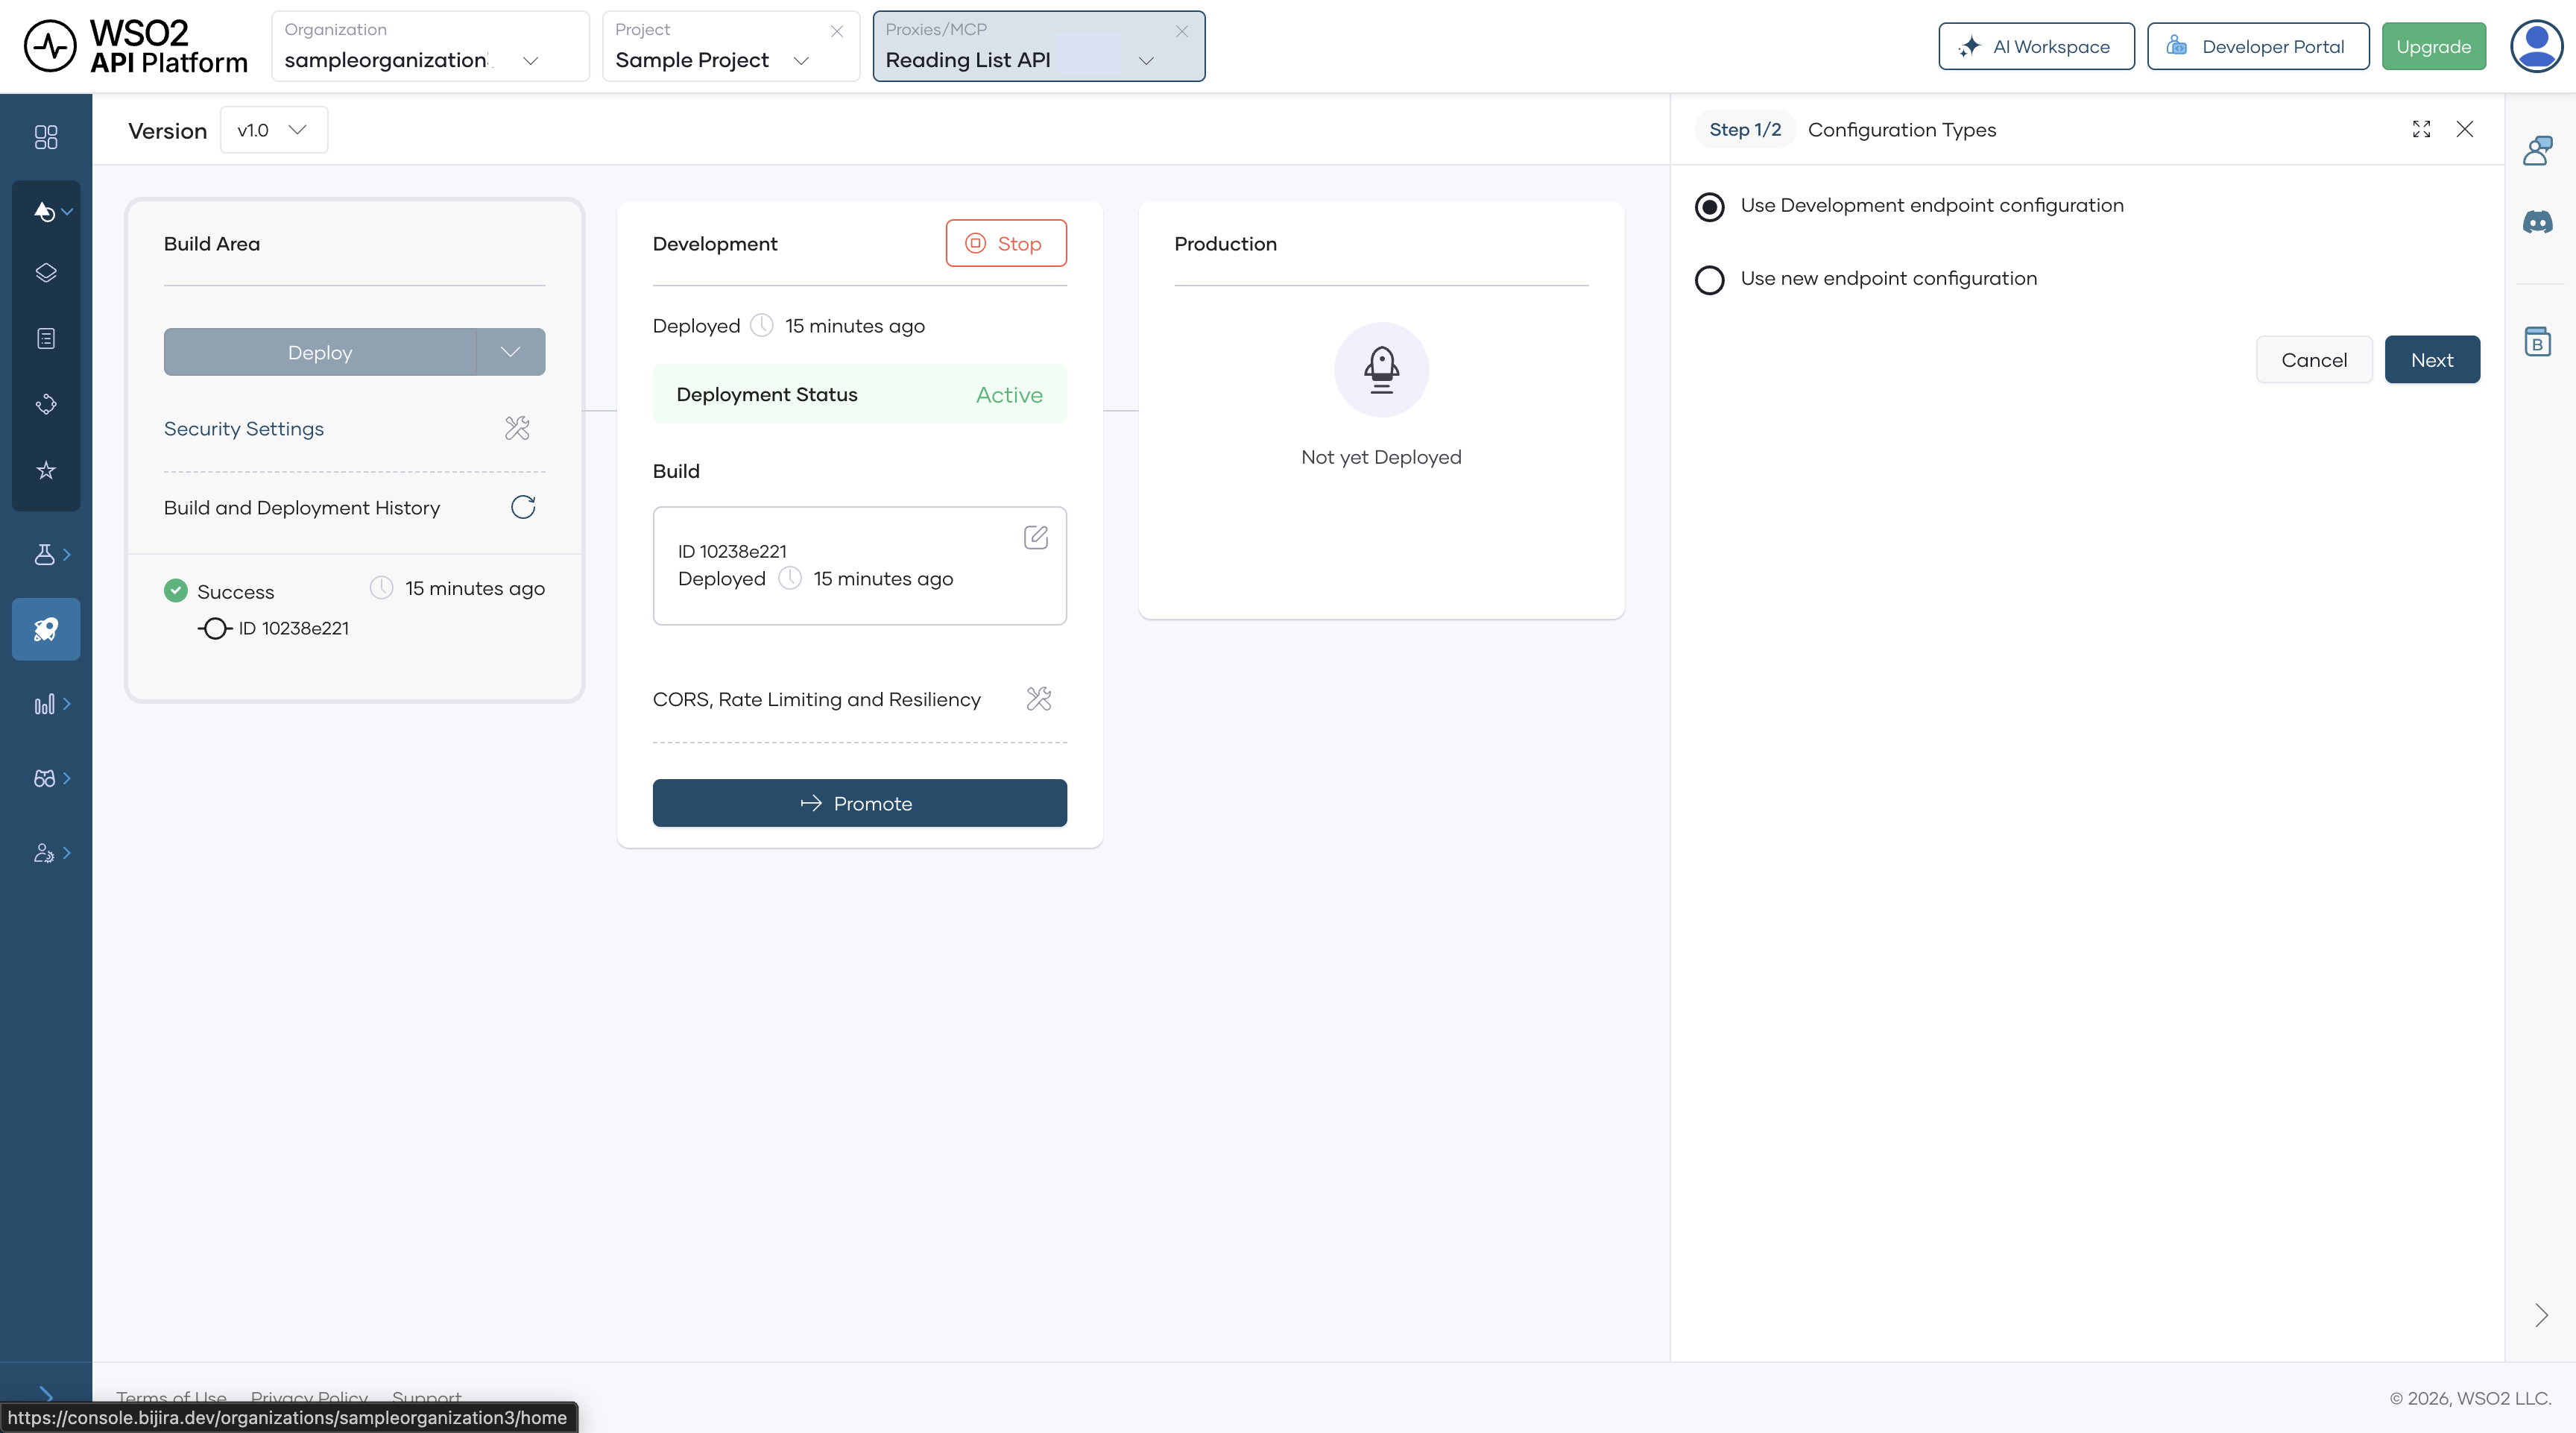
Step 5: Deploy the MCP Server
Deploying promotes your MCP server from the development environment to the production gateway.
- In the left navigation menu, click Deploy.
- In the Development card, click Promote.
- In the Configuration Types pane, select Use Development endpoint configuration and click Next.
Expected result: The Production card shows Deployment Status as Active.
Step 6: Add the MCP Server to the Developer Portal
Publishing makes your MCP server discoverable to consumers in the Developer Portal so they can subscribe and generate credentials.
- In the left navigation menu, click Manage, then click Lifecycle.
- Click Publish.
- In the Publish MCP Server dialog, confirm the Display Name and Production Endpoint URL, then click Confirm.
Expected result: The lifecycle state changes to Published.
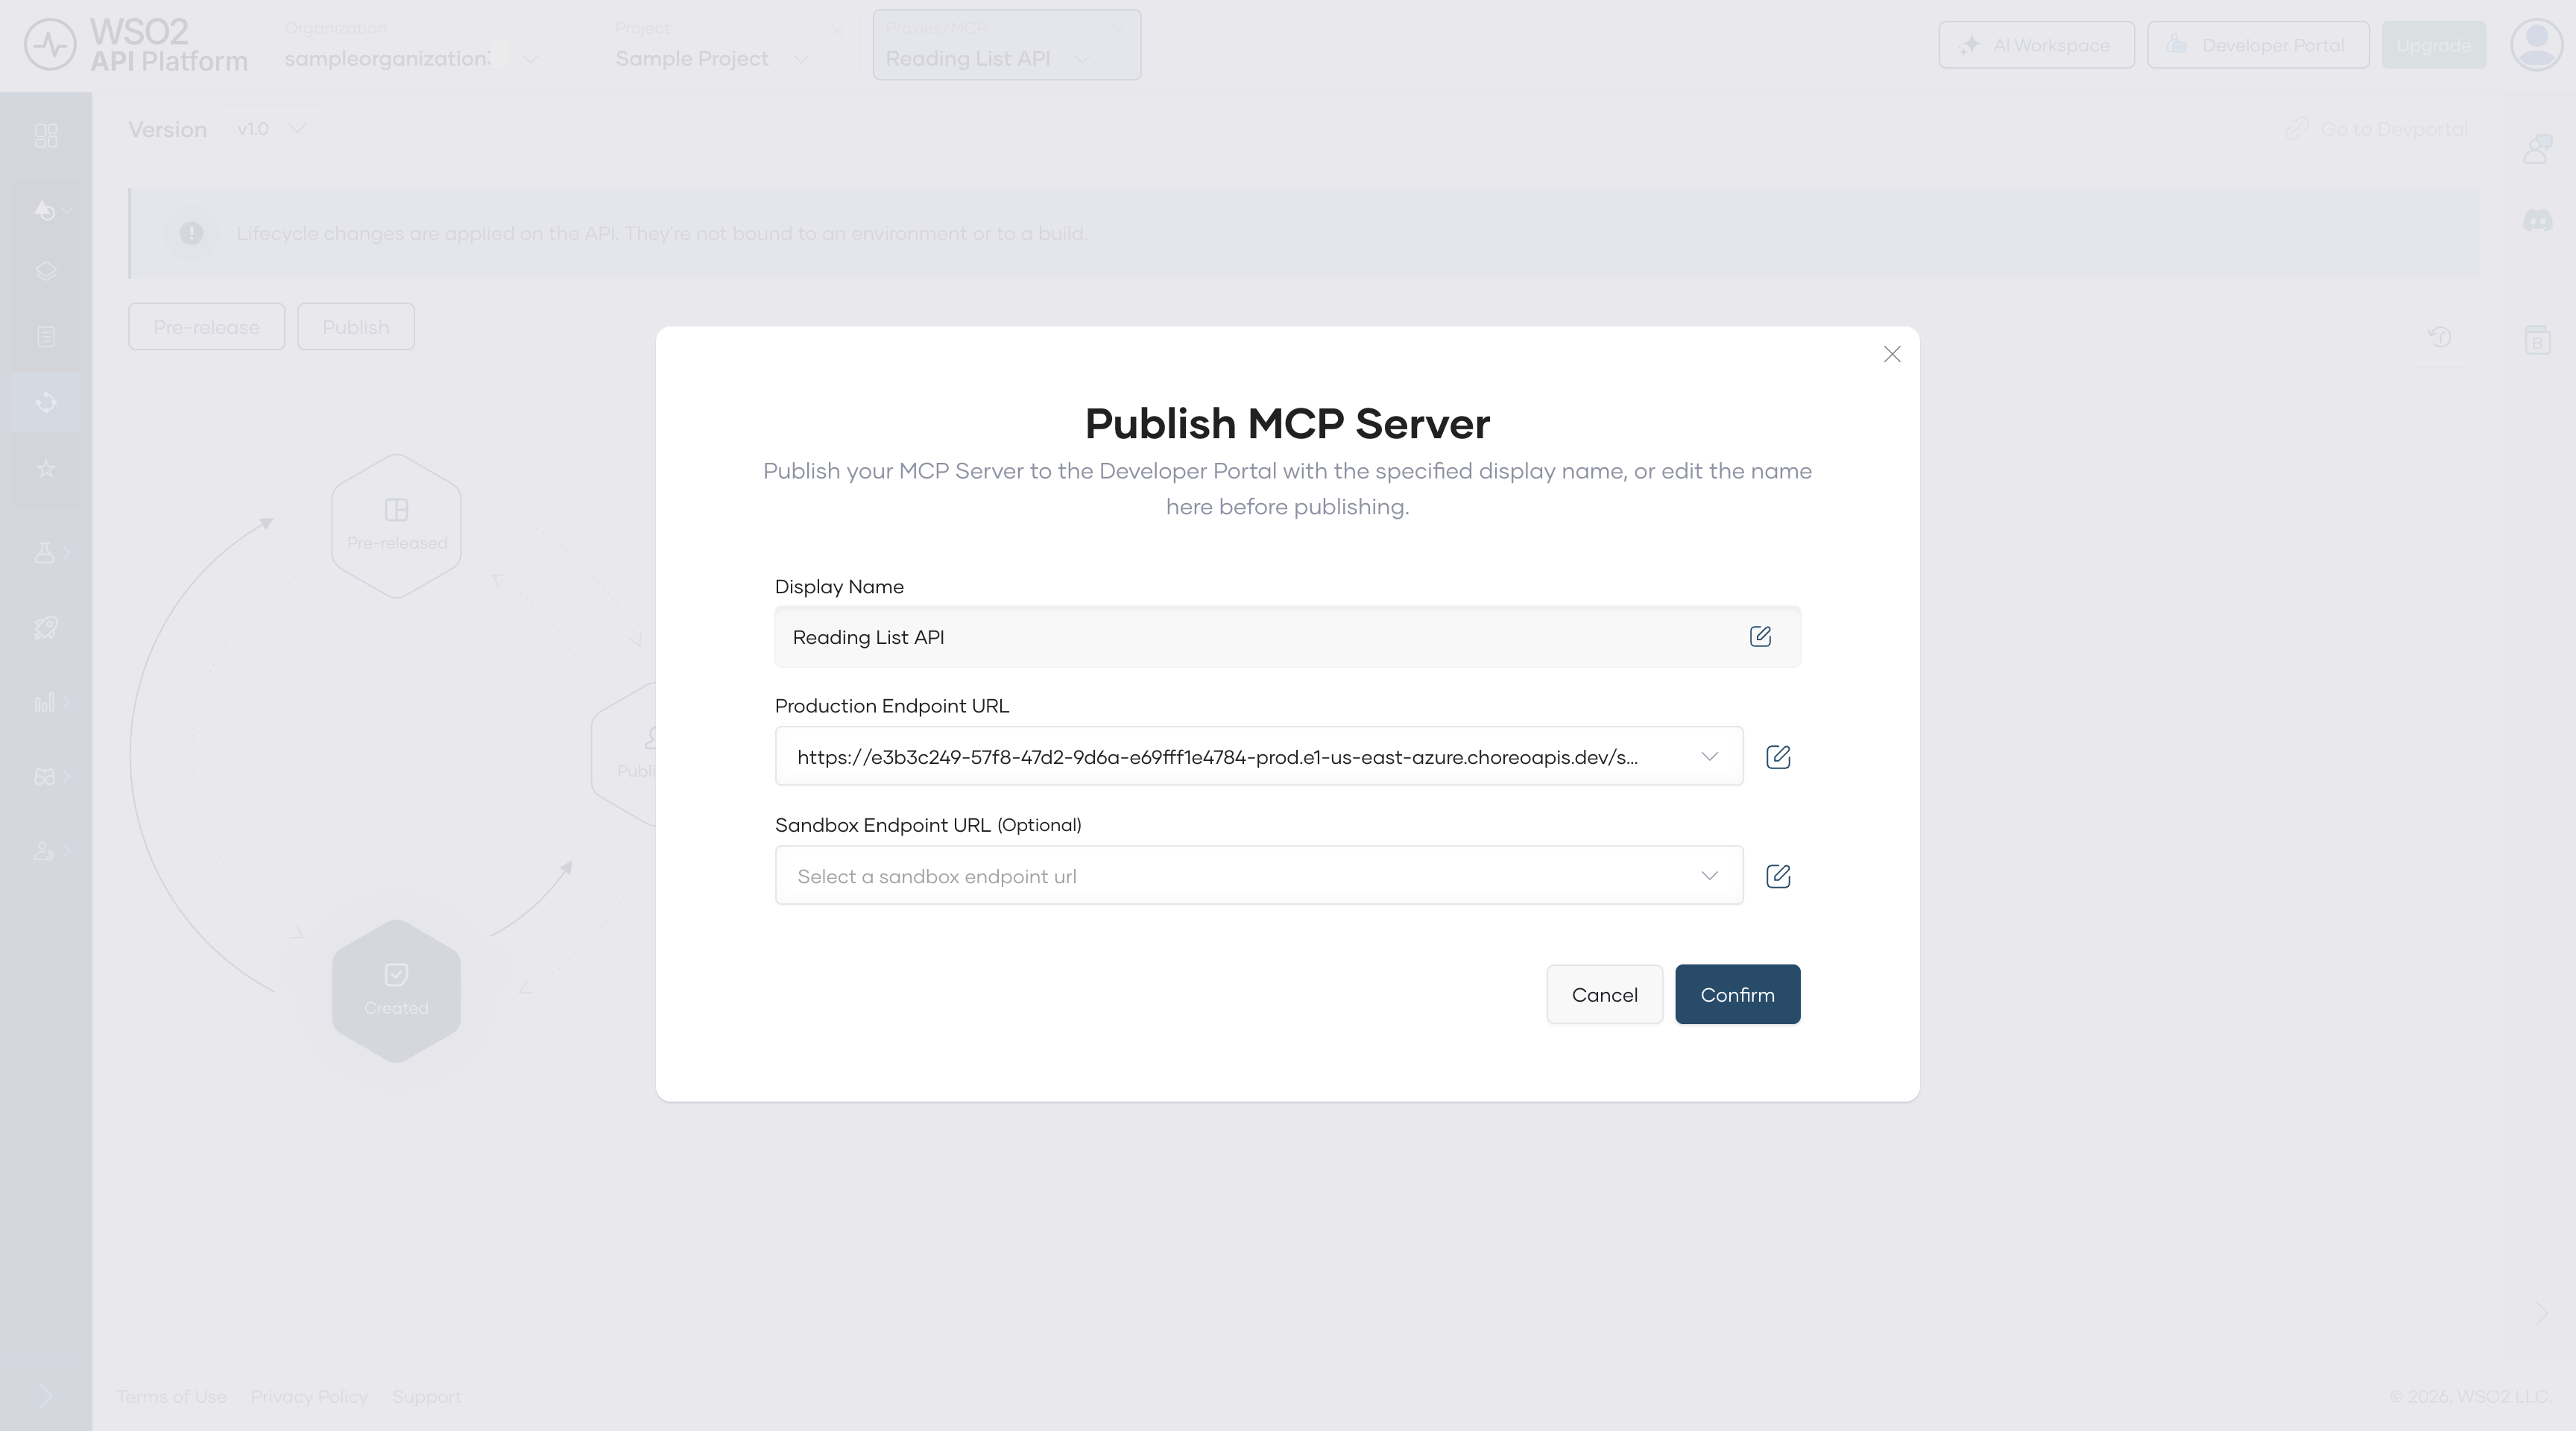
Note
The Production Endpoint URL in the dialog is unique to your organization.
Step 7: Add a Subscription in the Developer Portal
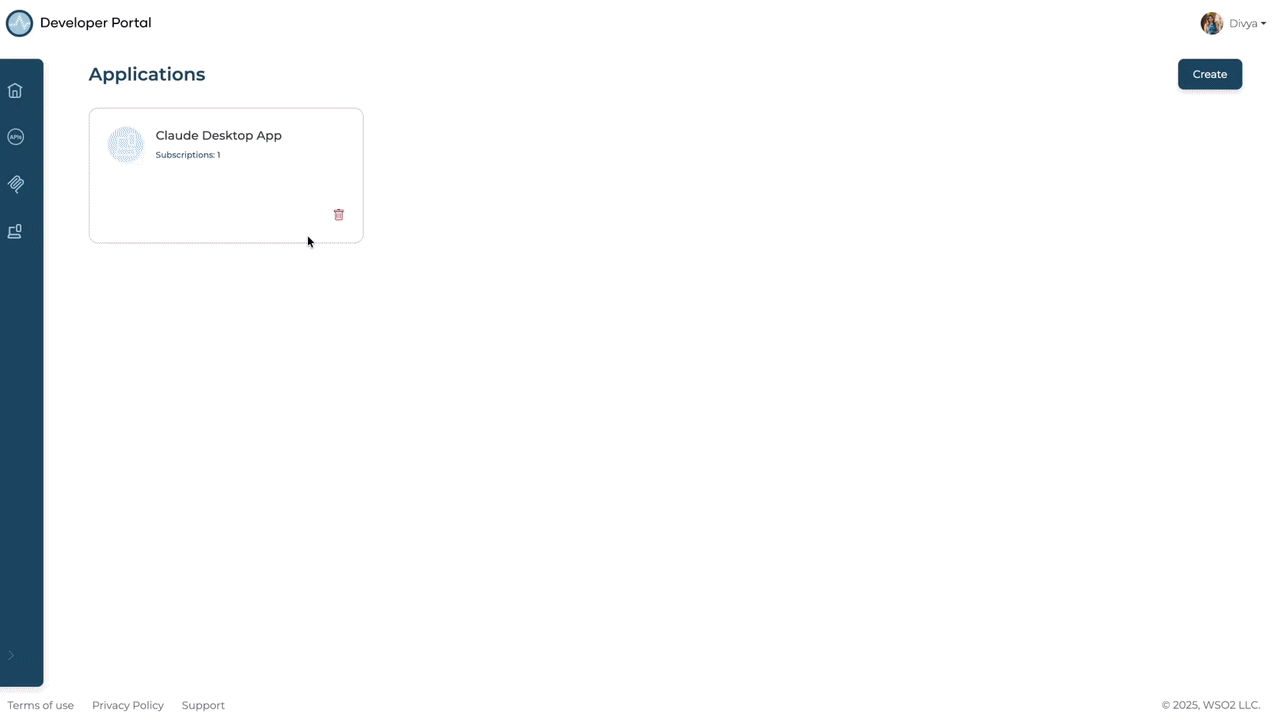
An application in WSO2 API Platform represents a client — in this case, Claude Desktop. You'll create one and subscribe it to the Reading List MCP server so it can make authenticated tool calls.
- In the Lifecycle pane, click Go to Developer Portal.
- In the Developer Portal left navigation menu, click Applications, then click Create.
- Enter an application name, such as
Claude Desktop App, and click Create. - Select Claude Desktop App and click Explore More under the Subscribed MCP Servers section. This opens the MCP Server listing page.
- Find your Reading List MCP server, click Subscribe, choose Claude Desktop App from the dropdown, and click Subscribe.
Expected result: Claude Desktop App appears in the application's Subscriptions list with an active subscription to the Reading List MCP server.
Step 8: Create an Access Token
Generate the OAuth2 bearer token that Claude Desktop will use to authenticate every tool call.
- In the Developer Portal, click Applications in the left navigation menu and open Claude Desktop App.
- In the application banner, click Manage Keys.
- On the Manage Keys page, select the Production tab.
- Click Generate Key and wait for the Consumer Key and Consumer Secret to be populated.
- Click Generate and copy the token.
Expected result: You have a bearer token to paste into the config file in the next step.
Warning
Bearer tokens expire after 3600 seconds (one hour) by default. WSO2 API Platform doesn't automatically refresh them. When your token expires, Claude Desktop will silently stop invoking tools. Generate a new token in the Developer Portal, update the Authorization value in claude_desktop_config.json, and restart Claude Desktop. To extend the token lifetime, click Modify on the Manage Keys page and increase the Application Access Token Expiry Time before generating.
Step 9: Paste the MCP Server Configuration into Claude Desktop
Claude Desktop only supports local stdio servers via its config file, so you can't point it directly at the WSO2 MCP Gateway URL. mcp-remote solves this — it runs locally as a subprocess, receives calls from Claude Desktop over stdio, and forwards them to the gateway over HTTPS with your bearer token attached.
Open claude_desktop_config.json via Settings > Developer > Edit Config in Claude Desktop, or navigate to it directly:
- macOS:
~/Library/Application Support/Claude/claude_desktop_config.json - Windows:
%APPDATA%\Claude\claude_desktop_config.json
If the file doesn't exist yet, create it with the content below. If it already exists with other keys, add mcpServers alongside them at the top level.
{
  "mcpServers": {
    "reading-list": {
      "command": "npx",
      "args": [
        "mcp-remote@latest",
        "https://<YOUR-GATEWAY-URL>",
        "--header",
        "Authorization: Bearer <YOUR-TOKEN>"
      ]
    }
  }
}
Replace <YOUR-GATEWAY-URL> with the MCP server URL from the Developer Portal and <YOUR-TOKEN> with the access token you copied in Step 8.
Expected result: The file is saved with the reading-list entry inside mcpServers.
Warning
Don't commit claude_desktop_config.json to version control. It contains your bearer token in plain text. Add it to .gitignore if your home directory is under source control.
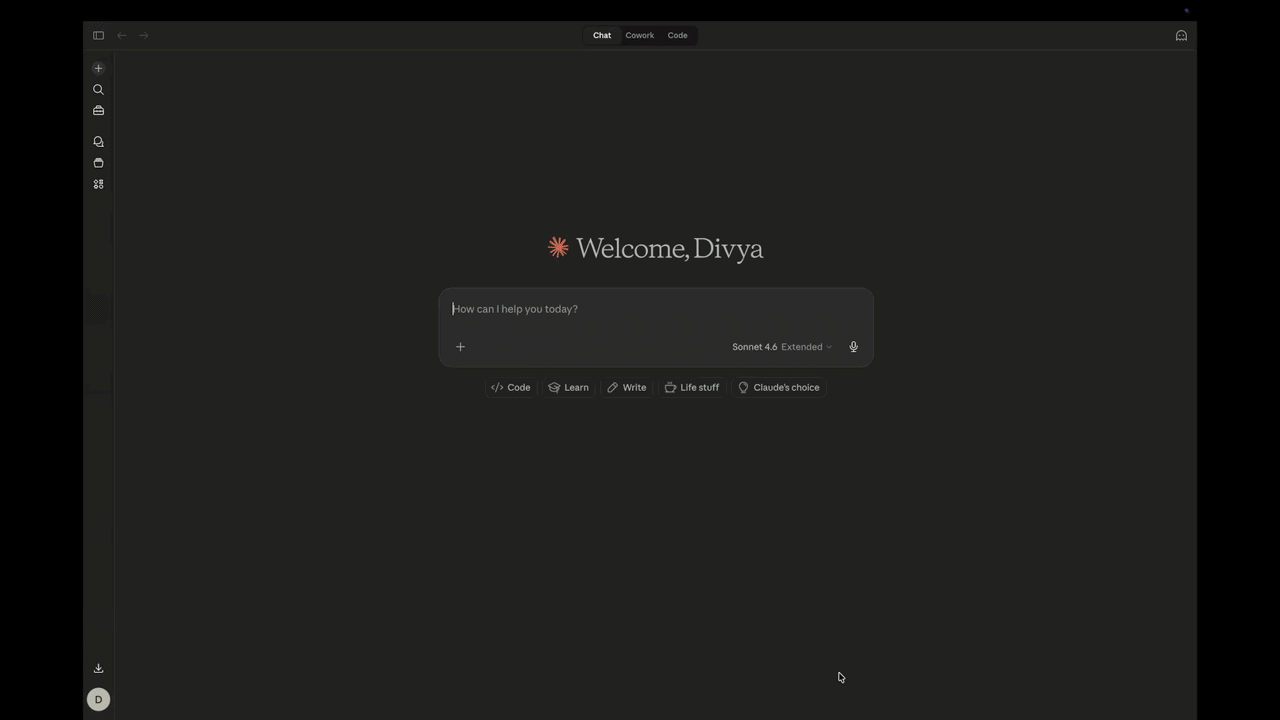
Step 10: Run Claude Desktop
Claude Desktop loads claude_desktop_config.json only on startup. Restart it fully for your MCP server configuration to take effect.
Expected result: Your Reading List MCP server appears as an available connector in the + menu of the chat input. Click + > Connectors > Manage Connectors to confirm the tools it exposes.
Verify
-
In Claude Desktop, start a new conversation and type:
"What books are on my reading list?"Confirm Claude invokes the correct tool and returns a real response from the backend. You'll see a tool-use indicator in the chat showing which tool was called. If Claude doesn't invoke the tool automatically, try:"Use the reading list tool to show me all books."
-
Confirm that unauthenticated requests are rejected. In your terminal, call the MCP server endpoint without an
Authorizationheader and confirm you receiveHTTP 401 Unauthorized.curl -v -X POST https://<YOUR-GATEWAY-URL>/mcp \ -H "Content-Type: application/json" \ -d '{"jsonrpc":"2.0","method":"tools/list","id":1}'Expected response:
401 Unauthorized. -
Confirm that authenticated requests succeed. Call the same endpoint with your bearer token and confirm you receive
HTTP 200 OK.curl -v -X POST https://<YOUR-GATEWAY-URL>/mcp \ -H "Content-Type: application/json" \ -H "Authorization: Bearer <YOUR-TOKEN>" \ -d '{"jsonrpc":"2.0","method":"tools/list","id":1}'Expected response:
HTTP 200with a list of your Reading List tools. -
In WSO2 API Platform, navigate to Insights > API Insights. Confirm your Claude Desktop request appears in the traffic view with a
200response code.
Note
Allow a few minutes for traffic to appear in API Insights after the first request.
Troubleshooting
| Symptom | Resolution |
|---|---|
The following entries in claude_desktop_config.json are not valid MCP server configurations and were skipped |
Confirm you're using the mcpServers key (not servers) and that the entry uses command and args, not url. The URL-only format is for VS Code, not Claude Desktop. |
| MCP server doesn't appear under + > Connectors after restart | Confirm Node.js 18+ is installed and the npx command is available in your terminal. Run npx mcp-remote@latest --help to verify. Also confirm you fully restarted Claude Desktop after saving the config file. |
| mcp-remote starts, but tools don't respond | Confirm <YOUR-GATEWAY-URL> is correct and the token is valid. Run npx mcp-remote@latest https://<YOUR-GATEWAY-URL> --header "Authorization: Bearer <YOUR-TOKEN>" directly in your terminal and check the error output. |
| Claude searches memory or connected tools instead of invoking an MCP tool | Confirm your MCP server appears under + > Connectors > Manage Connectors. If it does, rephrase the query explicitly, for example: "Use the reading list tool to show me all books." |
HTTP 401 Unauthorized on every tool call |
Your bearer token has expired. Generate a new token in the Developer Portal, update claude_desktop_config.json, and restart Claude Desktop. |
HTTP 404 on tool calls |
Confirm the MCP server status is Deployed in WSO2 API Platform, and the gateway URL in your config matches the URL shown in the Developer Portal. |
| The OAuth browser window opens and fails | This happens when adding the server via Settings > Connectors instead of the config file. The Connectors flow requires a full OAuth authorization server; use the mcp-remote config file approach in Step 9 instead. |
What You Learned
- Created a governed MCP server from a REST API without writing any custom server code
- Configured natural-language tool descriptions so Claude understands when to invoke each tool
- Enforced OAuth2 authentication on every MCP tool call at the gateway level, with unauthenticated requests rejected before reaching the backend
- Connected Claude Desktop to a remote HTTP MCP server using mcp-remote as a local stdio bridge, working around Claude Desktop's stdio-only config file limitation
Next Steps
- Aggregate MCP tools from multiple APIs — combine this MCP server with others into a single endpoint so AI agents can query across systems in one call
- Connect your MCP server to VS Code Copilot — use the same deployed MCP server with VS Code Copilot using the Developer Portal's native configuration snippet
- Monitor MCP tool usage with runtime logs — track which tools are being called, by which clients, and where errors occur
Try the sample
The companion sample runs this setup locally using a self-hosted gateway, so you can try the full guide without a cloud account.