Build a Claim Handling Durable Agent
The durable AI agent receives expense claims, validates them, and pays them out — but only after a Finance reviewer approves the payment from the Integration Control Plane. If the process crashes while waiting, it resumes exactly where it left off.
Prerequisites
A working WSO2 Agent Builder environment.
Local setupInstall and launch WSO2 Integrator on your machine.
WSO2 Cloud AccountFor AI assisted development and WSO2 Cloud deployments.
Also required:
WSO2 Integrator CopilotSigned in to WSO2 Integrator Copilot (provides the default AI model — no API key needed)
DockerDocker installed, including Docker Compose. It runs the Temporal server that keeps the workflow's durable record.
Step 1: Create the project
-
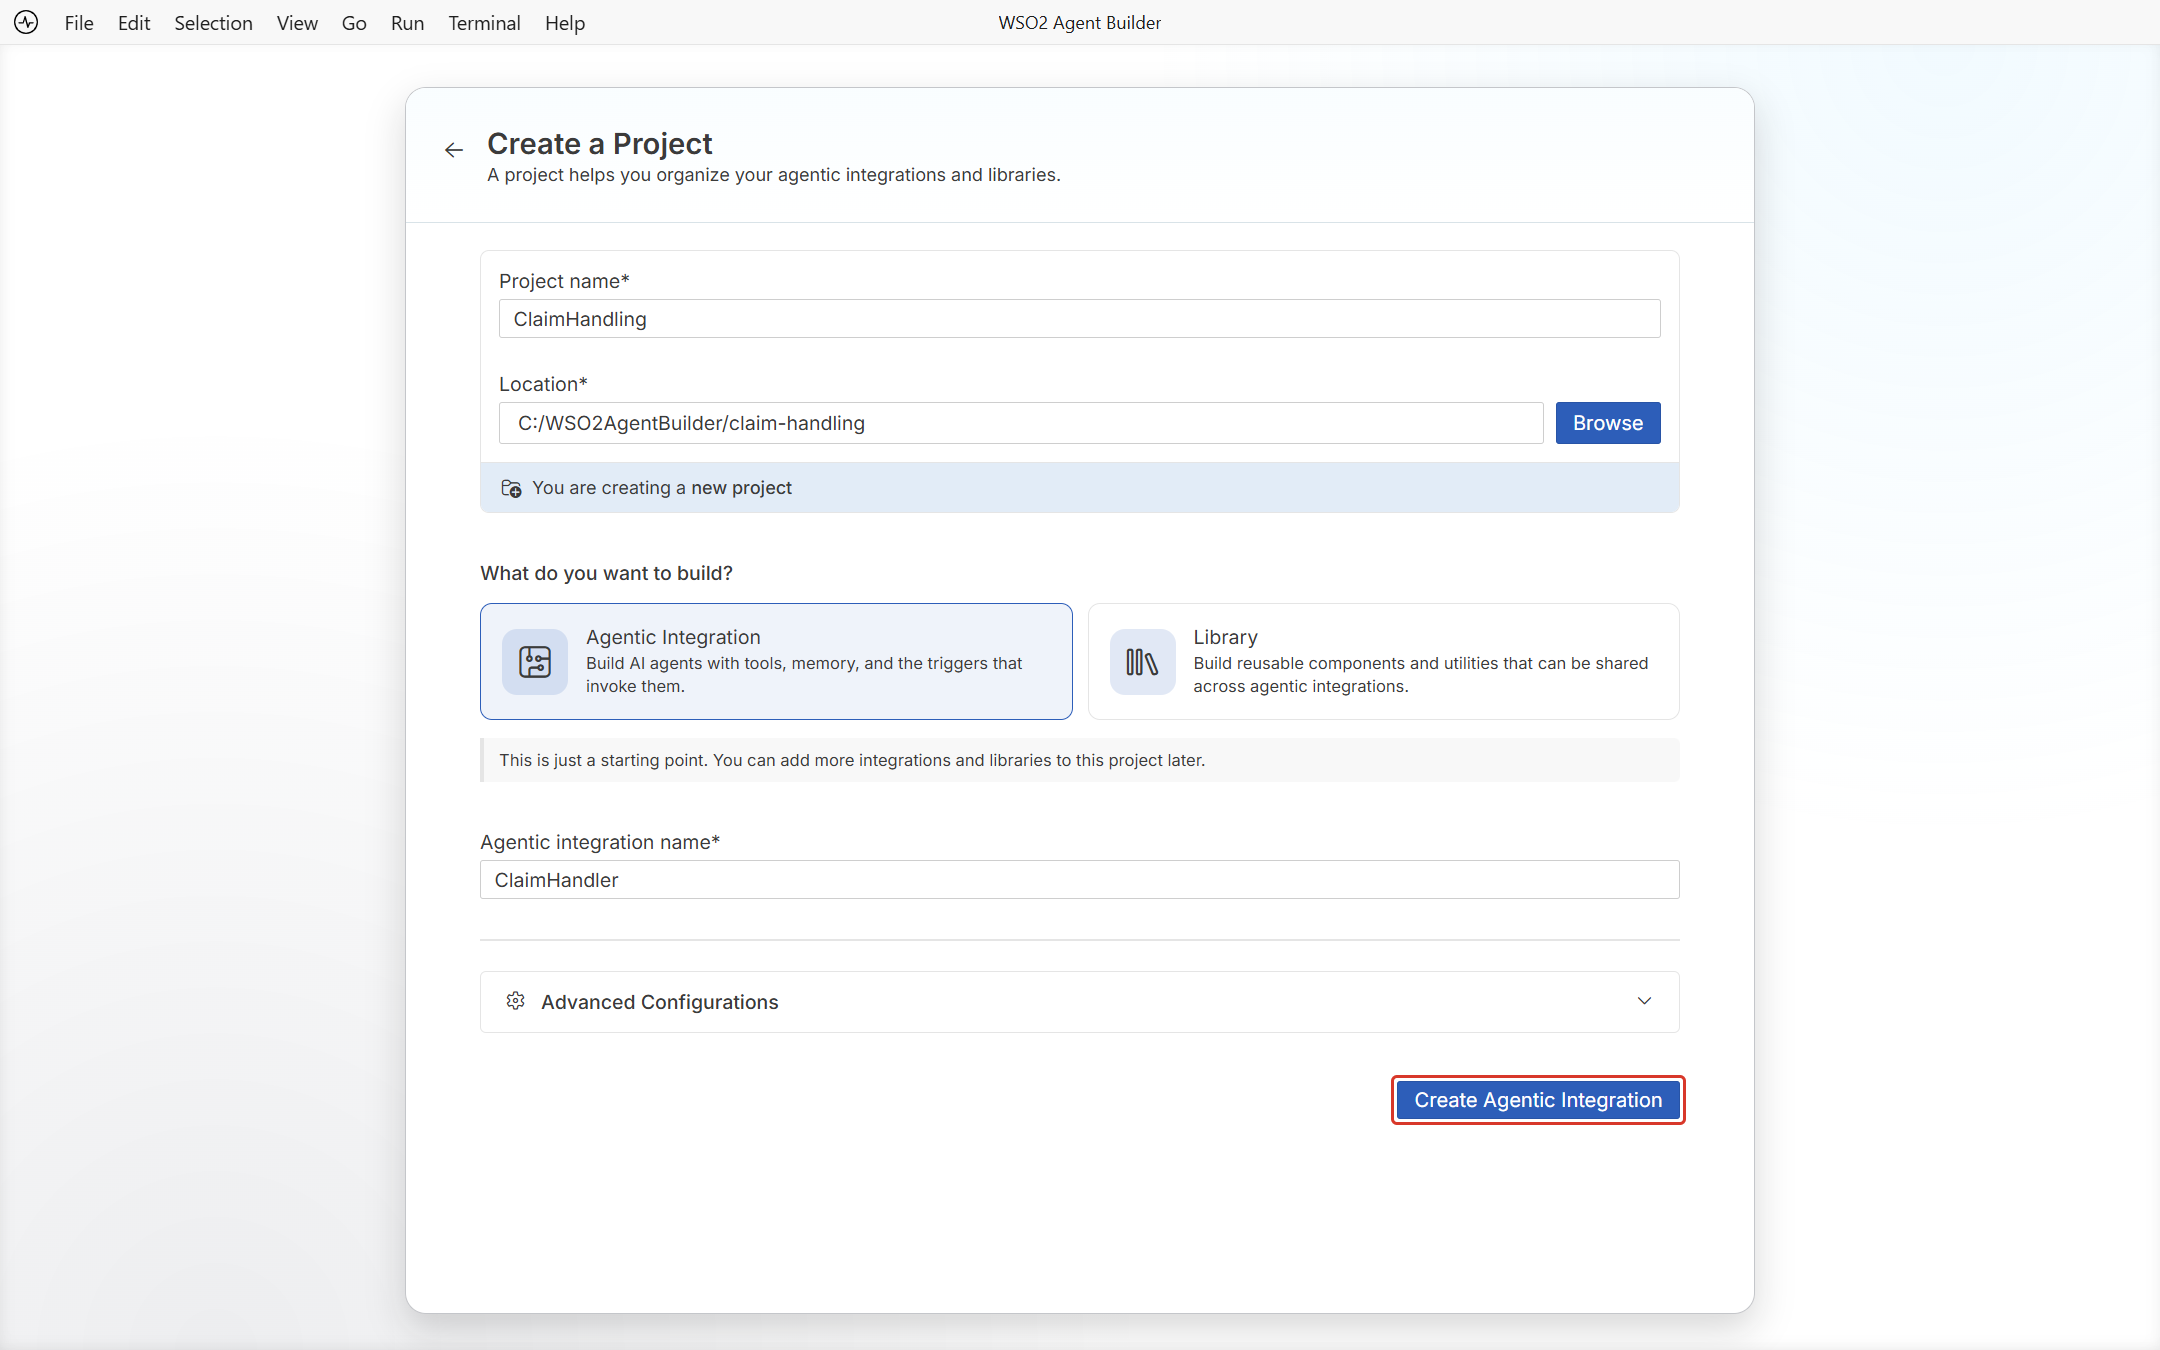
Open WSO2 Agent Builder. Under Start Building your Agent, click Create.
If you're not signed in, click Sign In first. The default WSO2 model provider used in this quick start needs you to be signed in before you run the agent.
-
Set Project name to
ClaimHandling. -
Under What do you want to build?, keep Agentic Integration selected.
-
Set Agentic integration name to
ClaimHandler. -
Click Create Agentic Integration.
Step 2: Create the durable agent
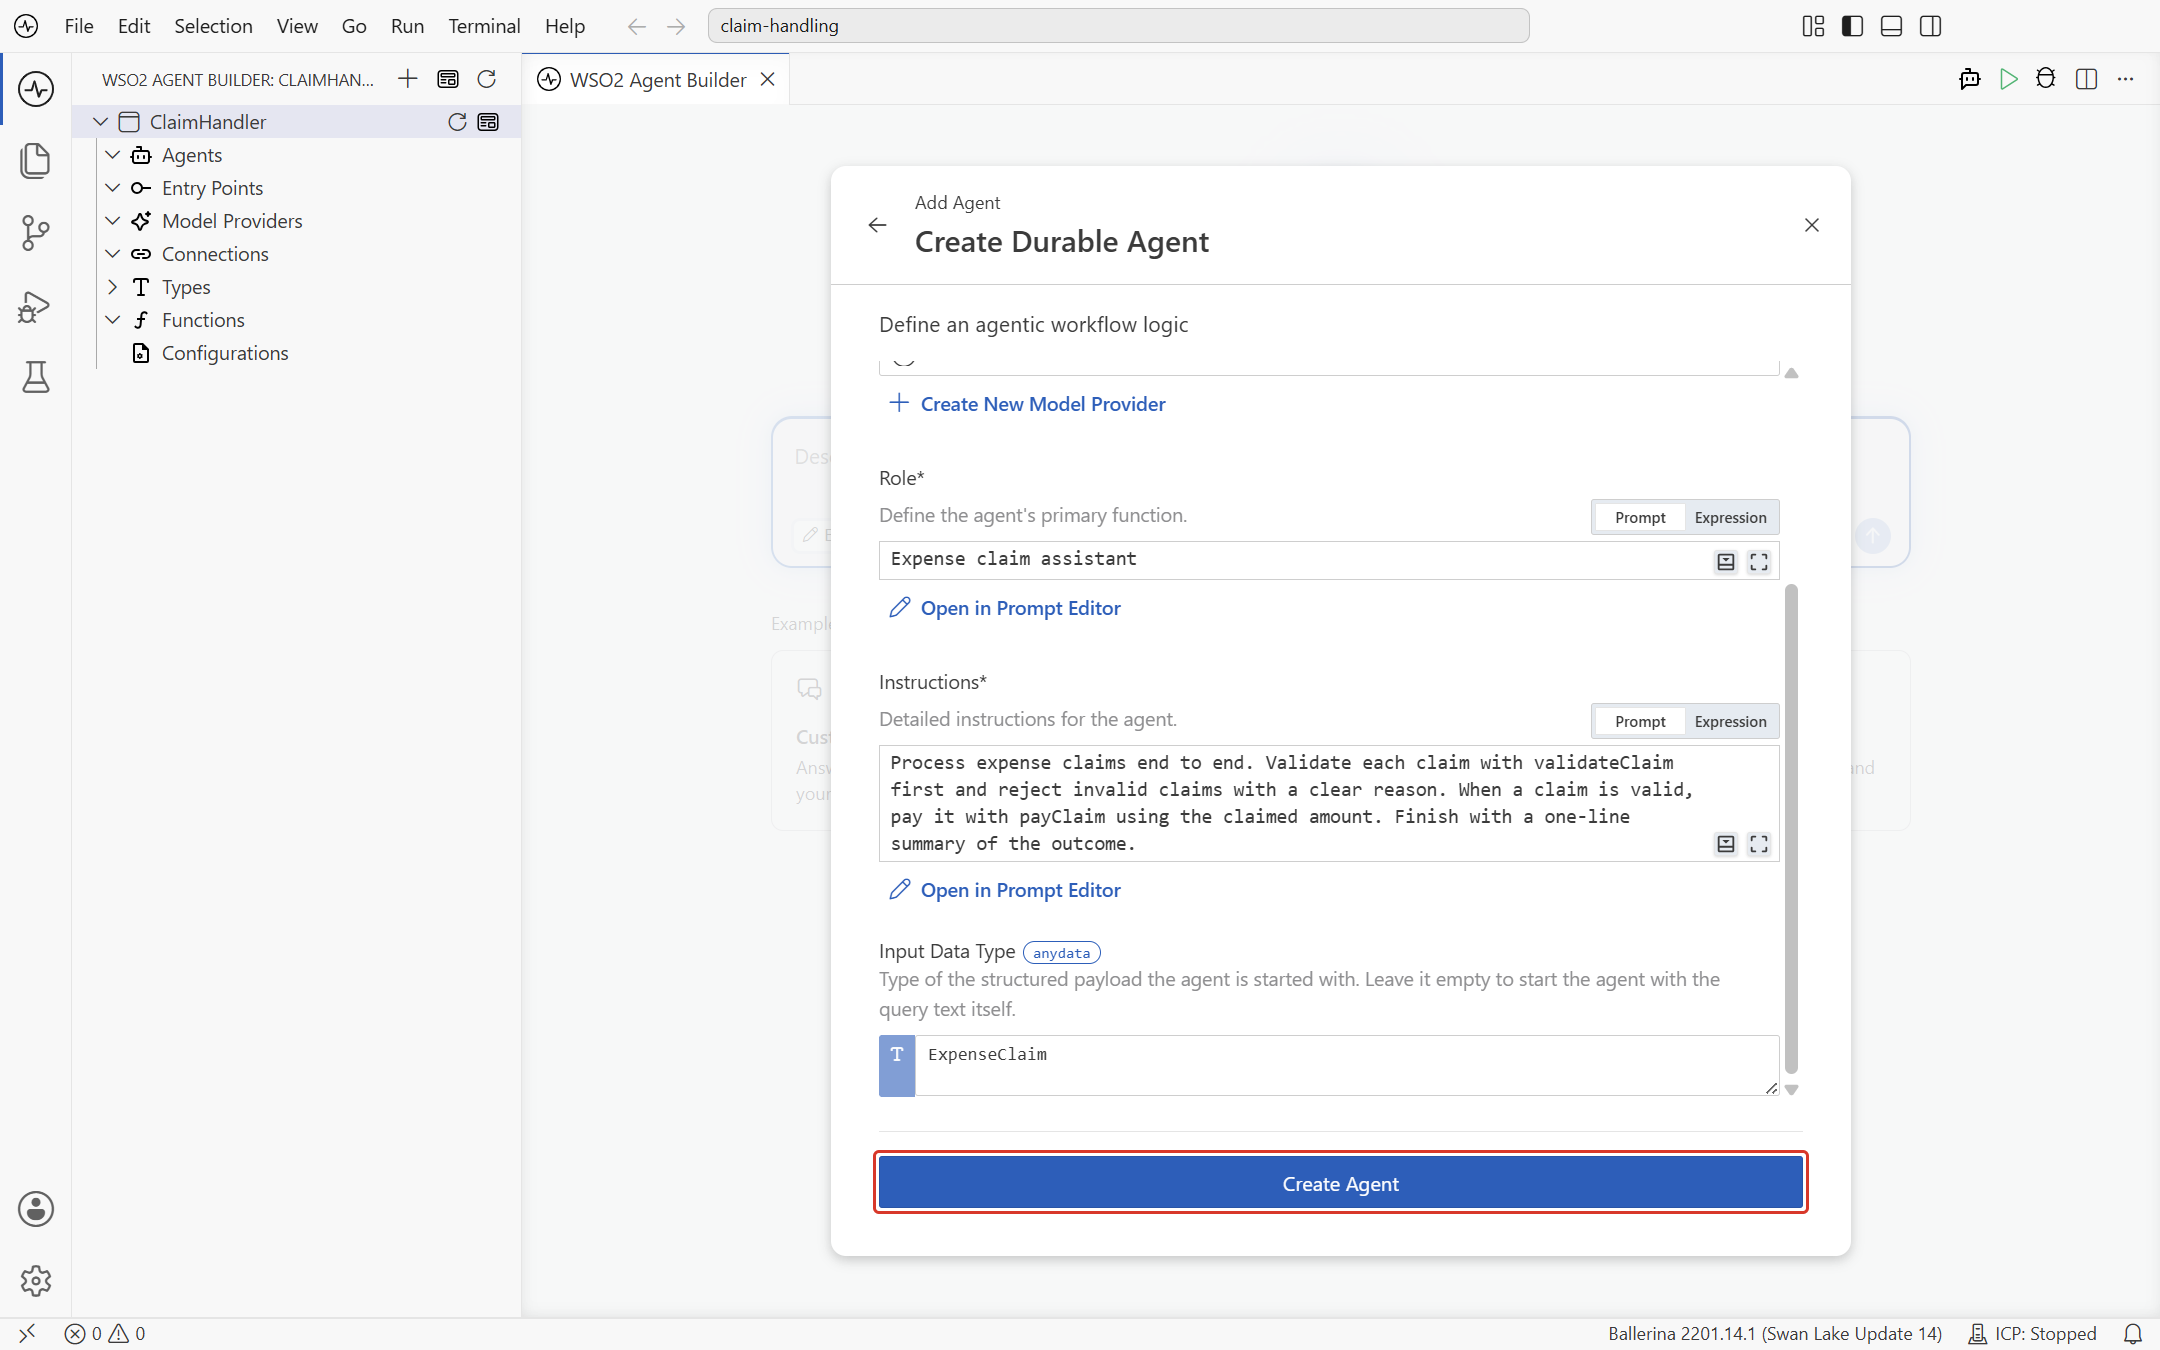
Creating the agent is also where you describe it: the model it thinks with, its role, and the instructions it plans from.
-
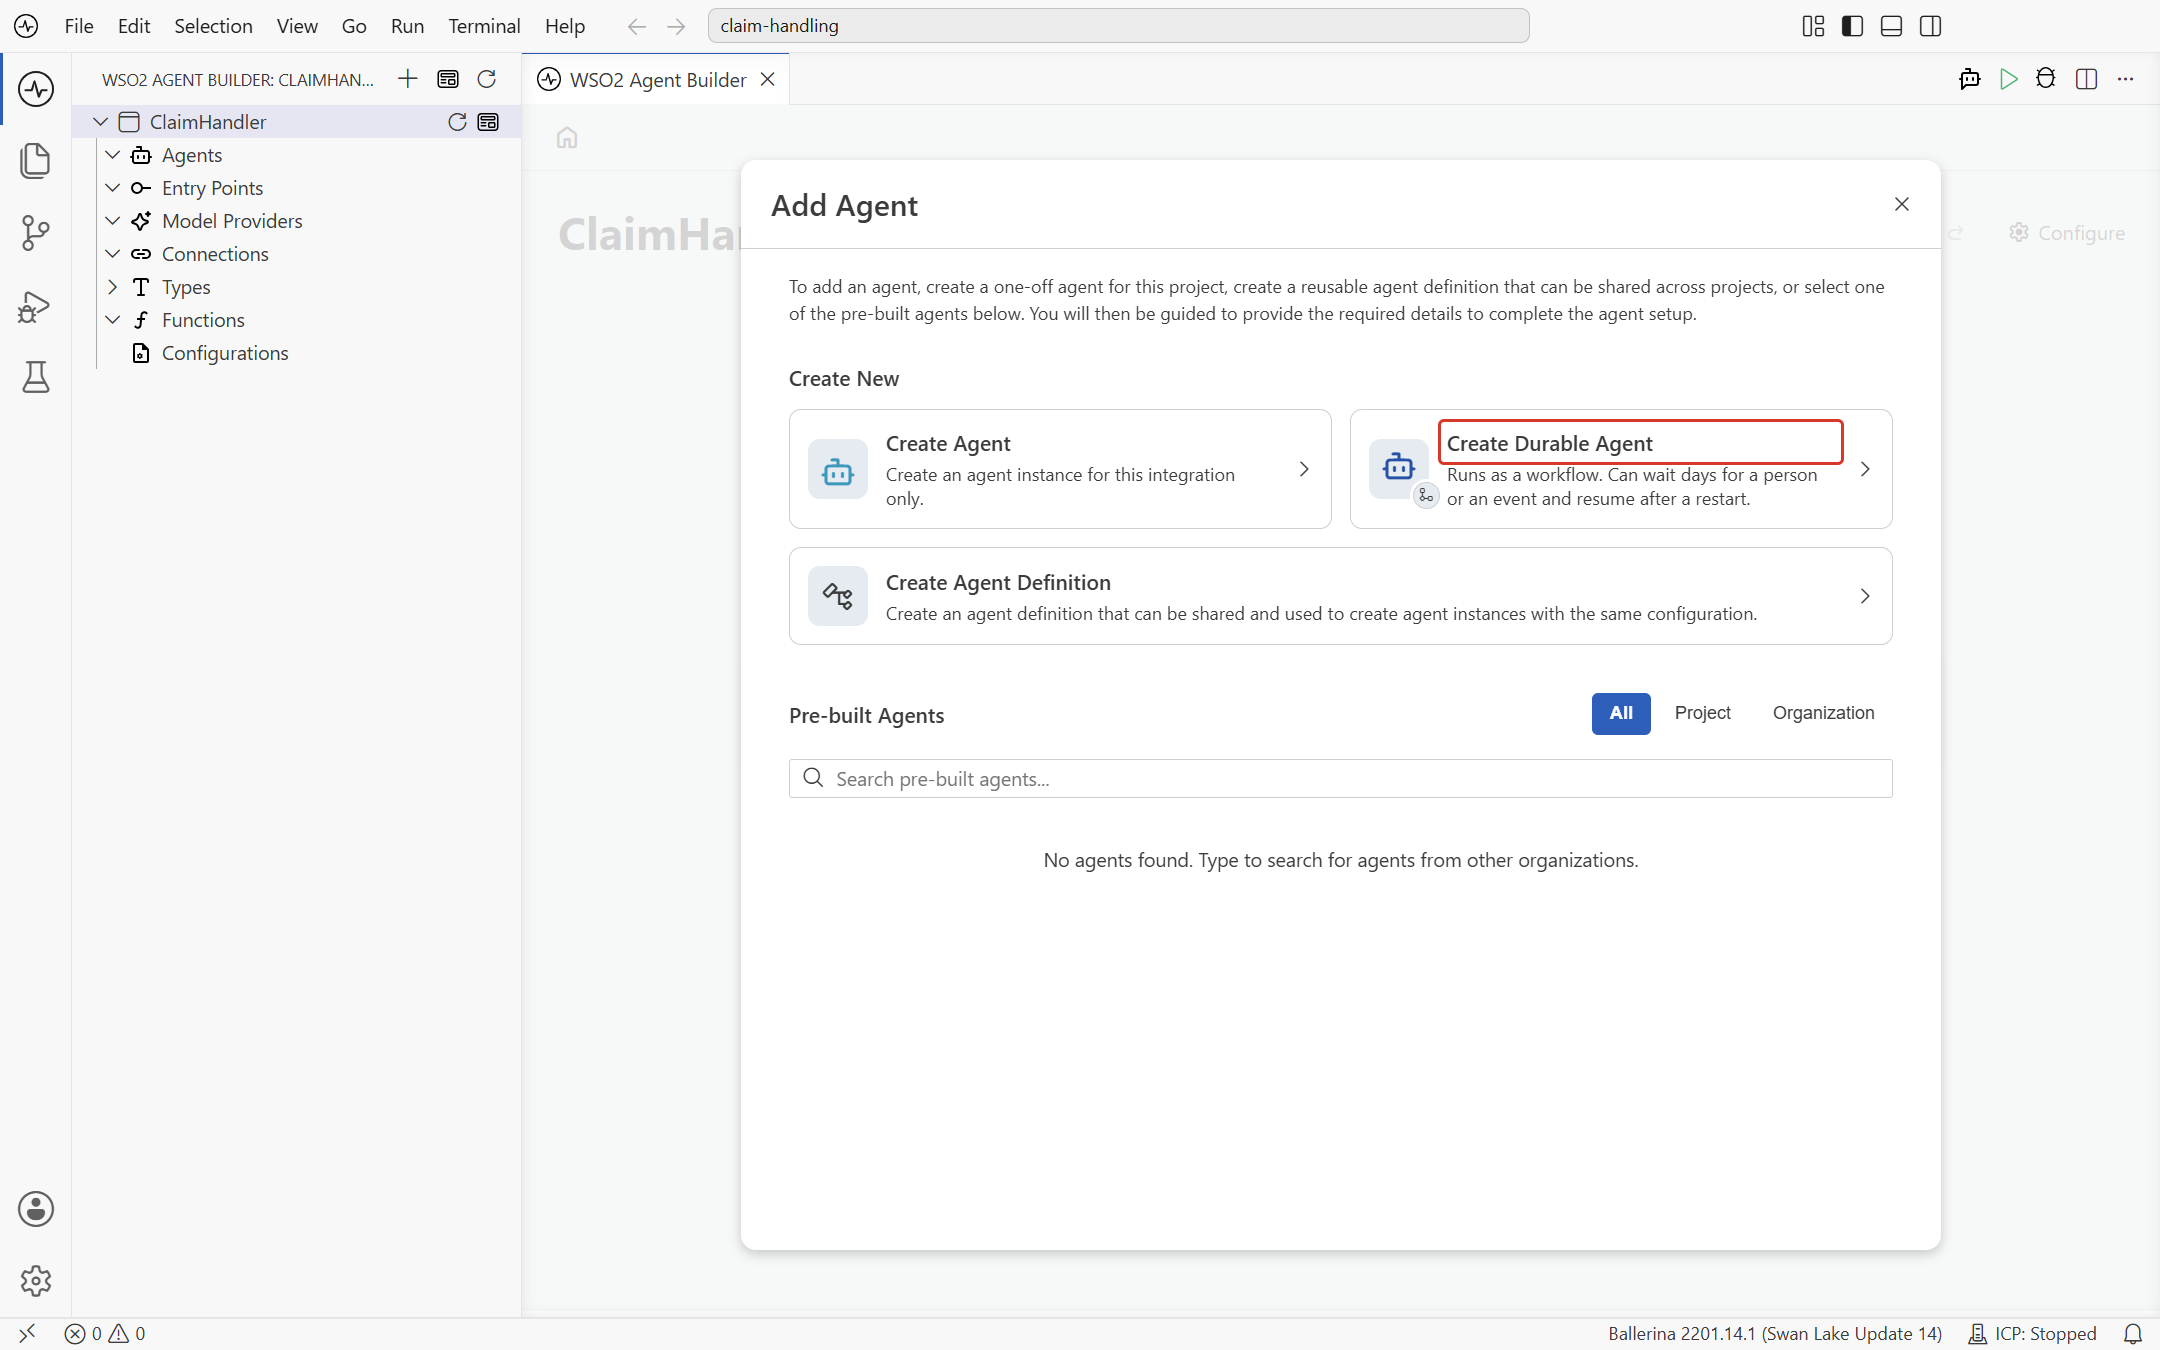
The project opens on the new
ClaimHandlerintegration. Under Or start from scratch, click Add Agent. -
In the Add Agent dialog, select Create Durable Agent.
-
Set Name to
claimAgent. -
Leave Model on Default WSO2 Model Provider.
-
Set Role to
Expense claim assistant. -
Set Instructions to:
Process expense claims end to end. Validate each claim with validateClaim first and reject invalid claims with a clear reason. When a claim is valid, pay it with payClaim using the claimed amount. Finish with a one-line summary of the outcome.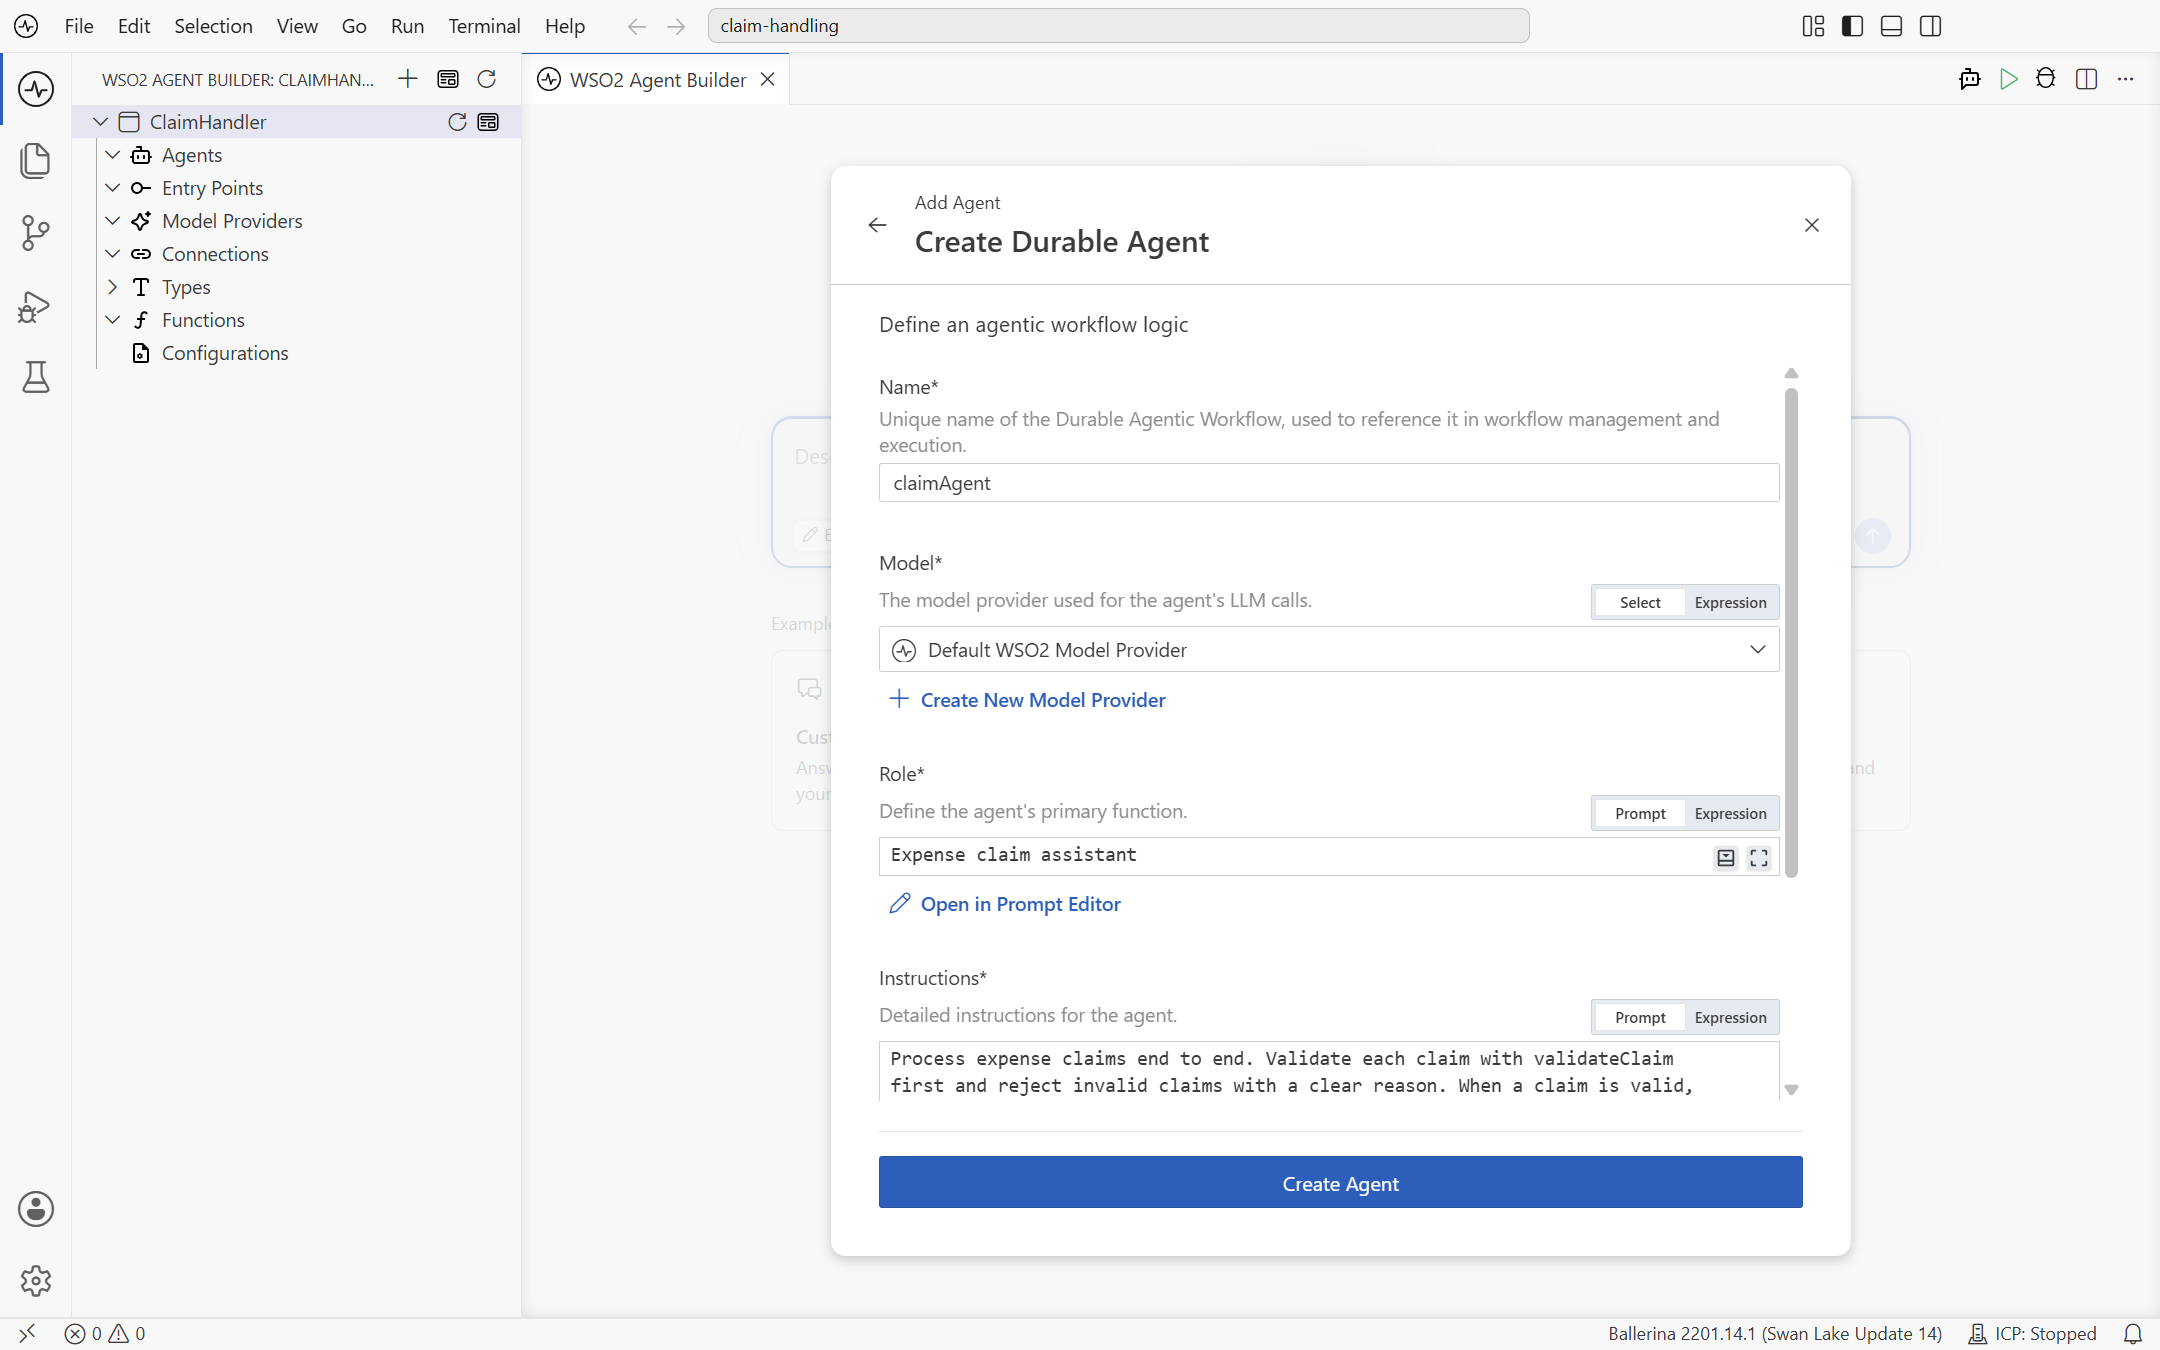
-
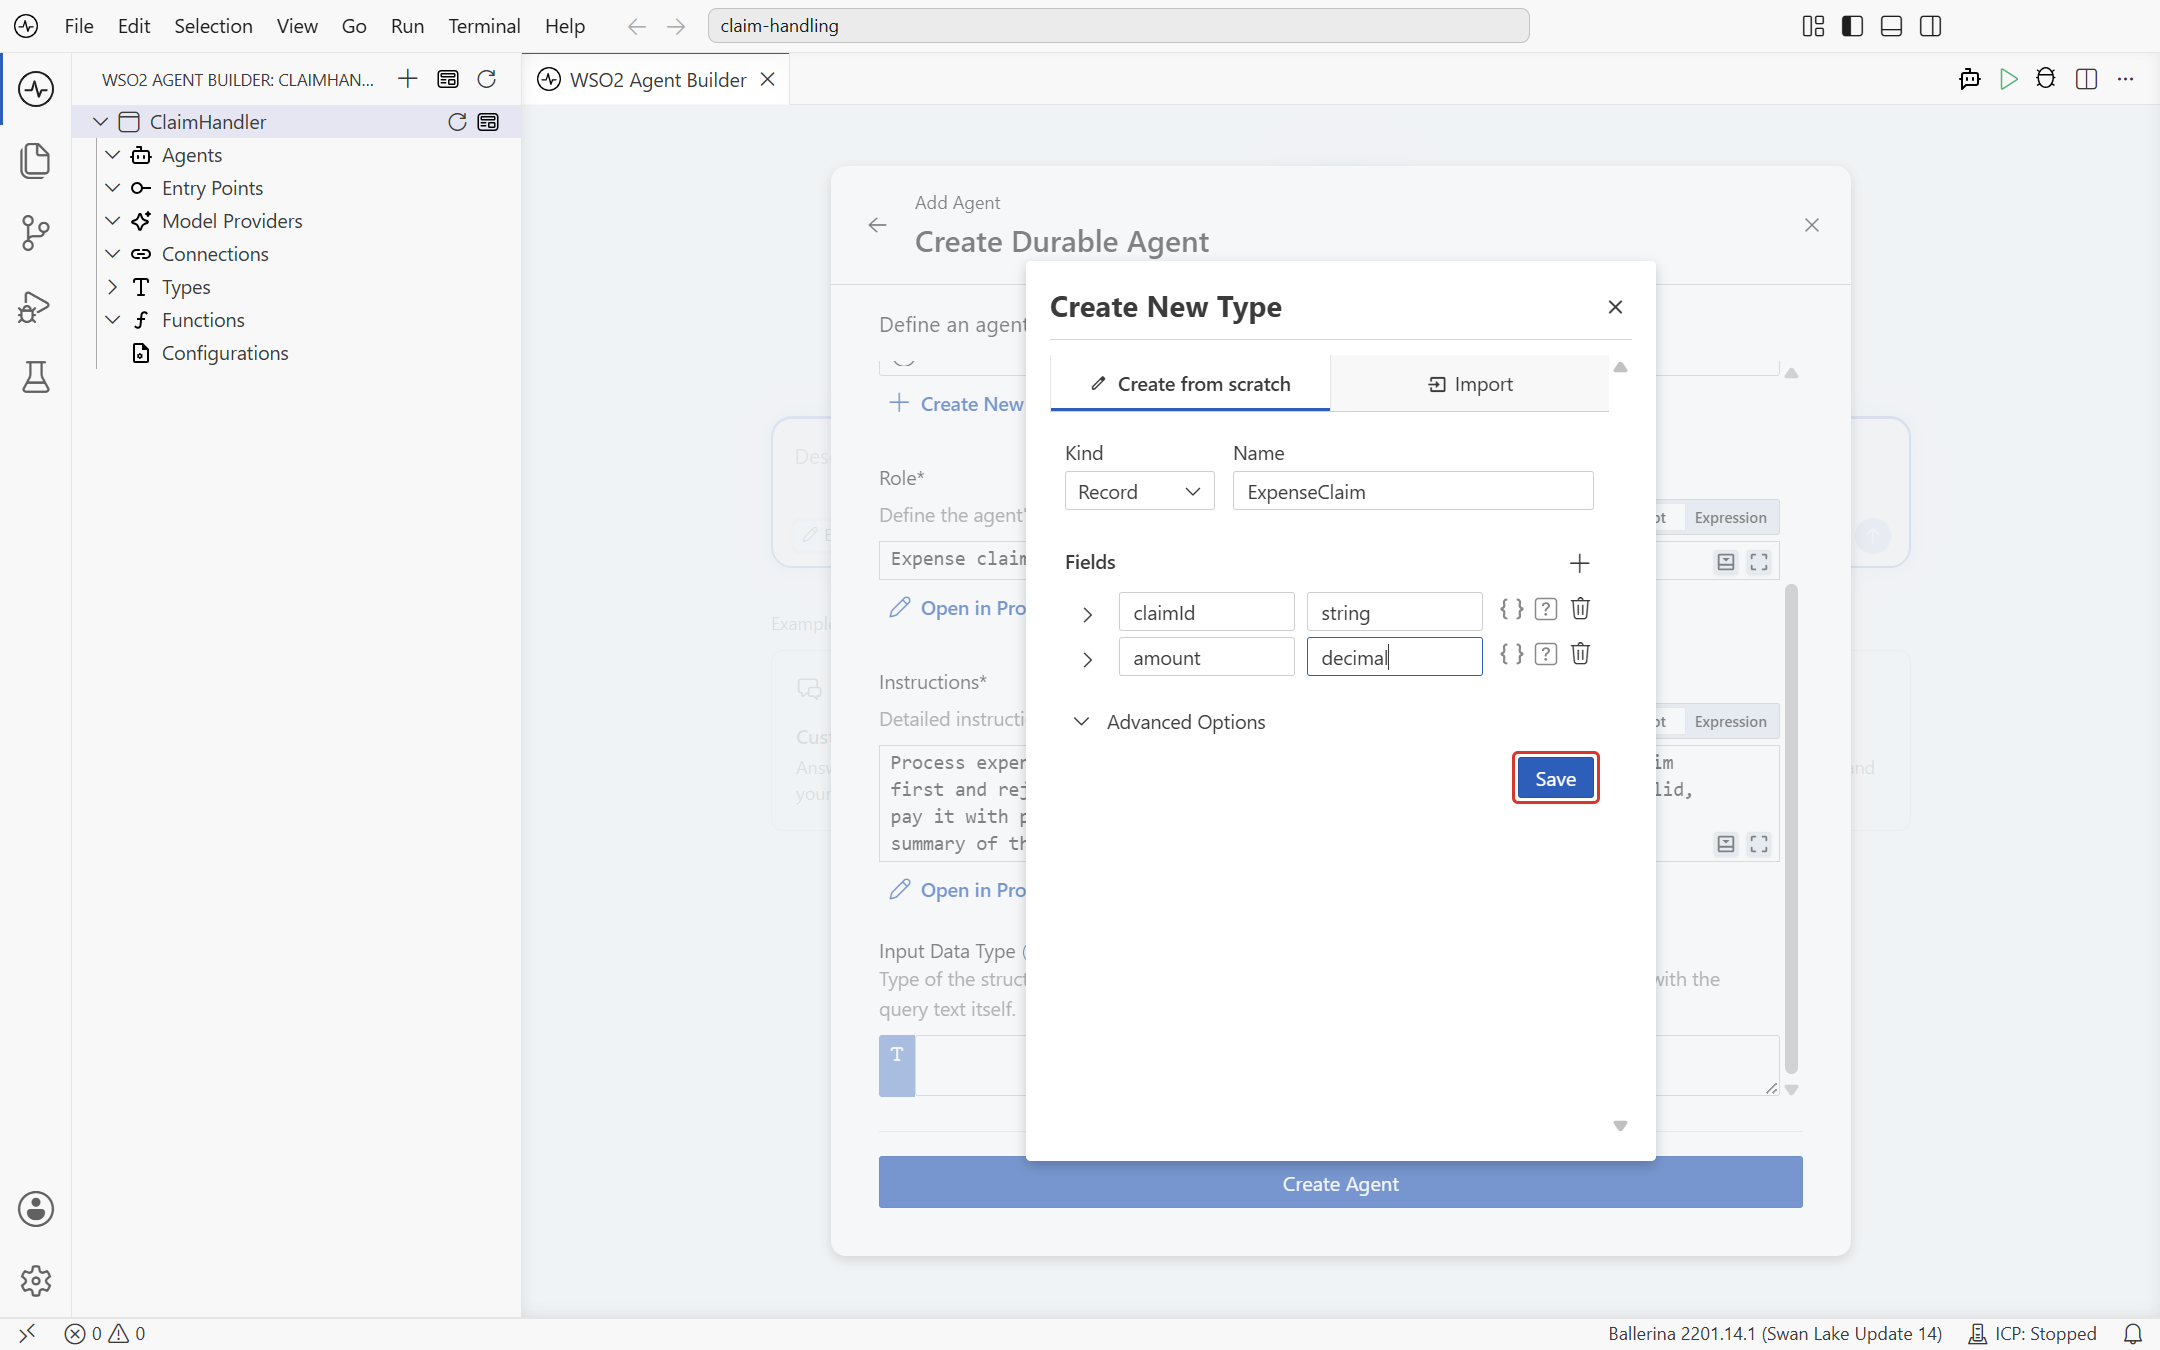
Input Data Type is the structured payload each run starts with. Create the claim record here: click the field, select Create New Type, and on the Create from scratch tab keep Kind as Record, set Name to
ExpenseClaim, then click + next to Fields and add:Field Type claimIdstringamountdecimal -
Click Save.
-
Click Create Agent.
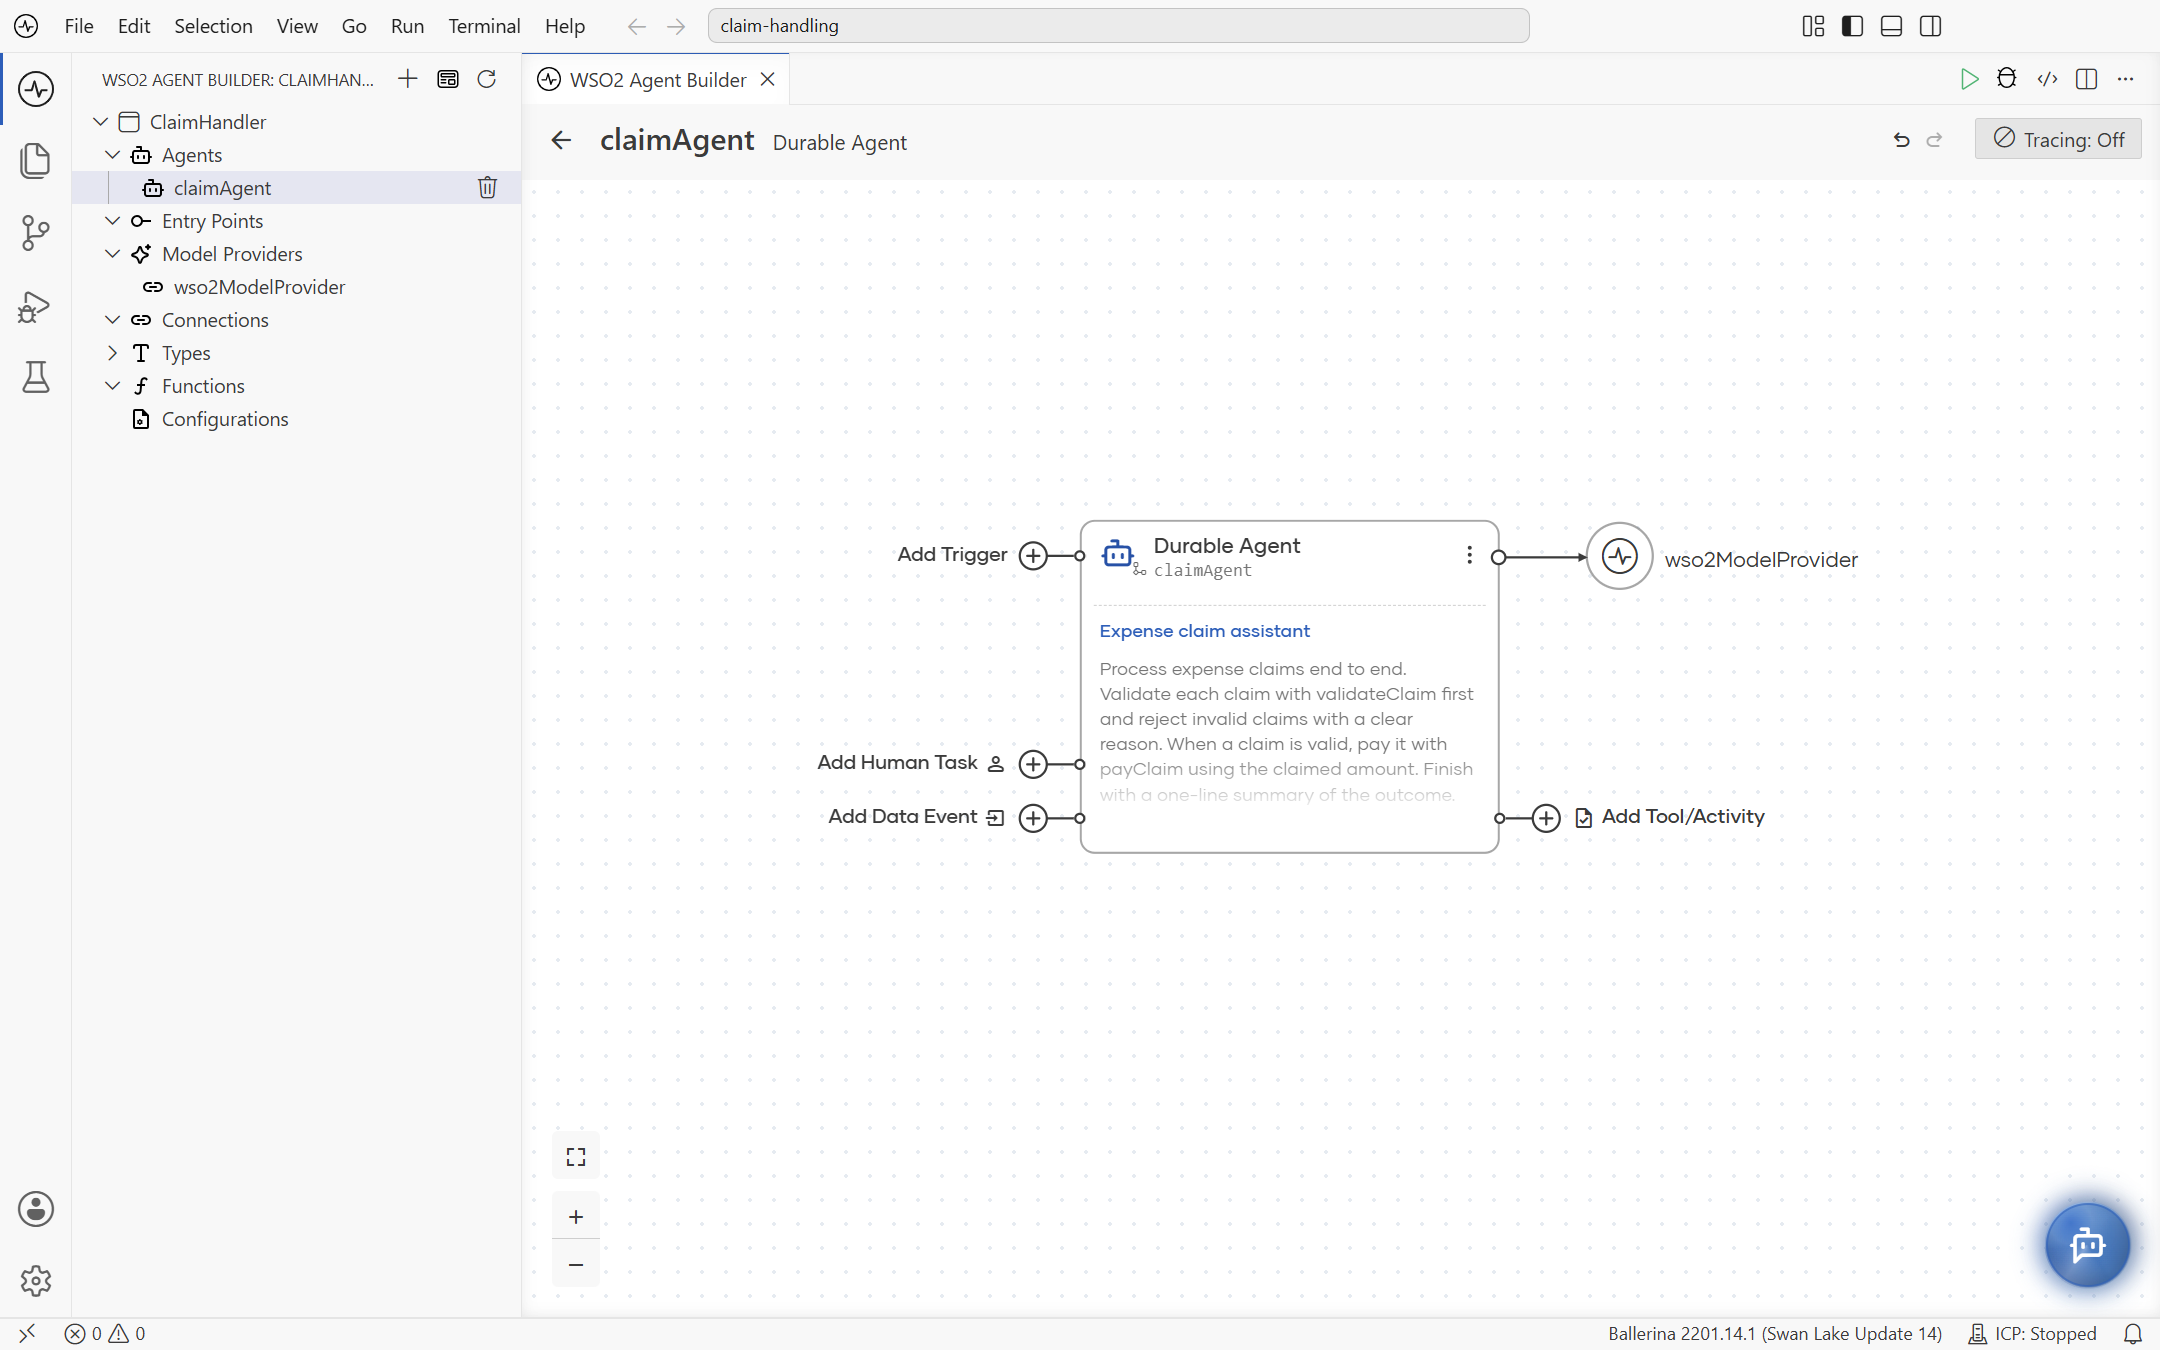
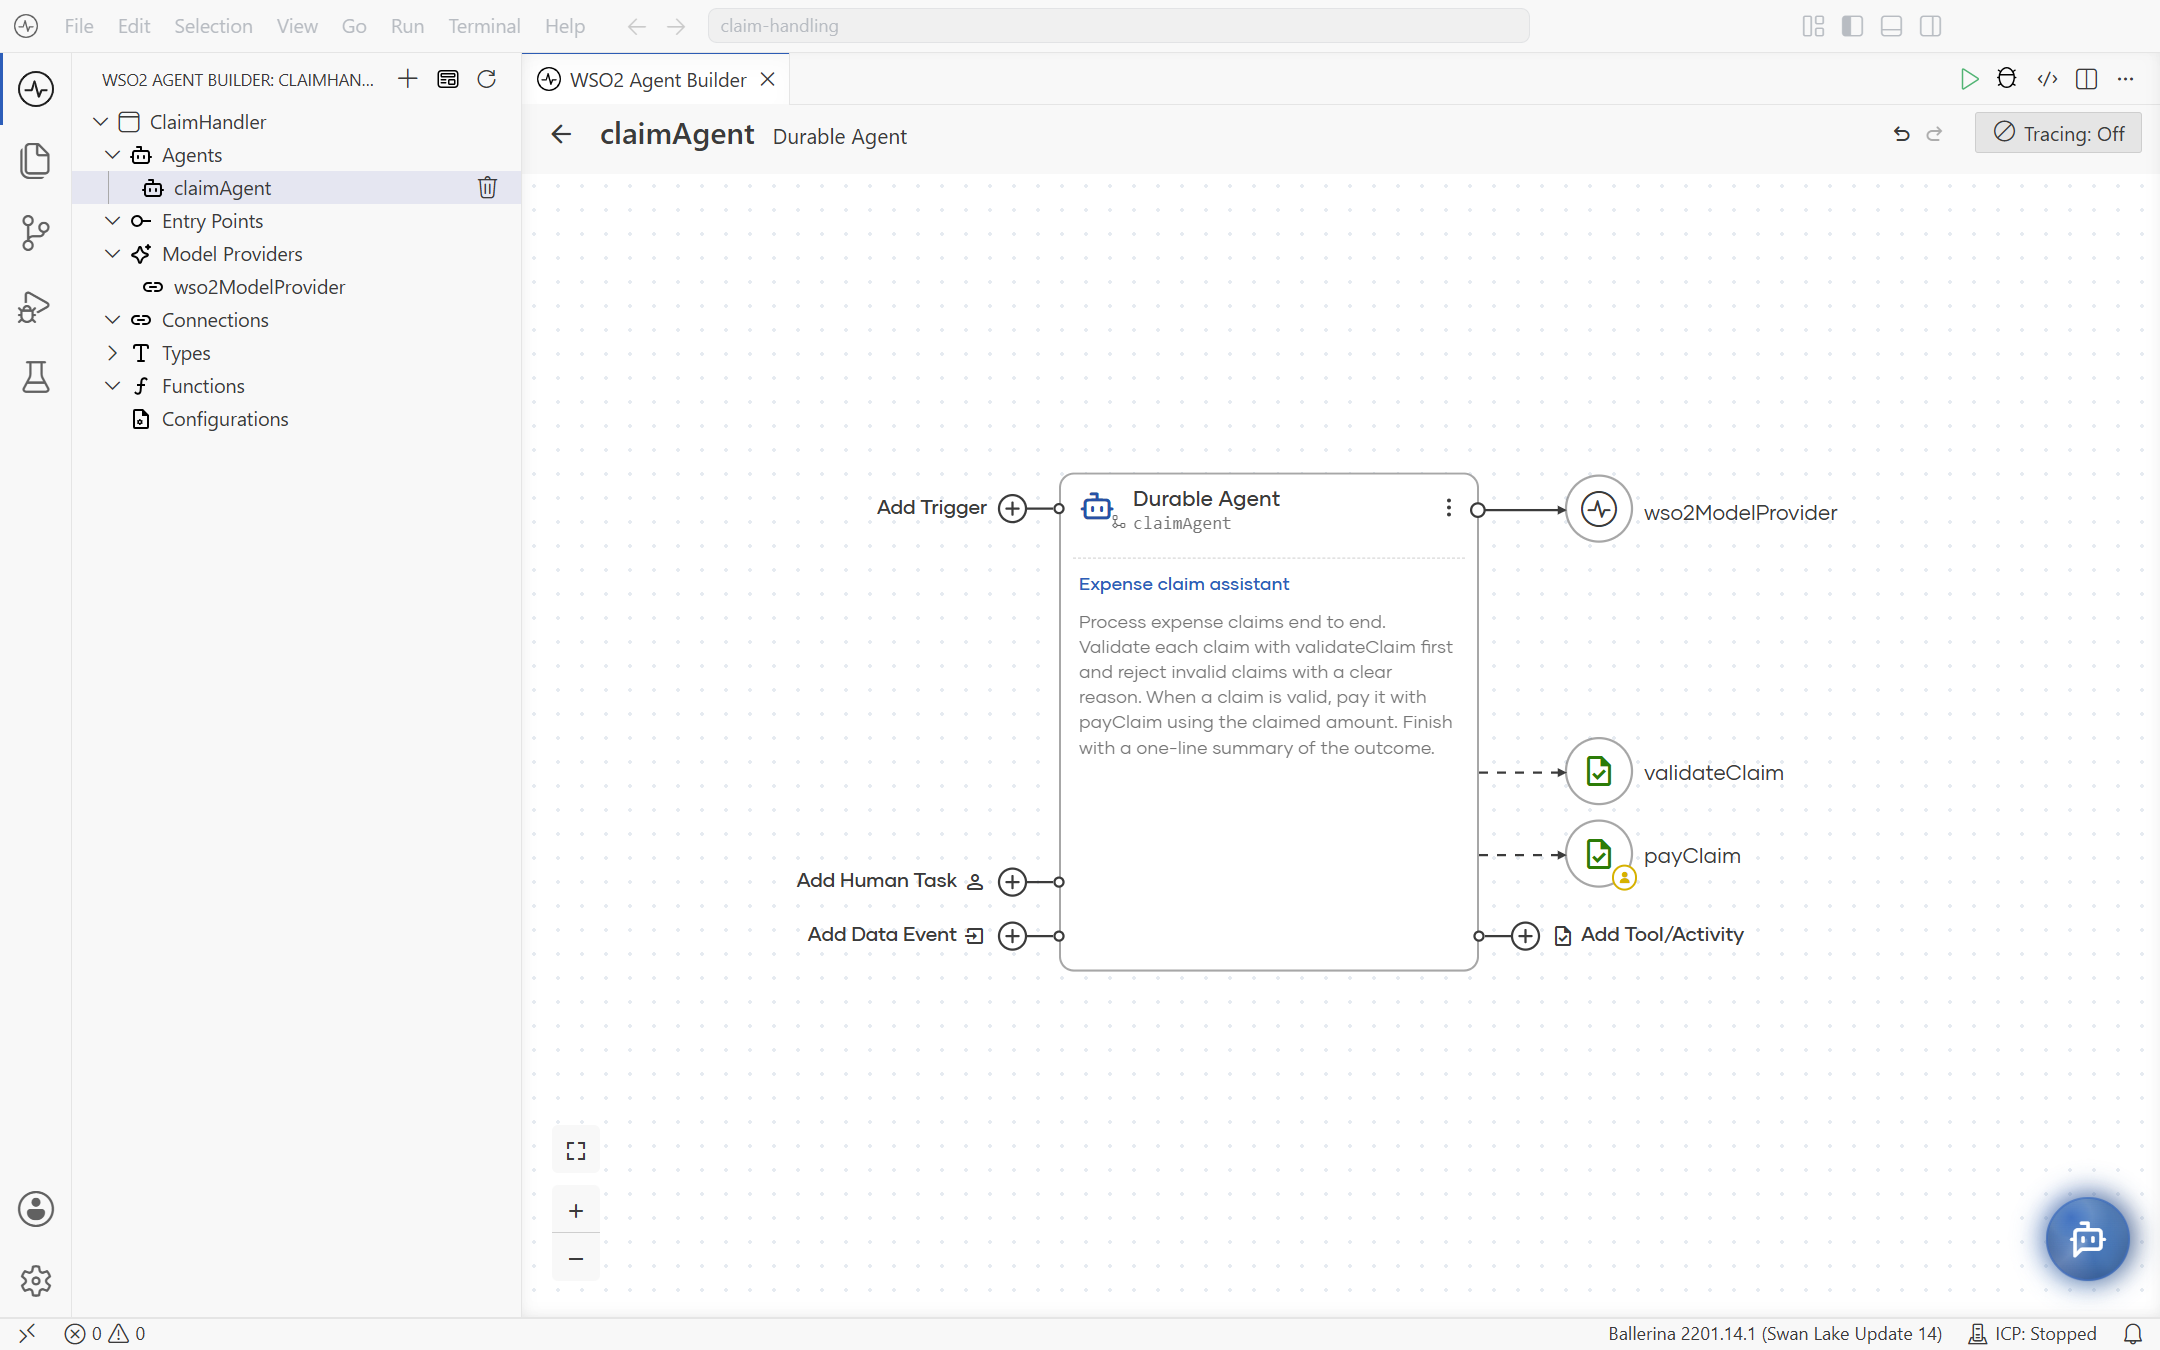
The agent's canvas opens. It shows the durable agent with its role and instructions, the model provider it uses, and Add Trigger, Add Human Task, Add Data Event, and Add Tool/Activity for extending it.
Step 3: Attach the agent activities
Activities are the units of work the agent can call. Each one runs durably — completed work is never lost or repeated, even across restarts.
Attach the claim validator
-
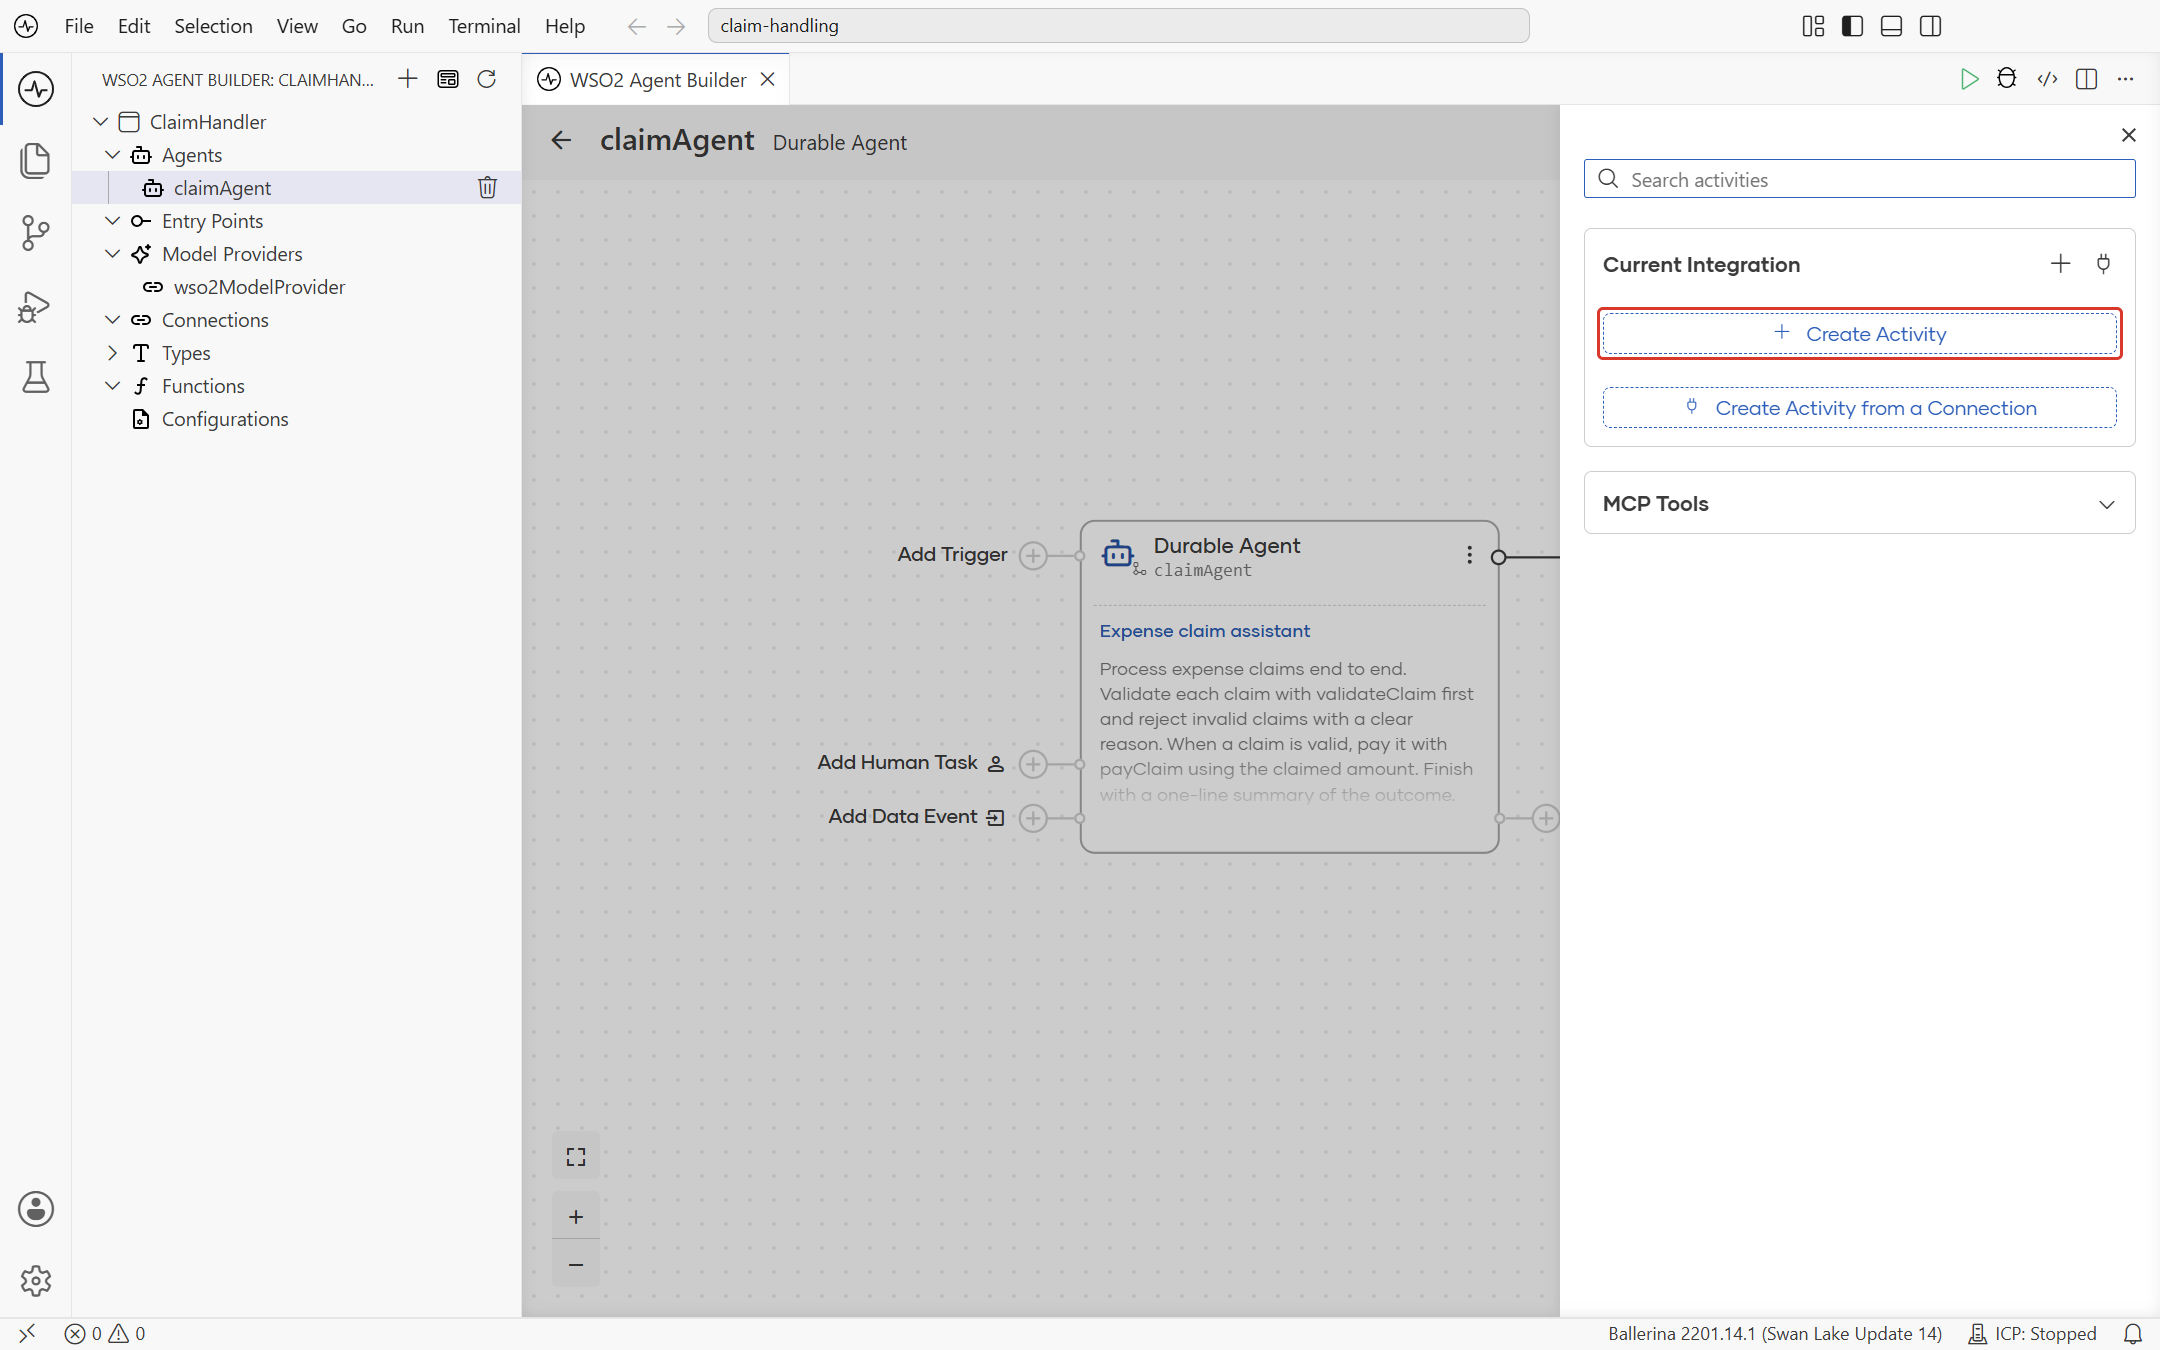
On the agent canvas, click Add Tool/Activity. The activities panel opens.
-
Under Current Integration, click Create Activity. The Workflow Activity form opens.
-
Set Activity Name to
validateClaim. -
Under Parameters, click Add Parameter. Set Type to the
ExpenseClaimrecord created in Step 2 and Name toexpenseClaim, then click Add. -
Set Return Type to
booleanand click Save.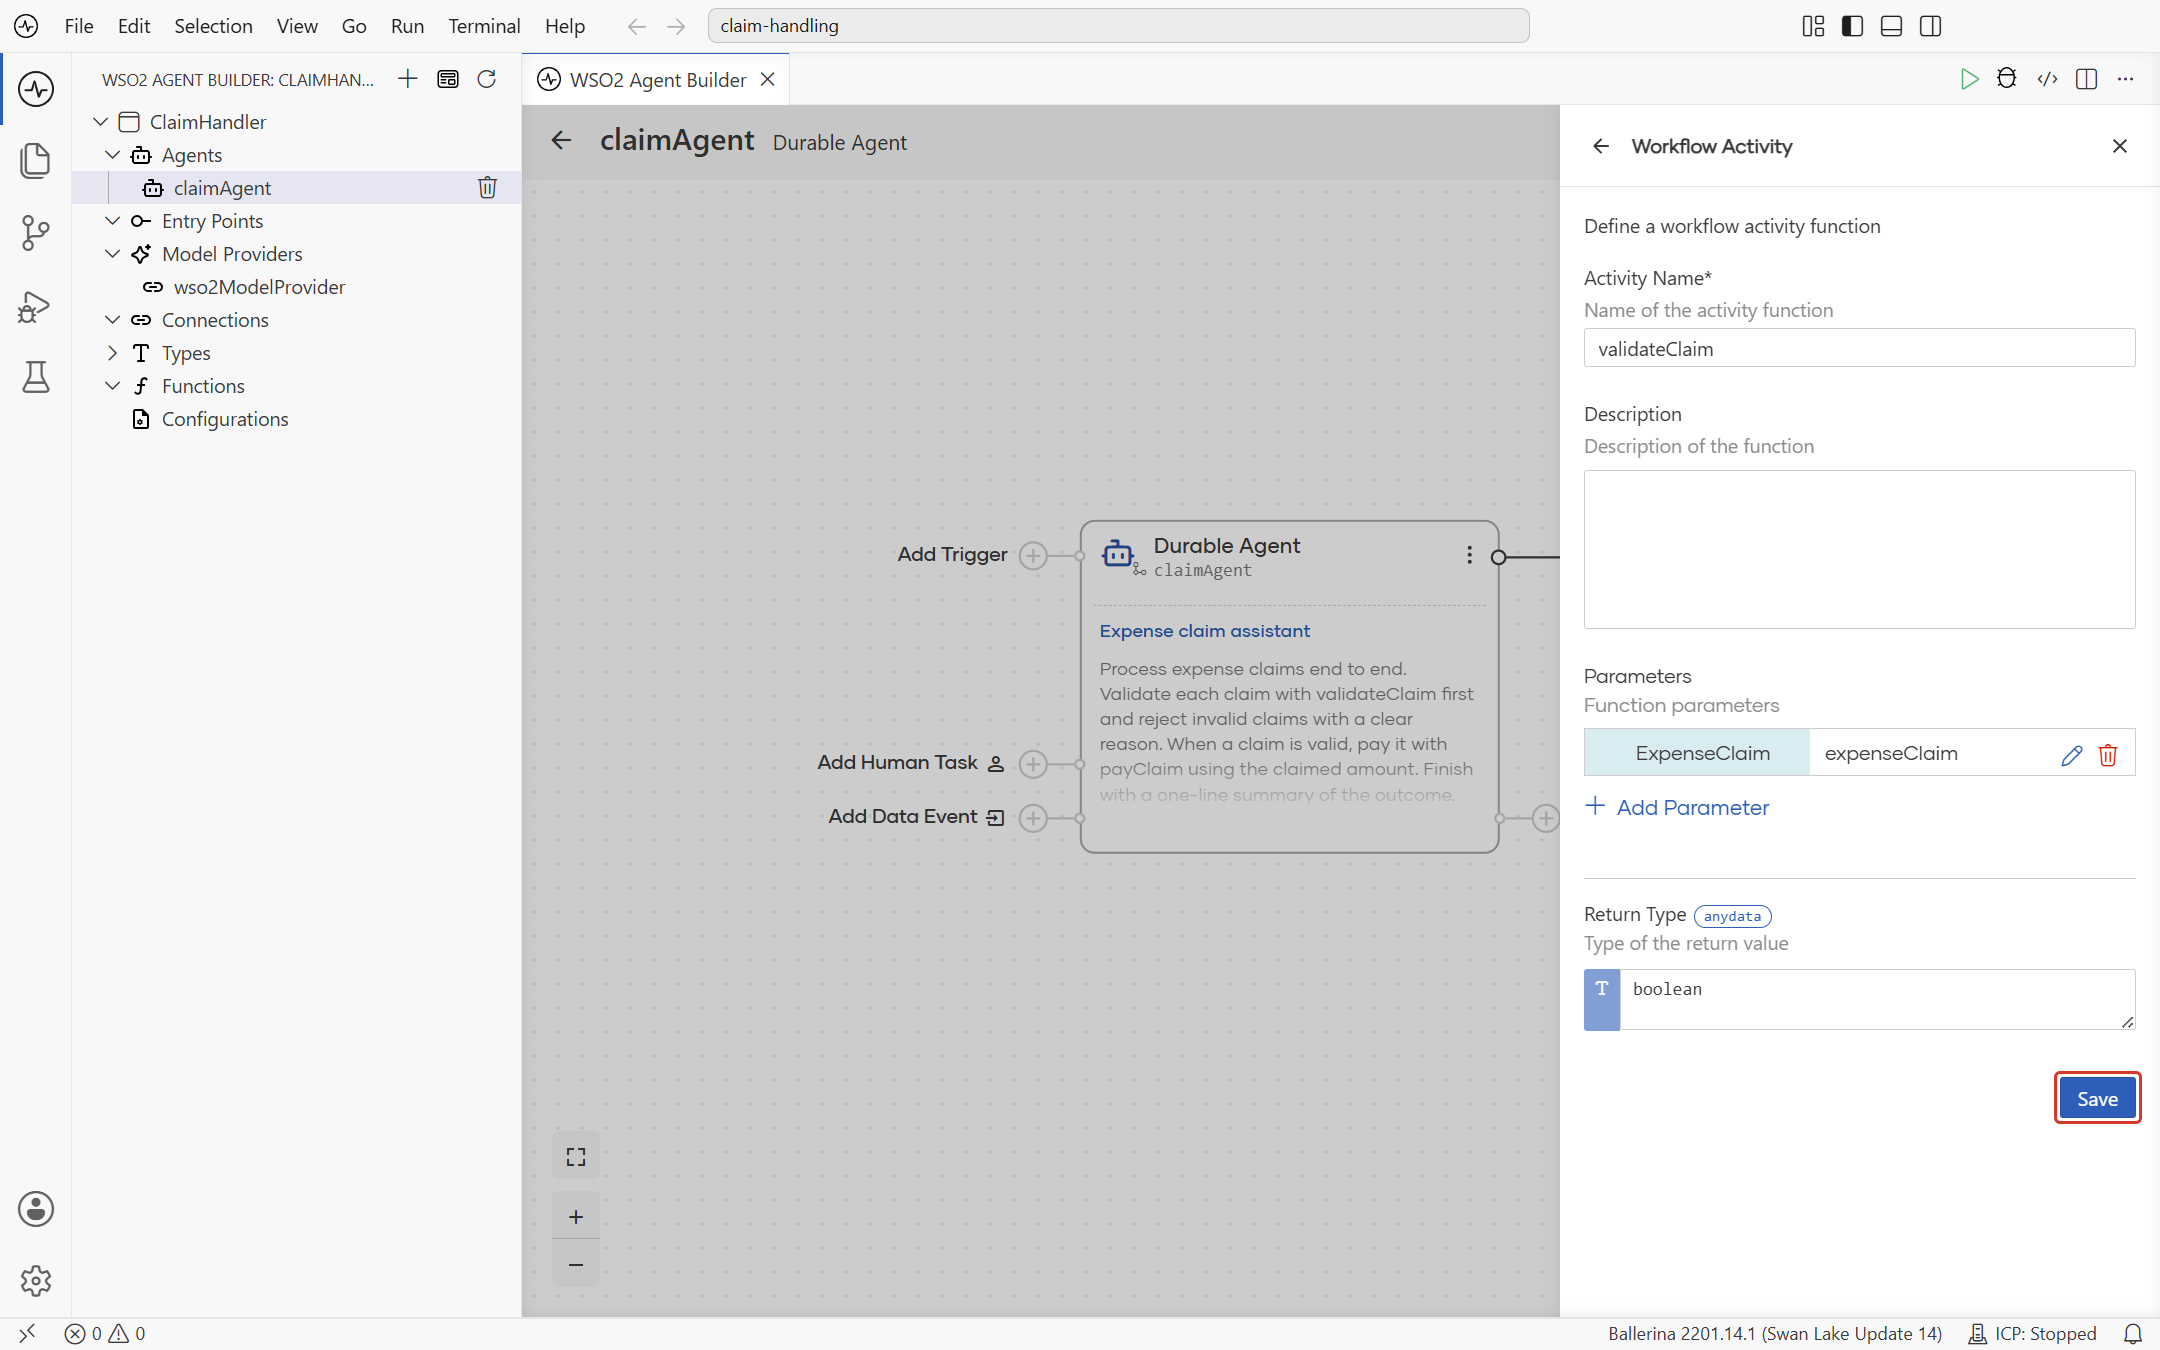
-
Click
validateClaimunder Current Integration. Leave Approval Policy and Retry Policy at their defaults and click Save.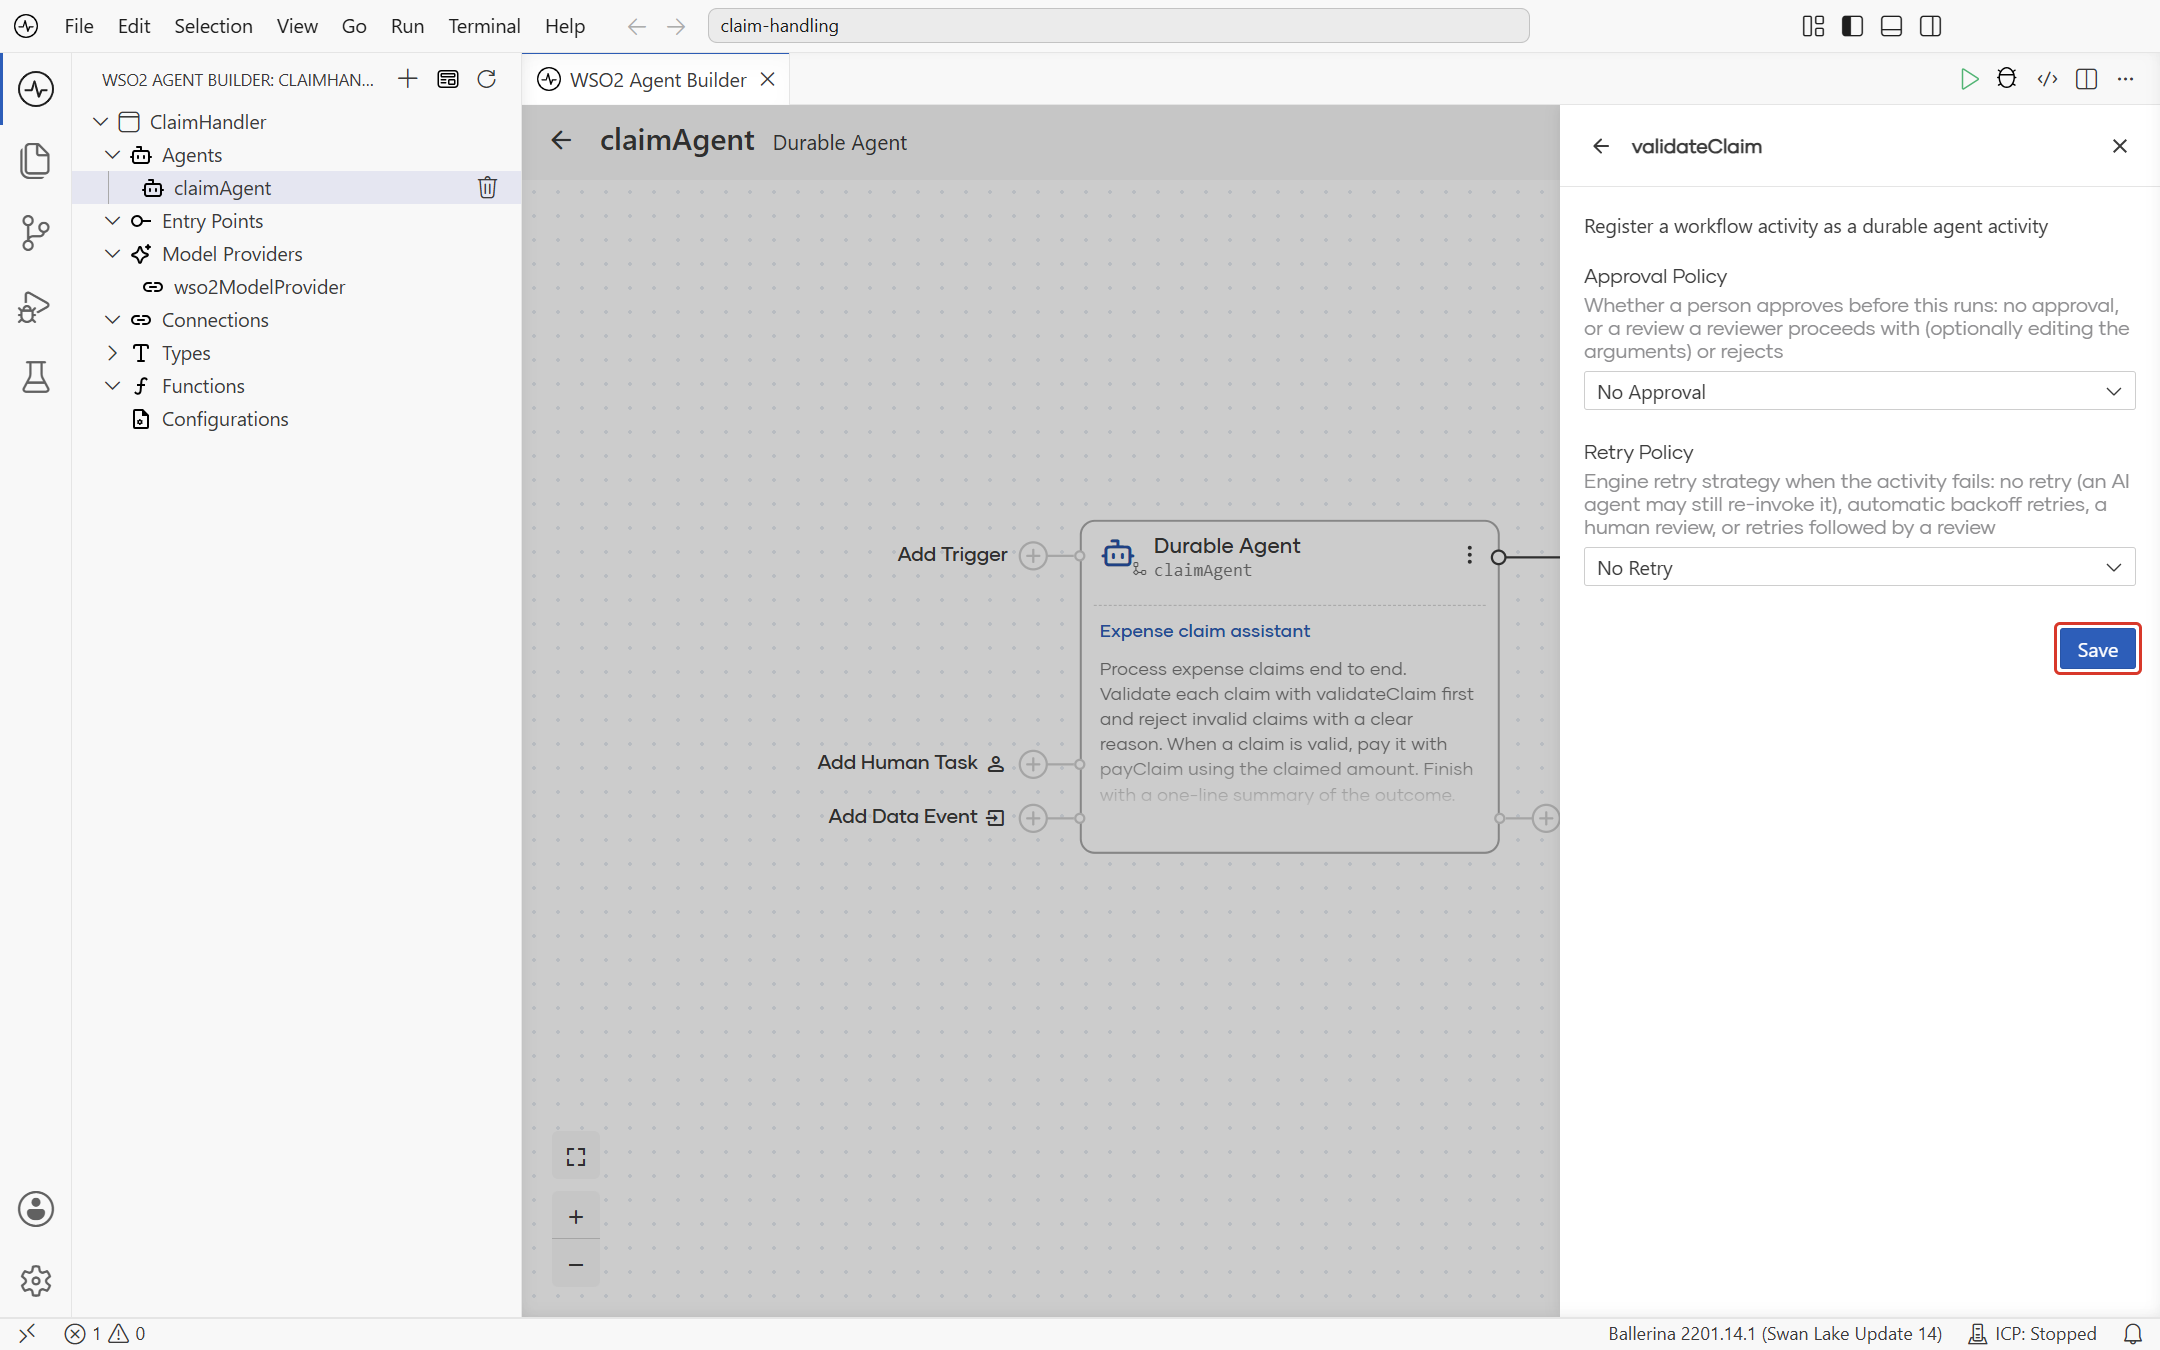
validateClaim joins the agent node as an activity.
Define the claim validator body
Creating the activity gives it a signature but an empty body. The activity is a function, so its flow returns the validation result. Make it return true only for positive claim amounts:
-
On the agent canvas, click the menu next to
validateClaimand select View. The activity's flow opens.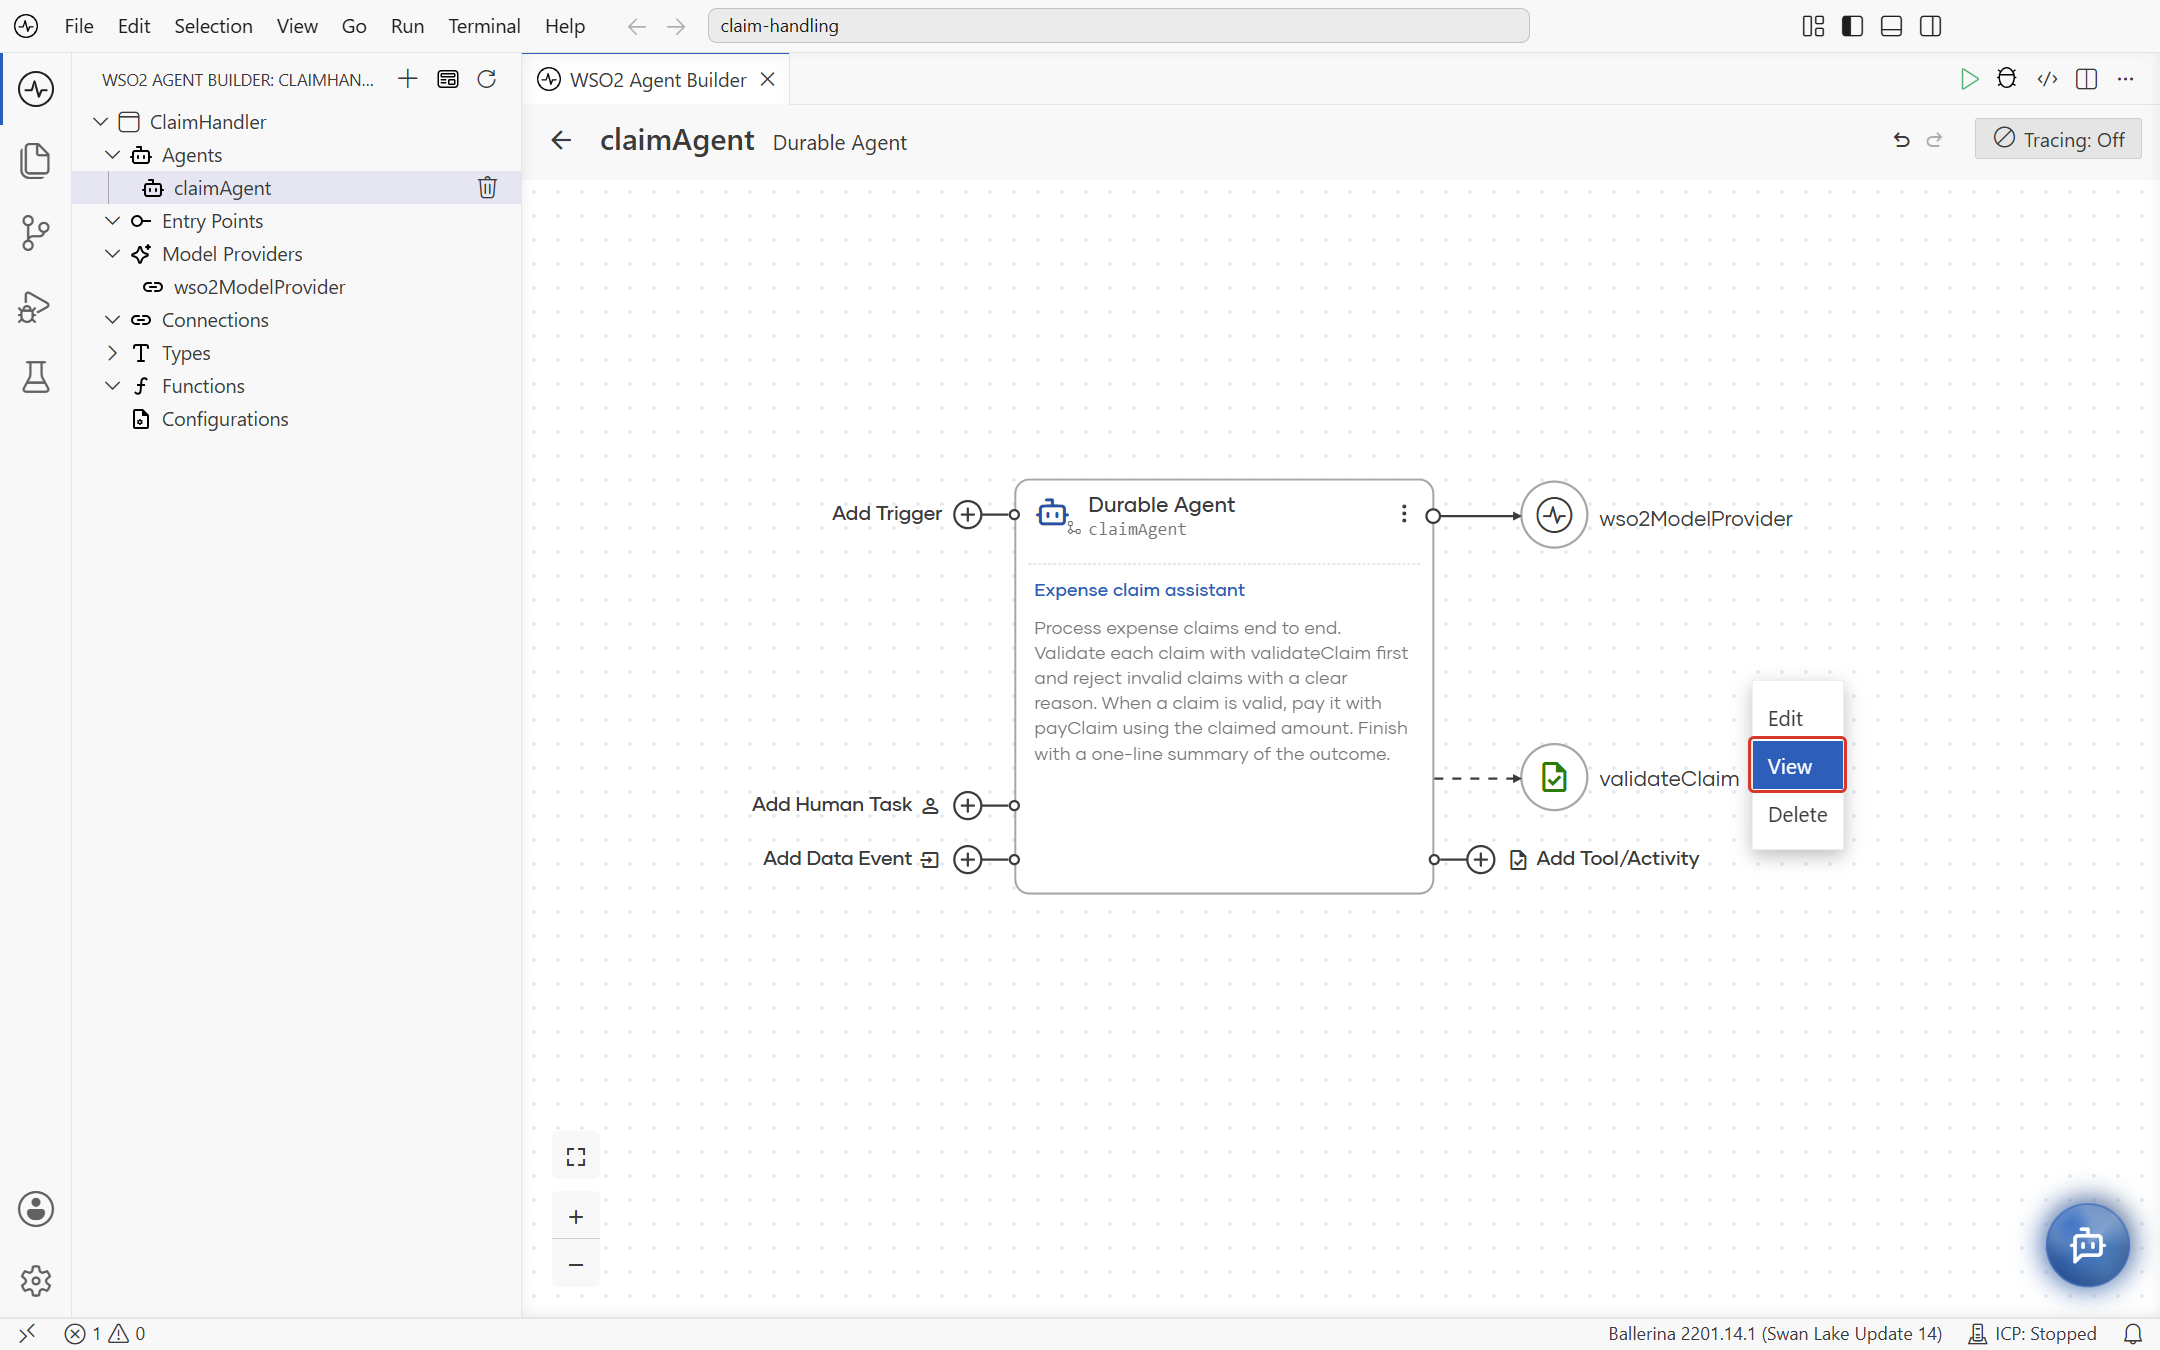
-
Click + on the flow diagram to open the node panel, then under Control, select Return.
-
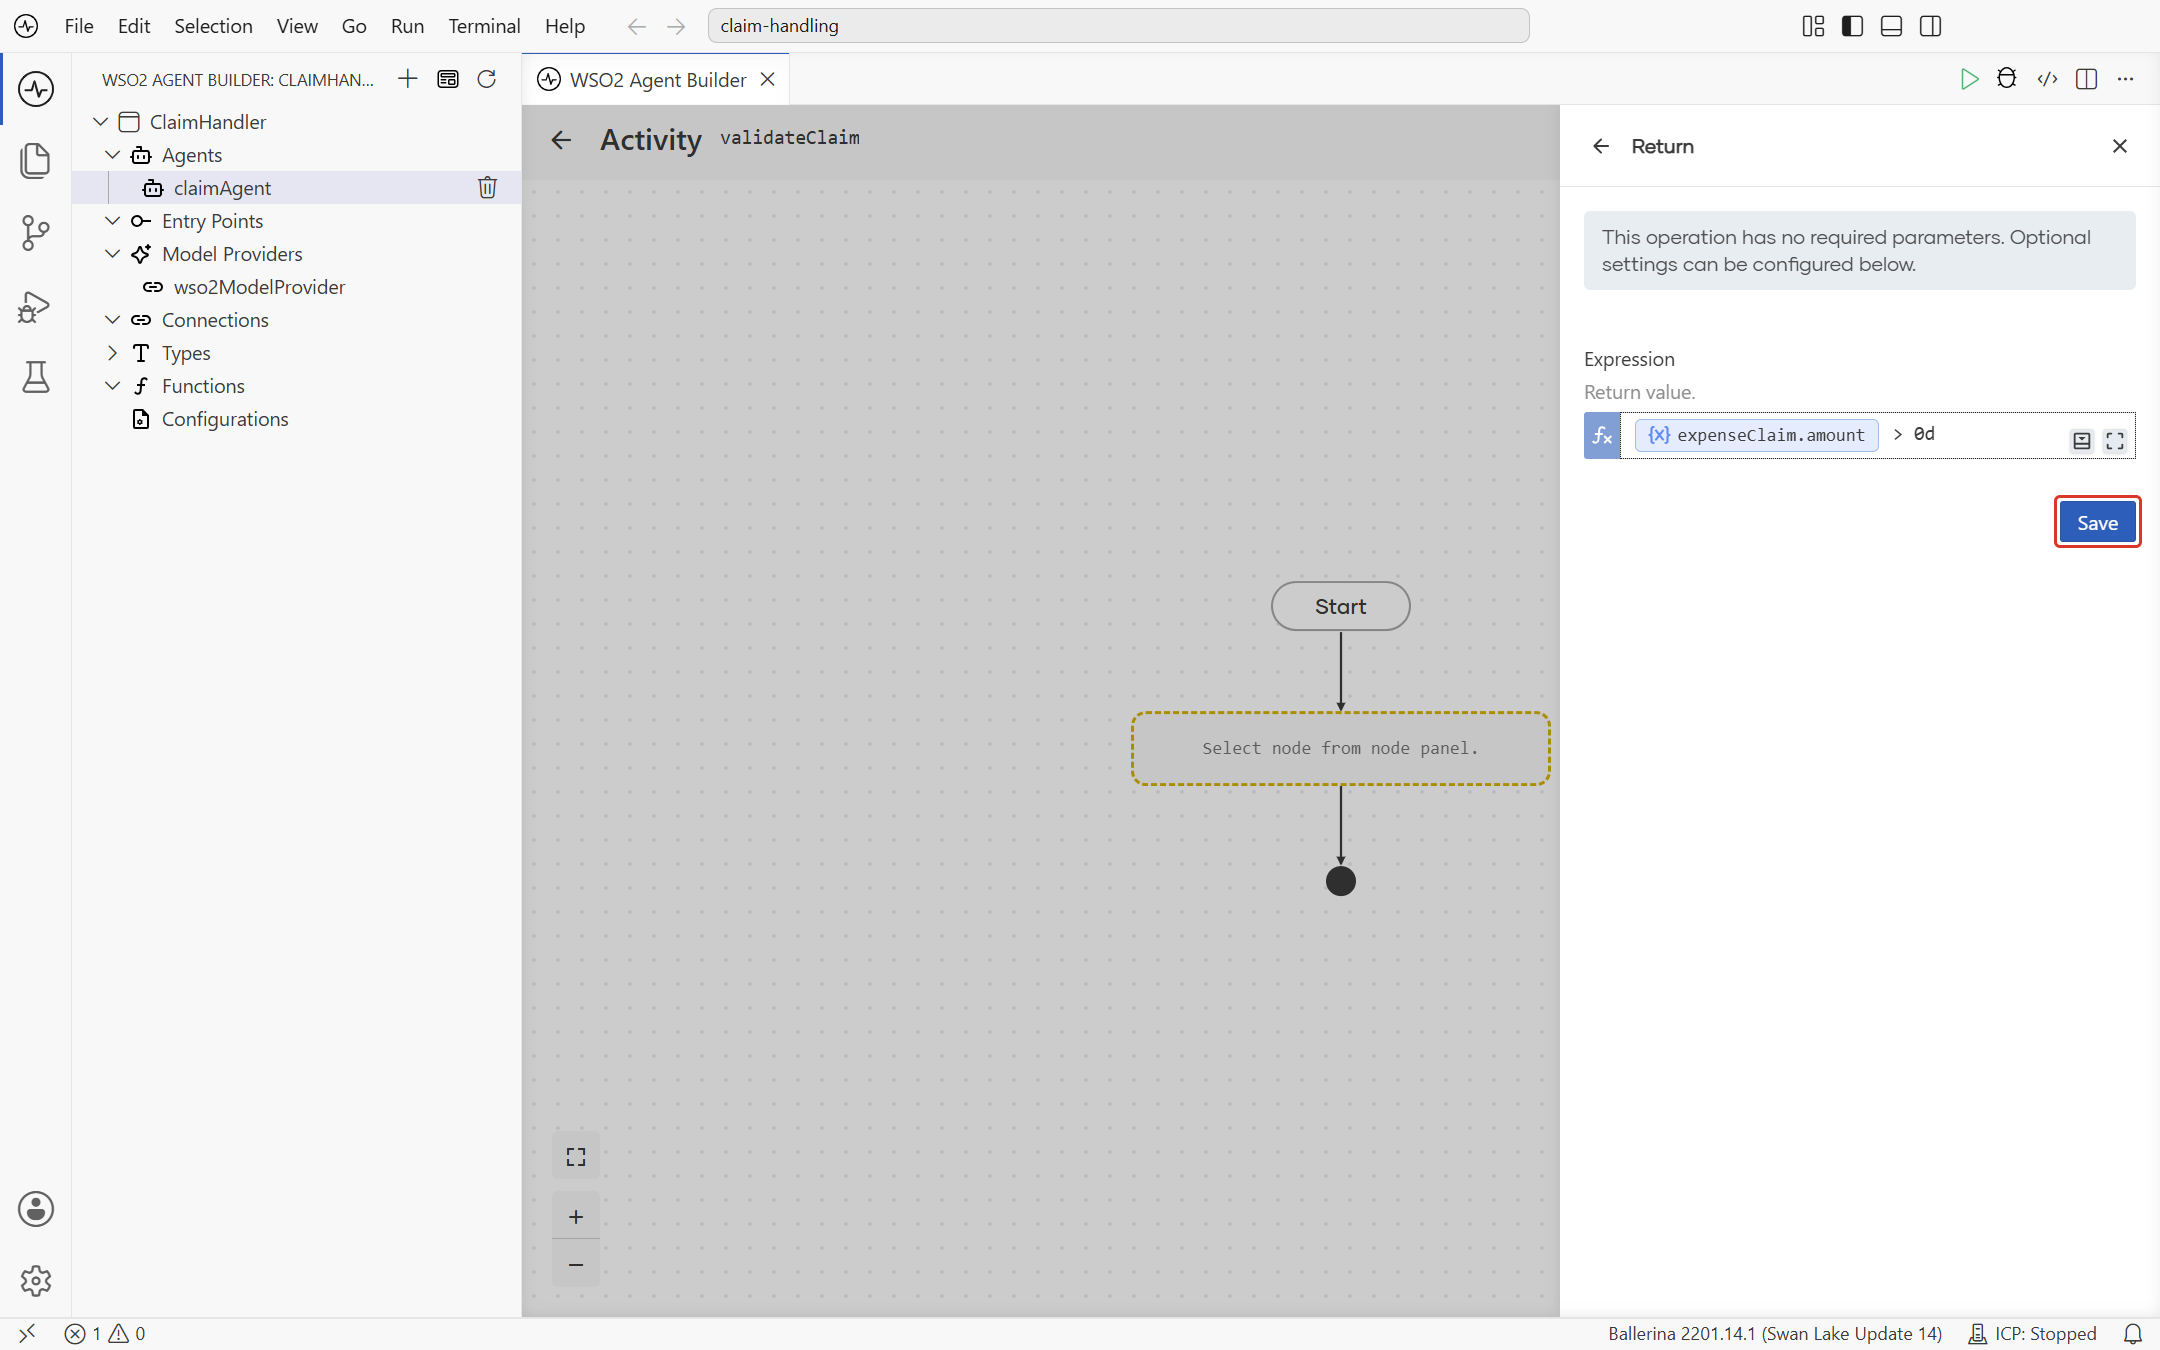
Click the Expression field to open the value helper, then select Inputs >
expenseClaim>amount. -
With the cursor after the inserted value, type
> 0dto require a positive amount. -
Click Save.
-
Select
claimAgentin the breadcrumb to return to the agent canvas.
Add the payment activity
Paying out is the risky step, so gate it behind a person. The activity is created the same way as the validator, and the register form is where the gate goes on:
-
On the agent canvas, click Add Tool/Activity, then under Current Integration, click Create Activity.
-
Set Activity Name to
payClaim. -
Under Parameters, click Add Parameter. Set Type to
ExpenseClaimand Name toexpenseClaim, then click Add. -
Leave Return Type empty and click Save.
-
Click
payClaimunder Current Integration to open its register form, and set Approval Policy to Human Approval. Now, before the agent runs the activity, a review activity is created and the agent suspends durably until a reviewer proceeds or rejects. -
Set Reviewer Roles to
Finance, the roles permitted to decide that approval. -
Click Save.
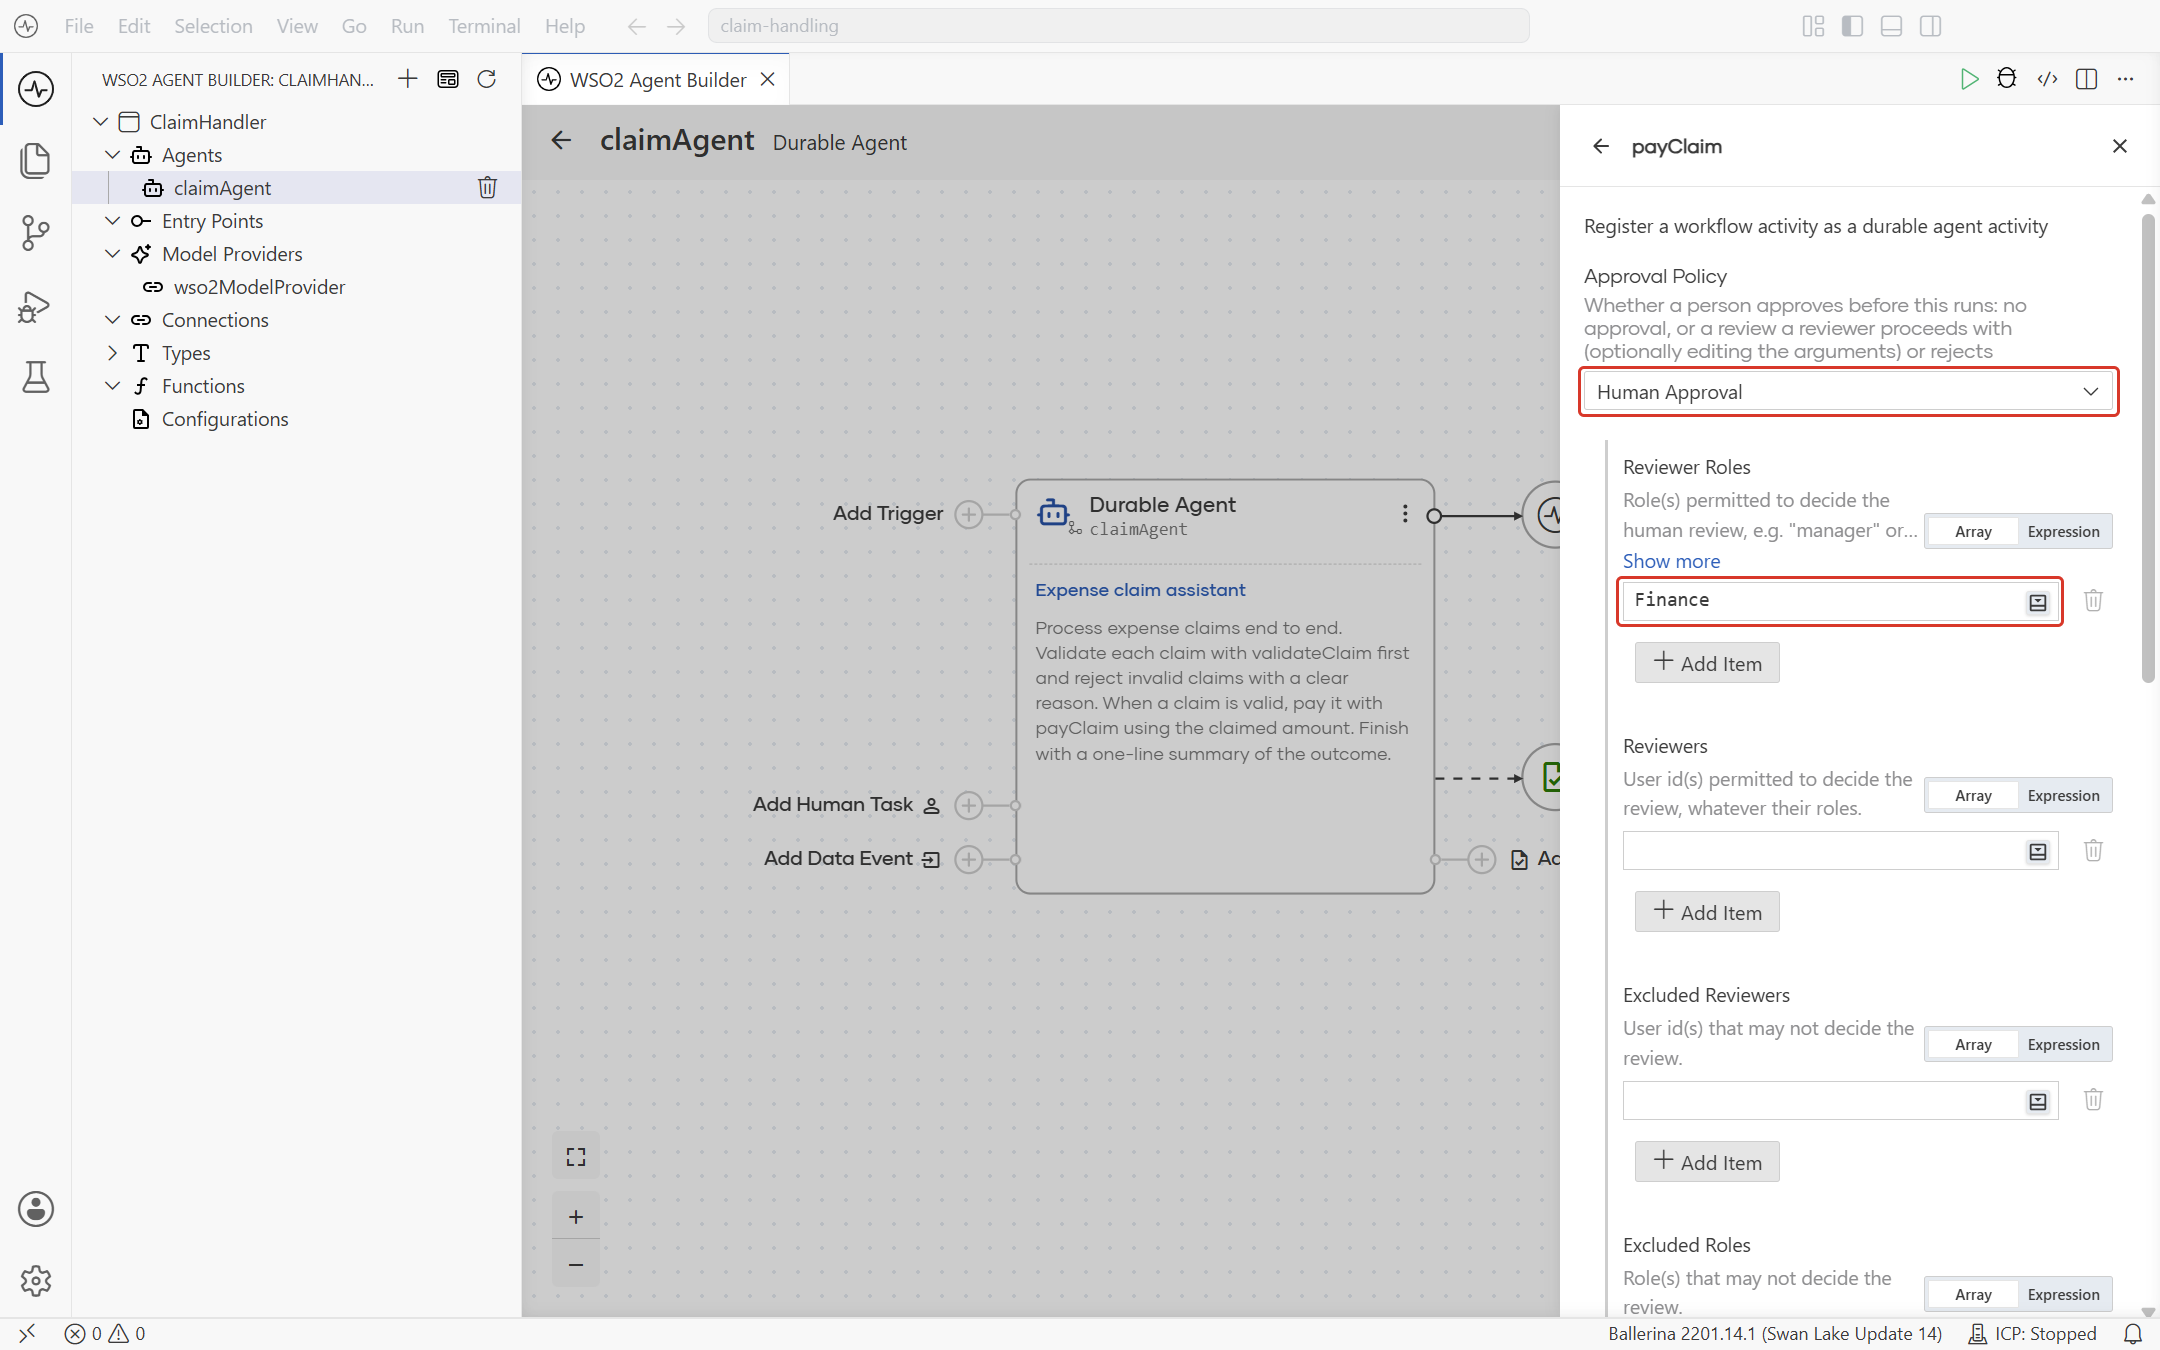
payClaim joins the agent node beside validateClaim, drawn with a badge marking it as gated. The agent can now propose a payment, but it cannot release one on its own.
Step 4: Start the agent from a trigger
An agent does nothing until something starts it. Give the agent an HTTP trigger that hands each incoming claim to claimAgent and answers with the ID of the run it started.
-
On the agent canvas, click Add Trigger.
-
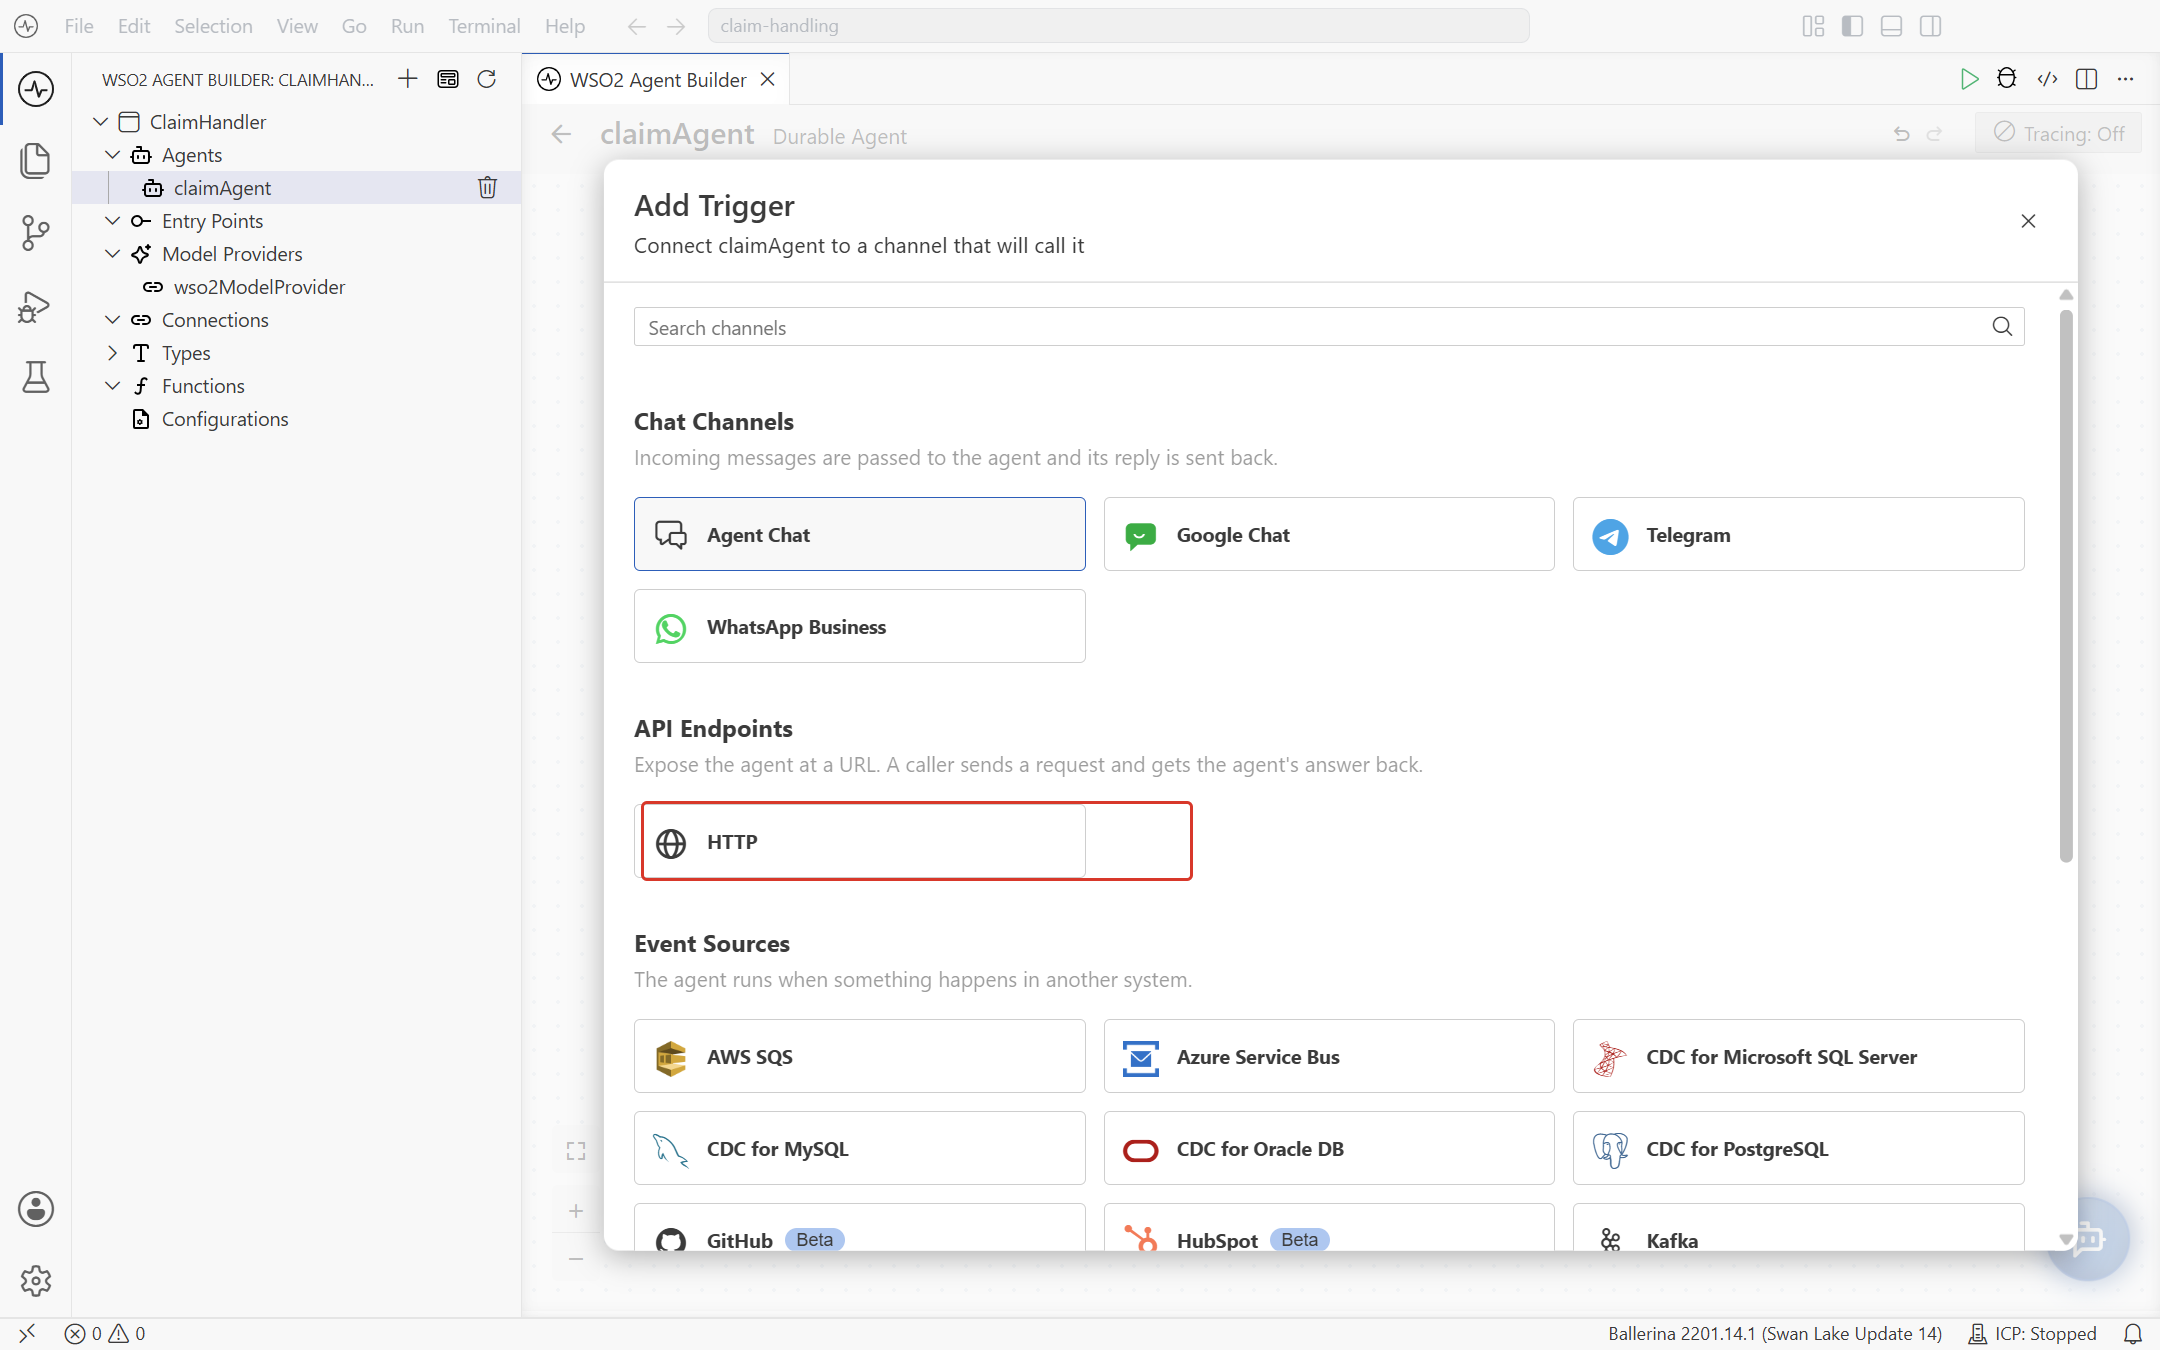
Under API Endpoints, select HTTP.
-
Keep the generated Endpoint Path (
/claim-agent), HTTP Method (POST), and Resource Path (.). -
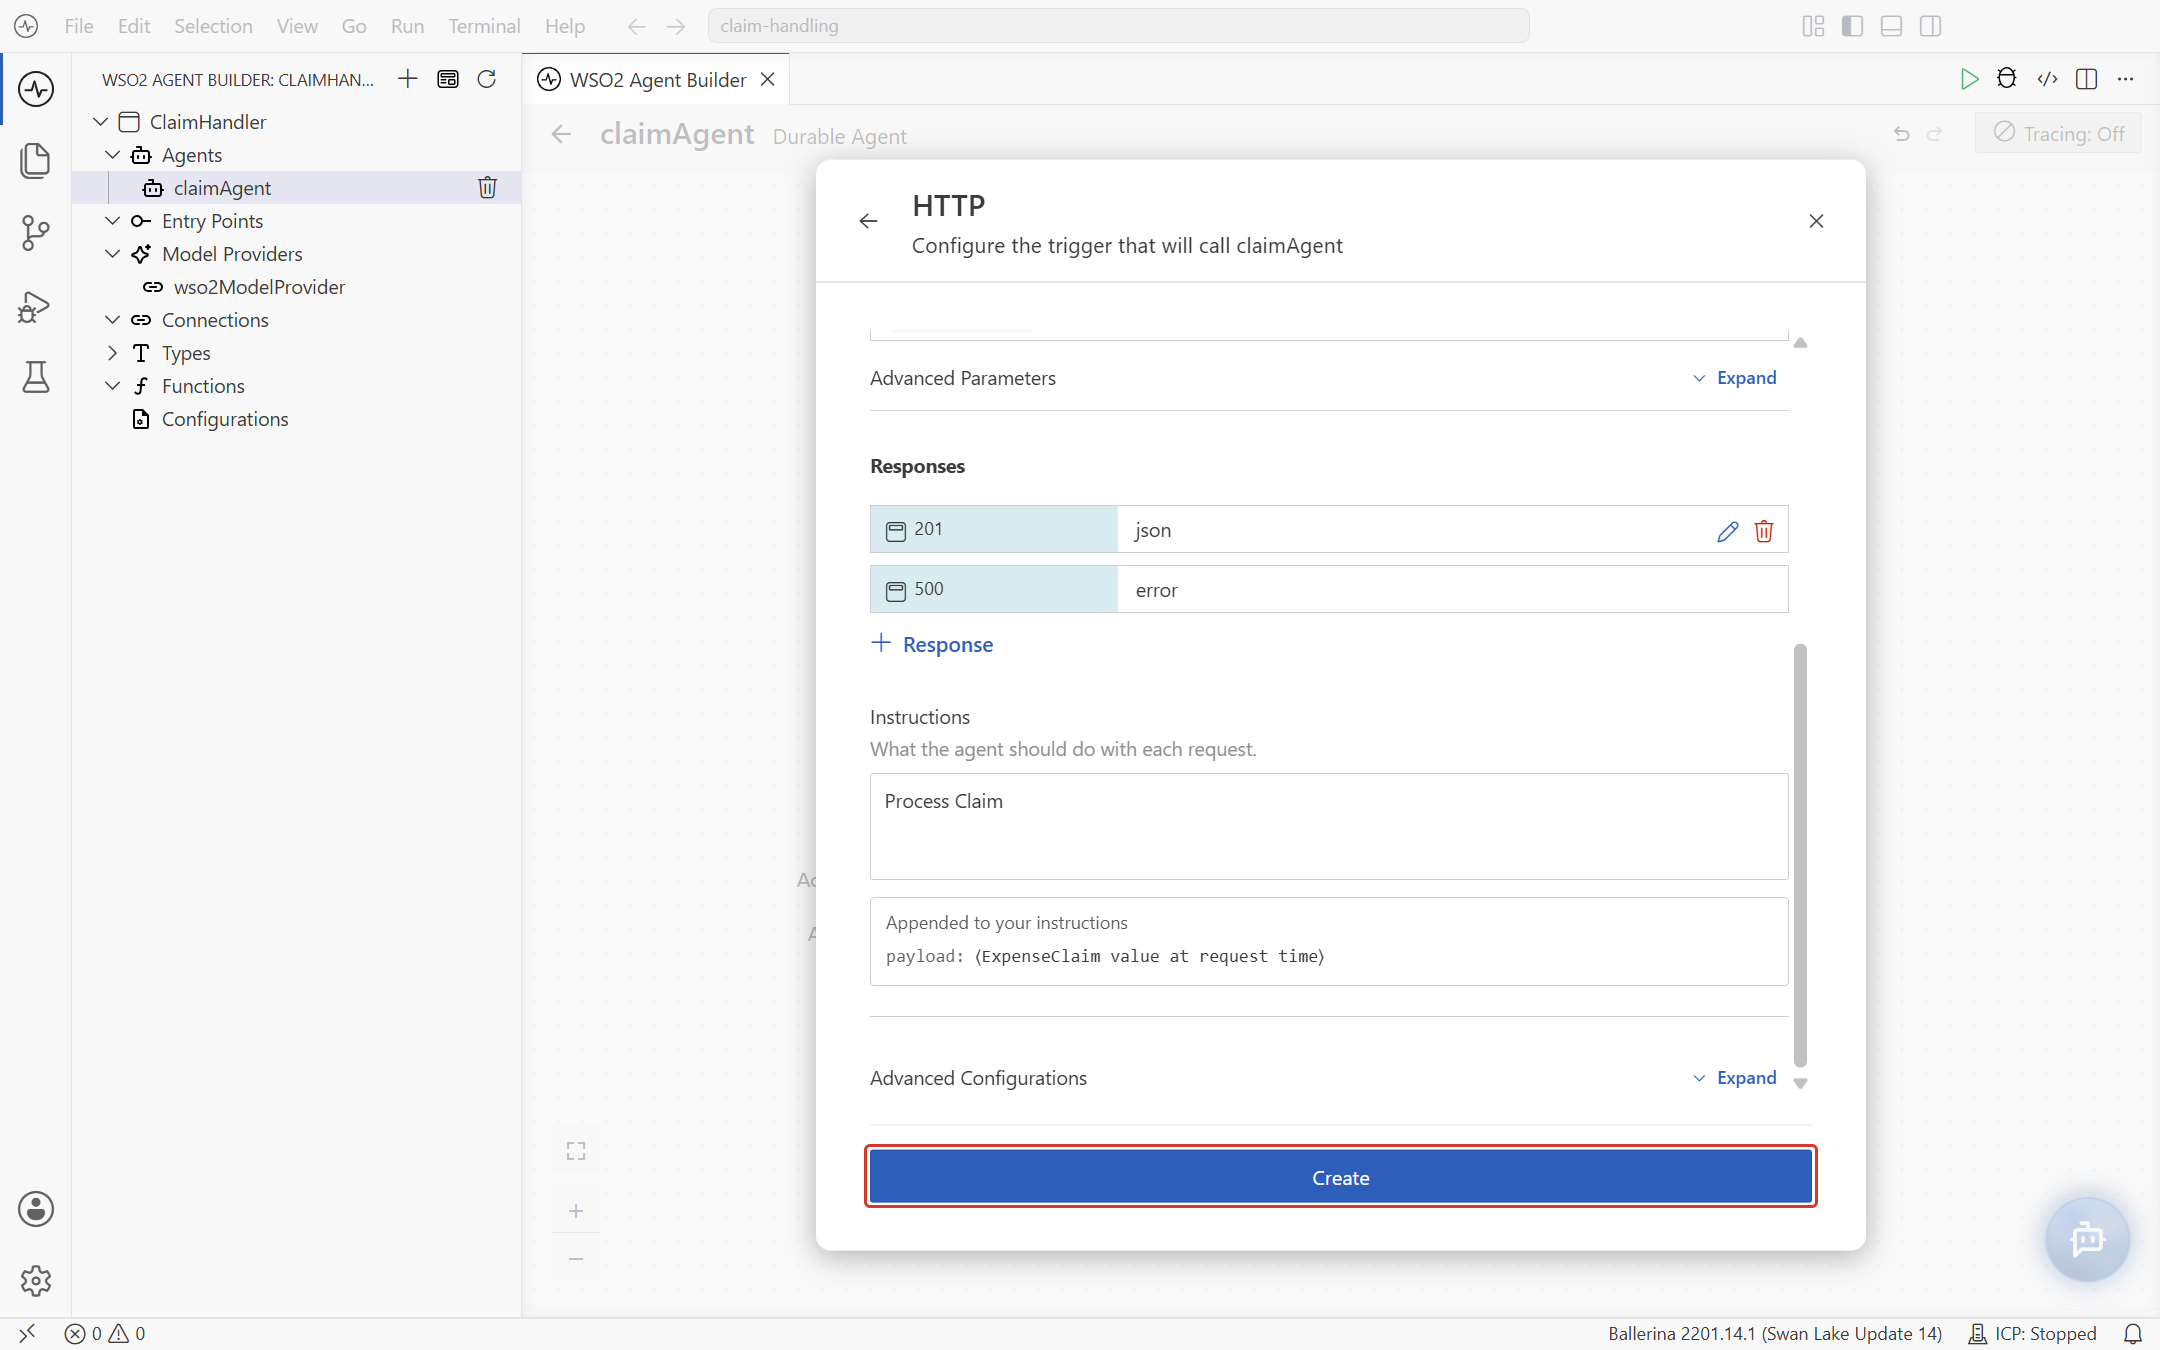
Under Payload, click the edit icon, set Type to
ExpenseClaim, and click Save. -
Set Instructions to
Process Claim. This is the user turn the agent plans this run from. The claim itself is appended to it, as Appended to your instructions shows. -
Click Create.
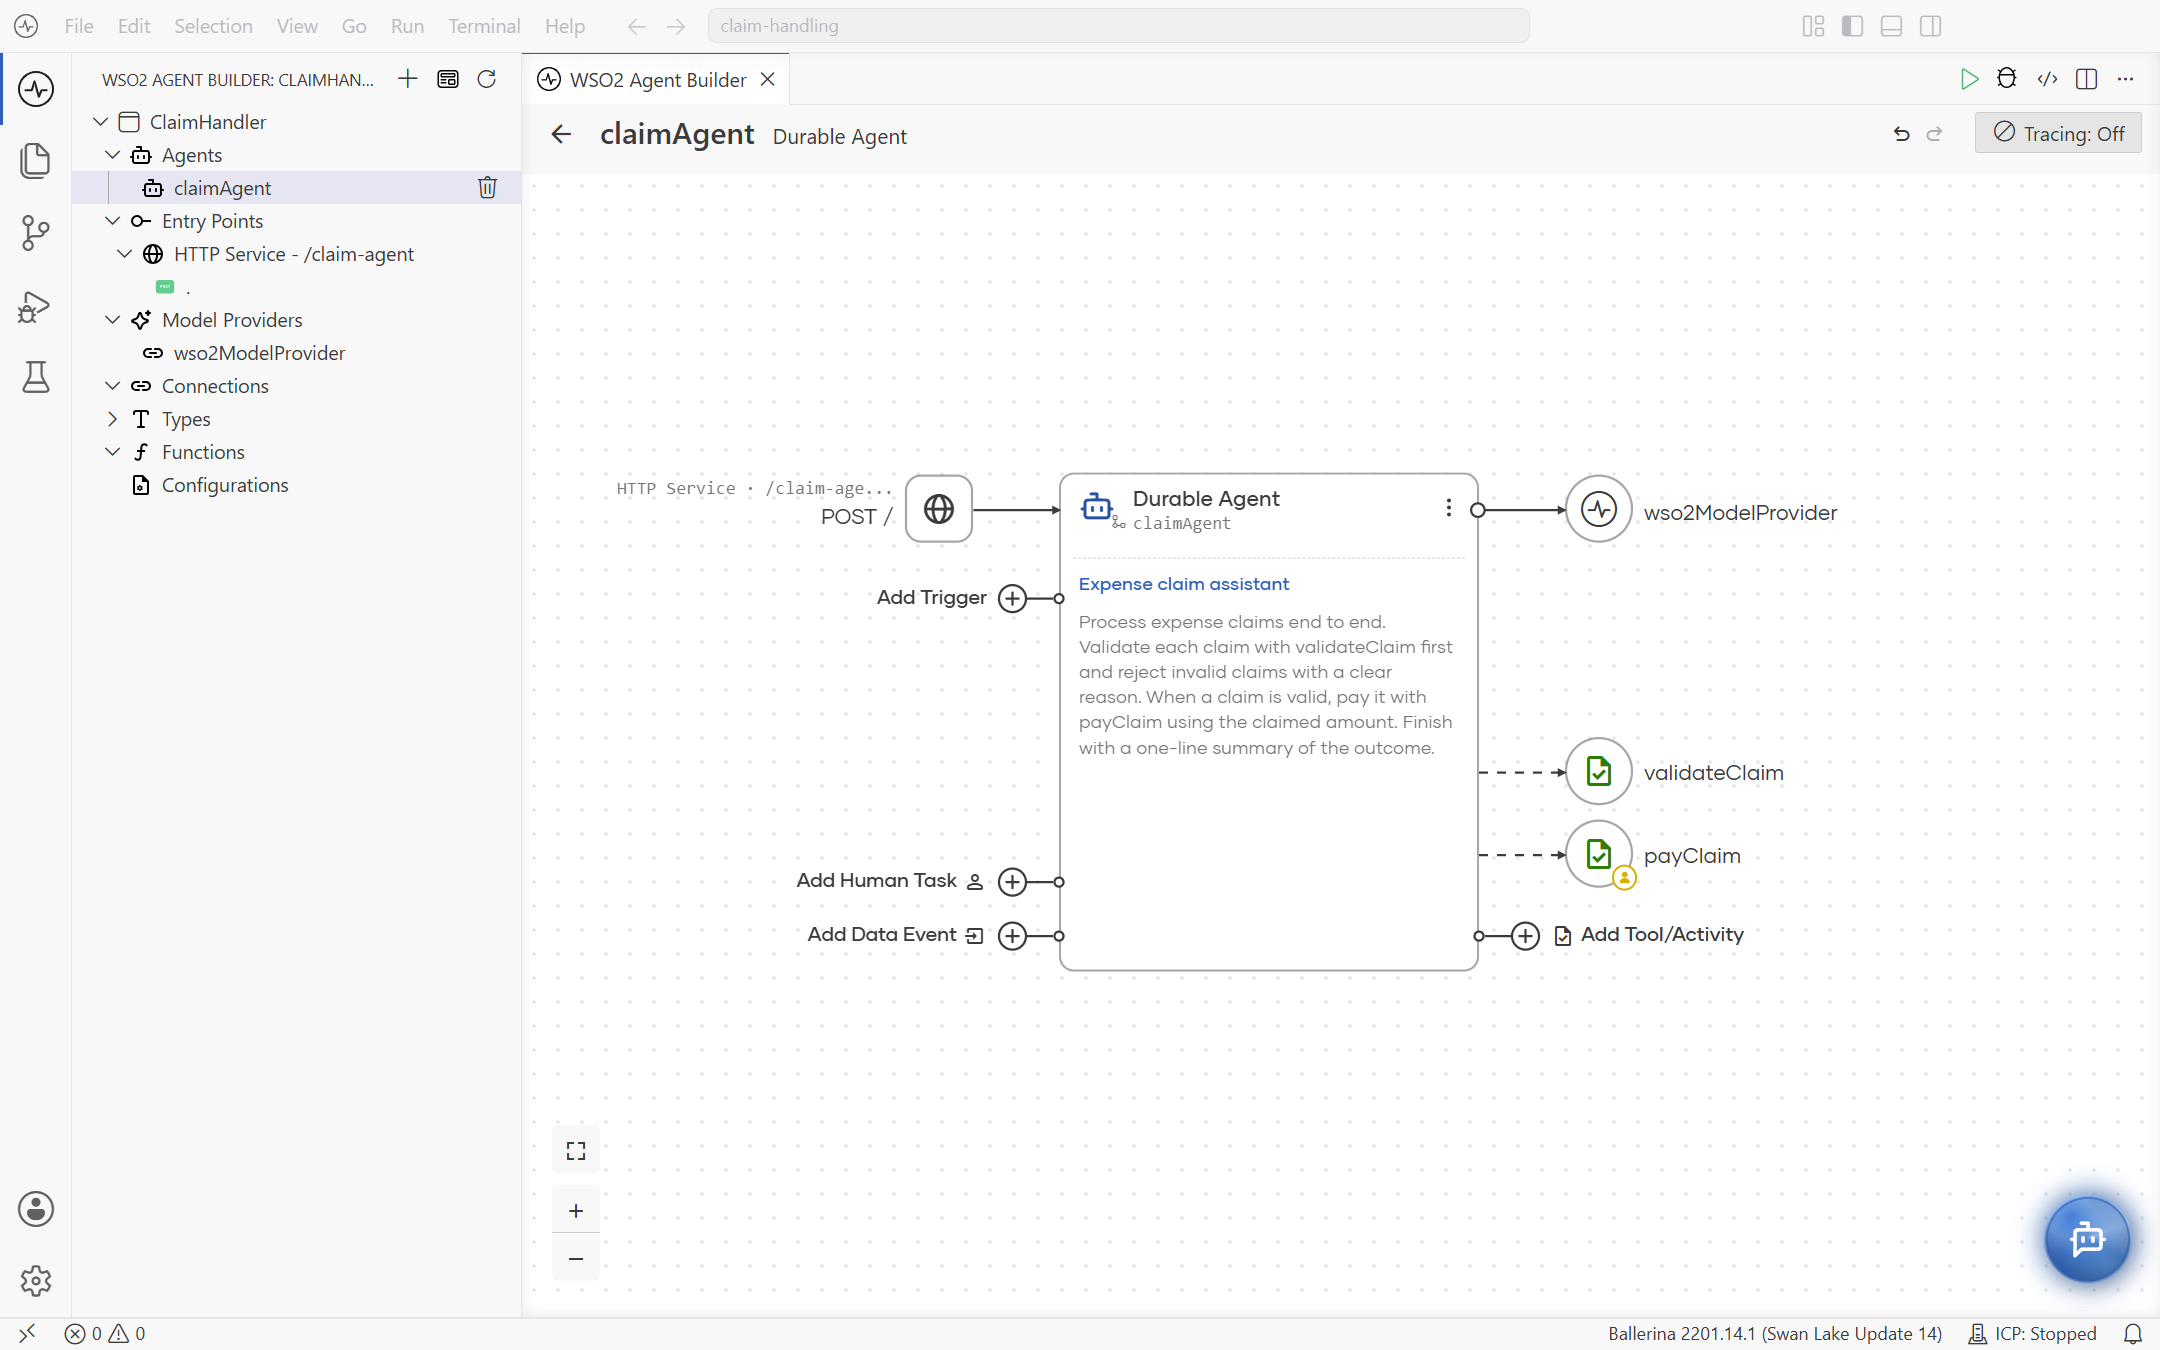
The trigger appears on the canvas, connected to the agent.
-
Click the trigger node to open the resource's flow. It runs
claimAgentand stores the result inresult, then returns a placeholder error. -
Click the Return node, replace its Expression with
result, and click Save.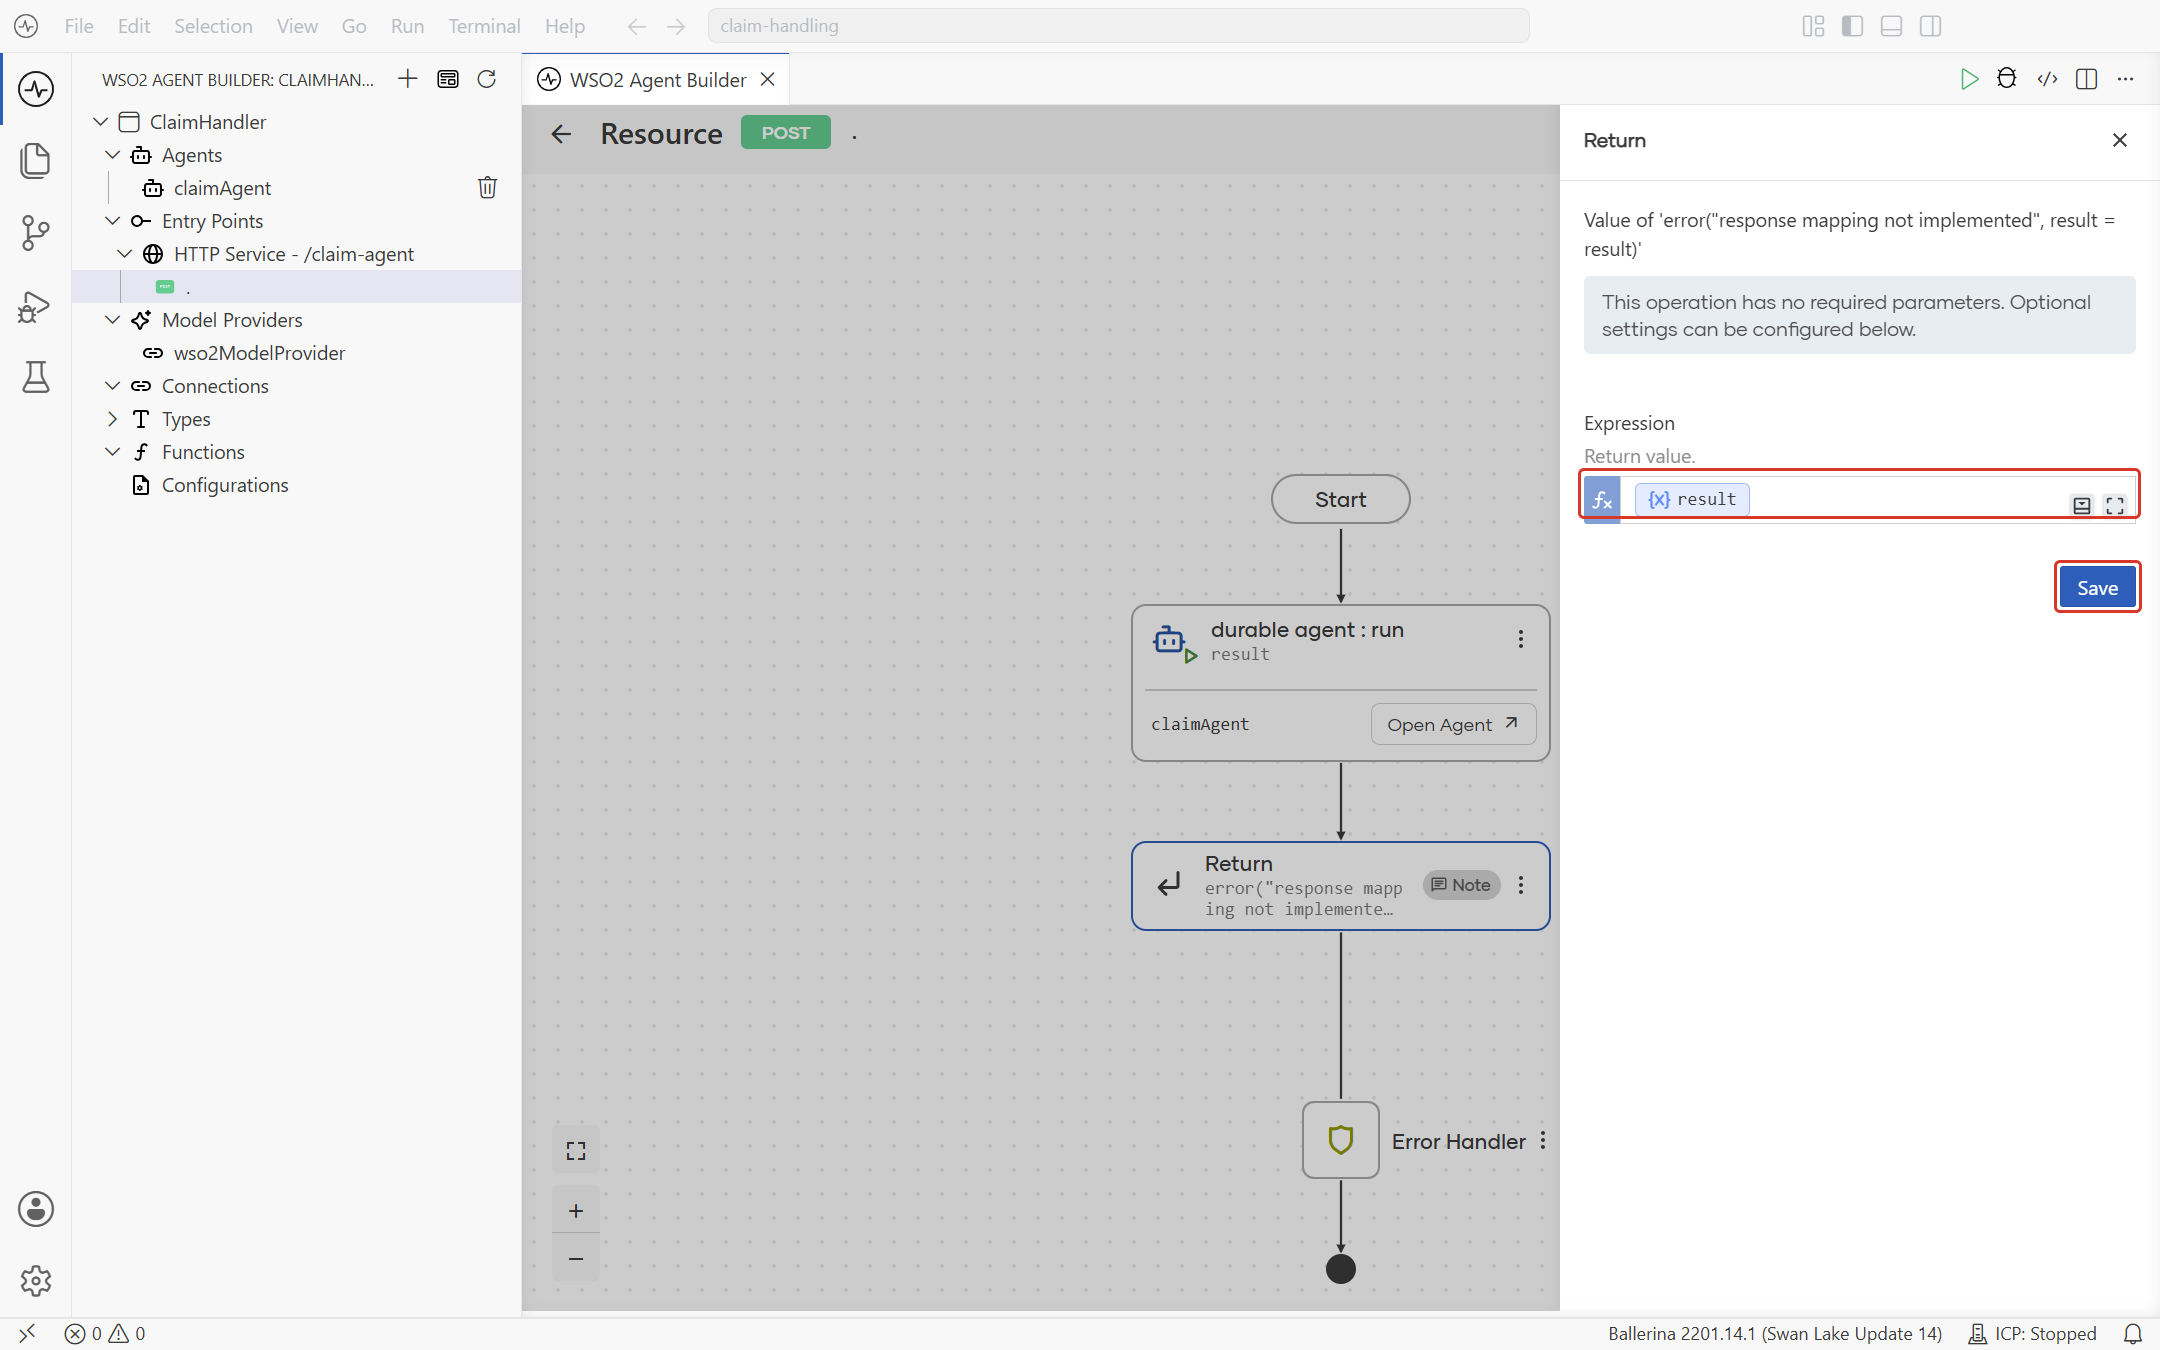
The resource now starts an agent run for every claim it receives and answers with that run's instance ID.
run starts the agent and returns immediately with its instance ID. It does not wait for the claim to finish, which is the point: the run may sit on the payClaim approval for days. Return the ID to the caller, because it is what addresses this run later.
Step 5: Start the Temporal server
A durable workflow keeps its record in a workflow engine. The runtime's mode defaults to LOCAL, which expects a Temporal server on localhost:7233, so start one before running the integration. Temporal's sample Compose file brings up a server and its dependencies in Docker:
git clone https://github.com/temporalio/samples-server.git
cd samples-server/compose
docker compose up
Leave the containers running for the rest of this guide.
To check that WSO2 Agent Builder can reach it, select ClaimHandler in the breadcrumb to open the integration overview, and in the right panel, under Management, expand Workflow Management. It reads Workflow runtime reachable at localhost:7233.
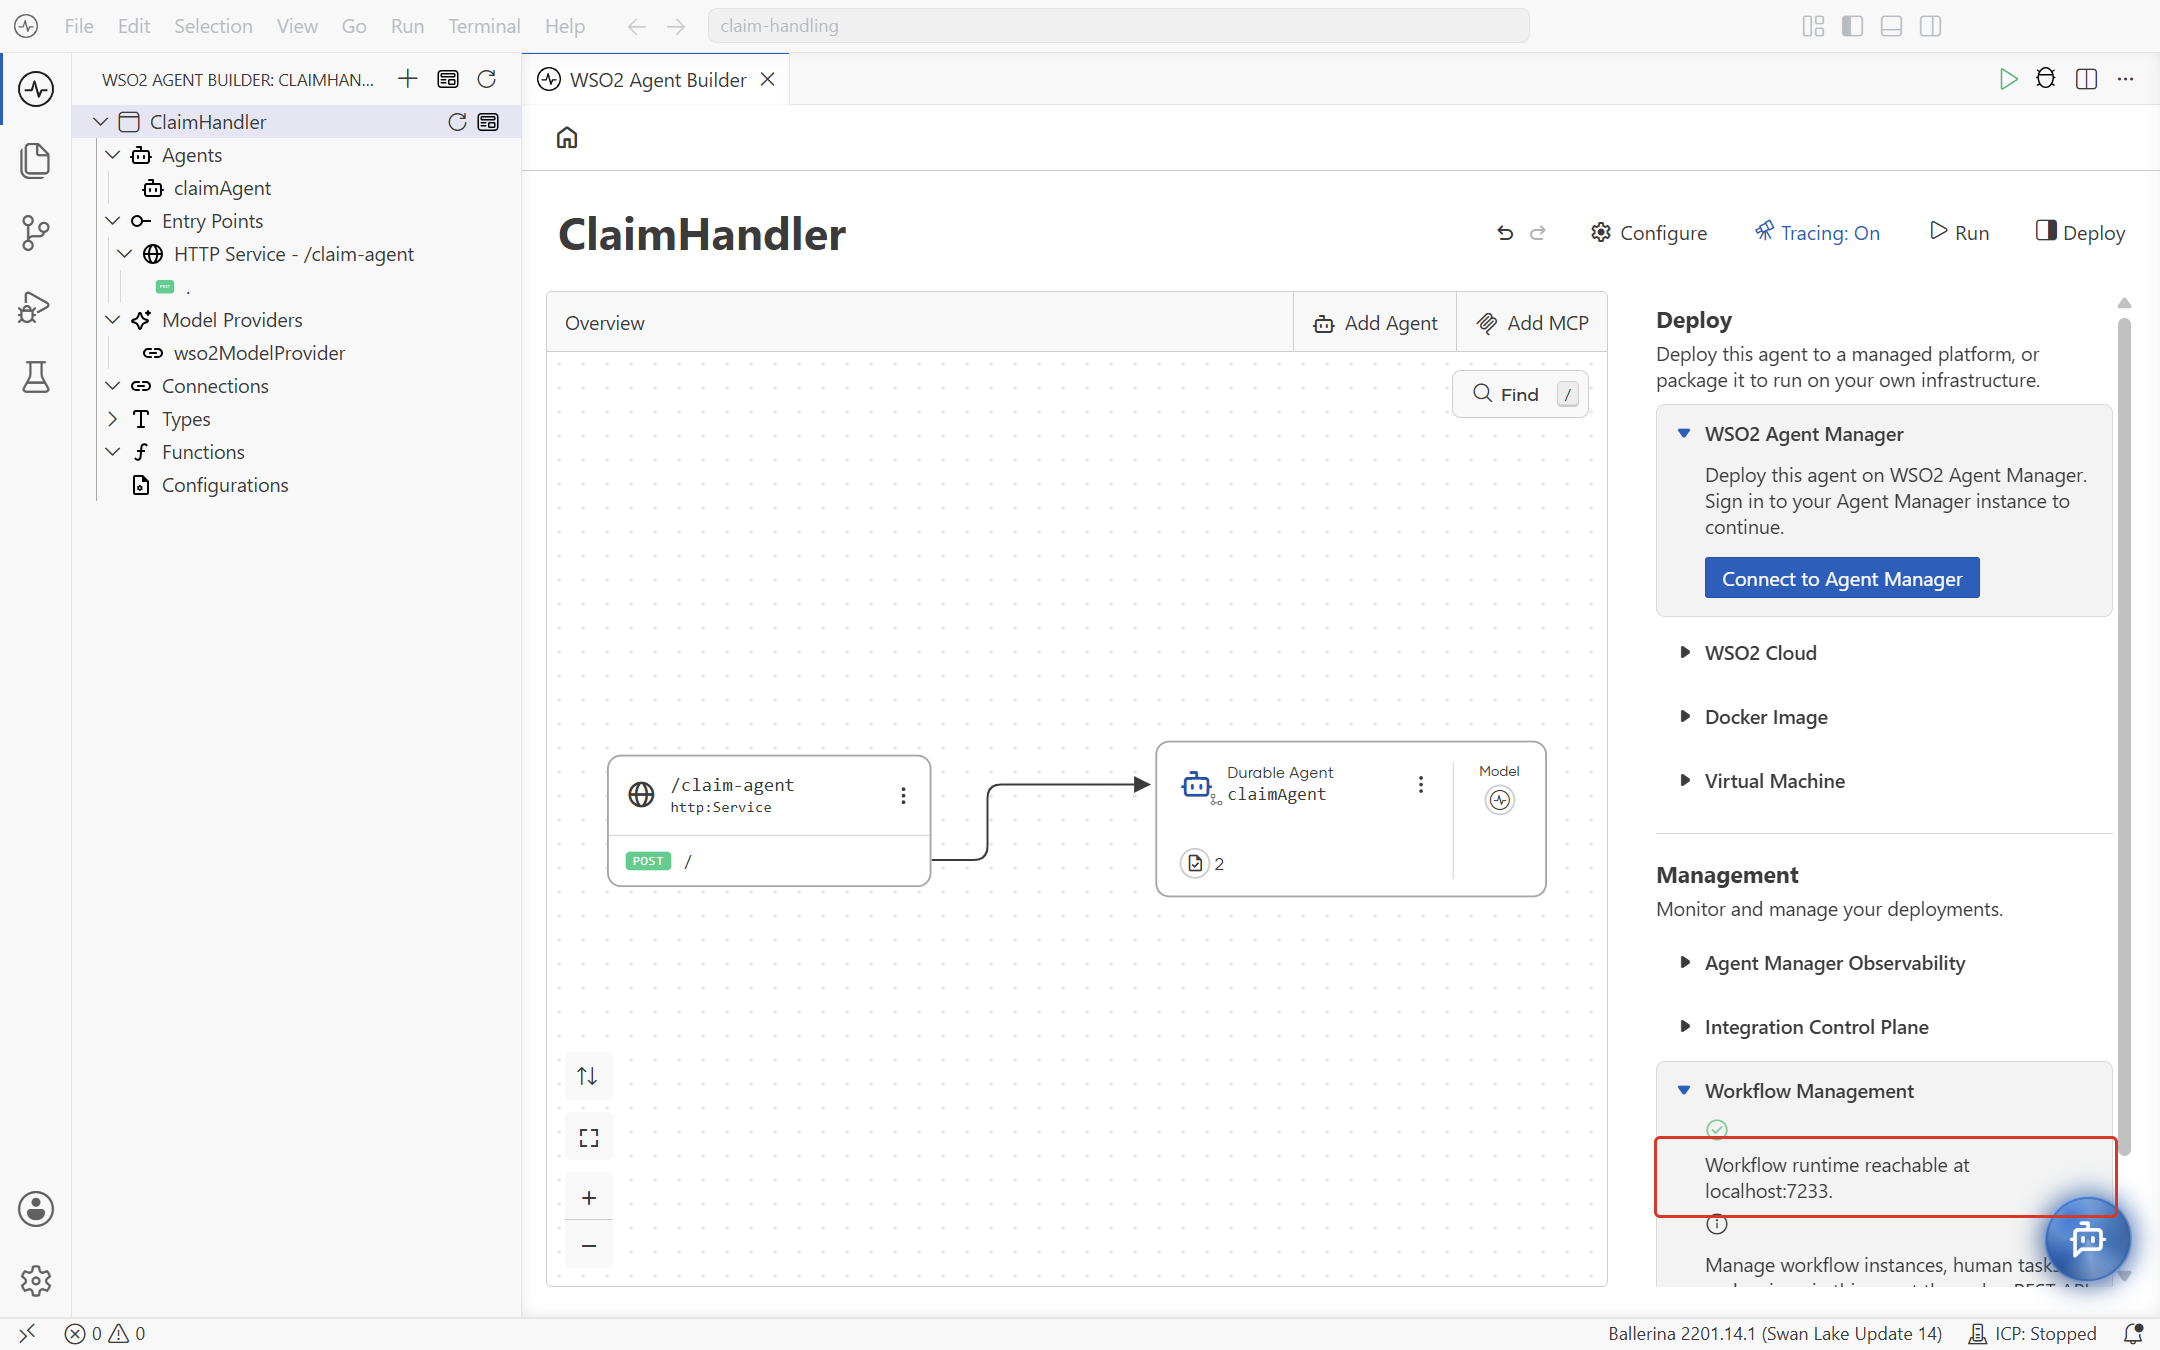
Without a Temporal server, Workflow Management shows Use in-memory runtime. That switches the workflow mode to IN_MEMORY, which is for testing only: runs are lost when the integration stops.
Step 6: Start the local ICP server
The gated payClaim suspends the run until a Finance reviewer decides on it, and the Integration Control Plane console is where that decision is made. Start a local ICP server before running the integration, so the approval has somewhere to land.
-
On the integration overview, in the right panel, under Management, expand Integration Control Plane and check Enable ICP Monitoring.
-
Expand Publish to Local ICP and click Start ICP Server.
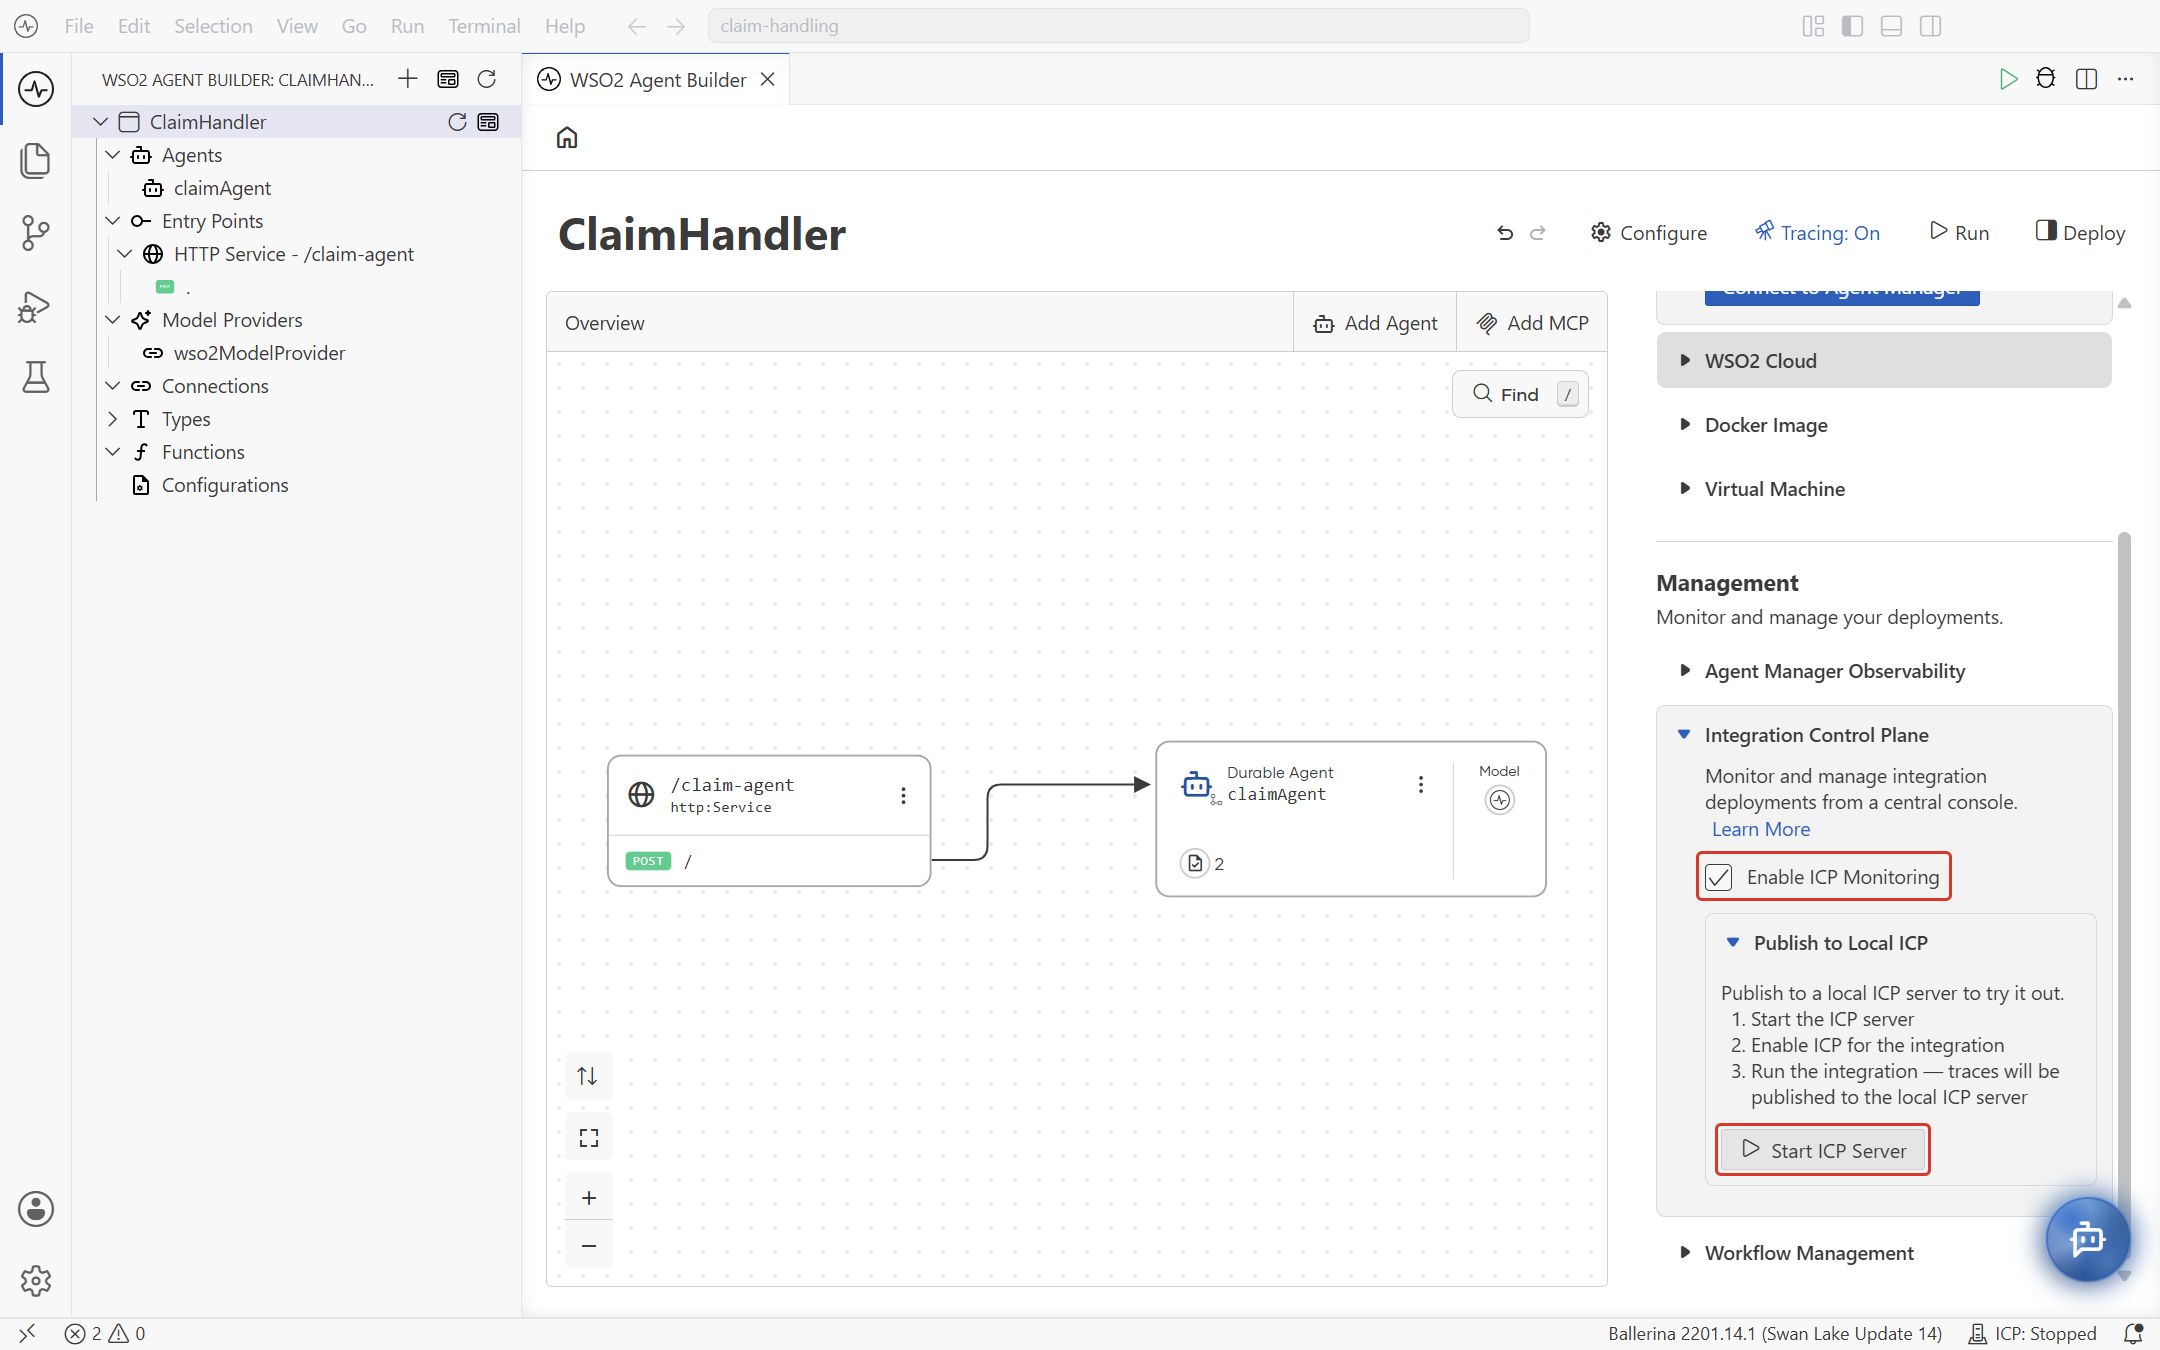
The terminal opens on an ICP Server task and logs the startup. The status bar at the bottom right switches from ICP: Stopped to ICP: Running.
Enable ICP Monitoring writes the runtime bridge configuration that points this integration at the local ICP server. Start ICP first so the integration registers with it as it boots; otherwise the run has no inbox to publish the payClaim approval to.
Step 7: Run it
-
On the integration overview, click Run.
-
Watch the terminal. After the integration compiles and starts, the runtime bridge connects to the ICP server started in Step 6:
... module=wso2/icp.runtime.bridge message="Full heartbeat acknowledged by ICP server"The heartbeat is the integration registering itself, which is what puts the
payClaimapproval in front of a reviewer later.
Step 8: Submit a new claim
Once the service is up, a pop-up says 1 service found in the integration. Test with Try It Client? Click Test. A TryIt.hurl file opens beside the overview, holding a request generated from the trigger, along with the schema the resource expects.
Fill in a real claim: replace the {?} placeholder for claimId and the 0 for amount, then click the run button in the request cell's left gutter to send it.
{
  "claimId": "2002",
  "amount": 1500
}
Or send it with curl:
curl -X POST localhost:9090/claim-agent -H 'Content-Type: application/json' \
  -d '{"claimId":"2002","amount":1500}'
The response is 201 Created, with the new run's instance ID as the body:
HTTP/1.1 201 Created
01a1862d-4a16-7f44-b006-190464ba3948
The agent validates the claim, decides to pay it, and pauses: the gated payClaim created an approval review for the Finance role. The workflow now waits durably; you can even restart the integration and nothing is lost.
Step 9: See the claim waiting in ICP
The run is now sitting on the payClaim approval, and the ICP console is where that wait is visible.
-
On the integration overview, under Publish to Local ICP, click View in ICP. The console opens in the browser on the All Projects page. If it asks you to sign in, sign in as the ICP administrator.
-
That page already lists
default-project, and it holds an integration namedclaimhandler. Neither was created by hand: the integration registered both with ICP when it started, and because it carries a durable workflow it is registered as a workflow integration. -
Open
default-project, thenclaimhandler. The Dev environment reports 1/1 Active and lists Workflow Definitions withclaimAgentselected. -
Click View Workflows. The Workflow Executions page lists one instance for
claimAgent, whose Workflow ID is the instance ID the claim request returned, with status Running and the time it started. -
Click the instance to open Execution Details:
- Workflow Input shows the Query the run started from, which carries the claim, and the agent name.
- The timeline below is the run so far: the agent thought, completed
validateClaim, thought again. - At the end of the timeline, you will see that the agent opened review-payClaim, which is still running. That open review is the gate holding the payment.
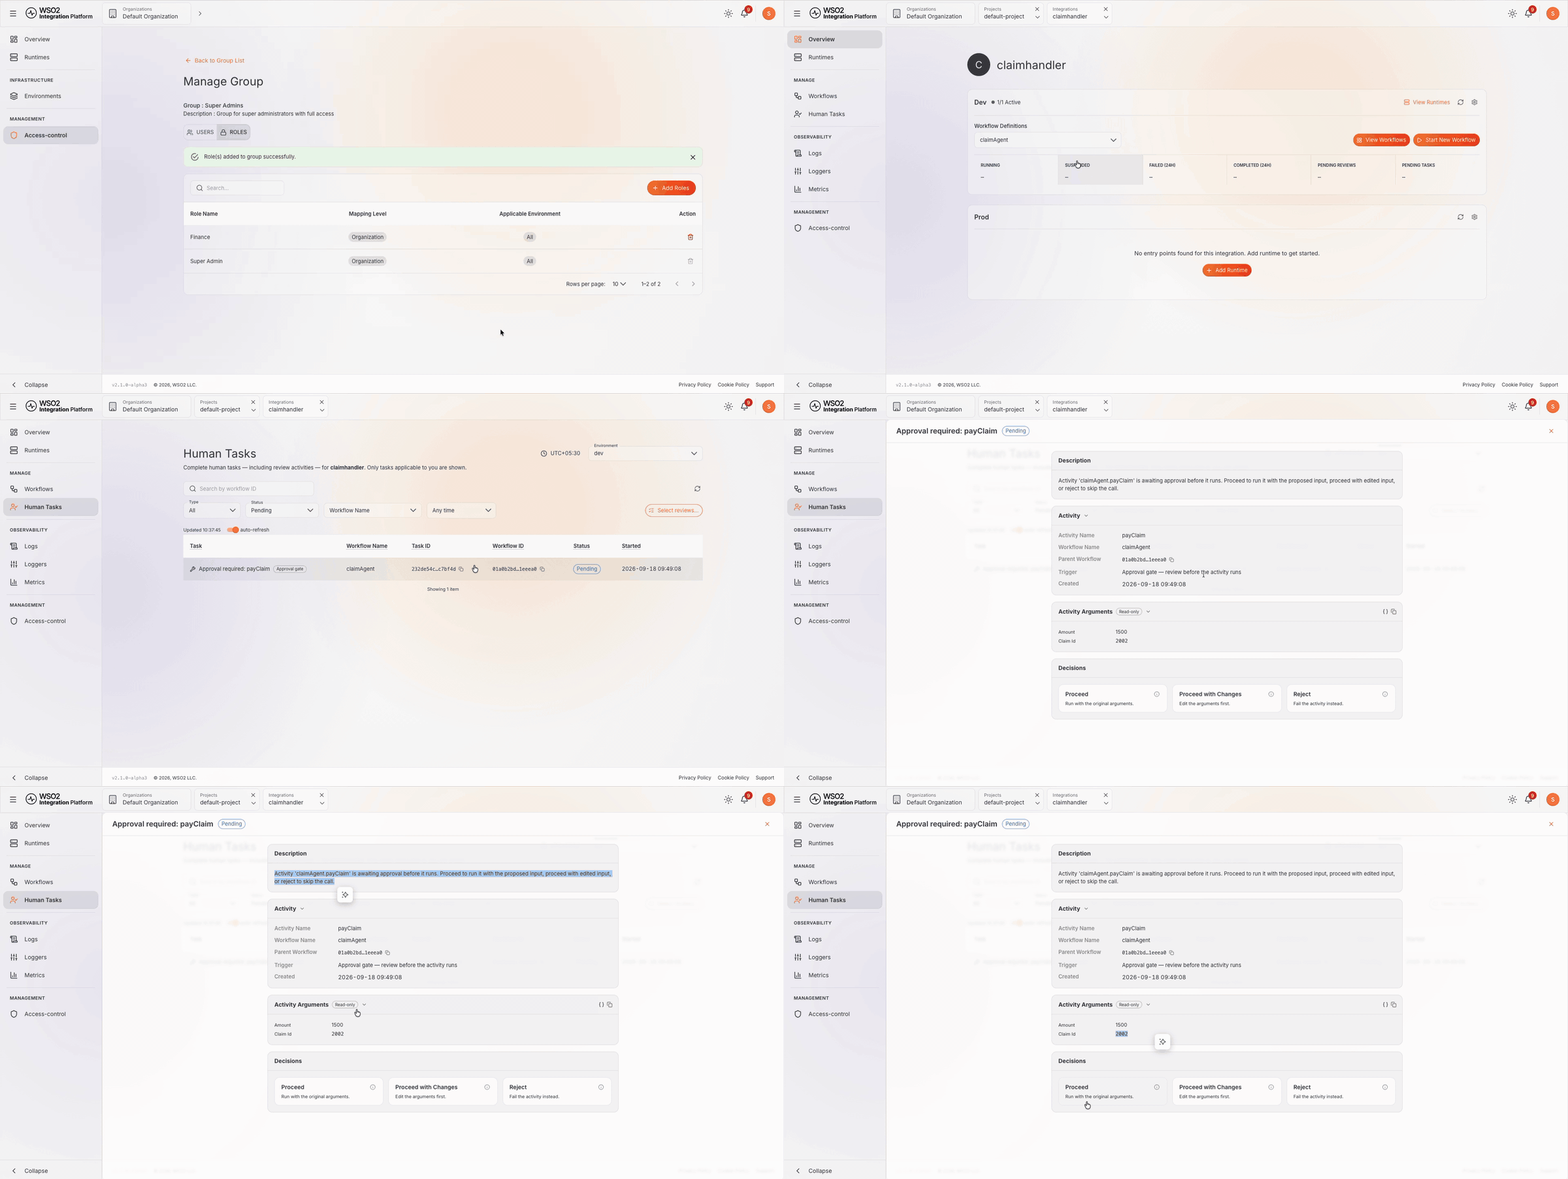
Step 10: Give your user the Finance role
The review is on the timeline, but it is not yet addressed to you. payClaim was registered with Finance as its reviewer role, and you are signed in as admin, who does not carry that role yet. Roles reach users through groups, so create a Finance role that can see and decide human tasks, and a group that grants it.
- Click Default Organization at the top of the console to leave the integration, then in the left navigation, under MANAGEMENT, click Access-control. Inside an integration, Access-control shows only that integration's roles and groups. The Users tab lists a single user,
admin(System Administrator). - Open the Roles tab and click + Create Role. Set Role Name to
Finance, expand Workflow-Management, and selectworkflow_mgt:view_human_tasks,workflow_mgt:manage_human_tasks, andworkflow_mgt:view_workflows. Click Create. - Open the Groups tab, click + Create Group, set Name to
Finance Reviewers, and click Create. - Click Finance Reviewers. On the USERS tab, click + Add Users, select System Administrator (admin), and click Add.
- On the ROLES tab, click + Add Roles. Select
Financein the Roles dropdown, leave Applicable Environments on All Environments, and click Add.
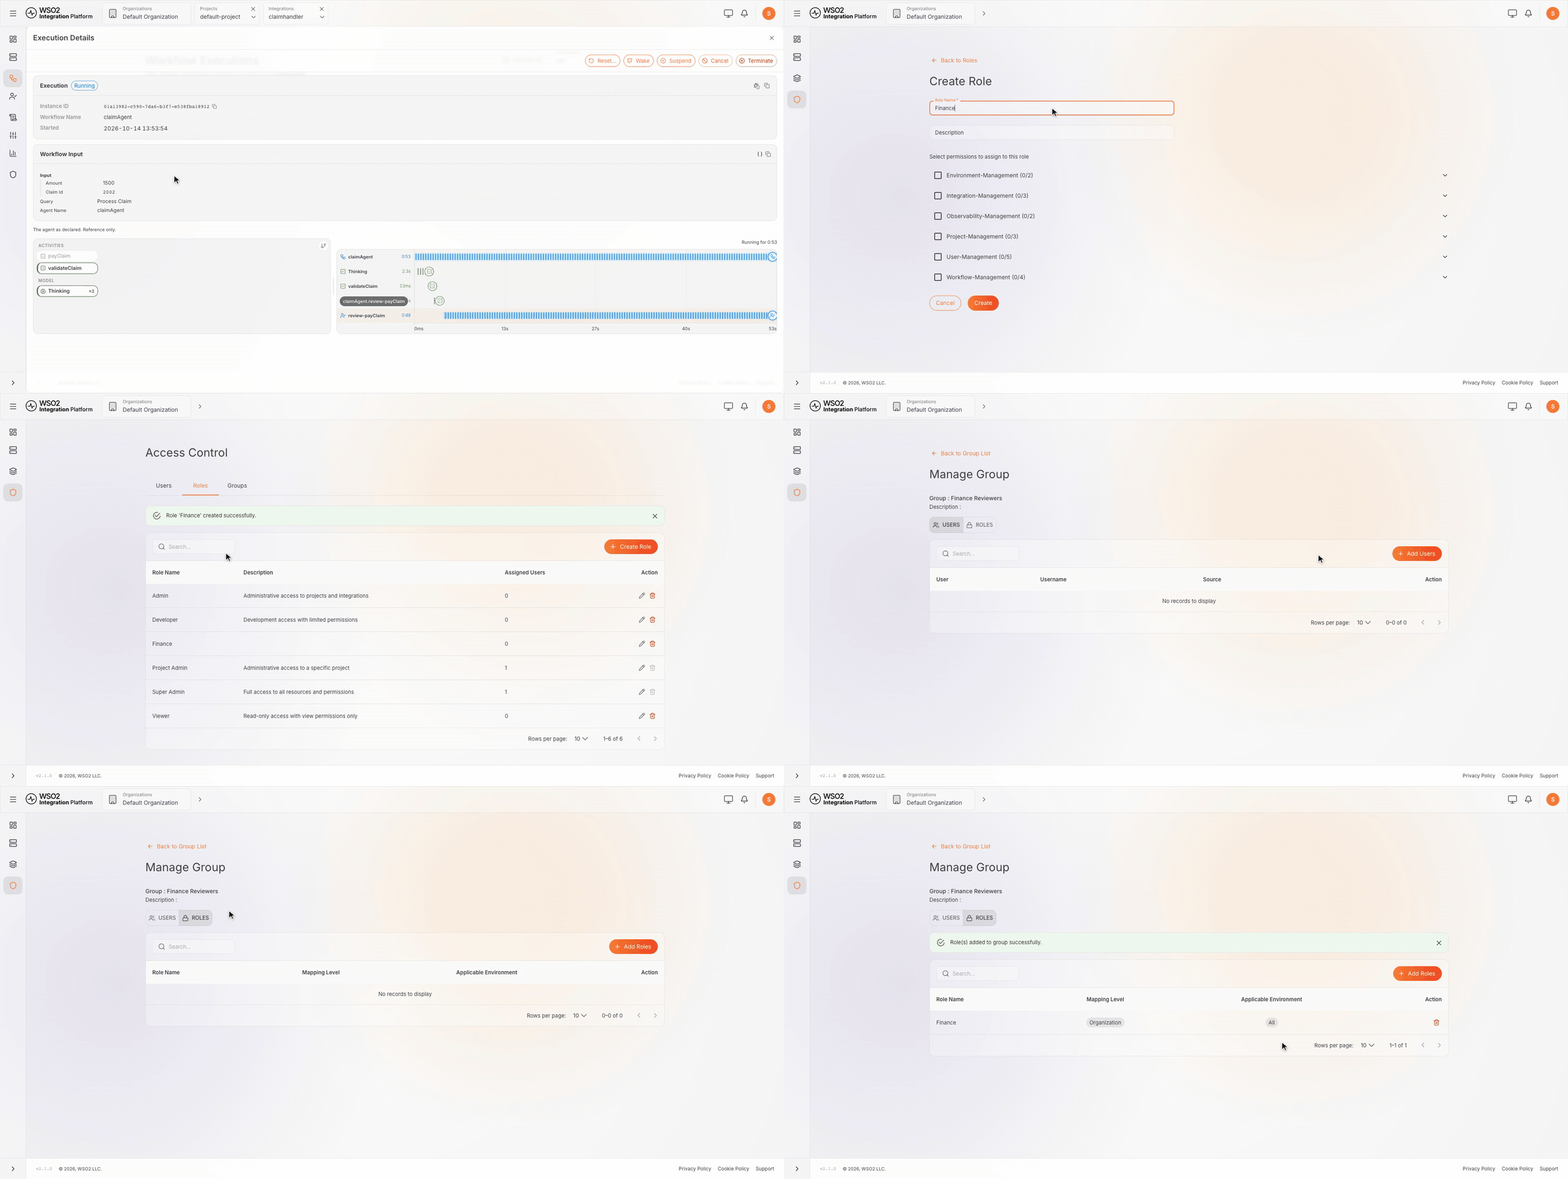
The console confirms Role(s) added to group successfully. admin now holds Finance through Finance Reviewers, so the approval reaches it. In a real deployment, add the accounts of the people who approve payments to this group; admin stands in for them here.
Step 11: Approve the payment
-
Use the breadcrumb at the top of the console to return to
default-project, thenclaimhandler. -
In the left navigation, under MANAGE, click Human Tasks. The page gathers the human tasks and review activities for
claimhandler, and it shows only the ones applicable to you. Without theFinancerole added in Step 10, this list stays empty. -
With Status on Pending, one task is listed: Approval required: payClaim, badged Approval gate, on
claimAgent, carrying the workflow ID of your run. -
Click the task. The panel lays out the decision:
- Activity names the activity and its workflow, links the parent workflow, and gives the Trigger as
Approval gate — review before the activity runs. - Activity Arguments is read-only and holds the claim ID and amount the agent proposes to pay.
- Decisions offers Proceed (run with the original arguments), Proceed with Changes (edit the arguments first), and Reject (fail the activity instead).
- Activity names the activity and its workflow, links the parent workflow, and gives the Trigger as
-
Click Proceed. Confirm Proceed repeats the arguments and warns that the activity runs with them and that this cannot be undone. Click Proceed to release the payment.
The console reports Activity proceeded, and on the next refresh the list reads No pending tasks.
Open the run again from Workflows. payClaim has now completed. The agent takes one closing turn, and the execution reads Completed, with a Closed time and a Workflow Result holding the agent's own summary of the claim. The model words it differently on each run, for example:
The claim has been processed and paid successfully.
The timeline is green end to end, and it shows where the time went: the thinking turns and validateClaim took seconds, payClaim ran in milliseconds once released, and review-payClaim accounts for almost the entire run. For most of the run, nobody was working on the claim. It was waiting for a person, and it lost nothing by waiting.
Source code
View the generated Ballerina code
The steps above generate the following Ballerina code. types.bal holds the claim record, functions.bal the activities, workflows.bal the durable agent, and main.bal the HTTP trigger's listener and service.
types.bal
type ExpenseClaim record {|
    string claimId;
    decimal amount;
|};
functions.bal
import ballerina/workflow;

@workflow:Activity
function validateClaim(ExpenseClaim expenseClaim) returns boolean|error {
    return expenseClaim.amount > 0d;
}

@workflow:Activity
function payClaim(ExpenseClaim expenseClaim) returns error? {
}
workflows.bal
import ballerina/ai;
import ballerina/workflow;

final ai:Wso2ModelProvider wso2ModelProvider = check ai:getDefaultModelProvider();
final workflow:DurableAgent claimAgent = check new ({
    systemPrompt: {
        role: string `Expense claim assistant`,
        instructions: string `Process expense claims end to end. Validate each claim with validateClaim first and reject invalid claims with a clear reason. When a claim is valid, pay it with payClaim using the claimed amount. Finish with a one-line summary of the outcome.`
    },
    model: wso2ModelProvider,
    inputType: ExpenseClaim,
    activities: [validateClaim, {activity: payClaim, approvalPolicy: {userRoles: "Finance"}}]
});
main.bal
import ballerina/http;

listener http:Listener httpDefaultListener = http:getDefaultListener();

service /claim\-agent on httpDefaultListener {
    resource function post .(@http:Payload ExpenseClaim payload) returns json|error {
        do {
            string result = check claimAgent.run(string `Process Claim

Request payload:
${payload.toJsonString()}`);
            return result;
        } on fail error err {
            // handle error
            return error("unhandled error", err);
        }
    }
}
What's next
- Create a Durable Agent — Every field of the durable agent, its activities, data events, and human tasks
- Gated tools vs durable agentic workflow — Choose between an agent with gated tools and a durable agent
- Gate Tools for Approval — Pause a regular agent's tool calls for human approval in chat
- Build an AI agent — Build a chat agent and test it in the built-in chat panel