Example
Solace (JMS) Producer Example
What you'll build
Build an integration that publishes a message to a Solace PubSub+ topic using the WSO2 Integrator low-code visual designer. The integration connects to a Solace broker with a Jms MessageProducer connection and sends a message to a topic, with every connection parameter bound to a configurable variable.
Operations used:
- Send : Publishes a message to the configured Solace destination.
Architecture
Prerequisites
- A running Solace PubSub+ broker accessible over an SMF broker URL, with a message VPN, username, and password. See the Setup Guide.
Setting up the Solace (JMS) MessageProducer integration
New to WSO2 Integrator? Follow the Create a New Integration guide to set up your integration first, then return here to add the connector.
Adding the Jms MessageProducer connector
Step 1: Open the connector palette
- In the WSO2 Integrator sidebar, select + next to Connections to open the Add Connection palette.
- Enter
solace.jmsin the search field.
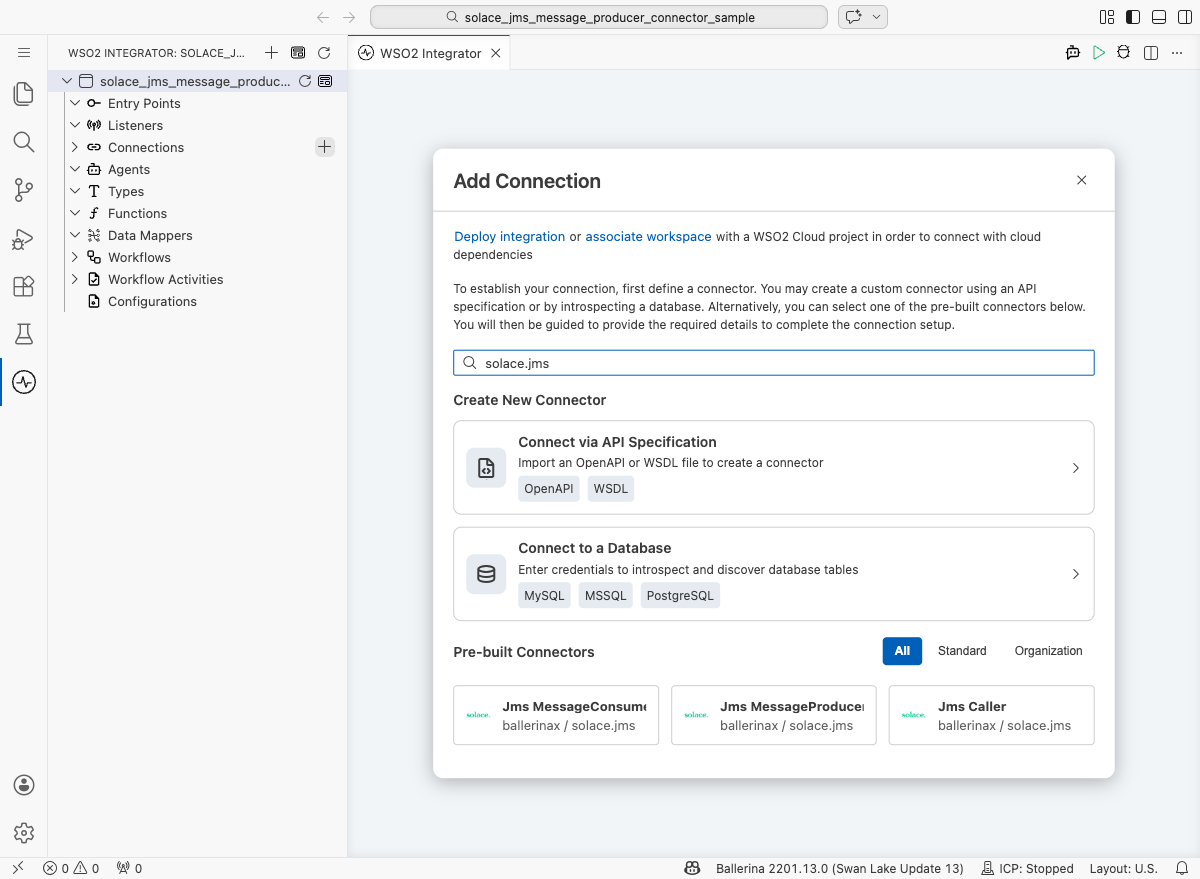
- Select the Jms MessageProducer card.
Configuring the Jms MessageProducer connection
Step 2: Bind the connection parameters to configurable variables
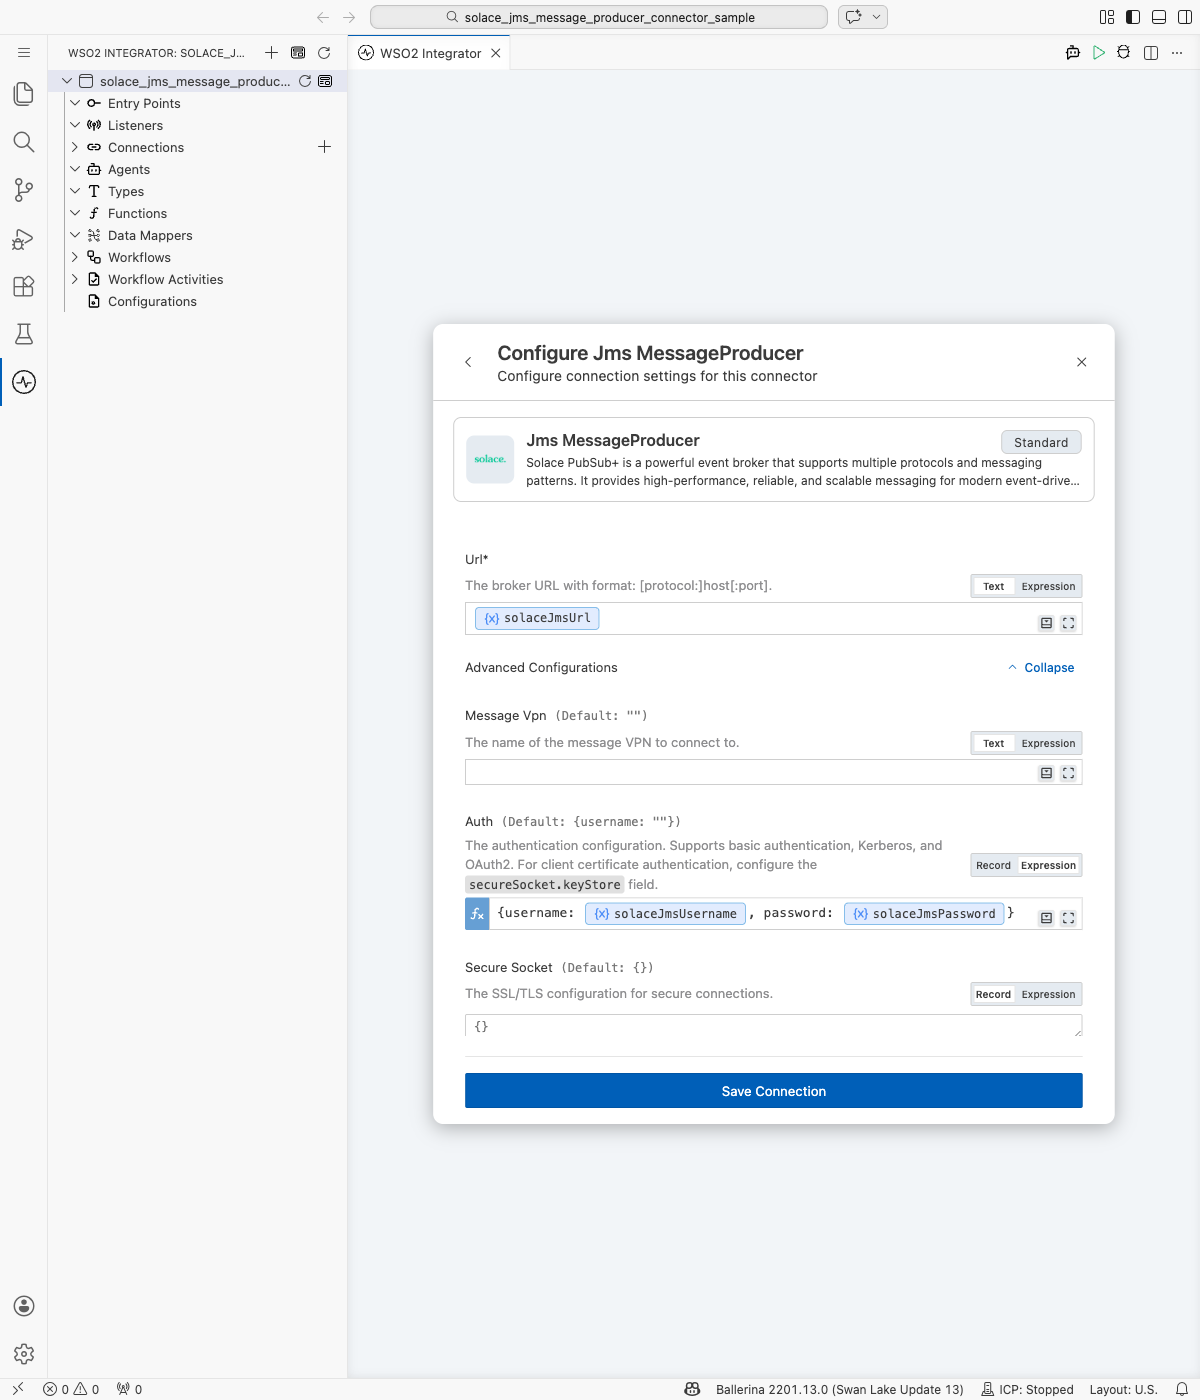
For each field, open its helper panel, select the Configurables tab, select + New Configurable, and save a configurable string variable for it.
- Url : The Solace broker URL in
smf://format, bound to a configurable variable. - Auth : The authentication configuration; enter
{username: solaceJmsUsername, password: solaceJmsPassword}in expression mode, referencing configurable variables for both fields.
Step 3: Save the connection
Select Save Connection. The Connections section now lists jmsMessageproducer as an available connection in the project.
Step 4: Set actual values for your configurables
- In the left panel, select Configurations.
- Enter a value for each configurable listed below.
- solaceJmsUrl (
string) : The Solace broker URL, for example,smf://localhost:55554. - solaceJmsUsername (
string) : Username for basic authentication. - solaceJmsPassword (
string) : Password for basic authentication. - solaceJmsTopicName (
string) : The topic to publish messages to.
Configuring the Jms MessageProducer Send operation
Step 5: Add an automation entry point
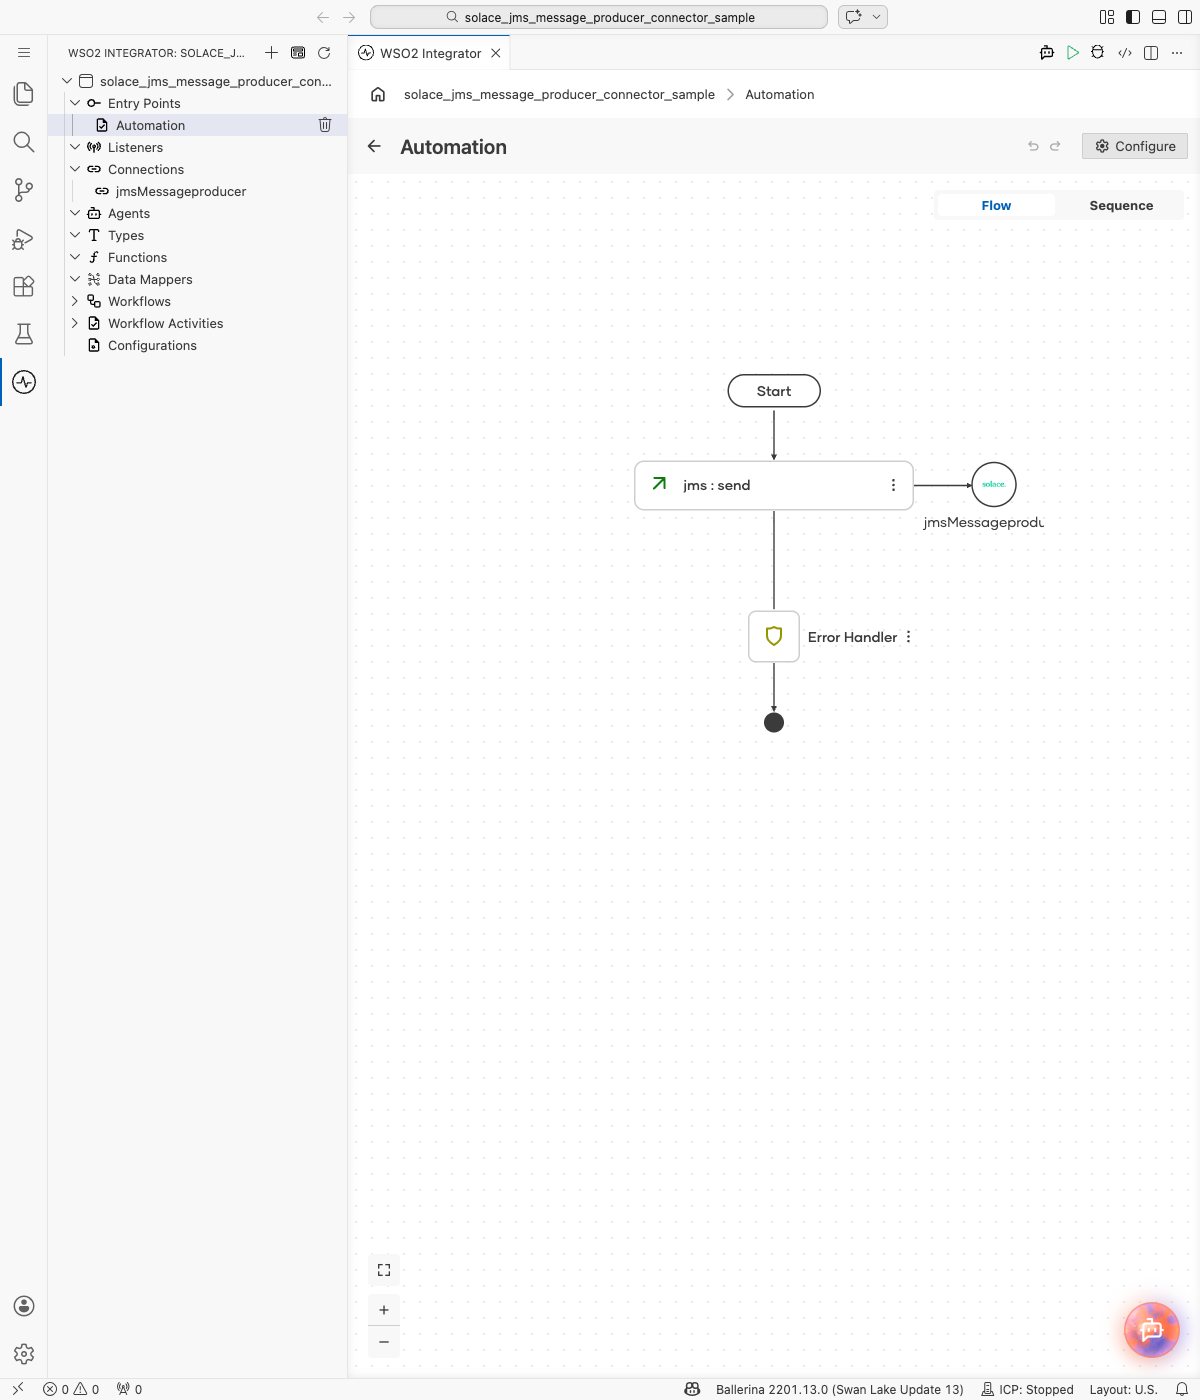
Select + next to Entry Points, select Automation, and select Create to accept the default name (main). The flow canvas opens with Start and Error Handler nodes.
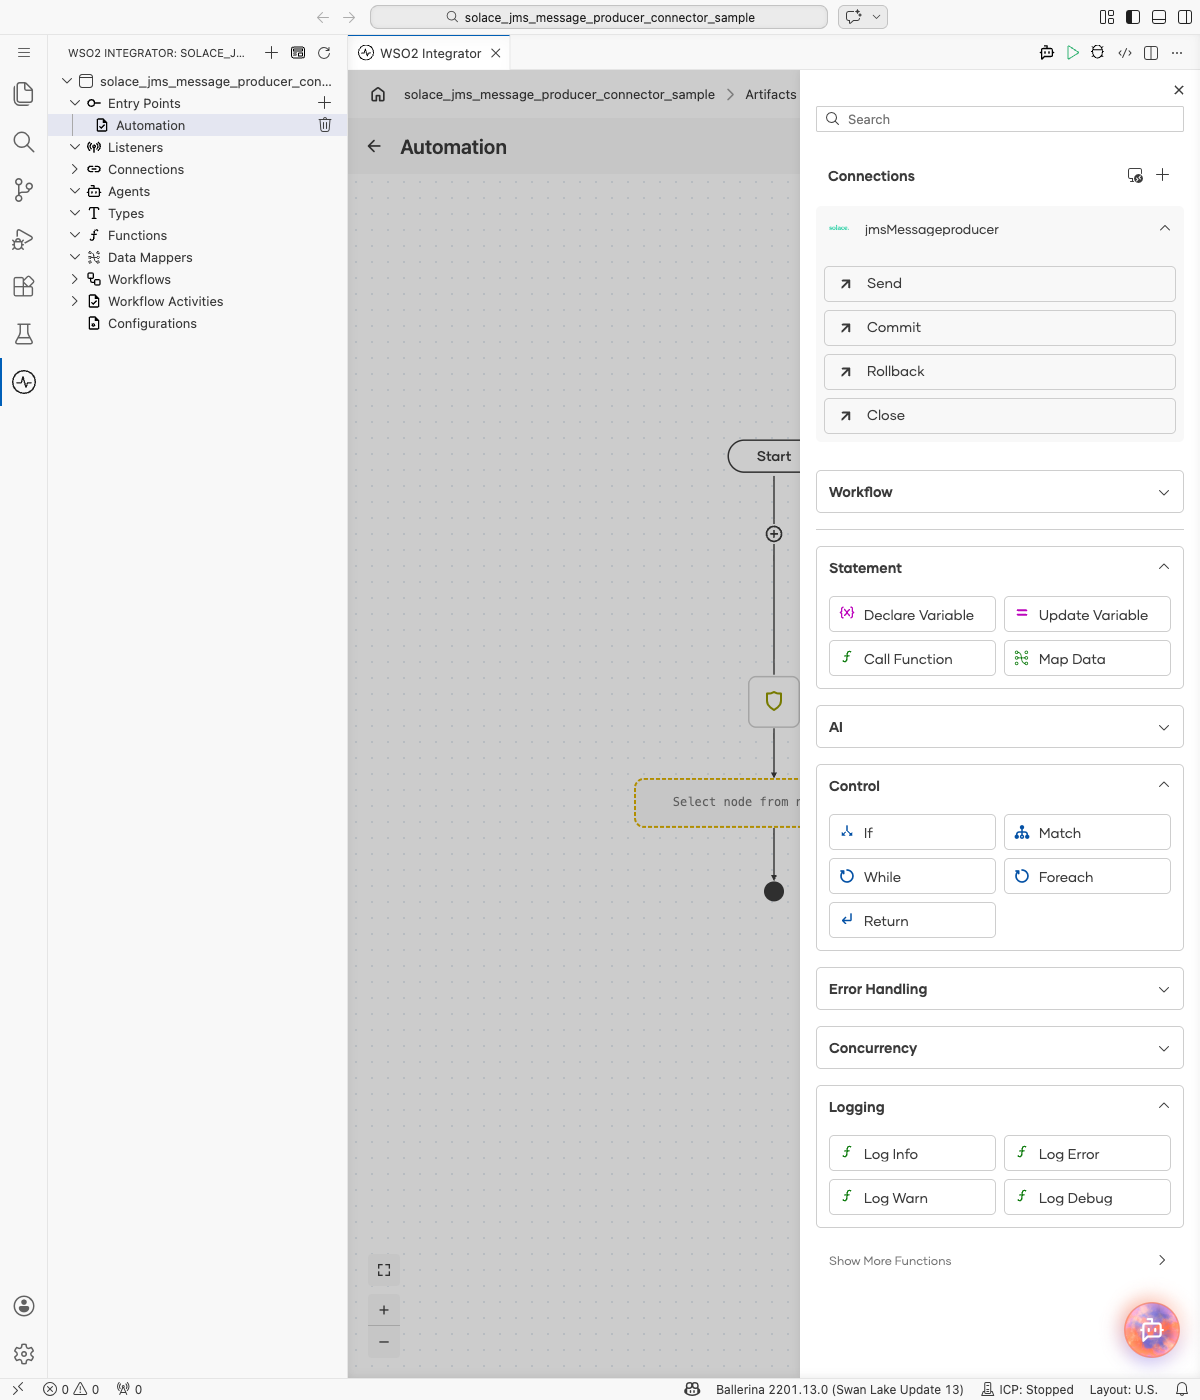
Step 6: Expand the connection and select Send
Select + on the flow canvas, then expand jmsMessageproducer under Connections to display its operations: Send, Commit, Rollback, and Close.
Step 7: Configure the Send operation
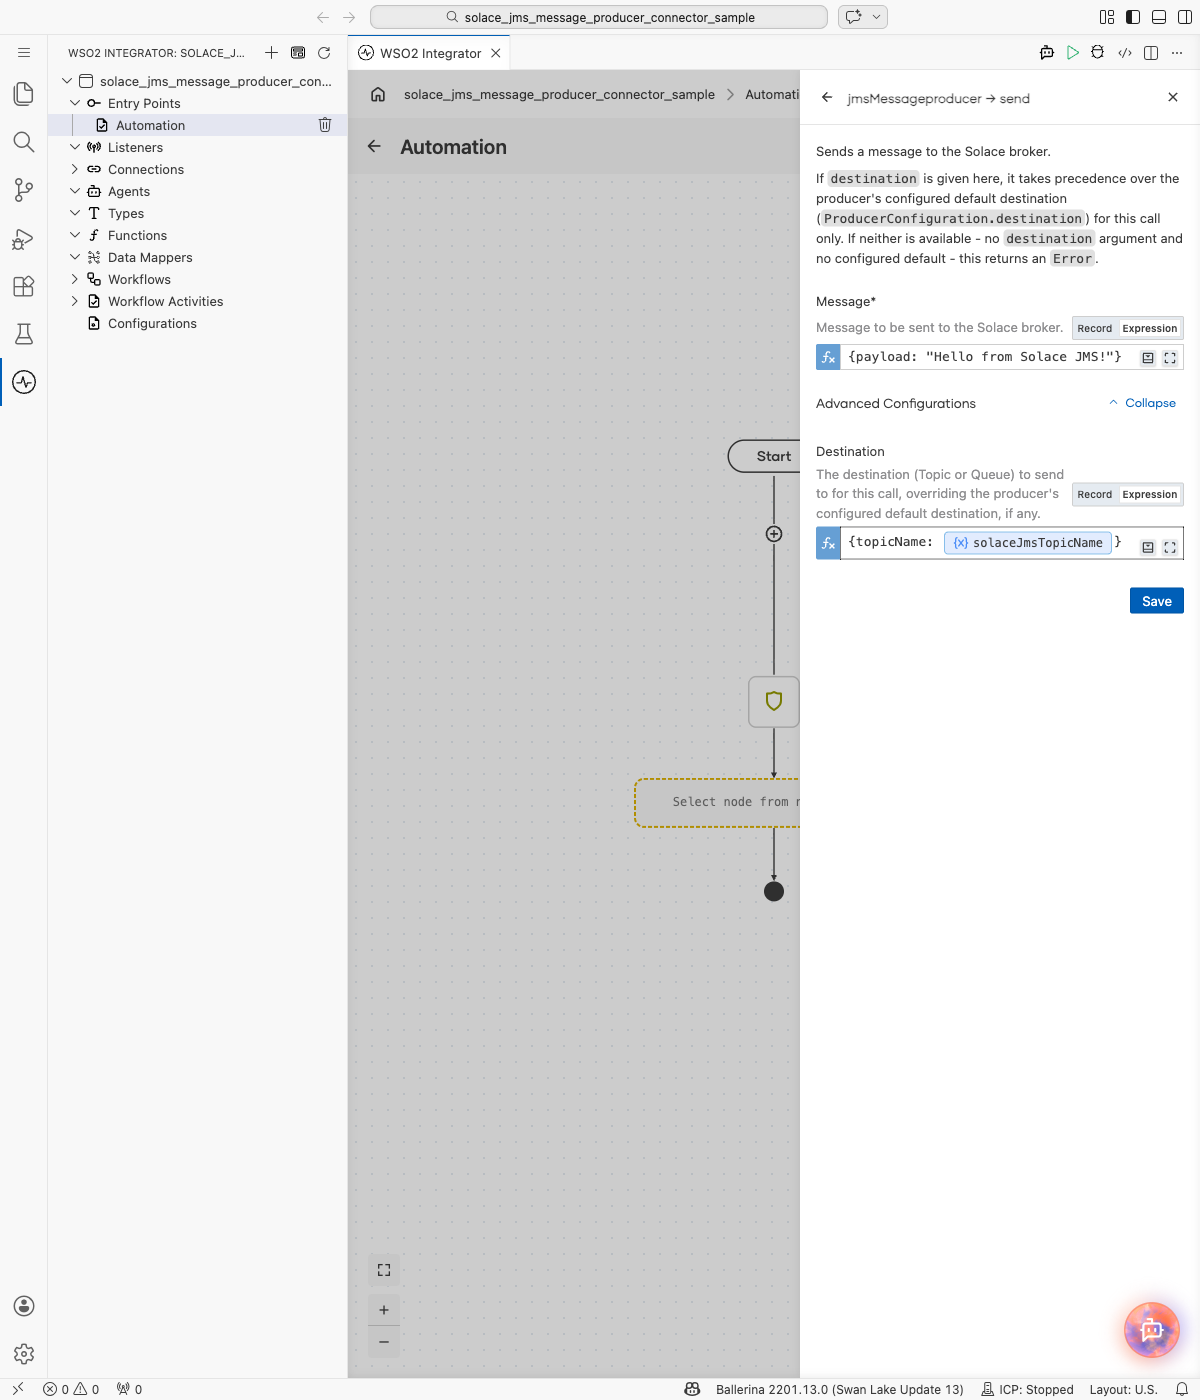
Select Send to open the jmsMessageproducer → send form, then enter:
- Message : A
jms:Messagerecord; set thepayloadfield to"Hello from Solace JMS!". - Destination (under Advanced Configurations) :
{topicName: solaceJmsTopicName}.
Step 8: Save the operation
Select Save. The jms : send node connects between Start and Error Handler in the automation flow.
Try it yourself
Try this sample in WSO2 Integration Platform.

Solace (JMS) Consumer Example
What you'll build
Build an integration that connects to a Solace broker with a Jms MessageConsumer connection and receives a single message from a queue. This example uses the WSO2 Integrator low-code canvas to configure the connection and the receive operation visually.
Operations used:
- Receive : Receives a message from the configured Solace queue, blocking until a message arrives or the call times out.
Architecture
Prerequisites
- A running Solace PubSub+ broker with a durable queue already provisioned. See the Setup Guide; durable queues aren't created automatically unless
enableDynamicDurablesistrue.
Setting up the Solace (JMS) MessageConsumer integration
New to WSO2 Integrator? Follow the Create a New Integration guide to set up your integration first, then return here to add the connector.
Adding the Jms MessageConsumer connector
Step 1: Open the connector palette
- In the WSO2 Integrator sidebar, select + next to Connections to open the Add Connection palette.
- Enter
solace.jmsin the search field.
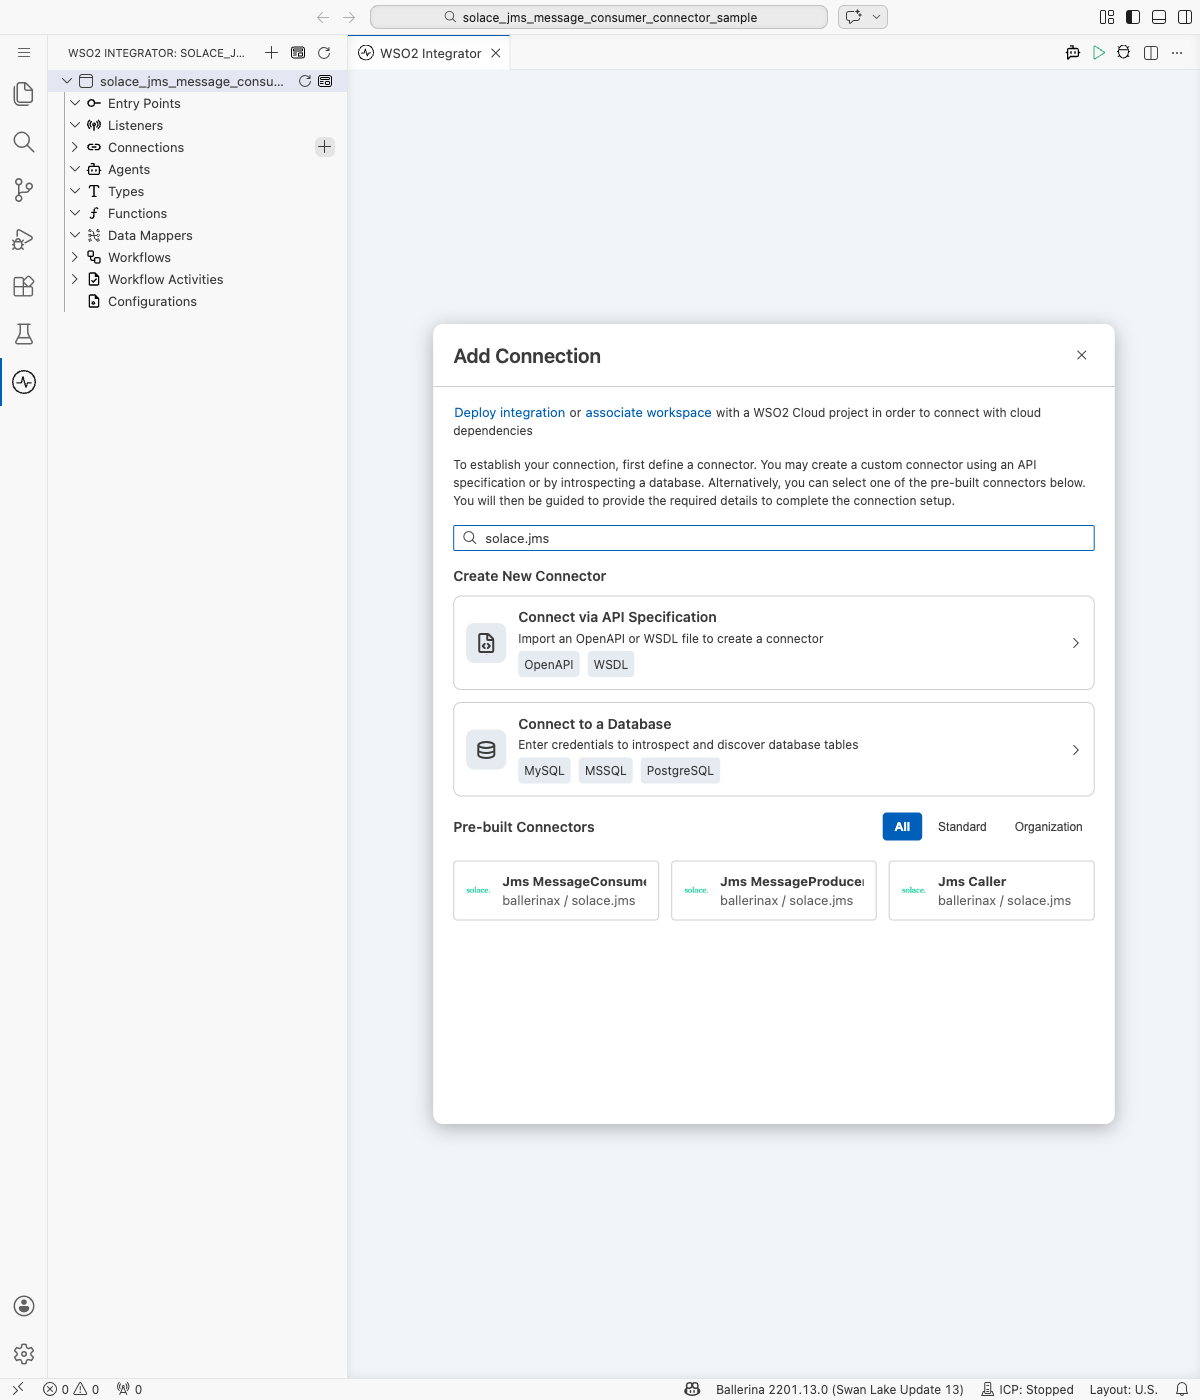
- Select the Jms MessageConsumer card.
Configuring the Jms MessageConsumer connection
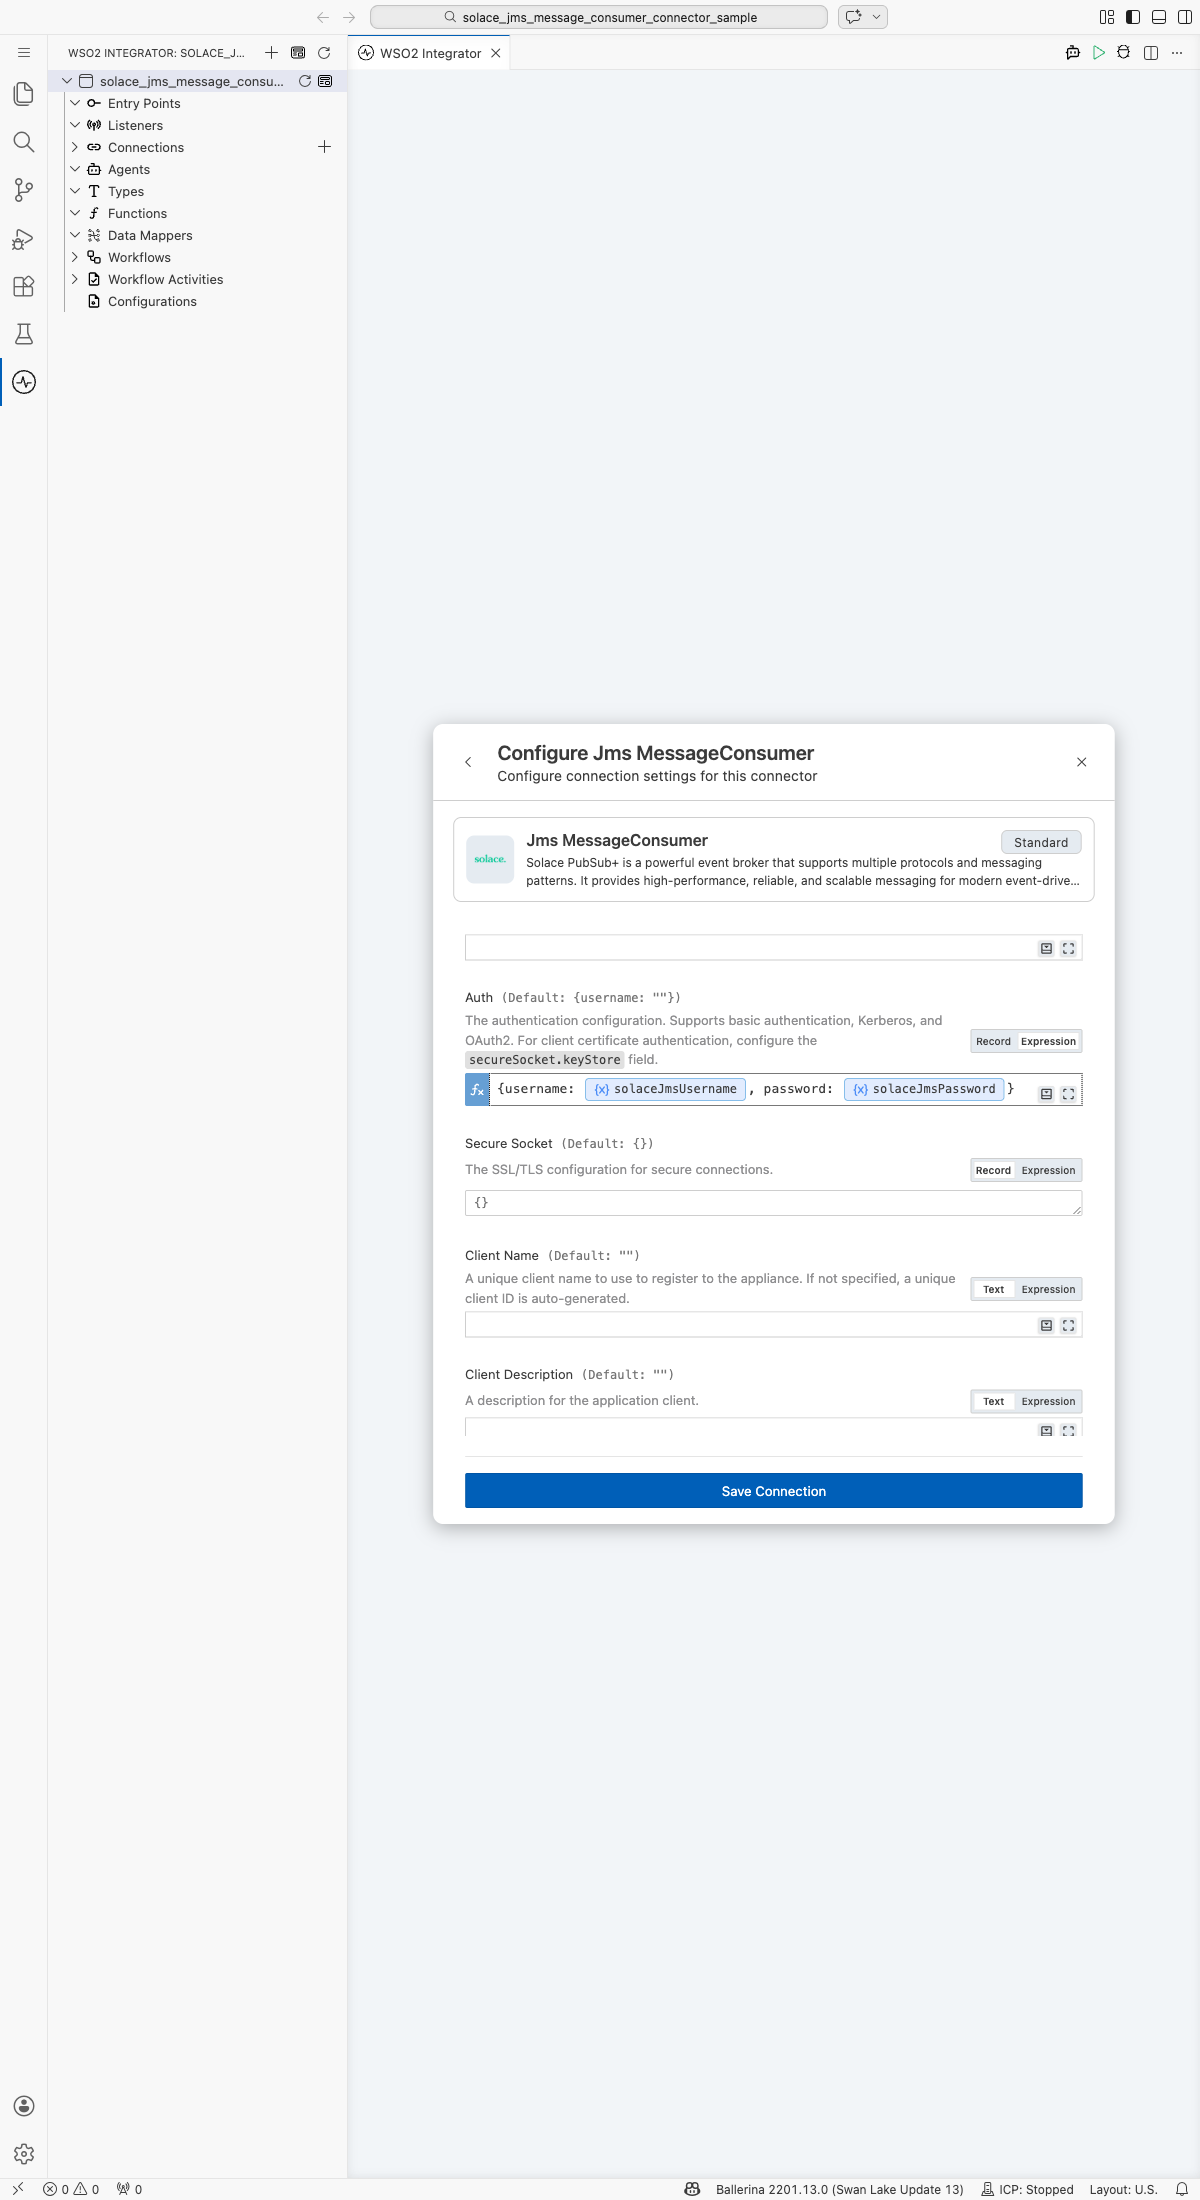
Step 2: Bind the connection parameters to configurable variables
- Url : The Solace broker URL, bound to a configurable variable.
- Auth : Enter
{username: solaceJmsUsername, password: solaceJmsPassword}in expression mode, referencing configurable variables for both fields. - Subscription Config : Enter
{queueName: solaceJmsQueueName}in expression mode, referencing a configurable variable for the queue name.
Step 3: Save the connection
Select Save Connection. The Connections section now lists jmsMessageconsumer as an available connection in the project.
Step 4: Set actual values for your configurables
- In the left panel, select Configurations.
- Enter a value for each configurable listed below.
- solaceJmsUrl (
string) : The Solace broker URL, for example,smf://localhost:55554. - solaceJmsUsername (
string) : Username for basic authentication. - solaceJmsPassword (
string) : Password for basic authentication. - solaceJmsQueueName (
string) : The queue to receive messages from. The queue must already exist on the broker.
Configuring the Jms MessageConsumer Receive operation
Step 5: Add an automation entry point
Select + next to Entry Points, select Automation, and select Create to accept the default name (main). The flow canvas opens with Start and Error Handler nodes.
Step 6: Expand the connection and select Receive
Select + on the flow canvas, then expand jmsMessageconsumer under Connections to display its operations: Receive, Receive No Wait, Ack, Commit, Rollback, Close, and Destination Name.
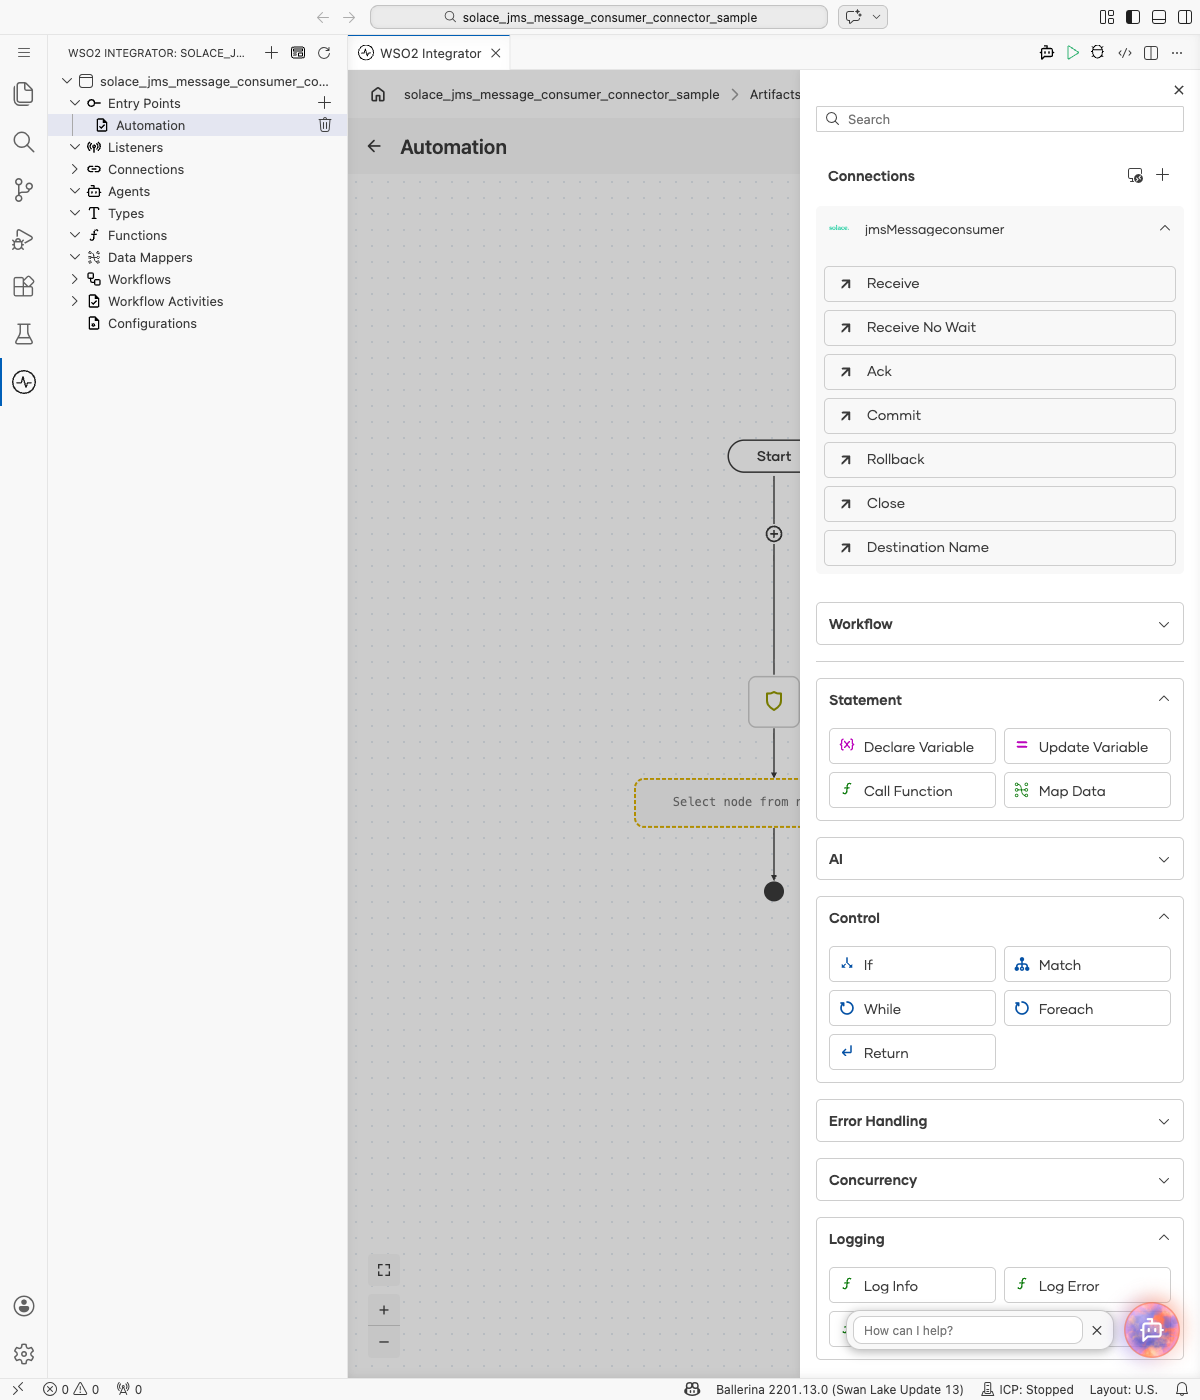
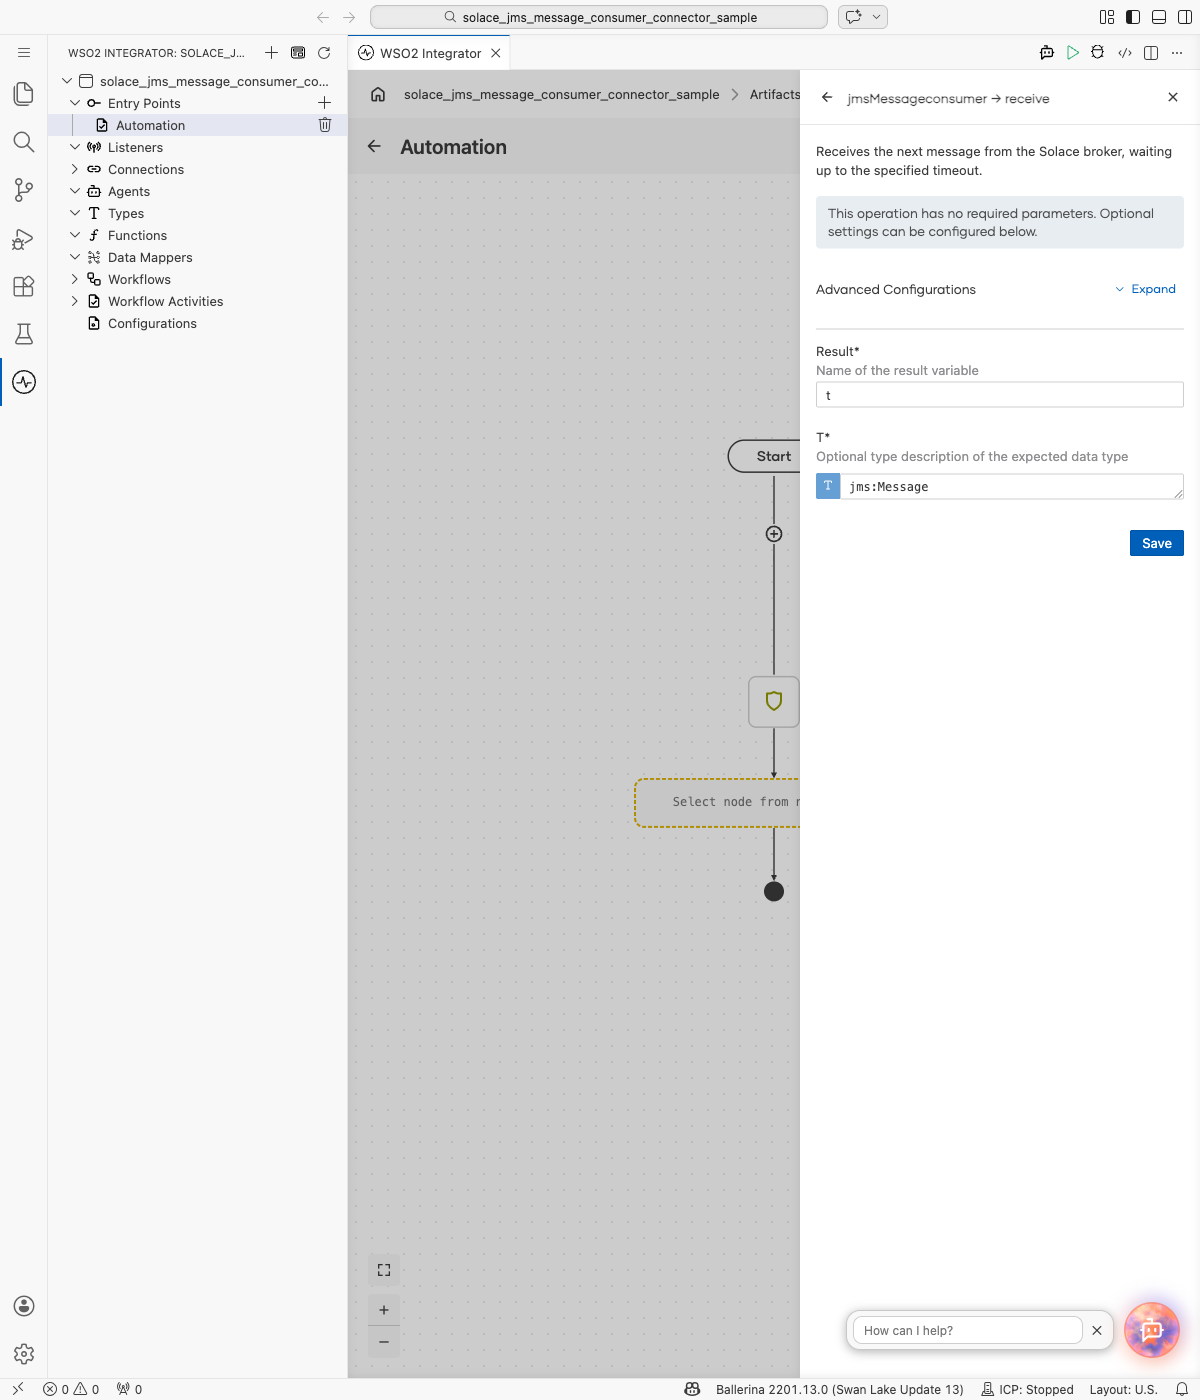
Select Receive to open the jmsMessageconsumer → receive form.
Step 7: Configure the Receive operation
This operation has no required parameters. Enter the following optional values:
- Result : The variable name to store the received message in.
- T : A narrowed message type, for example,
record {|*jms:Message; T payload;|}, to bind the payload to a specific type. Leave this asjms:Messageto receive the raw message.
Step 8: Save the operation and log the result
Select Save to add the jms : receive node to the flow.
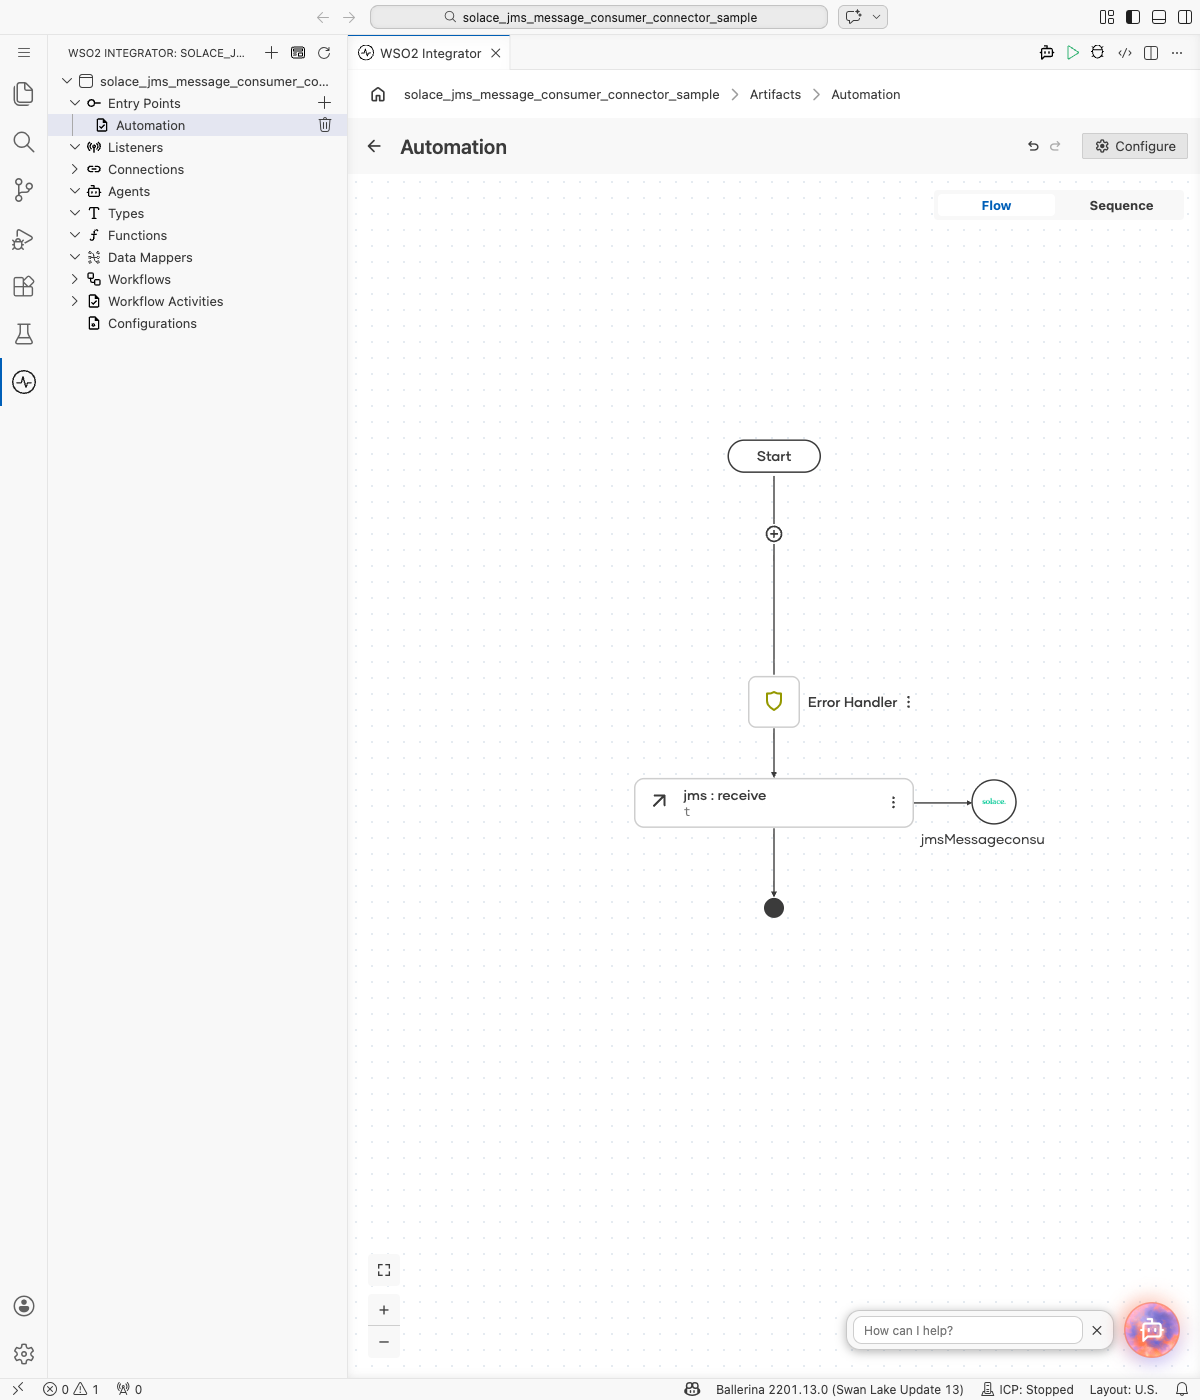
Add a Log Info step after it, logging the received message.
Try it yourself
Try this sample in WSO2 Integration Platform.
Solace (JMS) Trigger Example
What you'll build
Build an integration that reacts to messages arriving on a Solace queue. A jms:Listener subscribes to the queue and dispatches every message to an onMessage handler, which deserializes the payload into an OrderMessage record, logs it as a JSON string, and acknowledges it.
Operations used:
- onMessage : Invoked when a message is received on the subscribed queue.
Architecture
Prerequisites
- A running Solace PubSub+ broker with a durable queue already provisioned, and a client username with permission to consume from it. See the Setup Guide.
Setting up the Solace (JMS) integration
New to WSO2 Integrator? Follow the Create a New Integration guide to set up your integration first, then return here to add the trigger.
Adding the Solace (JMS) trigger
Step 1: Open the Artifacts palette and configure the listener
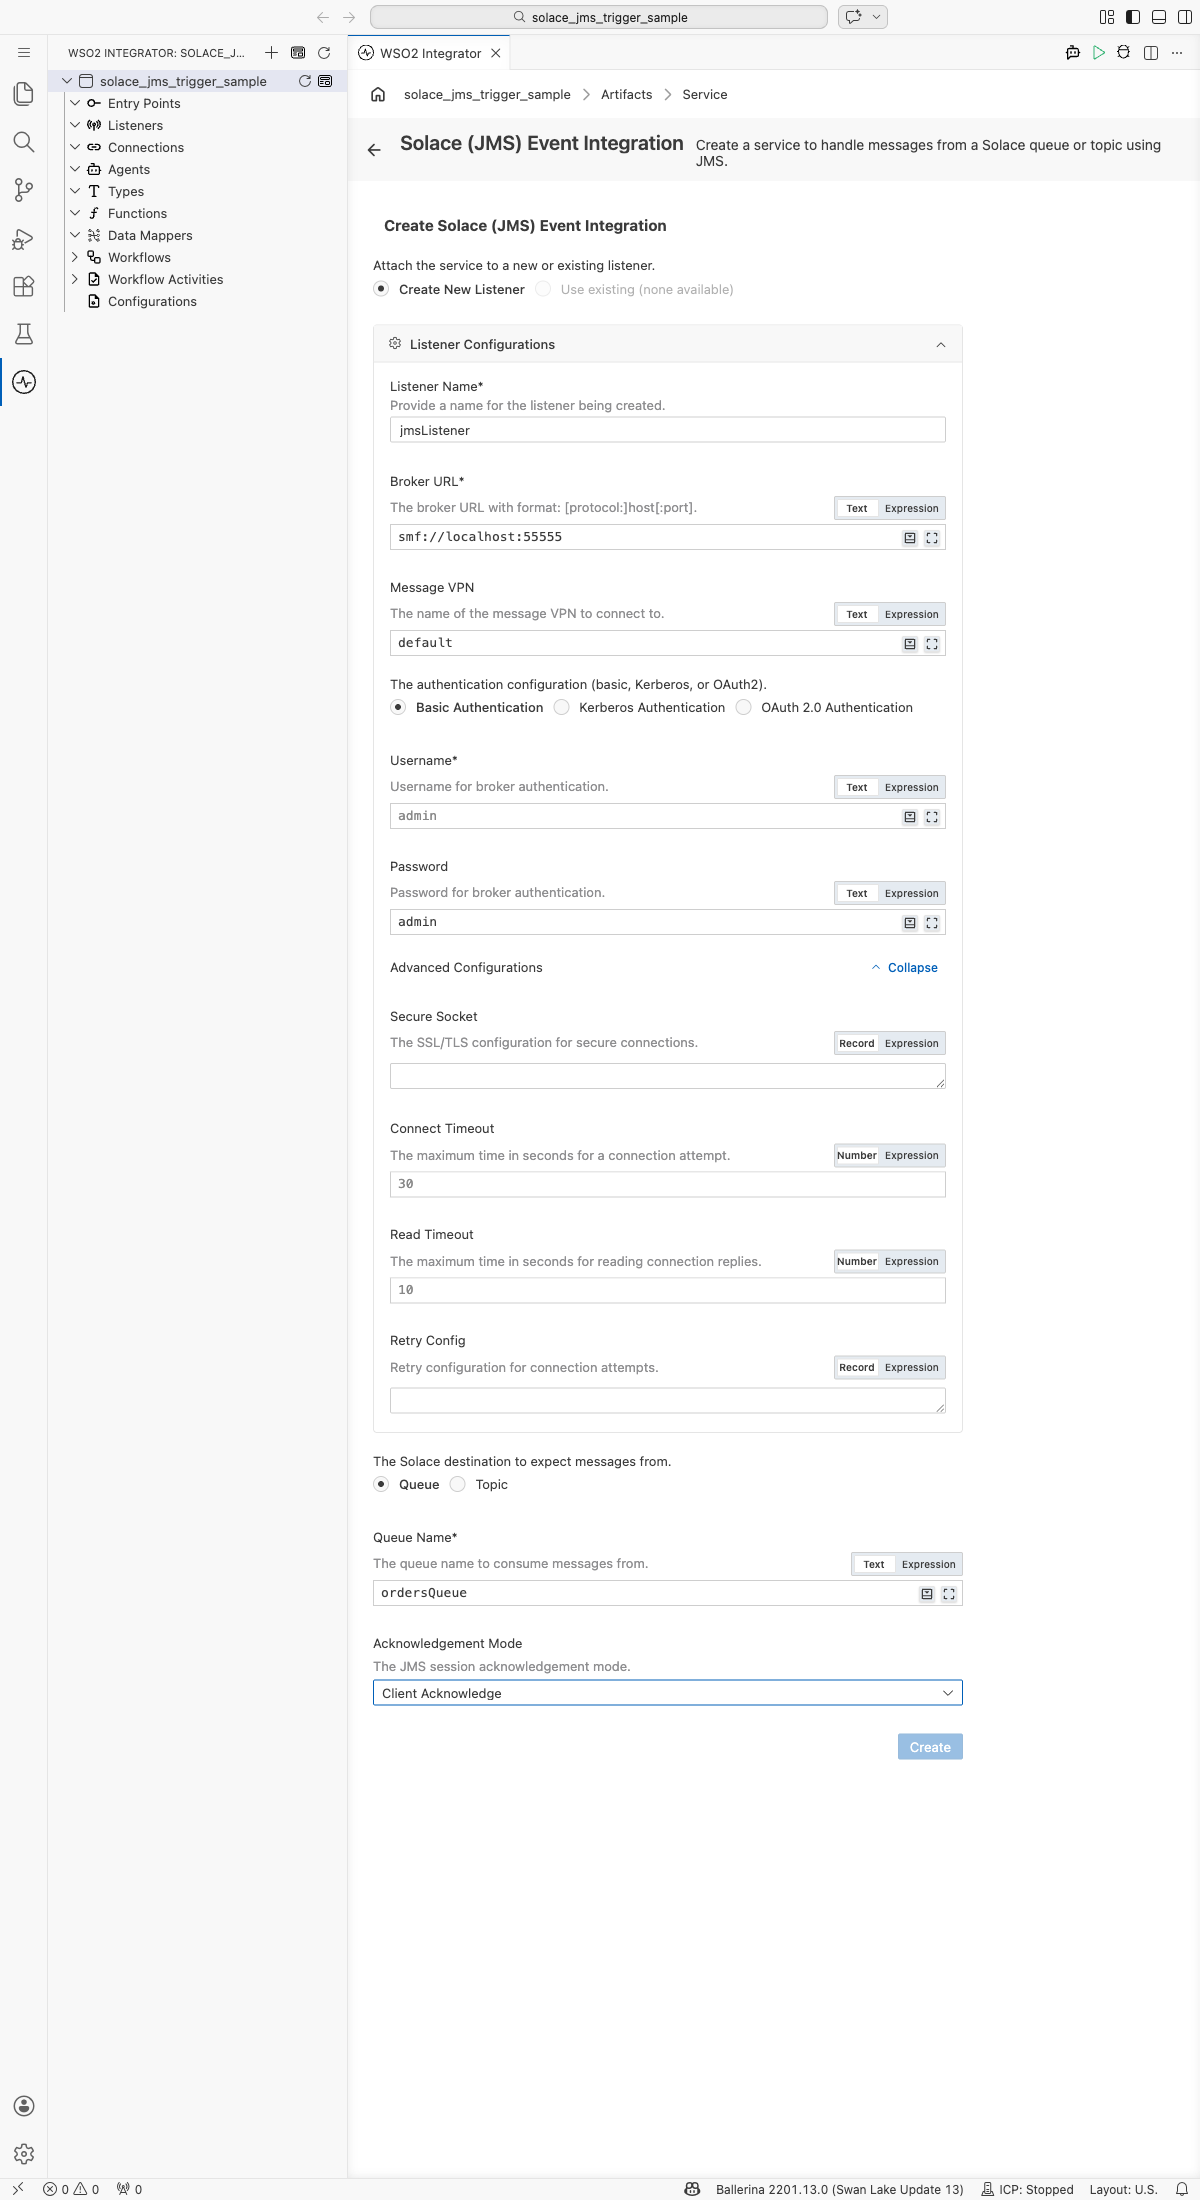
Select + Add Artifact, then select the Solace (JMS) card in the Event Integration category. The Create Solace (JMS) Event Integration form opens.
For each field, open its helper panel, select the Configurables tab, select + New Configurable, and save a configurable string variable for it.
- Listener Name : A name for the listener, for example,
jmsListener. - Broker URL : The Solace broker URL in
smf://format, bound to a configurable variable. - Message VPN : The message VPN to connect to. Defaults to
default. - Basic Authentication : Select this option, then bind Username and Password to configurable variables.
Step 2: Configure the destination and acknowledgement mode
Scroll down and configure the remaining fields:
- Queue : Select this destination type.
- Queue Name : The queue to consume messages from, bound to a configurable variable. The queue must already exist on the broker.
- Acknowledgement Mode : Select Client Acknowledge so the handler can acknowledge each message explicitly.
Step 3: Set actual values for your configurations
- In the left panel, select Configurations.
- Enter a value for each configurable listed below.
- solaceJmsUrl (
string) : The Solace broker URL. - solaceJmsUsername (
string) : The client username with permission to consume from the queue. - solaceJmsPassword (
string) : The password for the client username. - solaceJmsQueueName (
string) : The name of the queue to consume messages from.
Step 4: Create the listener and service
Select Create. The listener and service are registered, and the Service view opens with an empty Event Handlers list.
Handling Solace (JMS) events
Step 5: Add the onMessage handler
Select + Add Handler, then select onMessage. In the New onMessage Configuration panel, select Define Value, then select the Create Type Schema tab. Enter OrderMessage as the type name and add an orderId field of type string. Select Save to create the type, then select Save again to open the flow canvas for the onMessage remote function.
Step 6: Log and acknowledge the received message
Add a Log Info step to the flow, setting its Msg field to message.toJsonString(), then add an Ack step that calls ack on the caller connection to acknowledge the message.
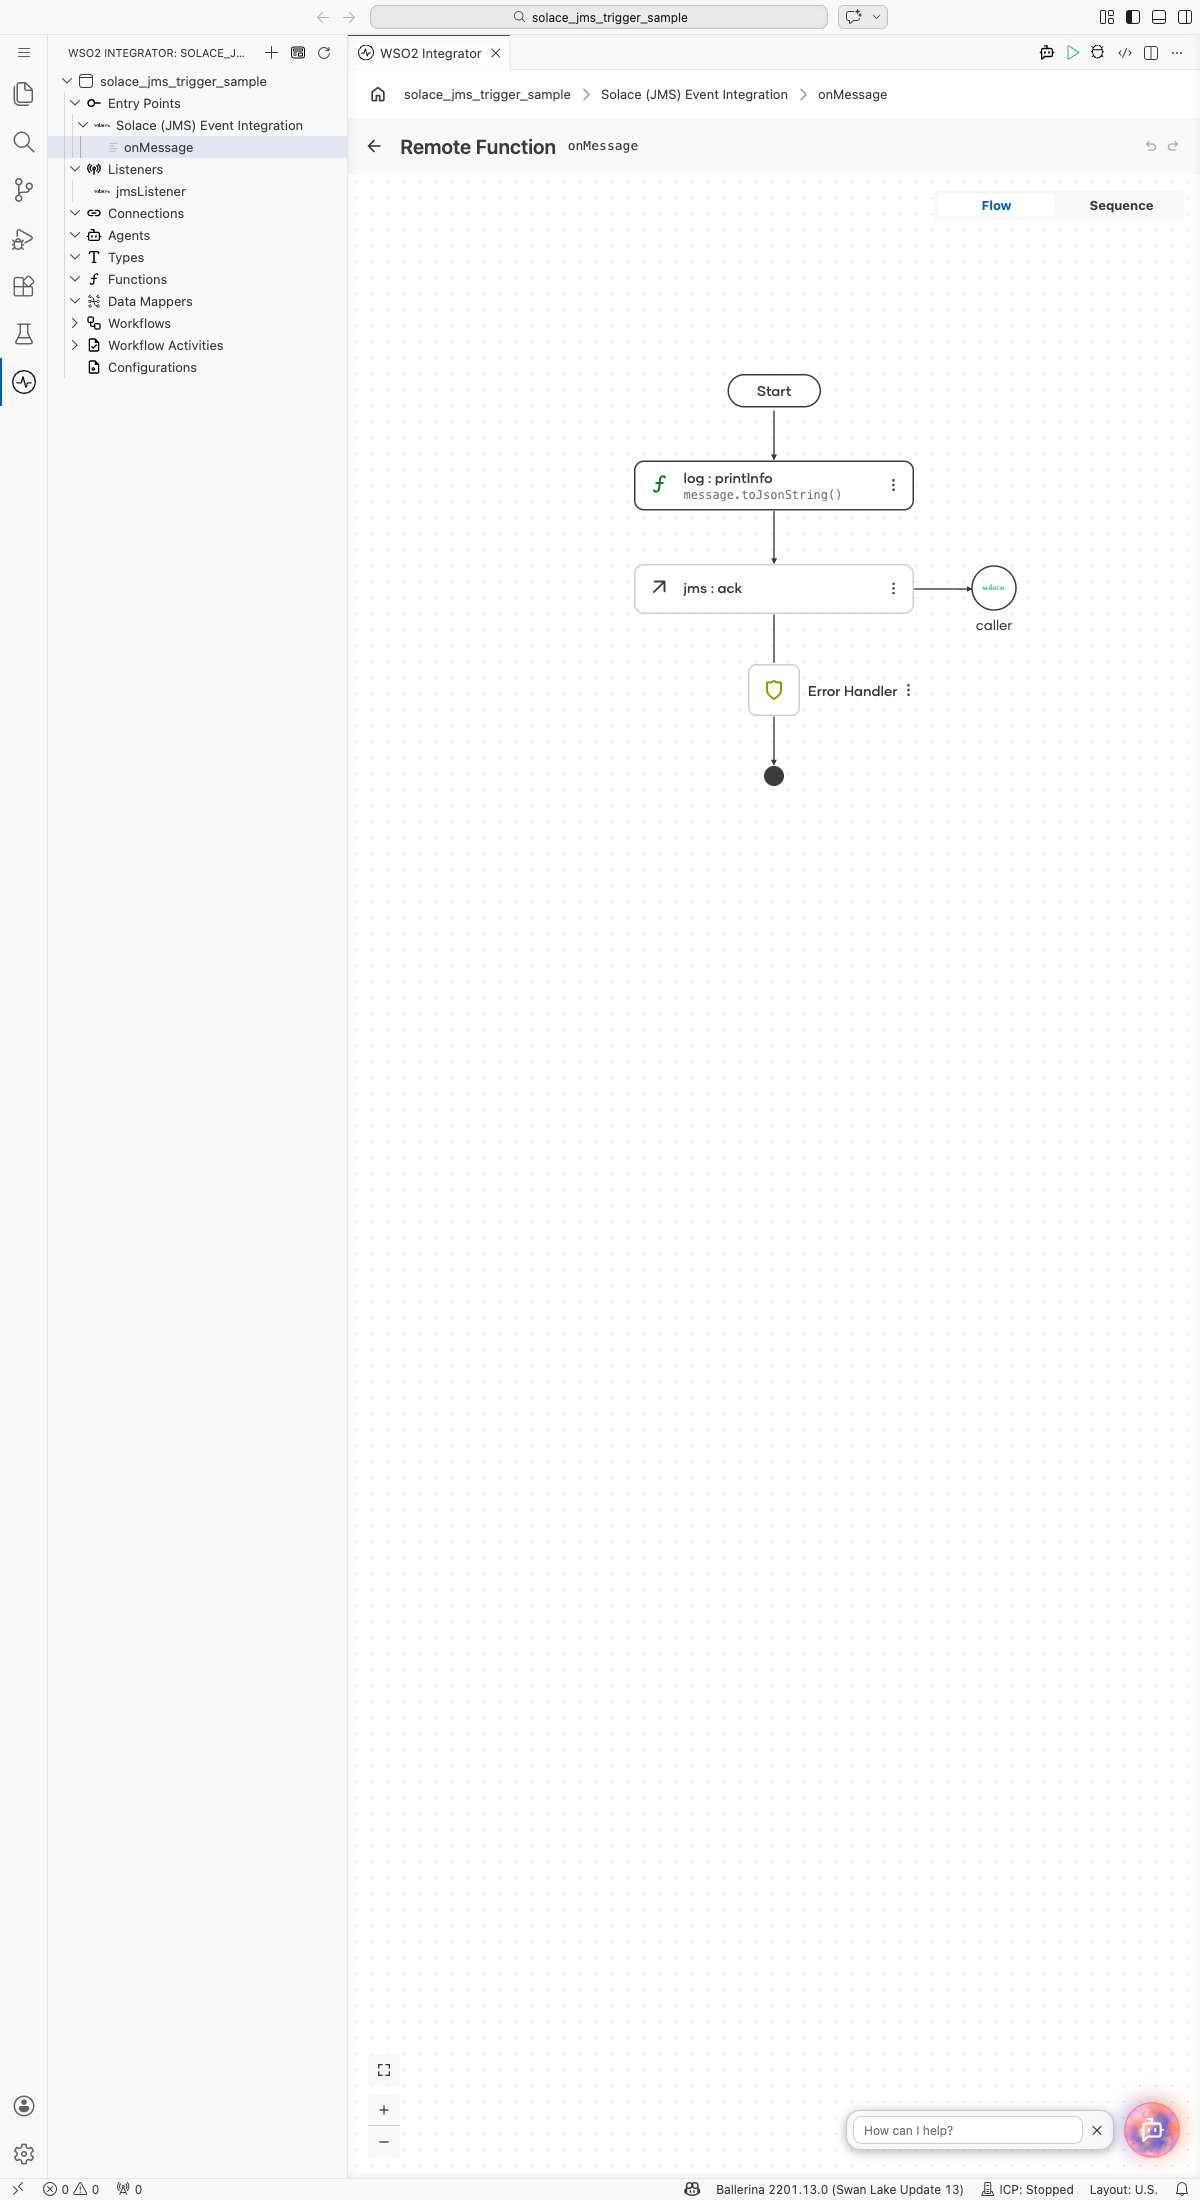
Select Save, then select the back arrow to return to the Service view.
Step 7: Confirm the handler is registered
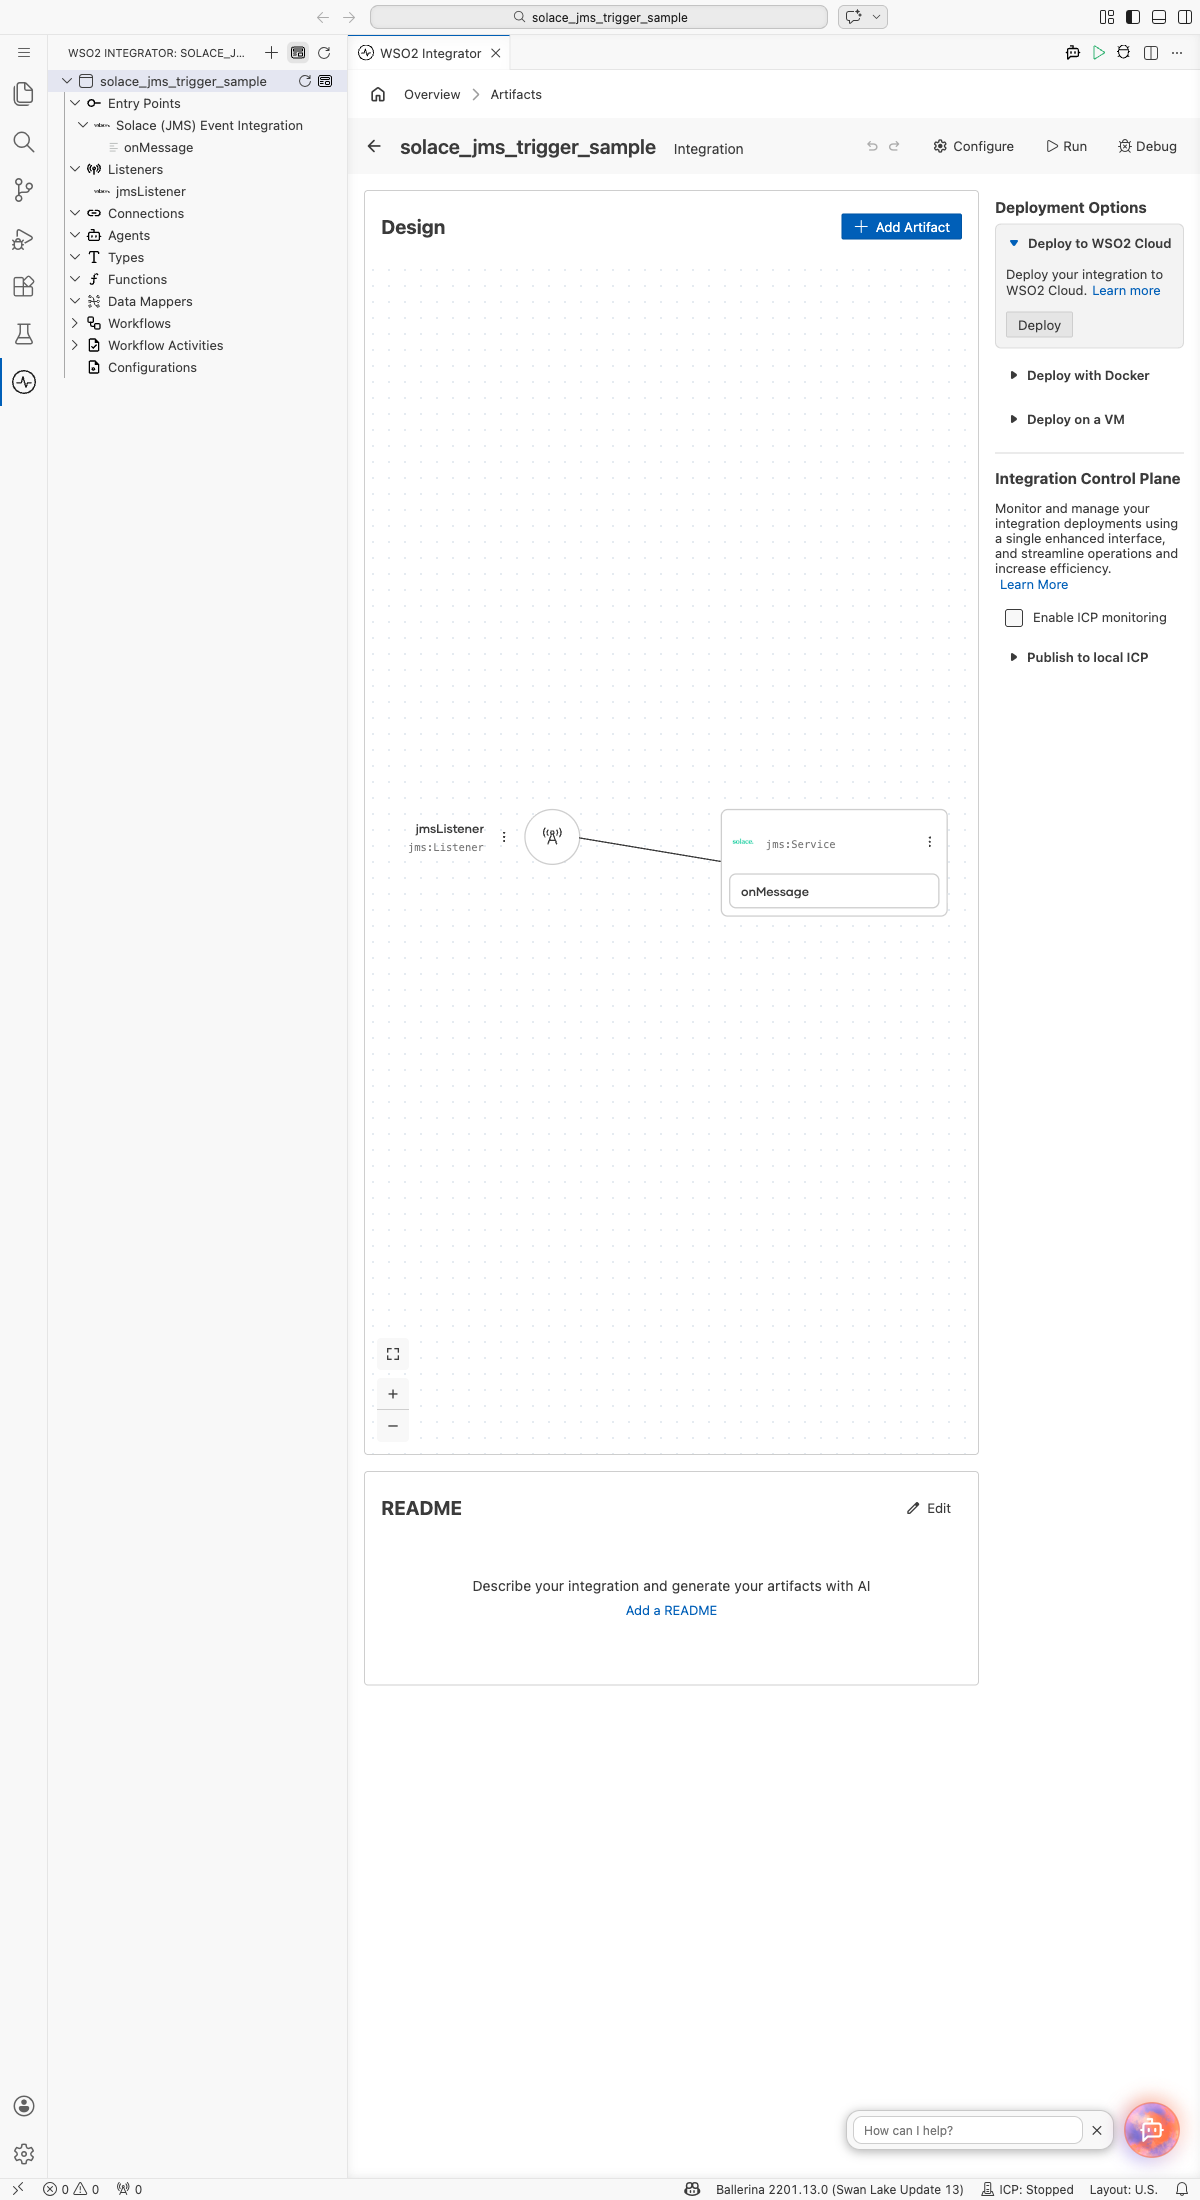
The design canvas now shows jmsListener connected to the jms:Service, with the onMessage handler registered.
Running the integration
Step 8: Run the integration and publish a test message
- Select Run to start the integration, and wait for the listener to connect to the broker.
- Publish a test message to the same queue, for example, with a Jms MessageProducer integration built from the producer example, or from the broker's Try Me tool in PubSub+ Manager.
- Confirm the message payload appears in the integration's log output as a JSON string.
Try it yourself
Try this sample in WSO2 Integration Platform.
More code examples
The solace.jms connector provides practical examples illustrating usage in various scenarios. Explore these examples, covering the following use cases:
-
Order Fulfillment - Send orders to a queue and process them with
CLIENT_ACKNOWLEDGEmode. Shows point-to-point (queue) messaging where a message is only acknowledged once it has been fulfilled successfully, so a worker that crashes beforehand picks it back up on restart. -
Live Price Alerts - Publish stock price updates to hierarchical topics and raise alerts only for significant moves. Shows publish/subscribe (topic) messaging with topic wildcards and a JMS message selector.
-
Transactional Inventory Sync - Apply inventory deltas from a queue within a
SESSION_TRANSACTEDsession, rolling back and safely discarding a bad update instead of corrupting inventory state. Shows transacted sessions withcommit/rollback.