Example
Azure Blob Storage example
What you'll build
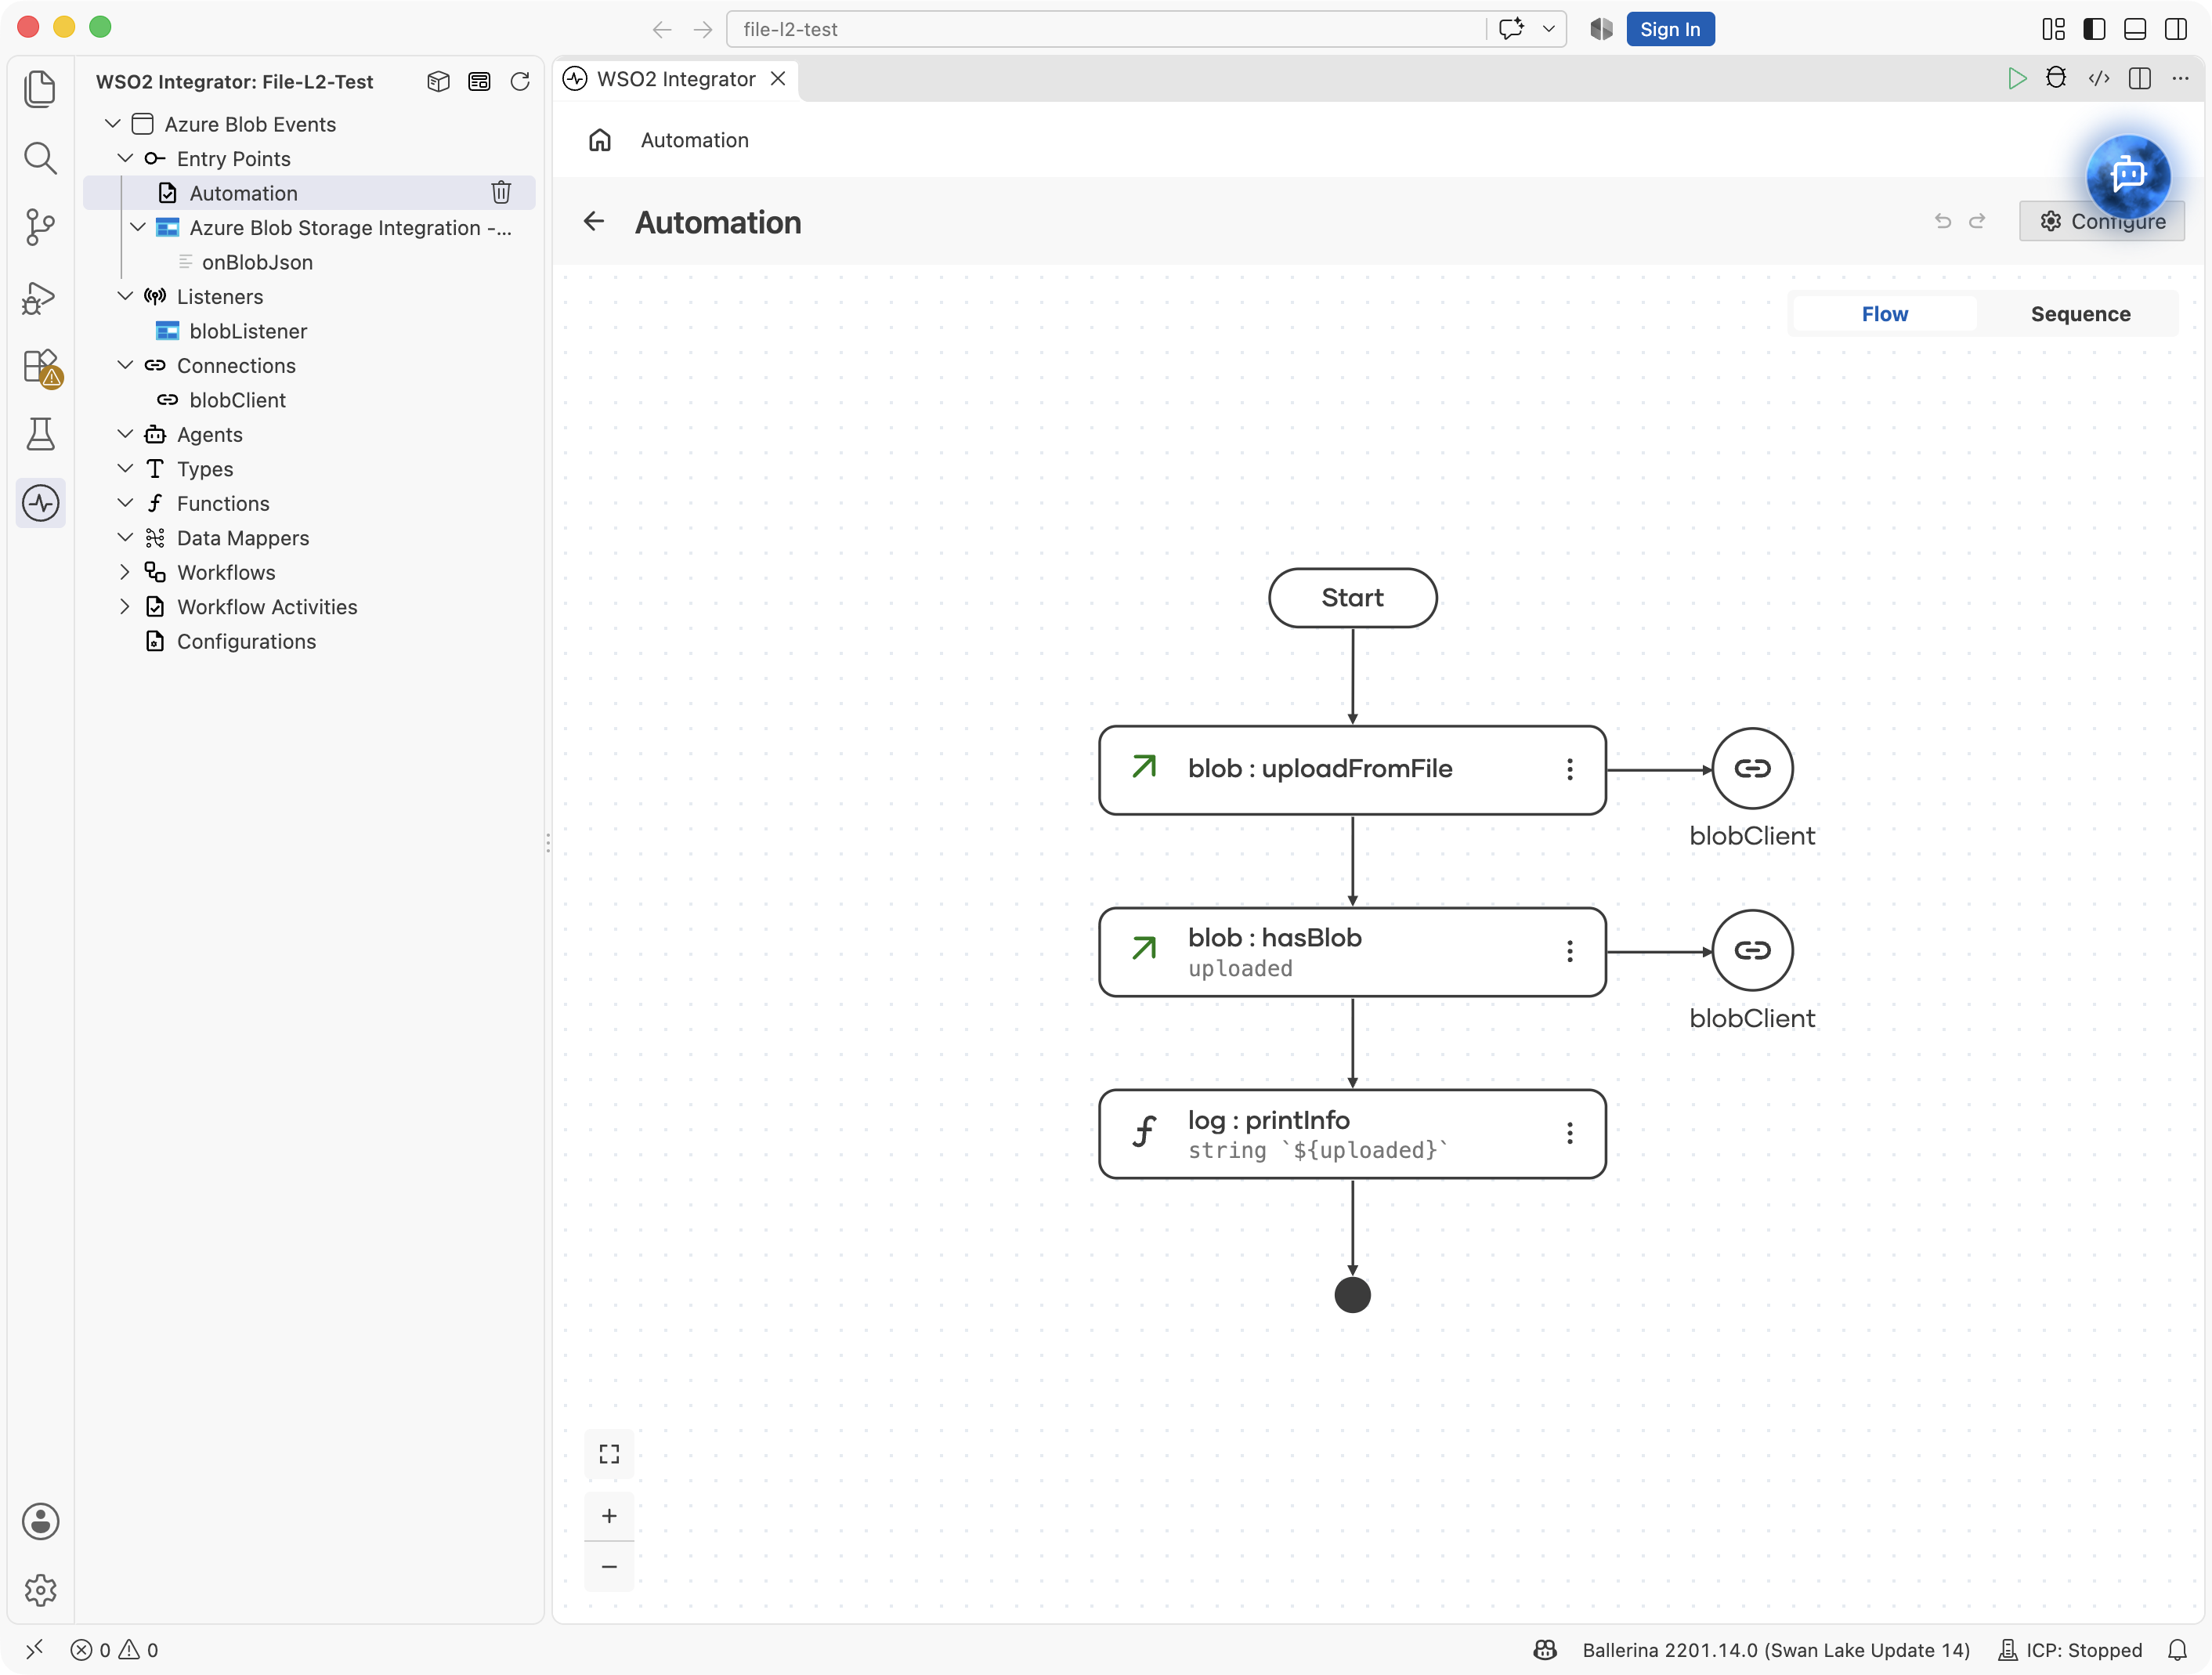
Build a WSO2 Integrator automation that connects to an Azure Blob Storage container, uploads a local report with the uploadFromFile operation, and confirms the upload with the hasBlob operation. The workflow uses configurable variables to manage the Azure credentials securely.
Operations used:
- uploadFromFile : Uploads a local file to a path in the container.
- hasBlob : Checks whether a blob exists at a container path.
Architecture
Prerequisites
- An Azure storage account with a container (see the Setup Guide)
- The storage account name and an access key
Setting up the integration
New to WSO2 Integrator? Follow the Create a New Integration guide to set up your integration first, then return here to add the connector.
Step 1: Add an Automation entry point
A new integration starts with no artifacts, so the sidebar stays empty and connections cannot be added yet. Create the entry point first:
- Select + Add Artifact on the canvas toolbar.
- Under Automation, select the Automation tile.
- Select Create Integration. No additional configuration is needed.
An Automation entry point appears in the sidebar under Entry Points, and the design view shows the automation node. Selecting the node opens the automation flow editor with a Start node.
Creating the configurable variables
The connection form references configurable variables for the container name and credentials, so create the variables first.
Step 2: Create configurable variables
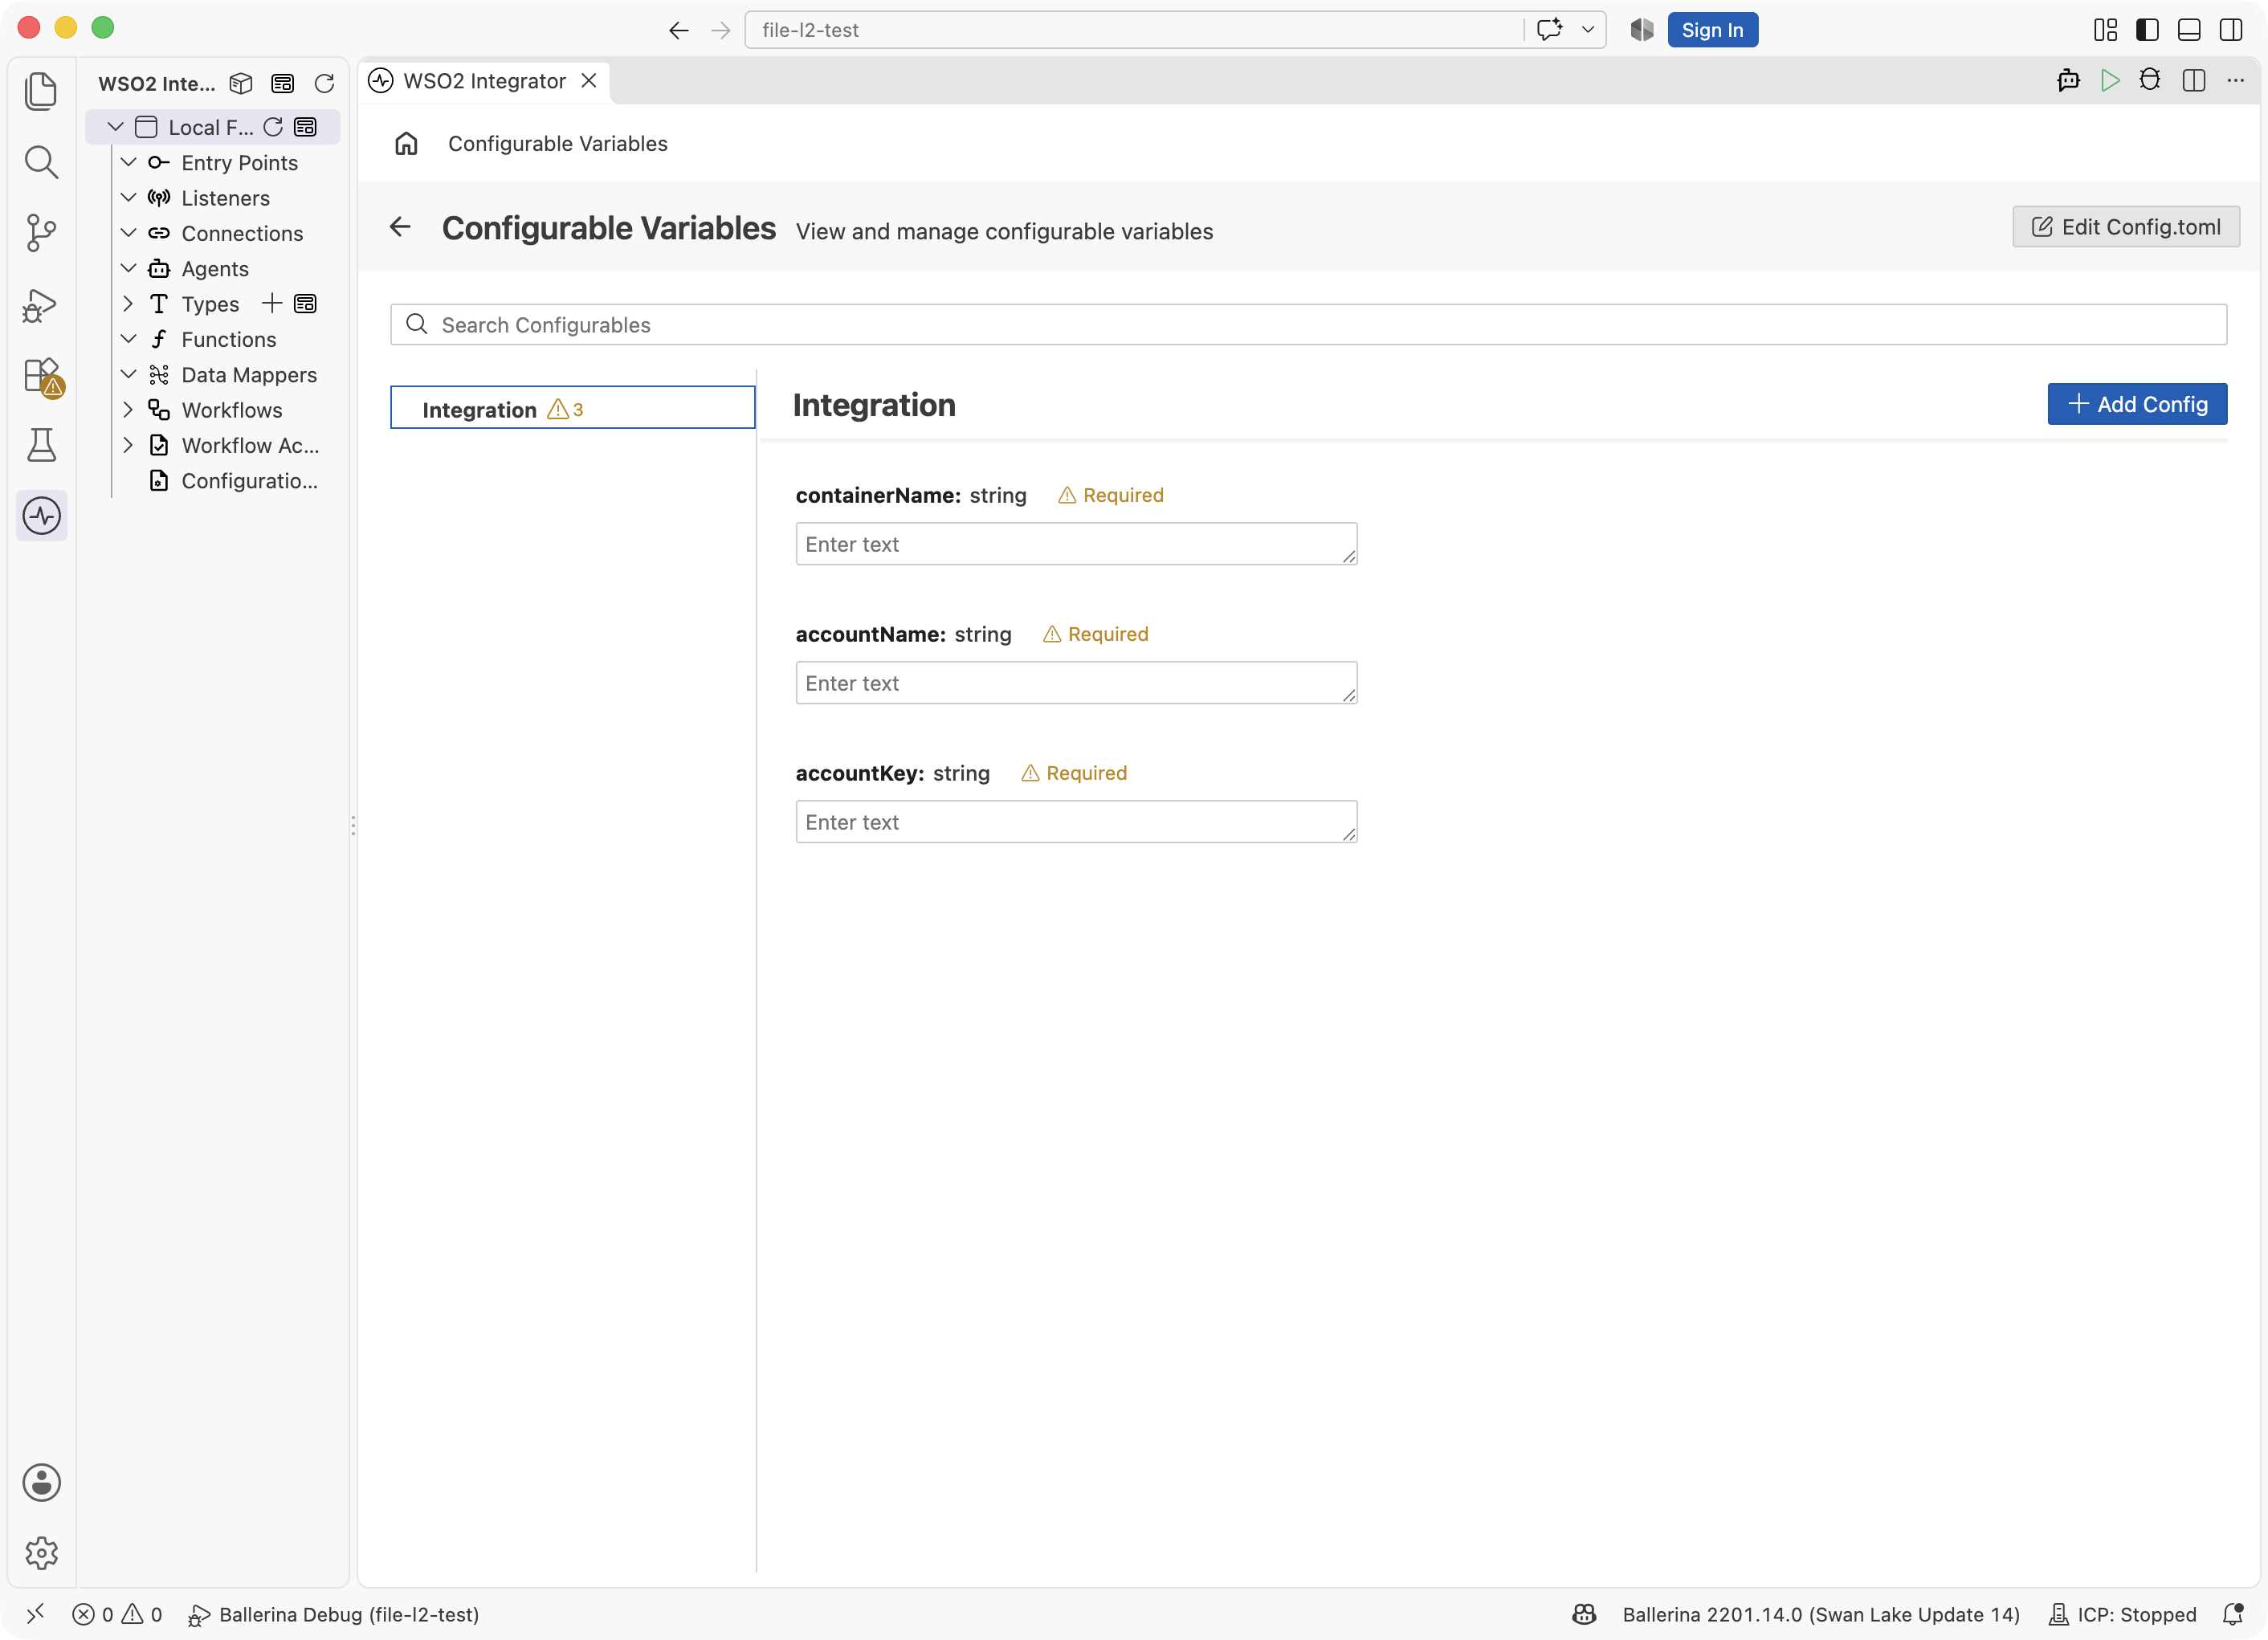
- In the sidebar, select Configurations to open the Configurable Variables view.
- Select + Add Config, enter the Variable Name, keep the Variable Type as
string, leave Default Value empty, and select Save. Repeat for each variable listed below.
- accountName (string) : The Azure storage account name
- accountKey (string) : An access key of the storage account
- containerName (string) : The name of the container to bind the client to
Adding the Azure Blob Storage connector
Select Add Connection in the WSO2 Integrator sidebar to open the connector palette.
Step 3: Open the connector palette and select the container client
- In the WSO2 Integrator sidebar, expand Connections and select the + button next to it.
- In the connector palette search box, enter
azure.storage.blob. - The palette lists three cards under
ballerinax / azure.storage.blob: Blob (the container-scoped client this example uses), Blob Admin (the account-levelAdminClient), and Blob Caller (passed to trigger handlers, not used as a connection). Select the Blob card.

Configuring the Azure Blob Storage connection
Step 4: Bind connection parameters to the configurable variables
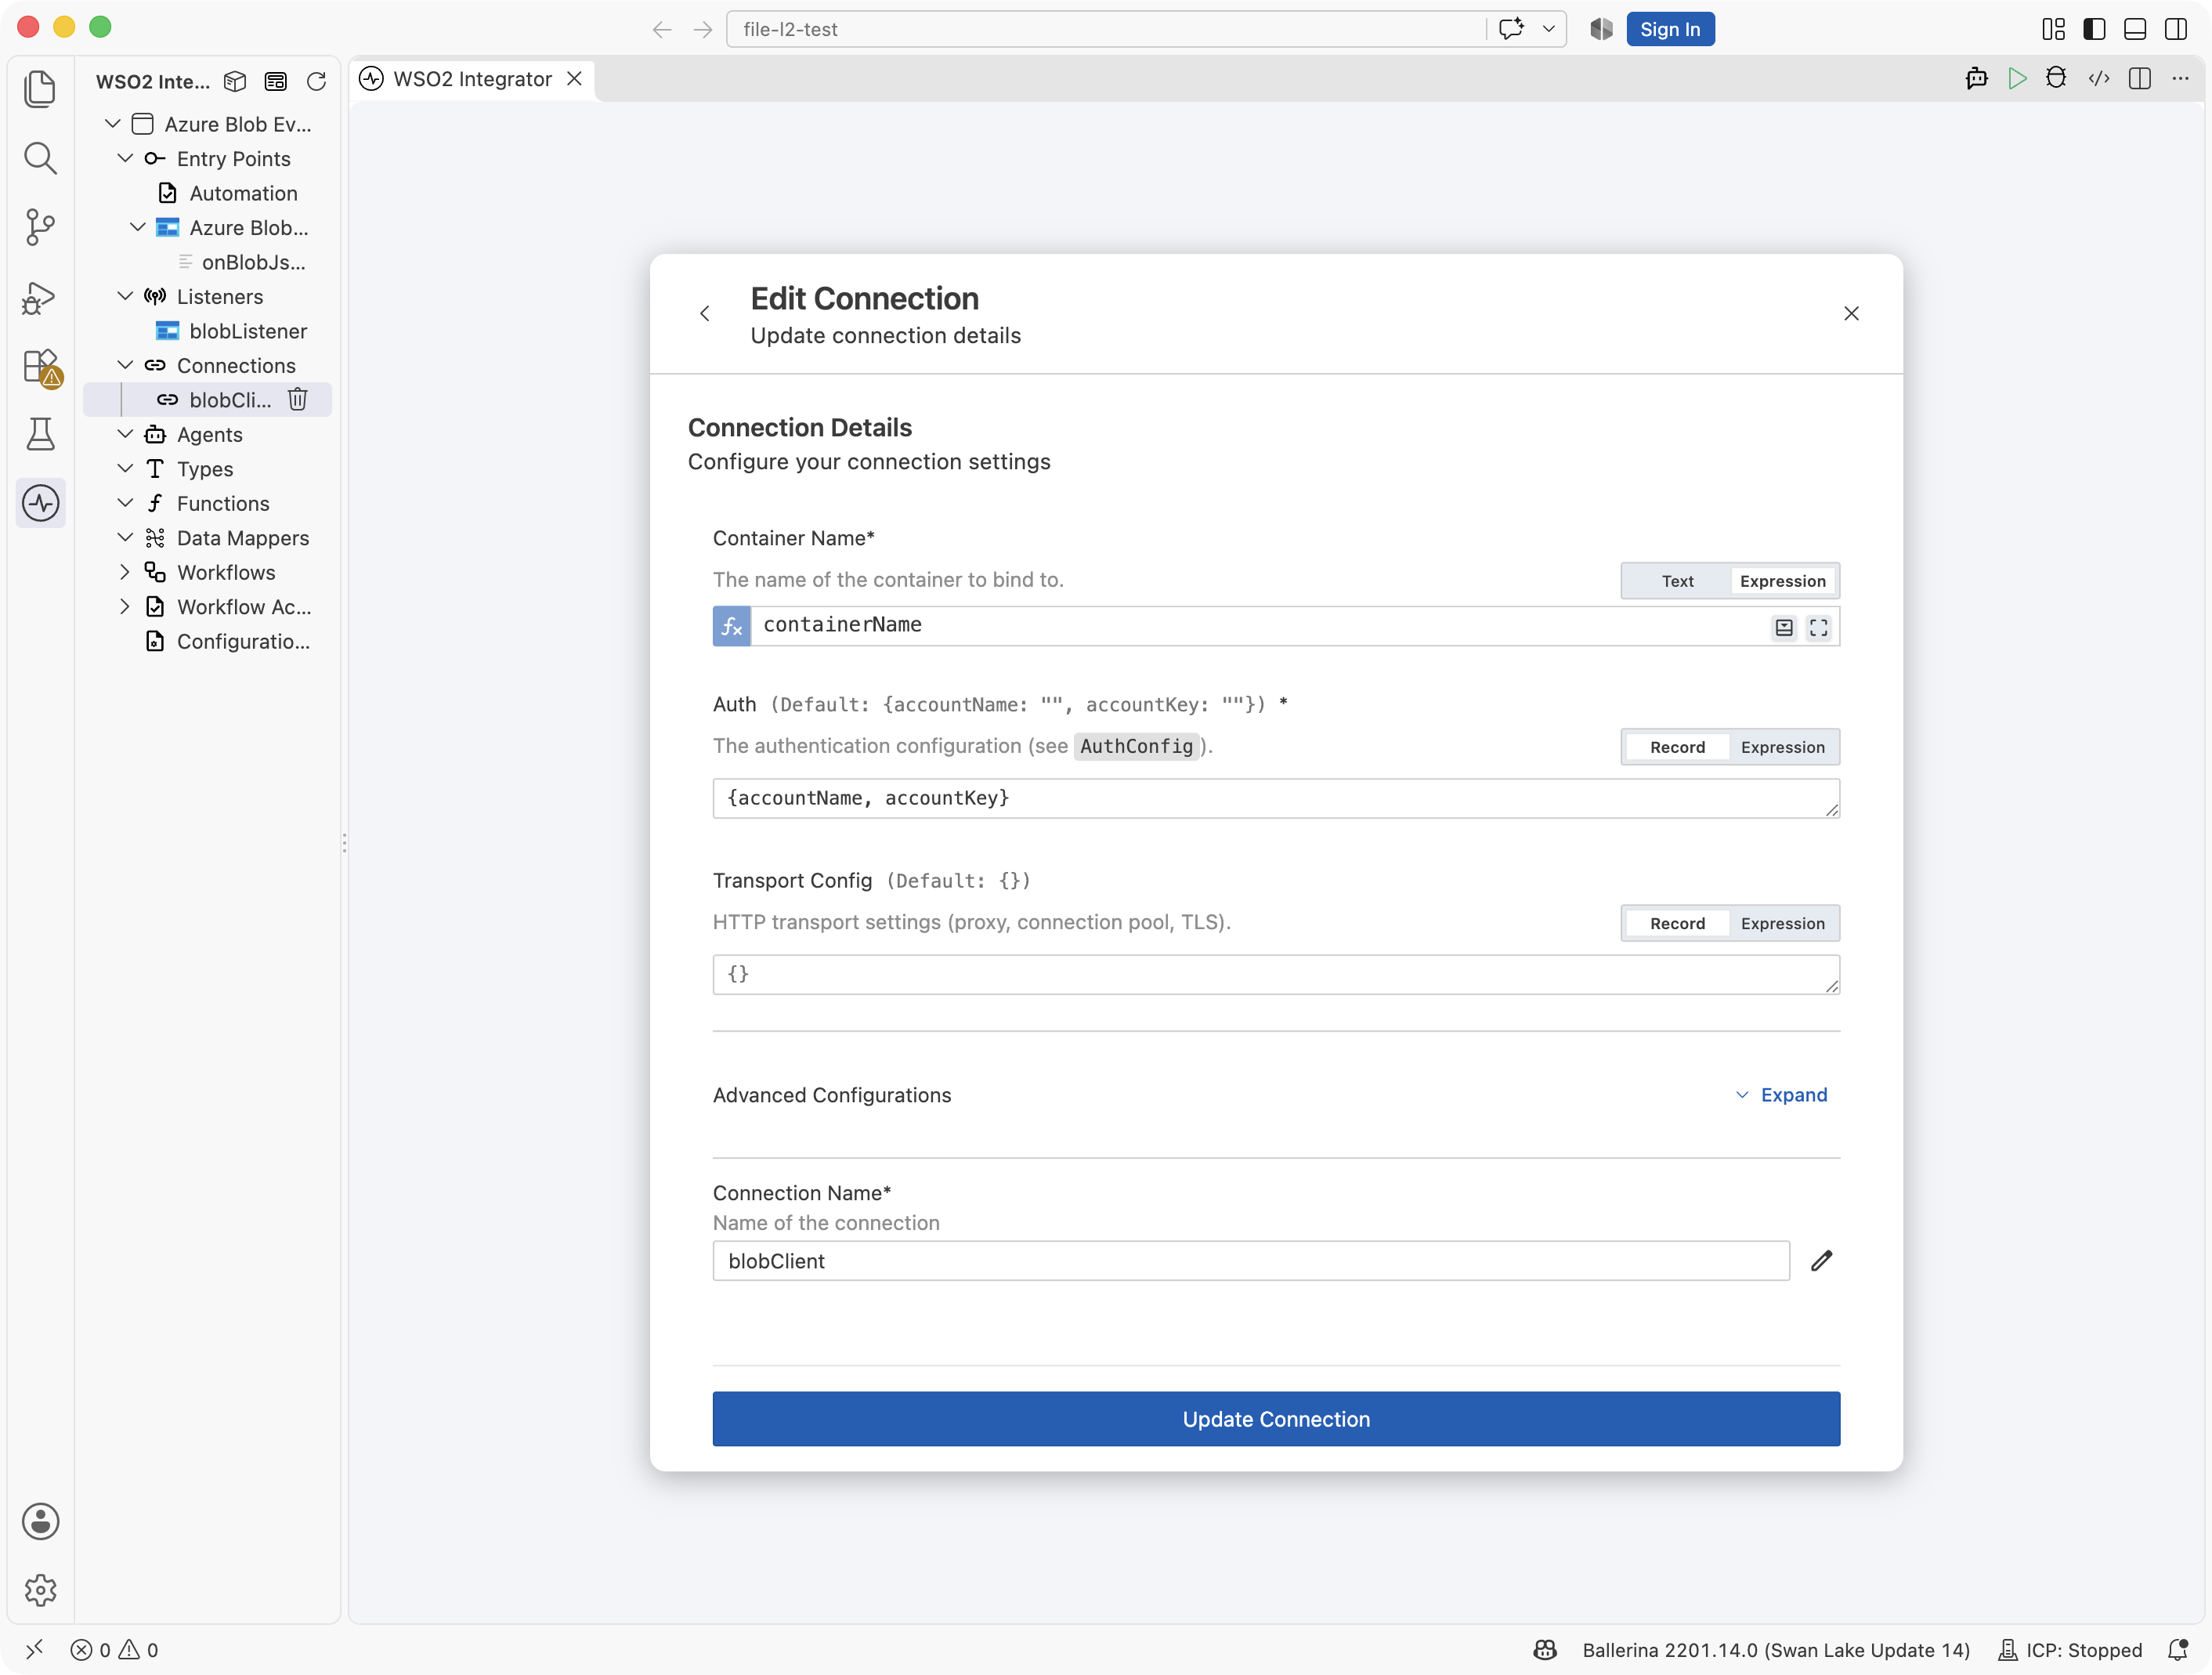
Selecting the Blob card opens the connection form (the same form reopens as Edit Connection when you select the connection later). Switch Container Name to Expression and enter containerName, switch Auth to Expression and enter {accountName, accountKey}, leave Transport Config at its default, and set Connection Name to blobClient.
Step 5: Save the connection
Select Save Connection to persist the connection. The form closes and blobClient appears in the sidebar under Connections.
Step 6: Set actual values for your configurables
- In the left panel, select Configurations.
- Set a value for each configurable listed below.
- accountName (string) : Your storage account name, from the Setup Guide
- accountKey (string) : An access key of the storage account
- containerName (string) : The container to work with (for example,
reports)
Configuring the uploadFromFile operation
Step 7: Select the uploadFromFile operation and configure its parameters
- In the sidebar under Entry Points, select Automation to open its flow editor (selecting the automation node in the design view works too).
- Select the + button on the canvas between Start and Error Handler.
- In the right-side node panel, expand Connections → blobClient.
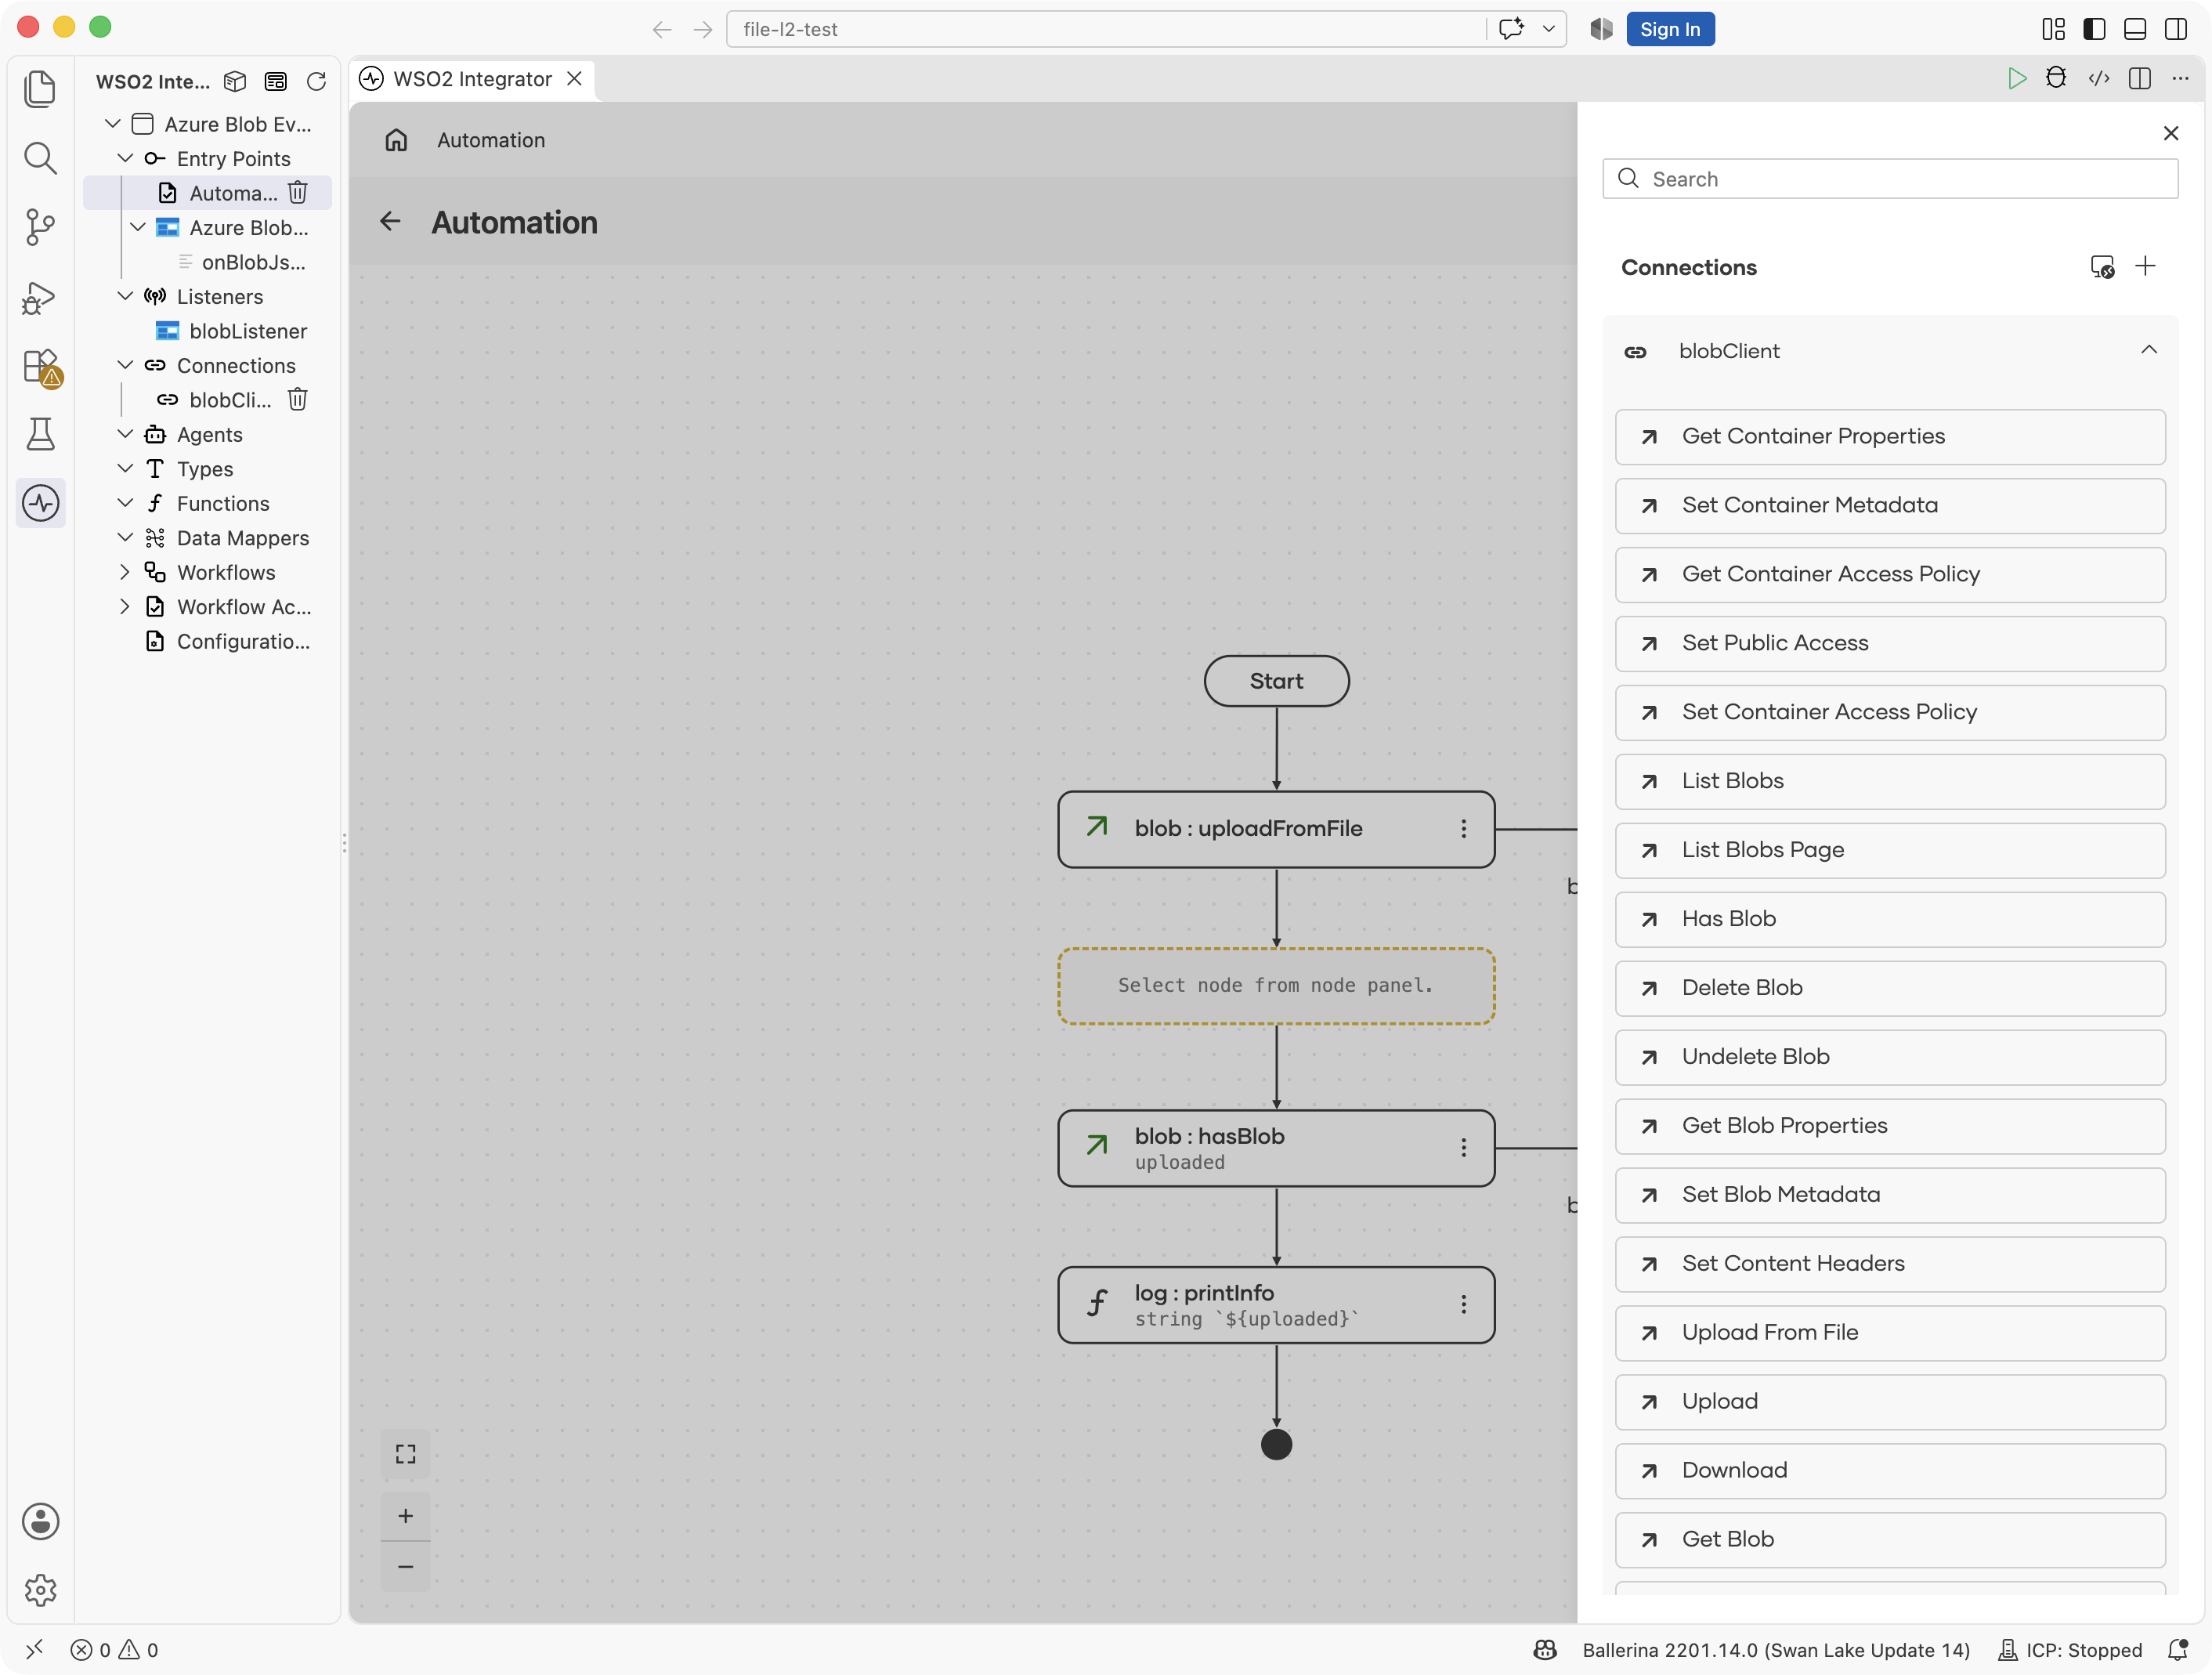
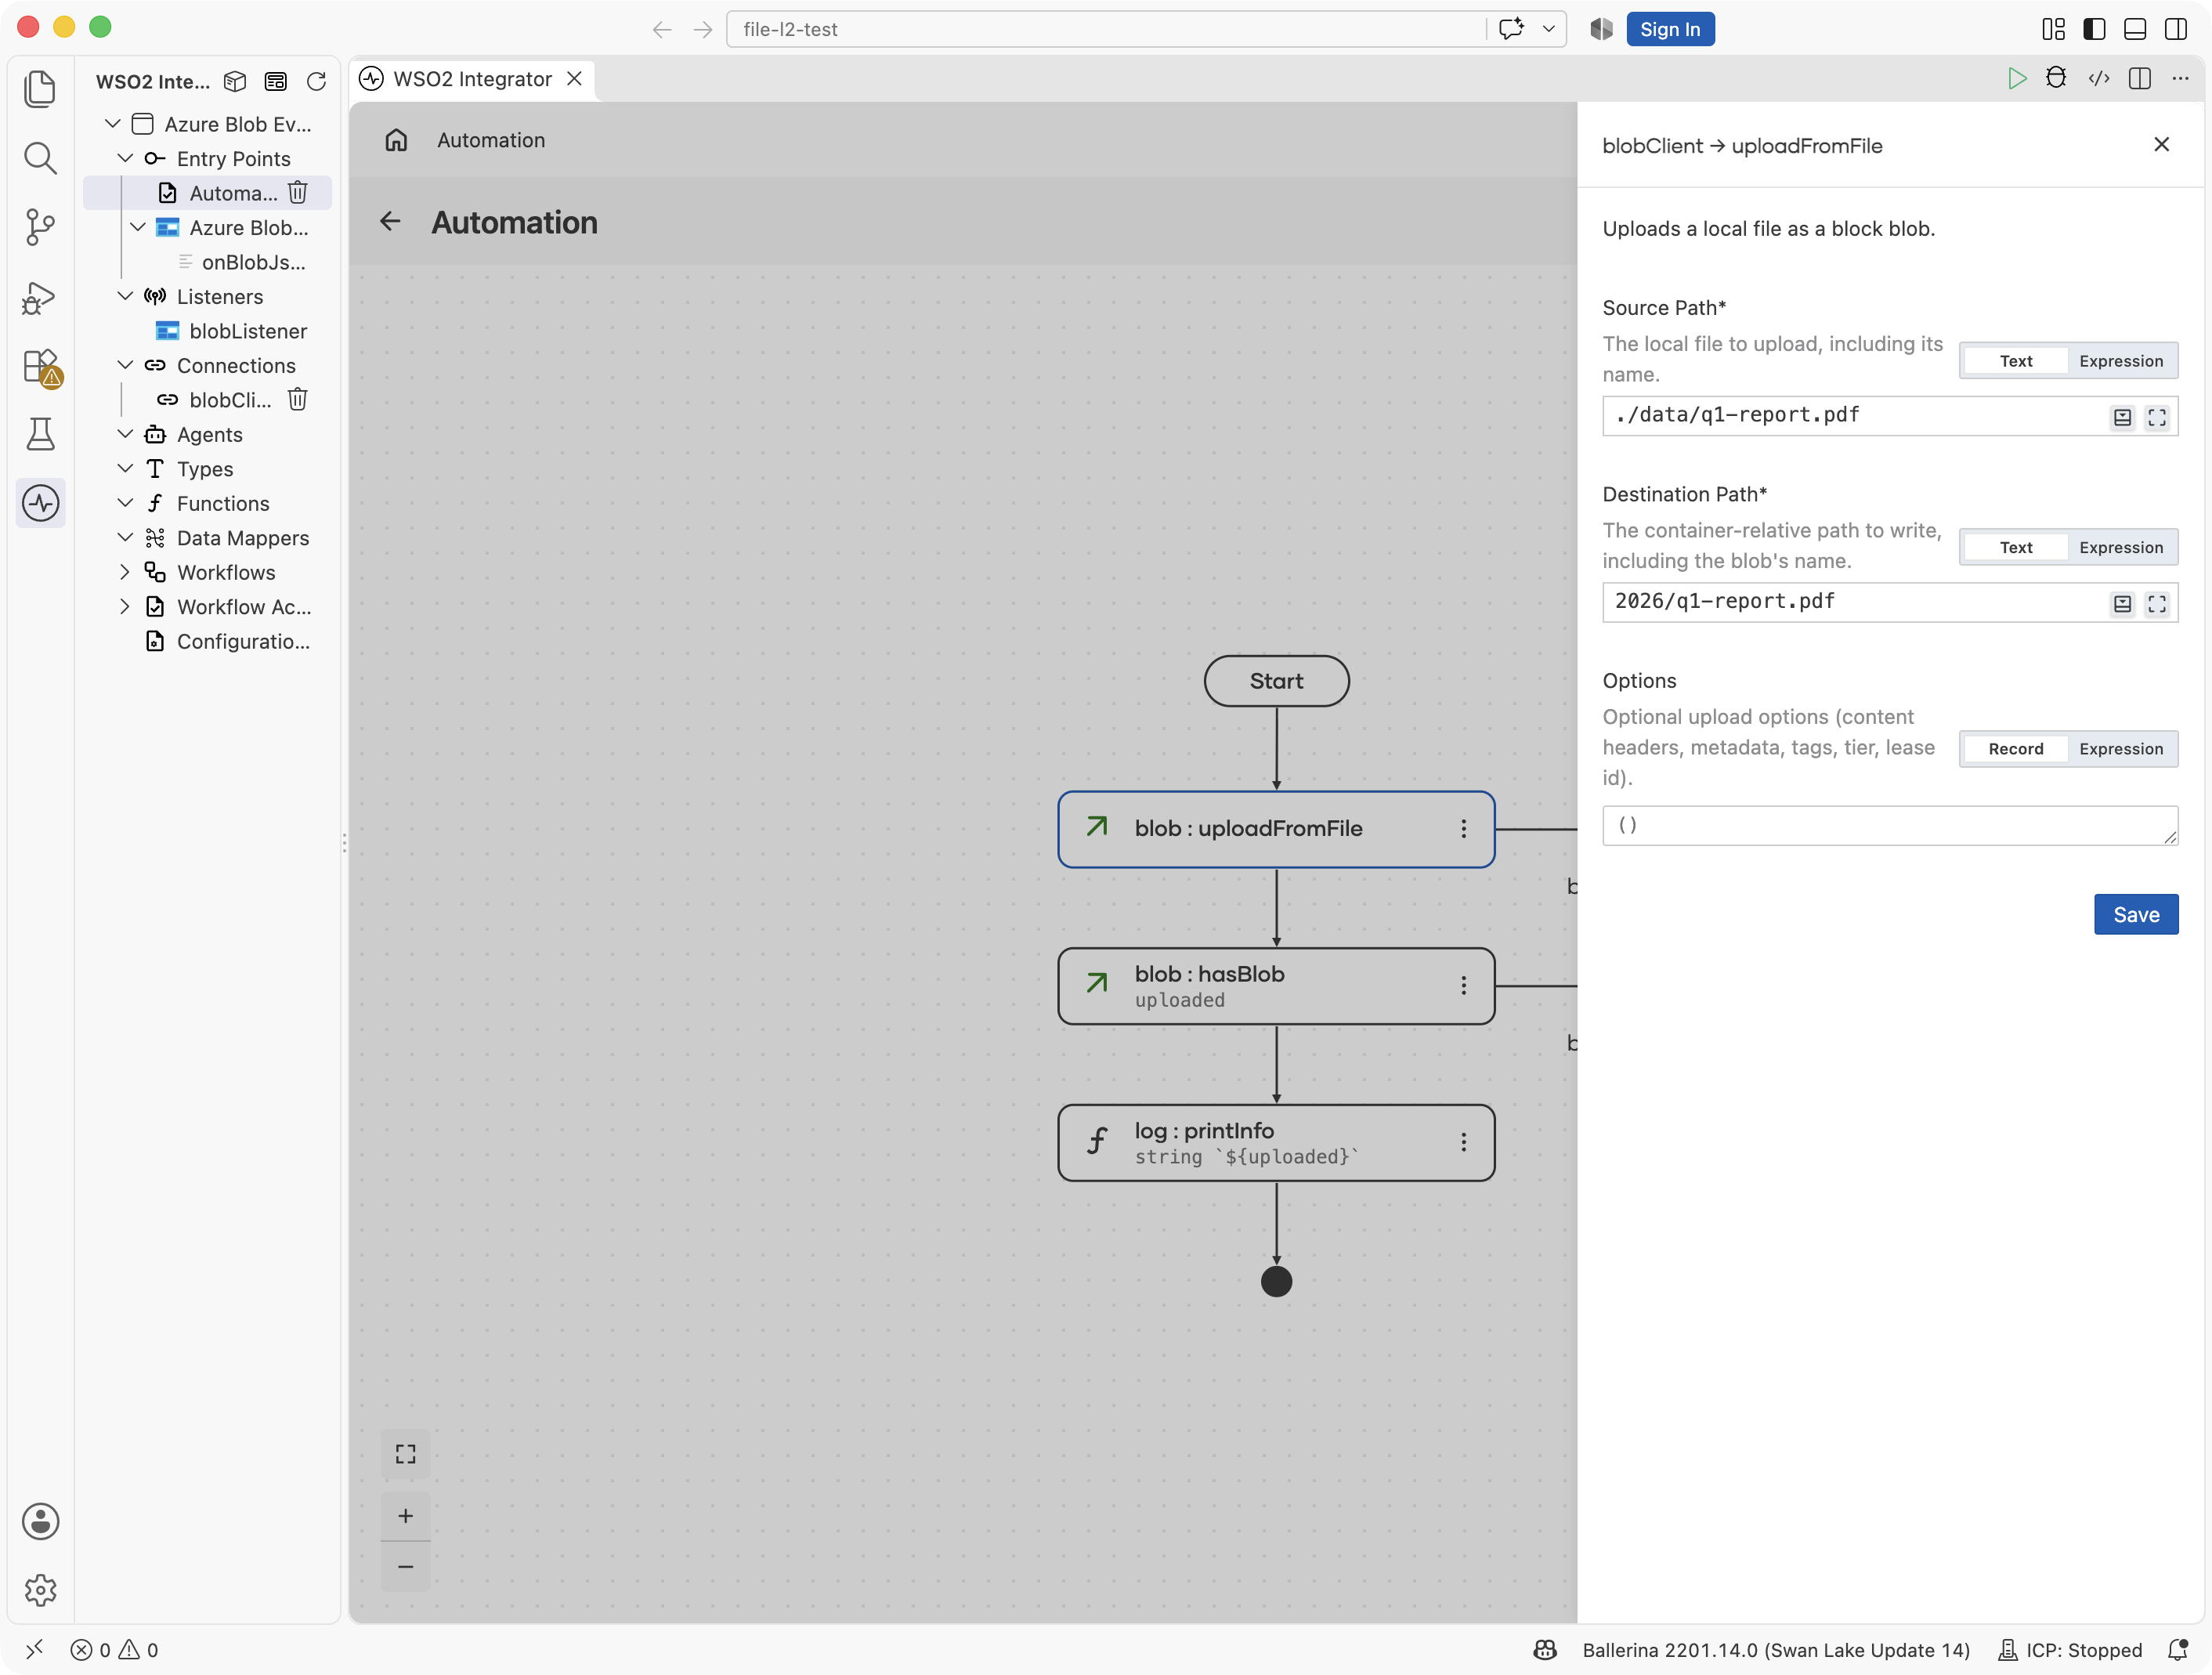
- Select Upload From File and fill in the operation form:
- Source Path : The local file to upload (for example,
./data/q1-report.pdf) - Destination Path : The container-relative path to upload to, including the blob name (for example,
2026/q1-report.pdf). Slashes in the path form virtual folders. - Options : Leave empty. It takes content headers, metadata, tags, an access tier, or a lease id when needed.
- Select Save.
Step 8: Confirm the upload and log the result
- Select the + below the Upload From File node and add the Has Blob operation from Connections → blobClient. Set Path to the destination path from Step 7 (
2026/q1-report.pdf) and name the result variableuploaded(its type is fixed toboolean). - Add a Log Info statement below it with the expression
string `${uploaded}`(the message must be a string, so the boolean is interpolated).
hasBlob returns true once the blob is present in the container, so the log output confirms the upload.
Azure Blob Storage trigger example
What you'll build
This integration reacts to blobs arriving in a container. An Event Grid subscription delivers each blob's created event to a storage queue, and a listener service consumes that queue. When a .json blob arrives, the onBlobJson handler fires with the parsed content and logs it; the message is acknowledged when the handler returns, and a blob that fails to parse moves to the service's poison queue.
Architecture
Prerequisites
- An Azure storage account with a container named
invoices, a storage queue namedinvoice-events, and an Event Grid subscription that delivers the container's blob created events to that queue (see the Setup Guide) - The storage account name and an access key
Setting up the integration
New to WSO2 Integrator? Follow the Create a New Integration guide to set up your integration first, then return here to add the trigger.
Configuring the Azure Blob Storage listener
Step 1: Create configurable variables
In the left panel, select Configurations. In the Configurable Variables panel, select + Add Config and create each configuration listed below. If you completed the client example in the same project, the first two variables already exist; reuse them.
- accountName (string) : The Azure storage account name
- accountKey (string) : An access key of the storage account
Adding the Azure Blob Storage trigger
Step 2: Select the Azure Blob Storage integration type
- Select the + button in the WSO2 Integrator side panel header to open the New Integration wizard (on an empty project, the + Add Integration or Library button in the project view opens the same wizard), and continue to the Type step.
- Scroll to the File Integration category, select the Azure Blob Storage card, and select Next.

Step 3: Configure the service and the listener
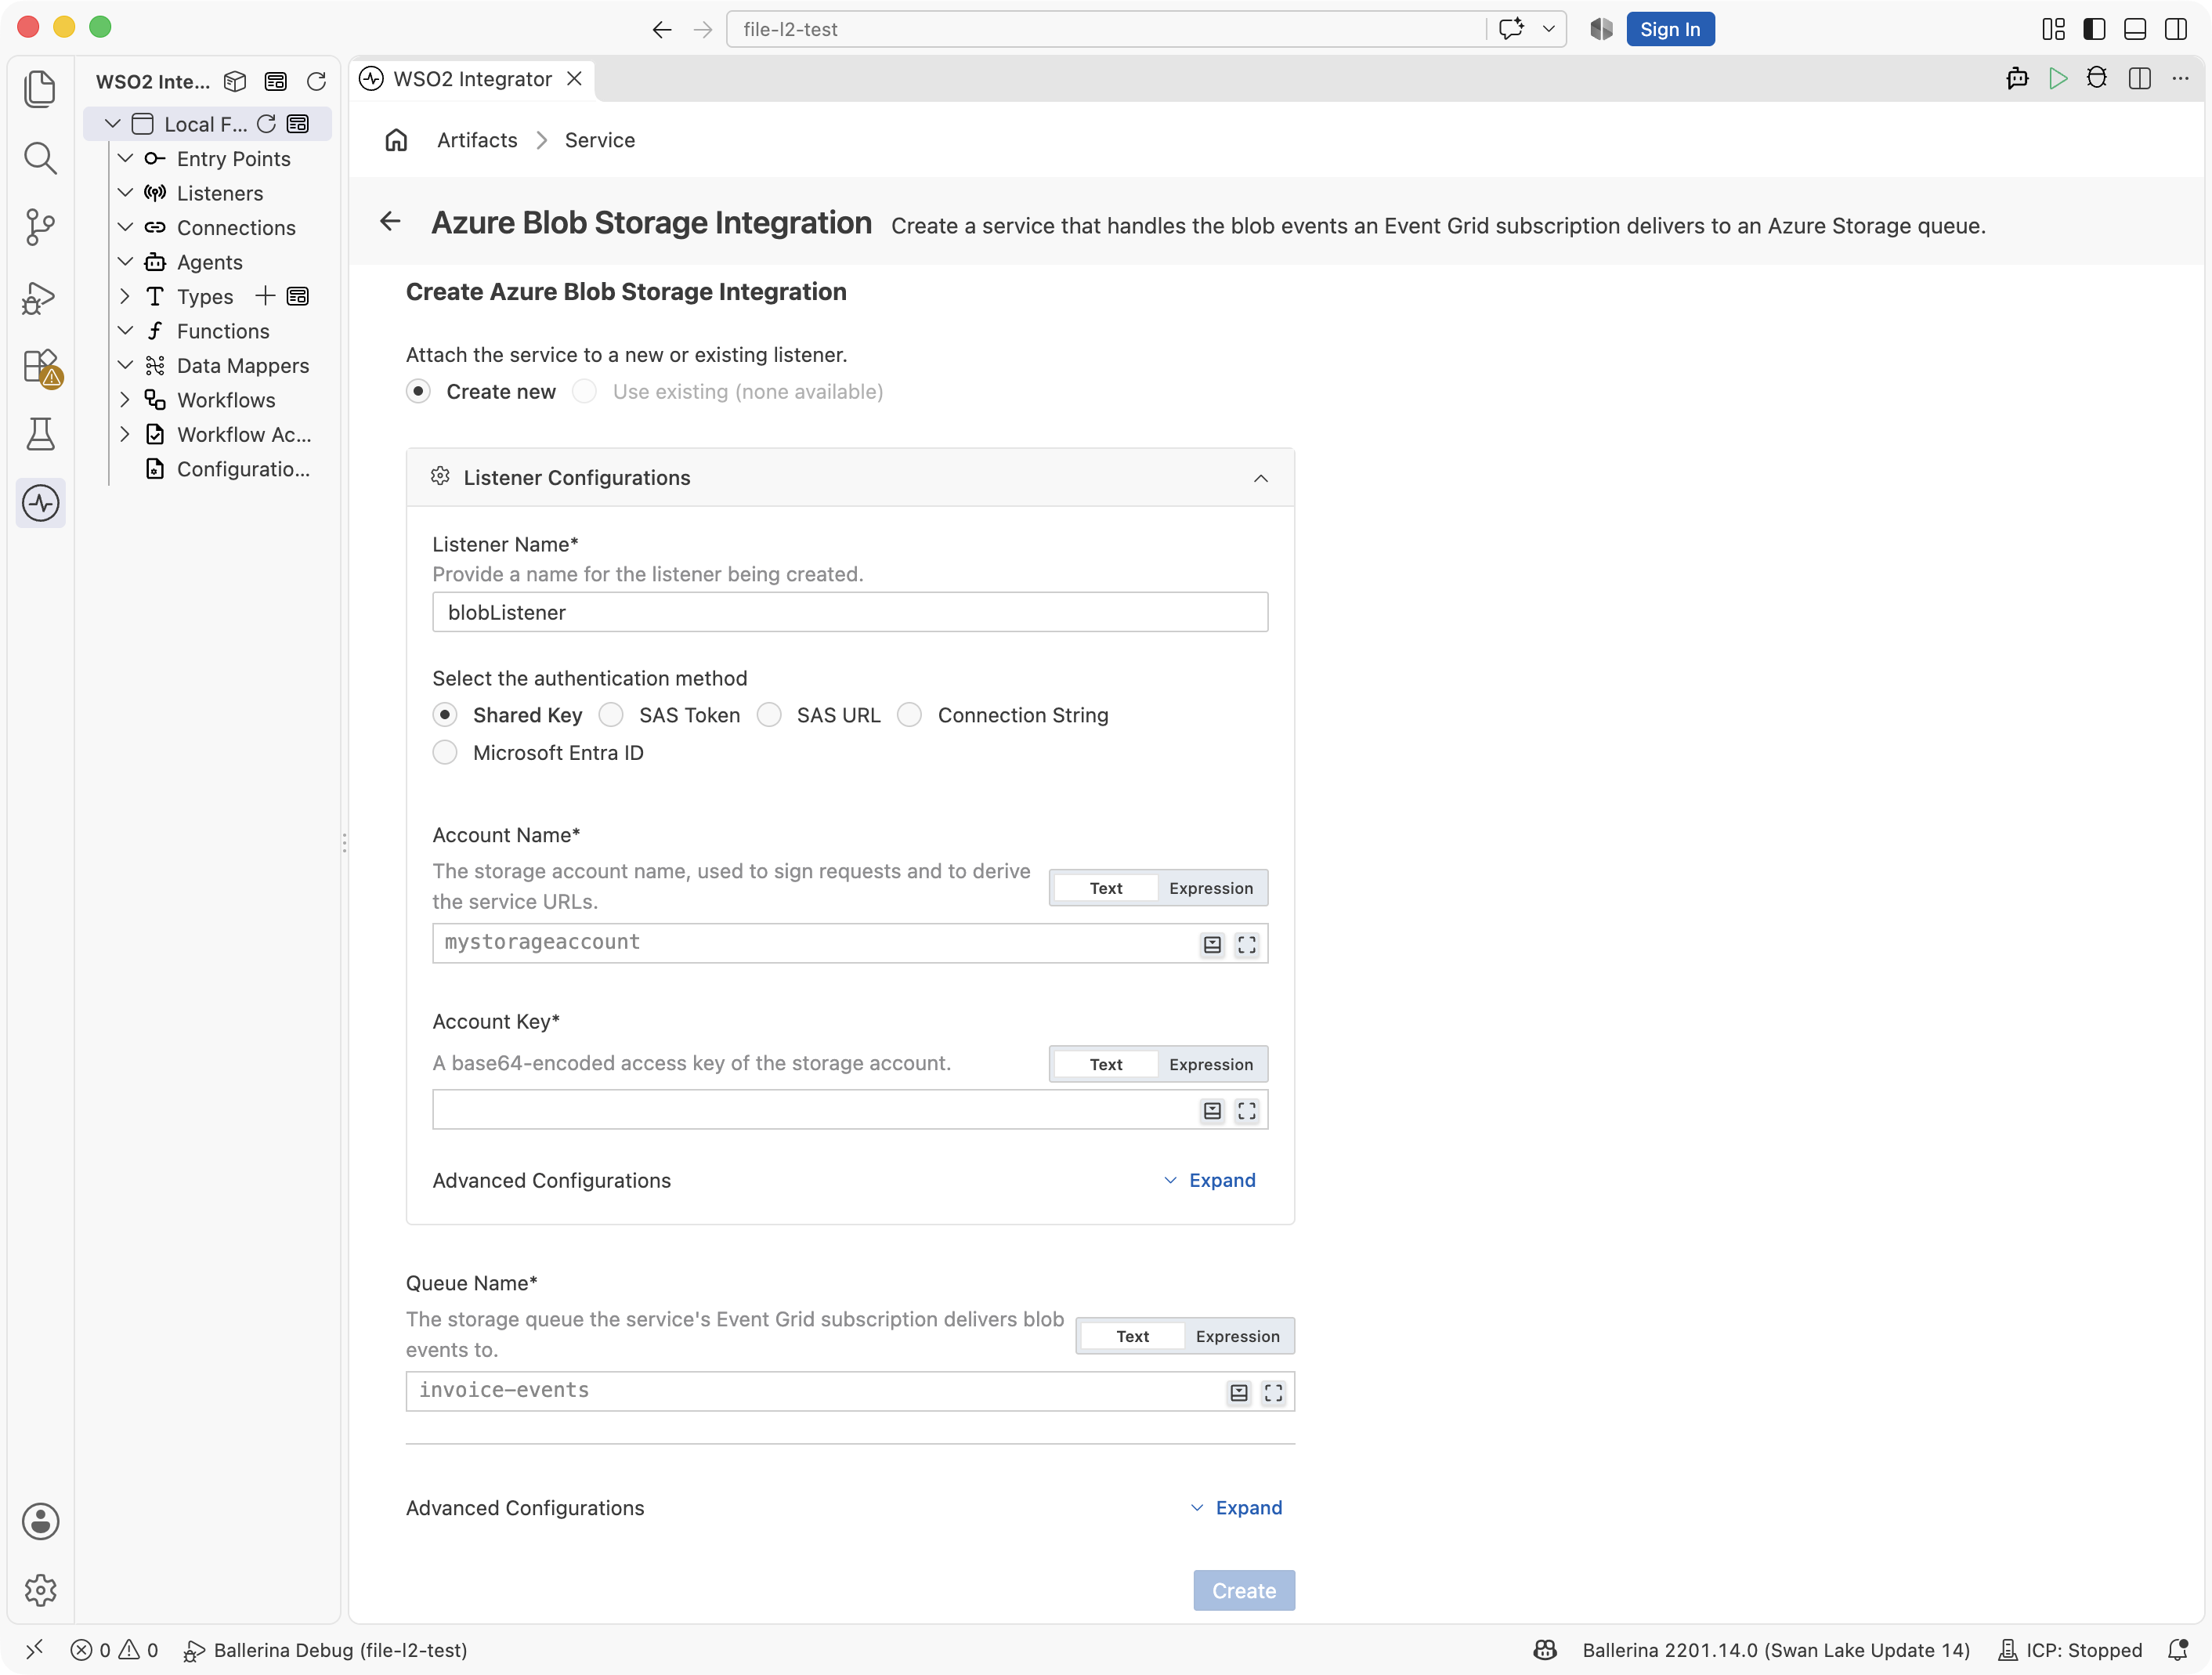
The Create Azure Blob Storage Integration form opens. Its upper part, Listener Configurations, creates the listener the service attaches to; the lower part holds the service's own settings. Fill it referencing the configurables:
- Listener Name :
blobListener - Select the authentication method : Shared Key
- Account Name : Switch to Expression and enter
accountName - Account Key : Switch to Expression and enter
accountKey - Queue Name :
invoice-events. This is the storage queue the Event Grid subscription delivers to; the service consumes it.
The listener box has its own Advanced Configurations (relaxed data binding and the queue service URL), and the form ends with the service's Advanced Configurations: the poison queue name and the consumption settings (batch size, polling interval, redelivery delay, delivery count). Leave both at their defaults. There is no container field. The Event Grid subscription decides which container's events reach the queue, and each event carries its container and path.
Step 4: Create the trigger
Select Create to generate the listener and the service. An Azure Blob Storage Integration entry appears in the sidebar under Entry Points, and its page header names the listener and the queue it consumes.
Setting configuration values
Step 5: Set actual values for your configurations
In the left panel, select Configurations again, and set a value for each configuration created above:
- accountName (string) : Your storage account name
- accountKey (string) : An access key of the storage account
Handling blob events
Step 6: Add a blob handler
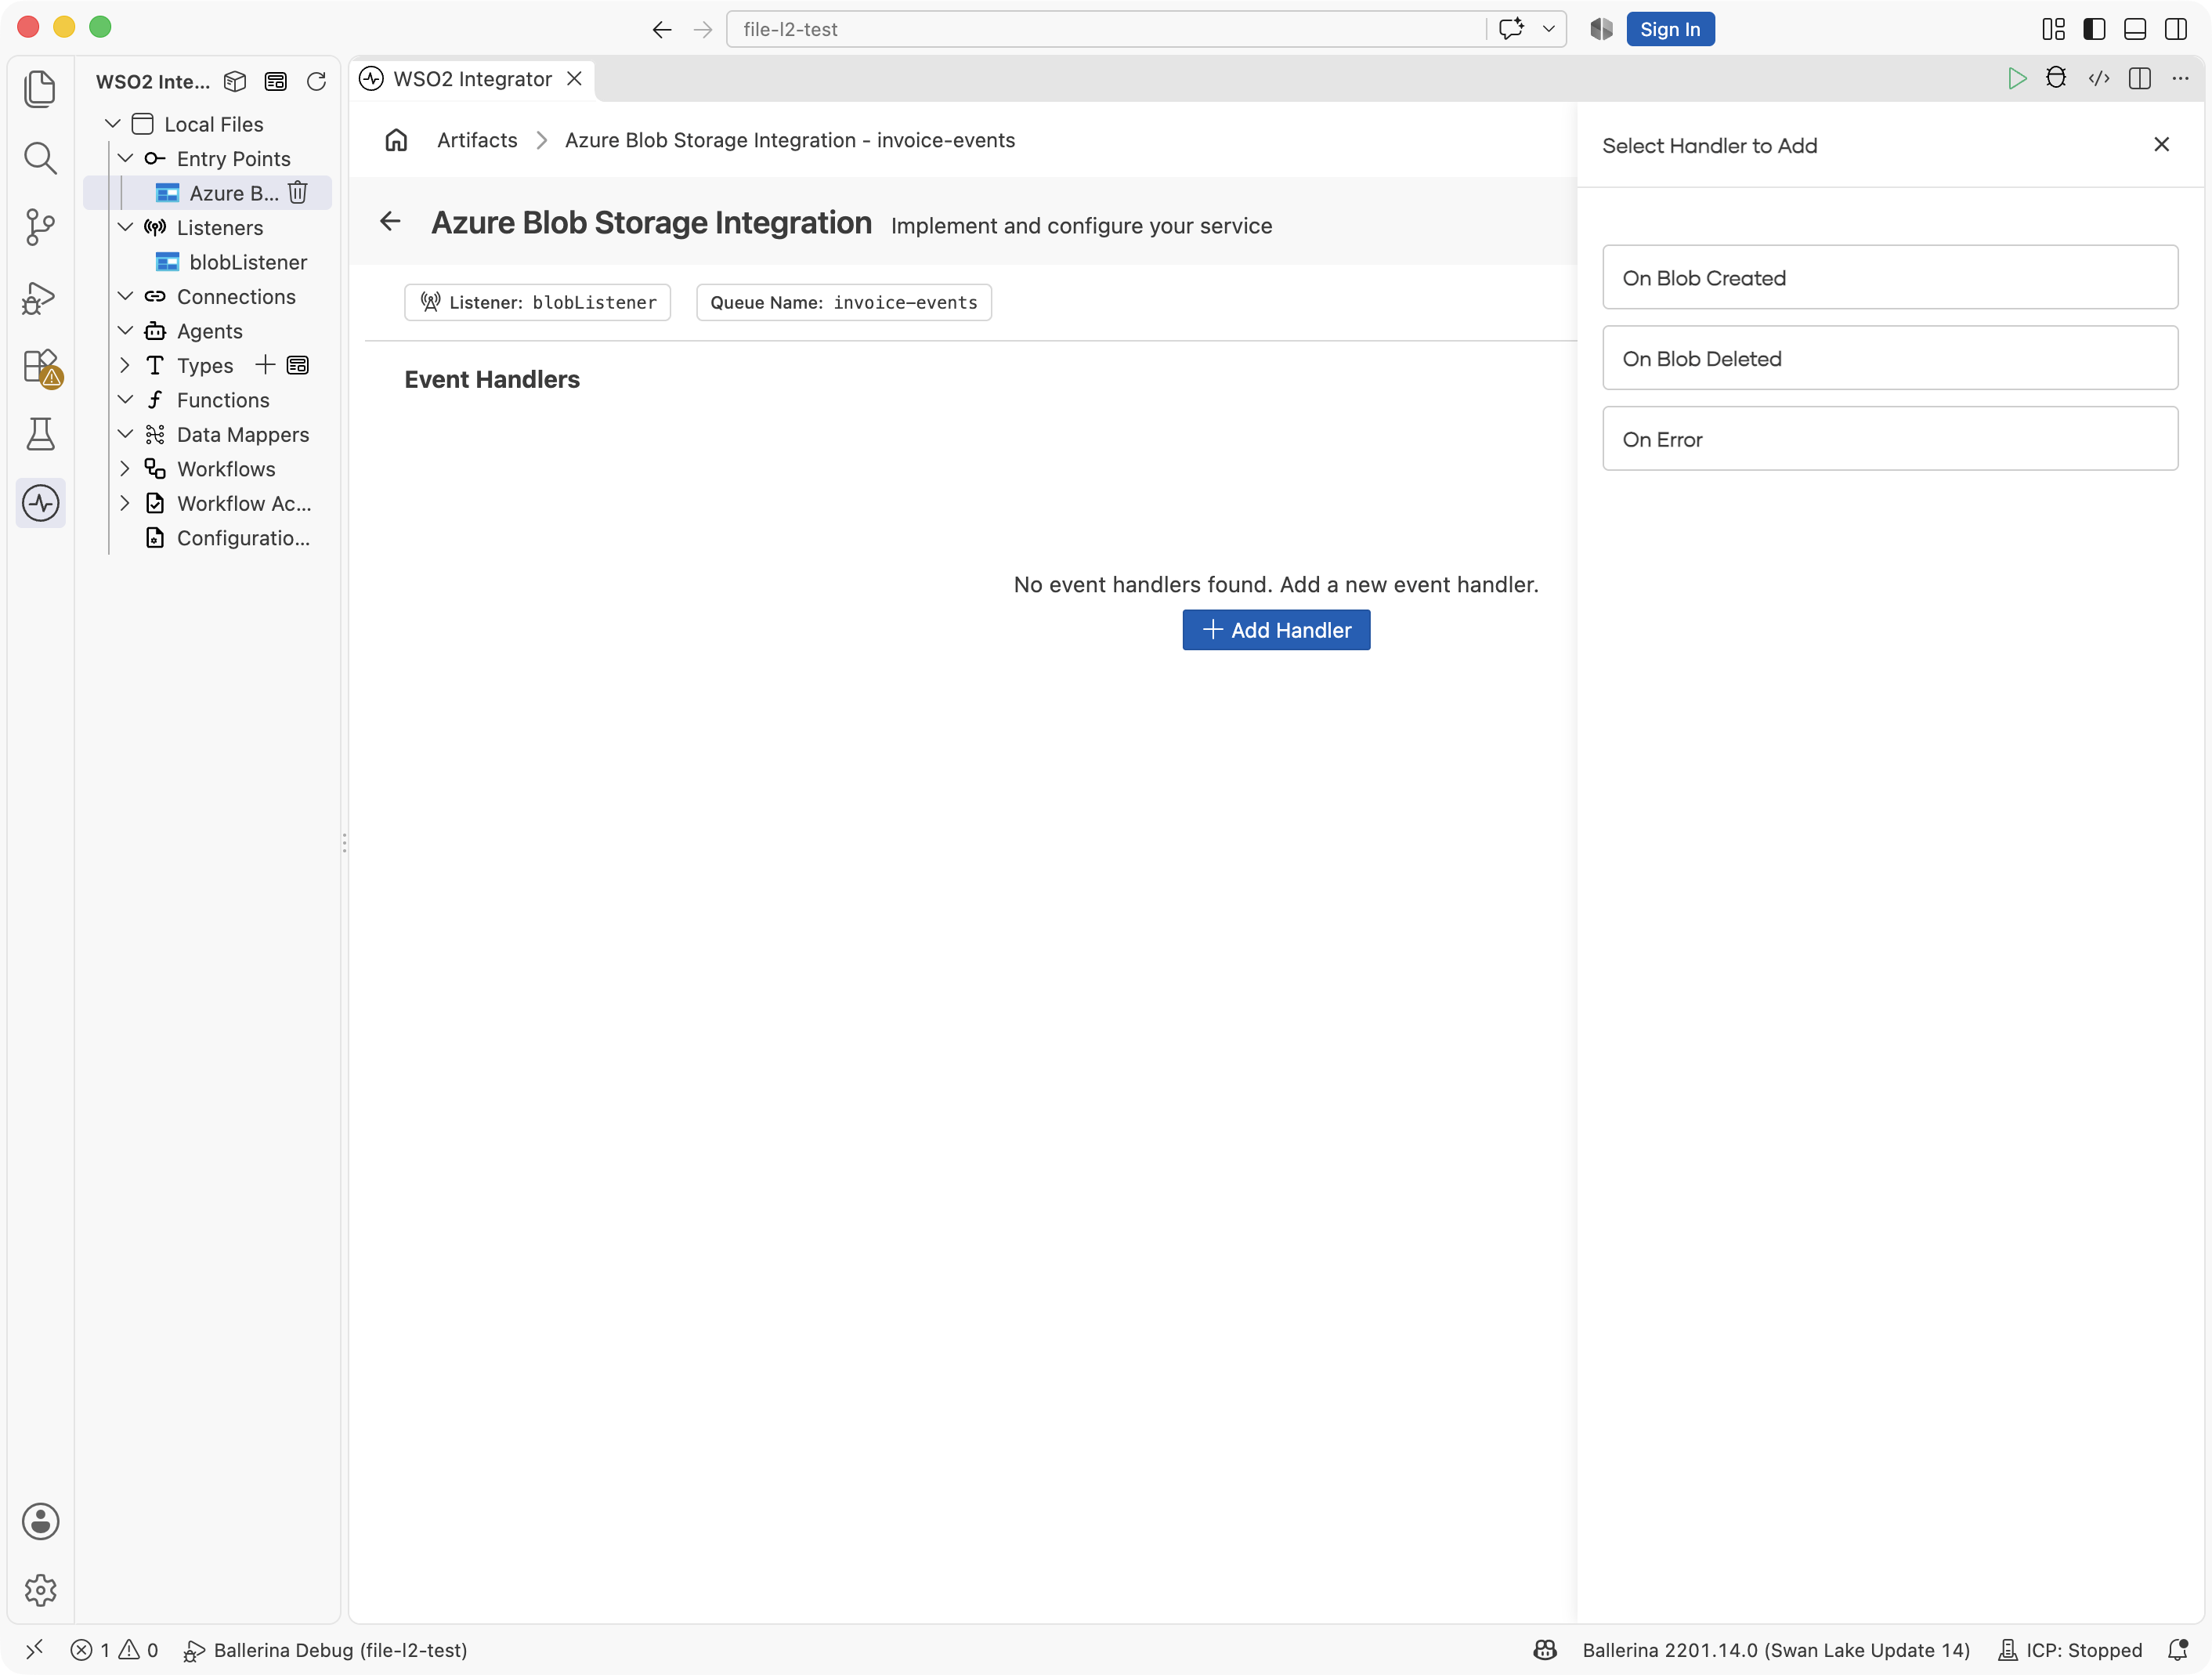
Return to the integration service view (select the service under Entry Points) and select + Add Handler. The Select Handler to Add panel offers On Create, which fires for blobs created or replaced in a container the subscription covers; On Delete, which generates onBlobDelete; and On Error, which generates onError. Select On Create. Its Format setting then selects how the content is delivered: JSON, XML, CSV, Text, or Raw Bytes, generating the onBlobJson, onBlobXml, onBlobCsv, onBlobText, or onBlob callback respectively.
Step 7: Configure the JSON handler
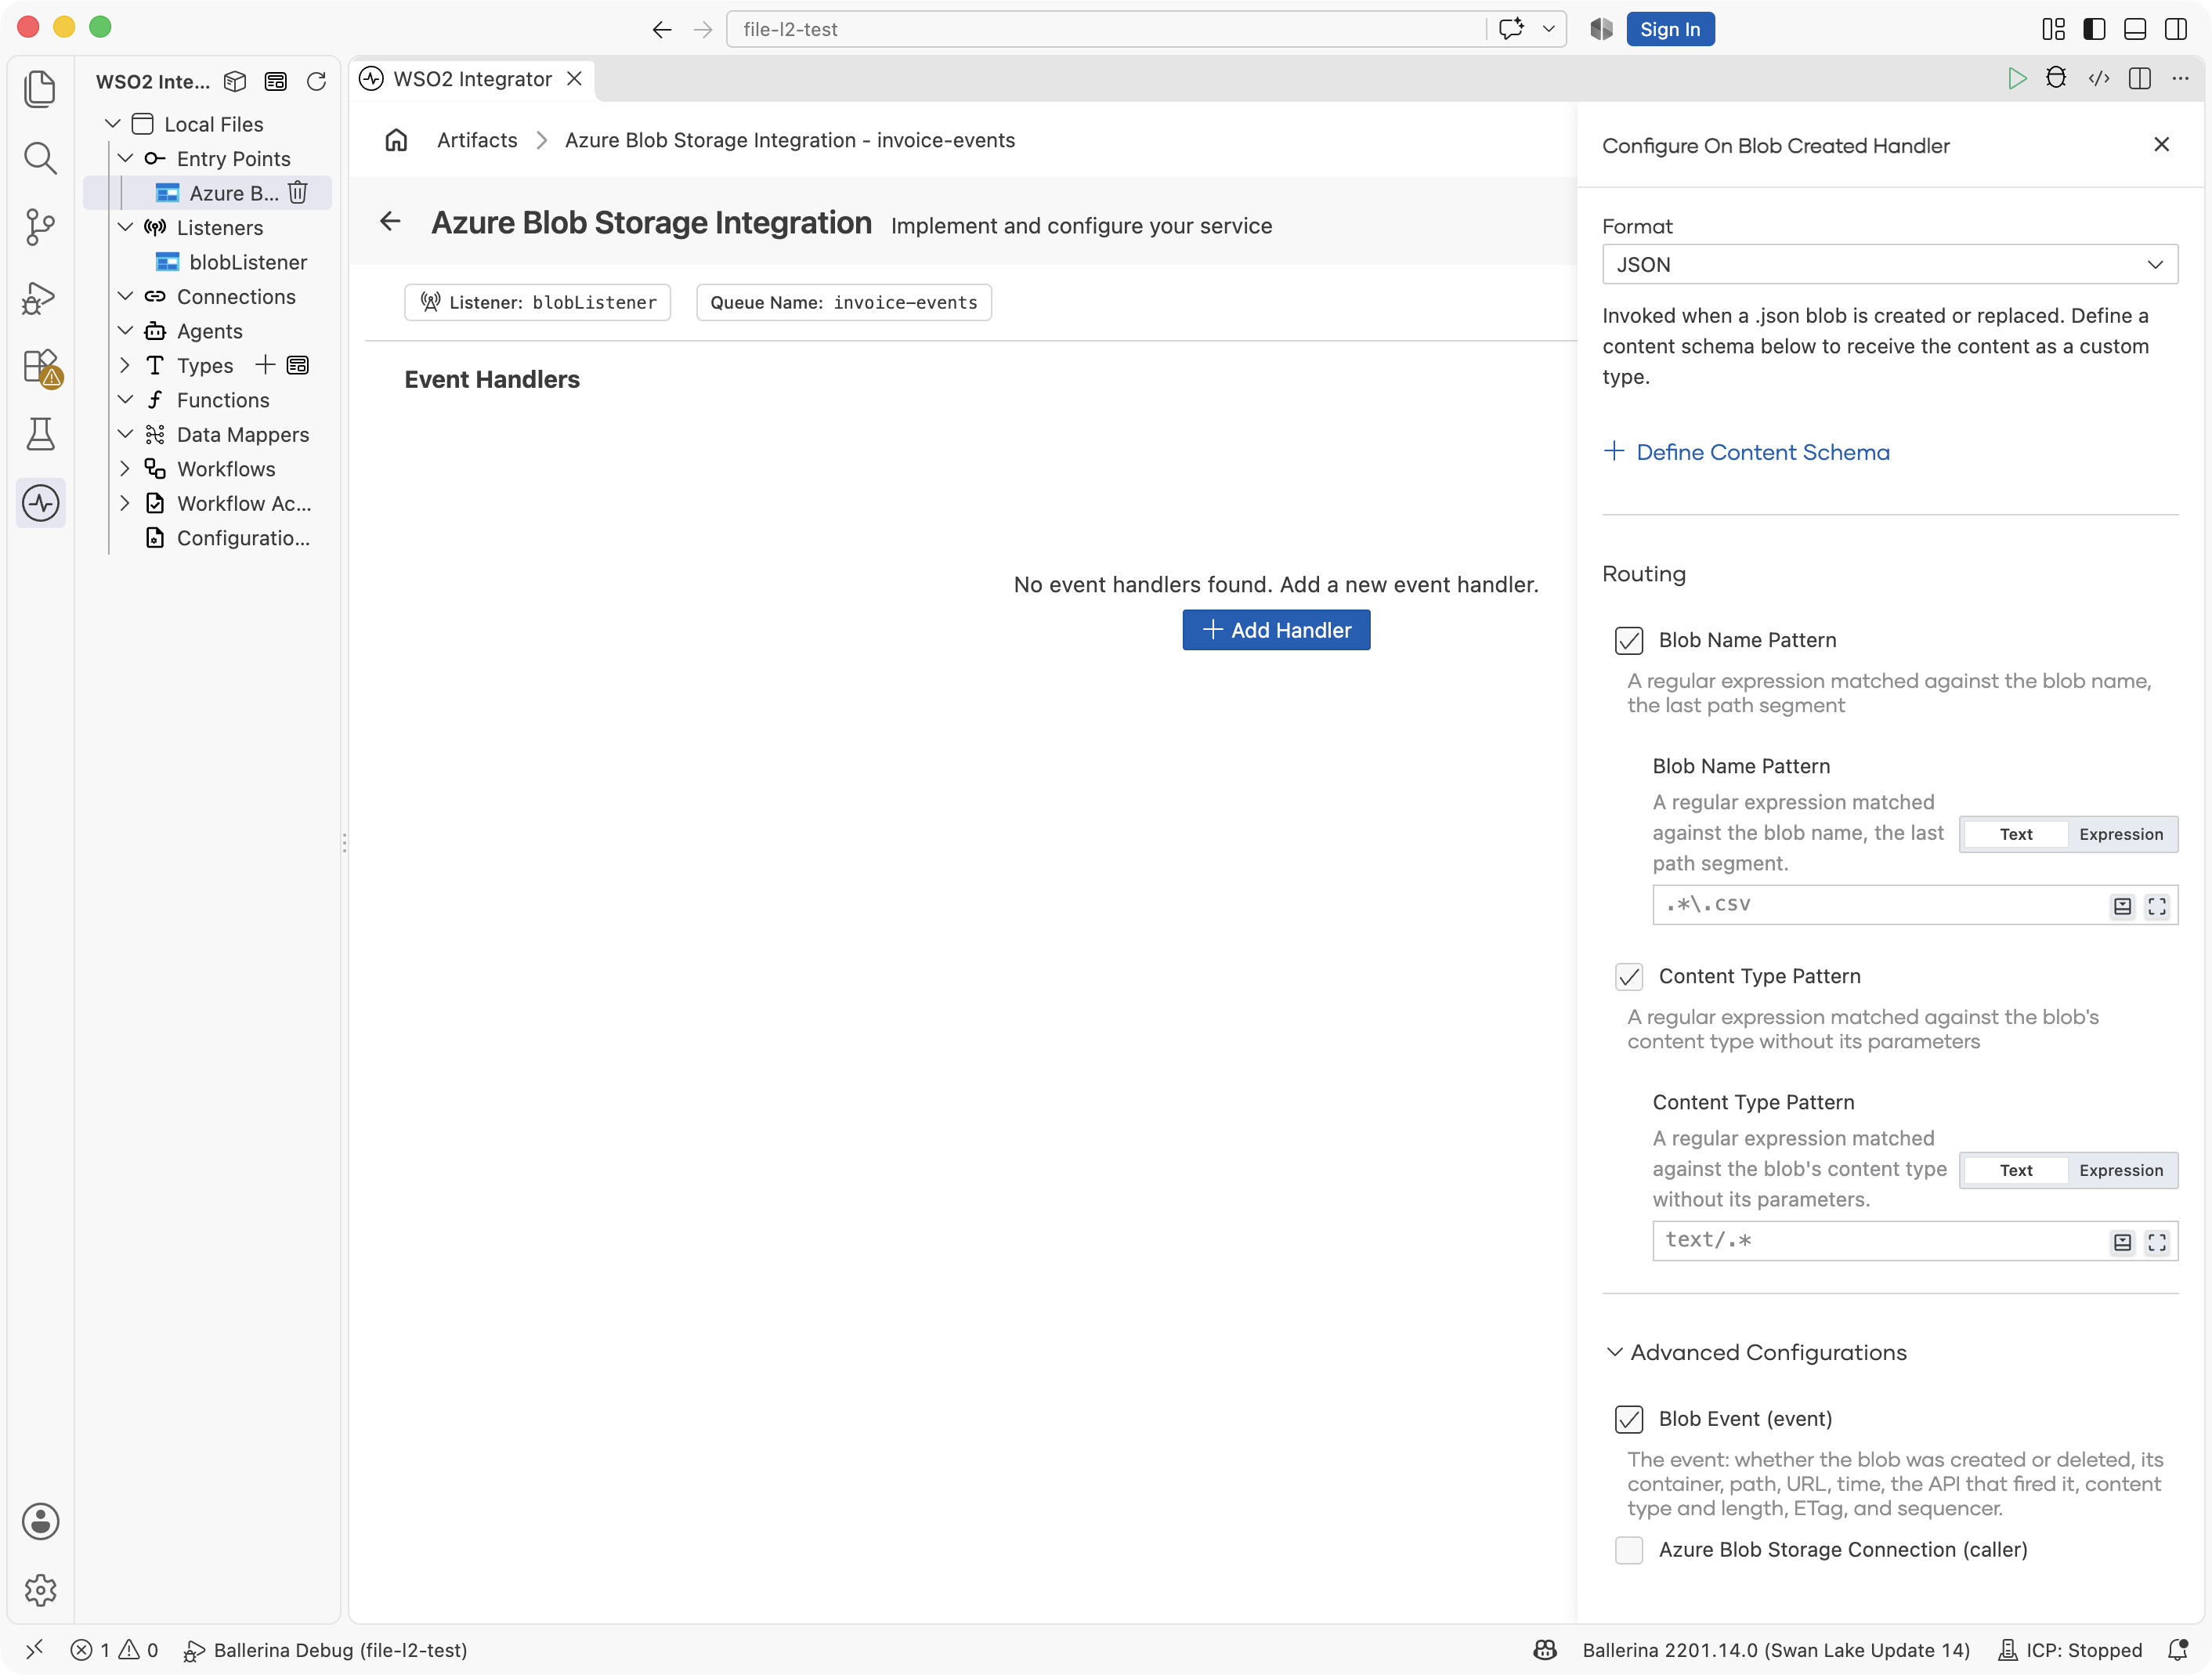
In the Configure On Create Handler panel, set:
- Format : JSON, so the handler receives the parsed content as
json. To receive a record instead, create the record type first (under Types in the sidebar) and pick it through Define Content Schema. - Routing : leave Blob Name Pattern and Content Type Pattern unticked, so the handler takes every
.jsonblob. Ticking one writes a@blob:FunctionConfigannotation with that regular expression; see the Trigger Reference. - Advanced Configurations : tick Blob Event (event) to receive the event alongside the content. Azure Blob Storage Connection (caller) adds the
Callerparameter; this example does not need it.
Select Save to register the onBlobJson handler on the service.
Step 8: Add a log statement to the handler
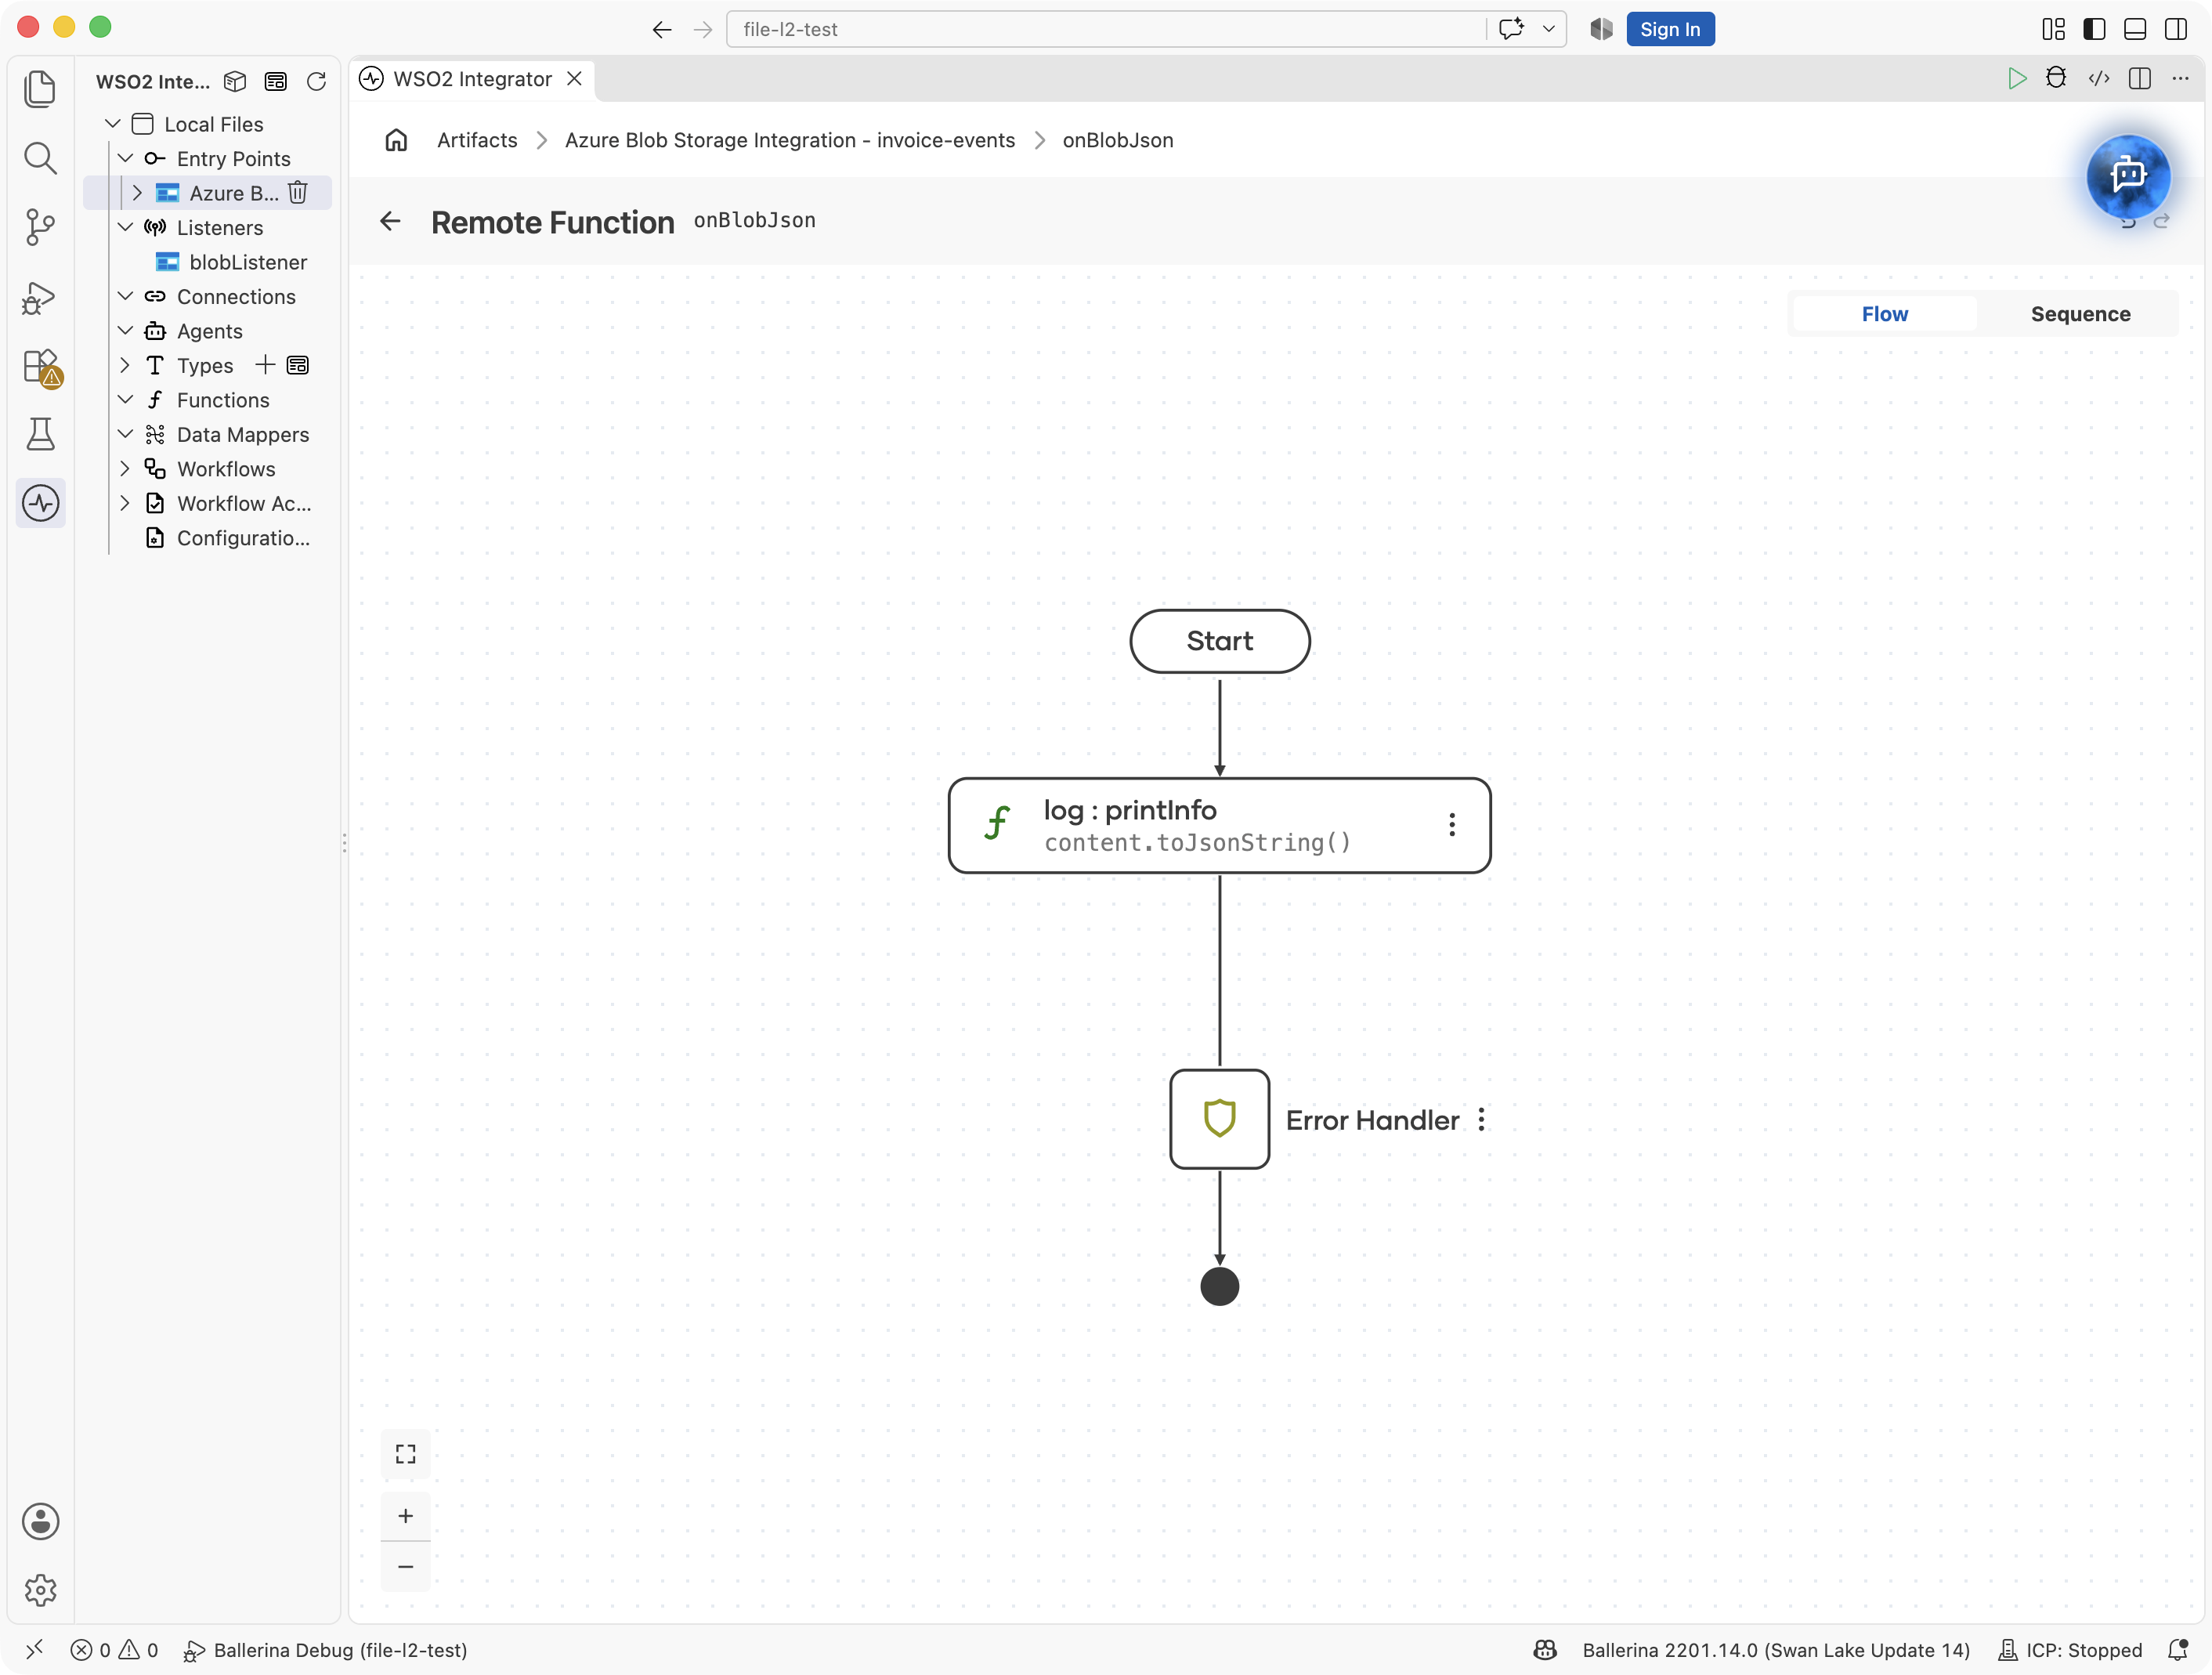
After the handler is saved, WSO2 Integrator opens the handler's flow canvas. The handler receives the parsed blob content as an input named content of type json, and the event as event.
- Select the + inside the handler flow and choose Log Info from the Logging section in the side panel.
- In the expression editor, select
contentfrom the Inputs list, then append.toJsonString().
Step 9: Verify the design view
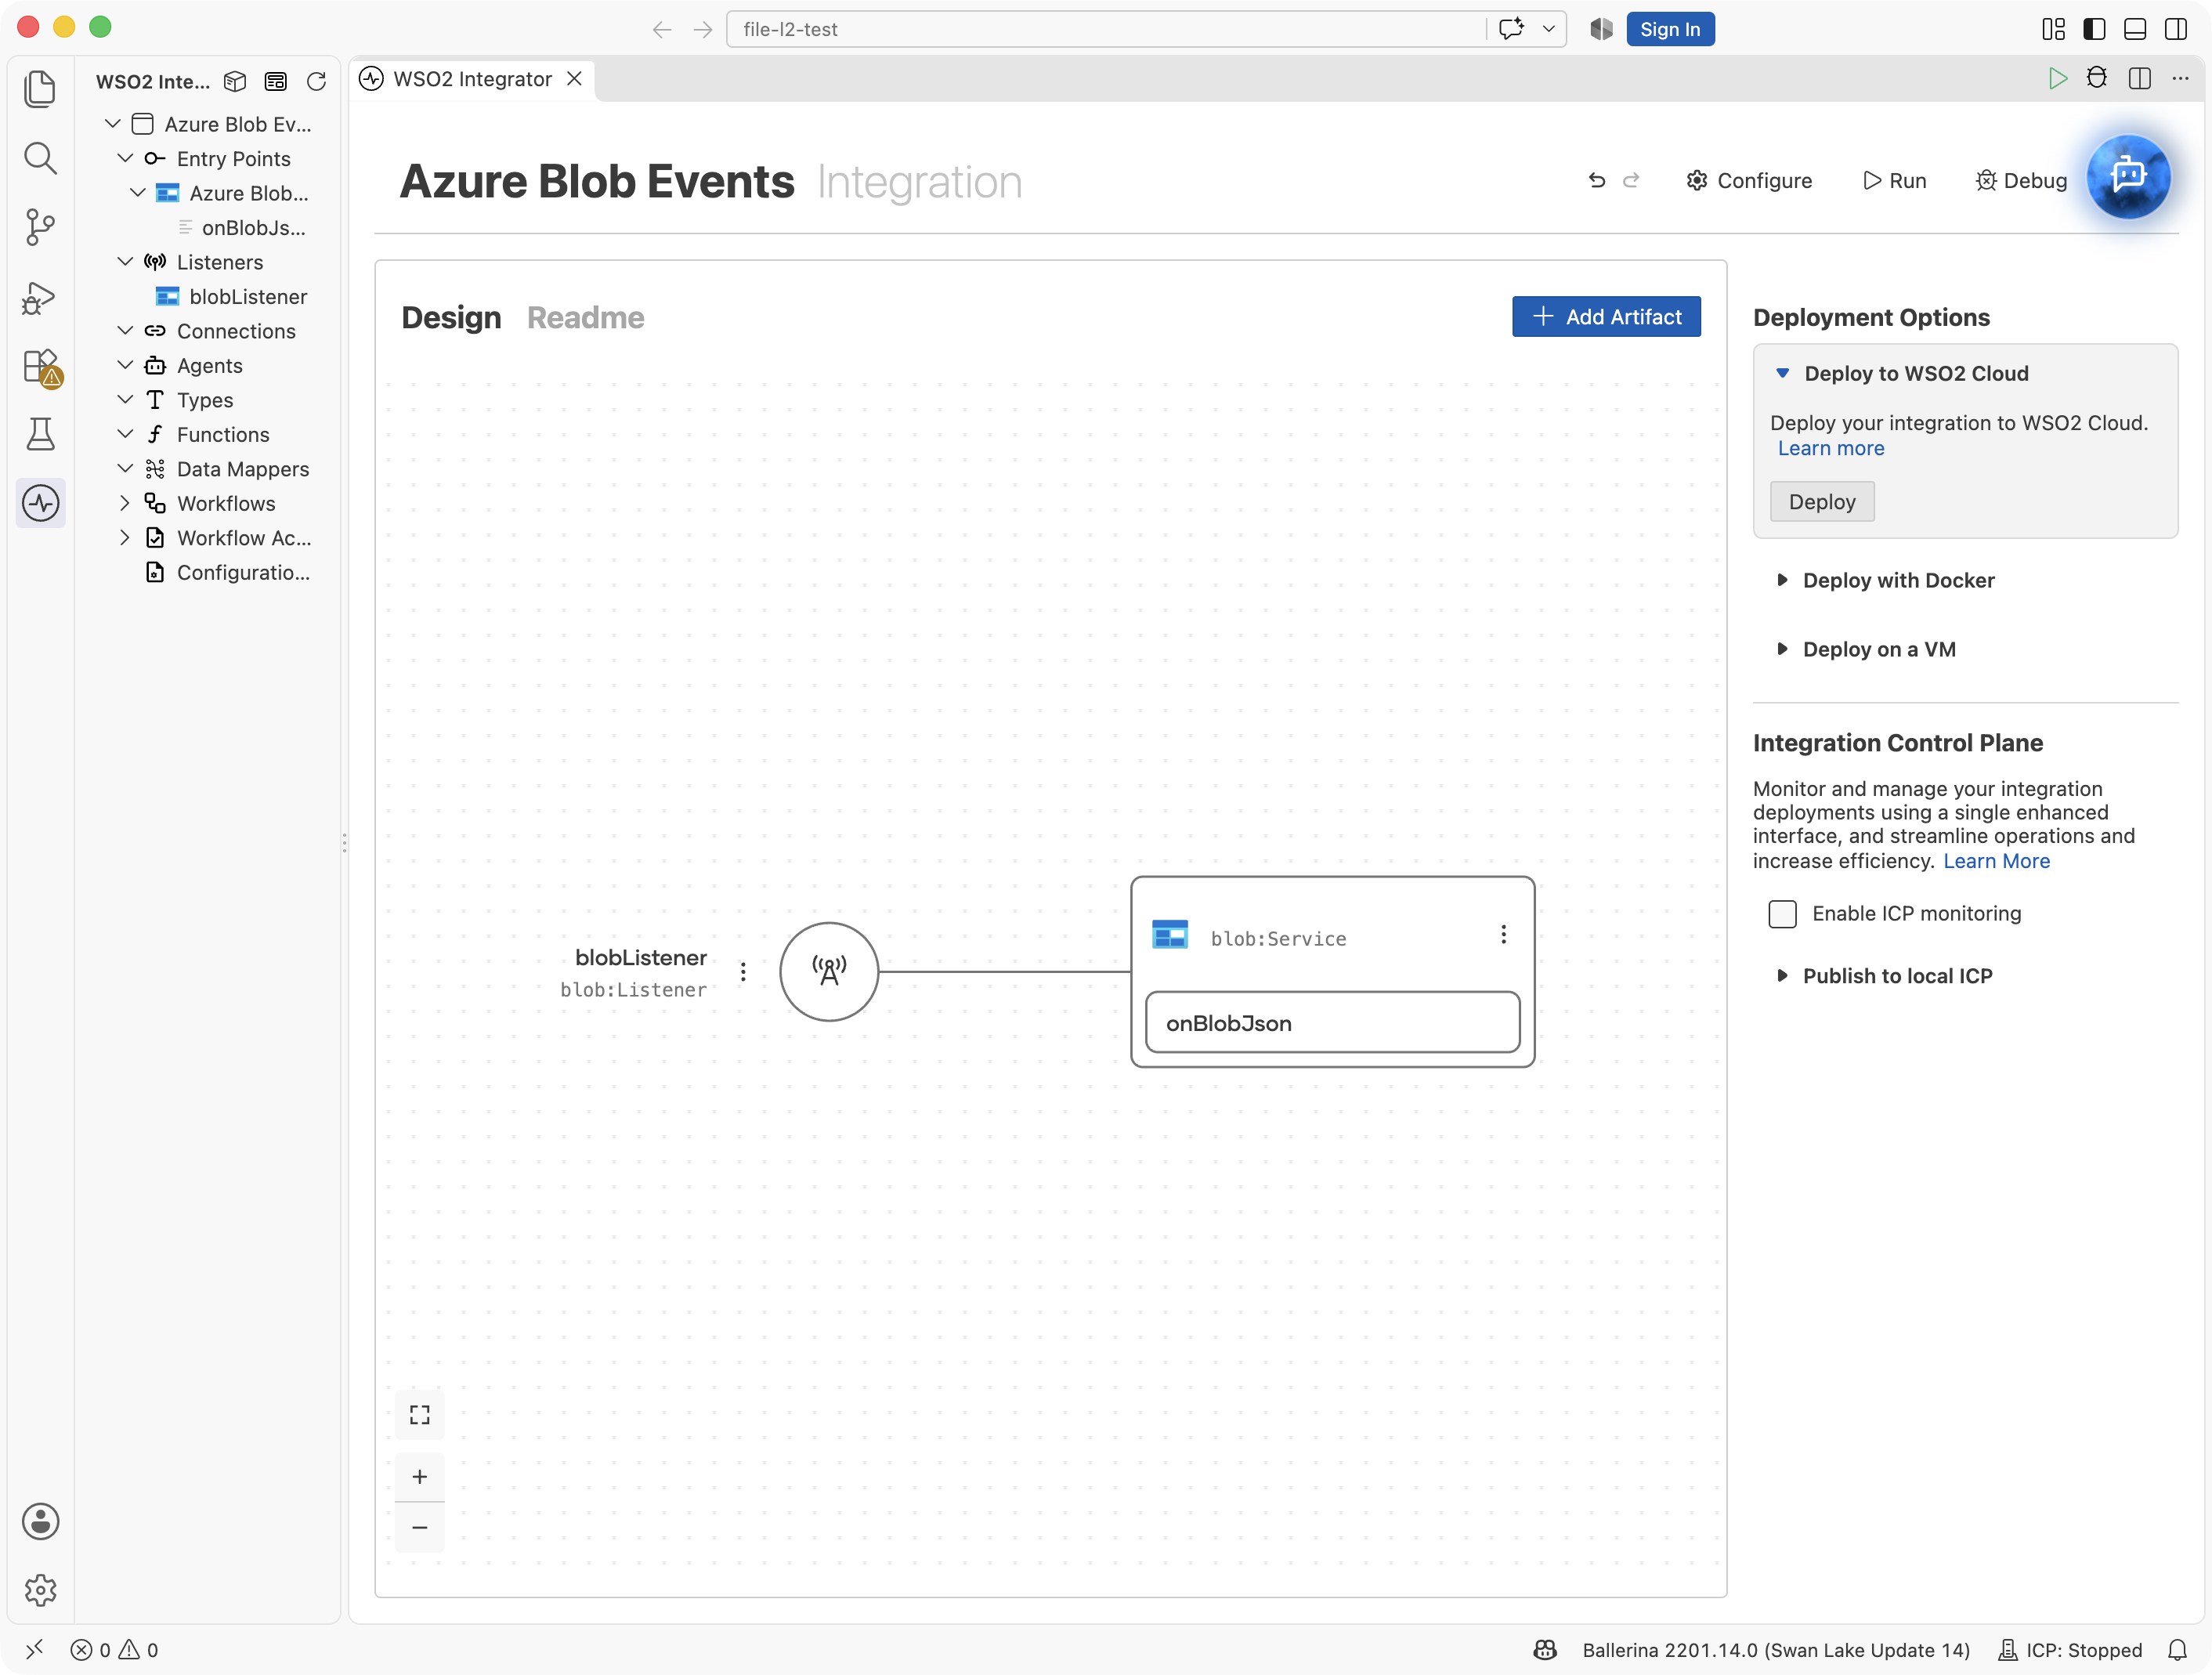
Navigate back to the integration's design view (select the integration name at the top of the sidebar). The diagram shows blobListener feeding the blob:Service with its registered onBlobJson handler.
Running the integration
Select Run Integration in the WSO2 Integrator toolbar to start the integration. To fire a test event, upload a .json blob into the container the subscription covers:
- In the Azure portal, open your storage account and navigate to Data storage > Containers.
- Open the
invoicescontainer and select Upload to add a small.jsonfile.
Within a few seconds, Event Grid delivers the created event to the queue, the onBlobJson handler fires and logs the parsed content to the console, and the message is acknowledged. A malformed .json blob is logged as an error and its message moves to the invoice-events-poison queue, which the listener creates on first use; open Data storage > Queues in the portal to inspect it. A blob of any other type is acknowledged with a warning that names the subscription filter that would keep it out, because this service declares no handler for it.
More code examples
The Azure Blob Storage connector provides practical examples illustrating usage in various scenarios. Explore these examples, covering archiving, SAS handouts, event-driven processing, and tag queries.
- Folder archive - Upload a local folder into a container, tier each blob by its age, and list what the archive holds.
- Download link - Upload a report and generate a time-limited, read-only SAS URL that can be handed to a third party.
- Blob event processor - React to blobs as they arrive with the listener, binding invoices to a record, tagging and moving them, parking bad ones in the poison queue, and logging everything else.
- Tag search - Find blobs by their index tags with a tag query and mark the matches processed.
- Blob events from Service Bus - Consume blob events delivered to an Azure Service Bus queue with
parseEventand read each new invoice through the client.