Authenticate users into Flutter applications using Asgardeo
Flutter, introduced by Google, is an open-source software development kit (SDK) that enables developers to create high-quality and high-performance cross-platform applications for mobile, web, desktop, and embedded apps with a single codebase.
There are two ways to implement user authentication in your application:
- Add the logic to handle user authentication into the application.
- Use an identity provider to handle user authentication in your application.
If you choose the first option of handling user registration and login within the application, there are certain difficulties that you need to consider.
- First, the application itself will be responsible for maintaining user identities and implementing secure password policies. It also needs to include bot detection mechanisms and ensure proper security protocols are in place for authentication.
- If you want to include a dedicated login option for admins, it needs to be handled within the application. However, if an admin makes a mistake, it will be difficult to identify the error and the respective admin, as the application will not know which admin logged in.
To avoid these challenges, it is recommended to use an identity provider to handle user registration and authentication. This means that all user identities are managed by the identity provider and that the login data is recorded. In cases of harmful activity, it will be easier to identify who was online and what they did, which makes problem-solving and threat elimination easier.
Asgardeo, a SaaS-based customer identity and access management (CIAM) solution, is a suitable identity provider for Flutter applications.
Overview
This tutorial guides you through the process of integrating user authentication capabilities into a Flutter application using Asgardeo. As Flutter supports multiple platforms with a single codebase, let's focus on developing for the iOS platform.
For detailed instructions on platform-specific development, see Flutter's installation guide.
Authentication flow
The following steps explain the high-level authentication flow:
- The user clicks the login button of a Flutter application.
- The user is directed to the Asgardeo (CIAM provider) login page.
- The user enters their Asgardeo account credentials.
- The user is authenticated via Asgardeo, and upon successful login, they are redirected to the application's home page.
- If the user clicks the logout button of the application, they are logged out from Asgardeo and redirected to the relevant page.
OIDC authentication method
The Flutter application integrates with Asgardeo using the OIDC protocol, which is a standard way of supporting secure authentication and identity and access management. OIDC supports several grant types, and here the Authorization Code flow is used.
SDKs
In the world of software development, an SDK (Software Development Kit) is an essential set of software tools and programs that enable developers to create applications for specific platforms, operating systems, computer systems, or devices.
When integrating Asgardeo with your mobile application, you can use any third-party OIDC SDK that supports the protocol. For this tutorial, let's use the flutter_appauth SDK. With this SDK, you can easily add OIDC-based login and logout capabilities to your Flutter applications.
Prerequisites
Be sure that the following prerequisites are fulfilled.
-
Flutter SDK
Follow the Flutter Installation Guide to install the SDK, tools, and dependencies.
-
Development environment
Set up any one of the following environments to edit and refactor your Flutter application code.
- Android Studio
- IntelliJ IDEA
- Visual Studio Code
Step 1: Set up the application
Clone this repository to get the sample application. At this initial stage, the application contains sign-in, view profile, and sign-out options that let you navigate the pages. User authentication is not implemented yet. Furthermore, all profile information is hard coded at the application level.
In this tutorial, we will walk you through the process of adding authentication capabilities to the application using Asgardeo as the CIAM provider. You will also learn how to retrieve and display the profile information of an authenticated user.
Step 2: Register your application in Asgardeo
To integrate Asgardeo as your CIAM provider, you need to register your application as a Mobile Application in Asgardeo. Since you have chosen iOS as your development platform, you will register it as a mobile application. See the instructions on registering a mobile application.
Note
When registering the mobile application, be sure to add wso2.asgardeo.sampleflutterapp://login-callback as the authorized redirect URI. This is the same callback URL you will add when setting up the application.
After registering your application with Asgardeo, you can enable user attributes for the app. These attributes correspond to the user's profile information that can be retrieved by the application with the user's consent.
Note
If you need additional attributes that are not listed in the user's profile section by default, you can configure new attributes and retrieve them through the profile scope.
In this tutorial, you will retrieve the First Name, Last Name, Mobile, Country, Birth Date, and Photo URL as profile information.
Note that admin users are not allowed to log in to the Android application. Therefore, it is necessary to create a business user in Asgardeo. See the instructions on managing users in Asgardeo.
Step 3: Install dependencies
Let's start the integration by adding the required dependencies:
-
A wrapper package around AppAuth that provides functionalities for the authentication and authorization of users. This dependency will be used to communicate with Asgardeo to perform user authentication.
-
A composable, future-based library for making HTTP requests. This will be used to access Asgardeo server endpoints in the application flow.
To add these dependencies:
-
Update the
dependenciessection of thepubspec.yamlfile located in the root directory of your project as follows: -
Get them downloaded by running the
flutter pub getcommand in a terminal opened at the project root directory.
Note
This tutorial uses Flutter version 3.3.10 and flutter_appauth version 4.2.1. Hence, the current implementation is only guaranteed to support those particular versions without any issues. You may find other available versions of flutter_appauth here.
Step 4: Configure the Callback URL
The callback URL is the method by which Asgardeo communicates back with the application. Once the authentication process is complete, Asgardeo redirects users back to the location specified in the callback URL.
-
iOS setup
Update the
<dict>element in theRunner/Info.plistfile located in your iOS folder by adding the following entry: -
Android/macOS Setup
Follow the Readme of the Flutter AppAuth plugin for the configurations required for macOS and Android.
Step 5: Integrate your application with Asgardeo
Follow the steps given below to integrate your application with Asgardeo:
-
Add the following code snippet to the
lib/main.dartfile to import the required external packages: -
Set the required variables by adding the following code snippet:
const clientId = '<Client ID>';
const redirectUrl = '<Redirect URI>';
const discoveryUrl = '<Discovery>';
const userInfoEndpoint = '<UserInfo>';
!!! note You can find the values of these parameters in the Quick Start and Info tabs of the registered application in Asgardeo.
clientId This is the client ID of the application registered in Asgardeo. Note: Client secrets are not issued for mobile apps since they are public clients. However, the PKCE (Proof Key for Code Exchange) extension is enabled by default as a security measure. redirectUrl (Required) This is the URI to which the authorization code is sent upon authentication and where the user is redirected upon logout. Note: This is the URI given as the Authorized redirect URIs (e.g.: wso2.asgardeo.sampleflutterapp://login-callback) when the application in Asgardeo is created. This should be constructed by appending://login-callbackto the callback URI we used when configuring the Callback URL.discoveryUrl This is the OpenID Connect Discovery endpoint in Asgardeo, which is used to discover Asgardeo's metadata required to interact with it. userInfoEndpoint This is the endpoint in Asgardeo that is used for retrieving user profile information from Asgardeo.
Now, you need to modify the loginFunction(), retrieveUserDetails(), and logOutFunction() methods in the application. All these methods reside in the lib/main.dart file.
Step 6: Implement login
First, you need to initiate the two variables _idToken and _accessToken in the _MyAppState class and modify the initState() method to keep the received id token and access token in the login flow as below.
class _MyAppState extends State<MyApp> {
  late int _pageIndex;
  late bool _isUserLoggedIn;
  late String? _idToken;
  late String? _accessToken;
  late String? _firstName;
  late String? _lastName;
  late String? _dateOfBirth;
  late String? _country;
  late String? _mobile;
  late String? _photo;

  @override
  void initState() {
    super.initState();
    _pageIndex = 1;
    _isUserLoggedIn = false;
    _idToken = '';
    _accessToken = '';
    _firstName = '';
    _lastName = '';
    _dateOfBirth = '';
    _country = '';
    _mobile = '';
    _photo = '';
  }
…………
…………
}
You can change the login method to authenticate application users to the system through Asgardeo. The authorizeAndExchangeCode() method in the flutter_appauth library handles the end-to-end authentication flow.
You can replace the current implementation of the loginFunction() with the following code snippet:
Future<void> loginFunction() async {
  try {
    final AuthorizationTokenResponse? result =
        await flutterAppAuth.authorizeAndExchangeCode(
      AuthorizationTokenRequest(
        clientId,
        redirectUrl,
        discoveryUrl: discoveryUrl,
        promptValues: ['login'],
        scopes: ['openid', 'profile'],
      ),
    );

    setState(() {
      _isUserLoggedIn = true;
      _idToken = result?.idToken;
      _accessToken = result?.accessToken;
      _pageIndex = 2;
    });
  } catch (e, s) {
    print('Error while login to the system: $e - stack: $s');
    setState(() {
      _isUserLoggedIn = false;
    });
  }
}
Here's how the flow works in more detail:
-
AuthorizationTokenRequest is created by passing the
clientId,redirectUrl,discoveryUrl, andscopes.The scope parameter defines the actions that the Flutter application can perform on behalf of the user, and it is used to retrieve the required user attributes by the application. The following are the scopes defined in the request:
openid: Performs OIDC sign-in.profile: Retrieves the user's profile information.
-
The
AuthorizationTokenRequestobject is then passed into appAuth.authorizeAndExchangeCode() to start the sign-in process.The user is directed to Asgardeo's sign-in page for authentication. As a result, AuthorizationTokenResponse is received. It contains two token types returned by Asgardeo.
- Access Token: A token represents access delegated to the client application by the user to access the user's protected resources. It has a specific scope and duration.
- ID Token: A security token represented as a JSON Web Token (JWT) that proves the user's successful authentication with Asgardeo. Furthermore, it contains other requested user profile information.
Step 7: Retrieve user information
Once the user has logged in to the system, there is a section that shows the user's profile information. To get this information from Asgardeo, we will implement the retrieveUserDetails() method. This method uses the access token received in the login flow and includes it in the header section of the request as a bearer token to access the /userinfo endpoint.
Then, the retrieved profile information response is parsed and set to the corresponding variables.
You will notice that the ID token contains the same set of user information and wonder why we are using a different API call to fetch them separately. Calling the userinfo endpoint with the retrieved access token is an alternative way of retrieving the users profile information.
Furthermore, this demonstrates how access tokens are used for accessing protected resources (such as the userinfo endpoint) on behalf of the user.
You can use the following code snippet to replace the content of the retrieveUserDetails() method.
Future<void> retrieveUserDetails() async {
    final userInfoResponse = await http.get(
      userInfoEndpoint,
      headers: {'Authorization': 'Bearer $_accessToken'},
    );

    if (userInfoResponse.statusCode == 200) {
      var profile = jsonDecode(userInfoResponse.body);
      setState(() {
        _firstName = profile['given_name'];
        _lastName = profile['family_name'];
        _dateOfBirth = profile['birthdate'];
        _country = profile['address']['country'];
        _mobile = profile['phone_number'];
        _photo = profile['picture'];
        _pageIndex = 3;
      });
    } else {
      throw Exception('Failed to get user profile information');
    }
  }
Step 8: Implement logout
Finally, change the logOutFunction() method, which performs the user logout. The following code snippet handles the user's sign-out functionality.
void logOutFunction() async {
    try {
      final EndSessionResponse? result = await flutterAppAuth.endSession(
        EndSessionRequest(
          idTokenHint: _idToken,
          postLogoutRedirectUrl: redirectUrl,
          discoveryUrl: discoveryUrl,
        ),
      );

      setState(() {
        _isUserLoggedIn = false;
        _pageIndex = 1;
      });
    } catch (e, s) {
      print('Error while logout from the system: $e - stack: $s');
    }
  }
Step 7: Try it out
Let's walk through the end-to-end flow of the application we built in this tutorial.
-
Run the Flutter application using the following command.
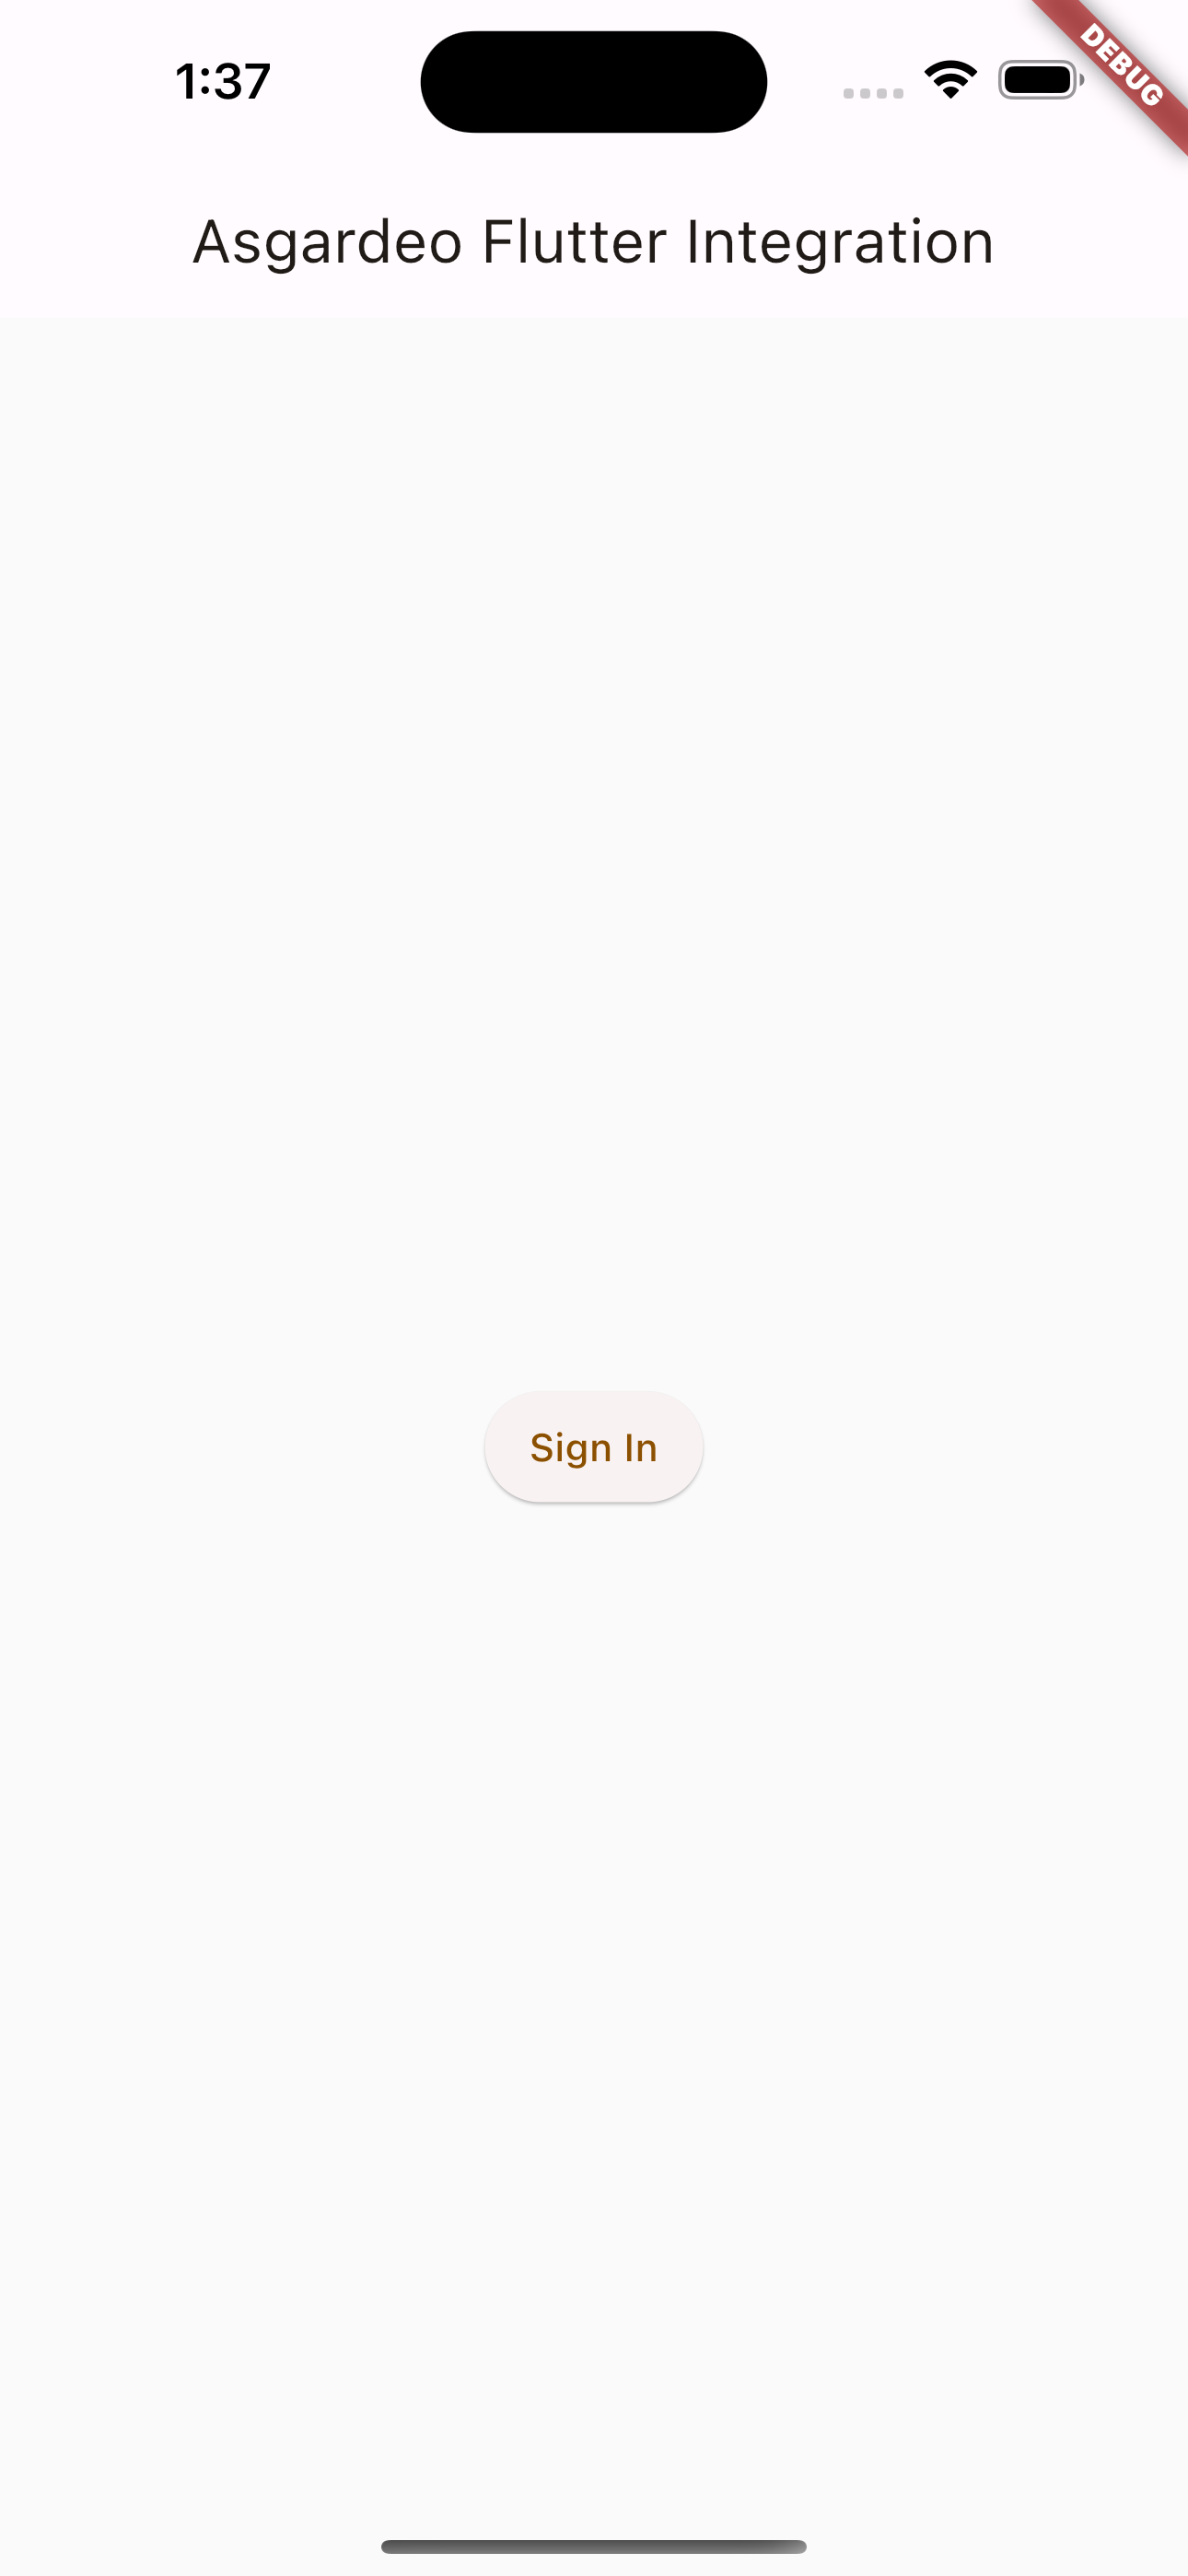
After the application starts, you will see the login page with the Sign In option.
-
Click Sign In to start the authentication process.
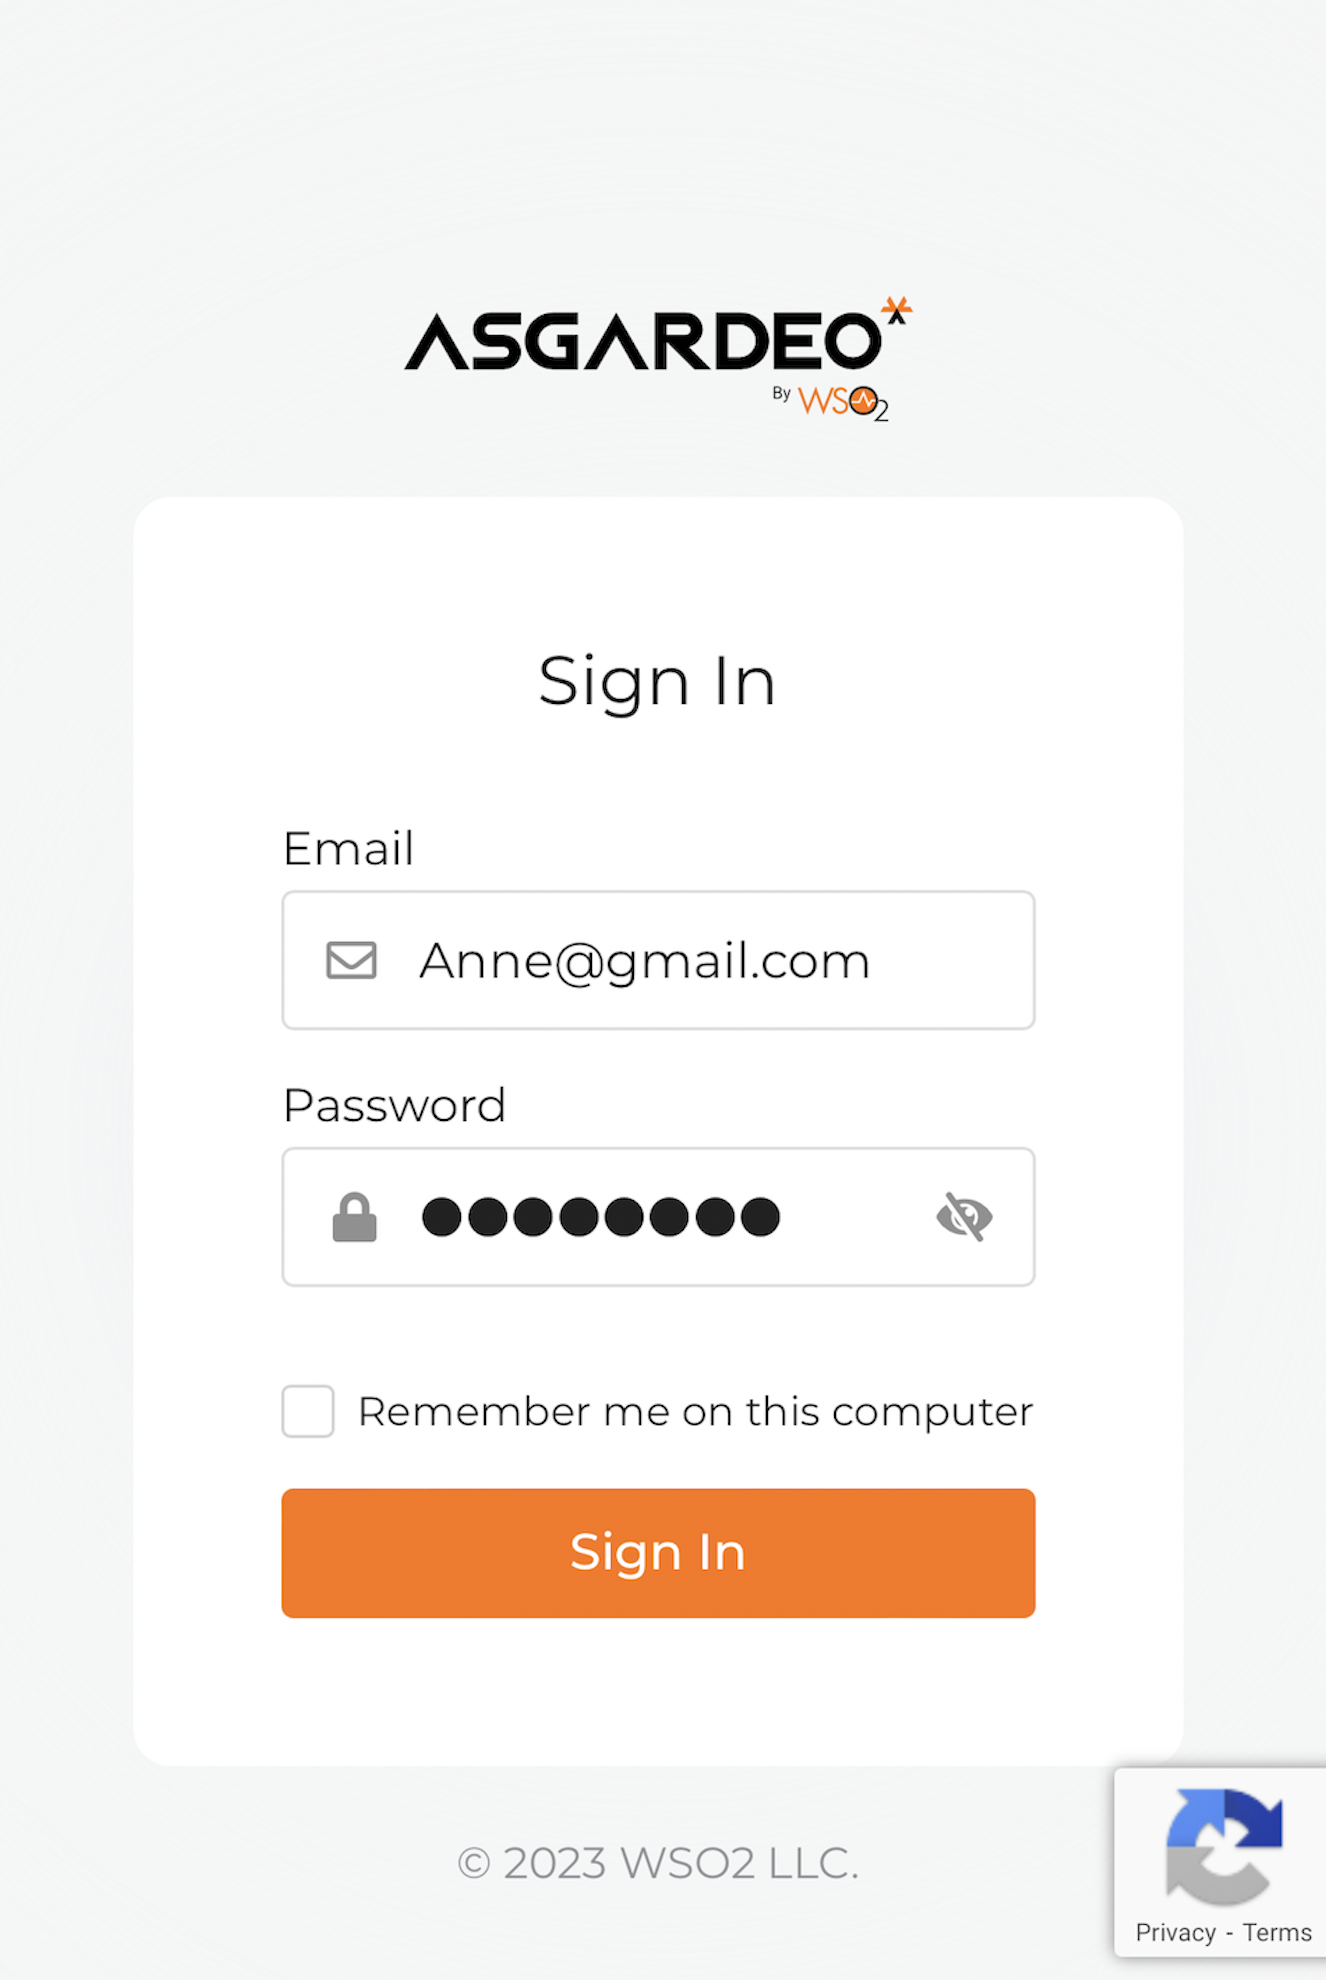
You will be redirected to Asgardeo's login page, where you will enter valid user credentials.
-
Use the credentials of the user created when you registered the application in Asgardeo.
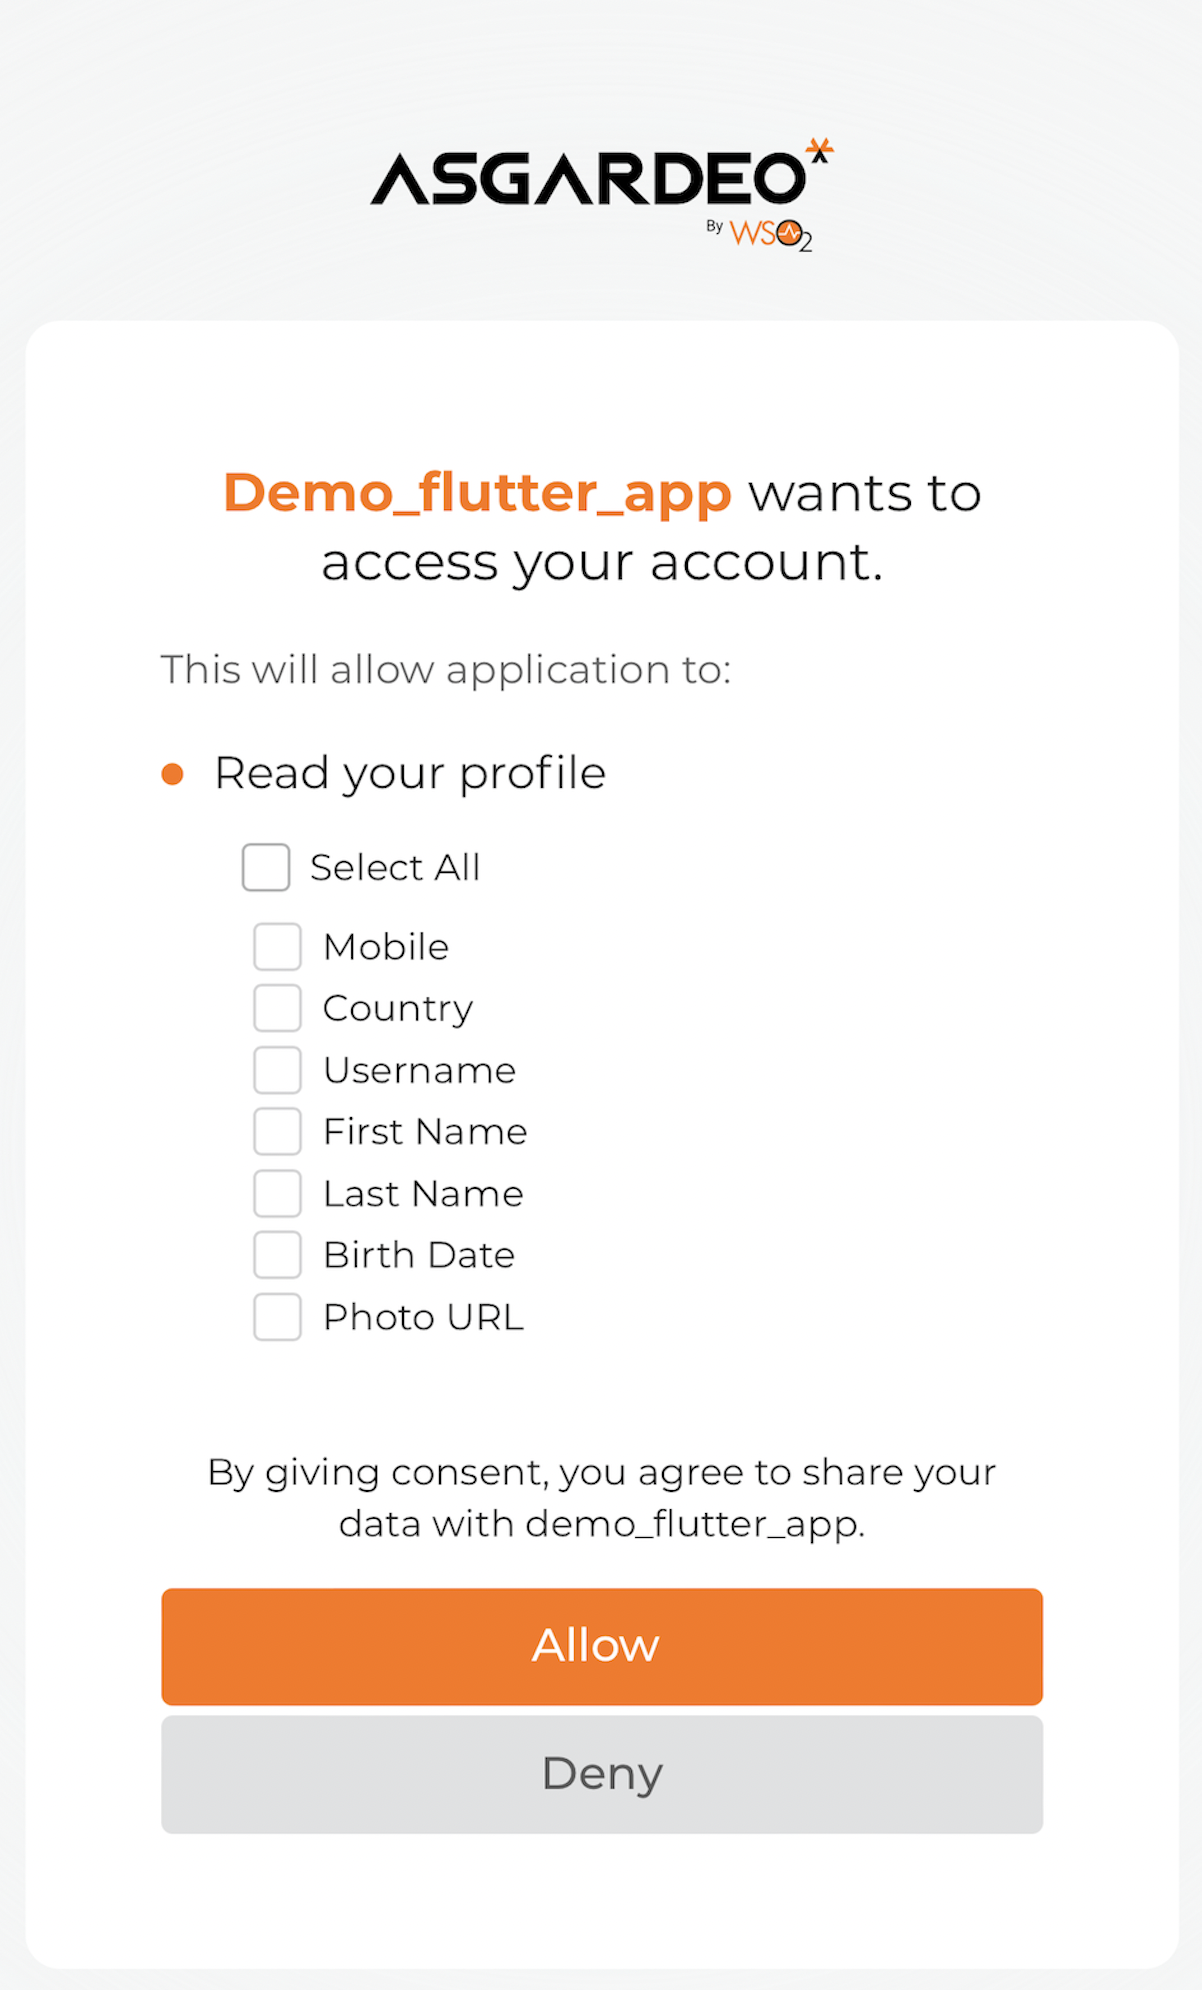
Upon the first login attempt, Asgardeo prompts for consent to share the configured attributes with the Flutter application.
-
Give your consent accordingly, allowing the application to access your profile information.
-
Once logged in, you will see a home page with the View profile and Sign out options.

-
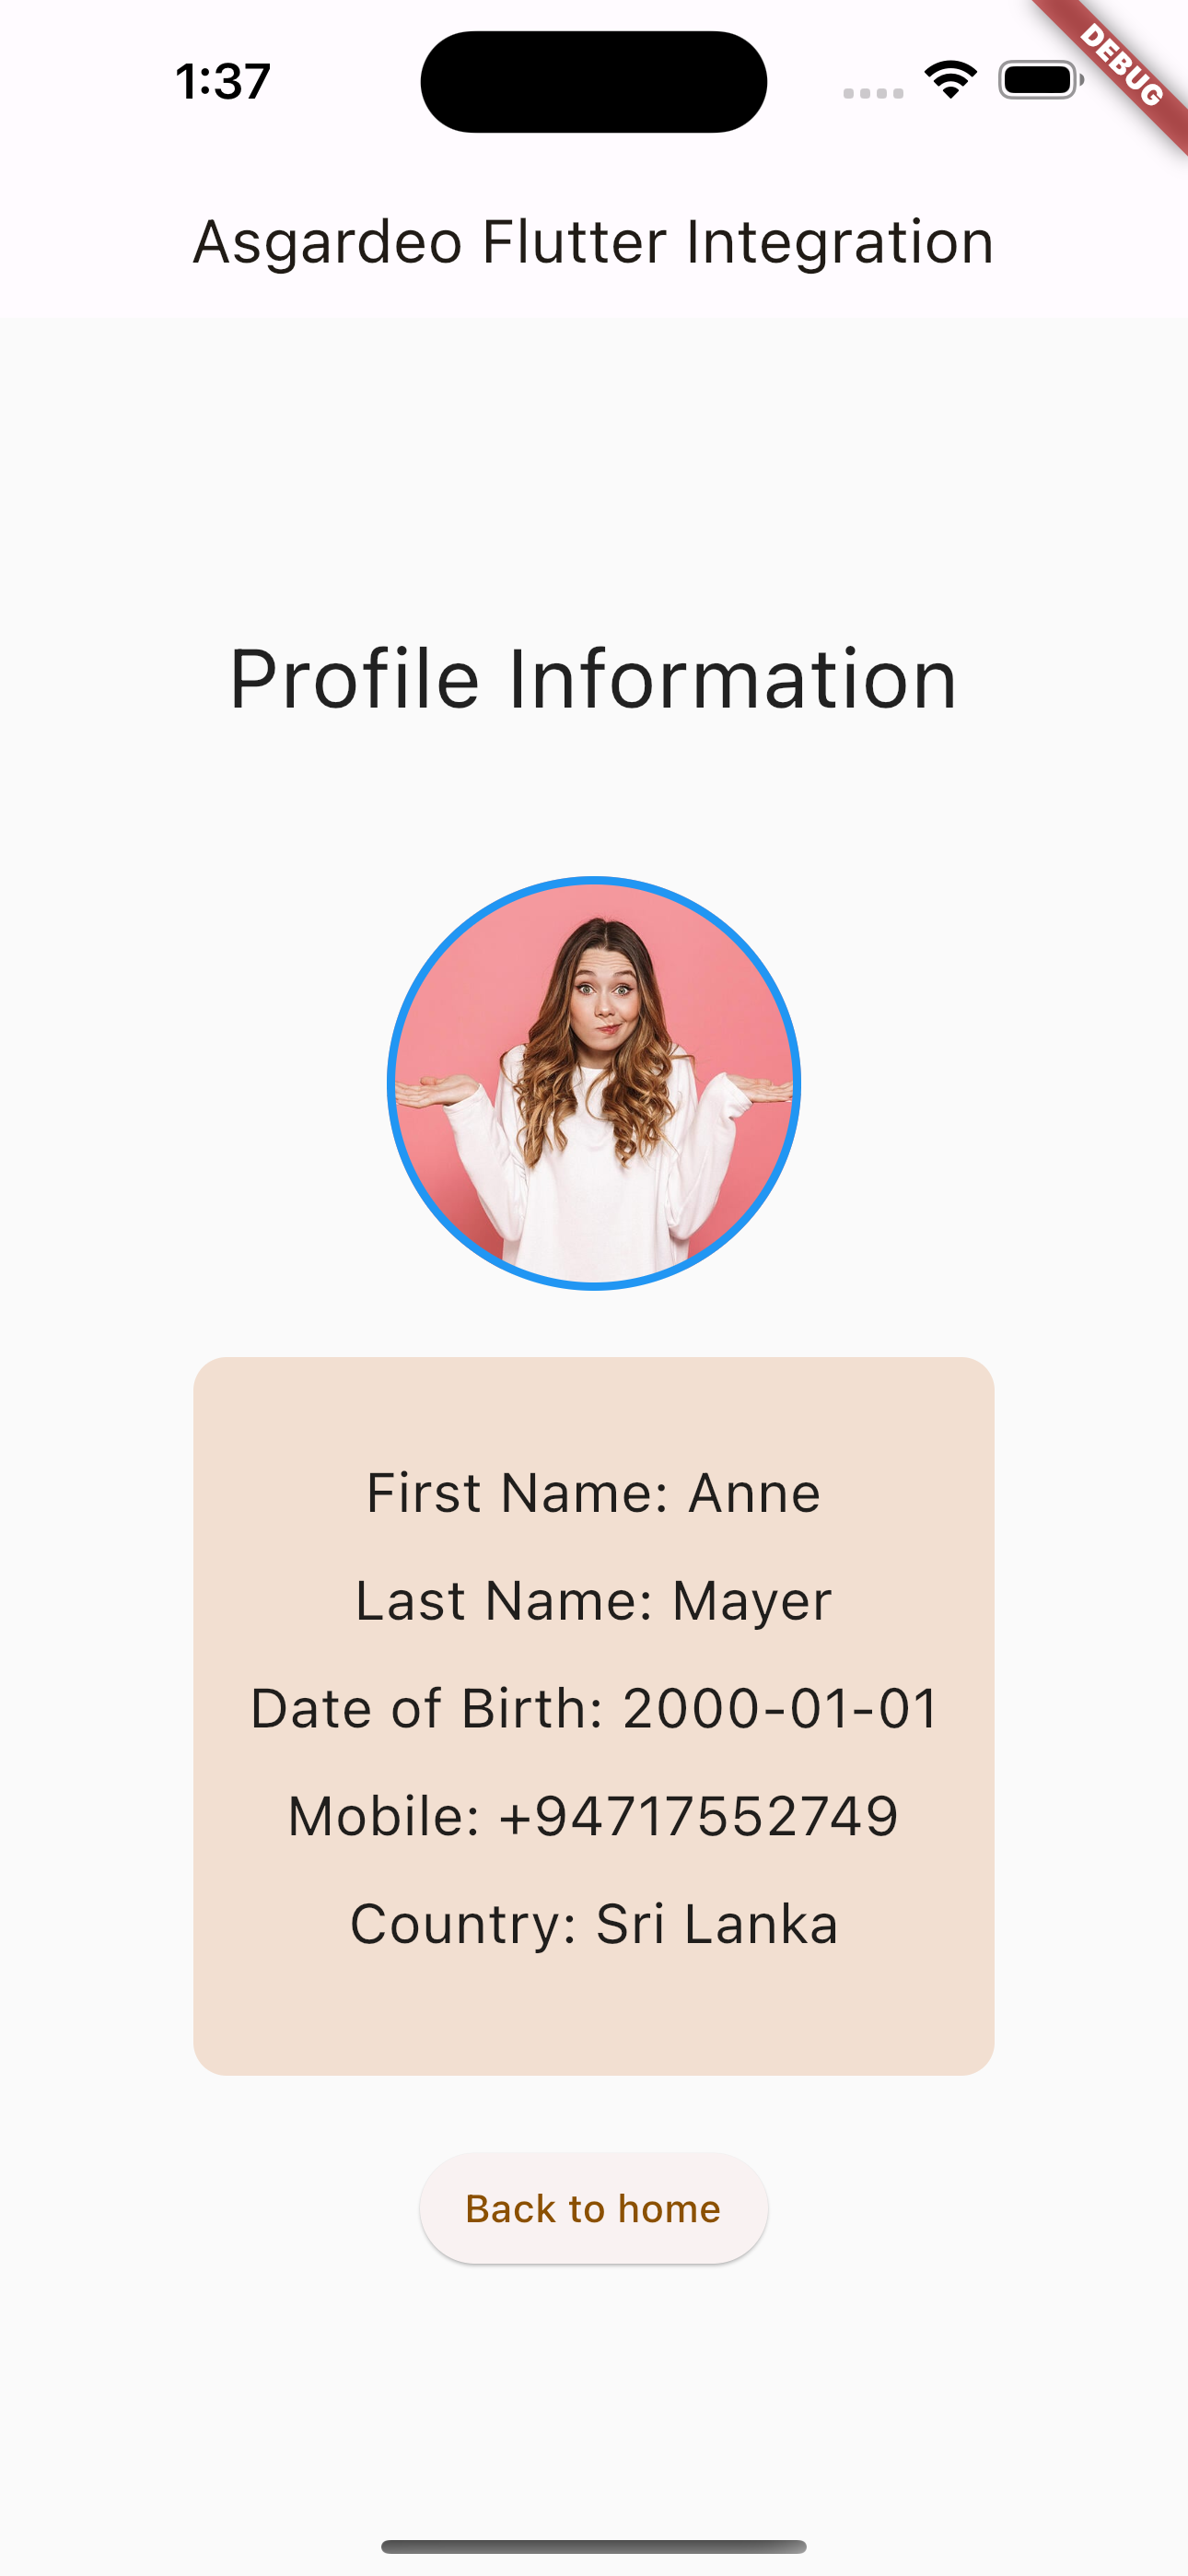
Go to the Profile Information section by clicking View profile.
You can now view the logged-in user's profile information. You can click Back to home to navigate back to the home page.
-
Log out from the application by clicking Sign out.
You get redirected to the login page upon a successful logout.
Summary
In this tutorial, we demonstrated how to add authentication to a Flutter application using Asgardeo as the CIAM provider. The integration of authentication and authorization capabilities was made possible with the use of the Flutter AppAuth plugin.
We also provided a detailed guide on how to configure the application on Asgardeo. Starting with a sample Flutter application without user authentication implemented, we modified the sign-in, sign-out, and user info retrieval methods to successfully integrate authentication and profile info retrieval capabilities using Asgardeo.
The completed source code of the application.