Examples
Solace Producer Example
What you'll build
Build a Solace PubSub+ message-publishing integration using the WSO2 Integrator low-code visual designer. The integration connects to a Solace PubSub+ broker and publishes a message to a configured topic, with all connection parameters stored as configurable variables.
Operations used:
- Send : Publishes a message to the Solace PubSub+ broker on a configured topic
Architecture
Prerequisites
- A running Solace PubSub+ broker with access to a host URL, message VPN, username, and password
Setting up the Solace MessageProducer integration
New to WSO2 Integrator? Follow the Create a New Integration guide to set up your integration first, then return here to add the connector.
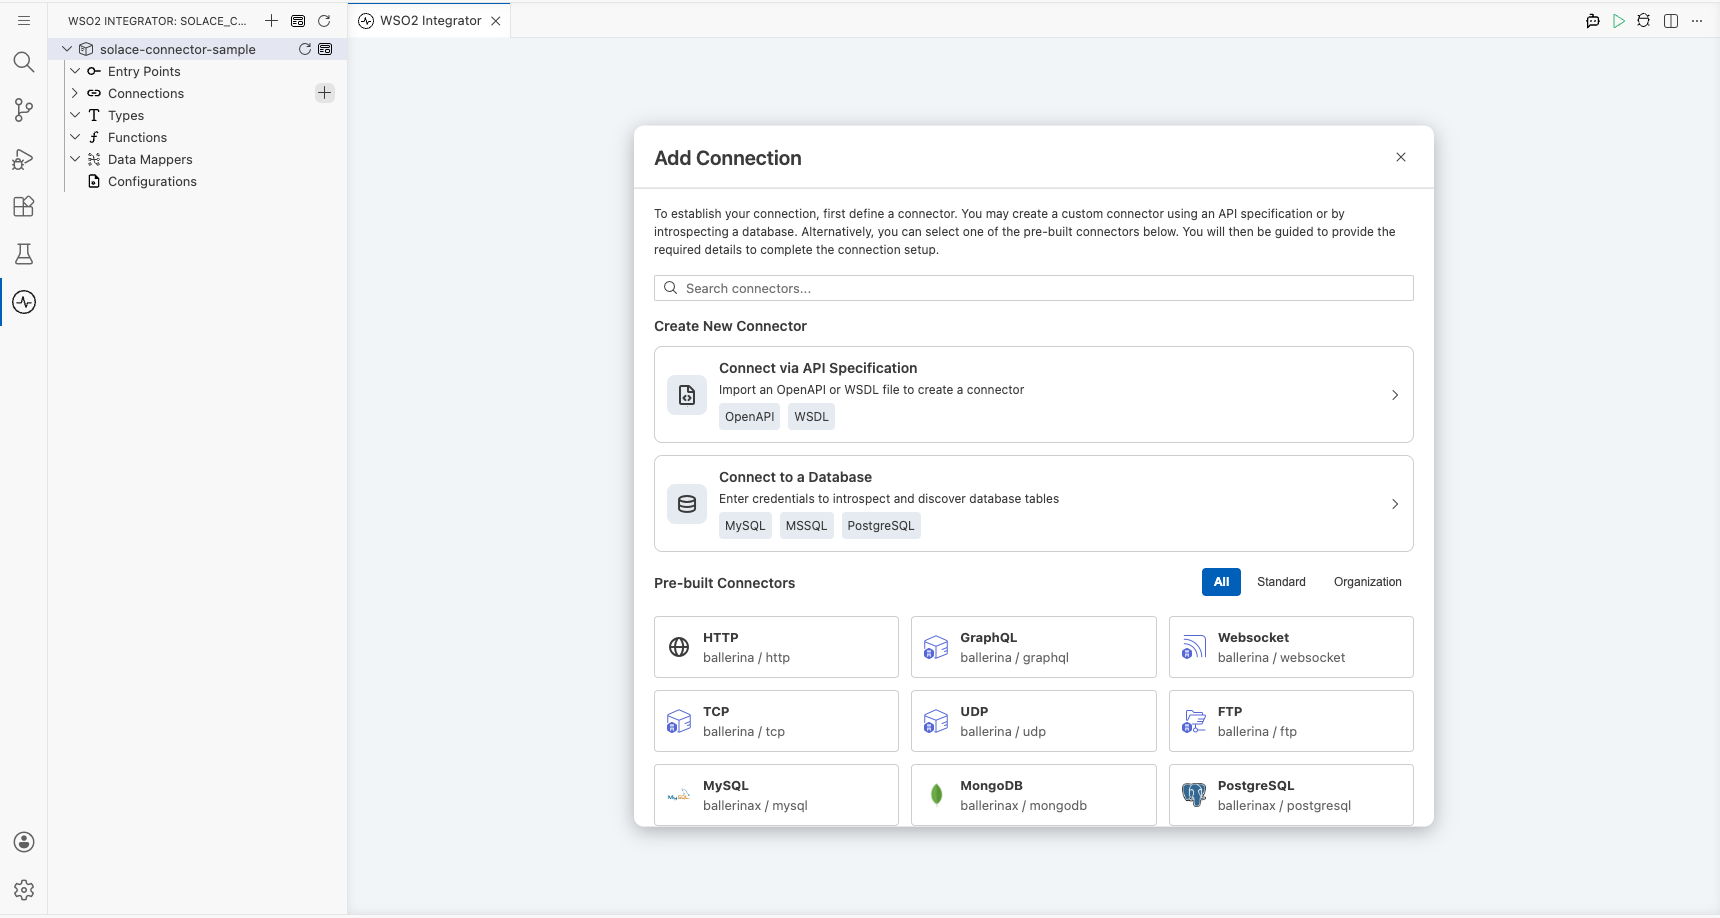
Adding the Solace MessageProducer connector
Step 1: Open the connector palette
- Navigate to the Connections section in the WSO2 Integrator panel.
- Select + Add Connection to open the connector marketplace palette.
- Enter
solacein the search box to filter results. - Select Solace MessageProducer from the list.
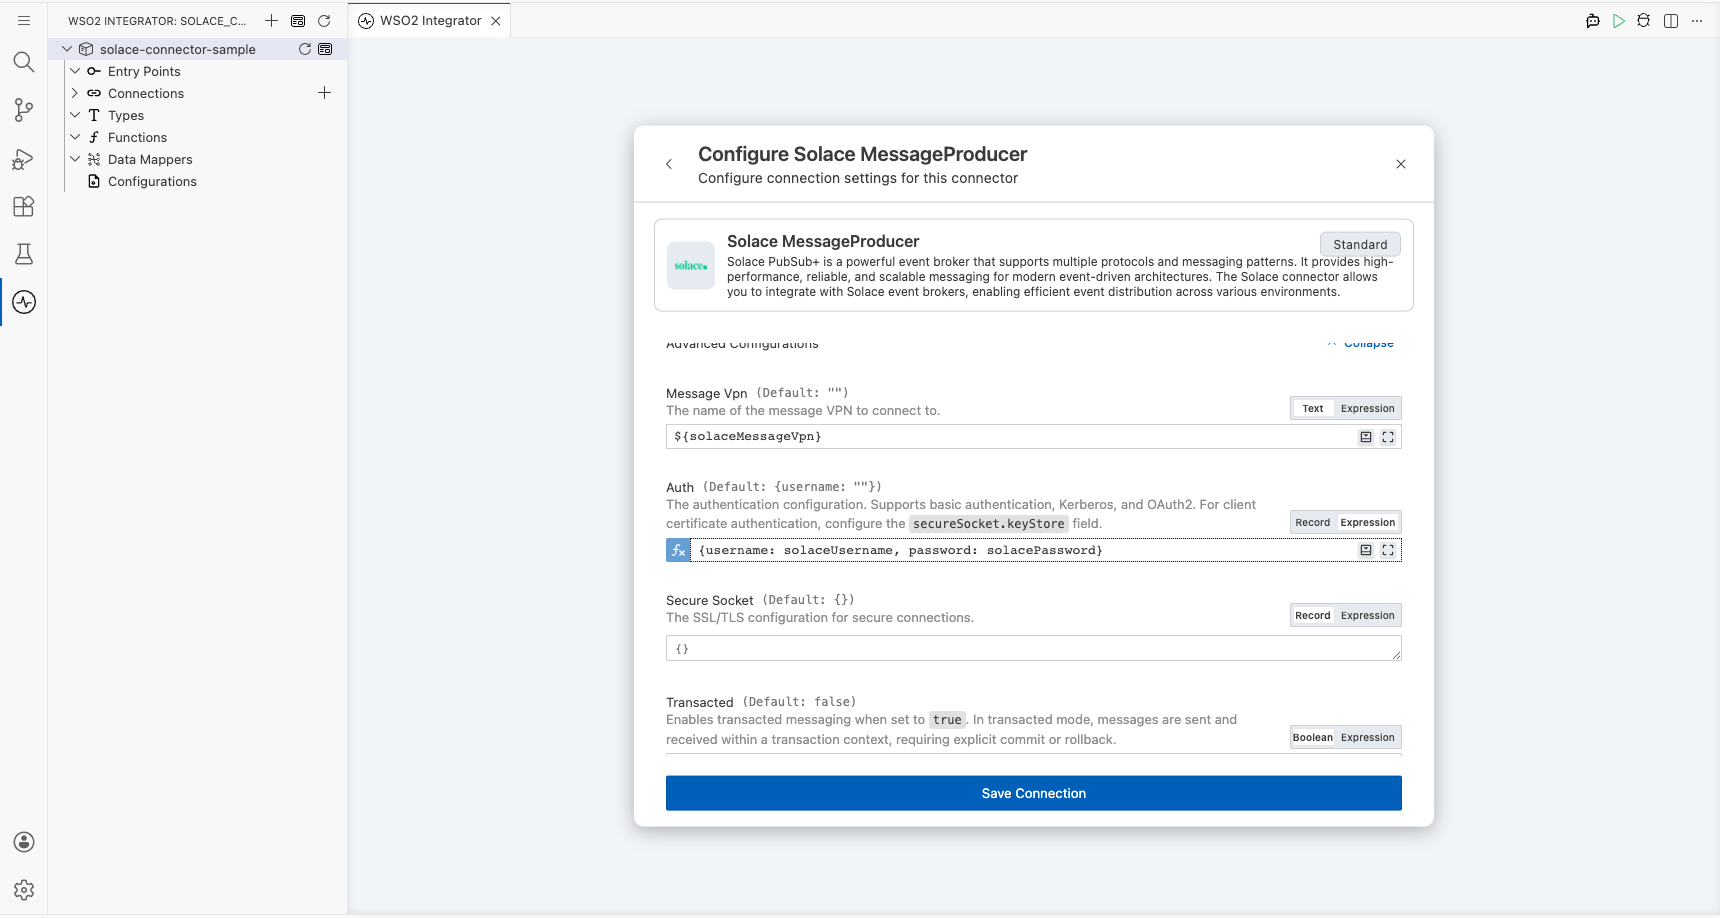
Configuring the Solace MessageProducer connection
Step 2: Fill in connection parameters
Bind all sensitive parameters to configurable variables so they can be overridden at runtime without code changes. Use the Configurables panel to create each variable, then inject it into the corresponding field.
- Host URL : The Solace broker host URL
- Message VPN : The message VPN name on the broker
- Auth : Authentication configuration; enter the record literal referencing
solaceUsernameandsolacePasswordconfigurable variables in Expression mode - Username (inside Auth) : Username for basic authentication
- Password (inside Auth) : Password for basic authentication
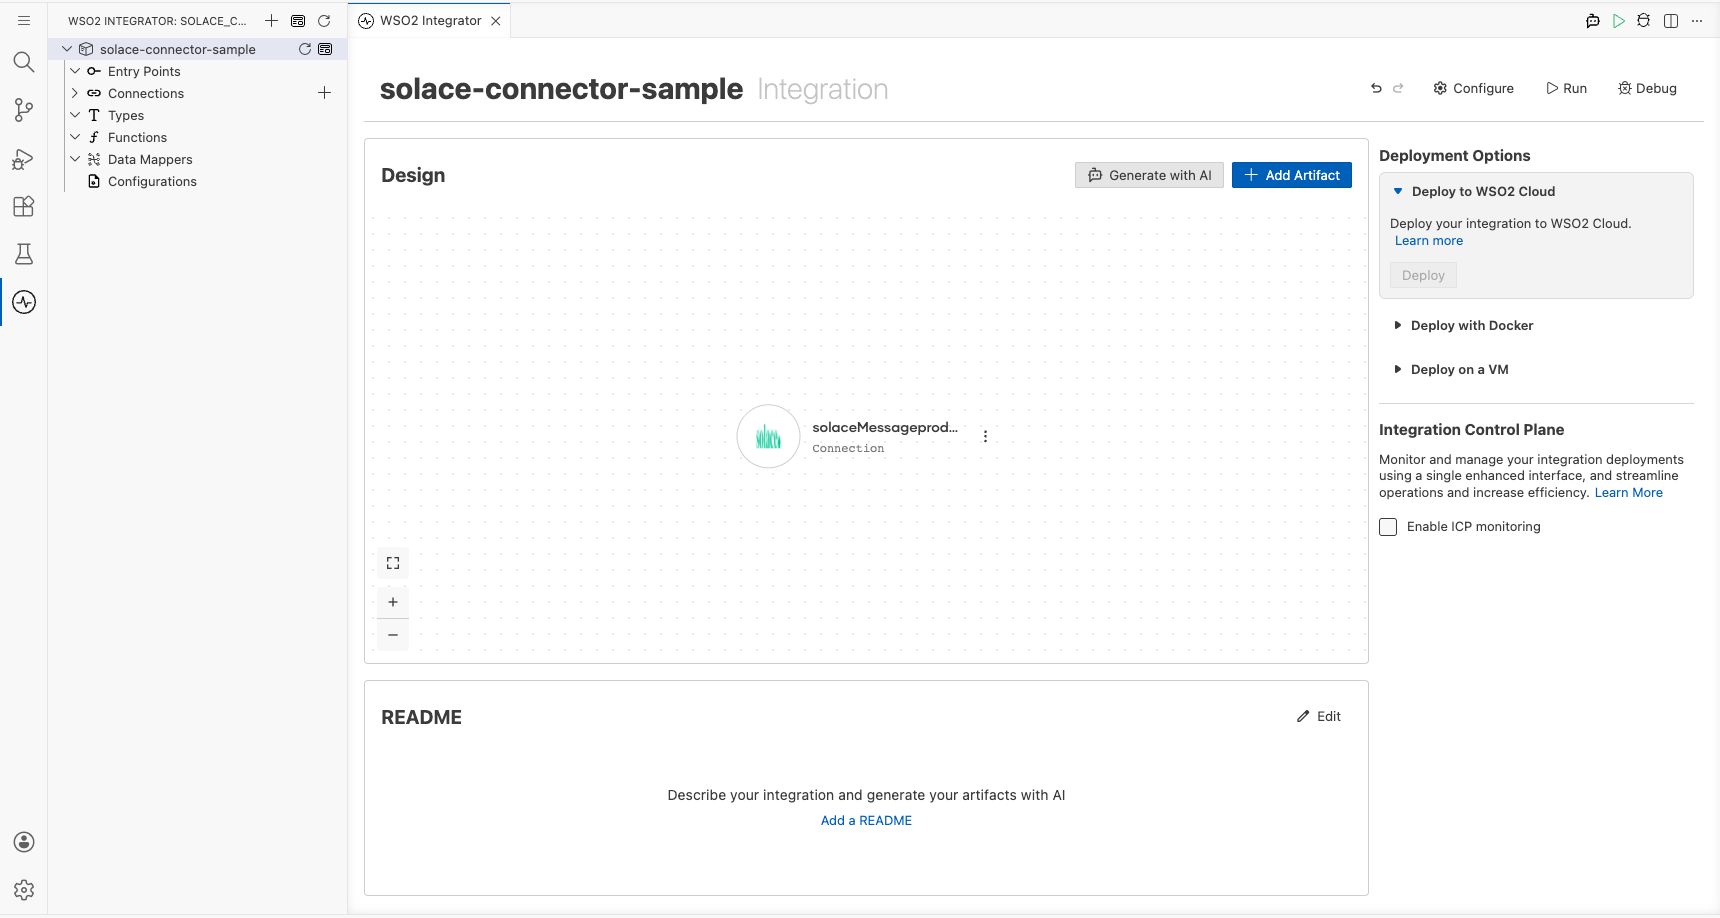
Step 3: Save the connection
Select Save Connection to persist the connection. The Connections panel now shows solaceMessageproducer as an available connection in the project.
Step 4: Set actual values for your configurables
- In the left panel, select Configurations.
- Set a value for each configurable listed below.
- solaceHostUrl (string) : The Solace broker host URL (for example,
tcp://your-host:55555) - solaceMessageVpn (string) : The message VPN name on the broker
- solaceUsername (string) : Username for basic authentication
- solacePassword (string) : Password for basic authentication
- solaceTopicName (string) : Topic name to publish messages to
Configuring the Solace MessageProducer Send operation
Step 5: Add the Automation entry point
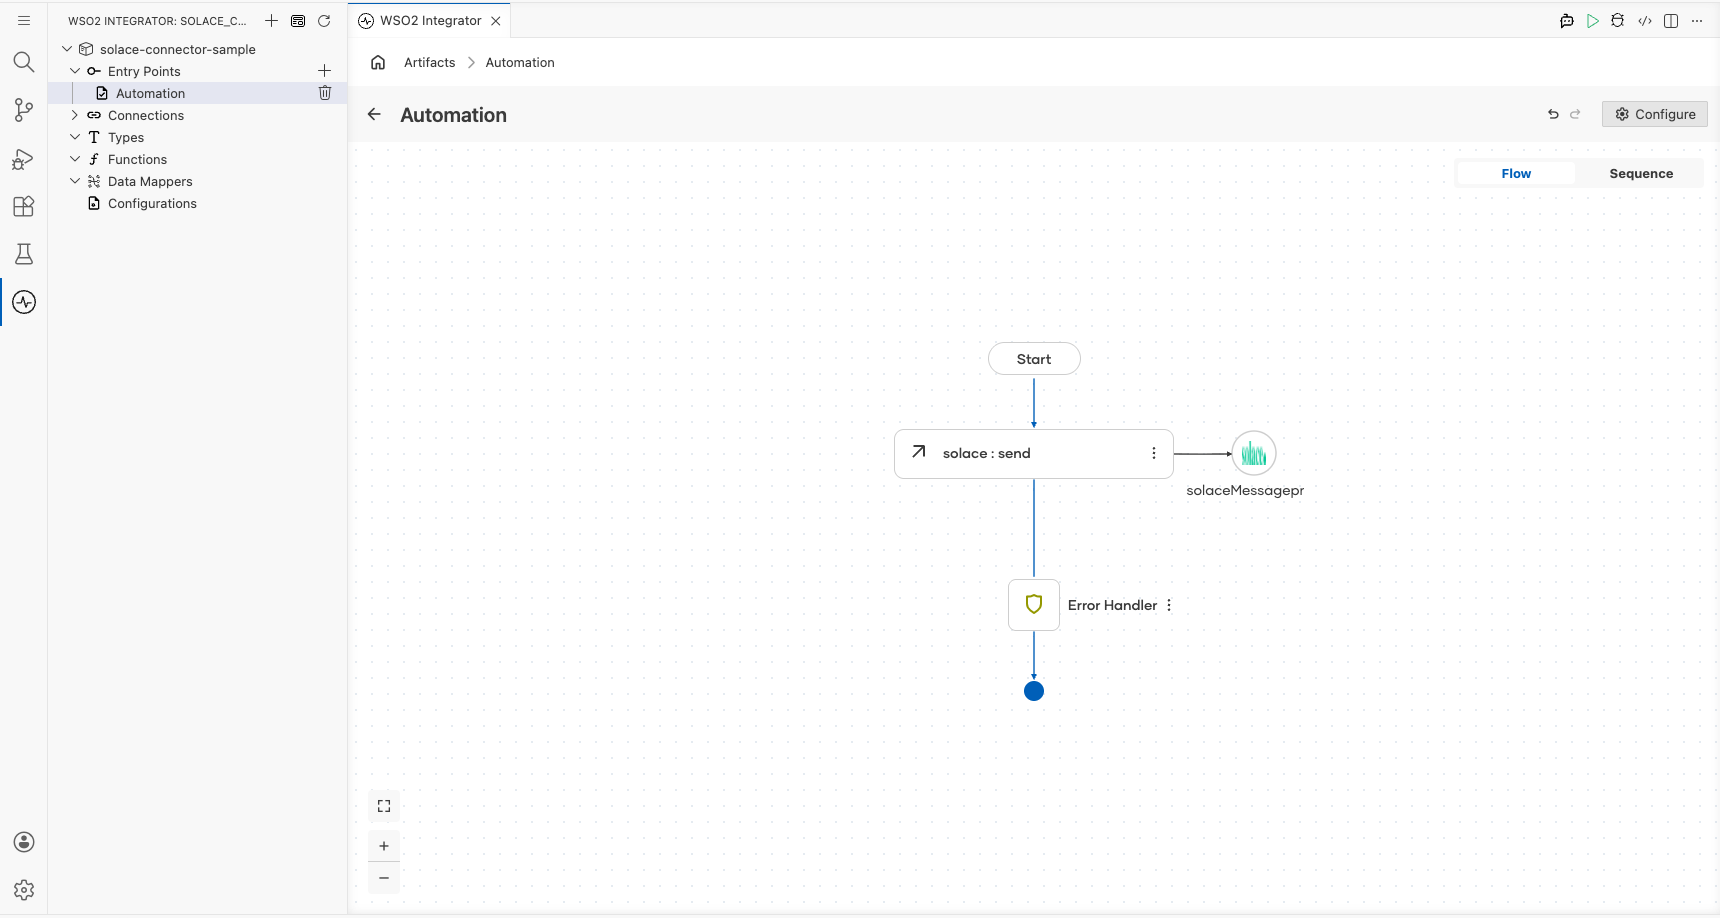
Open the Automation entry point (main) in the WSO2 Integrator panel under Entry Points. The flow canvas opens. Select the + button on the canvas to open the operations node panel. Under Connections, select solaceMessageproducer to expand its available operations.
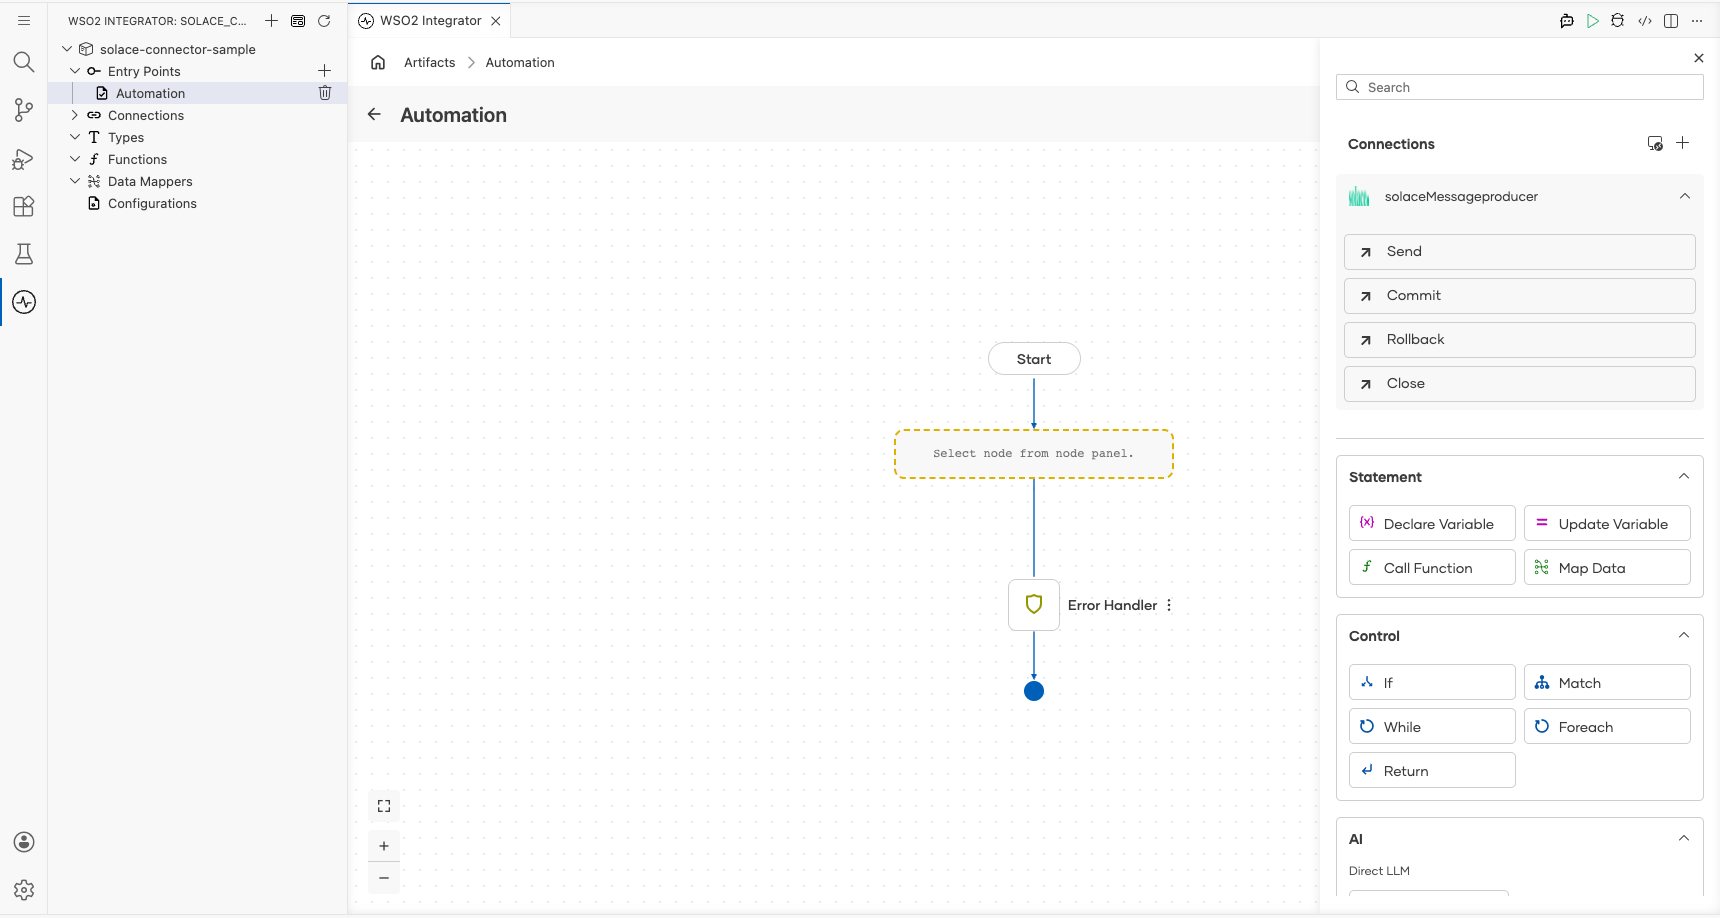
Step 6: Select the Send operation and configure its parameters
Select Send from the operations list. The Send operation form opens with the title solaceMessageproducer → send. Configure the following parameter:
- Message : A
solace:Messagerecord; set thepayloadfield to"Hello from Solace!"
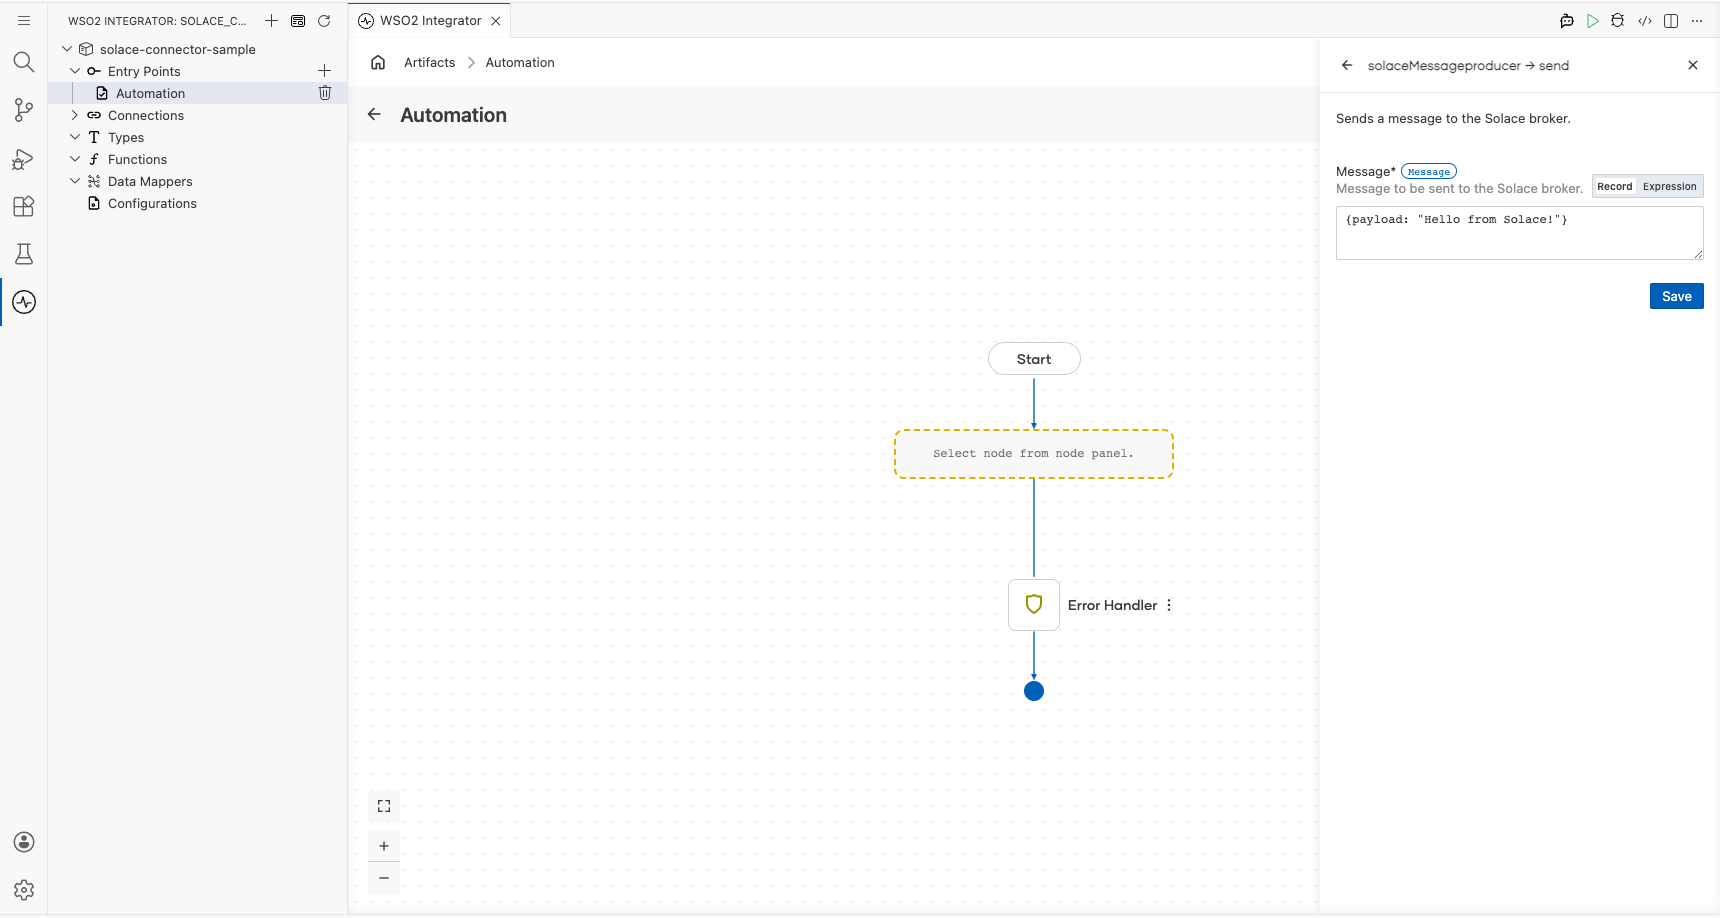
Select Save to add the node to the flow.
Try it yourself
Try this sample in WSO2 Integration Platform.

Solace Consumer Example
What you'll build
Build a Solace MessageConsumer integration that connects to a Solace broker, receives a message from a queue, and logs the result. This integration uses the WSO2 Integrator low-code canvas to configure the connection and operation visually.
Operations used:
- Receive : Receives a message from the configured Solace queue, blocking until a message arrives or a timeout occurs
Architecture
Prerequisites
- A Solace broker accessible via a host URL
Setting up the Solace MessageConsumer integration
New to WSO2 Integrator? Follow the Create a New Integration guide to set up your integration first, then return here to add the connector.
Adding the Solace MessageConsumer connector
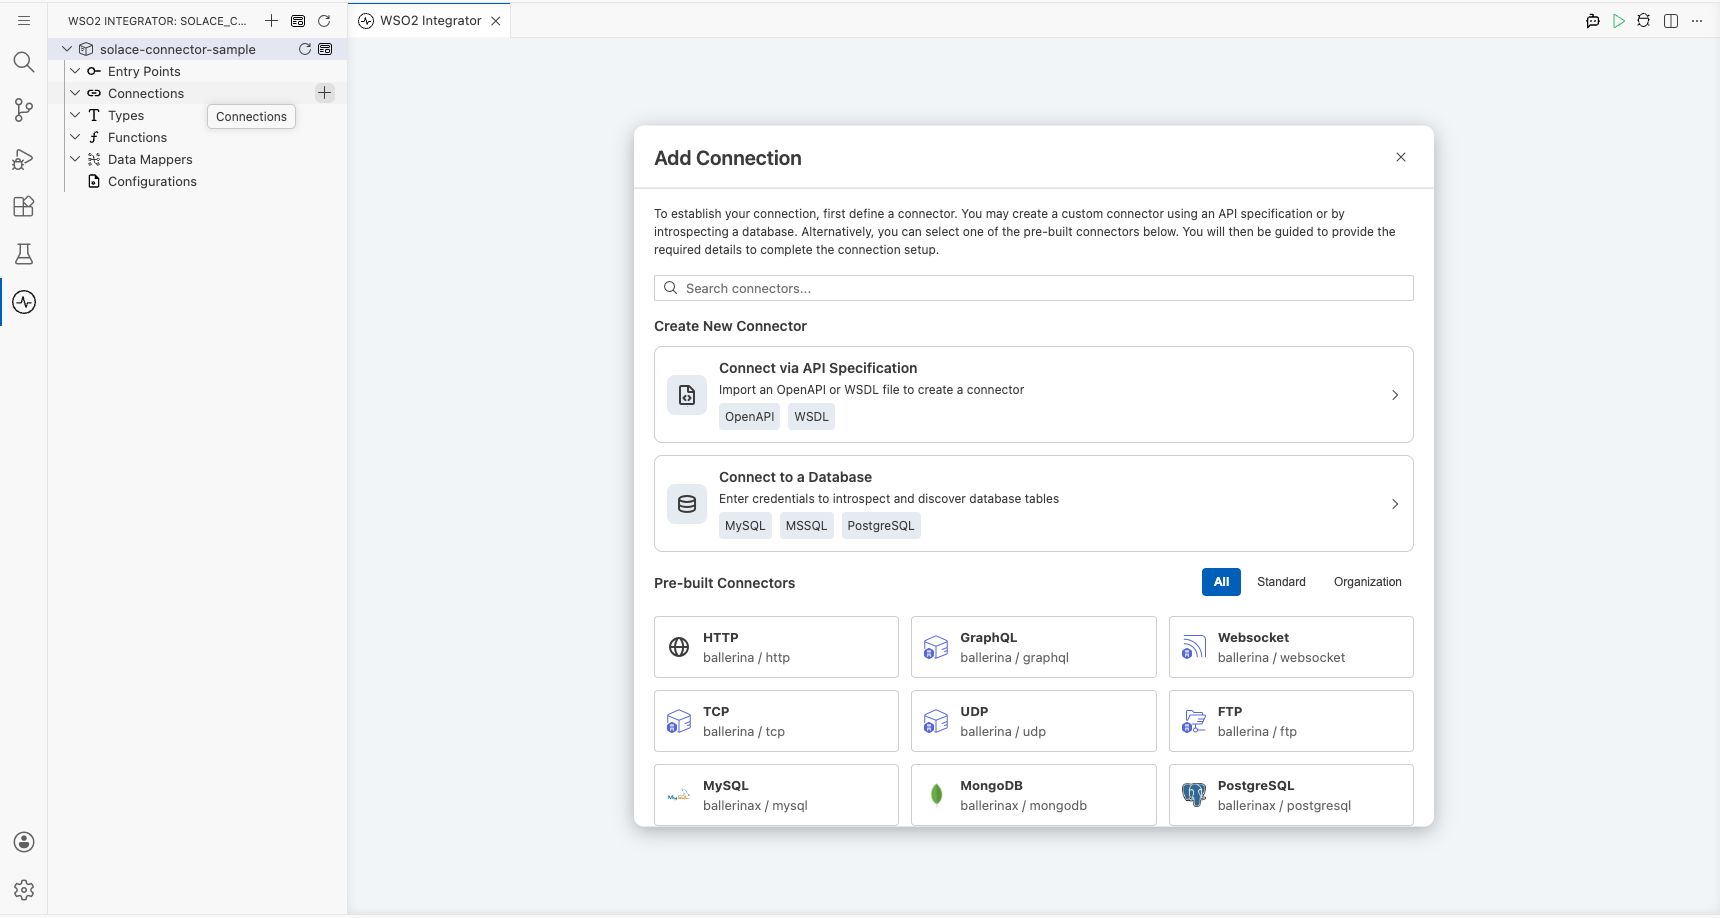
Step 1: Open the Add connection panel
In the WSO2 Integrator sidebar, hover over Connections and select the + icon to open the Add Connection panel.
Configuring the Solace MessageConsumer connection
Step 2: Fill in the connection form
Enter the following parameters, binding each field to a configurable variable:
- Connection Name : Auto-filled name for this connection instance
- Url : The Solace broker host URL, bound to a configurable variable
- Subscription Config : Queue or topic subscription record, bound to a configurable variable
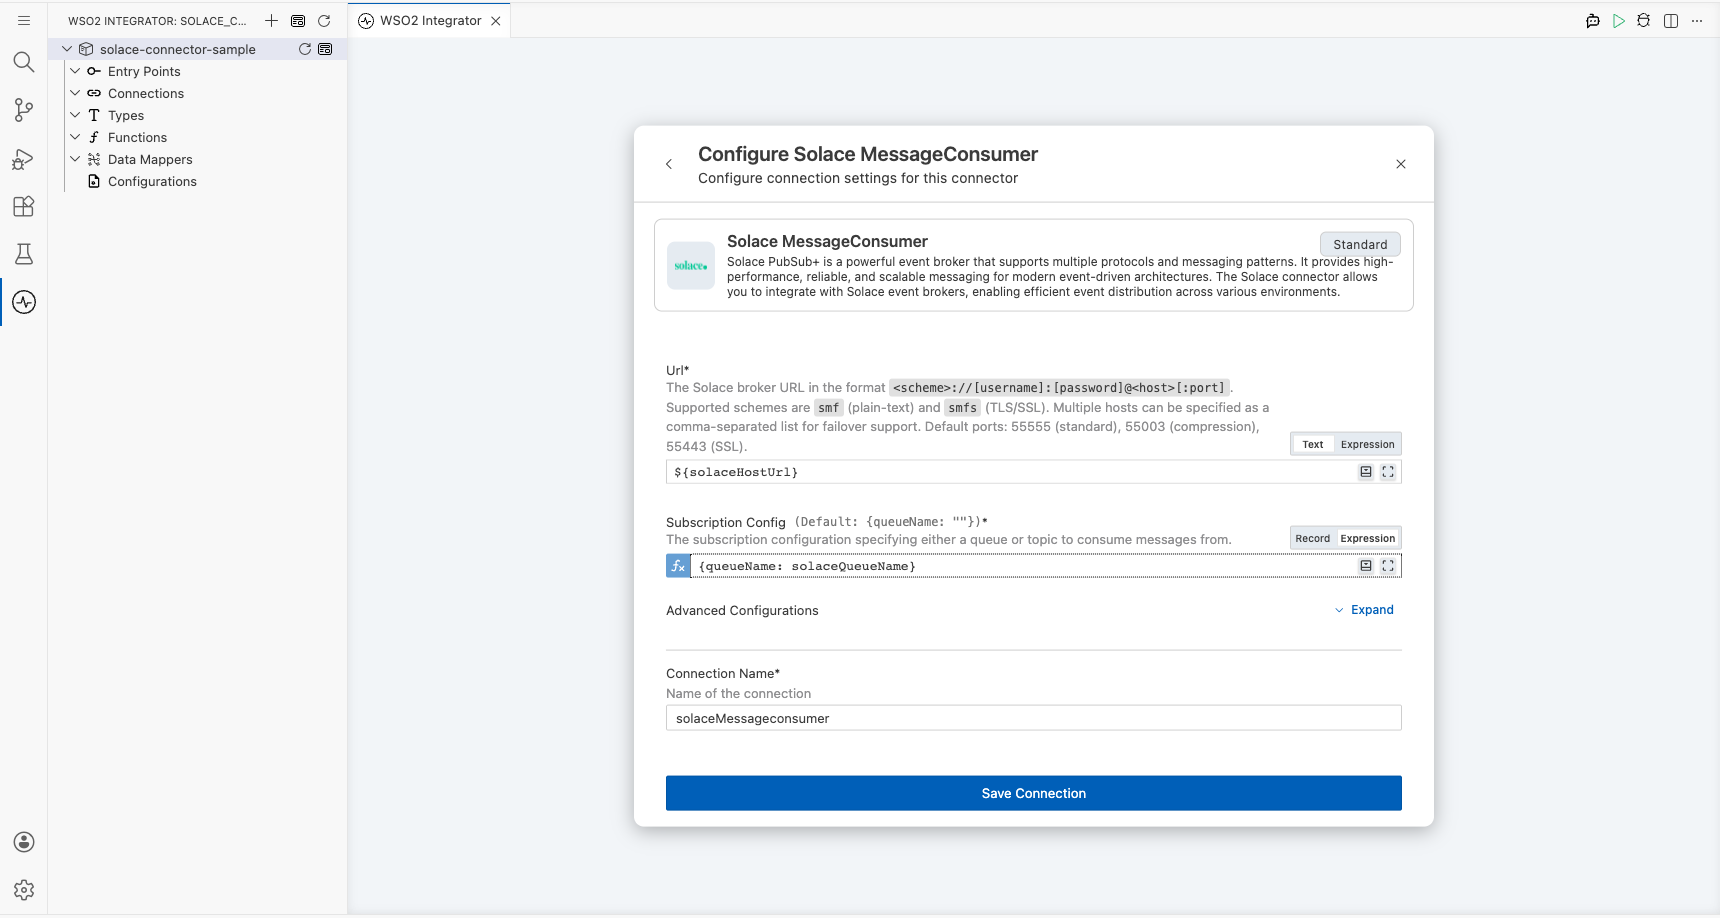
Step 3: Save the connection
Select Save to persist the connection. The solaceMessageconsumer node appears in the Connections list on the canvas.

Step 4: Set actual values for your configurables
In the left panel, select Configurations and set a value for each configurable listed below:
- solaceHostUrl (string) : The full host URL of your Solace broker (for example,
tcp://<broker-host>) - solaceQueueName (string) : The name of the Solace queue to subscribe to
Configuring the Solace MessageConsumer Receive operation
Step 5: Add an automation entry point
- In the WSO2 Integrator sidebar, hover over Entry Points and select the + icon.
- Select Automation from the artifact type panel.
- Select Create to create the automation (named
mainby default).
Step 6: Select and configure the Receive operation
- Select the + icon on the placeholder node between Start and Error Handler on the canvas.
- Under Connections in the node panel, expand solaceMessageconsumer to reveal available operations.
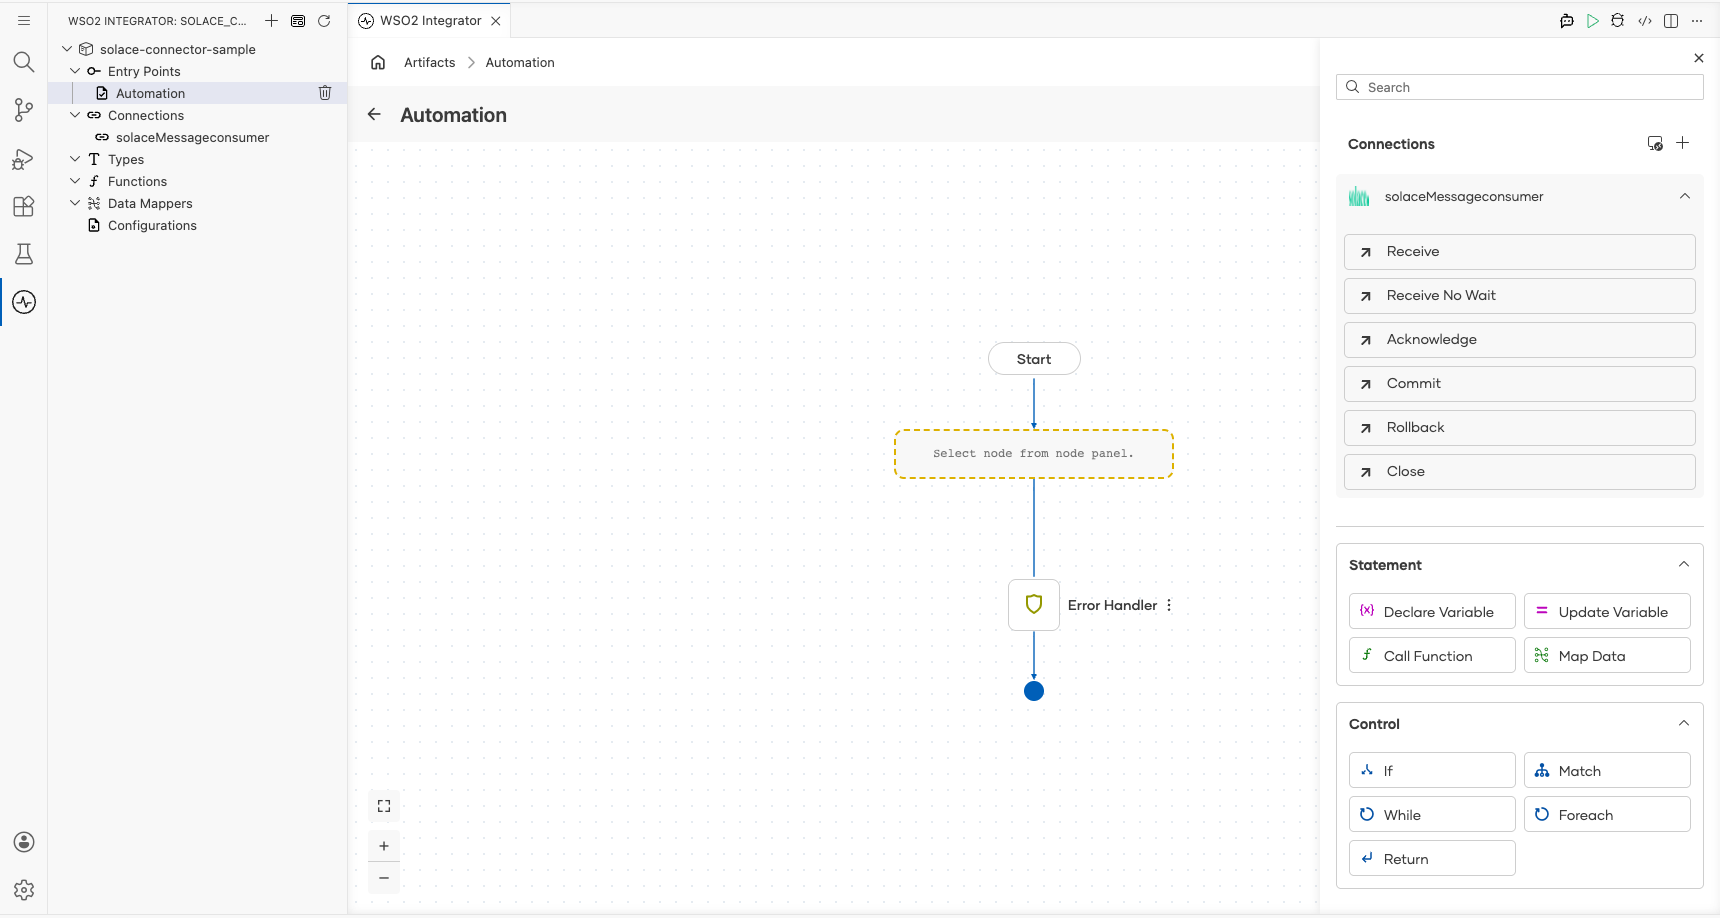
- Select Receive to open the operation configuration panel.
- Configure the following parameter:
- Result : Variable name to store the received message
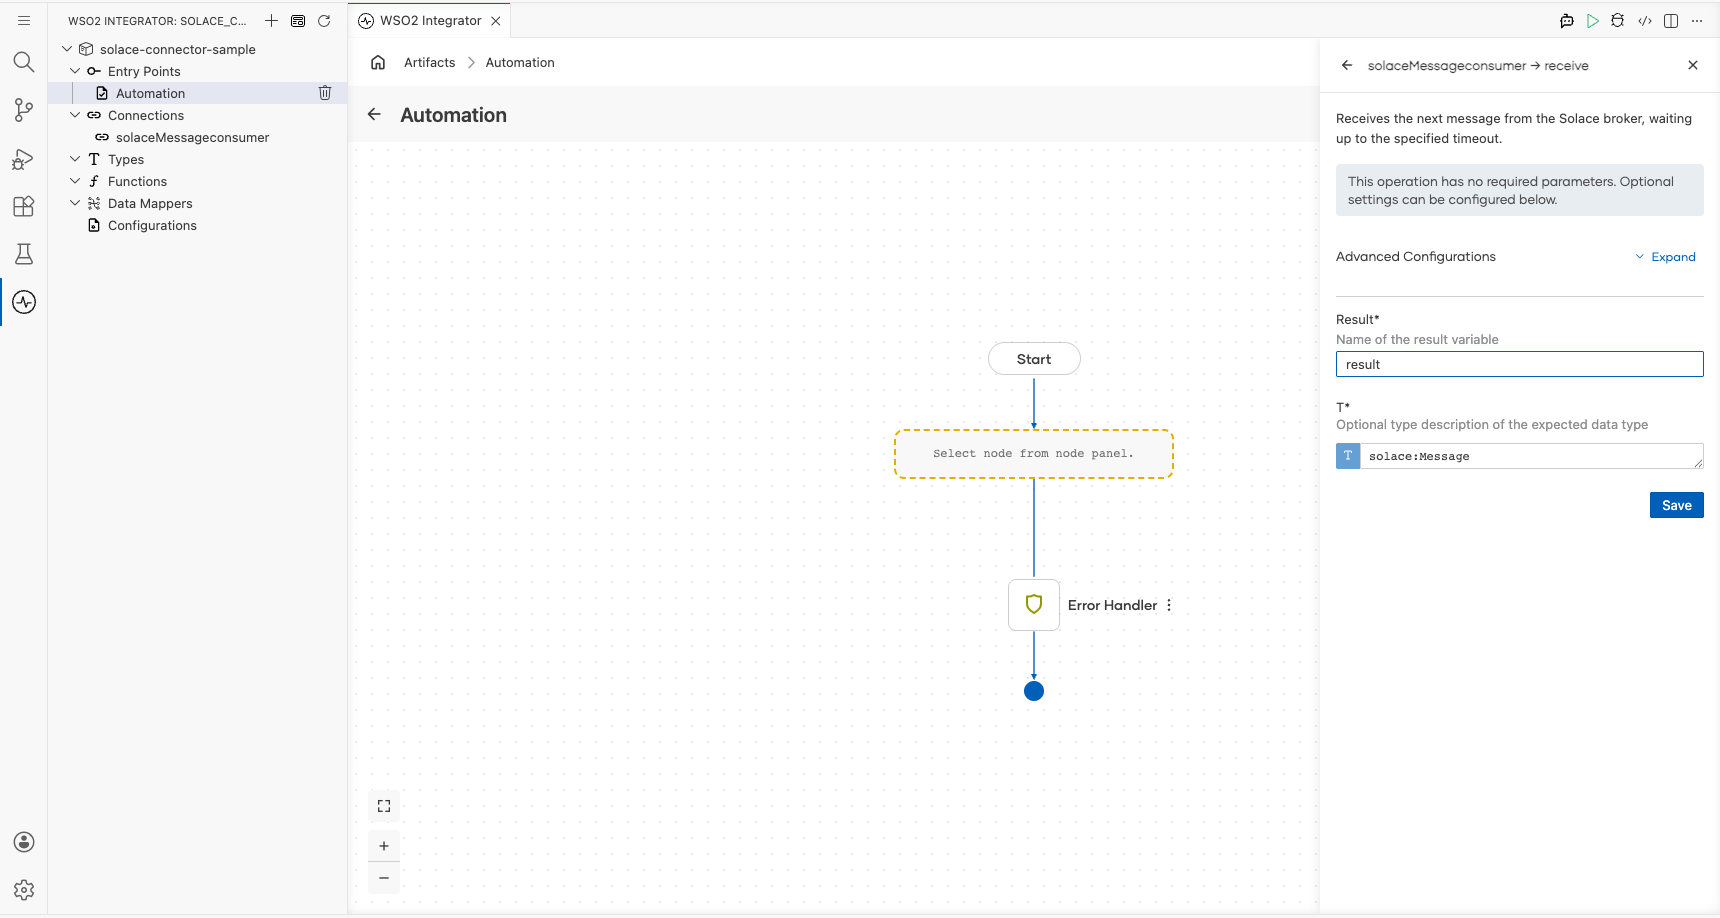
- Select Save to add the
solace : receivenode to the automation flow.

Try it yourself
Try this sample in WSO2 Integration Platform.
Solace Trigger Example
What you'll build
This integration connects to a Solace PubSub+ broker as an event consumer. When a message is published to a configured Solace queue or topic by an external producer, the trigger listener receives it and routes it to the onMessage handler. The handler deserializes the incoming message as a SolaceMessagePayload record and logs the full payload as a JSON string using log:printInfo, providing a foundation for building event-driven processing pipelines on top of Solace PubSub+.
Architecture
Prerequisites
- A running Solace PubSub+ broker (self-hosted, Docker, or Solace Cloud) accessible from the integration host.
- A message VPN configured on the broker with a queue or topic the integration can subscribe to.
- A client username and password with
Guaranteed Endpoint Permission(for queues) orSubscribepermission (for topics) on the target destination. - The broker's SMF (Solace Message Format) host URL.
Setting up the Solace integration
New to WSO2 Integrator? Follow the Create a New Integration guide to set up your integration first, then return here to add the trigger.
Adding the Solace trigger
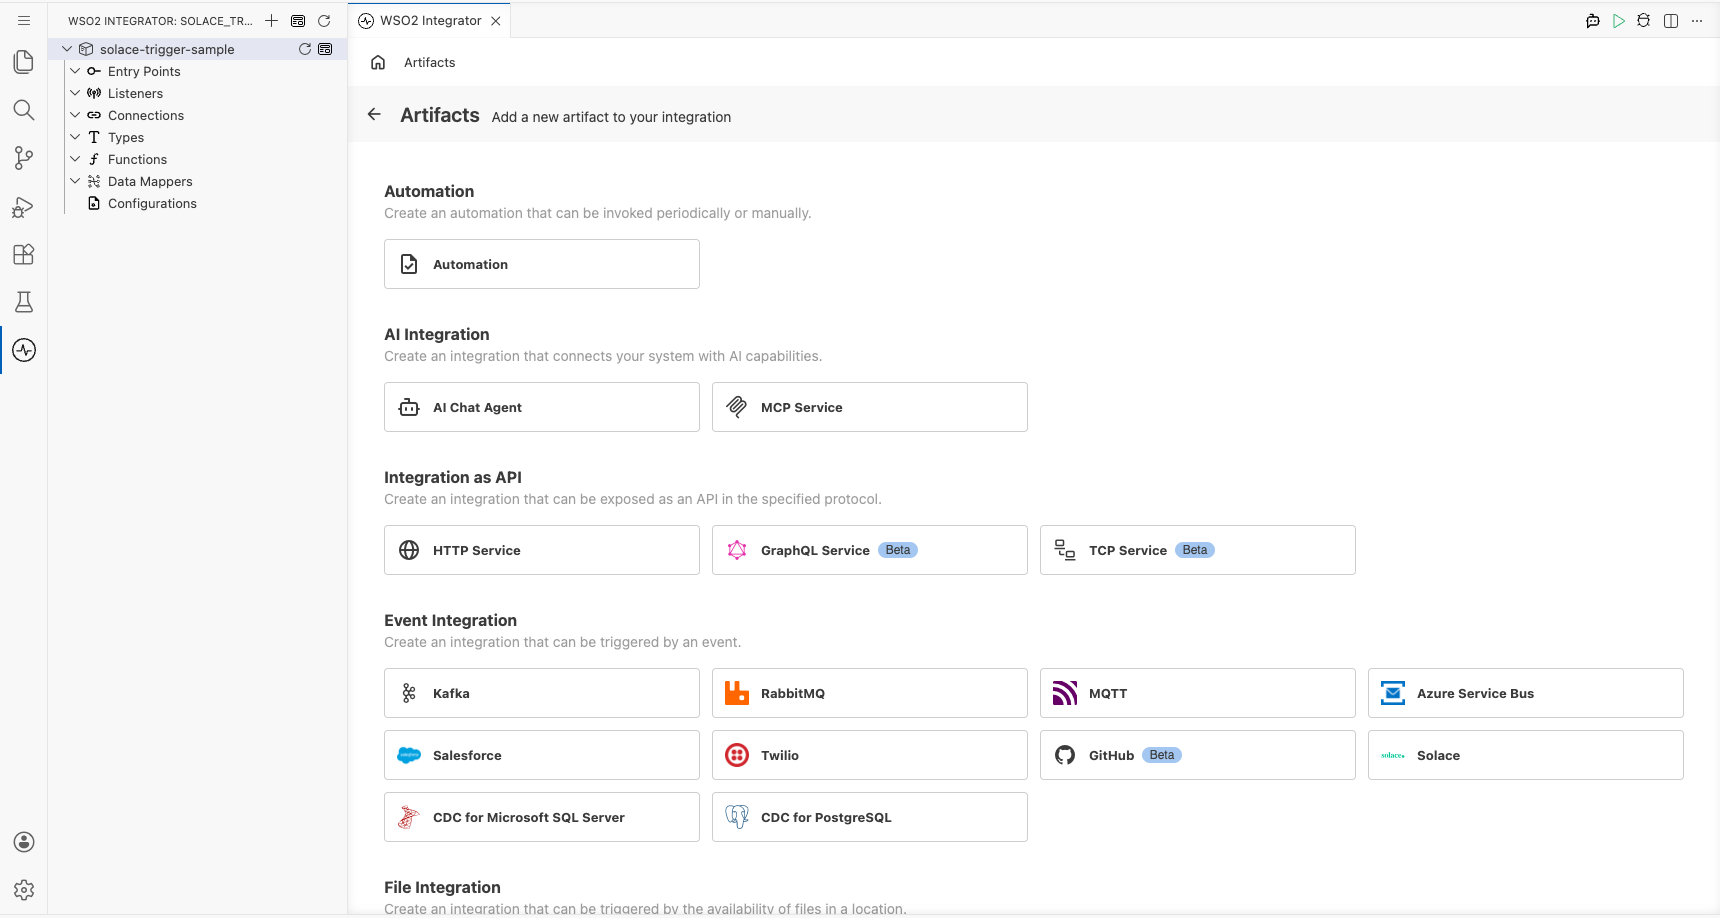
Step 1: Open the Artifacts palette and select the Solace trigger
- On the integration canvas, select + Add Artifact to open the Artifacts palette.
- In the Event Integration category, locate and select the Solace card.
Configuring the Solace listener
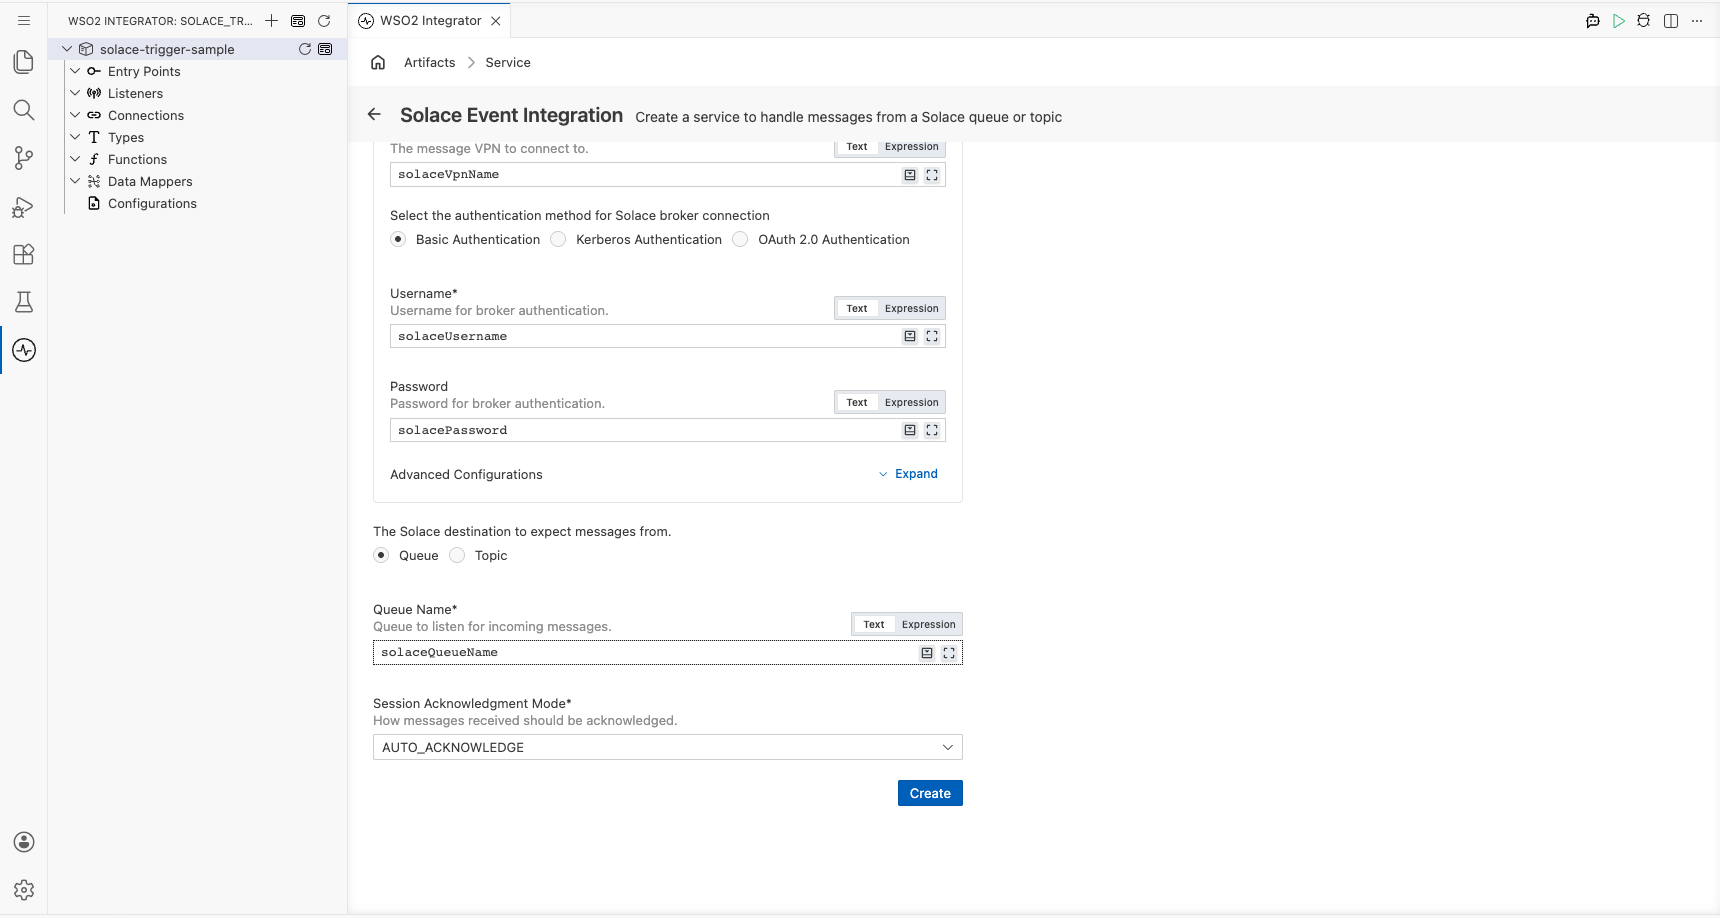
Step 2: Bind Solace listener parameters to configuration variables
For each required listener field, open the Helper Panel next to the field, select the Configurables tab, select + New Configurable, enter a camelCase variable name and the correct primitive type (configurable string for text/URL/credential fields), and select Save. The configuration name is then placed in the field as a reference.
- Broker URL : The Solace broker's SMF host URL, bound to a
configurable string - Message VPN : The Solace message VPN the client connects to, bound to a
configurable string - Username : The client username used for broker authentication, bound to a
configurable string - Password : The client password for broker authentication, bound to a
configurable string - Queue Name : The name of the Solace queue or topic the integration subscribes to, bound to a
configurable string
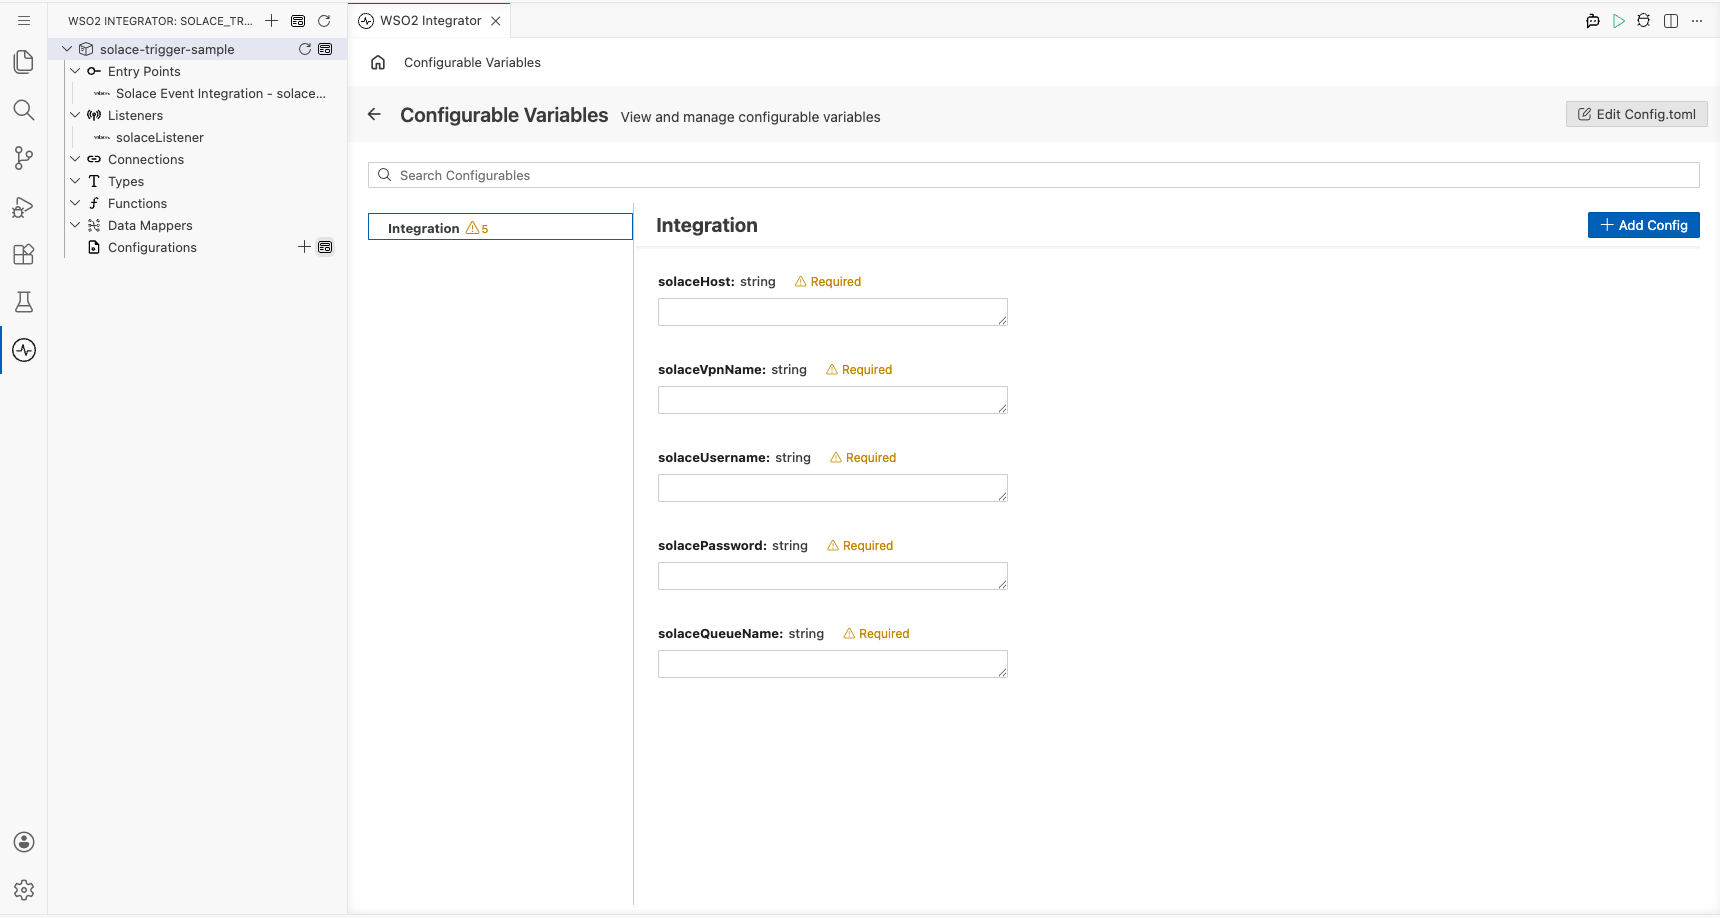
Step 3: Set actual values for your configurations
In the left panel of WSO2 Integrator, select Configurations (at the bottom of the project tree, under Data Mappers) and select View Configuration. The Configurations panel opens where you can set a value for each configuration:
- solaceHost (string) : The full SMF URL of your Solace broker
- solaceVpnName (string) : The message VPN name configured on your broker
- solaceUsername (string) : The Solace client username with subscription permissions
- solacePassword (string) : The password for the Solace client username
- solaceQueueName (string) : The name of the queue or topic to consume messages from
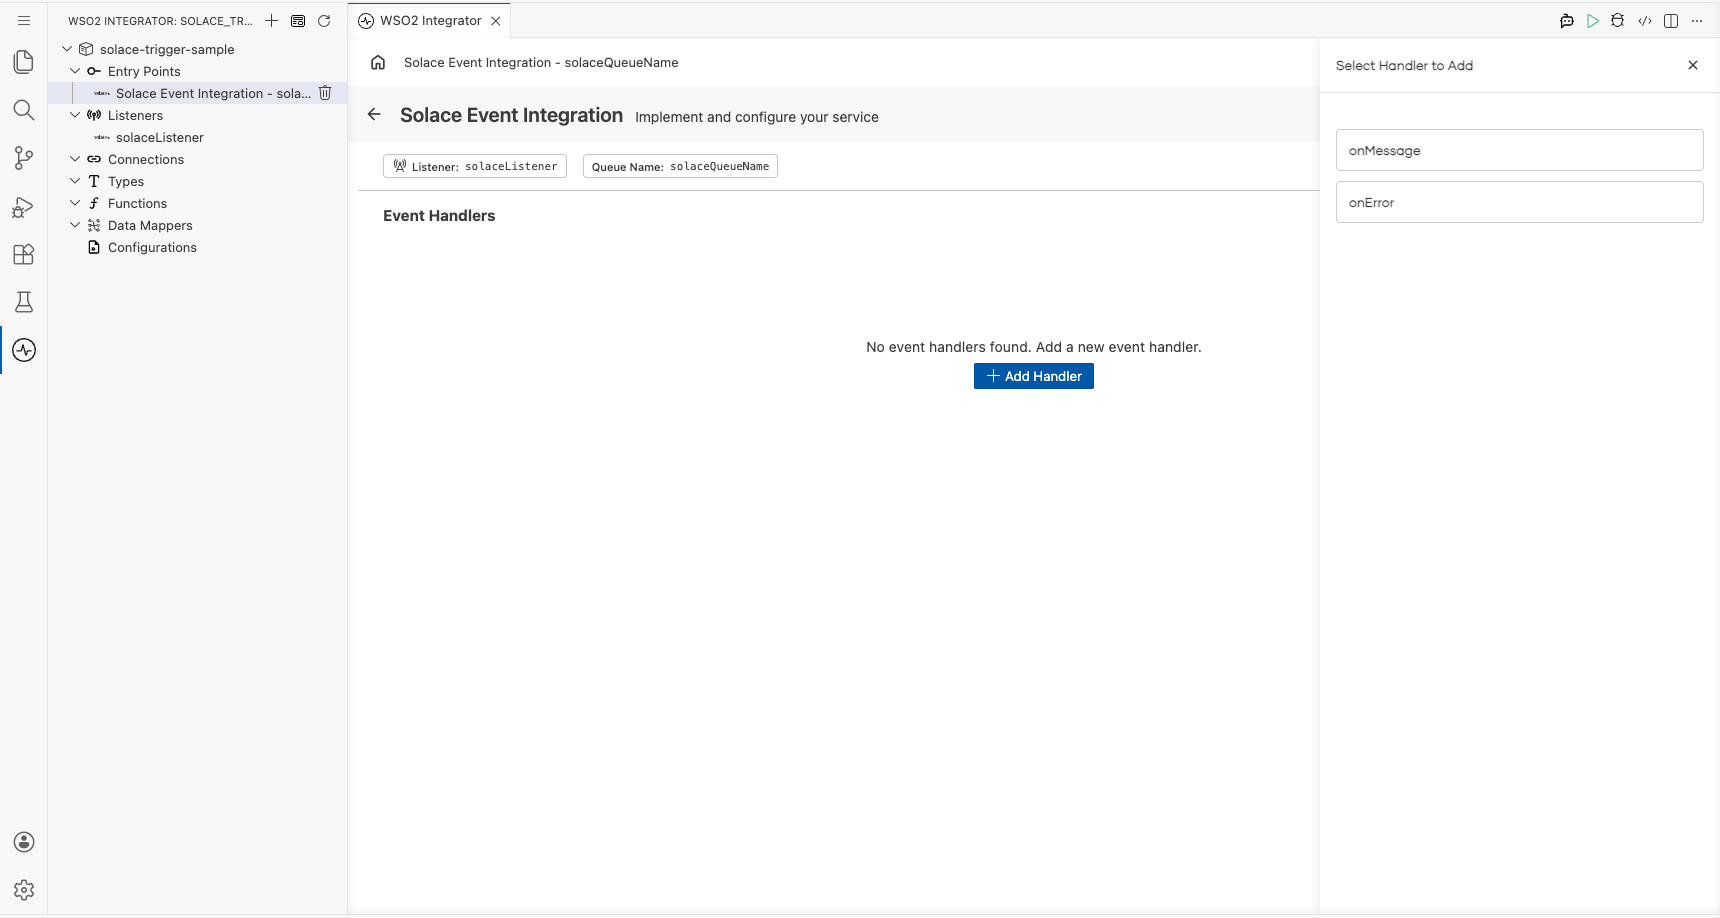
Step 4: Select Create to register the listener and open the Service view
After binding all parameters and setting configuration values, select Create on the trigger configuration form. The Solace listener is automatically registered and the Service view opens, showing the listener chip; no separate "Add Listener" step is required.
Handling Solace events
Step 5: Open the Add Handler side panel
- In the Service view, select + Add Handler on the right side of the Event Handlers section.
- The Select Handler to Add side panel opens, listing the available handler options for the Solace trigger (for example,
onMessageandonError).
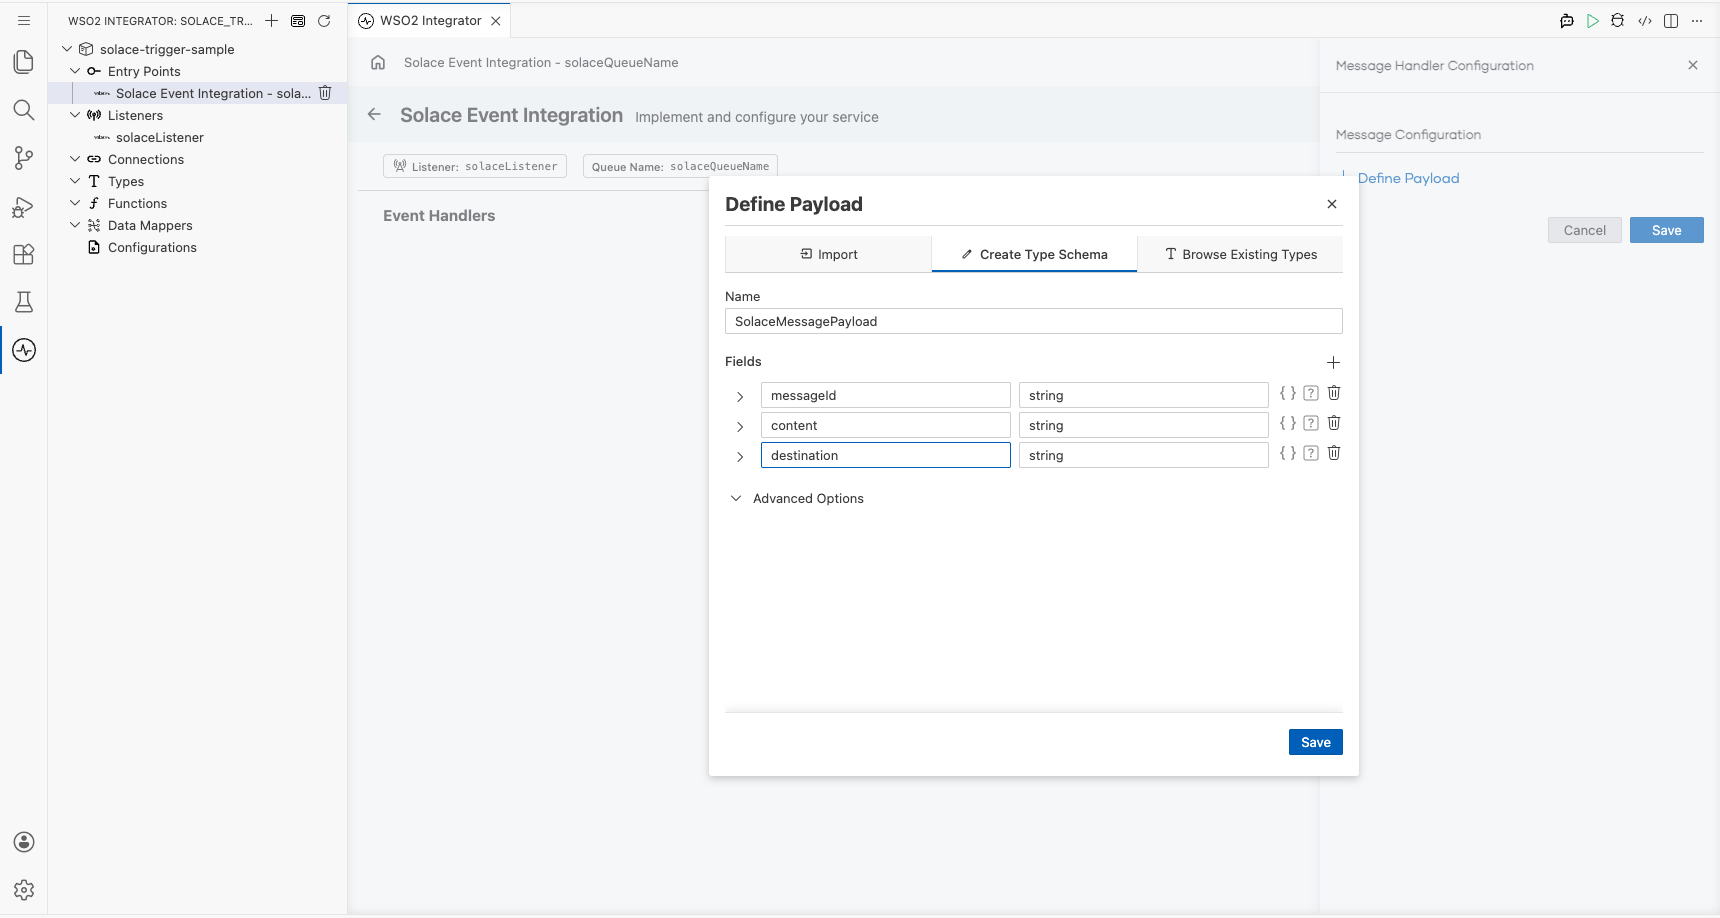
Step 6: Select the onMessage handler and define the SolaceMessagePayload record type
- In the Select Handler to Add side panel, select onMessage to open the Message Handler Configuration panel.
- In the Message Configuration section, select Define Value to open the modal.
- Select the Create Type Schema tab.
- In the Name field, enter
SolaceMessagePayload. - Select the + icon next to Fields to add each payload field; enter the field name and a type for each. Add the following fields:
messageId:stringcontent:stringdestination:string
- Select Save to create the record type and close the modal.
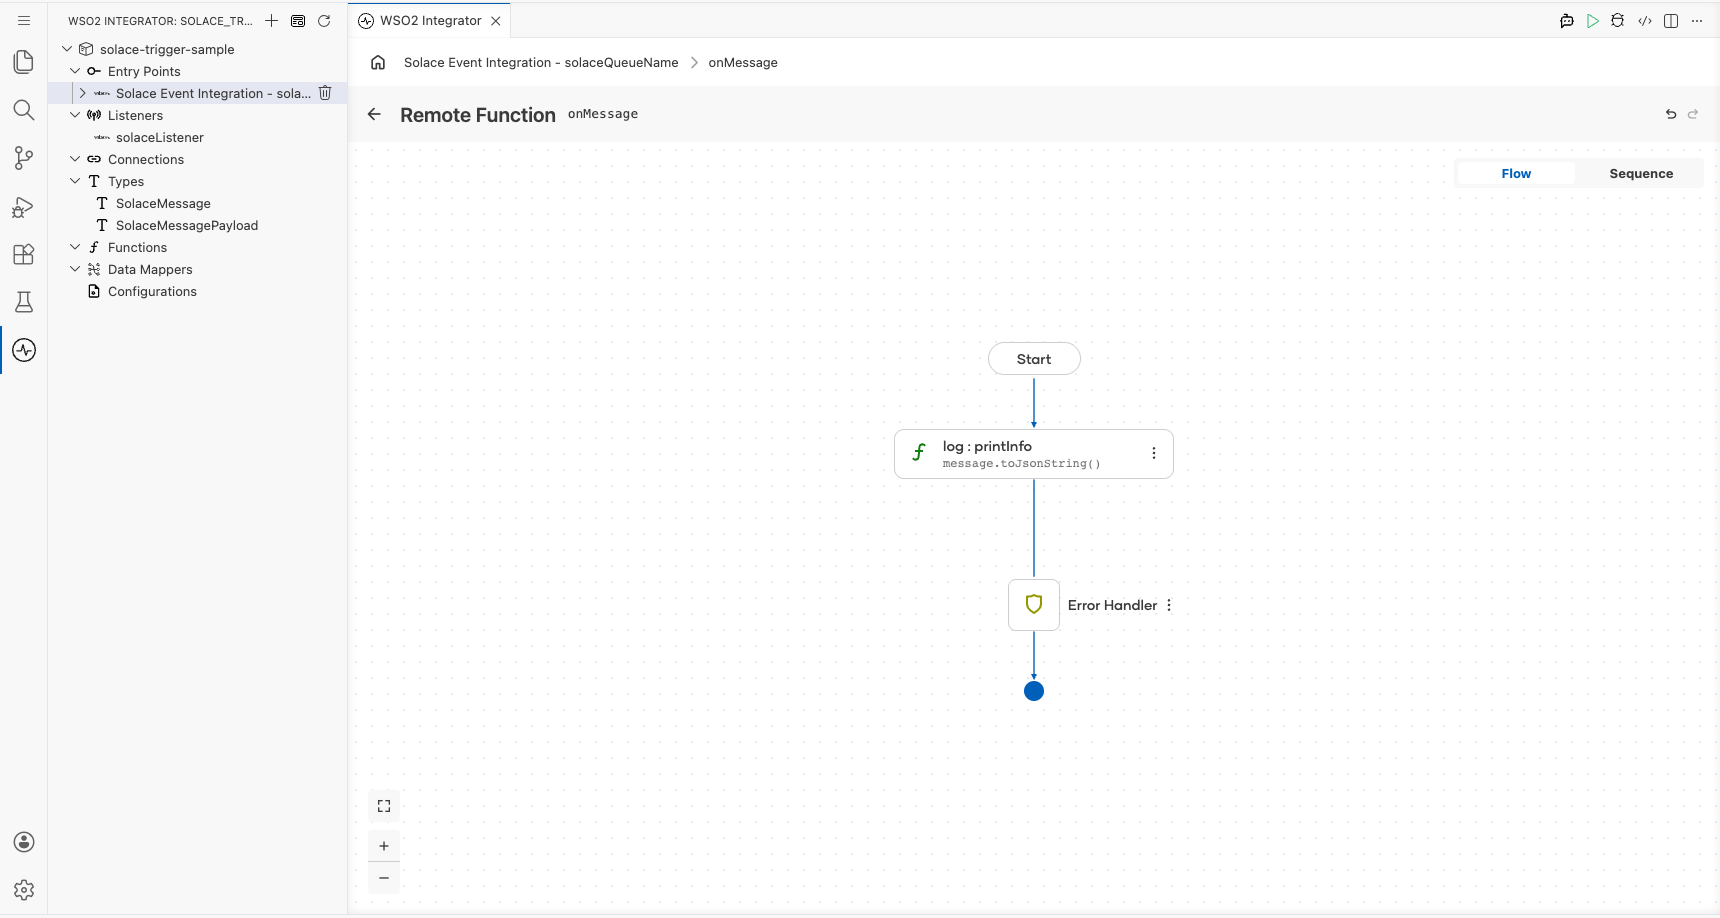
Step 7: Save the handler configuration and add a log statement to the flow
- In the Message Handler Configuration panel, select Save to open the flow canvas for the
onMessagehandler. - In the handler body, add a
log:printInfo(message.toJsonString())step using the flow canvas. - Verify the
log:printInfonode appears between Start and Error Handler on the canvas.
Step 8: Confirm the onMessage handler is registered in the Service view
Select the back arrow in the canvas header (or re-select the Solace trigger service in the project tree) to return to the Service view. The Event Handlers list now shows the registered onMessage handler row, confirming the handler is active and ready to receive Solace messages.

Running the integration
Step 9: Run the integration and trigger a test Solace message
- In the WSO2 Integrator panel, select Run to start the integration. Wait for the listener to connect to the Solace broker (watch for a "Listening on queue/topic" log line).
- Send a test message using one of the following approaches:
- A separate WSO2 Integrator Solace Producer integration (recommended): assemble a Solace producer from the same low-code canvas and publish a test message to the same queue or topic.
- Solace's
sdkperfCLI tool: run the tool targeting your broker's SMF host, client username, password, and queue name to publish a single persistent message. - The Solace PubSub+ Manager web console: navigate to Queues → Try Me (for queues) or Try Me (for direct topics) in the broker's management UI and publish a test message body such as
{"messageId":"msg-001","content":"hello solace","destination":"test/queue"}.
- Observe the integration's log output. The payload JSON string should appear printed by
log:printInfo, confirming end-to-end message receipt and deserialization.