Example
Twilio Example
What you'll build
Build a Twilio SMS integration using the WSO2 Integrator low-code UI. The integration configures the Twilio connector with secure configurable credentials and calls the createMessage operation to send an SMS message.
Operations used:
- createMessage : Sends an SMS message by specifying a recipient number, sender number, and message body.
Architecture
Prerequisites
- Twilio account with an Account SID and Auth Token
Setting up the Twilio integration
New to WSO2 Integrator? Follow the Create a New Integration guide to set up your integration first, then return here to add the connector.
Adding the Twilio connector
Step 1: Open the add connection panel
Select Add Connection (the + icon next to Connections) in the WSO2 Integrator panel to open the connector palette.
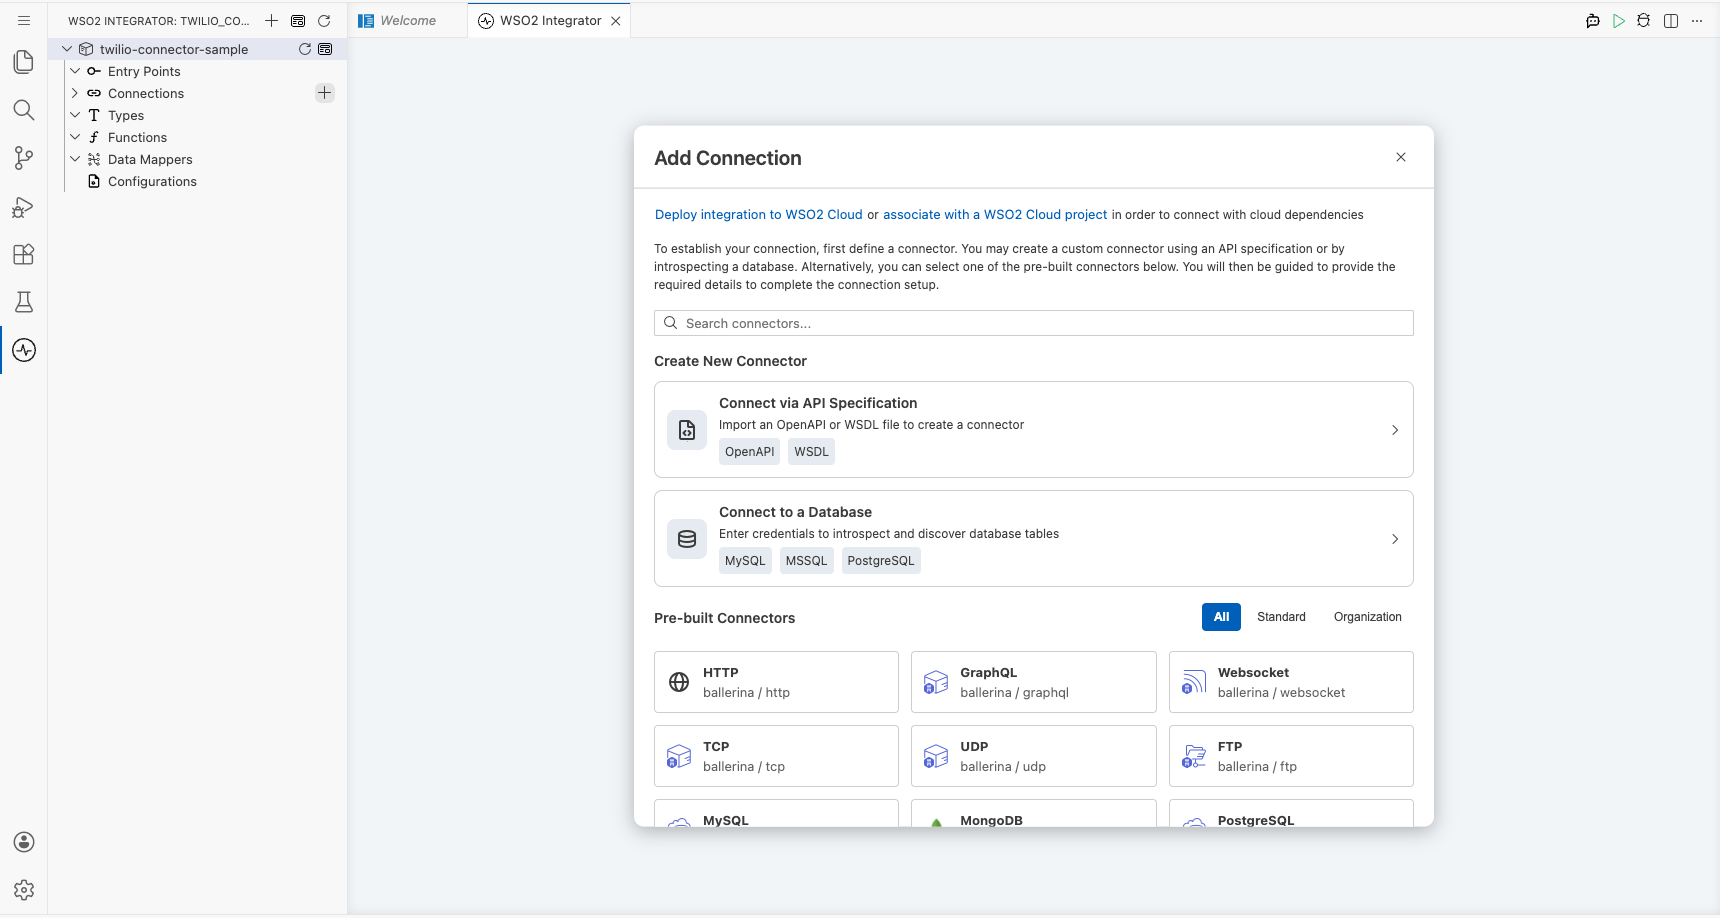
Step 2: Select the Twilio connector
Search for "twilio" in the palette, then select Twilio from the search results to open the Configure Twilio form.
Configuring the Twilio connection
Step 3: Fill in connection parameters
Enter the connection parameters, binding each to a configurable variable to keep credentials out of source code:
- accountSid : Twilio Account SID, bound to a
stringconfigurable variable - authToken : Twilio Auth Token, bound to a
stringconfigurable variable - connectionName : Name for this connection instance (for example,
twilioClient)
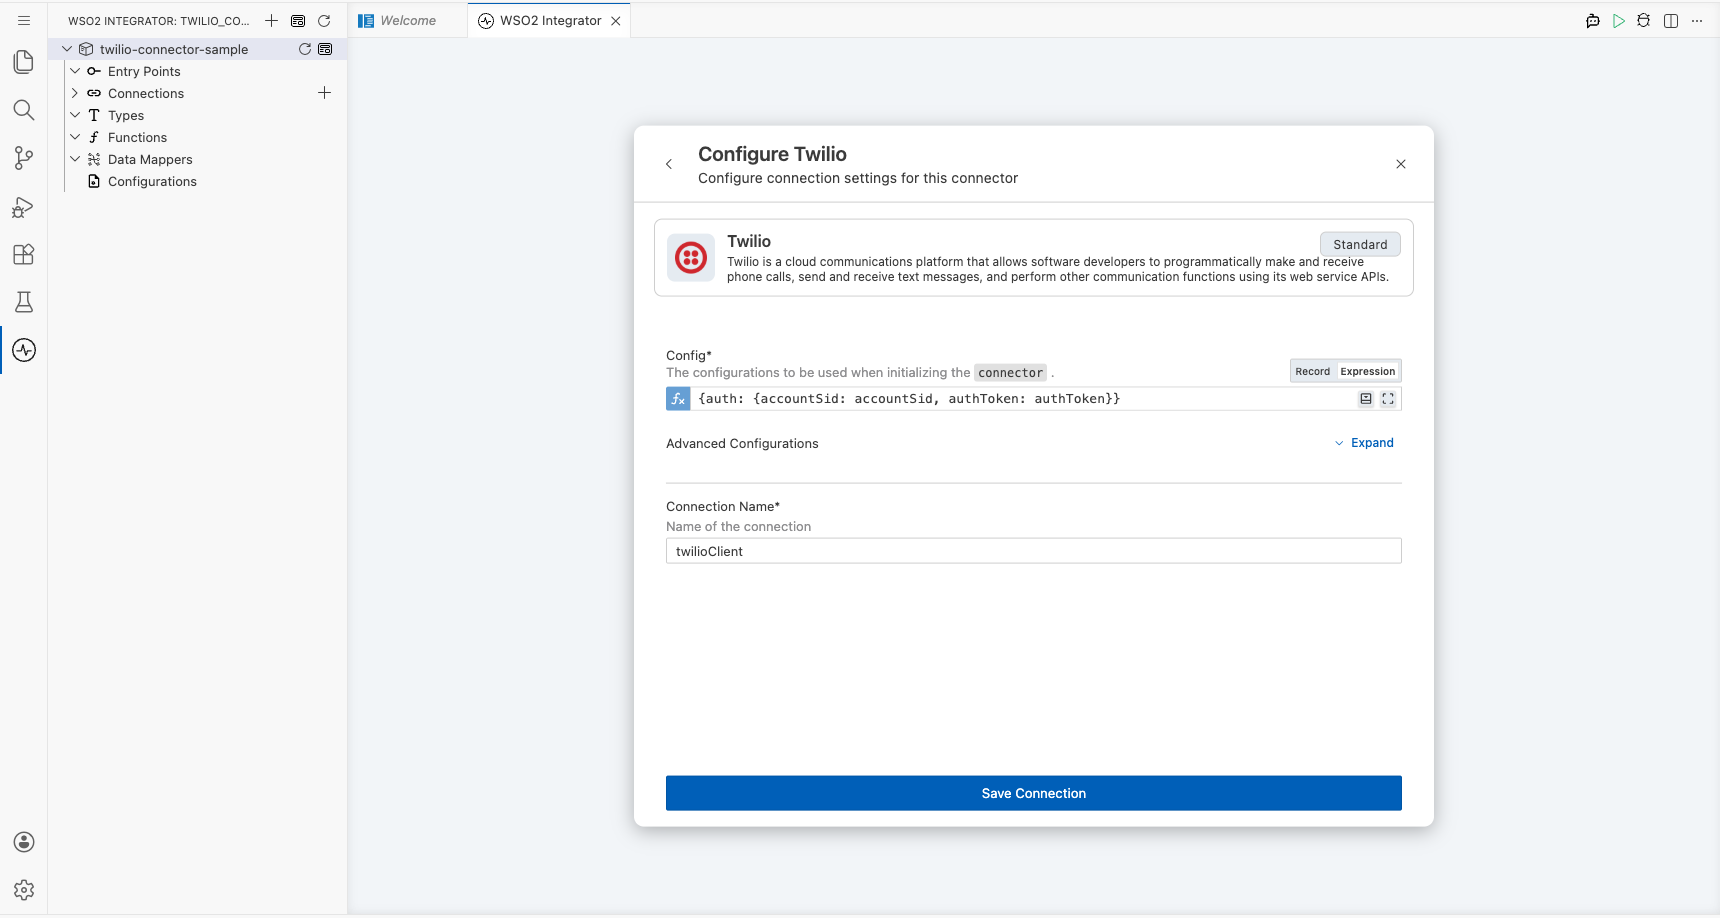
Step 4: Save the connection
Select Save Connection to persist the connection. The twilioClient connection appears in the Connections panel and on the design canvas.
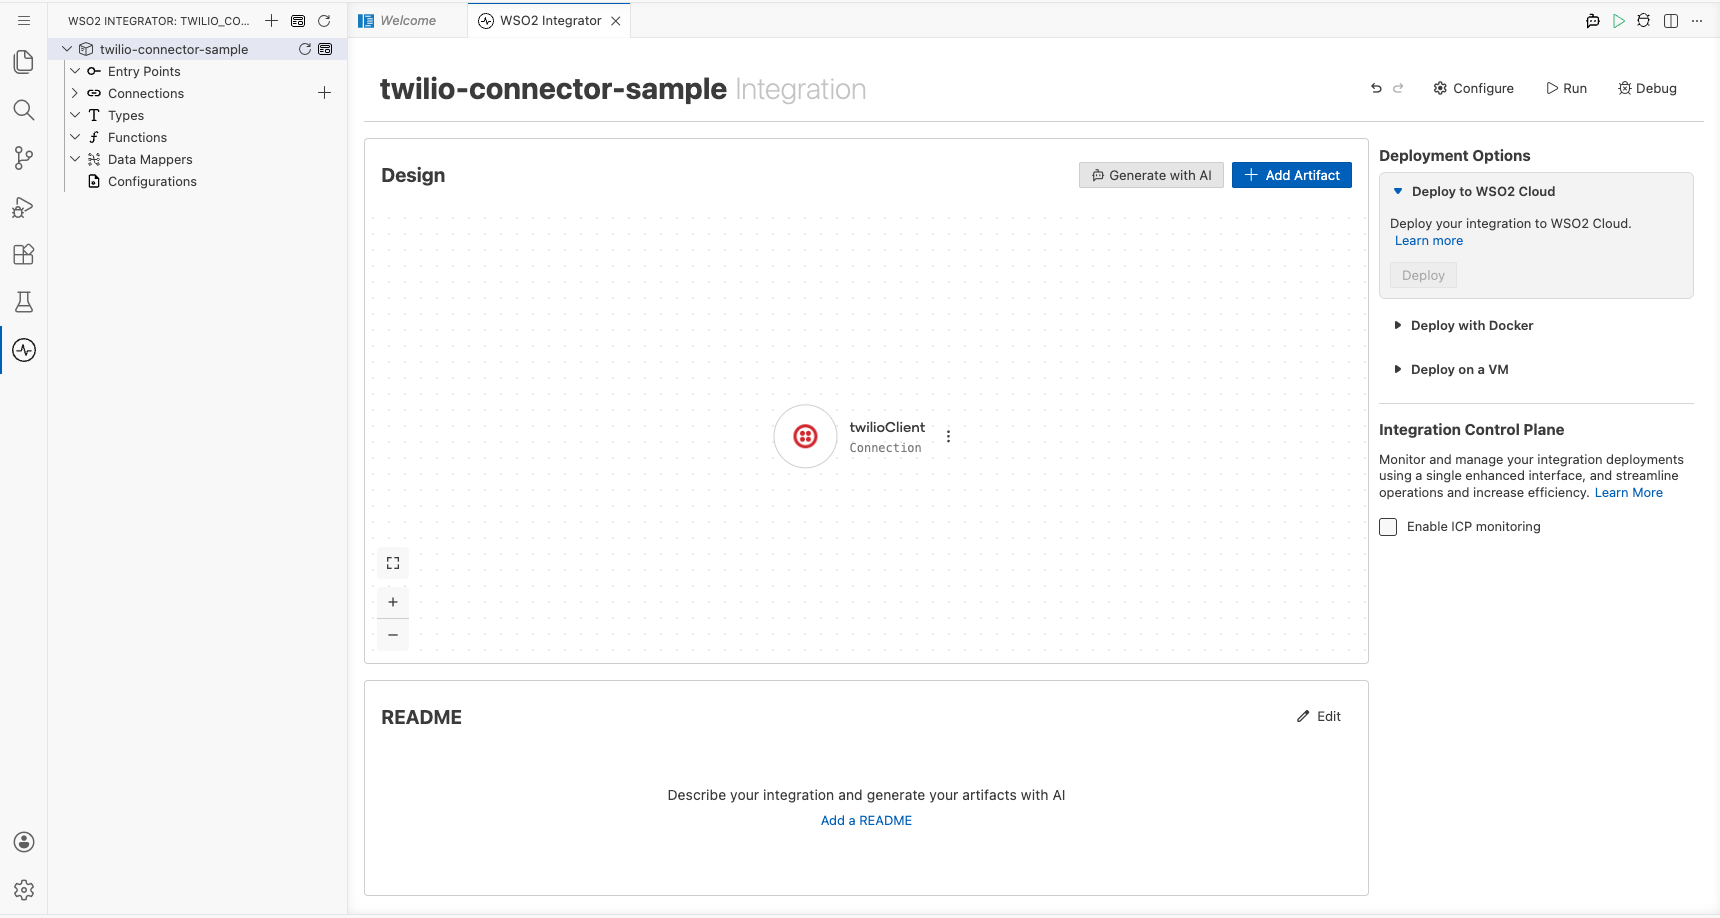
Step 5: Set actual values for your configurables
In the left panel, select Configurations to open the Configurations panel. Set a value for each configurable listed below:
- accountSid (string) : Your Twilio Account SID (for example,
ACxxxxxxxxxxxxxxxxxxxxxxxxxxxxxxxx) - authToken (string) : Your Twilio Auth Token
Configuring the Twilio createMessage operation
Step 6: Add an automation entry point
In the integration overview, select + Add Artifact, then select Automation from the artifact type list, and select Create. A new automation named main is added under Entry Points and the flow editor opens.
Step 7: Select and configure the createMessage operation
In the Automation flow editor, select the + button between Start and Error Handler to open the node panel. Expand twilioClient under Connections to reveal available operations.
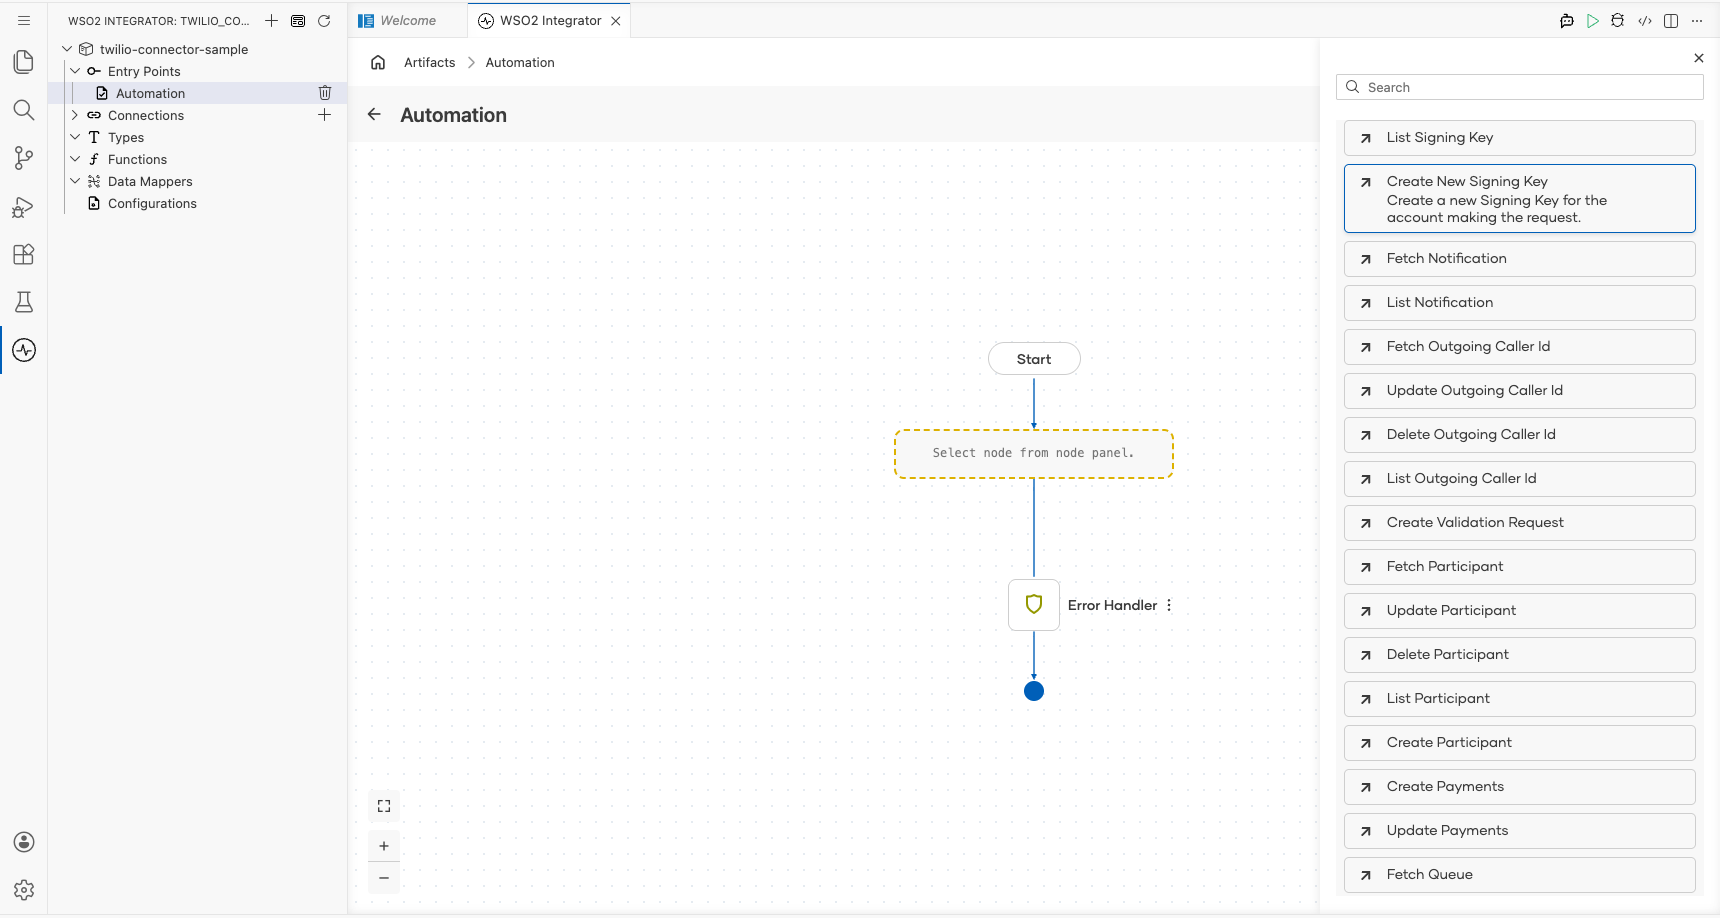
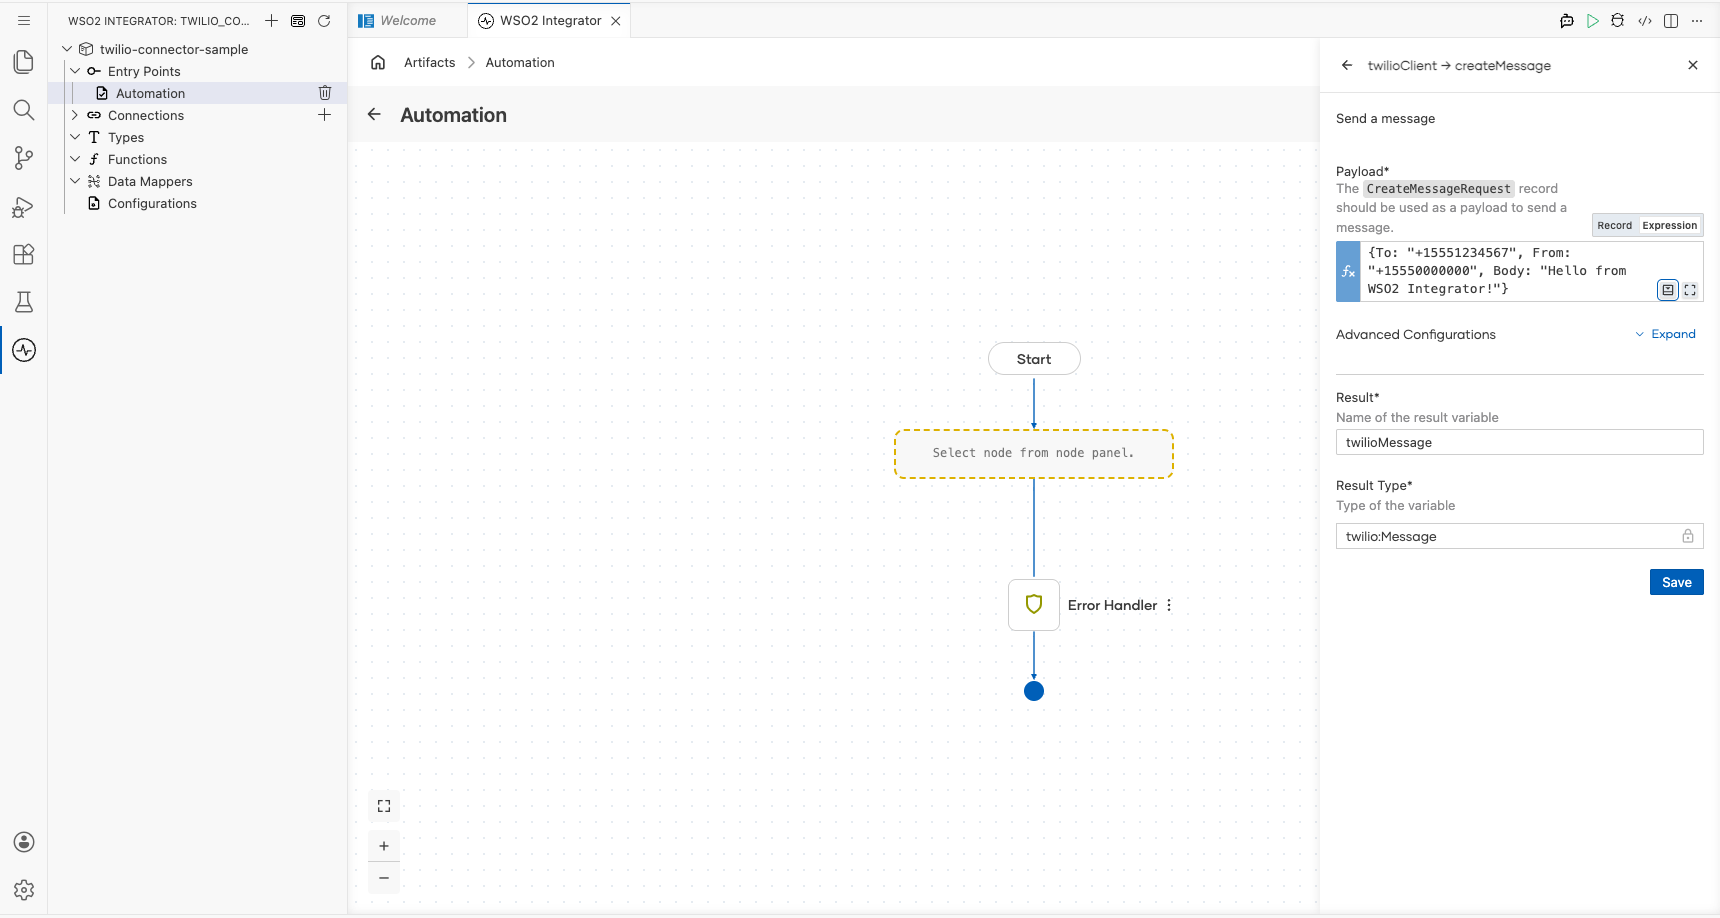
Select Create Message from the Message group to open the twilioClient → createMessage configuration form. Enter the following values in the Payload field:
- To : Recipient phone number in E.164 format
- From : Your Twilio-provisioned sender number
- Body : The SMS message text
- Result : Auto-named result variable (
twilioMessage) of typetwilio:Message
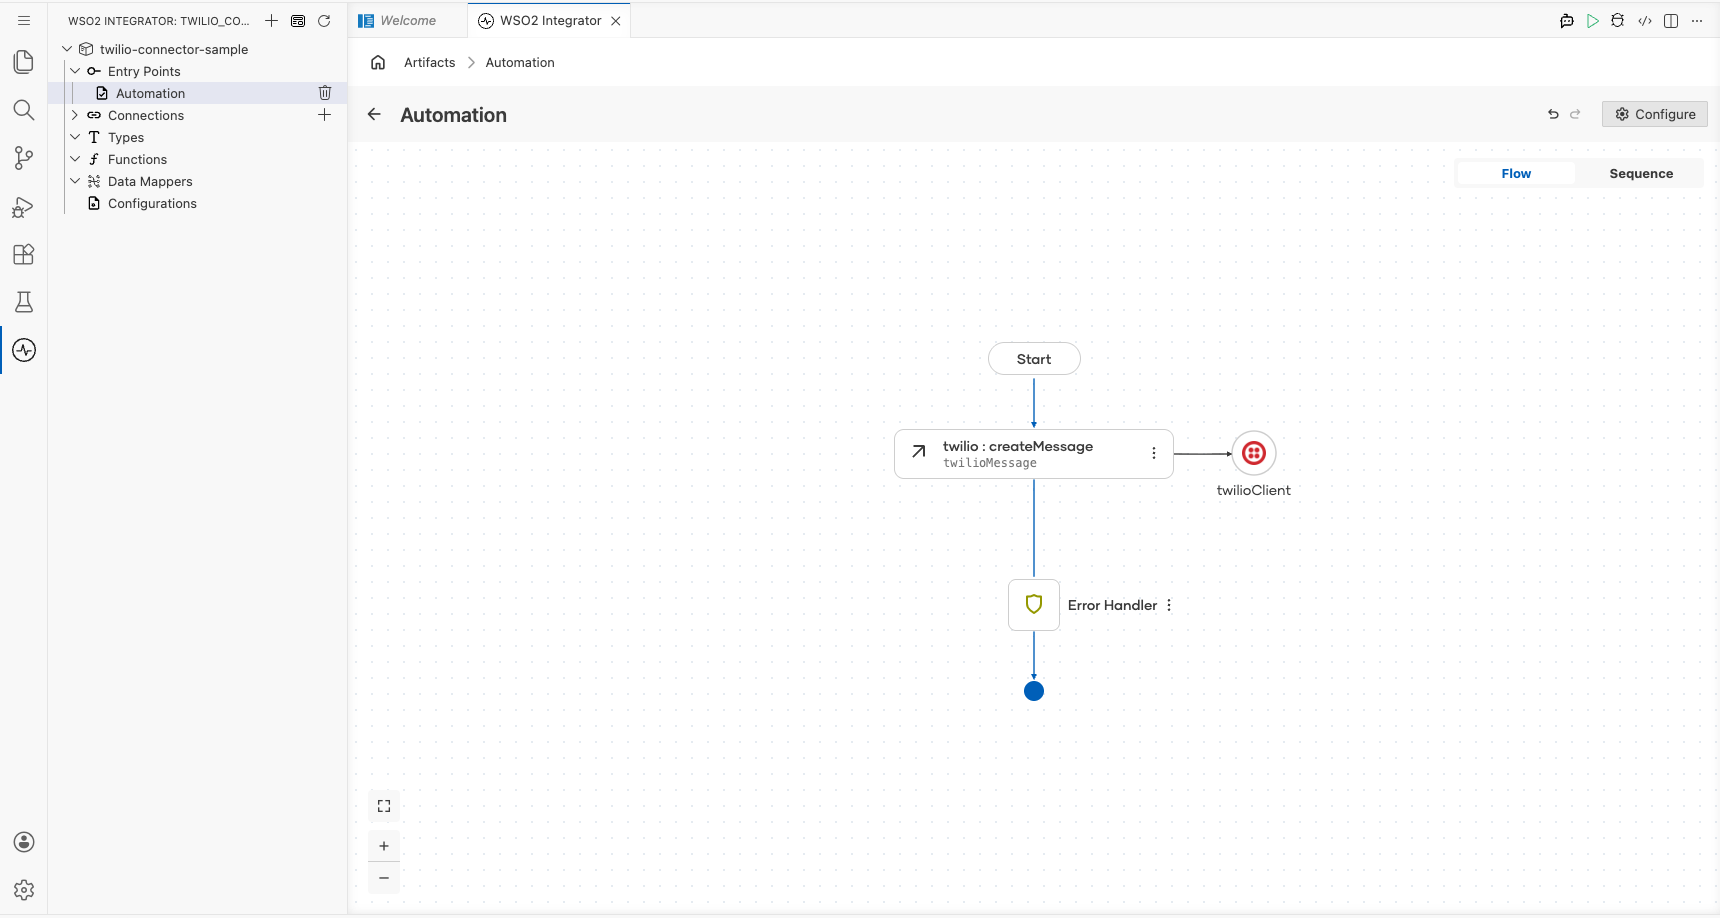
Select Save. The twilio : createMessage node appears in the automation flow.
Try it yourself
Try this sample in WSO2 Integration Platform.

More code examples
The Twilio connector comes equipped with examples that demonstrate its usage across various scenarios. These examples are conveniently organized into three distinct groups based on the functionalities they showcase. For a more hands-on experience and a deeper understanding of these capabilities, we encourage you to experiment with the provided examples in your development environment.
- Account management
- Create a sub-account: Create a subaccount under a Twilio account
- Fetch an account: Get details of a Twilio account
- Fetch balance: Get the balance of a Twilio account
- List accounts: List all subaccounts under a Twilio account
- Update an account: Update the name of a Twilio account
- Call management
- Make a call: Make a call to a phone number via Twilio
- Fetch call log: Get details of a call made via Twilio
- List call logs: Get details of all calls made via Twilio
- Delete a call log: Delete the log of a call made via Twilio
- Message management
- Send an SMS message: Send an SMS to a phone number via Twilio
- Send a WhatsApp message: Send a WhatsApp message to a phone number via Twilio
- List message logs: Get details of all messages sent via Twilio
- Fetch a message log: Get details of a message sent via Twilio
- Delete a message log: Delete a message log via Twilio
Twilio Trigger Example
What you'll build
This integration reacts to SMS delivery status changes reported by Twilio. When Twilio posts a webhook for an outgoing or incoming SMS status update, the twilio:Listener receives the webhook and routes it to the onReceived handler in your twilio:SmsStatusService. The handler logs the full event payload as a JSON string for debugging and observability.
Architecture
Prerequisites
- A Twilio account with an active phone number
- Your Twilio webhook URL configured to point to your listener endpoint as the status callback URL on your Twilio number or messaging service
Setting up the Twilio integration
New to WSO2 Integrator? Follow the Create a New Integration guide to set up your integration first, then return here to add the trigger.
Adding the Twilio trigger
Step 1: Open the Artifacts palette
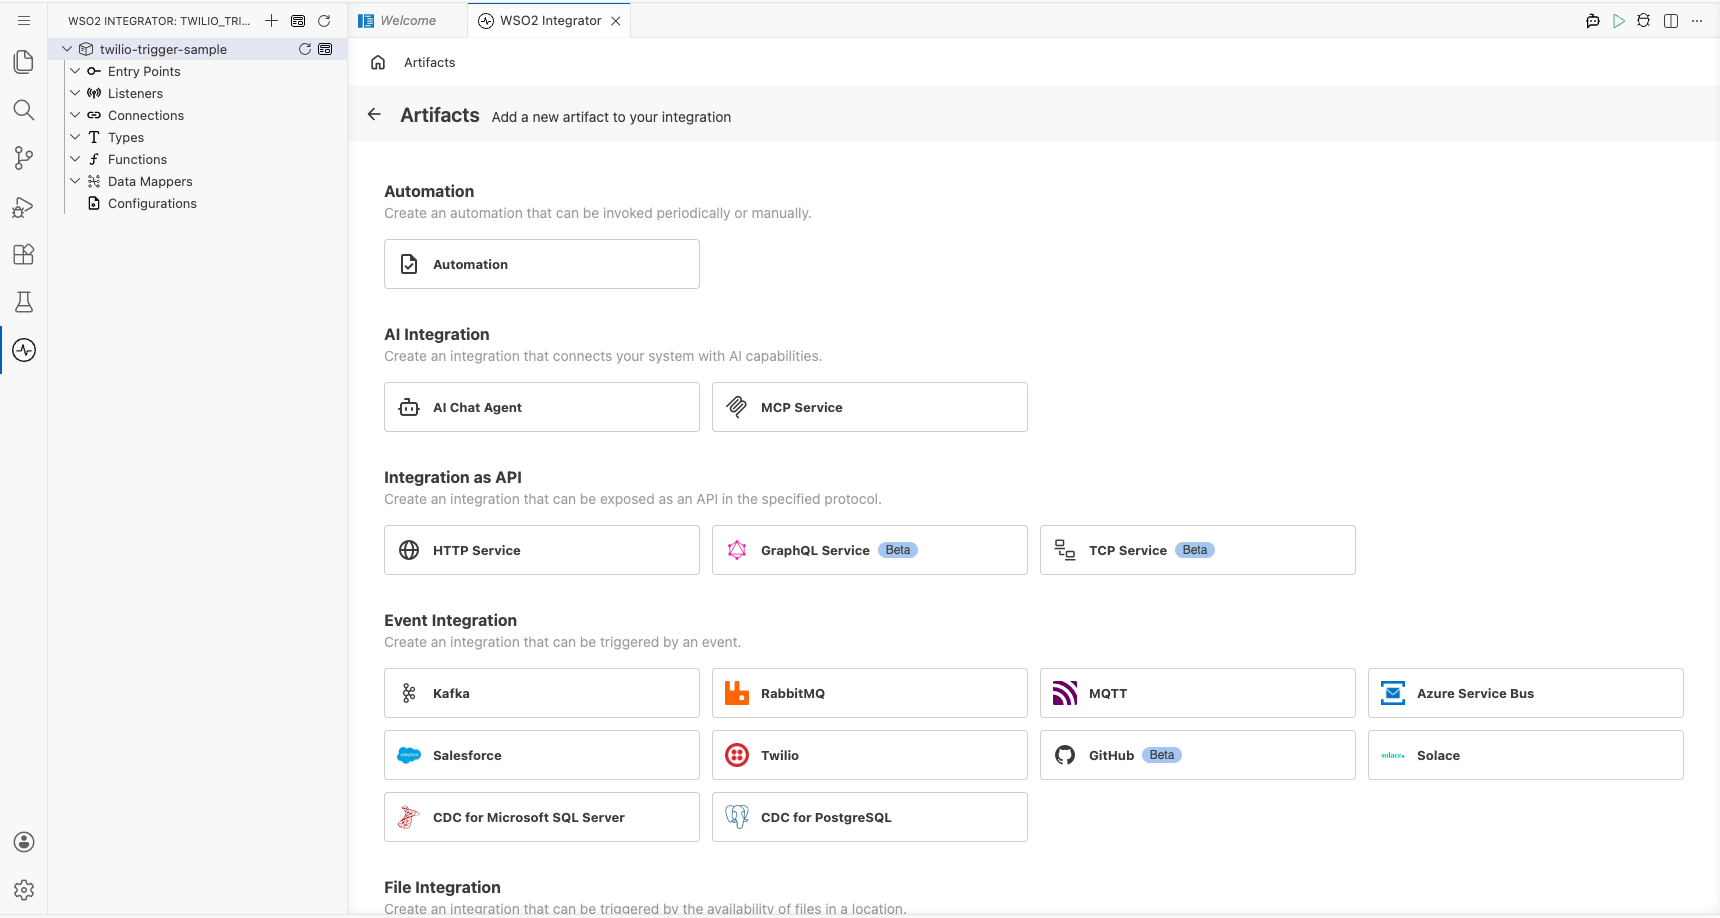
Select Add Artifact in the WSO2 Integrator panel to open the Artifacts palette. Scroll to the Event Integration category and locate the Twilio card.
Configuring the Twilio listener
Step 2: Fill in the trigger configuration form
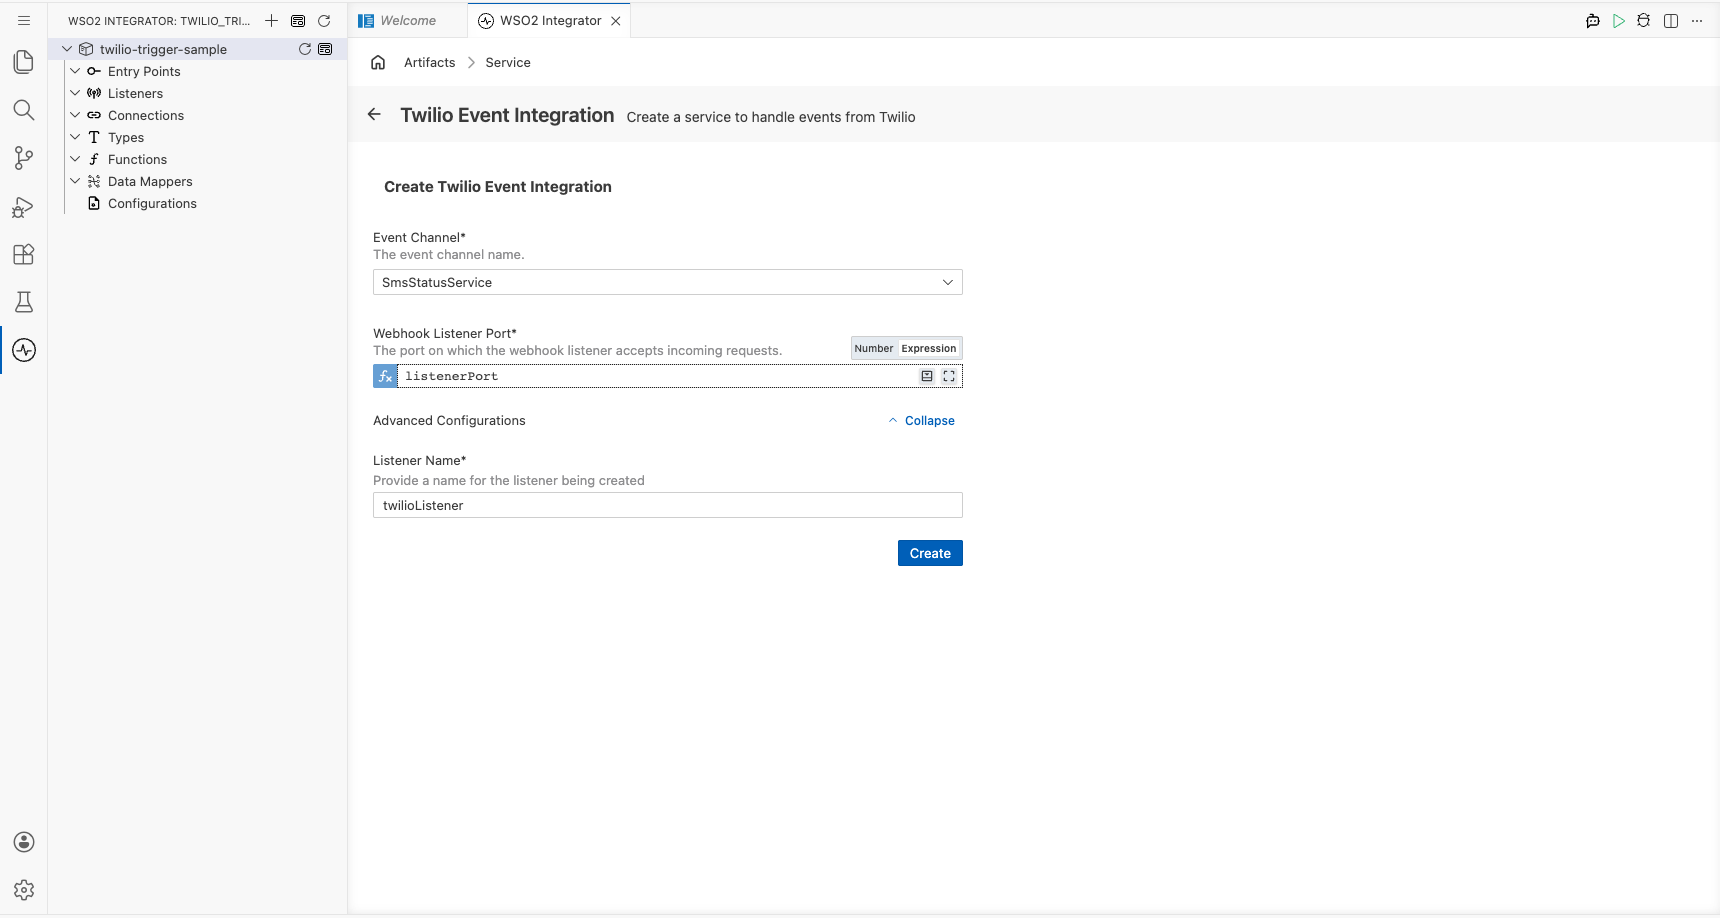
Select the Twilio card to open the trigger configuration form, then configure the listener parameters:
- Service Type: The service type for this trigger:
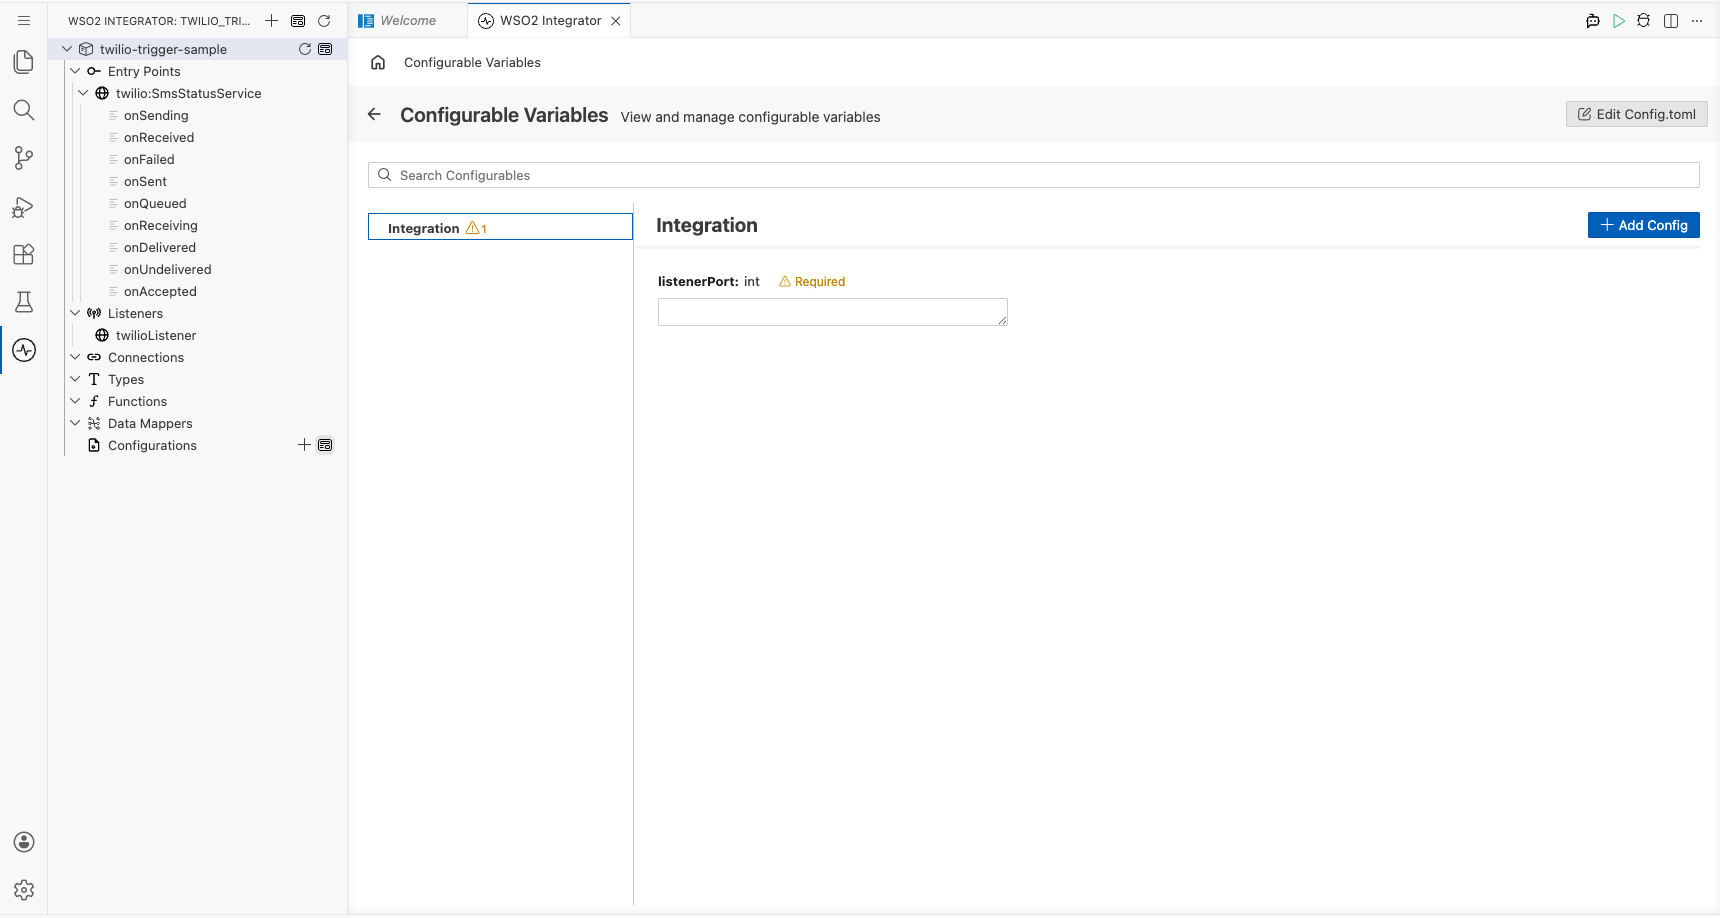
SmsStatusServiceis pre-selected - Webhook Listener Port: The port on which the Twilio webhook listener accepts incoming HTTP status callbacks from Twilio: bind this field to a
configurable intvariable namedlistenerPort
Step 3: Set actual values for your configurations
Select Configurations in the left panel of WSO2 Integrator. Set a value for each configuration listed below:
- listenerPort (int) : The port on which the Twilio webhook listener will accept incoming HTTP status callbacks from Twilio
Step 4: Create the trigger
Select Create to generate the integration.
Handling Twilio events
Step 5: Inspect the pre-registered event handlers
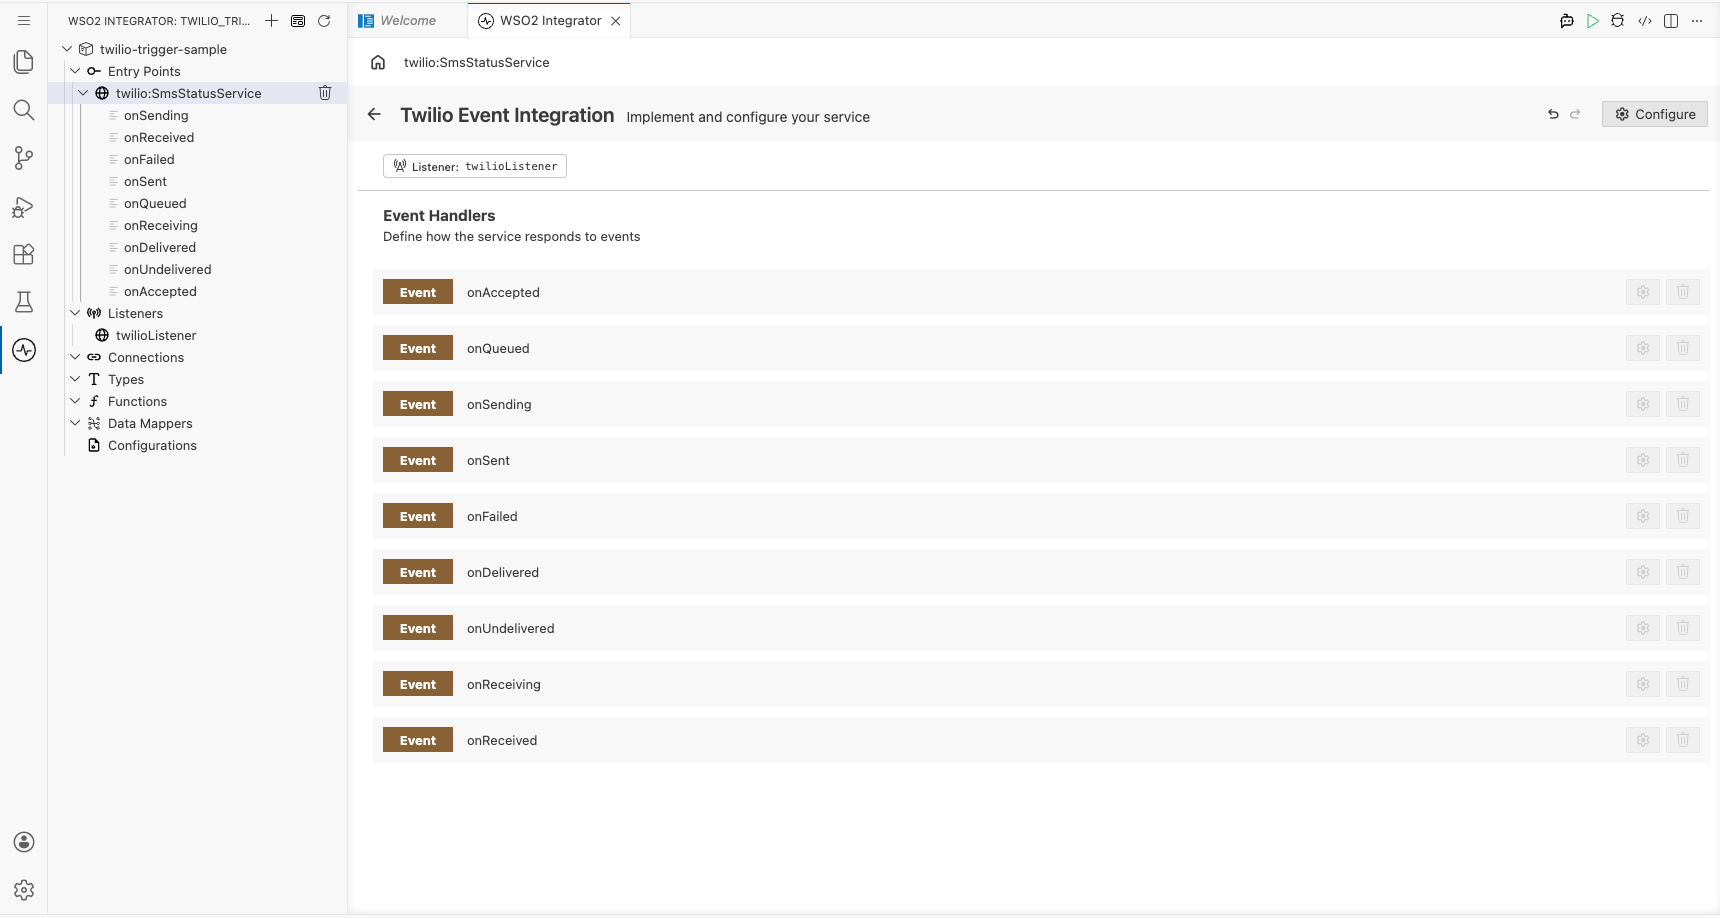
Select twilio:SmsStatusService in the left project tree to open the Twilio Event Integration service view.
Note: Unlike Kafka or RabbitMQ, the Twilio
SmsStatusServicepre-registers all nine SMS status handlers at service creation time. There's no + Add Handler side panel for this trigger; all handlers are automatically wired.
The service view shows the full set of pre-registered handlers bound to the twilioListener:
- onAccepted : Twilio accepted the message for delivery
- onQueued : Message is queued
- onSending : Message is being sent
- onSent : Message was sent to the carrier
- onFailed : Message failed to send
- onDelivered : Message confirmed delivered
- onUndelivered : Message could not be delivered
- onReceiving : Inbound message being received
- onReceived : Inbound message fully received
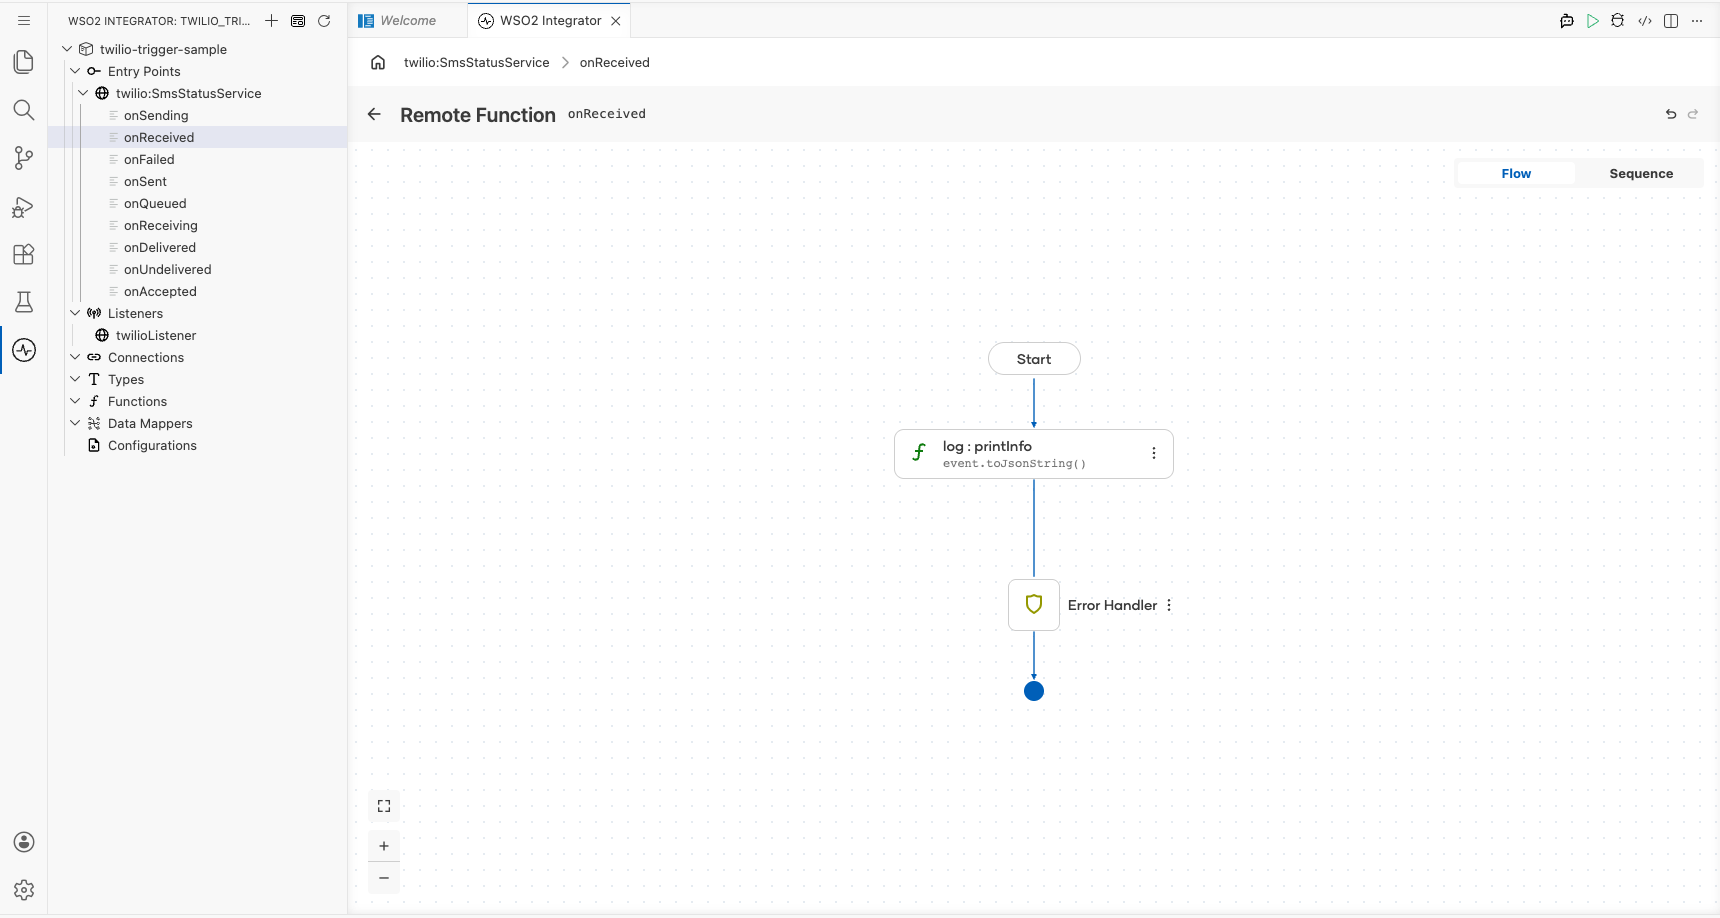
Step 6: Open the onReceived handler flow
Select the onReceived row to navigate to its flow canvas.
Note: The
onReceivedhandler uses the library-definedtwilio:SmsStatusChangeEventWrapperpayload type. There's no Define Value modal for this trigger; the payload type is provided by theballerinax/trigger.twiliopackage and can't be customised via the UI.
The initial flow canvas shows a minimal handler skeleton: Start → + → Error Handler → End.
Step 7: Add a log step
Select the + icon in the flow chart, and in the side panel that opens, choose Log Info from the Logging section, then enter event.toJsonString() as the message.
Running the integration
Run the integration from WSO2 Integrator and then fire a test SMS status event to confirm the log output. Use any of the following methods:
- Twilio web console: Navigate to your Twilio phone number settings, set the status callback URL to your listener endpoint, and send a test SMS from the Twilio console. Twilio posts a status webhook for each delivery stage (
queued,sent,delivered, and so on). - Twilio CLI: Use the Twilio CLI (
twilio api:core:messages:create) to send an SMS from your active Twilio number with--status-callbackpointing to your listener endpoint. Each status transition triggers a separate webhook POST. - Direct HTTP POST: Use a tool such as
curlor Postman to send a POST request that mimics a Twilio status callback to your listener endpoint, with form-encoded fields such asMessageSid,MessageStatus,From, andTo.
When the integration receives a webhook, the onReceived handler logs the full twilio:SmsStatusChangeEventWrapper payload as JSON. Verify that the log entry appears in the WSO2 Integrator console output.
Try it yourself
Try this sample in WSO2 Integration Platform.