Example
Table of Contents
Shopify Connector Example
What you'll build
Create a WSO2 Integrator automation that connects to the Shopify Admin API using the ballerinax/shopify.admin connector. The integration is triggered on a scheduled interval and calls the getProducts operation to retrieve a list of products from your Shopify store's Admin API. The complete flow, Automation trigger → Shopify Admin connector call → End, is assembled entirely in the WSO2 Integrator low-code canvas.
Operations used:
- getProducts : Retrieves a list of products from the Shopify store's Admin API
Architecture
Prerequisites
- A Shopify store with Admin API access enabled (a Shopify Partner account or development store is sufficient).
- A Shopify Admin API access token with the necessary permissions for the operation being called (e.g.,
read_products). - The Shopify store's base URL in the format
https://{your-store}.myshopify.com/admin/api/{api-version}.
Setting up the Shopify admin integration
New to WSO2 Integrator? Follow the Create a New Integration guide to set up your integration first, then return here to add the connector.
Adding the Shopify admin connector
Step 1: Open the add connection palette
Select the + Add Connection button in the Connections section of the low-code canvas sidebar to open the connector search palette.

Step 2: Search for and select the shopify.admin connector
- In the search box, enter shopify to filter the connector list.
- Locate the Admin connector card (labelled
ballerinax / shopify.admin) in the search results. - Select the connector card to open the connection configuration form.
Configuring the Shopify admin connection
Step 3: Bind Shopify admin connection parameters to configurables
For each connection field, use the Configurables tab to create a new configurable variable and auto-inject the reference into the field.
- Api Key Config : API keys for authorization. Contains the
xShopifyAccessTokenfield, which represents the Shopify Admin API access token (X-Shopify-Access-Tokenheader). - Service Url : The base URL of the Shopify Admin API endpoint for your store.
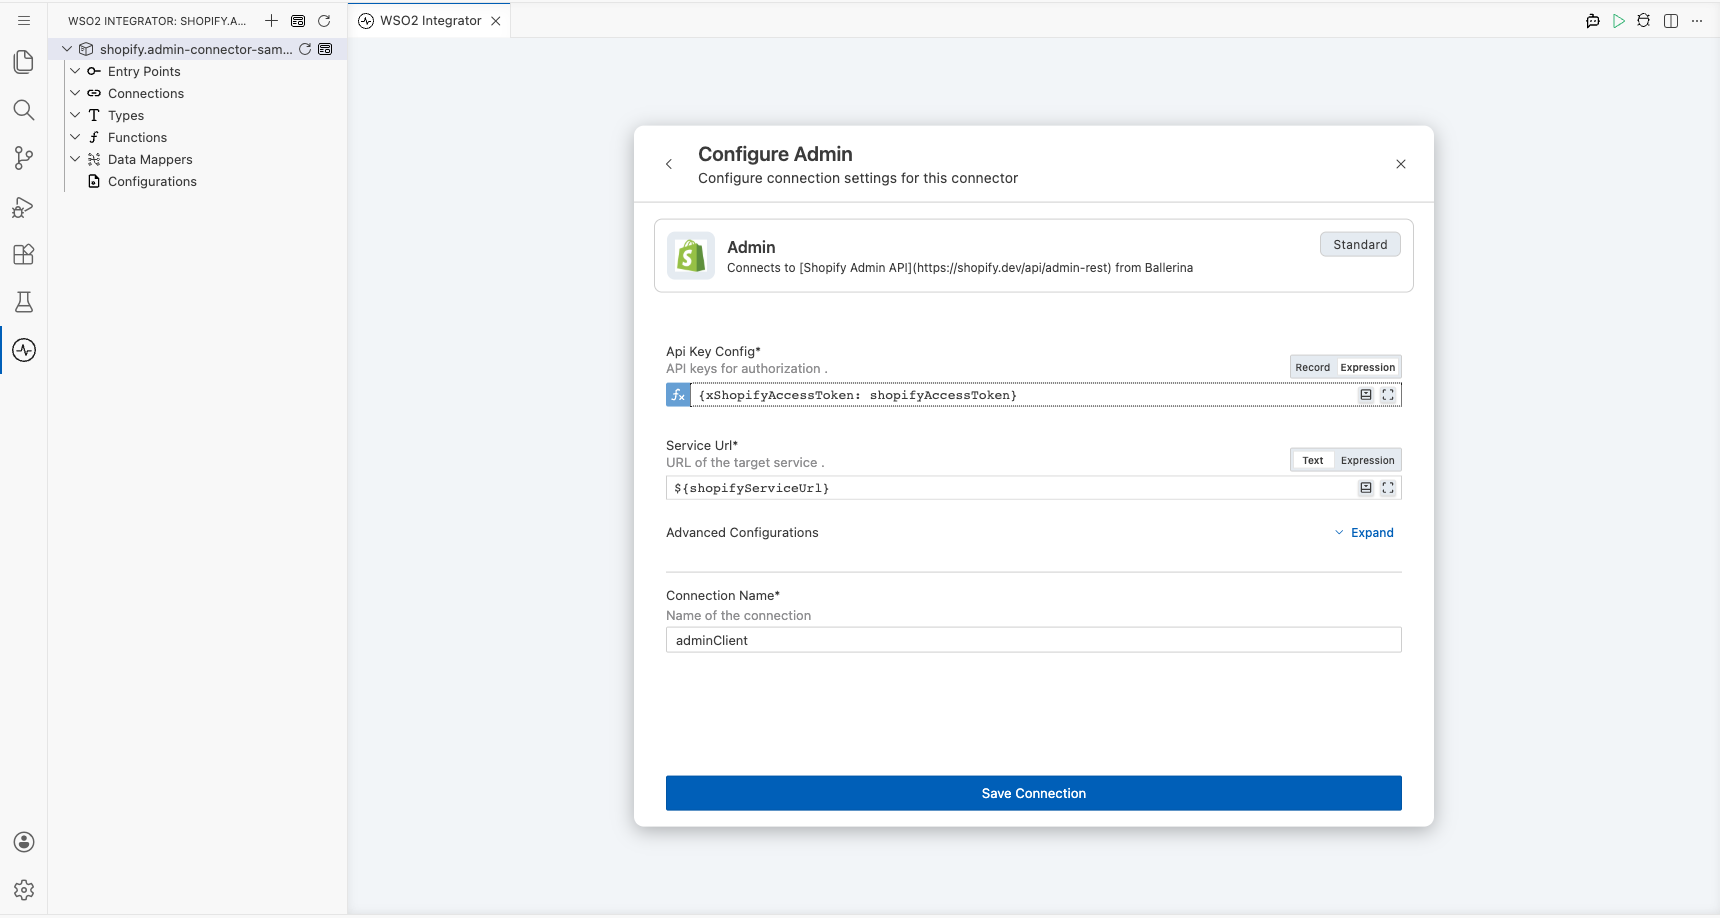
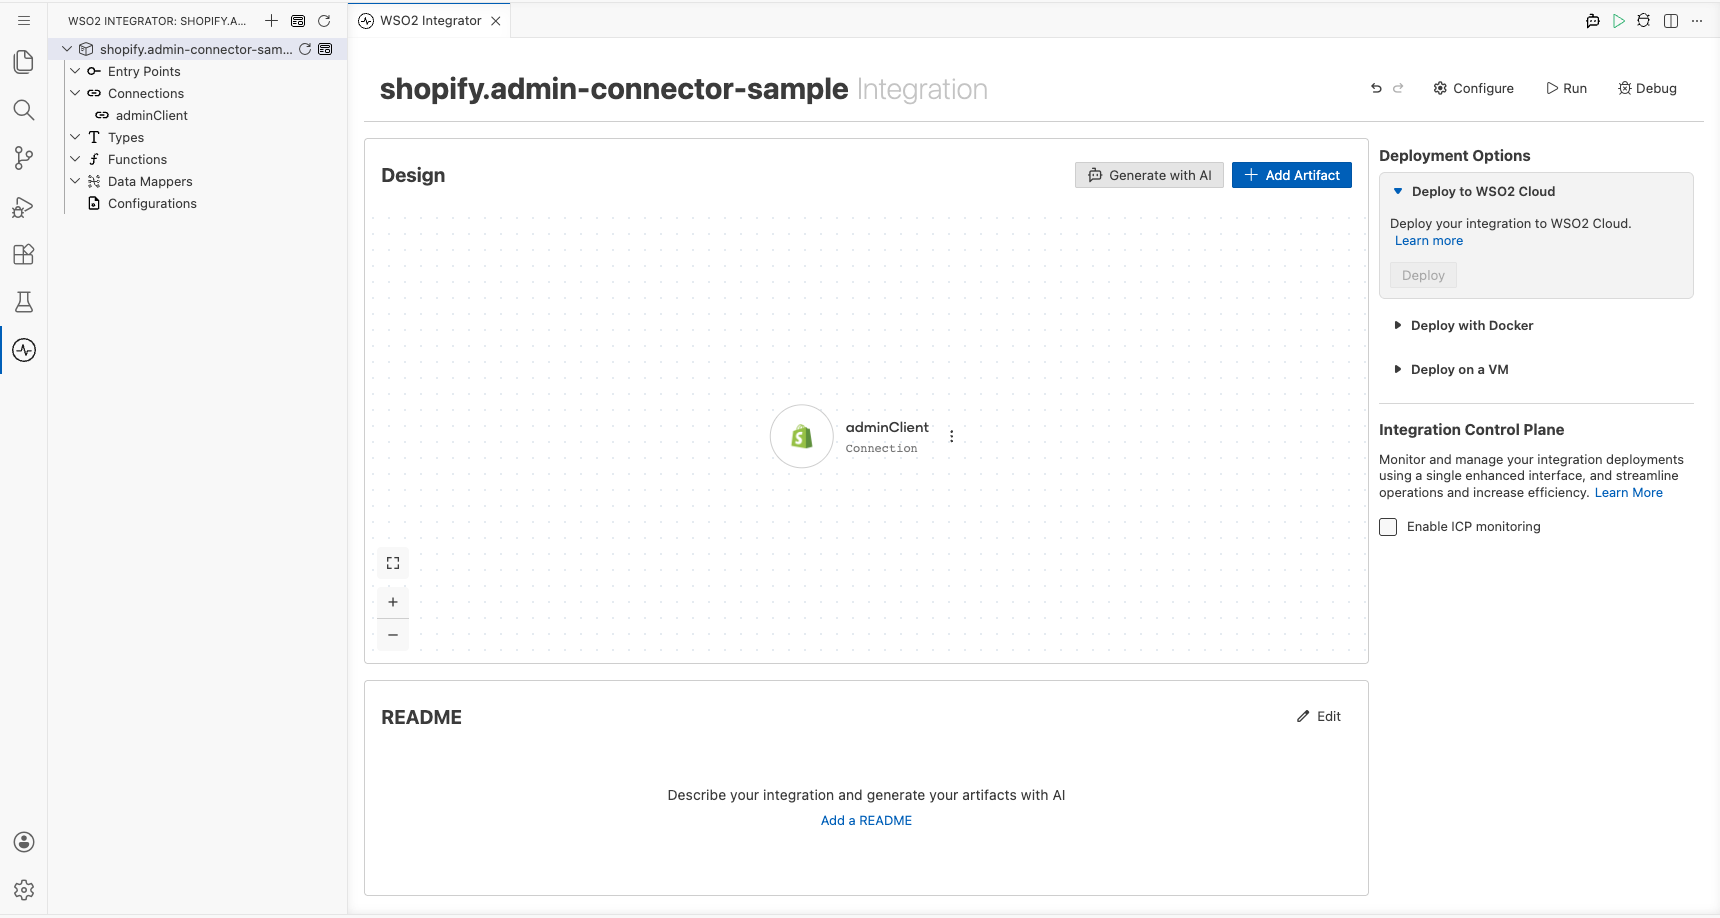
Step 4: Save the shopify.admin connection
Select Save Connection to persist the connection configuration. The shopify.admin connector now appears as a named connection entry (adminClient) in the Connections panel on the low-code canvas.
Step 5: Set actual values for your configurables
- In the left panel of WSO2 Integrator, select Configurations (listed at the bottom of the project tree, under Data Mappers).
- Set a value for each configurable listed below.
- shopifyAccessToken (string) : Your Shopify Admin API access token (found in your Shopify Partner dashboard or app settings)
- shopifyServiceUrl (string) : The full base URL of your Shopify Admin API, e.g.,
https://your-store.myshopify.com/admin/api/2024-01
Configuring the Shopify admin getProducts operation
Step 6: Add an automation entry point
- In the left sidebar, hover over Entry Points and select Add Entry Point.
- Select Automation in the artifact selection panel.
- Select Create to confirm and create the automation entry point.
Step 7: Select the getProducts operation and configure its parameters
- Select the + (Add Step) button in the automation flow between the Start and Error Handler nodes to open the step-addition panel.
- Under Connections in the node panel, select the adminClient connection node to expand it and reveal all available Shopify Admin API operations.
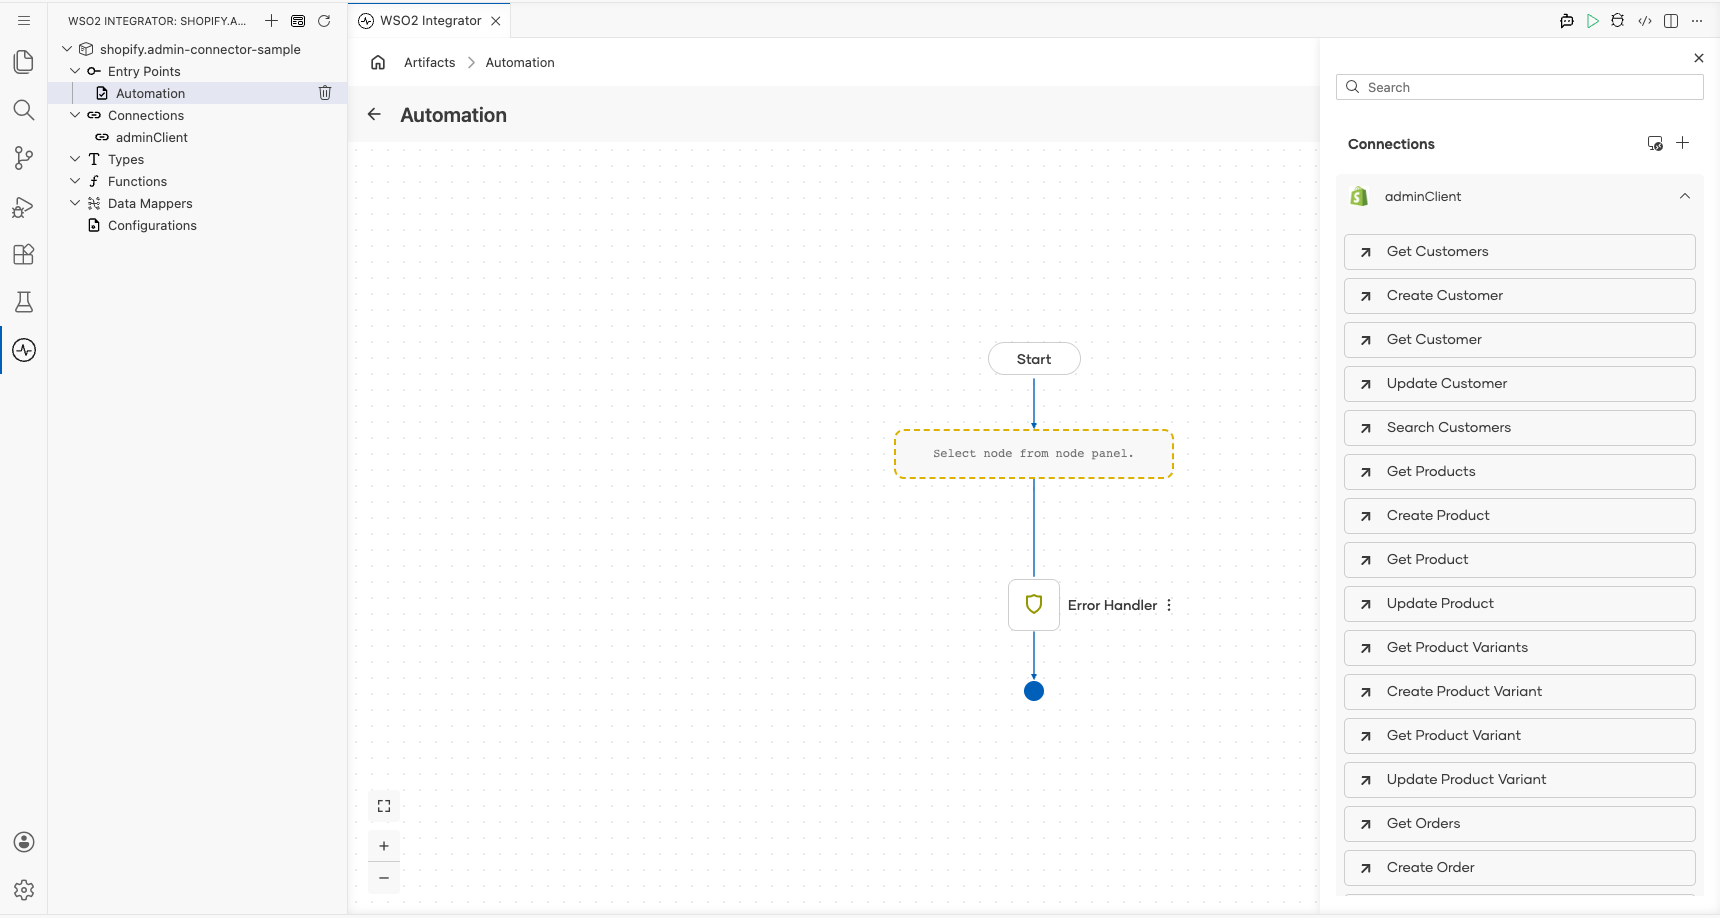
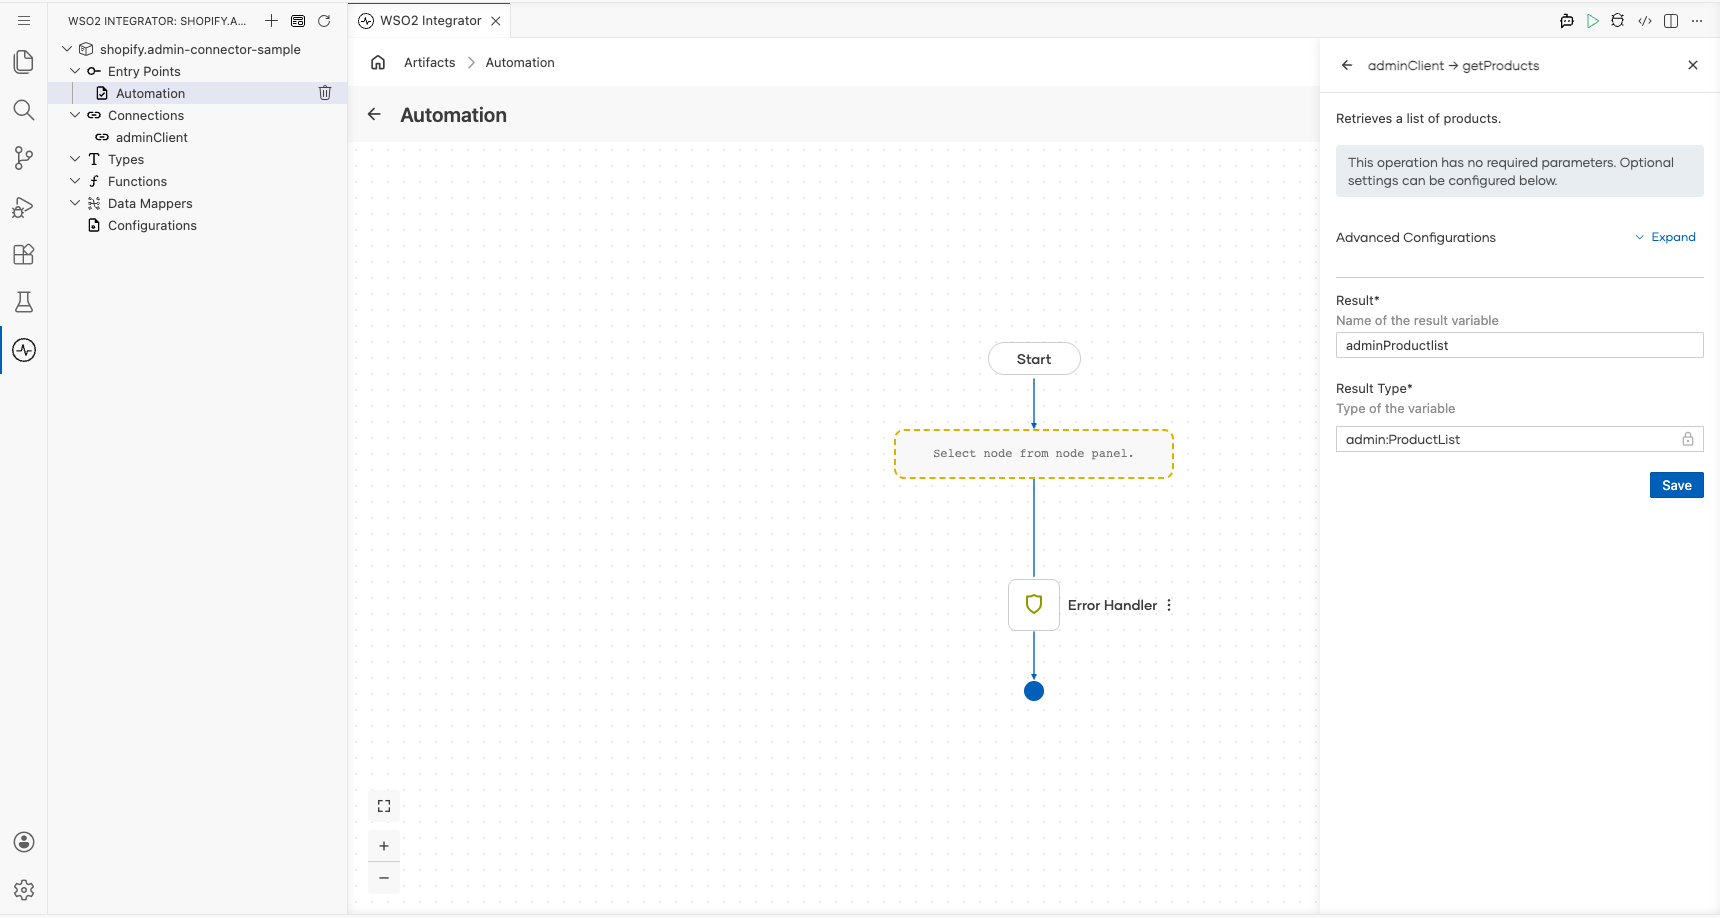
- Select Get Products from the list of operations, then verify the operation fields:
- Result : The variable name that will hold the Shopify API response (auto-filled as
adminProductlist) - Result Type : The type of the result variable (
admin:ProductList)
- Result : The variable name that will hold the Shopify API response (auto-filled as
- Select Save to add the Shopify Admin operation step to the automation flow.

Try it yourself
Try this sample in WSO2 Integration Platform.

Shopify Trigger Example
What you'll build
This integration listens for incoming Shopify webhook events by configuring a Shopify webhook listener with a shared secret. When a matching Shopify Orders event is received, the registered handler, onOrdersCreate, is invoked with the event payload of type shopify:OrderEvent, and the payload is logged as a JSON string using log:printInfo. The overall flow is: Shopify Store → Shopify Listener → Handler → log:printInfo.
Architecture
Prerequisites
- A Shopify store or Partner account with webhook configuration permissions.
- A Shopify webhook shared secret (generated in the Shopify admin or Partner Dashboard under Notifications → Webhooks).
- A publicly accessible Shopify webhook endpoint URL (use a tunneling tool such as ngrok if your environment is not publicly reachable).
Setting up the Shopify integration
New to WSO2 Integrator? Follow the Create a New Integration guide to set up your integration first, then return here to add the trigger.
Adding the Shopify trigger
Step 1: Open the artifacts palette and select the Shopify trigger
- Select + Add Artifact on the integration canvas to open the artifacts palette.
- In the Event Integration category, locate and select the Shopify card.

Configuring the Shopify listener
Step 2: Bind Shopify listener parameters to configuration variables
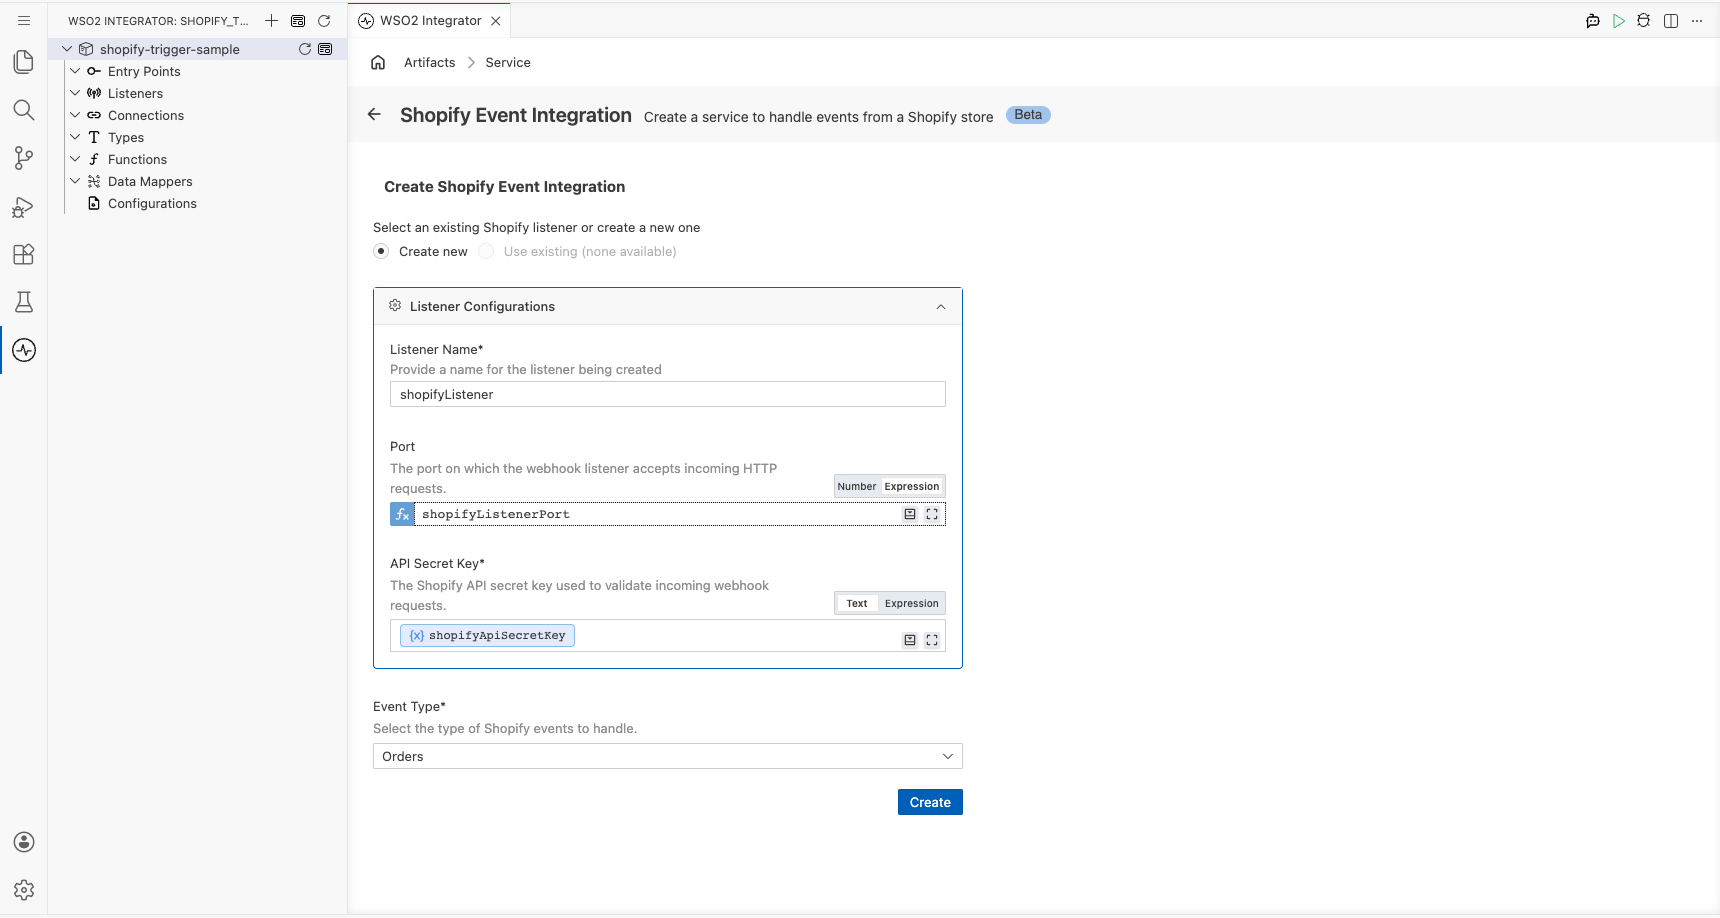
For each required listener parameter, open the helper panel next to the field, select the Configurables tab, select + New Configurable, enter a camelCase variable name and the appropriate type (configurable string for text or credential fields, configurable int for numeric fields), and select Save. The configuration is automatically injected into the field. Repeat for every required field:
- API Secret Key : The webhook API secret key used to verify that incoming requests originate from Shopify.
- Port : The port on which the Shopify webhook listener accepts incoming HTTP requests.
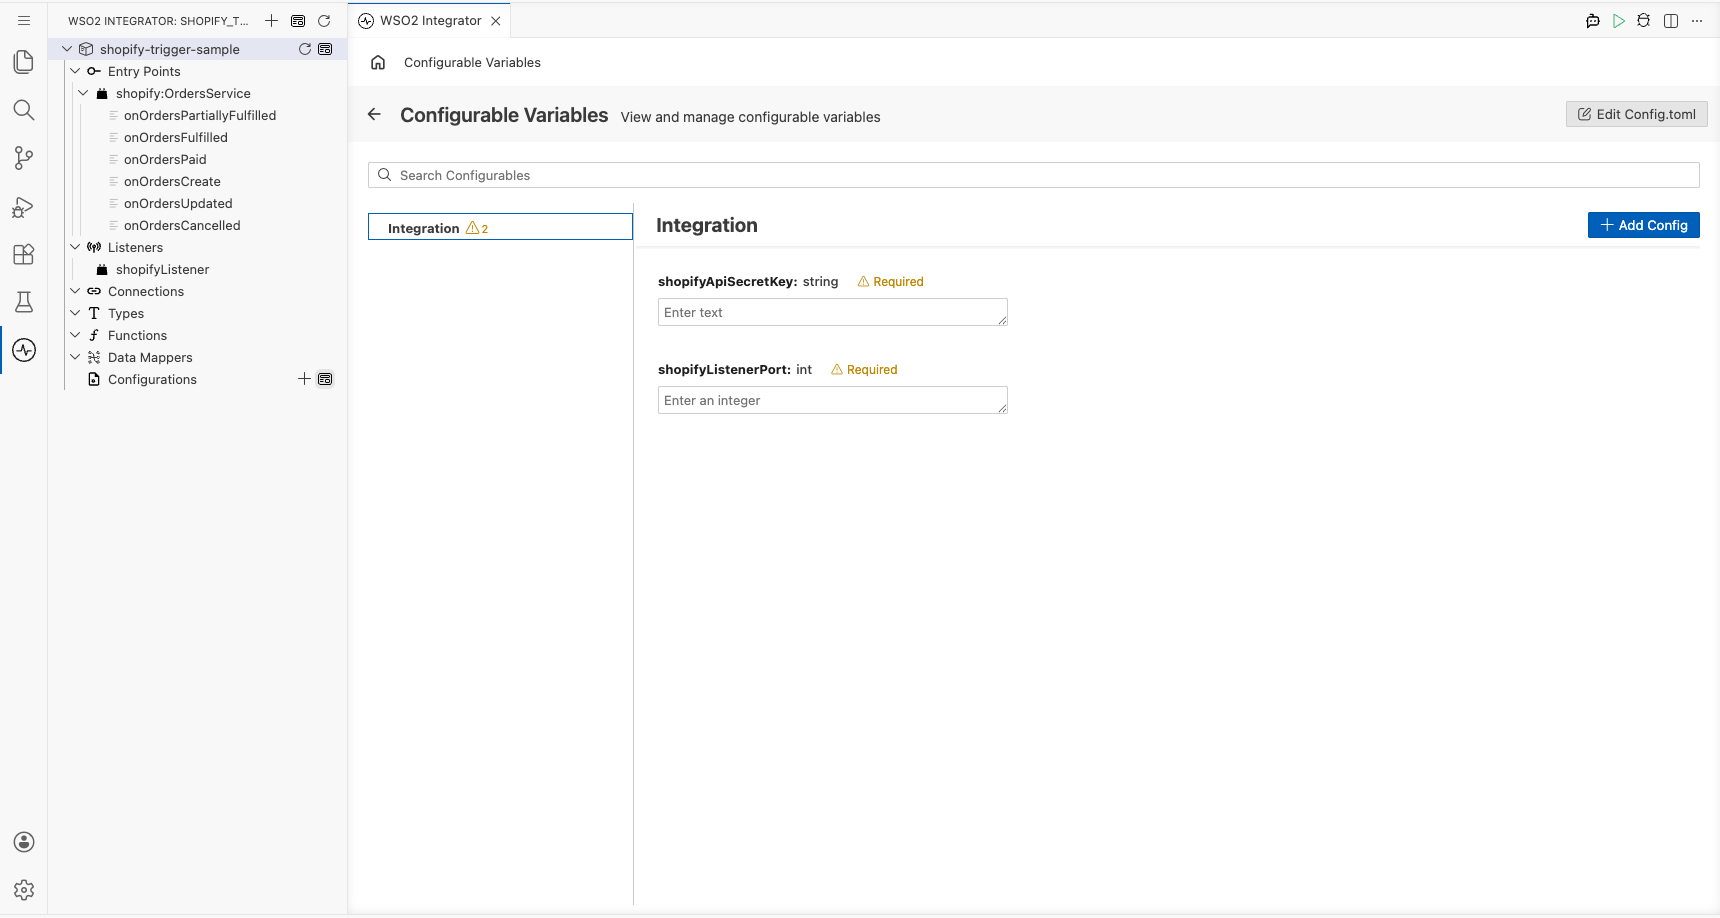
Step 3: Set actual values for your configurations
Select Configurations in the left panel of WSO2 Integrator (at the bottom of the project tree, under Data Mappers) to open the Configurations panel, then set a value for each configuration listed below:
- shopifyApiSecretKey (string) : Your Shopify webhook API secret key, copied from the Shopify admin or Partner Dashboard.
- shopifyListenerPort (int) : The port number on which the listener should run.
Step 4: Select Create to register the listener and open the Service view
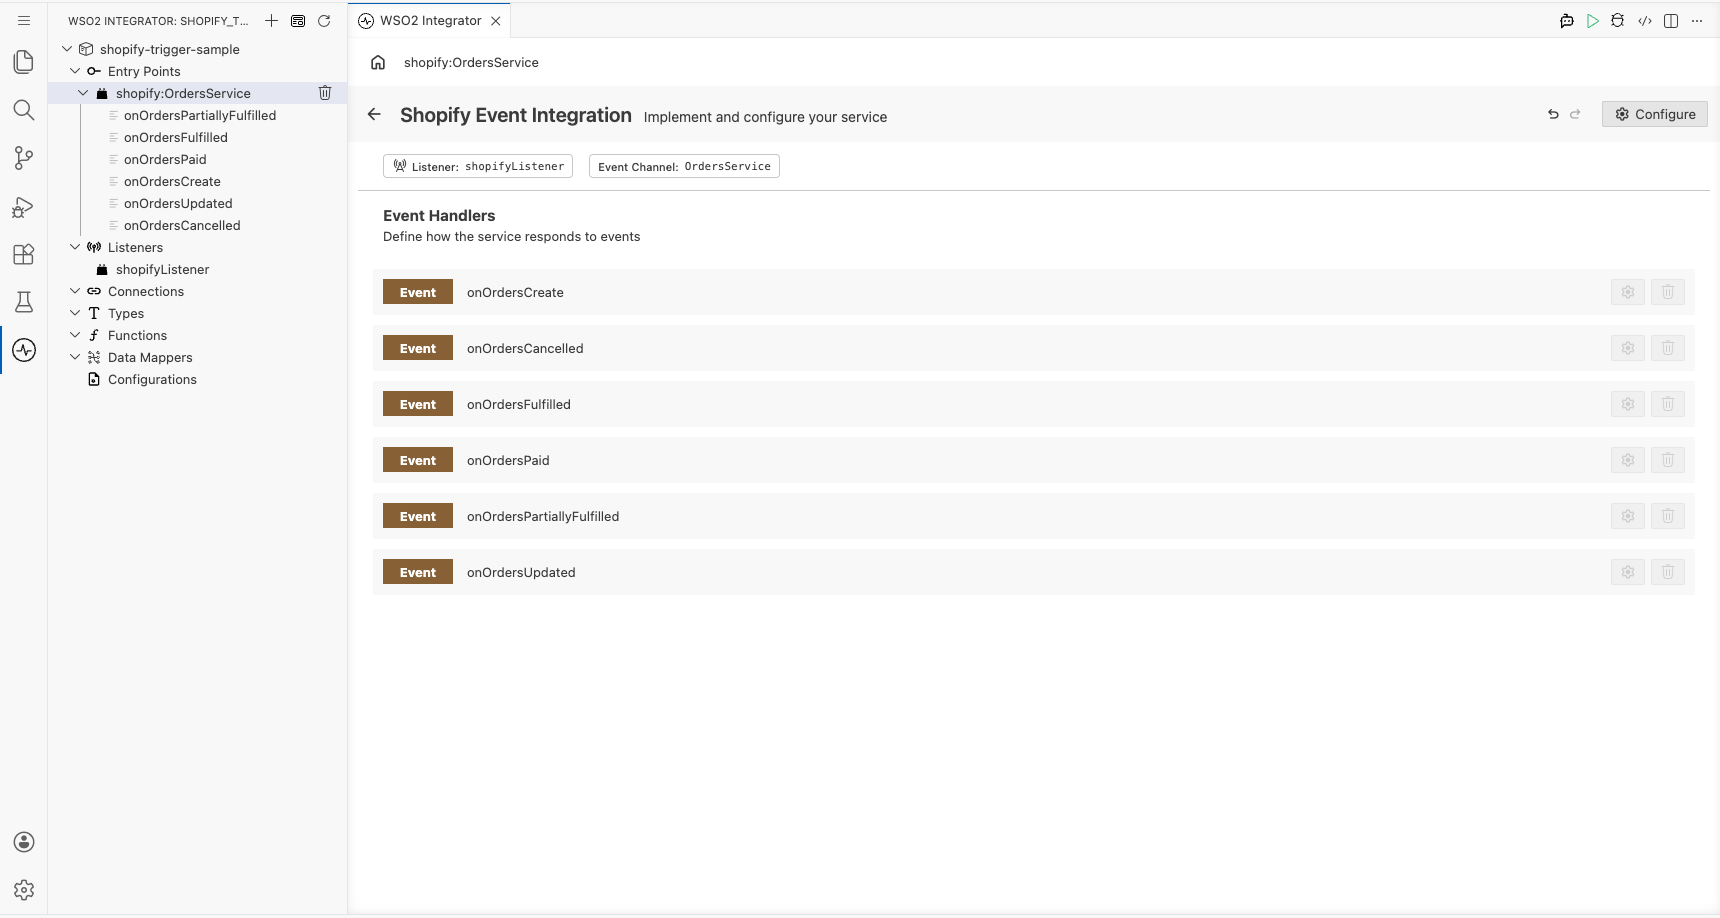
Select Create to submit the Shopify trigger listener configuration. Select the Event Channel type, for example, Orders, and provide a service name. The listener is created automatically and the Service view opens, showing the Shopify listener chip and the Event Handlers section with all available Orders event handlers pre-registered (onOrdersCreate, onOrdersCancelled, onOrdersFulfilled, onOrdersPaid, onOrdersPartiallyFulfilled, onOrdersUpdated).
Handling Shopify events
Step 5: Open the add handler side panel
- In the Service view, review the Event Handlers section: for the Orders event channel, all six Orders handlers are pre-registered automatically when the service is created.
- Select any handler row (for example, onOrdersCreate) to open its flow canvas.
Step 6: Select the onOrdersCreate handler and review the payload type
- In the project tree, select onOrdersCreate under
shopify:OrdersServiceto open the handler's flow canvas. - The handler function signature is
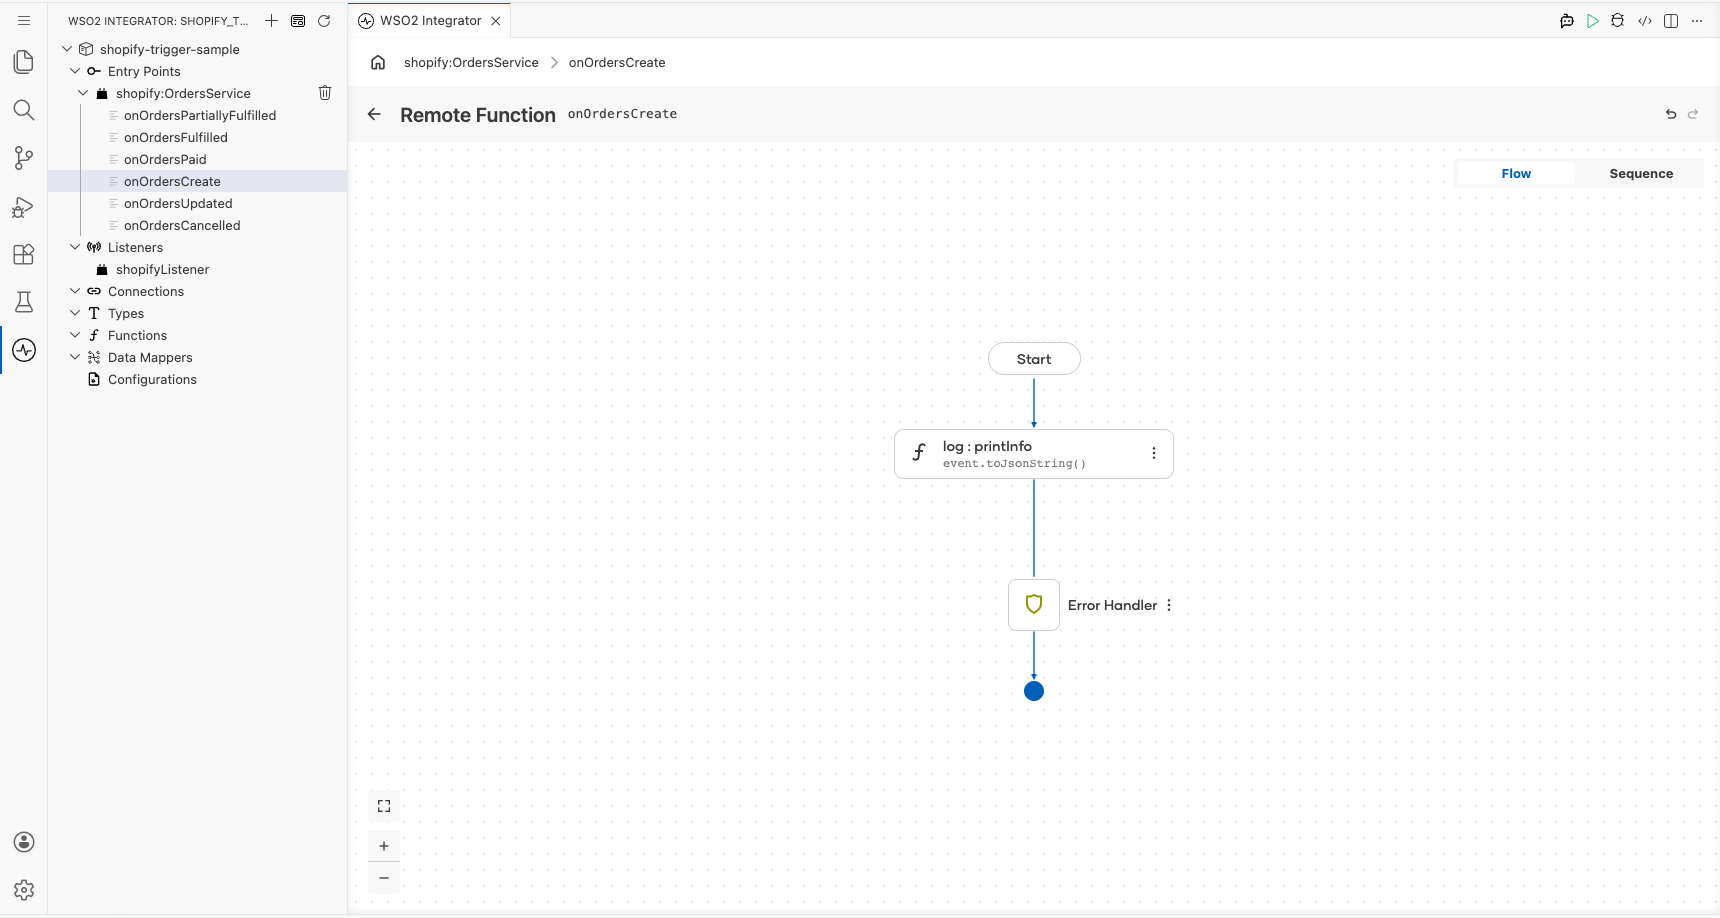
remote function onOrdersCreate(shopify:OrderEvent event) returns error?; the event payload is already strongly typed asshopify:OrderEvent, so no custom type schema definition is required. - The flow canvas opens showing Start → (empty) → Error Handler, ready for logic to be added.
Step 7: Add a log statement to the handler flow
- In the flow canvas for
onOrdersCreate, select + between Start and Error Handler to open the node panel. - Expand the Logging category and select Log Info. The
log:printInfoconfiguration form appears on the right. - In the Msg* field, switch to Expression mode and enter
event.toJsonString(). - Select Save. The
log:printInfonode now appears in the flow canvas between Start and Error Handler, displayingevent.toJsonString()as its message.
Step 8: Confirm the handler is registered in the Service view
Select the back arrow in the canvas header (or re-select shopify:OrdersService in the project tree) to return to the Service view. The Event Handlers list confirms all Orders handlers, including onOrdersCreate, are registered and ready.

Running the integration
Step 9: Run the integration and trigger a test Shopify event
- In the WSO2 Integrator panel, select Run to start the integration. The Shopify listener begins accepting webhook requests on the configured port.
- Trigger a test Shopify order-created event using one of the following methods:
- A WSO2 Integrator HTTP Client integration, assembled from the same low-code canvas (recommended), that sends a POST request to the listener endpoint with a valid
X-Shopify-Hmac-SHA256header and a JSON body matching theshopify:OrderEventstructure. - The Shopify Partner Dashboard or Shopify Admin → Settings → Notifications → Webhooks → Send test notification to fire a real webhook to a publicly accessible endpoint.
- A WSO2 Integrator HTTP Client integration, assembled from the same low-code canvas (recommended), that sends a POST request to the listener endpoint with a valid
- Observe the log output in the integration console: the Shopify order event payload JSON appears printed by
log:printInfo(for example:{"id":1,"email":"[email protected]","total_price":"99.00"}).
Try it yourself
Try this sample in WSO2 Integration Platform.