Set up ThunderID as a key manager
ThunderID speaks RFC 7591 Dynamic Client Registration with RFC 7592 read, update and delete, so the API Portal & MCP Hub can create OAuth2 applications on a developer's behalf and manage them afterwards.
This page covers what ThunderID needs, then how to register it in the portal — from the UI or from the configuration file.
Before you begin
You need a running ThunderID instance reachable from the portal, and an OAuth2 application in ThunderID for the portal itself. That application is not a developer's: it is the credential the portal presents when registering theirs, so it needs permission to call ThunderID's DCR endpoint.
Create the portal's application in ThunderID
- Log in to ThunderID.
- Go to Applications and click Add Application.
- Select the Backend Service type and create one with a name.
- Copy the secret now. It is shown once and cannot be retrieved later.
- The Overview page has the client ID and the well-known (discovery) URL. Keep both — the portal needs the client ID, and the discovery URL saves typing the endpoints by hand.
Authorize it to call the DCR endpoint
A newly created application can obtain a token but cannot register clients with it until it holds a role that permits this.
- Go to the Roles tab and choose Edit.
- Open the Assignment tab, then the Apps tab inside it.
- Click Add and select the application you created.
Note
These steps use the administrator role for simplicity. A custom role works too — it needs the system permission to reach the DCR endpoint.
Endpoints
ThunderID exposes the three endpoints the portal needs under its OAuth2 base path:
| Endpoint | Path | Used for |
|---|---|---|
| Token | https://<thunder-host>/oauth2/token |
The portal's own token, and developers' client_credentials token requests. |
| Registration | https://<thunder-host>/oauth2/dcr/register |
Creating, reading, updating and deleting developers' OAuth2 applications. |
| Authorization | https://<thunder-host>/oauth2/authorize |
Only needed if developers use the authorization code grant. |
Rather than typing these, paste the well-known URL from the application's Overview page into Discovery URL in the portal and click Fetch.
Check the credential works
Before registering ThunderID in the portal, confirm the application can reach the DCR endpoint. First get a token:
PORTAL_CLIENT_ID=<client id from the Overview page>
PORTAL_CLIENT_SECRET=<the secret copied at step 4>
HOST=https://<thunder-host>

TOKEN=$(curl -s -k -X POST "$HOST/oauth2/token" \
  -u "$PORTAL_CLIENT_ID:$PORTAL_CLIENT_SECRET" \
  --data-urlencode "grant_type=client_credentials" \
  --data-urlencode "scope=system" \
  --data-urlencode "resource=$HOST/mcp" \
  | jq -r .access_token)
Then register a throwaway client with it:
curl -i -k -X POST "$HOST/oauth2/dcr/register" \
  -H "Authorization: Bearer $TOKEN" \
  -H "Content-Type: application/json" \
  -H "Accept: application/json" \
  -d '{
    "client_name": "Connectivity test",
    "grant_types": ["client_credentials"],
    "token_endpoint_auth_method": "client_secret_basic"
  }'
A 200 or 201 carrying a client_id means the portal will be able to register applications. Delete the test client afterwards, using the client_id from that response:
Note
-k skips TLS certificate verification, which a ThunderID instance on localhost with a self-signed certificate needs. Drop it against an instance with a certificate your machine trusts.
Reading a failure
If the token request fails, the response body names which input is wrong — invalid_client points at the credential, invalid_scope at scope, and invalid_target at resource. A status code alone cannot tell those apart. A token that is issued but rejected at the DCR endpoint usually means the application has not been assigned a role yet.
Configuring from the UI
Use this when administrators should be able to add and change the key manager without a restart.
Prepare the portal first
A key manager added from the UI gets the deployment-wide posture in [api_portal.key_manager_provisioning], which defaults to HTTPS-only on a publicly resolvable address with a verified certificate. A development ThunderID meets none of those, so relax all three before starting the portal — this section is read at startup:
[api_portal.key_manager_provisioning]
allow_private_endpoints = true
insecure_skip_verify    = true
allow_http_endpoints    = true
| Flag | Needed because |
|---|---|
allow_private_endpoints |
ThunderID is on a private or loopback address. |
insecure_skip_verify |
Its certificate is self-signed. |
allow_http_endpoints |
Only if ThunderID is served over plain http. |
Warning
These relax checks that exist to stop the portal being pointed somewhere it should not reach. Development only — see Endpoints added through the UI or the API.
Add the key manager
- Navigate to Settings and select the Key Managers tab under ORGANIZATION.
- Click + Add key manager.
- Set OAuth2 applications to In the portal, so the portal registers applications over DCR.
- Set Key manager type to ThunderID.
-
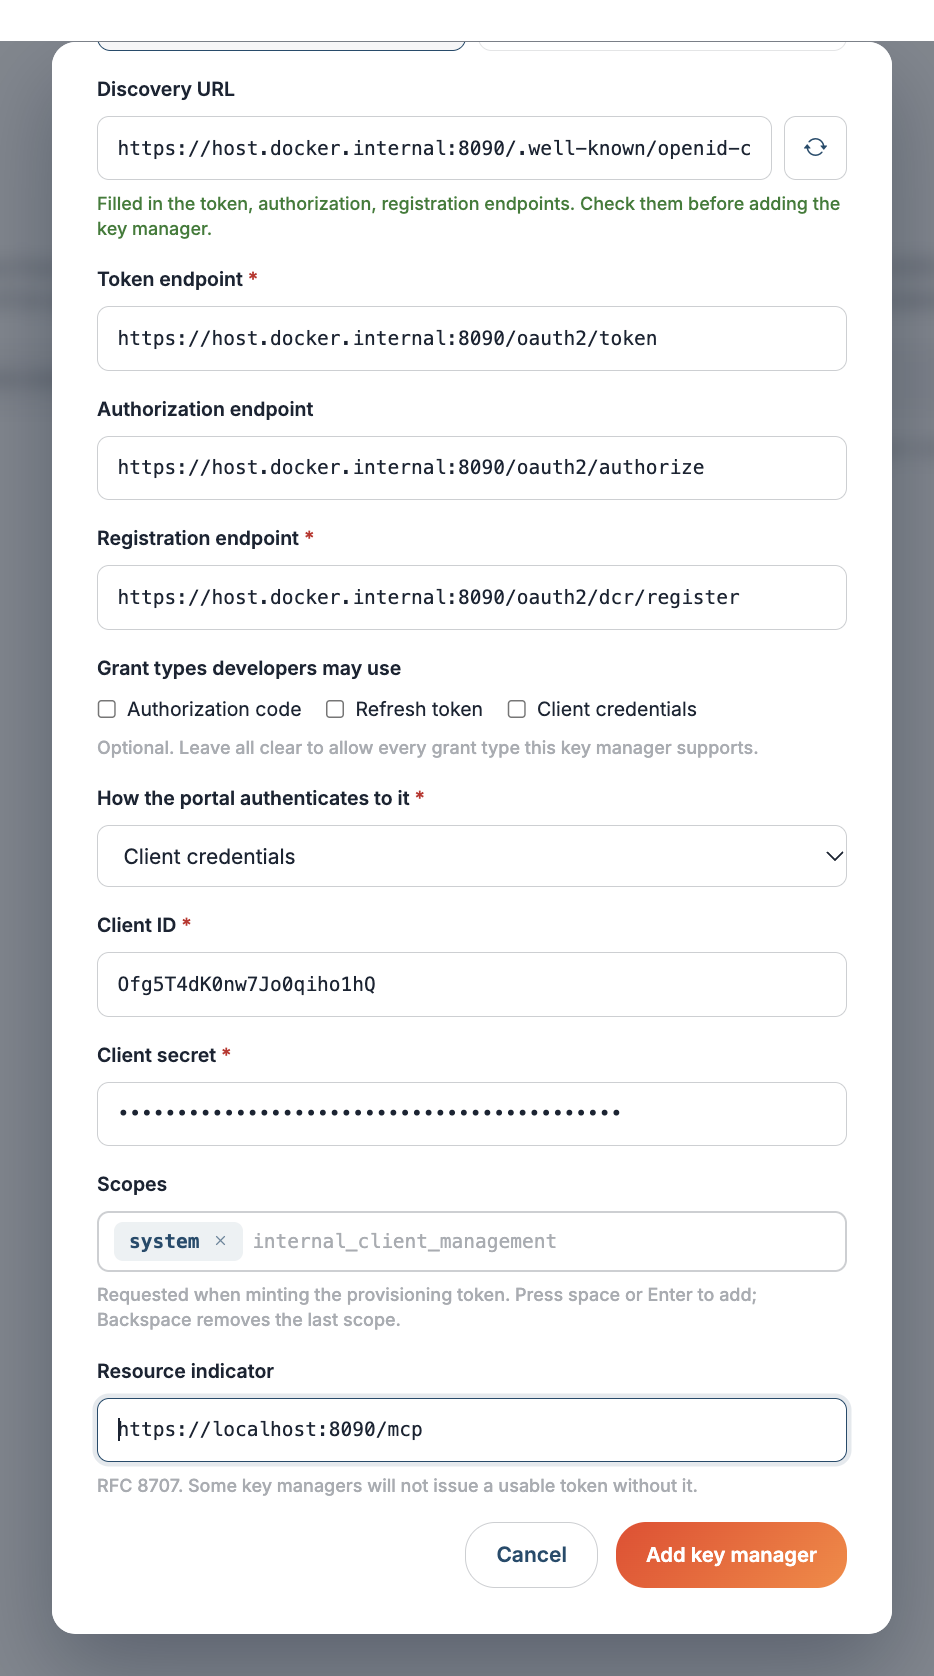
Paste the well-known URL from the application's Overview page into Discovery URL and click Fetch to populate the token, registration and authorization endpoints.
-
Under How the portal authenticates to it, choose Client credentials and enter the client ID and secret of the portal's own ThunderID application.
- Enter the Scopes and Resource indicator ThunderID's token endpoint requires — see the table below.
- Choose a Key type — Production or Sandbox. This cannot be changed later.
- Click Add key manager.
| Field | Value for ThunderID |
|---|---|
| Key manager type | ThunderID |
| OAuth2 applications | In the portal |
| Token endpoint | https://<thunder-host>/oauth2/token |
| Registration endpoint | https://<thunder-host>/oauth2/dcr/register |
| Authorization endpoint | https://<thunder-host>/oauth2/authorize, if developers use the authorization code grant |
| How the portal authenticates to it | Client credentials |
| Client ID / Client secret | The portal's own ThunderID application |
| Scopes | system |
| Resource indicator | https://localhost:8090/mcp — the resource server the system scope is registered against. This is ThunderID's default; if yours differs, use the resource server URL that scope is registered against instead. |
Do not rewrite the resource indicator for Docker
The Resource indicator is an identifier that ThunderID matches against its registered resource server — the portal never dials it. Leave it exactly as ThunderID has it registered, even when the endpoints above use a different host. The endpoints are dialled; this is not.
When the portal runs in Docker
A portal running in a container resolves localhost to the container, not to the machine ThunderID is on. Pasting https://localhost:8090/.well-known/openid-configuration fails with "The discovery document could not be read from that URL", and the log shows the real reason:
Key manager discovery fetch failed {"error":"connect ECONNREFUSED ::1:8090; connect ECONNREFUSED 127.0.0.1:8090"}
Use the host's address from the container's point of view. On Docker Desktop that is host.docker.internal:
Fetch rewrites nothing. The discovery document ThunderID returns still names localhost, so after clicking Fetch change the host in the populated Token endpoint, Registration endpoint and Authorization endpoint as well — otherwise discovery succeeds and every later call still fails. Leave the Resource indicator alone, per the warning above.
On Linux, host.docker.internal is not provided by default: add extra_hosts: ["host.docker.internal:host-gateway"] to the portal's service, or run ThunderID on the same Docker network and use its service name.
Configuring from the configuration file
Use this when the key manager belongs with the deployment rather than with an administrator. An entry declared here is read at startup and cannot be edited or deleted from the UI.
[[api_portal.key_manager]]
id                     = "thunder"
type                   = "thunderid"
name                   = "Production"
description            = "ThunderID"
token_endpoint         = "https://<thunder-host>/oauth2/token"
registration_endpoint  = "https://<thunder-host>/oauth2/dcr/register"
authorize_endpoint     = "https://<thunder-host>/oauth2/authorize"
key_type               = "PRODUCTION"

[api_portal.key_manager.auth]
method        = "client_credentials"
client_id     = "<client id from the Overview page>"
client_secret = '{{ env "APIP_AP_THUNDER_CLIENT_SECRET" }}'
scopes        = ["system"]
resource      = "https://<thunder-host>/mcp"
scopes and resource are what ThunderID's token endpoint expects for a token its DCR endpoint will accept — the same two values as the curl check above. Restart the portal for the entry to take effect. If anything in it is invalid, the portal refuses to start and names the problem, rather than starting without the key manager.
Pointing a development portal at a local ThunderID
A key manager declared here carries its own flags, rather than the deployment-wide [api_portal.key_manager_provisioning] section the UI route uses. A local ThunderID needs two of them: its address is private, and its certificate is self-signed.
[[api_portal.key_manager]]
id                      = "thunder-local"
type                    = "thunderid"
name                    = "Local ThunderID"
token_endpoint          = "https://host.docker.internal:8090/oauth2/token"
registration_endpoint   = "https://host.docker.internal:8090/oauth2/dcr/register"
authorize_endpoint      = "https://host.docker.internal:8090/oauth2/authorize"
allow_private_endpoints = true
insecure_skip_verify    = true

[api_portal.key_manager.auth]
method        = "client_credentials"
client_id     = "<client id from the Overview page>"
client_secret = '{{ env "APIP_AP_THUNDER_CLIENT_SECRET" }}'
scopes        = ["system"]
resource      = "https://localhost:8090/mcp"
The client_secret above reads an environment variable rather than holding the value, so the variable has to reach the portal process. When the portal runs under Docker Compose, add it to the environment: block of the api-portal service in docker-compose.yaml:
  api-portal:
    environment:
      APIP_AP_SERVER_PORT: ${APIP_AP_SERVER_PORT:-9543}
      APIP_AP_THUNDER_CLIENT_SECRET: <the secret copied at step 4>
Prefer ${APIP_AP_THUNDER_CLIENT_SECRET} here and keep the value in the api-platform.env file the service already loads, so the secret is not committed with the Compose file. Recreate the container afterwards — docker compose up -d api-portal — since a running container does not pick up a changed environment.
Note
{{ env "NAME" }} fails closed: if the variable is unset or empty the portal refuses to start and names it, rather than starting with an unusable key manager.
allow_http_endpoints is not listed because a configuration entry already permits http by default — add it only to be explicit. It is the UI route that needs it set, since the provisioning section defaults it off.
If the portal runs in a container, replace localhost in token_endpoint and registration_endpoint with host.docker.internal — but leave resource as the URL ThunderID registered the system scope against, since it is an identifier rather than an address the portal dials.
Warning
allow_private_endpoints and insecure_skip_verify relax checks that exist to stop the portal being pointed at something it should not reach. Use them for local development only.
What developers see
With ThunderID registered, a developer opening OAuth2 Keys and choosing this key manager is asked for:
| Field | Required | Notes |
|---|---|---|
| Application name | Yes | Shown to end users on the consent screen. |
| Grant types | Yes | Authorization code, refresh token, or client credentials. You can narrow this list per key manager with Grant types developers may use. |
| Callback URLs | Only with authorization code | Absolute URIs, no fragment. A client_credentials application never redirects and is not asked for one. |
| Response types | No | code, token or id_token. Must match the selected grants. |
| Client authentication method | No | client_secret_basic, client_secret_post, or none for a public client. |
The portal creates the client in ThunderID and shows the client secret once. It is not stored and cannot be shown again — the developer supplies it per token request.