Creating an Agent
In WSO2 Agent Builder, you first create an agent, then decide how it's called:
- Connect it to a trigger: A chat channel, an HTTP endpoint, an event source, or a file source calls the agent. For example, an Agent Chat trigger exposes the agent as a chat endpoint over HTTP.
- Call it inside a flow: Add an Agent step to any flow, such as the resource flow of an HTTP trigger, and the flow runs the agent as one of its steps.
Create an agent
-
Open the Add Agent dialog. Select Add Agent on your agentic integration's overview, or select the Add Agent action on the Agents node in the WSO2 Agent Builder side bar.
-
Under Create New, select Create Agent.
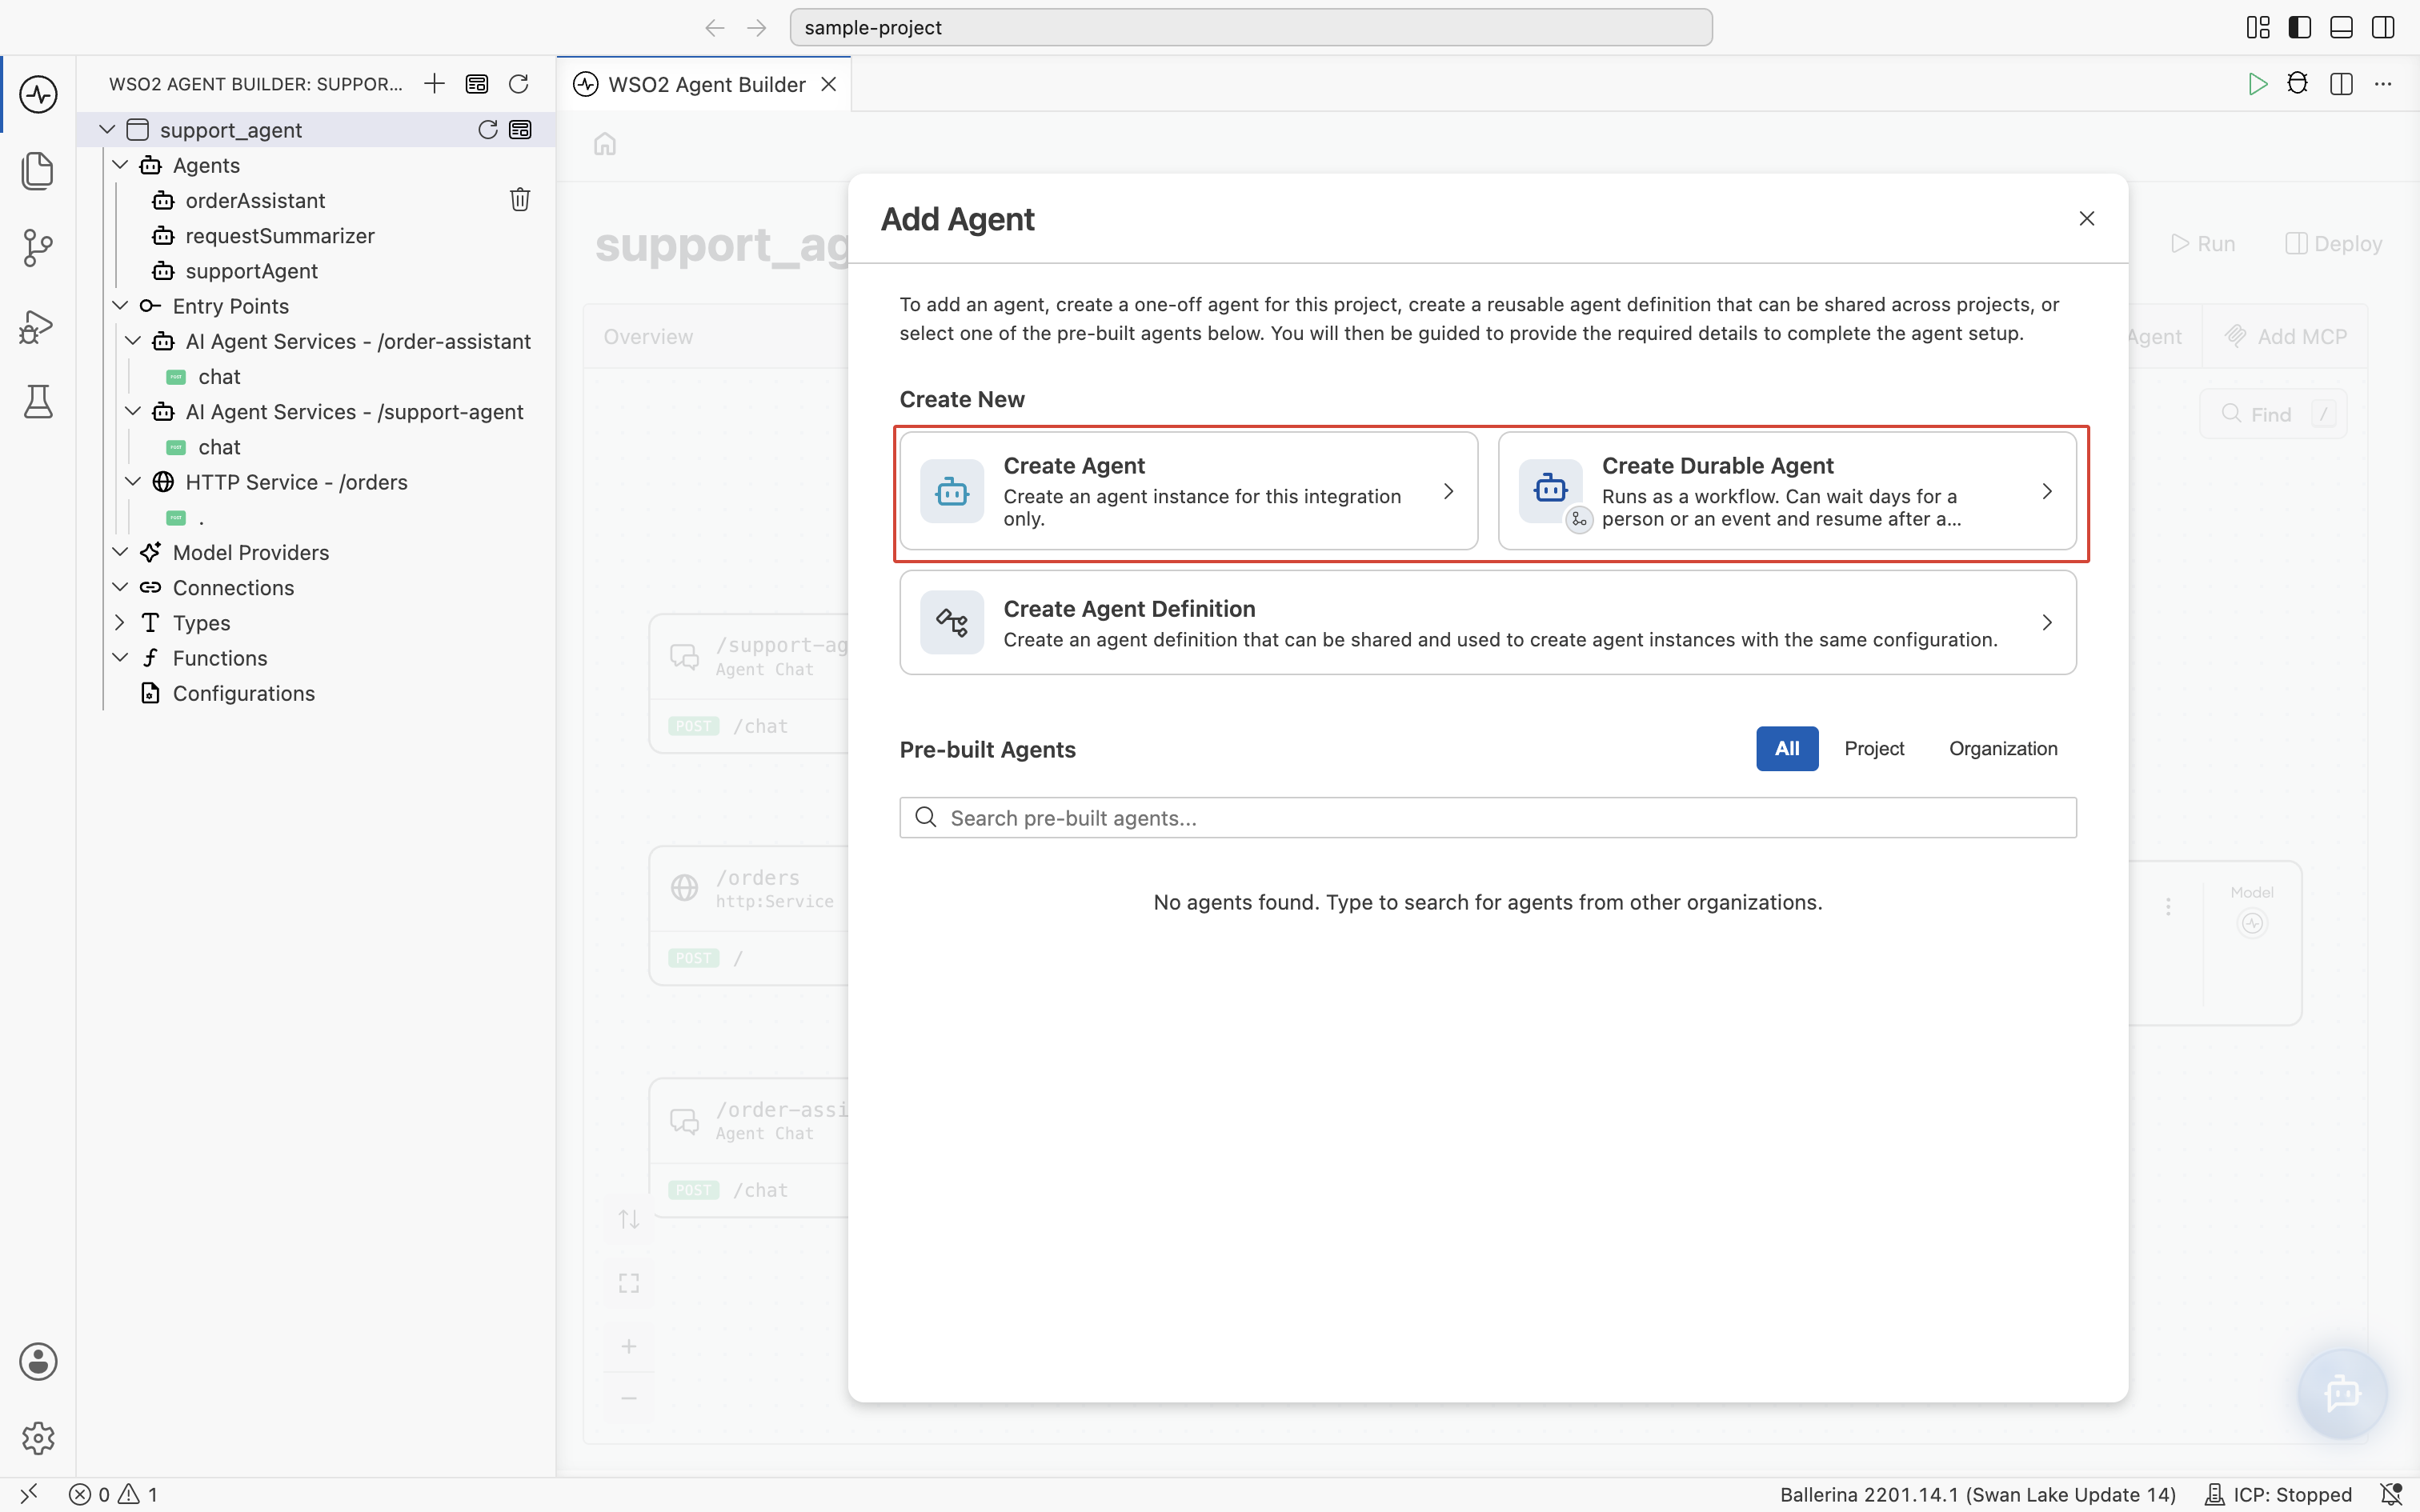
To create a reusable agent definition or use a pre-built agent instead, see Create an Agent Definition.
-
Configure the agent's role, instructions, and model:
Field Required Description Role Yes Defines the agent's primary function, for example Order Assistant.Instructions Yes Detailed instructions for the agent. Model Yes The model used by the agent. Keep Default WSO2 Model Provider, select another model provider, or select Create New Model Provider. 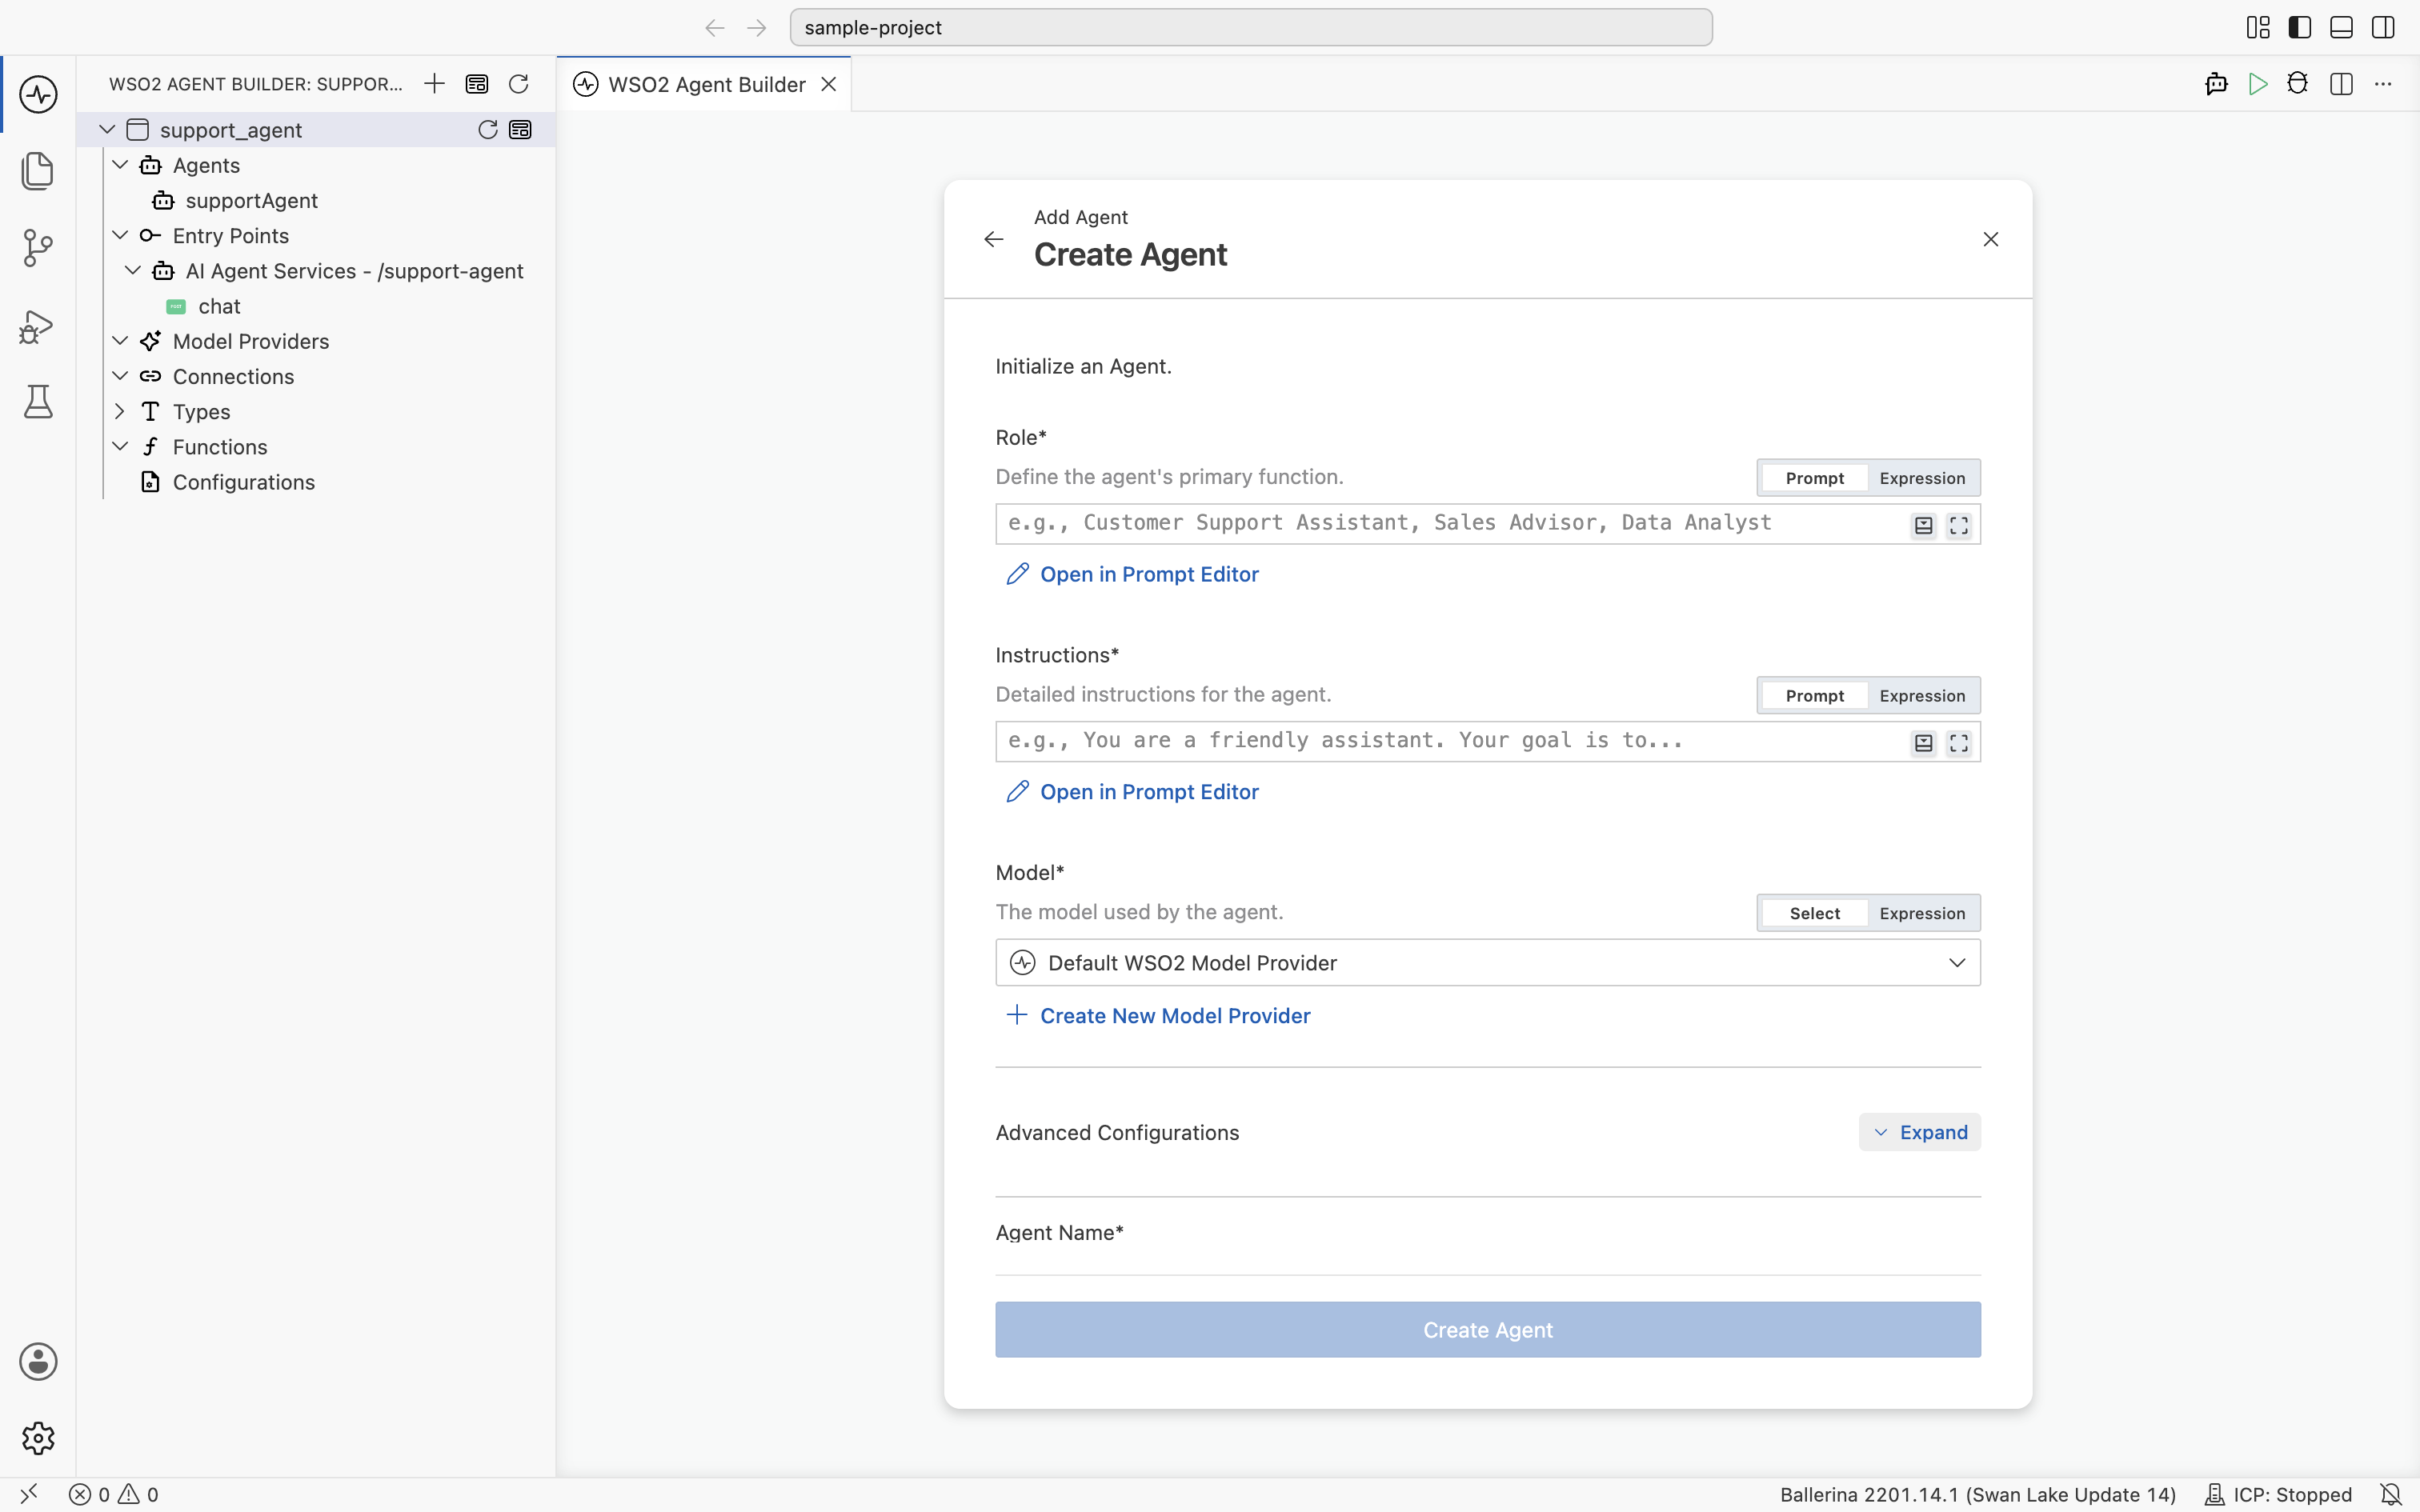
-
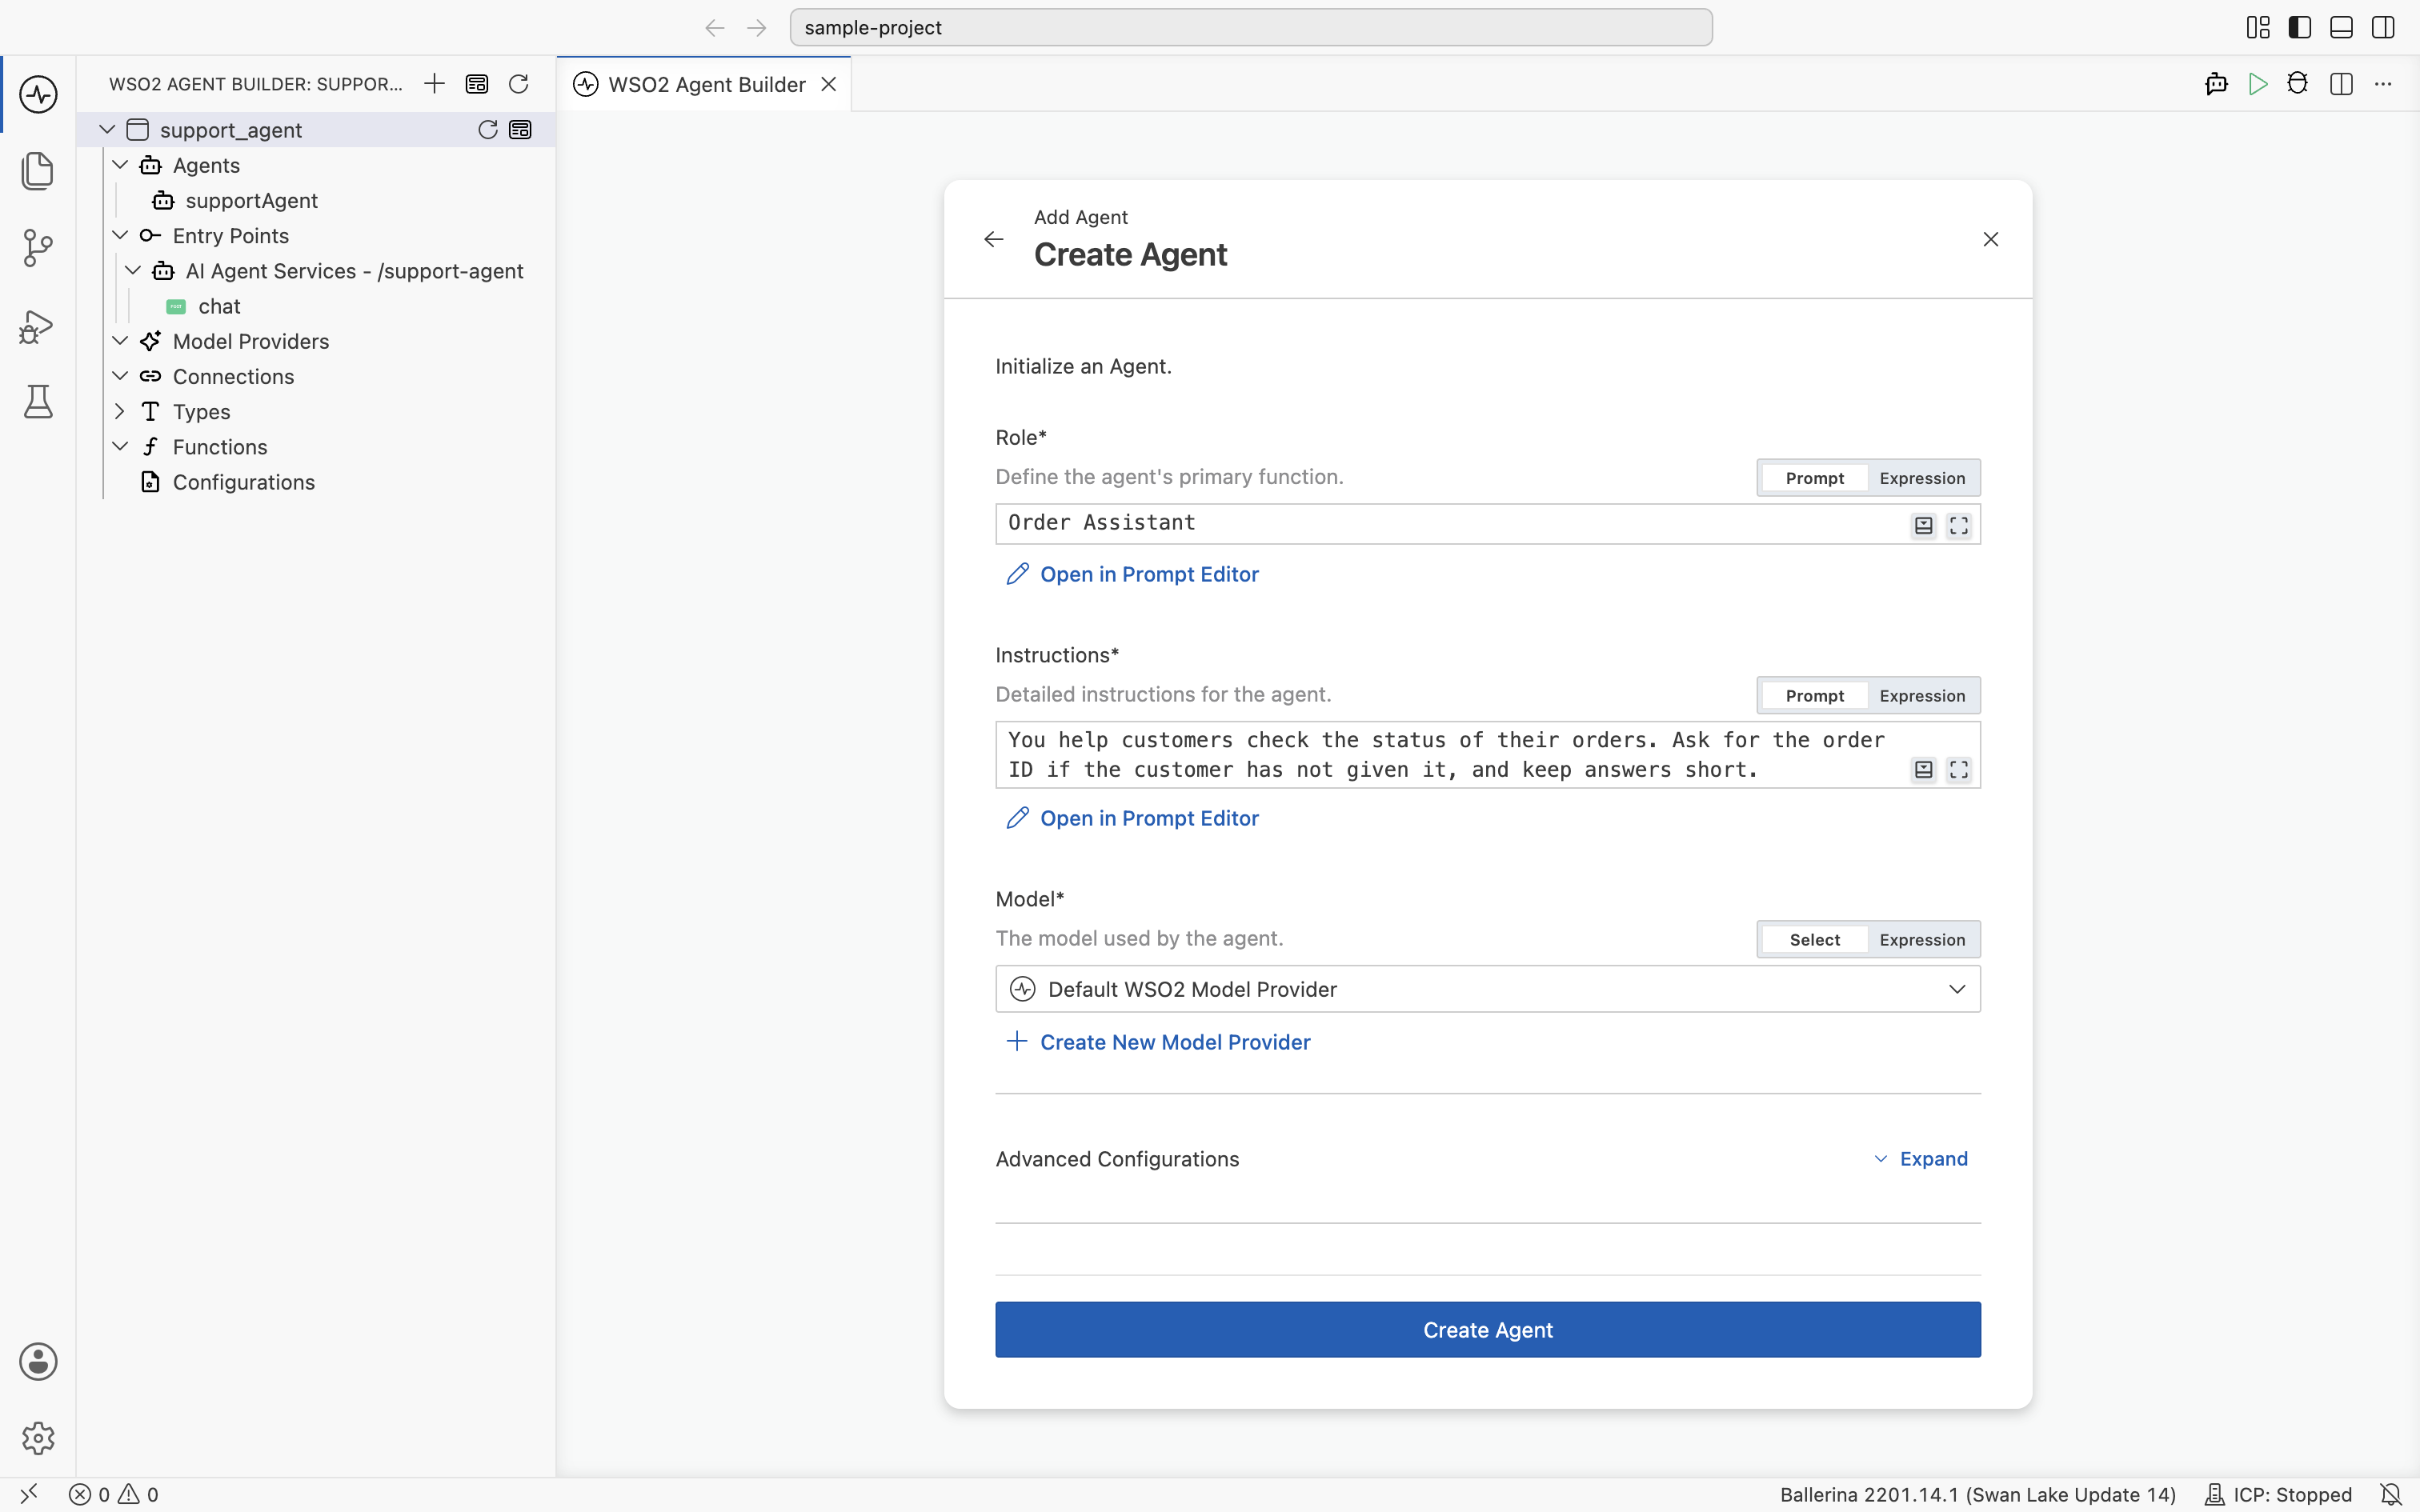
Fill in Role and Instructions, and leave Model as Default WSO2 Model Provider.
-
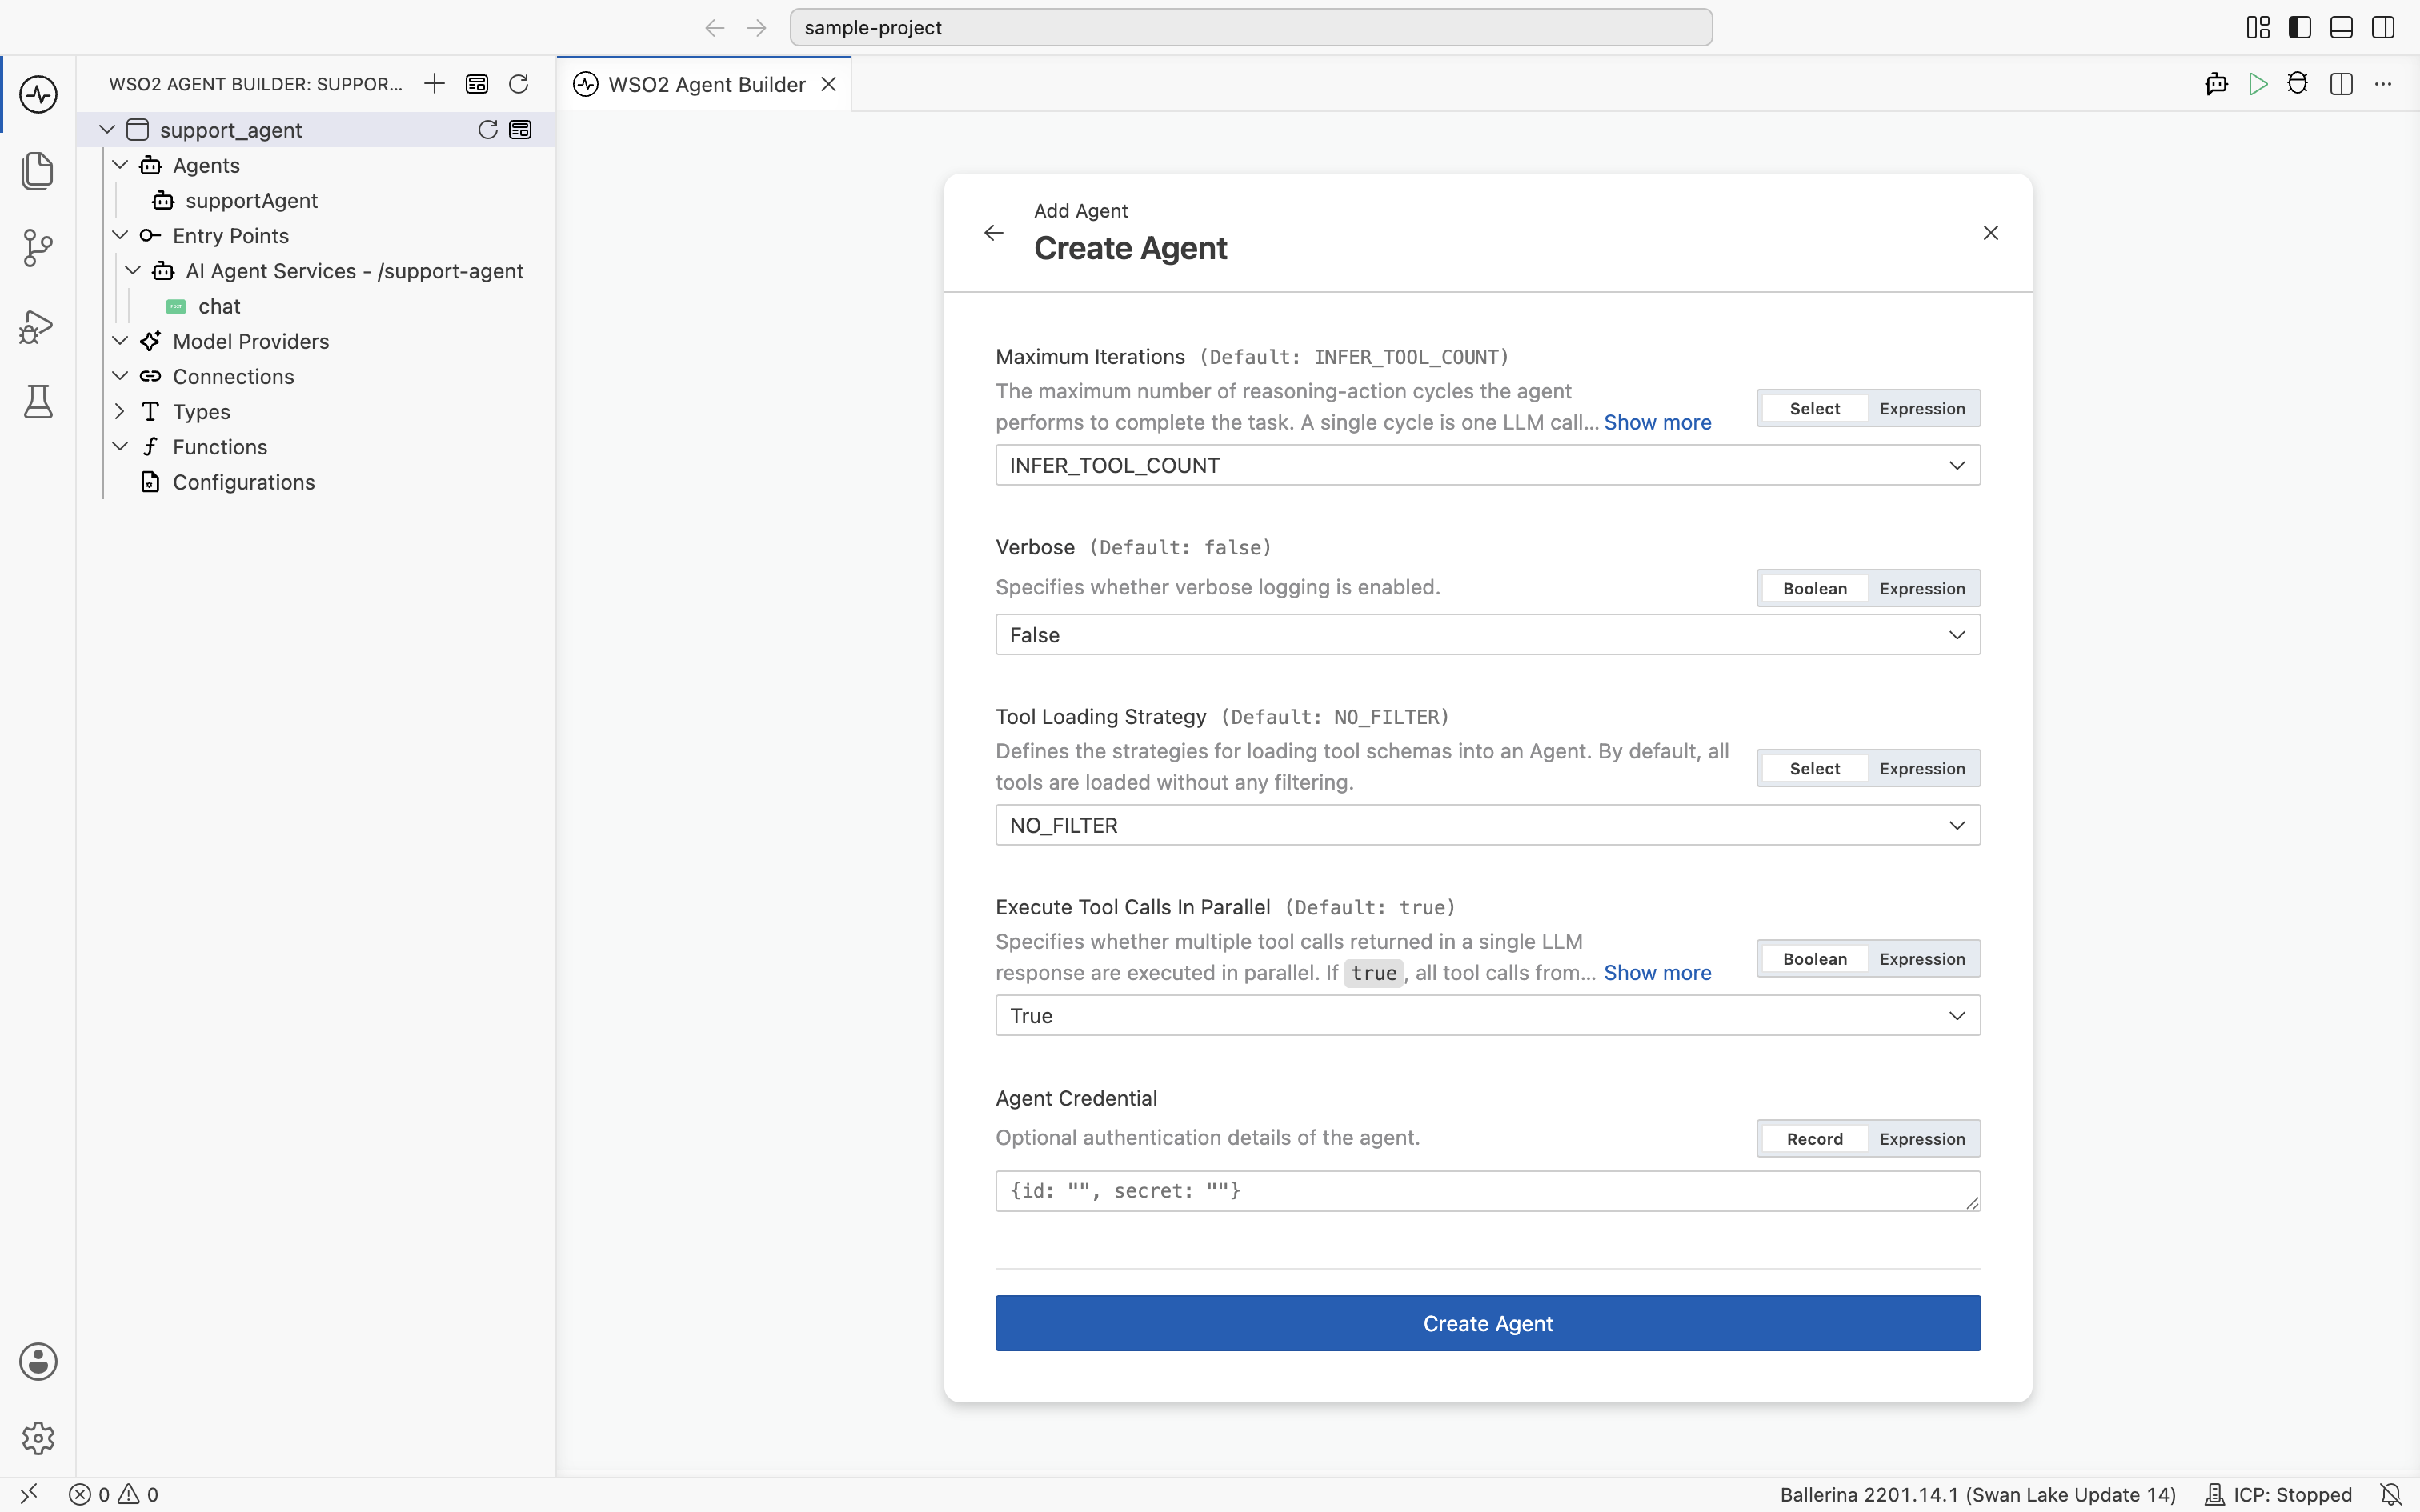
Optionally, expand Advanced Configurations to change how the agent runs, such as its maximum iterations or tool loading strategy. See Advanced configuration.
-
Set Agent Name, an identifier such as
orderAssistant, then select Create Agent.
The agent appears under Agents in the side bar, and its canvas opens.
- Visual Designer
- Ballerina Code
The canvas shows the AI Agent node with its name, an + Add Memory button, and a preview of its role and instructions. The node connects to its model provider on the right. Add Trigger on the left and Add Tool below the model provider are where you connect the agent to callers and give it tools.
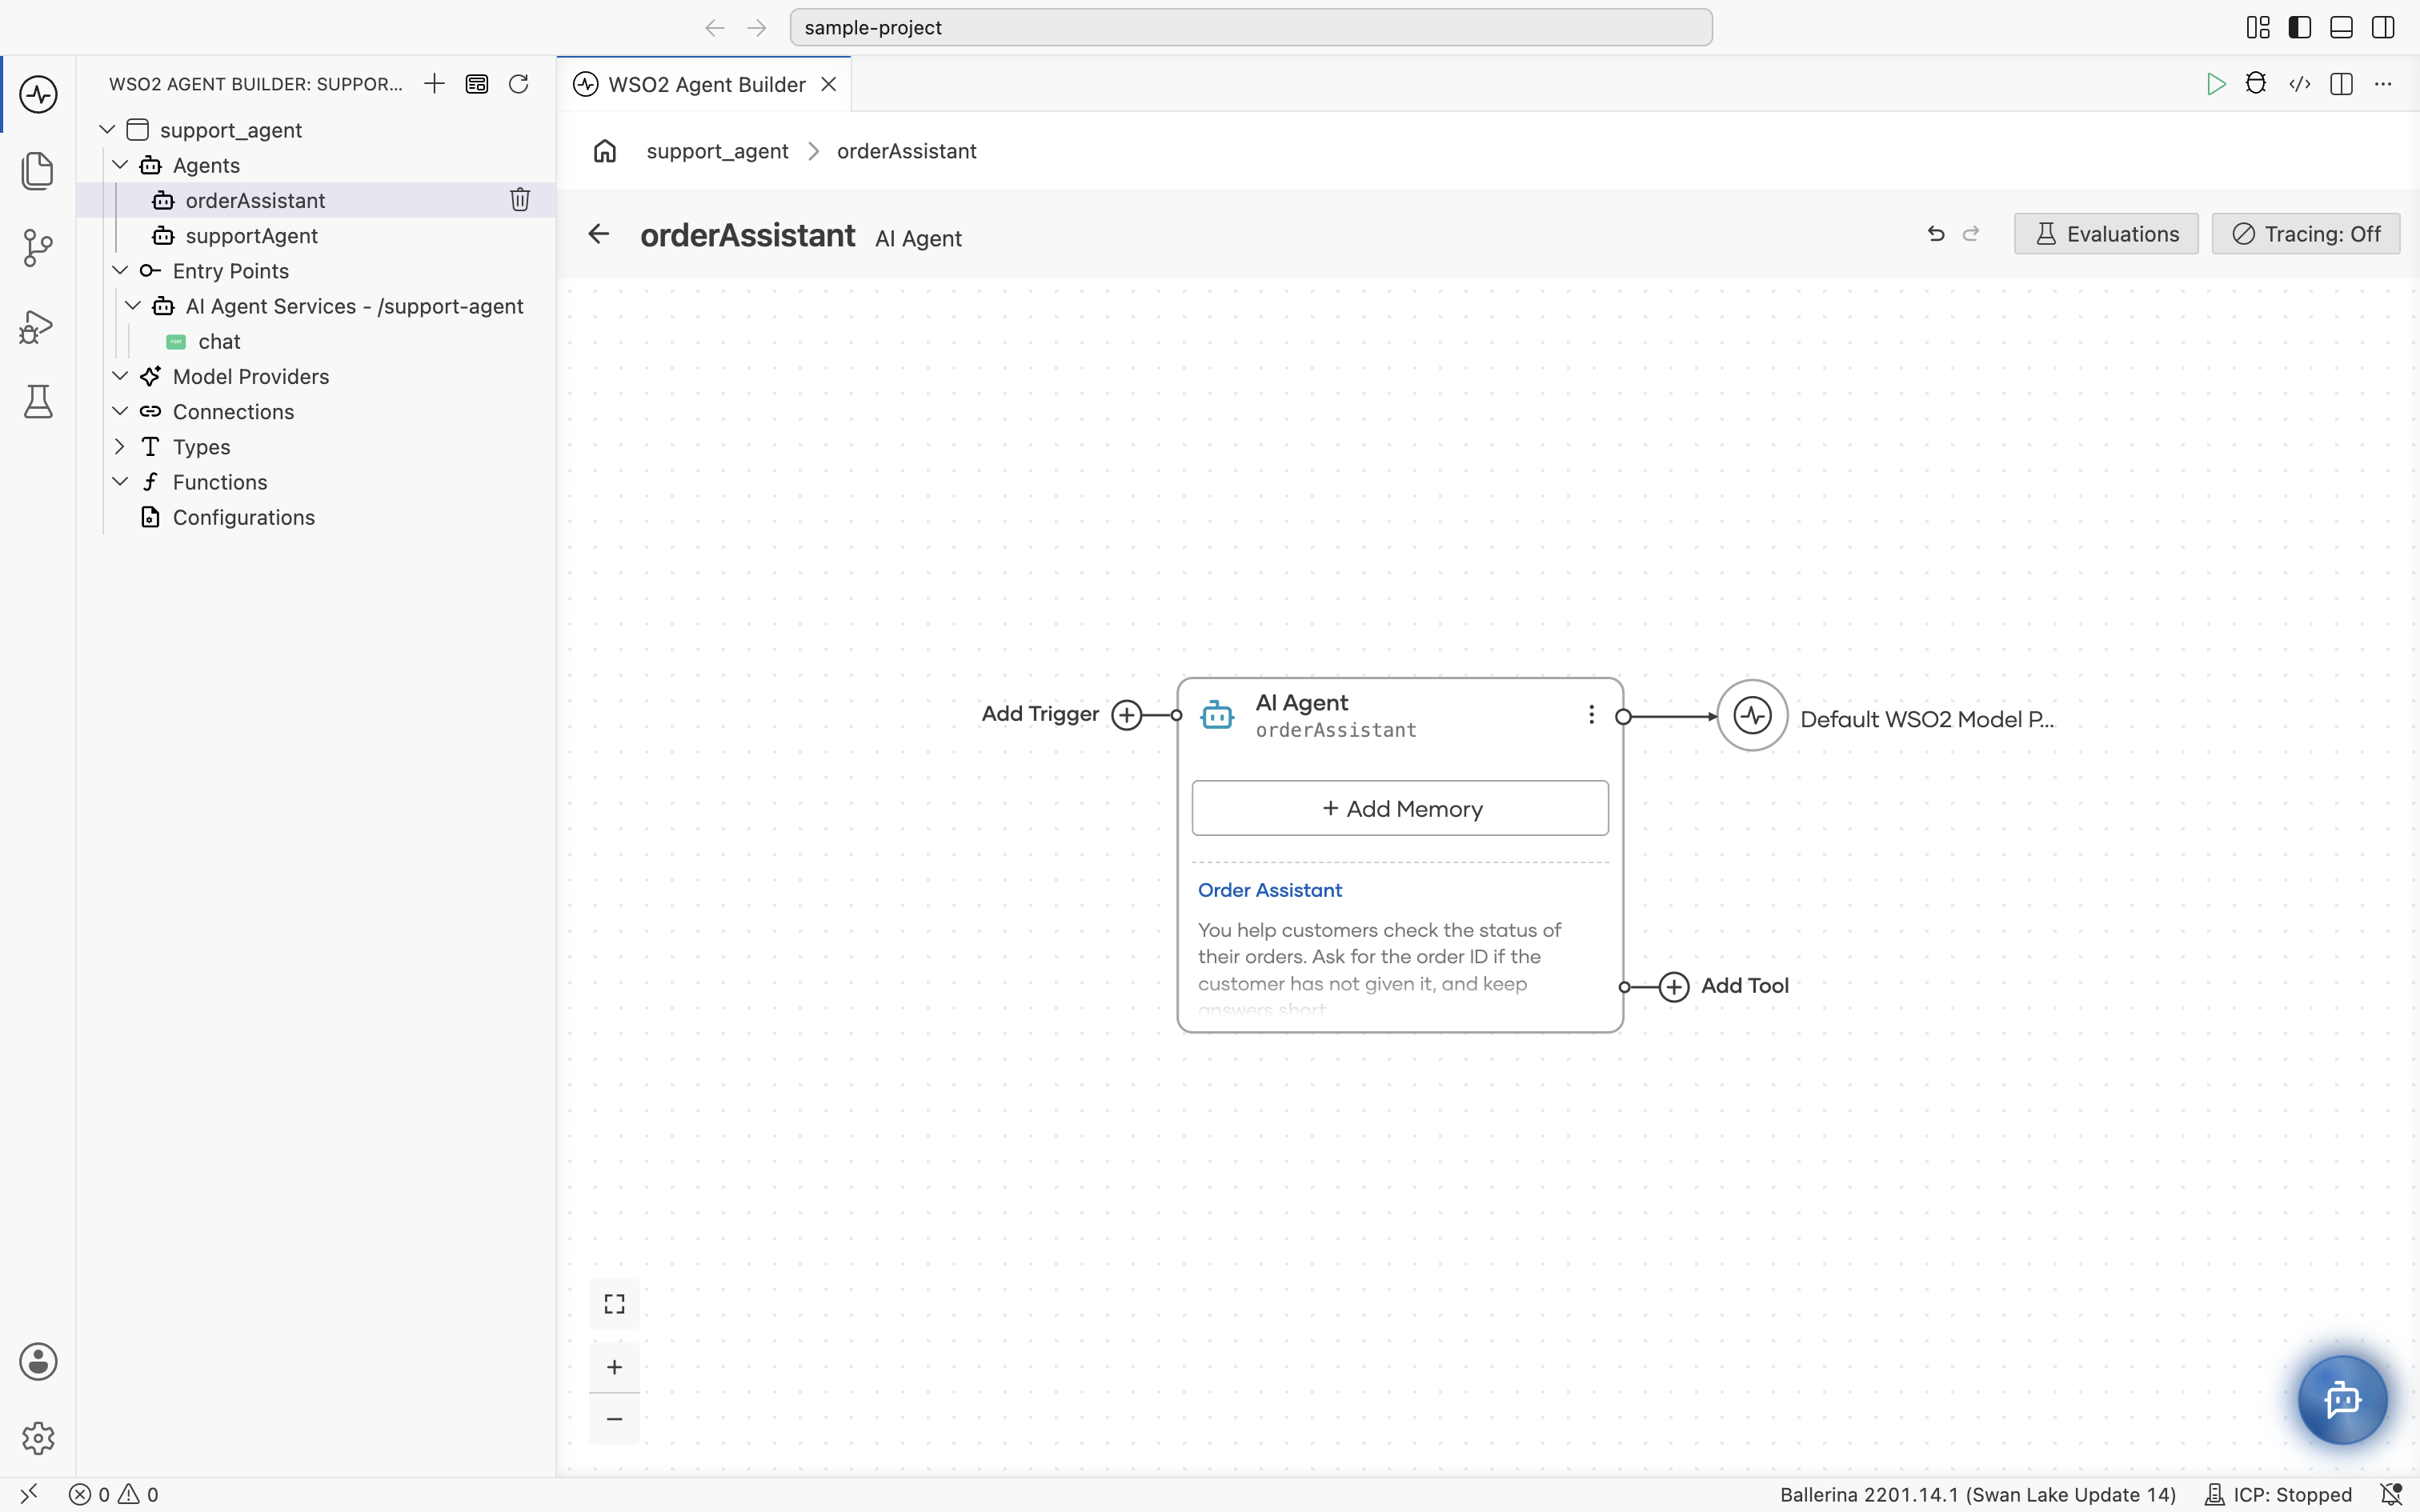
WSO2 Agent Builder adds the agent declaration to agents.bal:
import ballerina/ai;

final ai:Agent orderAssistant = check new (
    systemPrompt = {
        role: string `Order Assistant`,
        instructions: string `You help customers check the status of their
            orders. Ask for the order ID if the customer has not given it,
            and keep answers short.`
    },
    model = check ai:getDefaultModelProvider()
);
Expose the agent as a chat endpoint
Connect the agent to an Agent Chat trigger to call it over HTTP and chat with it from WSO2 Agent Builder.
-
On the agent canvas, select Add Trigger.
-
Under Chat Channels, select Agent Chat.
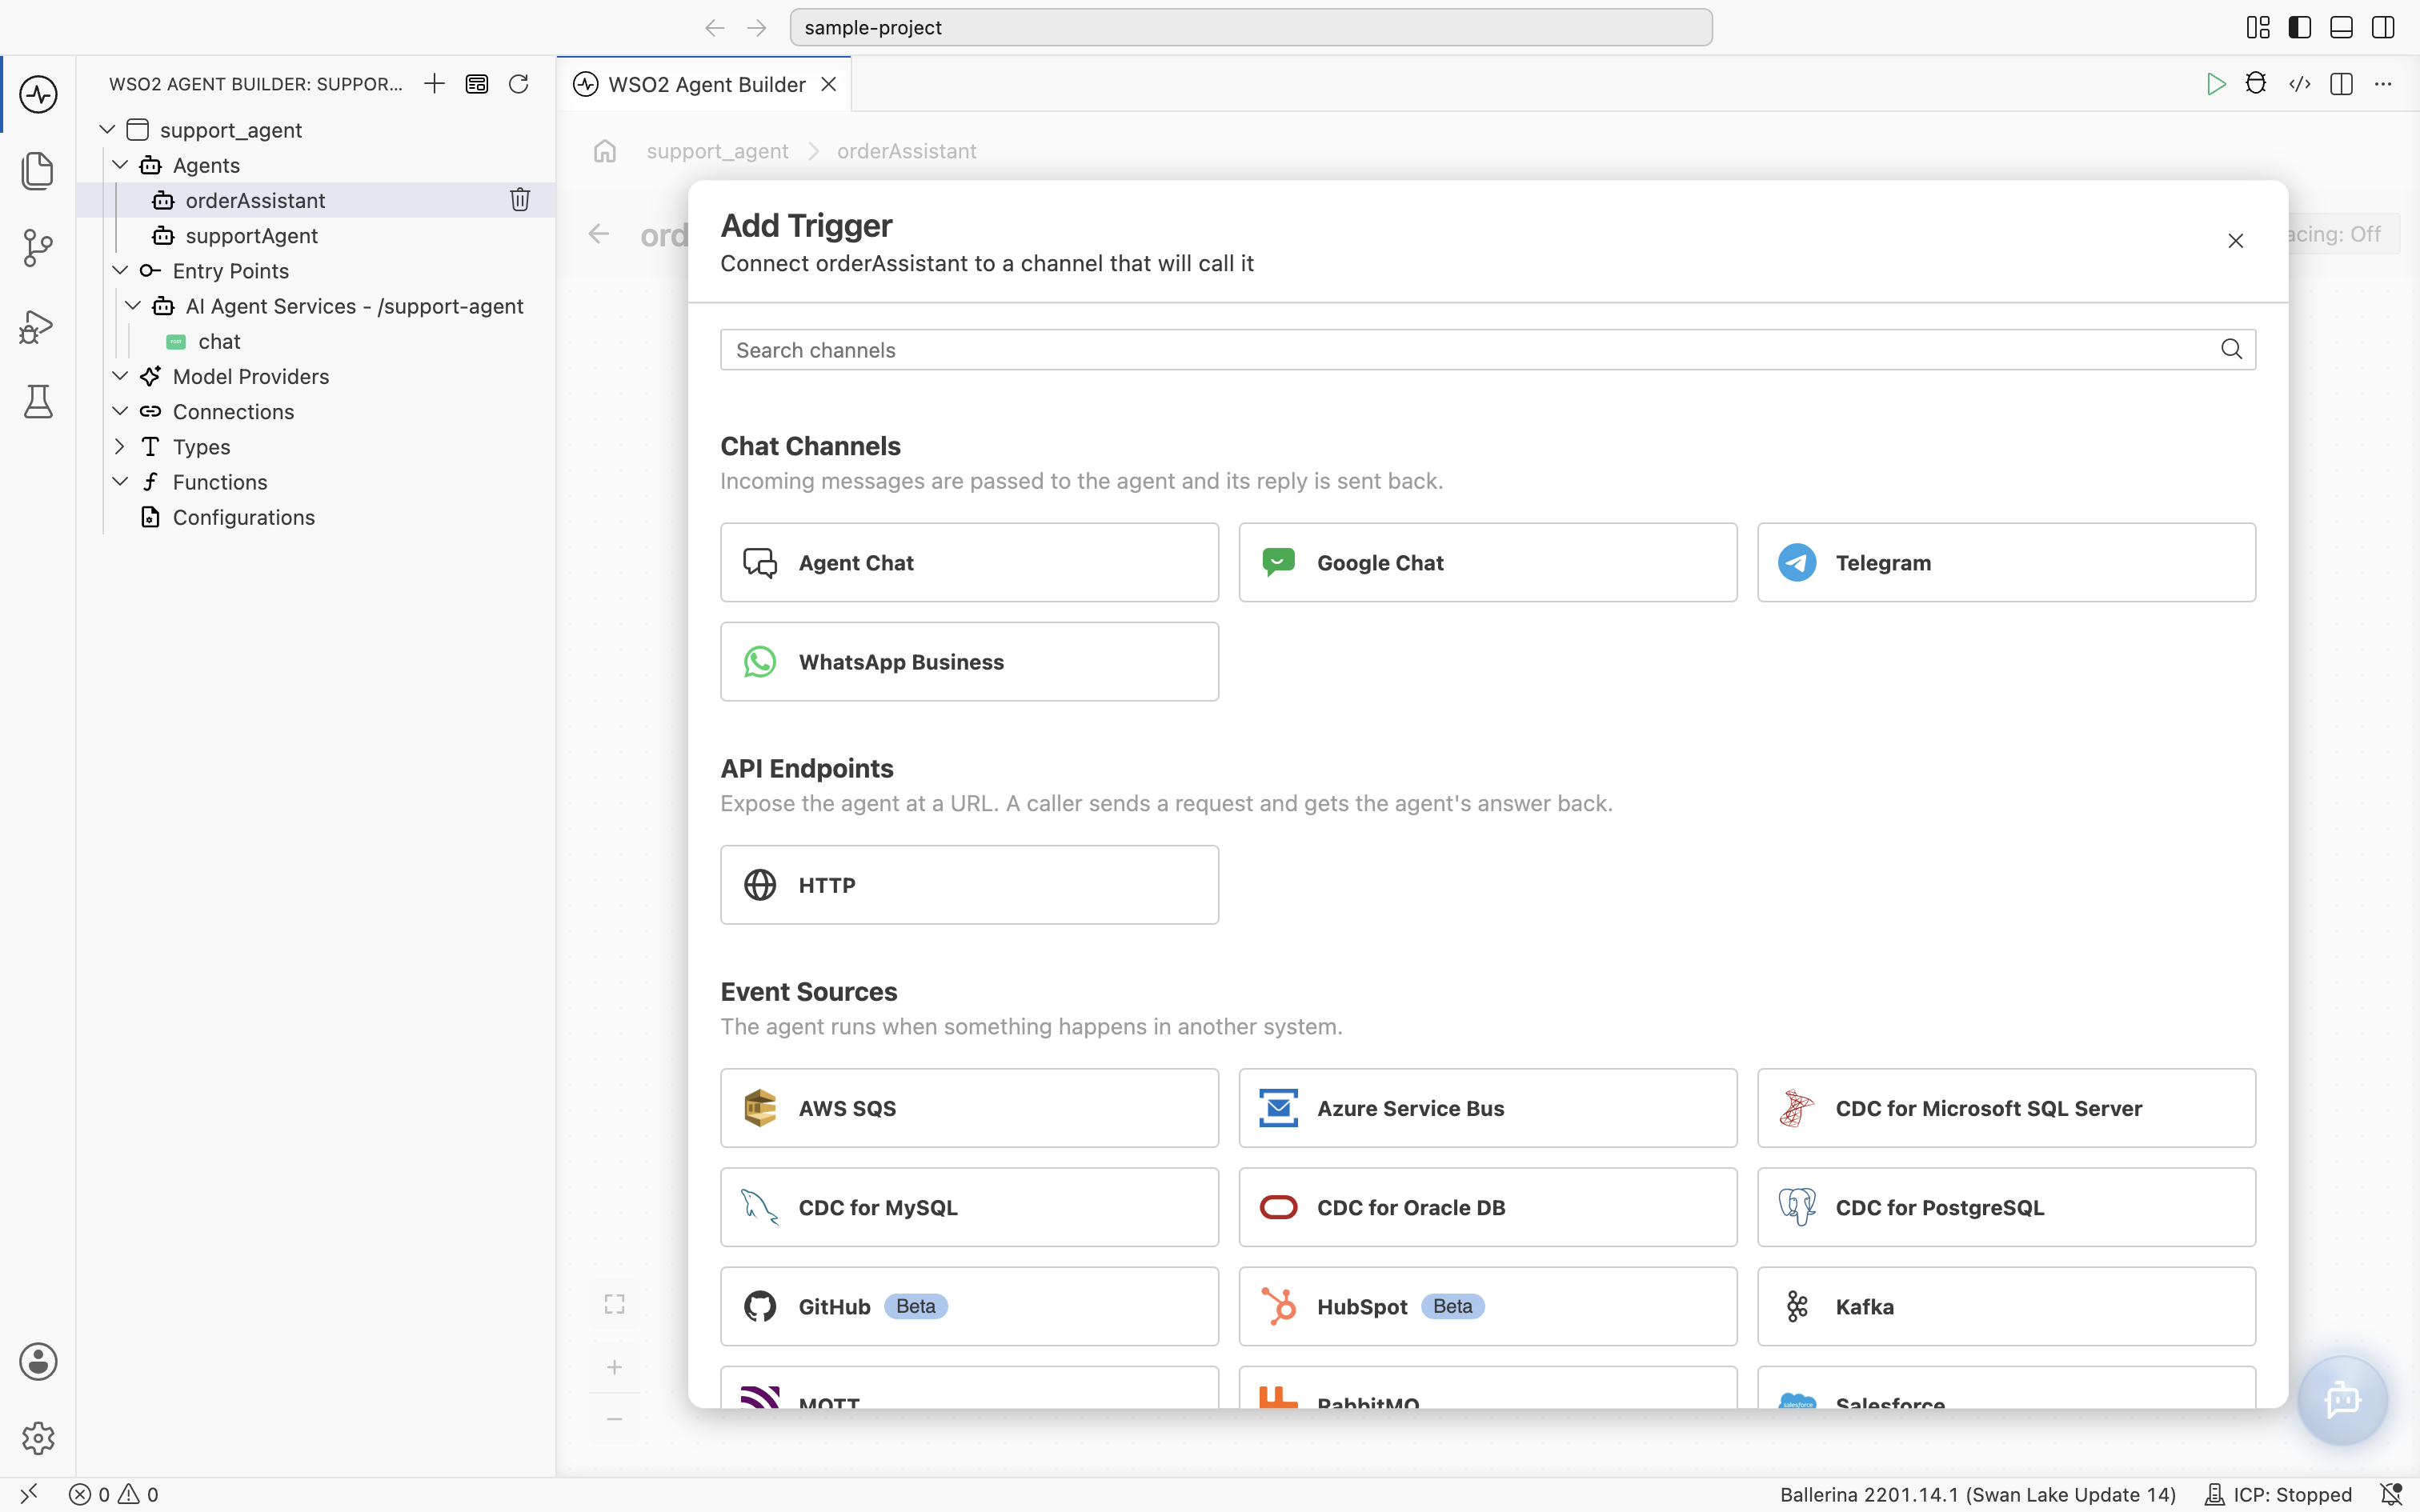
For the other triggers, see AI Agents.
-
Set Service Path, the HTTP path the chat endpoint is served on, for example
/order-assistant. Under Advanced Configurations, you can choose between the Shared Listener (Port 9090) and a Custom Listener. -
Select Create.
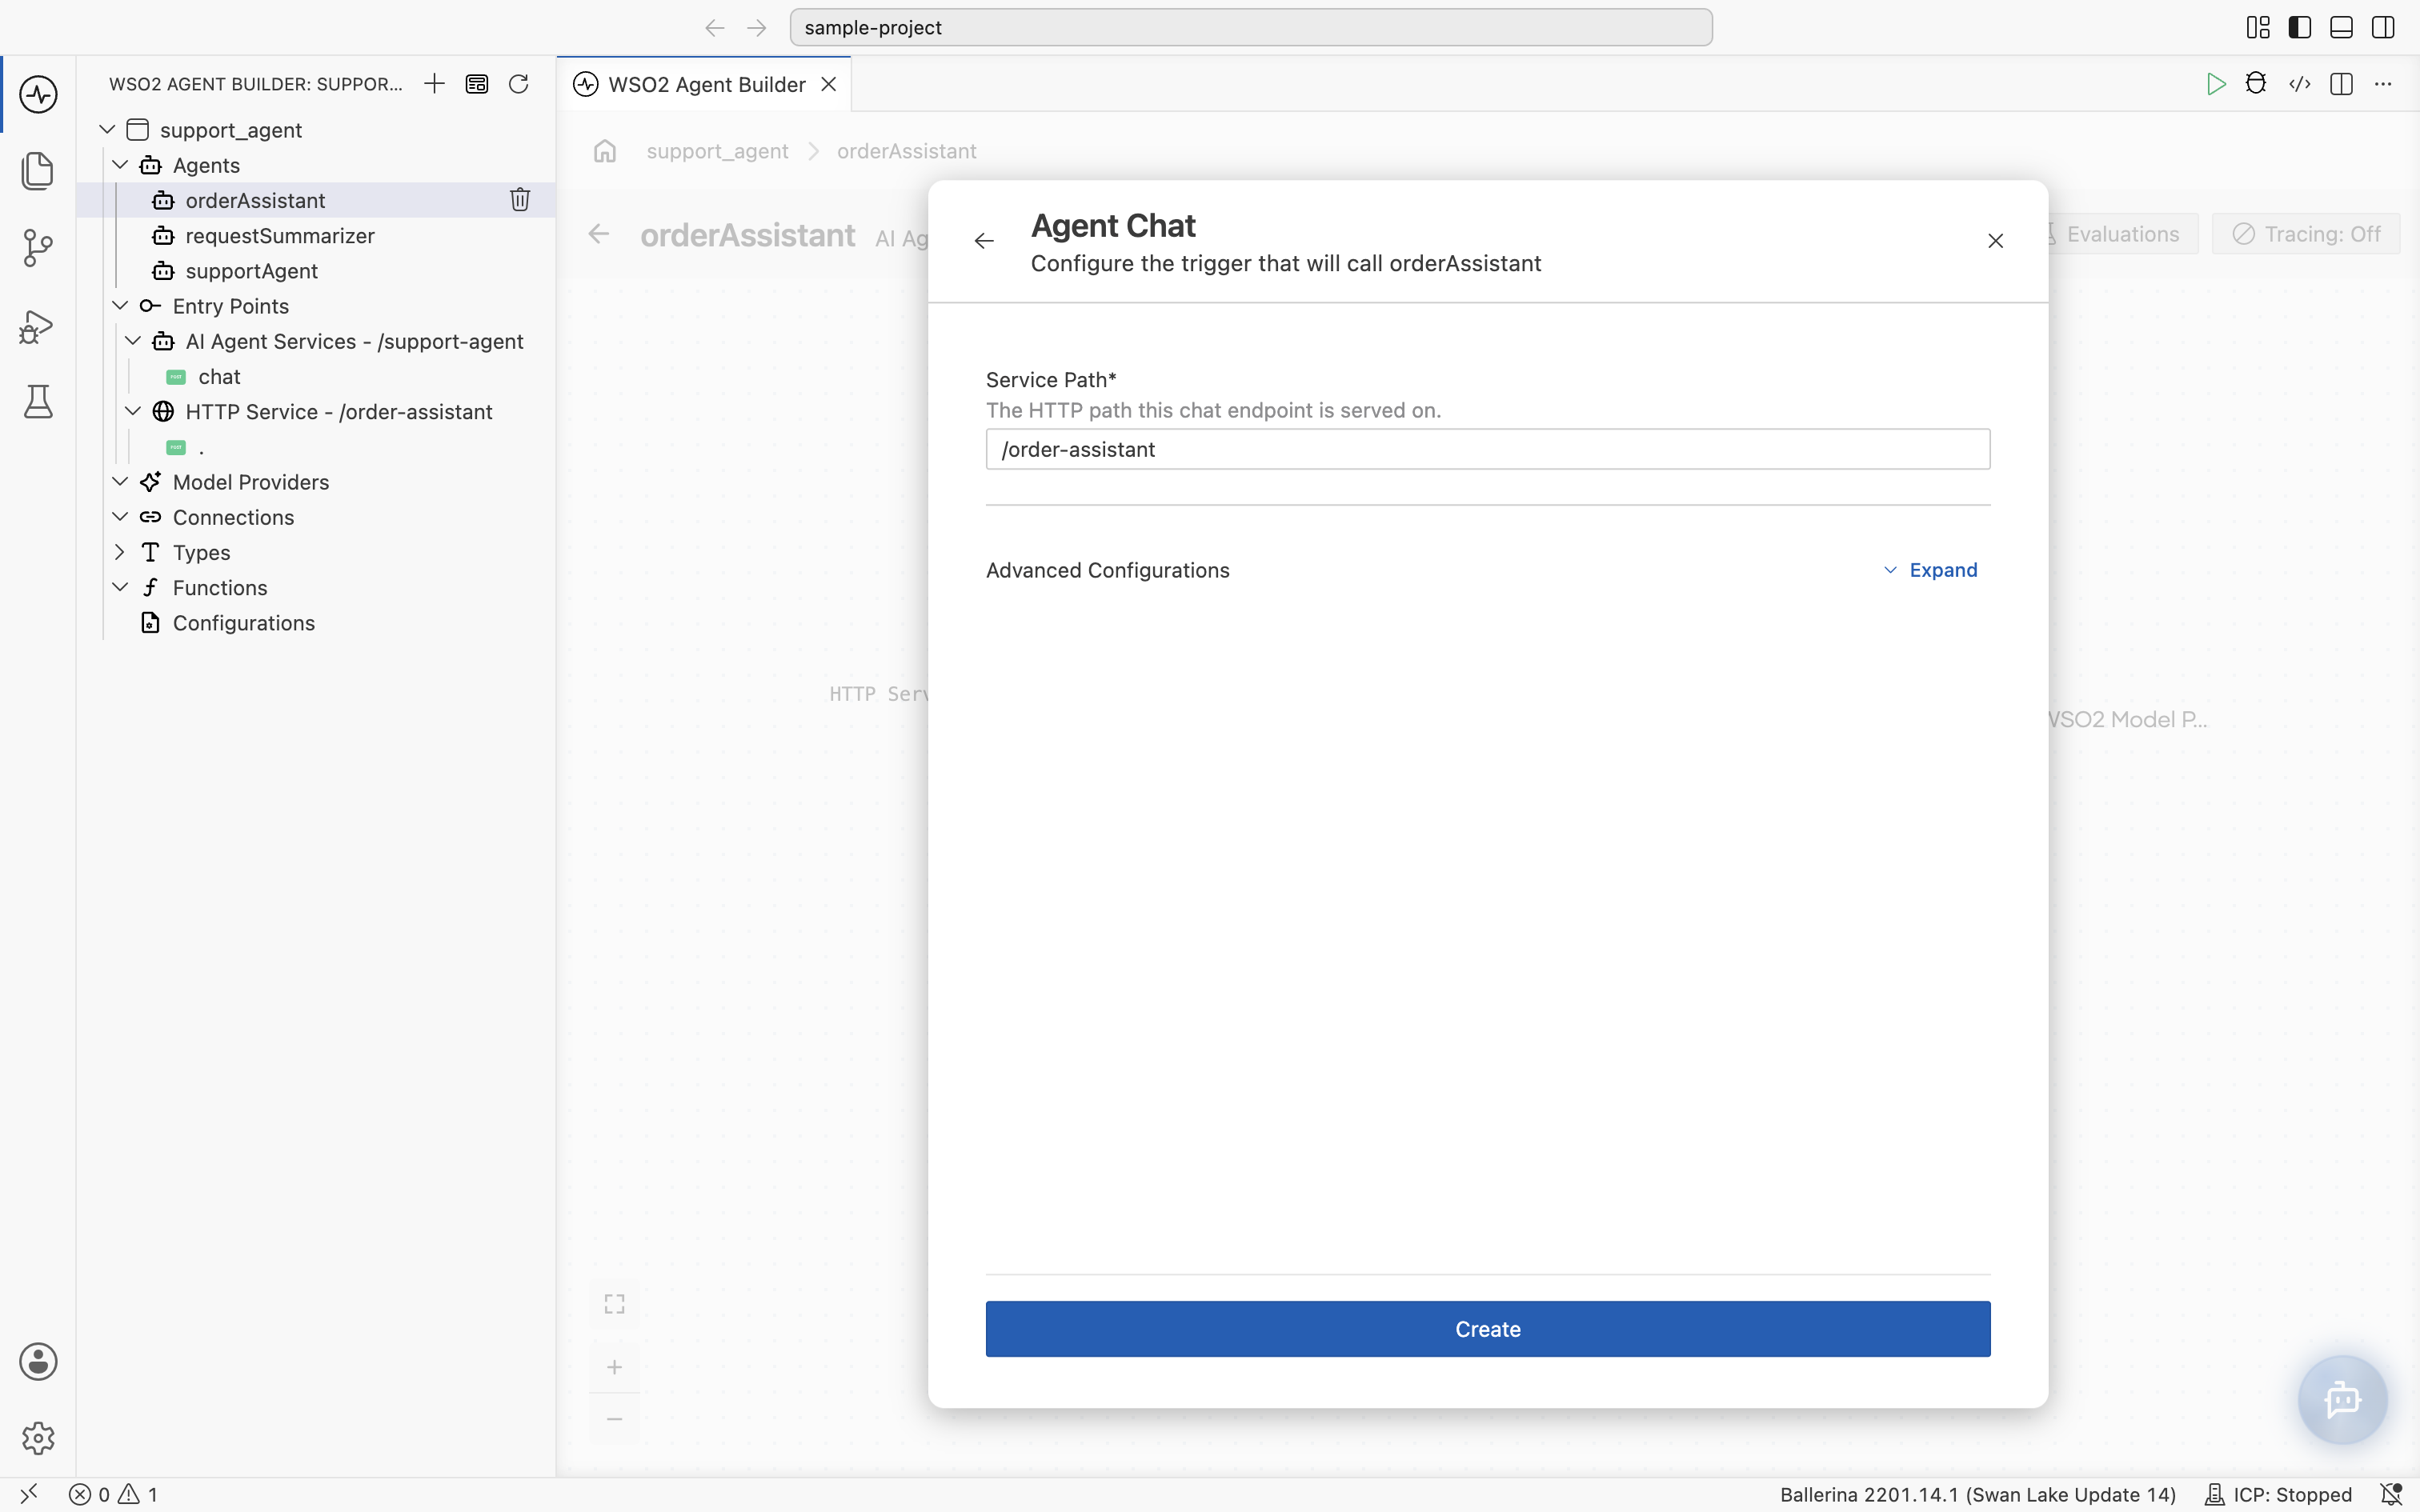
WSO2 Agent Builder generates the following:
- A listener (
agentChatListener) on the shared HTTP listener - A chat service on the service path, with a
POST /chatresource - A resource flow that runs the agent and returns its response
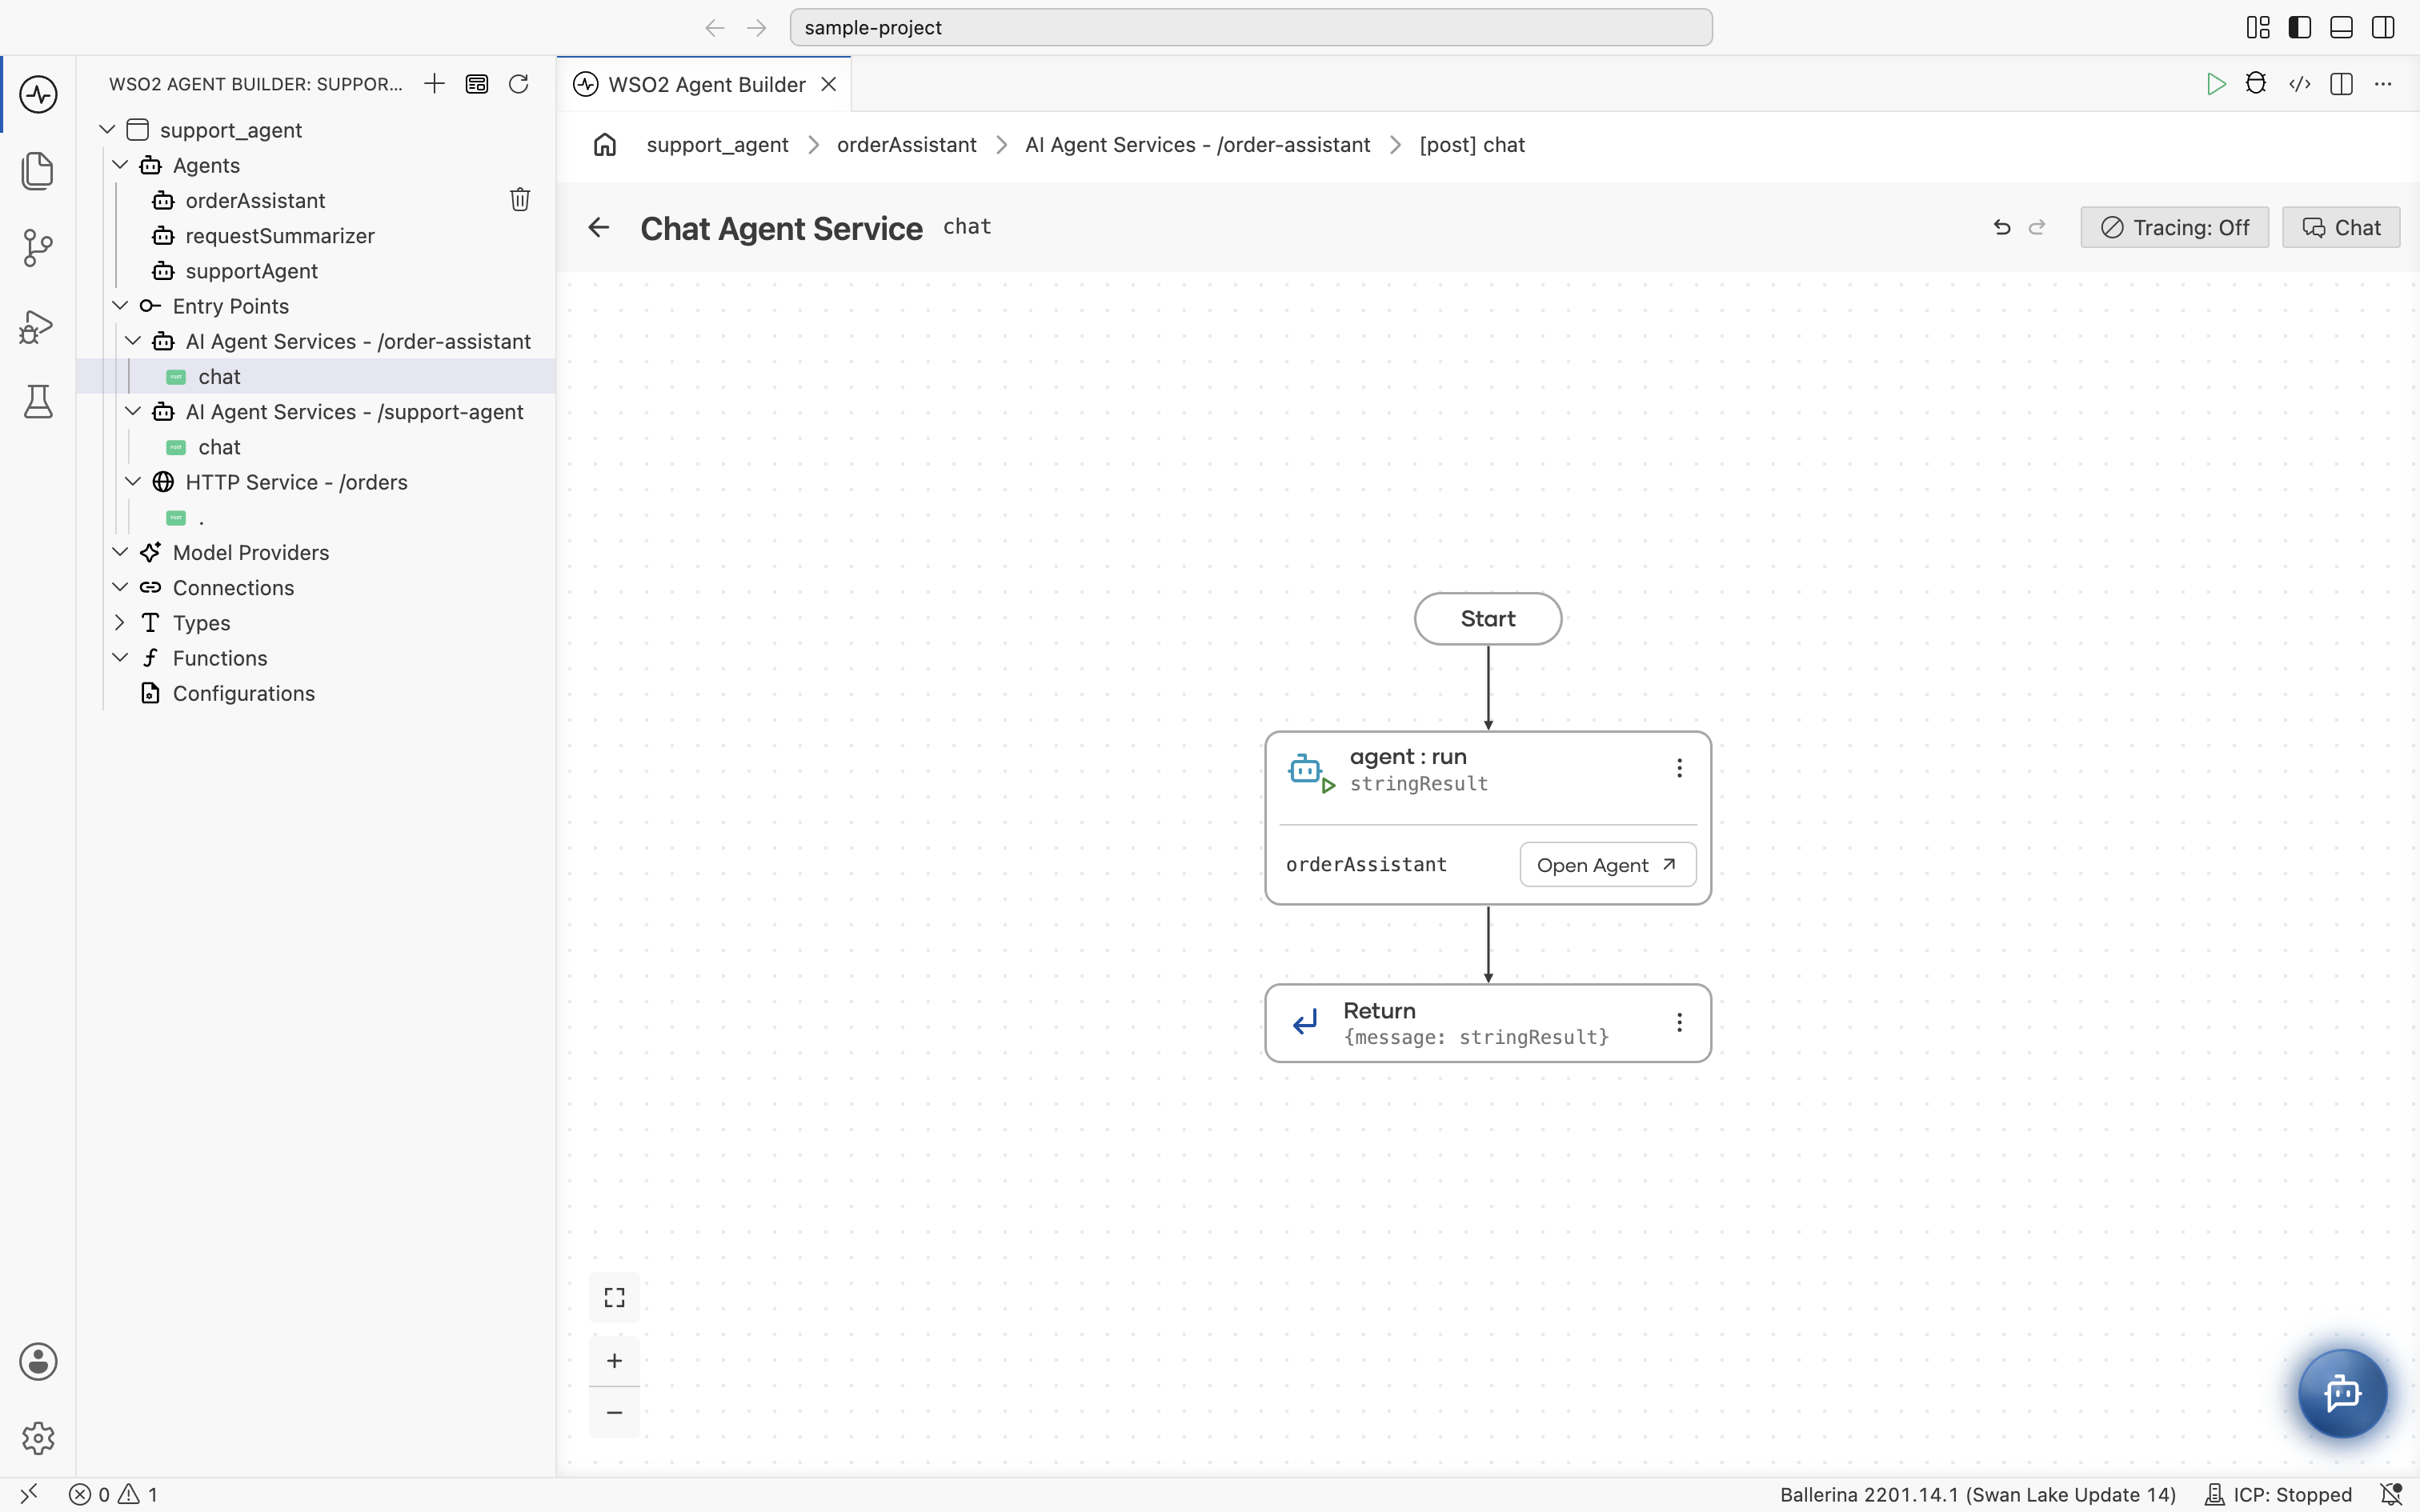
The trigger appears on the left of the agent canvas, and under Entry Points in the side bar. An agent can have more than one trigger. In the following example, orderAssistant is also called from an HTTP trigger on /orders.
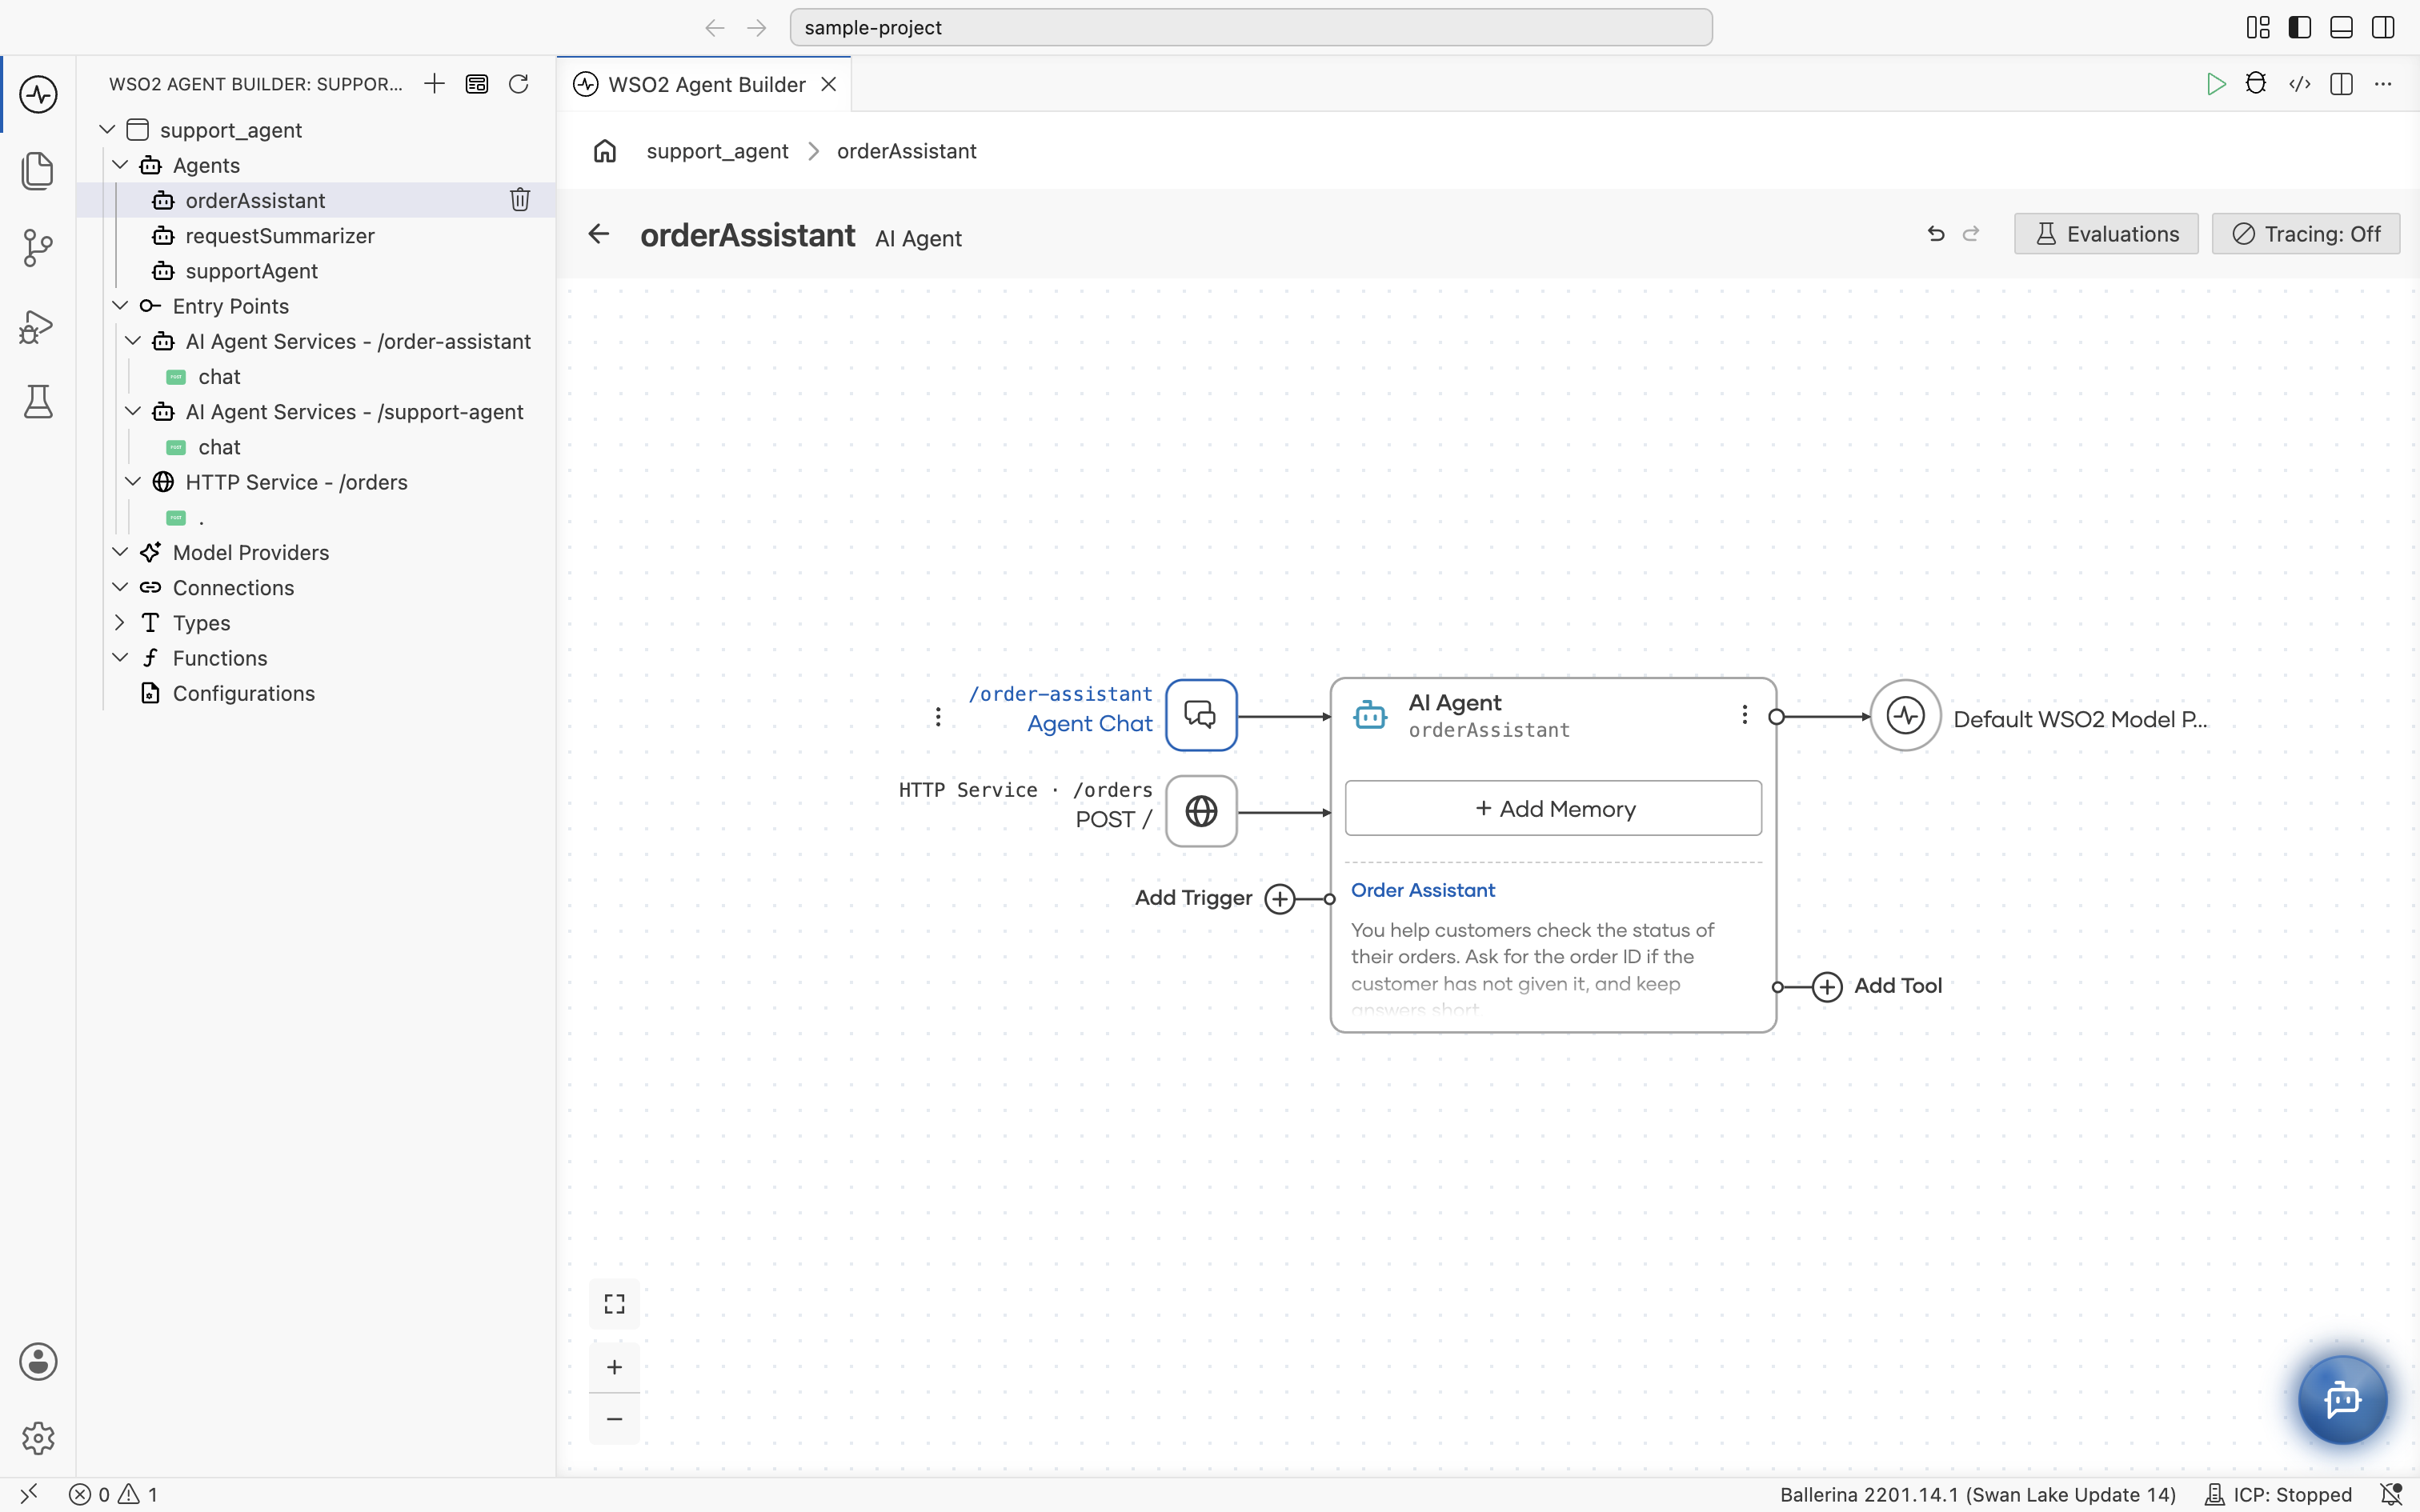
- Visual Designer
- Ballerina Code
Select the Agent Chat trigger to open the Chat Agent Service resource flow. It shows Start, an agent : run node bound to a result variable with an Open Agent link back to the agent's canvas, then Return. Select Chat at the top right to chat with the agent. See Try it and run.
import ballerina/ai;
import ballerina/http;

listener ai:Listener agentChatListener =
    new (listenOn = check http:getDefaultListener());

service /order\-assistant on agentChatListener {
    resource function post chat(@http:Payload ai:ChatReqMessage request)
            returns ai:ChatRespMessage|error {
        string stringResult = check orderAssistant.run(
            request.message, sessionId = request.sessionId);
        return {message: stringResult};
    }
}
Call an agent inside a flow
You can run an agent as one step of any flow that has a flow editor, such as the resource flow of an HTTP service. The following example adds a requestSummarizer agent to the POST resource of an HTTP service on /summaries, so the service returns a one-sentence summary of the request.
-
Open the flow. For example, select the service's resource under Entry Points in the side bar.
-
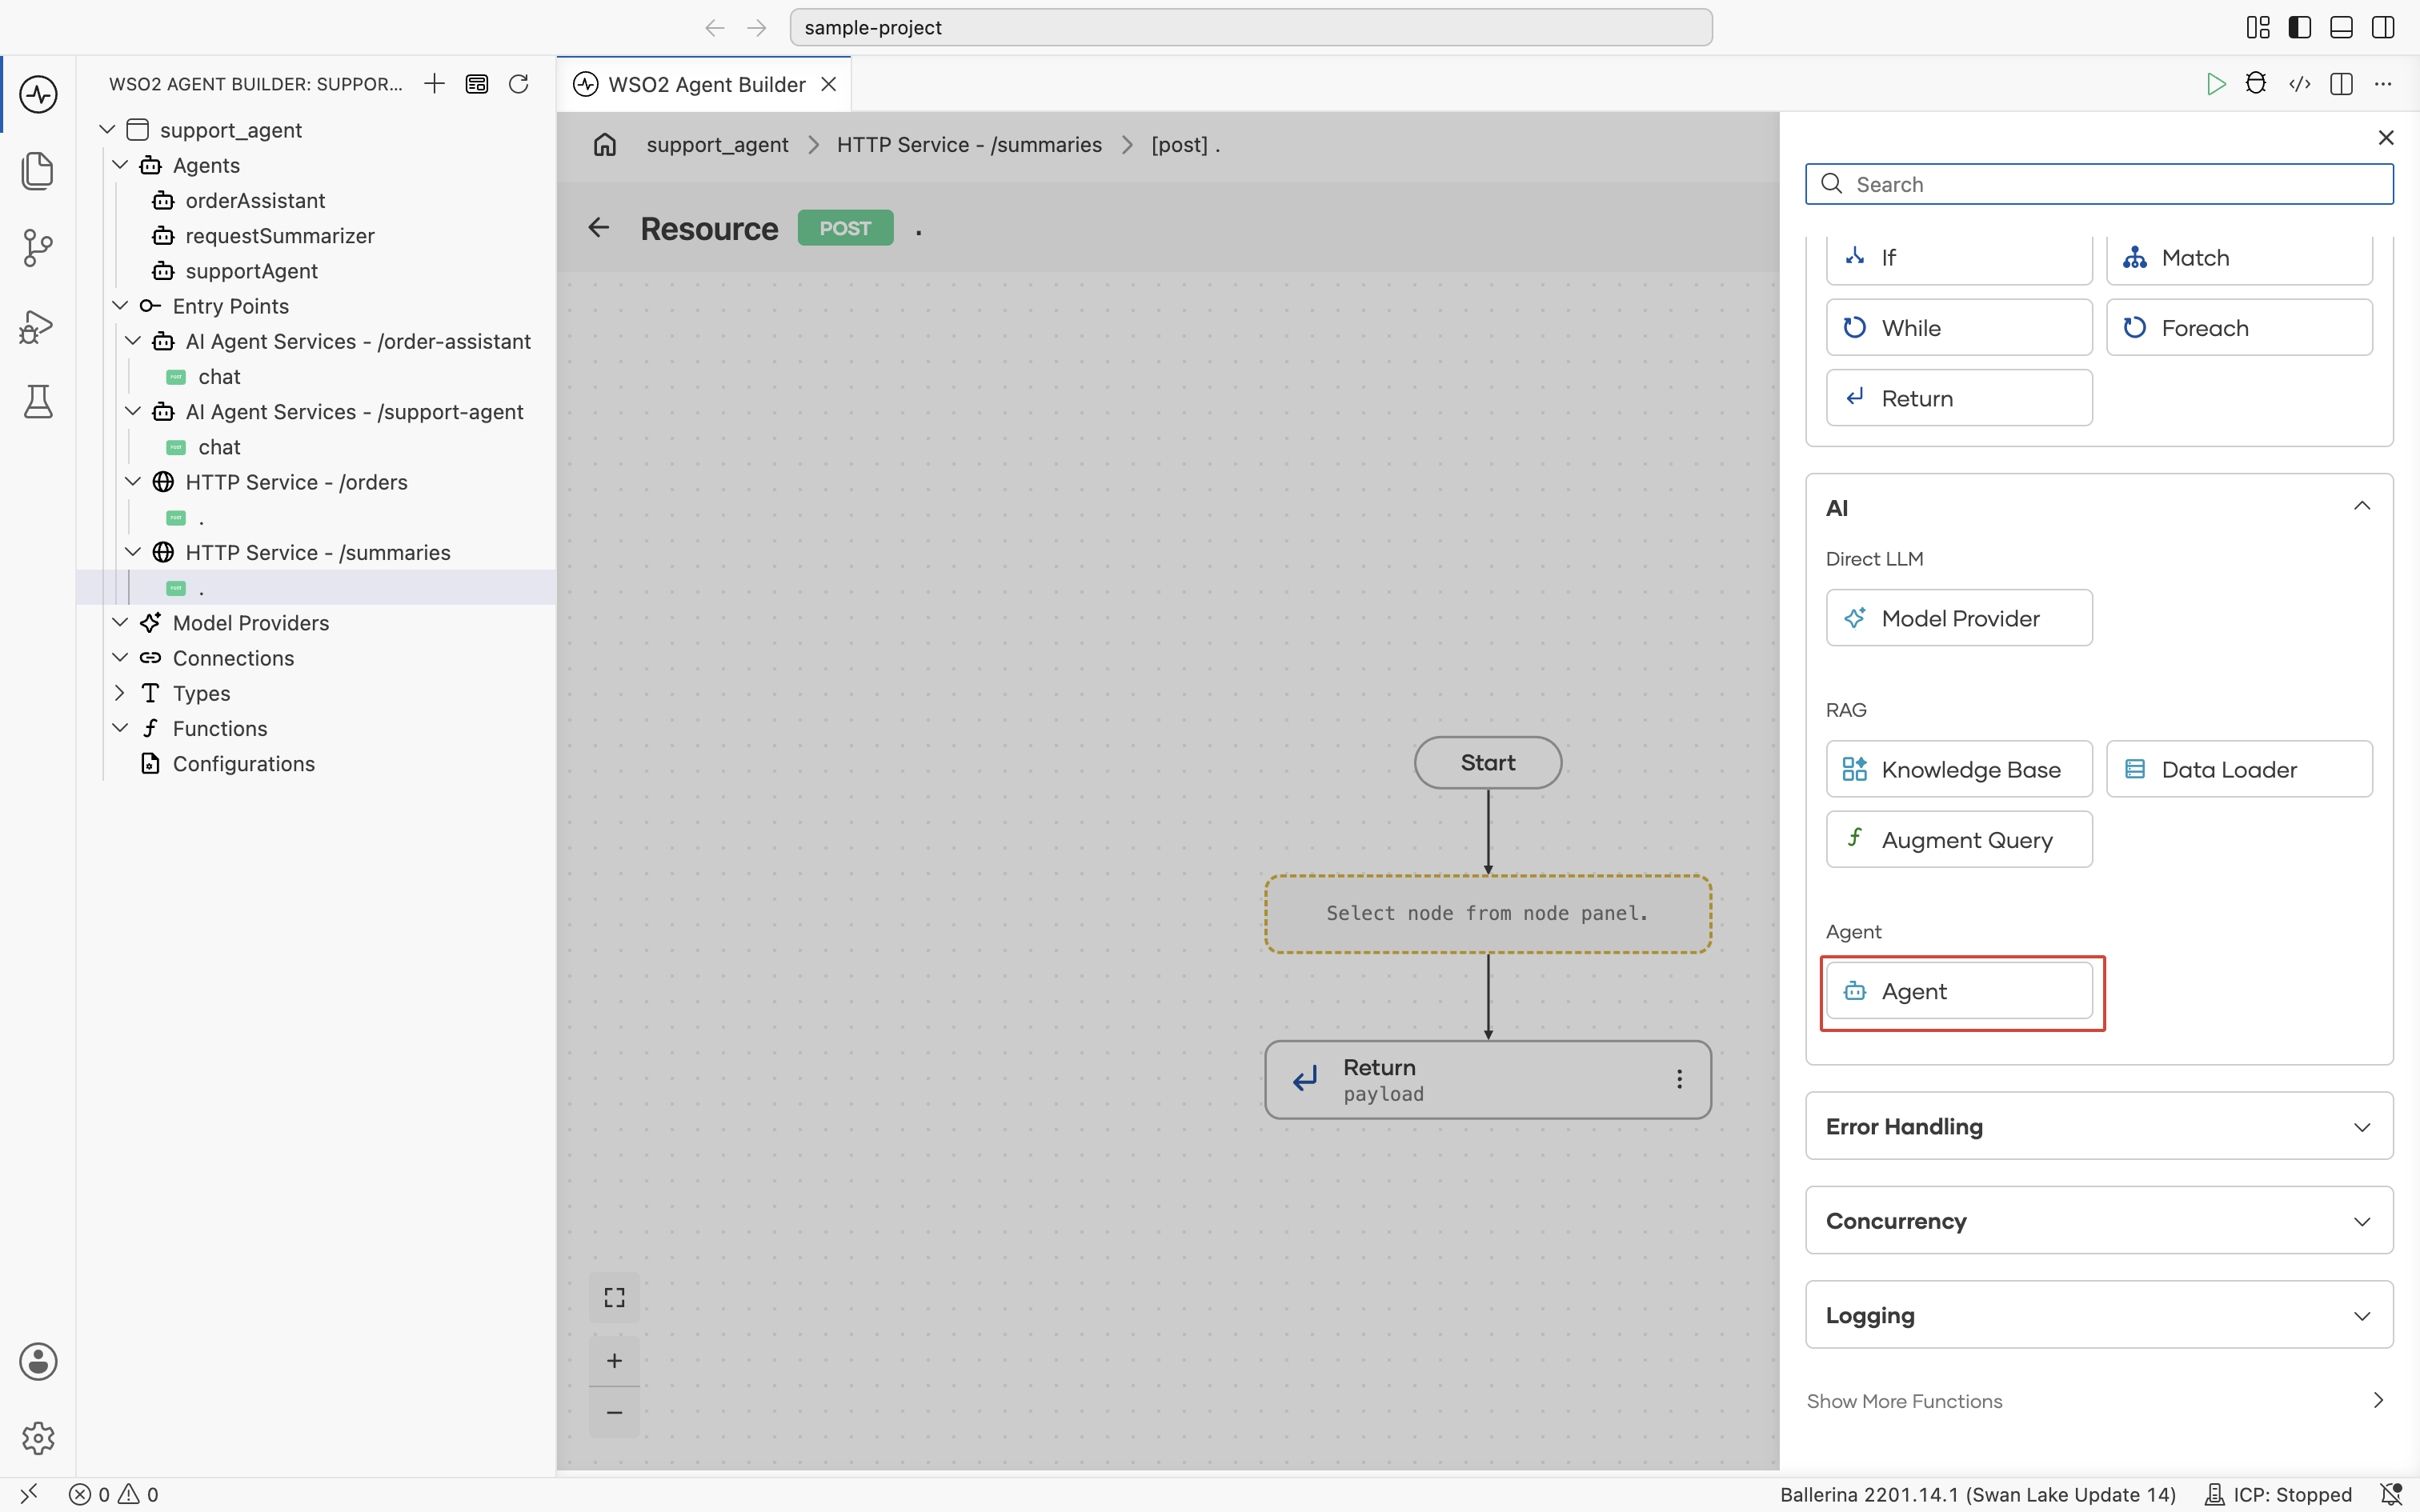
Hover over the connection where you want the step, and select the + that appears to open the node panel.
-
Under AI, select Agent.
-
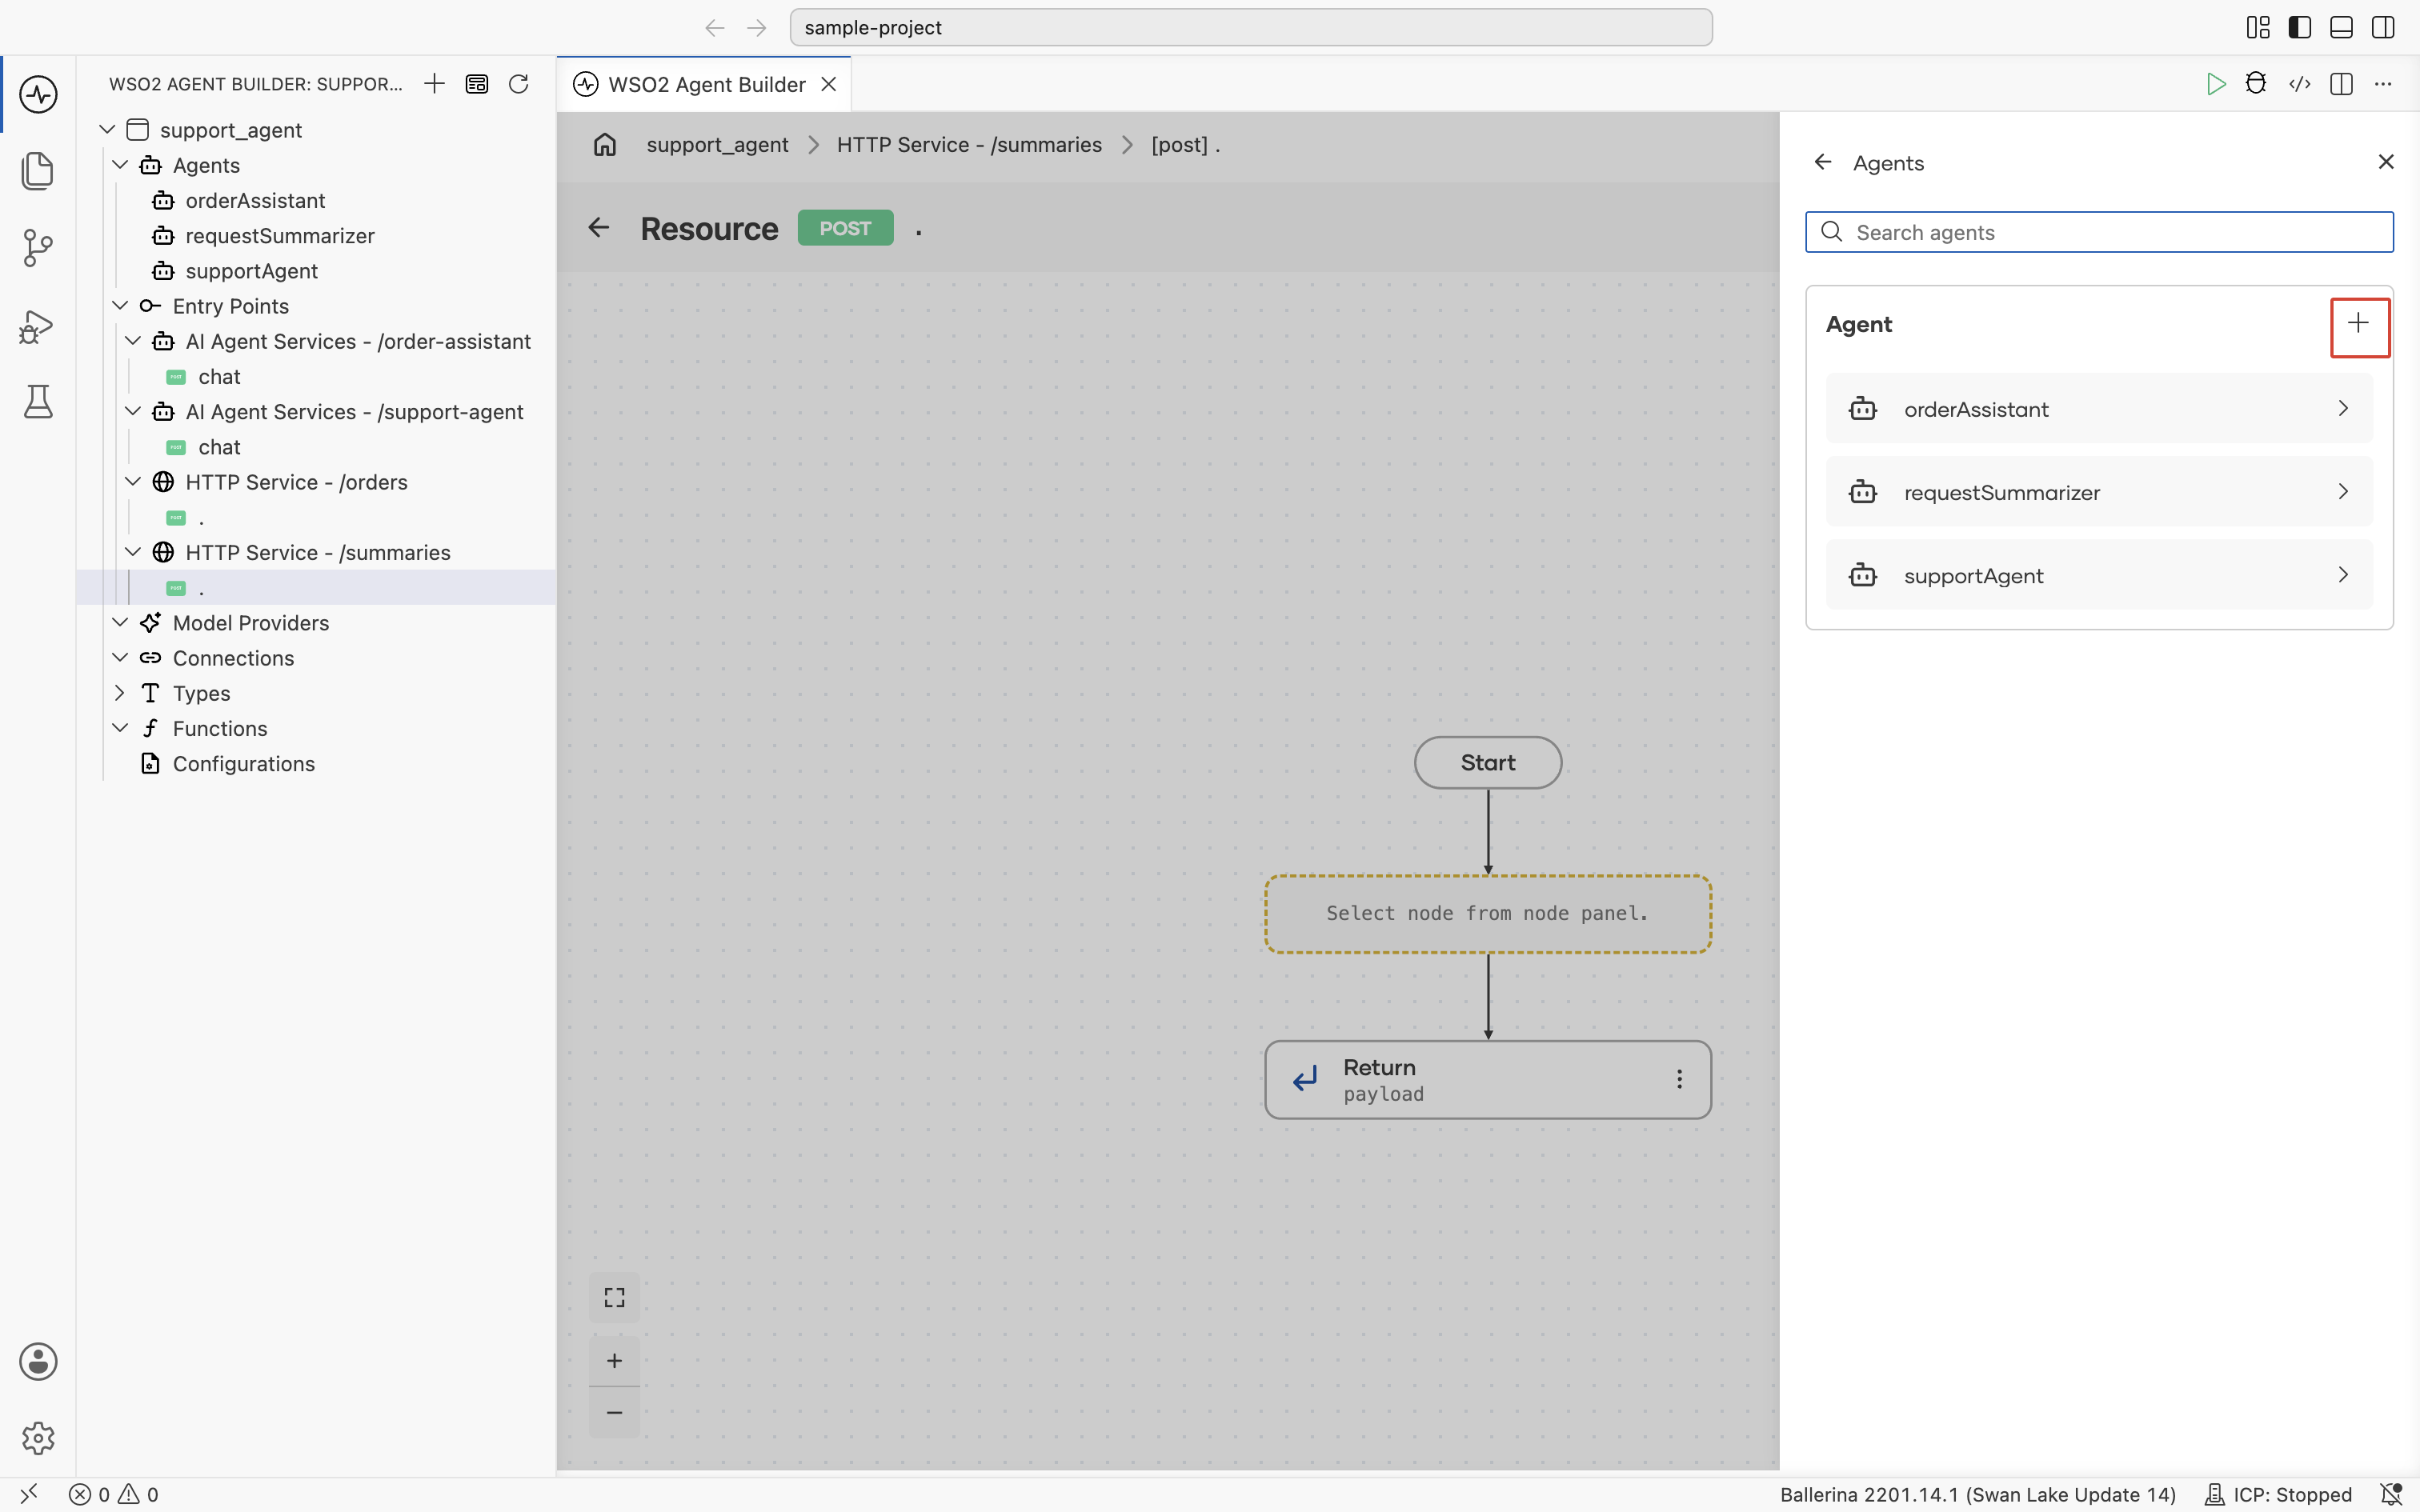
The Agents panel lists the agents already in the agentic integration. Select one to reuse it, or select + to open the Add Agent dialog and create a new one. After you create a new agent, select it in the list.
-
The AI Agent panel opens to bind this call of the agent in the flow:
Field Required Description Query Yes A query to start a new turn ( string/Prompt), or aResumeto continue a paused run.Session ID No The ID associated with the agent memory. Defaults to "sessionId".Context No Additional context that can be used during agent tool execution. Defaults to new ().Type Descriptor No Under Advanced Configurations. The expected return type format. Defaults to `ai:Trace Result Yes Name of the result variable. -
Set Query. If there's no input variable to bind, leave Query in Prompt mode and type a literal string, for example
Summarize this request: My order 1042 has not arrived yet and I need it by Friday.Leave Result at its default and select Save.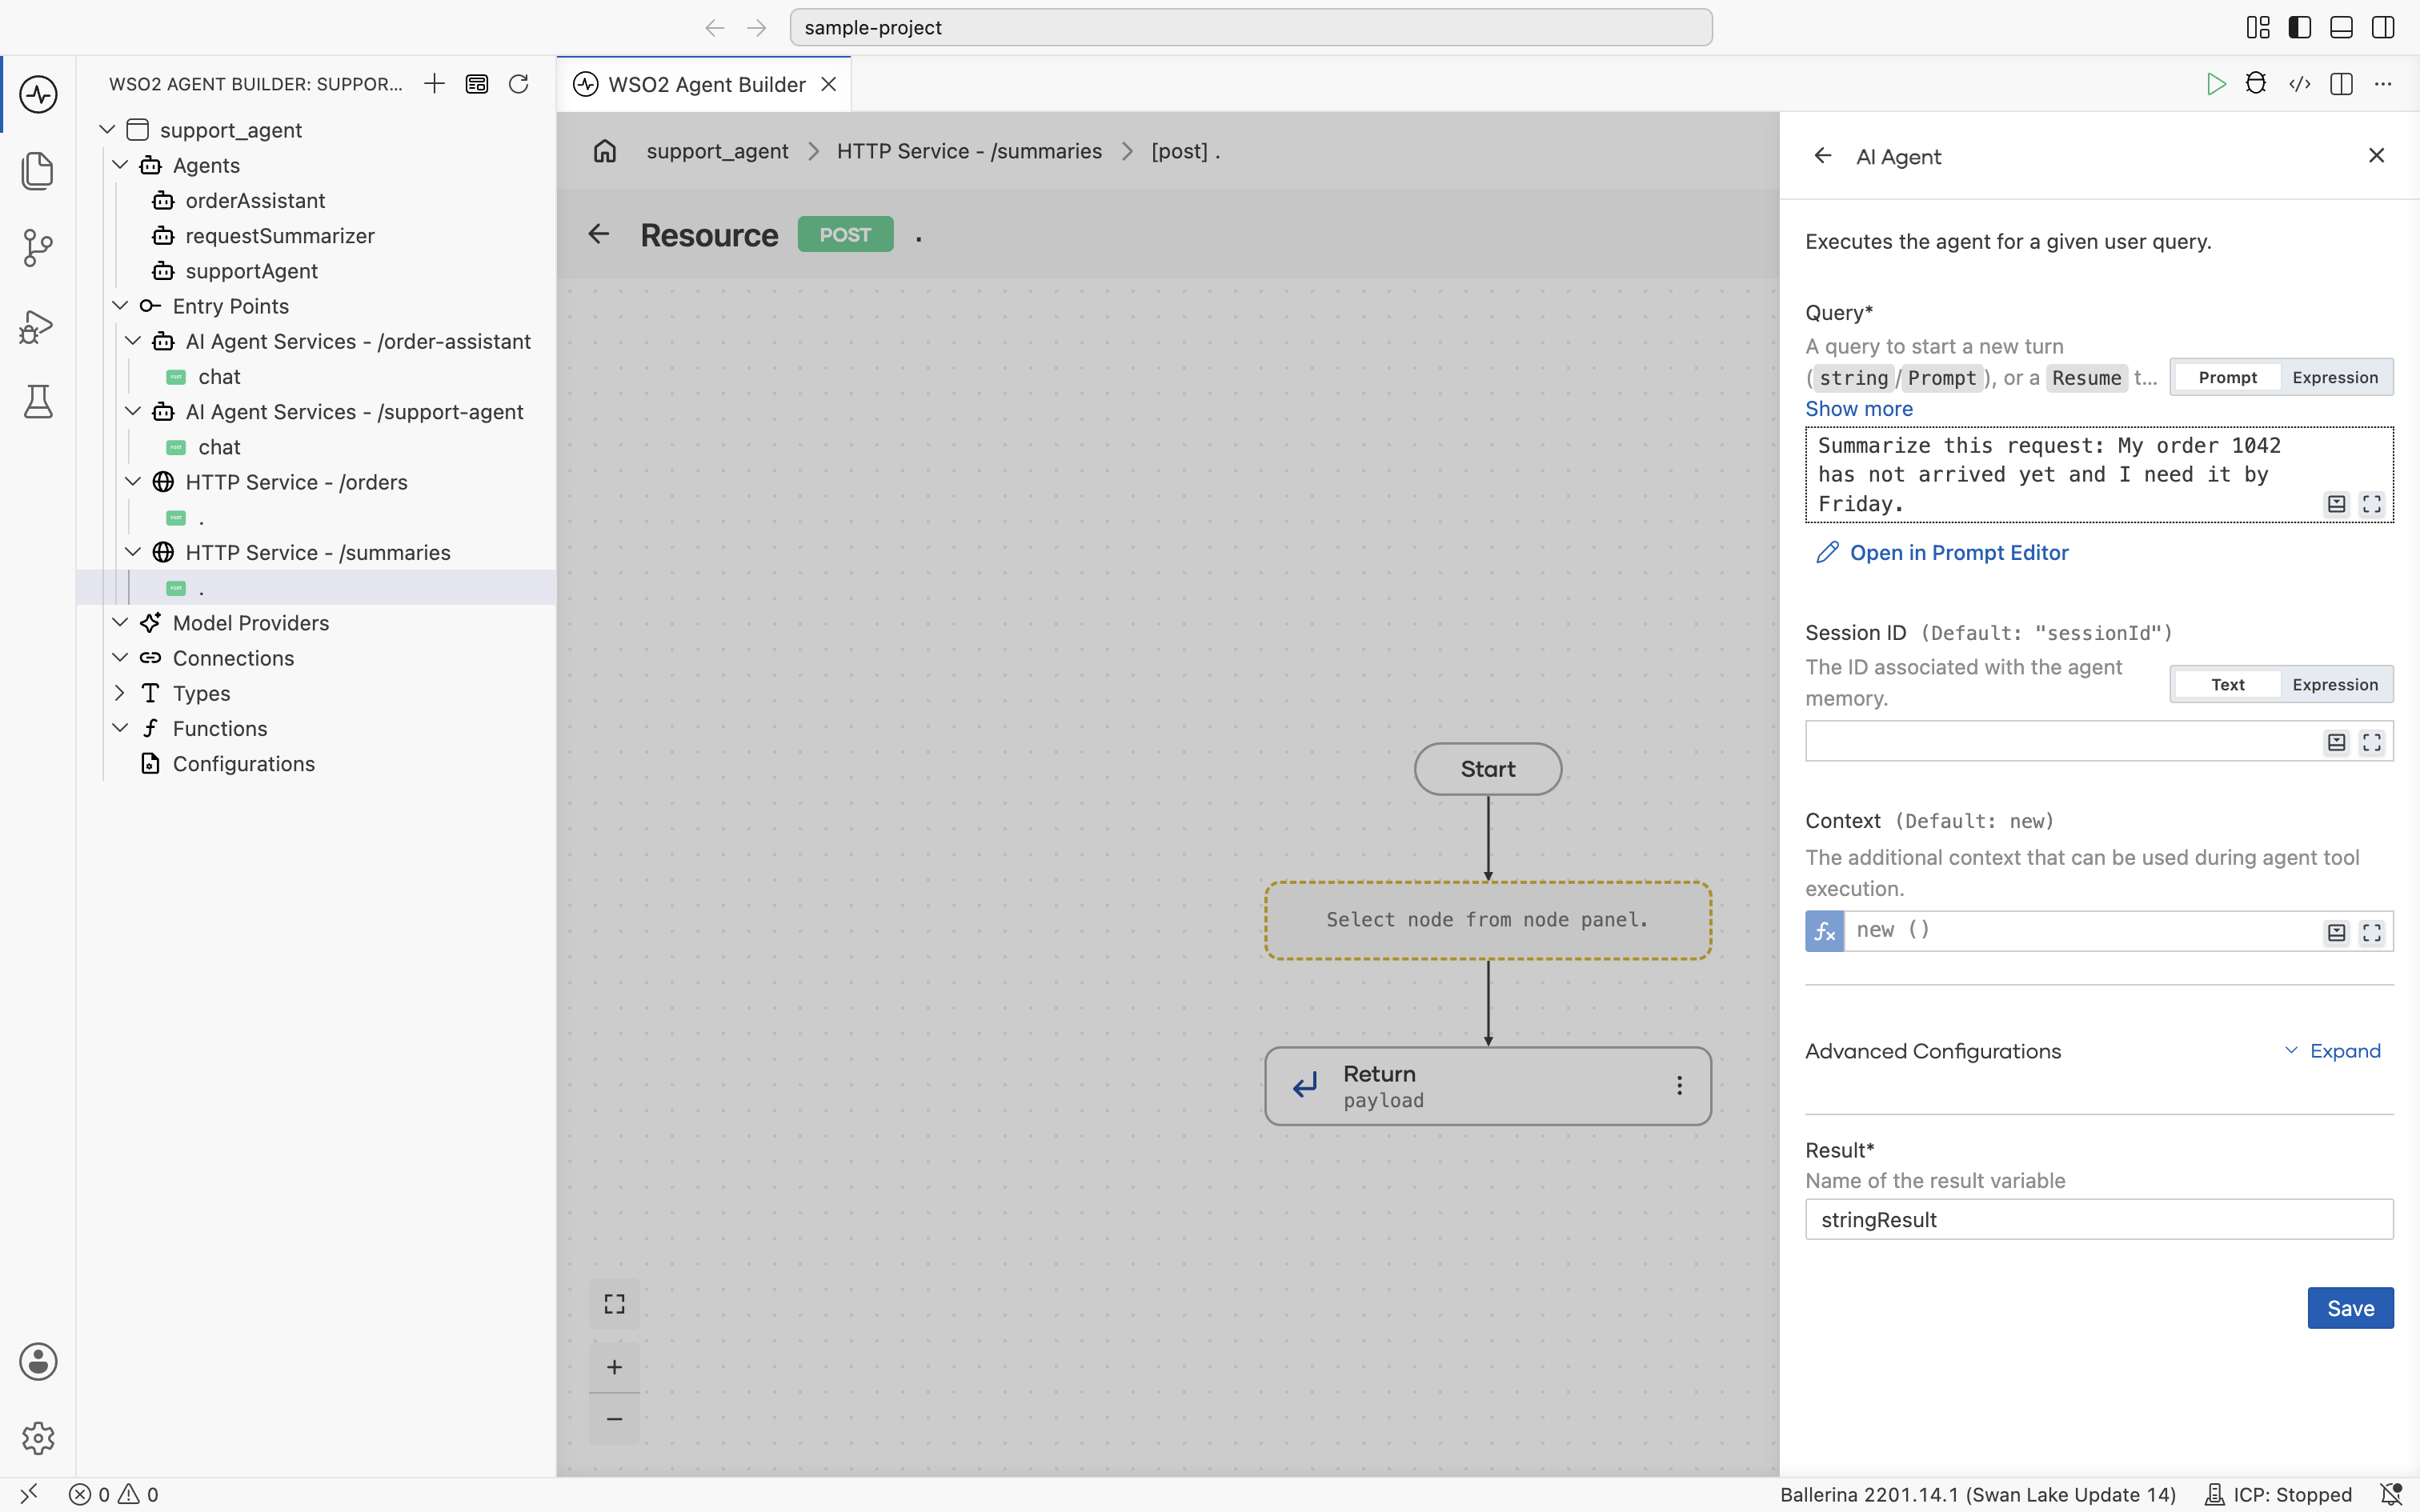
- Visual Designer
- Ballerina Code
This adds an agent : run node to the flow, bound to the result variable, with an Open Agent link to the agent's canvas. Select the node again to edit the call. In this example, the Return step is then set to return stringResult.
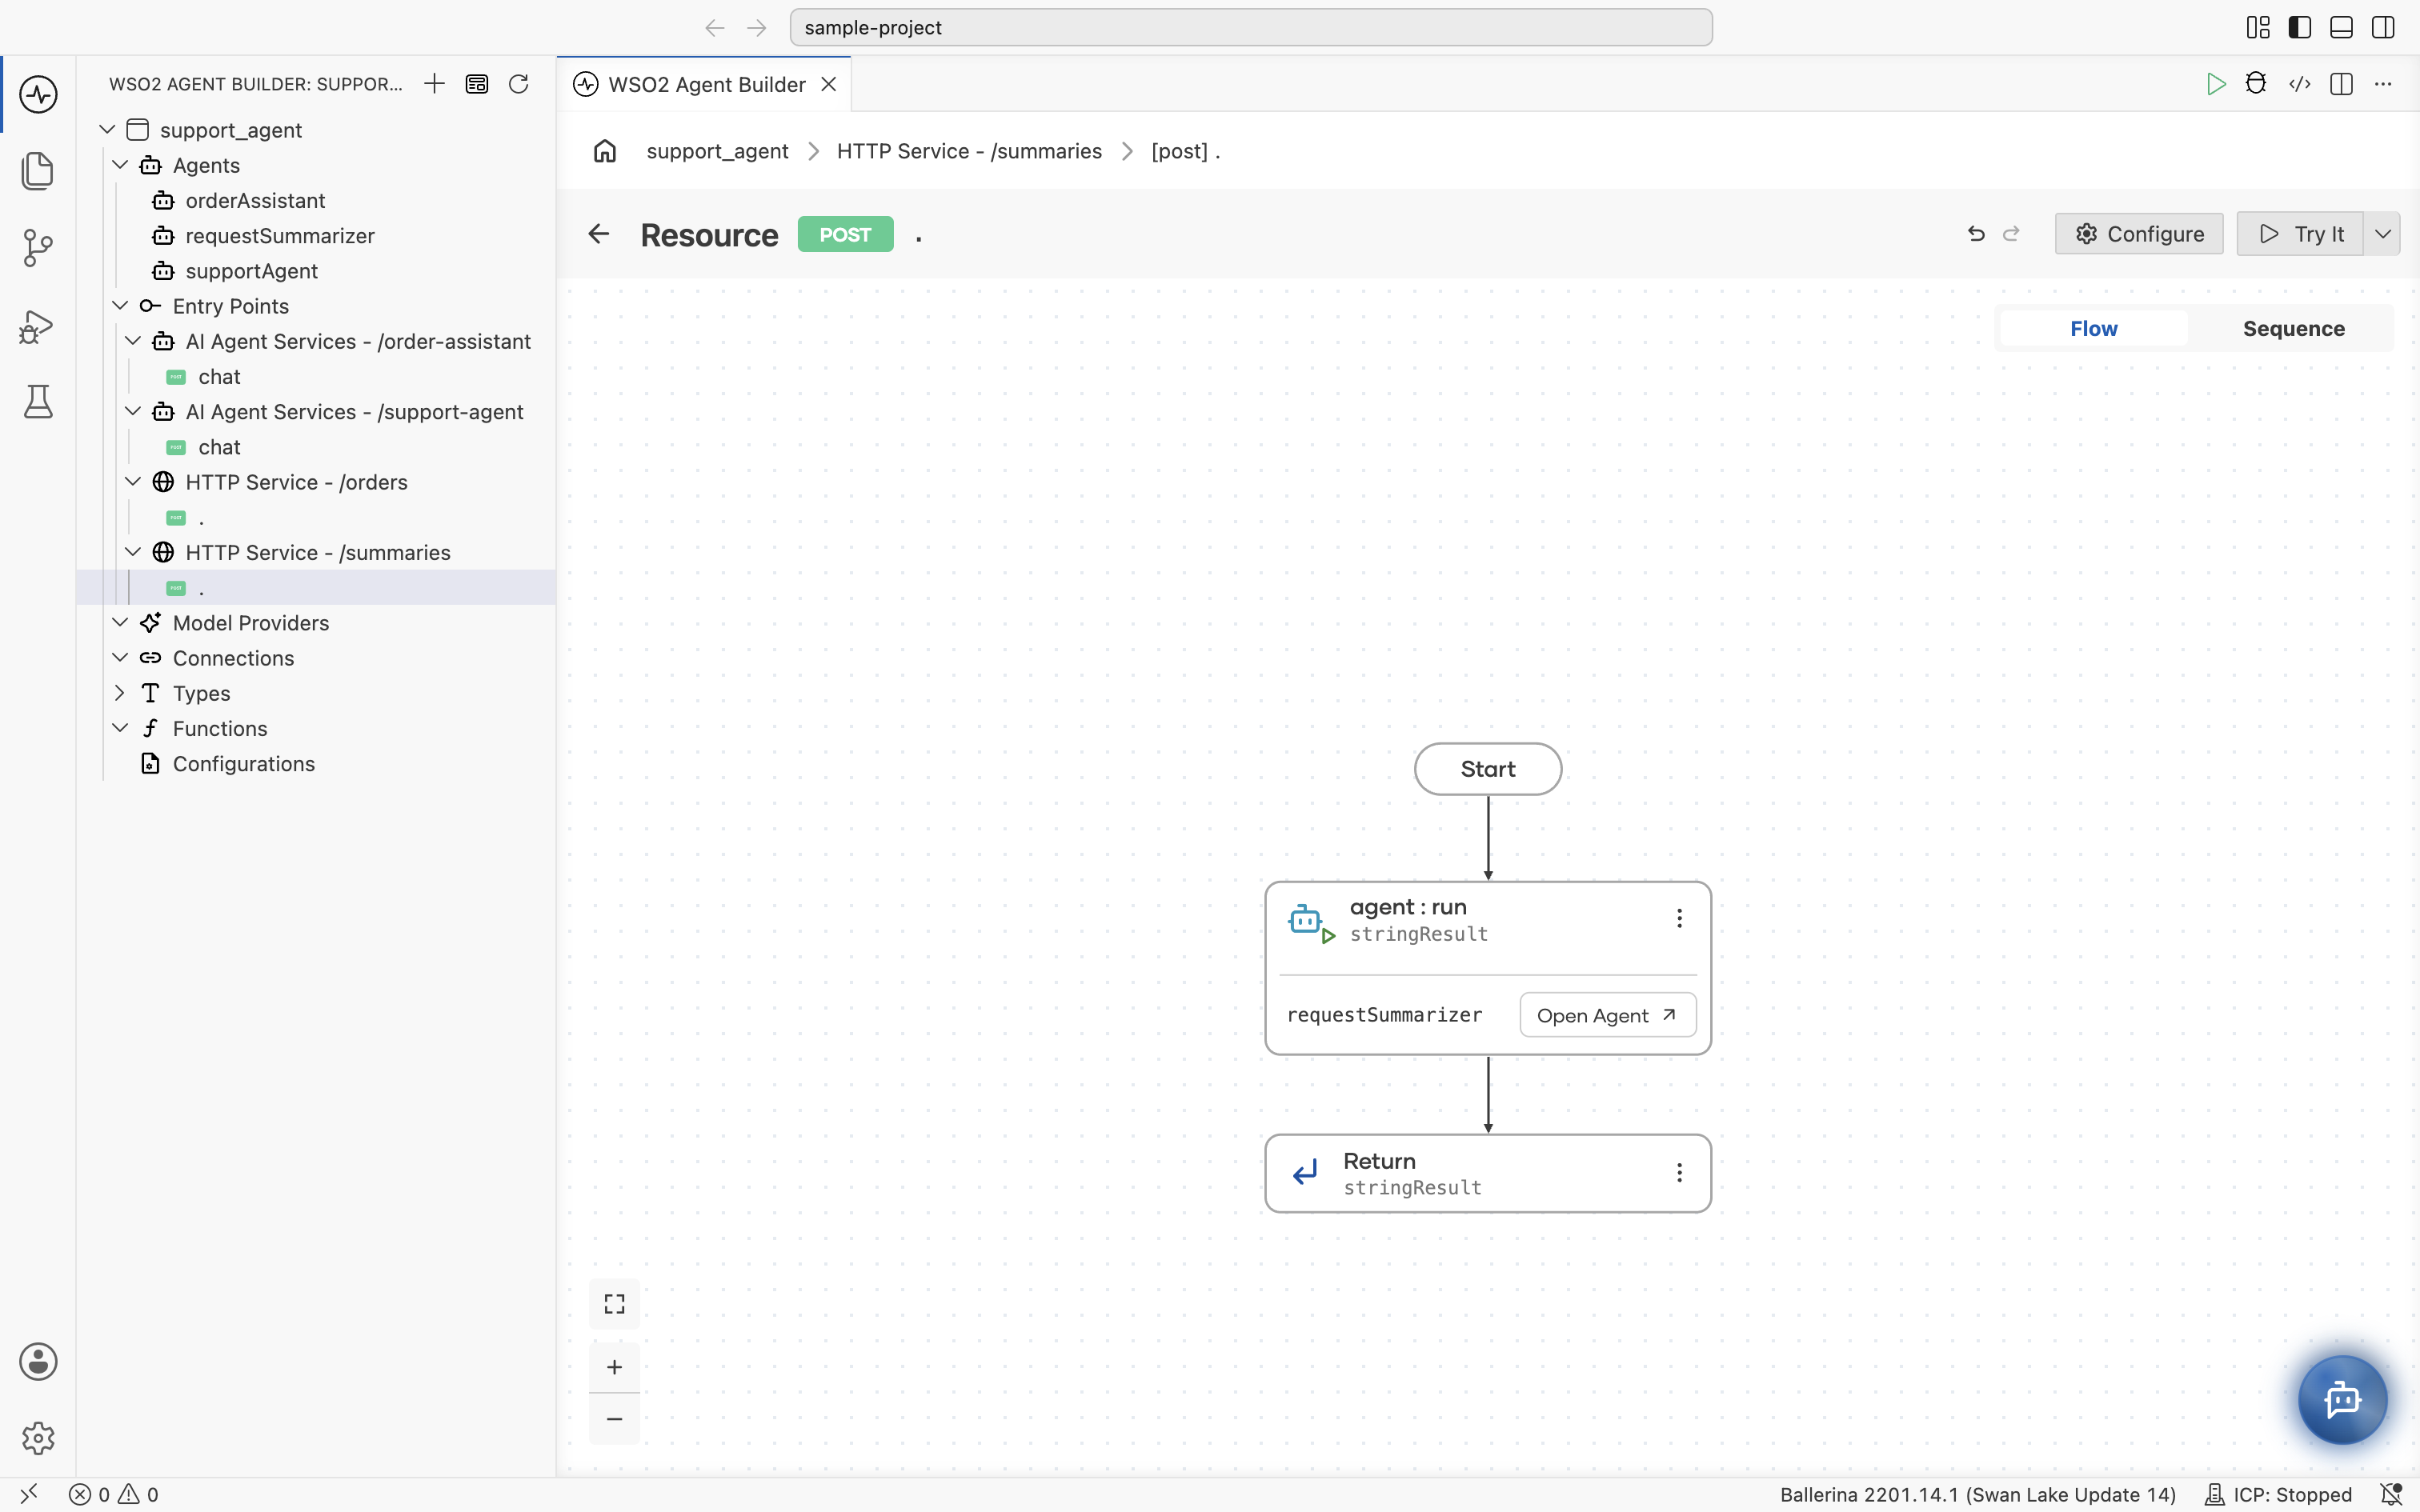
service /summaries on httpDefaultListener {
    resource function post .(@http:Payload string payload) returns string|error {
        string stringResult = check requestSummarizer.run(
            `Summarize this request: My order 1042 has not arrived yet and I need it by Friday.`);
        return stringResult;
    }
}
After creating an agent, you can configure:
- Agent behavior, including role, instructions, and query bindings
- Model provider
- Tools
- Memory
- Identity & access management
- Observability and tracing
Configure agent behavior
An agent's behavior is set in two places: on the agent itself, and on each call of the agent in a flow.
The agent
On the agent canvas, select the AI Agent node to open the Edit Agent panel. Changes here apply to every caller of the agent.
| Field | Description |
|---|---|
| Role | Defines the primary responsibility or persona of the agent. |
| Instructions | Specifies the behavior guidelines and operational instructions that the agent follows while responding. |
| Advanced Configurations | Runtime and execution settings. See Advanced configuration. |
| Agent Name | The agent's identifier. |
To change the model, select the model provider node on the canvas instead. See Model Providers.
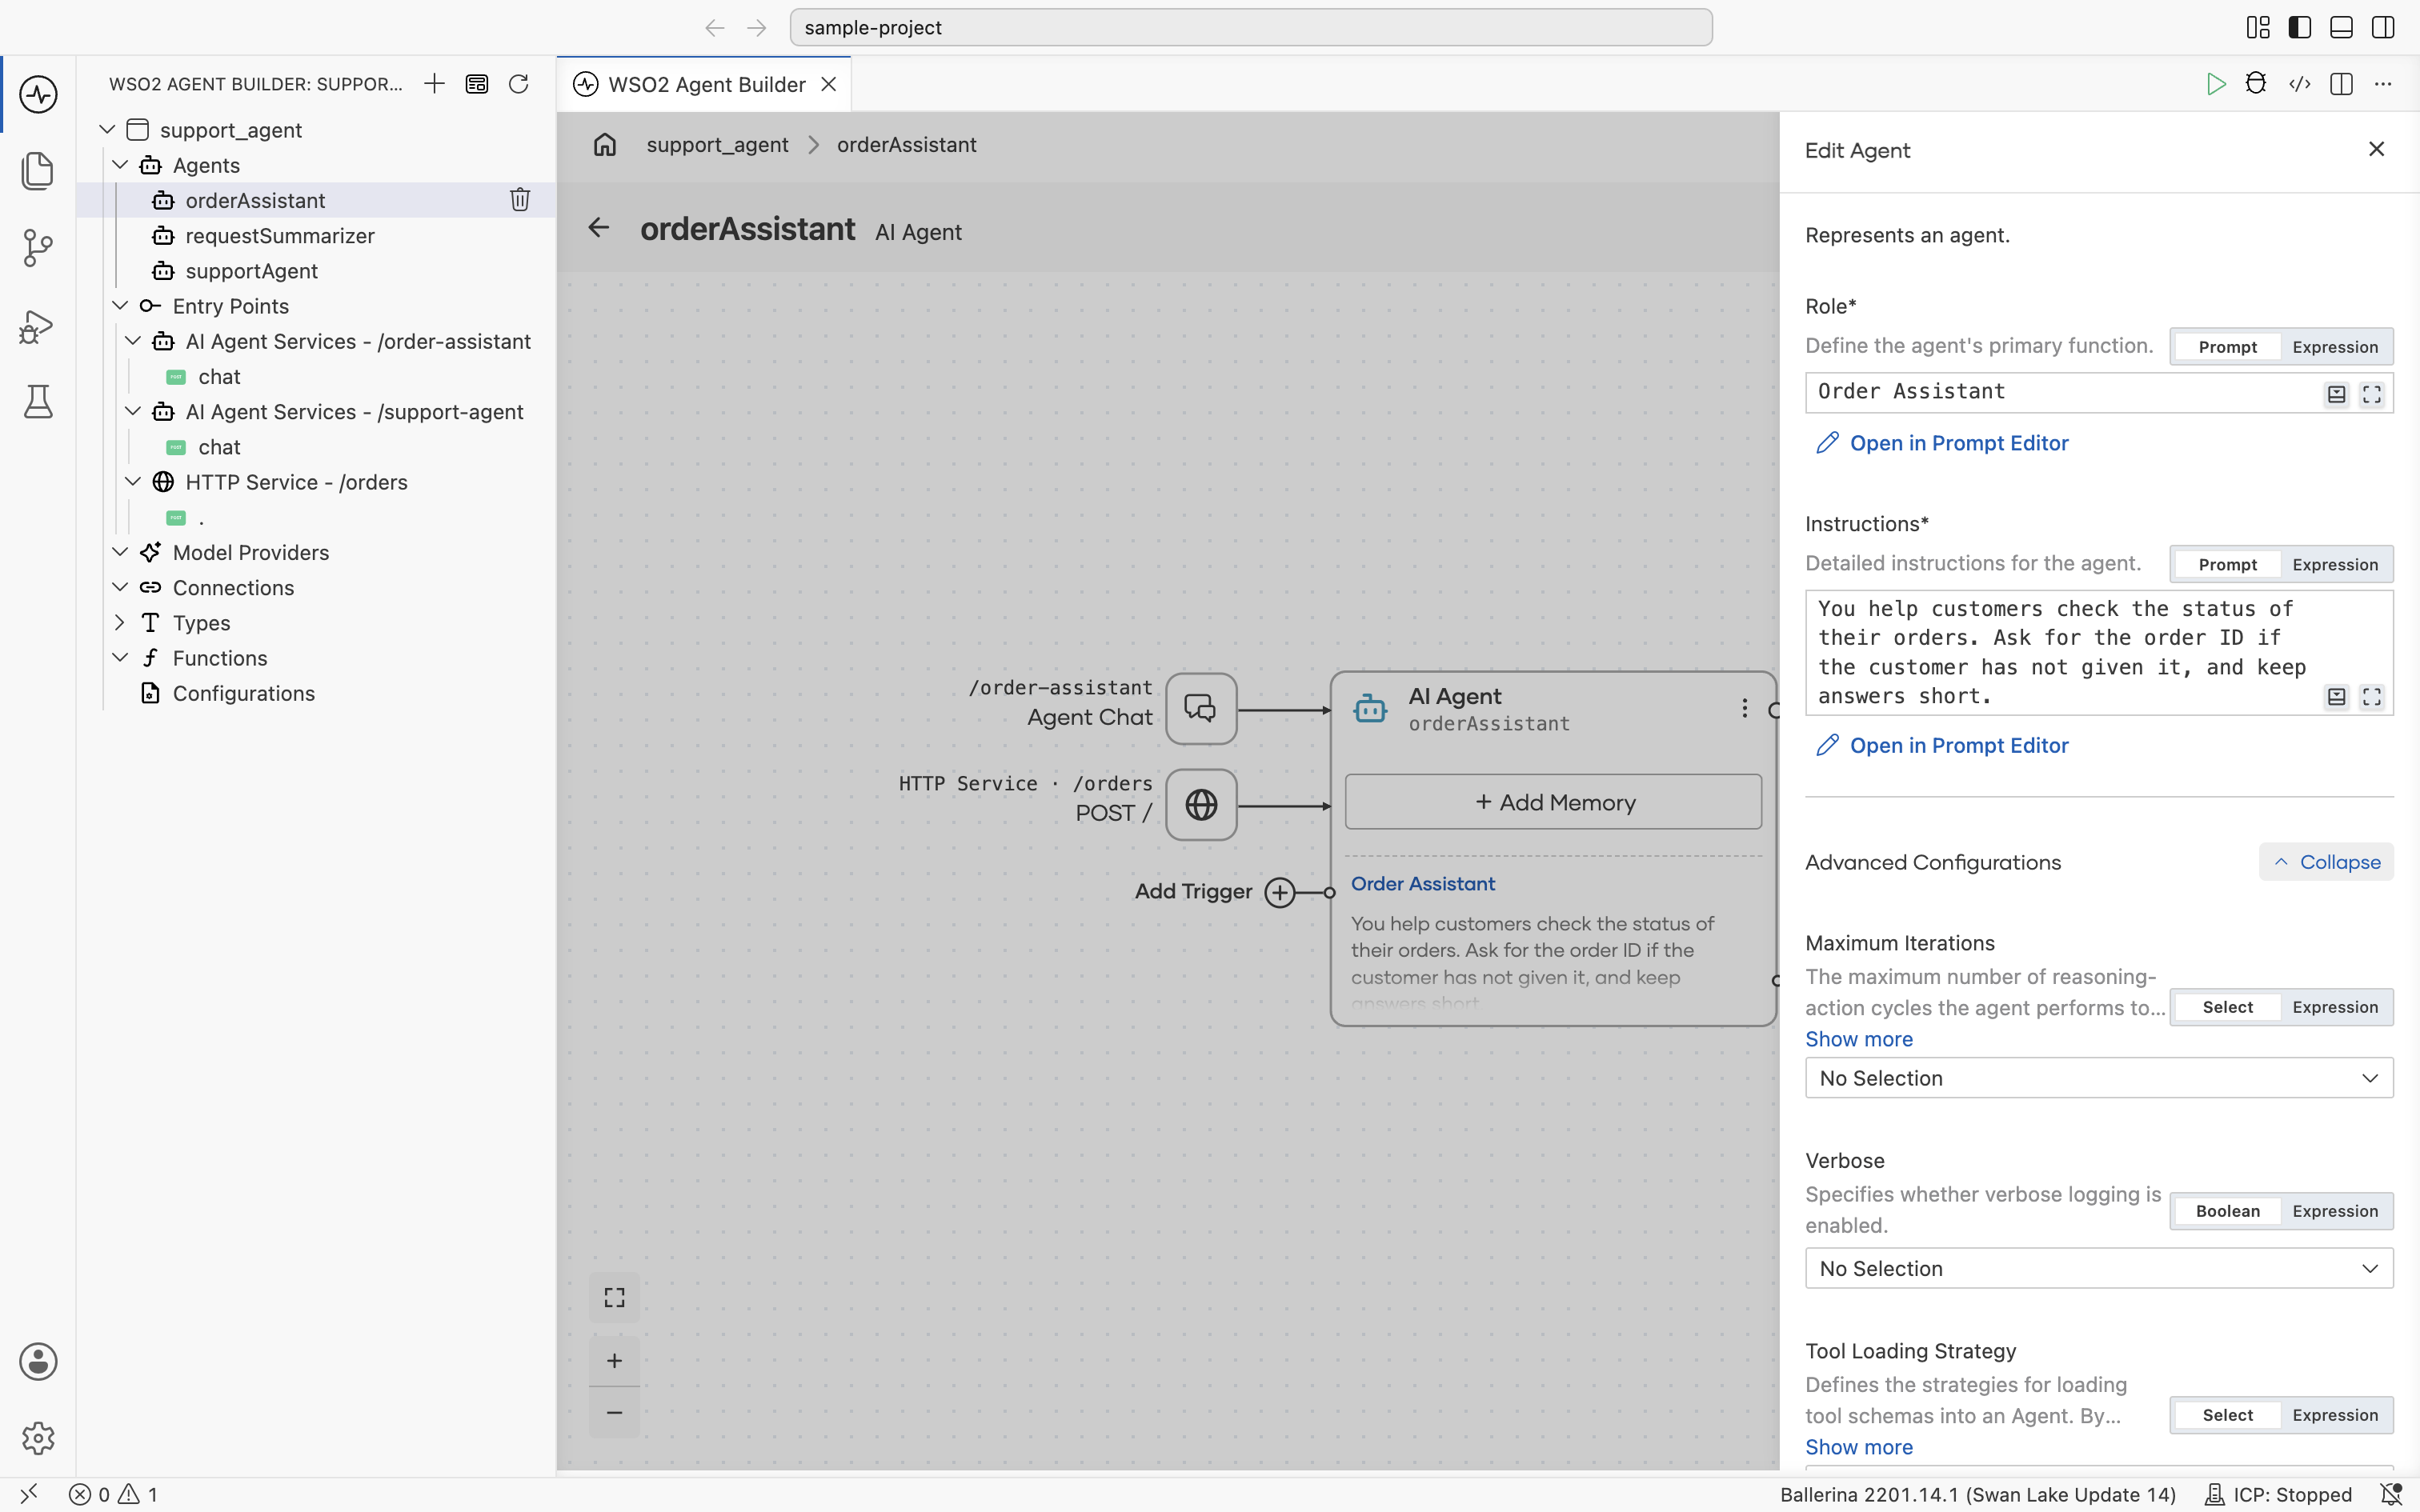
Advanced configuration
The Advanced Configurations section of the Create Agent form and the Edit Agent panel has the following settings:
| Field | Default | Description |
|---|---|---|
| Maximum Iterations | INFER_TOOL_COUNT | The maximum number of reasoning-action cycles the agent performs to complete a task. One cycle is one LLM call plus every tool call returned in that response. INFER_TOOL_COUNT resolves to max(number of tools, 10). |
| Verbose | false | Whether verbose logging is enabled. |
| Tool Loading Strategy | NO_FILTER | How tool schemas are loaded into the agent. NO_FILTER loads all tools without filtering. |
| Execute Tool Calls In Parallel | true | Whether multiple tool calls returned in a single LLM response run concurrently or one after another. |
| Agent Credential | None | Optional authentication details of the agent. See Identity & Access Management. |
A call of the agent
In a flow, select an agent : run node to open the AI Agent panel. Changes here apply only to that call.
| Field | Description |
|---|---|
| Query | The input for this call, as a prompt or an expression. |
| Session ID | The memory session this call uses. |
| Context | Additional context passed to the agent during tool execution. |
| Type Descriptor | The expected structure of the result. |
| Result | The variable that holds the agent's response. |
What's next
- Tools - Add tools to the agent.
- Memory - Configure conversational and persistent memory.
- Observability - Monitor traces, logs, and execution details.
- Evaluations - Test and evaluate agent behavior and response quality.