Tools
Tools enable AI agents to interact with external systems and perform actions during execution. WSO2 Agent Builder provides several ways to add and configure tools for an AI agent through a unified tool configuration experience.
This page describes the supported tool types, how to add them to an agent, and how each option works.
Add a tool
To add a tool to an agent, select Add Tool on the agent canvas. It sits below the model provider, connected to the AI Agent node.
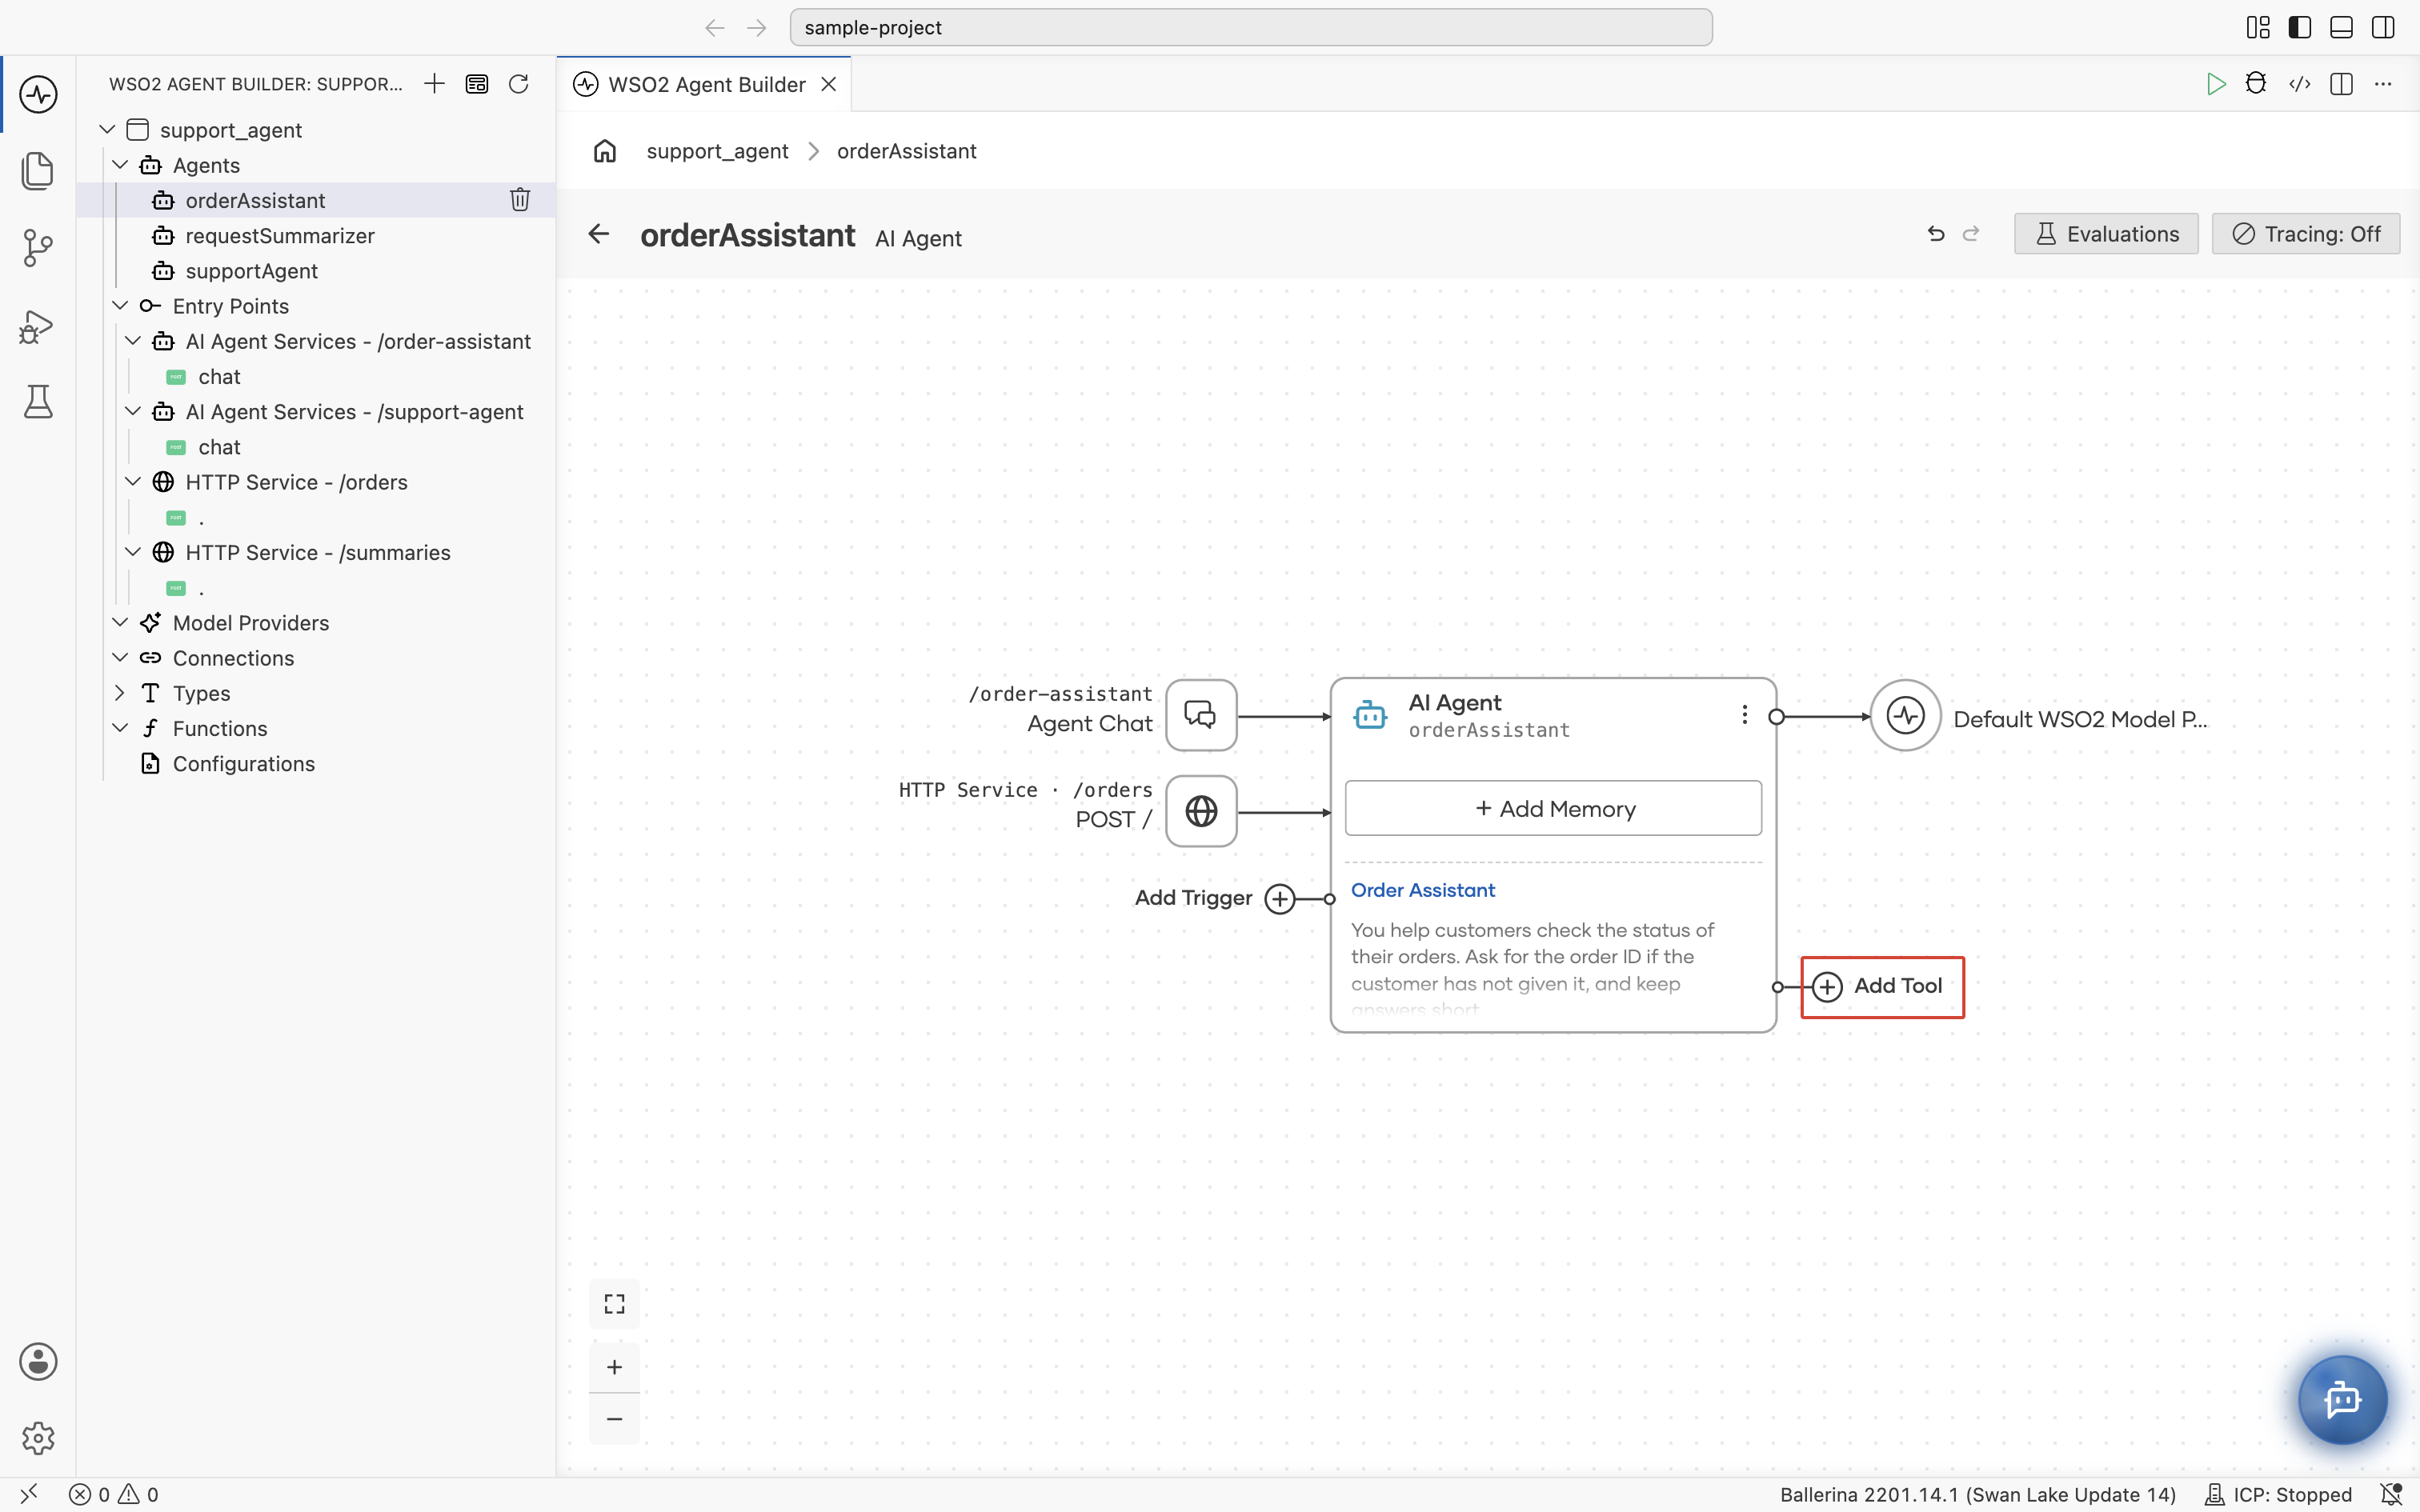
This opens the Add Tool panel, where you choose how to add capabilities to the agent.
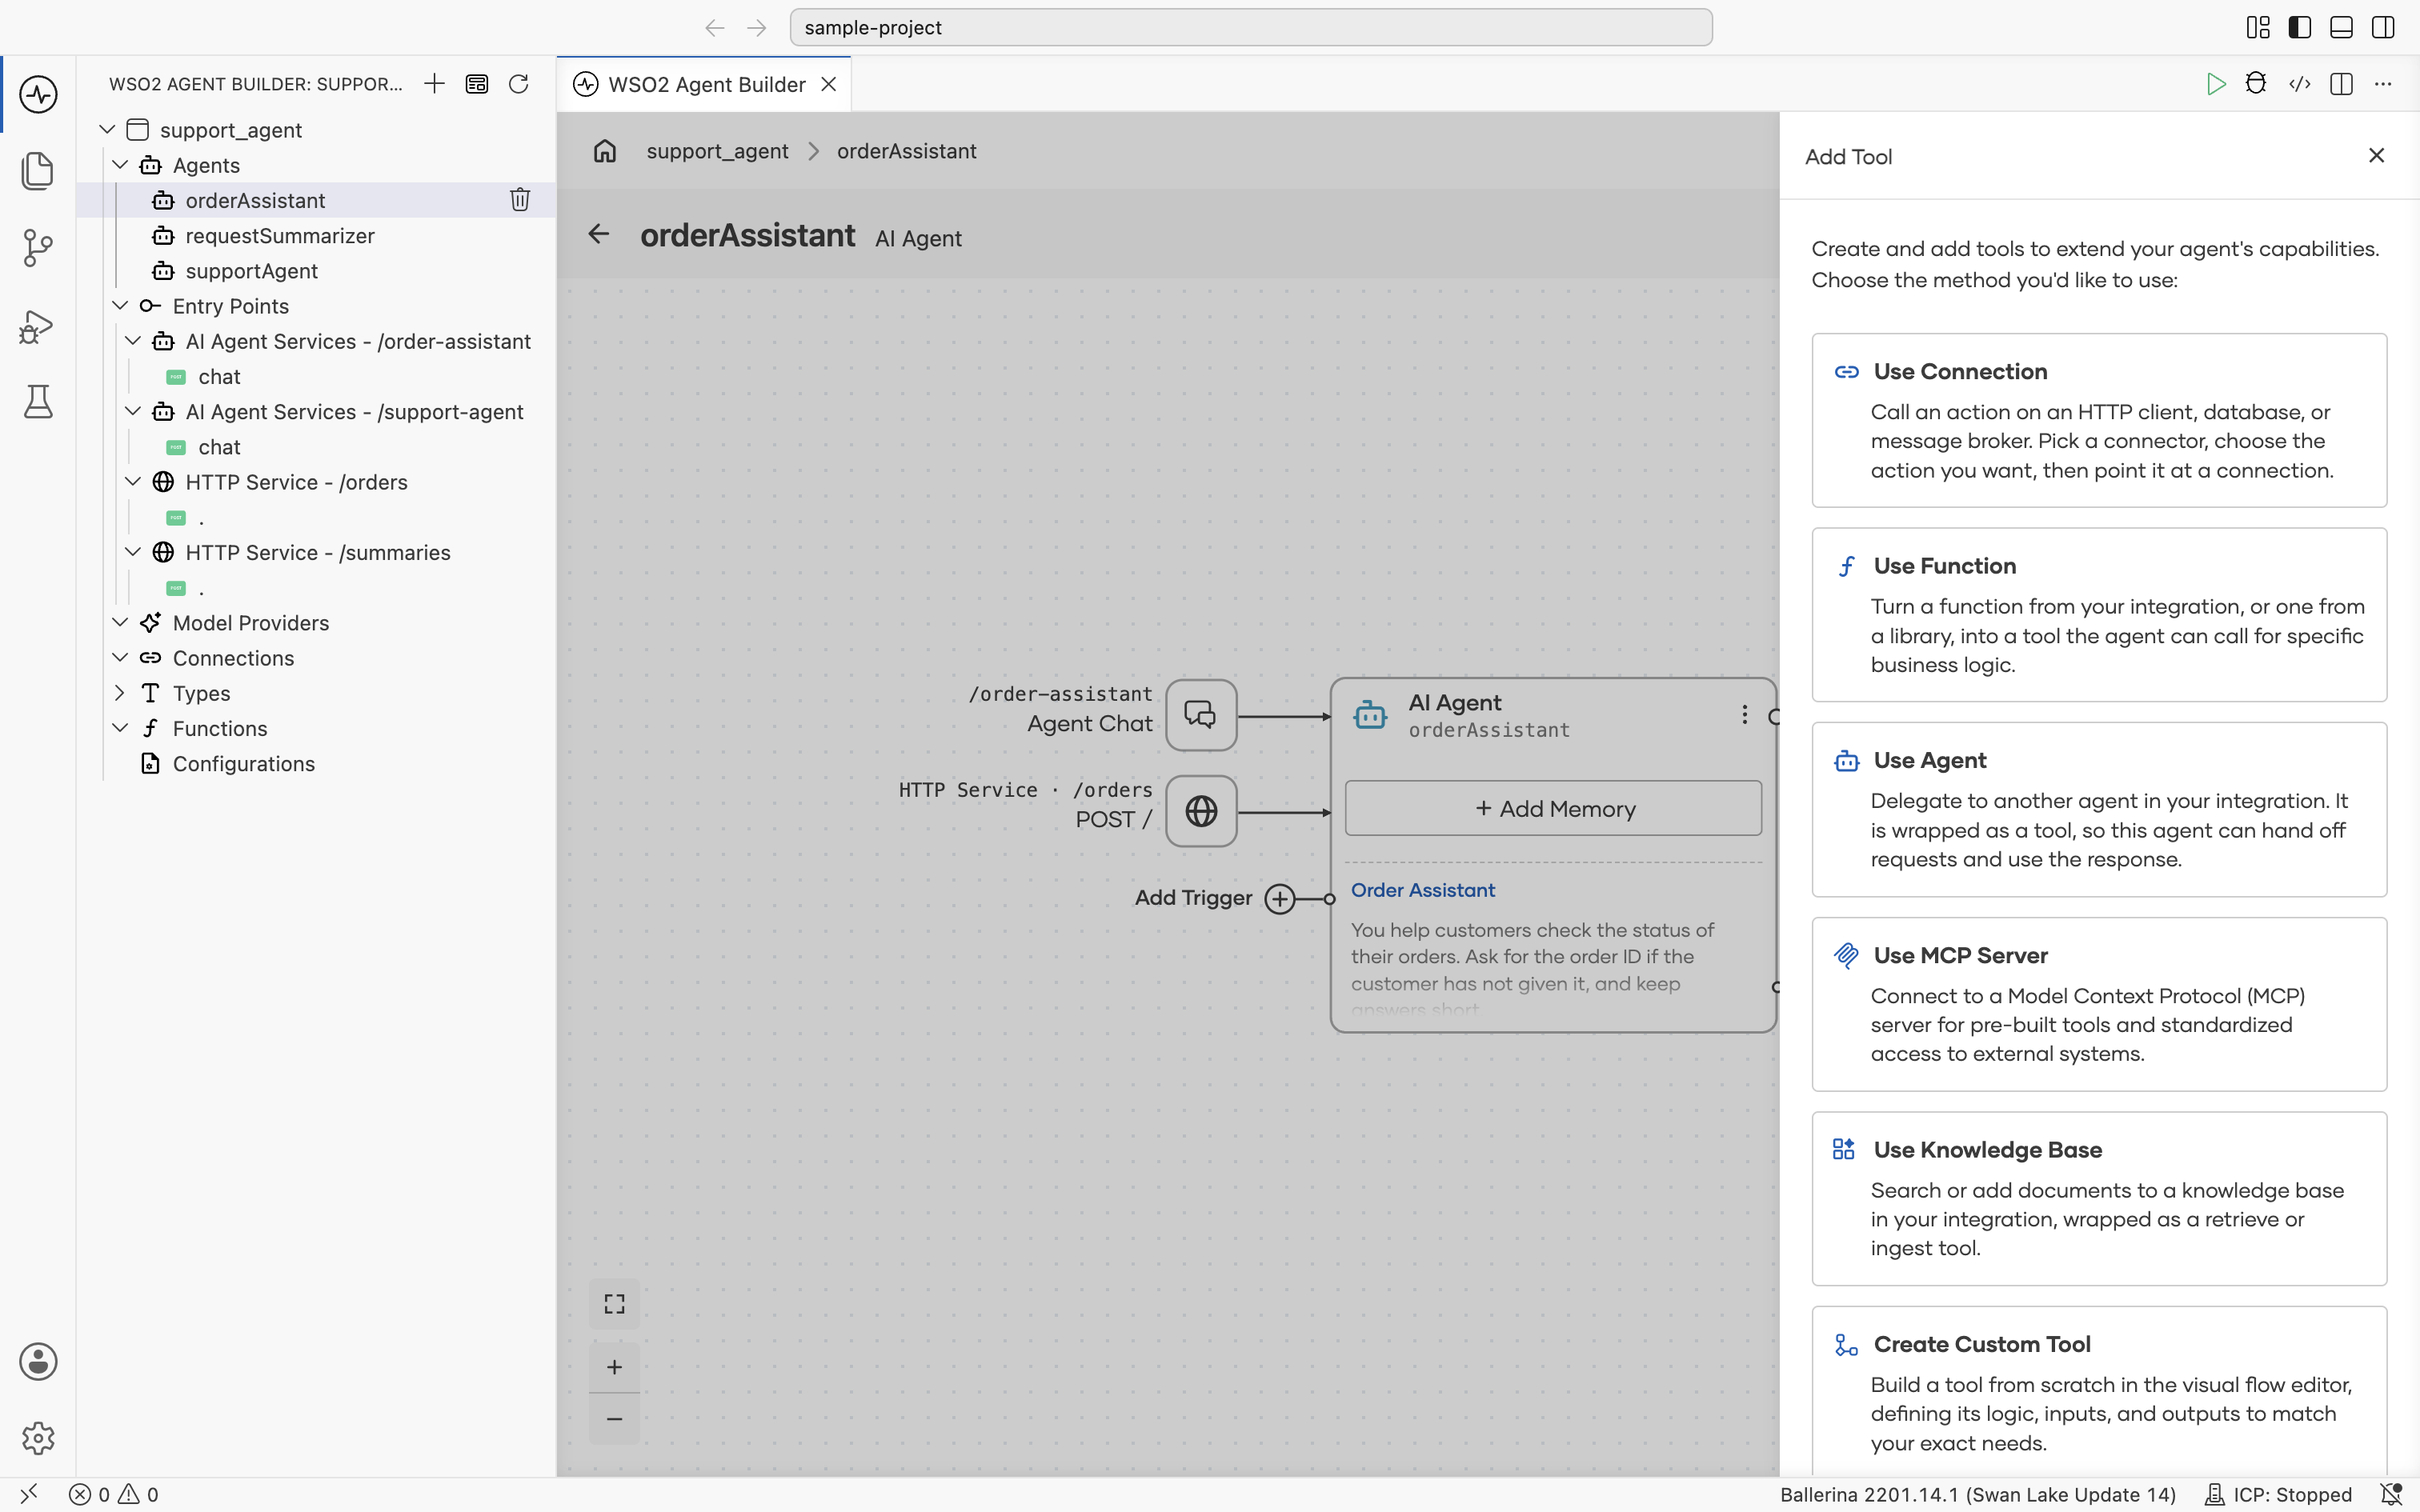
The following options are available:
| Option | Description |
|---|---|
| Create Custom Tool | Define a new tool by specifying its name, description, parameters, and return type, then implement its logic. |
| Use Connection | Call an action on an HTTP client, database, message broker, or SaaS connector such as Salesforce or GitHub. Pick a connector, choose the action, then point it at a connection. |
| Use Function | Turn a function from your agentic integration, or one from a library, into a tool. |
| Use Agent | Delegate to another agent, wrapped as a tool, so this agent can hand off requests and use the response. |
| Use MCP Server | Connect to tools hosted on an MCP server, either one your organization added to WSO2 Agent Manager or any server you connect to manually. |
| Use Knowledge Base | Search or add documents to a knowledge base, wrapped as a retrieve or ingest tool. |
Each option opens a dedicated configuration panel for setting up the selected tool type.
1. Create custom tool
Use this option when you want to define a tool before implementing its logic, or when the tool requires a fully custom structure.
Selecting Create Custom Tool opens the Add Tool - Create Custom Tool panel.
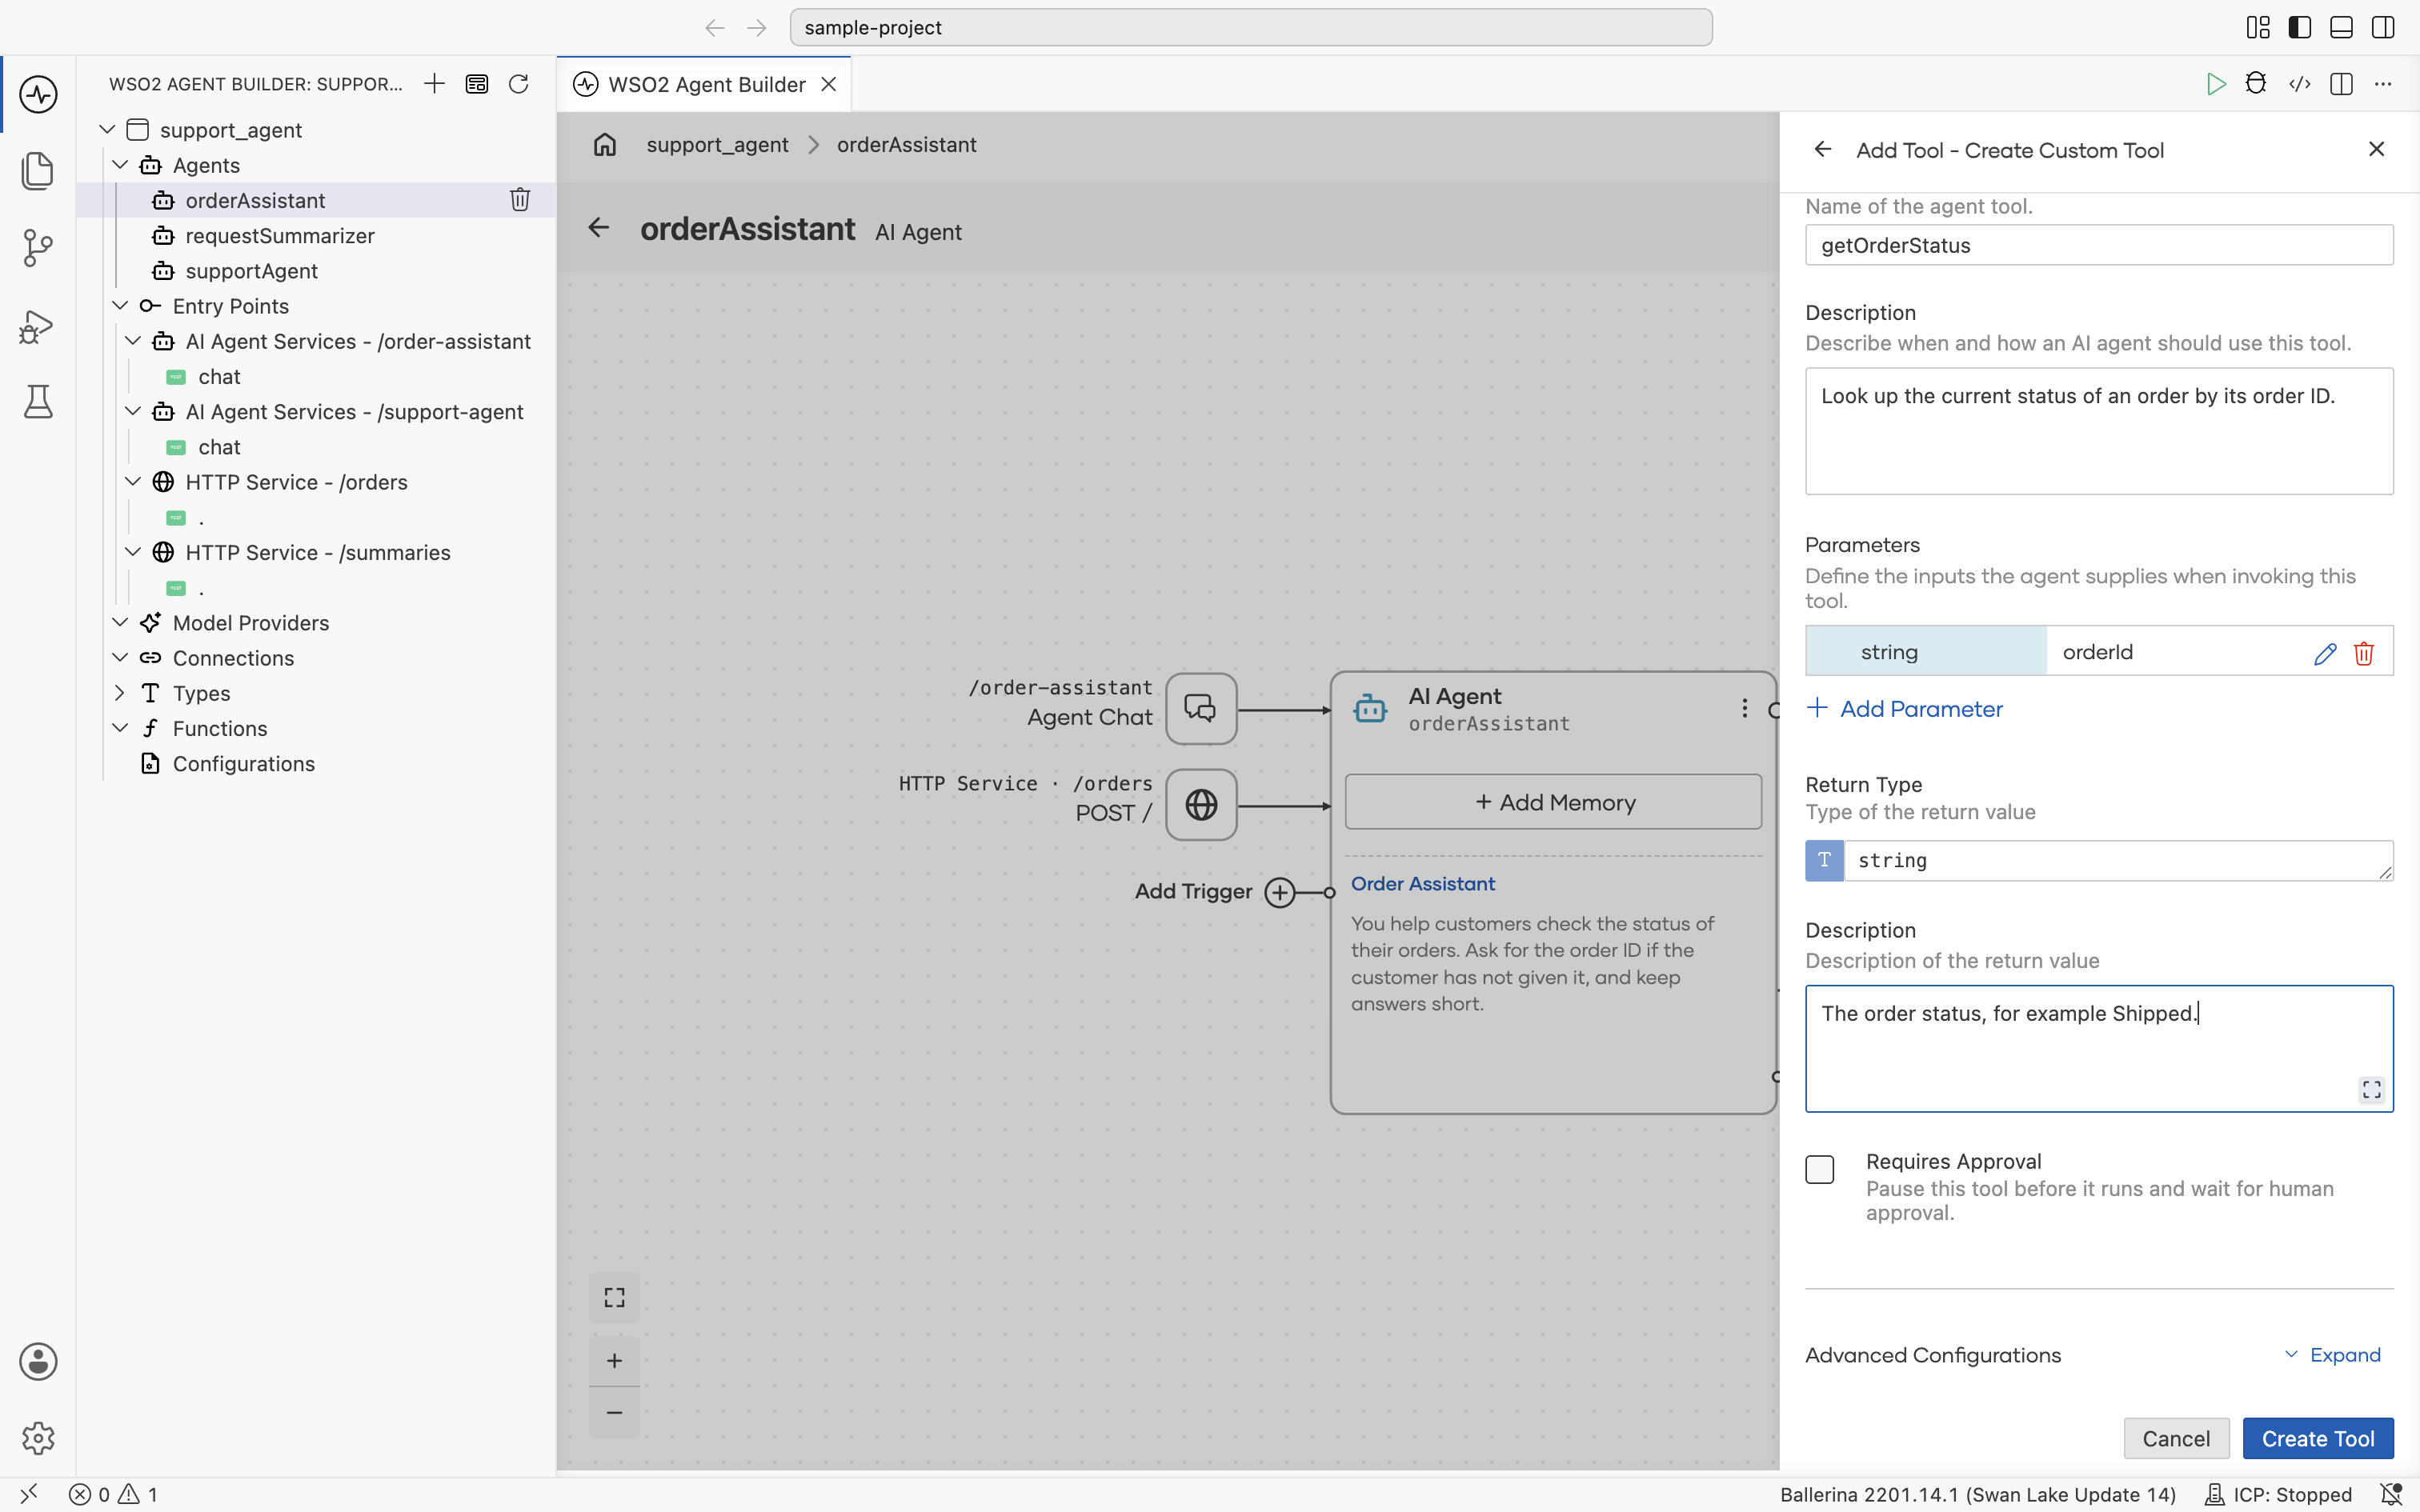
The panel provides the following fields for creating a tool:
| Field | Required | Description |
|---|---|---|
| Name | Yes | The name of the tool used by the LLM to identify and invoke it. |
| Description | No | Explains when and how the agent should use this tool. Although optional, a clear description significantly improves tool selection accuracy. |
| Parameters | No | The inputs the agent supplies when invoking the tool. Select + Add Parameter to add one, then set its Type, Name, and Description, and select Add. |
| Return Type | No | The Ballerina type returned by the tool, such as string, int, boolean, or a record type from your project. |
| Description (return) | No | A short description of the return value. |
| Requires Approval | No | Pauses the tool before it runs and waits for a person to approve the call. See Gate Tools for Approval. |
| Advanced Configurations | No | Additional settings that depend on the tool type. See Advanced configuration. |
After you select Create Tool, WSO2 Agent Builder generates a stub function annotated with @ai:AgentTool. Implement the tool logic inside the generated function.
- Ballerina Code
# Look up the current status of an order by its order ID.
# + orderId - The ID of the order to look up.
# + return - The order status, for example Shipped.
@ai:AgentTool
isolated function getOrderStatus(string orderId) returns string {
    panic error("not implemented");
}
2. Use connection
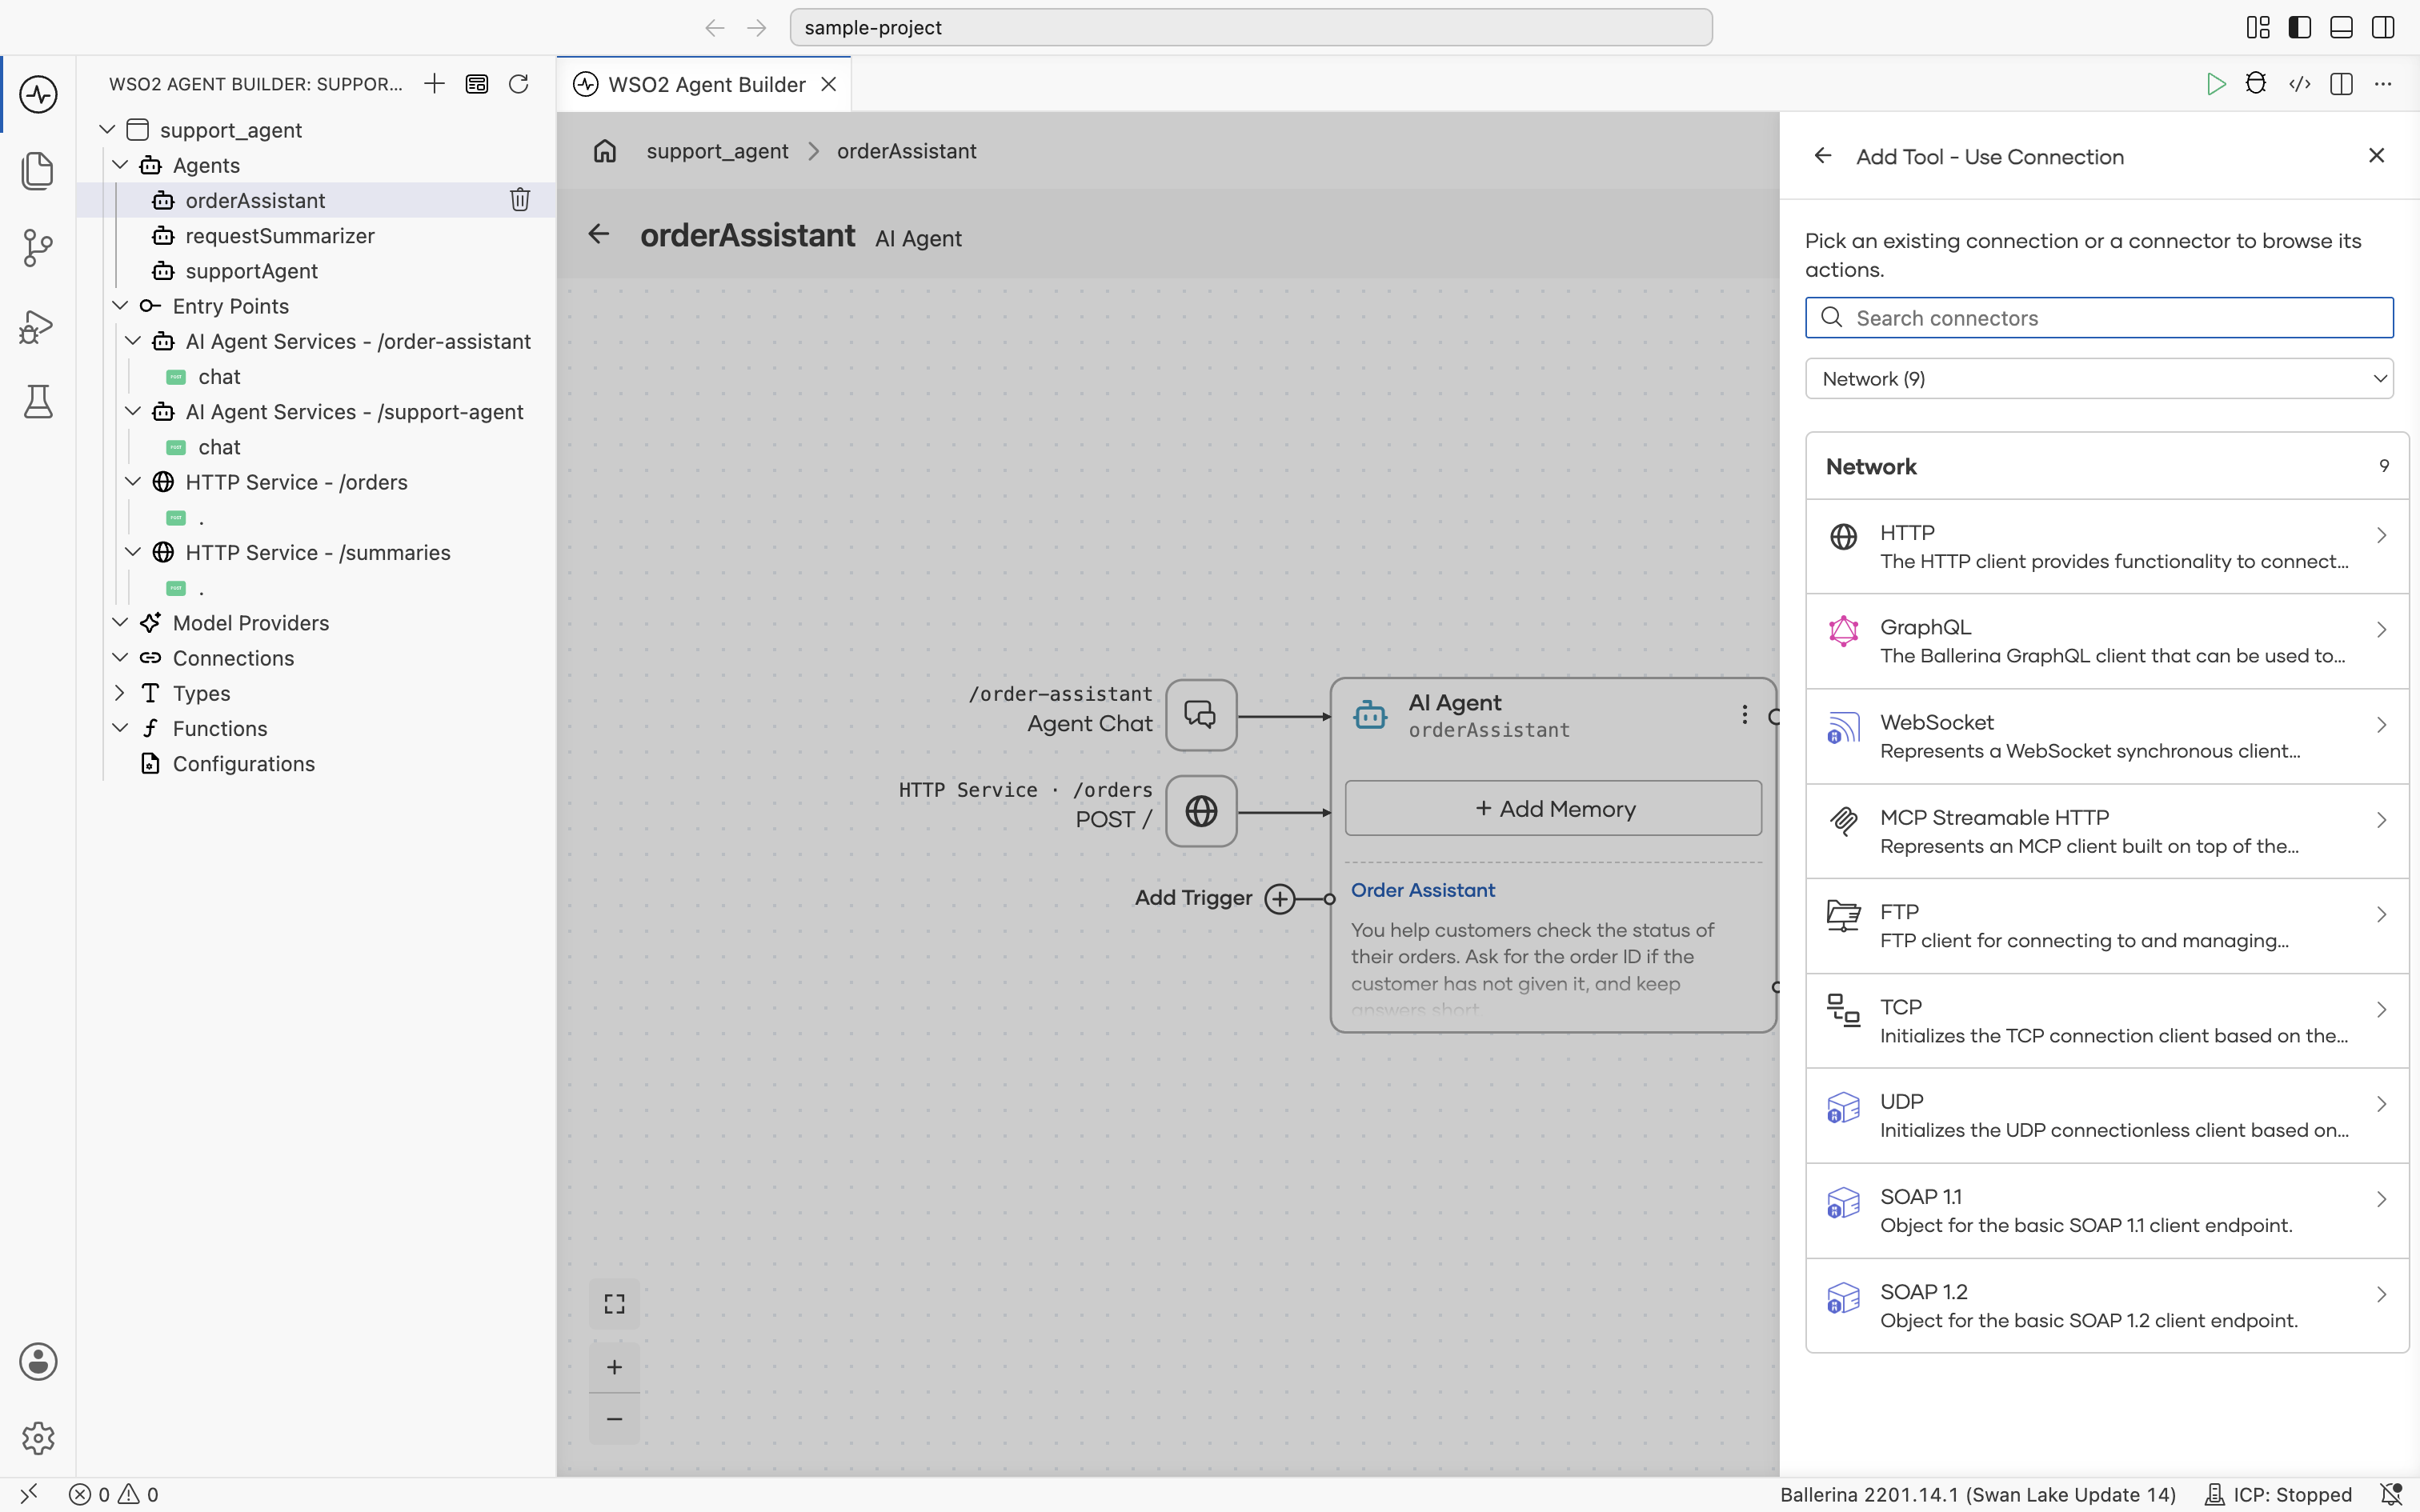
Selecting Use Connection opens the Add Tool - Use Connection panel. Pick an existing connection, or pick a connector to browse its actions.
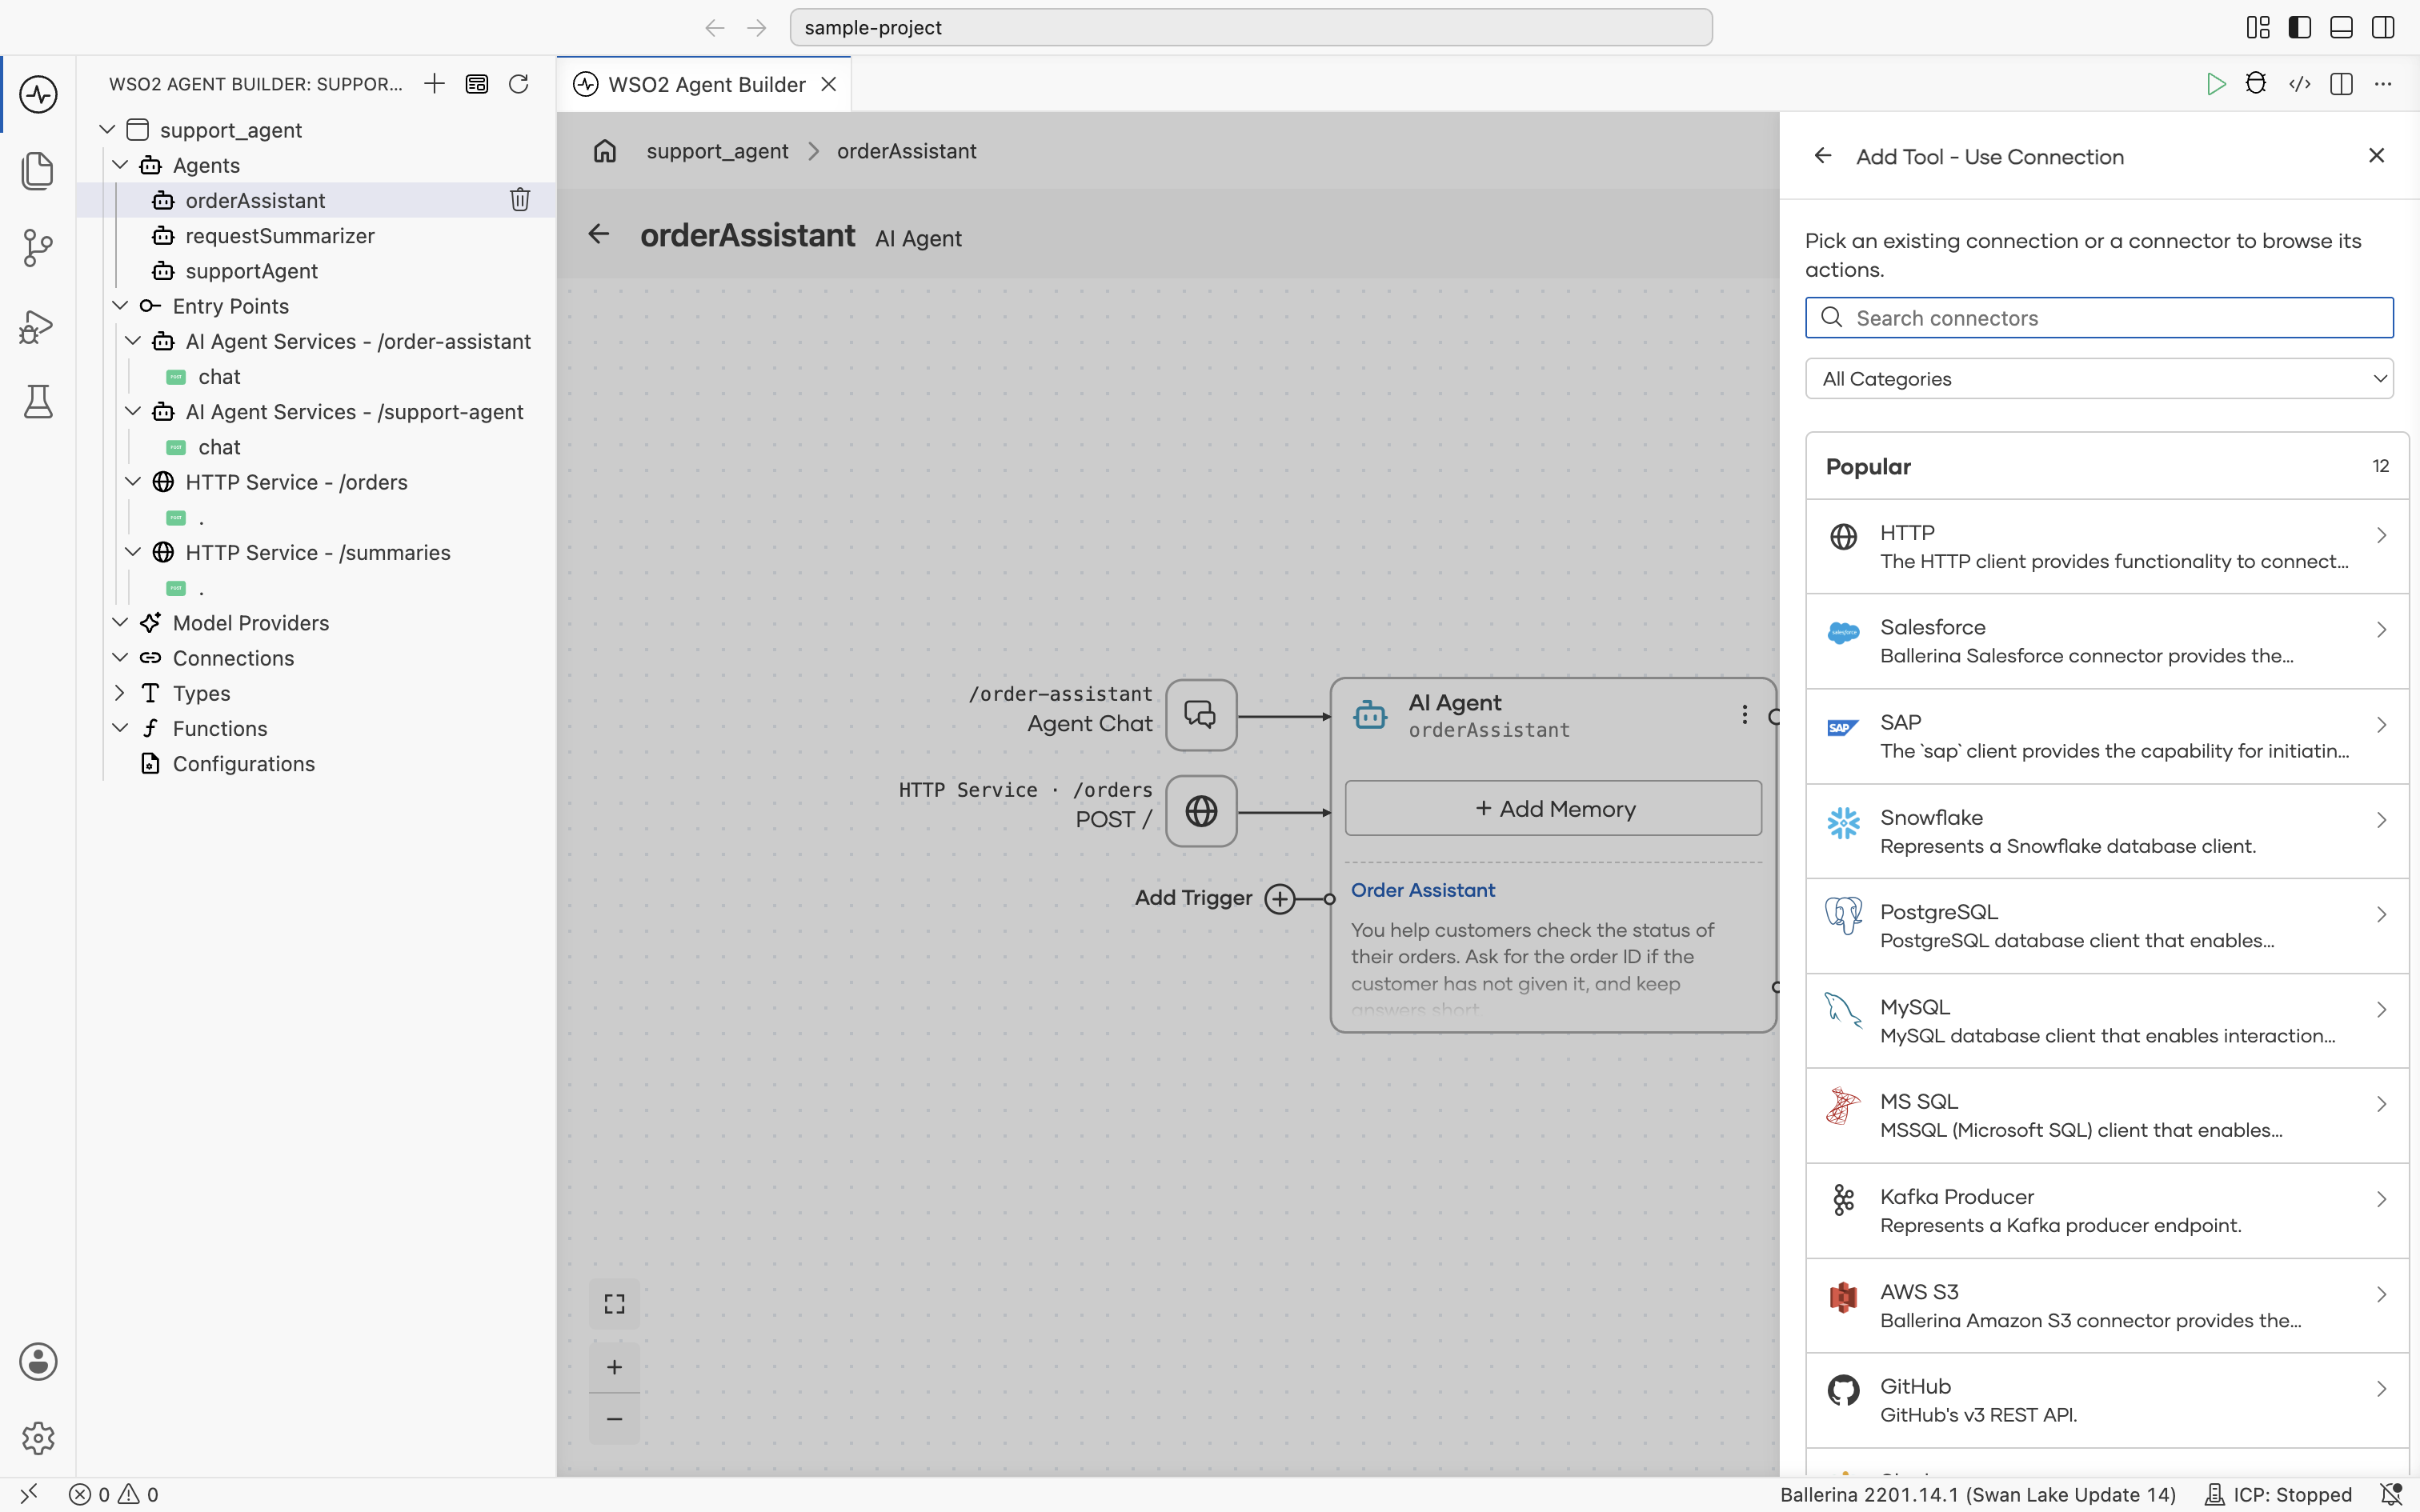
The panel provides the following options for finding a connector:
| Option | Description |
|---|---|
| Search | Find a connector by name across every category. |
| All Categories | Filter the list to a single category, such as Network, Database, or CRM & Sales. |
| Popular | The most commonly used connectors across all categories, shown by default. |
Choosing a category from the All Categories dropdown filters the list to show only the connectors in that category.
2.1 Select an action
After selecting a connector, WSO2 Agent Builder lists its available actions:
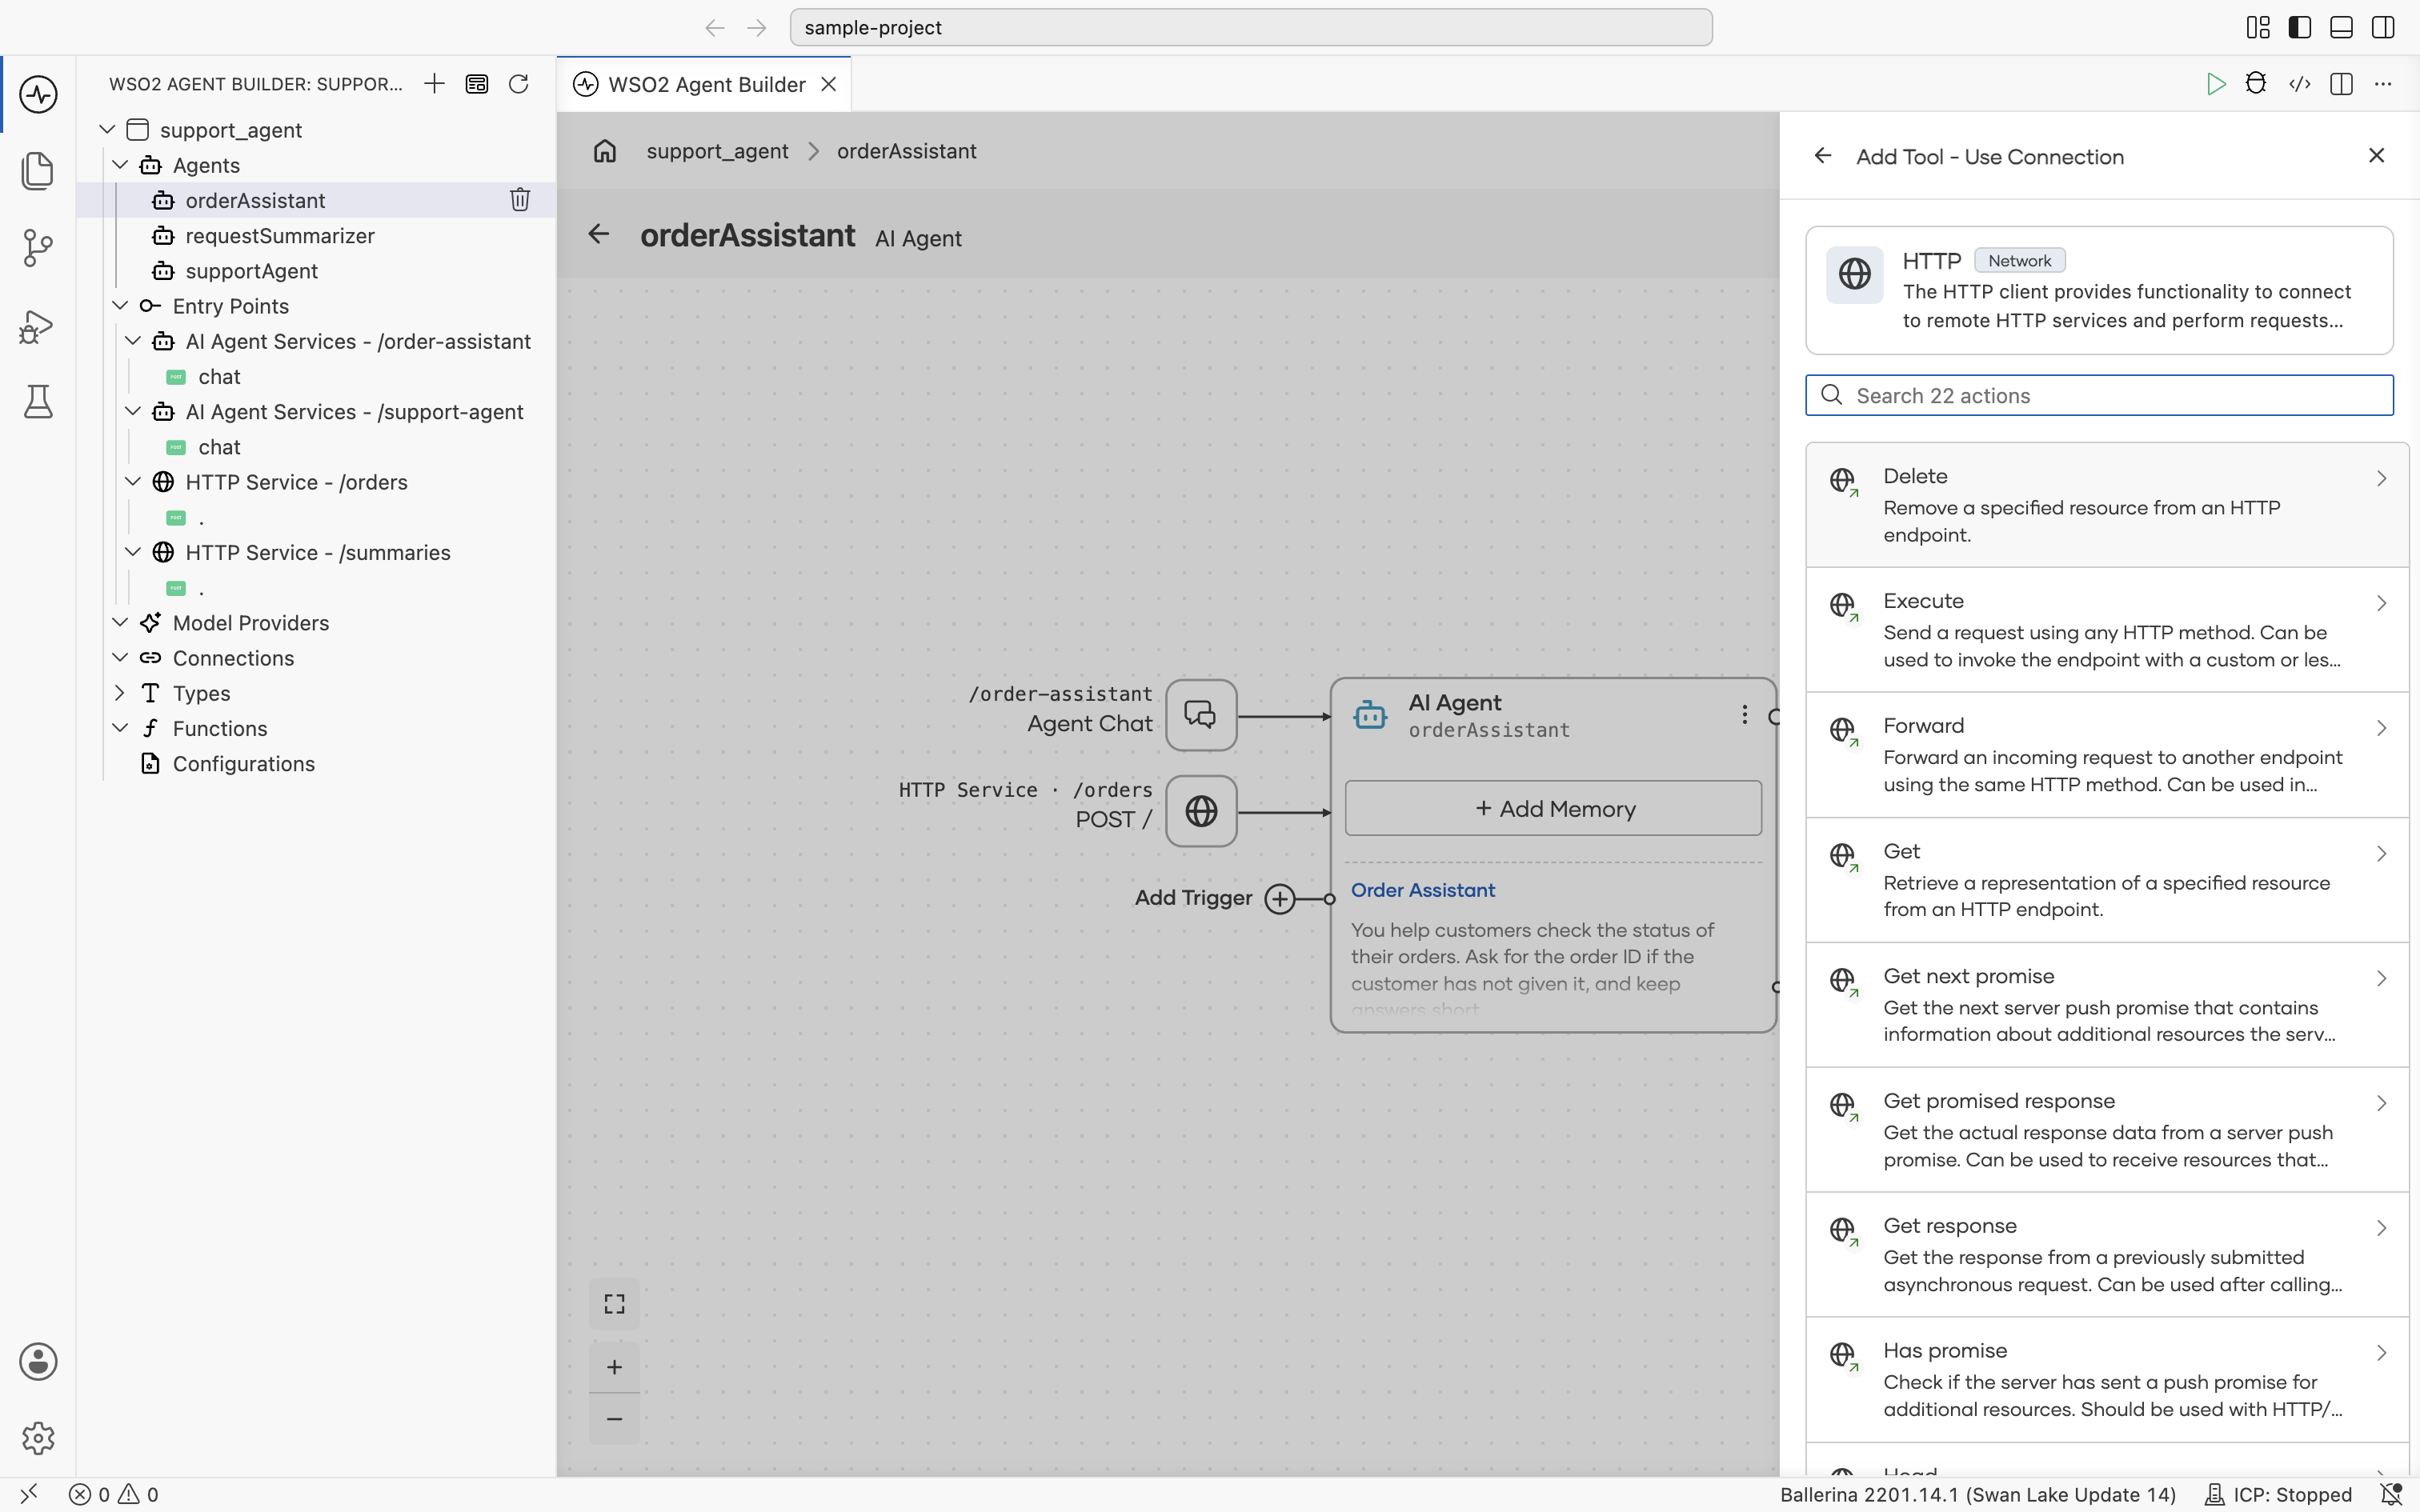
Selecting an action opens its tool configuration:
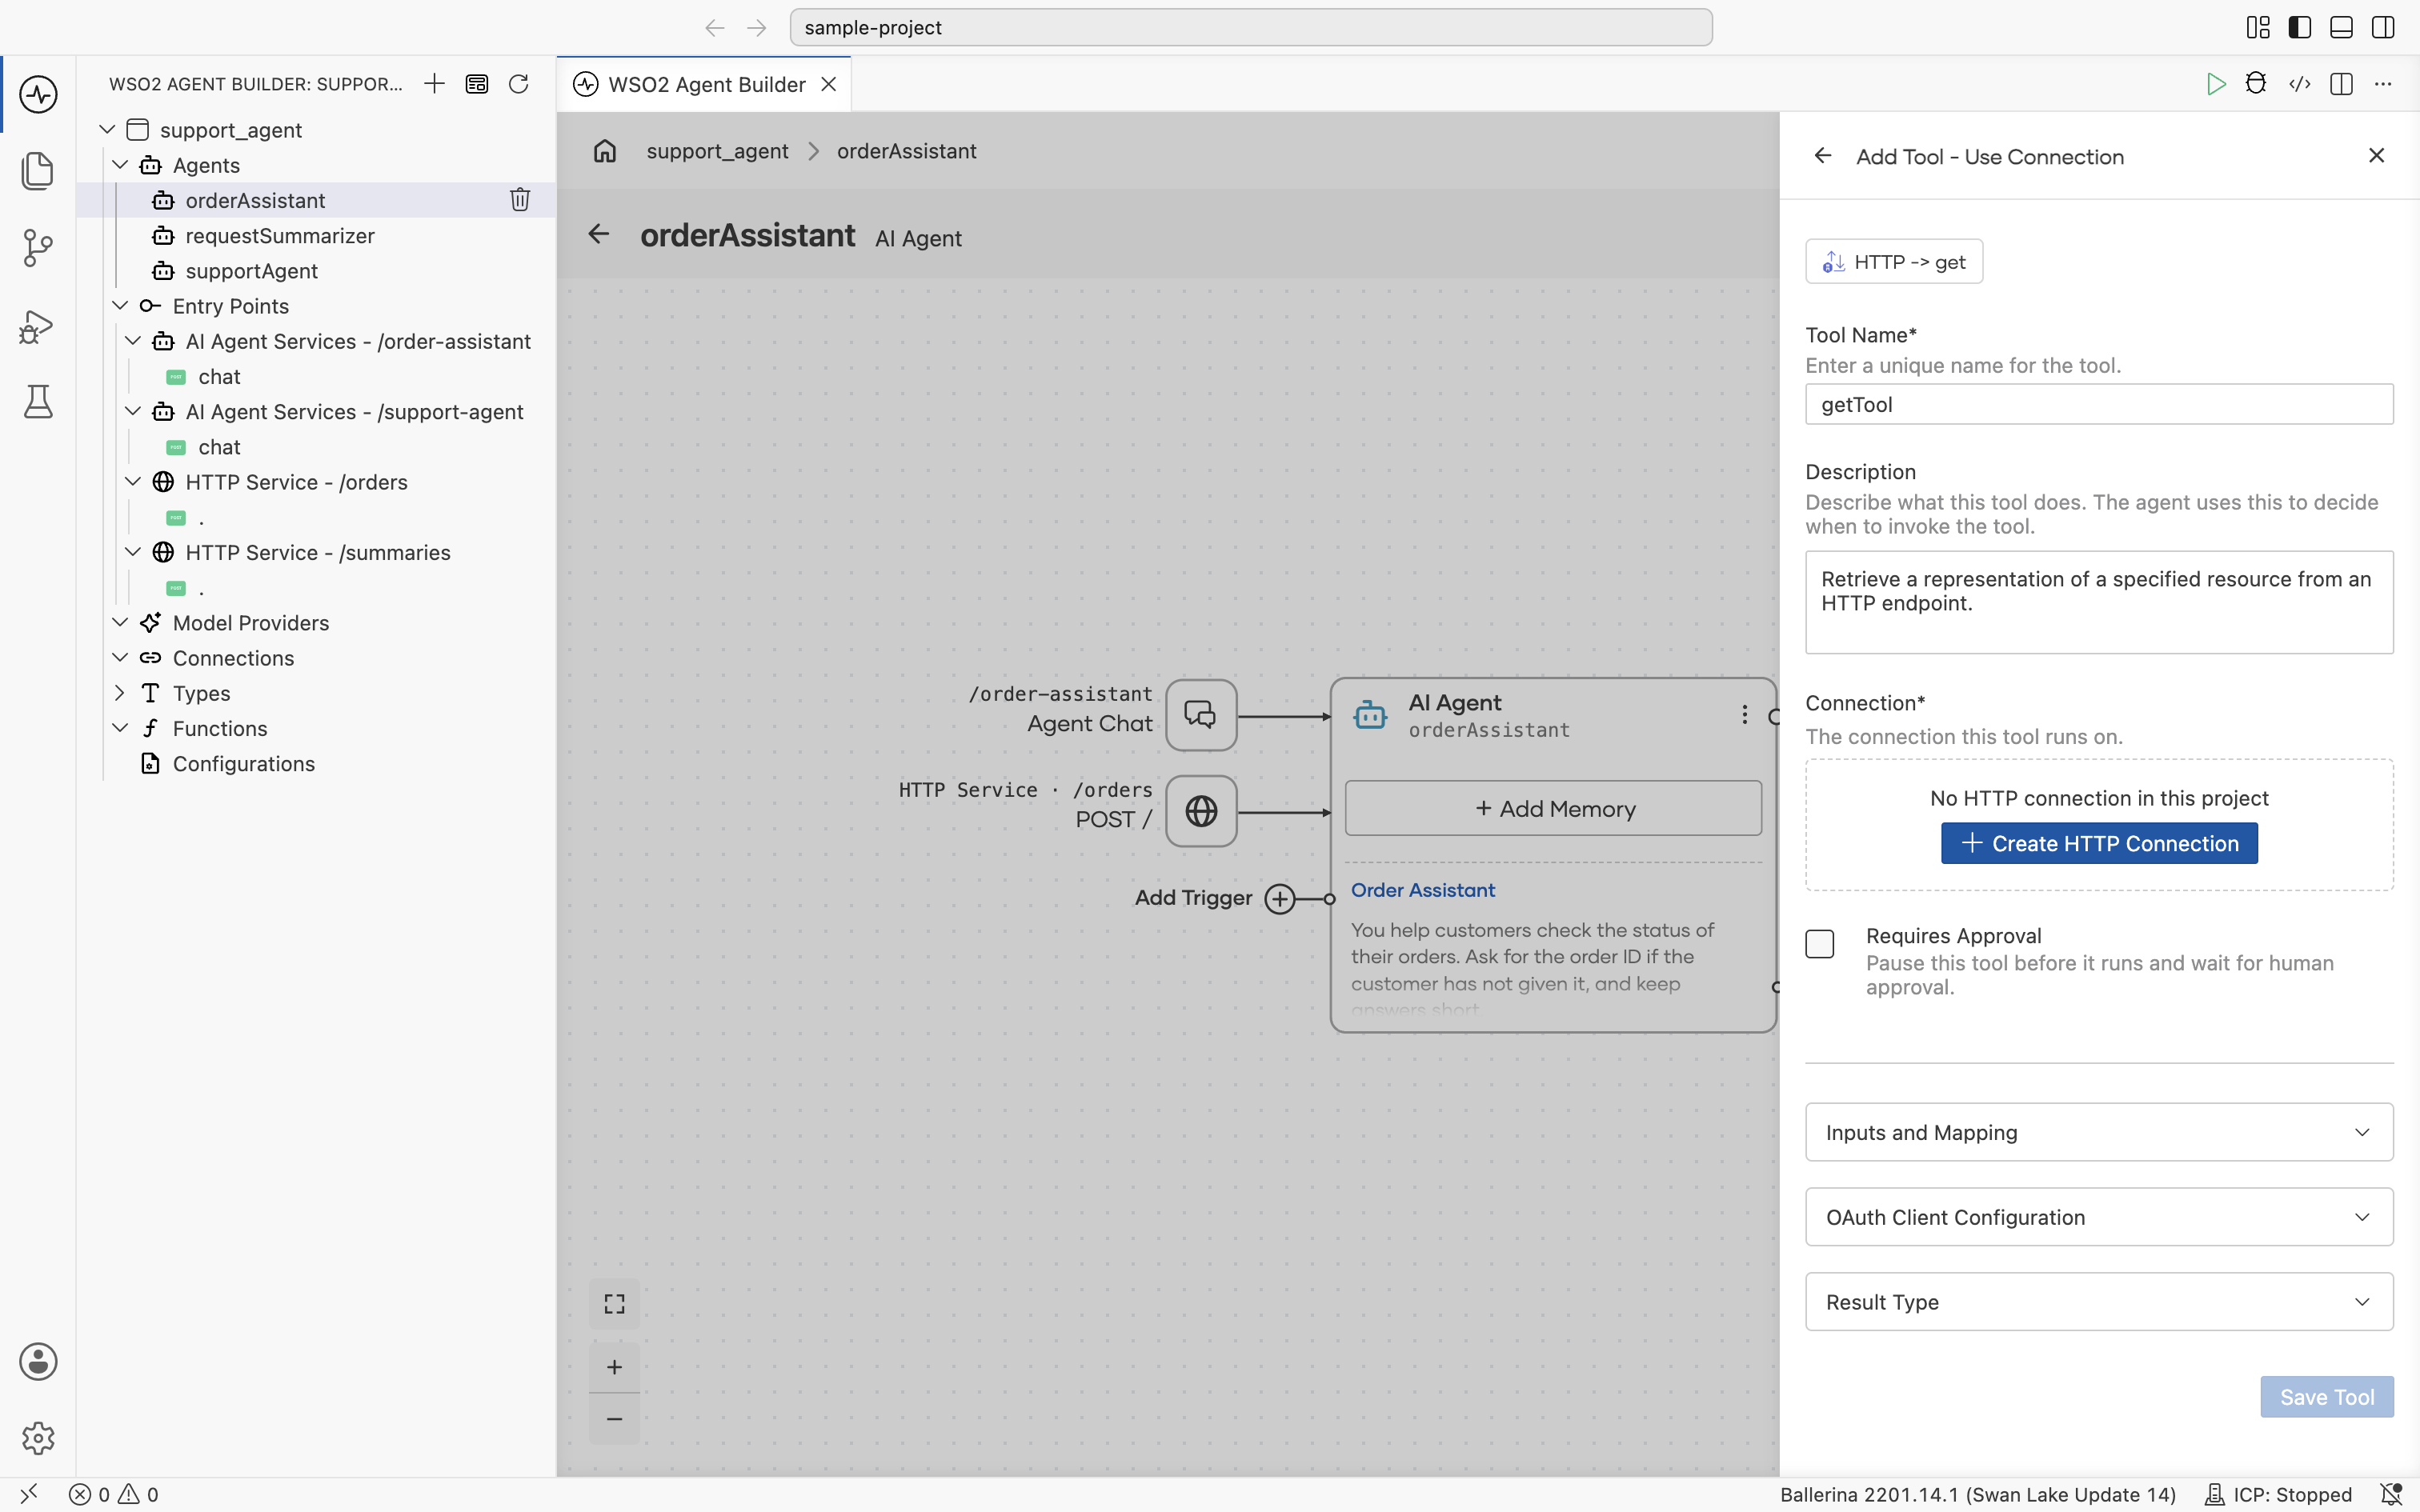
| Field | Required | Description |
|---|---|---|
| Tool Name | Yes | A unique name for the tool, prefilled from the action. |
| Description | No | Explains what the tool does, prefilled from the connector definition. The agent uses this to decide when to invoke the tool. |
| Connection | Yes | The connection this tool runs on. Select an existing one, or select + Create Connector Connection to create one if none exists yet. |
| Requires Approval | No | Pauses the tool before it runs and waits for a person to approve the call. See Gate Tools for Approval. |
| Inputs and Mapping | No | The action's parameters and how they map to the tool's inputs, derived from the connector definition. |
| OAuth Client Configuration | No | OAuth client settings, when the connection's authentication requires them. |
| Result Type | No | The Ballerina type the tool returns, derived from the connector definition. |
Select Save Tool to add it. Use this option when a suitable connector already exists, so the agent can interact with external systems without extra wrapper code.
3. Use function
Selecting Use Function opens the Add Tool - Use Function panel. Pick a function from your agentic integration or from a library, and the function becomes the tool.
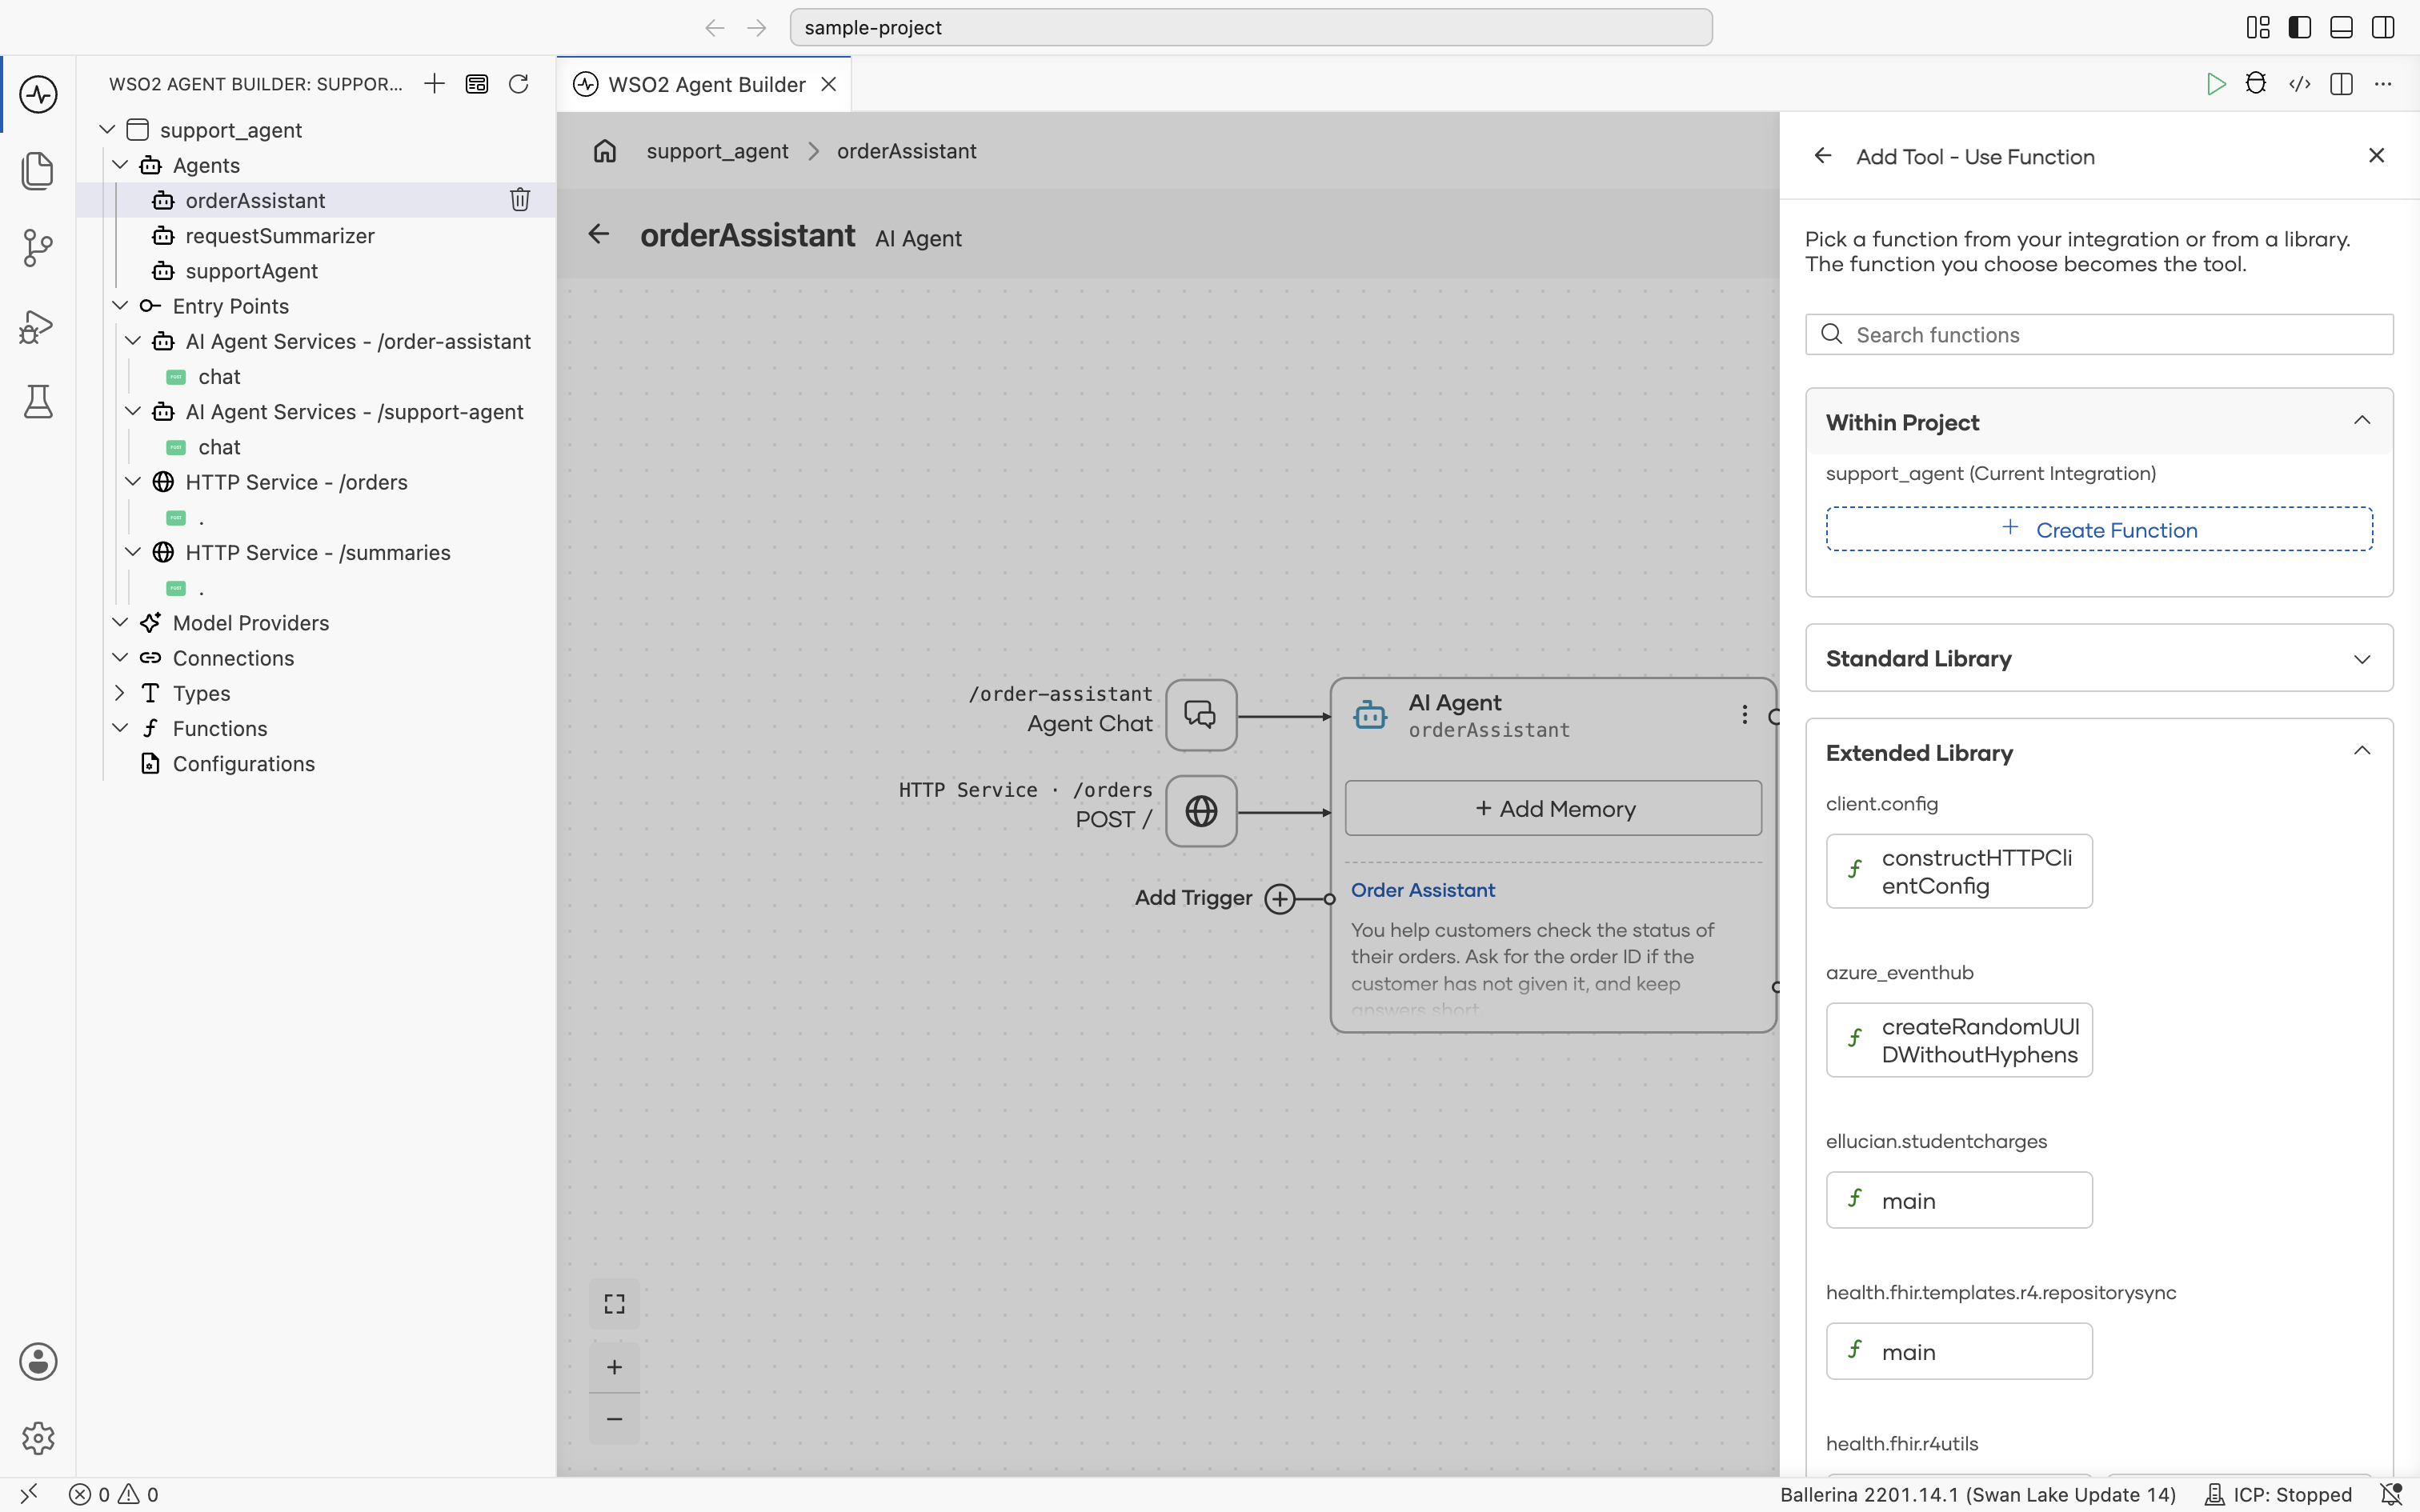
Expanding Standard Library lists Ballerina standard library functions grouped by module.
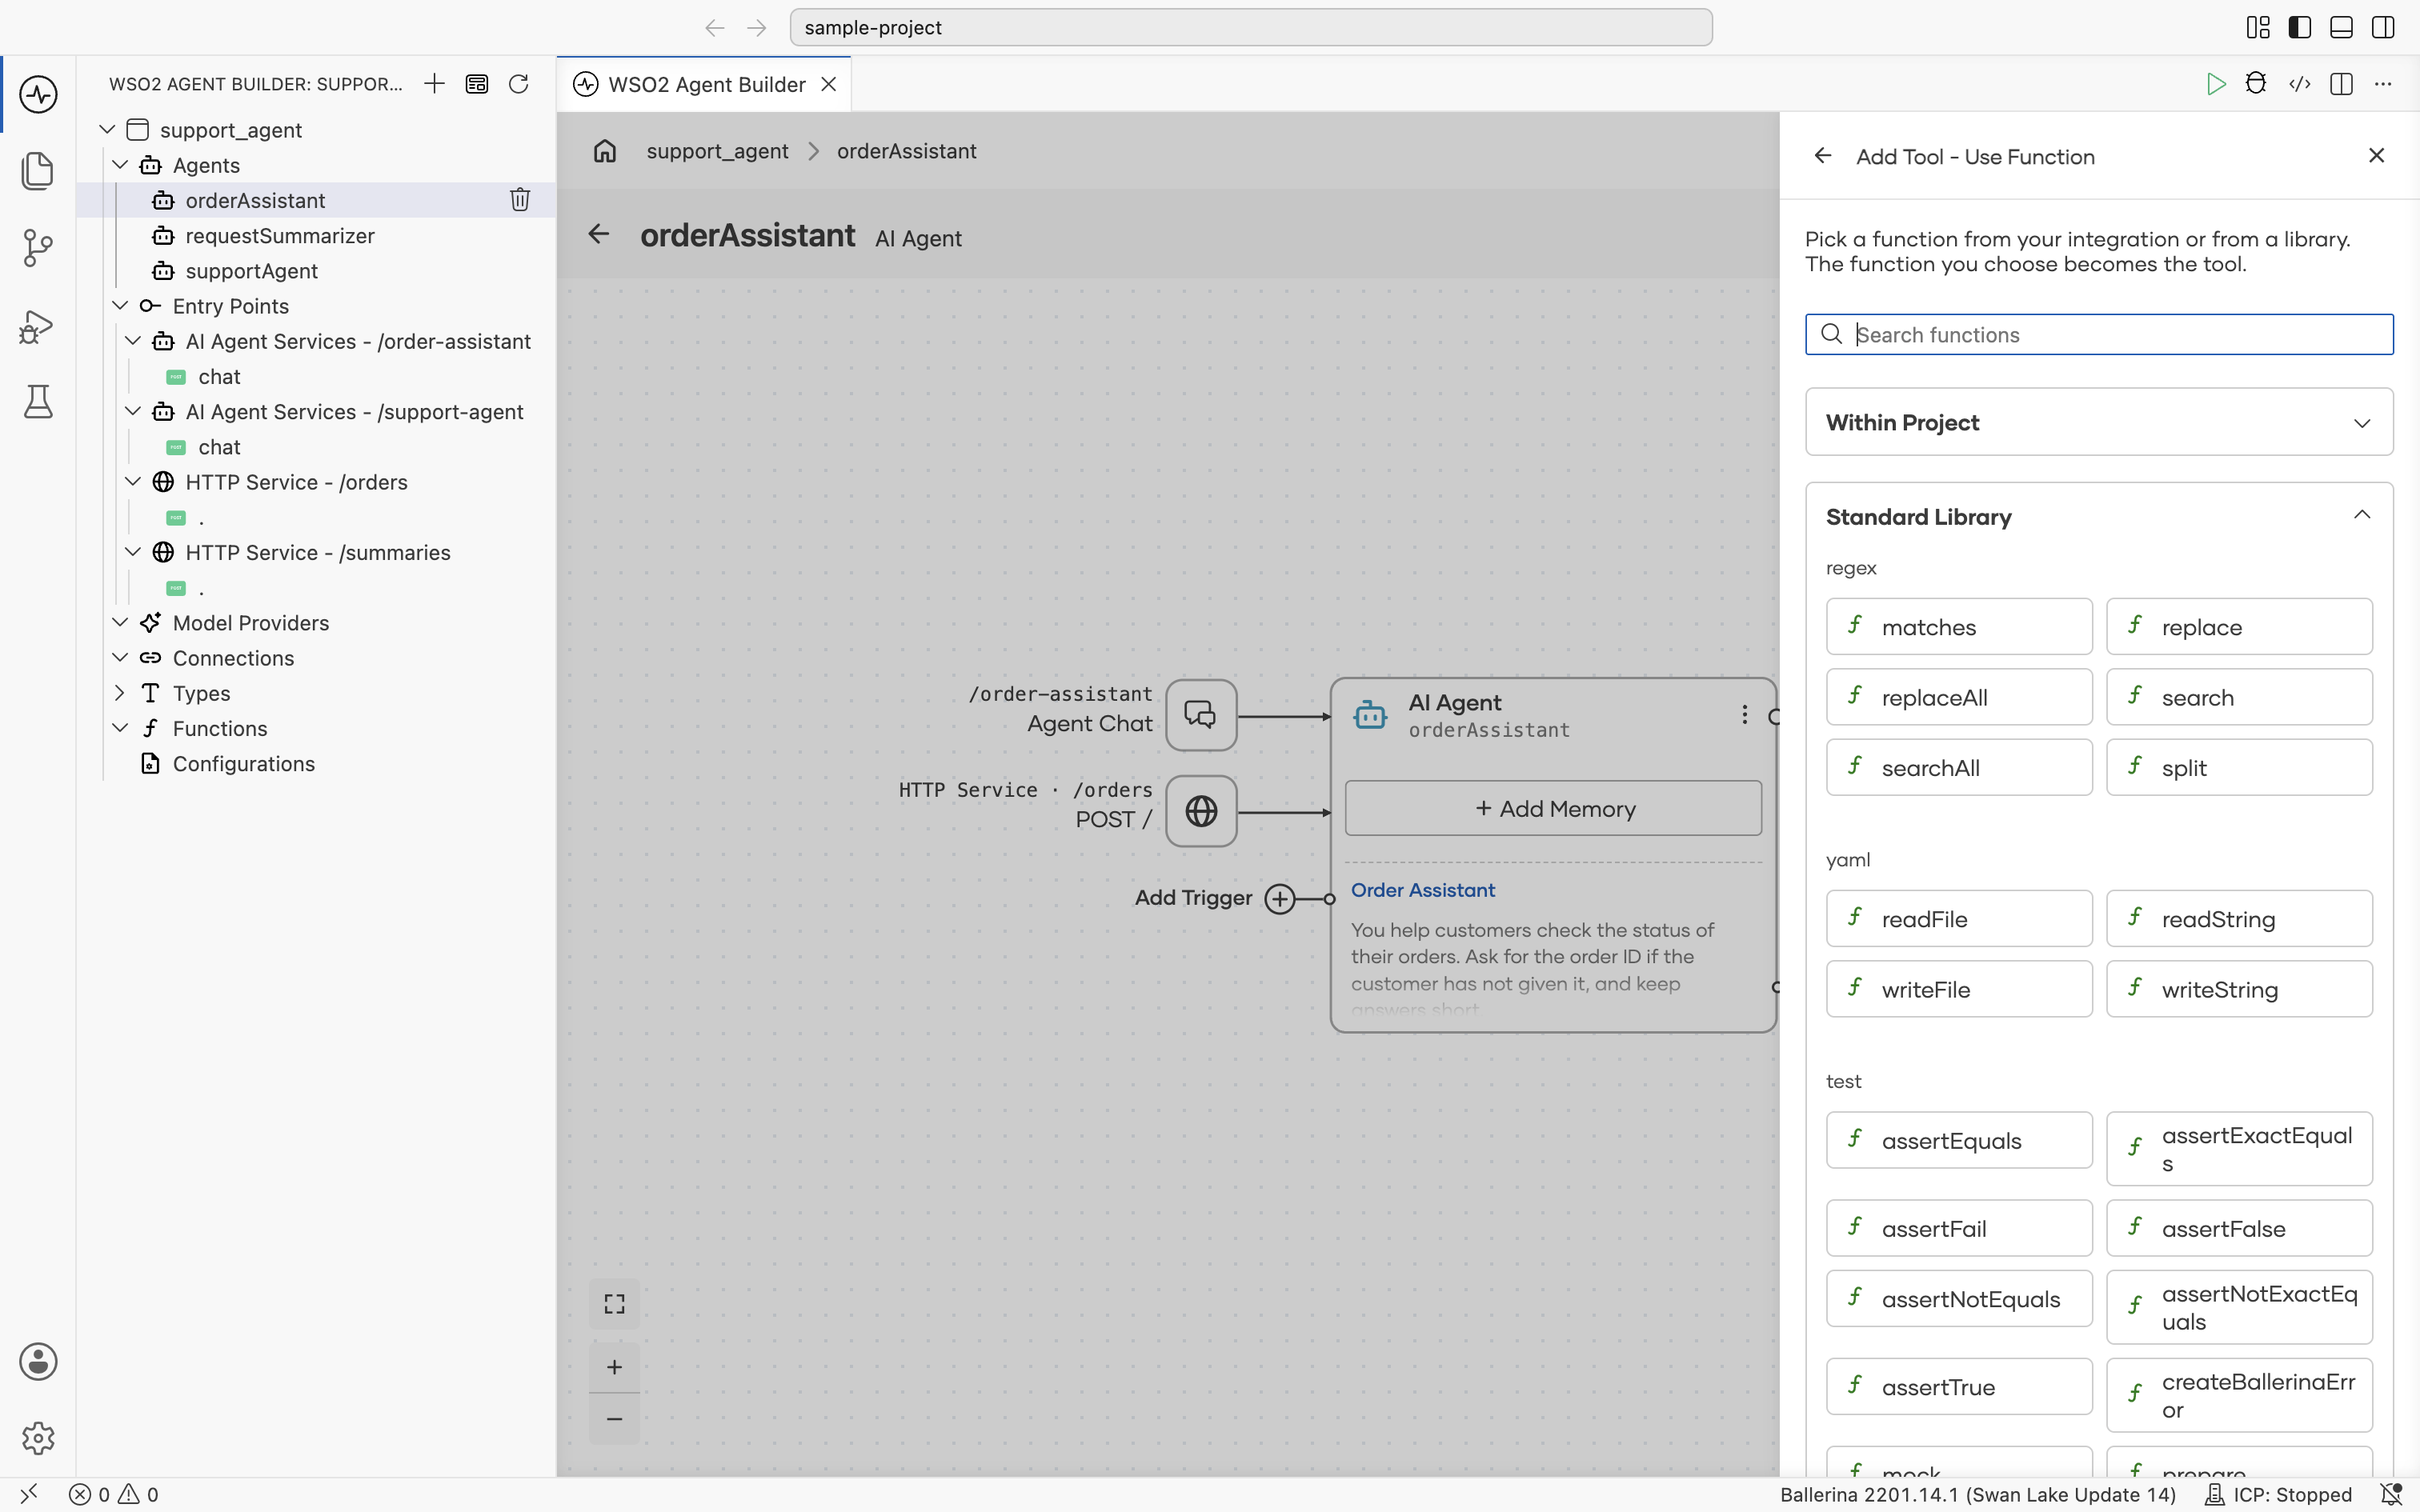
The panel provides the following sections for selecting a function:
| Section | Description |
|---|---|
| Within Project | Functions defined in your agentic integration. Select + Create Function to author a new one. |
| Standard Library | Ballerina standard library functions, grouped by module (for example regex, yaml, test). |
| Extended Library | Functions from connector modules available to the project, grouped by module name. |
Use Search functions to find a function by name across all three sections. Selecting a function opens its tool configuration:
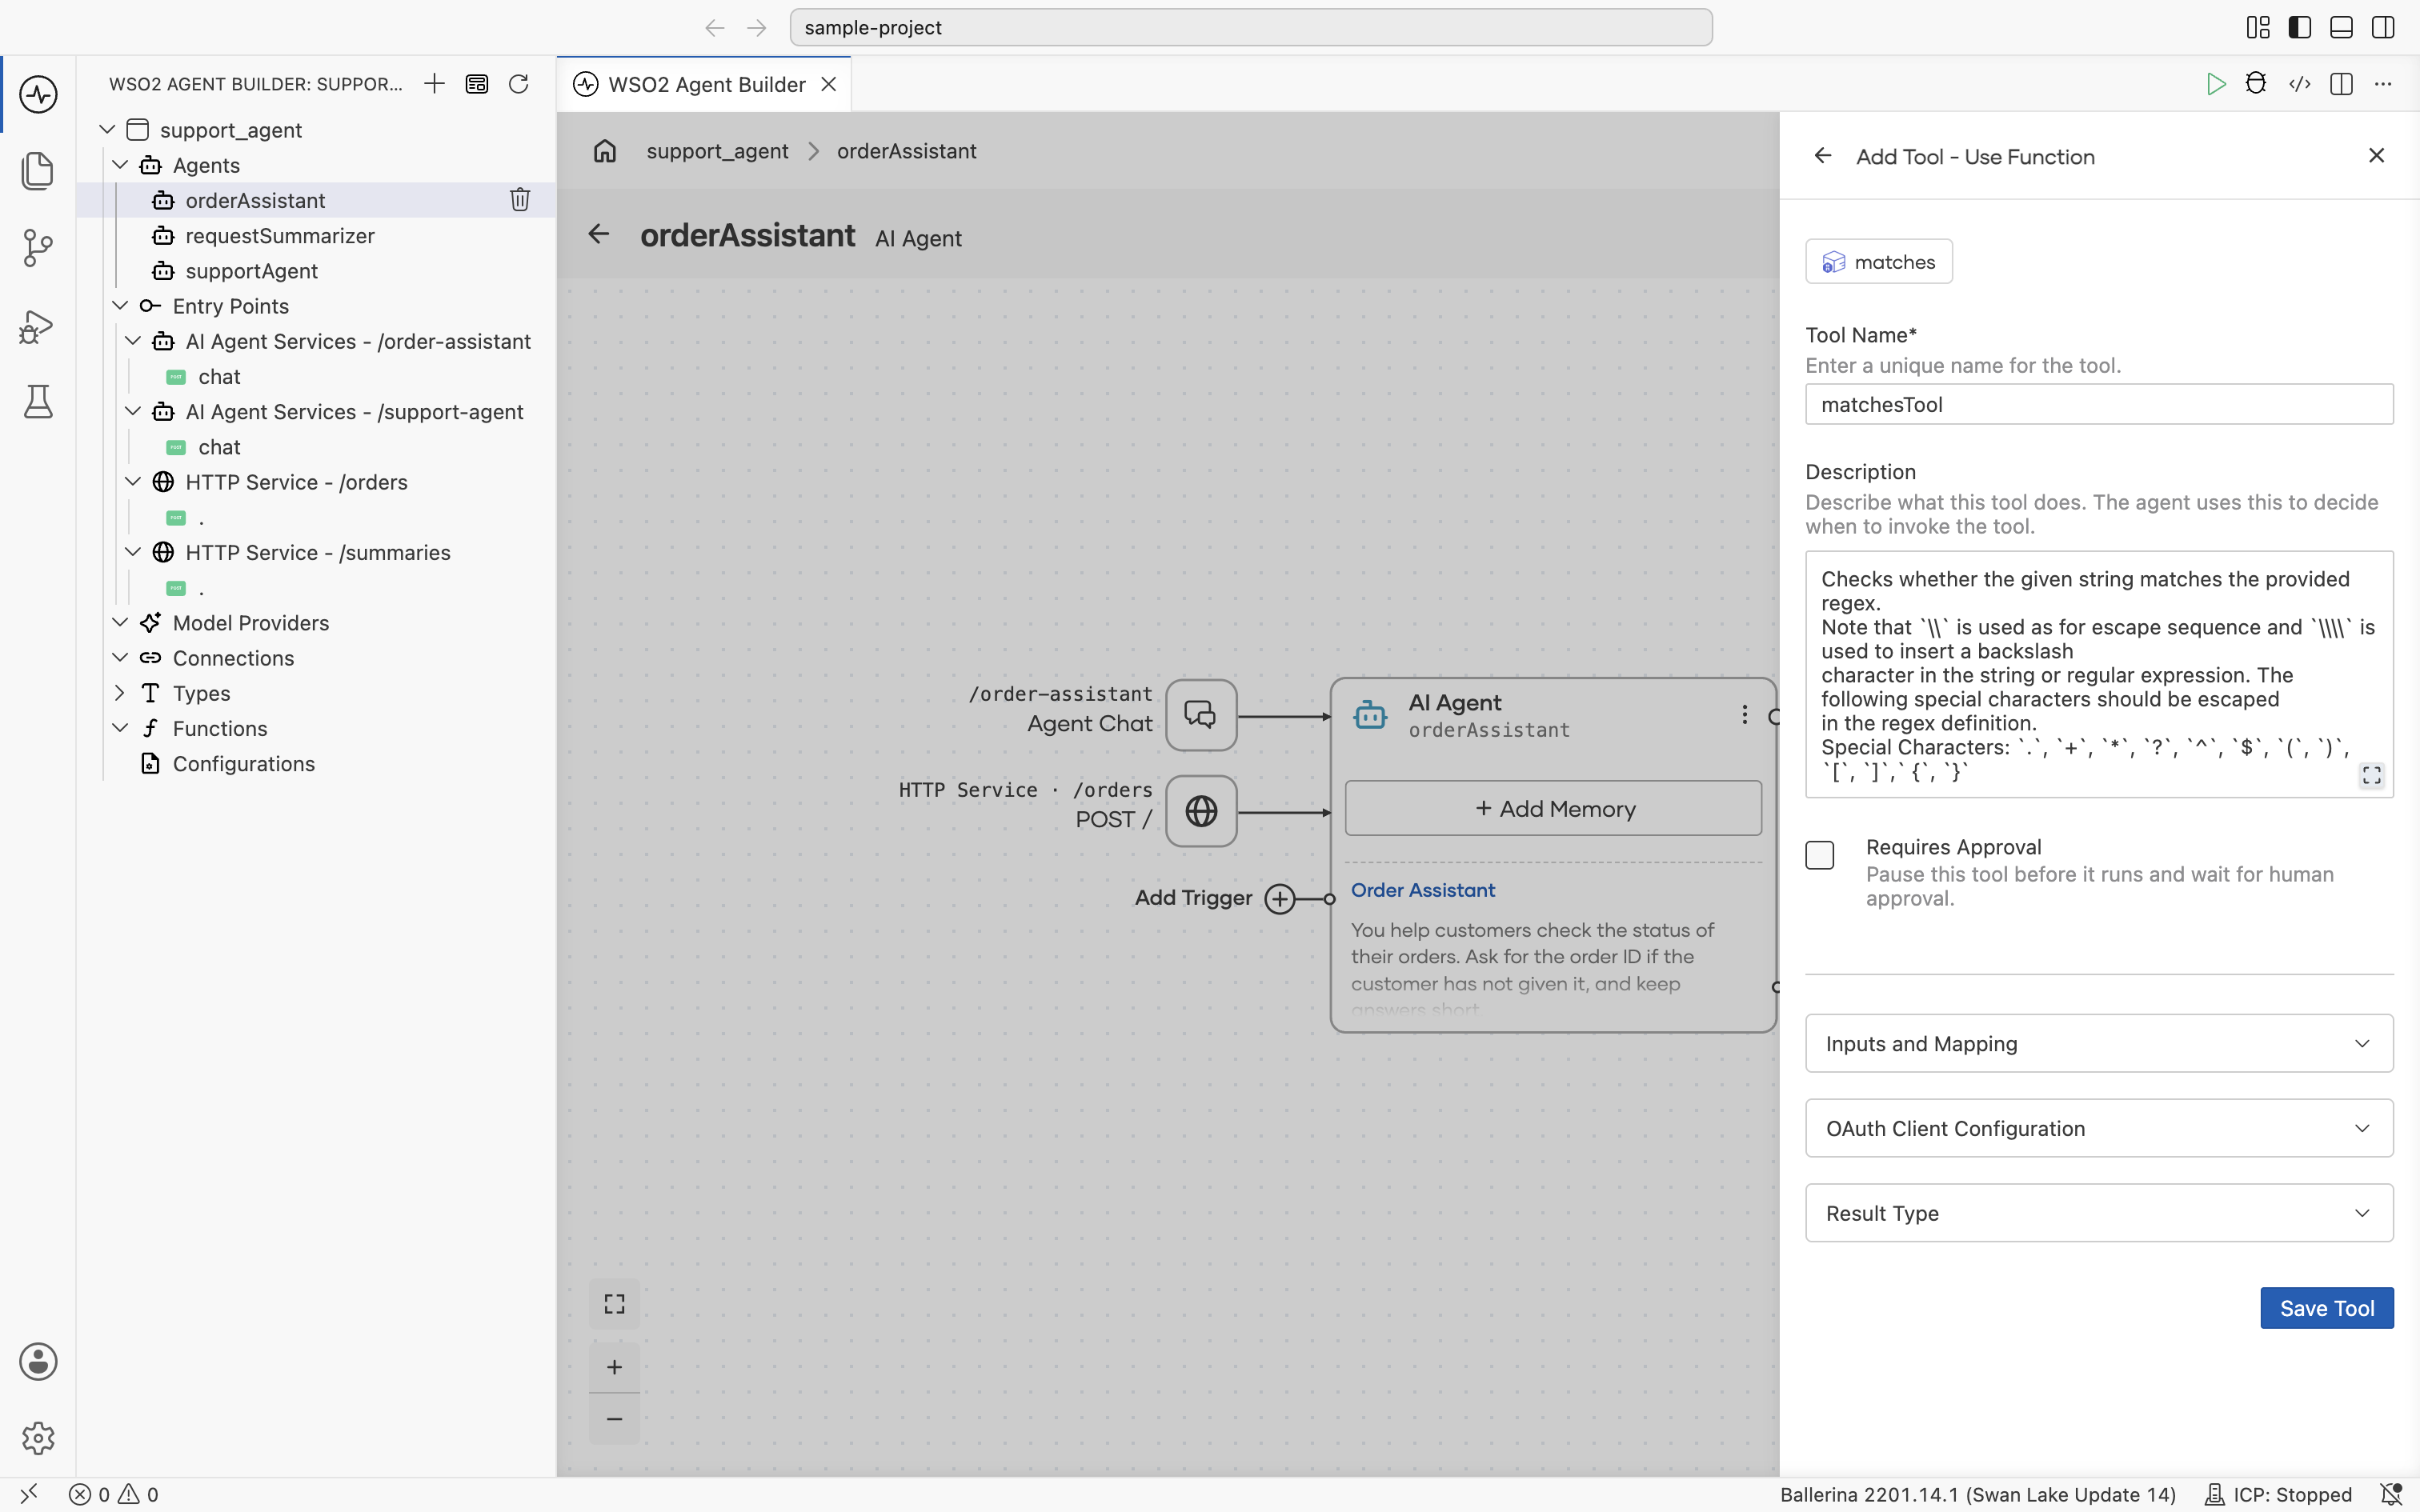
| Field | Required | Description |
|---|---|---|
| Tool Name | Yes | A unique name for the tool, prefilled from the function name. |
| Description | No | Explains what the tool does, prefilled from the function's documentation when available. |
| Requires Approval | No | Pauses the tool before it runs and waits for a person to approve the call. See Gate Tools for Approval. |
| Inputs and Mapping | No | The function's parameters and how they map to the tool's inputs, derived from the function signature. |
| OAuth Client Configuration | No | OAuth client settings, when the function needs them (for example a connector-derived function that calls an OAuth-protected endpoint). |
| Result Type | No | The Ballerina type the tool returns, derived from the function's return type. |
Select Save Tool to add it. WSO2 Agent Builder generates a tool function annotated with @ai:AgentTool that calls the selected function, and adds it to the agent's tools.
4. Use agent
Selecting Use Agent attaches another agent as a tool. The calling agent decides when to invoke it, passes it a task, and uses what comes back.
Agents already in the agentic integration are listed for selection, and new ones can be created from the same panel. For the full flow and the fields on the tool, see Hierarchical Agents.
Use this option when a task needs its own multi-step reasoning rather than a single action. See Multi-Agent Concepts for when to split work this way.
5. Use MCP server
Selecting Use MCP Server offers two ways to add MCP tools:
| Option | Description |
|---|---|
| WSO2 Agent Manager | MCP servers your organization added to Agent Manager, served through its AI Gateway. Requires you to be signed in to Agent Manager. |
| Connect Manually | Enter the server URL and authentication for any MCP server. |
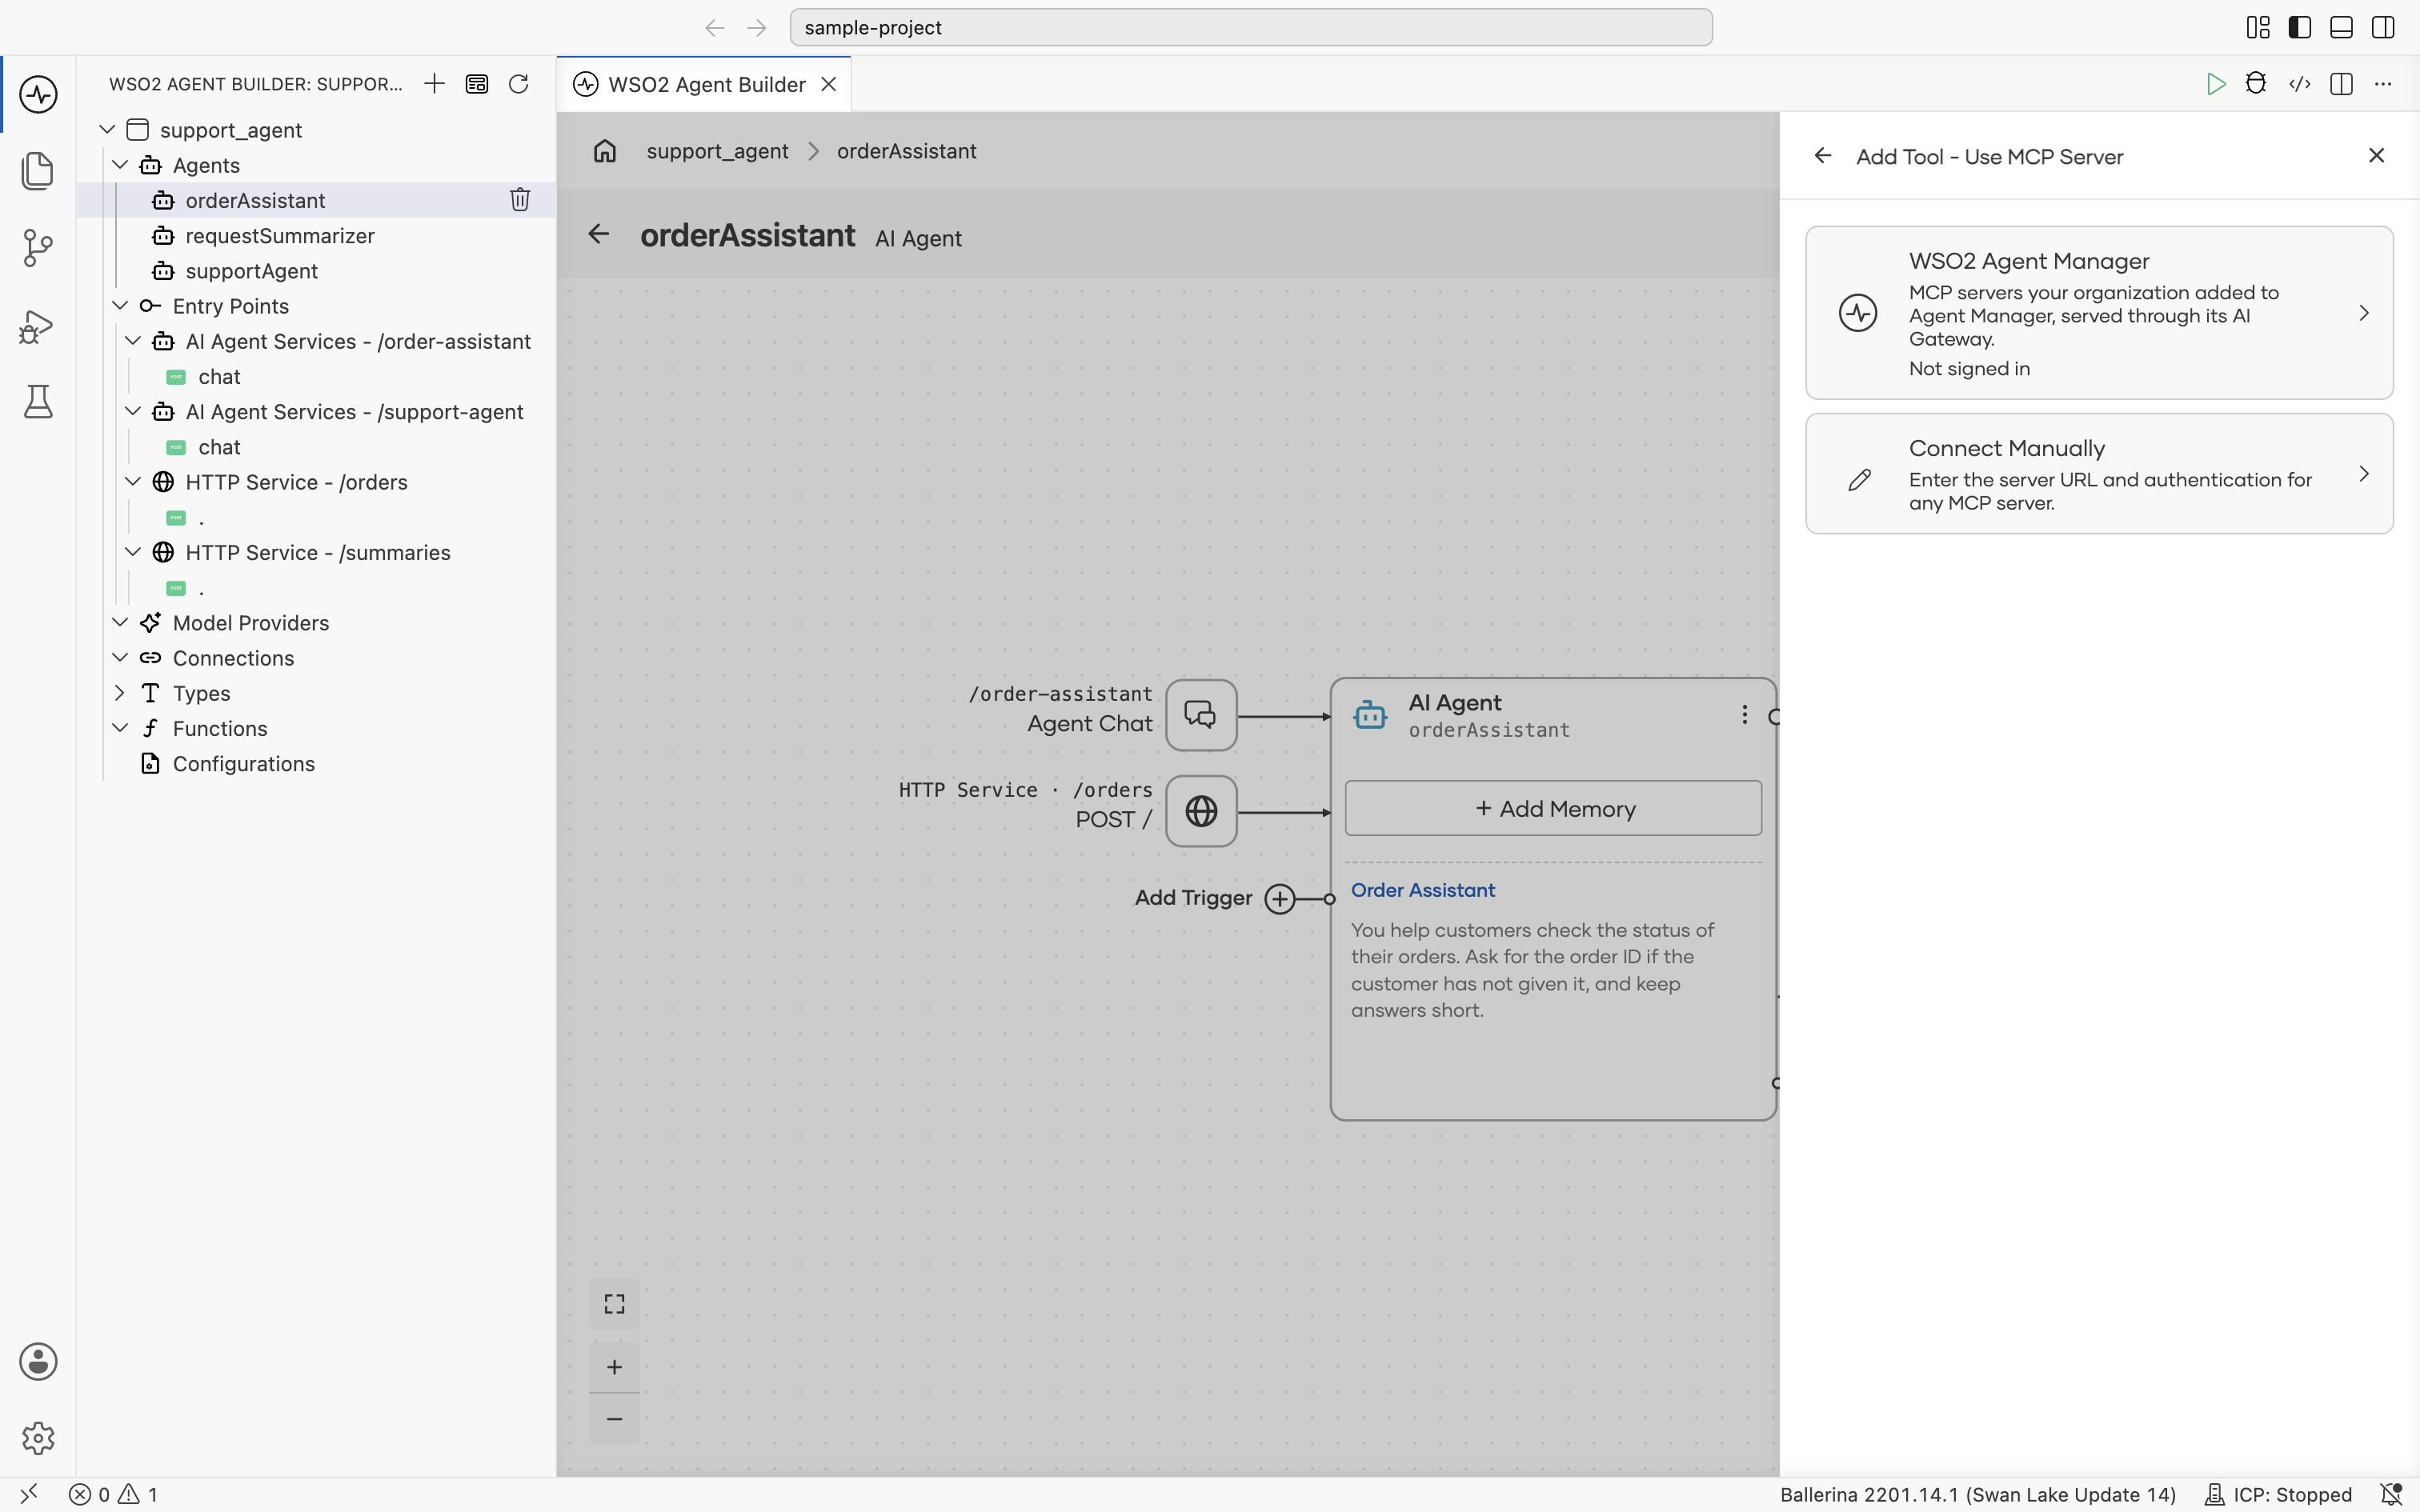
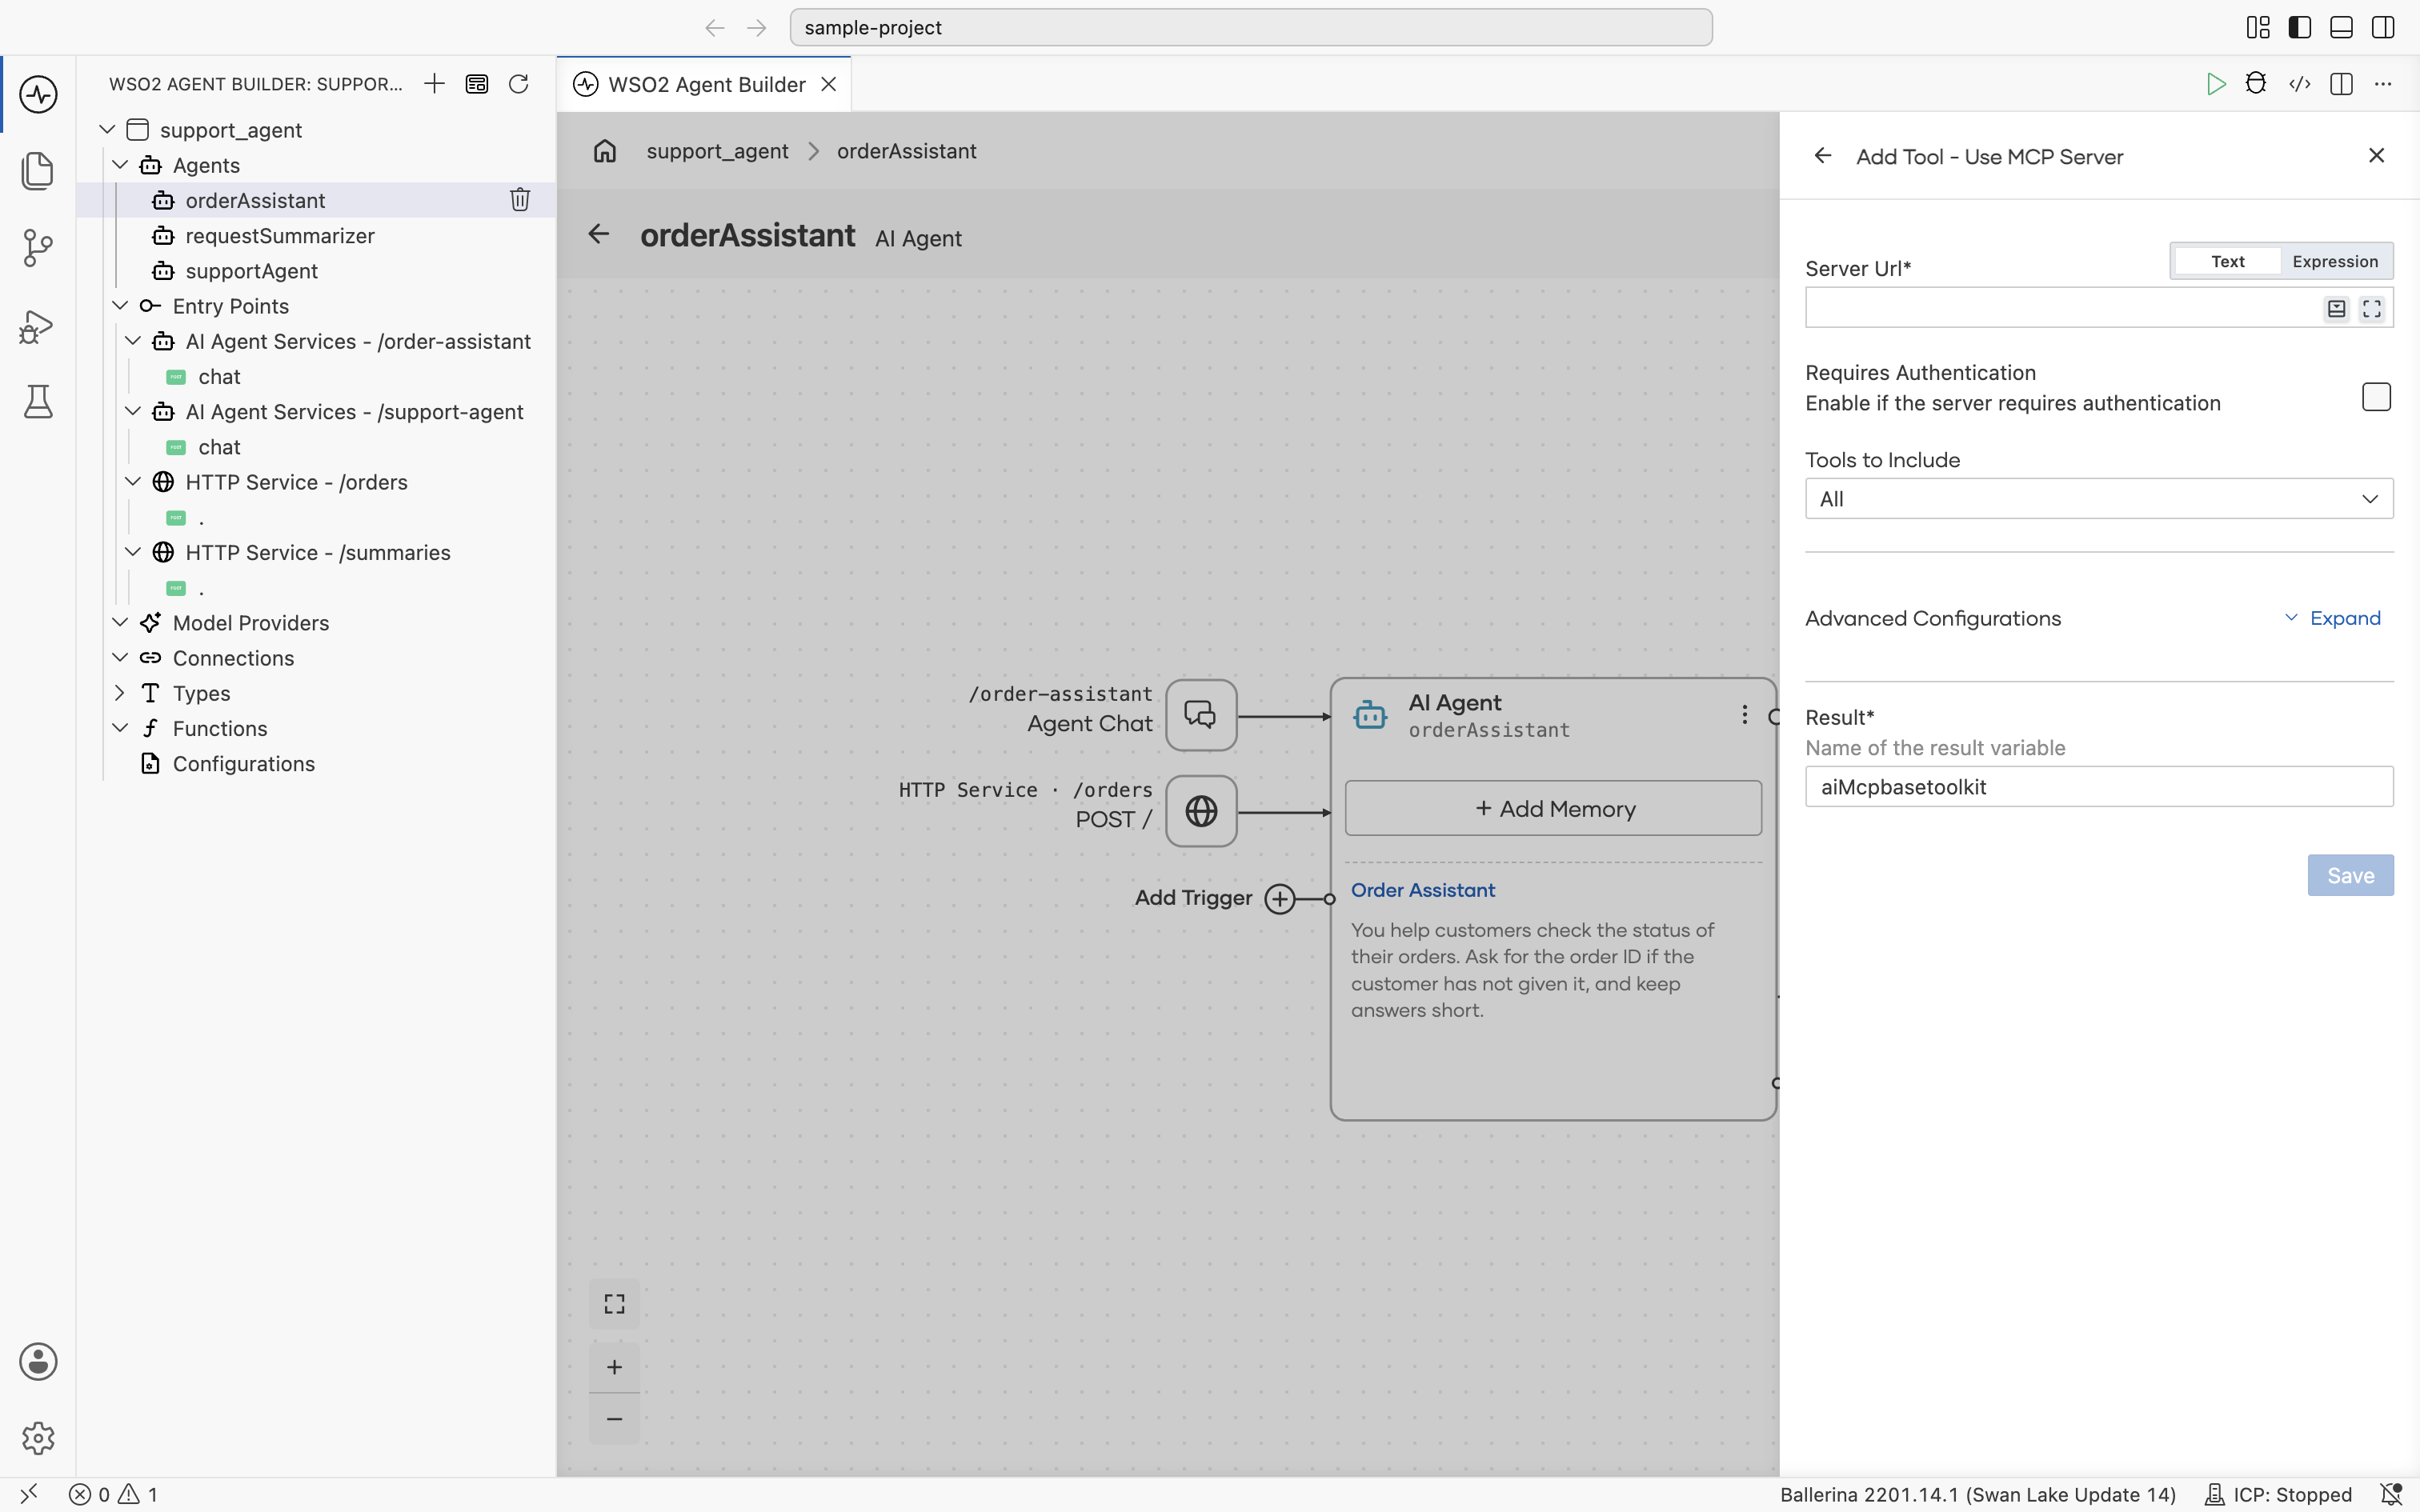
Selecting Connect Manually opens the MCP server configuration:
| Field | Description |
|---|---|
| Server Url | The MCP endpoint URL, for example http://localhost:9090/mcp or https://mcp.example.com. |
| Requires Authentication | Enable this option if the server requires authentication, then configure the required authentication settings. |
| Tools to Include | Select All to expose every tool advertised by the server, or choose a specific subset of tools by name. |
| Advanced Configurations | Additional HTTP client configurations. |
| Result | The name of the variable used to store the MCP toolkit. |
After saving, every tool exposed by the MCP server, or every tool selected in Tools to Include, becomes available to the agent. These tools appear alongside local tools and are used transparently from the agent's perspective.
Tip: An agentic integration can also consume its own MCP service. See Exposing a Service as MCP.
6. Use knowledge base
Selecting Use Knowledge Base opens the Add Tool - Use Knowledge Base panel. Pick an existing knowledge base, or a knowledge base type to browse its actions.
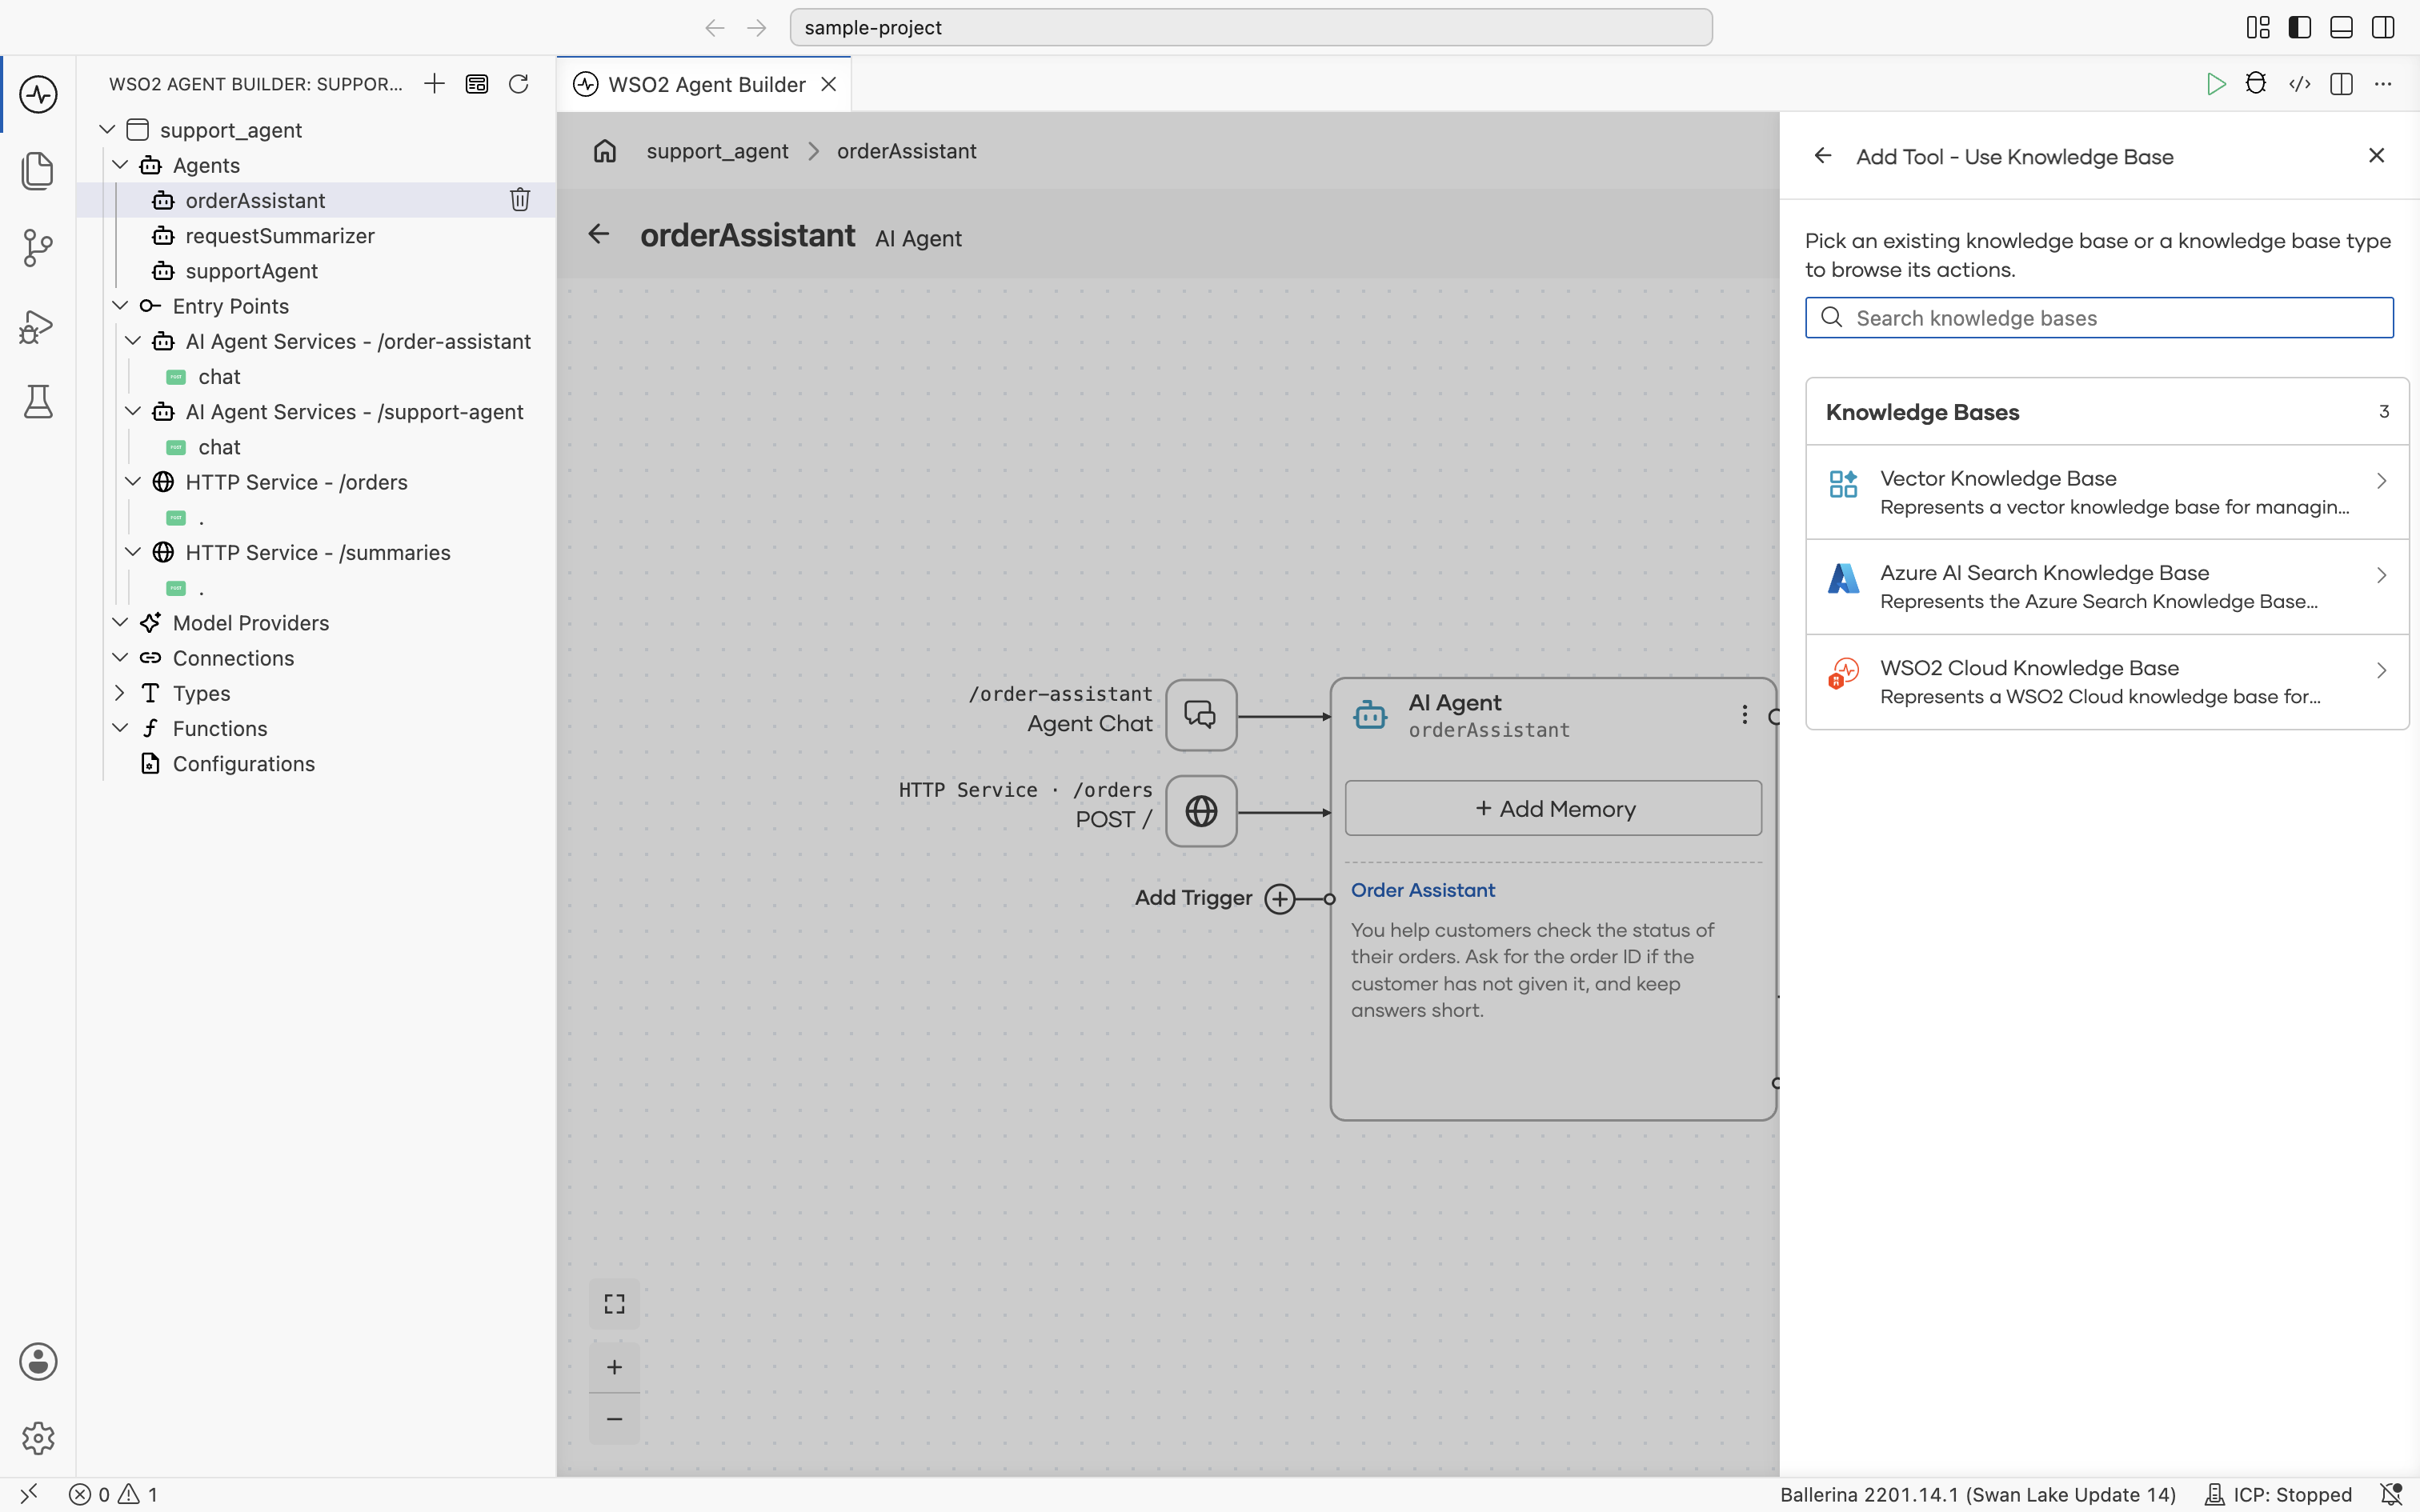
Selecting a type lists its actions, such as Retrieve, which returns the chunks most relevant to a query. Select New Knowledge Base to create one of that type, then pick the action the agent should call.
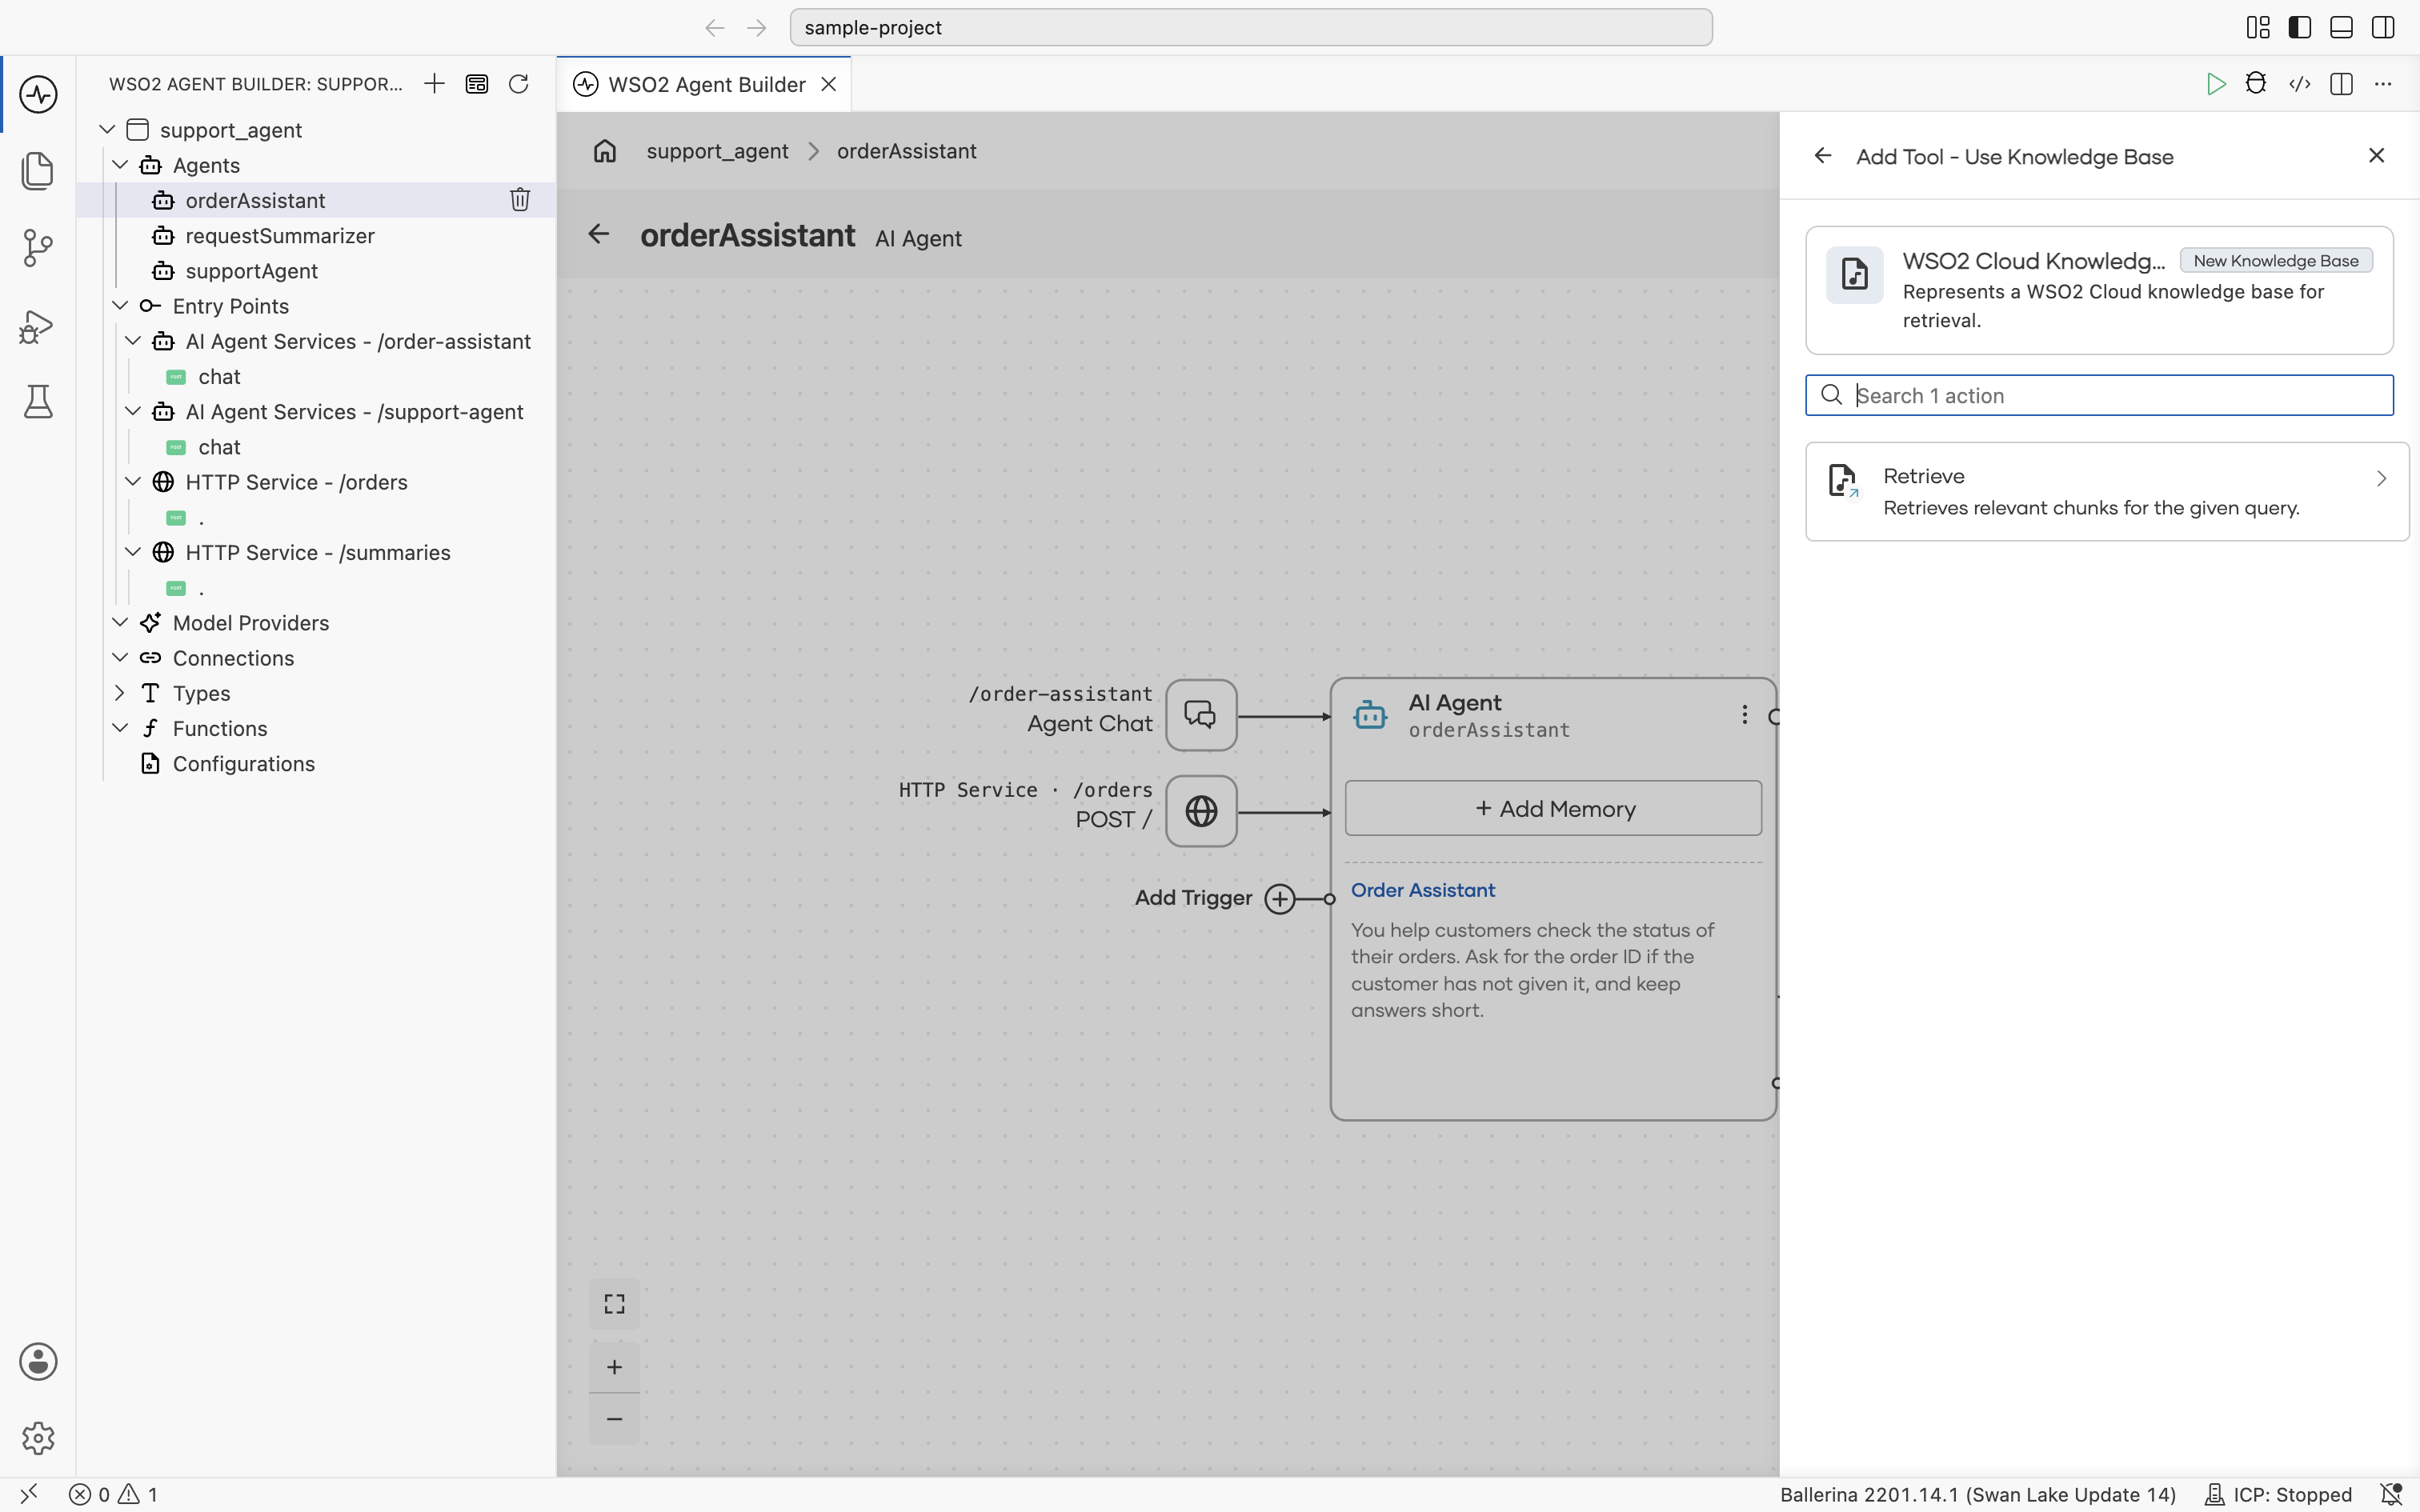
Use this option to let the agent decide when to search your documents, instead of retrieving context before every call. See How Knowledge Bases Work and Knowledge Bases.
After adding a tool
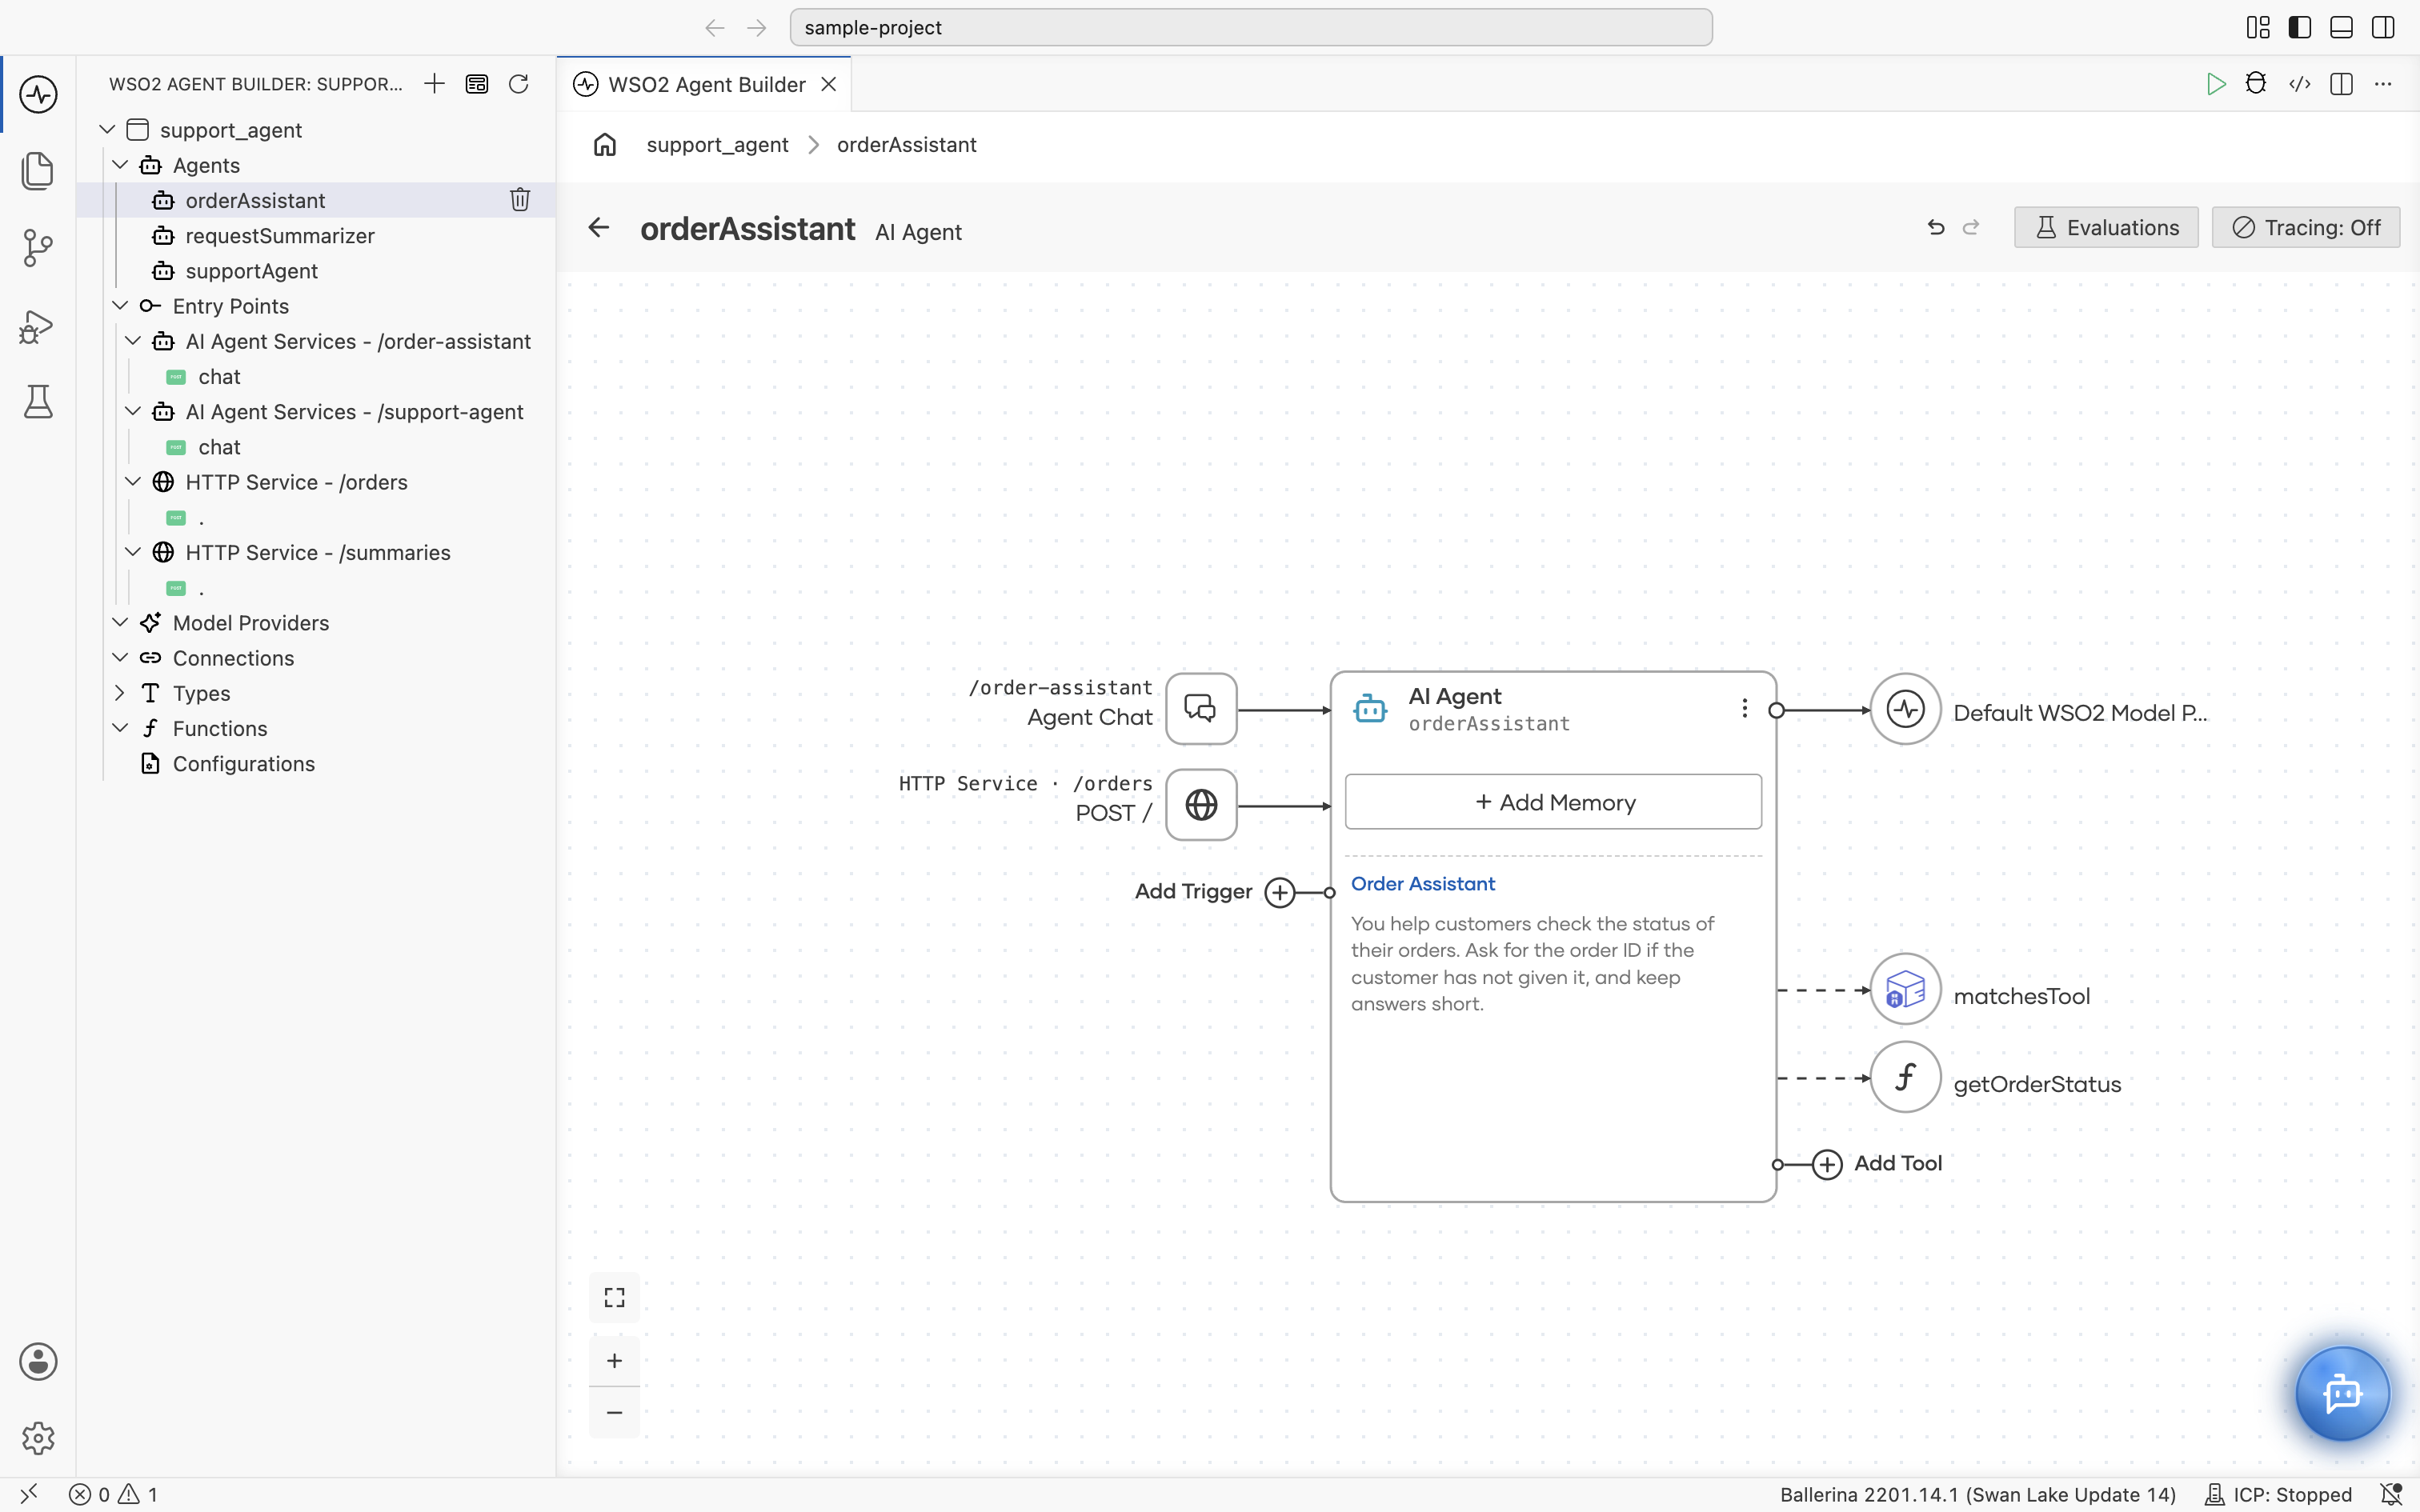
The new tool appears as its own node on the canvas, connected to the AI Agent node with a dashed line, and is available to the agent in every reasoning step from that point onward.
Write descriptions the agent can use
The agent doesn't see your tool's code. On every reasoning step, it receives each tool's name, description, and parameter descriptions, and decides from those alone which tool to call and with what arguments. A vague description is the most common reason an agent picks the wrong tool, or doesn't call a tool when it should.
Write the description for the LLM, not for a developer:
- Say what the tool does and when to call it, in terms of the user's request rather than the API. For example, "Use when the customer asks where their order is or when it will arrive."
- Say when not to call it, if other tools look similar. For example, "Don't use for refunds; use
refundOrderinstead." - Describe each parameter's meaning and format, such as "The order ID, a number like 1042." The agent fills arguments from these descriptions.
- Describe what the tool returns, so the agent knows how to use the result.
- Mention side effects, such as "Issues a real refund. It can't be undone." This also helps reviewers decide on gated tools.
- Use a clear tool name, such as
getOrderStatusrather thangetTool. The name is also sent to the LLM.
Edit prefilled descriptions. For Use Connection and Use Function, WSO2 Agent Builder prefills Tool Name and Description from the connector or function documentation. That text describes the API, not your use case. For example, the HTTP connector's get action is prefilled with "Retrieve a representation of a specified resource from an HTTP endpoint.", which doesn't tell the agent when to call it. Replace it before you select Save Tool. To change an existing tool, select its node and then Configure.
| Description | |
|---|---|
| Vague | Gets an order. |
| Clear | Look up the current shipping status of an order by its order ID. Use when the customer asks where their order is or when it will arrive. Returns a status such as Processing, Shipped, or Delivered. Don't use for refunds or cancellations. |
Keep the agent's Instructions consistent with your tool descriptions. If the instructions say "always confirm the order ID first", the tool description doesn't need to repeat it, but it mustn't contradict it.
To check the result, turn on tracing and chat with the agent. In the trace, the Chat span's Available Tools shows exactly what the LLM received, and the Execute Tool spans show which tools it called and with what arguments. See Observability.
Toolkit
A toolkit is a class that bundles related tools. For example, a TaskManagerToolkit can expose addTask and listTasks. Toolkits are currently written in source view only (there is no dedicated UI yet). You create a single Ballerina class with tool methods and register the toolkit in the agent's tool list. The agent treats toolkit methods exactly like individual tools.
Use a toolkit when:
- A group of tools shares state, such as a connector, database client, or configuration value.
- You want to enable or disable a set of related tools as a unit.
- Ballerina Code
type Task record {|
    string description;
    time:Date dueBy?;
    time:Date createdAt = time:utcToCivil(time:utcNow());
    time:Date completedAt?;
    boolean completed = false;
|};

// A toolkit to manage a set of tasks.
public isolated class TaskManagerToolkit {
    *ai:BaseToolKit;

    private final map<Task> tasks = {};

    // The `getTools` method describes the tools provided by this toolkit.
    public isolated function getTools() returns ai:ToolConfig[] =>
        // The `ai:getToolConfigs` function generates tool configurations
        // for the specified tools.
        ai:getToolConfigs([self.addTask, self.listTasks]);

    // Tool to add a new task.
    @ai:AgentTool
    isolated function addTask(string description, time:Date? dueBy = ()) {
        lock {
            self.tasks[uuid:createRandomUuid()] = {
                description: description,
                dueBy: dueBy.clone()
            };
        }
    }

    // Tool to list all current tasks.
    @ai:AgentTool
    isolated function listTasks() returns map<Task> {
        lock {
            return self.tasks.clone();
        }
    }
}
Add the toolkit to the agent
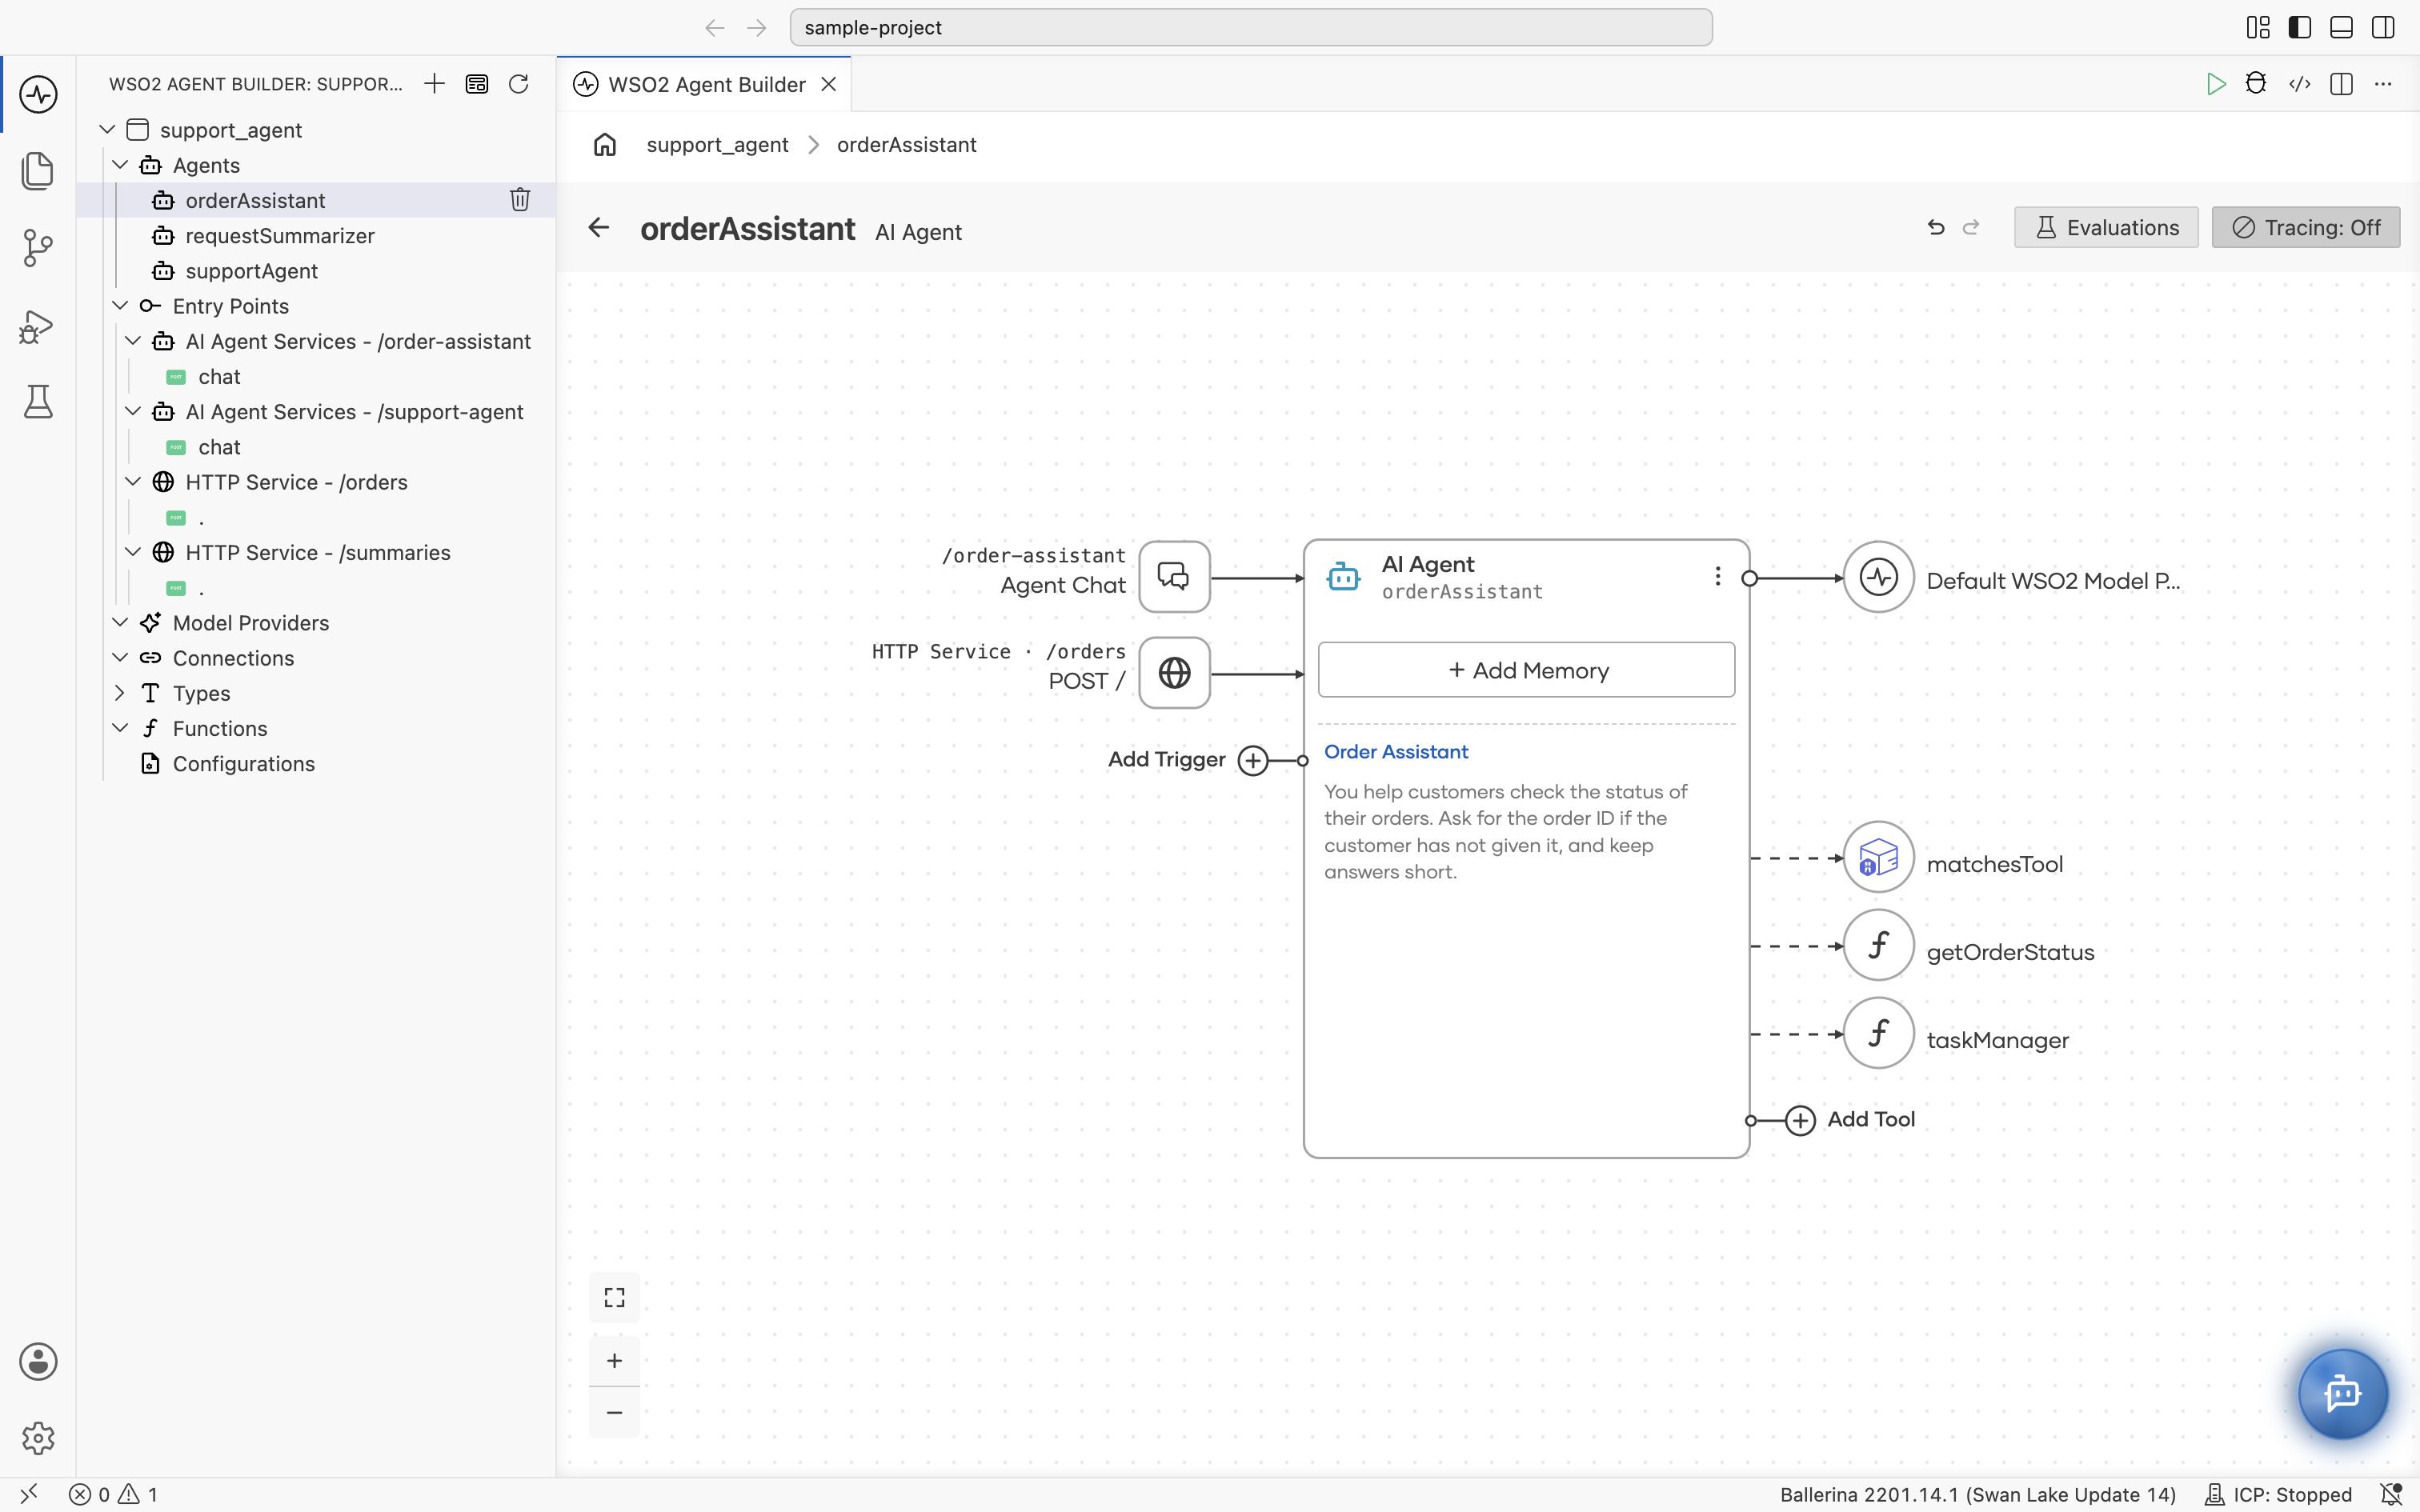
Once you create the toolkit, open the agent in source view and add the toolkit instance to the agent's tools list.
- Ballerina Code
import ballerina/ai;

TaskManagerToolkit taskManager = new TaskManagerToolkit();

final ai:Agent orderAssistant = check new (
    systemPrompt = {role: string `Order Assistant`, instructions: string `...`},
    model = check ai:getDefaultModelProvider(),
    tools = [matchesTool, getOrderStatus, taskManager]
);
After adding the toolkit, the agent can invoke all tools exposed by the TaskManagerToolkit, including addTask and listTasks. Since the toolkit maintains shared state internally, all tool invocations operate on the same task collection managed by the toolkit instance. The toolkit appears on the canvas as a single tool node.
Configure an attached tool
Once a tool is attached, select its node on the canvas to open the tool's view. To delete a tool, right-click its node and select Delete. The right-click menu also has Edit and View.
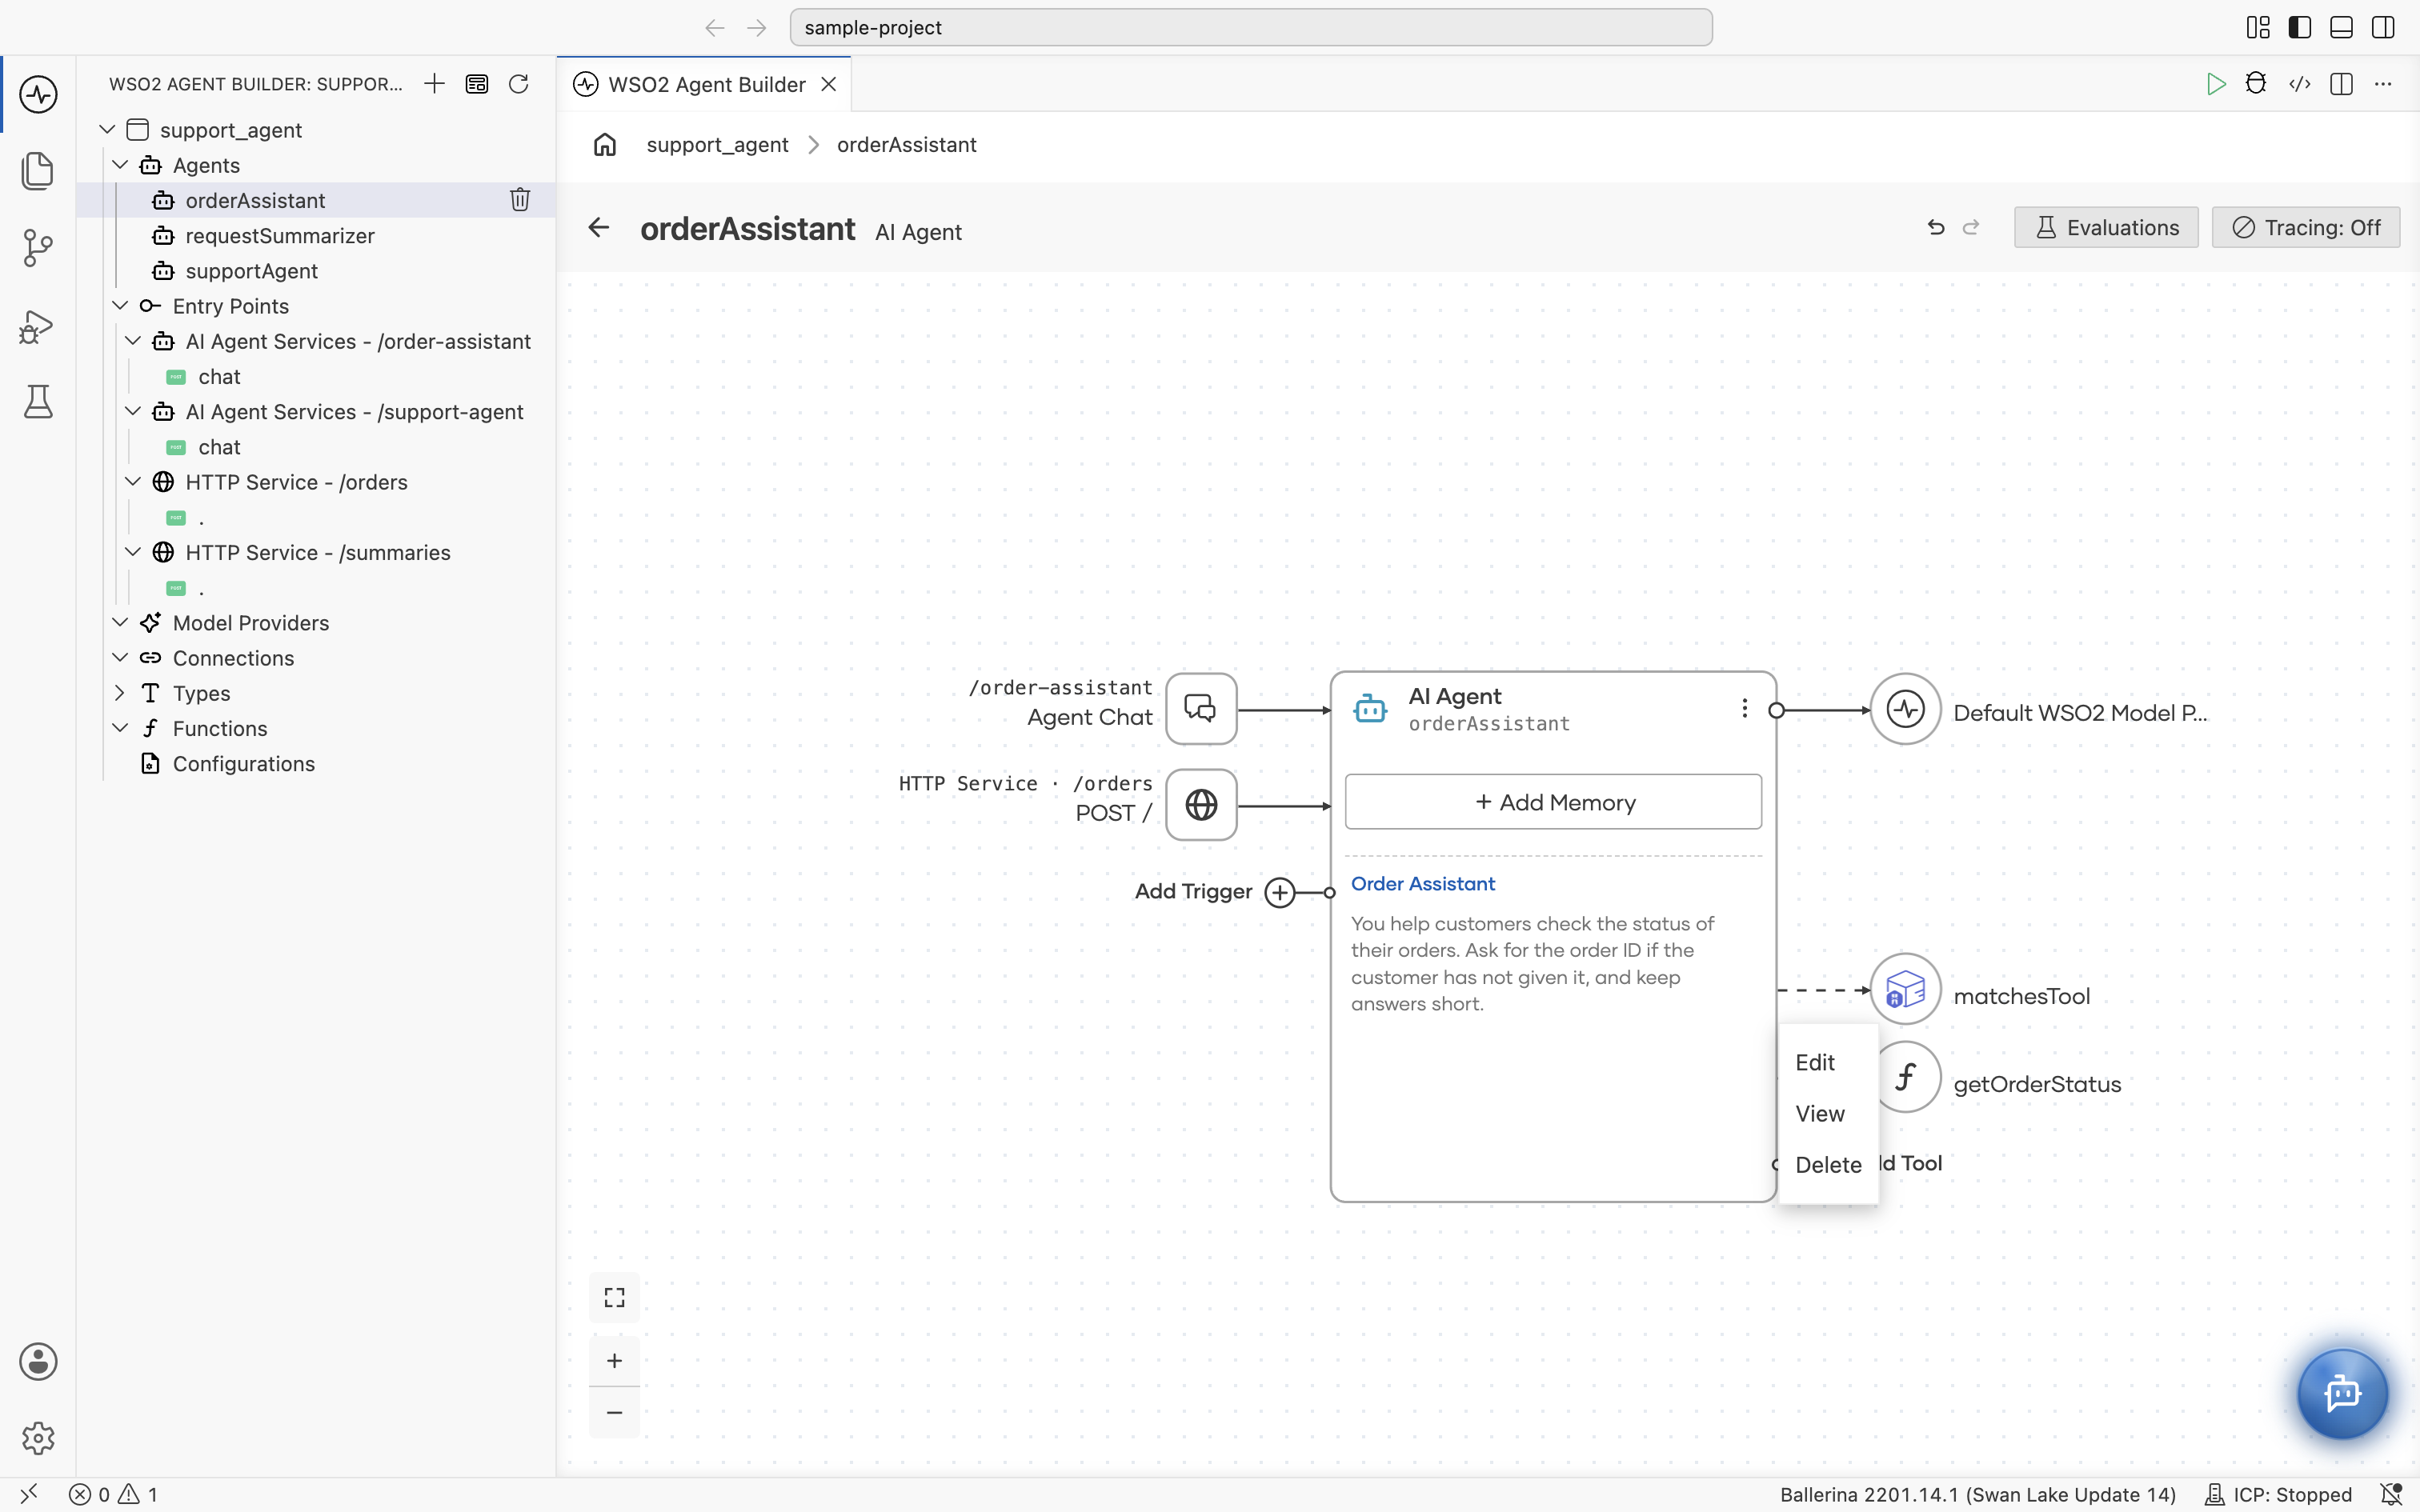
The tool's view shows its own flow: for a function- or connector-based tool, its underlying call and return; for a custom tool, the generated function, where you implement its logic. Select Configure at the top of the view to edit the tool's fields in the Agent Tool form.
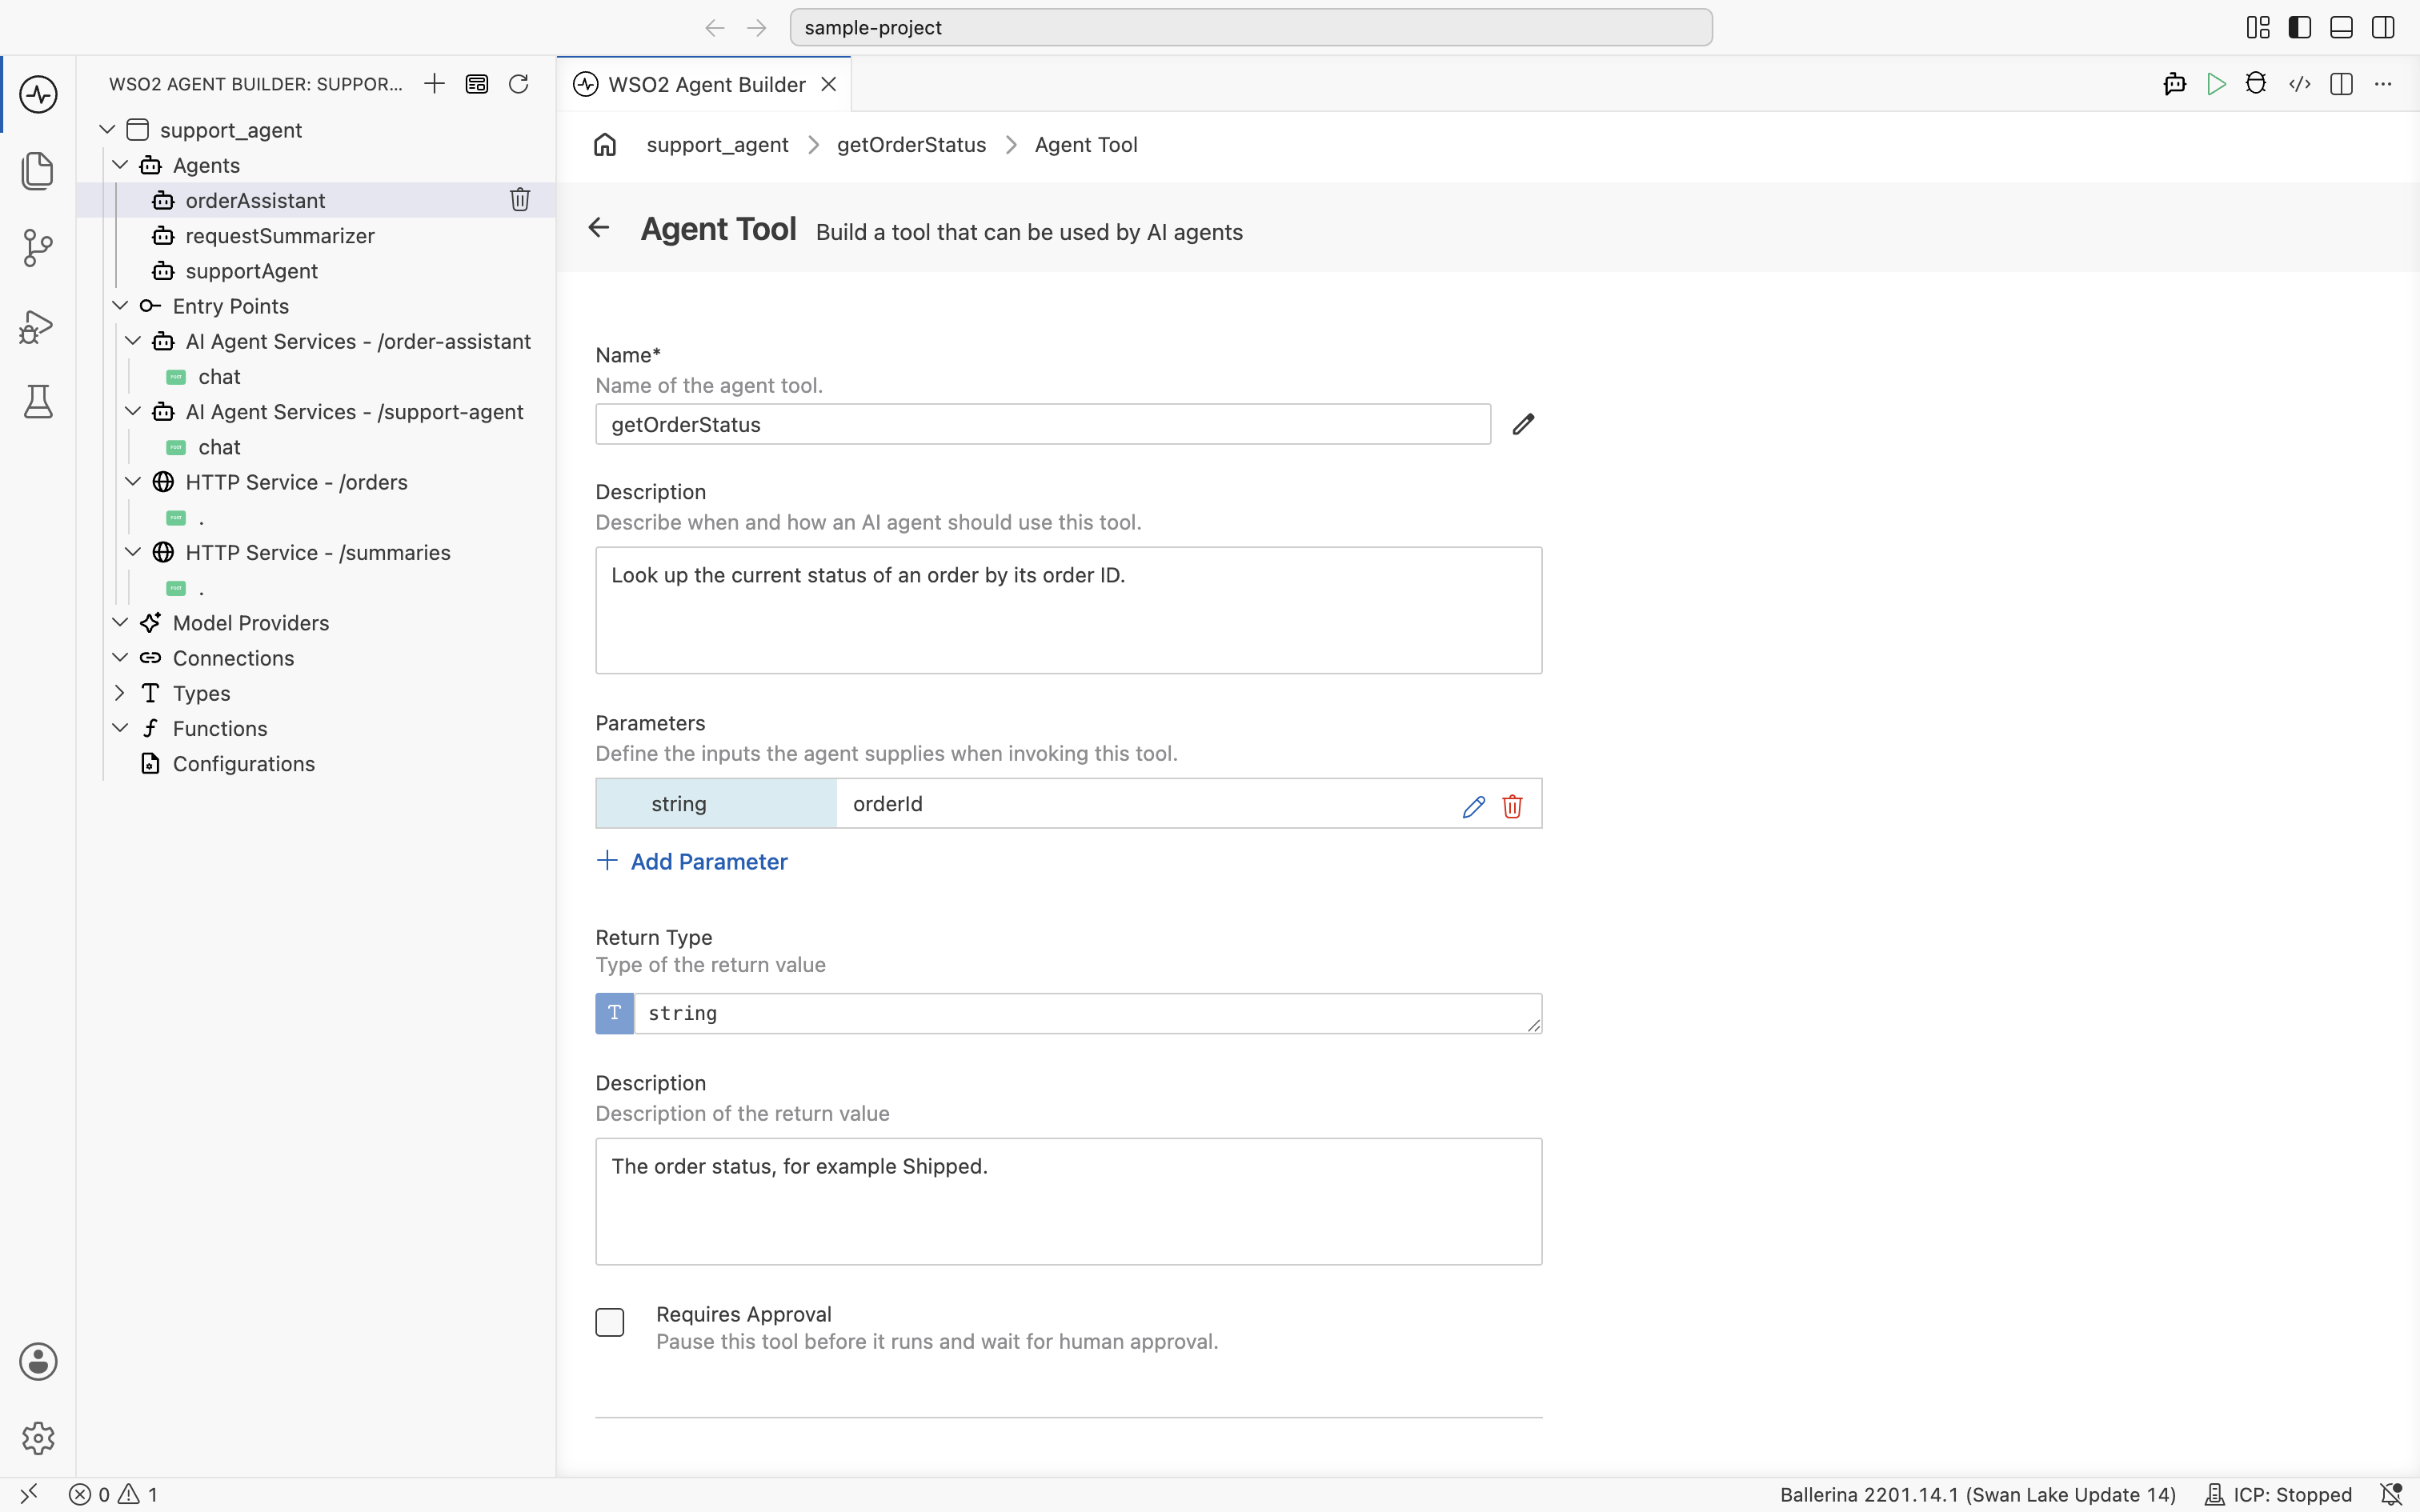
| Field | Required | Description |
|---|---|---|
| Name | Yes | The name or identifier of the agent tool. |
| Description | No | A description of the agent tool. This helps AI agents understand when and how to use the tool. |
| Parameters | No | Defines the input parameters used when invoking the tool. |
| Return Type | No | Defines the type of value returned by the tool. |
| Return Description | No | A description of the value returned by the tool. |
| Requires Approval | No | Pauses the tool before it runs and waits for a person to approve the call. See Gate Tools for Approval. |
| Advanced Configurations | No | Additional settings that depend on the tool type. See Advanced configuration. |
Advanced configuration
The advanced settings depend on the tool type. For example, a connection tool can include OAuth client settings for the endpoint it calls. Expand the section on the tool's form to see the settings that apply to that tool.
What's next
- Memory — Make the agent's tool calls remember earlier turns.
- Observability — See which tools the agent actually selects.
- Evaluations — Learn how to prevent regressions in AI agent quality.