Implement login using the Authorization Code flow
See the instructions given below to implement login with OpenID Connect in your application by using the authorization code flow. This method is suitable for confidential clients such as traditional web applications.
The following diagram explains how this flow works with Asgardeo:
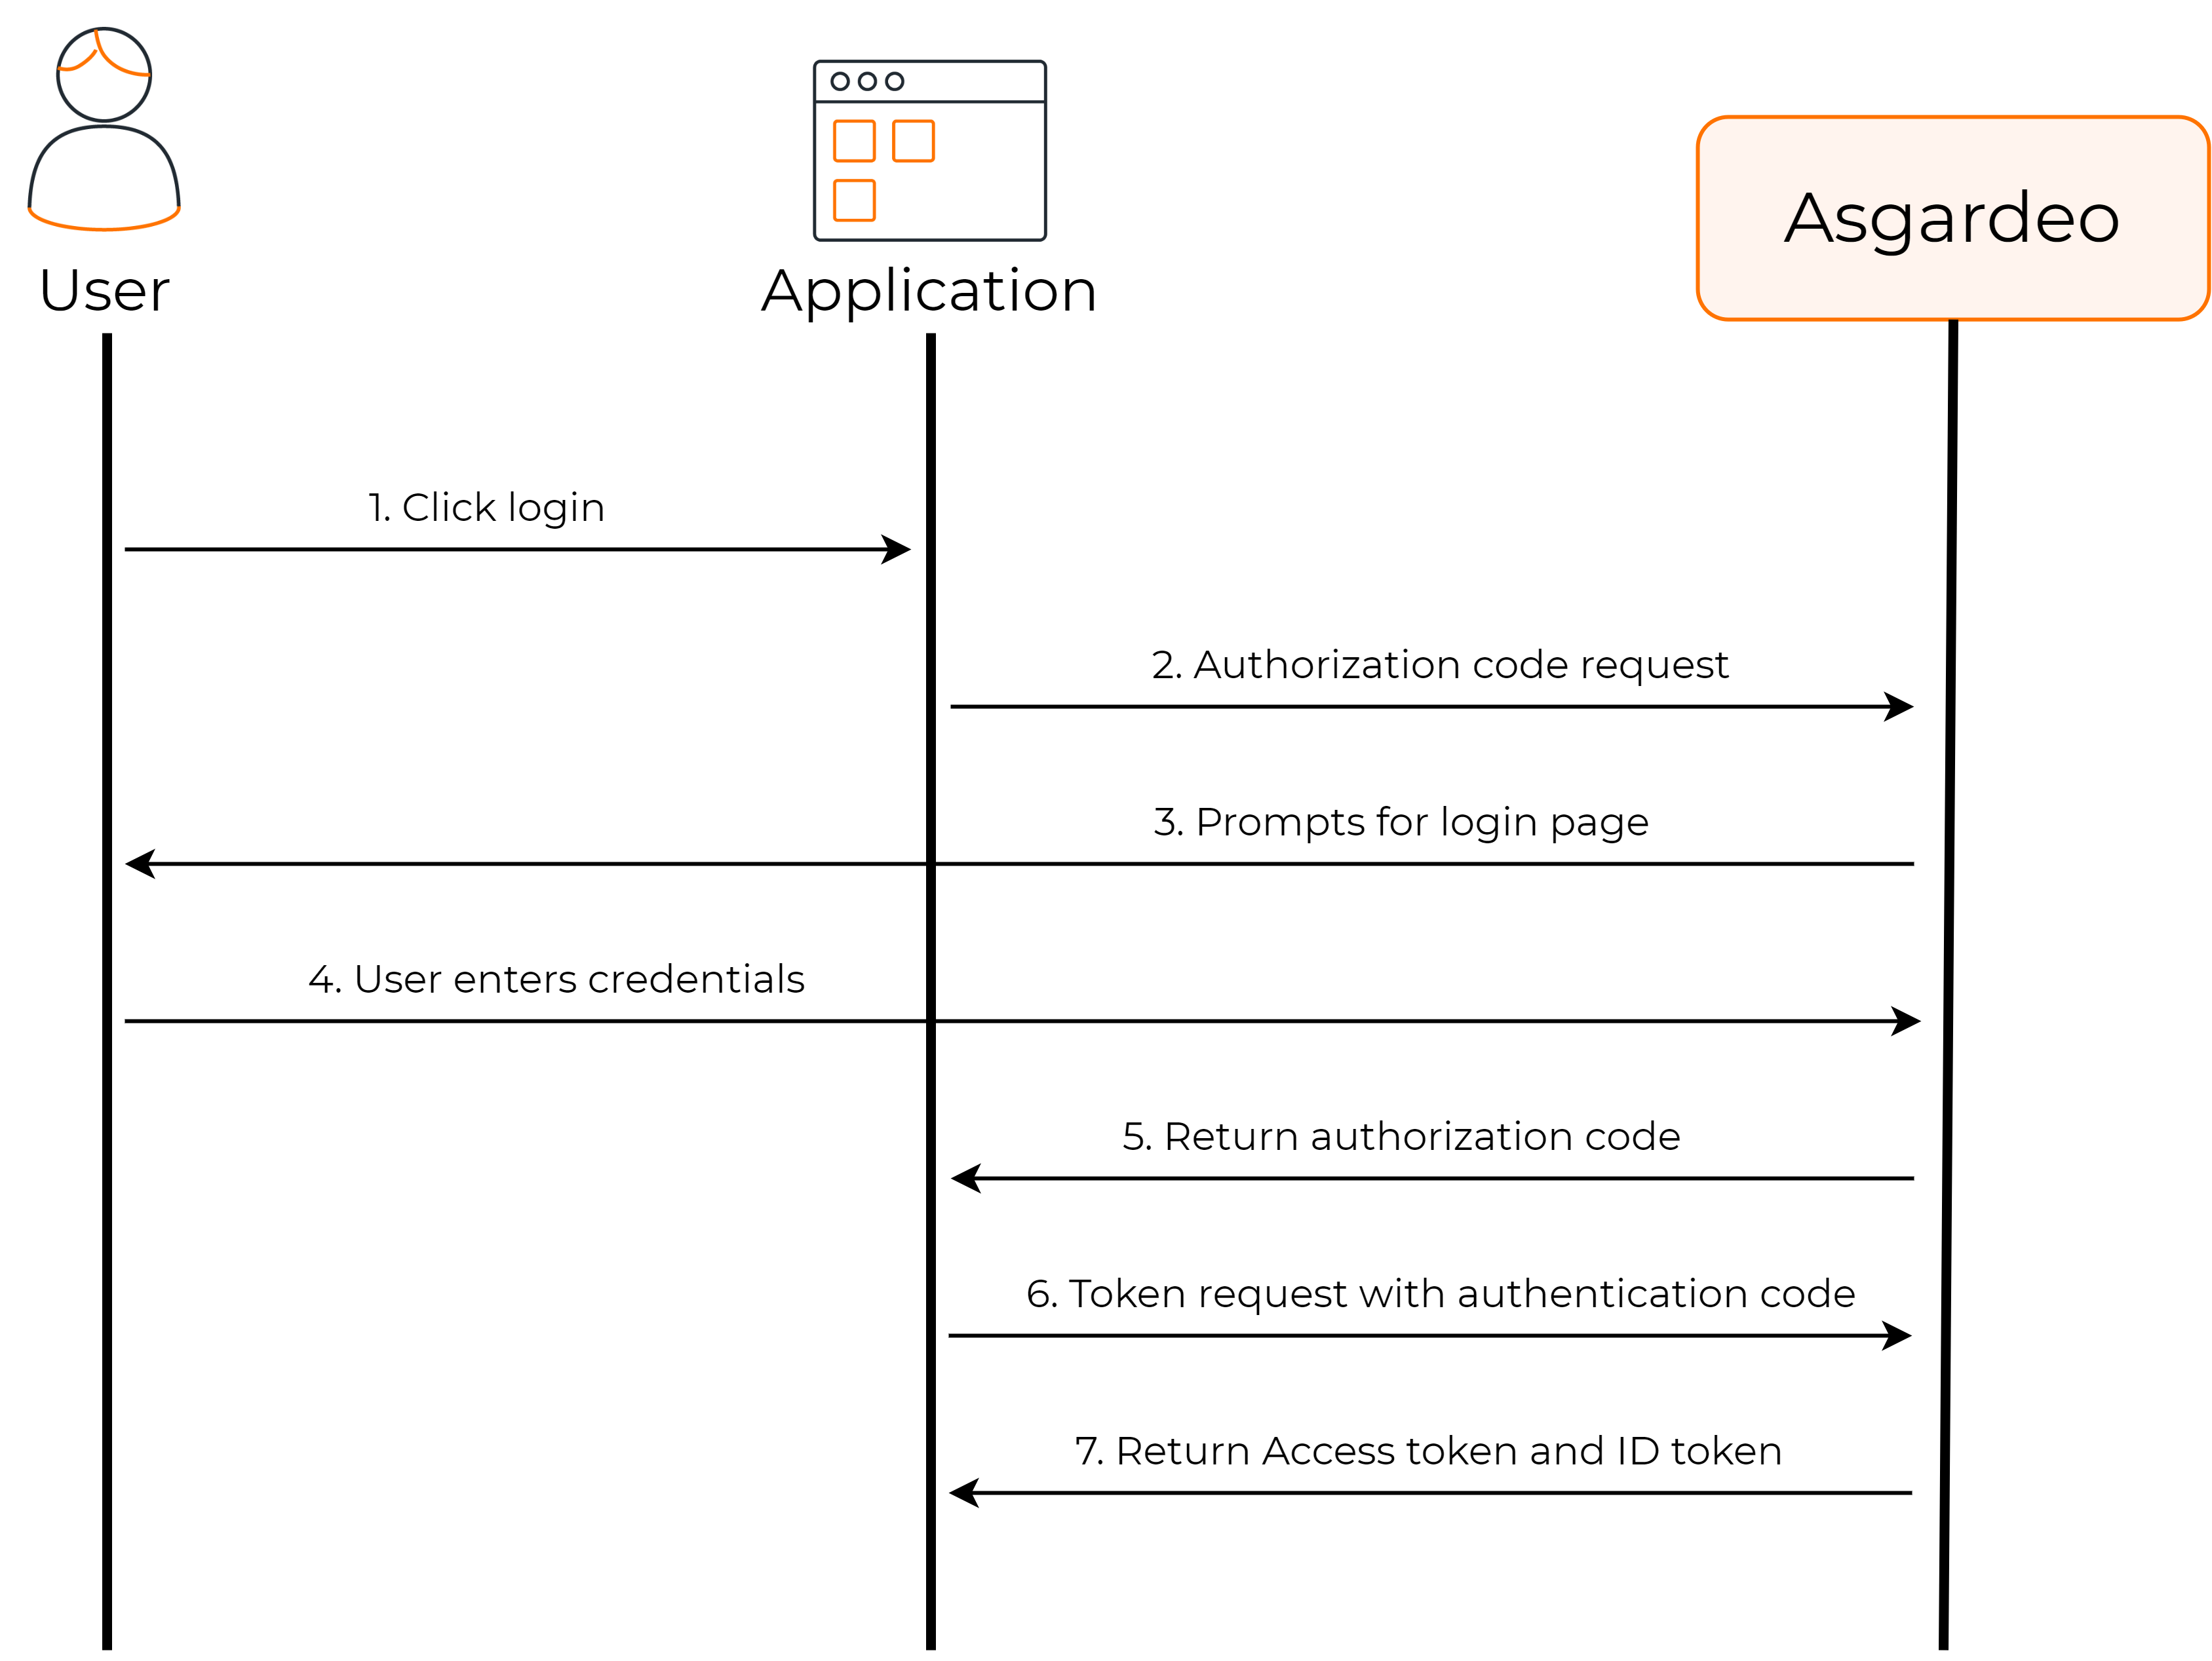
As shown above, you need to configure your application to get the authorization code from Asgardeo, and then exchange it for the required tokens.
Prerequisites
To get started, you need to have an application registered in Asgardeo. If you don't already have one, register a web app with OIDC.
Note
Note that only users can log in to business applications. Therefore, to test login on your application, you need a user account.
Get the authorization code
First, your app must initiate a login request to the authorization endpoint of Asgardeo. After redirecting to Asgardeo, the user should be prompted with a login page if the user is not authenticated.
Authorization endpoint
Request format
https://api.asgardeo.io/t/{organization_name}/oauth2/authorize?scope={scope}&response_type=code&redirect_uri={redirect_uri}&client_id={client_id}&login_hint={email-address-passed-as-a-hint}
Request sample
https://api.asgardeo.io/t/bifrost/oauth2/authorize?response_type=code&client_id=z8RB6ysdDZhe4QO0zJAQzKbi6P4a&scope=openid&redirect_uri=http://localhost:3000&login_hint=[email protected]
| Request Parameter | Description |
|---|---|
response_type |
Required grant type. Use code to represent the authorization code grant type. |
redirect_uri |
This is where the response is redirected to at the end of the process. This needs to be the same as one of the URLs given in the registered apps. |
client_id |
The client ID obtained when registering the application in Asgardeo. |
scope |
For OpenId Connect login, use openid as one of the scopes. There can be additional scopes as well. Scopes should be space separated. Example: openid email profile |
login_hint |
The email address of the user can be passed as a query parameter. This will trigger a prompt for the user to input their password directly, streamlining the authentication process. Note that the functionality of this query parameter is only valid if the basic authenticator is used as the first step in the sign-in flow. |
Once the user is successfully authenticated, Asgardeo redirects the user to the redirect_uri with the authorization code.
Sample response
https://localhost:3000/?code=97c85a59-a758-3a56-95cd-e71a505b493d&session_state=a0c3bc89849ba0f236791f7fe76a837b7b4422fdc9aca16db394d19a28724a29.wQc7eSHSRrGNfECJRMhSAw
Get tokens
After receiving the authorization code, the application has to exchange it to get the tokens given below:
access_tokenid_tokenrefresh_token(only if therefresh_tokengrant type is enabled for the application registered in Asgardeo)
Token endpoint
Token request
When your application is a confidential client, it needs to identify itself to the token endpoint by submitting its credentials. There are several ways to implement client authentication at the token endpoint:
Note
See the list of client authentication methods in the OIDC specification.
-
Use client_secret_post: The
client_idandclient_secretare both sent as body parameters in the POST message. See the example given below.curl --location --request POST 'https://api.asgardeo.io/t/{organization_name}/oauth2/token' \ --header 'Content-Type: application/x-www-form-urlencoded' \ --data-urlencode 'code={authorization_code}' \ --data-urlencode 'grant_type=authorization_code' \ --data-urlencode 'client_id={client_id}' \ --data-urlencode 'client_secret={client_secret}' \ --data-urlencode 'redirect_uri={redirect_uri}'var settings = { "url": "https://api.asgardeo.io/t/{organization_name}/oauth2/token", "method": "POST", "timeout": 0, "headers": { "Content-Type": "application/x-www-form-urlencoded" }, "data": { "code": "{authorization_code}", "grant_type": "authorization_code", "client_id": "{client_id}", "client_secret": "{client_secret}", "redirect_uri": "{redirect_uri}" } }; $.ajax(settings).done(function (response) { console.log(response); });var axios = require('axios'); var qs = require('qs'); var data = qs.stringify({ 'code': '{authorization_code}', 'grant_type': 'authorization_code', 'client_id': '{client_id}', 'client_secret': '{client_secret}', 'redirect_uri': '{redirect_uri}' }); var config = { method: 'post', url: 'https://api.asgardeo.io/t/{organization_name}/oauth2/token', headers: { 'Content-Type': 'application/x-www-form-urlencoded' }, data : data }; axios(config) .then(function (response) { console.log(JSON.stringify(response.data)); }) .catch(function (error) { console.log(error); }); -
Use client_secret_basic: The client secret is sent as an authorization header in the request (
Authorization: Basic BASE46_ENCODING<client_id:client_secret>). See the example given below.curl --location --request POST 'https://api.asgardeo.io/t/bifrost/oauth2/token' \ --header 'Authorization: Basic ejhSQjZ5c2REWmhlNFFPMHpKQVF6S2JpNlA0YTp6MEM3OXpsb3B4OGk3QnlPdzhLMTVBOWRwbFlh' \ --header 'Content-Type: application/x-www-form-urlencoded' \ --data-urlencode 'code=97c85a59-a758-3a56-95cd-e71a505b493d' \ --data-urlencode 'grant_type=authorization_code' \ --data-urlencode 'redirect_uri=https://myfirstwebapp.io/login' -
Use a private key JWT: A secured JWT assertion with the data required for client authentication is sent in the token request. See the example given below.
Note
Learn more about private key JWT client authentication in Asgardeo.
--header 'Content-Type: application/x-www-form-urlencoded' \
--data-urlencode 'code={authorization_code}' \
--data-urlencode 'grant_type=authorization_code' \
--data-urlencode     'client_assertion_type=urn:ietf:params:oauth:client-assertion-type:jwt-bearer'\
--data-urlencode 'client_assertion={jwt_assertion}' \
--data-urlencode 'redirect_uri={redirect_uri}'
The token request has the following parameters in addition to the credentials for authentication:
| Request Parameter | Description |
|---|---|
code |
The authorization code received from the authorization request. |
grant_type |
The grant type. Here we are using the authorization_code grant. |
redirect_uri |
This is where the response is redirected to at the end of the process. |
client_assertion_type |
This parameter is only used for client authentication using a private JWT key. |
Sample response will be as follows:
{
  "access_token": "54bd024f-5080-3db5-9422-785f5d610605",
  "scope": "openid",
  "id_token": "eyJ4NXQiOiJZemM1T1Rnd1pURTNNV1F6TVdFek5ERm1OelZoTTJOaU9UQmxOamN3TlRJNU9HTTBNbVExWWprd1lqZzJNVEl3WldNd056TTRNemcxWkdJeVpEZzNaQSIsImtpZCI6Ill6YzVPVGd3WlRFM01XUXpNV0V6TkRGbU56VmhNMk5pT1RCbE5qY3dOVEk1T0dNME1tUTFZamt3WWpnMk1USXdaV013TnpNNE16ZzFaR0l5WkRnM1pBX1JTMjU2IiwiYWxnIjoiUlMyNTYifQ.eyJpc2siOiI4ZTQyYjgzOTQzYWViYTkwMGU3MjJkMWI5NzU3Nzc3OTAyOGRhM2NiZWJmZjhhZTQxMDVhZTA5OTRiZjU5ZDYxIiwiYXRfaGFzaCI6IlZETXZUaWFsbjRRWEk4VUlJUjVlbnciLCJhdWQiOiJ6OFJCNnlzZERaaGU0UU8wekpBUXpLYmk2UDRhIiwiY19oYXNoIjoiOXRMaHJvQnV6Z0I4aDlIWWV6cTBpZyIsInN1YiI6InVzZXIxQGJpZnJvc3QuY29tIiwibmJmIjoxNjIwNzAzODA5LCJhenAiOiJ6OFJCNnlzZERaaGU0UU8wekpBUXpLYmk2UDRhIiwiYW1yIjpbIkJhc2ljQXV0aGVudGljYXRvciJdLCJpc3MiOiJodHRwczpcL1wvYWNjb3VudHMuYXNnYXJkZW8uaW9cL3RcL2JpZnJvc3RcL29hdXRoMlwvdG9rZW4iLCJleHAiOjE2MjA3MDc0MDksImlhdCI6MTYyMDcwMzgwOSwic2lkIjoiYWQ3M2NlZGMtMzM3Ny00NDU3LWExYjUtNTZjODgyMTg1MzZmIn0.RSSL3InOFlvt_xQWFDKZY4FjKFFxh8rqGAlm1vKxleP6dKVlDAT4E0sudCJV5paJ-HdxVMd8MveWwpxrIL5NJw9XCa_sCEfso2fsMgRzQyEn1gjKLmr6Fj8Up3BoPnzPzn1cqVd-pKeXomzciM_ZDwsLr8qAEgVp663D4fg_F6pjVdDr17JRCUgO96yyjHRC5Eiqd7MP20Xhb-ZCMe0OhAlJlCmXB0FZV3nOTbza-jGvG8e_k80g3KVPFO7USek2Px3dCYfcbcA3k3cVzbTN8r8PIY3CEIIHtu5RyO_m1v3A0fjKvSaatfN0K2sndnlRpXFtOosIKQDYsy94wGnWkQ",
  "token_type": "Bearer",
  "expires_in": 3600
}
To get a refresh token, you need to enable the Refresh Token grant type for the application. By default, it is enabled for traditional web application templates.