Kerberos Authentication Using WSO2 Products

- Amila Jayasekara
- Research Assistant - Indiana University Bloomington
Applicable Versions
- WSO2 Identity Server - 3.2.0
- WSO2 Identity Server - 3.2.2
- WSO2 Identity Server - 3.2.3
Introduction
Kerberos is a widely used authentication mechanism. Many applications use Kerberos to securely authenticate users against a LDAP user store. Kerberos is also the main authentication mechanism used in MS Windows environment. To incorporate Kerberos authentication to Web services, there is a separate WS-Security token profile defined. You will find an implementation of WS-Security Kerberos token profile within WSO2 products such as the WSO2 ESB and WSO2 Application Server.
This article is organized as follows:
In the first section we will briefly discuss Kerberos protocol and related terminology. If you are curious to use the Kerberos directly then jump to section two.
In section two we will setup WSO2 Identity Server as the KDC server and we will discuss how to secure an ESB service using Kerberos protocol. In a separate article we will discuss how you can use Kerberos protocol to secure a STS service and retrieve SAML tokens. Also we will discuss the related pattern.
Kerberos Protocol
Kerberos is a brokered authentication mechanism. When 2 parties want to communicate and if they don't trust each other, then they use a third party to establish trust between them. In Kerberos terms we call the trusted third party as a KDC (Key Distribution Center). The KDC consists of two parts:
- The Ticket Granting Server (TGS)
- Authentication Server (AS)
Authentication Server (AS) is the place where we store user credentials. AS is quite similar to the LDAP server. In Kerberos, users are known as “client principals”. Service names are stored in the LDAP server. We address services as “service principals”. Similar to “client principals”, “service principals” will also have an associated password. Defined service principals user names and passwords are associated with a particular service.
There are few variations of Kerberos protocol. We currently use Kerberos version V. Each version makes the protocol more secure but at the same time each version upgrade makes the protocol more complex. In the following diagram I am depicting the basic message flow of Kerberos authentication. But following diagram does not explain all the communication messages/content in a Kerberos communication.
Kerberos communication is carried out in 2 steps:
- Client requesting a ticket to access TGS server
- Client requesting a service ticket to access a particular service by giving above retrieved TGS ticket.
Figure 1 depicts the Kerberos communication in high level.

Figure 1 : Kerberos Authentication
In following we will discuss above steps in detail.
Client requesting a ticket to access TGS server.
- User goes to client computer and enters user name and password.
- Client computer creates a request to TGS server asking for TGT ticket. The request is encrypted using user's password and sent to KDC server together with the user name.
- The KDC server checks whether user is a valid user. If user is valid, KDC server gets user's credentials from AS and derives the key which was used to encrypt the request. If request is successfully decrypted, KDC decides user's credentials as correct.
- KDC server then issues the TGT to client.
Client requesting a token to access a service.
- Client creates a request to access a particular service. In the request client has to mention the service it wants to access. Client sends the request together with the TGT obtained from last step.
- KDC server will validate the TGT ticket. KDC server will also validate the “Service Principal” data and it will create a “Service Token”. The “Service Token” is encrypted using the password of “Service Principal”.
- “Service Token” contains a symmetric key which can be used in communication between client and server. Along with the “Service Ticket” KDC server also sends this symmetric key to the client in encrypted format.
- Client discovers the symmetric key by decrypting the reply from KDC server.
- Client drafts the actual service request and sends the service request + “Service Ticket” by applying security features mentioned in the policy.
- Server is bound to a particular “Service Principal” and the password associated with the “Service Principal”. When the service receives client's request, service will discover “Symmetric Key” by decrypting “Service Ticket” using the password of “Service Principal” (Actually a key derived from password).
- Once the server and client discovers the symmetric key they can communicate without an issue.
Above explains the Kerberos protocol in high-level. But there are more data exchanged between the entities in-order to avoid attacks such as re-play. To keep it simple I have not mentioned all message data and communication steps. The real Kerberos protocol much more than explained above, and it only discusses the crucial points.
Implementing Kerberos authentication for ESB services using WSO2 Identity Server as the KDC
“WSO2 Identity Server” comes with an ApacheDS based “Embedded LDAP Server”. It also has a KDC server. We can use this KDC server to implement Kerberos authentication to services. In the following I am explaining the implementation steps of Kerberos authentication to service.
Download & Install WSO2 Identity Server:
- Download WSO2 Identity Server from here
- Extract WSO2 Identity Server zip to a file location
Enable KDC server:
- Open $IS_HOME/repository/conf/embedded-ldap.xml in your favorite editor – Using this configuration file you can control embedded LDAP server parameters.
- Locate
configuration section. - Under
you will find following configuration element, "<Property name="enabled">false</Property>" Set above property value to “true”. - In addition, we will disable time stamp pre-authentication for this example. To do that, navigate to “<Property name="preAuthenticationTimeStampEnabled">true</Property>” element in the same configuration section and set above property's value to “false”.
- Next, open $IS_HOME/repository/conf/user-mgt.xml in an editor.
- Set following property to true, under “ApacheDSUserStoreManager” configuration, <Property name="kdcEnabled">true</Property>.
- Start Identity Server – Go to $IS_HOME/bin and run “./wso2server.sh”.
If KDC successfully starts, you should see following statement in the startup log:
[2012-06-24 01:42:34,105] INFO {org.apache.directory.server.kerberos.kdc.KdcServer} - Kerberos service started.
Create Service Principal
- Login to Identity Server management console using default username & password (user - "admin", password - "admin").
- Go to Configure → Service Principals (If “Service Principals” is disabled you probably not have done configuration step 7 in above).
-
You should see a screen similar to following:

Figure 2 : Service Principal Management View
-
Out objective is to authenticate ESB services using Kerberos. So we need to create a “Service Principal” representing ESB. Usually service principal name is in following format:
{Service Name}/{Domain Name}
So lets create a service principal as follows:
esb/localhost
If you have a domain name it enforces name lookup to validate communication. But if you want to avoid domain name validation, you can create service principal similar to following:
esb/host
When adding “Service Principal” it will also ask for a password. Give a valid password. For this example I am using “qazqaz”
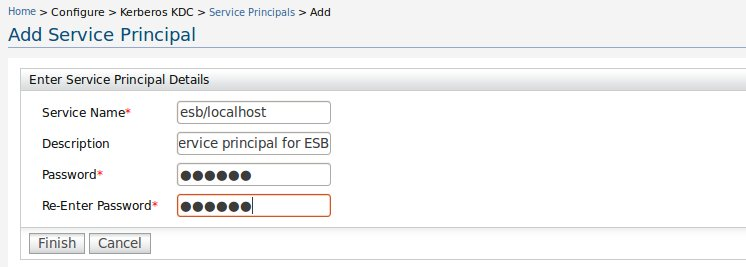
Figure 3 : Adding a new Service Principal
-
After adding the service principal you can see the service principal in the listing page.

Figure 4 : Service Principal Listing
Create Client Principal
- After enabling KDC server, all users added to WSO2 Identity Server are treated as client principals.
-
To add users, go to Configure → Users and Roles → Users → Add New User For this example I am going to create a user called “amilaj” with password “wsxwsx”.
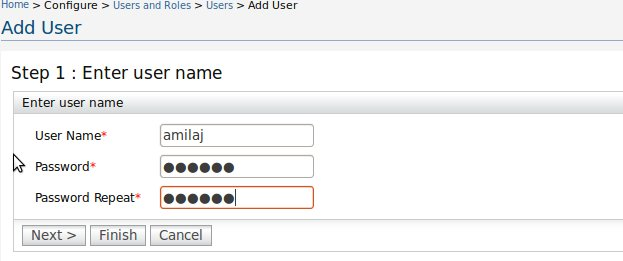
Figure 5 : Adding a new user
When communicating with Kerberos protocol we also need to specify a realm which user belongs to. Embedded server uses the default realm “WSO2.ORG”. This you can change in $IS_HOME/repository/conf/embedded-ldap.xml. Locate <DefaultPartition> configuration section and you will find following configuration element:
<Property name="realm">wso2.org
Here change the realm property value.
Kinit & Klist
There are some Kerberos related tools as well. Some of those tools are kinit, klist, ktutil, kadmin, etc … Using these tools, we can do various operations such as retrieving “Ticket Granting Ticket” from KDC, listing tickets in local cache, etc …
By default these tools use the Kerberos configuration file residing in /etc/krb5.conf file. In this file we need to mention where the KDC server is running, what realm to use, what are encryption algorithms used, etc … A sample /etc/krb5.conf file which suits this example is listed below.
[libdefaults]
        default_realm = WSO2.ORG
	default_tkt_enctypes = des-cbc-md5 des-cbc-crc des3-cbc-sha1
	default_tgs_enctypes = des-cbc-md5 des-cbc-crc des3-cbc-sha1
	permitted_enctypes = des-cbc-md5 des-cbc-crc des3-cbc-sha1
	allow_weak_crypto = true

[realms]
        WSO2.ORG = {
                kdc = 127.0.0.1:8000
        }

[domain_realm]
        .wso2.org = WSO2.ORG
        wso2.org = WSO2.ORG

[login]
        krb4_convert = true
        krb4_get_tickets = false
With above configuration we can retrieve TGT from KDC server for a “Client Principal”. Lets use the “Client Principal” we added above. So the user name we added is “amilaj”. Then the client principal name with Kerberos realm would be [email protected]. Lets try to retrieve a TGT from KDC server for above “Client Principal”.
amila@aj:~/runenv/Run/kerberos-article/wso2is-3.2.0/repository/conf$ kinit [email protected]
Password for [email protected]:
Above command will retrieve a TGT from KDC server and cache it in the file system. You can view cached keys by executing “klist” command.
amila@aj:~/runenv/Run/kerberos-article/wso2is-3.2.0/repository/conf$ klist
Ticket cache: FILE:/tmp/krb5cc_1000
Default principal: [email protected]

Valid starting     Expires            Service principal
06/24/12 07:26:18  06/24/12 09:50:18  krbtgt/[email protected]
	renew until 06/25/12 07:26:17
Now we have finished setting up KDC server, service principals and client principals. Now lets look at how we can setup ESB to authenticate services through Kerberos.
ESB configurations for Kerberos Authentication
Steps for setting up ESB is as follows:
- Download and install ESB from here
-
Place and configure Kerberos related configuration files -
krb5.conf - In previous section we discussed about /etc/krb5.conf. We need to place a similar configuration file in $ESB_HOME/repository/conf directory. Again ESB will find KDC server, port, realm information from this file. You can use the same file listed above, for this purpose.
Jaas.conf - In Java, the Kerberos is implemented with the help of GSSAPI. GSSAPI is implemented as a JAAS module. Therefore to provide certain authorizations we also need to place a jaas.conf file in $ESB_HOME/repository/conf directory. A sample jaas.conf is listed below.
Server {
com.sun.security.auth.module.Krb5LoginModule required
useKeyTab=false
storeKey=true
useTicketCache=false
isInitiator=false
principal="esb/[email protected]";
};
Above configuration specifies what login module to be used (Kerberos in our case) and other Kerberos related configurations such as whether to use a keytab file, whether to use a ticket cache, etc …
Note at the end of the configuration we are specifying the “Service Principal” which we defined above.
- Change port offset. Open $ESB_HOME/repository/conf/carbon.xml. Locate <Offset>0</Offset> element and set it to 5. I.e <Offset>5</Offset>
- Start ESB server – Go to $ESB_HOME/bin. Execute wso2server.sh. E.g :- > ./wso2server.sh
-
For this example lets secure “echo” service with Kerberos security. Go to service listing page and select “echo” service. Main → Web Services → List → echo. Select “Security” and enable security. Select security scenario 16.
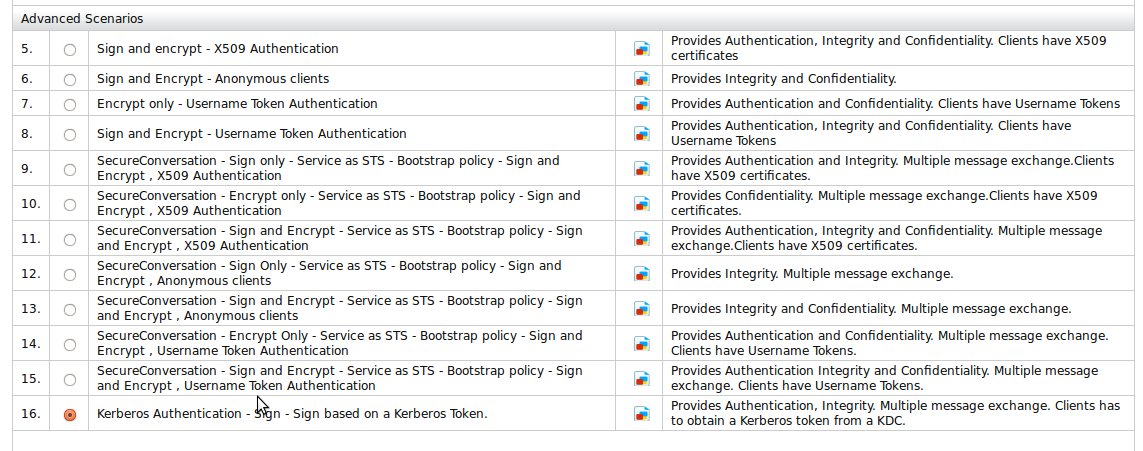
Figure 6 : Applying Kerberos Security Policy
-
Next we need to bind the service with a “Service Principal” name. In the following screen we need to specify the “Service Principal” name and the “Service Principal” password. (i.e. esb/localhost and “qazqaz”).
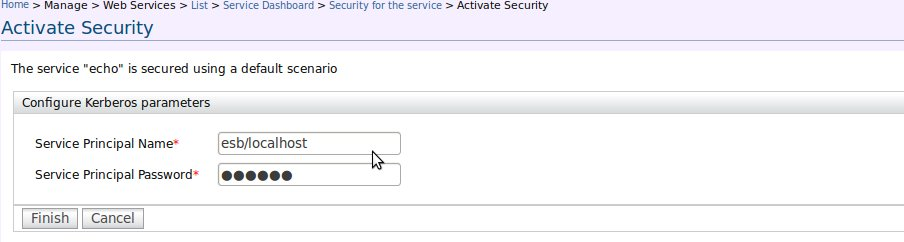
Figure 7 : Binding service to Service Principal
- With above we have finished applying Kerberos security to “echo” service.
Writing a client to access echo service
In the client program we first need to communicate with the WSO2 IS based KDC server and retrieve a TGT ticket. Then we need to get a service ticket given by TGT. But in the client program, communicating KDC server and retrieving a service ticket is handled transparently. We do not need to worry about that at code level.
In the client program we need to use a security policy quite similar to one used in the service side. For this you can copy the service policy in server (Select the service → Go to service dashborad → Select “Policies” → Select “Edit Policy” of a binding).
In the policy under rampart configuration, we can add Kerberos specific configurations. In the client program also we need to specify a Kerberos configuration file (krb.conf) and JAAS configuration file (jaas.conf). Client program finds the KDC server by reading Kerberos configuration. Following I am listing a sample krb.conf that can be used at client side.
[libdefaults]
             default_realm = WSO2.ORG
             default_tgs_enCtypes = des-cbc-md5 des-cbc-crc des3-cbc-sha1
             default_tkt_enctypes = des-cbc-md5 des-cbc-crc des3-cbc-sha1
             permitted_enctypes = des-cbc-md5 des-cbc-crc des3-cbc-sha1
             allow_weak_crypto = true

             [realms]
               WSO2.ORG = {
                    kdc =    localhost:8000
             }
A sample jaas.conf listing is also as below.
Client {
com.sun.security.auth.module.Krb5LoginModule required
useTicketCache=false;
};
In the policy under rampart configurations we can specify above files. Under Kerberos configuration we need to specify what is the “Client Principal” used, what “Service Principal” client program is trying to access and also locations of Kerberos configuration and JAAS configuration files.
               <rampart:kerberosConfig>
                    <!-- Authenticating user -->
                    <rampart:property name="client.principal.name">amilaj</rampart:property>
                    <!-- Authenticating user password -->
                    <rampart:property name="client.principal.password">wsxwsx</rampart:property>
                    <!-- To which service client needs to talk to -->
                    <rampart:property name="service.principal.name">esb/[email protected]</rampart:property>
                    <!-- Kerberos jaas.conf -->
                    <rampart:property name="java.security.auth.login.config">repo/conf/jaas.conf</rampart:property>
                    <rampart:property name="javax.security.auth.useSubjectCredsOnly">true</rampart:property>
                    <!-- Kerberos configurations -->
                    <rampart:property name="java.security.krb5.conf">
                        repo/conf/krb.conf
                    </rampart:property>
                </rampart:kerberosConfig>
Here I am attaching a sample client program which can be used with this example. You need to change endpoints appropriately and you can use “ant” command to try out the sample. E.g :- “ant run” will compile, build and run the client.
Author
Amila Jayasekara
Technical Lead
About Author
- Amila Jayasekara
- Research Assistant
- Indiana University Bloomington