Managing iOS devices with WSO2 EMM - Part 2

- Dilshan Edirisuriya
- Software Engineer - WSO2
Table of contents
- Introduction
- iOS-related configurations
Introduction
WSO2 EMM implements the EMM with mobile device management and mobile application management as its main components. The WSO2 EMM server setup can be done as mentioned by following this ‘Getting Started’ guide. This article mainly focuses on the iOS enrollment.
Here is the message flow of the WSO2 EMM by considering the iOS enrollment.
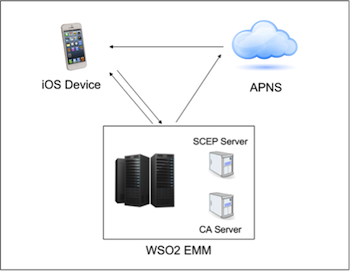
Figure 1
WSO2 EMM consists of an SCEP server component and a CA server component. The iOS device acts as a SCEP client where it sends the SCEP request to the MDM. For enrollment, there needs to be some generated certificates that will be generated by the CA component. The iOS device will generate private/public key pair and send a certificate signing request to CA where the CA component needs to generate the public key certificate and store the public key for encryption later.
When there is a requirement to push a payload or operation into the user’s device, the EMM server will poll them in the queue for operation. Thereafter, it sends a notification to Apple APNS to ask the service to wake up the device; if the device cannot be woken up, at a later stage, APNS will instruct the device to query the bounded EMM server to fetch the profiles. Then the device requests the pending profiles continuously in a cycle where the EMM server needs to send these one by one or as a set. These profiles will be taken out of the queue at the EMM server end.
Upon completion, the EMM server will terminate the stale state and these profiles will be pushed automatically, except the noticeable features supported by iOS such as device lock, disable camera, passcode, etc.
iOS-related configurations
In the EMM server, iOS-related configurations reside in the "{product_home}/ repository/conf/ mdm-config.xml" file.
The following is a sample mdm-config.xml file.
		{server_url}/mdm/scep
		{server_url}/mdm/profile
		{server_url}/mdm/checkin
		{server_url}/mdm/server


		{file_path}/pushcert.pfx
		password
		false


		{file_path}/PlainCert.pfx
		password
		true


		topic_id/ios-mdm-topic-id>

		{server_url}/mdm/api/devices/register


            	{file_path}/repository/resources/security/wso2carbon.jks

            		JKS

            		wso2carbon

            		wso2carbon

            		wso2carbon


{file_path}/repository/resources/security/wso2mobilemdm.jks

            			JKS

            			wso2mobile

			cacert

			cacert

			racert

			racert
You will need to change the following xml entries to setup iOS device management.
- ios-enroll-url - this is the SCEP URL. You may point to an external SCEP server as well.
- ios-profile-url - this URL will be executed with device information, such as IMEI, ICCID, OS version, and product model.
- ios-checkin-url - this URL will be called with necessary mobile device management push tokens. This consists of push token, magic token, and unlock token to send MDM push notifications.
- ios-server-url - this URL will be called upon device wake up. When APNS triggers a wakeup call on the device, the device will invoke the server. The server is invoked via this URL where EMM will get the pending operations from the queue and compose the payloads.
- ios-apns-cert-path - this is the path to push certificate. This will be generated for the EMM native agent app application identifier. This needs to be generated by the enterprise iOS developer program.
- ios-apns-cert-password - password for the push certificate, which is in pfx format.
- ios-apns-production-mode - this is a true/false switch. When the agent app uses a production provisioning profile, make this switch true. Otherwise use false for sandbox mode where the provisioning profile will be a development profile.
- ios-mdm-apns-cert-path - this is the path to MDM push certificate.
- ios-mdm-apns-cert-password - password for the MDM push certificate, which is in pfx format.
- ios-mdm-apns-production-mode - this is a true/false switch. When the EMM runs in production mode, make this true otherwise make it false for sandbox mode.
- ios-mdm-topic-id - topic id of the MDM.
- ios-device-property-post-url - device properties will be posted to this URL to update.
- keystore-location - location of the Carbon keystore.
- keystore-type - type of keystore.
- keystore-password - Carbon keystore password.
- keystore-key-alias - alias of the Carbon keystore.
- keystore-key-password - password of the key.
- mdm-keystore-location - location of the EMM keystore. This will hold the EMM related keys.
- mdm-keystore-type - type of the keystore.
- mdm-keystore-password - MDM keystore password.
- mdm-keystore-ca-cert-alias - alias of the certificate authority certificate.
- mdm-keystore-ca-cert-priv-password - private key password of the certificate authority.
- mdm-keystore-ra-cert-alias - alias of the registration authority certificate.
- mdm-keystore-ra-cert-priv-password - private key password of the registration authority.
Upon successfully configuring the EMM, iOS devices can enroll to EMM. In the EMM system, there is an invite function that will trigger an email invite to the user. This will load as shown in Figure 2.
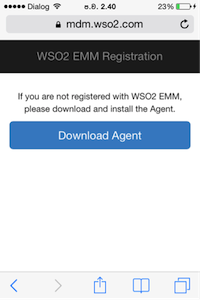
Figure 2
Click on the "Download Agent" button in Figure 2. This will download the iOS native agent application.

Figure 3
Click on the "Install" button to install the application in the mobile device as illustrated in Figure 3.

Figure 4
Click on "Start Registration" as shown in Figure 4 to proceed with the registration.
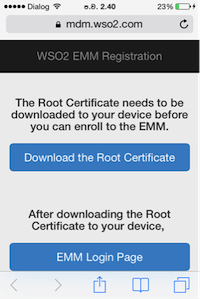
Figure 5
As shown in Figure 5, you will be given 2 options - "Download the Root Certificate" and "Emm Login Page". Initially, click on "Download the Root Certificate" to download the WSO2 root certificate.
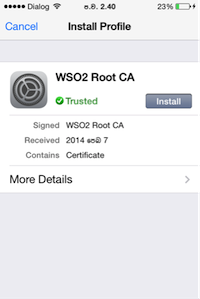
Figure 6
Click on "Install" button.

Figure 7
Click on "Install Now" as in Figure 7 to confirm the profile installation.
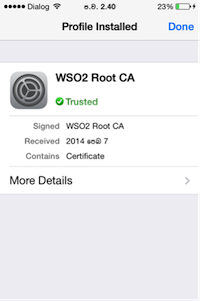
Figure 8
Upon completion, click on the "Done" button as shown in Figure 8. This will navigate back to the home page where you have the "Download the Root Certificate" and "Emm Login Page" (refer to Figure 5).
The next step is to click on the "Emm Login Page" as shown in Figure 5.
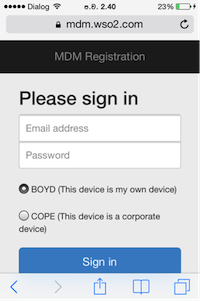
Figure 9
Enter email address and password fields. Select the BYOD and COPE options based on the ownership of the device.

Figure 10

Figure 11
If you have selected the option as "BYOD" you will be given the BYOD policy for approval. Click on "I Accept" in Figure 11.
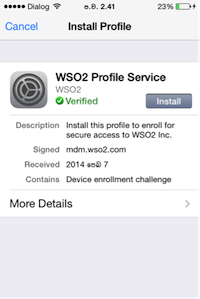
Figure 12
If the credentials are correct and validated, the above screen will popup. Click on the "Install" button.
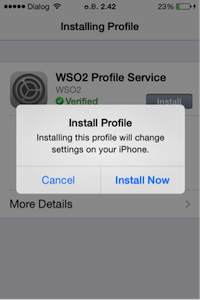
Figure 13
Click on "Install Now" to confirm the profile installation as shown in Figure 13.

Figure 14
The above warning in Figure 14 will be shown to the user, indicating the possible operations that can be executed in your device by EMM admin. Click on "Install" if you agree.
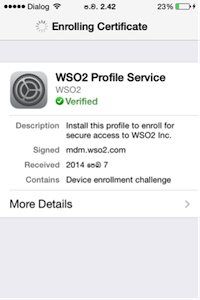
Figure 15
Enrollment will be done automatically and this will switch back to the Safari web page. Hold the device for 2-3 seconds and this will navigate back the agent app.
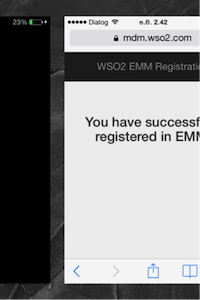
Figure 16
Now the steps involved in the enrollment process have been completed. The user is successfully registered in the MDM system. The administrator will see the following details in the user’s registered device.

These information can be executed on the user’s devices.
- Device lock - lock the device.
- Clear passcode - if the user has added a passcode to unlock the device this will get cleared.
- WIFI - this will send a WIFI payload with the username and password.
- Camera - enable/disable the camera.
- Passcode policy - add a policy to the user’s passcode, such as maximum failed attempts, minimum length, days of expiration, minimum complex characters, and passcode history. As soon as the admin triggers this, the user will be given a prompt to enter a new passcode with the policy. The user can cancel this dialog, but will only be given a maximum of 1 hour to reset it. If the passcode is not set (after 1 hour) the prompt dialog will remain on the screen until the user resets it.
- Email configuration - push the username and password of the email account with the incoming and outgoing mail server details.
- CalDav calendar - subscription to a CalDav account.
- Enterprise WIPE - WIPE the enterprise container of the device. This will remove the MDM profile along with other profiles installed by the EMM.
- APN - push access point network configurations.
- LDAP - send LDAP configurations.
- Mute - mute the device.
- Message - send a push notification message to the device.
Other than the operations, the EMM will show the user’s current location and battery information.
Click here to download WSO2 EMM.
About Author
- Dilshan Edirisuriya
- Software Engineer
- WSO2