Hierarchical Agents
In a hierarchical system, an orchestrator agent owns the request. It decides at run time which specialist agents to involve, hands each one a task, and combines their answers into its reply. Unlike sequential agents, which run every stage in a fixed order, the orchestrator calls only the specialists a request needs.
In WSO2 Agent Builder, you build the hierarchy by attaching each specialist to the orchestrator as a tool. The orchestrator then treats it like any other tool: it decides when to invoke it, passes it a task, and uses what comes back.
This page describes how to attach an agent as a tool, how to configure the result, and how to test the delegation end to end. For guidance on whether to split work across agents at all, see Multi-Agent Concepts.
The example on this page
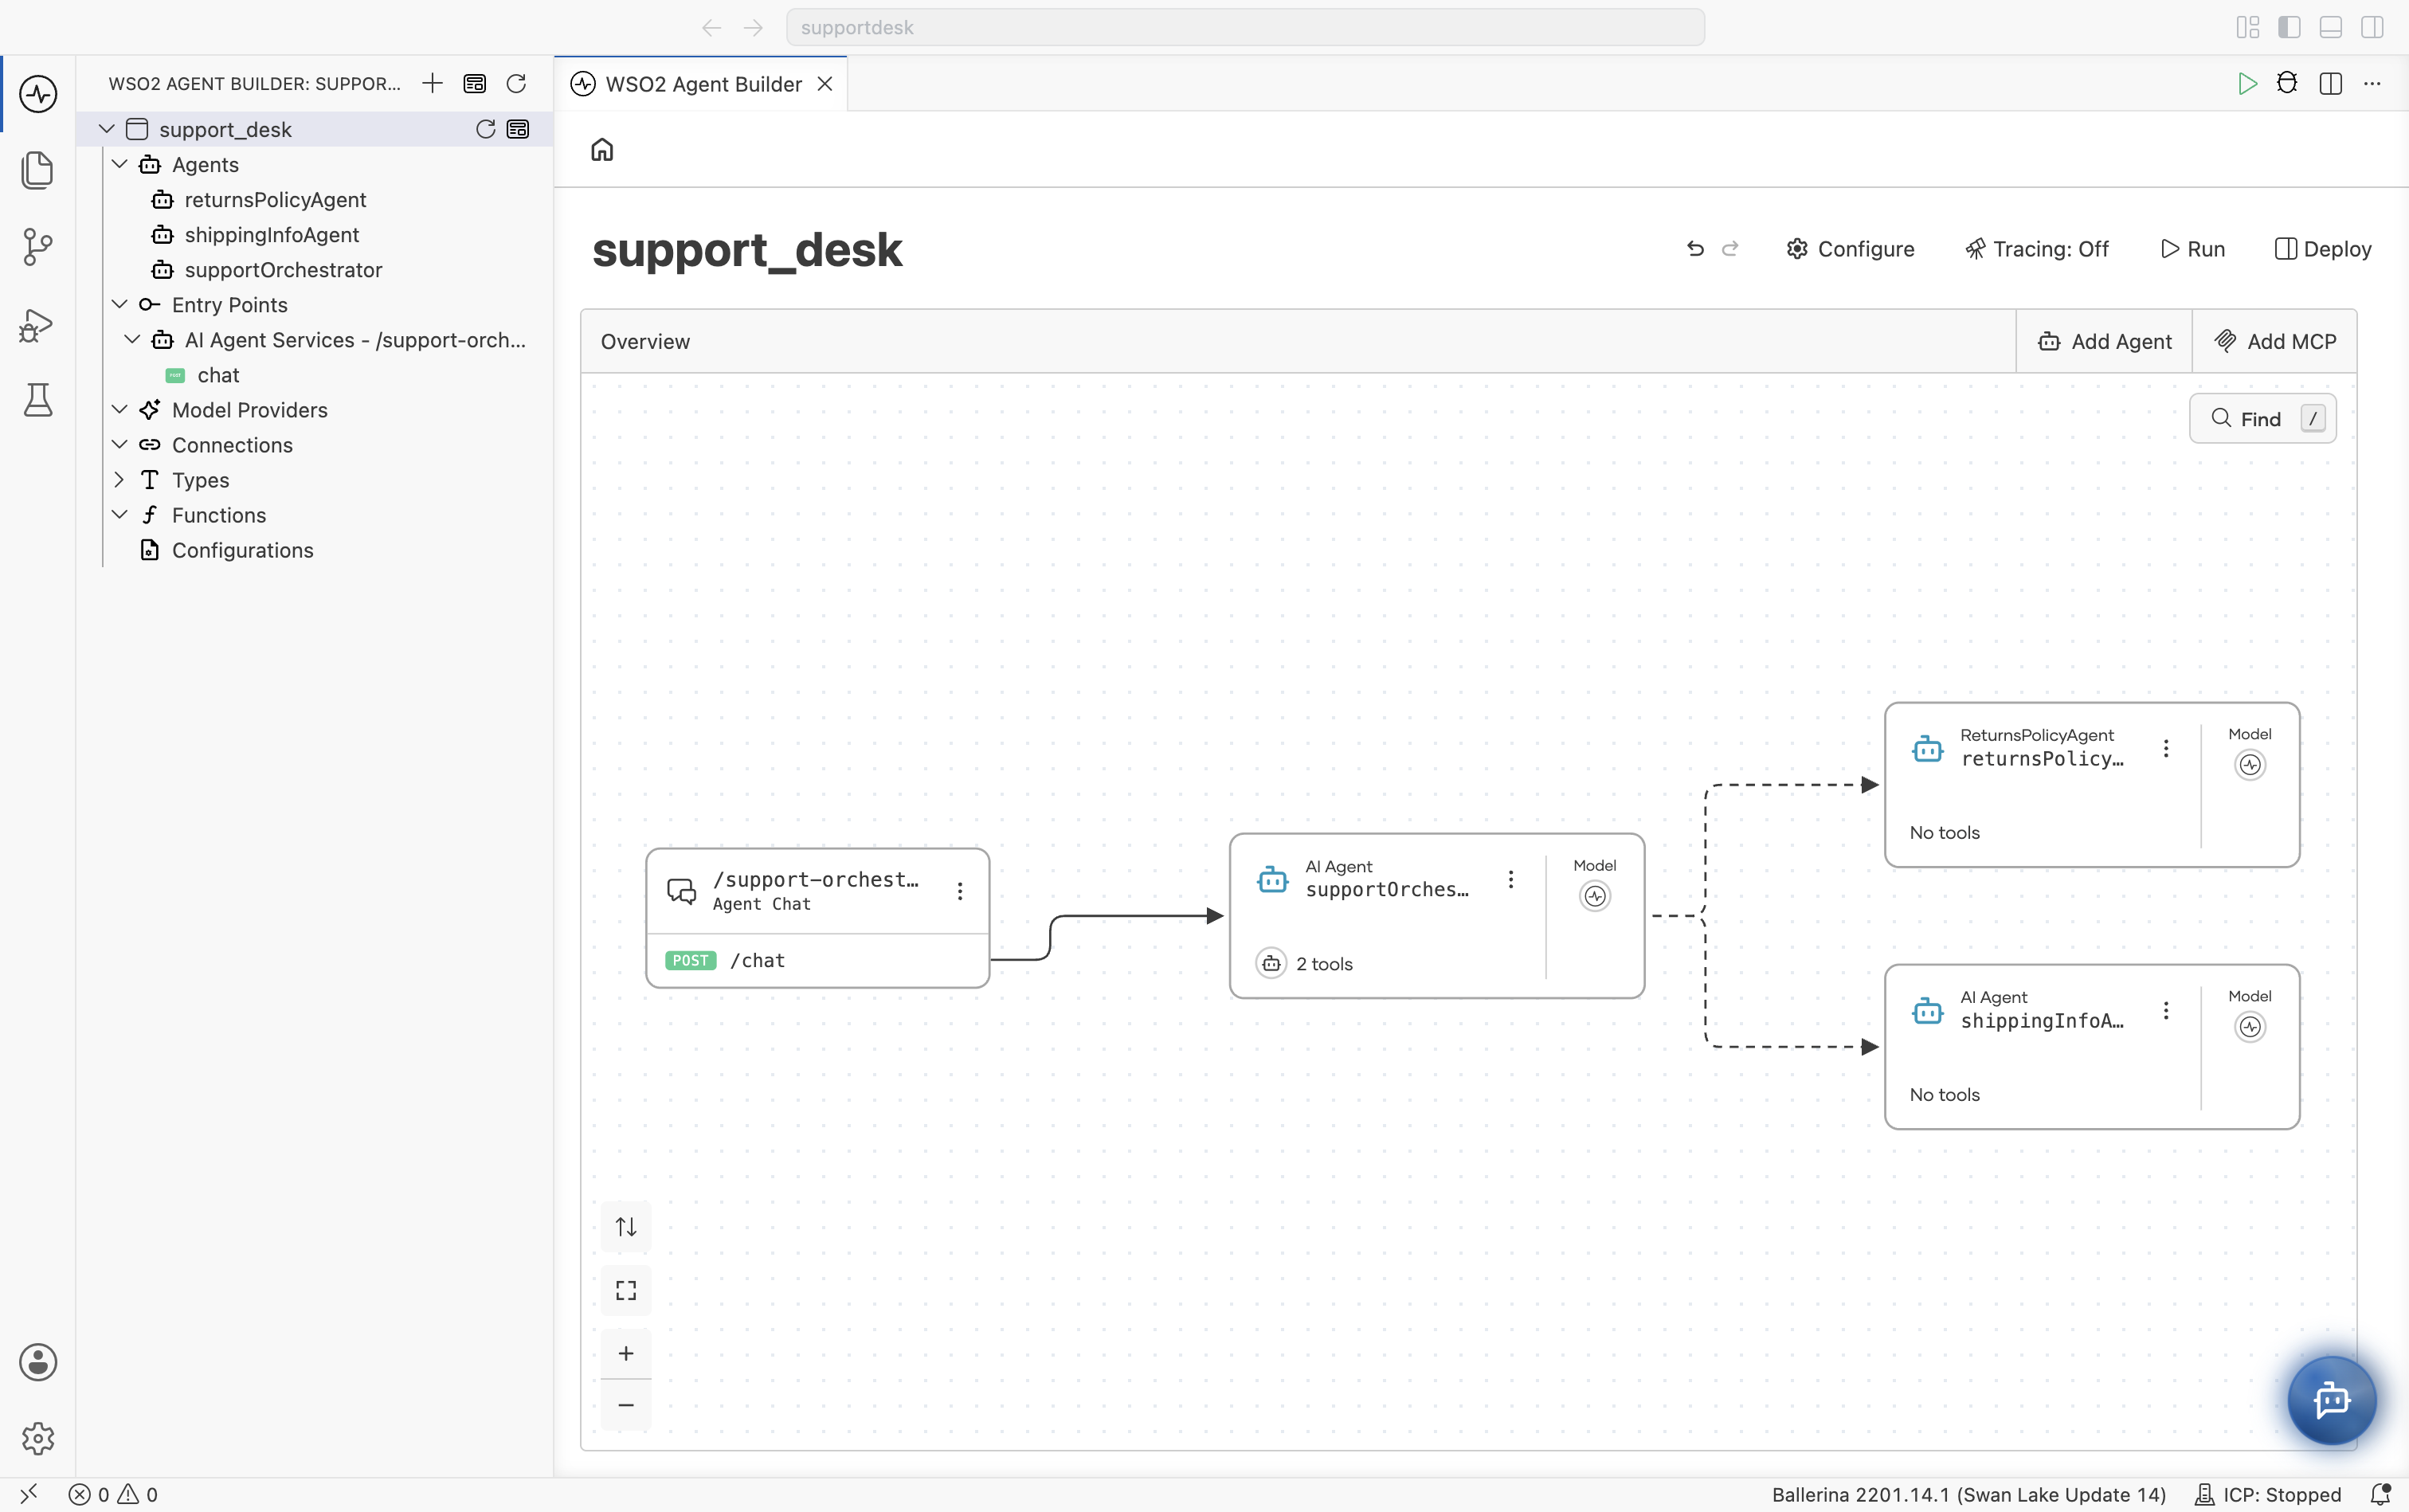
The steps follow one customer support example in a support_desk agentic integration. An orchestrator answers the customer and hands each part of a question to the specialist that owns it:
-
The orchestrator is
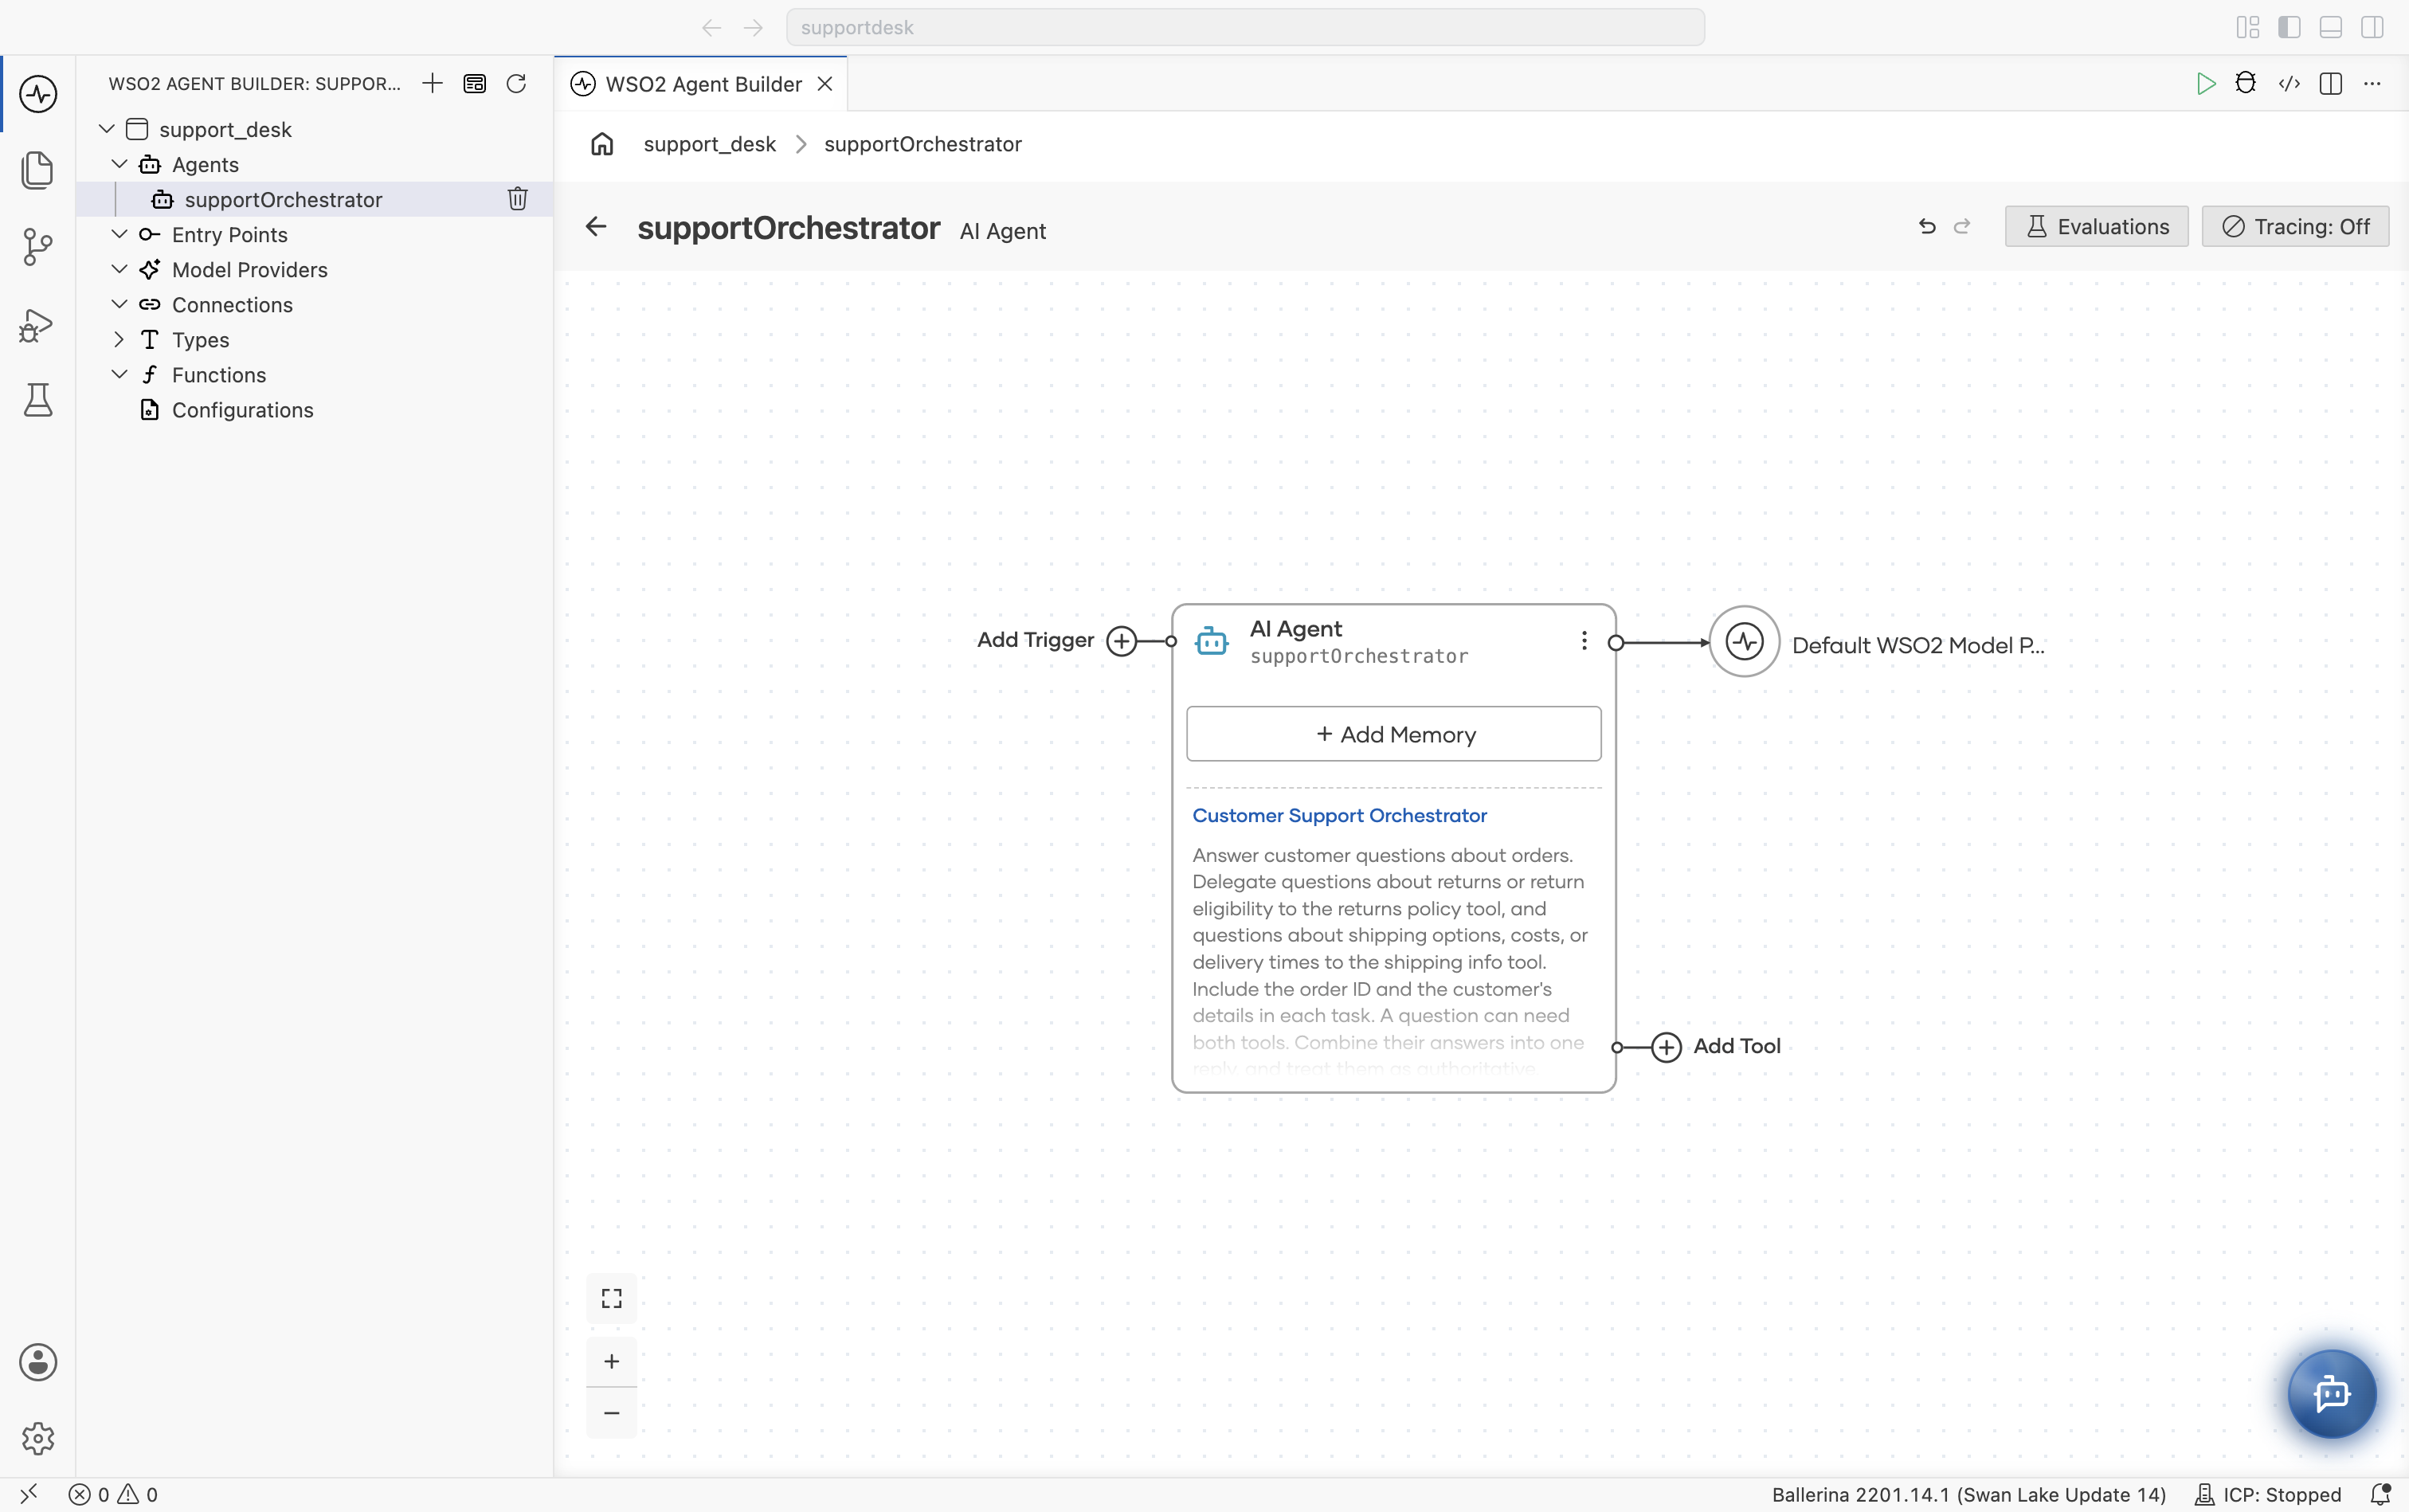
supportOrchestrator, created with Create Agent, with RoleCustomer Support Orchestratorand these Instructions:Answer customer questions about orders. Delegate questions about returns or return eligibility to the returns policy tool, and questions about shipping options, costs, or delivery times to the shipping info tool. Include the order ID and the customer's details in each task. A question can need both tools. Combine their answers into one reply, and treat them as authoritative. -
The first specialist is
returnsPolicyAgent, an instance of theReturnsPolicyAgentdefinition created in Create an Agent Definition. It decides whether an order can be returned. -
The second specialist is
shippingInfoAgent, a new agent created with Create Agent while attaching it. It answers questions about shipping options, costs, and delivery times.
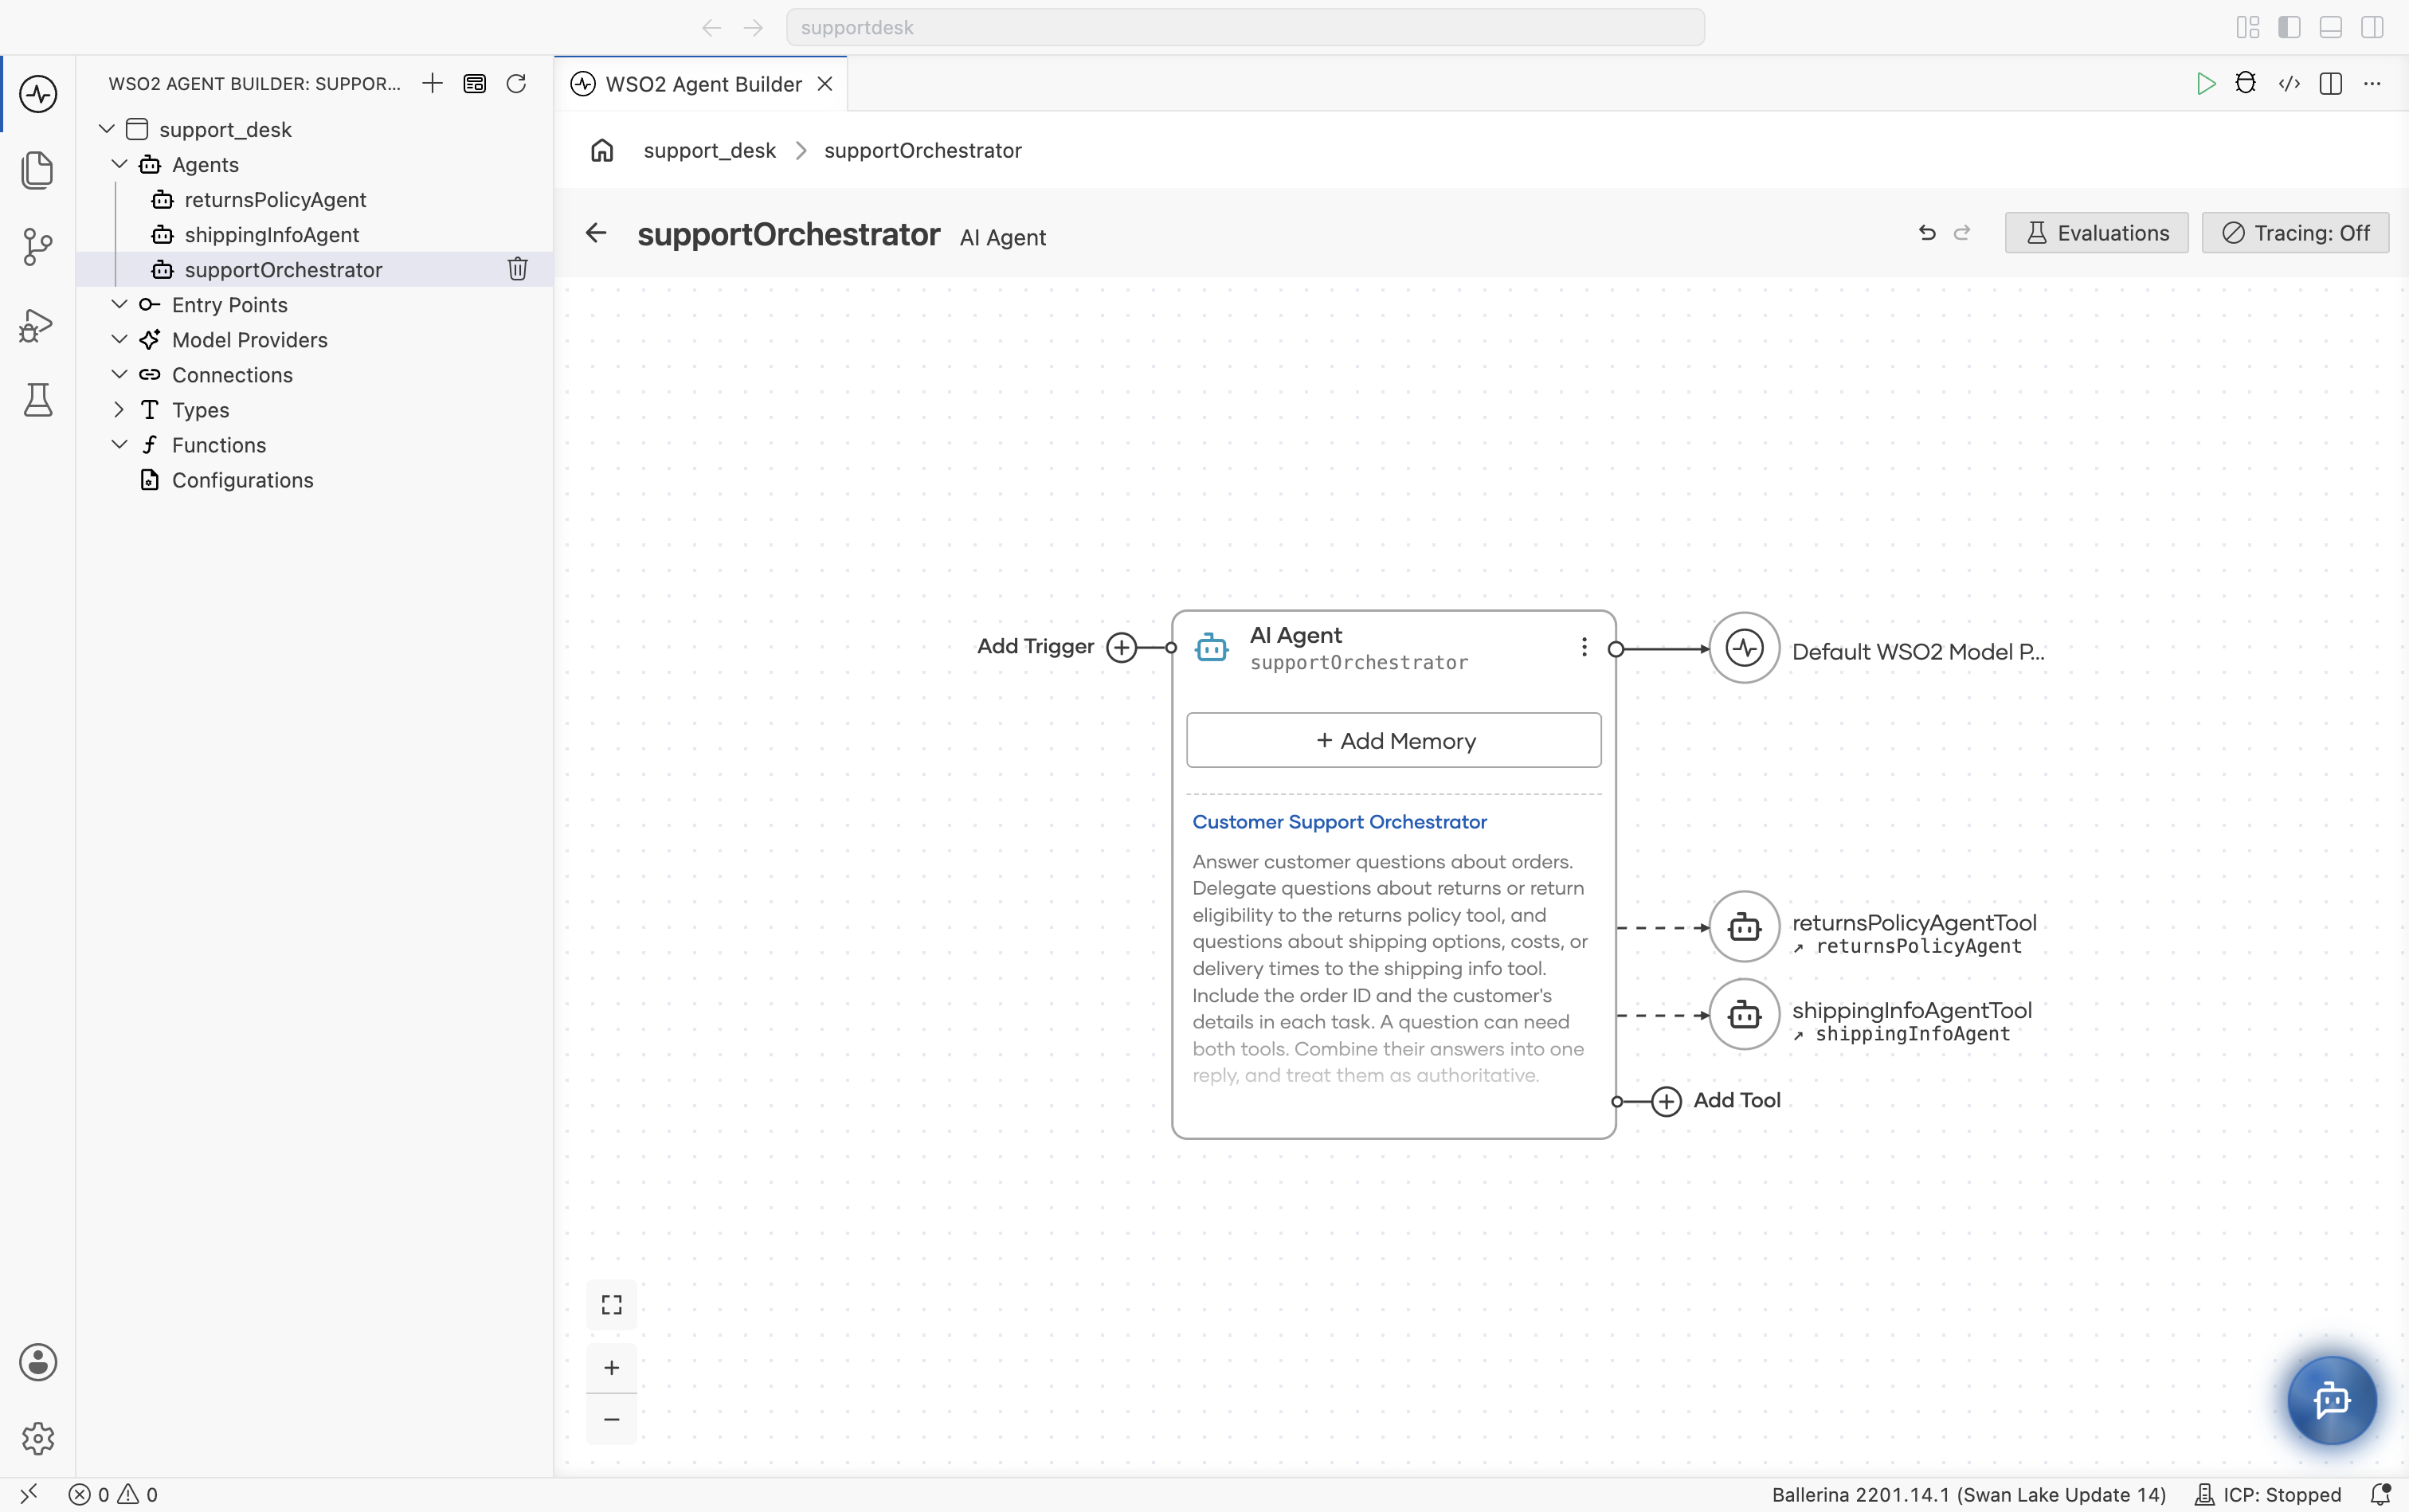
When you finish, the integration's Overview shows the hierarchy: an Agent Chat trigger calls supportOrchestrator, and dashed edges run from the orchestrator to each specialist it can delegate to.
Open the calling agent
Tools are attached on the calling agent's canvas, so start by creating an agent or opening an existing one. Select the agent under Agents in the project tree, or select its card on the integration's Overview. In the example, open supportOrchestrator.
If the canvas shows Start, an agent : run node, and Return, you are looking at the flow of a trigger that calls the agent, not the agent itself. Click Open Agent on the agent : run node to get to the agent's canvas.
Attach the first specialist
-
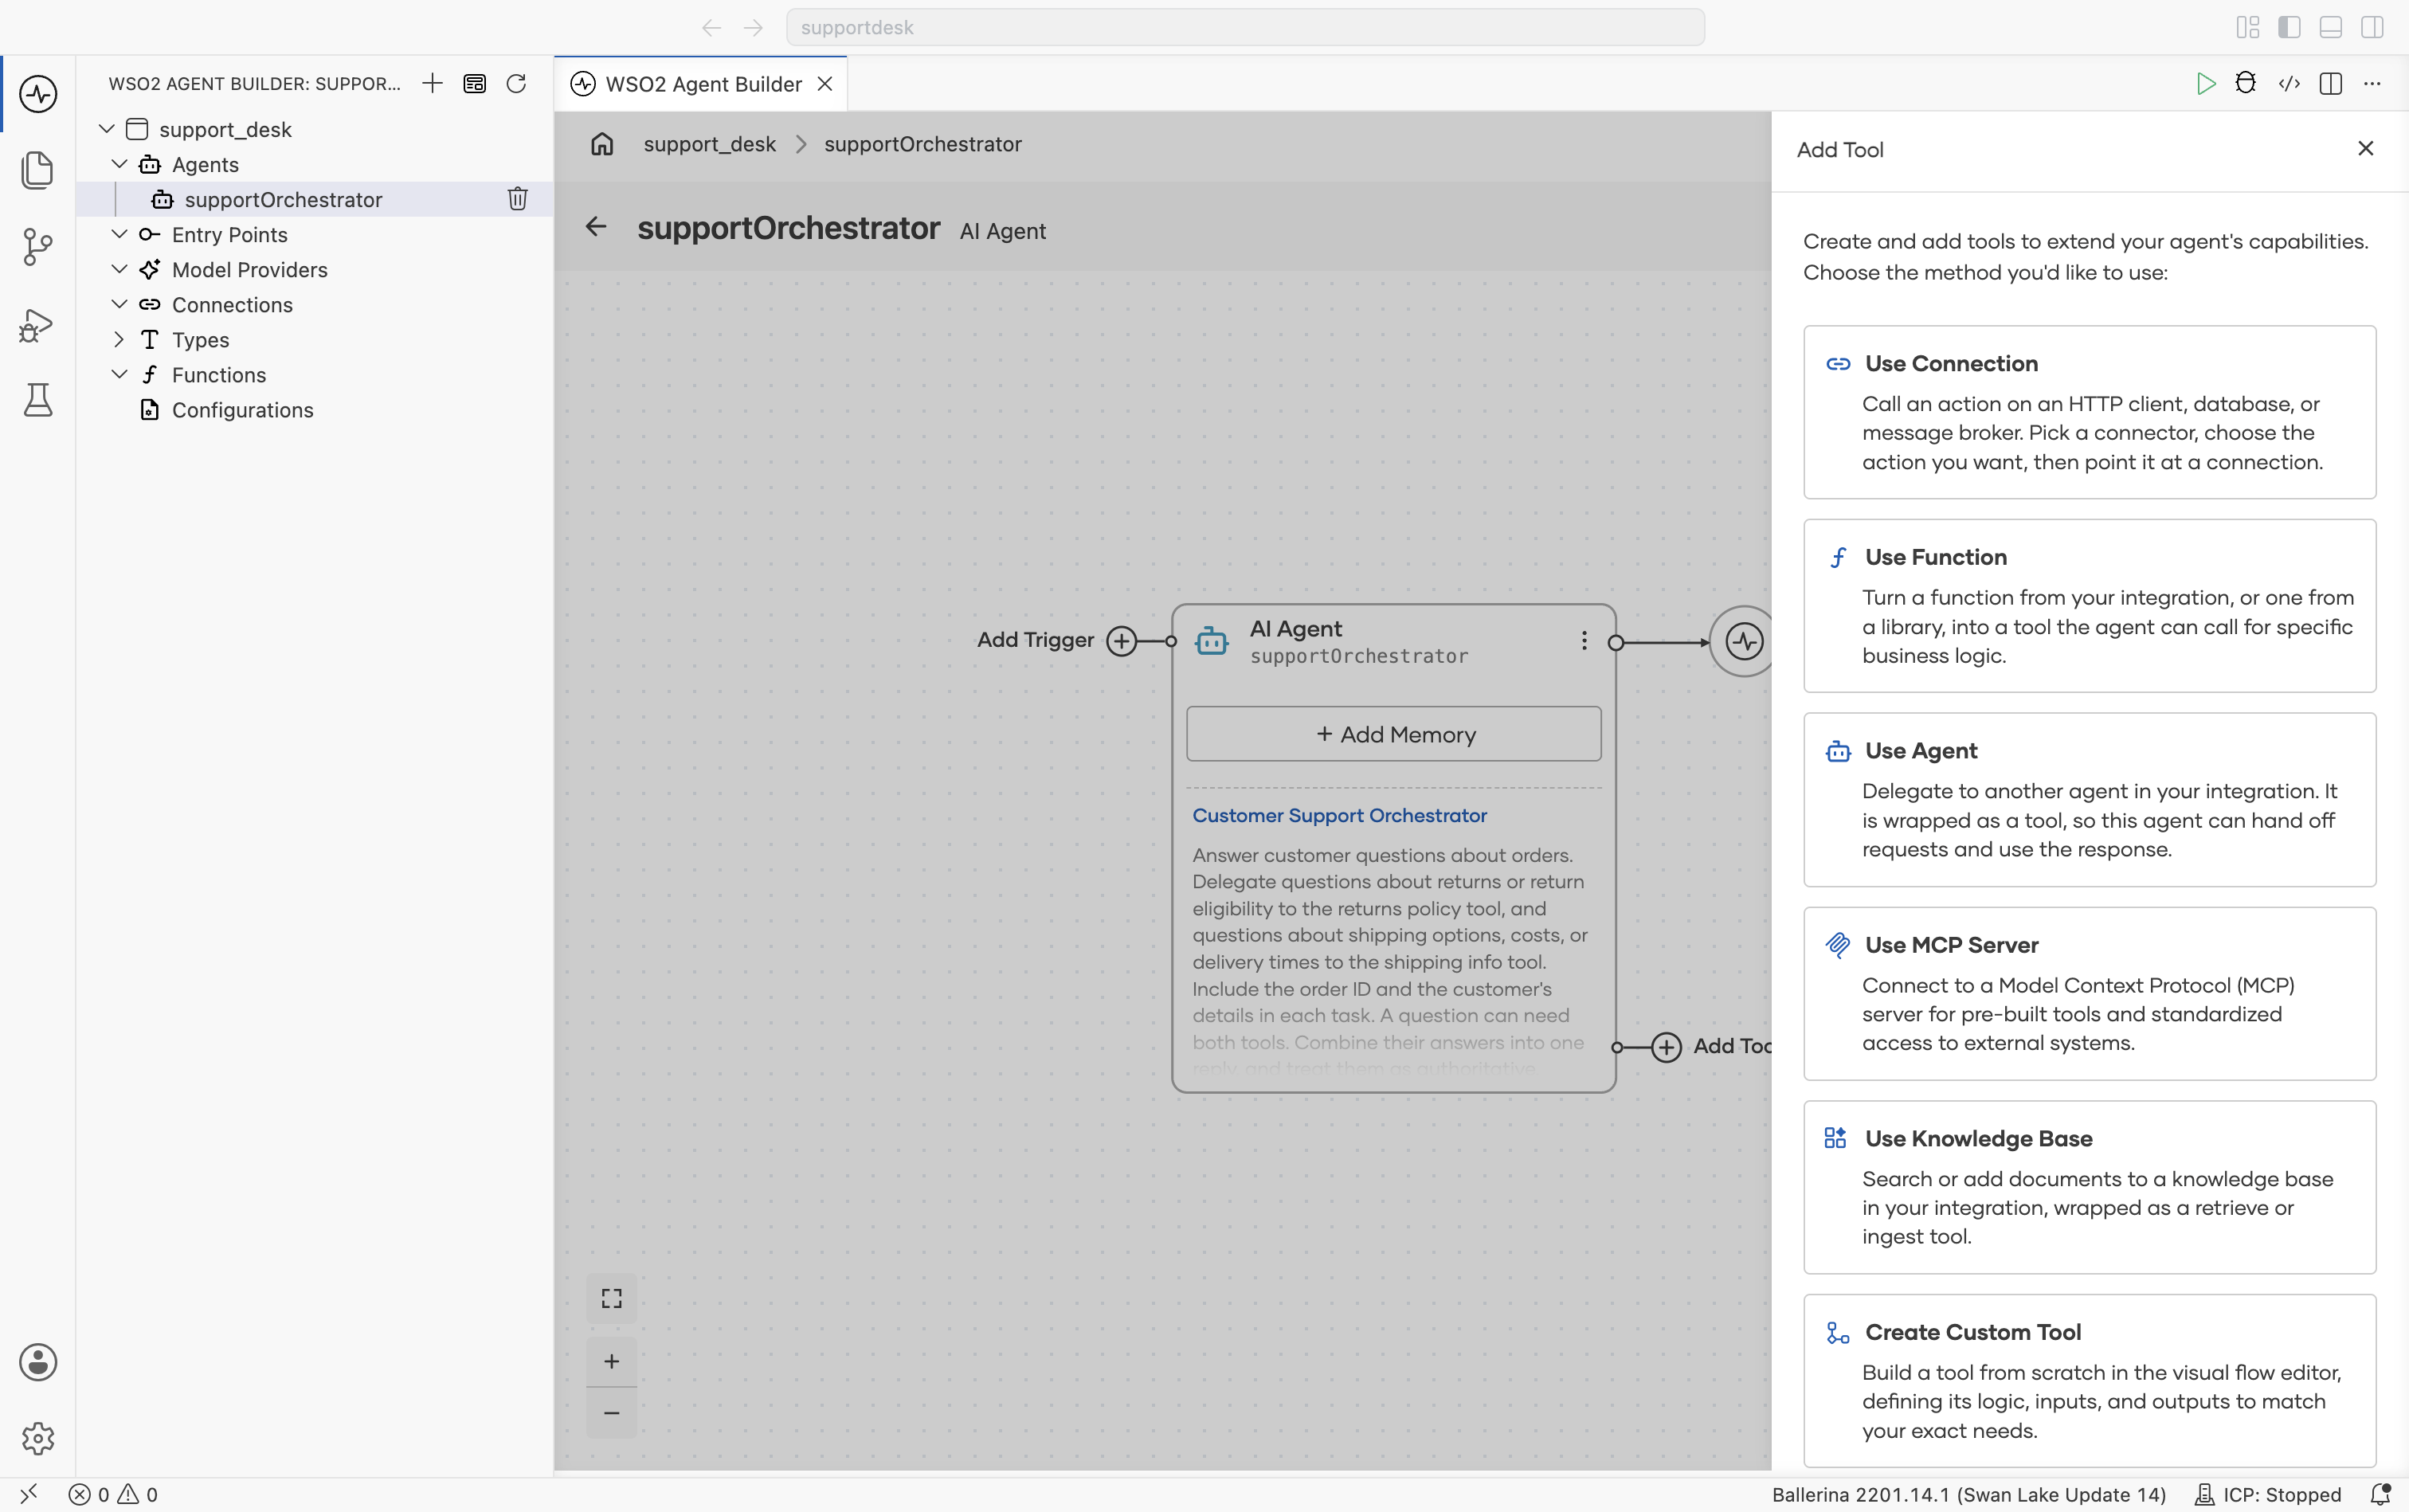
Click Add Tool on the AI Agent node. The Add Tool panel opens with the available tool types.
-
Select Use Agent, which delegates to another agent in your integration by wrapping it as a tool. For the other tool types, see Tools.
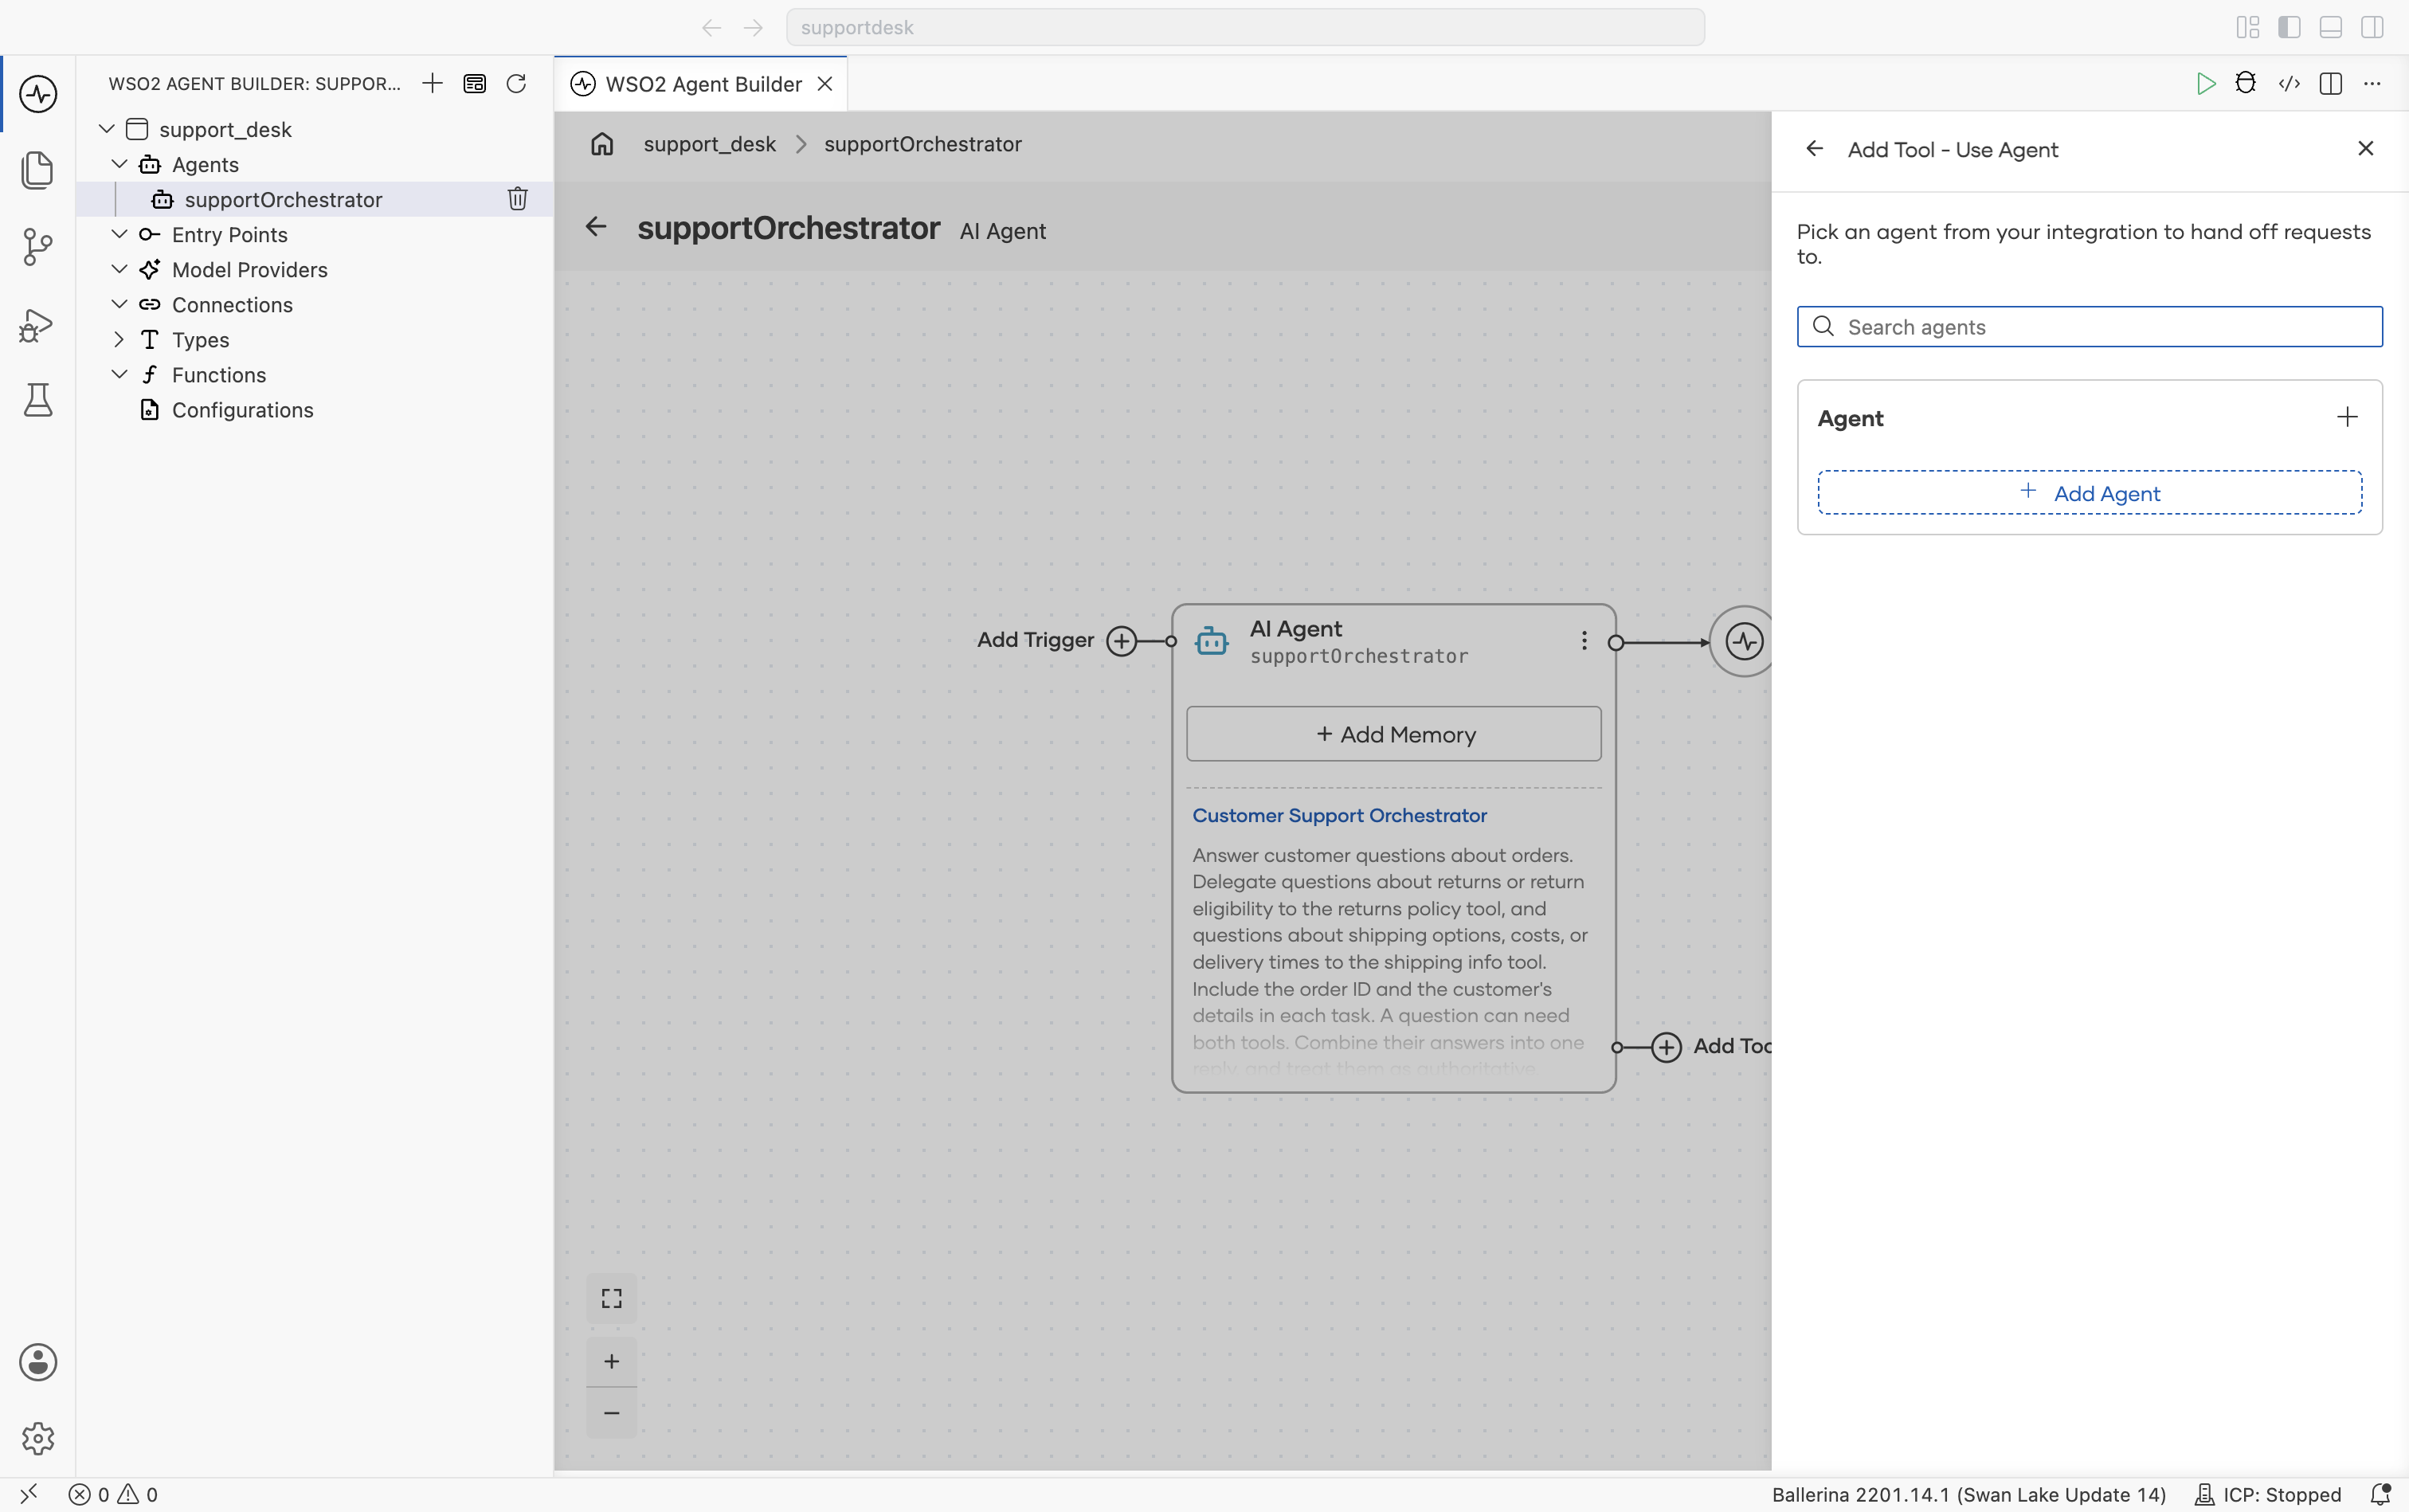
Other agents already in the integration are listed here and can be attached directly.
-
If the agent you want doesn't exist yet, click + Add Agent, or the + next to Agent when the list already has agents, and choose where the new agent comes from.
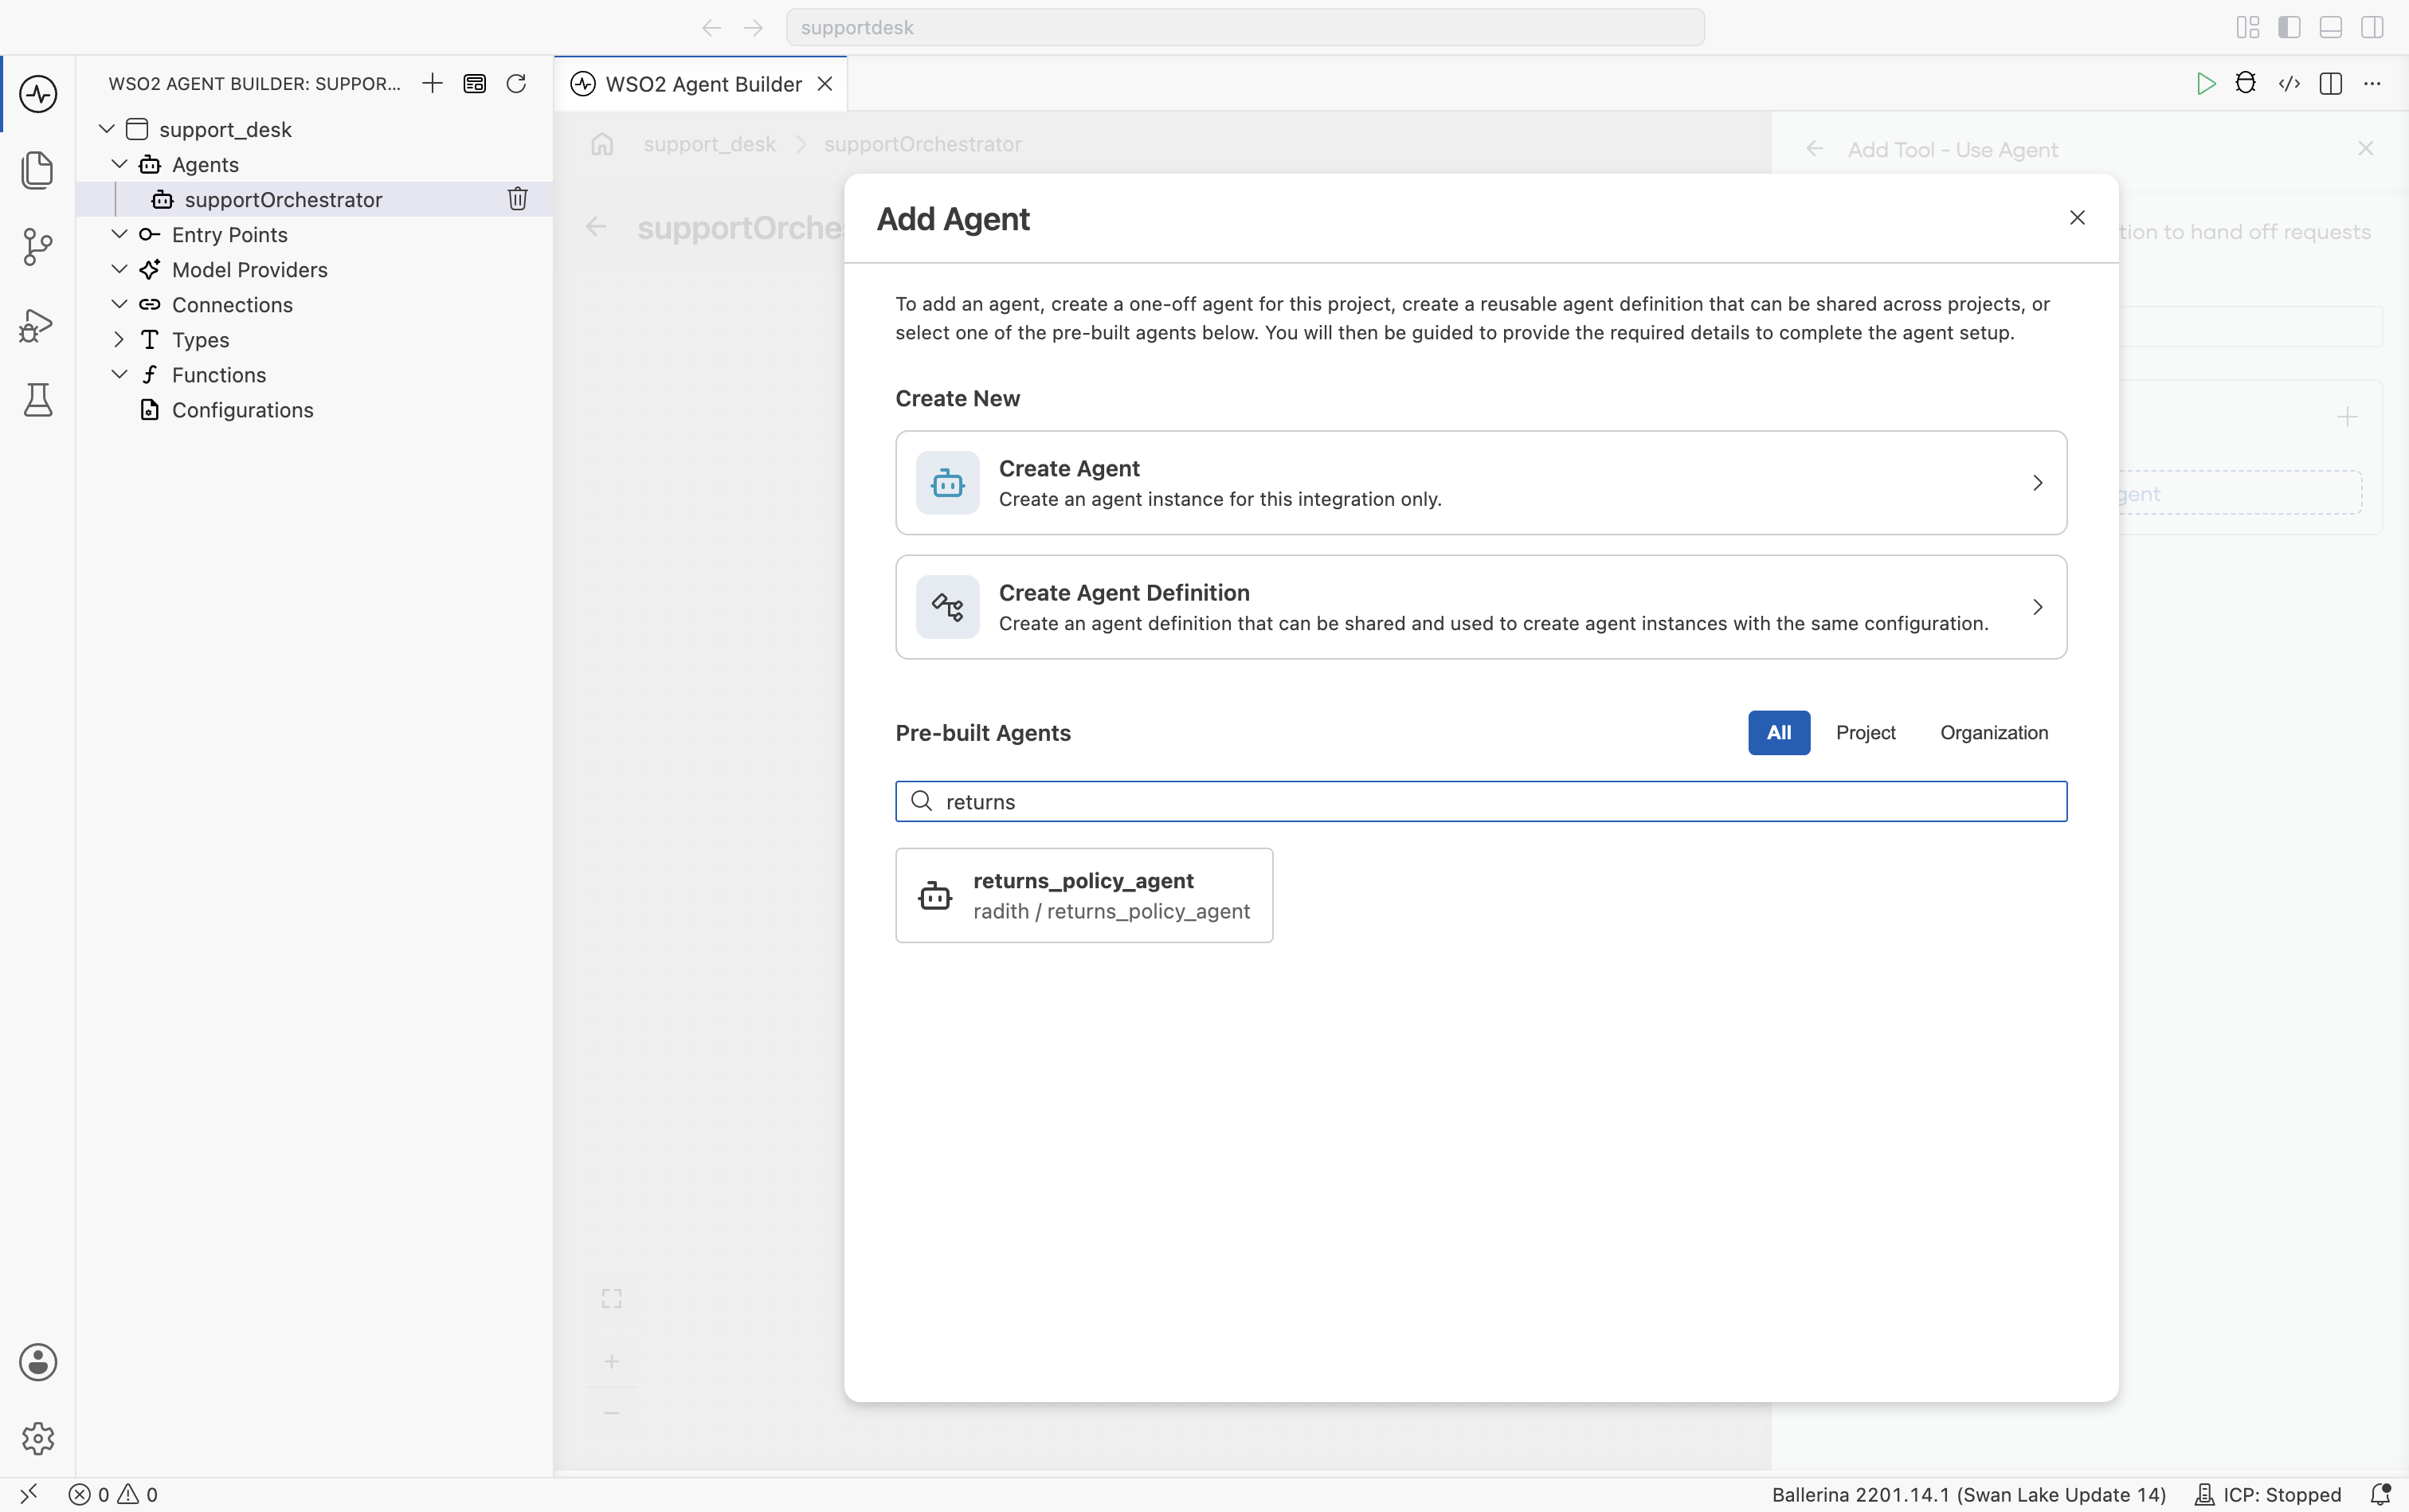
Option Result Create Agent A new agent created in this integration and used only here. Create Agent Definition A reusable definition, and an instance of it attached as the tool. Pre-built Agents An instance of a definition that already exists in this project or your organization. Create Durable Agent, which appears when you add an agent from the integration's Overview, isn't offered when you add an agent from a tool.
For the fields in each path, see Create a definition.
In the example, select returns_policy_agent under Pre-built Agents.
-
If you picked a pre-built agent, the Configure Agent step asks for the values the definition needs to create an instance: its Model, an optional Memory, any initialization parameters the definition declares, and an Agent Name for the new instance. In the example, keep the Default WSO2 Model Provider, leave Memory empty, and keep the generated Agent Name,
returnsPolicyAgent. Click Add Agent.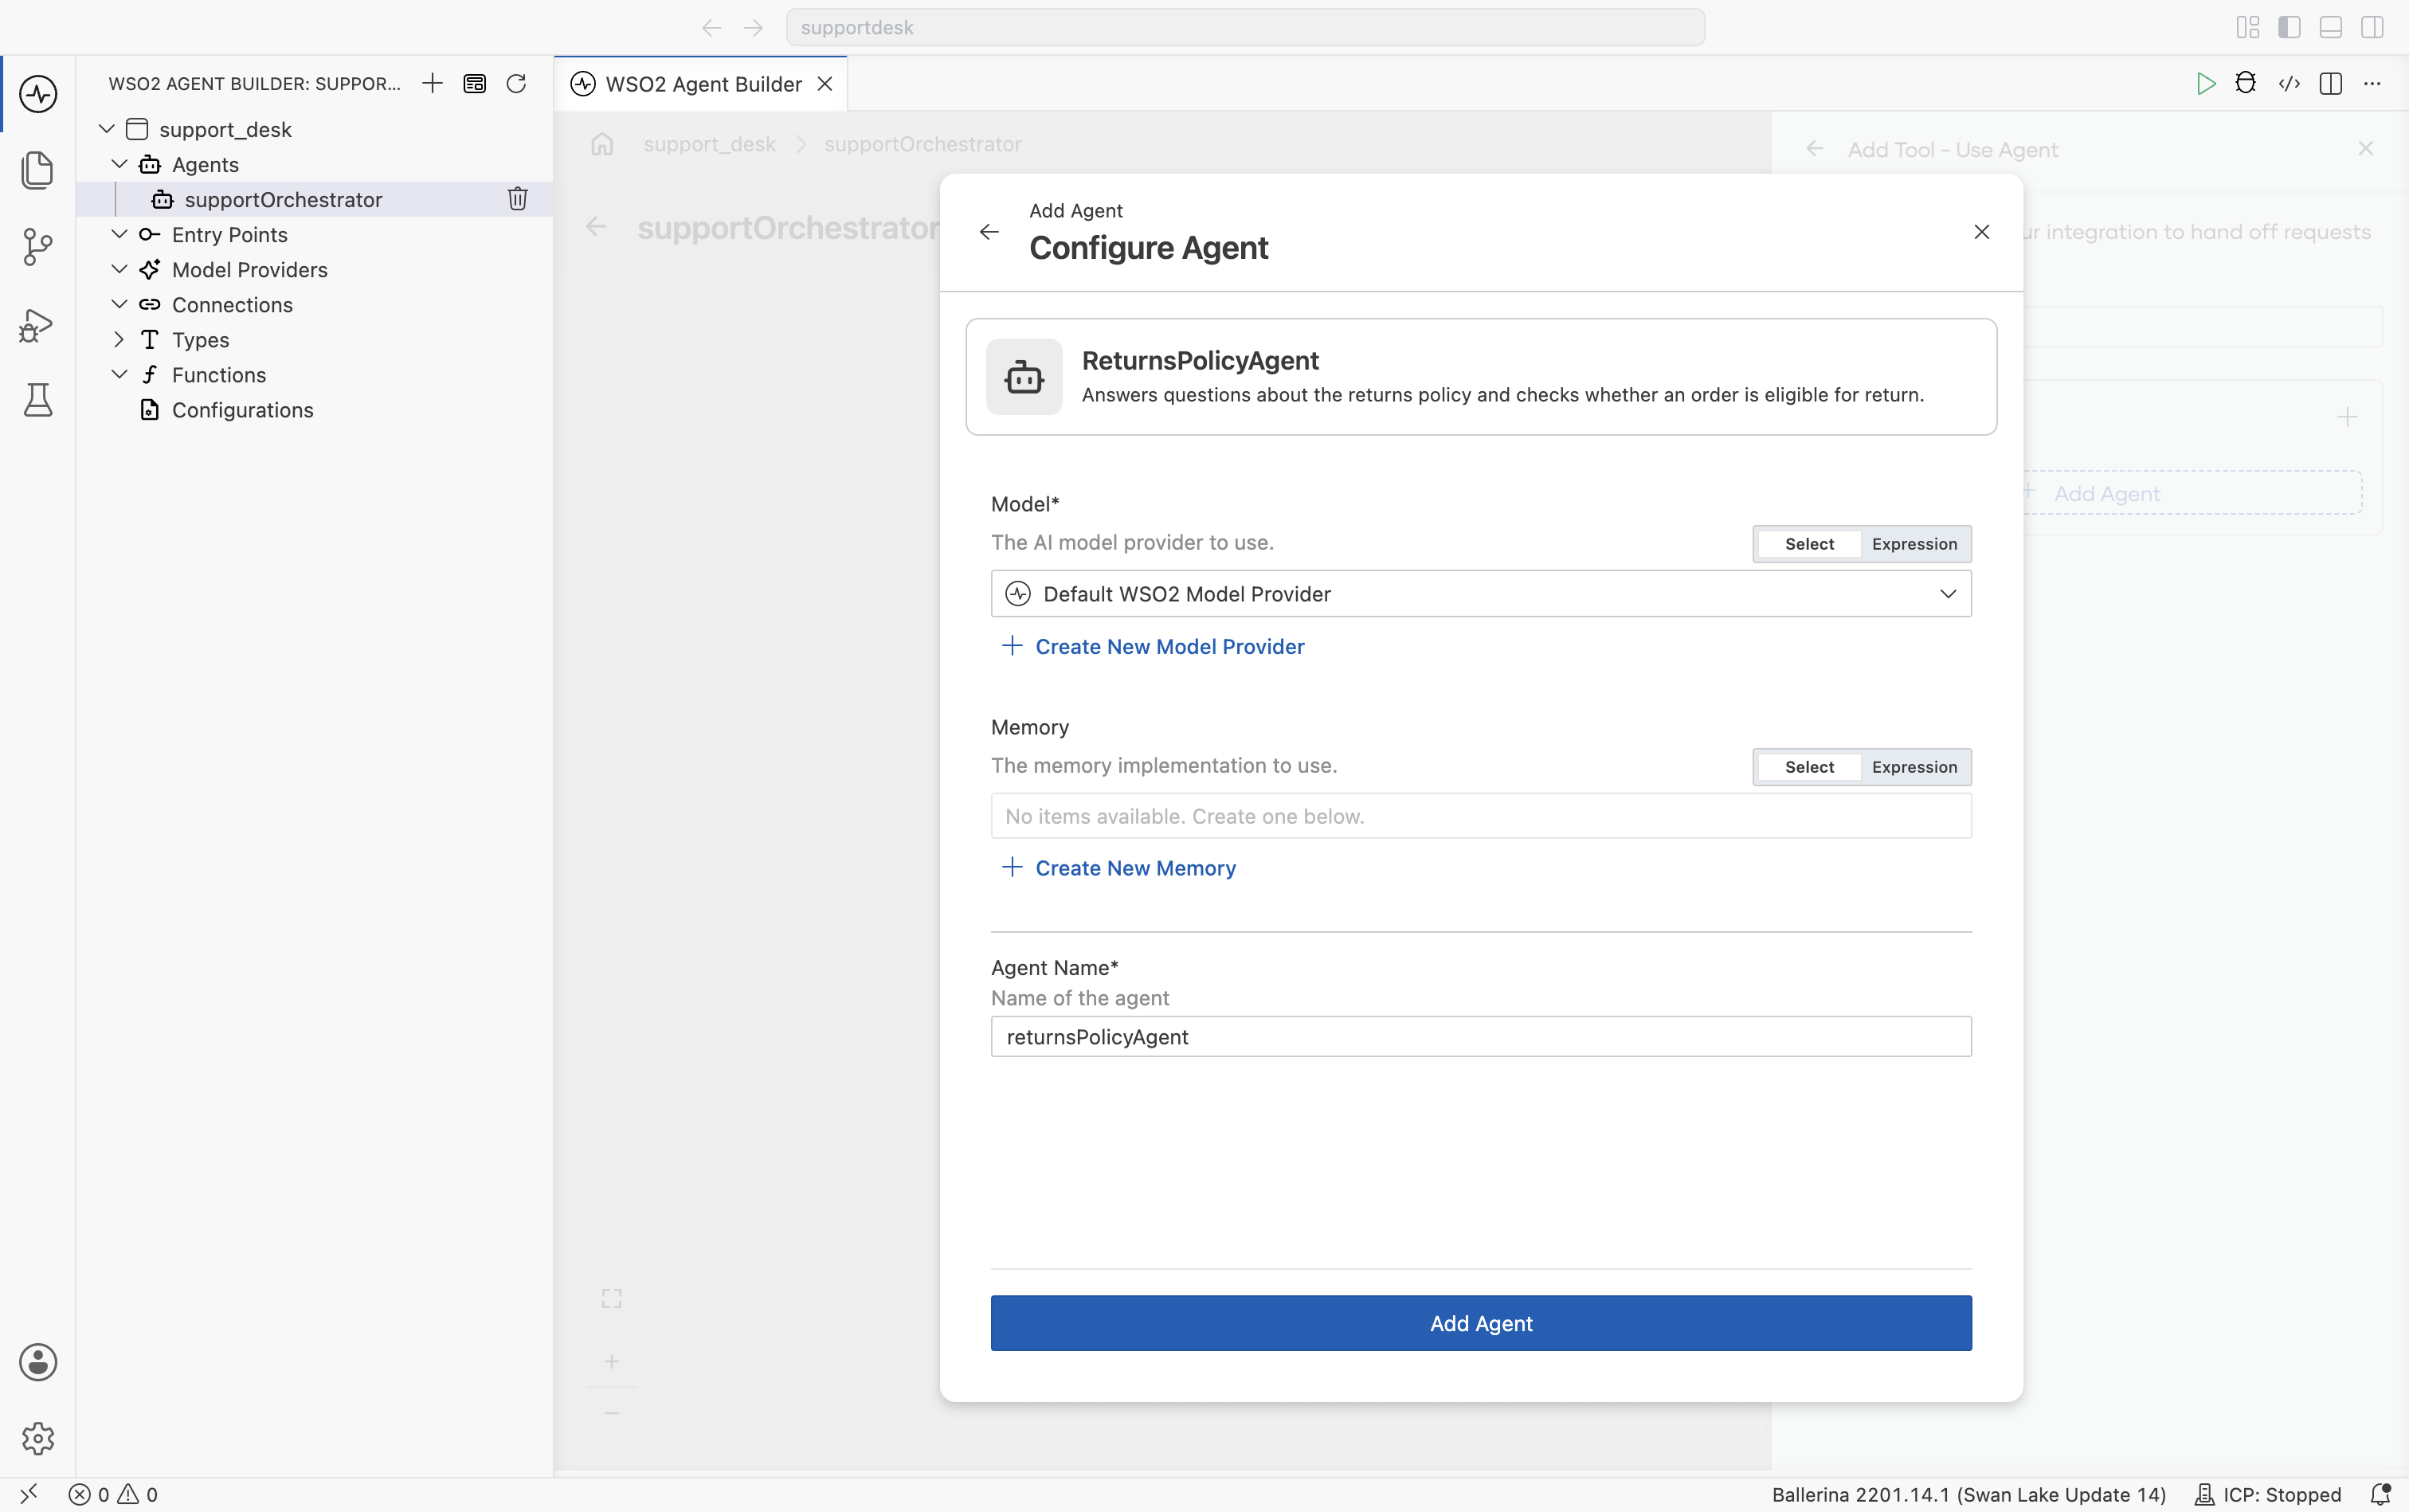
The new instance is added under Agents in the project tree, alongside the calling agent.
Configure the tool
Once an agent is selected, configure how the calling agent sees and invokes it. In the example, set Description to:
Use when the customer asks whether an order can be returned, or asks about the returns policy. Pass the order ID and the customer's reason for the return.
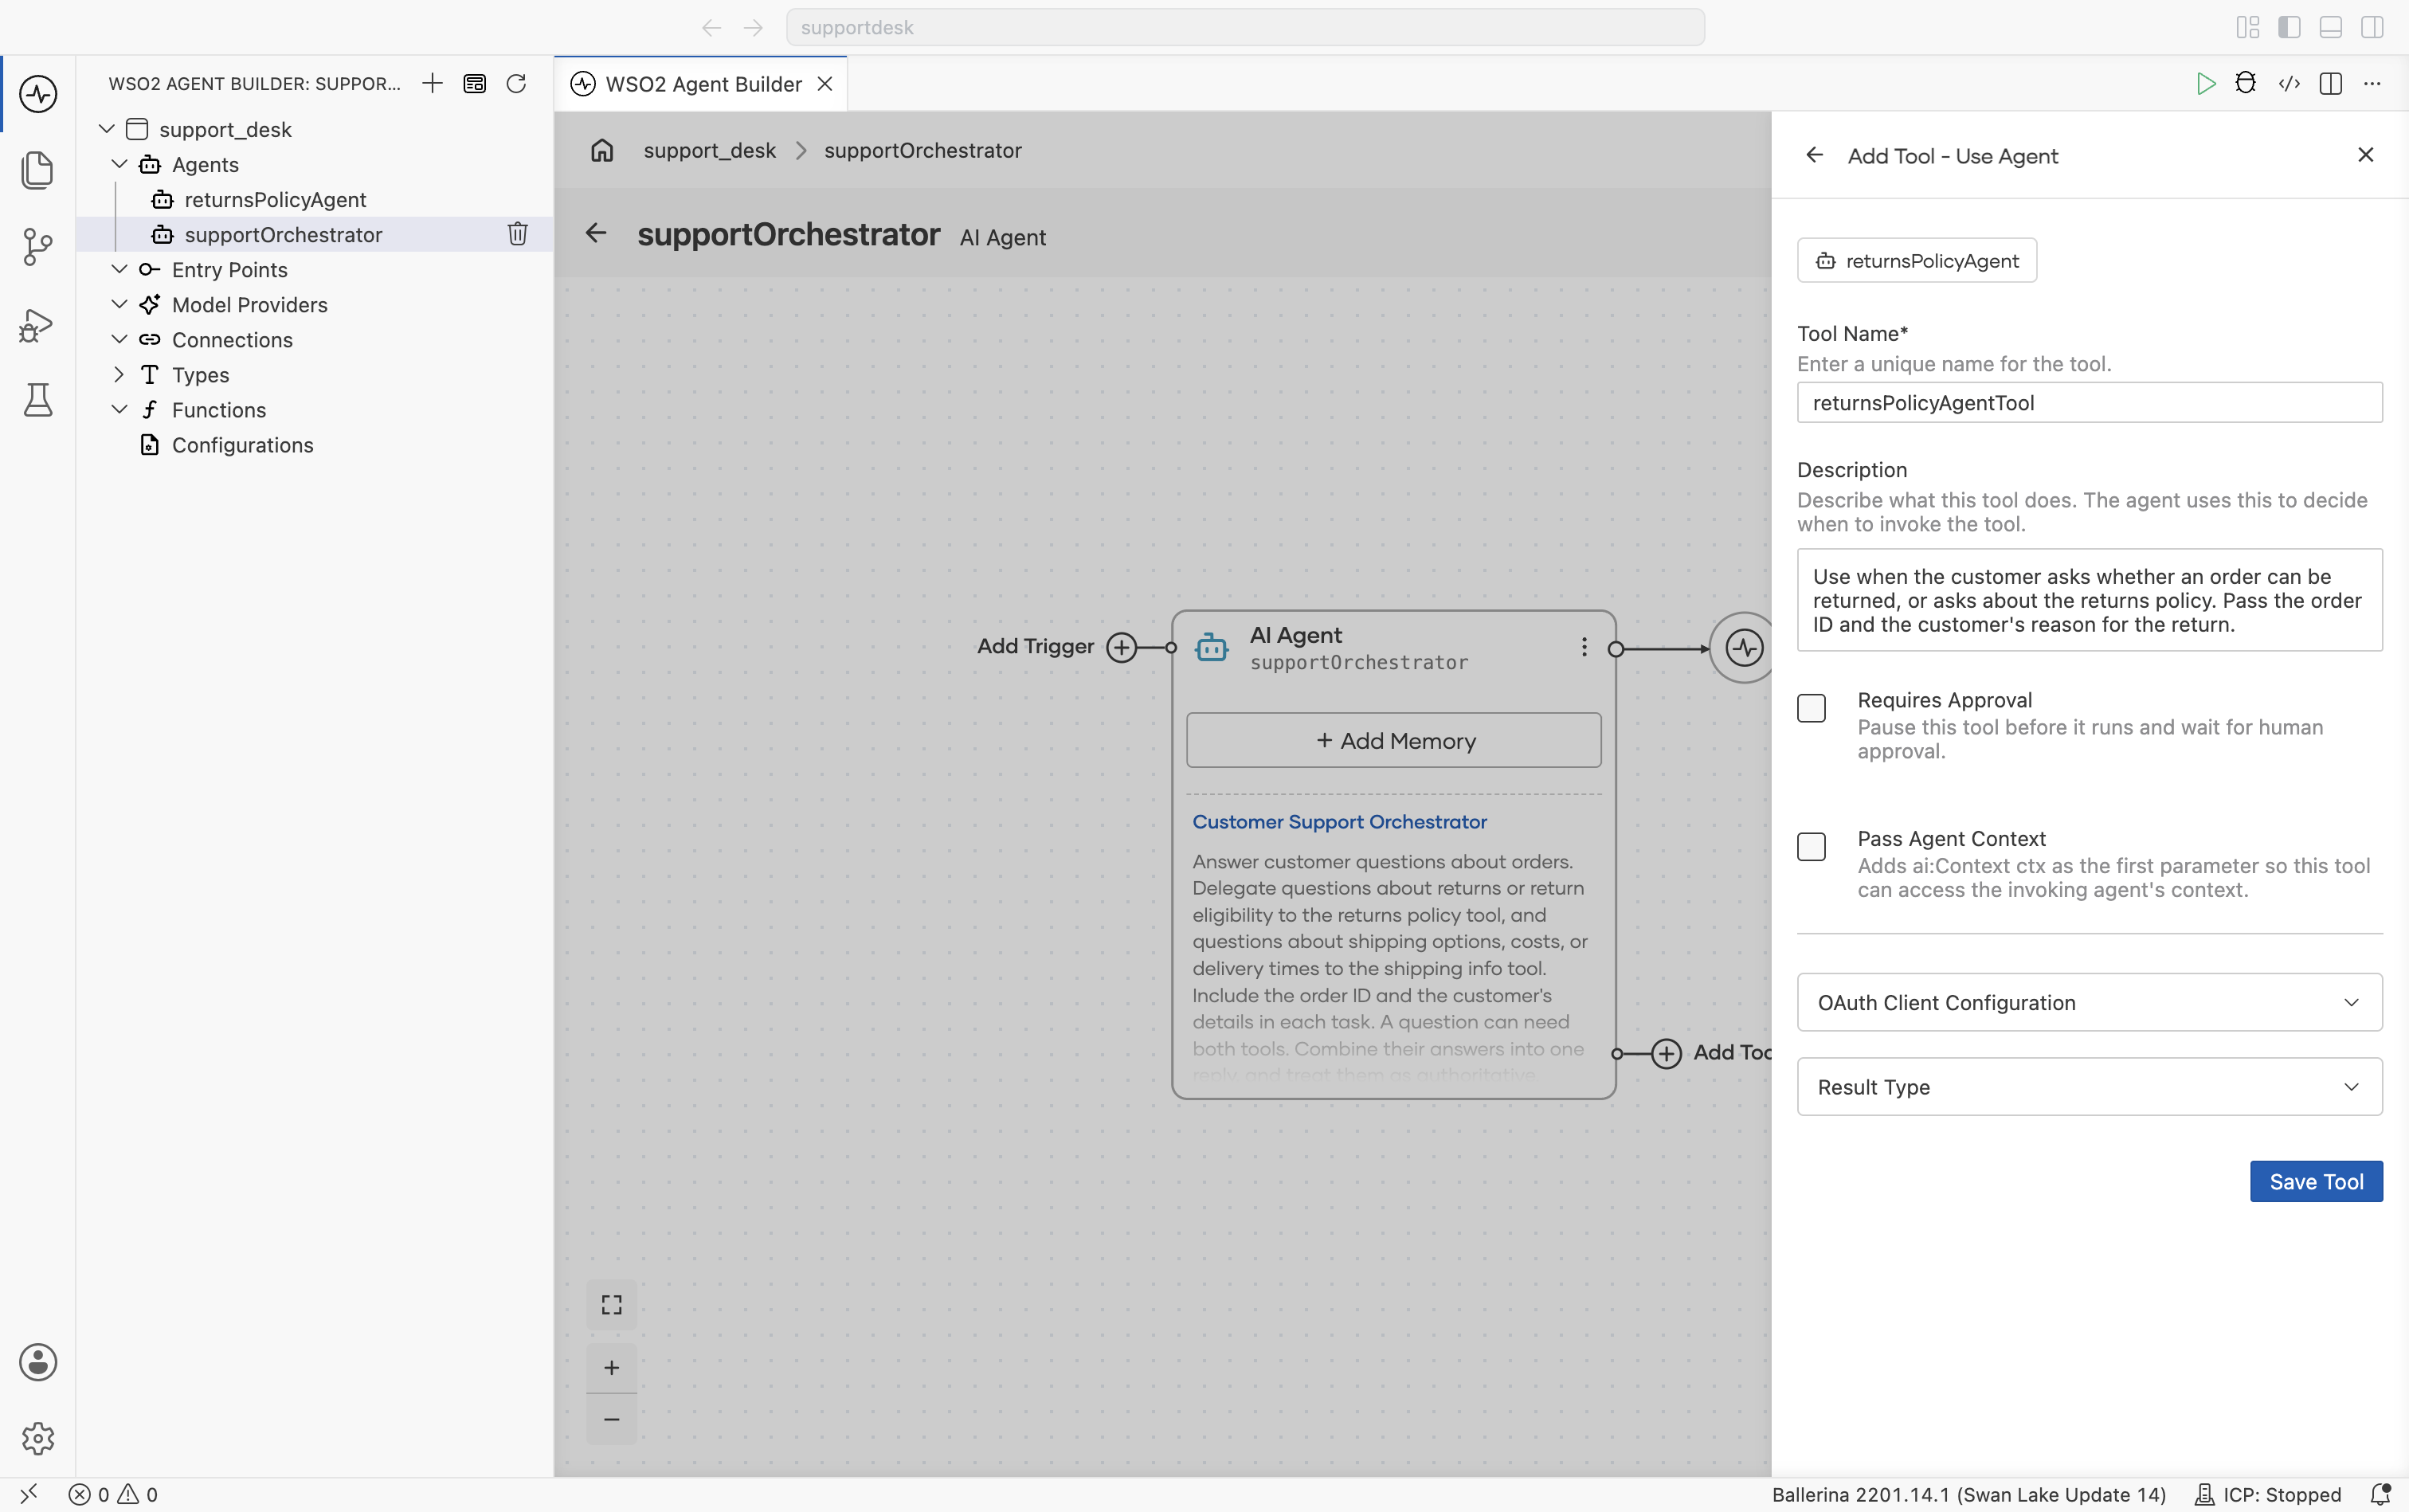
| Field | Required | Description |
|---|---|---|
| Tool Name | Yes | A unique name for the tool. Defaults to the agent's name followed by Tool, such as returnsPolicyAgentTool. |
| Description | No | What the tool does. The calling agent uses this to decide when to invoke it. Defaults to Delegates a query to <agent>. |
| Requires Approval | No | Pauses the tool before it runs and waits for a person to approve the delegation. See Gate Tools for Approval. |
| Pass Agent Context | No | Gives the sub-agent access to the calling agent's ai:Context. See Sharing values with the sub-agent. |
| OAuth Client Configuration | No | Credentials the tool uses when calling external authorization servers. The fields are the same as for any other tool. See Tools. |
| Result Type | No | The type the tool returns to the calling agent. Defaults to string. See What the sub-agent returns. |
Click Save Tool to attach it. The tool appears on the calling agent's canvas, linked to the agent it delegates to.
Sharing values with the sub-agent
ai:Context is a key-value store that travels with a run, not the conversation history or anything the model sees. Enabling Pass Agent Context adds it as the first parameter of the generated tool, so the sub-agent's own tools can read values the calling agent put there, such as a tenant identifier, a user ID, or a result from an earlier step.
The model never sees these values and cannot supply them, so anything the sub-agent's reasoning needs still belongs in the task description.
Write the description for the caller, not the agent
An agent attached as a tool has two descriptions, and they are not the same thing:
| Written for | Purpose | |
|---|---|---|
| Tool name and description | The calling agent's LLM | Deciding whether to delegate, and when |
| Role and instructions | The sub-agent's own LLM | Deciding how to do the work once delegated |
Write the tool description around the trigger condition, meaning the situations in which the calling agent should hand off, rather than around the sub-agent's capabilities. This is where delegation most often fails: a description that reads like a job title tells the calling agent nothing about when to use it.
Attach the second specialist
Repeat the same steps for each specialist the orchestrator delegates to. This time, create the agent while you attach it.
-
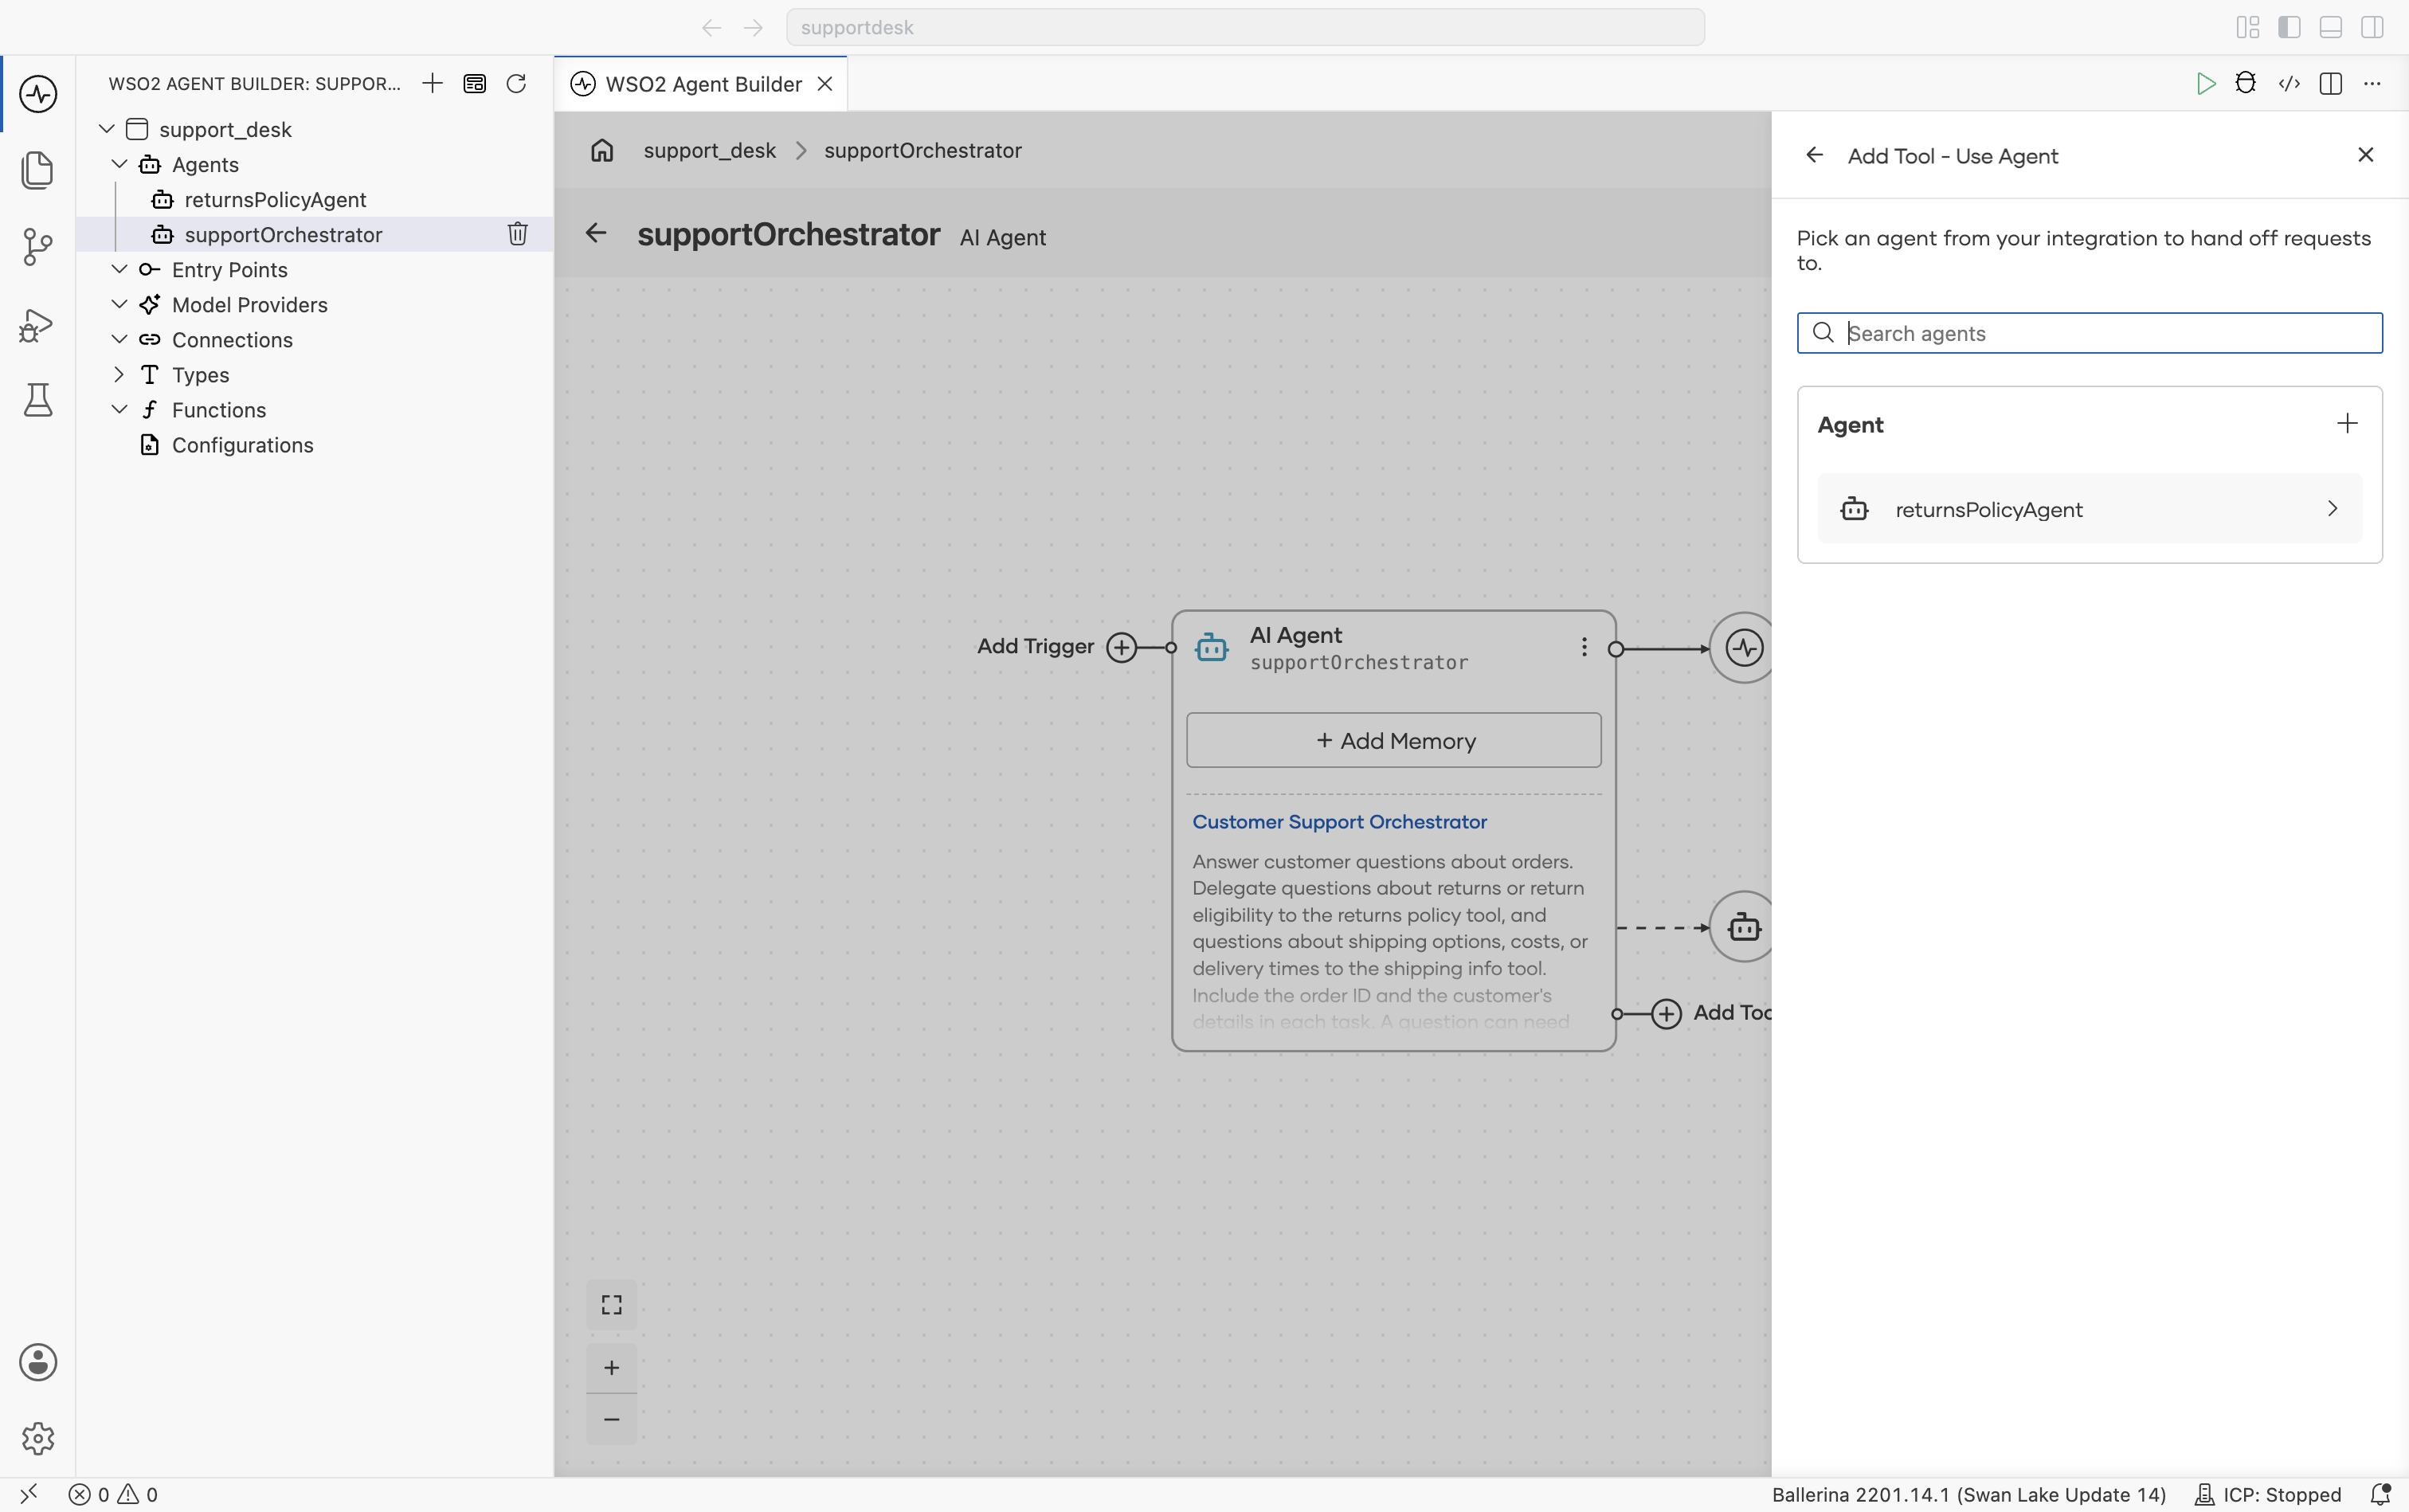
Click Add Tool on the AI Agent node, and select Use Agent. Agents already in the integration are listed under Agent.
-
Click the + next to Agent, and select Create Agent in the Add Agent dialog.
-
Fill in the new agent. In the example, set Role to
Shipping Information Specialist, Agent Name toshippingInfoAgent, and Instructions to:Answer questions about shipping options, costs, and delivery times using these rules. Standard shipping takes 3 to 5 business days and is free on orders over $50; otherwise it costs $5.99. Express shipping takes 1 to 2 business days and costs $14.99. Orders placed before 2 PM ship the same business day. Replacements for returned items ship by standard shipping at no cost. Never promise a specific delivery date.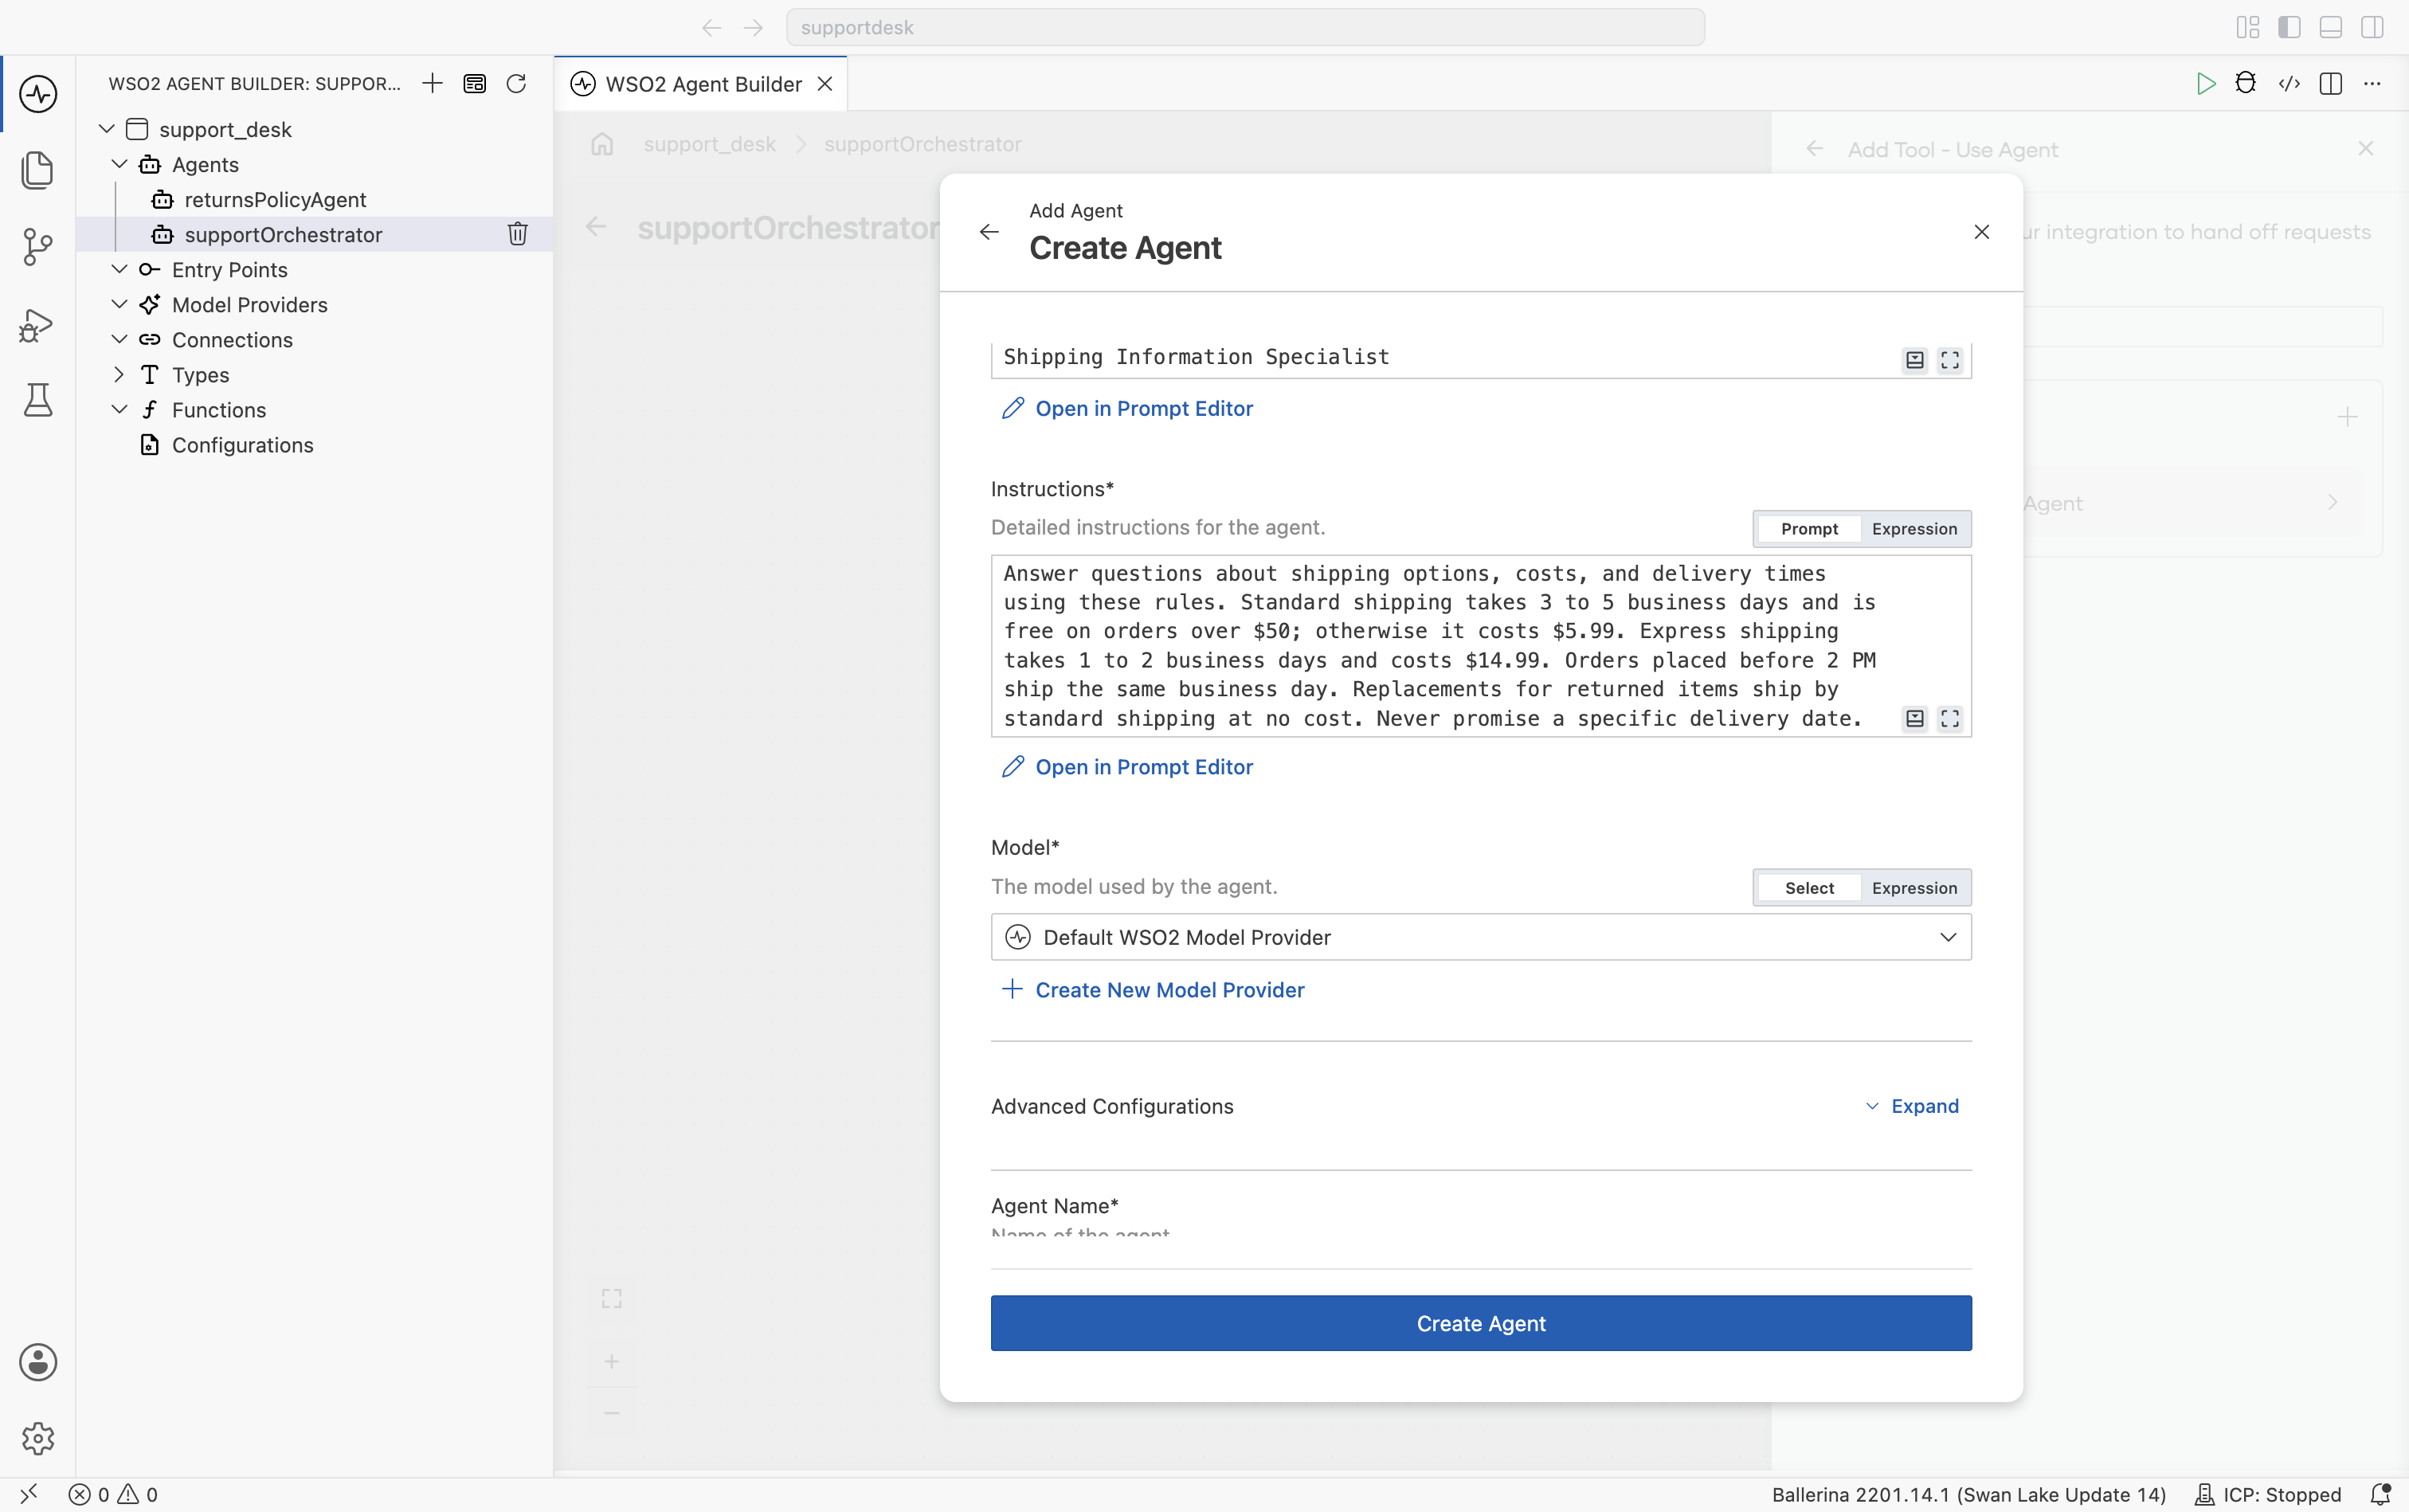
Click Create Agent. The tool form opens for the new agent.
-
Set Description to the following, and click Save Tool:
Use when the customer asks about shipping options, shipping costs, or how long delivery takes, including for a replacement. Pass the customer's question and any order details.
The orchestrator's canvas now shows both agent tools, each linked to the specialist it delegates to.
Reuse an agent or create a new one
If the agent you want already exists in the integration, you can attach it rather than creating another.
| Reuse an existing agent | Create a new agent | |
|---|---|---|
| Configuration | Shared with every other caller of that agent | Independent |
| Memory and session | Shared | Isolated, if configured with its own memory |
| Cost | One agent to maintain | Another agent to maintain |
| Use it when | The callers should behave identically and can share state | The sub-agent needs its own memory scope or configuration |
Reuse is the simpler default. Create a new agent when the callers must not see each other's conversation state.
Delegation must only go one way. Don't attach an agent as a tool of one of its own sub-agents, directly or through a longer chain.
What the sub-agent returns
The value the calling agent receives is determined by the sub-agent's response type. For an instance of an agent definition, this is the definition's Response Type. An agent created with Create Agent returns string.
The tool's Result Type is the type the calling agent sees, and defaults to string.
A narrow response type makes the sub-agent easier for the calling agent to use, because the result needs no further interpretation. A string response gives the calling agent prose it must reason about again.
Test the delegation
An agent only runs when a trigger calls it, so give the calling agent a trigger before you test it. An Agent Chat trigger is the quickest way to try a delegation from inside Agent Builder.
-
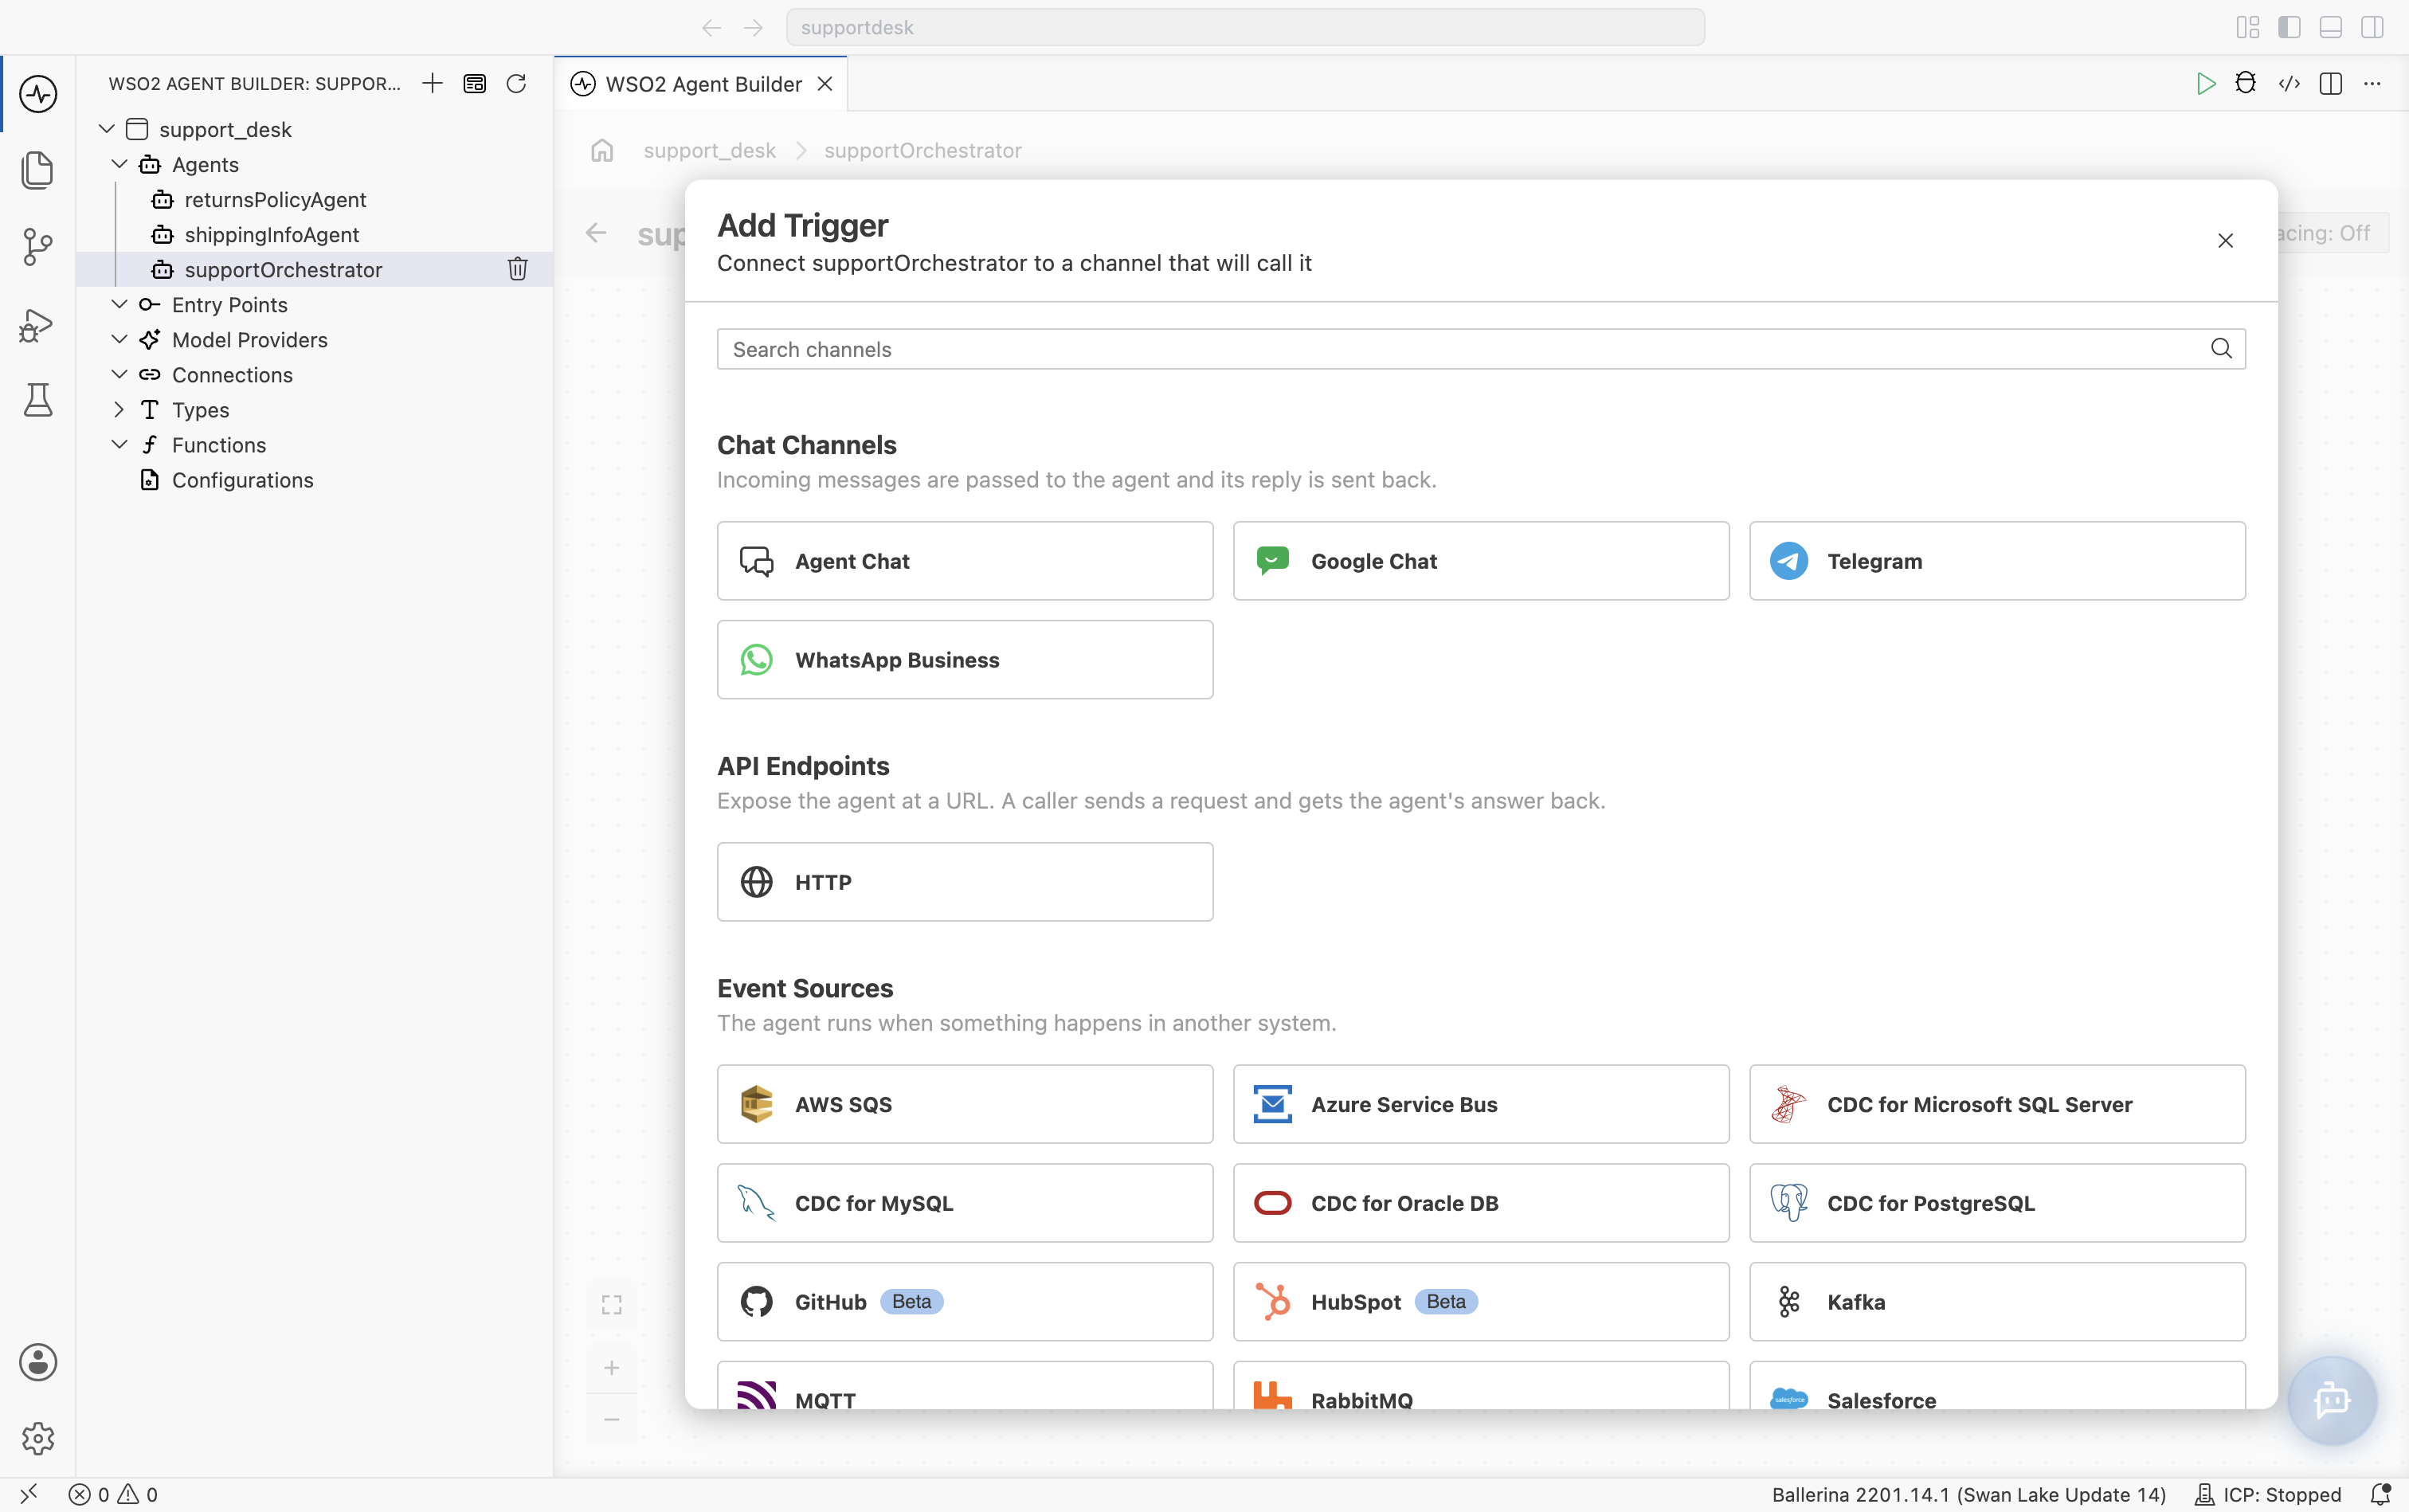
On the calling agent's canvas, or on its card in the integration's Overview, click Add Trigger.
-
Under Chat Channels, select Agent Chat. Keep the generated Service Path, or change it, and click Create.
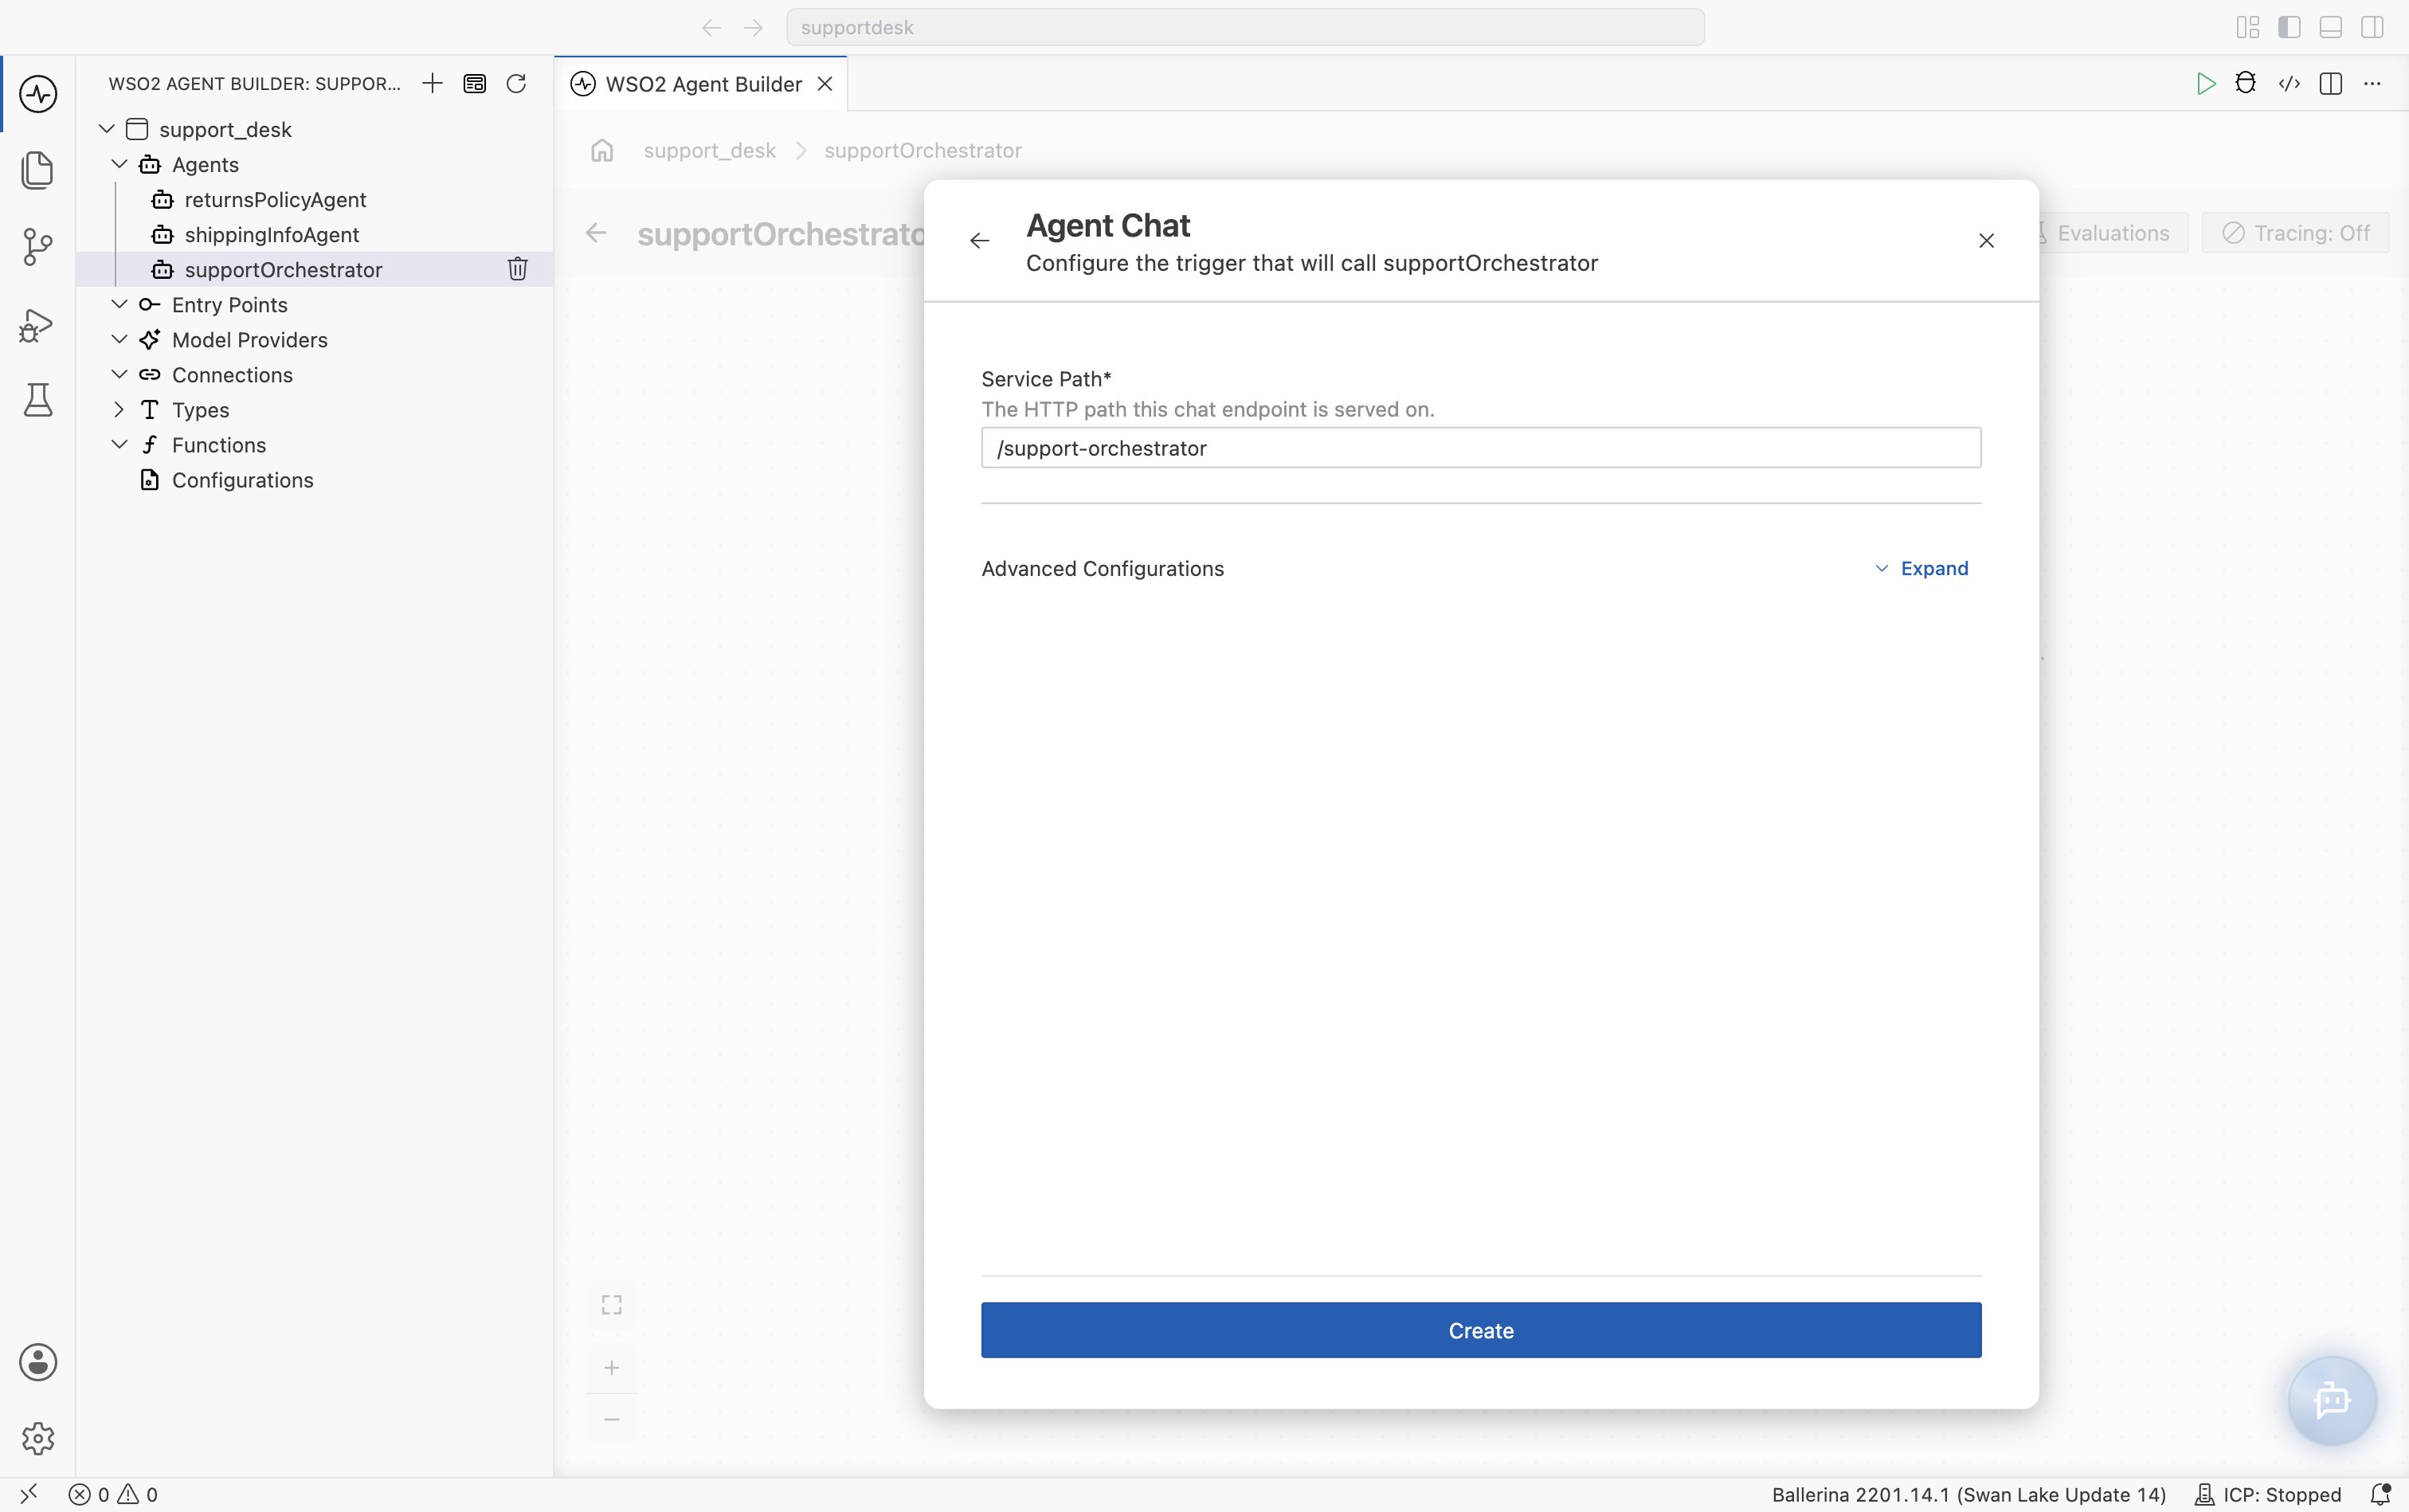
The service listens on the shared HTTP listener on port
9090by default. Expand Advanced Configurations to use a custom listener instead.The Overview now shows the whole hierarchy, as at the start of this page.
-
To see the delegation itself, set Tracing to On before you run. If the integration is already running, restart it: tracing changes only apply to a new run.
-
Click Run on the integration's Overview. When the pop-up 1 service found in the integration. Test with Try It Client? appears, click Test. The Agent Chat panel opens beside the Overview. Ask something that needs both specialists, such as
Can I return order 10423? The jacket arrived in the wrong size. How long will the replacement take to arrive?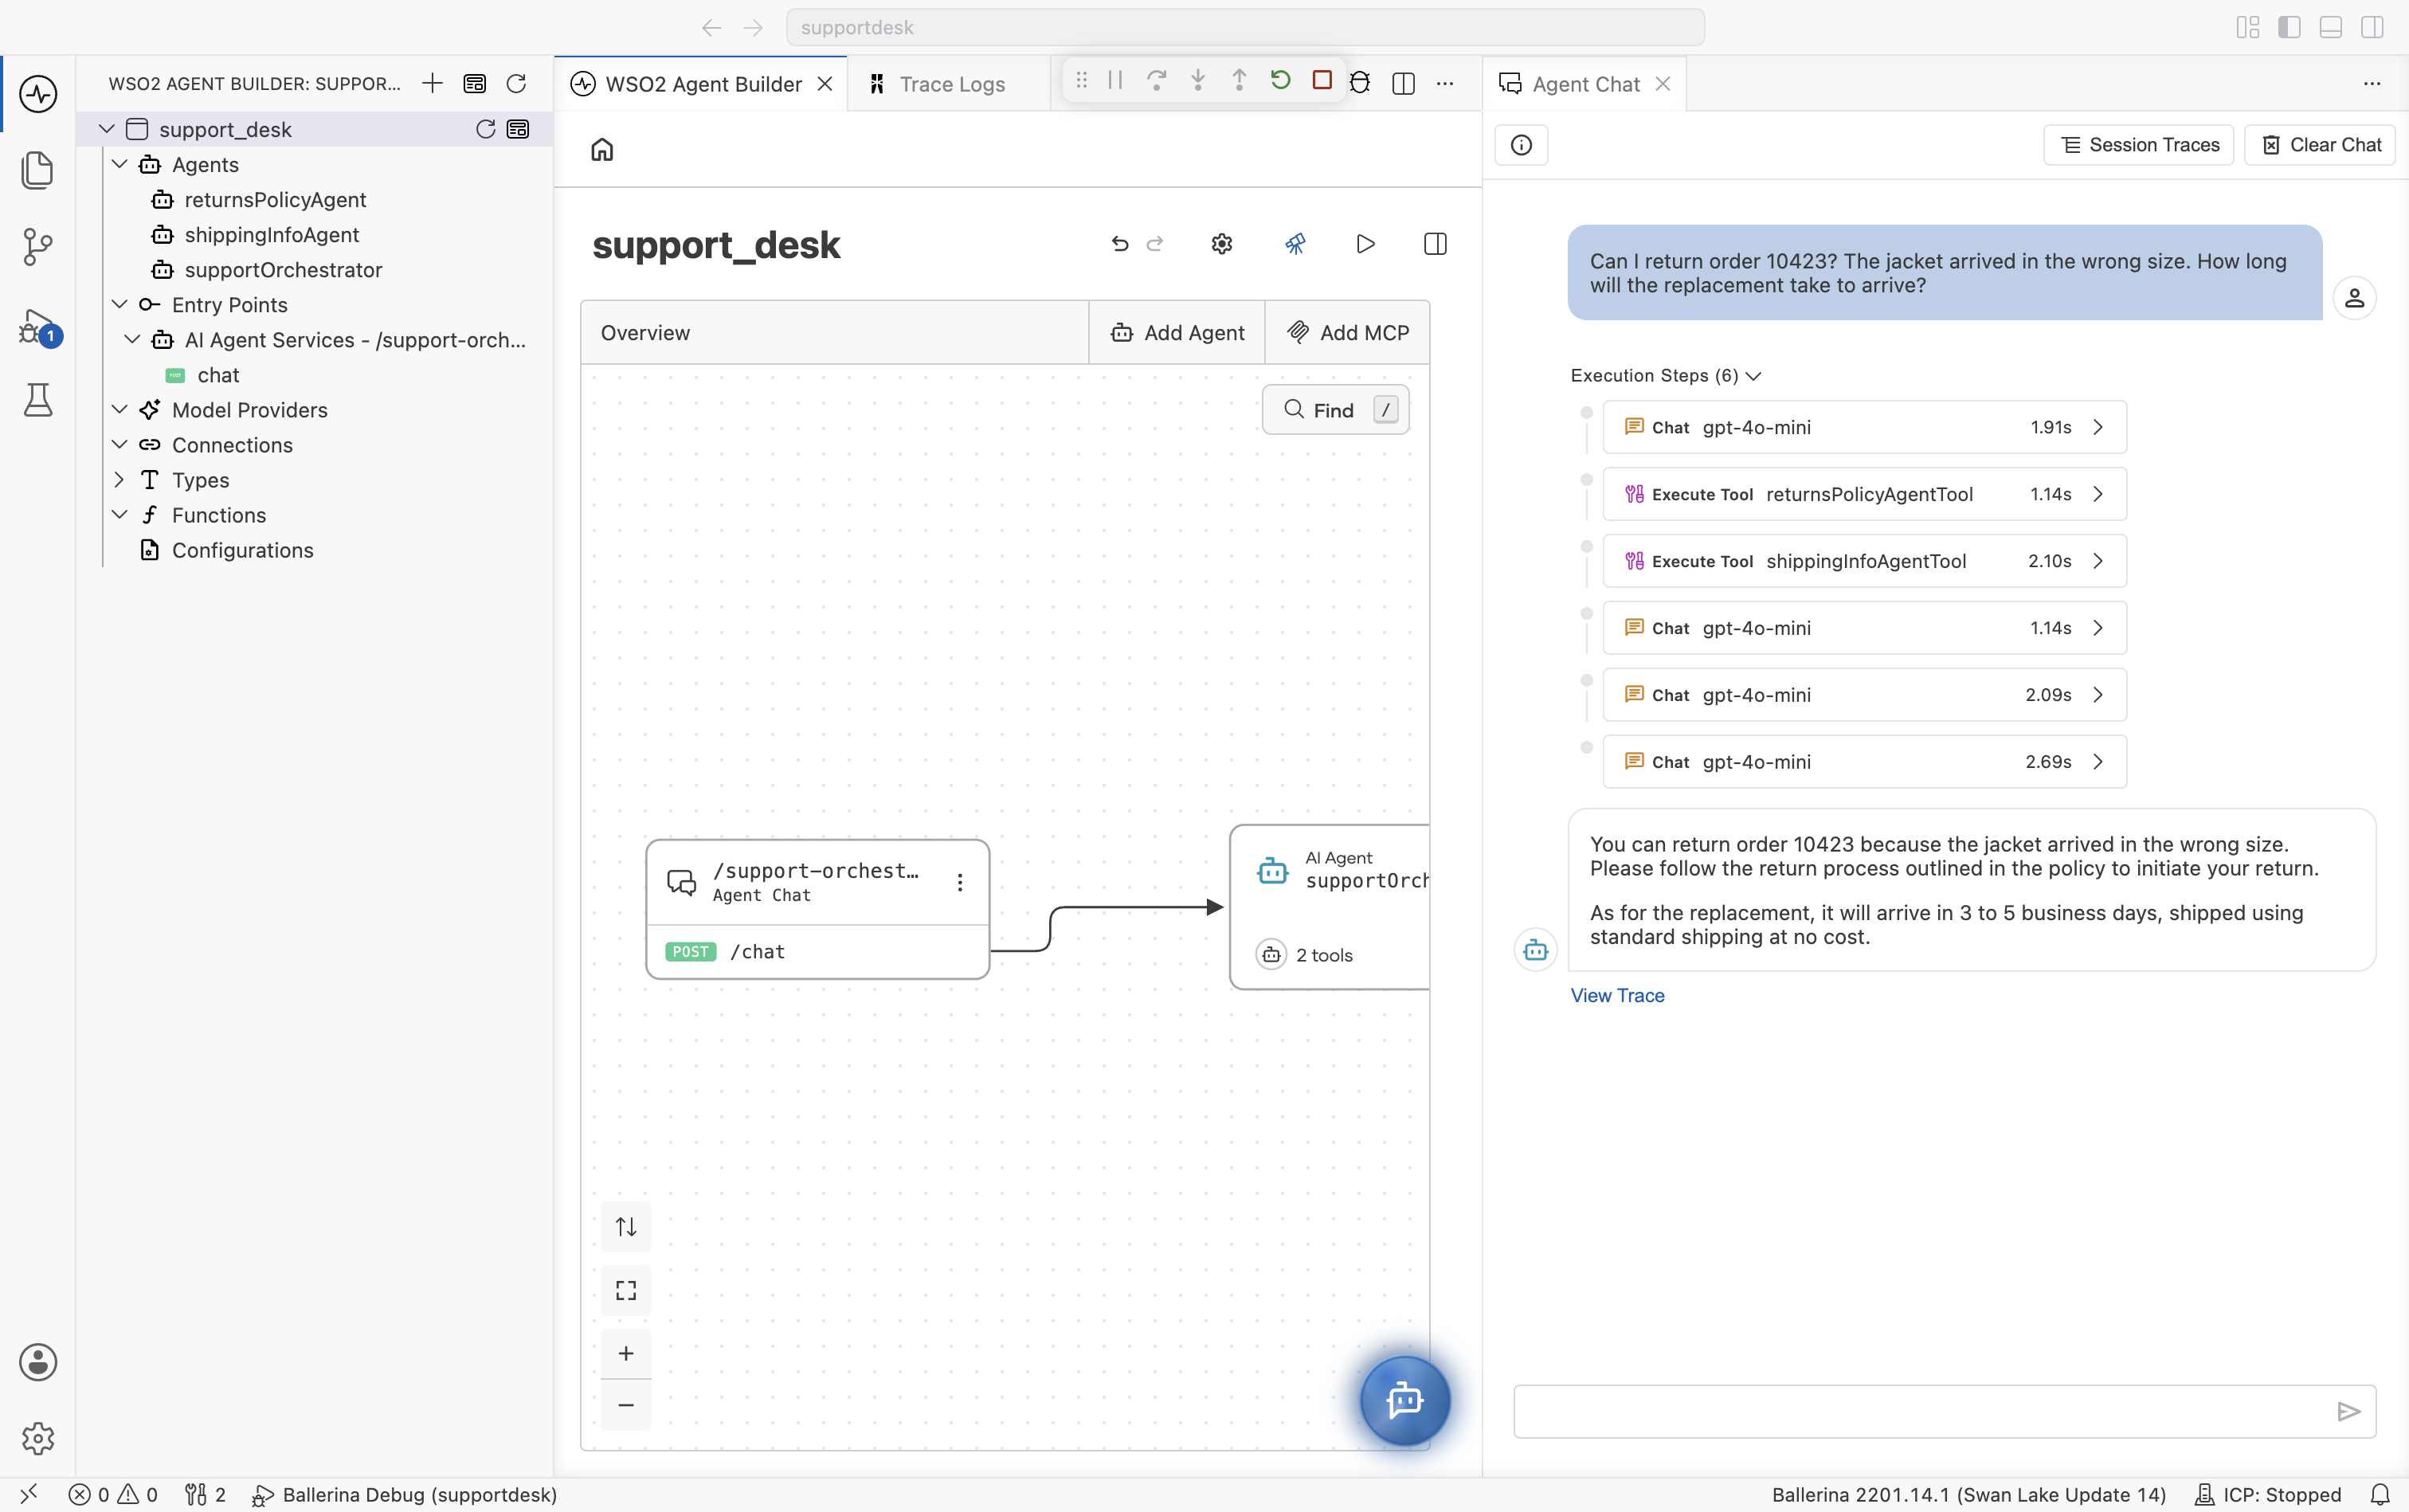
With tracing on, Execution Steps lists the calling agent's run. An Execute Tool step for an agent tool means the calling agent delegated to that specialist. In the example, the orchestrator delegates to both specialists and combines their answers into one reply. If it's missing, the calling agent answered on its own; see Common pitfalls.
-
Click View Trace. Each sub-agent's run appears under the calling agent's run as its own Invoke Agent span. Select one to see the task the calling agent actually sent.
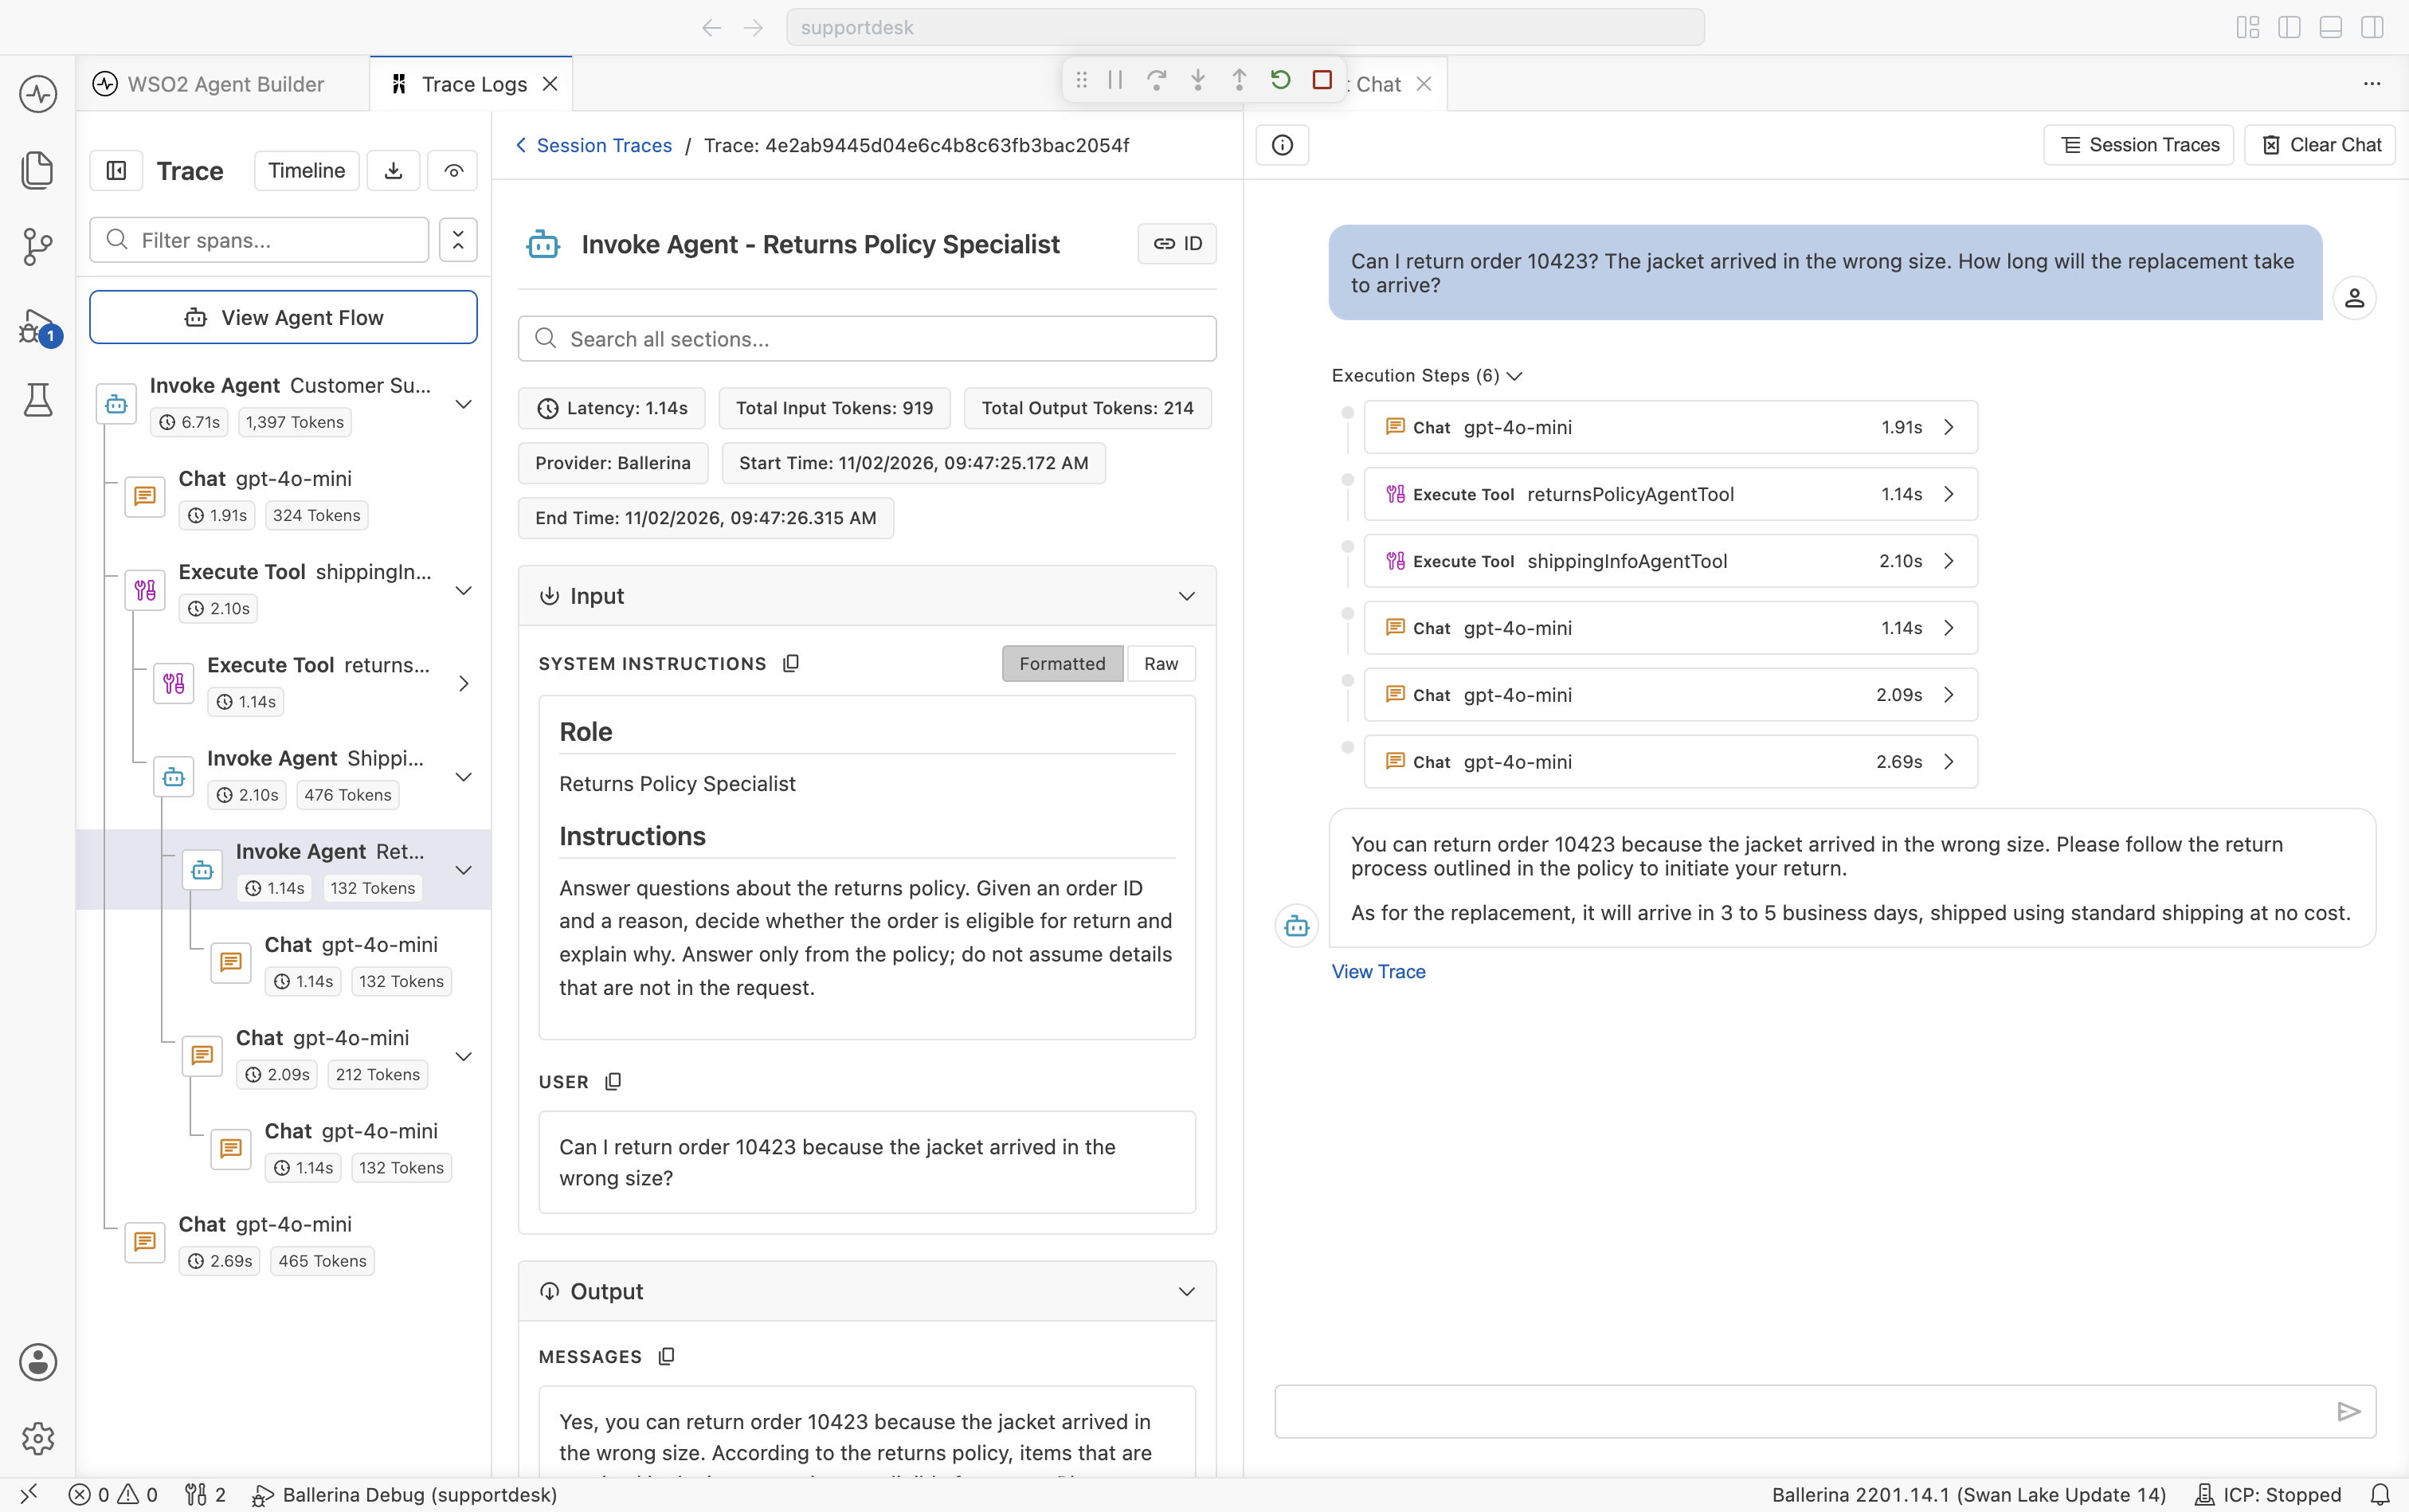
The sub-agent's USER input is the task the calling agent composed, not the customer's original message. This is the only thing the sub-agent sees, so check that it carries everything the sub-agent needs. See Context and session isolation.
For the rest of the trace viewer, see Observability.
Execution behavior
Failures are recoverable. A failing sub-agent does not fail the calling agent's run. The error comes back as a tool result the calling agent can react to. Say in its instructions what to do when a delegation fails.
Iteration budgets compound. Each agent enforces its own Maximum Iterations, defaulting to its tool count or 10, whichever is larger. A delegating agent's worst case is its own budget multiplied by its sub-agents'. Nesting is not otherwise bounded, so keep hierarchies shallow. See Advanced configuration.
Delegations can run in parallel. Tool calls from one response run concurrently by default, so two delegations can be in flight at once. This matters if they share memory. See Memory posture.
Common pitfalls
| Symptom | Likely cause | Fix |
|---|---|---|
| The sub-agent is never called, and Execution Steps has no Execute Tool step for it. | The description is still the generated default, which names the agent but says nothing about the situations it handles. | Replace it with the conditions that should trigger a hand-off. |
| The calling agent re-answers what the sub-agent already answered. | The response type is string and the result reads as advice. | Narrow the response type, and say in the instructions that the result is authoritative. |
| The sub-agent lacks information it needs. | The task the calling agent composed omitted it. Check the sub-agent's USER input in the trace. | Say in the tool description and the calling agent's instructions what a complete handoff must include. |
| Two callers see each other's conversation. | A single agent with shared memory is attached to both. | Create a separate agent for each caller. |
| Execution steps don't appear in the chat. | Tracing is off, or was turned on without restarting the integration. | Set Tracing to On and restart the integration. |
What's next
- Sequential Agents — Run agents one after another in a fixed order.
- Multi-Agent Concepts — Topologies, cost, and when not to delegate.
- Create an Agent Definition — Build a specialist once and reuse it.
- Tools — The other tool types available to an agent.
- Observability — Trace a delegated call end to end.