Add Data Sources
RAG ingestion automation loads content from an external data source into a Knowledge Base. It extracts and chunks supported files, creates embeddings with the Knowledge Base configuration, and stores the embeddings in its vector store. You can run ingestion once, on demand, or on a recurring schedule.
Open AI Services > Knowledge Base, select a Knowledge Base, and use its Overview tab to add and operate data sources.
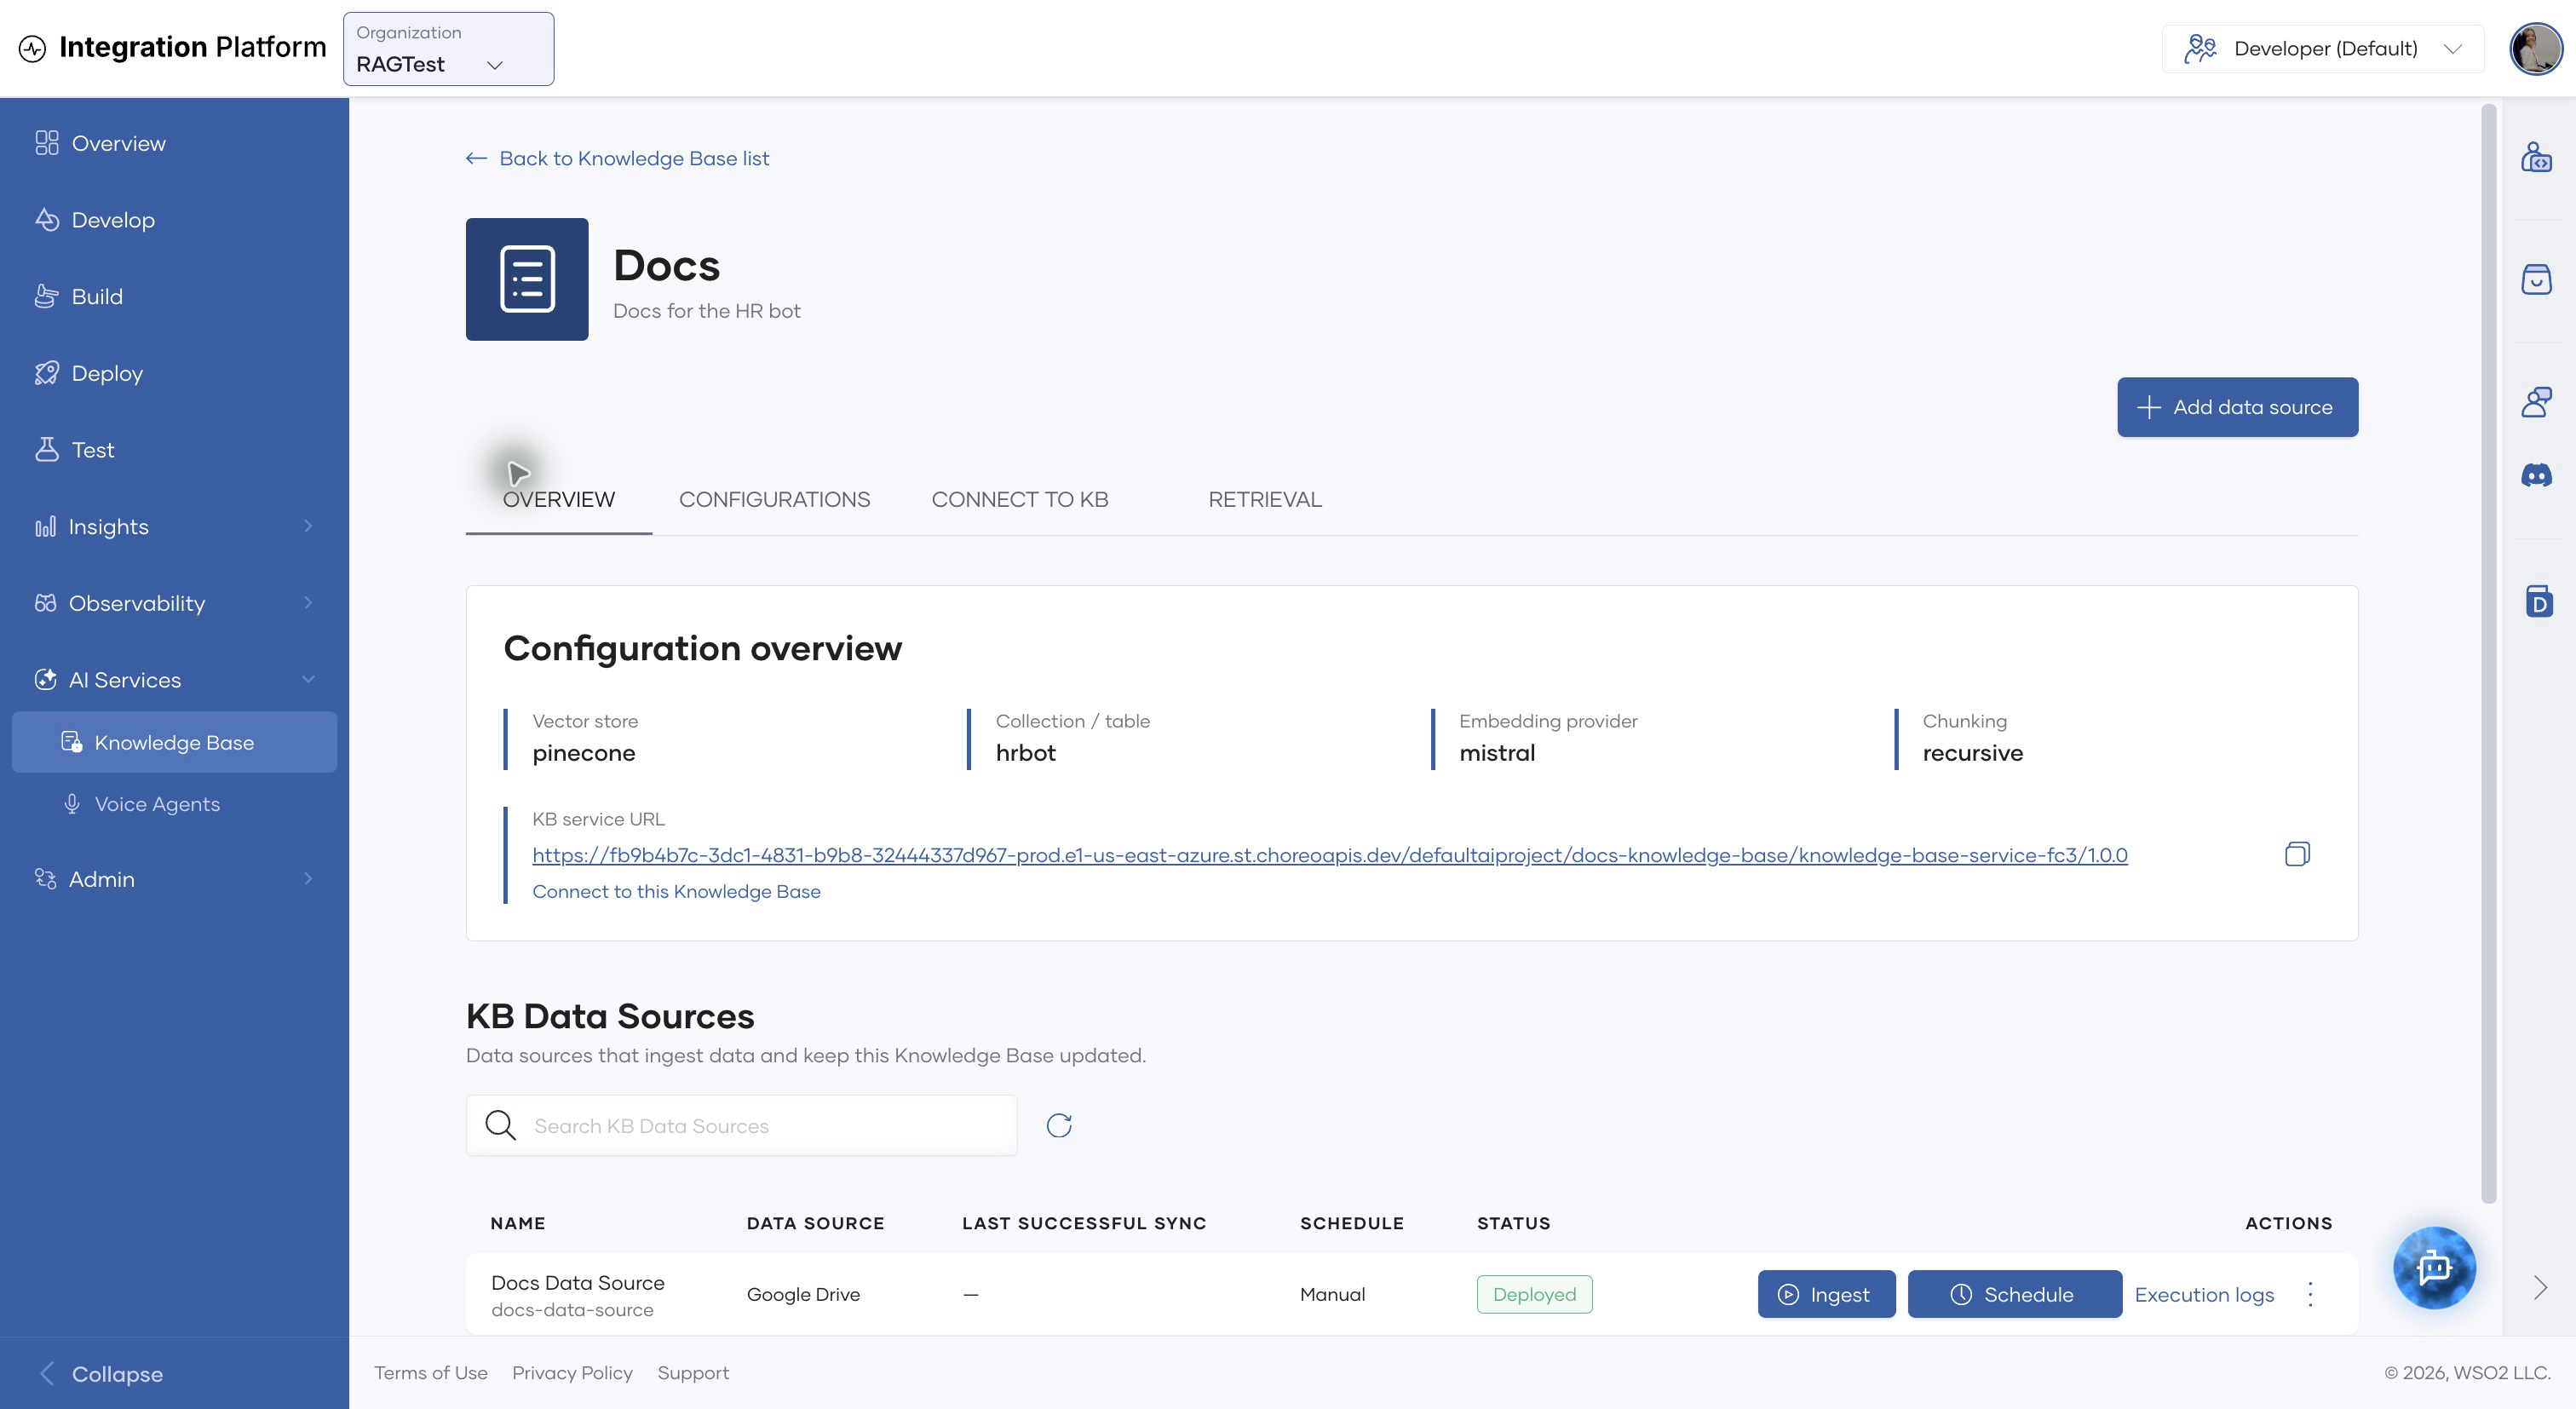
The KB Data Sources table provides the following information and controls for each source:
| Item | Description |
|---|---|
| Name and Data source | Identify the ingestion automation and its source type. |
| Last successful sync | Shows when content was last ingested successfully. |
| Schedule | Shows whether ingestion is manual or scheduled. |
| Status | Shows the deployment state. Wait for Deployed before running ingestion. |
| Ingest | Starts an ingestion run immediately. |
| Schedule | Adds or changes an interval or cron schedule. |
| Execution logs | Opens the logs for completed and failed runs. |
| Actions menu | Opens the data-source component or deletes the data source. |
Prerequisites
Before adding a data source, make sure that you have:
- A Knowledge Base. See Create a Knowledge Base.
- Credentials that can read the target Google Drive folder or Amazon S3 bucket.
- The Google Drive folder ID or Amazon S3 bucket name.
- Permission to create and manage resources in the organization.
Supported content includes PDF files (including scanned PDFs), DOCX, PPTX, XLSX, CSV, HTML, Markdown, images, and audio files in MP3, WAV, M4A, FLAC, or OGG format.
Treat API keys, OAuth client secrets, refresh tokens, and AWS access keys as secrets. Do not place them in source files, documentation, or logs.
Add a data source
- Open AI Services > Knowledge Base.
- Select the Knowledge Base that should receive the content.
- On the Overview tab, click Add data source.
- Complete the three-step Create Ingestion wizard.
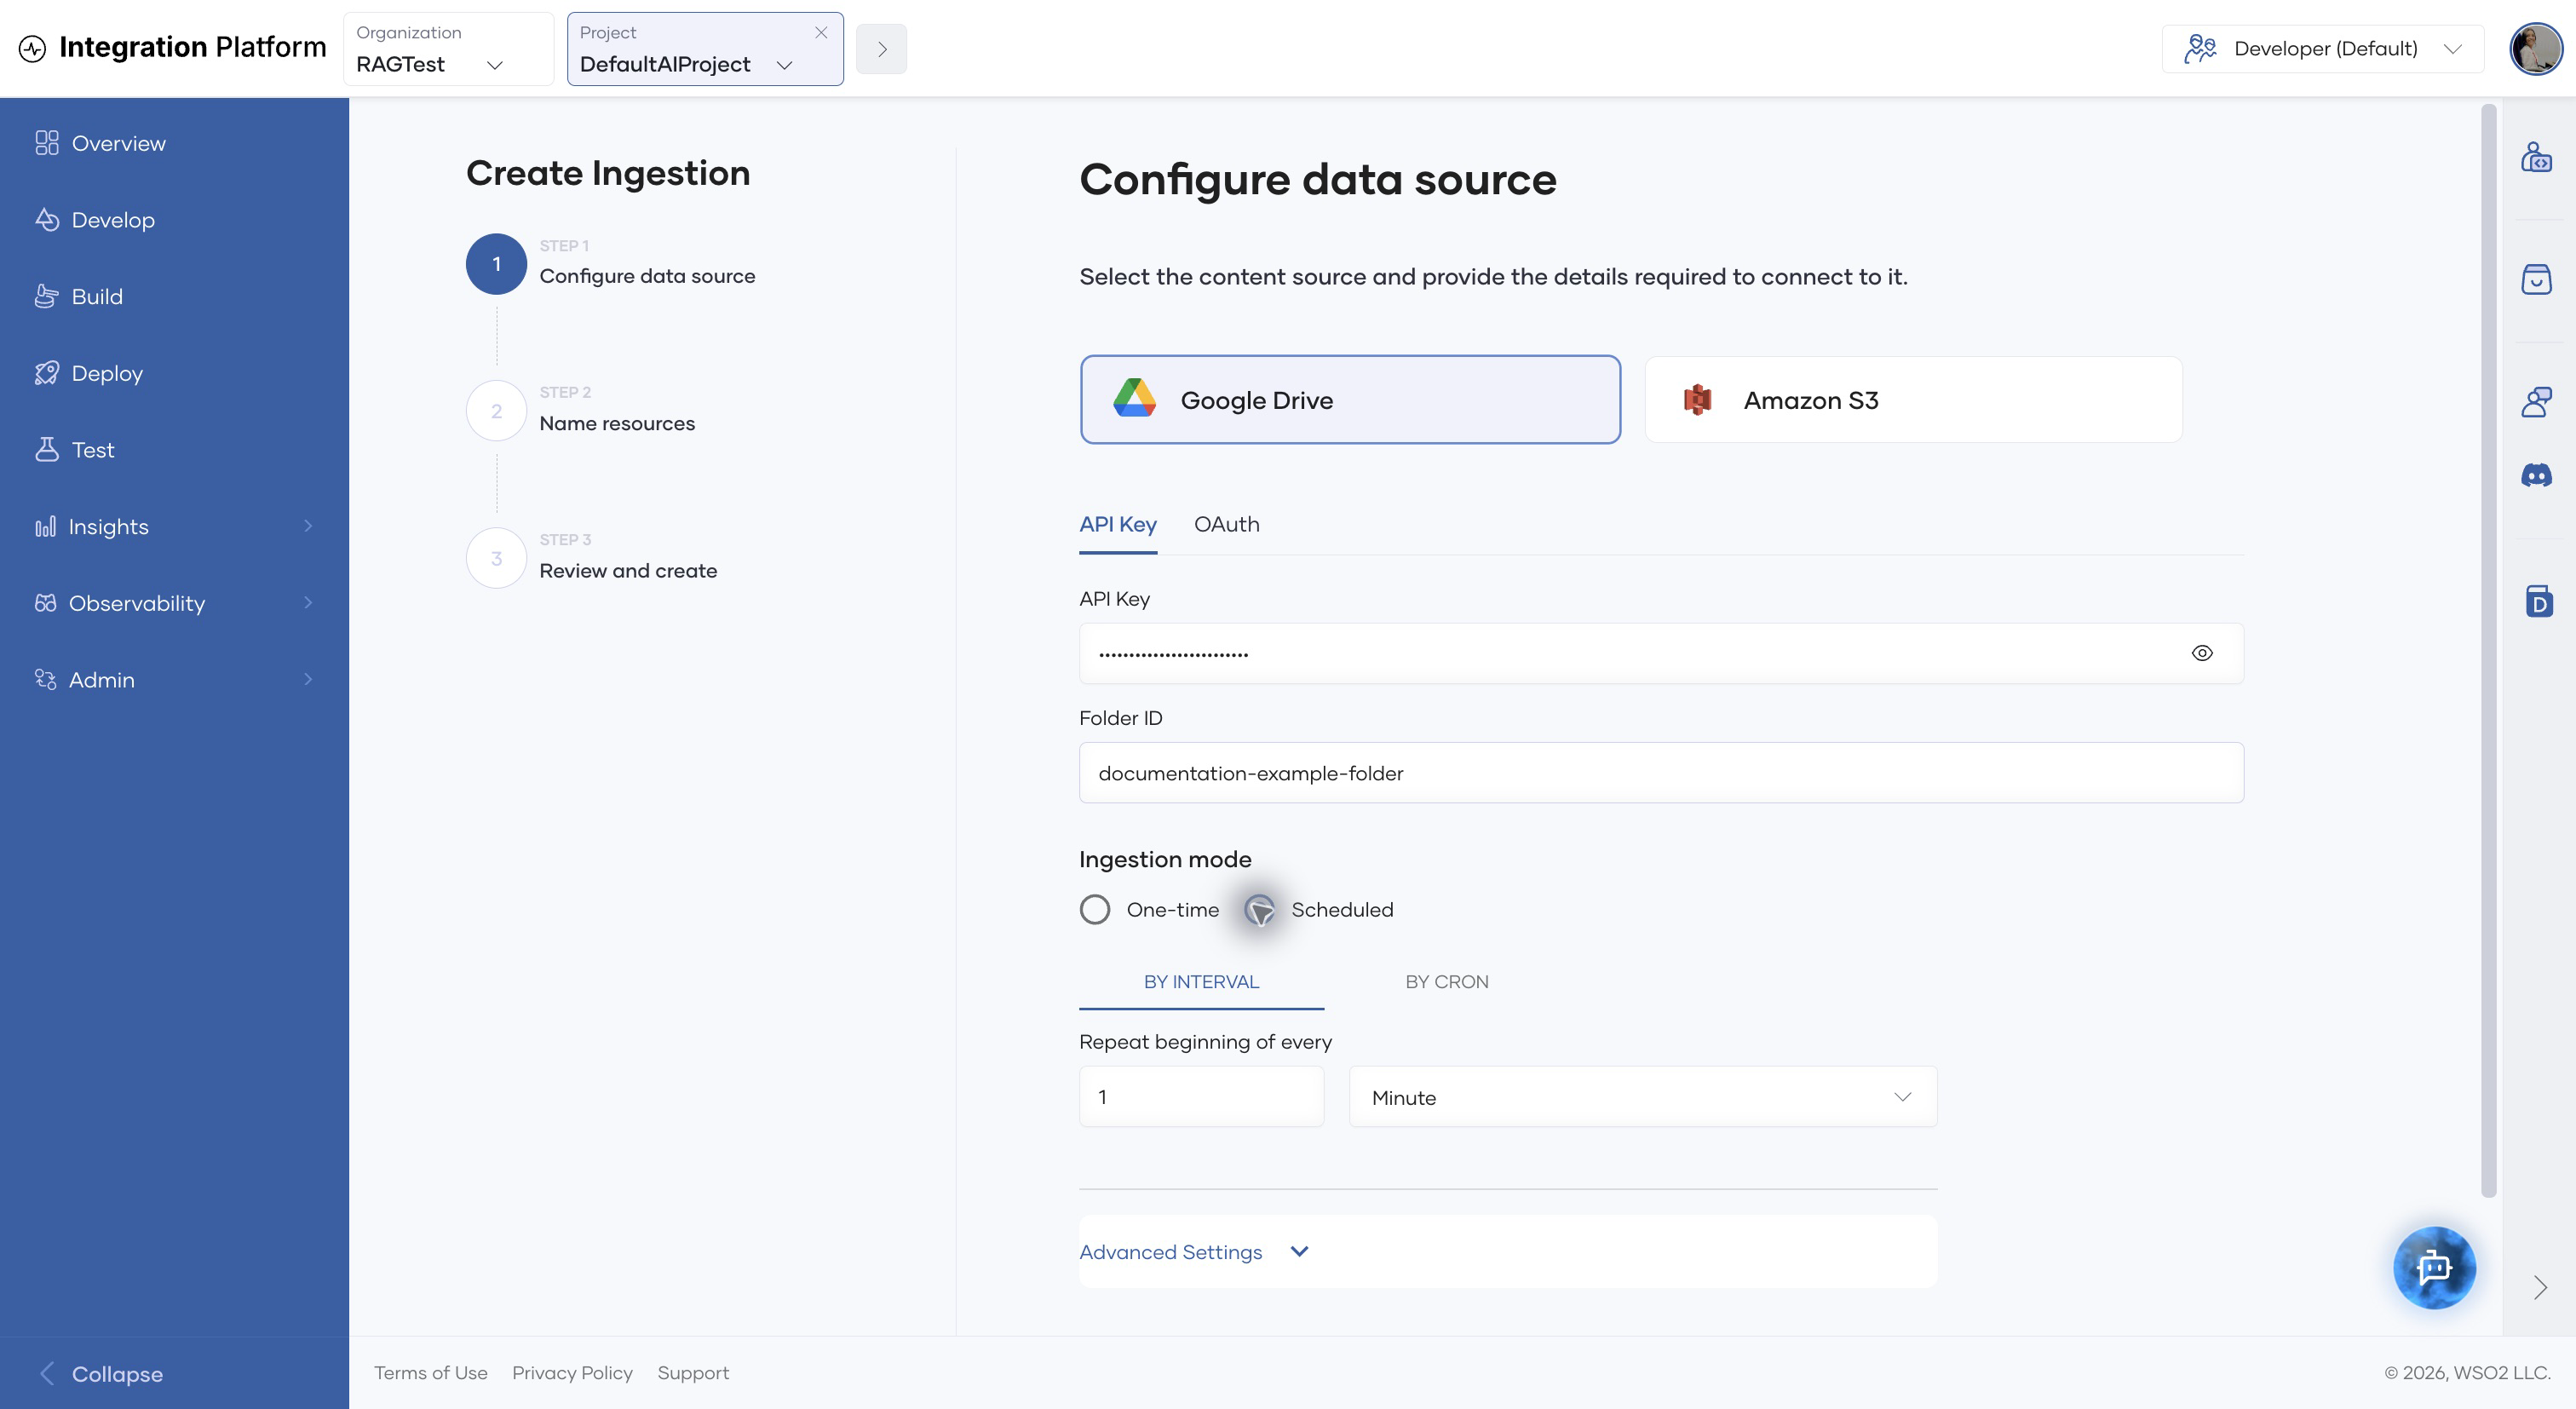
Step 1: Configure the data source
Select Google Drive or Amazon S3, and then enter the connection details.
| Data source | Authentication and location details |
|---|---|
| Google Drive - API Key | Enter an API key with access to the Google Drive API and the target Folder ID. The folder must allow Anyone with the link access when you use an API key. |
| Google Drive - OAuth | Enter the Client ID, Client Secret, Refresh Token, and target Folder ID. Use OAuth when the folder must remain private. |
| Amazon S3 | Enter the Access Key ID, Secret Access Key, and Bucket Name. The credentials must be able to list and read objects in the bucket. |
You can find a Google Drive folder ID in its URL after /folders/.
Next, select an ingestion mode:
- One-time runs ingestion once after the resource is deployed. You can run it again later with Ingest.
- Scheduled runs ingestion repeatedly. Select By interval for a simple recurring interval, or By cron for a cron expression and advanced timing controls.
The Configure data source step is shown below.
Click Next.
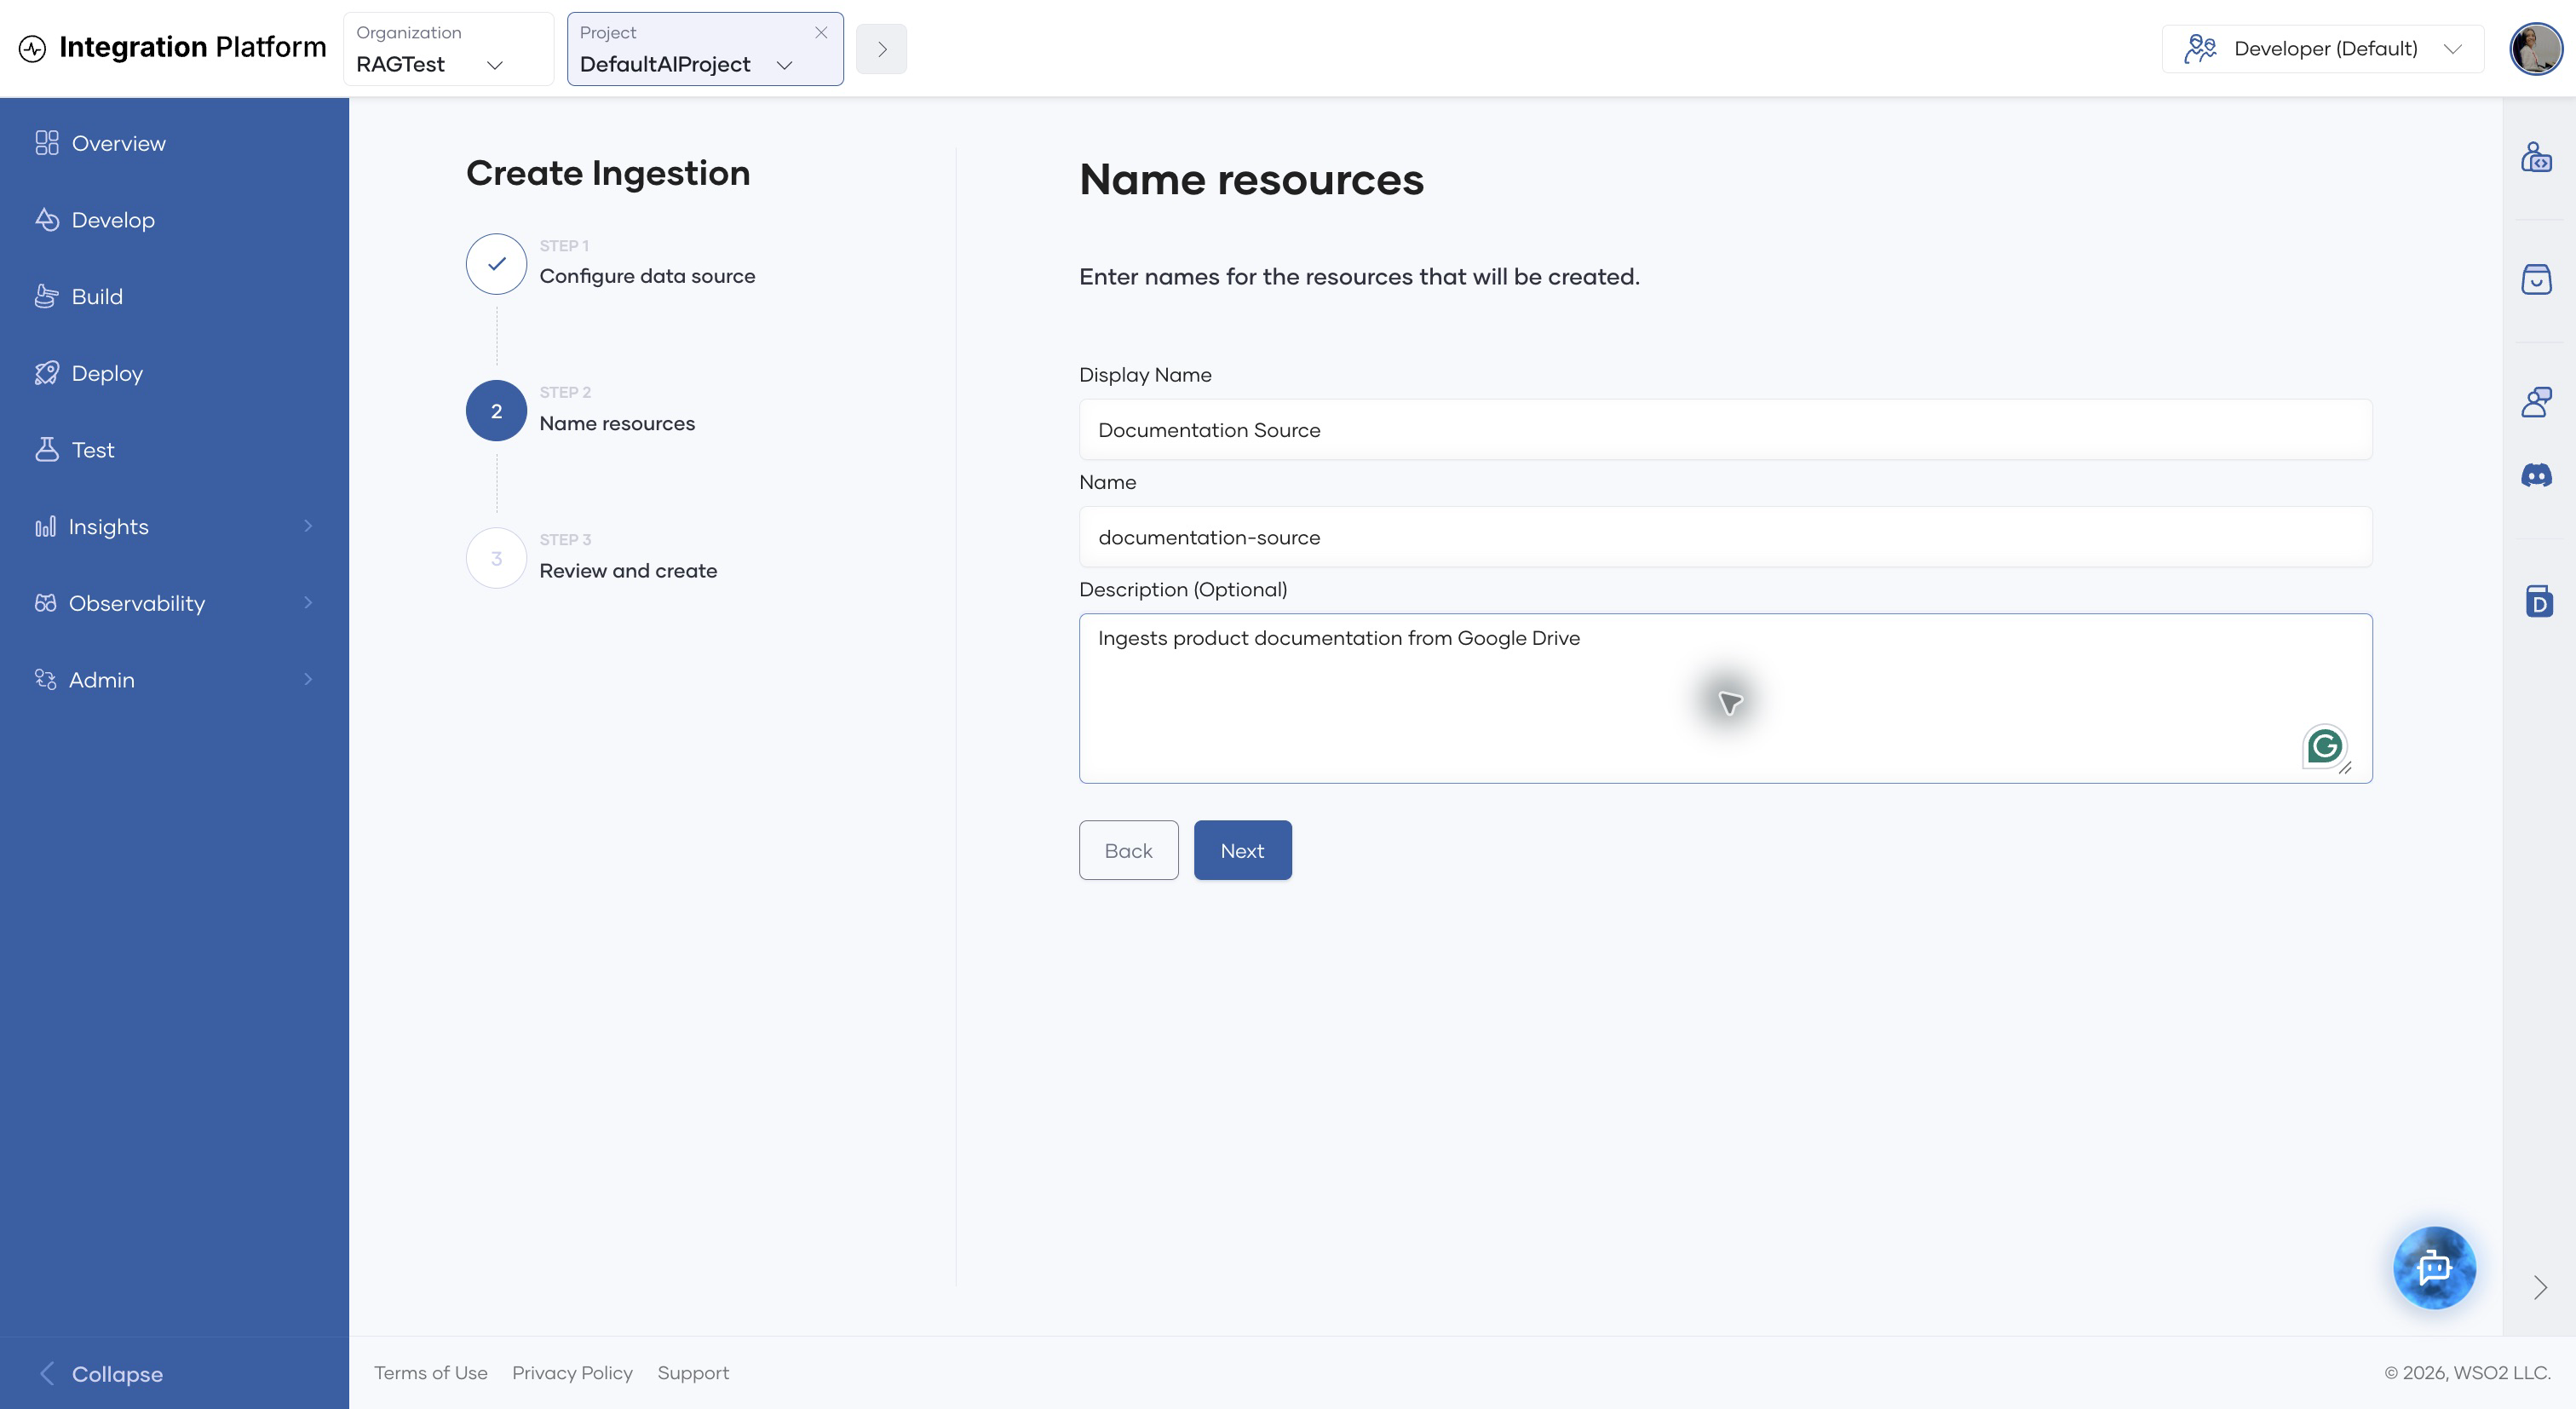
Step 2: Name the resources
Enter the resource details:
- Display Name: A readable name shown in the console.
- Name: The unique resource name. The console generates it from the display name, and you can edit it before creation.
- Description: Optional context about the source or its content.
Click Next.
Step 3: Review and create
Review the ingestion mode, resource name, Knowledge Base configuration, and data-source connection. Click Back to correct a value, or click Create to provision the ingestion automation.
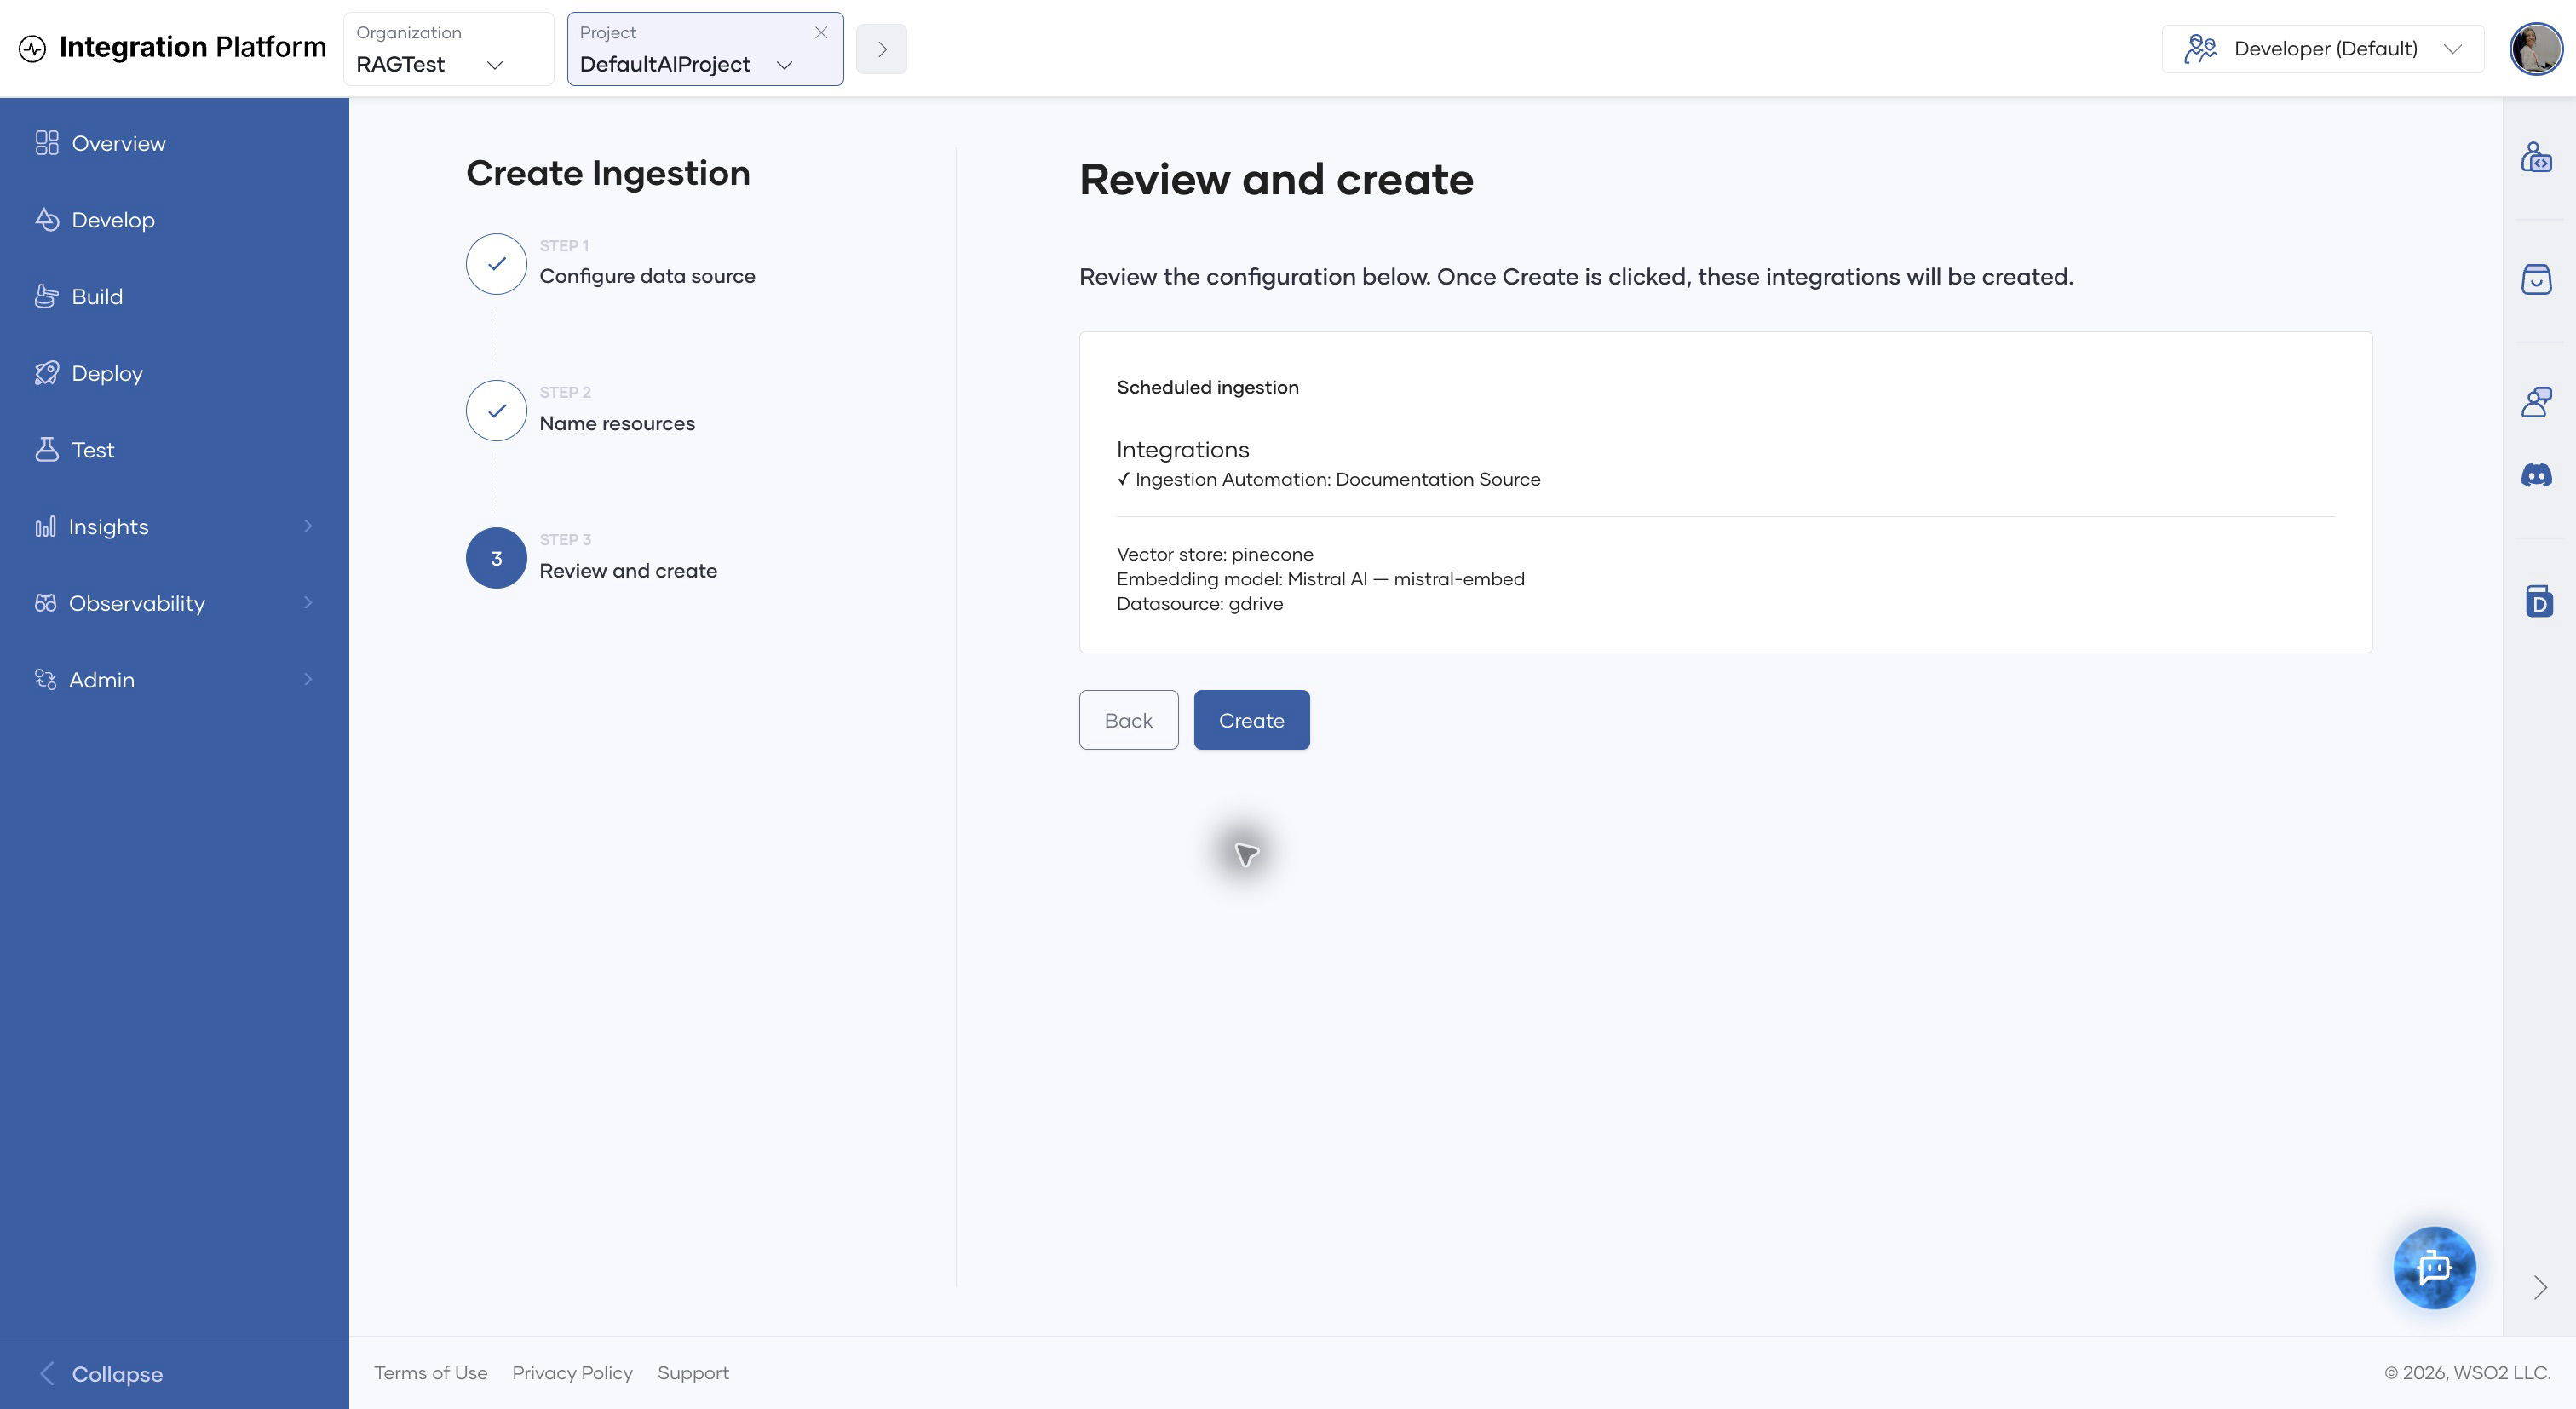
The data source appears in the KB Data Sources table. Wait until its status changes to Deployed.
Run and monitor ingestion
From the Knowledge Base Overview tab, you can operate each data source as follows:
- Click Ingest to start a run immediately. This is also useful when you need to refresh content before the next scheduled run.
- Click Schedule to add or update an interval or cron schedule.
- Open Execution logs to confirm that the run completed and to investigate failures.
- Check Last successful sync to verify that the Knowledge Base contains the latest source content.
After a successful run, open the Retrieval tab and send a query based on the ingested content. Review the returned chunks to confirm that the source is accessible, the content was processed, and retrieval settings return relevant results. For more information, see Knowledge Bases.
Troubleshoot ingestion
| Symptom | What to check |
|---|---|
| The data source does not reach Deployed | Open the actions menu, select the data-source component, and review its deployment logs. Correct the reported configuration or deployment error, and then redeploy. See Troubleshoot deployment for more guidance. |
| An ingestion run fails | Open Execution logs and check the provider credentials, source location, and network access. |
| No content is ingested | Confirm that the folder or bucket contains supported files and that the configured identity can list and read them. |
| New content is not appearing | Check the schedule and Last successful sync, or click Ingest to run immediately. |
| Retrieval returns no relevant chunks | Confirm that ingestion succeeded, query for text that exists in the source, and then adjust the retrieval result count or similarity threshold. |
What's next
- Manage a Knowledge Base — Edit configuration, connect applications, test retrieval, and delete a Knowledge Base.
- Vector Databases — Learn about the vector stores available to Knowledge Bases.