Voice Agents
A voice agent lets users talk to an AI agent instead of typing. WSO2 Cloud deploys a voice pipeline in front of your AI agent: it streams the user's audio through LiveKit, converts speech to text, sends the text to the AI agent over WebSocket, and speaks the agent's reply back using a text-to-speech provider.
You don't write any extra code for the voice pipeline. It's created and deployed as a separate integration, either from the AI agent's overview page or from AI Services > Voice Agents.
Voice agents are available to every organization under AI Services and don't need to be turned on as a feature preview. They're a paid feature: you need a paid WSO2 Cloud subscription to create one.
First, build the AI agent, expose it over WebSocket, and deploy it to WSO2 Cloud:
- In WSO2 Integrator, add a Voice Agent Service to the project and call your agent from it. See Voice Agent in WSO2 Integrator.
- In WSO2 Agent Builder, add a Voice Chat trigger to the agent, next to its Agent Chat trigger. See Voice Agent in WSO2 Agent Builder.
This page then covers adding the voice pipeline to that agent in WSO2 Cloud.
- A paid WSO2 Cloud subscription. Voice agents are available to all organizations, but Enable Voice Agents is disabled on the free tier.
- An AI agent integration deployed in WSO2 Cloud that exposes a WebSocket endpoint. Without one, Enable Voice Agents is disabled with the tooltip Add a WebSocket endpoint to this AI Agent to enable voice. See Expose an AI agent over WebSocket.
- A LiveKit project: the LiveKit URL (for example,
wss://your-project.livekit.cloud), an API key, and an API secret. See LiveKit credentials. - API keys for your speech-to-text and text-to-speech providers. For OpenAI, create a key on the OpenAI API keys page.
Expose an AI agent over WebSocket
The voice pipeline sends each transcribed user utterance to the AI agent as a chat message and speaks the returned string. Create the AI agent, then expose it over WebSocket. You can reuse an agent that you already expose as a chat agent, so the same agent answers both chat and voice:
- WSO2 Integrator: add a Voice Agent Service and call your agent from its
onChatMessagehandler. See Voice Agent in WSO2 Integrator. - WSO2 Agent Builder: open the agent's canvas, click Add Trigger, and select Voice Chat under Chat Channels. Agent Builder wires the agent into the
onChatMessagehandler for you. See Voice Agent in WSO2 Agent Builder.
Both generate code similar to the following:
import ballerinax/ai.wso2.integration;

listener integration:CloudVoiceListener voiceListener = new (8080);

isolated service integration:VoiceService on voiceListener {
    isolated remote function onChatMessage(integration:ChatMessage message) returns string|error {
        string response = check customerSupportAgent.run(message.message, message.sessionId);
        return response;
    }
}
In this example, customerSupportAgent is a customer support agent with tools to check order status, explain the return policy, and create support tickets, plus short-term memory. Passing message.sessionId to the agent keeps the conversation context for the duration of a voice session.
Deploy the integration to WSO2 Cloud so its WebSocket endpoint is running.
Write the agent's system prompt for speech: ask for short replies (one or two sentences) with no Markdown, lists, or code. Long or formatted replies take longer to synthesize and sound unnatural when read aloud.
Create a voice agent
You can create a voice agent in two ways:
- From the AI agent's overview page: the quickest option when the AI agent is deployed in WSO2 Cloud. The agent is preselected for you.
- From AI Services > Voice Agents: lets you pick the project and the target agent yourself. The target can be an agent deployed in WSO2 Cloud (Platform-Hosted Agent) or any agent you host yourself that's reachable over WebSocket (Externally-Hosted Agent, for development and testing only).
Both options then continue through the same LiveKit, speech-to-text, text-to-speech, and deploy steps.
From the AI agent overview page
Open the AI agent integration's Overview page and click Enable Voice Agents (on the right, under Lifecycle Status).
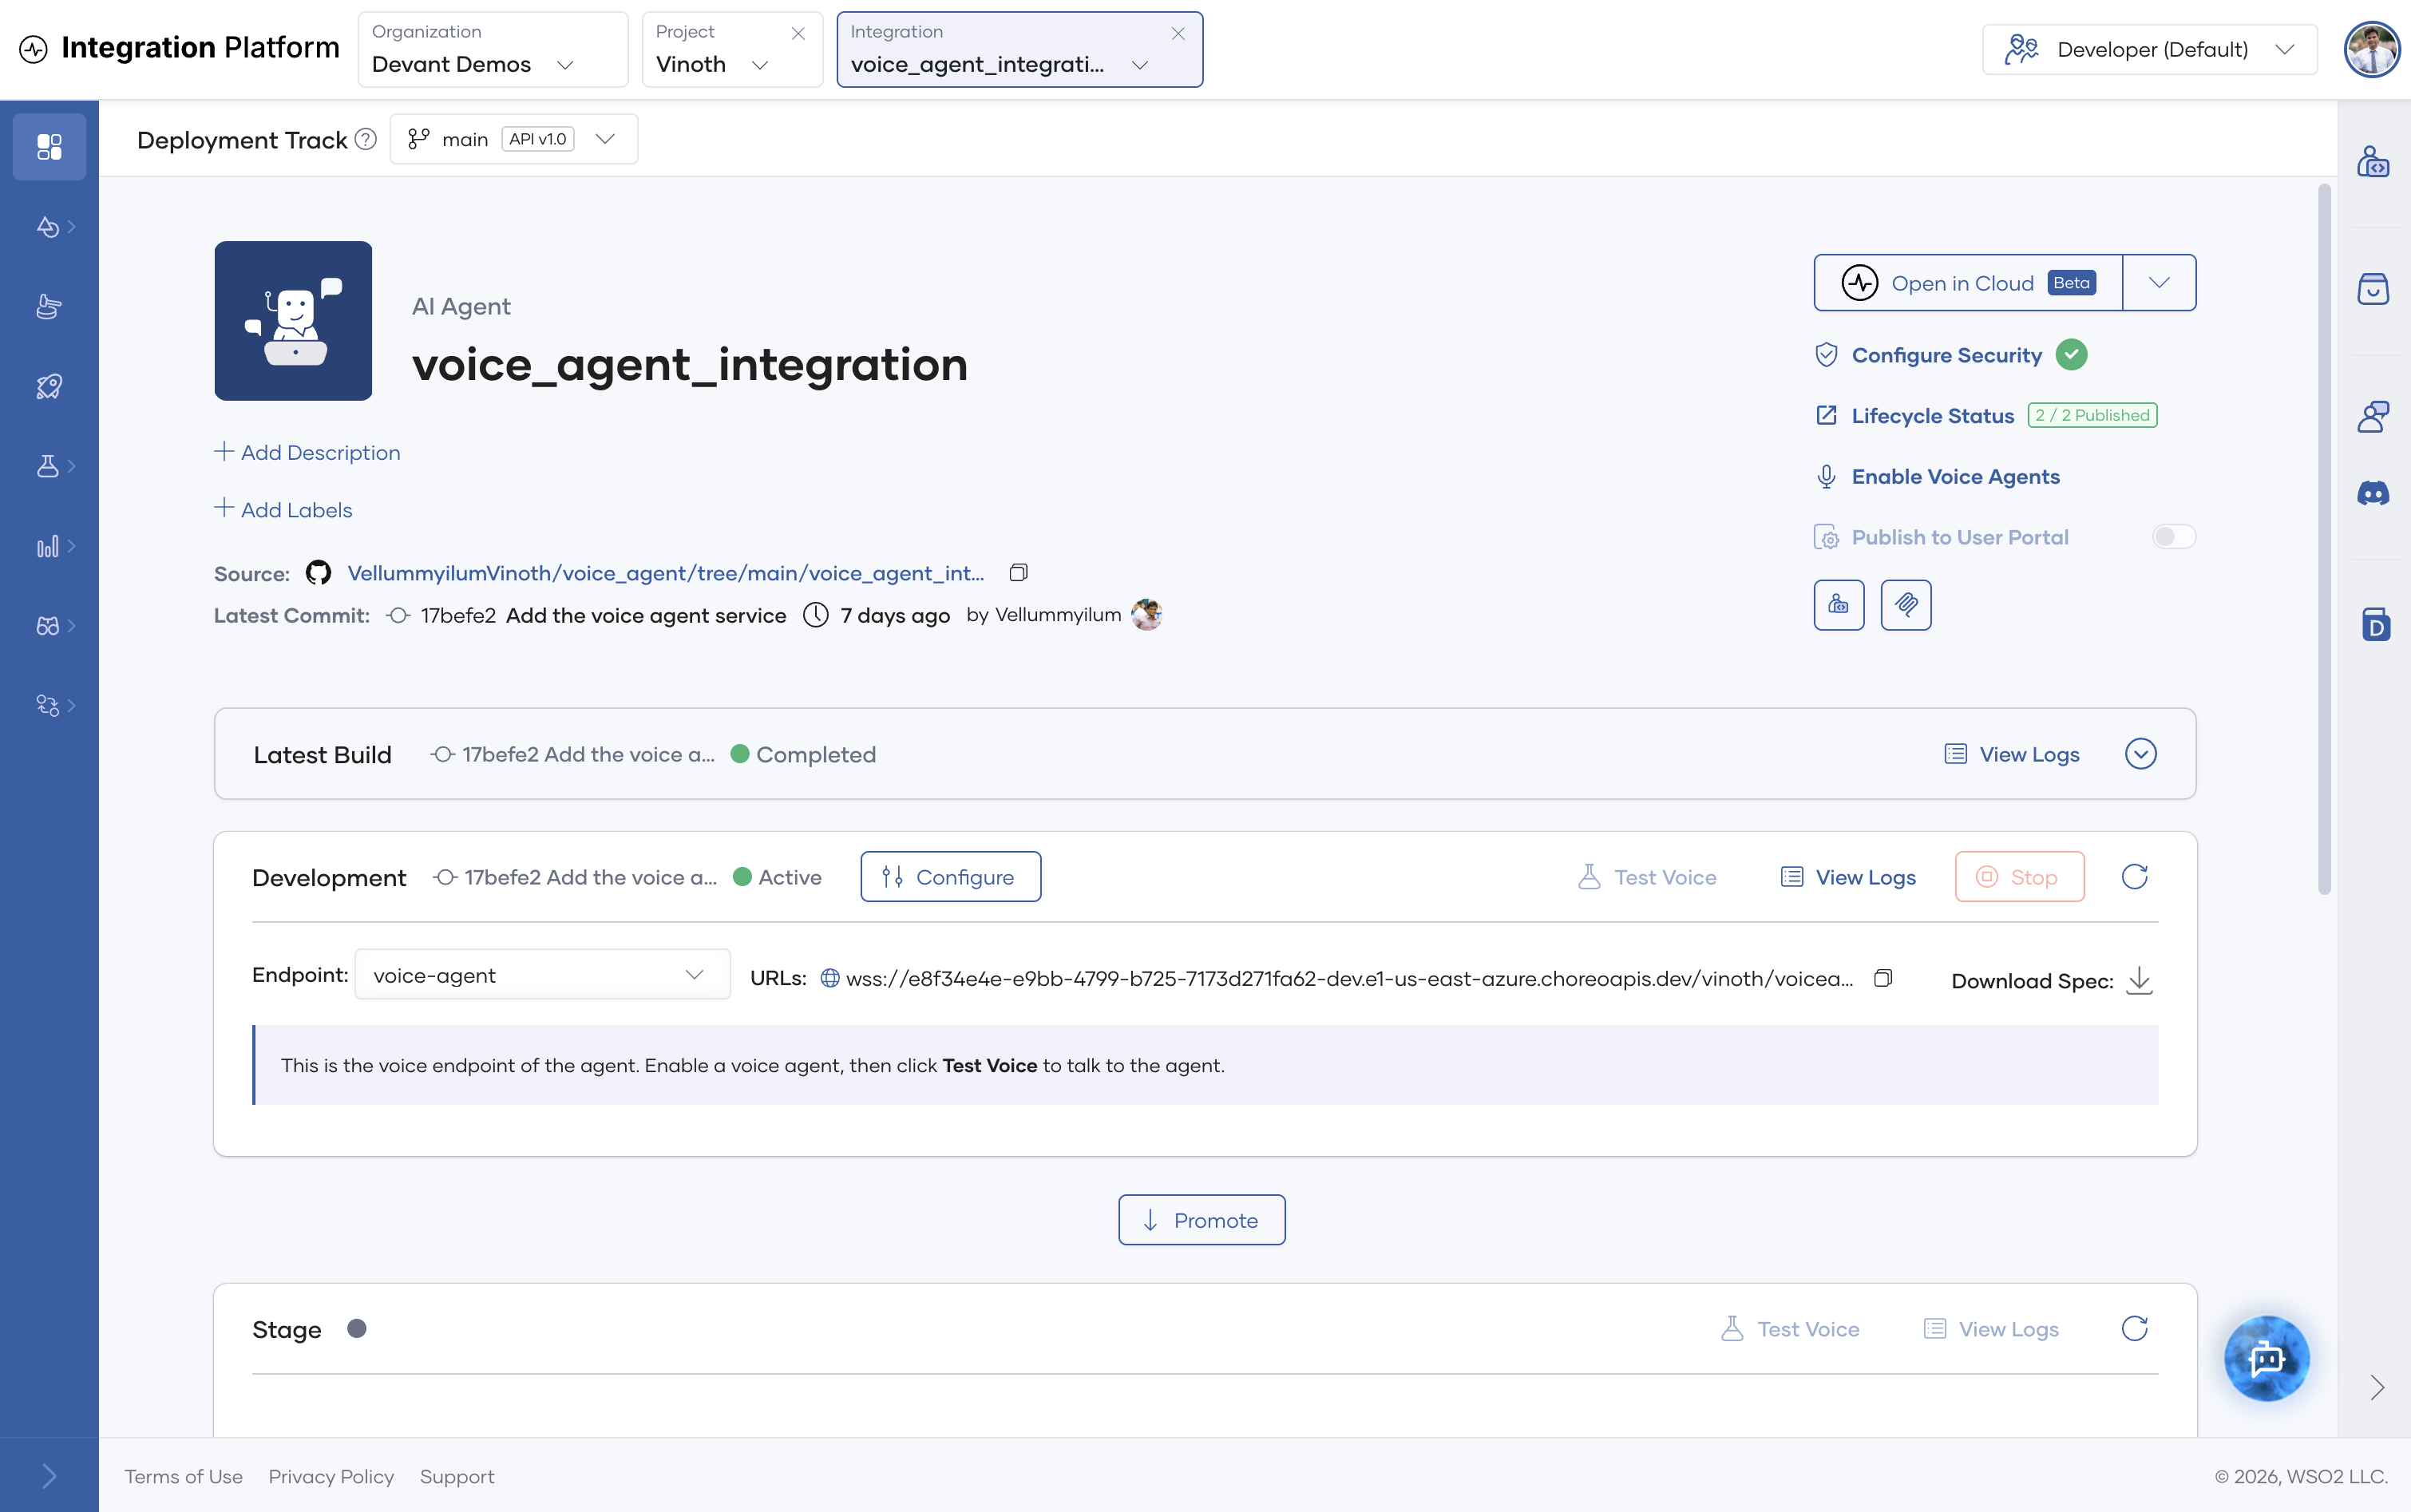
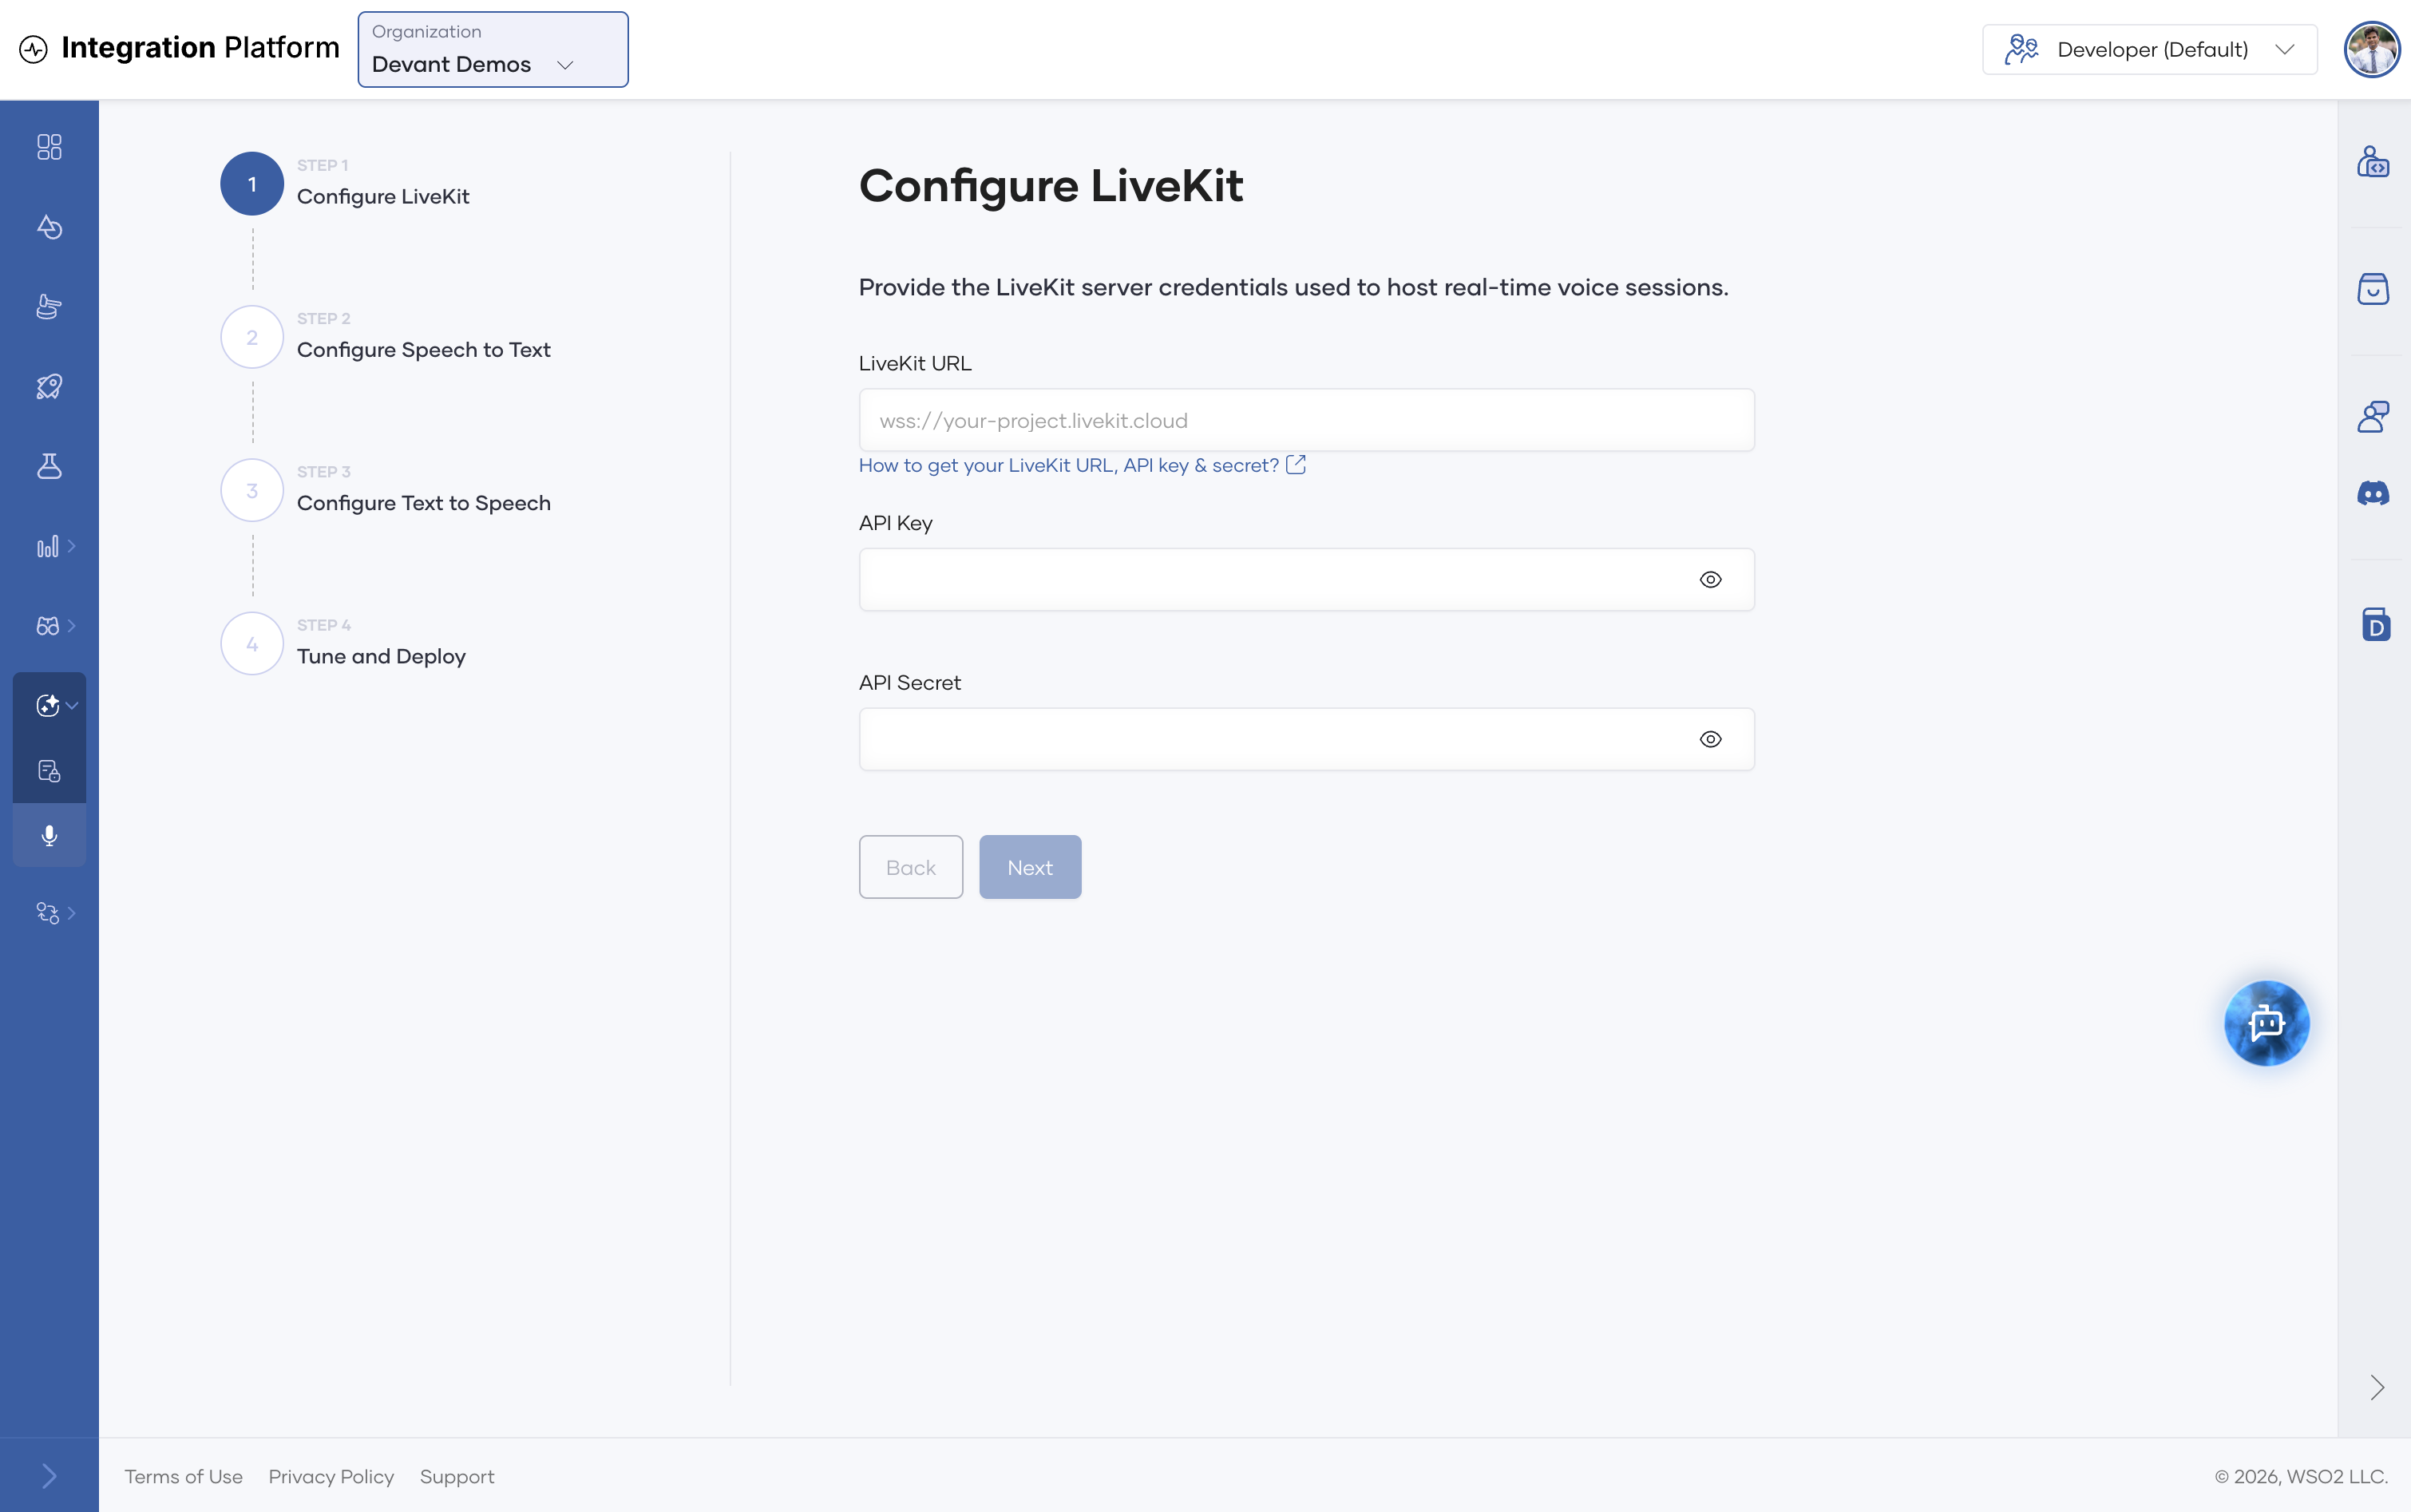
A four-step wizard opens. The current AI agent is preselected as the target, so there's no Configure Agent step: the wizard starts at Configure LiveKit.
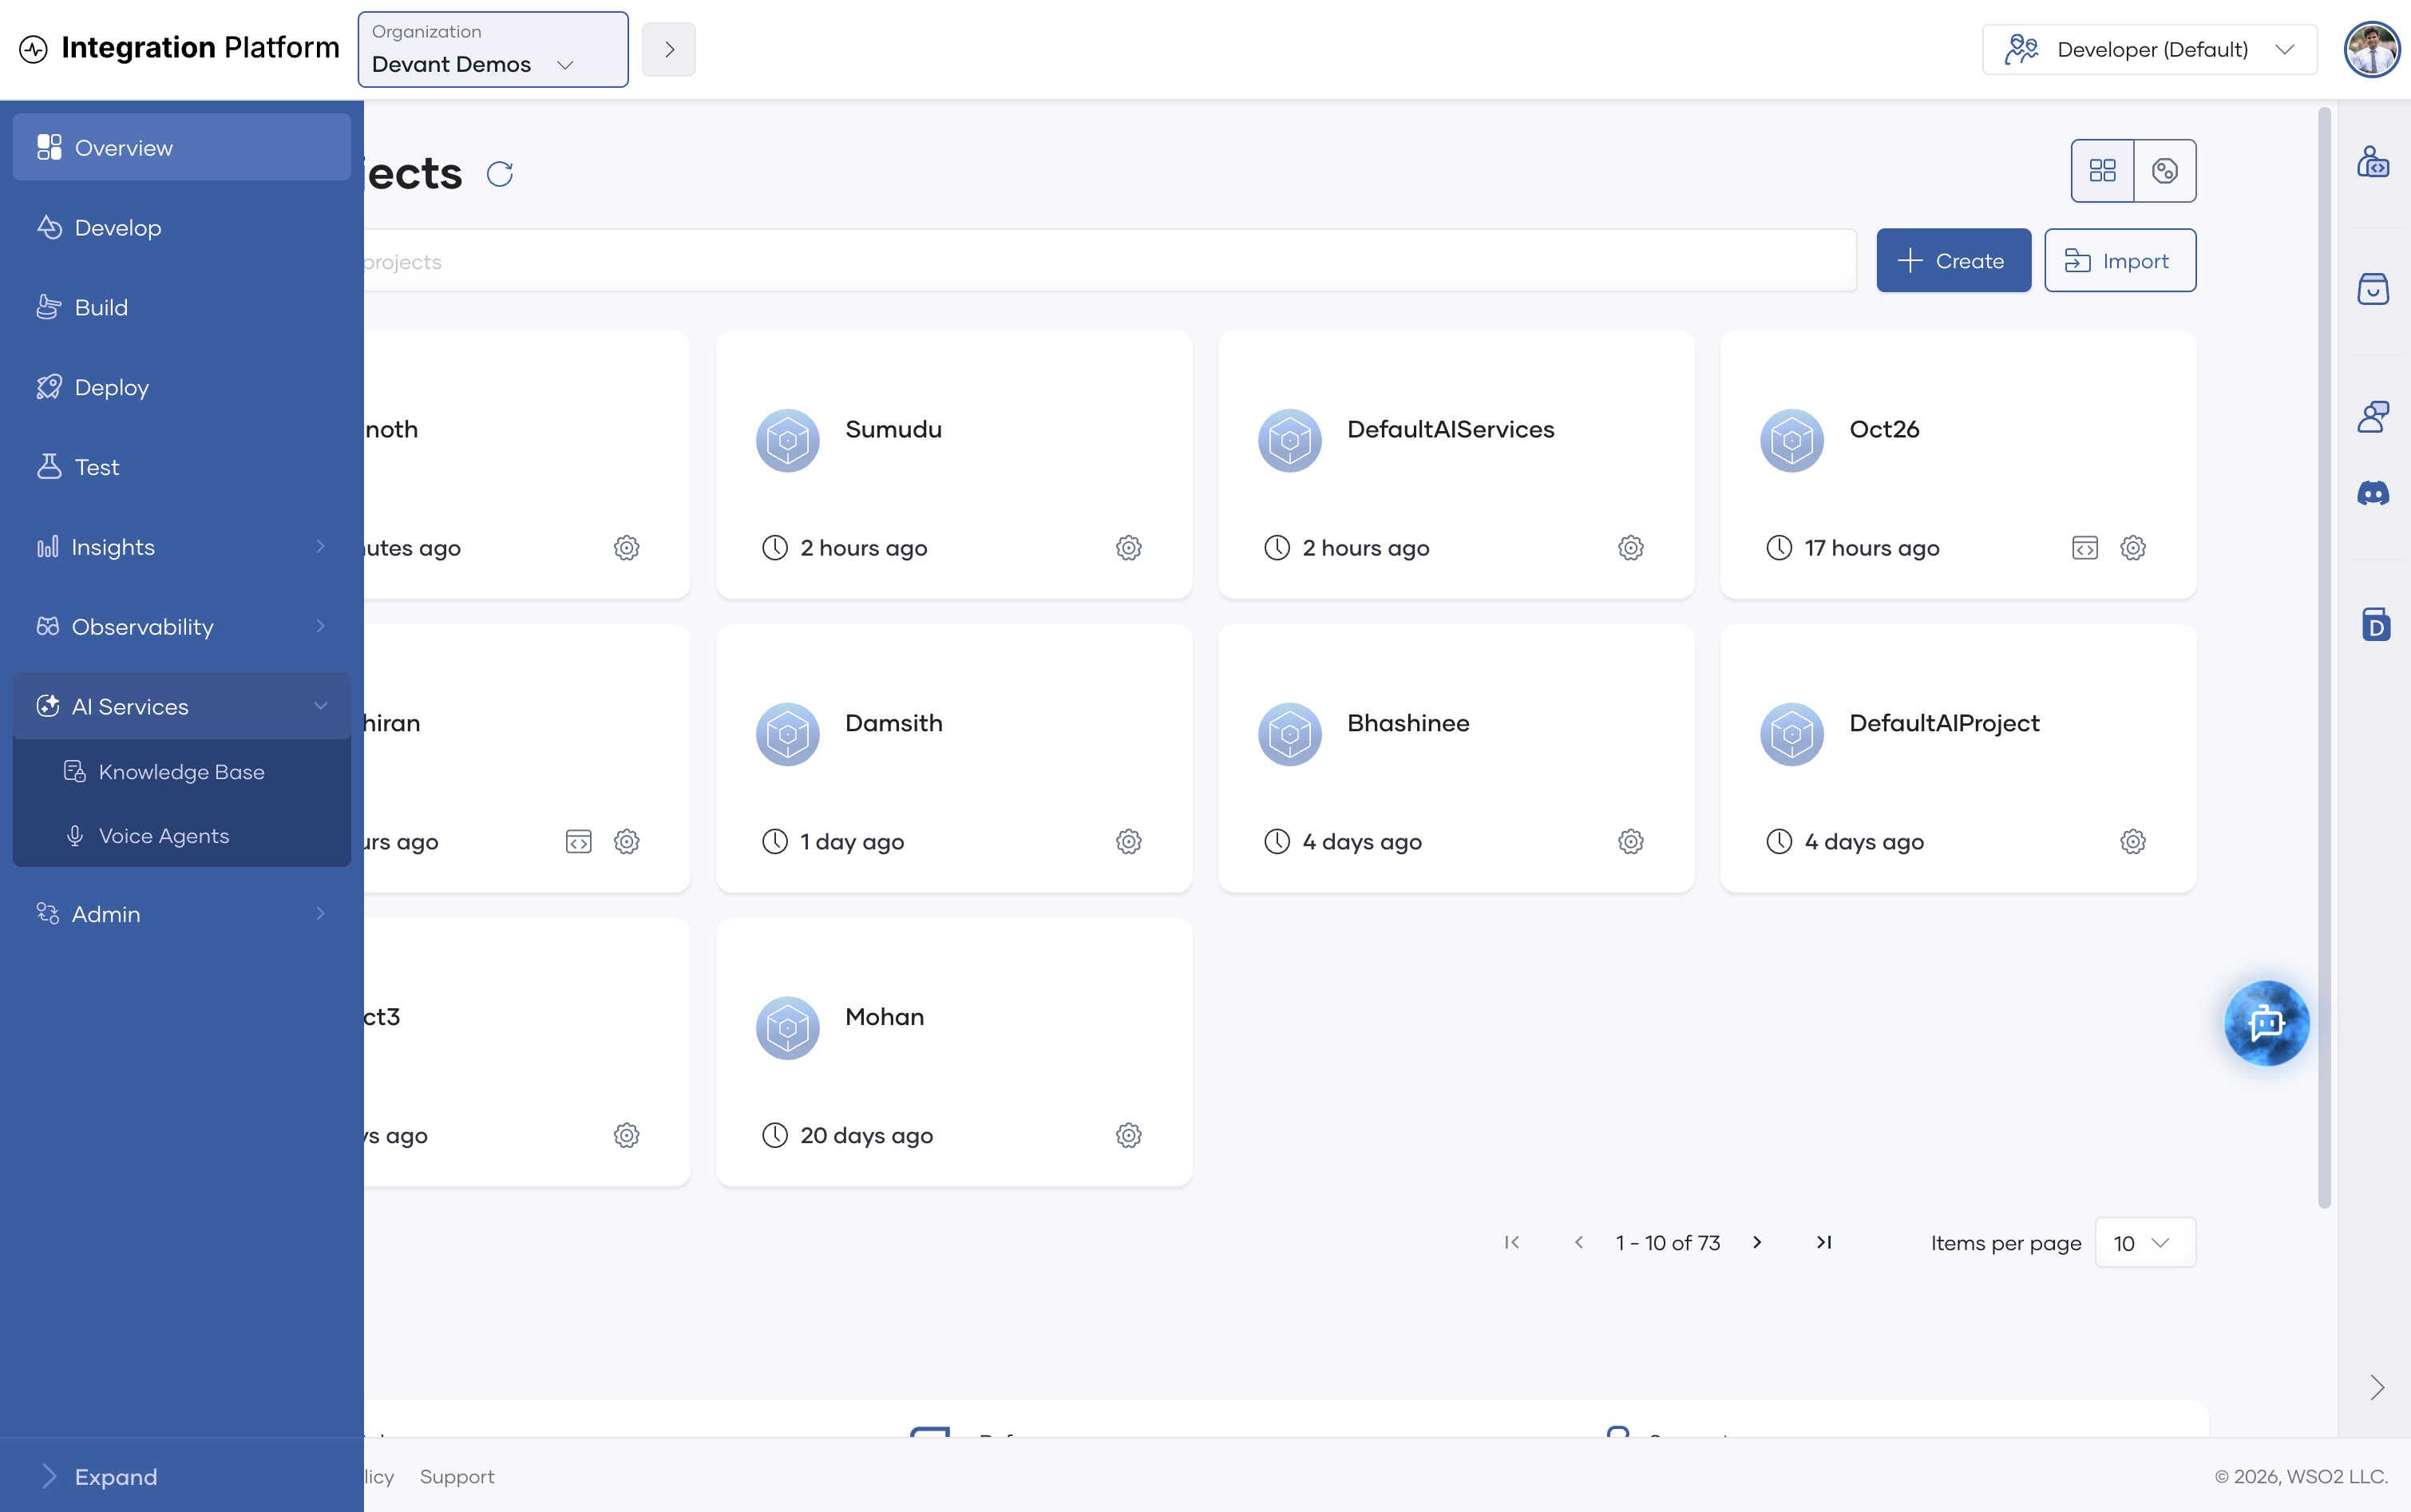
From AI Services > Voice Agents
-
In the organization's left navigation, expand AI Services and click Voice Agents. A five-step wizard opens at Configure Agent.
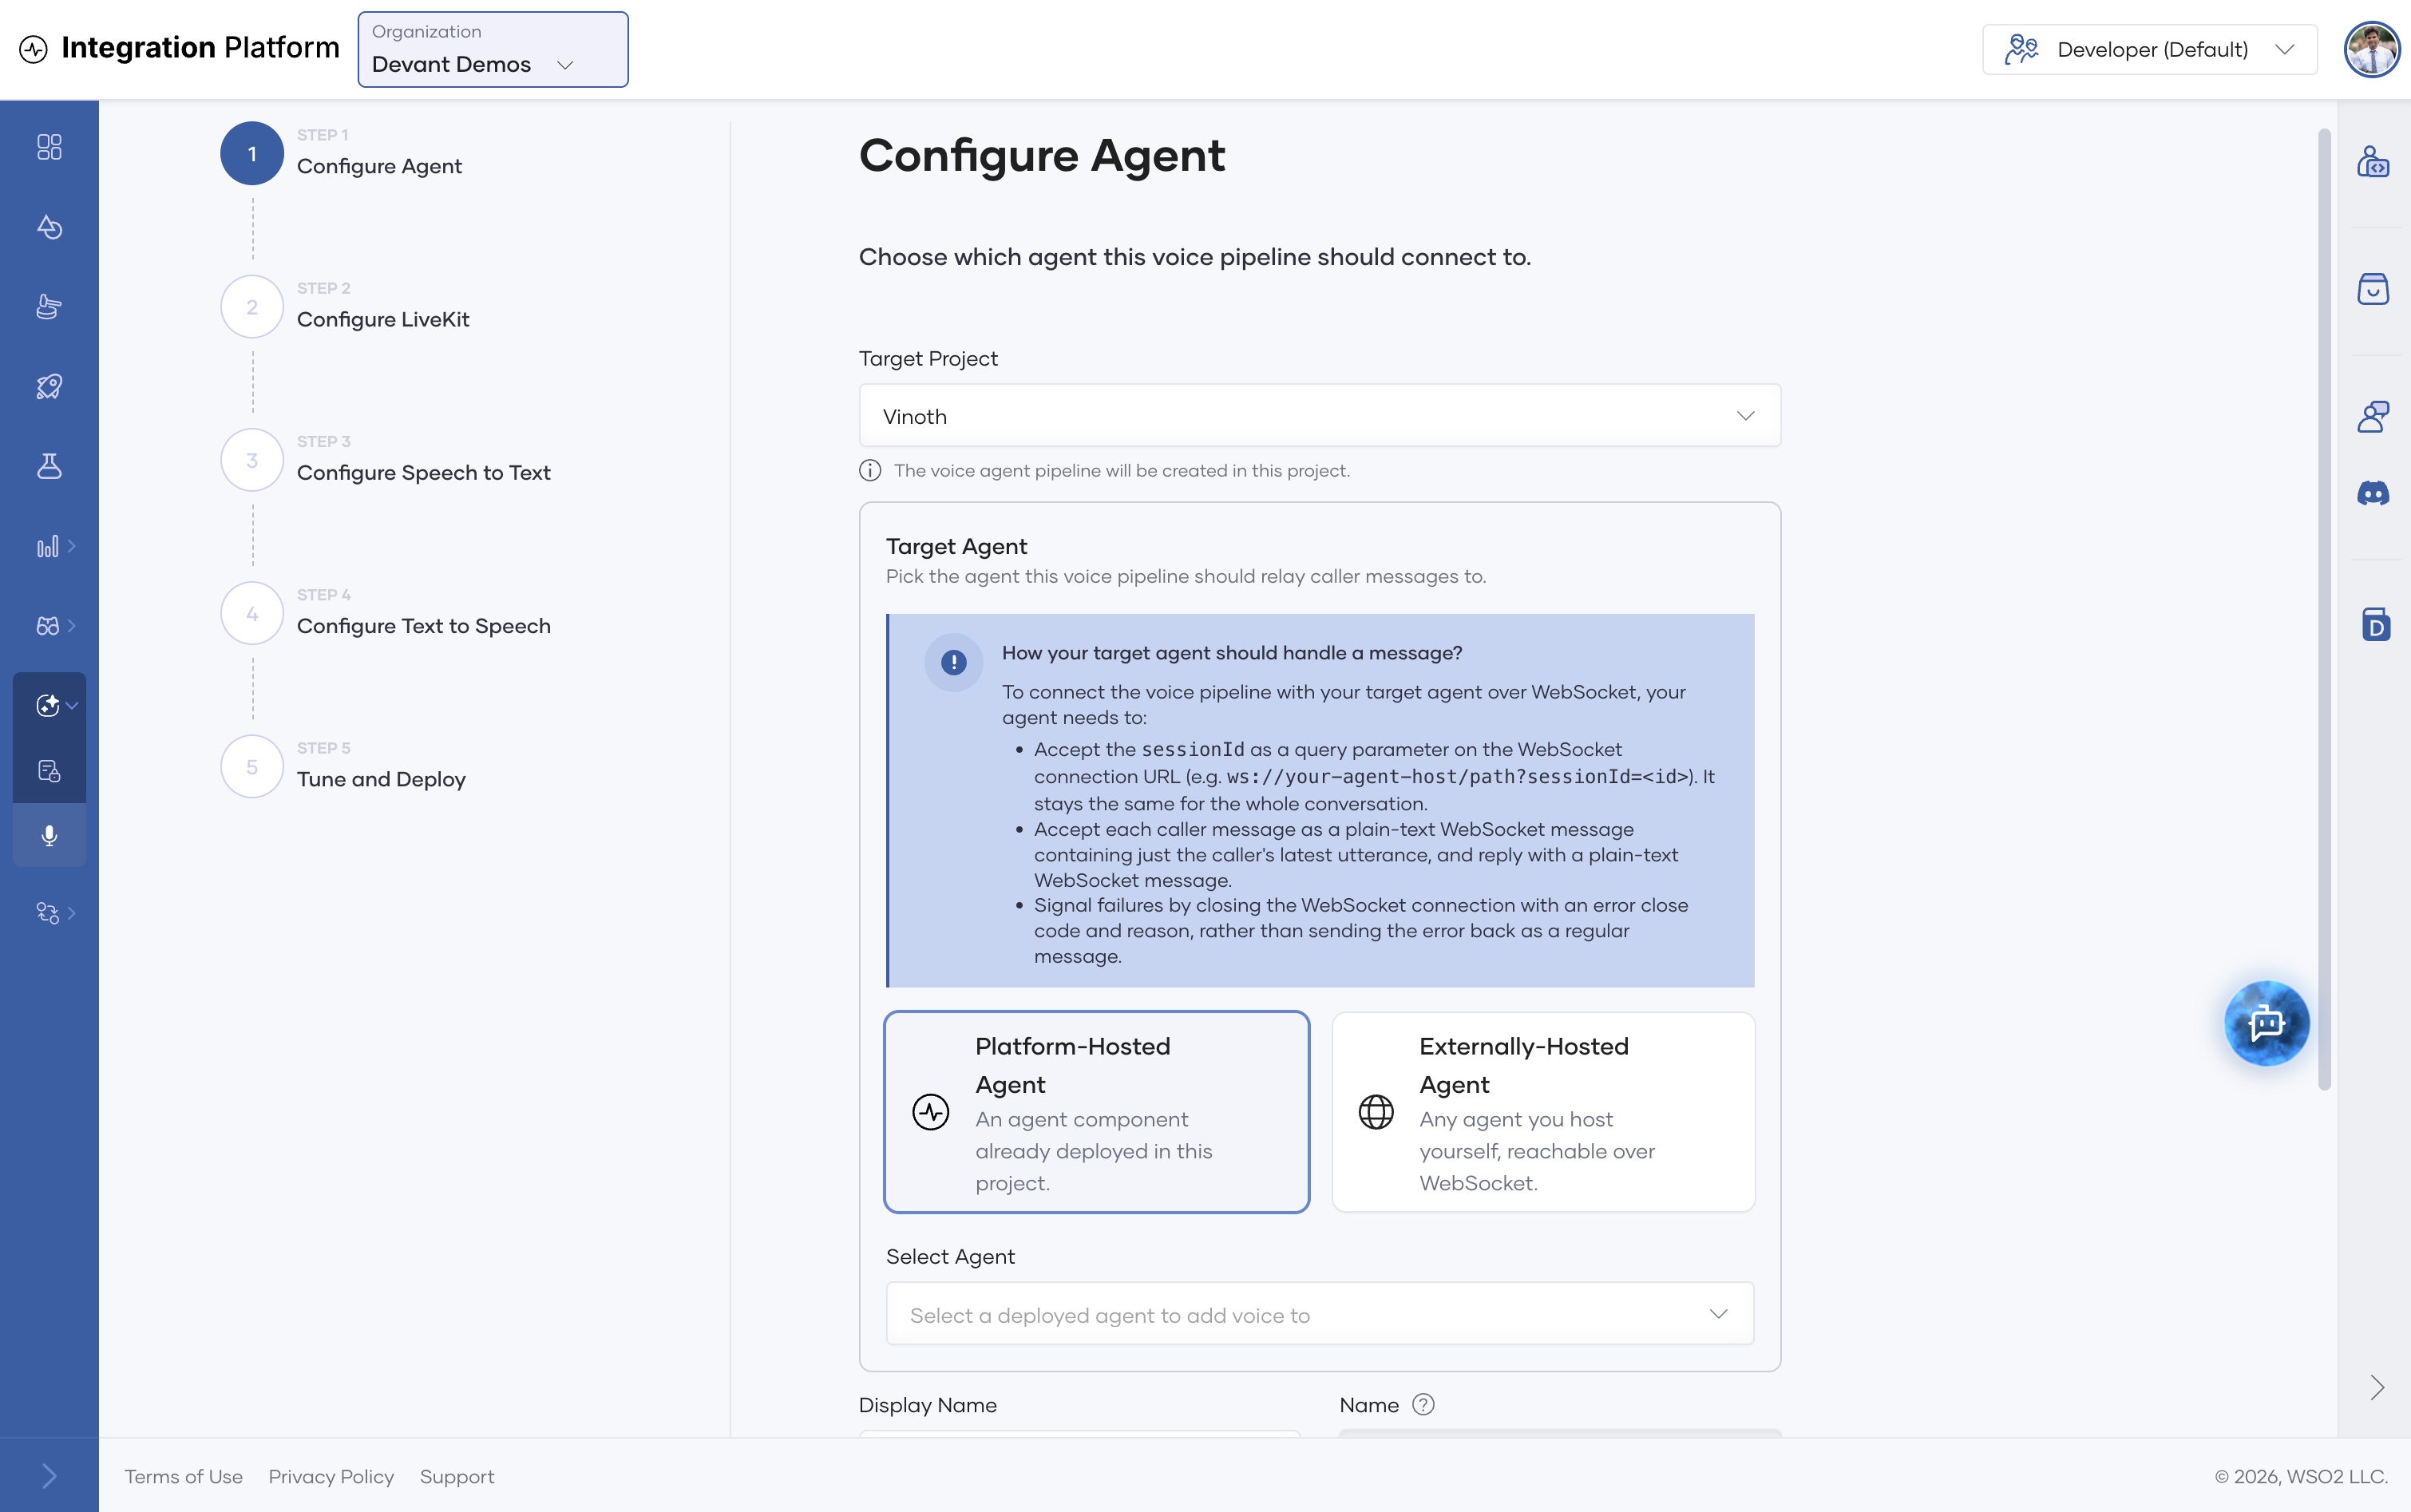
Configure agent
-
Select the Target Project. The voice agent is created in this project.
-
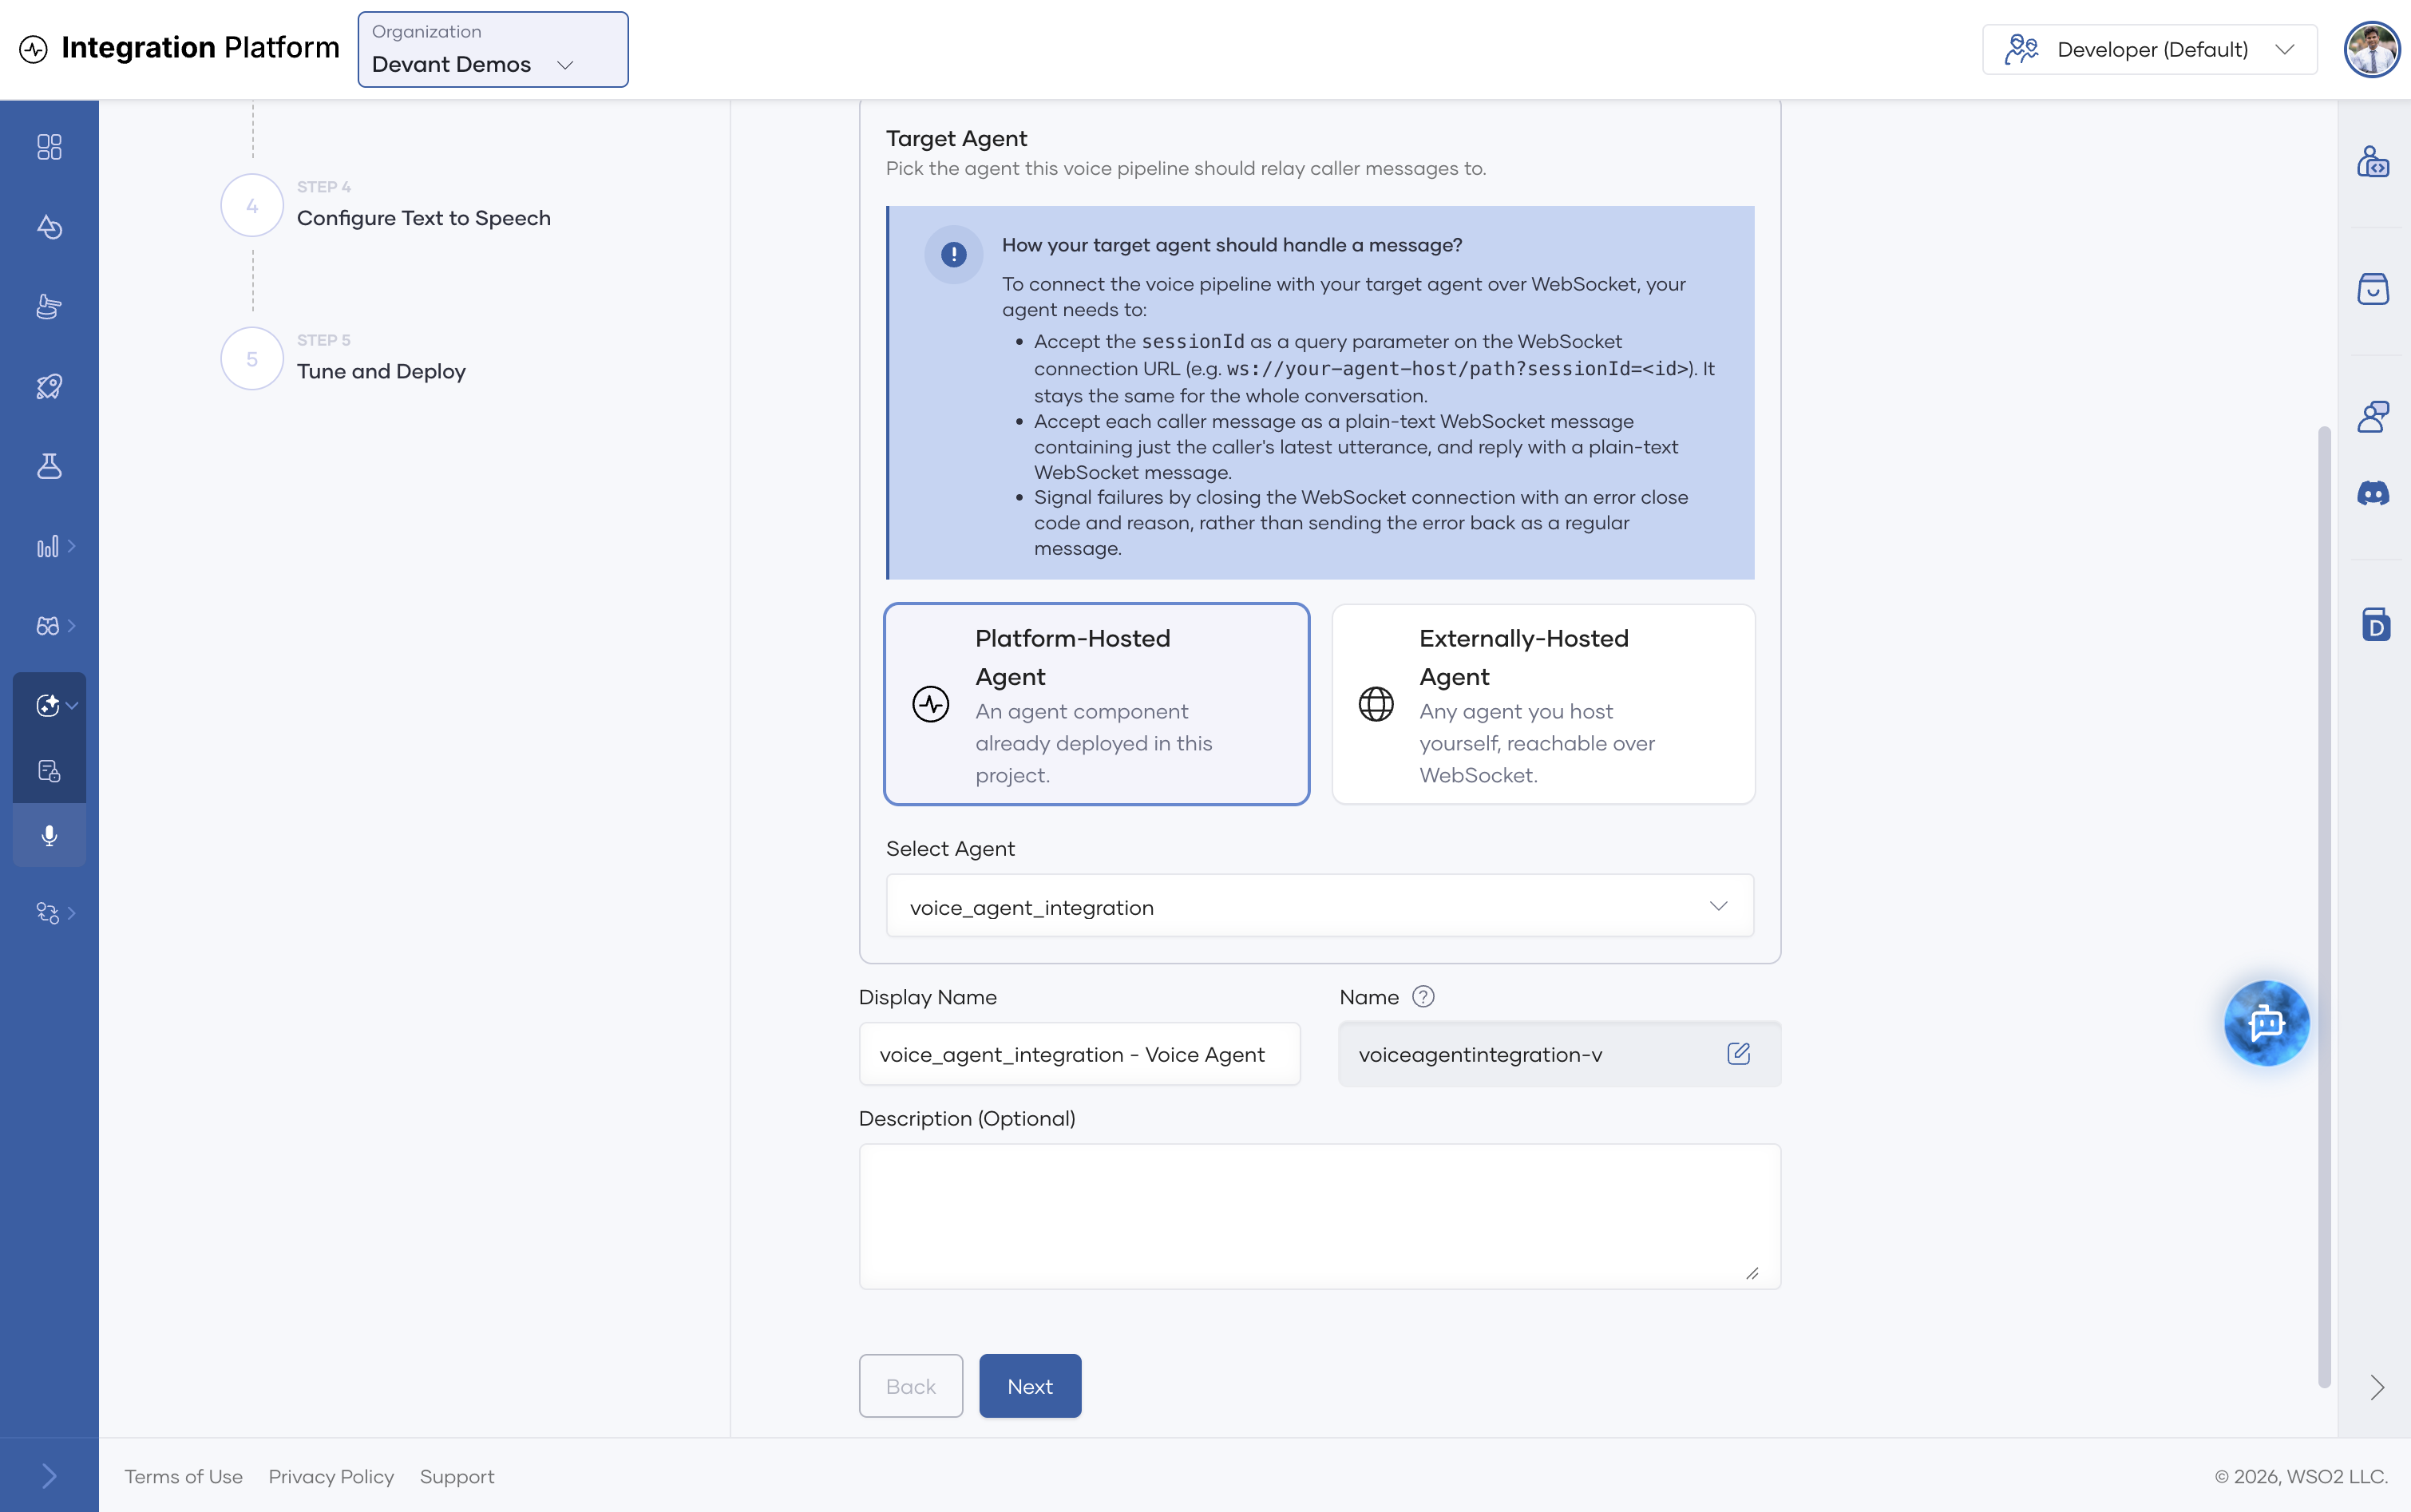
Under Target Agent, choose where the agent that answers the caller runs:
-
Platform-Hosted Agent: an AI agent that's already deployed in WSO2 Cloud, in the selected project. Pick it from Select Agent. The list shows only agents with a deployed WebSocket endpoint. WSO2 Cloud resolves the agent's WebSocket URL for you when it deploys the voice agent. This gives the same result as clicking Enable Voice Agents on that agent's overview page.
-
Externally-Hosted Agent: any agent you host yourself, outside WSO2 Cloud, that's reachable over WebSocket. Enter its WebSocket URL, which must start with
wss://(orws://for local setups), for example a public tunnel URL such aswss://<your-host>/voice-agent. The voice agent uses this URL as its Target Agent WebSocket URL configuration, so the agent must stay reachable at that URL while the voice agent is in use.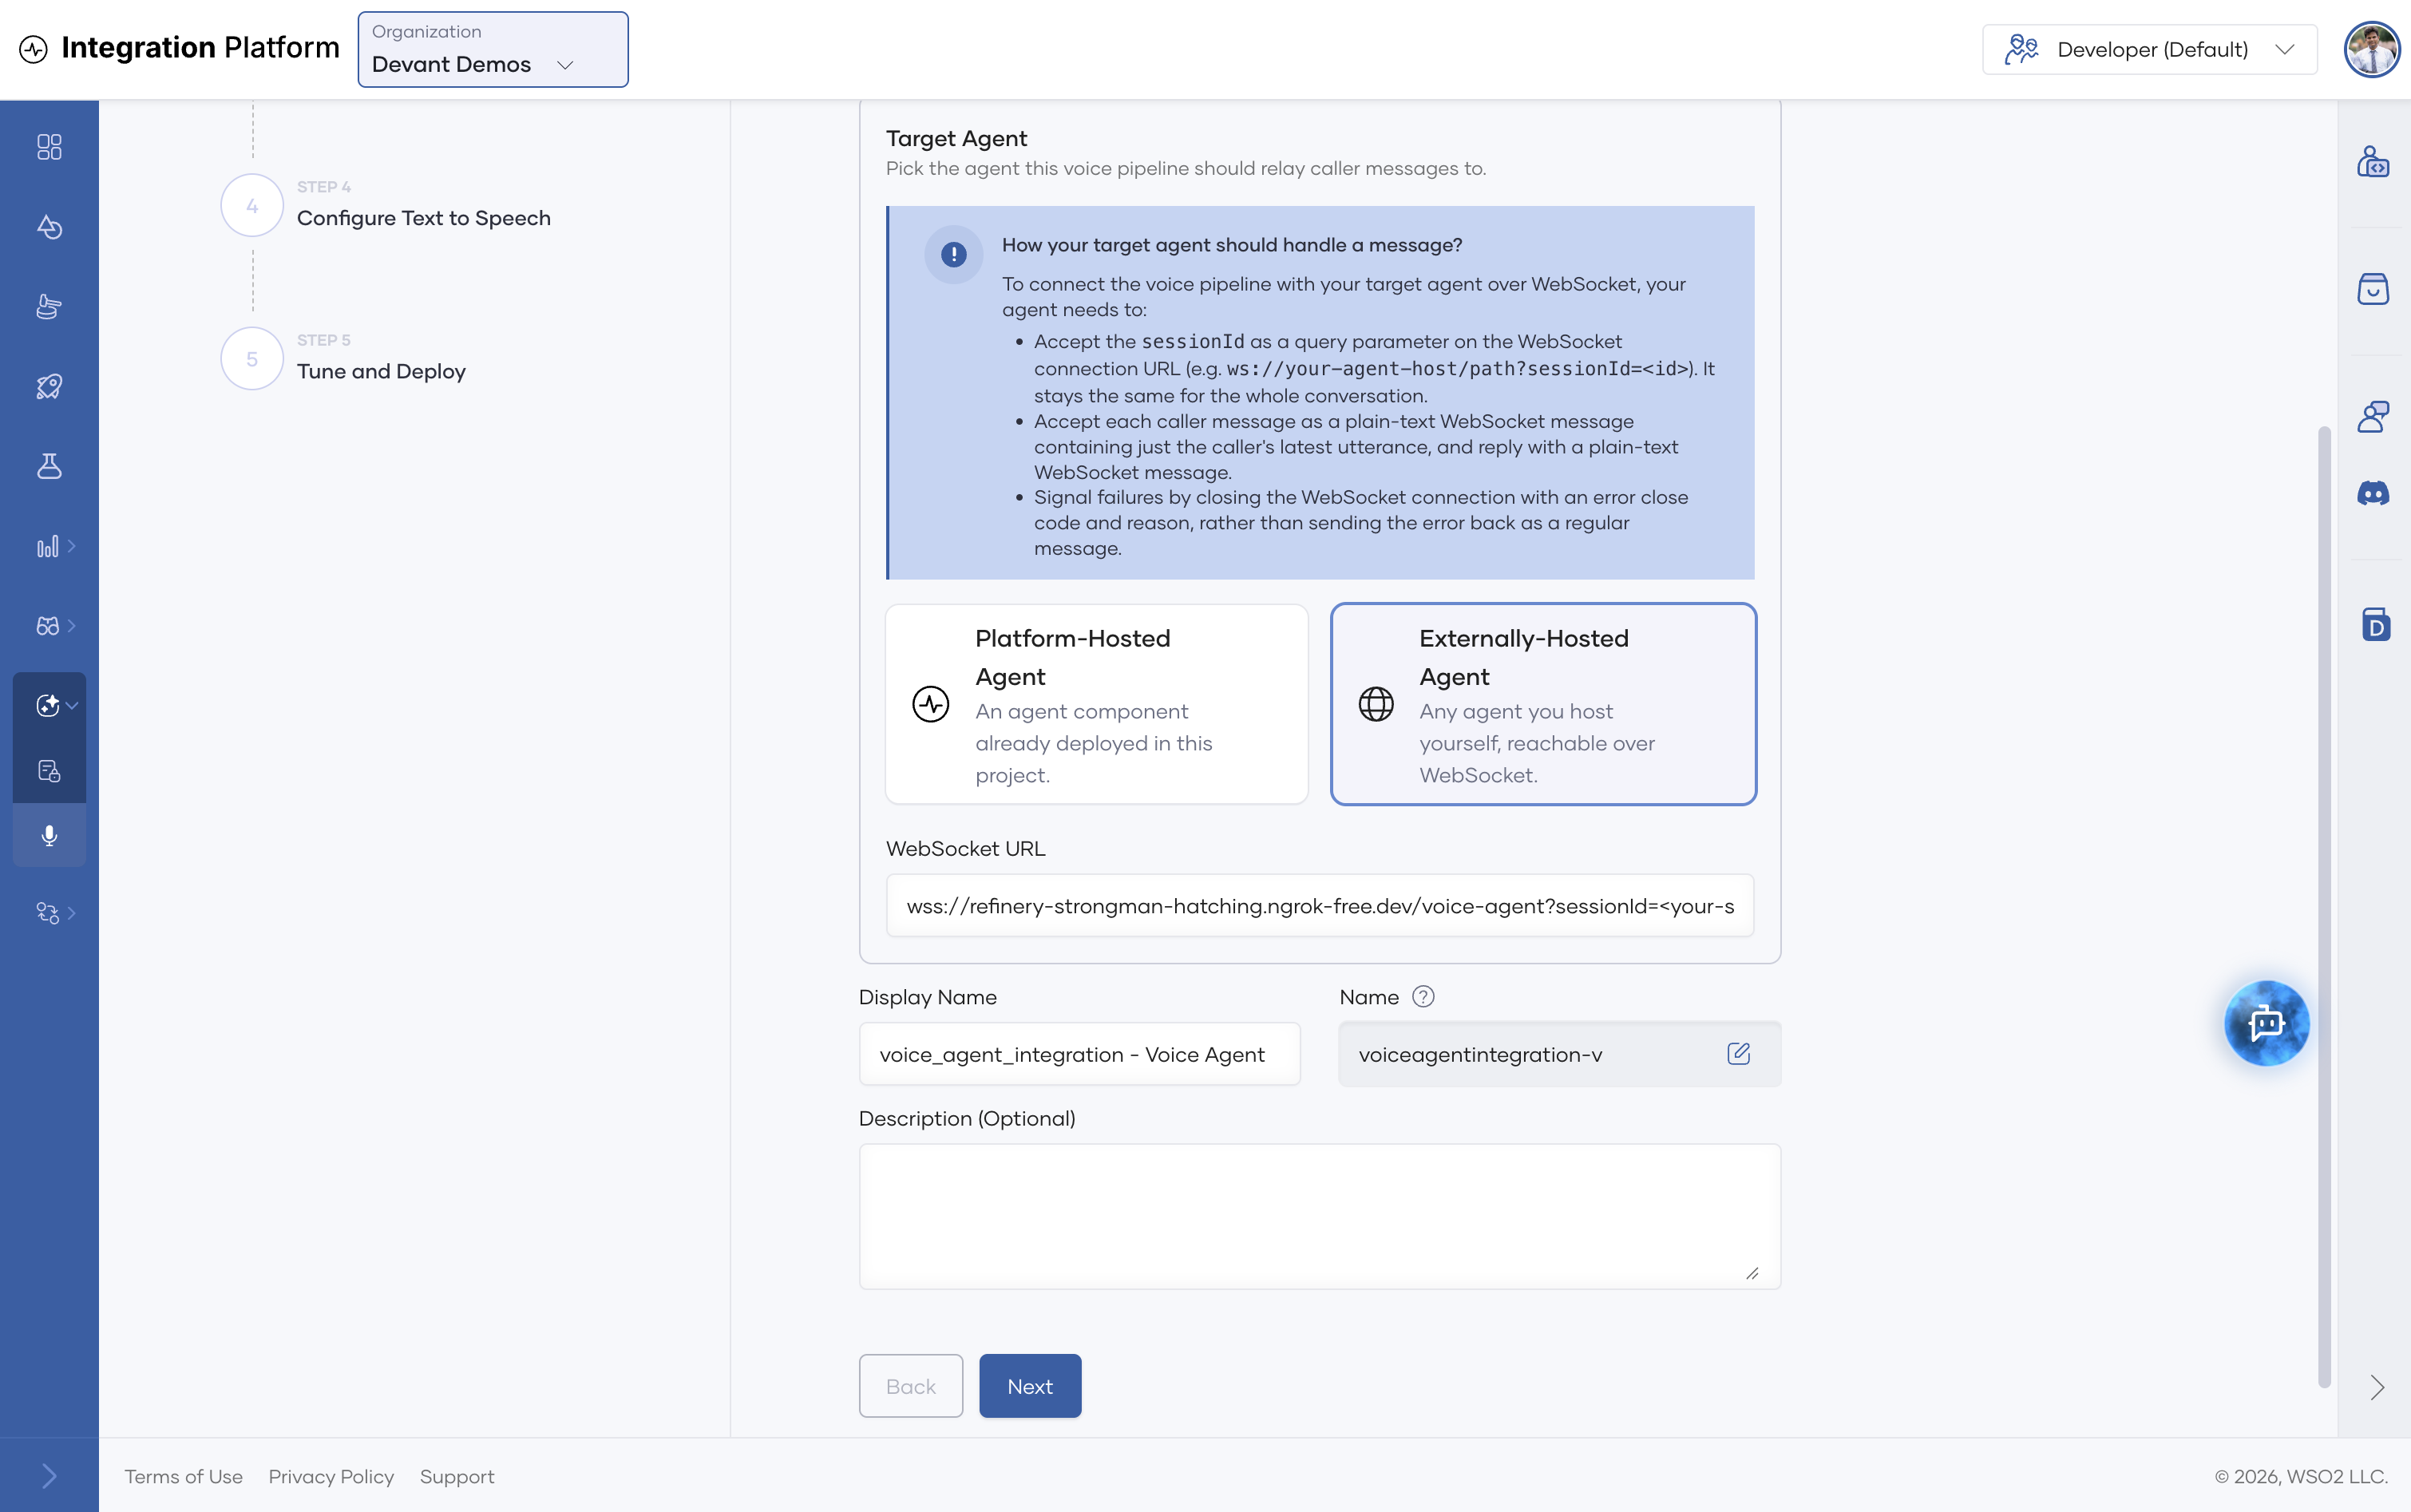
Development and testing onlyUse an externally hosted agent only for development and testing. The voice agent doesn't authenticate to an externally hosted agent yet, so this option isn't suitable for production. For production, use a Platform-Hosted Agent.
An externally hosted agent must follow the same WebSocket contract as a Voice Agent Service. The wizard summarizes it under How your target agent should handle a message?:
- Accept the
sessionIdas a query parameter on the WebSocket connection URL (for example,wss://your-agent-host/path?sessionId=<id>). It stays the same for the whole conversation. - Accept each caller message as a plain-text WebSocket message containing only the caller's latest utterance, and reply with a plain-text WebSocket message.
- Signal failures by closing the WebSocket connection with an error close code and reason, instead of sending the error back as a regular message.
-
-
Check the Display Name and Name. They default to
<agent-name> - Voice Agent. Optionally, add a Description. -
Click Next.
Configure LiveKit
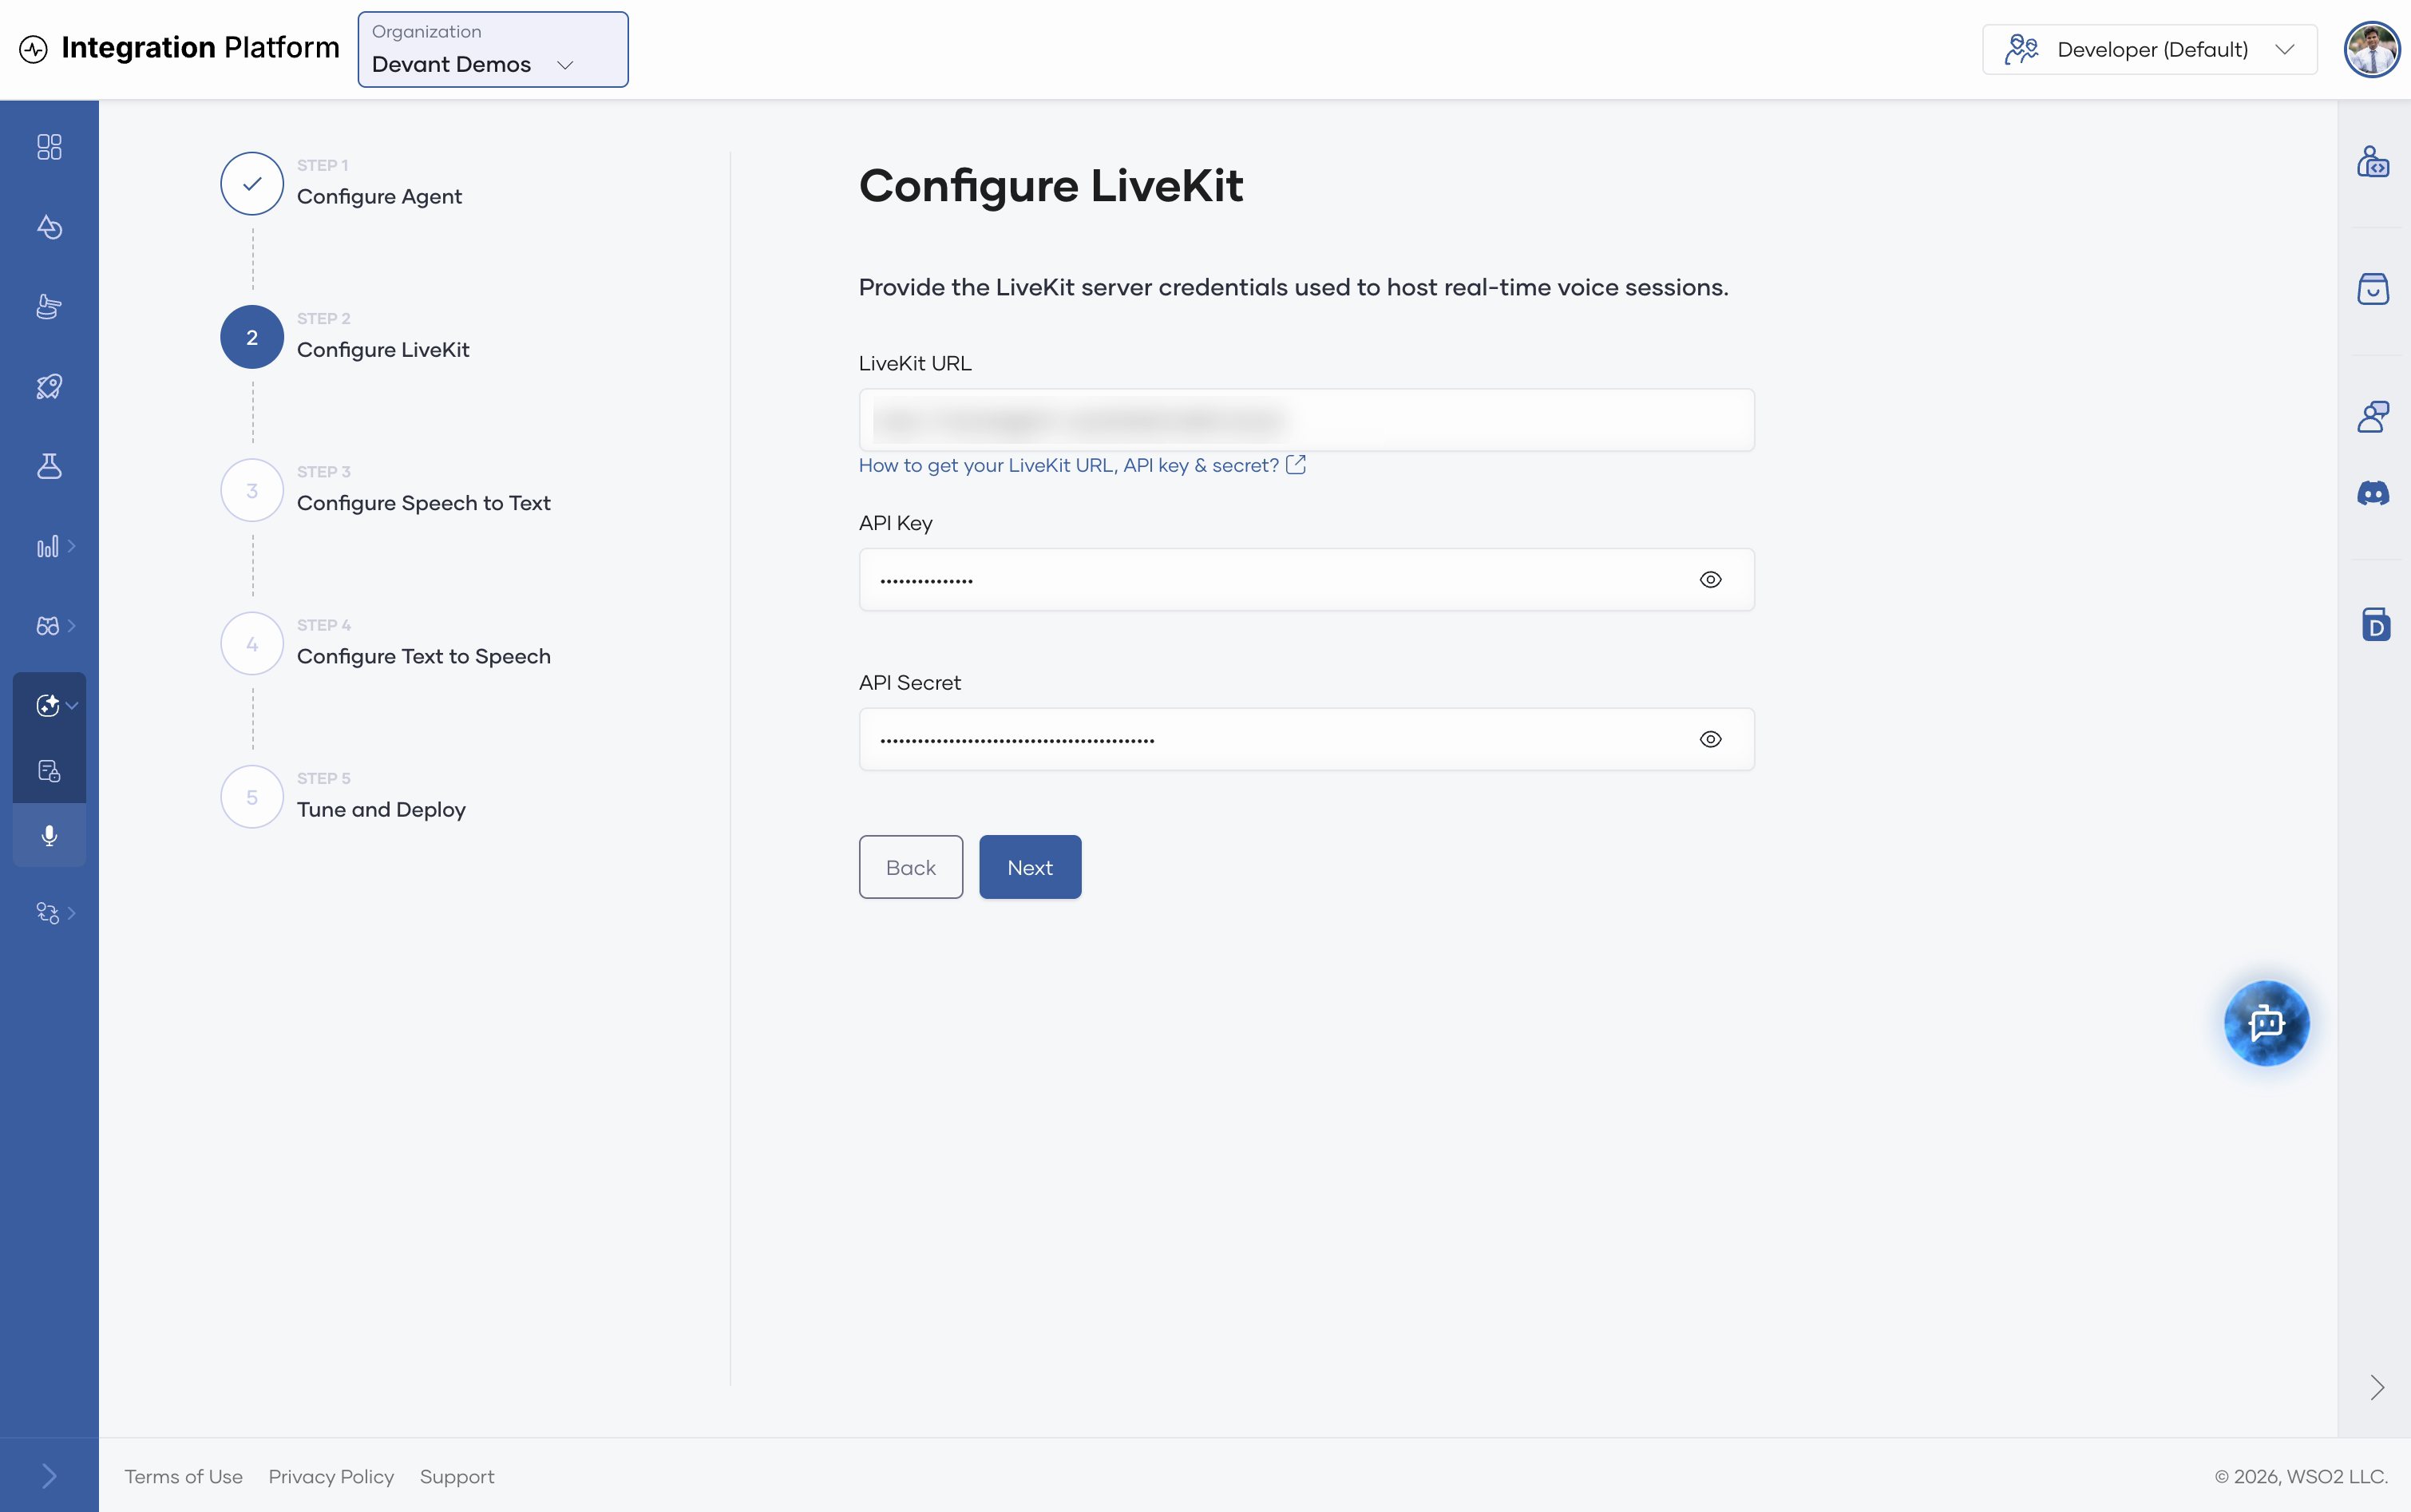
LiveKit handles the real-time audio connection between the user's browser and the voice pipeline.
- Enter the LiveKit URL, for example
wss://your-project.livekit.cloud. - Enter the API Key and API Secret of your LiveKit project.
- Click Next.
To find these values, see LiveKit credentials. The wizard also links to this page from How to get your LiveKit URL, API key & secret?
Configure speech to text
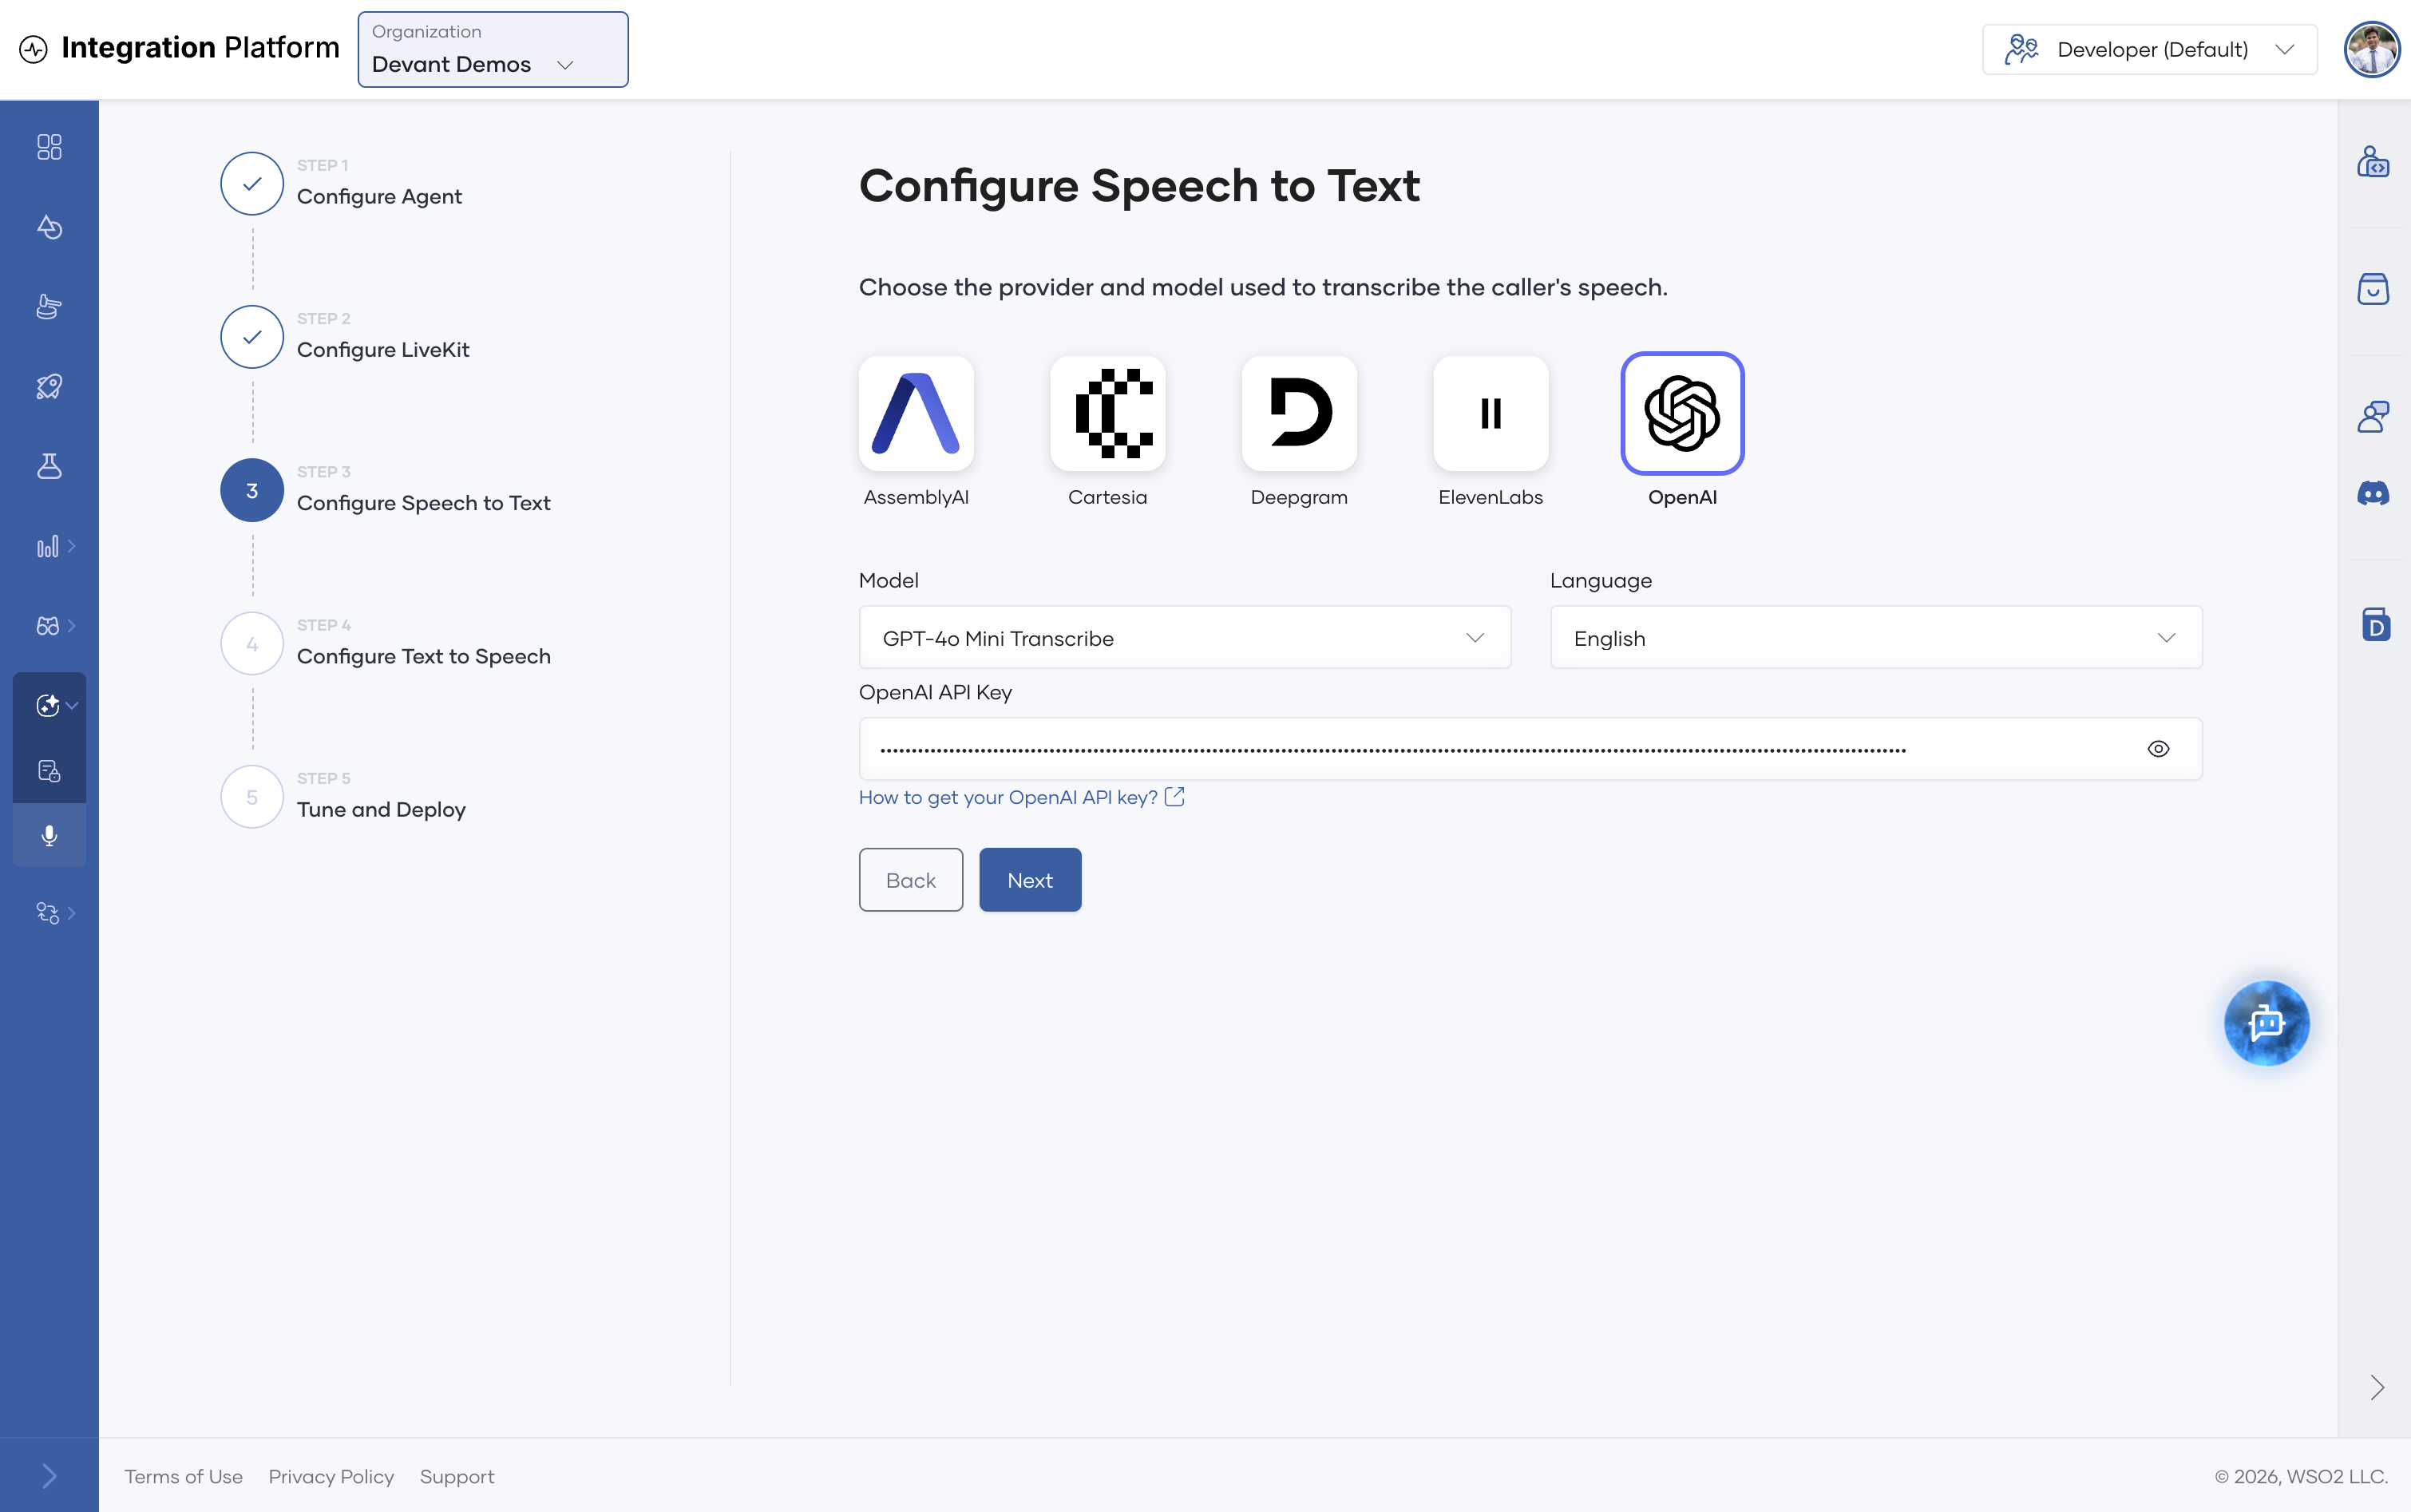
- Select a speech-to-text (STT) provider: AssemblyAI, Cartesia, Deepgram, ElevenLabs, or OpenAI.
- Check the Model and Language. When you select a provider, the wizard preselects a model and language, which you can change. For OpenAI, it preselects GPT-4o Mini Transcribe and English.
- Enter the provider's API key. For OpenAI, create one on the OpenAI API keys page. The wizard links to each provider's key page, for example How to get your OpenAI API key?
- Click Next.
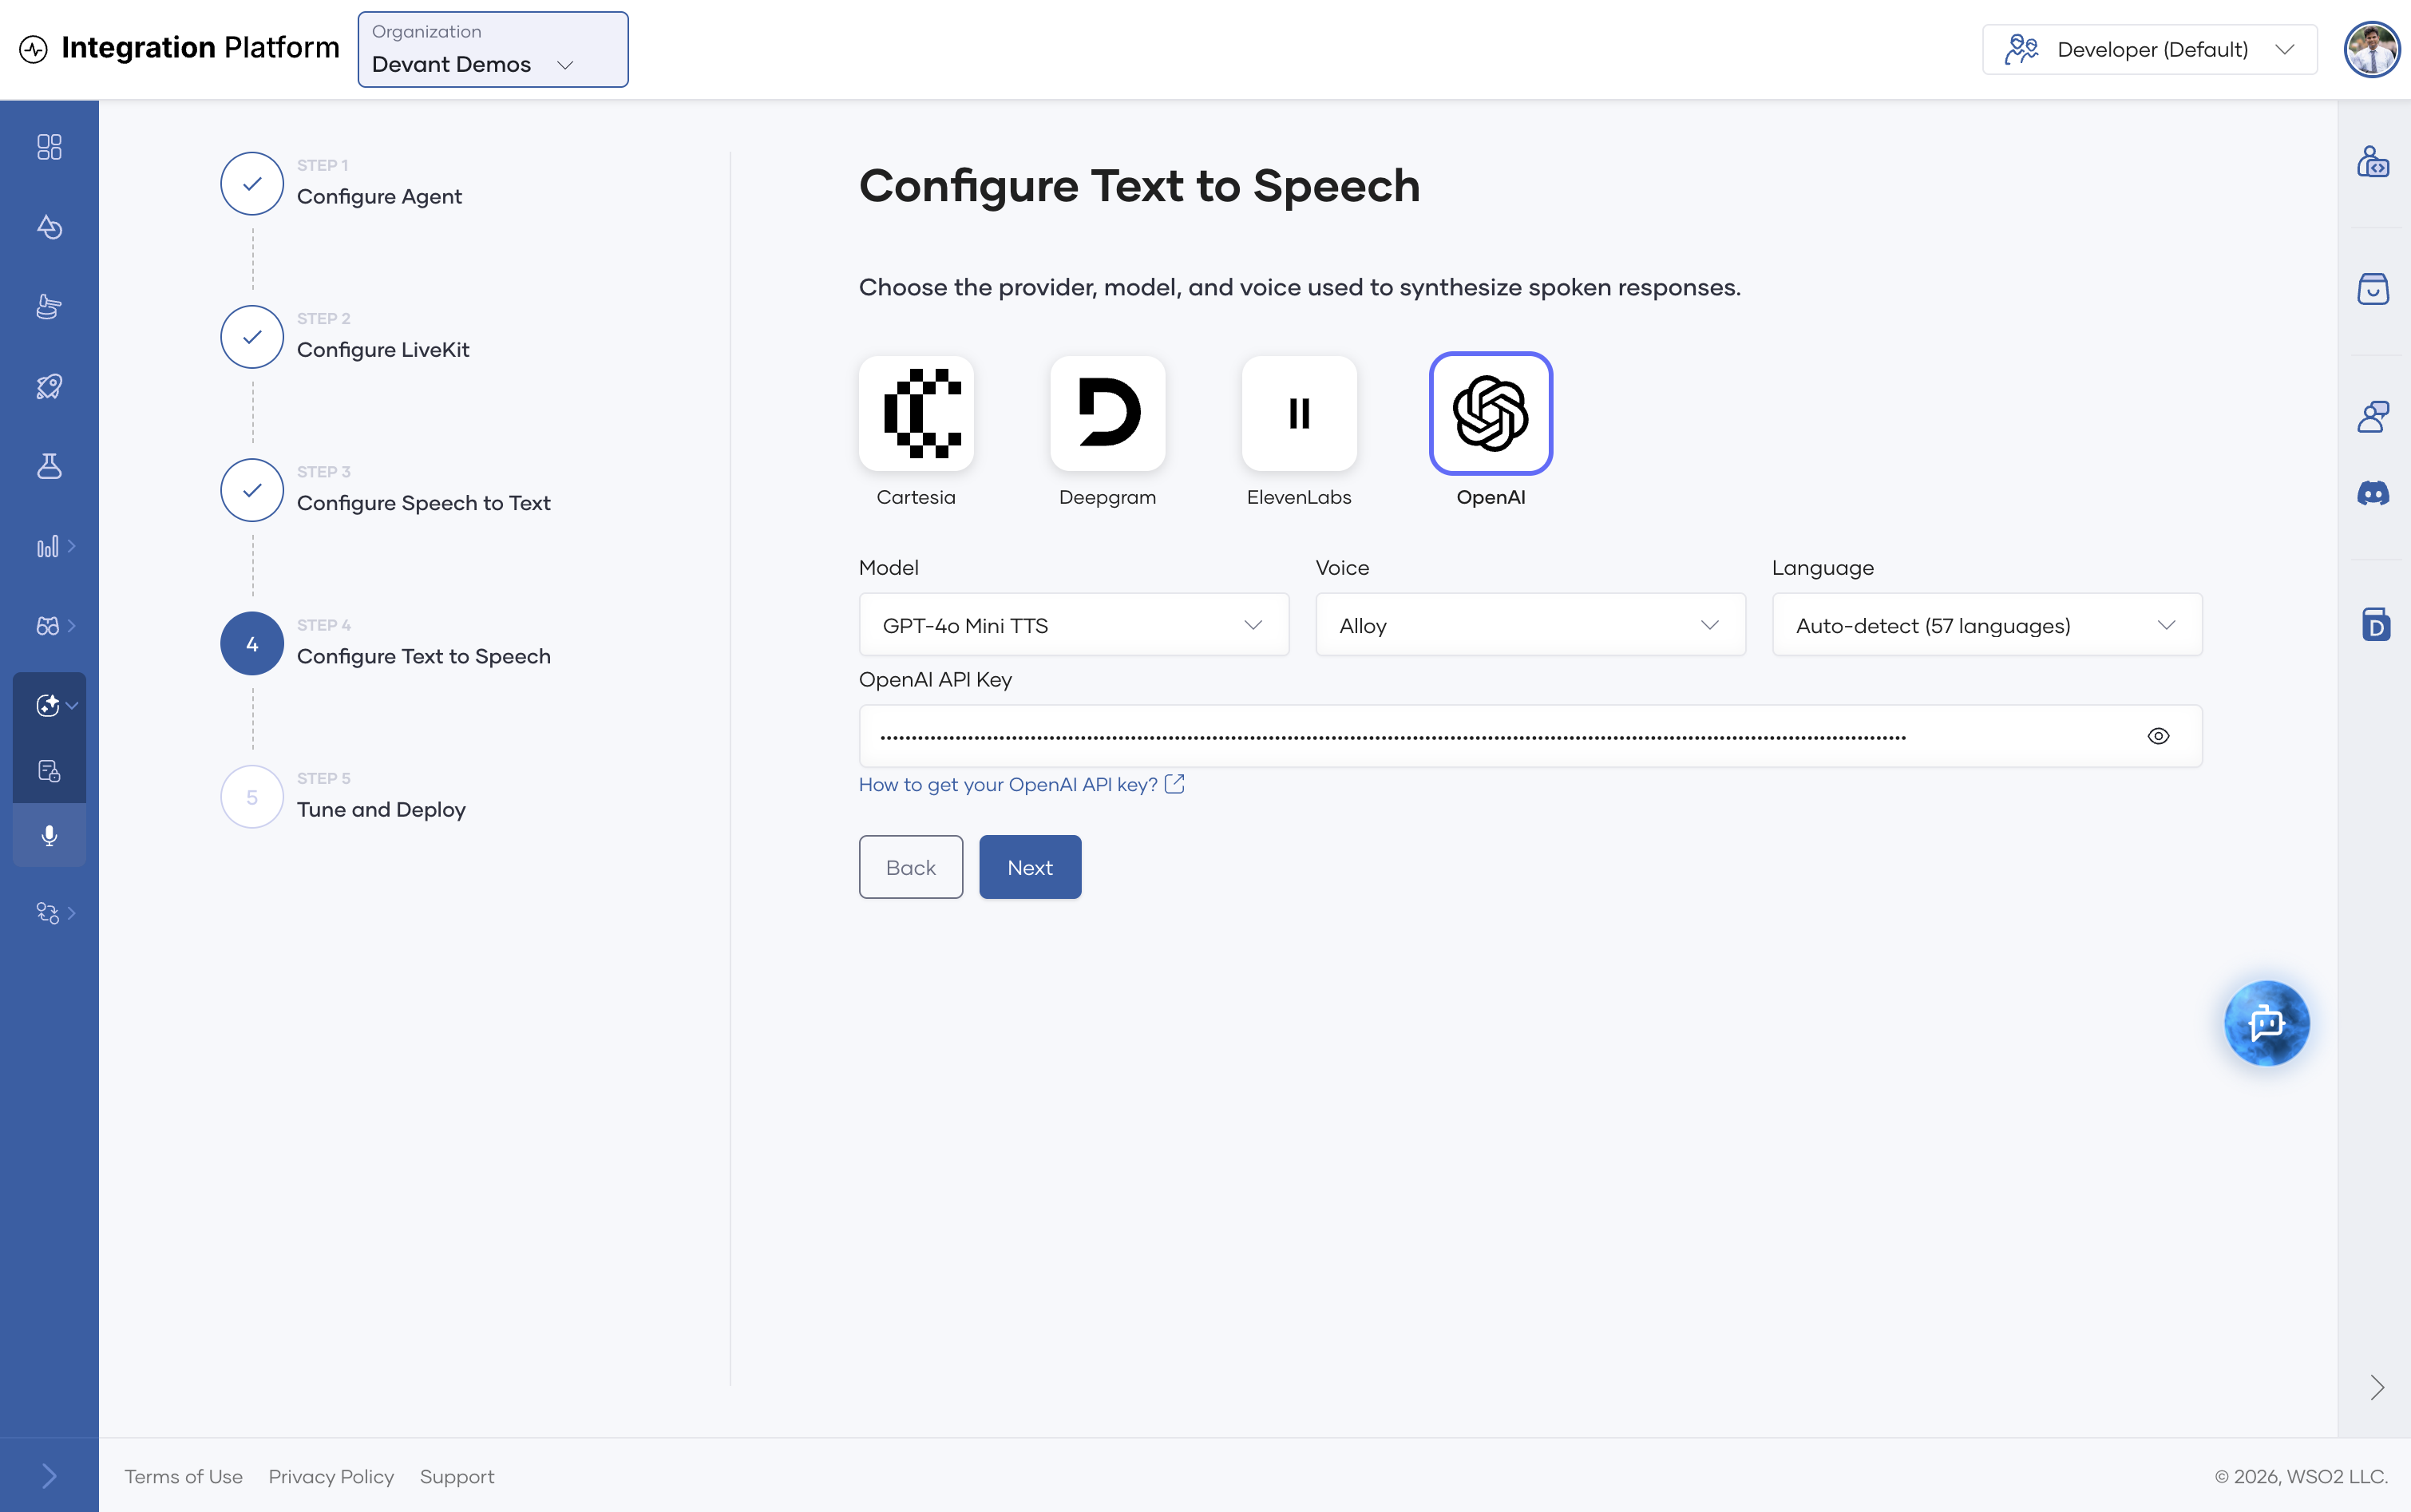
Configure text to speech
- Select a text-to-speech (TTS) provider: Cartesia, Deepgram, ElevenLabs, or OpenAI.
- Select the Model, Voice, and Language. Cartesia and ElevenLabs also accept a custom voice ID.
- Enter the provider's API key. You can reuse the same OpenAI API key for both speech to text and text to speech.
- Click Next.
As with speech to text, the wizard preselects a model, voice, and language for the provider you select. For OpenAI, it preselects GPT-4o Mini TTS, Alloy, and auto-detected language. The available OpenAI models are GPT-4o Mini TTS, TTS-1, and TTS-1 HD, and the available voices are Alloy, Ash, Ballad, Coral, Echo, Fable, Nova, Onyx, Sage, and Shimmer.
Tune and deploy
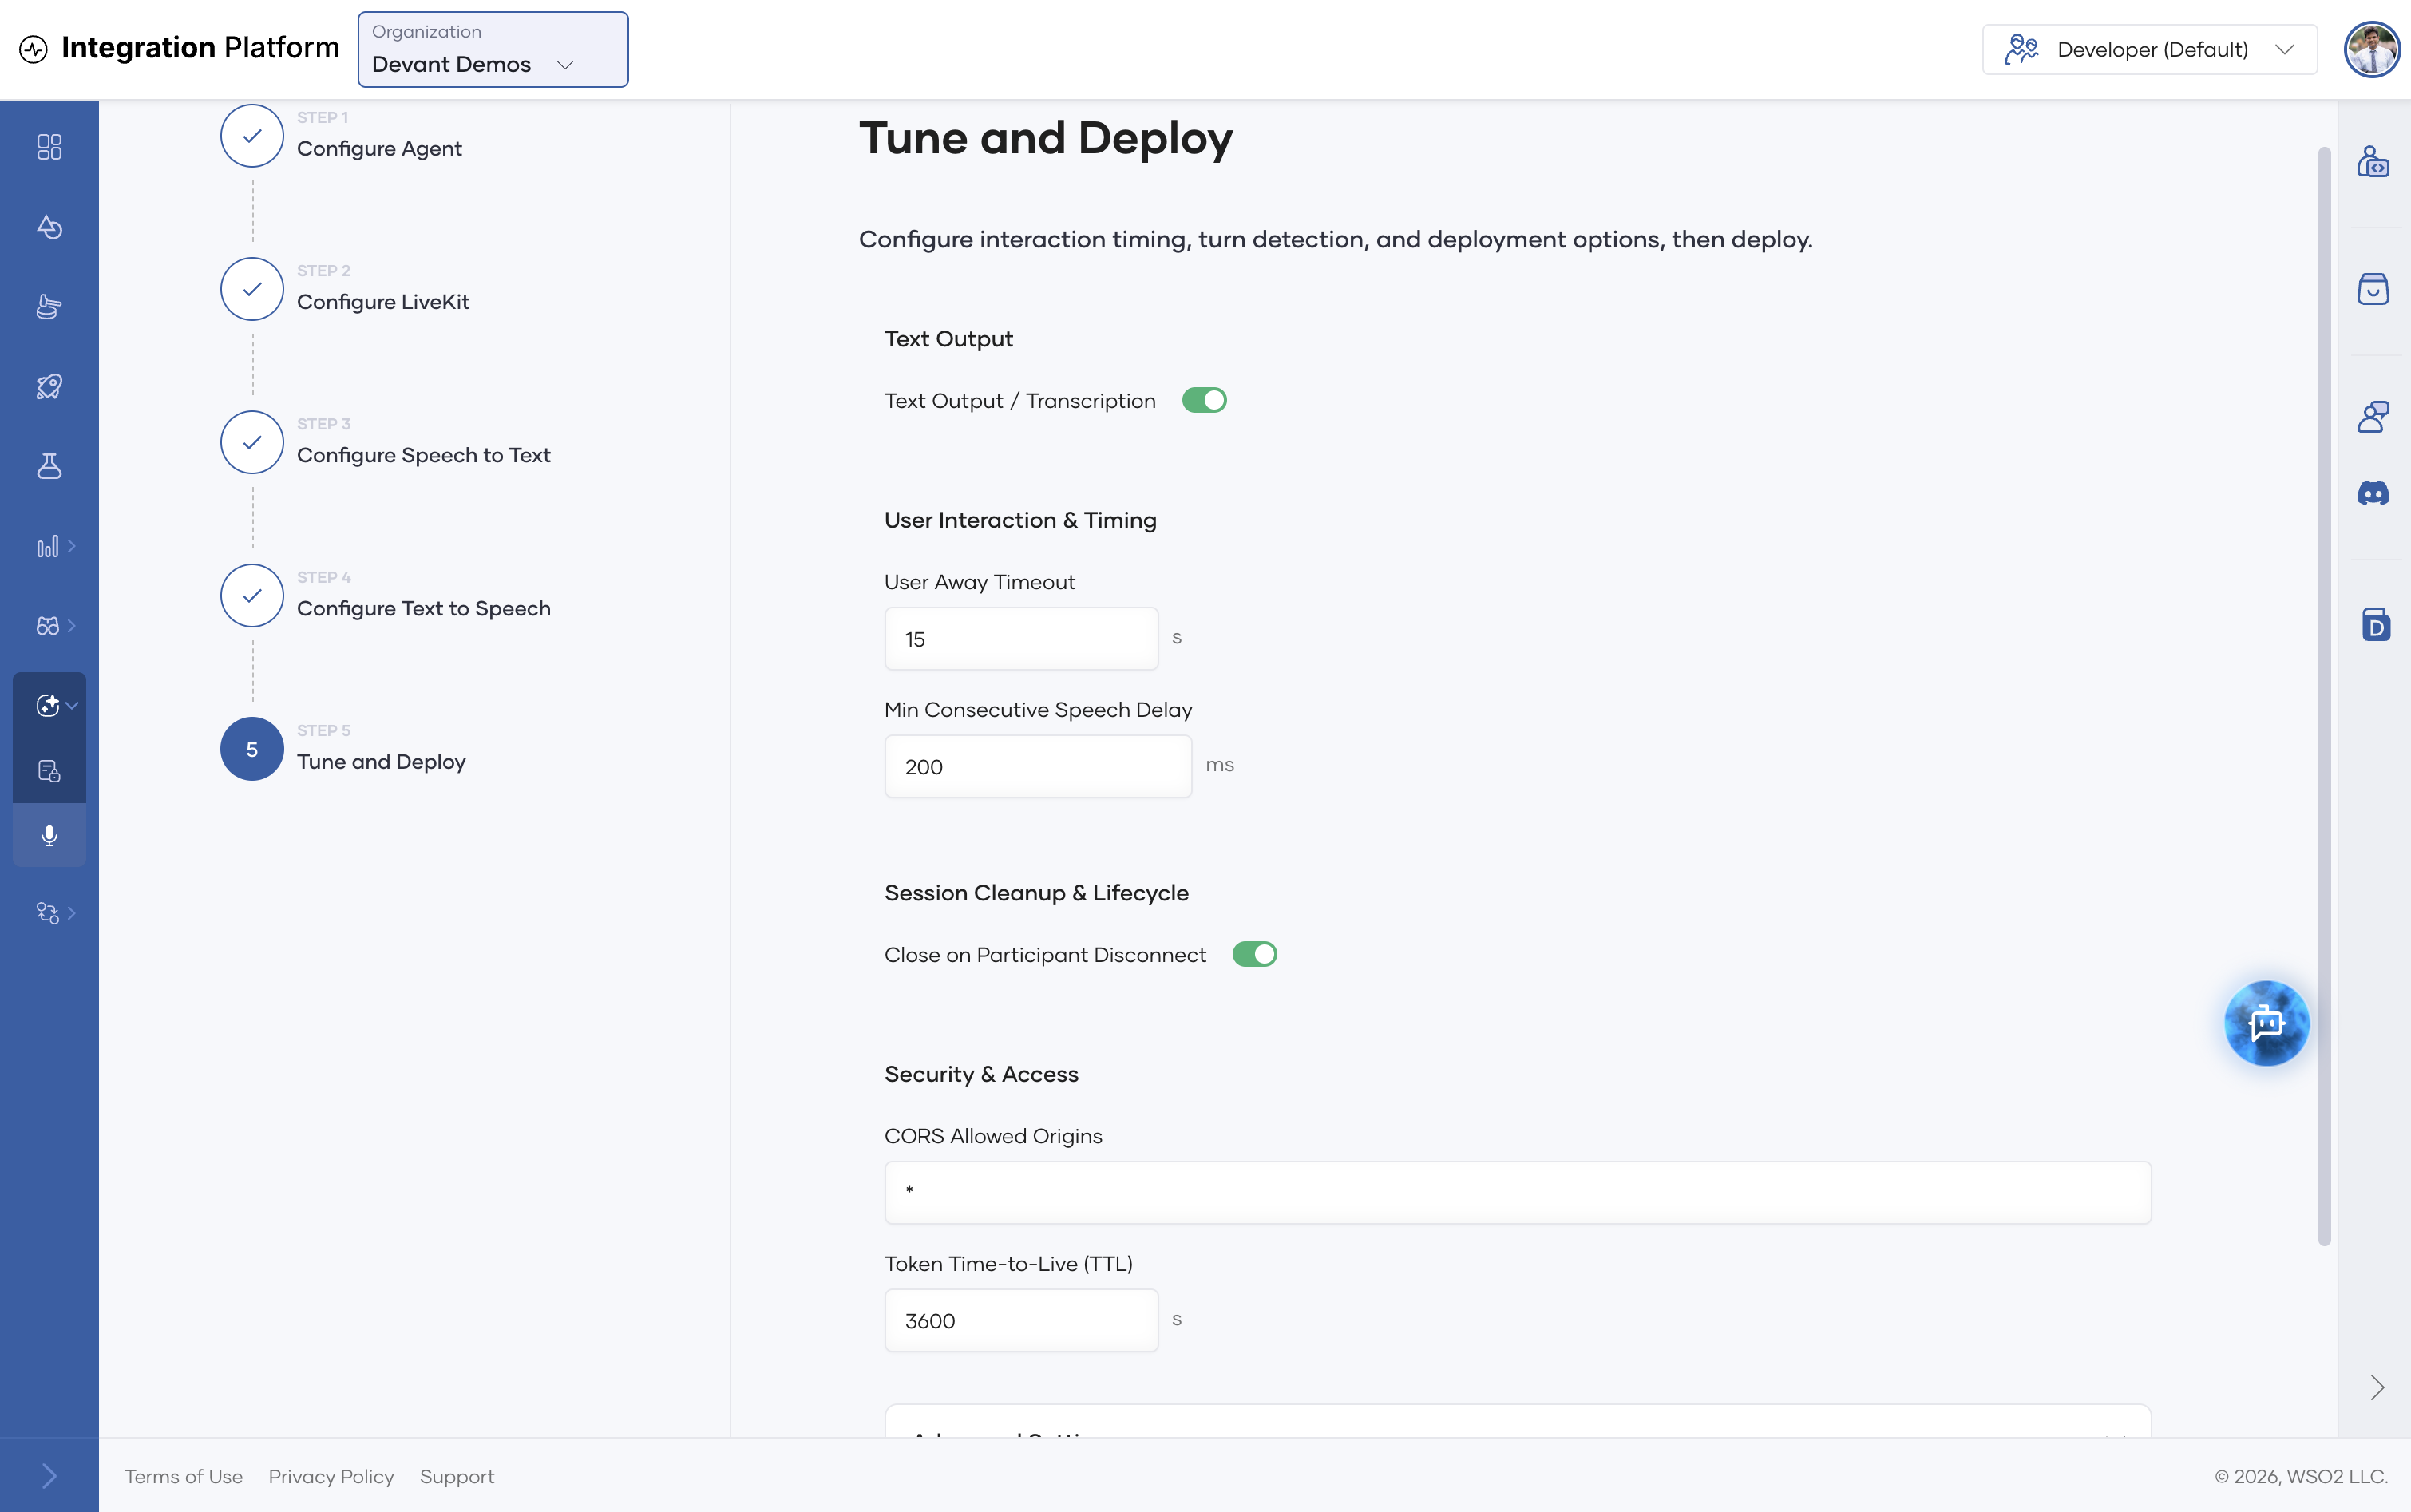
The defaults work for most agents. Adjust them if needed:
| Setting | Default | Description |
|---|---|---|
| Text Output / Transcription | On | Publishes the conversation transcript to the client alongside the audio. |
| User Away Timeout | 15 s | Ends the session after this much silence from the user. |
| Min Consecutive Speech Delay | 200 ms | Minimum gap between consecutive agent utterances. |
| Close on Participant Disconnect | On | Closes the LiveKit room when the user leaves. |
| CORS Allowed Origins | * | Origins allowed to request session tokens from the voice agent. Restrict this for production. |
| Token Time-to-Live (TTL) | 3600 s | How long a session token stays valid. |
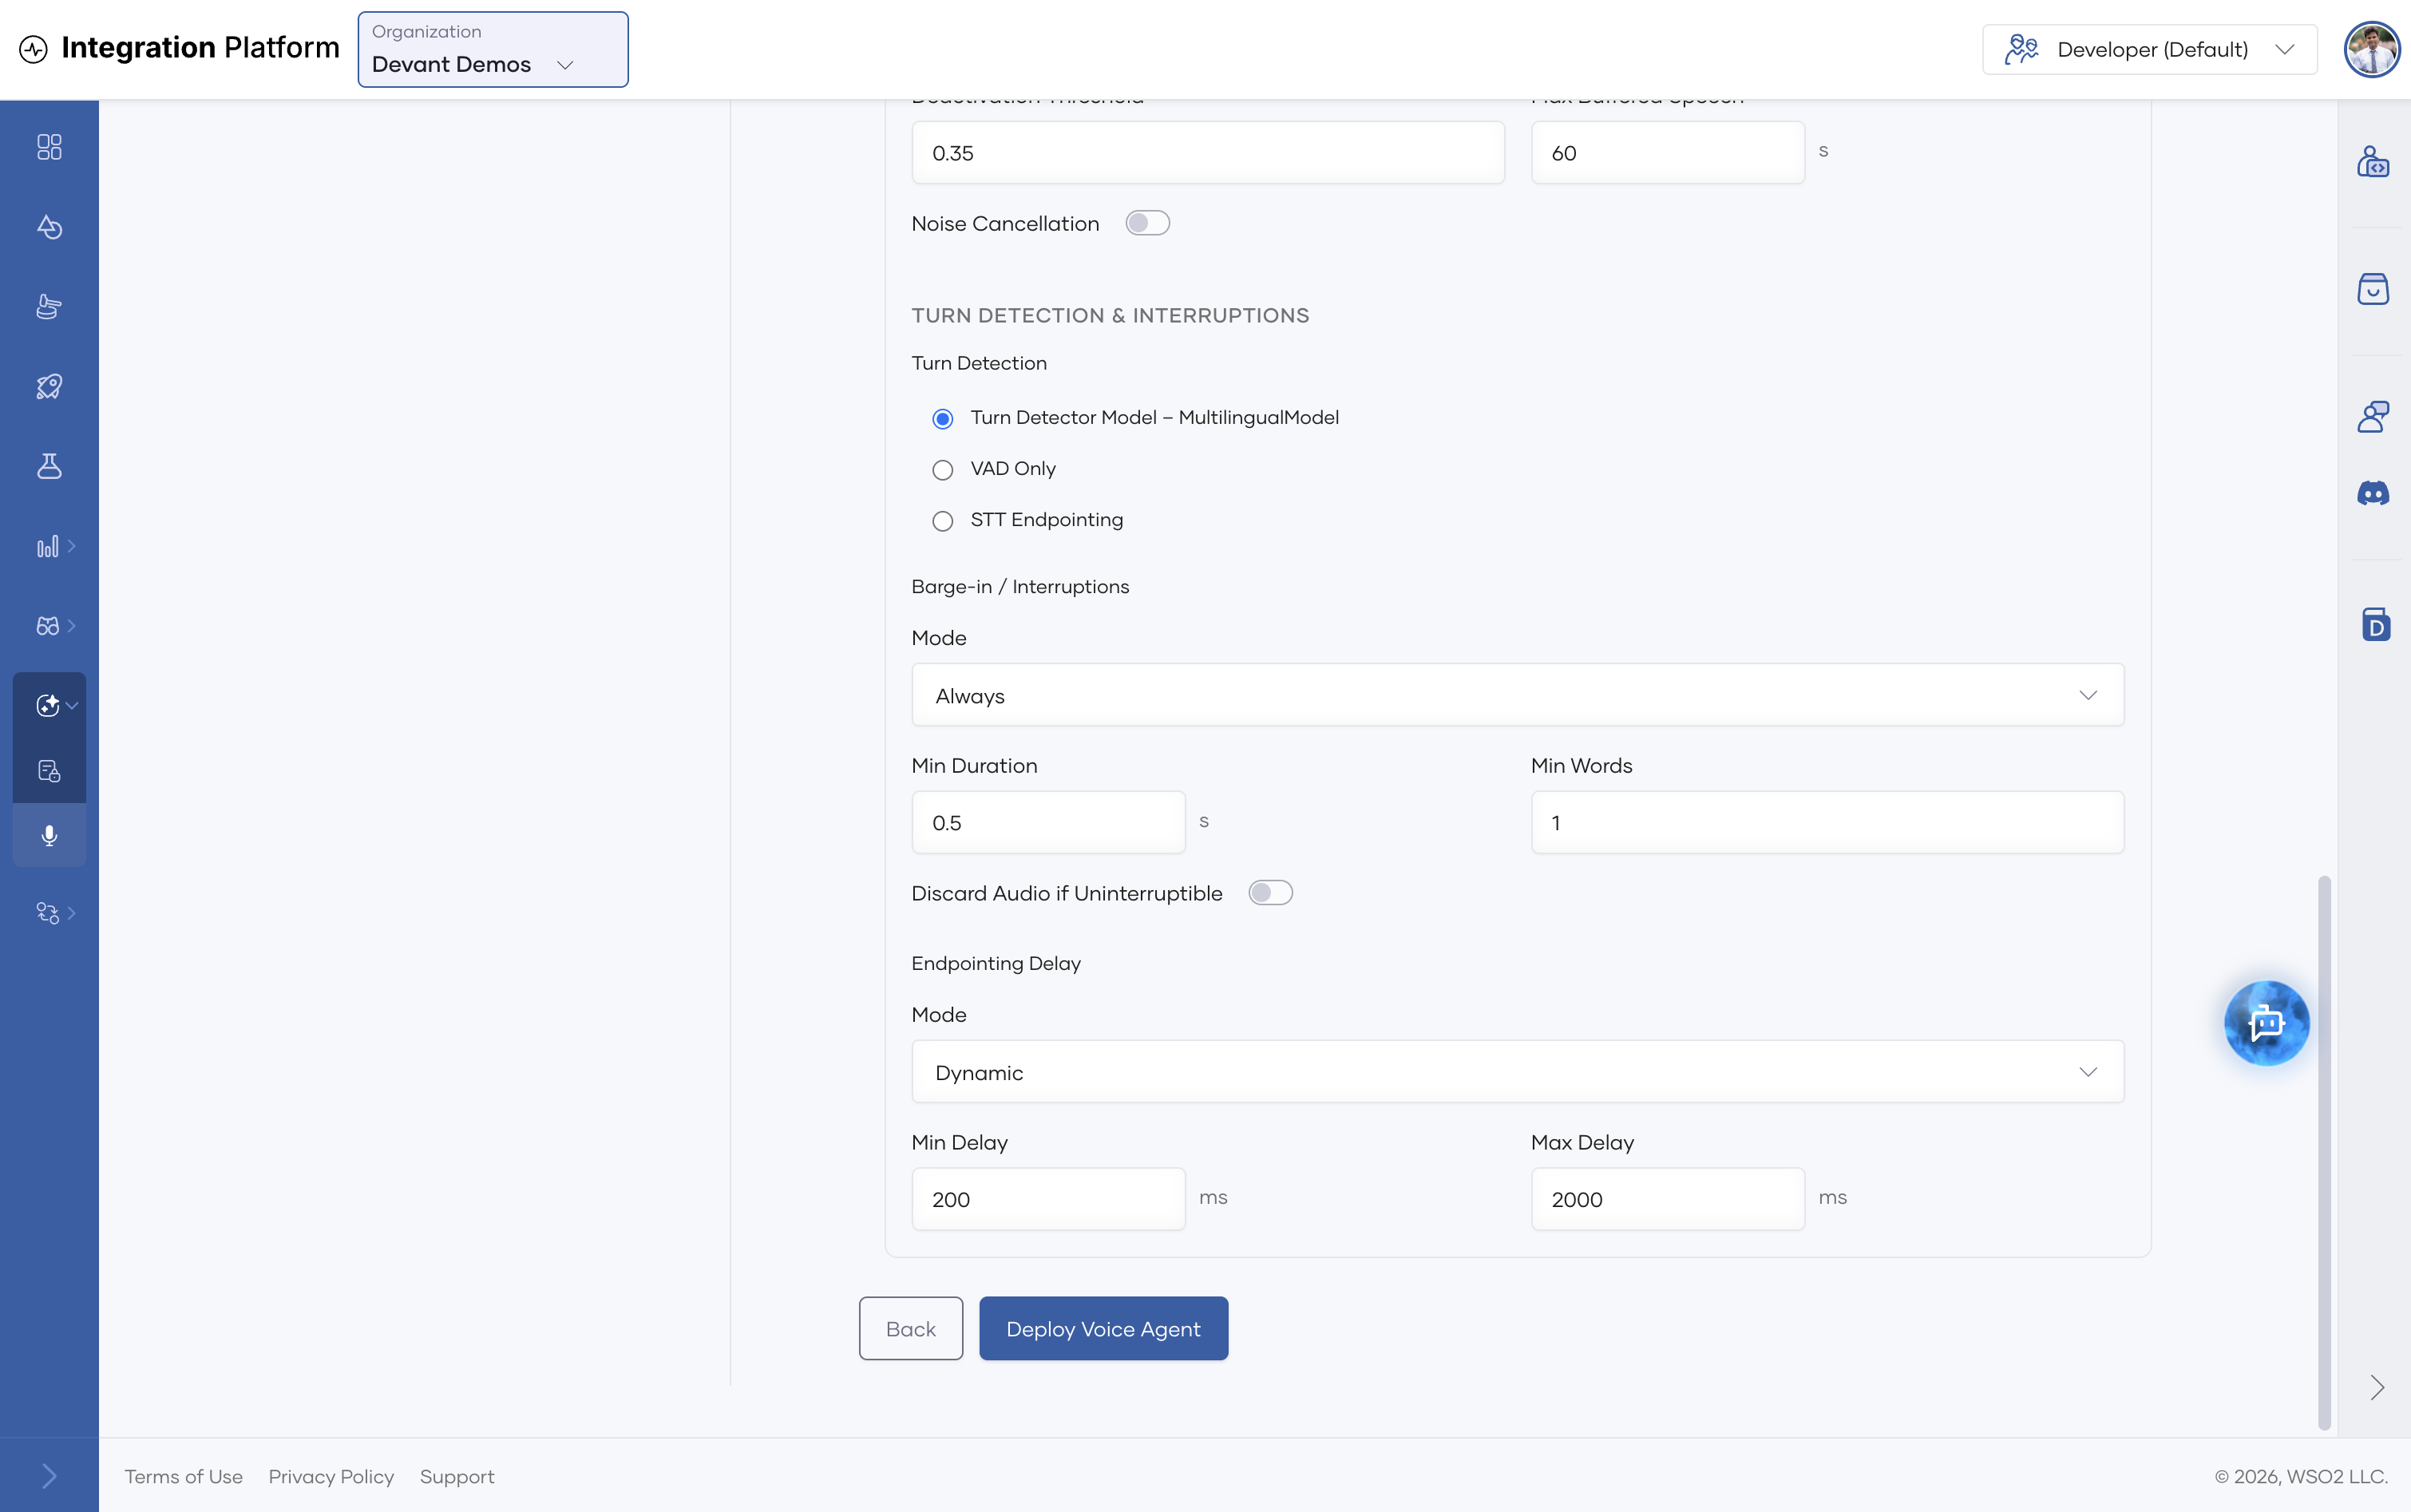
Advanced Settings expose voice activity detection (VAD), noise cancellation, turn detection, barge-in (interrupting the agent while it speaks), and endpointing delay.
Click Deploy Voice Agent.
WSO2 Cloud creates a new integration of type Voice Agent in the project, named <agent-name> - Voice Agent by default, and deploys it to the Development environment. The voice agent connects to the target agent through its Target Agent WebSocket URL configuration.
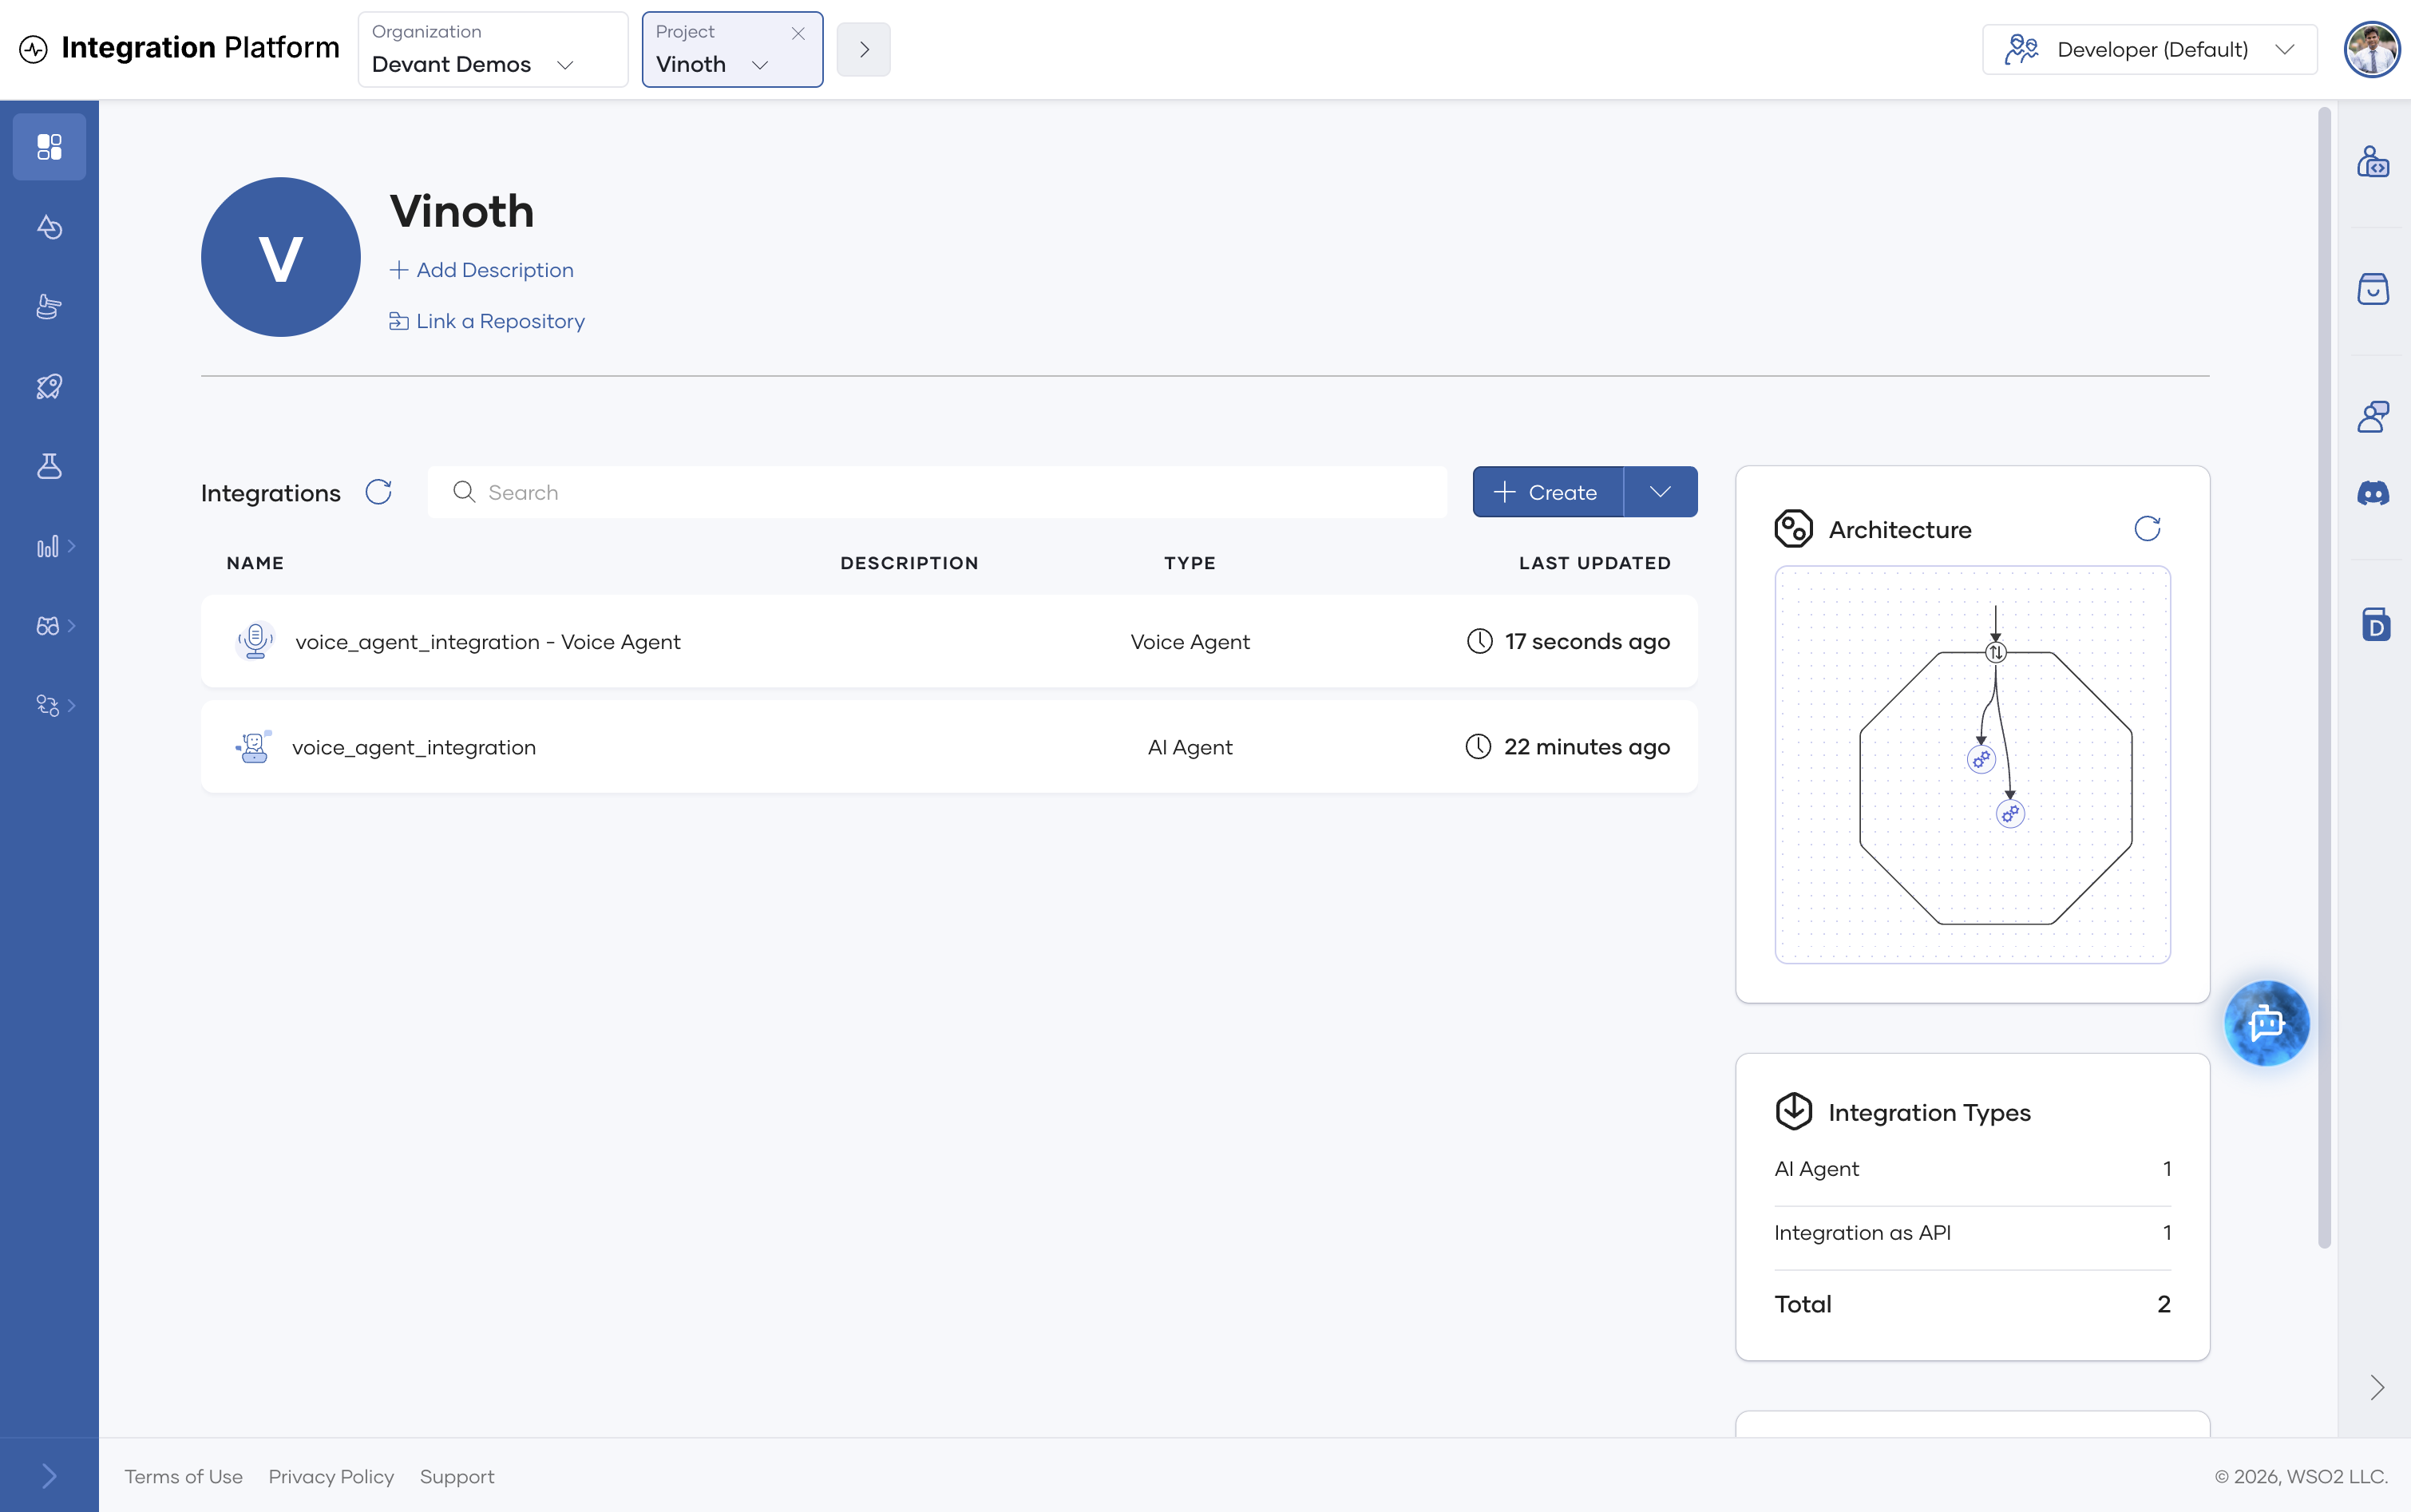
Open the voice agent and wait until the Development card on its overview page shows Active. The voice agent has Development, Stage, and Production cards. Each card has its own Voice Tester, and How to Connect shows how to connect a client to that environment.
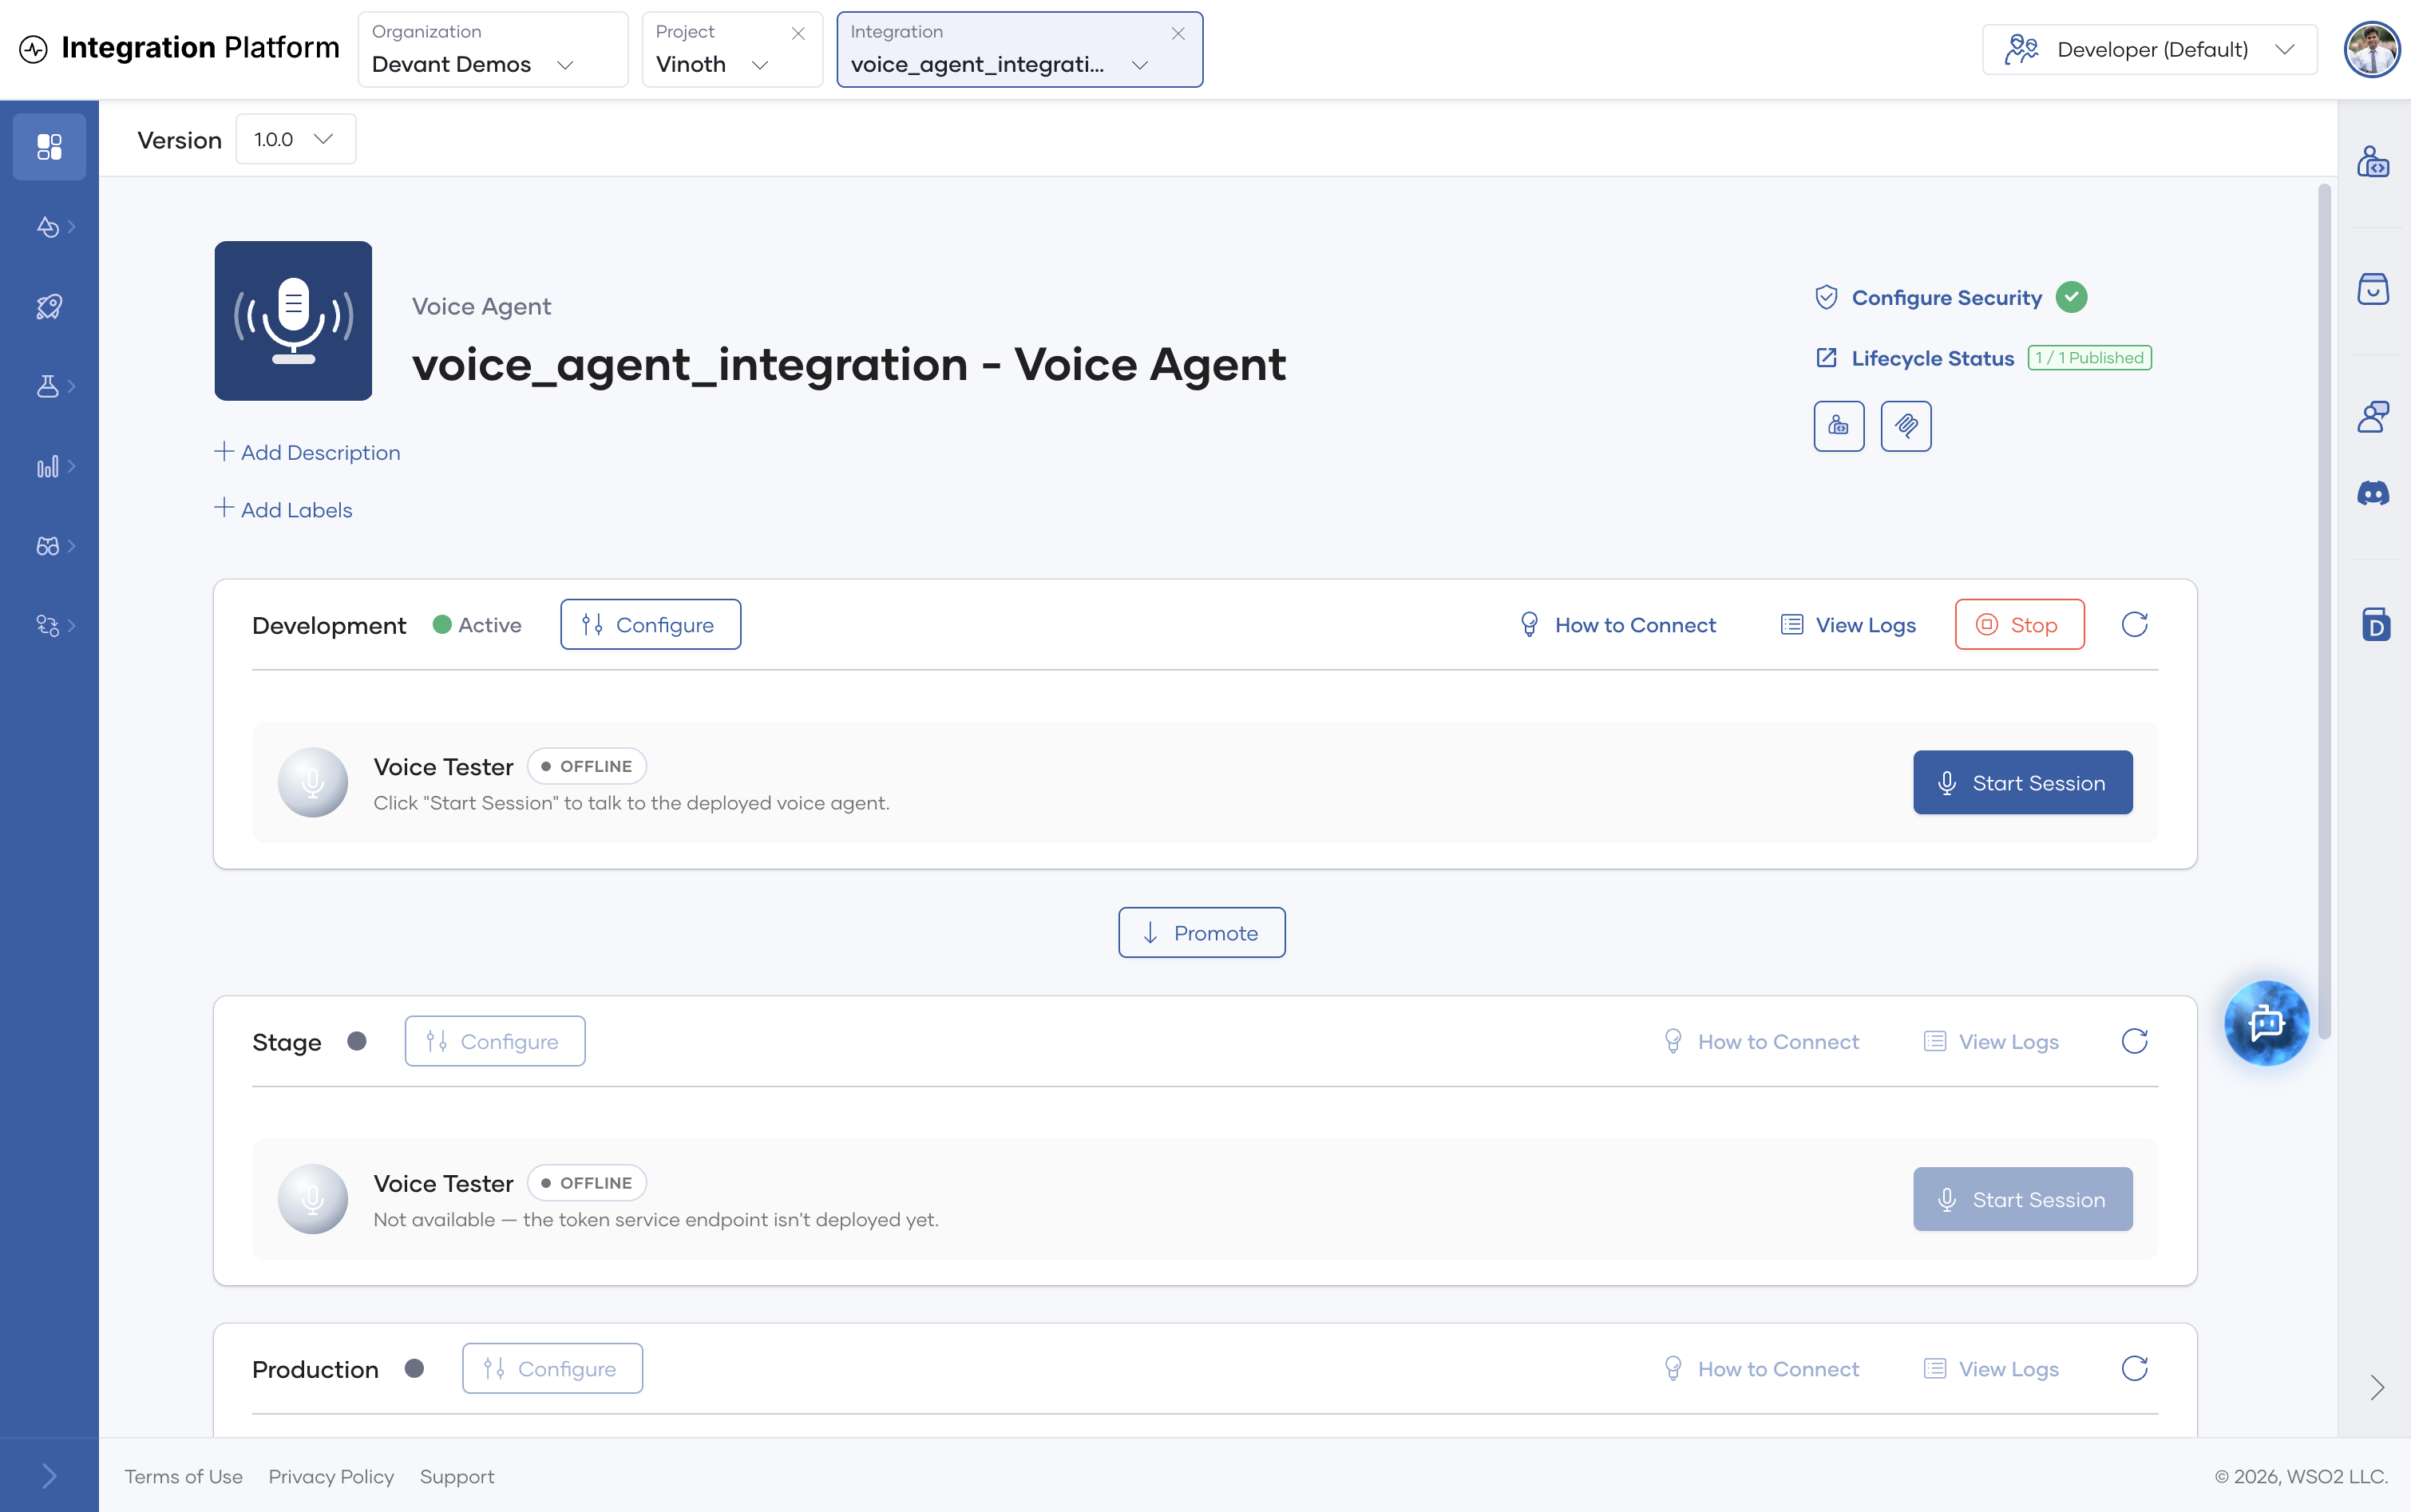
Test the voice agent
Click Start Session in the Voice Tester on the Development card, or open the tester from Test > Voice Agent in the voice agent's left navigation. The Test page has an environment selector next to Version.
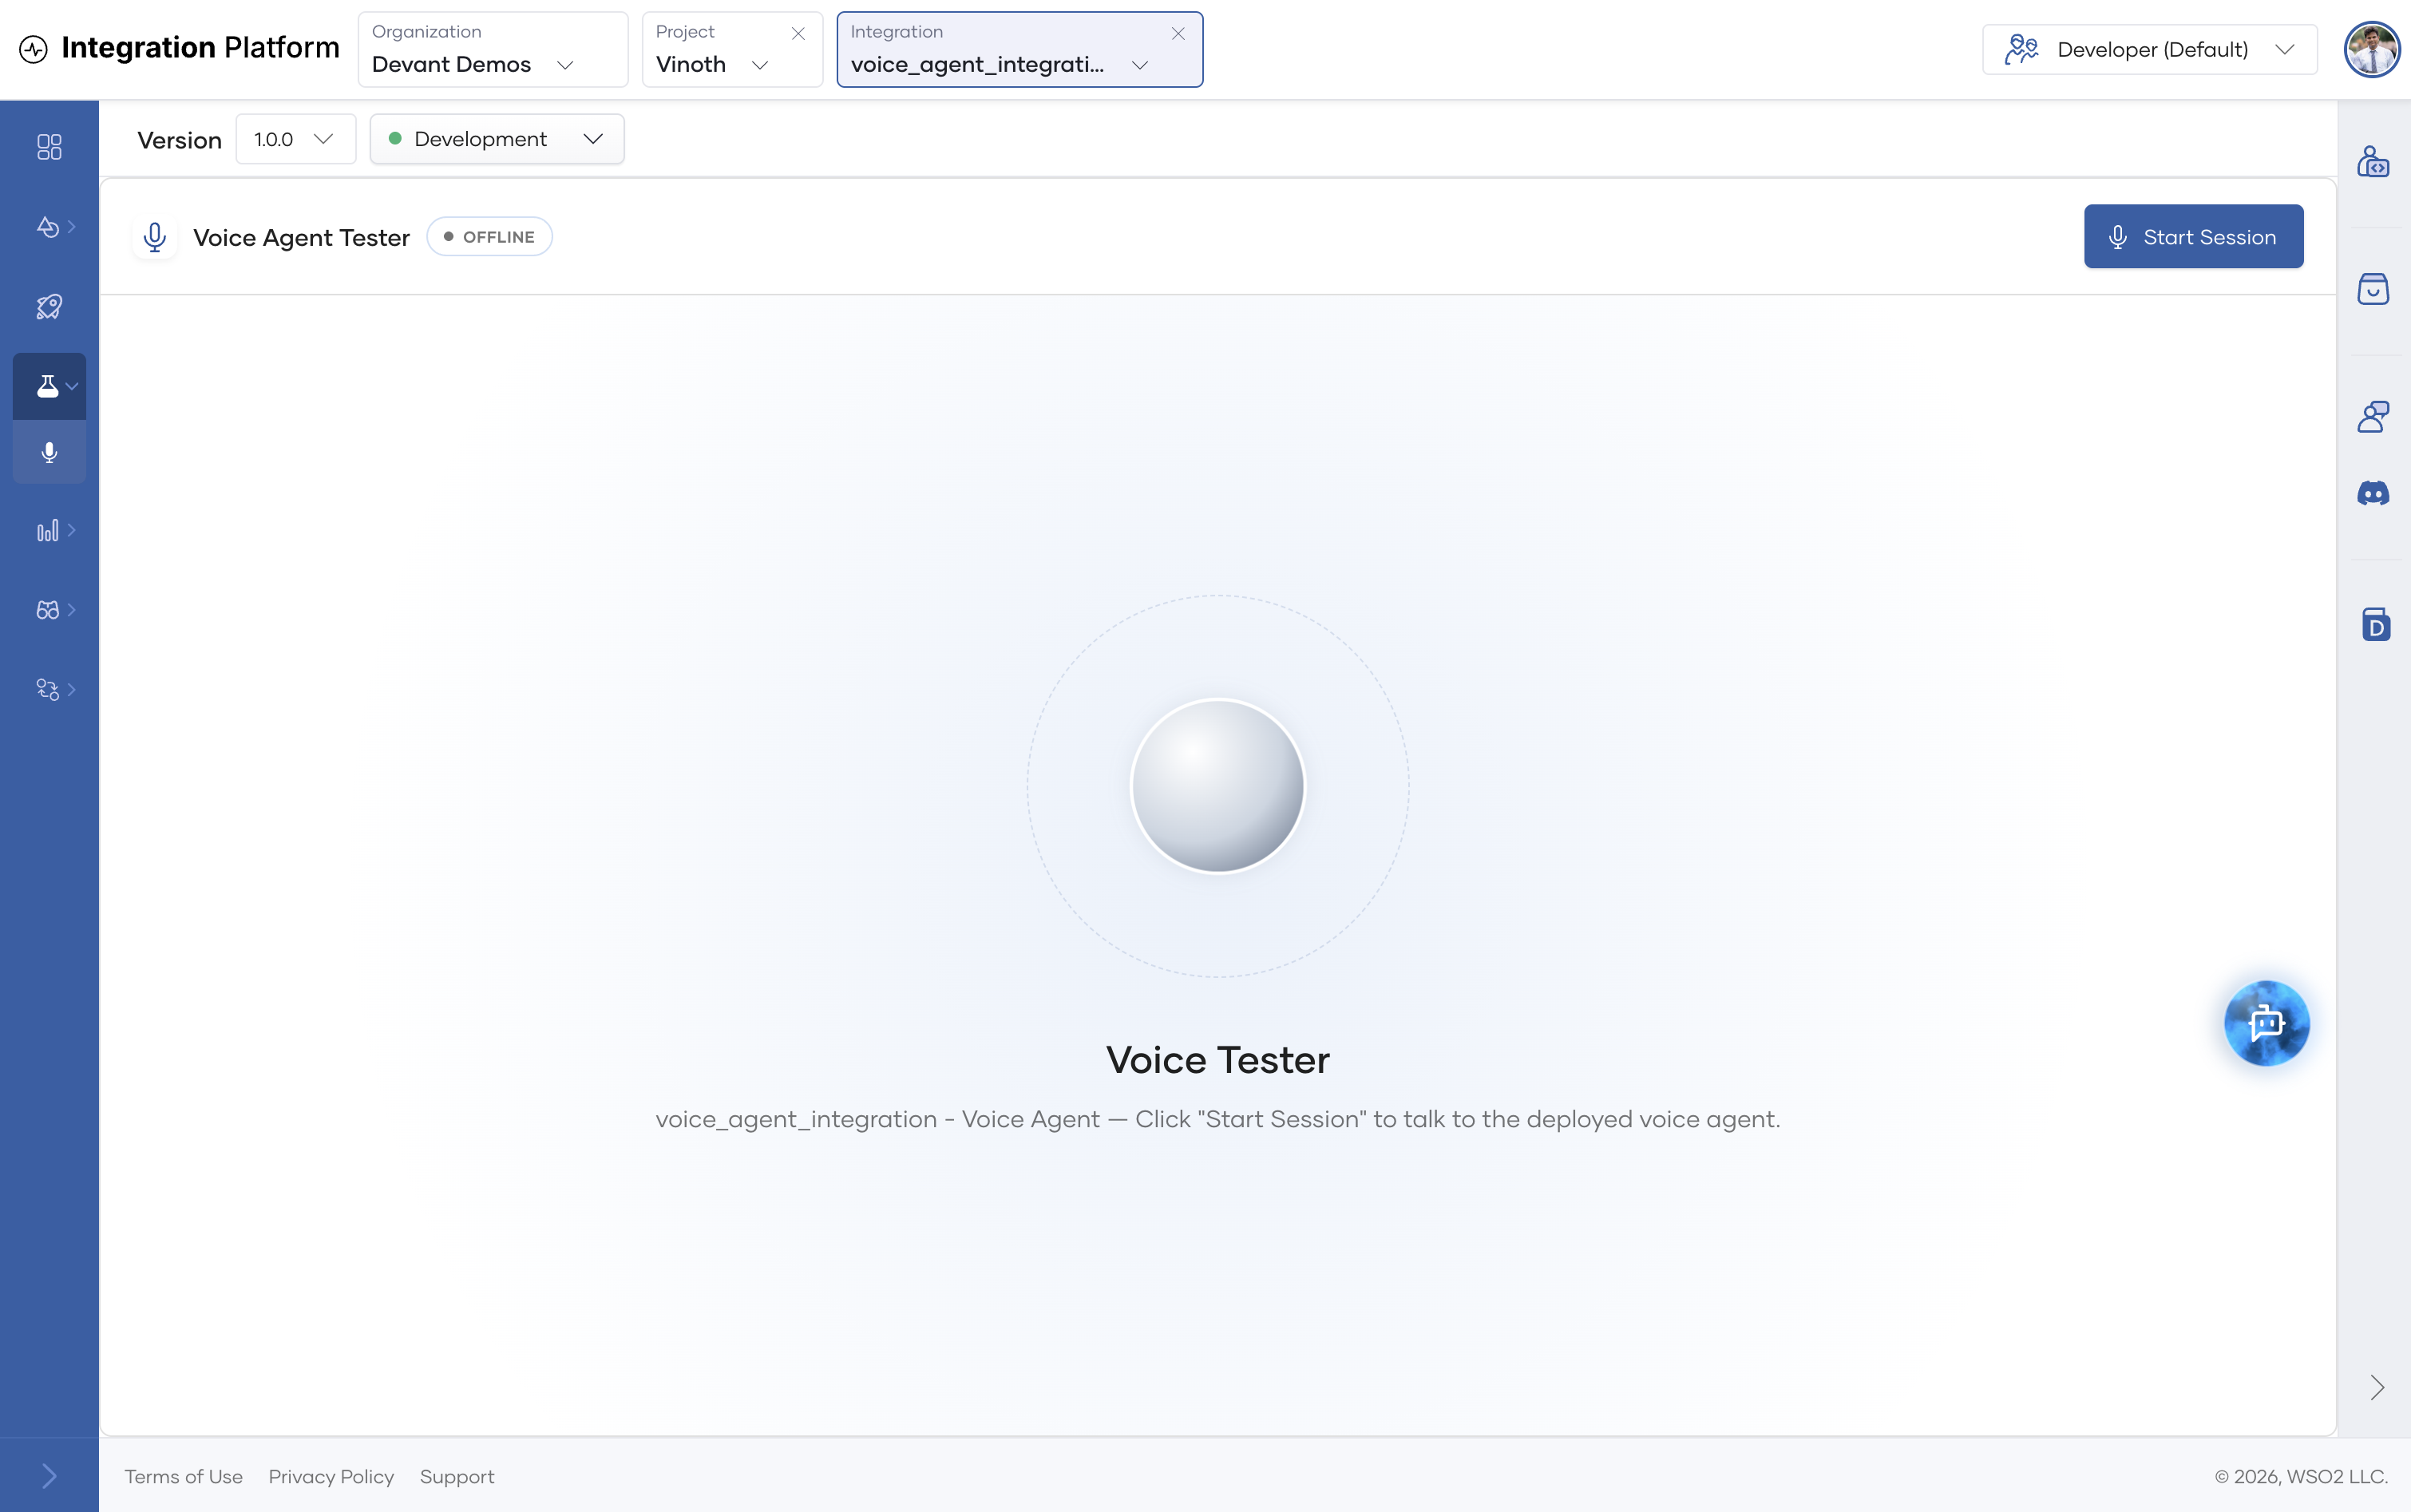
- Click Start Session and allow microphone access when the browser asks. The tester shows LIVE and Conversation Active with Speak into your microphone. The agent is listening and responding.
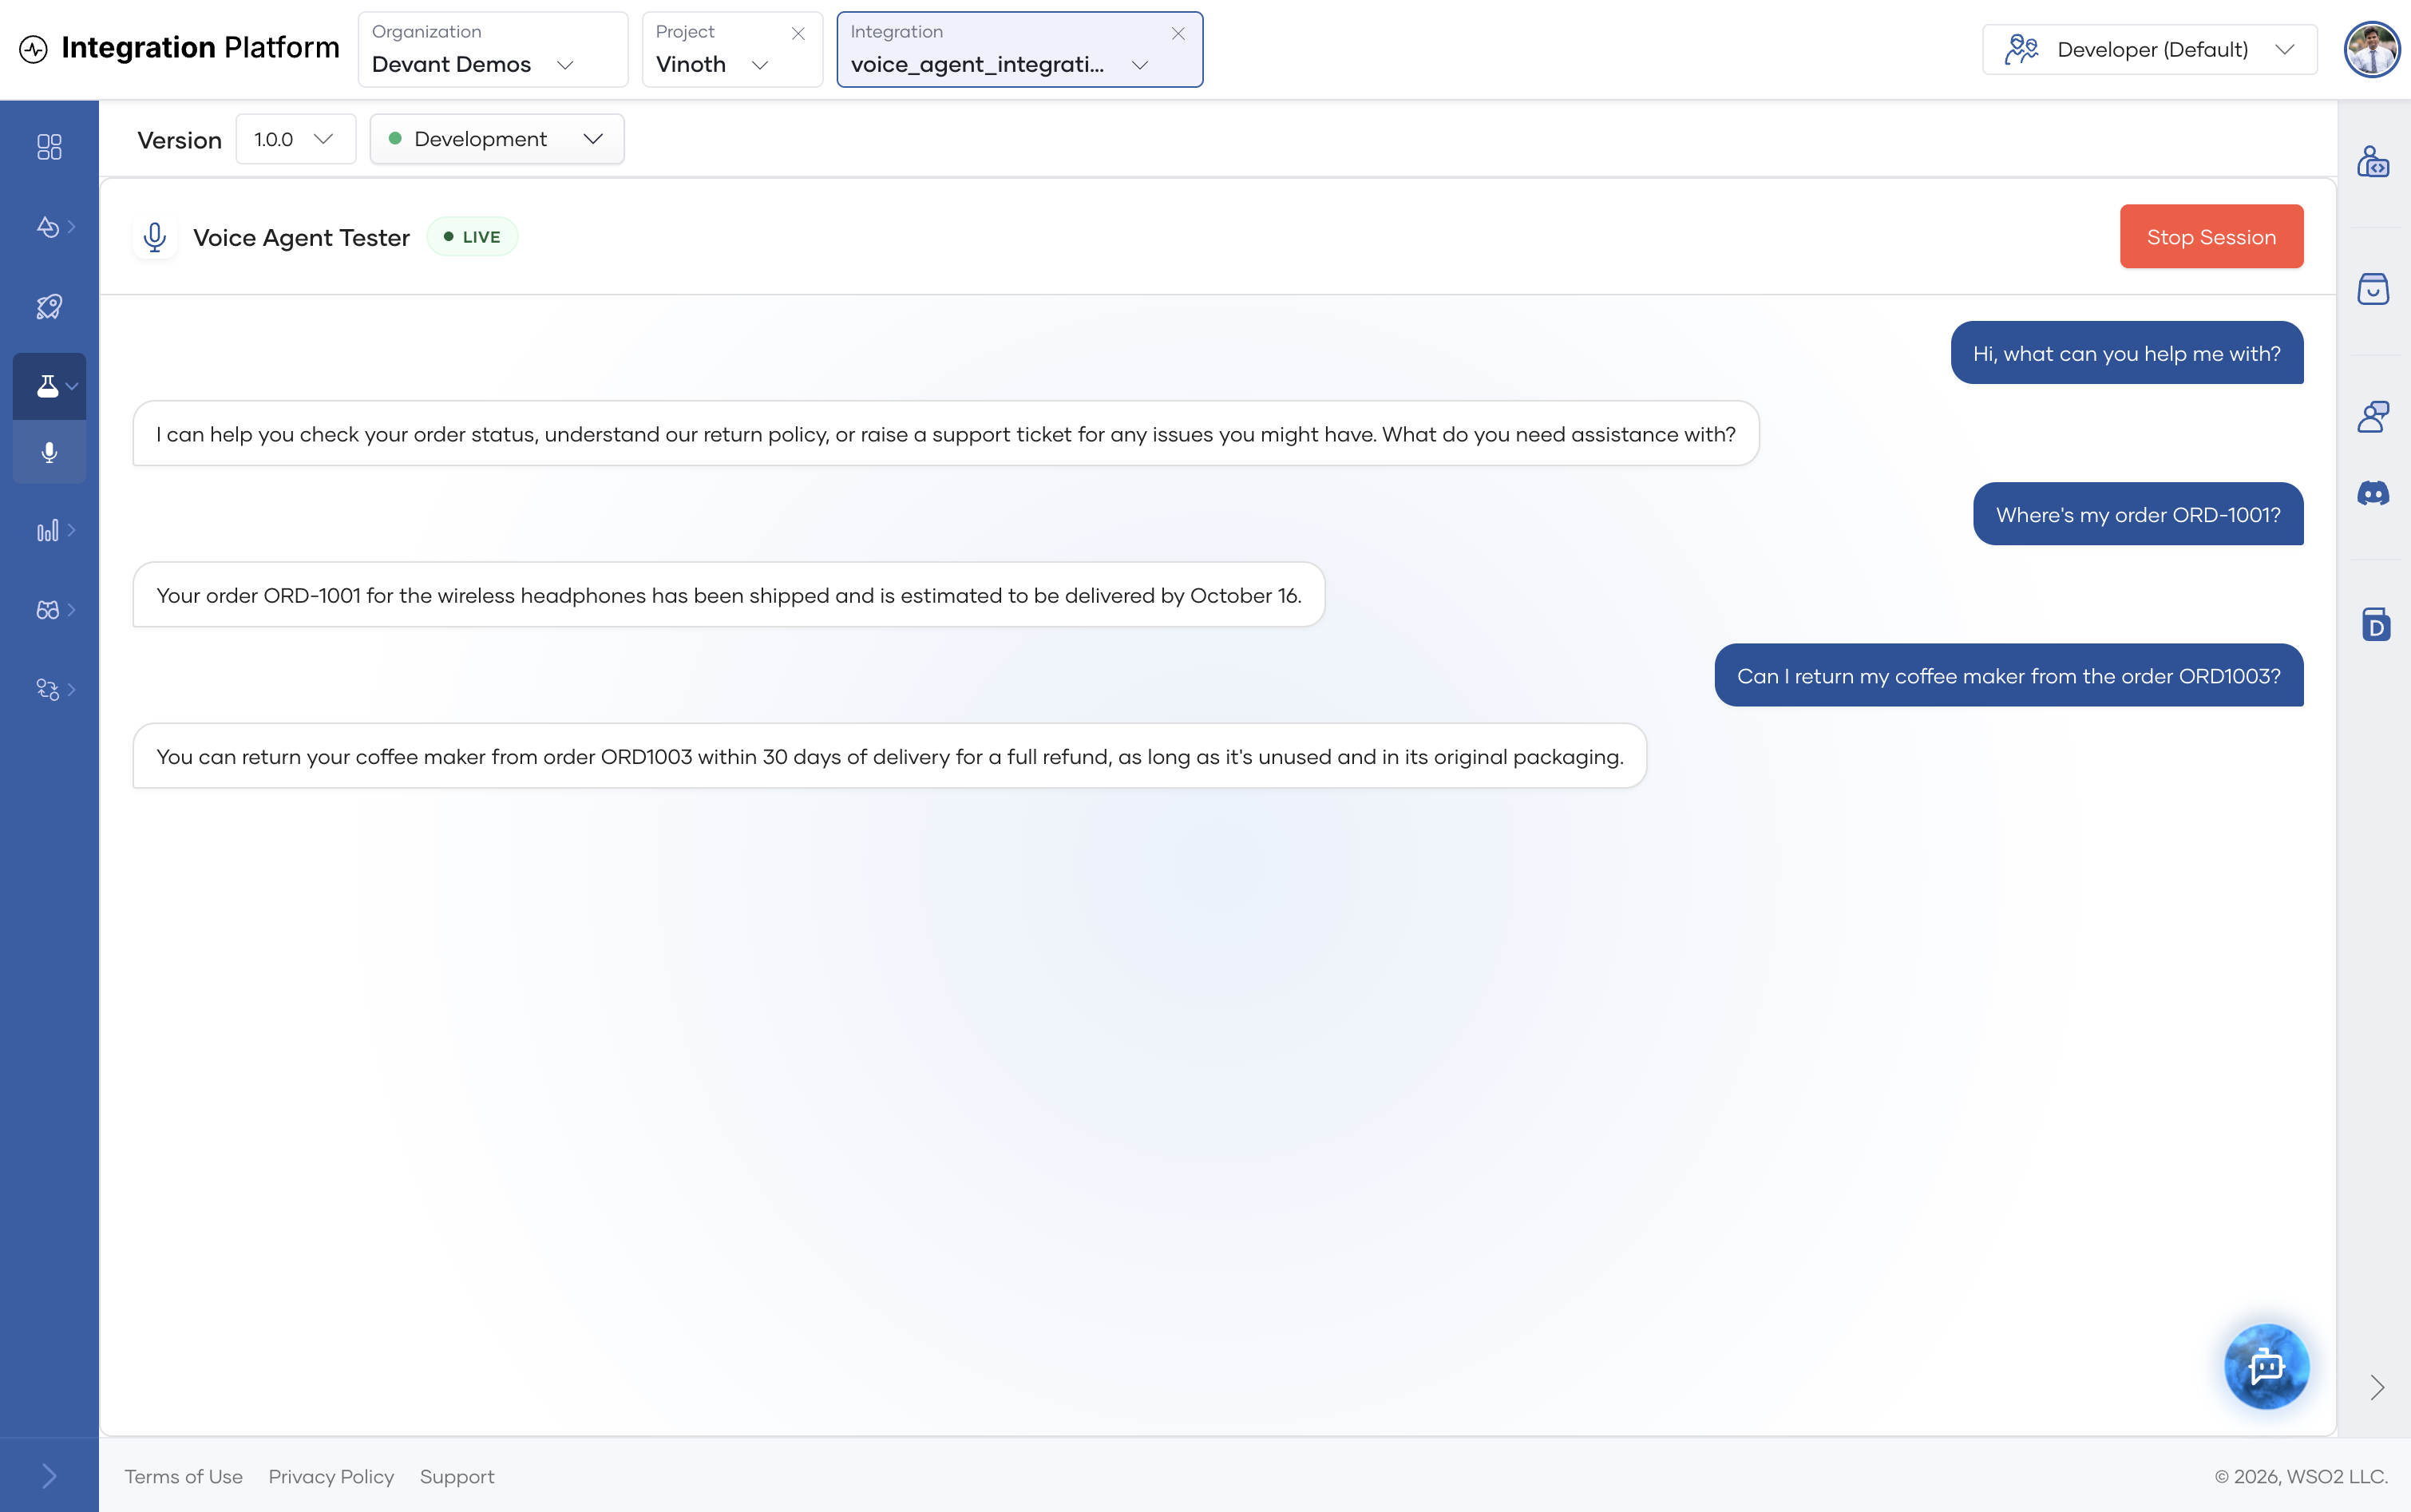
- Speak to the agent. The tester shows the transcript of what you say and the agent's replies, and you hear the agent's reply.
- Click Stop Session to end the conversation.
For the customer support example, try:
- "Hi, what can you help me with?"
- "Where is my order ORD-1001?"
- "Can I return my coffee maker from order ORD-1003?"
Promote to production
When you're ready to use the voice agent beyond Development, click Promote on the voice agent's overview page to promote it to the next environment (Stage, then Production). Wait until the target environment's card shows Active, then test it with that card's Voice Tester.
Troubleshooting
The reply text appears before the audio
The transcript is published as soon as the AI agent returns its full reply, but the audio has to wait for text-to-speech synthesis. To reduce the gap:
-
Keep the agent's replies short and voice-friendly: one or two sentences with no Markdown or lists.
-
Use a low-latency TTS model. For OpenAI, TTS-1 is faster than TTS-1 HD or GPT-4o Mini TTS. Cartesia and Deepgram Aura are also fast.
-
Check the AI agent's own logs for errors, such as a missing LLM model or API key configuration.
The session ends on its own
A session ends when the user is silent for longer than User Away Timeout, or when the user leaves and Close on Participant Disconnect is on. Log entries such as publisher data channel '_reliable' closed unexpectedly followed by disconnected from room with reason: RoomClosed are part of normal room teardown, not an error.