Migrate from TIBCO BusinessWorks
Overview
The TIBCO migration tool converts TIBCO BusinessWorks process definitions to Ballerina code. It handles process flows, activities, transitions, shared resources, error handling configurations, and more.
Run the TIBCO migration tool
- WSO2 Integrator
- CLI
The migration wizard guides you through a 5-step process to convert your TIBCO BusinessWorks project(s) into a WSO2 Integrator project.
Prerequisite
- Ensure WSO2 Integrator is installed and available on your system.
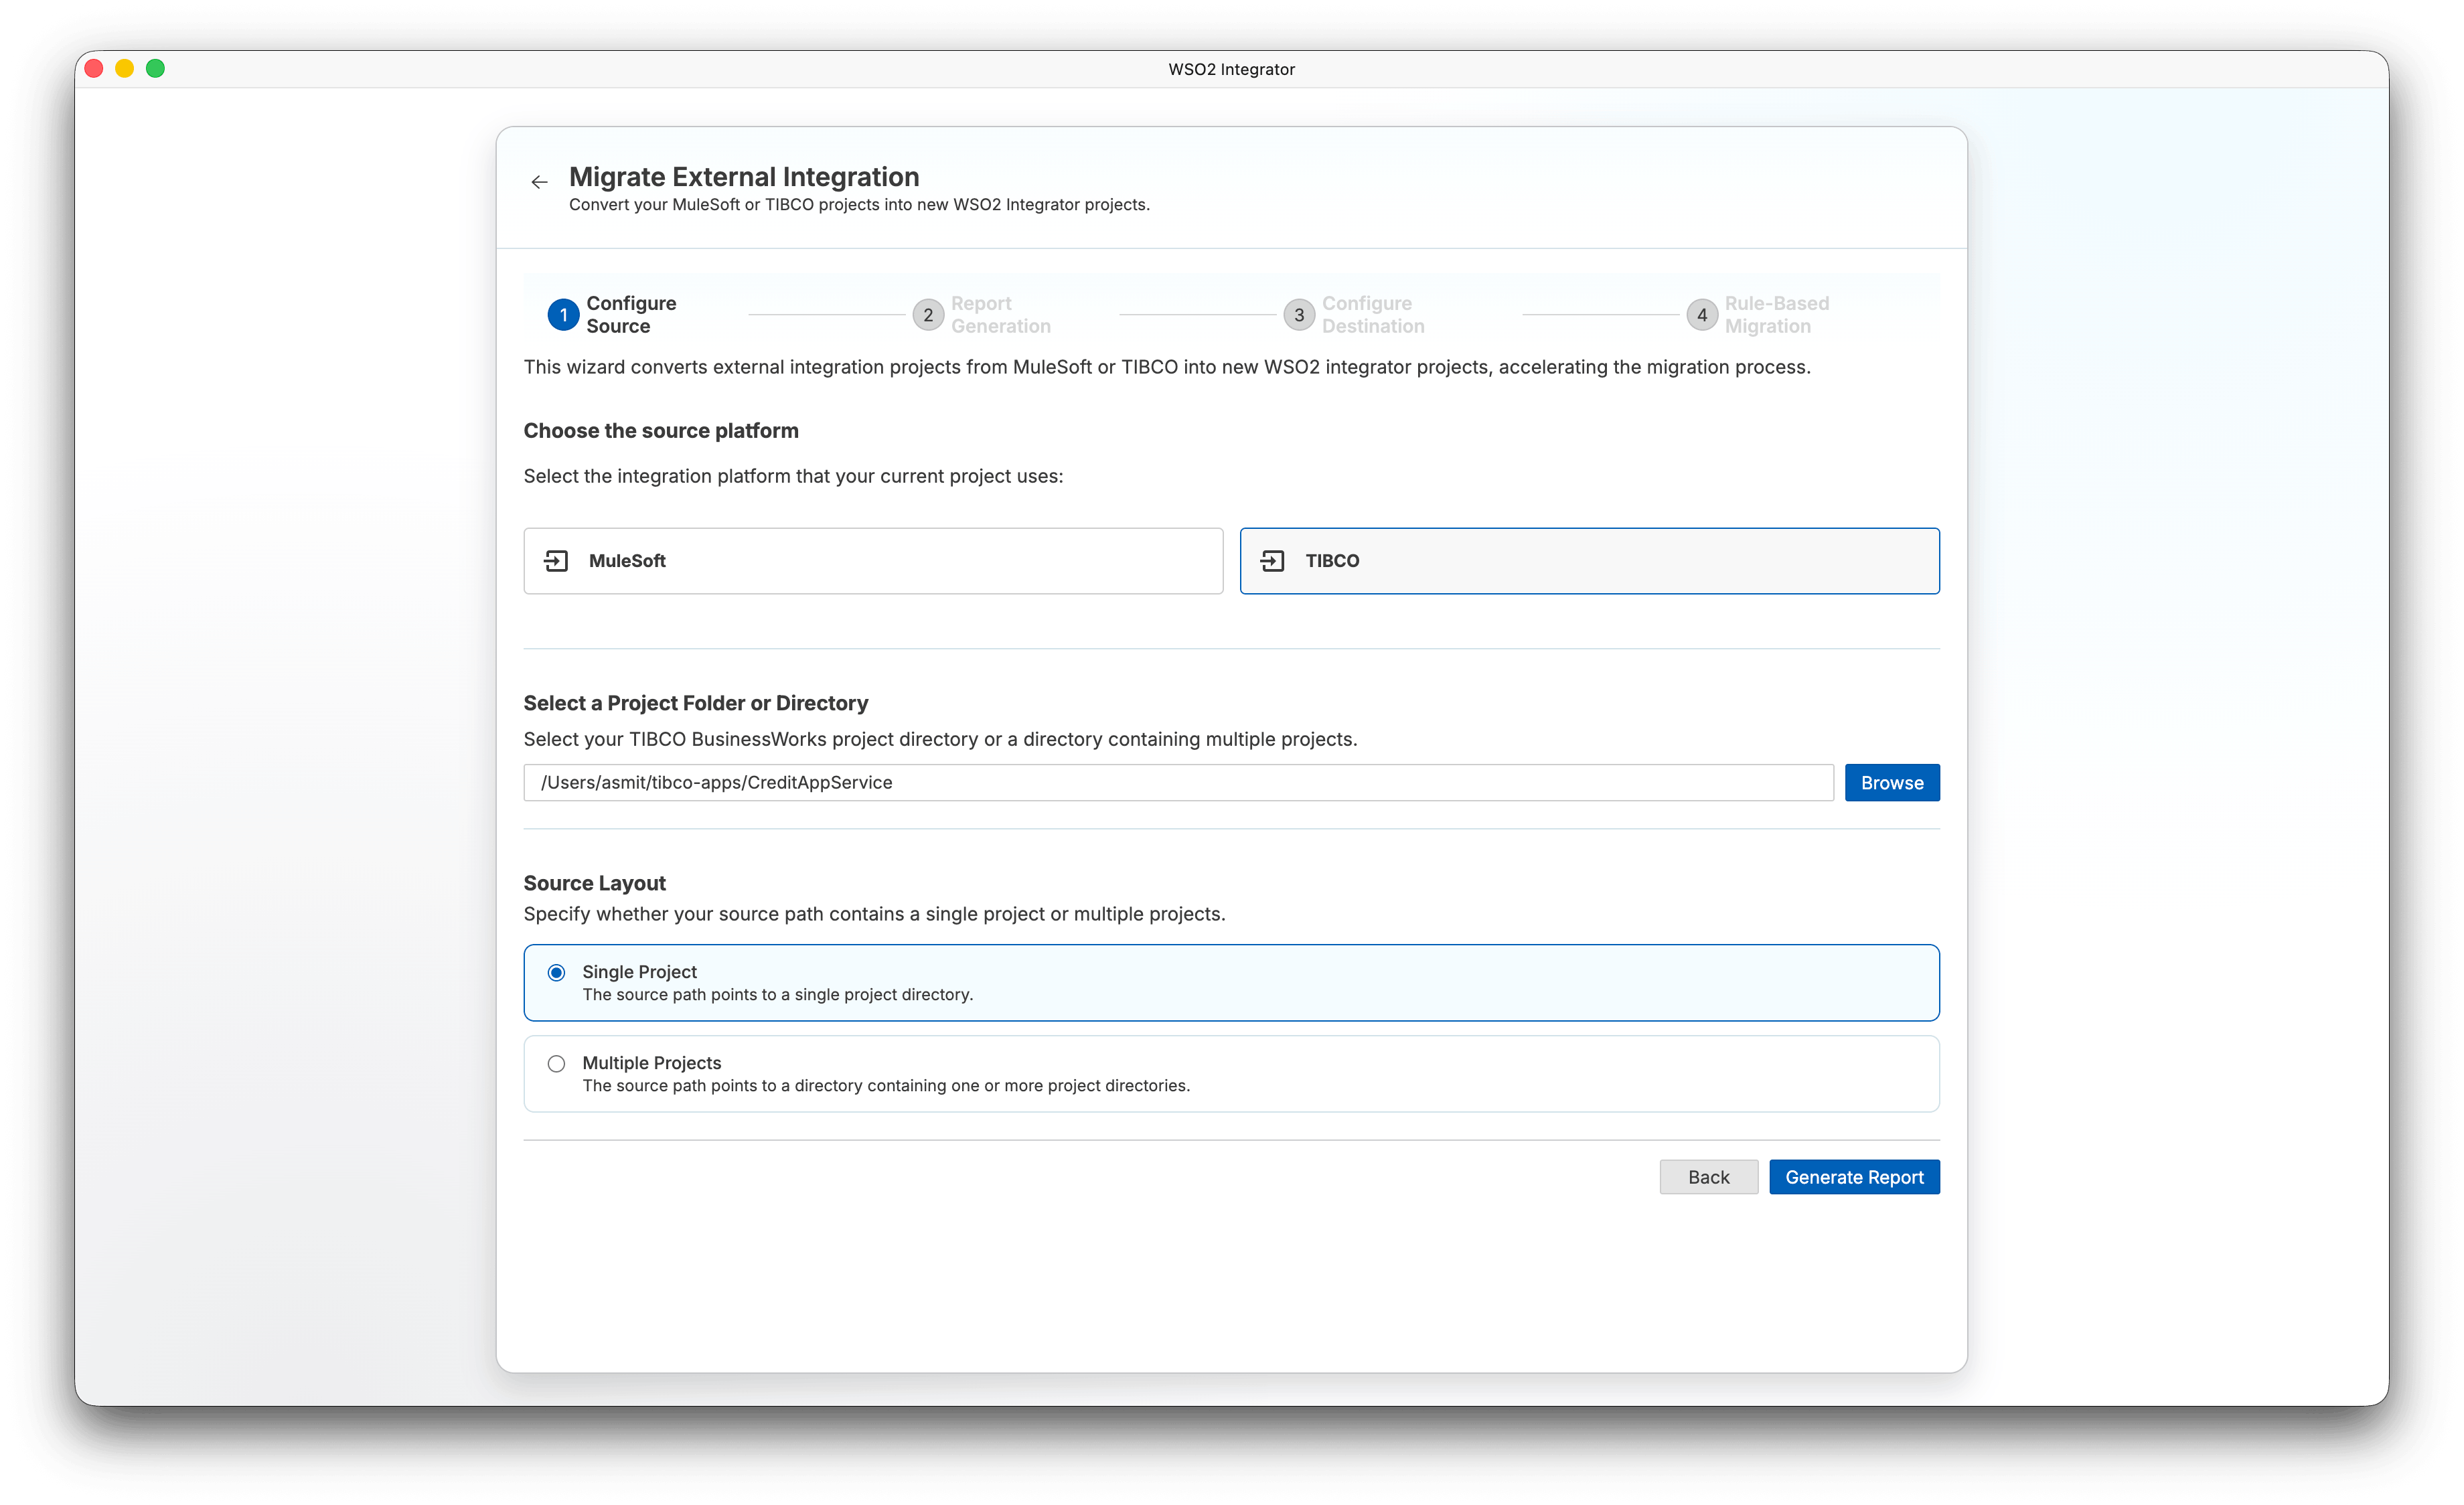
Step 1: Configure source
-
Open WSO2 Integrator, click More Actions, and select Migrate Integrations from Other Vendors.
-
Select TIBCO as the source platform.
-
Under Select a Project Folder or Directory, click Browse and select your TIBCO BusinessWorks project directory or a directory containing multiple projects.
-
Under Source Layout, select one of the following:
- Single Project — The source path points to a single project directory.
- Multiple Projects — The source path points to a directory containing one or more project directories.
Note: The Source Layout section appears only after you select a directory.
-
Click Generate Report.
Step 2: Report generation
The wizard performs a dry run against your source project(s) to generate a coverage report before the actual migration begins.
When the dry run completes, the wizard displays a summary of the migration coverage:
-
Migration Coverage — Percentage of code lines that were automatically migrated.
-
Total code lines — Total number of source code lines analyzed.
-
Migratable code lines — Lines successfully converted to Ballerina.
-
Non-migratable code lines — Lines that require manual attention.
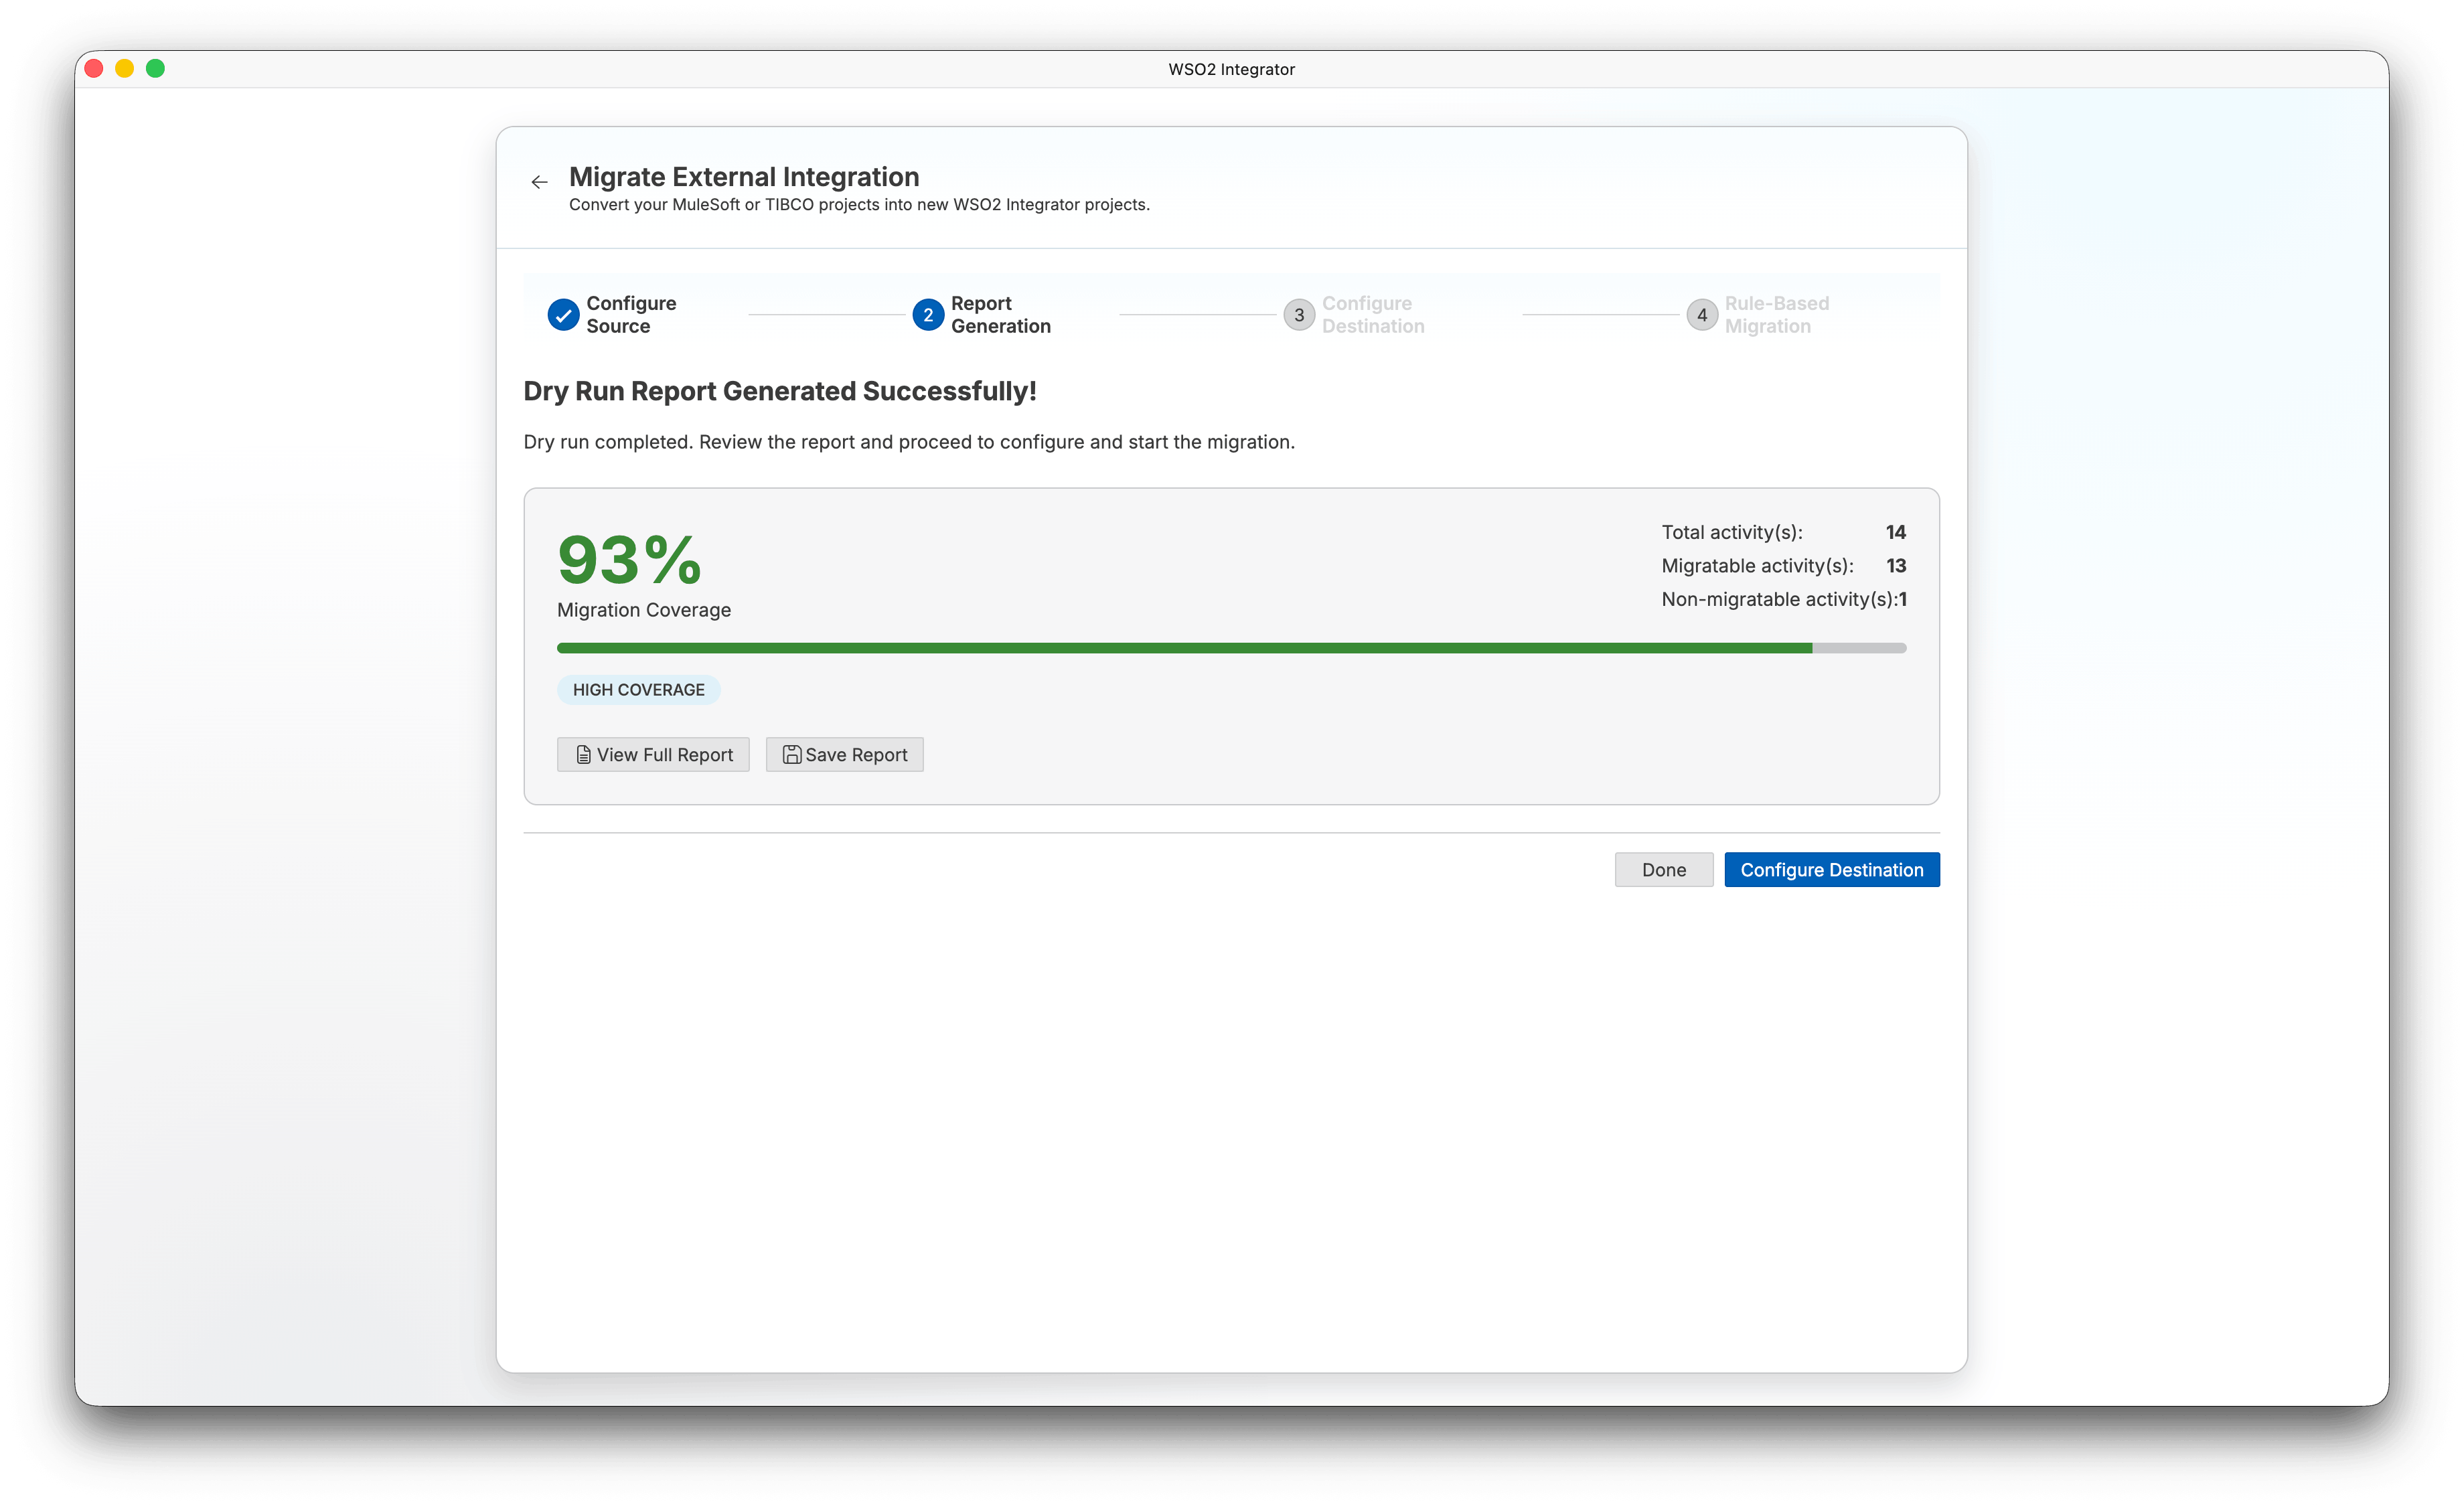
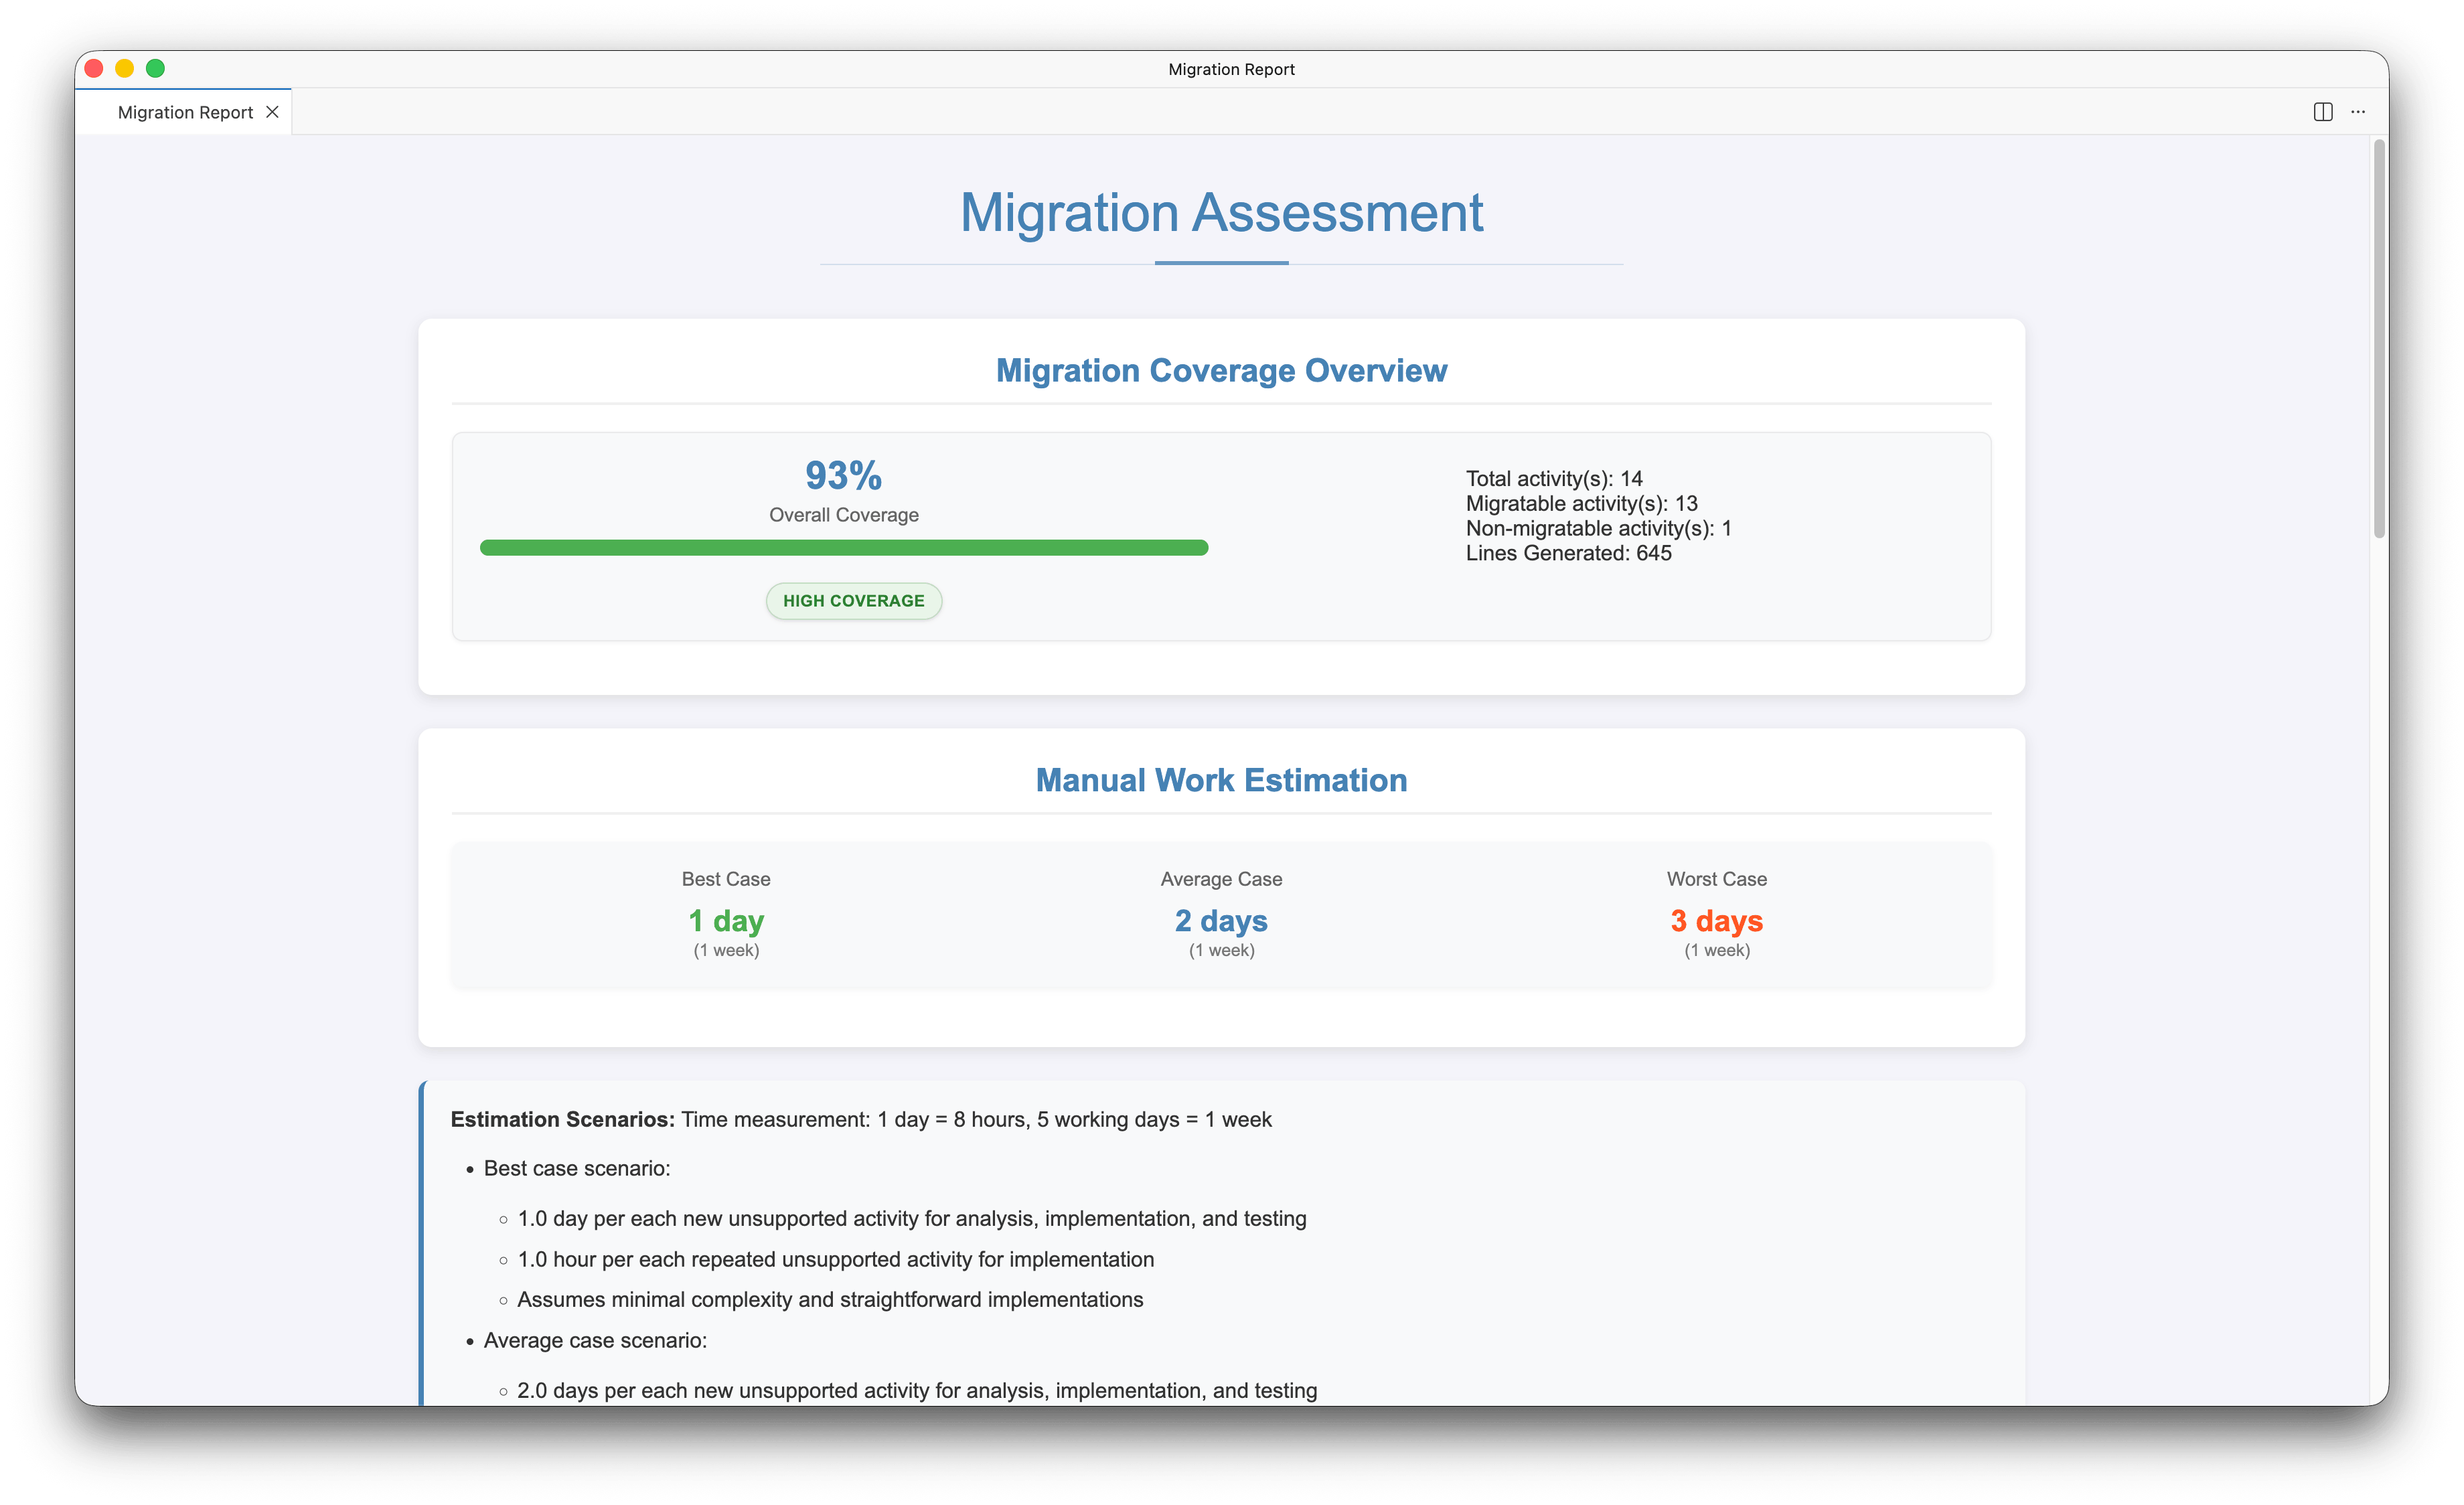
Click View Full Report to open the full HTML report. The report includes:
-
Migration Coverage Overview — Overall coverage percentage with a breakdown of total, migratable, and non-migratable code lines.
-
Manual Work Estimation — Estimated effort (best, average, and worst case) for completing non-migratable items.
-
Currently Unsupported Elements — List of elements that could not be automatically migrated.
-
Element Blocks that Require Manual Conversion — Specific code blocks that need manual implementation.
Click Save Report to download the report for future reference.
Click Configure Destination to proceed, or Done to exit the wizard.
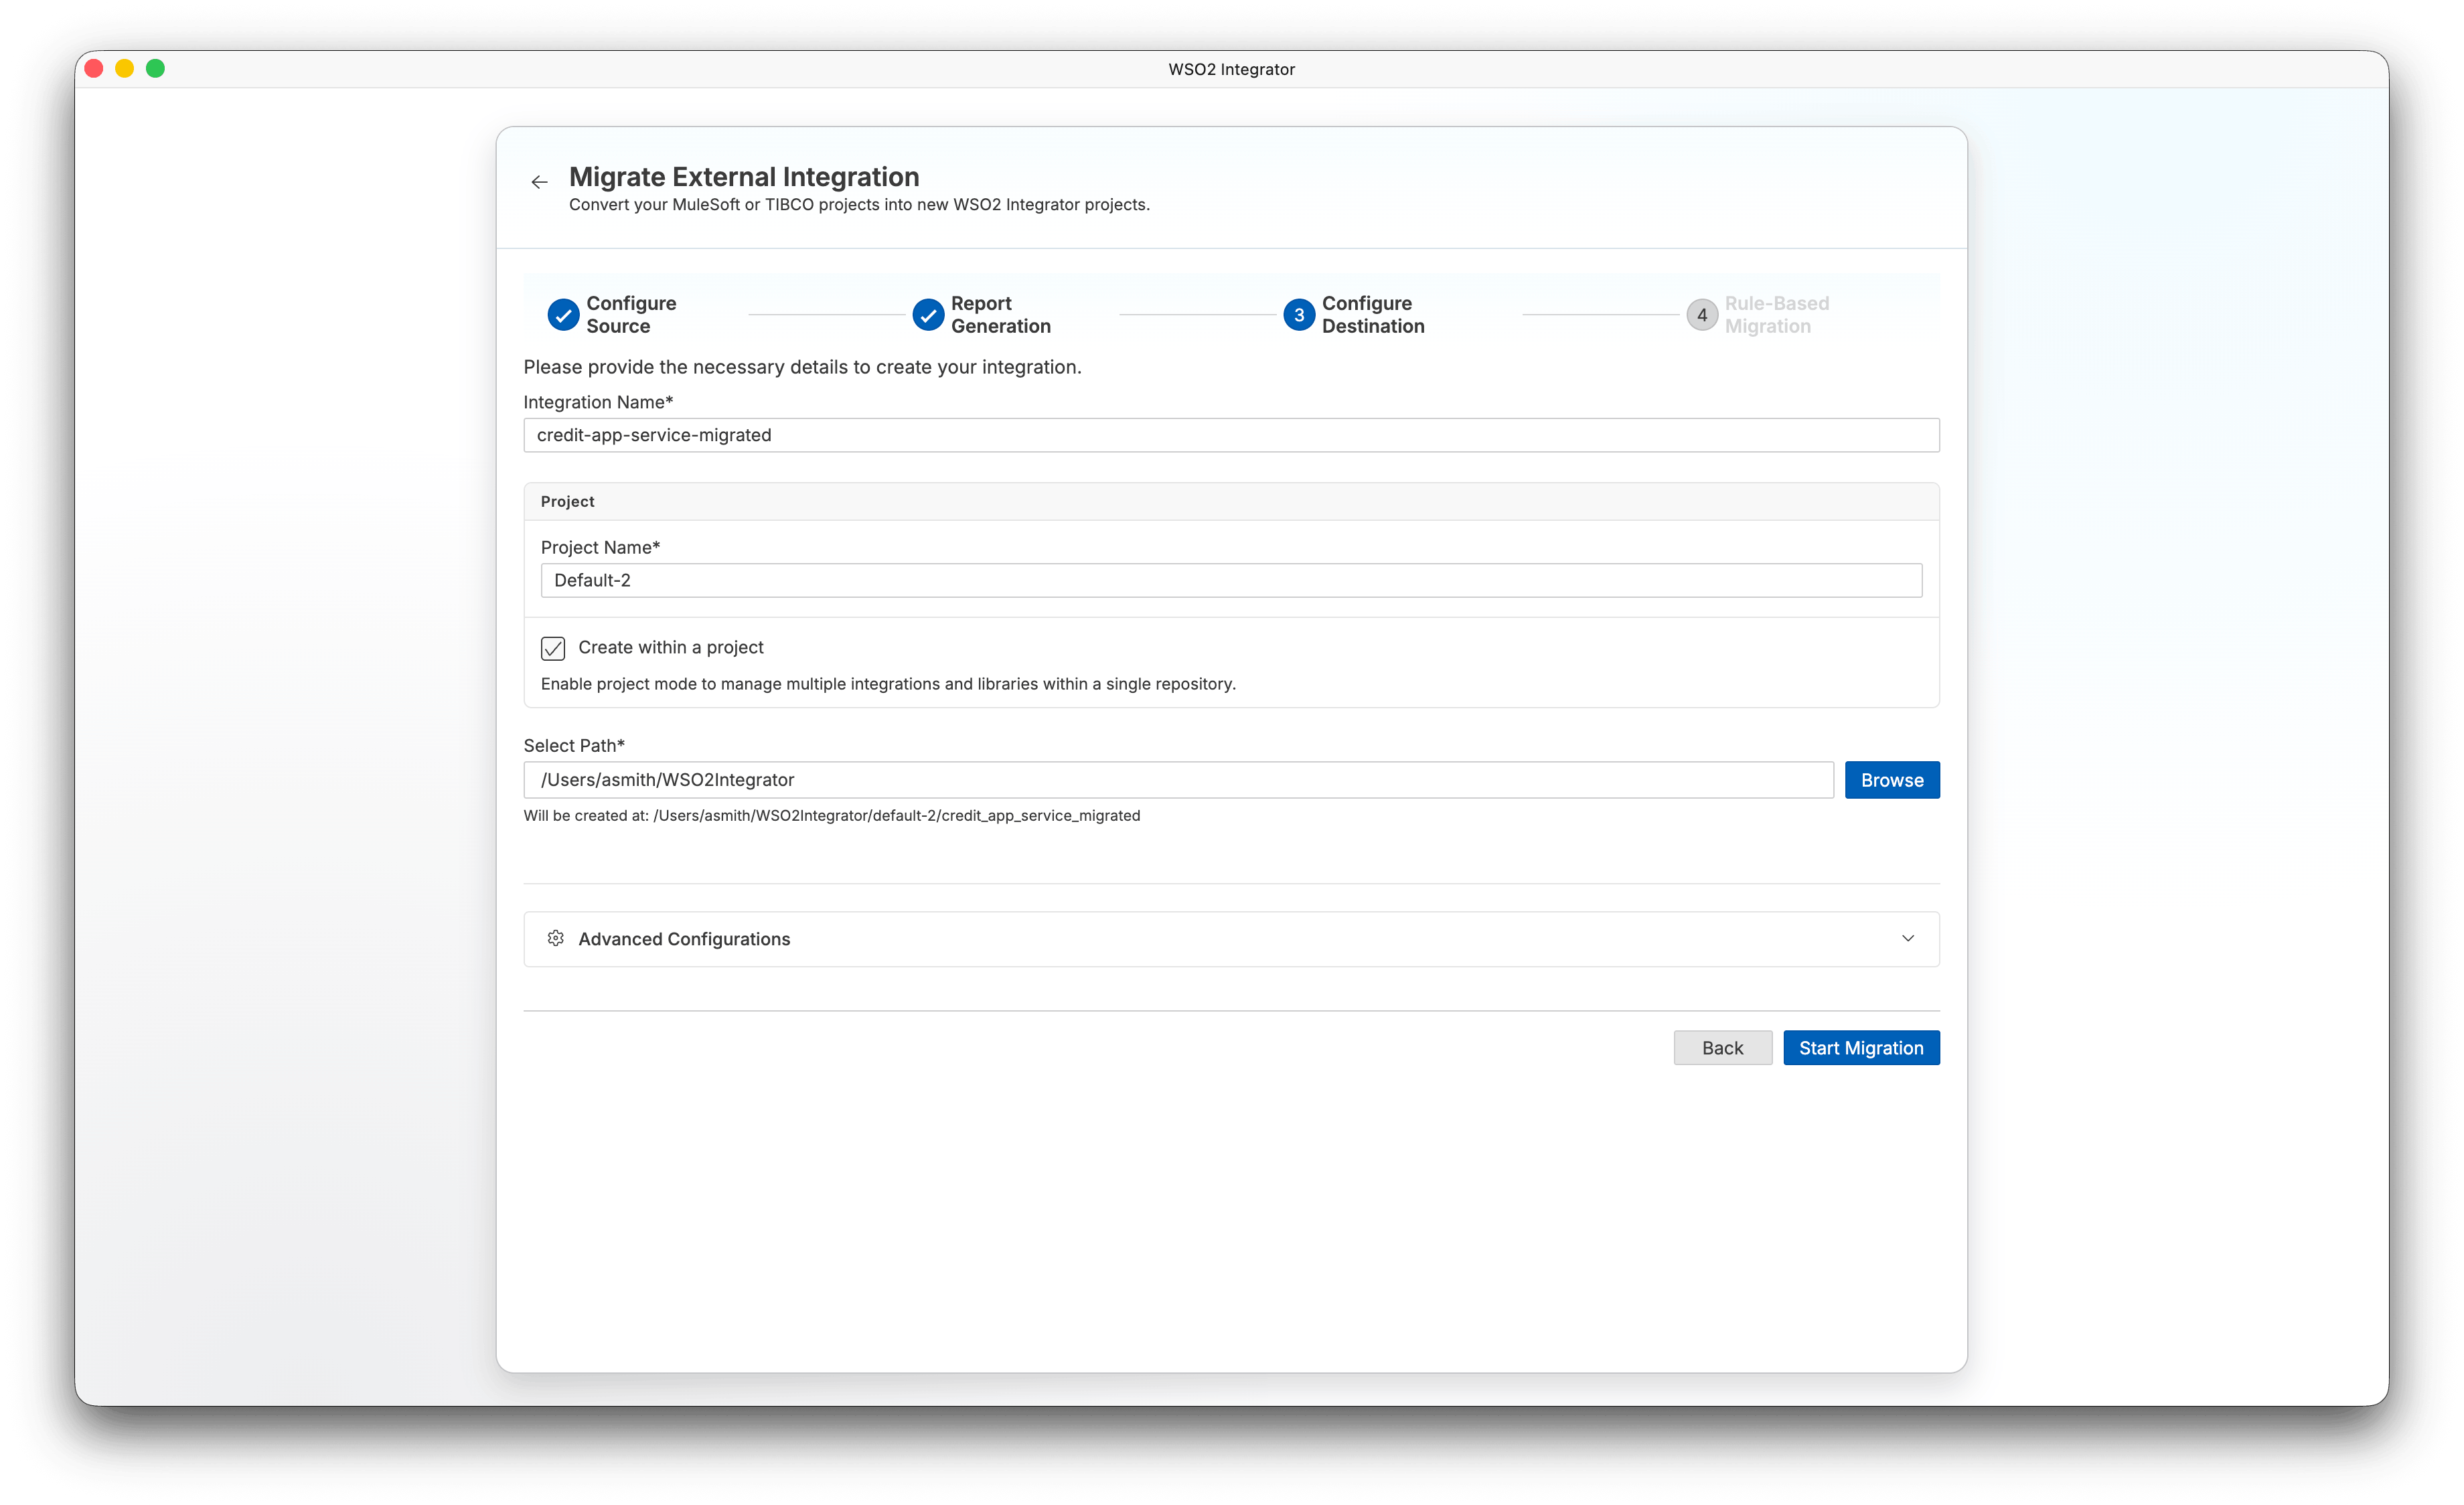
Step 3: Configure destination
-
Enter an Integration Name for your migrated project.
-
Configure the project settings:
- Project Name — Name of the project (defaults to
Default). - Create within a project — Enable project mode to manage multiple integrations and libraries within a single repository.
- Select Path — Choose where to create the migrated project.
- Project Name — Name of the project (defaults to
-
Click Start Migration.
Step 4: Rule-based migration
The wizard runs the automated rule-based migration and displays progress in the migration log.
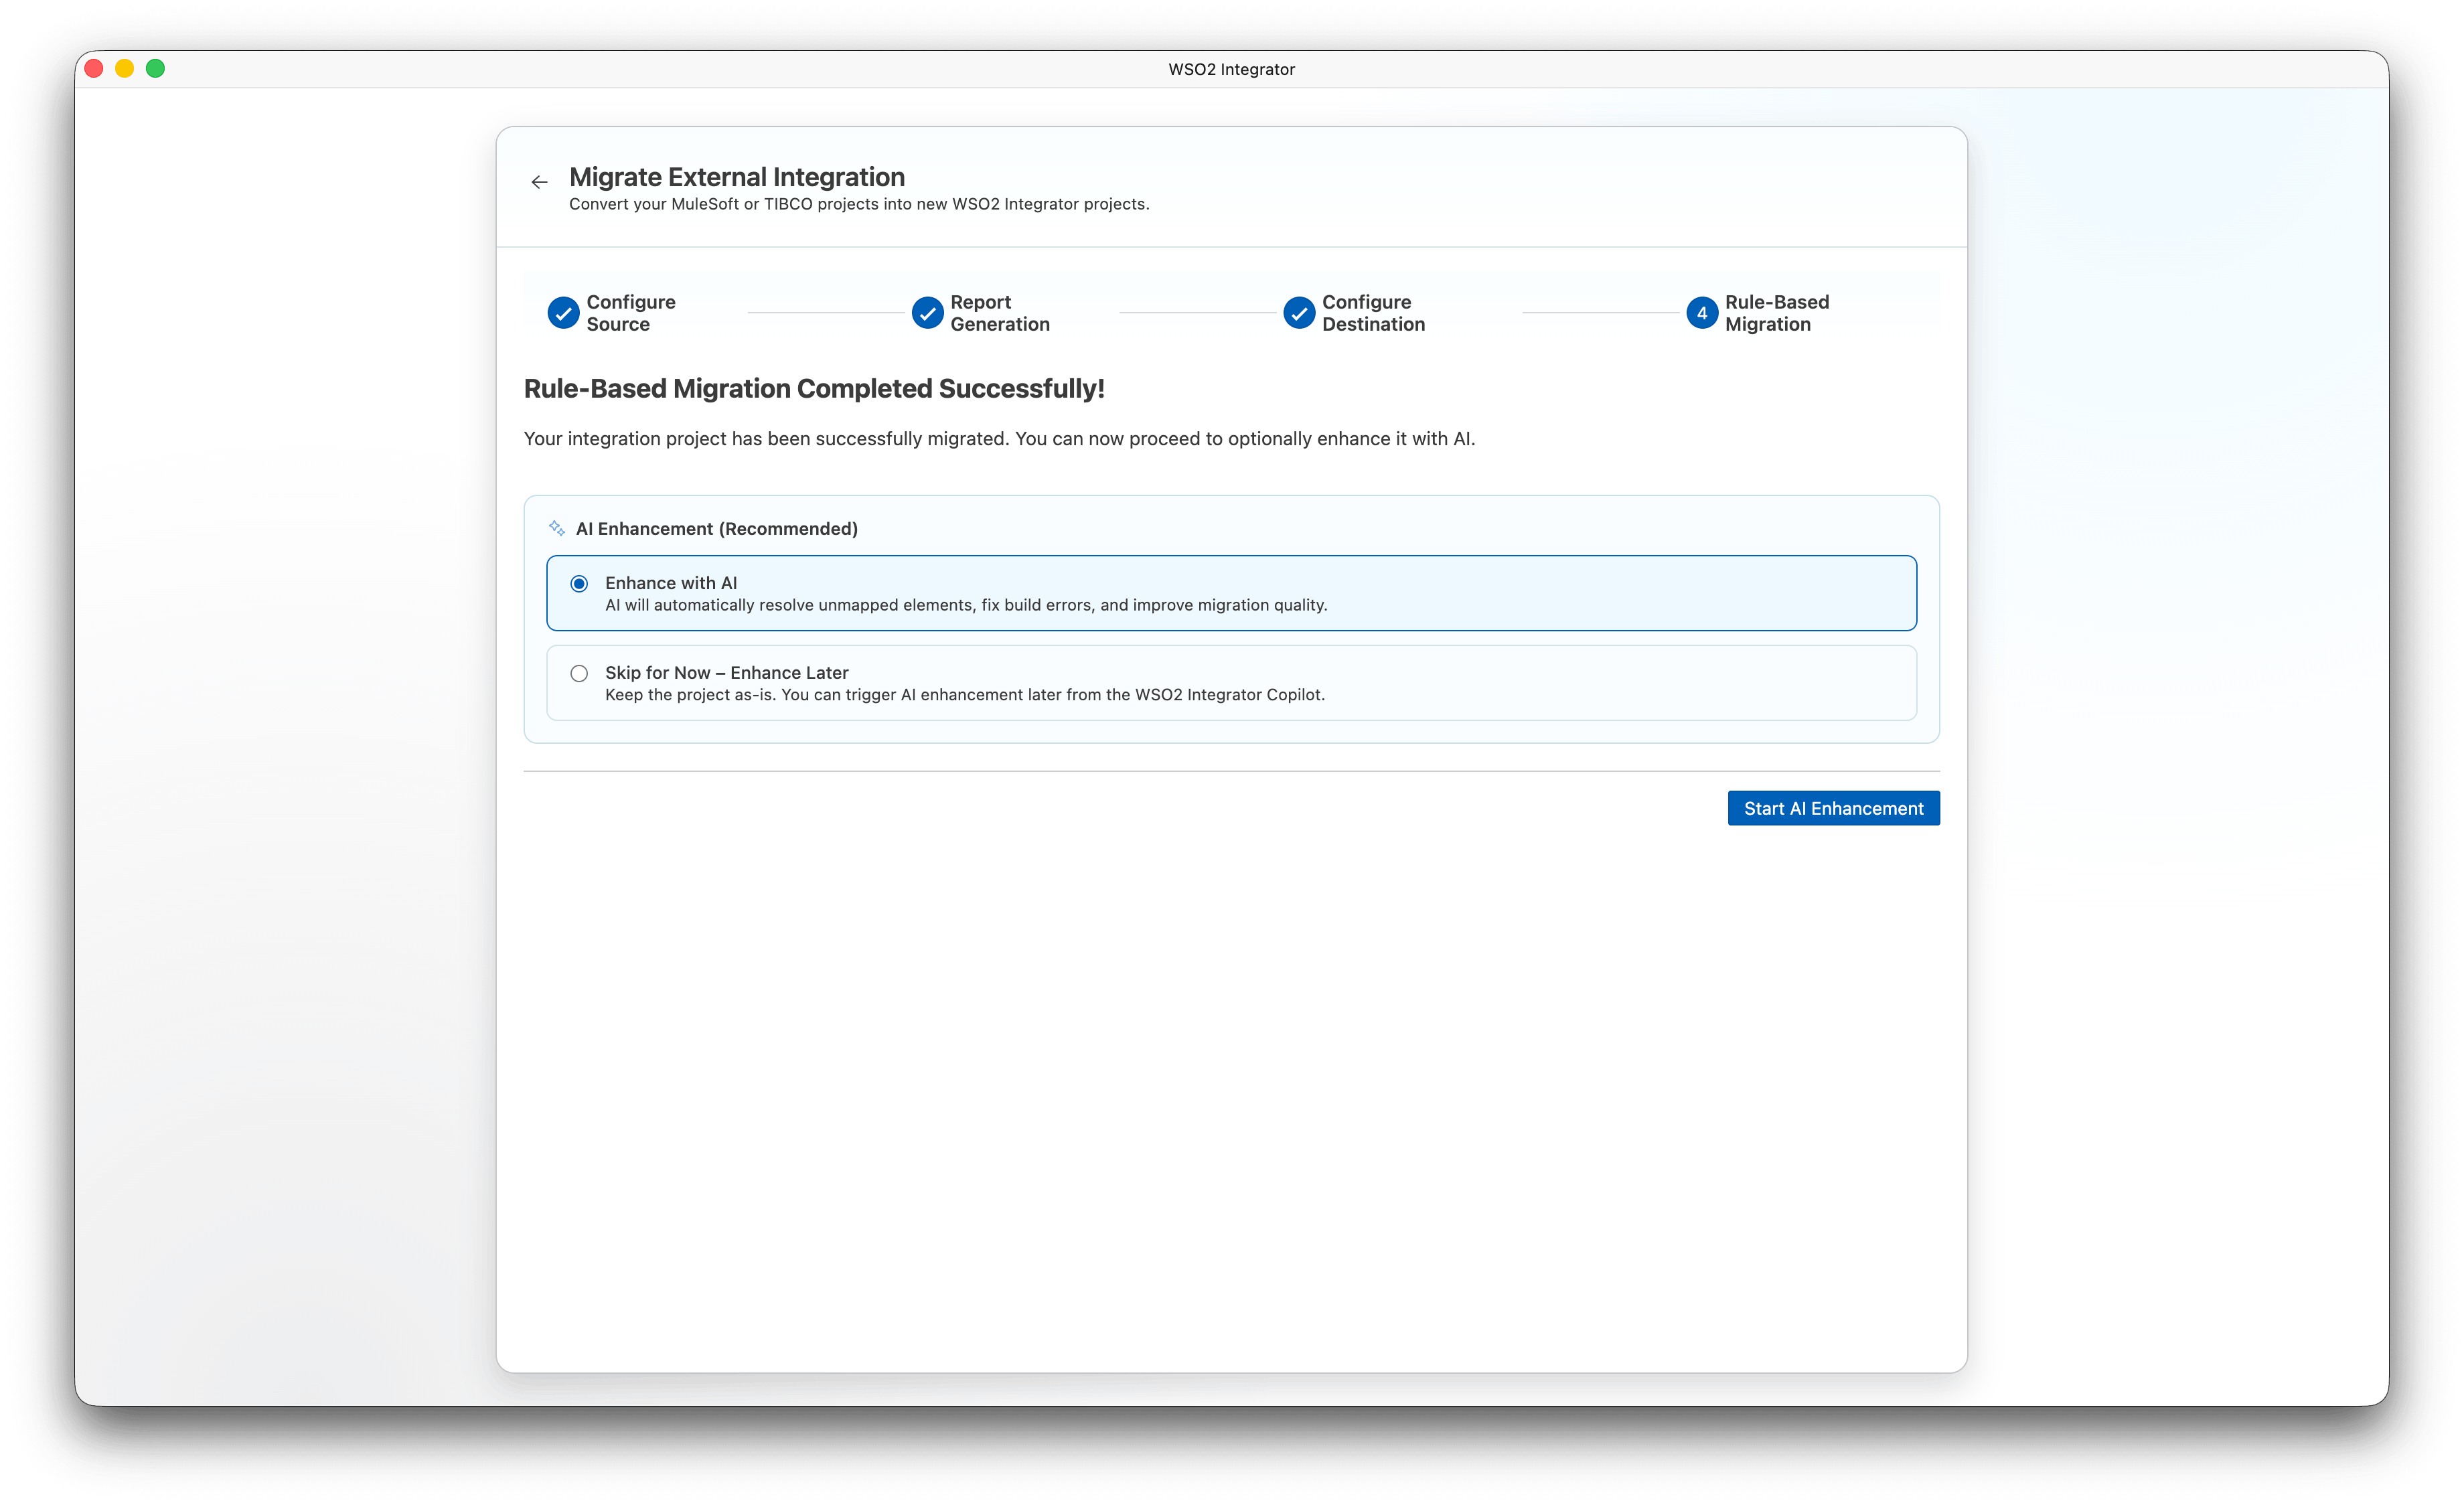
After the migration completes successfully, the AI Enhancement (Recommended) section appears. Select one of the following:
- Enhance with AI — AI automatically resolves unmapped elements, fixes build errors, and improves migration quality.
- Skip for Now – Enhance Later — Keep the project as-is. You can trigger AI enhancement later from WSO2 Integrator Copilot.
Click Start AI Enhancement to proceed to Step 5, or if you chose to skip, click Open Project to open the migrated project or Done to exit.
Step 5: AI enhancement
This step runs only if you selected Enhance with AI in Step 4.
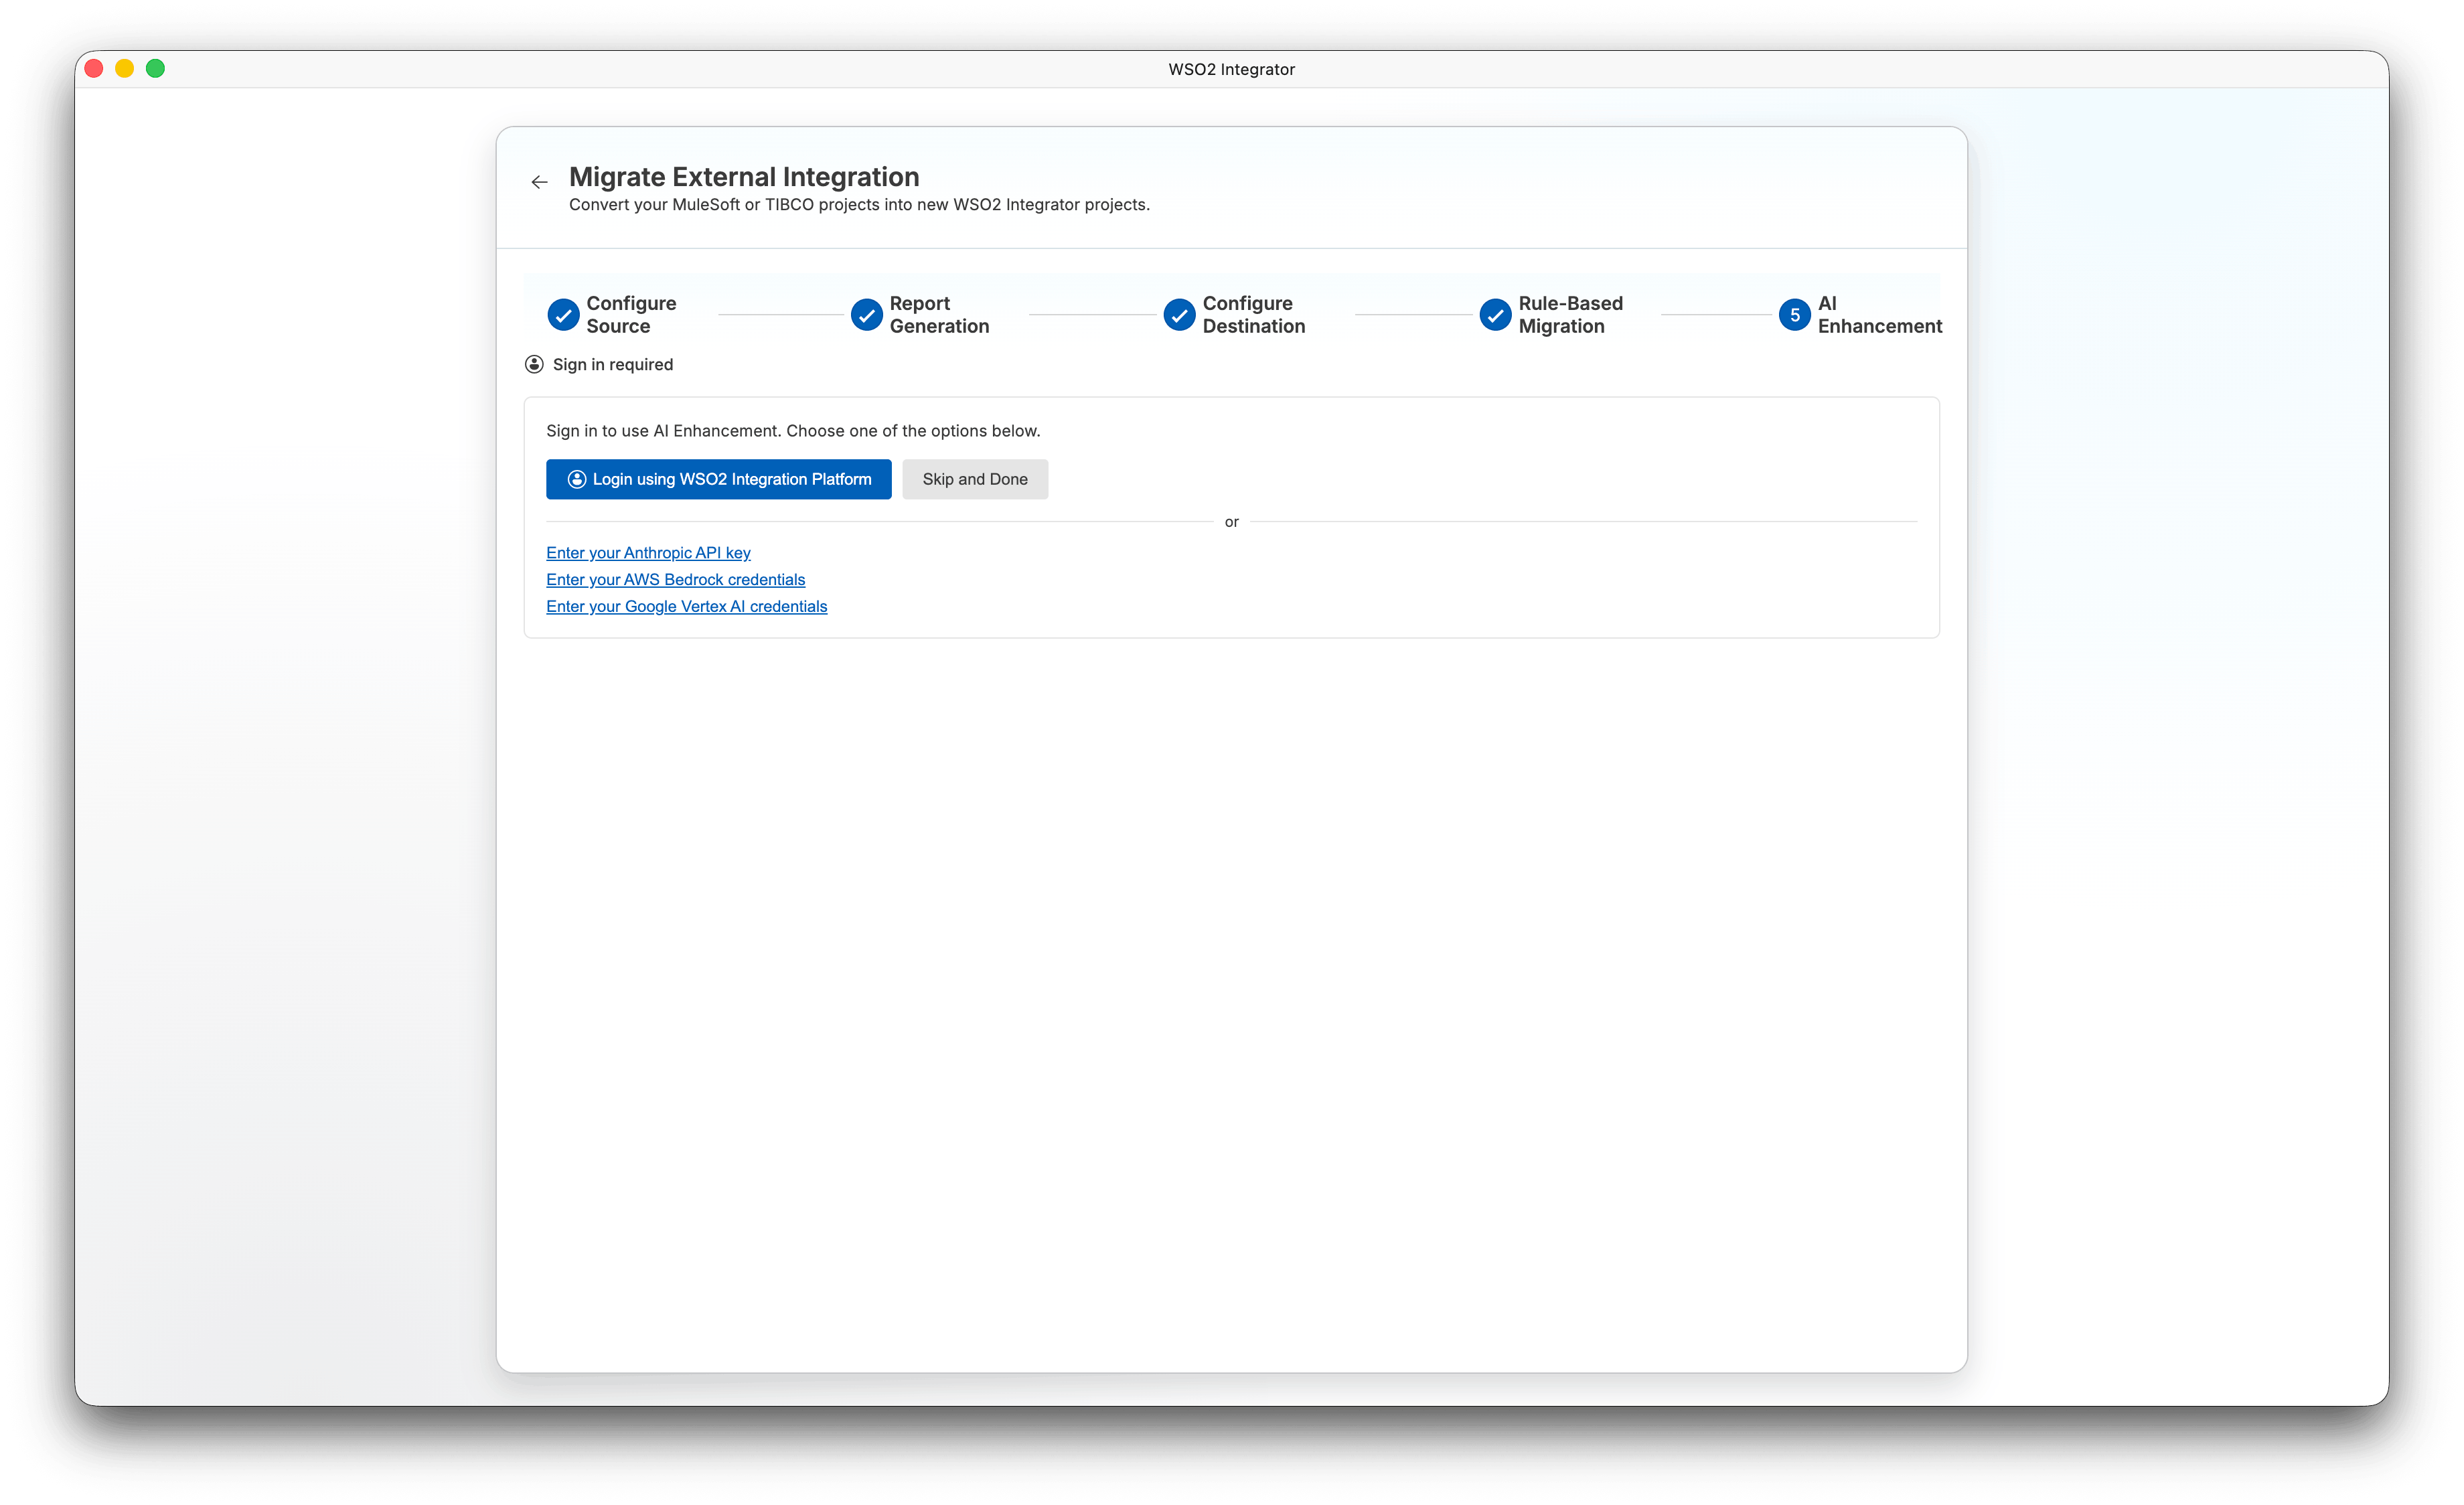
The wizard first checks whether you are signed in. If not, a sign-in panel appears:
-
Click Login using WSO2 Integration Platform to sign in using SSO, or use one of the alternative options:
- Enter your Anthropic API key
- Enter your AWS Bedrock credentials
- Enter your Google Vertex AI credentials
-
To skip AI enhancement and exit, click Skip and Done.
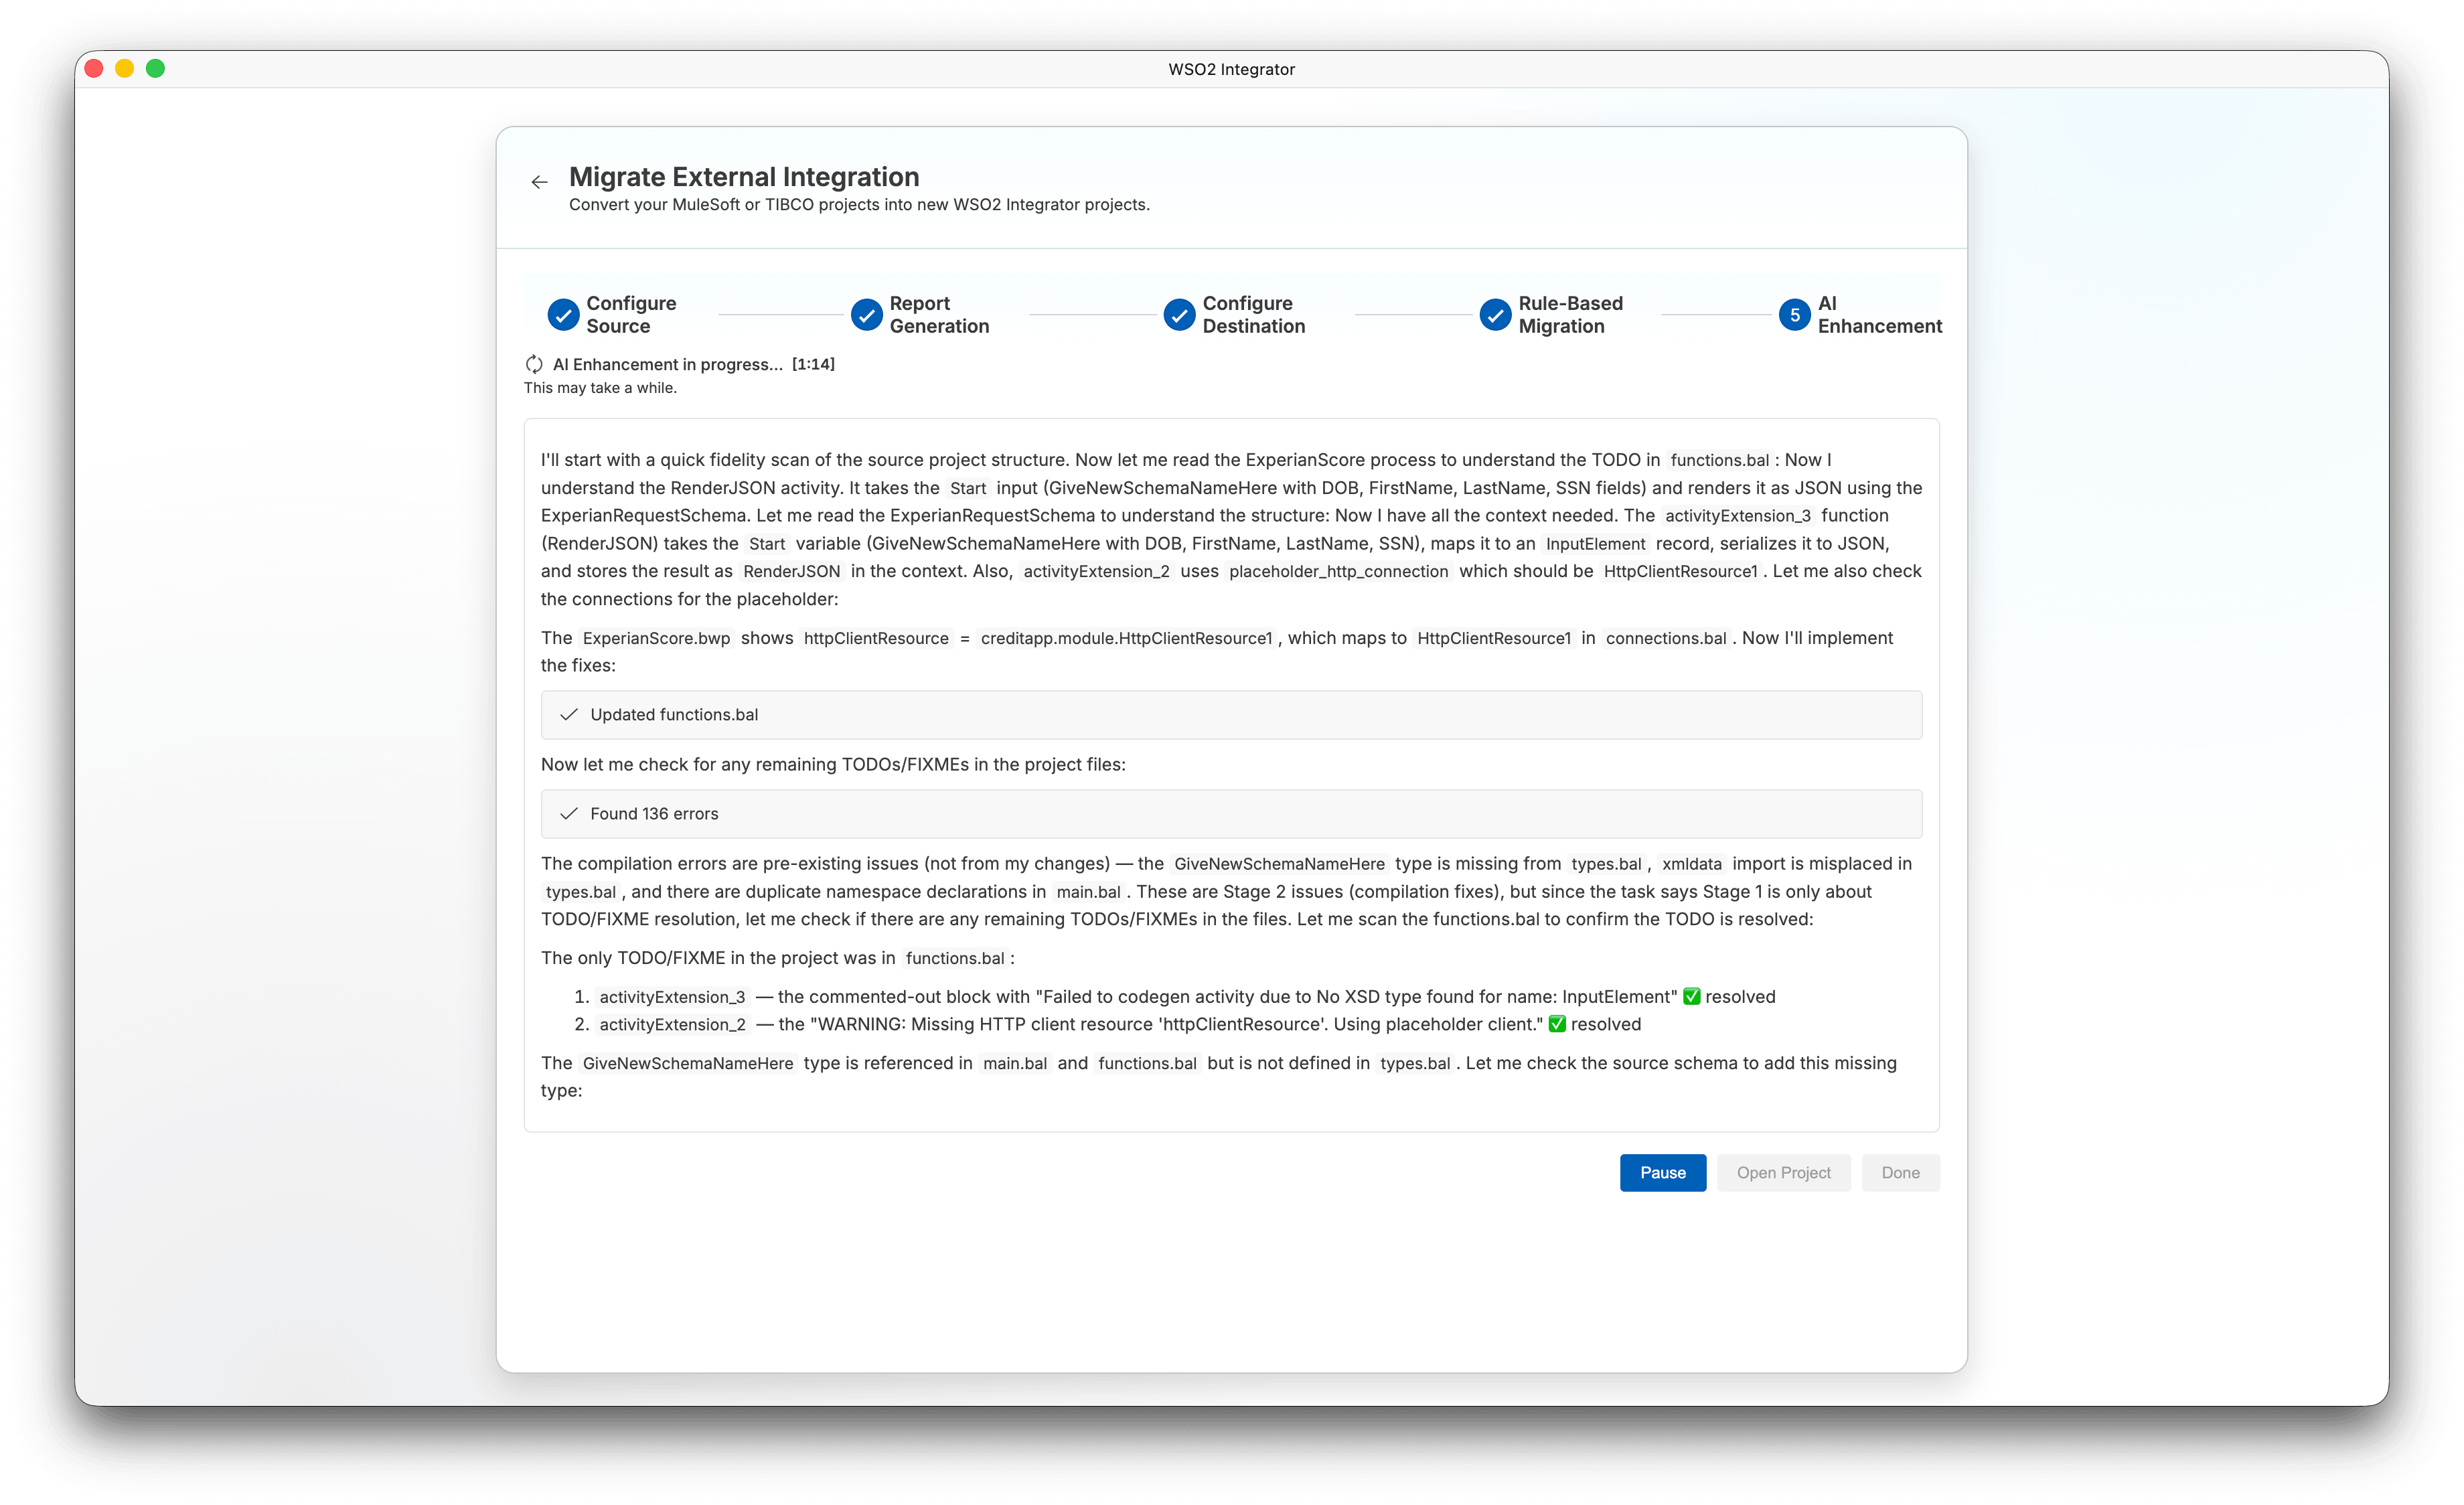
After signing in, the AI agent runs automatically and streams its progress. The agent resolves unmapped elements, fixes build errors, and improves the overall quality of the migrated code.
While the agent is running:
-
Click Pause to pause the AI enhancement. Click Resume to continue.
-
Click Done to exit the wizard, or Open Project to open the project without waiting for the agent to finish.
When the AI enhancement completes, the status shows AI Enhancement completed. Click Open Project to open the migrated project or Done to exit.
You can migrate TIBCO BusinessWorks projects using the Ballerina CLI tool. Follow these steps:
CLI prerequisite
- Ensure Ballerina is installed, and the
balcommand is available in your environment.
Steps
- Install the migration tool:
Install the migration tool by running:
bal tool pull migrate-tibco - Run the migration command:
Use the following command syntax to migrate your projects:
bal migrate-tibco <source-project-directory-or-file> [-o|--out <output-directory>] [-k|--keep-structure] [-v|--verbose] [-d|--dry-run] [-m|--multi-root] [-g|--org-name <organization-name>] [-p|--project-name <project-name>]
Key parameters
<source-project-directory-or-file>: Path to the TIBCO BusinessWorks project directory or a standalone process file.-o, --out <output-directory>: (Optional) Output directory for the generated Ballerina package.-k, --keep-structure: (Optional) Preserve original process structure.-v, --verbose: (Optional) Enable verbose output.-d, --dry-run: (Optional) Analyze and generate a migration report without creating Ballerina code.-m, --multi-root: (Optional) Treat each child directory as a separate TIBCO project and convert all.-g, --org-name <organization-name>: (Optional) Organization name for the generated Ballerina package.-p, --project-name <project-name>: (Optional) Project name for the generated Ballerina package.
Examples
Here are some example commands you can use:
-
Migrate a TIBCO BusinessWorks project to a specific output directory:
bal migrate-tibco /path/to/tibco-project -o /path/to/output-dir -
Migrate all TIBCO BusinessWorks projects in a directory (multi-root mode):
bal migrate-tibco /path/to/projects-directory -o /path/to/output-dir -m -
Analyze all TIBCO BusinessWorks projects without generating code (dry-run):
bal migrate-tibco /path/to/projects-directory -o /path/to/output-dir -m -d
For more CLI options and usage, see the official migration tool documentation.
Note: The migration AI enhancement feature is currently only available in the wizard (UI) workflow. It is not available when using the CLI tool.
Component mapping
| TIBCO component | Ballerina equivalent |
|---|---|
| Process Definition | Ballerina service / function |
| HTTP Receiver | http:Listener + service |
| HTTP Request | http:Client |
| JDBC Connection | mysql:Client / postgresql:Client |
| JDBC Query / Update | Database query functions |
| XML Parse / Render | XML data binding / record types |
| Mapper Activity | Data transformation expressions |
| Choice (If/Else) | if/else |
| Iterate / Loop | foreach / while |
| Group (Transaction) | transaction block |
| Catch / Fault Handler | do/on fail error handler |
| Timer | task:Listener with scheduled job |
| JMS Receiver / Sender | JMS connector client |
| File Read / Write | File I/O functions |
| Log Activity | log:printInfo() / log:printError() |
| Sub-Process | Function call |
| Shared Variable | Module-level variable / isolated variable |
Example: TIBCO process to Ballerina service
TIBCO BusinessWorks process (XML):
<pd:ProcessDefinition xmlns:pd="http://xmlns.tibco.com/bw/process/2003"
                       xmlns:xsl="http://www.w3.org/1999/XSL/Transform">
    <pd:name>GetOrder</pd:name>
    <pd:startName>HTTP Receiver</pd:startName>
    <pd:endName>Send HTTP Response</pd:endName>

    <pd:activity name="HTTP Receiver">
        <pd:type>com.tibco.plugin.http.HTTPEventSource</pd:type>
        <config>
            <sharedChannel>/SharedResources/HTTP Connection.sharedhttp</sharedChannel>
            <outputMode>String</outputMode>
            <Methods>GET</Methods>
            <ResourceURI>/api/orders/{orderId}</ResourceURI>
        </config>
    </pd:activity>

    <pd:activity name="Log Request">
        <pd:type>com.tibco.pe.core.WriteToLogActivity</pd:type>
        <config>
            <message>Processing order request</message>
        </config>
    </pd:activity>

    <pd:activity name="Query Database">
        <pd:type>com.tibco.plugin.jdbc.JDBCQueryActivity</pd:type>
        <config>
            <jdbcSharedConfig>/SharedResources/JDBC Connection.sharedjdbc</jdbcSharedConfig>
            <statement>SELECT name, total FROM orders WHERE id = ?</statement>
        </config>
    </pd:activity>

    <pd:activity name="Send HTTP Response">
        <pd:type>com.tibco.plugin.http.HTTPSendResponseActivity</pd:type>
        <config>
            <responseCode>200</responseCode>
        </config>
    </pd:activity>
</pd:ProcessDefinition>
Generated Ballerina code:
import ballerina/http;
import ballerina/log;
import ballerina/sql;
import ballerinax/mysql;

configurable string dbHost = ?;
configurable string dbUser = ?;
configurable string dbPassword = ?;

final mysql:Client dbClient = check new (dbHost, dbUser, dbPassword, "orders_db");

service /api/orders on new http:Listener(8090) {

    resource function get [string orderId]() returns json|error {
        log:printInfo("Processing order request", orderId = orderId);

        record {|string name; decimal total;|} result = check dbClient->queryRow(
            `SELECT name, total FROM orders WHERE id = ${orderId}`
        );

        return {
            id: orderId,
            name: result.name,
            total: result.total
        };
    }
}