Configure a Custom Domain
A custom domain is essential for effective branding, discoverability, and credibility of an integration exposed as an API. WSO2 Cloud - Integration Platform lets you configure custom domains for your organization so that developers can set custom URLs for their integrations.
The custom domains feature is available exclusively to paid subscribers of WSO2 Cloud.
This page explains the custom domain configuration model and guides you through the following tasks:
Custom domain configuration model
Organization administrators can add custom domains to an organization. Once added, developers can use those custom domains to configure custom URLs for their integrations in specific environments.
Configure a custom domain for your organization
Add a custom domain
To add a custom domain, you must have organization administrator privileges.
-
Sign in to WSO2 Cloud.
-
In the top navigation, click the Organization.
-
In the left navigation menu under Admin, click Settings. This opens the organization-level settings page.
-
Click the URL Settings tab and then click the Active Domains tab.
-
Click + Add Domains.
-
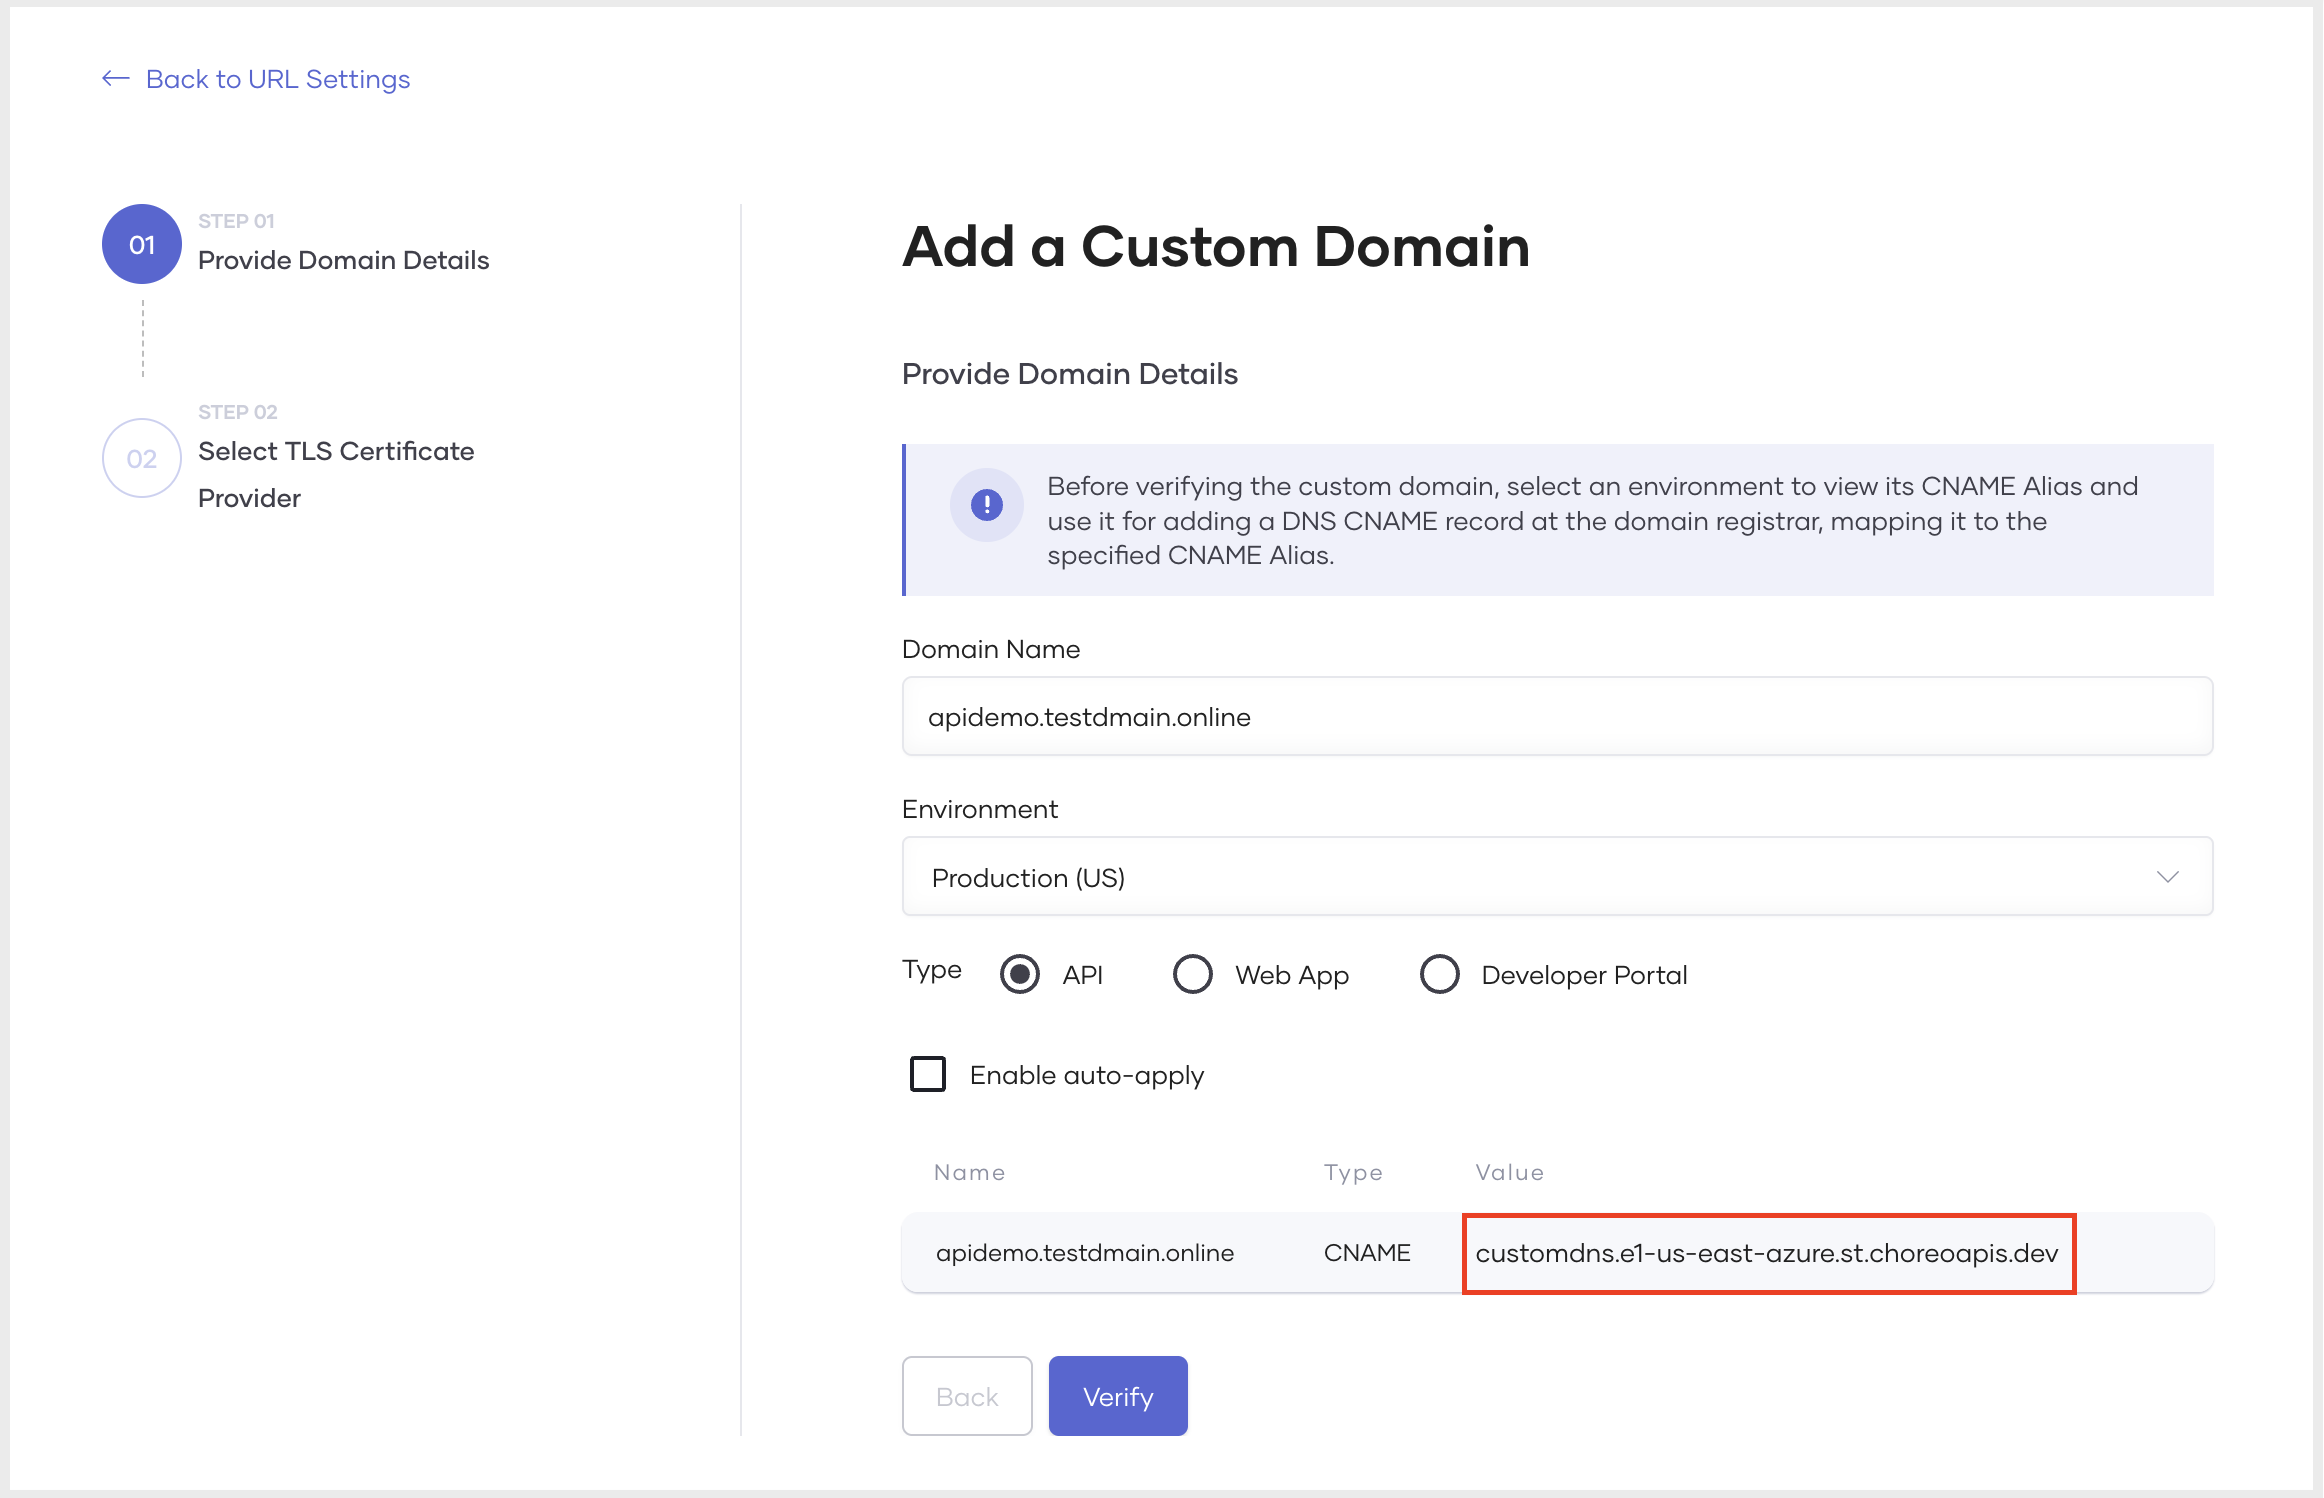
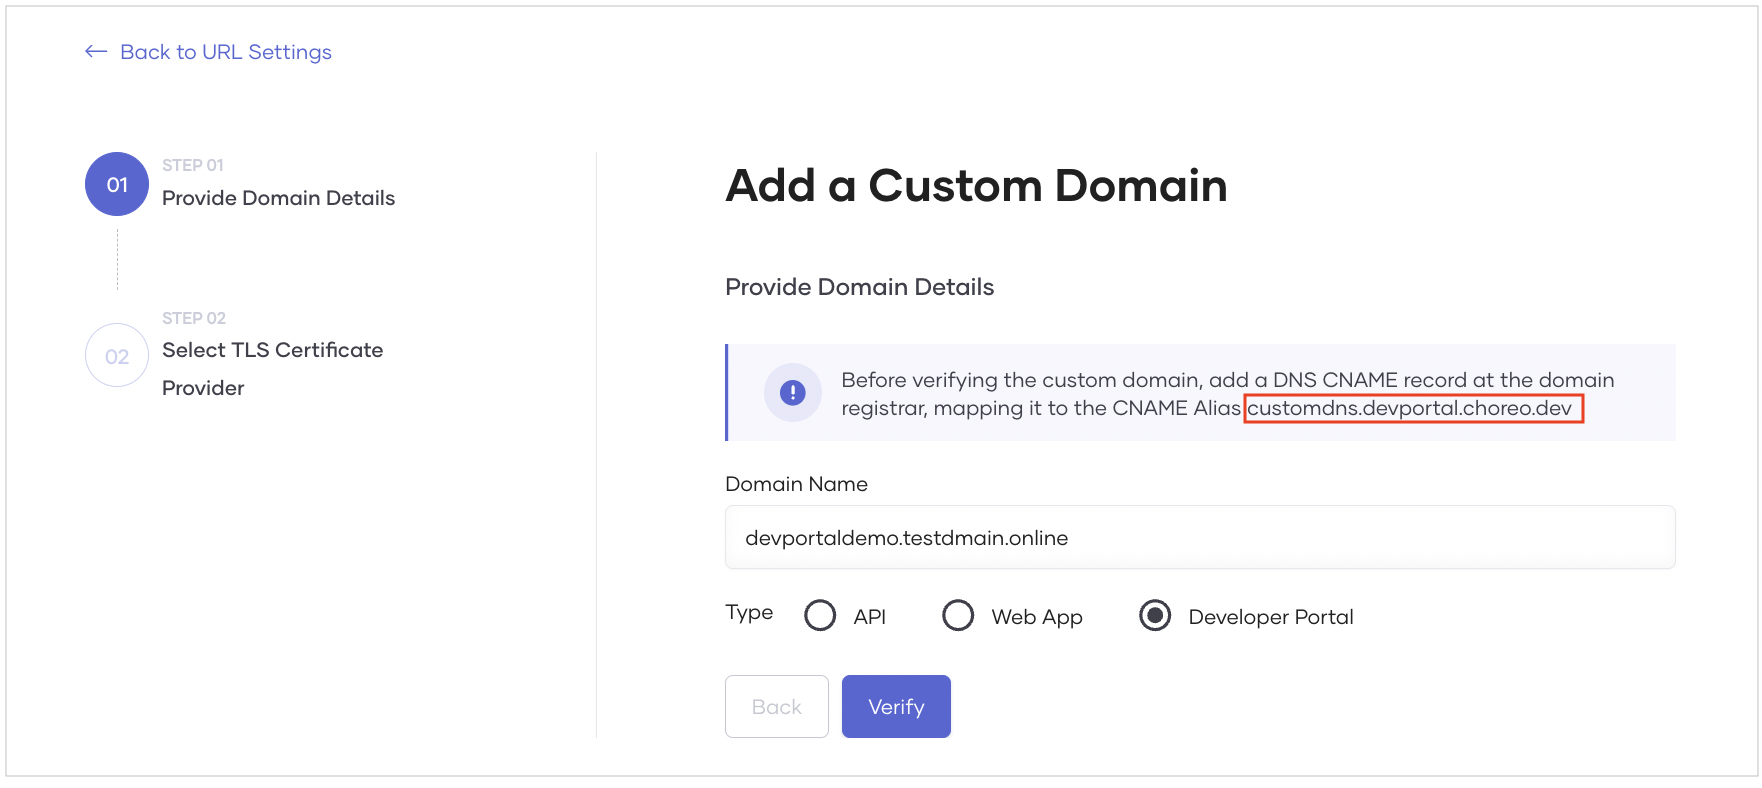
In the Add a Custom Domain pane, do the following:
-
Enter your domain name.
-
Select the environment to apply the domain name.
-
Select the entity type to apply the domain name.
tipIn this context, the API entity type represents integrations exposed as APIs.
-
(Optional) Select the Enable auto-apply checkbox to automatically apply this domain to all APIs in the selected environment.
infoThis option is only available when the entity type is set to API. When enabled, you do not need to manually configure a custom URL for each API. The custom domain is applied automatically to all existing and new APIs in the selected environment. Only the domain is applied automatically; the original context path of each API remains unchanged.
-
-
Review the generated CNAME target value displayed and create a DNS record that maps your domain name to the CNAME target value with your DNS provider.
 info
infoWhen you select Developer Portal as the entity type, the environment is not applicable and the CNAME alias is displayed as follows:
-
After creating the CNAME DNS record, click Verify.
infoIf the CNAME mapping is correct, verification completes successfully. It can take some time for the configured CNAME mapping to be globally available.
-
After successful verification, click Next.
-
Select a TLS certificate provider. You can either import your own TLS certificates or click Let's Encrypt to allow WSO2 Cloud to generate and manage certificates for you.
noteIf you import your own certificate, it must meet the following requirements:
TLS certificate:
- Issued by a certificate authority (CA), containing the domain's public key, domain name, organization details, expiration date, and the CA's digital signature.
- Must be an X.509 certificate in PEM format.
- Must be issued directly or via a wildcard entry for the custom URL. For example:
- Direct issuance: if the domain is
apis.example.com, the certificate must includeapis.example.com. - Wildcard: if the CNAME is
apis.example.com, the certificate can use*.example.com.
- Direct issuance: if the domain is
TLS key file:
- Must be in PEM format.
- Must be encrypted using RSA encryption.
Certificate chain file:
- Must contain your domain's TLS certificate (optional if already included in the certificate) and one or more intermediate certificates in the correct order, leading back to a root certificate.
- All certificates in the chain must be X.509 certificates in PEM format.
Construct a certificate chain with a root certificate
A typical certificate chain consists of the following components:
- Root certificate: The trusted self-signed certificate issued by the CA.
- Intermediate certificates (if any): Certificates issued by the root CA to subordinate CAs.
- Leaf certificate: Your end-entity certificate issued by the CA. This may be included in the chain or provided separately.
Follow these steps to construct the chain:
-
Obtain and organize your certificates in the correct order:
- Leaf certificate: The public certificate issued by the CA (optional in the chain).
- Intermediate certificates: Obtain from the CA, if applicable.
- Root certificate: Obtain from the CA. If self-signed, it serves as the trust anchor.
-
Concatenate the certificates into a single file in the following order, ensuring each certificate begins and ends with the correct markers on a new line:
-----BEGIN CERTIFICATE-----
<Leaf Certificate Content>
-----END CERTIFICATE-----
-----BEGIN CERTIFICATE-----
<Intermediate Certificate Content>
-----END CERTIFICATE-----
-----BEGIN CERTIFICATE-----
<Root Certificate Content>
-----END CERTIFICATE----- -
Save the file with a name such as
certificate_chain.pem. -
Verify the certificate chain using the following command:
openssl verify -CAfile <root_or_bundle_cert>.pem certificate_chain.pemReplace
<root_or_bundle_cert>.pemwith the path to your root certificate or a bundle containing both the root and intermediate certificates. -
Upload the verified chain via the console:
- If the chain includes the leaf certificate:
- Upload the chain in the TLS Certificate field.
- Upload the private key in the TLS Key File field.
- Leave the Certificate Chain File field empty.
- If the chain does not include the leaf certificate:
- Upload the leaf certificate in the TLS Certificate field.
- Upload the private key in the TLS Key File field.
- Upload the chain in the Certificate Chain File field.
- If the chain includes the leaf certificate:
To continue with this guide, click Let's Encrypt.
-
Click Add to save the custom domain.
The custom domain is now listed in the Active Domains tab under URL Settings.
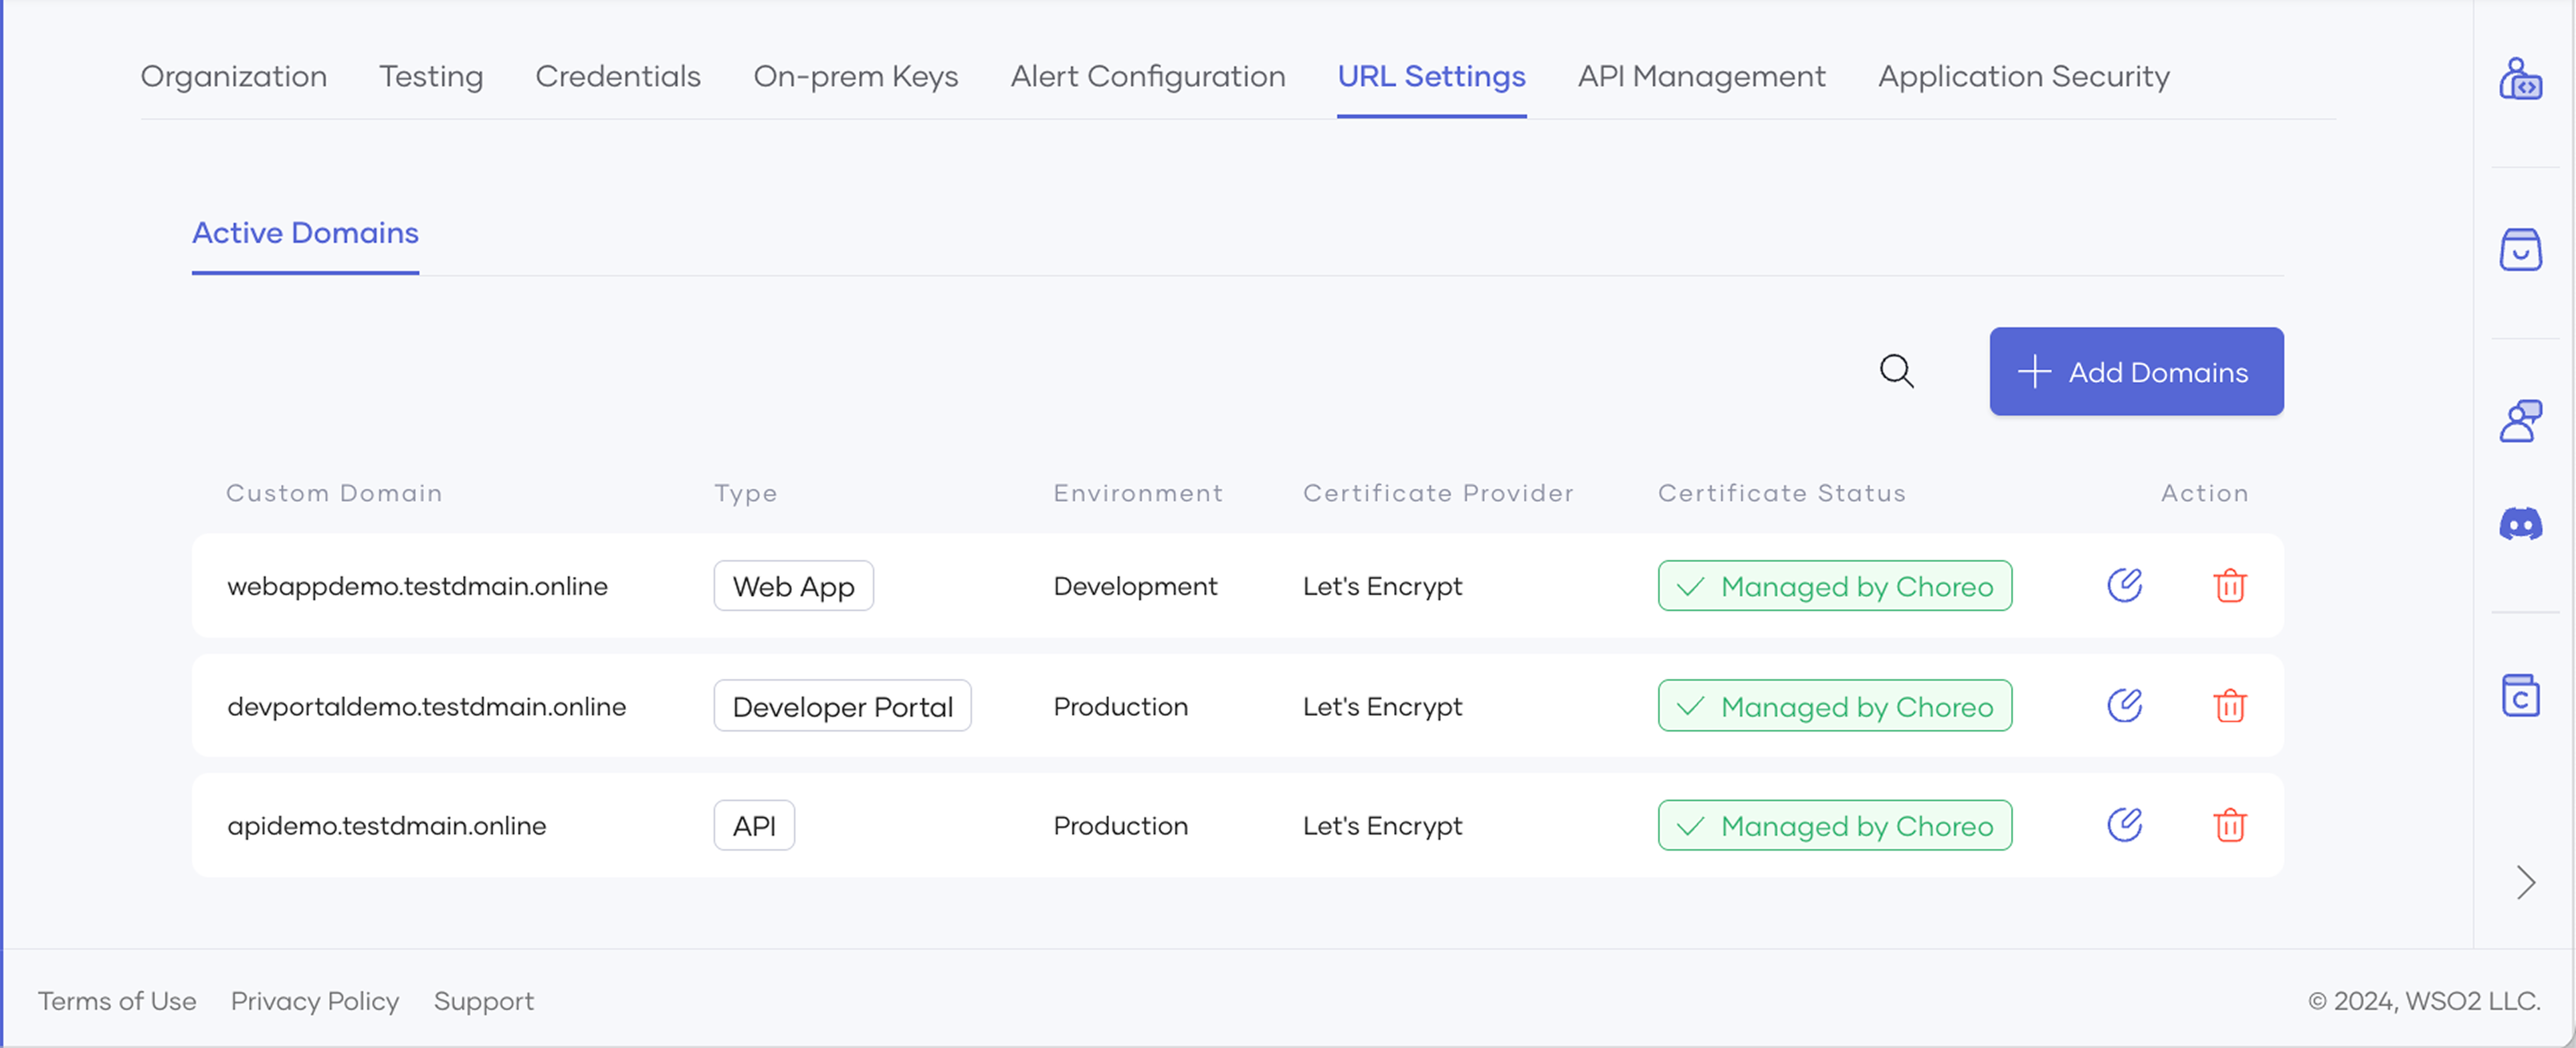
The domain is available for the entity types in the specified environment. You can use it to configure a custom URL for an integration.
If you add a custom domain for the Developer Portal entity type, the customization is applied immediately and your organization's Developer Portal is accessible via the added domain.
To view the entity types using a specific custom domain, click the domain listed in the Active Domains tab.
Configure a custom URL for an integration
When an administrator adds custom domains for specific environments, developers can use any available custom domain to configure a custom URL for an integration in that environment.
Add a custom URL to an integration
Before you configure a custom URL for a specific environment, ensure the integration is deployed to that environment.
-
Sign in to WSO2 Cloud.
-
In the Integration Listing pane, click the integration for which you want to set a custom URL.
-
In the left navigation menu under Admin, click Settings. This opens the integration-level settings page.
-
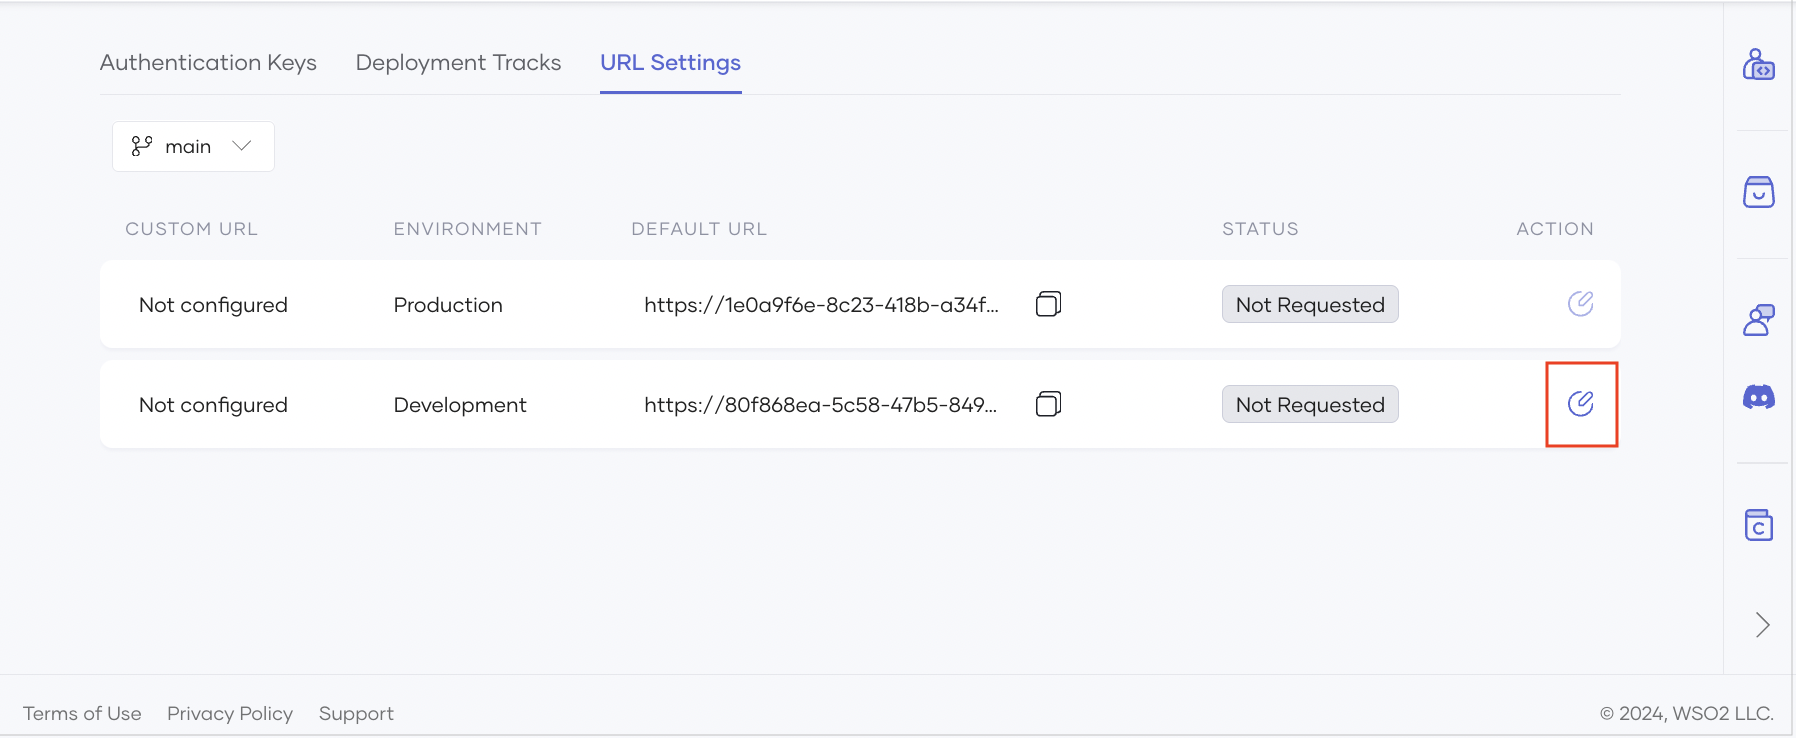
Click the URL Settings tab. This displays the active deployments of the integration across environments and shows whether a custom URL is configured. If a custom domain is available for an environment, the Edit URL Mapping icon in the corresponding Action column is enabled.
-
Click the Edit URL Mapping icon in the Action column for the environment you want to configure. This opens the URL Settings dialog.
-
In the URL Settings dialog, select a domain from the Domain list.
tip- The Domain list shows all available domains for the integration.
- If you are configuring a custom URL for an API, specify an appropriate context path in the Path field. The field shows the default context path, which you can edit as needed.
-
Click Deploy. This creates the custom URL mapping, which appears under the URL Settings tab with the status Approved.
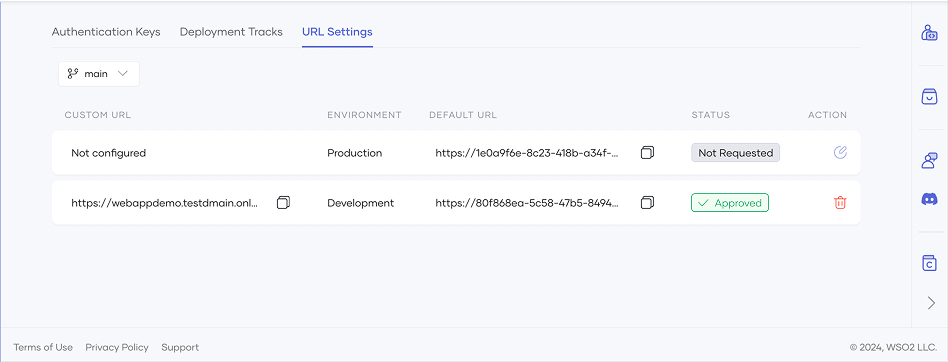
Once deployed, both the custom URL and the default URL can be used to access the integration.
What's next
- Configurations overview — Explore all configuration options available for integrations in WSO2 Cloud
- Endpoint configurations — Control the visibility level for each integration endpoint
- Security configurations — Secure integration endpoints with API Key or OAuth2 authentication