Manage Users in the User Portal
Users sign in to the User Portal with an account in your WSO2 Identity Platform organization. That organization is the user store for the User Portal. You create users and roles, and assign permissions to roles, from the Users and Roles tabs in the WSO2 Cloud console.
The Users and Roles tabs are a convenience. They make changes in your WSO2 Identity Platform organization, so you can also manage User Portal users and roles directly in WSO2 Identity Platform. If you create a role there, under Role Audience, select Application, then select the User Portal application. The User Portal uses only the roles on this application. For more information, see WSO2 Identity Platform documentation: Onboard users and WSO2 Identity Platform documentation: Manage roles.
The roles of a user decide what the user can do in the User Portal. Each role holds a set of permissions, which are the scopes that WSO2 Identity Platform adds to the user's token. The User Portal shows an integration only if the user has the view scope for its type. See Scopes.
To manage User Portal users and roles in the WSO2 Cloud console, your role must include the Manage Organization permission under Organization Management, assigned at the organization level. For more information about roles and permissions, see Access Control.
How access works
Scopes
When you enable the User Portal, the platform creates the User Portal APIs API resource in your WSO2 Identity Platform organization. This API resource defines the following scopes. To see them in the console, go to Admin > Settings > User Portal > Roles, click a role, then click Permissions.
| Scope | What it allows | View scope |
|---|---|---|
automation:view | View automations in the organization. | Yes |
automation:trigger | Run automations in the organization. | No |
aiagent:view | View AI agents in the organization. | Yes |
aiagent:invoke | Chat with AI agents in the organization. | No |
workflow:view | View workflows in the organization. | Yes |
workflow_mgt:view_workflows | View workflow executions in the organization. | Yes |
workflow_mgt:manage_workflows | Start, suspend, resume, cancel, and terminate workflow executions, and act on approvals in the organization. | No |
workflow_mgt:view_human_tasks | View the human tasks of workflows in the organization. | Yes |
workflow_mgt:manage_human_tasks | Complete the human tasks of workflows in the organization. | No |
The User Portal uses these scopes as follows:
- To see an integration, a user needs the view scope for its type. A user needs
automation:viewto see automations,aiagent:viewto see AI agents, andworkflow:viewto see workflows. If a user has none of these scopes, the Integrations tab of the User Portal is empty. - To run an automation, a user needs
automation:trigger. Without this scope, the user can see the automation, but the Execute button is disabled.
By default, an AI agent does not check the aiagent:invoke scope, so any user who can see the agent can chat with it. To make the agent require this scope, change the security settings of the agent's chat endpoint: select the OAuth2 security scheme, then assign the aiagent:invoke scope as a permission to the /chat resource. See Configure security for an integration as an API.
You can also give users scopes that you define. See Add scopes from your own APIs.
Default roles
When you enable the User Portal, the platform creates two roles on the User Portal application. In your organization, go to Admin > Settings > User Portal > Roles to see them.
| Role | Scopes | Who gets it by default |
|---|---|---|
| WSO2 Cloud Admin | All the scopes of the User Portal API resource. | Members of your WSO2 Cloud organization who have permission to manage components. |
| WSO2 Cloud Reader | Only the view scopes of the User Portal API resource. | Every other member of your WSO2 Cloud organization. |
When a member of your WSO2 Cloud organization signs in to the User Portal with Sign in with Integration Platform for the first time, the platform adds the member to your WSO2 Identity Platform organization and assigns one of these roles. The platform does not change the roles of a member who already has a role on the User Portal application.
These are system roles. You can assign them to users and remove them from users, but you cannot rename them or change their permissions.
The platform does not assign a role to users that you create. When you create a user, select the roles that the user needs. A user without a role cannot see any integrations in the User Portal.
Changes to the permissions of a role can take up to 10 minutes to appear in User Portal tokens. When you assign a role to a user or remove a role from a user, the change takes effect the next time the user signs in.
Open the users and roles tabs
- Sign in to WSO2 Cloud.
- In the top navigation, click the Organization list and select your organization.
- In the left navigation menu, click Settings under Admin.
- Click the User Portal tab.
- Click the Users tab or the Roles tab.
The Users and Roles tabs appear only after you enable the User Portal. See Enable the User Portal.
Manage users
In your organization, go to Admin > Settings > User Portal > Users. The Users tab lists the users in your WSO2 Identity Platform organization. For each user, it shows the name, username, status, and the roles that the user has on the User Portal application. To search the list, click the search icon.
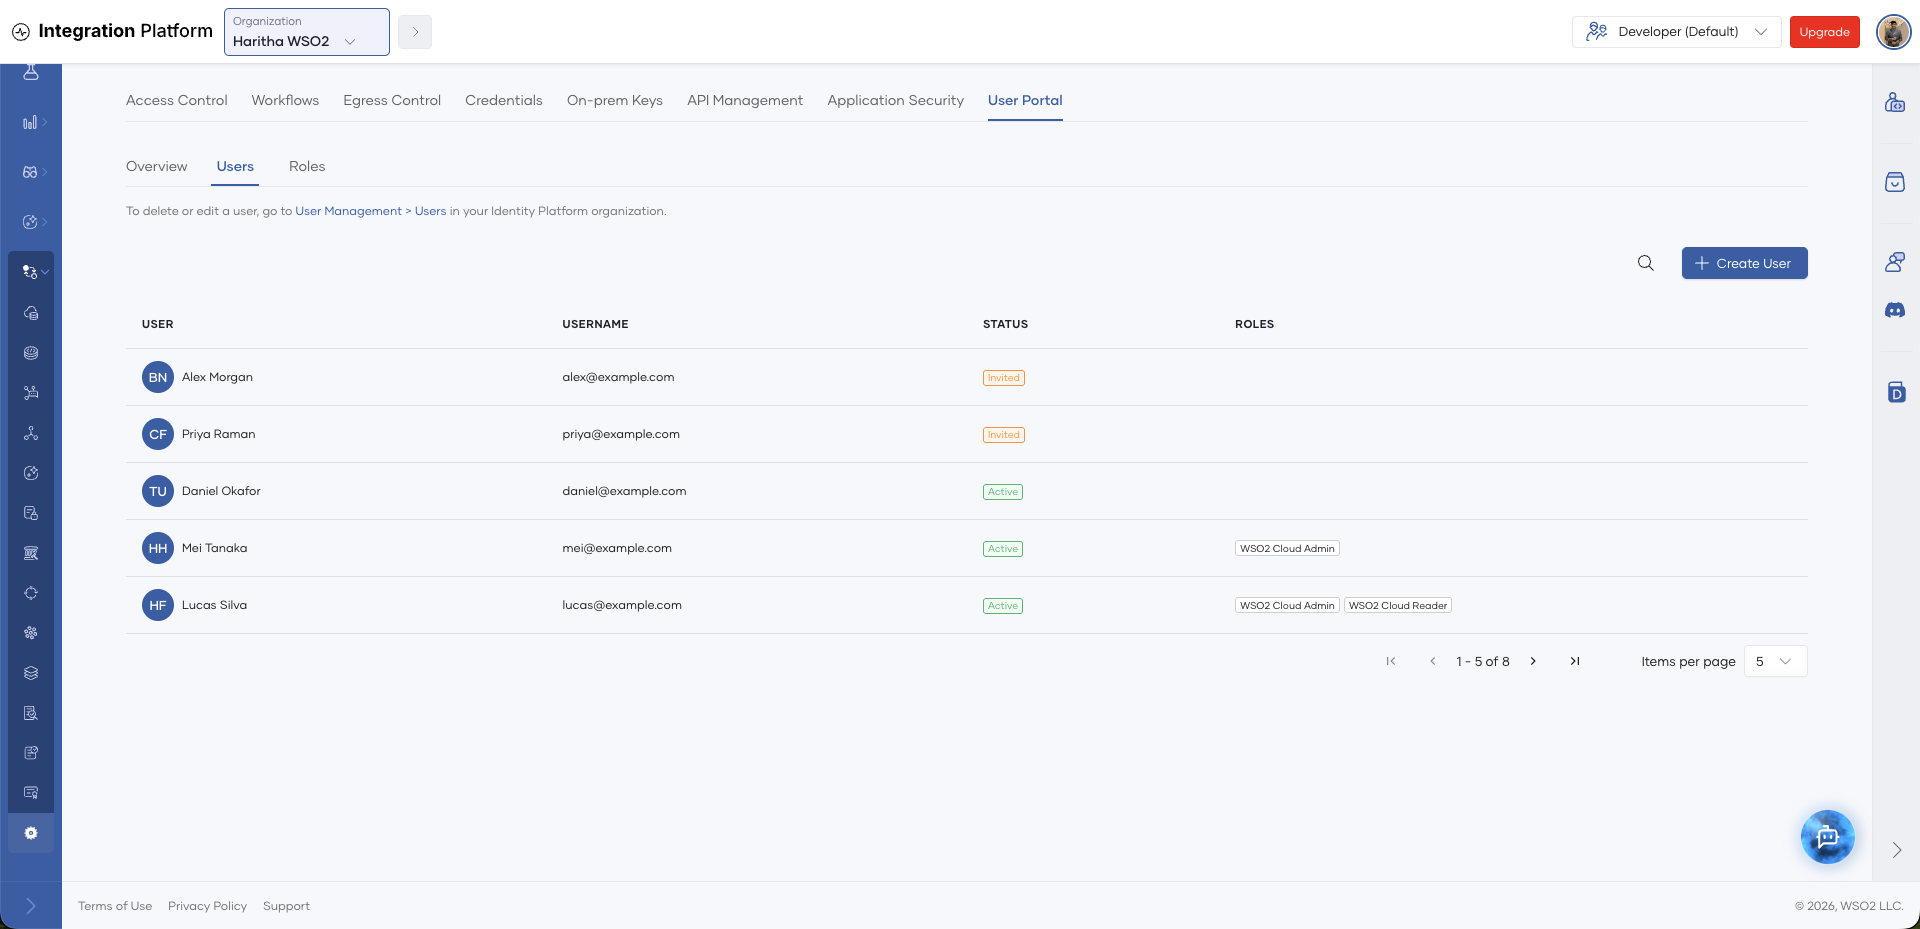
The status of a user is one of the following:
| Status | Meaning |
|---|---|
| Active | The user can sign in. |
| Invited | The user has not yet set a password from the invitation email. |
| Locked | The account is locked, so the user cannot sign in. Unlock the account in your WSO2 Identity Platform organization. |
Create a user
-
In your organization, go to Admin > Settings > User Portal > Users.
-
Click Create User.
-
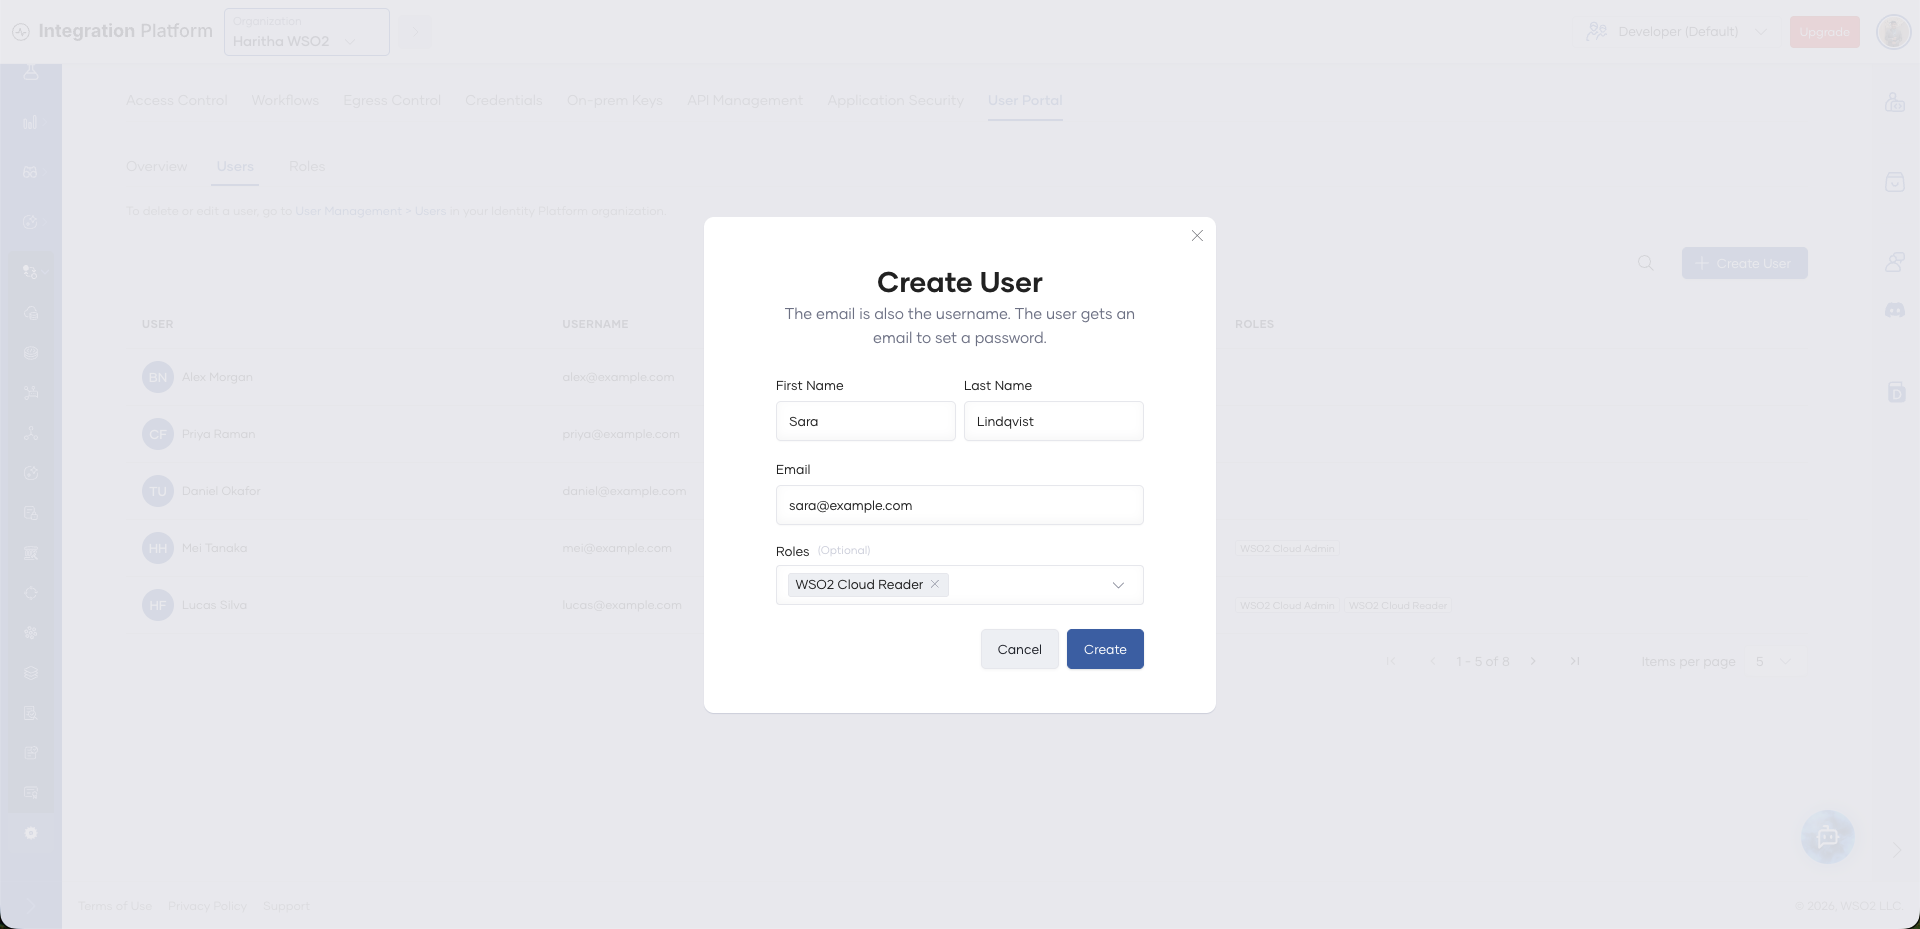
Enter the user's first name, last name, and email address. The email address is also the username.
-
Optional: In Roles, select the roles to assign to the user. You can also assign roles after you create the user. See Assign roles to a user.
-
Click Create.
The platform creates the user in your WSO2 Identity Platform organization and assigns the roles that you selected. WSO2 Identity Platform sends the user an email with a link to set a password. After the user sets a password, the user can sign in to the User Portal with Sign In. Share the User Portal link for your organization, or the organization handle, with the user. See Sign in to the User Portal.
Assign roles to a user
-
In your organization, go to Admin > Settings > User Portal > Users.
-
Click the user.
-
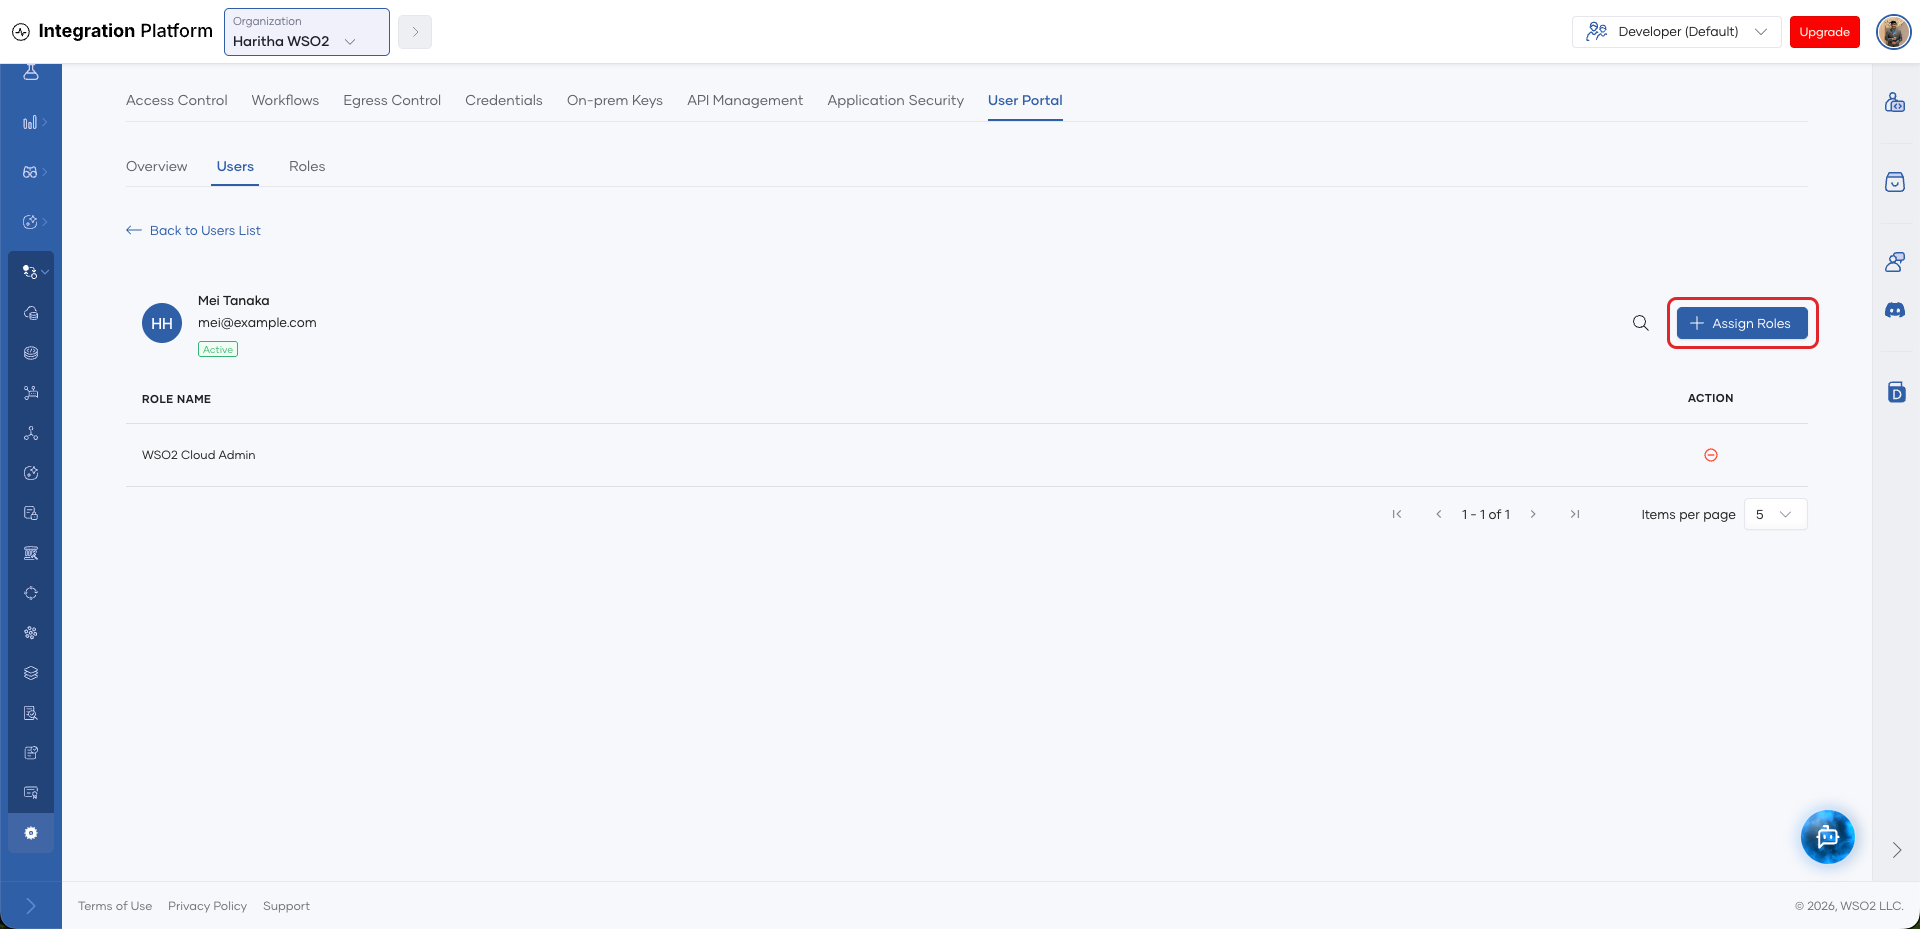
Click Assign Roles.
-
In Roles, select the roles to assign to the user.
-
Click Assign.
Remove a role from a user
- In your organization, go to Admin > Settings > User Portal > Users.
- Click the user.
- Next to the role, click the Unassign icon.
- In the confirmation dialog, click Remove.
Edit or delete a user
You cannot edit or delete users from the WSO2 Cloud console. To do this, go to User Management > Users in your WSO2 Identity Platform organization. The link on the Admin > Settings > User Portal > Users tab opens this page. For more information, see WSO2 Identity Platform documentation: Manage users.
Manage roles
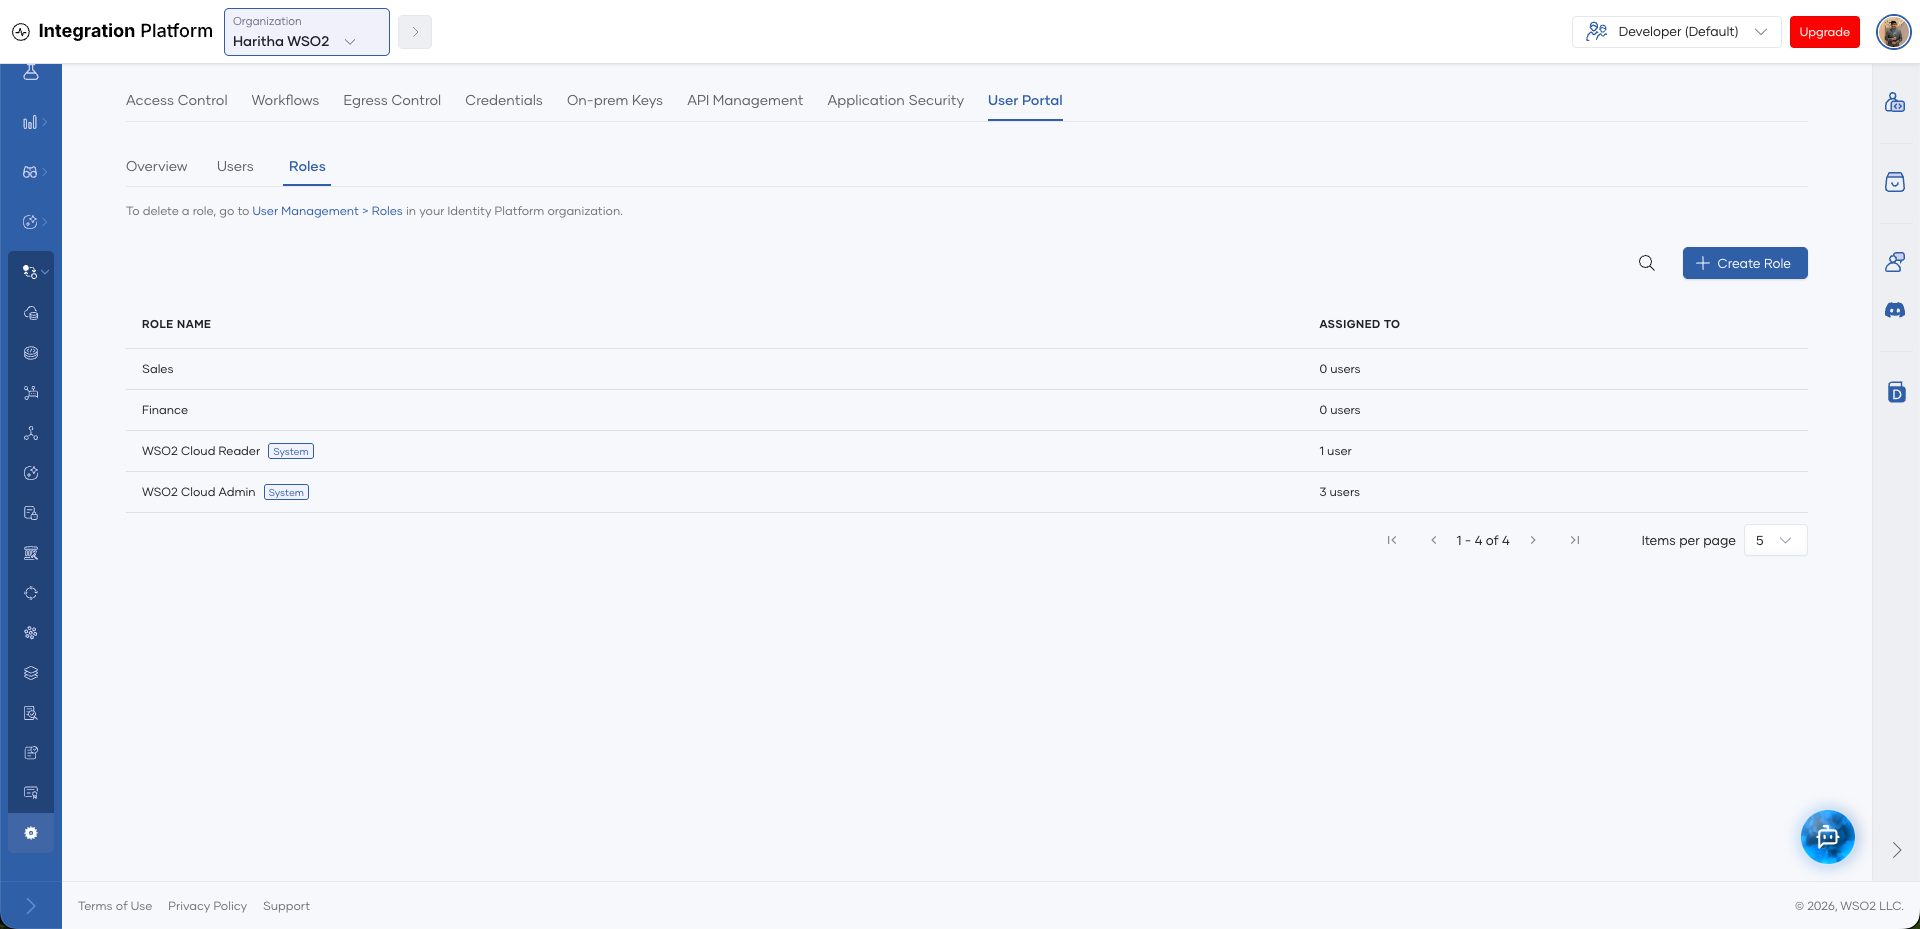
In your organization, go to Admin > Settings > User Portal > Roles. The Roles tab lists the roles on the User Portal application, and the number of users that have each role. System roles have a System label. To search the list, click the search icon.
Create a role
-
In your organization, go to Admin > Settings > User Portal > Roles.
-
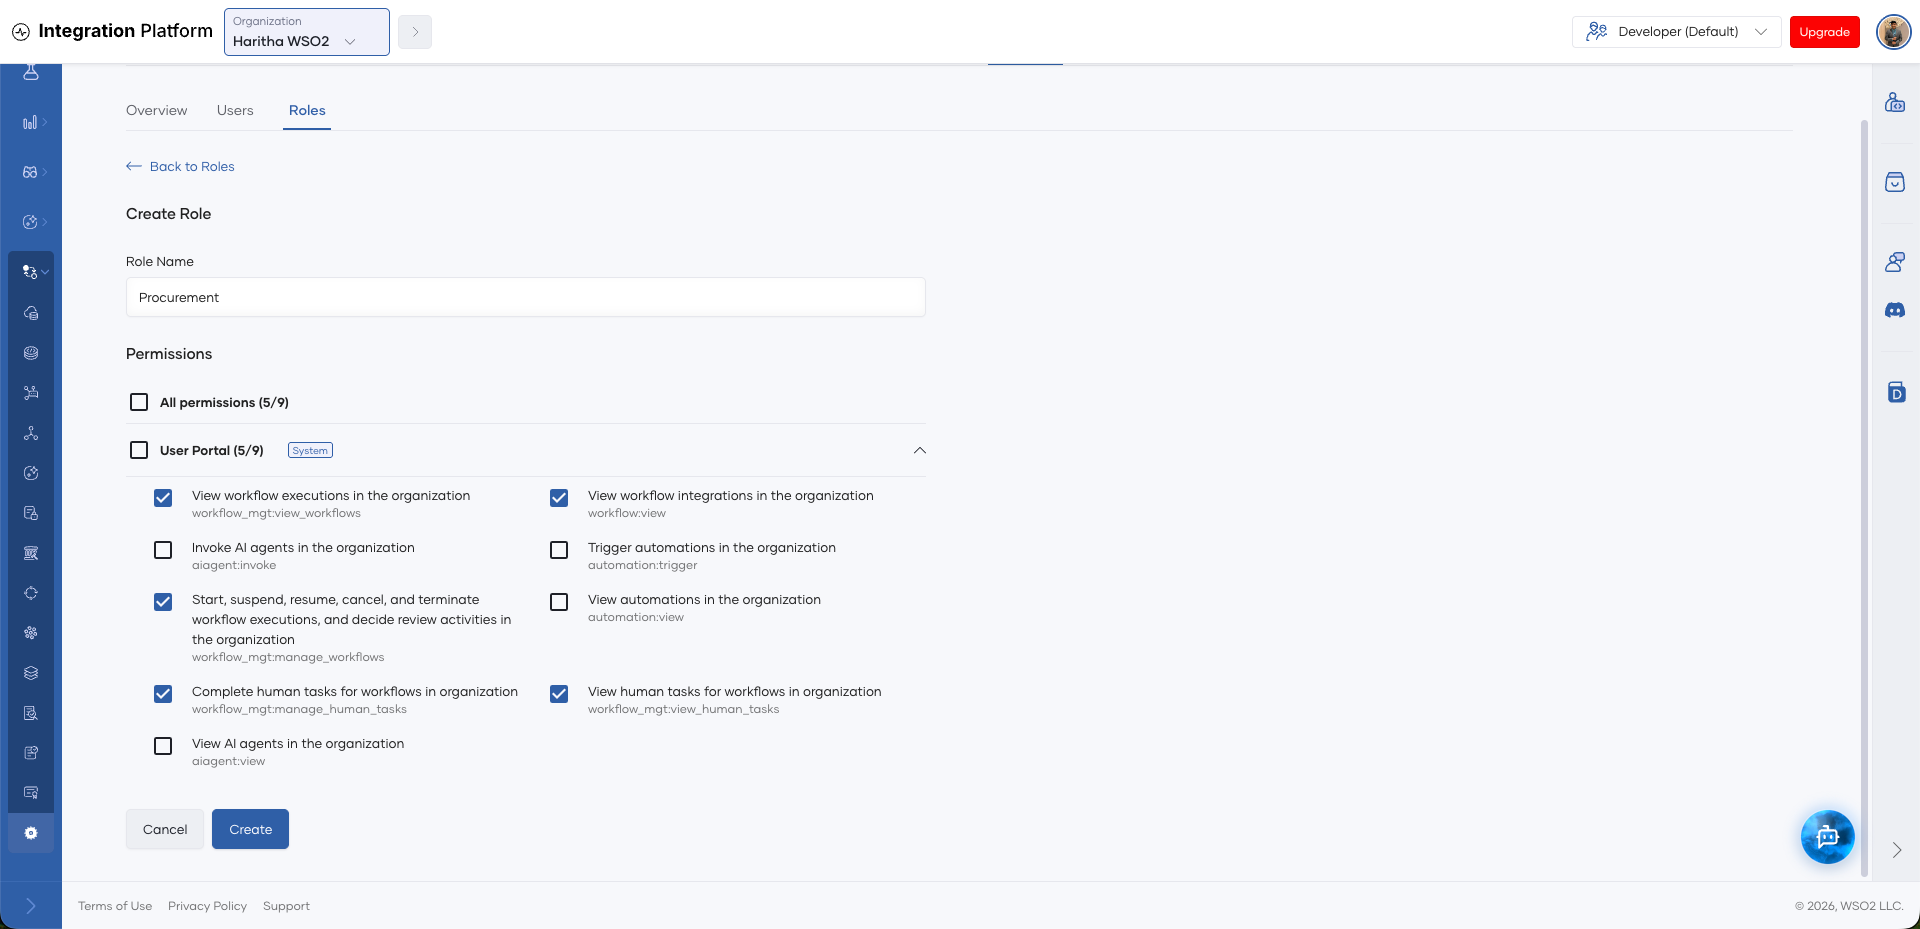
Click Create Role.
-
In Role Name, enter a name for the role.
-
Under Permissions, select the permissions for the role.
The permissions are grouped by API resource:
- User Portal: The scopes of the User Portal API resource. See Scopes.
- Your own API resources, labeled Custom API: The scopes of any other API resource that the User Portal application is authorized for. See Add scopes from your own APIs.
To select all the permissions in a group, select the check box of the group. To select all the permissions, select All permissions.
-
Click Create.
The console opens the new role, where you can assign users to it.
Change the permissions of a role
-
In your organization, go to Admin > Settings > User Portal > Roles.
-
Click the role.
-
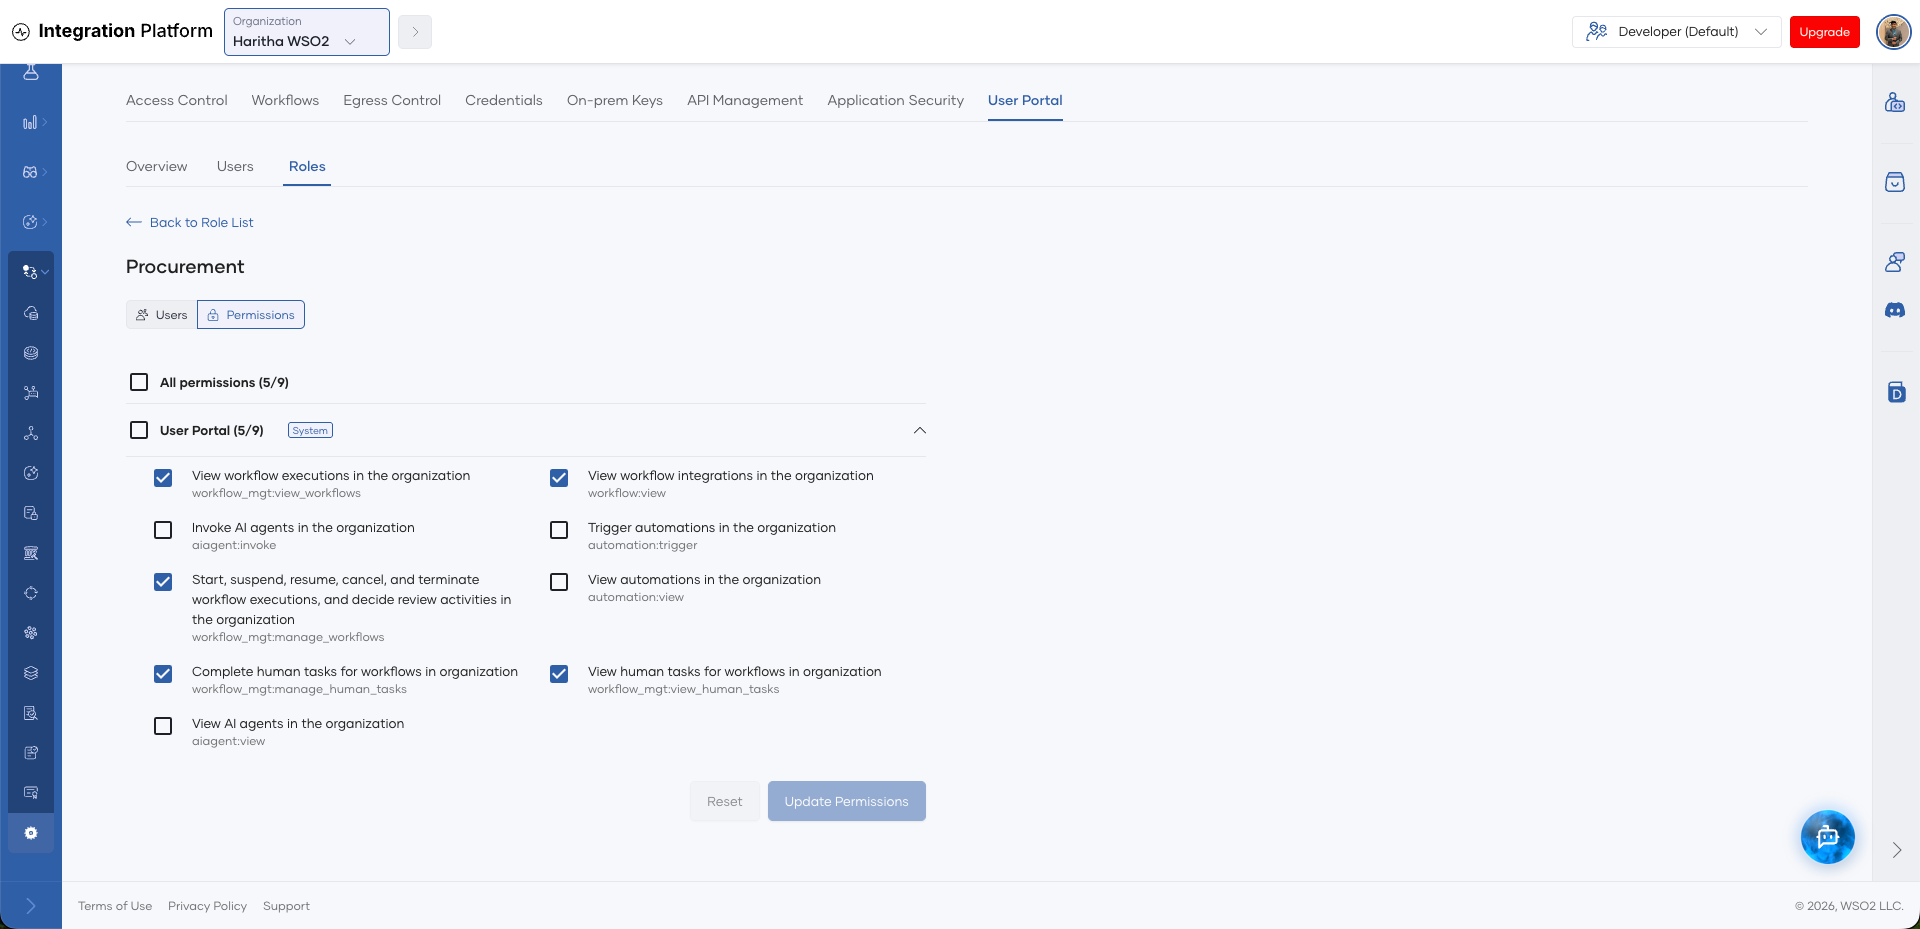
Click Permissions.
-
Select or clear permissions. To undo your changes, click Reset.
-
Click Update Permissions.
Rename a role
- In your organization, go to Admin > Settings > User Portal > Roles.
- Click the role.
- Click the role name, then enter the new name.
- Press Enter, or click outside the field.
Assign users to a role
-
In your organization, go to Admin > Settings > User Portal > Roles.
-
Click the role.
-
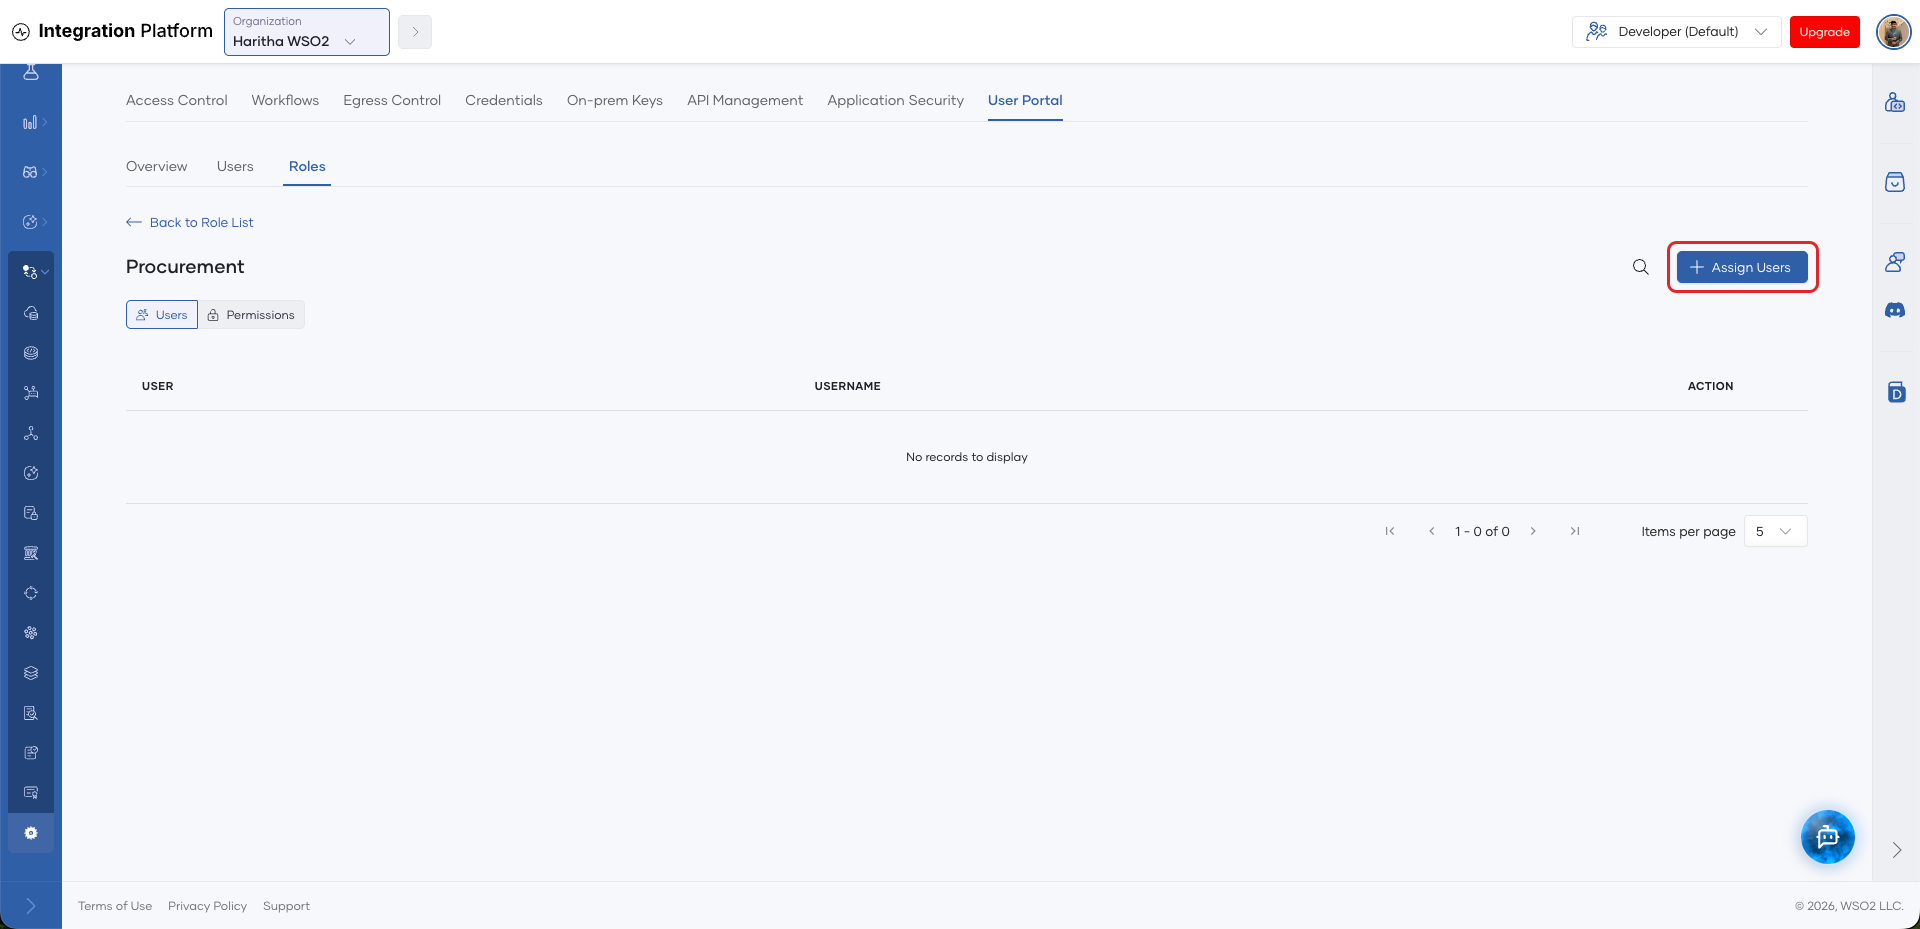
Click Users.
-
Click Assign Users.
-
In Users, select the users to assign the role to.
-
Click Assign.
To remove a user from the role, click the Unassign icon next to the user, then click Remove in the confirmation dialog.
Delete a role
You cannot delete roles from the WSO2 Cloud console. To do this, go to User Management > Roles in your WSO2 Identity Platform organization. The link on the Admin > Settings > User Portal > Roles tab opens this page. If you delete a system role, the User Portal page shows that the role is no longer in place. To recreate it, see Repair the User Portal. For more information, see WSO2 Identity Platform documentation: Manage roles.
Roles for workflow tasks
Workflows can assign human tasks to a role. In the User Portal, only users who have that role can see and act on those tasks. To let a user act on a task, go to Admin > Settings > User Portal > Roles in your organization, create the role, and assign it to the user.
The role name must match the role that the workflow assigns the task to. The user also needs the scopes to see the workflow and its tasks, which are workflow:view and workflow_mgt:view_human_tasks. To complete tasks, the user also needs workflow_mgt:manage_human_tasks. To act on approvals, the user also needs workflow_mgt:manage_workflows.
Add scopes from your own APIs
You can give User Portal users the scopes of your own APIs. To do this:
- In your WSO2 Identity Platform organization, create an API resource with the scopes, and authorize the User Portal application for those scopes. See WSO2 Identity Platform documentation: API authorization.
- In your organization, go to Admin > Settings > User Portal > Roles. Then create a role or change the permissions of a role, and select the scopes under the Custom API group.
- Assign the role to users.
You cannot add these scopes to the system roles.