Introducing Mediation Policies in Choreo

- Menaka Jayawardena
- Associate Technical Lead, WSO2

Photo by Chris Liverani on Unsplash
Introduction
API proxies are used to expose existing services as managed APIs. Depending on the business need, it’s sometimes necessary to conduct certain transformations before dispatching a request to the service or sending a response back to the client. These transformations can vary from simple tasks like adding custom authorization headers to the request to more complex scenarios like changing a response payload to a different schema.
With mediation policy support, Choreo lets users attach pre-defined policies to API proxies, allowing developers to transform requests and responses before sending them to the backend or the client. This also provides a framework for developing custom mediation policies that can be reused across the organization.
What is a Mediation Policy?
A mediation policy is a basic transformation unit that usually performs a single task like adding headers, removing query parameters, or logging a message. If you look at the pre-packed policies in Choreo, you’ll notice distinct policies to perform each transformation mentioned earlier. You can attach these policies to requests, responses, or error flows of a resource in the API proxy.
What are Mediation Flows?
Mediation policies occur under an API resource and can be separated into three logical flows:
- Request flow: This is the message flow from an API client to the backend service.
- Response flow: This is the message flow from a backend service to the API client.
- Fault flow: If an error occurs in the request or response flow, the execution falls back to the fault flow. Within the fault flow, the execution can be dropped, or a response can be sent back to the client. Figure 1 illustrates these flows.
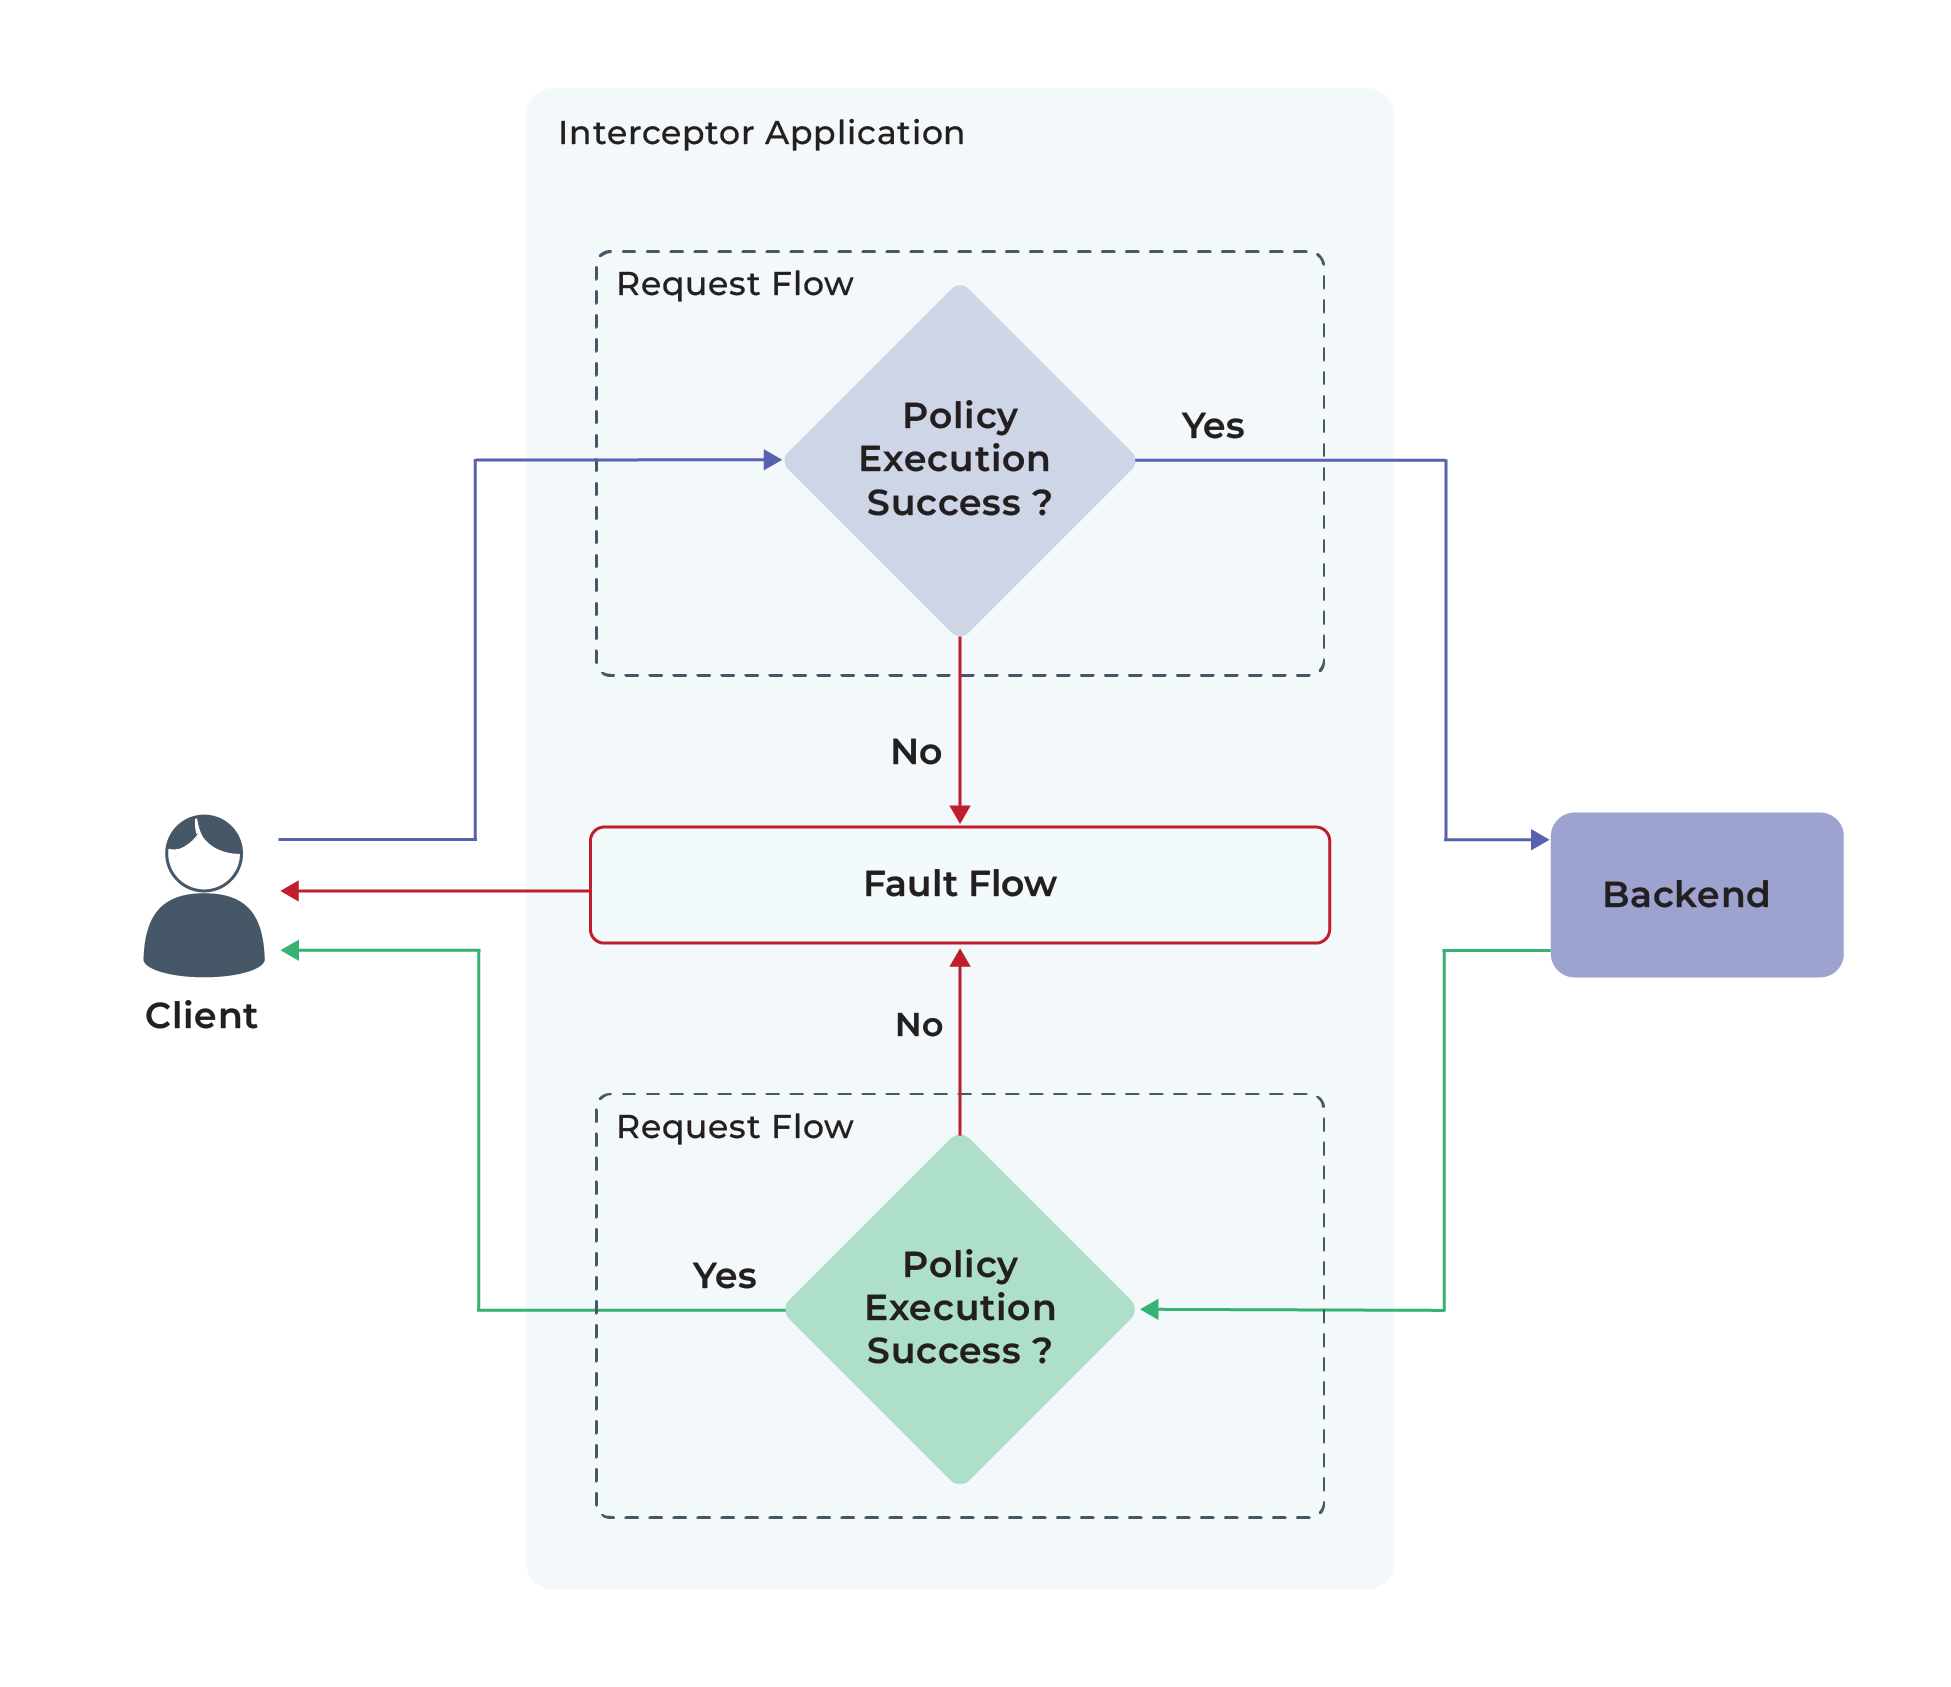
Figure 1: Mediation flows
Attaching Policies to an API Proxy
As seen in Figure 2, the steps below are an example of how users can attach a policy to an API Proxy.
- Login to the Choreo Console and click on Create an API Proxy.
- In the API Develop page, go to the Policies section. Here, you will see the API’s resource list.
- Click on a resource to expand it.
- Under Response Flow, click the Attach Policy button.
- This opens the Policy List view, and all existing policies will be listed. Policies will be filtered by the flow selected. In this list, you’ll only see policies that can be attached to the Response Flow.
- Click on the Add Header (2.0.0) policy
- Provide a name and value for the header, then click Add.
- Click the Save button to keep your changes.
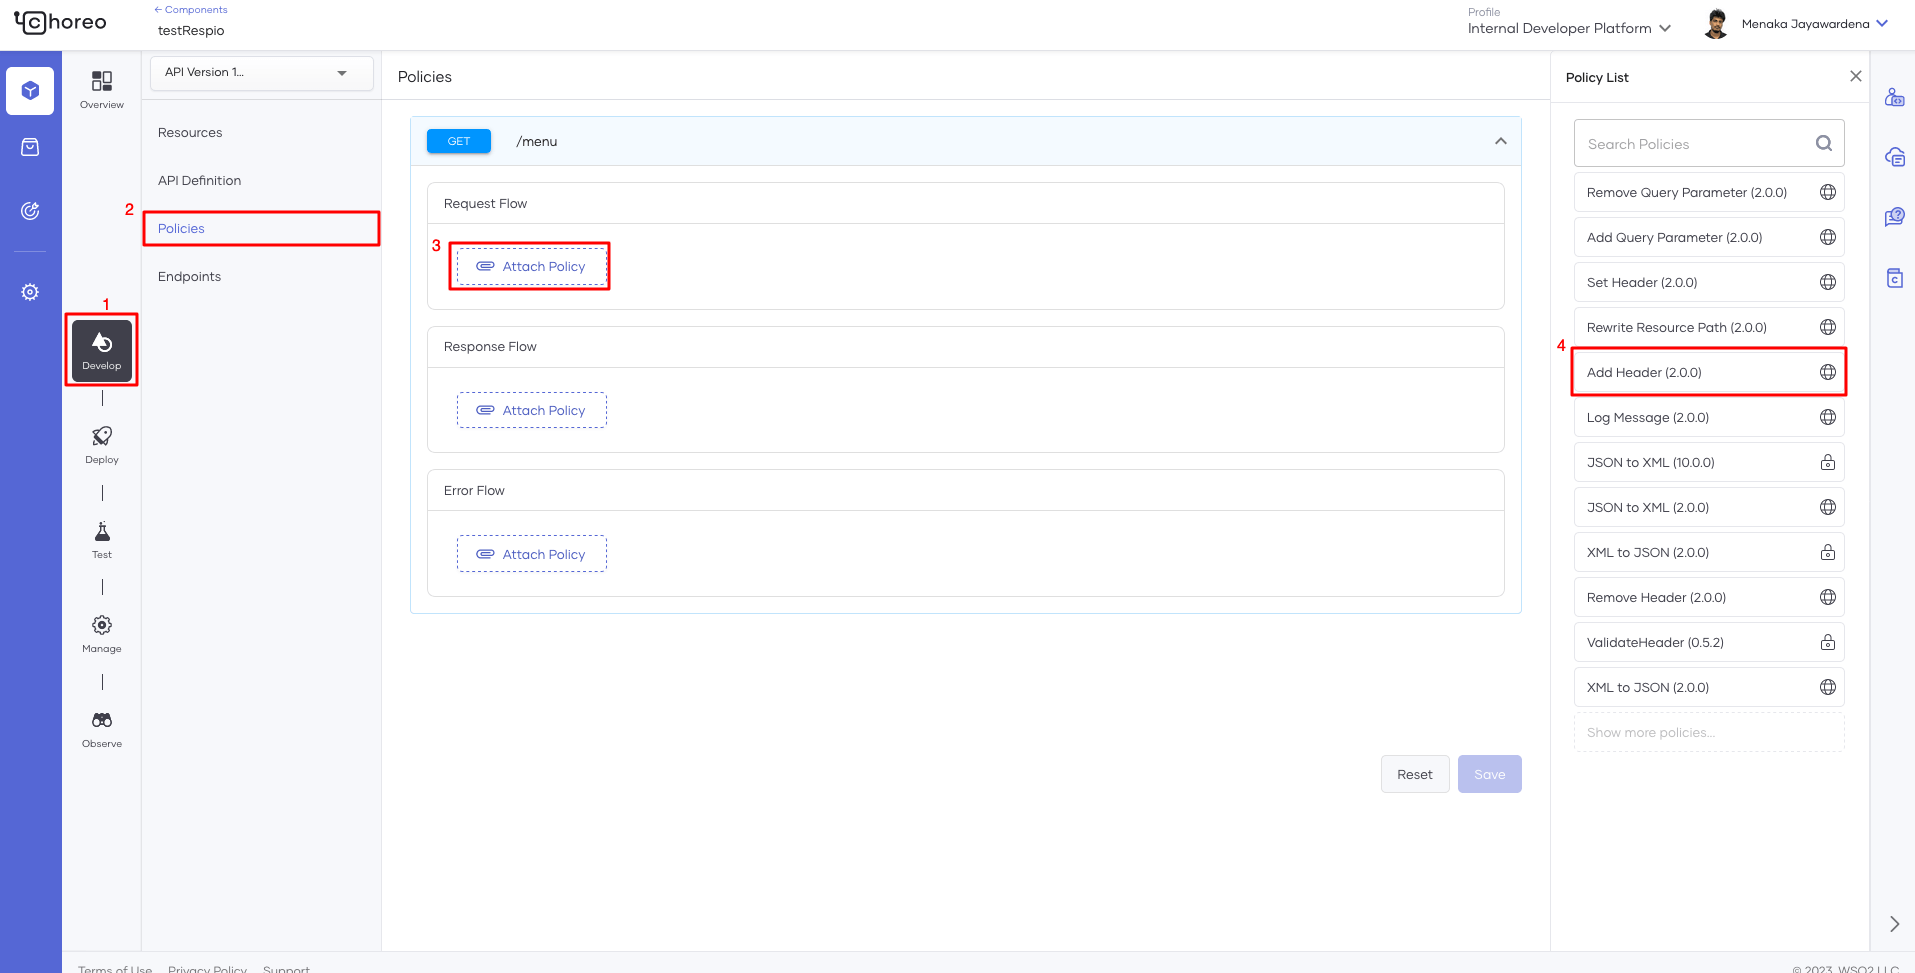
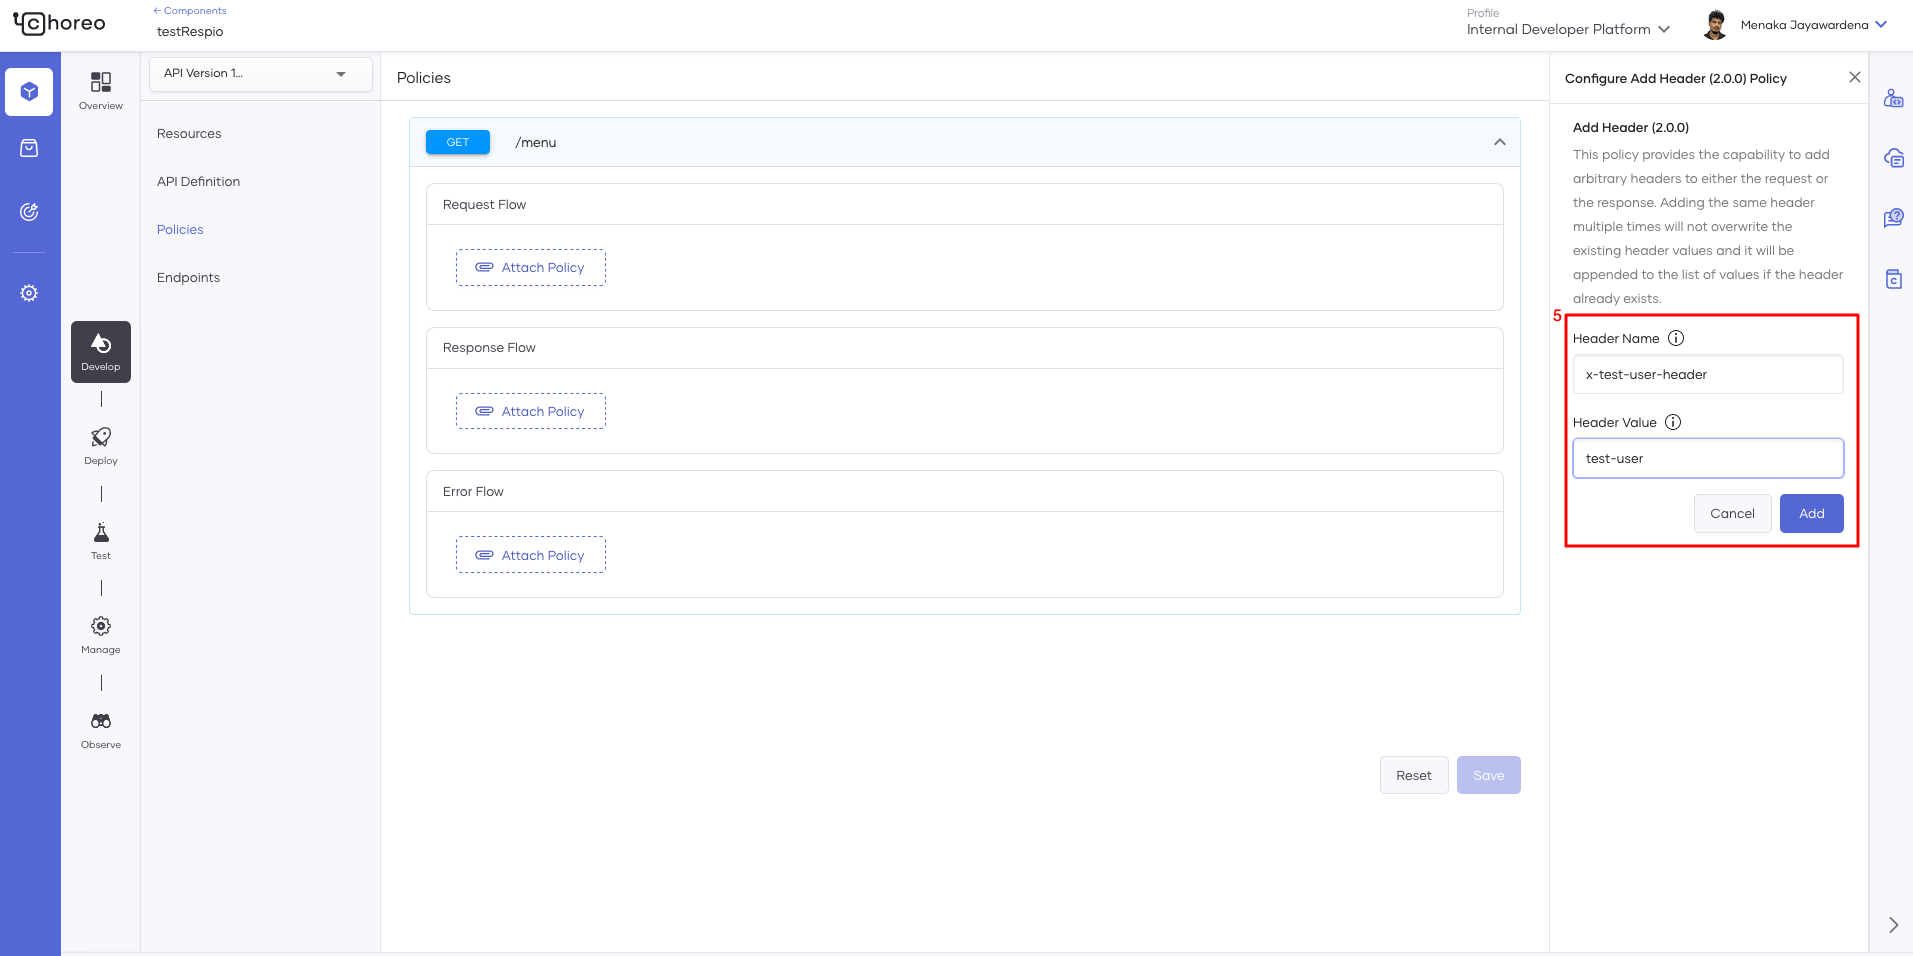
Figure 2: Attaching mediation policies to an API proxy
You can also attach multiple policies to a flow, and they will be executed in the order that they are defined. As shown in Figure 3, the execution order can be altered by dragging and dropping the policies as needed.

Figure 3: Rearranging the order of the policies
Environment-Specific Policy Parameters
Some policies require additional parameters. For example, the Add Header policy requires a header name and a header value. These parameters can be provided as static or dynamic values, which can then be specified when deploying the API to an environment.
To specify a parameter as dynamic, provide the parameter value in ${value} format.
E.g., Add header x-env that requires different header values for each environment, then set the Add Header policy parameters as shown in Figure 4:
- Header Name: x-env
- Header Value: ${xEnvValue}
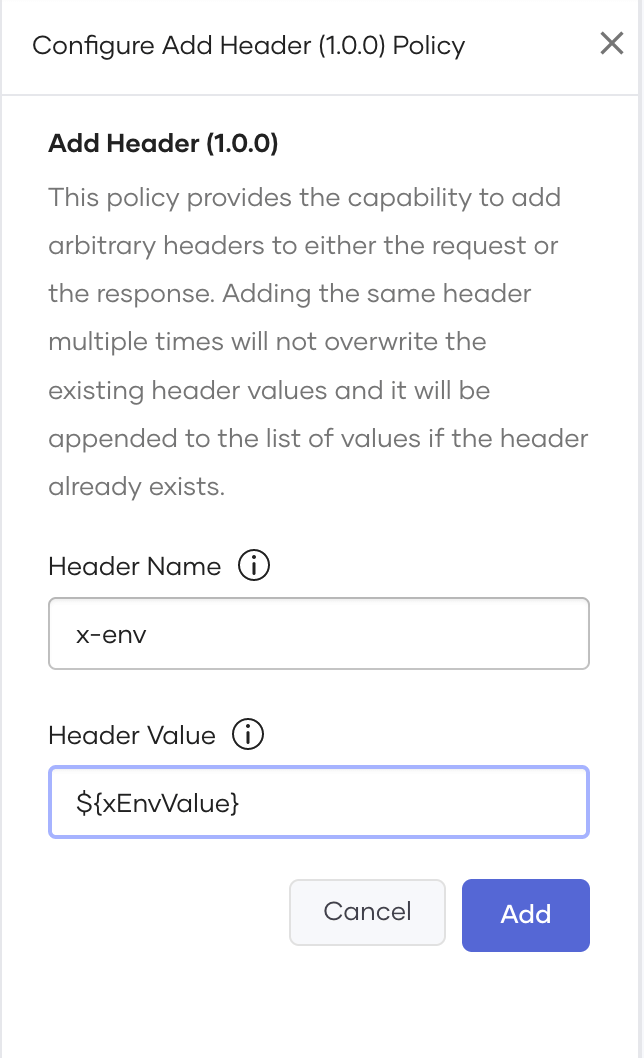
Figure 4: Policy Configuration
As seen in Figure 5, when deploying or promoting the API, you will be prompted to provide the value for xEnvEnvValue.
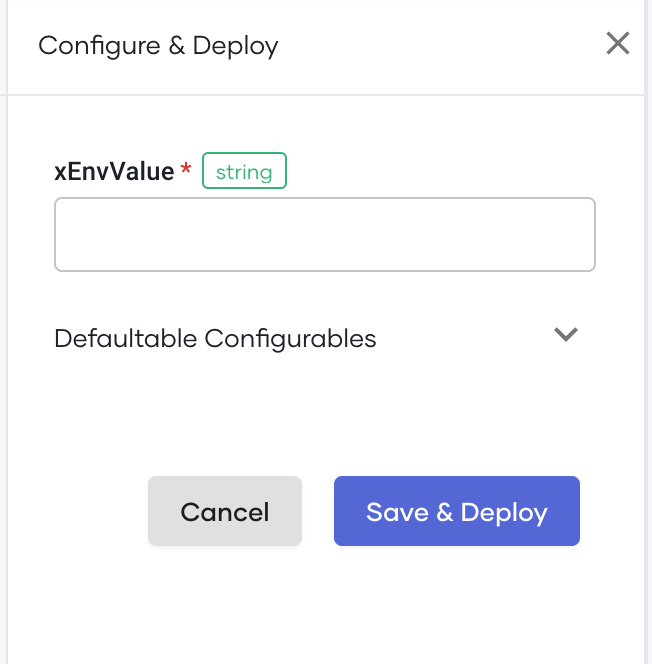
Figure 5: Environment specific configuration
Reading the Log Output
Some built-in policies, like the log policy, produce logs. When writing custom policies, you can log certain inputs/outputs to validate the policy. These logs will appear under the observability section (the observability tab becomes active when policies are attached to the API).
Figure 6 shows a sample output produced by logging the payload using the log policy.
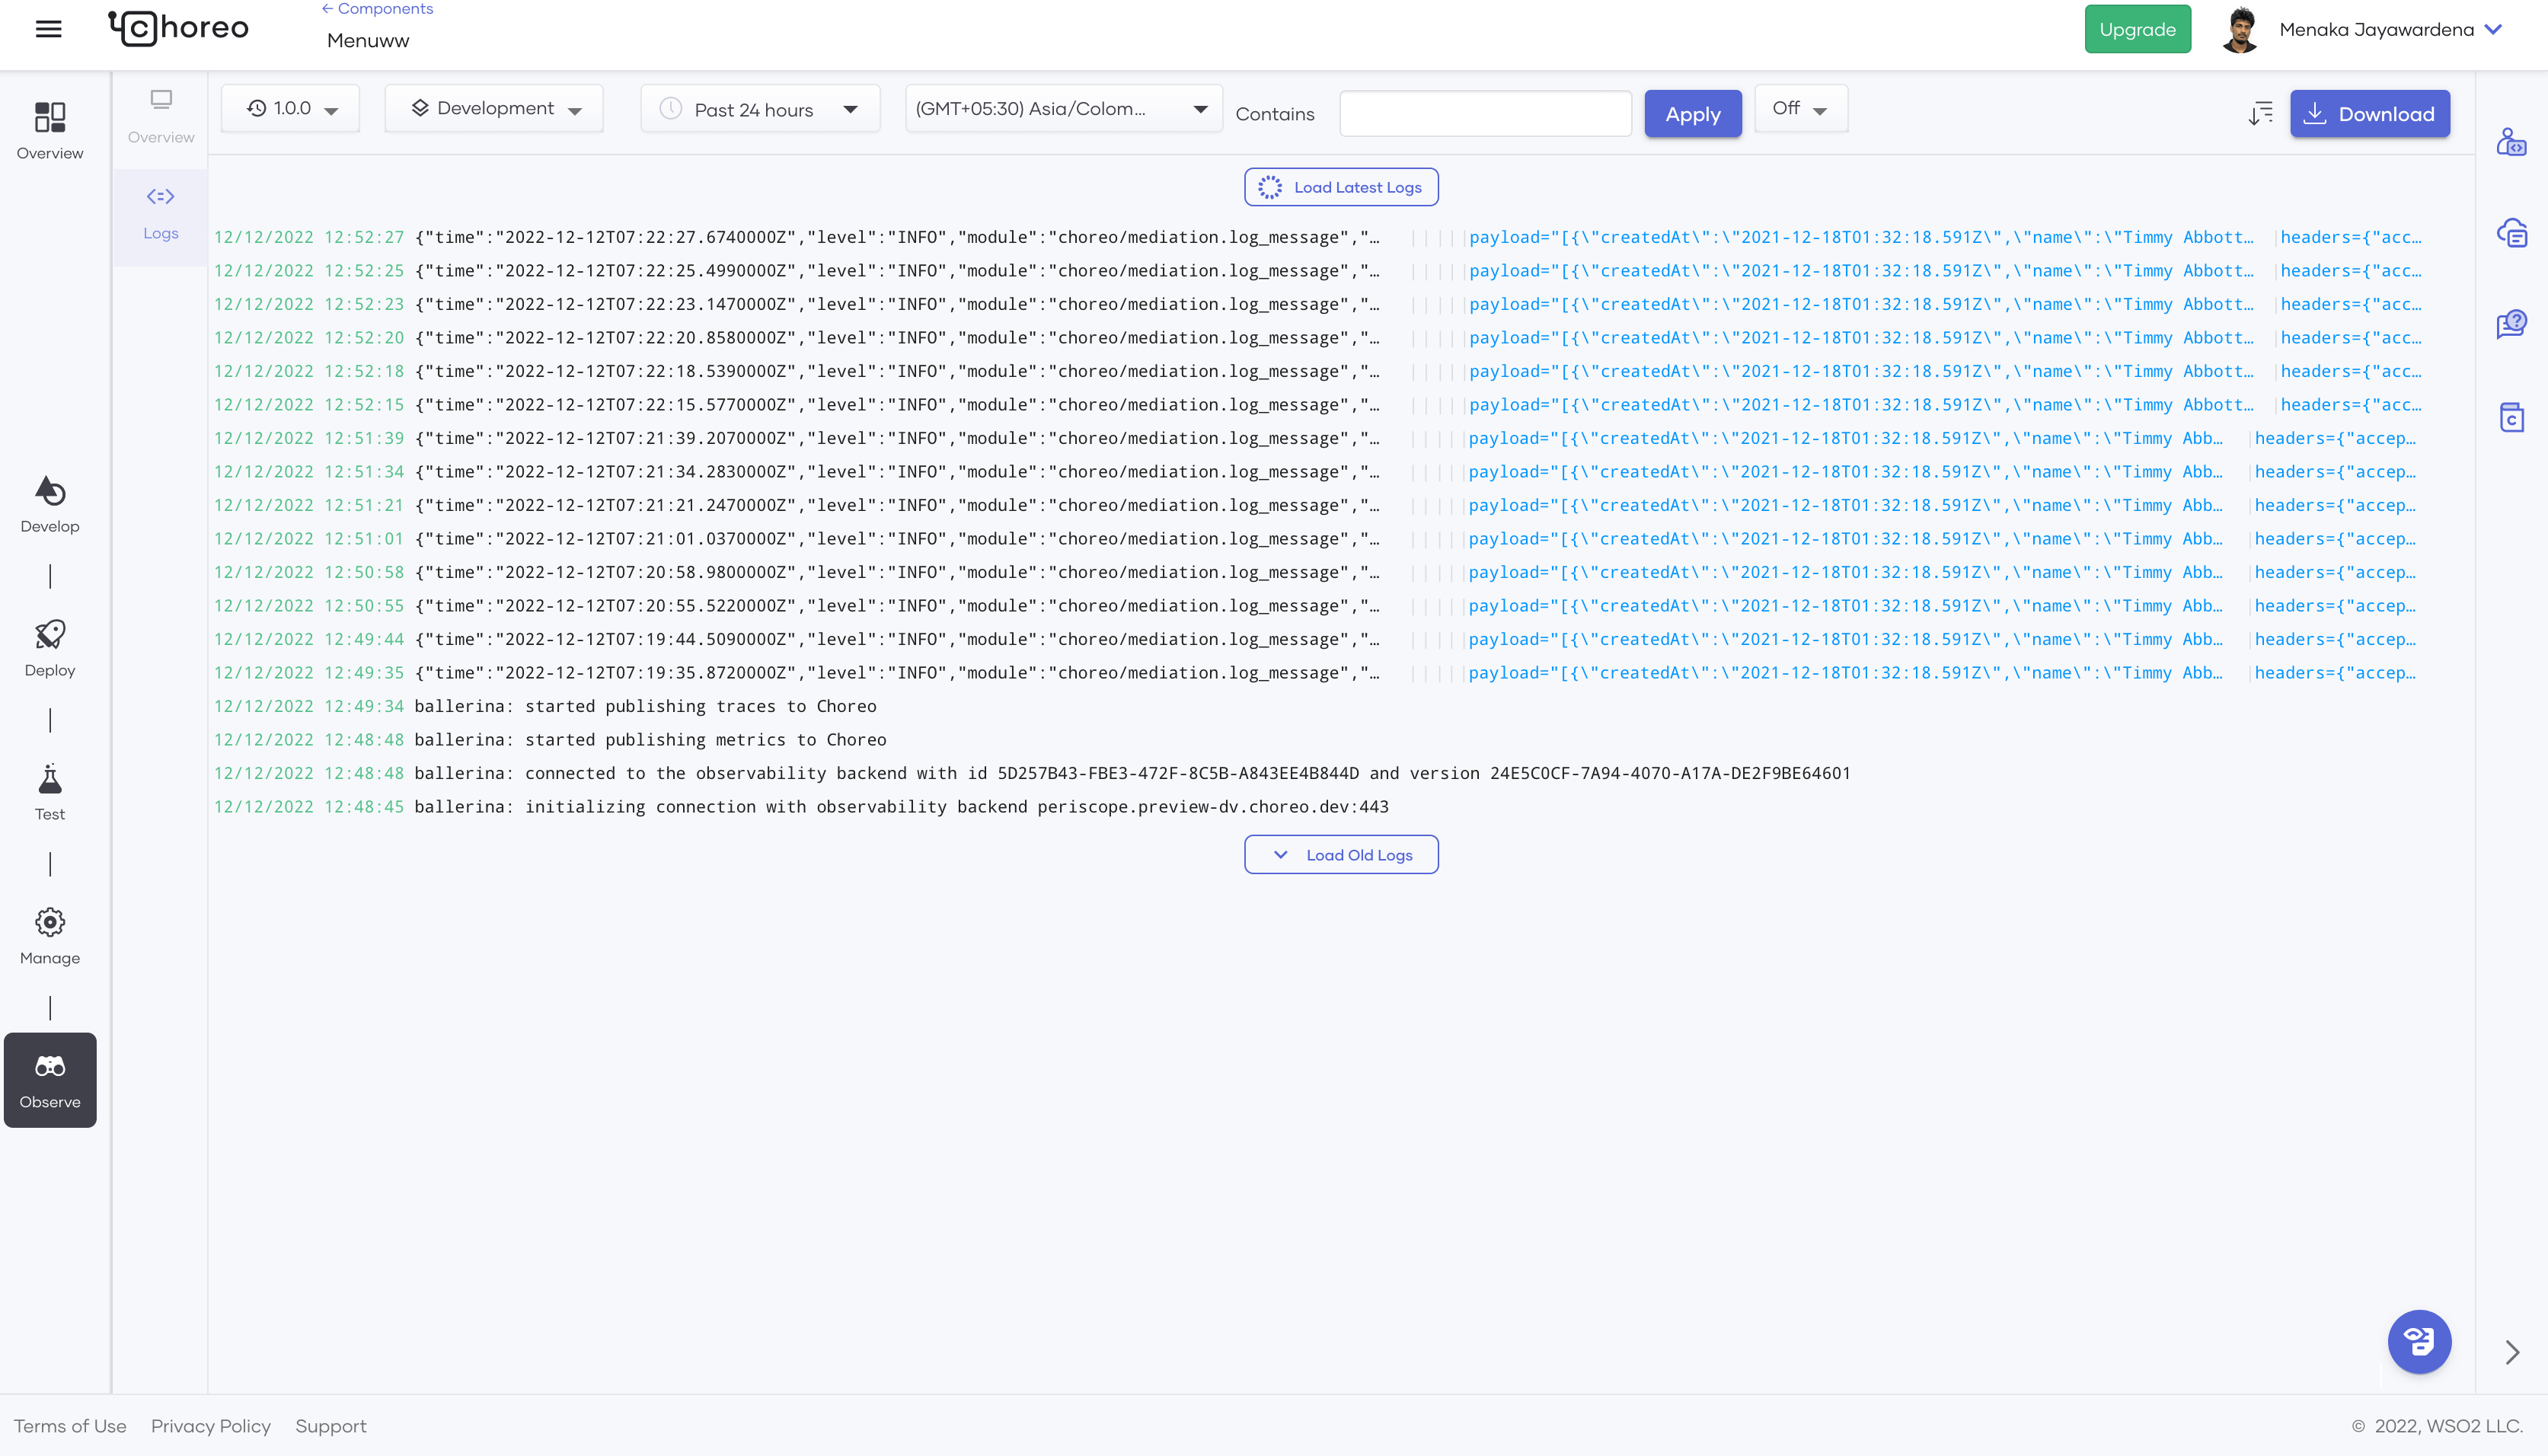
Figure 6: Mediation policy logs
An output will appear in the mediation tab, even if no log-producing policies have been attached. This is because the interceptor service that gets generated for executing policies produces standard logs. We’ll talk more about the Interceptor app in the next section.
How Does it Work?
When you attach a mediation policy to an API proxy, Choreo deploys an application called the Interceptor app between the gateway and the backend to conduct transformations.
As seen in Figure 7, this is how requests are routed when there are no policies.
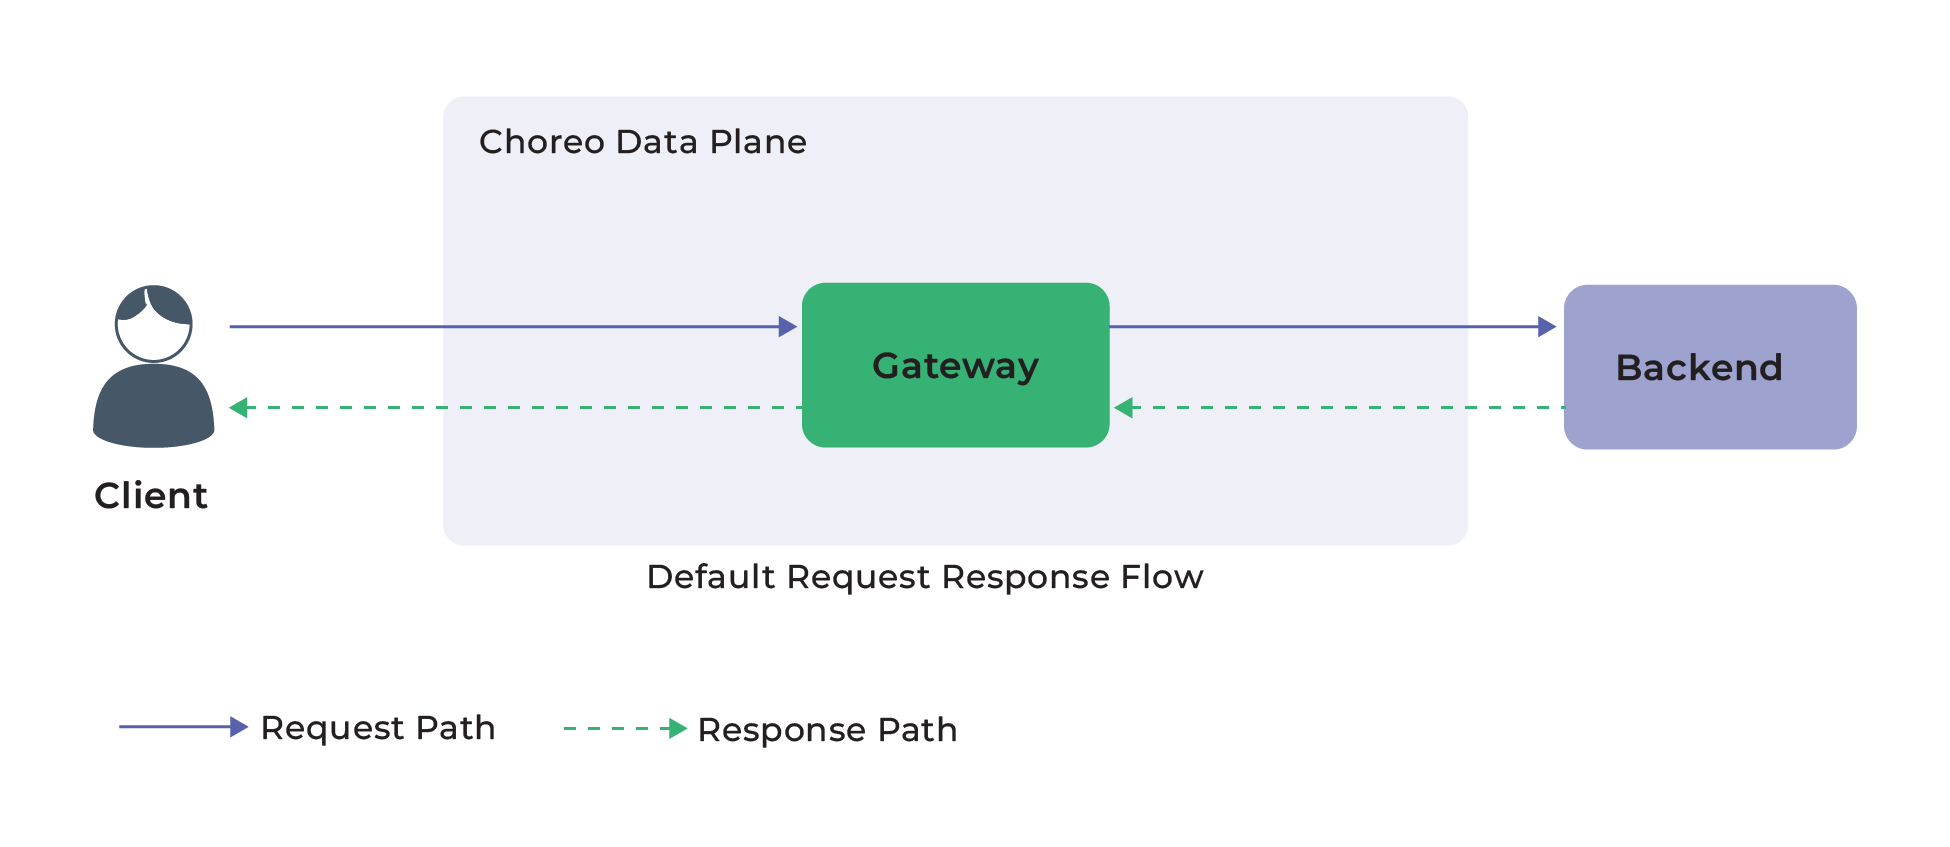
Figure 7: Default request response flow
Figure 8 shows how a request is routed when a policy is attached.
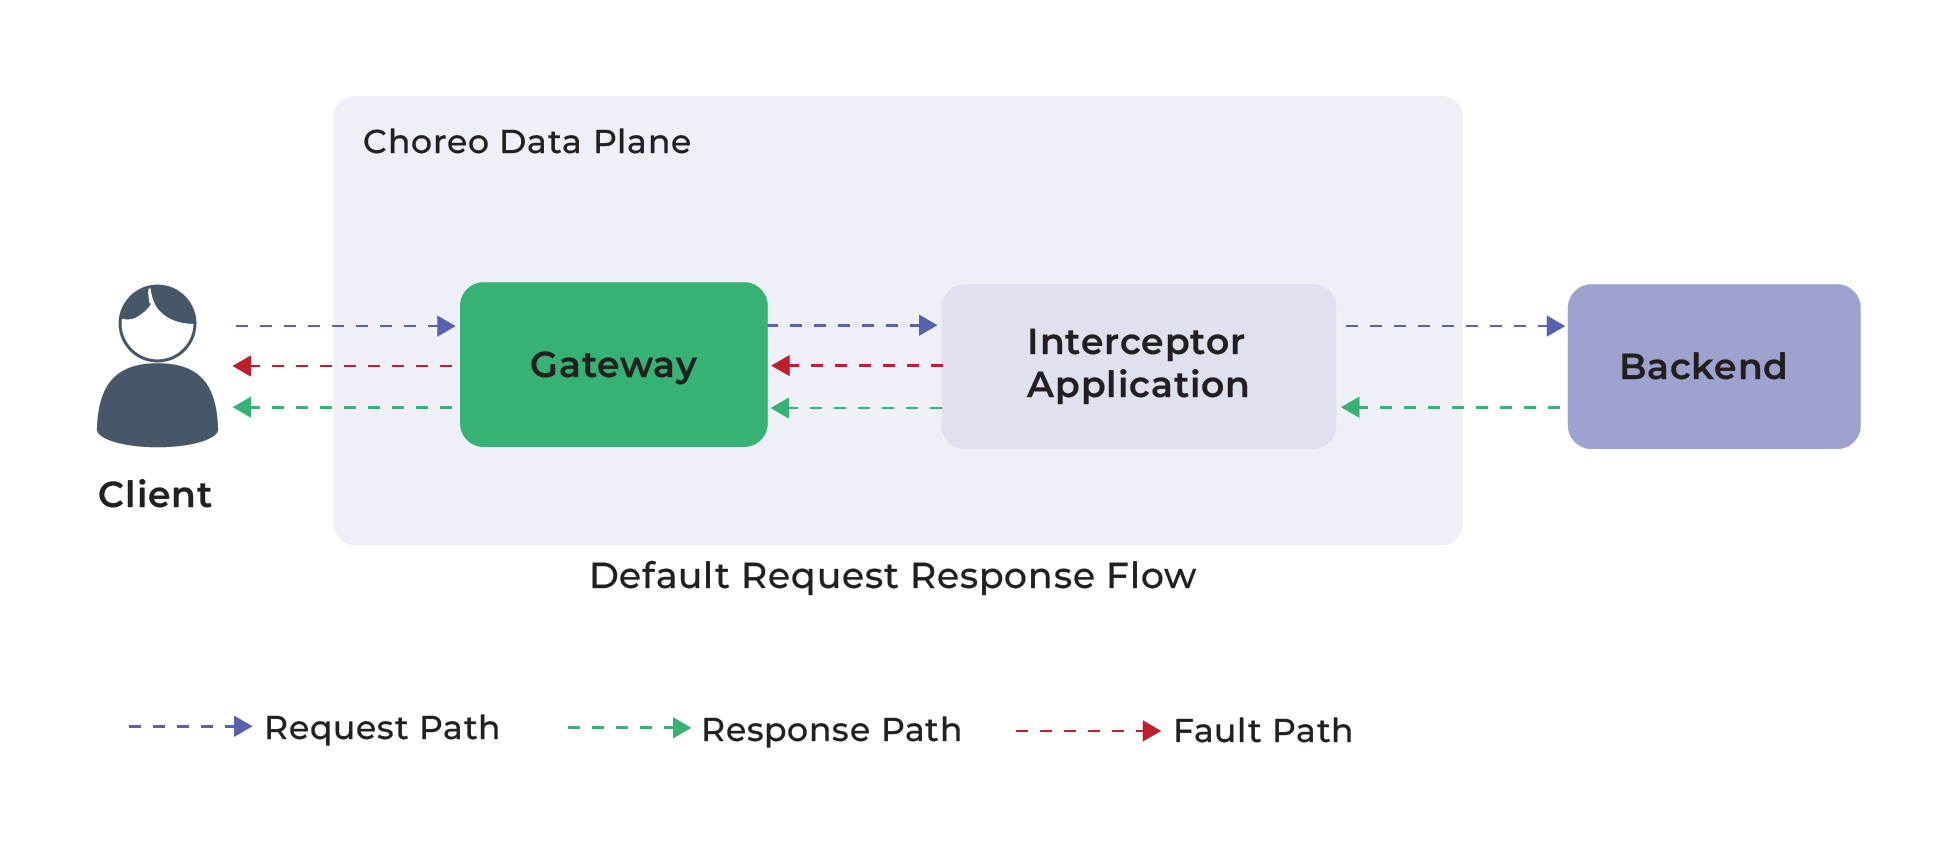
Figure 8: Request response flow with mediation
API Deployment
When deploying an API proxy with mediation, the deployment occurs in two steps.
Step 1: Generating the Interceptor App
When you deploy an API proxy that has policies, Choreo generates an interceptor app by looking at the policies you’ve specified. The app’s code is maintained in an internal Git repository. Since developers won’t edit the code directly, it is not visible to proxy developers. The code for the app is generated in Ballerina.
When deploying an API proxy, extra time is taken to generate the code for the app. When you first click the Deploy button, Choreo will generate the code, and the stages will be shown similar to Figure 9.
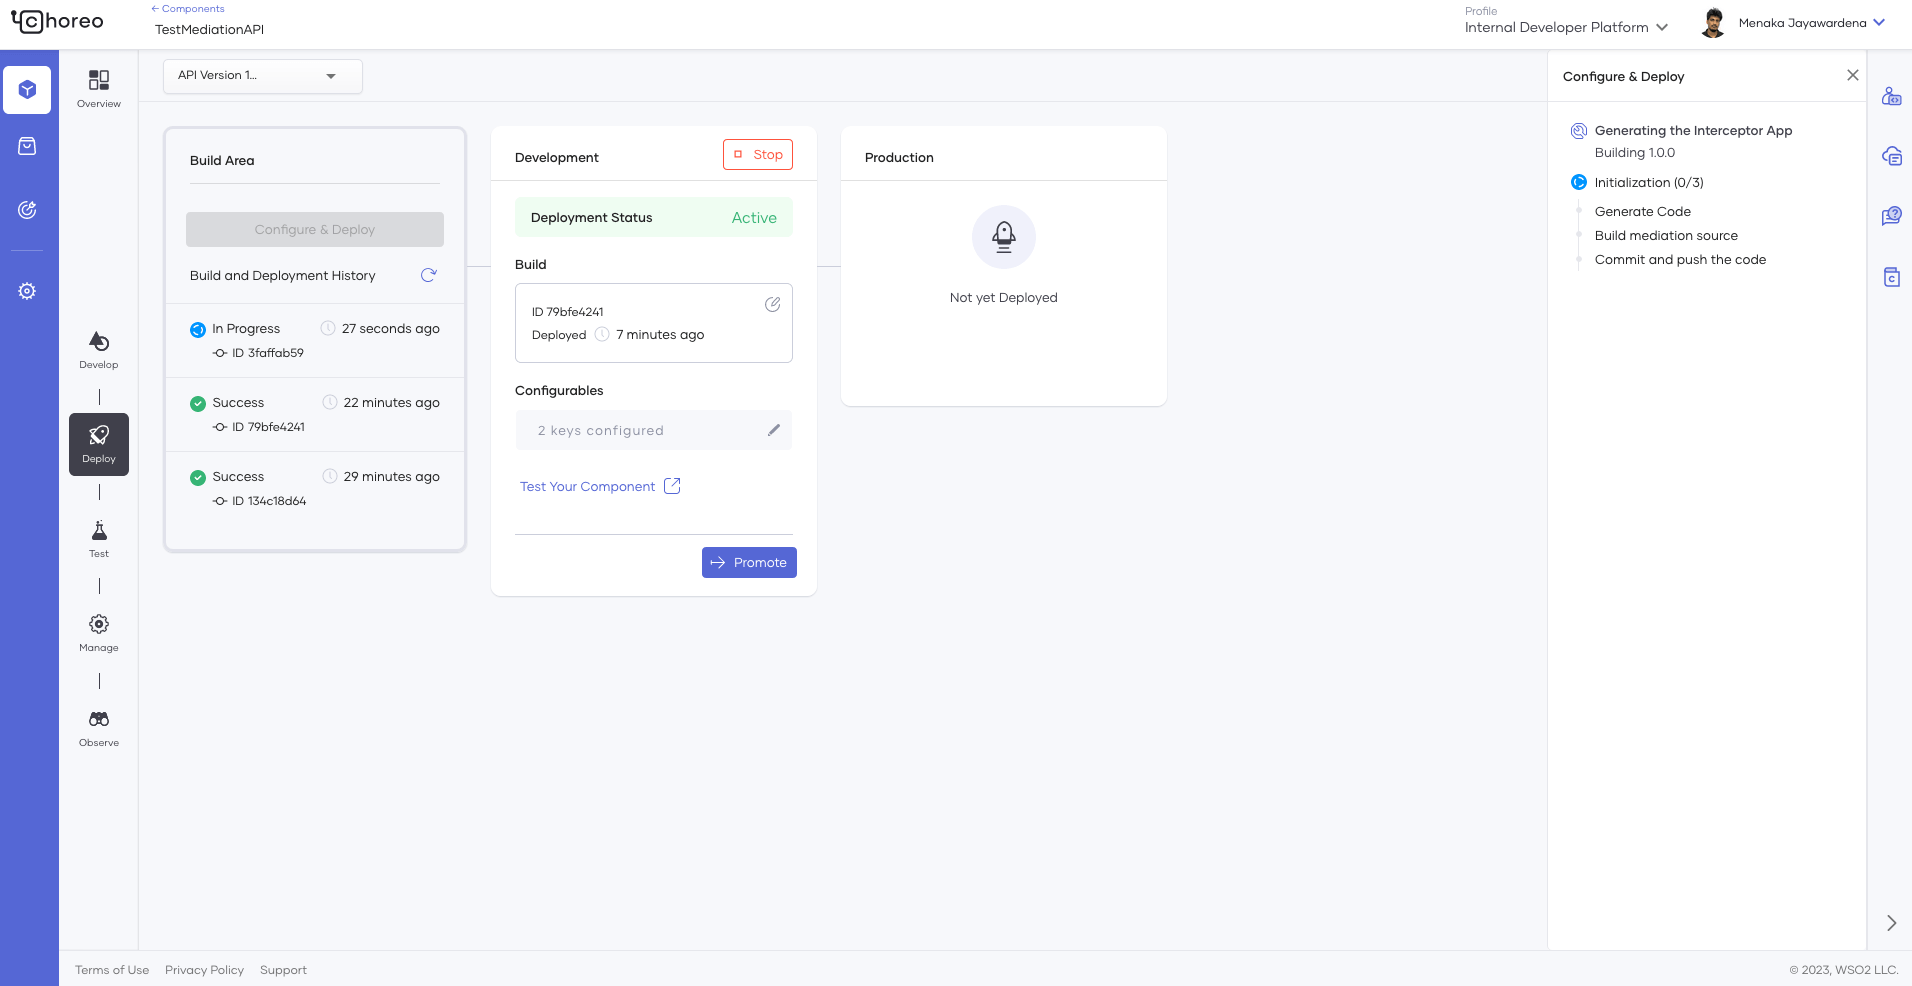
Figure 9: Interceptor app generation
If you’ve specified dynamic parameters while using policies, you’ll be prompted for them at the end of the code-generation step. Choreo will prompt you for the backend endpoints even if there are no dynamic parameters in place.
Step 2: Building the Interceptor App
In step 1, we only generated the code for the app. The code is built and pushed to an internal image registry before it’s deployed on the runtime. If you’re familiar with deploying a REST API, you might find the console output similar to the stages you see there. As shown in Figures 10 and 11, neither the Interceptor app nor the API proxy configurations are deployed.
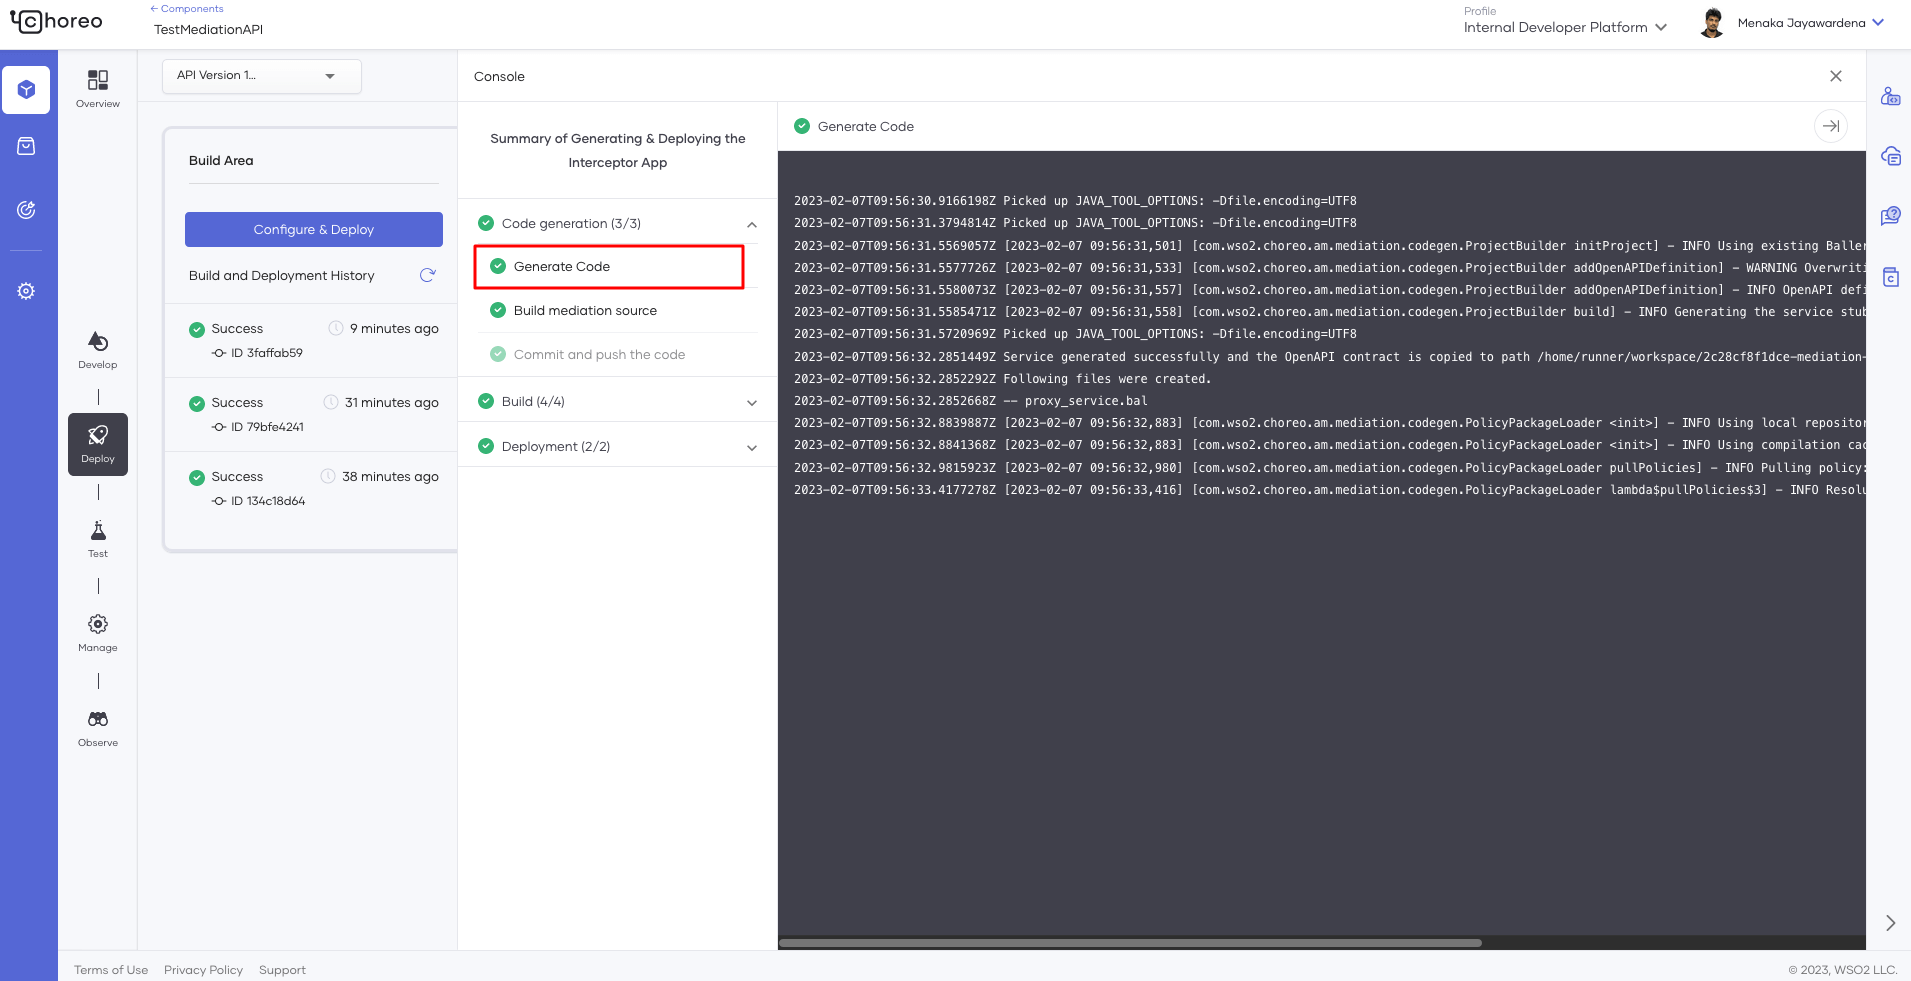
Figure 10: Interceptor app generation logs
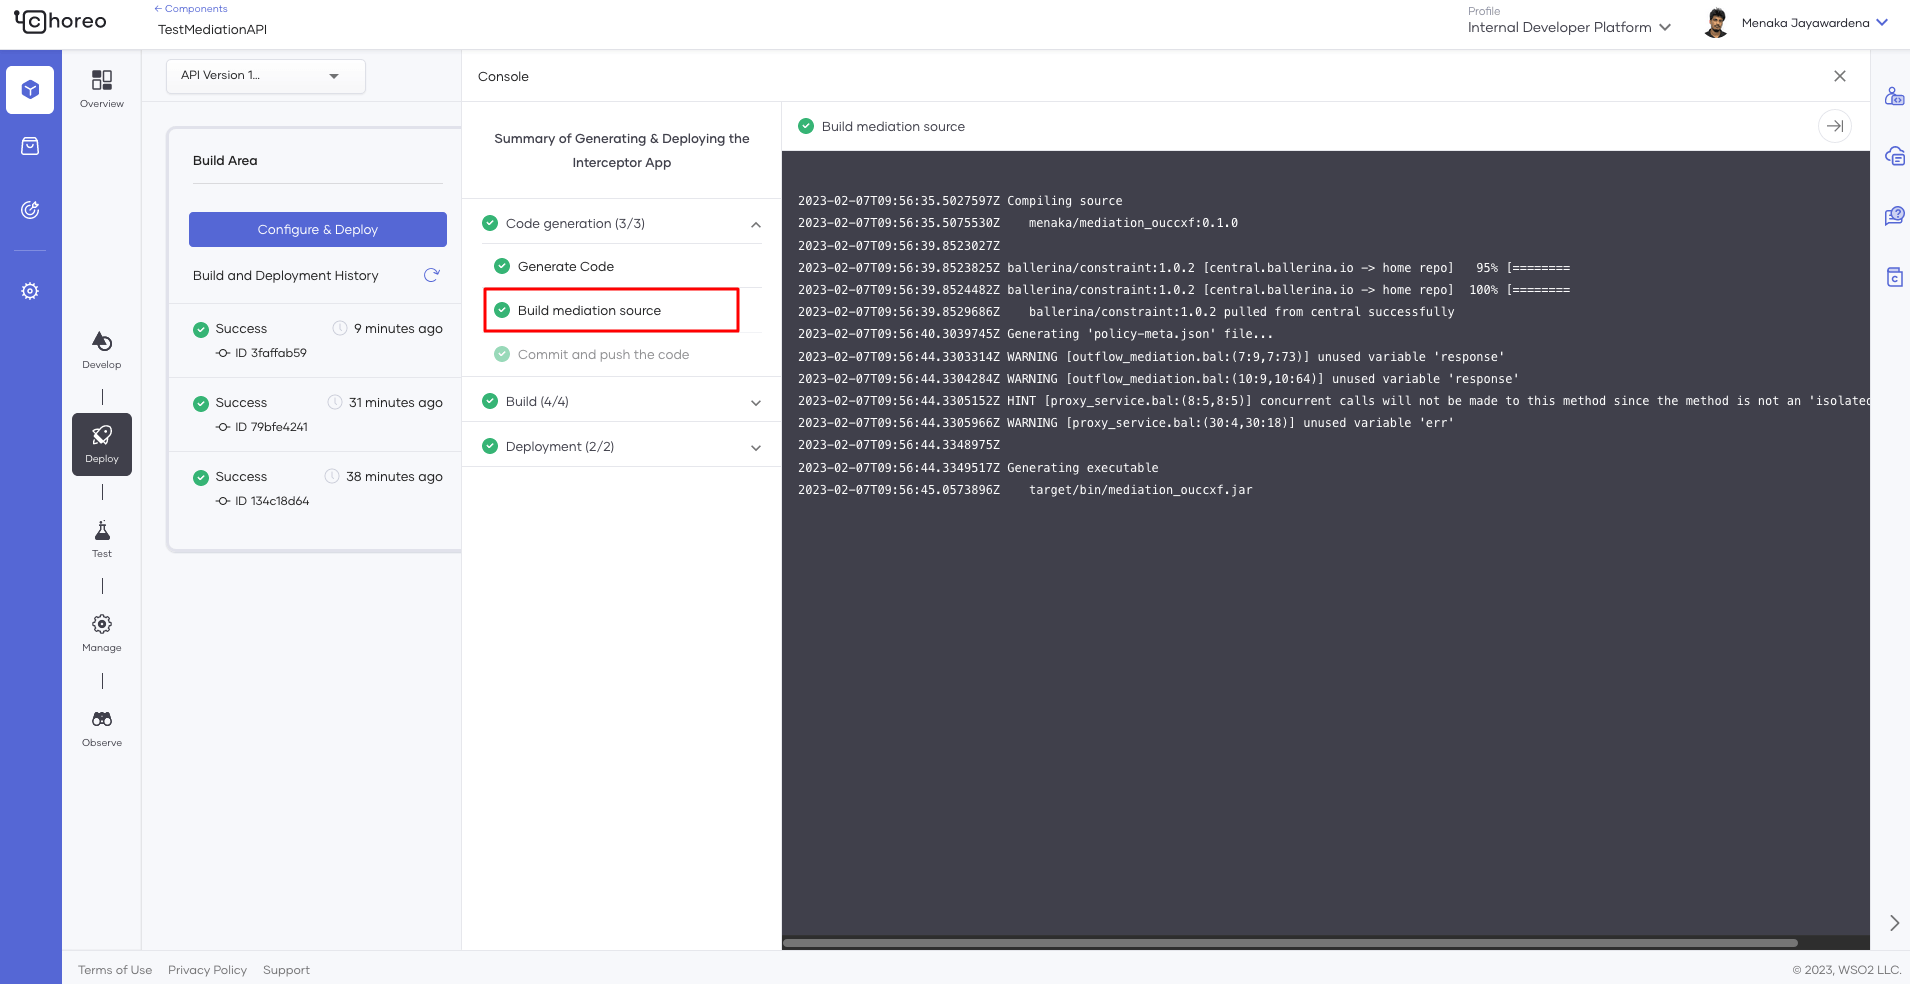
Figure 11: Interceptor app build logs
Step 3: Deployment
Once the app is built and pushed, the actual deployment takes place. In this phase, the proxy API will be deployed to the gateway by default (without mediation policies). If mediation policies are attached, the deployment will occur in two stages. First, the generated mediation service will be built and deployed. Then the API proxy will be deployed to the gateway. The steps of the deployment process can be seen in the right-hand side panel of Figure 12.
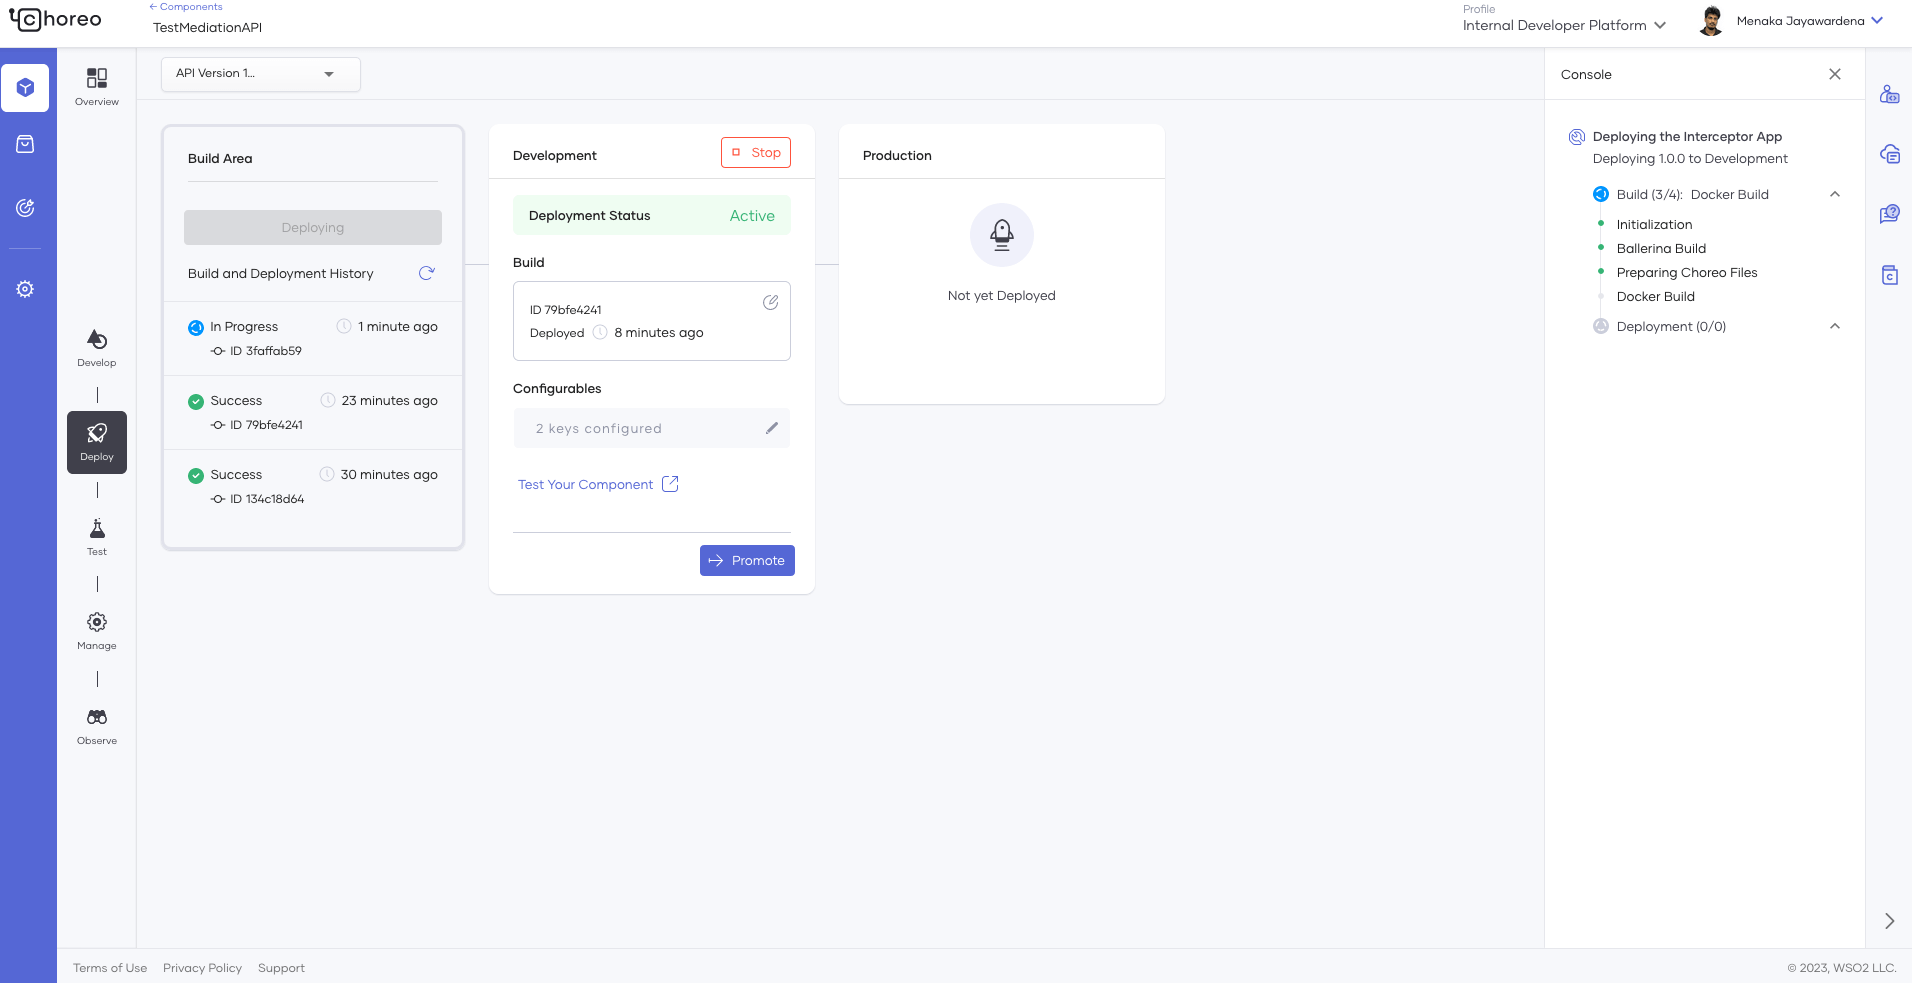
Figure 12: API deployment
API Invocation
Once the deployment is complete, you can go to the test section and invoke the API. When a request is made, it’ll pass through the gateway and the app as seen in Figure 13. Read on to see what happens.

Figure 13: API invocation
Request Flow
Once the request is received by the gateway, it is forwarded to the app. Then the mediation policies attached to the request flow are executed. Once the policies are successfully executed, the request is dispatched to the backed service.
Response Flow
In the response flow, the app receives the backend response. Then the mediation policies attached to the response flow are executed. Once the policies are successfully executed, the response is forwarded to the gateway, which then sends the response back to the client.
Fault Flow
If errors occur during the execution of the policies in request or response flows (i.e., if the policy function returns an error), the execution will halt, moving it into the fault flow. Then, if there are policies attached, those will be executed like the other flows (e.g., logging), and an error response will be sent to the client.
Implementing Custom Policies
If you can’t achieve your use case with built-in mediation policies, you can write a custom policy to do it. Technically, a policy is a package written in Ballerina. Thus, the transformation must be written in the Ballerina language. Then, it must be published to Ballerina Central before it can be attached to an API. These custom policies can be published either as public (available for all users within the organization) or private (only available for the user that developed it).
When authoring custom policies, we have published a policy template, where users can easily create a mediation policy project, implement the functionality, test, and publish the policy to Ballerina Central with ease.
Please follow the Create a policy guide for more information.
Conclusion
The ability to perform modifications to the request or response flows in API proxies is a vital requirement for many enterprise API management use cases. With the introduction of mediation policies in Choreo, users can now easily fulfill this requirement. Also, with the capability to implement custom policies, users receive greater control and more flexibility in implementing the mediation.
Find out more information about custom mediation by reviewing Choreo’s documentation. Sign up for Choreo for free today to try this out yourself!