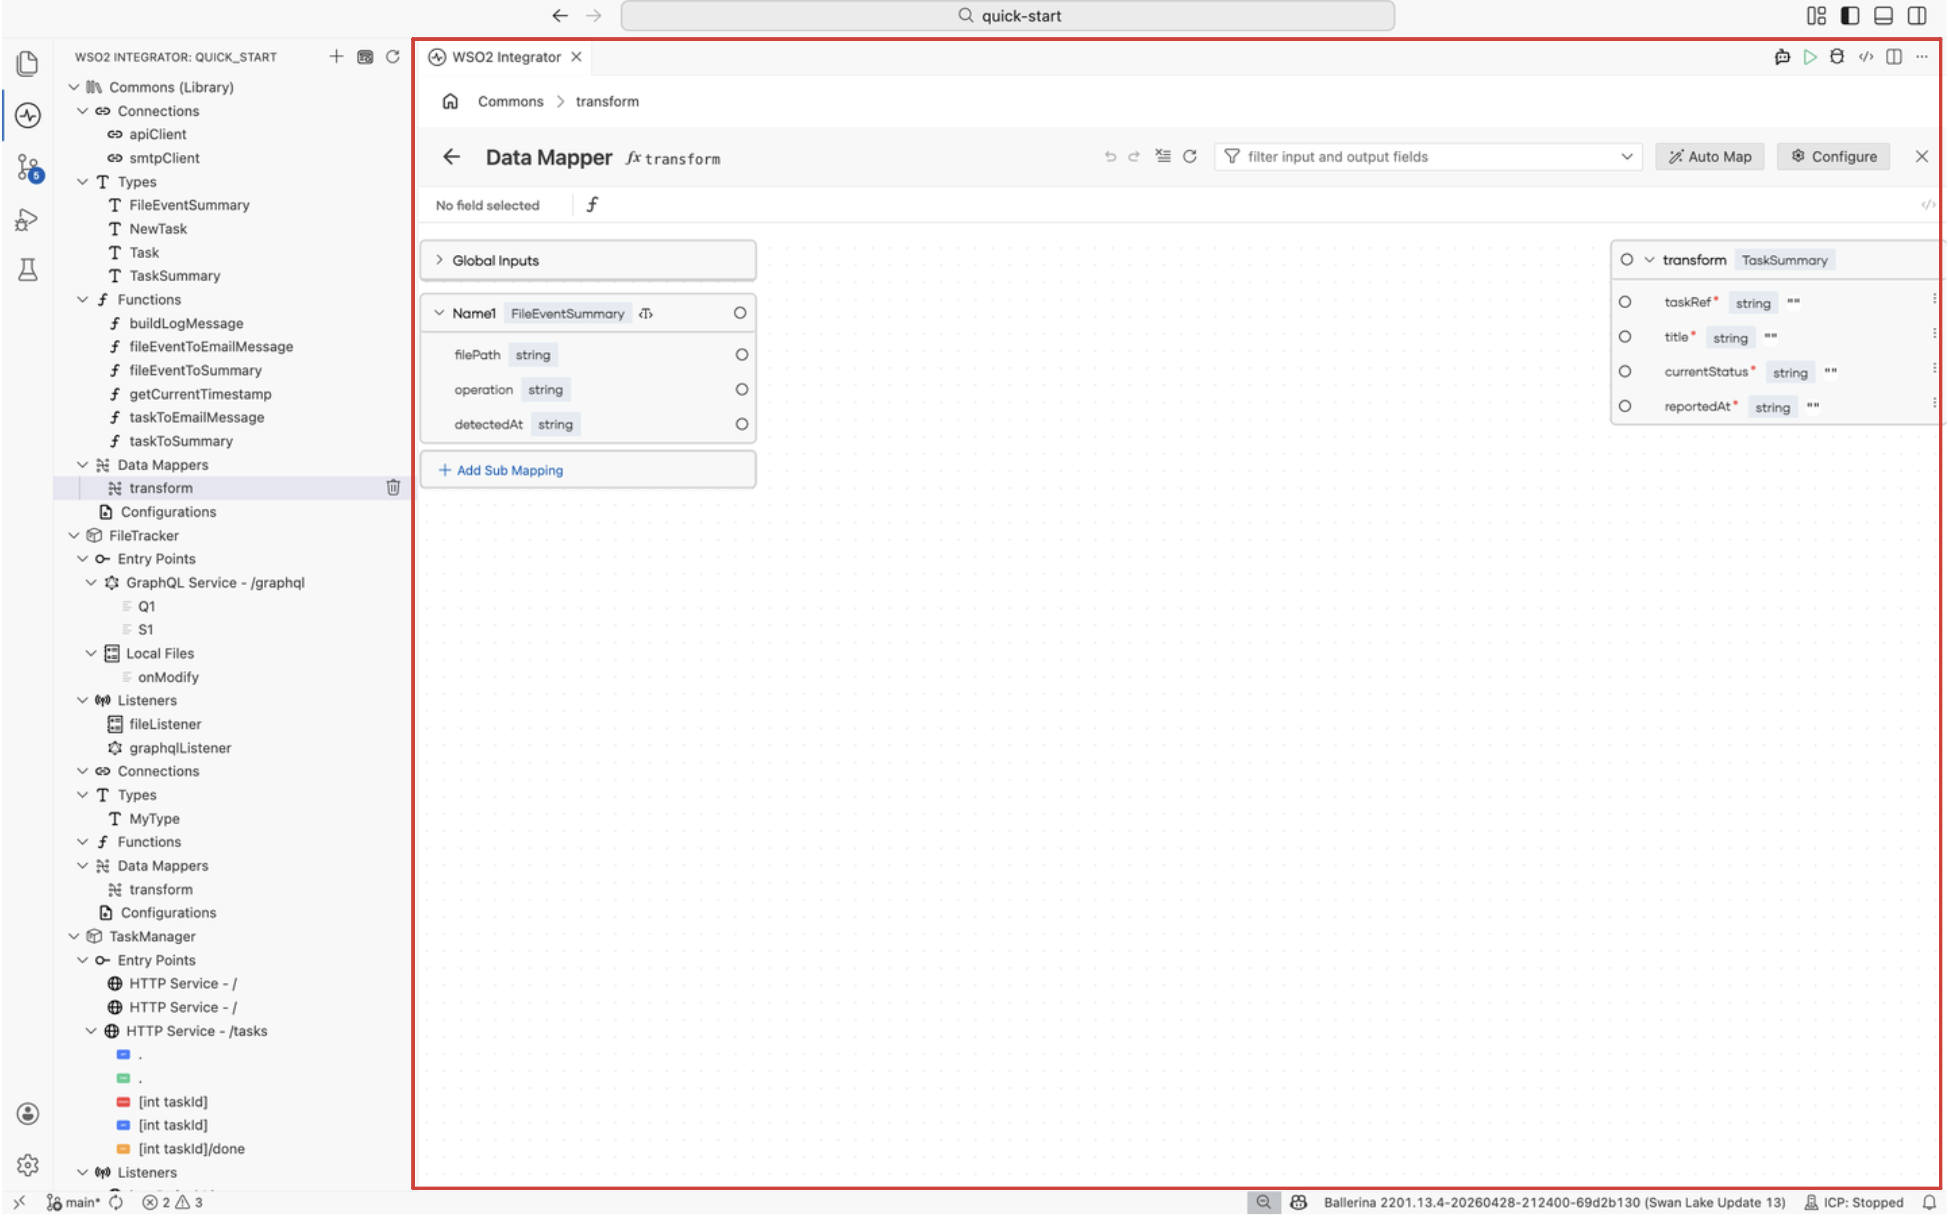
Data Mapper Editor
The Data Mapper editor is the visual surface you open for any data mapper in WSO2 Integrator. It shows the source types on the left, the target type on the right, and the mapping canvas between them, so you can wire fields by drawing links or filling expressions instead of hand-writing the conversion function. The data mapper itself is a typed function with one or more inputs and one output, and every change you make in the editor is reflected in the underlying function source.
For end-to-end usage, including how to create a data mapper, work with arrays and nested records, and apply transformations, see Data mapper.
Open the editor
Select a data mapper under Data Mappers in the project explorer, or select the data mapper node from a flow in the Flow Diagram editor. The editor opens with the data mapper's inputs on the left, the output on the right, and the mapping canvas between them.
To create a new data mapper before opening the editor, see Data mapper.
Header
The header runs along the top of the editor and combines the breadcrumb, the data mapper title, and the high-level actions.
| Control | Description |
|---|---|
| Breadcrumb | Shows the path from the parent artifact (for example, Commons > transform). Select a segment to return to it. |
| Back | Returns to the previous view, typically the Integrator view or the calling flow. |
| Title | Displays the fx icon followed by the data mapper name (for example, transform). |
| Undo / Redo | Reverses or reapplies recent mapping changes. |
| Collapse all | Collapses every input and output record so you see only the top-level fields. |
| Refresh | Reloads the editor to pick up changes made to the underlying types or inputs. |
| Filter input and output fields | Filters both panels to fields whose names match the search term, useful for large records. |
| Auto Map | Runs the automatic mapping action described below. |
| Configure | Opens the Configure editor for the data mapper. Use it to rename the data mapper, toggle Public, or change its inputs and output. |
| Close | Closes the data mapper and returns to the previous view. |
Selected field bar
Below the header, the editor shows a thin bar that reflects the field you are currently working with.
- No field selected appears when no link or output field is in focus.
- When you select an output field or an existing mapping, the bar shows the field path and offers an fx action to open the Expression editor inline, so you can write the value as a free-form expression.
- The
</>toggle on the right switches the editor between the visual mapping view and the source view, so you can inspect the generated Ballerina code without leaving the editor.
Inputs panel
The left side of the editor lists every input the data mapper receives. Each input appears as a collapsible card showing the parameter name and its type, with each field of the type rendered as a row inside the card. Drag a row into the mapping canvas, or onto an output field, to create a mapping.
Global Inputs
The Global Inputs section at the top of the panel exposes values that are reachable from any data mapper in the integration, such as configurable variables. Use this section when a target field should be filled from configuration rather than from the data mapper's parameters.
Sub Mappings
A sub mapping is a named intermediate value computed once inside the data mapper and reused across multiple output fields. Select + Add Sub Mapping at the bottom of the inputs panel to create one. A sub mapping behaves like an additional input row: give it a name and a type, fill in the expression that produces its value, and then drag it onto any output field that should use the computed value.
Use sub mappings to avoid repeating the same computation across many output fields, or to break a complex transformation into named steps.
Mapping canvas
The mapping canvas is the central area between the input and output panels. Lines drawn on the canvas represent field-to-field mappings.
- Draw a line by dragging from an input field's port to an output field's port. The editor generates the corresponding expression for that output field automatically.
- Select an existing line to highlight the source and target field, or to open the Expression editor for that mapping.
- When the input and output types do not match, the editor surfaces a diagnostic so you can fix the mismatch from the expression bar.
Output panel
The right side of the editor shows the data mapper's output type with each field rendered as a row. Every required field is marked with an asterisk (for example, taskRef*). Drop an input row or sub mapping onto an output row to map it, or select the output row to fill it through the expression bar.
Auto Map
Auto Map in the header attempts to wire every output field from the available inputs in one action. It matches fields by name and compatible type, and falls back to an AI-assisted suggestion when no exact match is found. Review the generated mappings on the canvas before saving, because Auto Map can produce best-effort suggestions that may need adjustment.
Configure
Configure in the header opens the data mapper's configuration in the Configure editor. Use it to rename the data mapper, toggle Public, or change the Inputs and Output (the same fields you set when you created the data mapper). Any change you make there is reflected in the mapping editor when you return.
What's next
- Data mapper: end-to-end guide to creating and using data mappers.
- Expression editor: write a custom expression for a single mapping.
- Configure editor: change the data mapper's inputs, output, or visibility.
- Type editor: define the record types the data mapper maps between.
- Flow Diagram editor: invoke the data mapper from a flow node.