Create A Data Service With The WSO2 Data Services Eclipse Plugin

- Saminda Wijeratne
- Senior Software Engineer - WSO2 Inc
Introduction
So you are thinking of creating a data service from the Eclipse plugin? Well its as easy as singing a lullaby (unless you have something against lullabies or babies naturally hate you – in which case luckily, as non of it has any relevance for data services). This tutorial is suitable for any user who has slight knowledge of what a service is and has worked with the new Data service solution.
A Background Check - Data Services Basics (just in case)
First, make sure you understand what a dataservice is. In simple terms, a data service is the exposure of data as a Web service. I‘m sure you know what data is or otherwise you wouldn‘t be reading this tutorial. But you might want to know the type of data is supported by this plugin. It supports 4 types of data that is commonly known to most users:
- Relational Databases
- Excel files
- CSV files
- and of course JNDI data sources.
Concept of Building a Data Service
-
We can have one or more of such data sources in a Web service. We just define those in our data service and viola!, your data service knows about the sources.
-
But still, a data service needs to know which data needs to be extracted from those sources. Or rather, what data should be retrieved, depending upon different conditions. Thus comes the concept of a query in a data service. You can have several different types of data retrieved from a single data source you defined. Which means you can have several queries for a single data source. Thus a query defines how to retrieve only the relevant data from a given data source. Sounds greek? Doesn‘t matter, wait until we actually start the tutorial.
-
So how does the user know, which method in a service needs to be invoked, in order to get data he/she wants? This is where “operations” come in to play. An operation in a data service, is what is exposed (or rather shown) to the end user. It is defined as what query to run when it is called, and what parameters user needs to provide for a successful execution of the query.
OK hope you‘re still with me on this. So the data service knows about the sources, and how to retreive relevant data. Non of these are important for the end user, as once the data service is deployed it will all happens behind the screen.
That's it. Now you know the basics, on how to build a data service. Let's try them using the plugin.
Pre-requisites
- You need Eclipse WTP 2.0 or later
- Download the plugin Data services plugin 1.0.1
- You can download the WSO2 Data Services solution from here.
-
Prerequisites for the tutorial
Tutorial uses MySQL 5.0 or later version database server
I'm using the popular MySQL sample database named sakila to create the data service. You may find downloadable scripts to create this database in mysql from here.
-
You can download the resulting sample data service for this tutorial from here.
Note:
Don't know how to setup the data services plugin?
Just copy the plugin jar file to the plugins folder of Eclipse. (Or in the case of Eclipse Ganymede, you can just copy it to the dropins folder instead, that is located in the same level as the plugins folder)
In this tutorial, I will demonstrate creating a Web service that exposes data stored in a relational database.
Creating a RDBMS Data Service
- First lets start the Eclipse WTP IDE. You may or may not have projects currently loaded on your workspace.
- To create a new data service:
- In the New Wizard dialog select WSO2 Data Services Creation Wizard and click Next. This will show the first page of the data services wizard.
- Select Create a new data service from scratch among the 3 options at the top.
- Then, we need to specify where we are going to deploy the data service. Currently, we have the options of deploying a data service in the data services solution or later versions of WSAS 2.3. If you want to deploy your data service on to a running instance of these servers accessible from your computer, then select the option Data service solution url for deploying the data service and specify the url (and port as shown in the example) to that server. The default port used for uploading a data service is port 9763, although in WSAS you could also use port 9762 also.
- If this is the first time you are deploying a data service to the server specified by the above URL, through the Eclipse plugin, in current workspace you need to set the trustore:
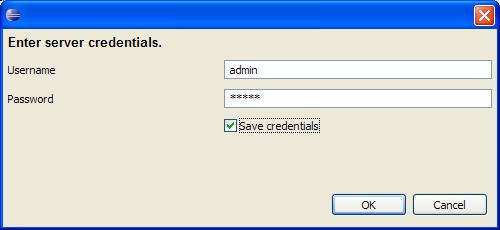
- So now, we need to provide the username and the password for the server we are intending to connect to. The plugin remembers the default username and password to access the server. In the event, the default credentials are no longer valid, you should click on Set Credentials and type in the correct username and password.
- Tick the Try it after deploying checkbox so that we can test the dataservice after it has been deployed to the server.
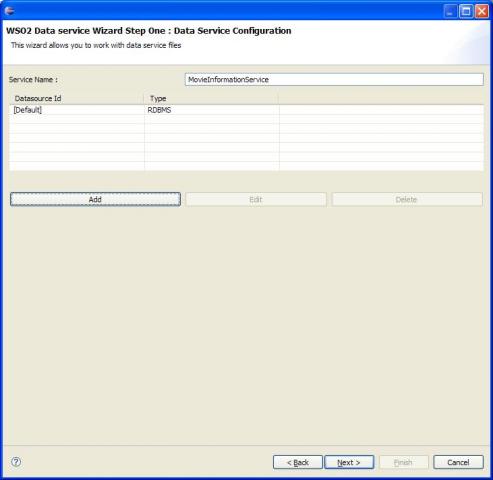
- Specify a valid service name in the Service Name text box. This name should comply any rules governing for creating service names.
- This version of the plugin supports multiple datasources. For this tutorial we will only add one datasource. Click Add to add a new datasource. By default the first datasource you add will have no name/id for it and thus will be called [Default] for the purpose of addressing it.
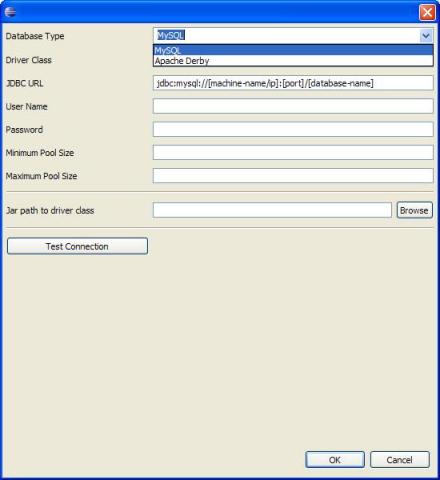
- We are going to create a mysql datasource for our dataservice. So select MySQL from the Database Type combo box.
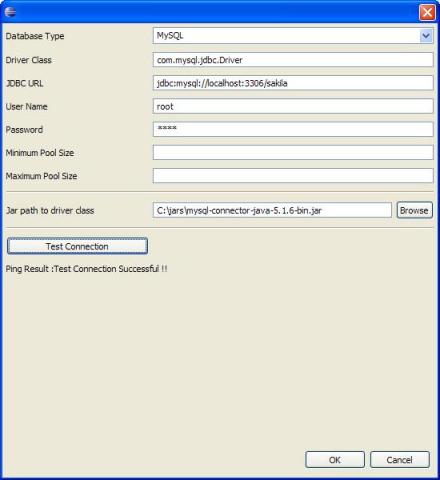
- Type in the information required to connect with the mysql database server
- After specifying the relevant details for the database connection you can click Test Connection button to test the entered details. The success and the failure of the test will be indicated right underneath the Test Connection button. If the test connection fails the message should indicate what might be wrong.
- Click OK to add the RDBMS datasource we just defined to the dataservice.
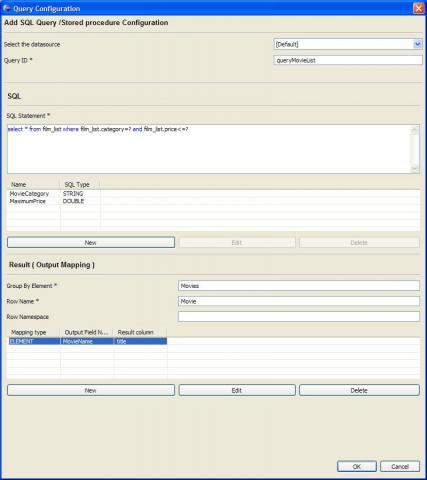
- Click Add New Query and the new query dialog will appear.
- Select [Default] from list of datasources we created.
- Specify a name for this query in the Query ID text box.
- Type the following in SQL Statement text box.
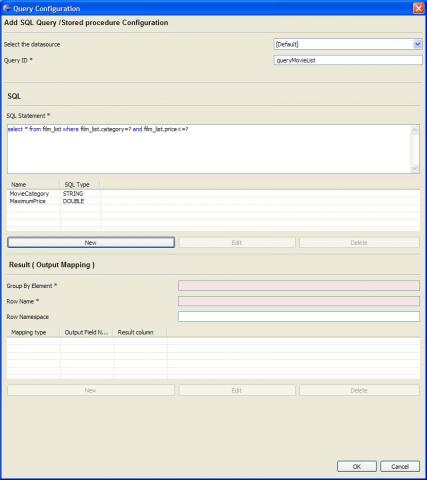
- Since the sql query we typed has two parameters which needs to be satisfied by the user, lets add 2 input mappings. Click New button to add input mappings to the query.
- Specify the Group By Element as "Movies" and Row Name as Movie.
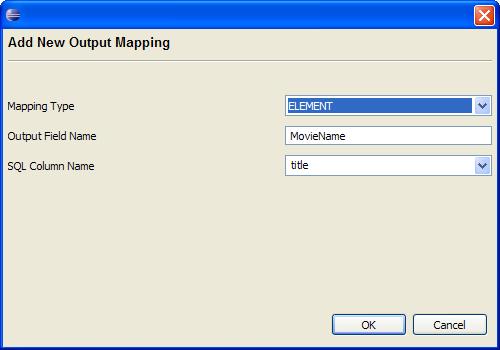
- Now we will map the output data to xml elements or attributes etc. For that click on New button on Result (Output Mapping).
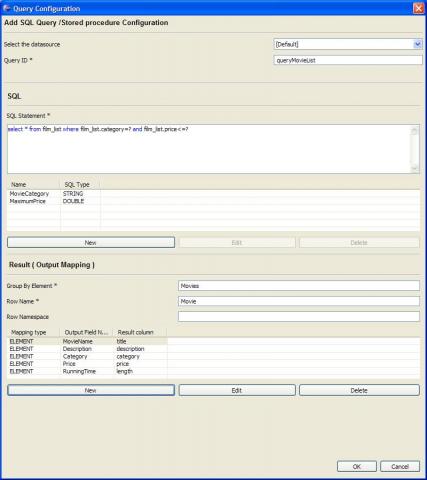
- Likewise lets add more output mappings to our query as the following table.
- Click OK to add the query to the dataservice.
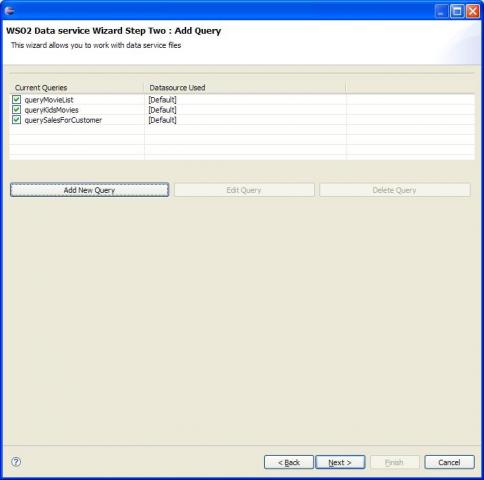
- Lets add 2 more queries to our dataservice. Follow the details on the table given below.
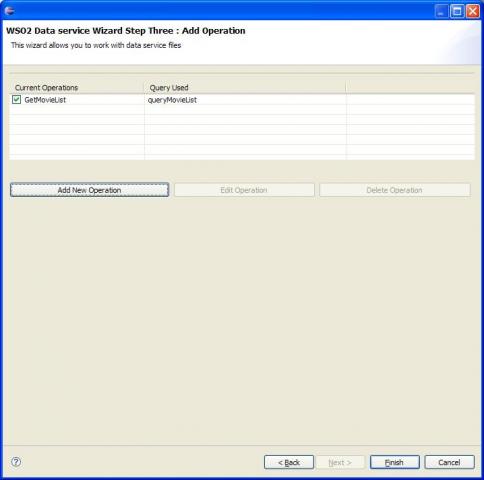
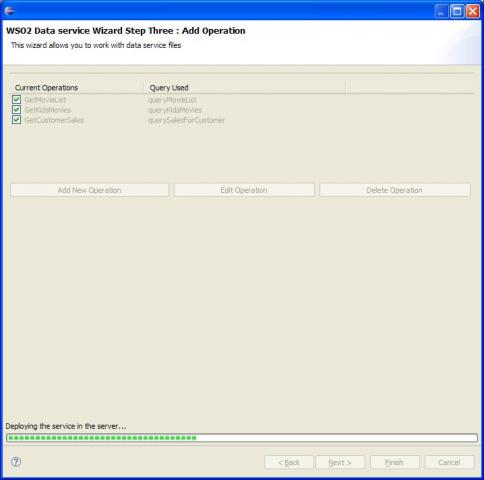
- Click Add New Operation to add operations
- Set the Operation Name as "GetMovieList" and set Operation Parameters.
- Click OK to add the operation to the dataservice.
- Lets add 2 more operations to the dataservice
- These added operations are what the end user sees.
- Click Finish to deploy the web service. If all goes well a success message will appear.
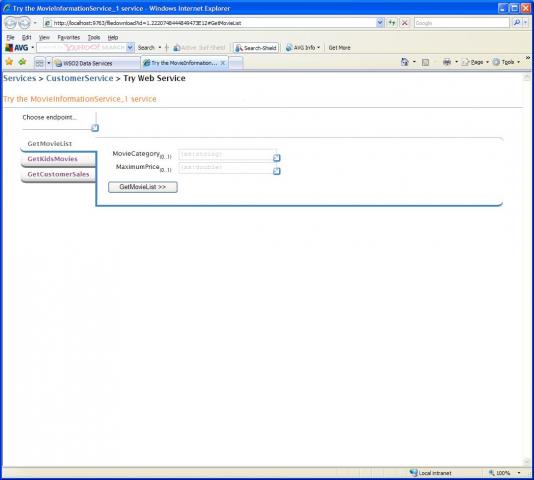
- If the data service was successfully deployed, the default Web browser will be launched with the try it page for the particular Web service.
- Specify relevant parameters and click on relevant buttons to test the service.

Press Ctrl + N
or
File → New → Other…
This will show the new dialog box


This page determines what you want to do. i.e. Create or modify or just deploy a dataservice. In our case we will be creating a dataservice now.


Click on Set truststore to specify the new truststore file.
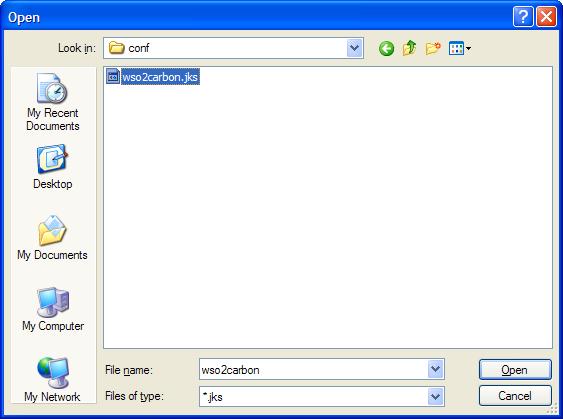
This file is located with the binary of the WSO2 Data Services solution server itself, under the conf directory. In the current version of the plugin, it is required to provide the path to this file. Truststore files belonging to different server versions may not work for other servers. This will help identify the server as a valid server.
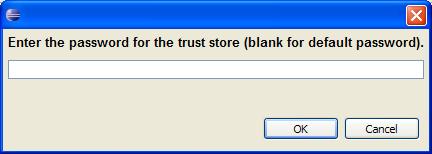
After selecting a valid trustore, the wizard will ask for a password. If you leave the password textbox empty and select OK, the default password for the carbon truststore (which is "wso2carbon") will be used. In the event the password for the truststore is different from the default password, please type in the correct password.
Note:
The plugin remembers the most recently typed in values set in the truststore within a workspace. Therefore, the next time you use the wizard to connect to the same server, you need not set truststore again.
Note:
The WSO2 Data Services solution is shipped with a default user account with the following credentials:
user name : admin
password : admin
If you select the Save credentials check box, the plugin will remember the credentials entered for this workspace and will use it for whatever the server url you have specified. If you change the server url and change the credentials with the Save credentials check box selected then the credentials of the earlier server URL will be overwritten.

Note:
Try it will only work if the dataservice was successfully deployed on the server and that the server manages to publish the service without any errors.
If all the information required has being gathered the Next button in the wizard will be enabled. Click next to start adding datasources.
Step 1 - Adding Data Sources
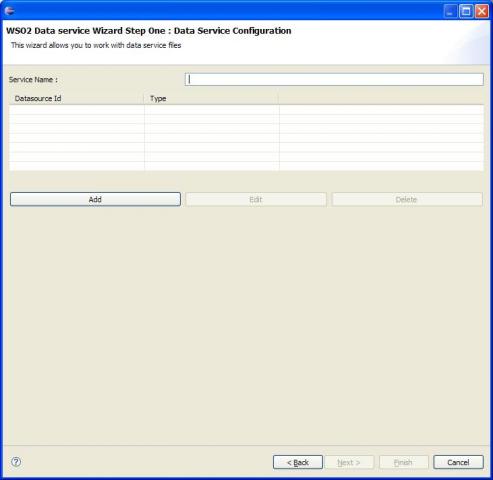
The 2nd page of the wizard is where we actually start building our data service.


From the datasource type dialog that popped up select RDBMS and click OK.
Note
Eventhough it is not required the plugin can test the connection with the database server you type in with the relevant details. But the plugin also requires the required database driver classes being present in the library path. If it is not present an annoying message such as the following screen shot may be shown to you.

And you will see just above the Test Connection button you can specify where the driver class is located. If you dont already have it for mysql you can download it from here.
i.e.
valid JDBC URL (If you've forgotten this is in the format jdbc:mysql://[machine-name or ip]:[port]/[database-name])
User Name and Password
Note:
The test connection need not be success since the connection information may be available at the deployed server only. Thus it may not work in your computer but will work in the server with no problems.
We have now completed the first step of defining datasources. If you want to change a defined datasource just select it from the table and click edit to change its parameters.
Step 2 - Adding Queries

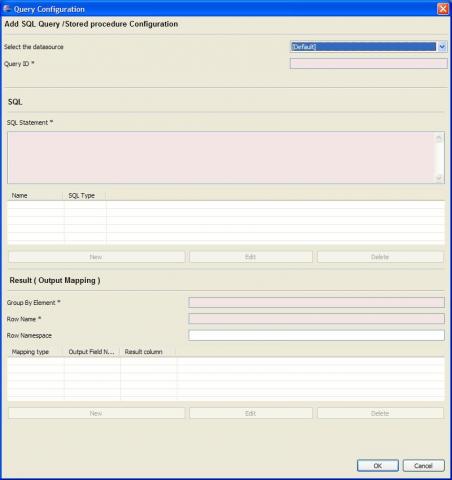
select * from film_list where film_list.category = ? and film_list.price <= ?
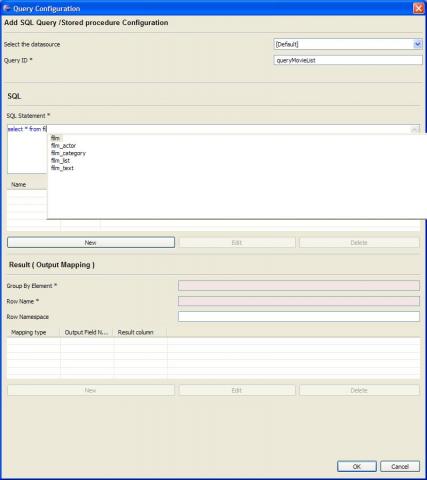
Press Ctrl + <Space> to get a popup list of tables available for the query. This list will only appear if the test connection was successfull for the datasource we are using. You can just select from the list to insert the table name in the query. Try pressing a "." after a table name, it will popup a list of columns available for that table.
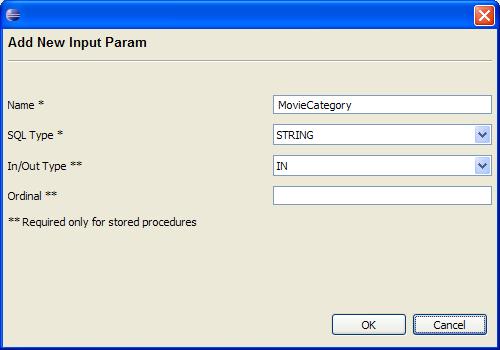
Type "MovieCategory" as its Name, "STRING" as SQL Type and click OK. Create another input mapping in the same way as above and put Name as "MaximumPrice", SQL Type as "DOUBLE". Then altogether you now have 2 input mappings.
Specify the values of the fields as above and click OK.
| Mapping Type |
Output Field Name |
SQL Column Name |
| ELEMENT | Description | description |
| ELEMENT | Category | category |
| ELEMENT | Price | price |
| ELEMENT | RunningTime | length |
Now the query dialog will look like the following
| Query ID | queryKidsMovies | |||||||||||||
| SQL | select * from film_list where rating='G' or rating='R' | |||||||||||||
| Group By Element | ChildrenMovies | |||||||||||||
| Row Name | Movies | |||||||||||||
| Output Mappings |
|
|||||||||||||
| Query ID | querySalesForCustomer | |||||||||||||
| SQL | SELECT concat(c.first_name , " ", c.last_name) as name, sum(amount) as amount FROM (select customer_id, amount from payment where payment_date>=? and payment_date<?) as p left join (select customer_id, first_name, last_name from customer) as c on p.customer_id=c.customer_id group by p.customer_id; | |||||||||||||
| Input Mappings |
|
|||||||||||||
| Group By Element | Customers | |||||||||||||
| Row Name | Customer | |||||||||||||
| Output Mappings |
|
|||||||||||||
All 3 queries are now added to the dataservice.
Step 3 - Adding Operations

 .
.

| Operation Name | GetKidsMovies | |
| Query | queryKidsMovies | |
| Operation Name | GetCustomerSales | |||||
| Query | querySalesForCustomer | |||||
| Parameters |
|
|||||


Summary
In this tutorial, I specifically focused on creating a data service using a RDBMS data source. Upon completing this tutorial, you should have gained some experience on vital components and developed a deeper understanding of WSO2 Data Services. Use of other types of data sources would be similar.
Author
Saminda Wijeratne, Software Engineer, WSO2 Inc., [email protected]
About Author
- Saminda Wijeratne
- Senior Software Engineer
- WSO2 Inc