How to Live Edit Your Axis2 Web Service Using Eclipse

- Saminda Wijeratne
- Senior Software Engineer - WSO2 Inc
If you are experiencing one or more of the following scenarios then this tutorial is for you:
- May be you are a person who create your Web service as it goes alone.
- Or you want to create a prototype Web service and want to try trial and error while developing it.
- Or you are fixing multiple issues in your Web service and you don't want to wait until all the issues are fixed to see whether they are really fixed.
In all the above scenarios there's a lot of time being wasted in undeploying the old Web service and redeploying the new version to see whether changes has taken effect as you had expected. This tutorial helps you to quickly edit a Web service which is already being published and within seconds you will be able to see those changes getting applied to the published Web service.
How to Live Edit Your Apache Axis2 Web Service
Web services have become mainstream and many create and consume Web services for their day to day operations. Changing the source code often forces you to undeploy and redeploy your Web service until you achieve the reasonably good Web service you are looking for. This is going to consume lot of time. This tutorial teaches you how to live edit a Web service when you have to deploy and undeploy the Web service each time.
Introduction
One of the best features in Apache Axis2 is the hot update feature. With that you can just drop a new version of your compiled class into an already published service directory and the Apache Axis2 engine will sense it and will redeploy the service with the new resources. This feature in Apache Axis2 has helped us to introduce you to to a tool in which you can edit a Web service which is already been published and within seconds you will be able to see your changes getting applied to the published Web service. This will be very helpful when fixing issues and verifying the fixes.
Couple of steps to start with:
- Setting up the environment
- Set the hot update to true in axis2.xml
- Set the eclipse setting to build the project automatically
Even though it has 3 steps, its step 2 and 3 that matters in setting up live editing your Web service. First step is to just create a Web service to demonstrate live editing.
Prerequisites
| 3.4 or higher | |
| Java | 1.5 or higher |
| WSO2 Web Services Application Server | 3.1.x |
| Eclipse Features |
Note: Visit the resources section of this tutorial to find out from where to download the prerequisites or click the above links.
You may download the resources for this tutorial from the resources section.
If you have the done this tutorial in creating Web services you can use the same workspace and skip the step 1.
Step 1 - Setting up the environment
Create a Web service using the following instructions
- Create a Dynamic web project having the WSAS facets enabled.
- Add a Java class which you want to expose and debug as a Web service
- Publish it as a Web service
(try this tutorial on more instructions on how to follow above instructions)
Step 2 - Enable Hot Update
Traverse to the directory/folder which WSAS binary distribution resides. Open the "conf" folder and locate the "axis2.xml" file.

Open the axis2.xml file from your favourite text editor. You will notice an xml tag (parameter) having the value of the attribute "name" as "hotupdate". Change the value of that xml tag as "true as shown in the screen shot" and save the file.

Step 3 - Set eclipse to build its projects automatically
Go to Projects menu and see whether the "Build Automatically" menu item is ticked/checked. If not please click on the menu item so that it is ticked/checked. Start/Restart the WSO2 Web Services Application Server (WSO2 WSAS).

That's it. Just continue changing the source code as you wish. When you save the changes by clicking the "Save" in the menu or tool bar or by just simply pressing "Ctrl + S", your published Web service will be automatically updated with your newly compiled code.
Eg:
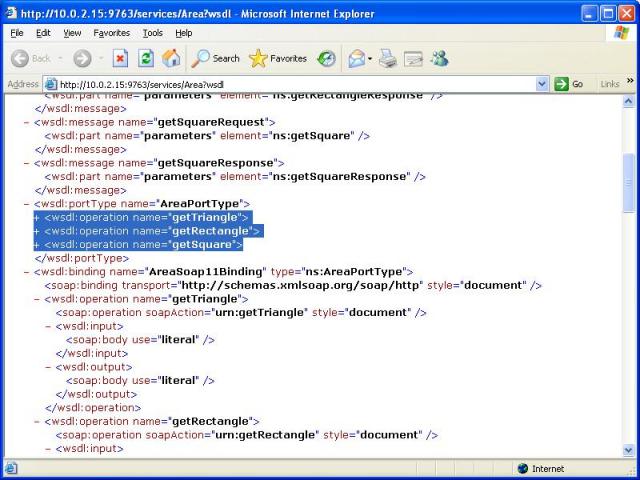
Before making any changes observe the WSDL of the Area Web service. It contains only 3 operations.
- getTriangle
- getRectangle
- getSquare
I want this Web service to be able to calculate the area of a circle also. So I add the following method to the Area class in my eclipse workspace.
    public double getCircle(double radius){
        double area=Math.PI*radius*radius;
        return area;
} 
And then I press Ctrl + S to save the changes made to the class. Give it a couple of seconds and look at the WSDL of the Area Web service. Now it contains 4 operations.
- getTriangle
- getCircle
- getRectangle
- getSquare

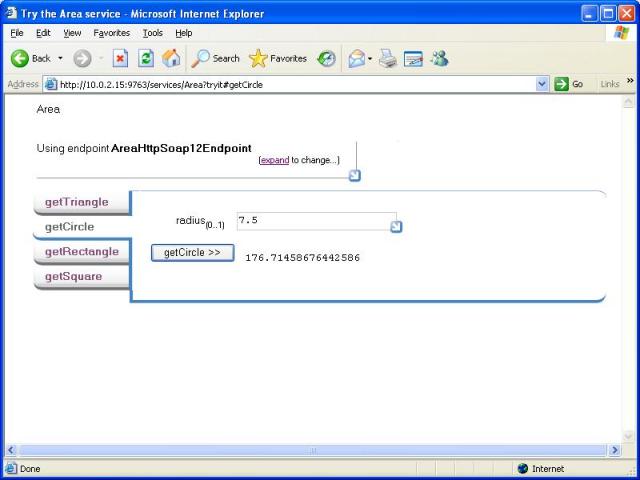
The changes were applied to the Web service and the WSAS published the new version of the Web service. Try using the "Try it" and verify your changes
Resources
- To download WSO2 Web Services Application Server (WSO2 WSAS) please visit https://wso2.org/projects/wsas/java
- To download WSO2 Web Services Application Server (WSO2 WSAS) Tools please visit https://wso2.org/projects/tools/ or use the update site URL https://tools.wso2.org/eclipse
Summary
In summary, I believe that now you know how you can try your Web service while creating it or create your Web service while using it.
Author
Saminda Wijeratne, Senior Software Engineer, WSO2, [email protected]
About Author
- Saminda Wijeratne
- Senior Software Engineer
- WSO2 Inc