Developing Low-Code Integrations with Choreo

- Rukshan Chathuranga
- Technical Lead, WSO2

Photo by
href="https://unsplash.com/@sloppyperfectionist?utm_source=unsplash&utm_medium=referral&utm_content=creditCopyText">Hans-Peter
Gauster on
href="https://unsplash.com/photos/3y1zF4hIPCg?utm_source=unsplash&utm_medium=referral&utm_content=creditCopyText">Unsplash
Introduction
The software development landscape today is full of various technologies and message formats that make up applications and systems. These can range from older legacy systems to newer, more modern applications. Because of this, the environment can be complex and challenging for integration developers. Enterprise integrations offer a solution by providing unified connectivity between these different components. However, integration developers still face many obstacles in this environment, such as data transformation, communication protocol variations, and support for both proprietary and standard message formats.
Low-code editors have changed the game in software development. One of their main advantages is that they can efficiently solve integration problems. They come with pre-built integrations and connectors for commonly used services and tools like databases, APIs, and other software systems. These integrations are made to work perfectly with the low-code editor, so users can easily connect their application to these services without needing to write any code. Low-code editors provide powerful tools for creating custom integrations, including a graphical flow editor and visual data mapping and transformation tools. WSO2 Integration Studio is a low-code editor that simplifies integration development by supporting a wide range of integration patterns and technologies. This allows developers to focus on designing and building complex integrations visually.
WSO2 Integration Studio has an XML-based domain-specific language (DSL) that makes it easy for developers to define different components and interactions between systems. Integration projects developed using WSO2 Integration Studio can be deployed and managed on Choreo by pushing the project code into a Github repository. This offers several benefits to organizations, such as improved API management capabilities, making it easier to create, deploy, and manage APIs, resulting in better integration with external systems and services. Choreo provides real-time monitoring and management of integrations, allowing organizations to quickly identify and resolve any issues, which improves the reliability of their integrations. The platform also supports integration with multiple cloud providers, including Amazon Web Services (AWS), Microsoft Azure, and Google Cloud Platform (GCP), allowing organizations to integrate their systems and services, no matter their underlying infrastructure.
How Choreo Simplifies the Deployment and Management of WSO2 Integration Studio-Developed Integrations
Choreo makes it easy for developers to deploy and manage their integrations on any cloud with just one click. The platform provides a streamlined, automated process for deploying and managing integrations in clouds, so developers can concentrate on coding and delivering business value, rather than handling infrastructure. The "one-click" feature of Choreo refers to the ease and simplicity of deployment. It gets rid of manual steps and reduces the time and effort required to deploy integrations.
Choreo also offers release management for applications deployed in multiple environments, including development, testing, staging, and production. This feature allows for consistent and efficient management of application releases across all environments. Developers can automate the deployment of new releases to ensure that the same version of the application is deployed consistently across all environments. This helps reduce the risk of errors and minimizes the time needed for release management. The solution provides a centralized view of all deployments, making it easy to track and manage releases across multiple environments. This helps organizations maintain a consistent release process and avoid errors in deployment.
Choreo offers API Management capabilities that provide extra protection and quality of service for WSO2 Micro Integrator-based integrations. REST API integrations based on WSO2 Micro Integrator can be linked to a managed API to provide additional security, rate limiting, and API discovery. Furthermore, the platform provides real-time business insights for APIs.
WSO2 Integration studio can be used to develop the following integration types:
- Integration-as-an API
- Event-Triggered Integration
- Scheduled Integration (coming soon)
- Manually-Triggered Integration (coming soon)

Figure 1: Integration types in Choreo
How to Develop and Manage Integrations on Choreo
Getting Started with WSO2 Integration Studio: Building a Content-Based Router Use Case
If you are new to WSO2 Integration Studio, the first thing you need to do is download and install it. Afterwards, you can start creating a new integration project. The platform provides several sample projects to help you get started. In this article, we will focus on developing a content-based router use case. The use case involves a news service that routes user requests to the appropriate destination based on the user's payload. Users can request either general news or sports news in a specific format. Our objective is to build an integration that can handle these requests and route them to the correct destination.
To begin with the content-based router use case, we must first define the input payload format. Users will send a request in the following format:
|
Defining the input format is an important step in building any integration, as it helps ensure that the data being processed is consistent and can be properly routed and transformed. In this case, the "type" parameter is used to determine which news service should handle the user's request. By defining this parameter in the input format, we can easily create a content-based router that can direct requests to the appropriate destination.
The first step in building the content-based router use case with WSO2 Integration Studio is to define the input payload format. The "type" parameter indicates whether the user is requesting general news or sports news. Once the input format is defined, we can create a new Integration Project in WSO2 Integration Studio and add a new REST API called "NewsAPI". We will add a switch mediator to the /newsapi resource to handle the user's request. The switch mediator will check the value of the "type" parameter and route the request to the appropriate destination. If the value is "news", the request will be sent to a general news service. If the value is "sports", the request will be sent to a sports news service.
After adding the switch mediator to handle the user's request, we need to add endpoints for the general and sports news services to complete the integration. This can be done by adding two endpoints to the send mediator: one for the general news service and another for the sports news service. With these endpoints added, we can test the integration by sending a request in the defined format. WSO2 Integration Studio will route the request to the appropriate service based on the value of the "type" parameter, either to the general news service or the sports news service. Once the integration is successfully tested, the REST API design will be complete.
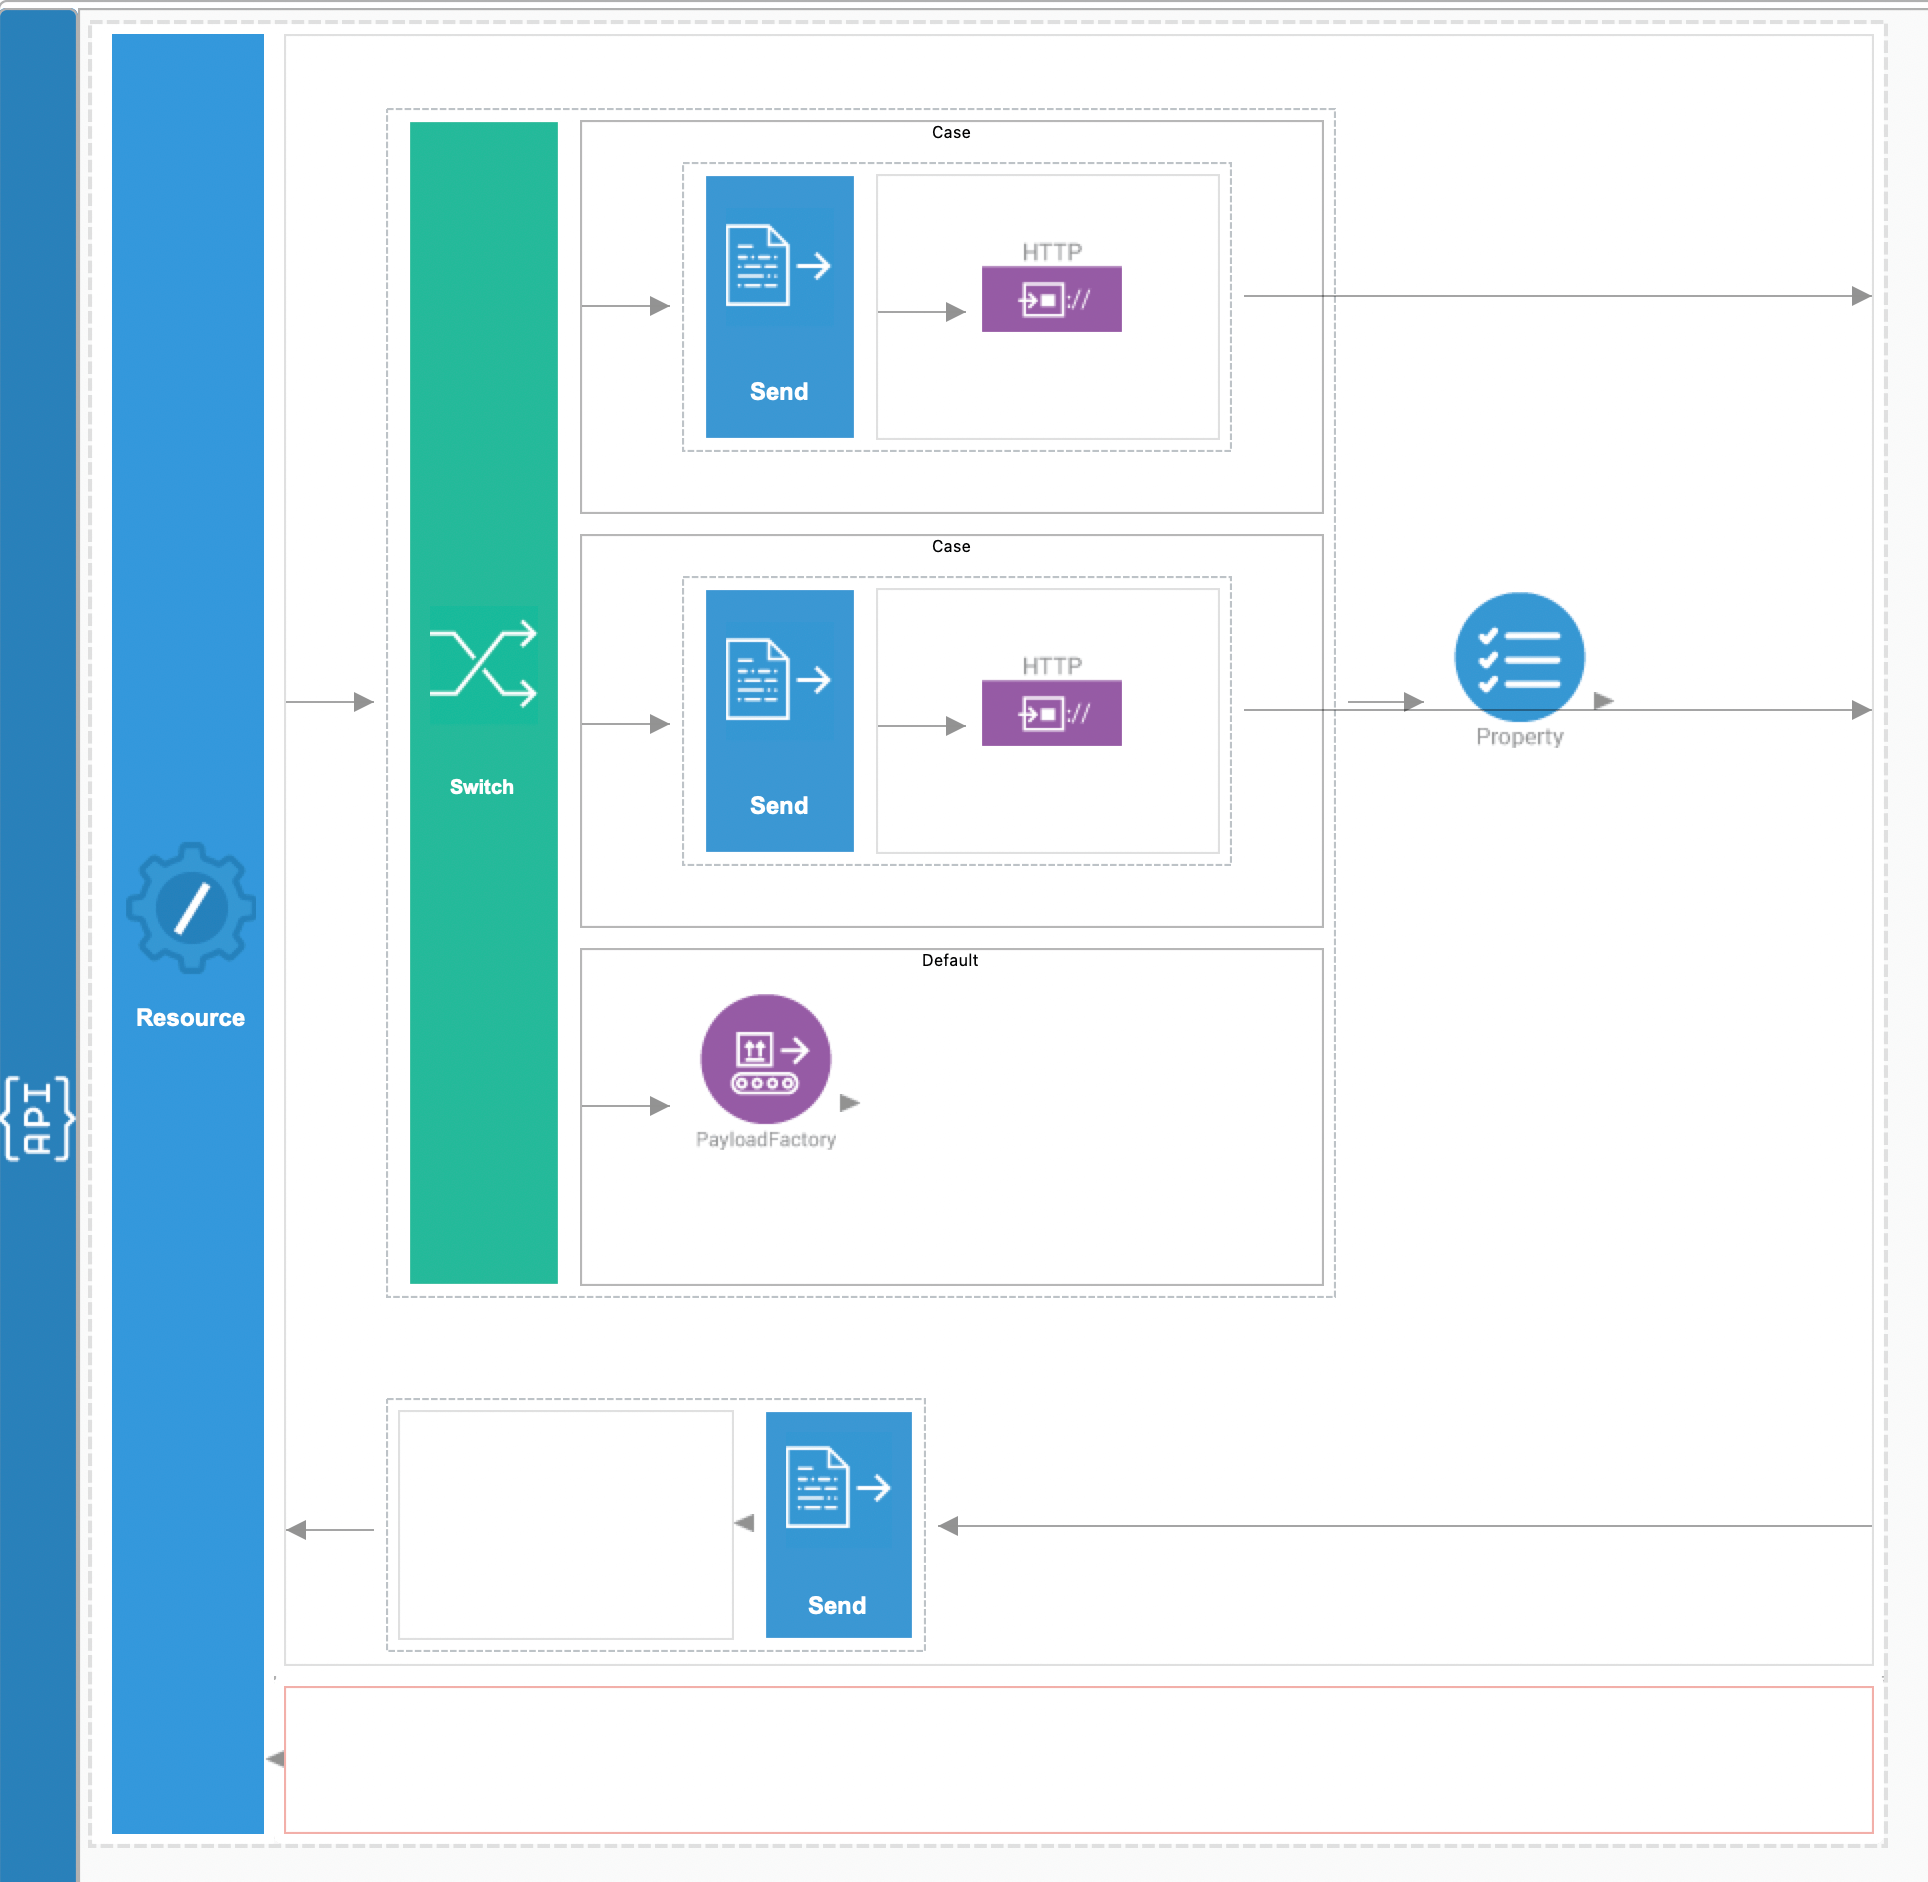
Figure 2: Design view of the REST API
Its source view will look as follows.
 <?xml version="1.0" encoding="UTF-8"?>
    <api context="/newsapi" name="NewsAPI" xmlns="http://ws.apache.org/ns/synapse">
        <resource methods="POST">
            <inSequence>
                <switch source="//type">
                    <case regex="sports">
                        <send>
                            <endpoint>
                                <http method="get" uri-template="https://feeds.bbci.co.uk/sport/rss.xml">
                                    <suspendOnFailure>
                                        <initialDuration>-1</initialDuration>
                                        <progressionFactor>1</progressionFactor>
                                    </suspendOnFailure>
                                    <markForSuspension>
                                        <retriesBeforeSuspension>0</retriesBeforeSuspension>
                                    </markForSuspension>
                                </http>
                            </endpoint>
                        </send>
                    </case>
                    <case regex="news">
                        <send>
                            <endpoint>
                                <http method="get" uri-template="https://rss.nytimes.com/services/xml/rss/nyt/HomePage.xml">
                                    <suspendOnFailure>
                                        <initialDuration>-1</initialDuration>
                                        <progressionFactor>1</progressionFactor>
                                    </suspendOnFailure>
                                    <markForSuspension>
                                        <retriesBeforeSuspension>0</retriesBeforeSuspension>
                                    </markForSuspension>
                                </http>
                            </endpoint>
                        </send>
                    </case>
                    <default>
                        <payloadFactory media-type="json">
                            <format>
                                {"message":"Unsuccessful request"}
                            </format>
                            <args/>
                        </payloadFactory>
                    </default>
                </switch>
                <property name="messageType" scope="axis2" type="STRING" value="application/json"/>
            </inSequence>
            <outSequence>
                <send/>
            </outSequence>
            <faultSequence/>
        </resource>
 </api>
Once you have completed the development and testing of your integration scenario using WSO2 Integration Studio, you can commit the integration project to your GitHub repository for version control and collaboration purposes. Additionally, if you want to share your integration scenario with other developers, you can use the examples repository, which contains a variety of sample integration scenarios, including the content-based router use case we discussed earlier. You can then import the example into Choreo and modify it as needed to meet your specific integration requirements. This can save you time and effort, as you can start with a pre-built integration scenario and customize it to suit your needs, rather than building an integration scenario from scratch.
Bring the Integration Project to Choreo
If you have an Integration project in your repository, you can select the Integration as an API component in Choreo. Then provide basic details about your component such as a name and a description. For example we used a sample available in choreo-examples repo as illustrated below.
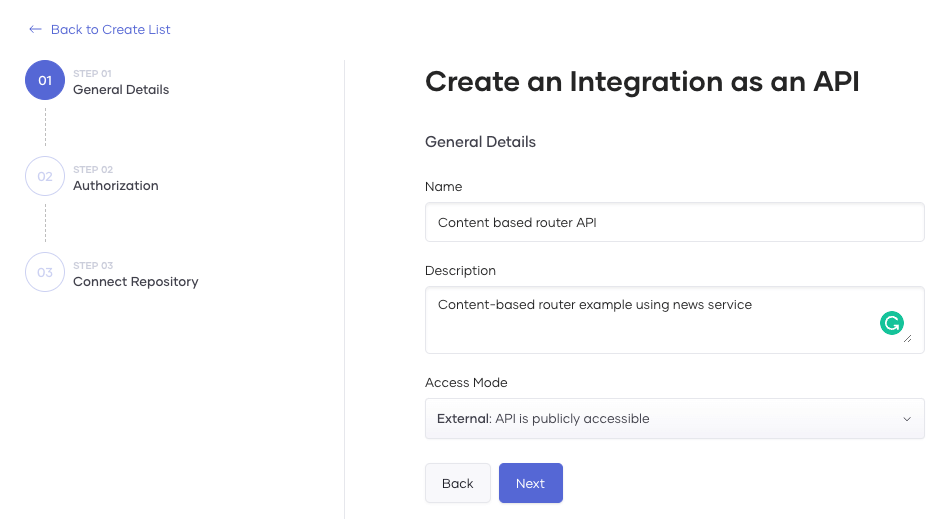
Figure 3: General details of the Integration as an API component
After granting authorization to access the source repository, you can provide the repository's name and branch, and choose WSO2 Micro Integrator's build preset in Choreo. Additionally, you can input details related to your integration, such as the Integration project root path and an OAS definition file path (if needed) to supply the Swagger test console with examples.
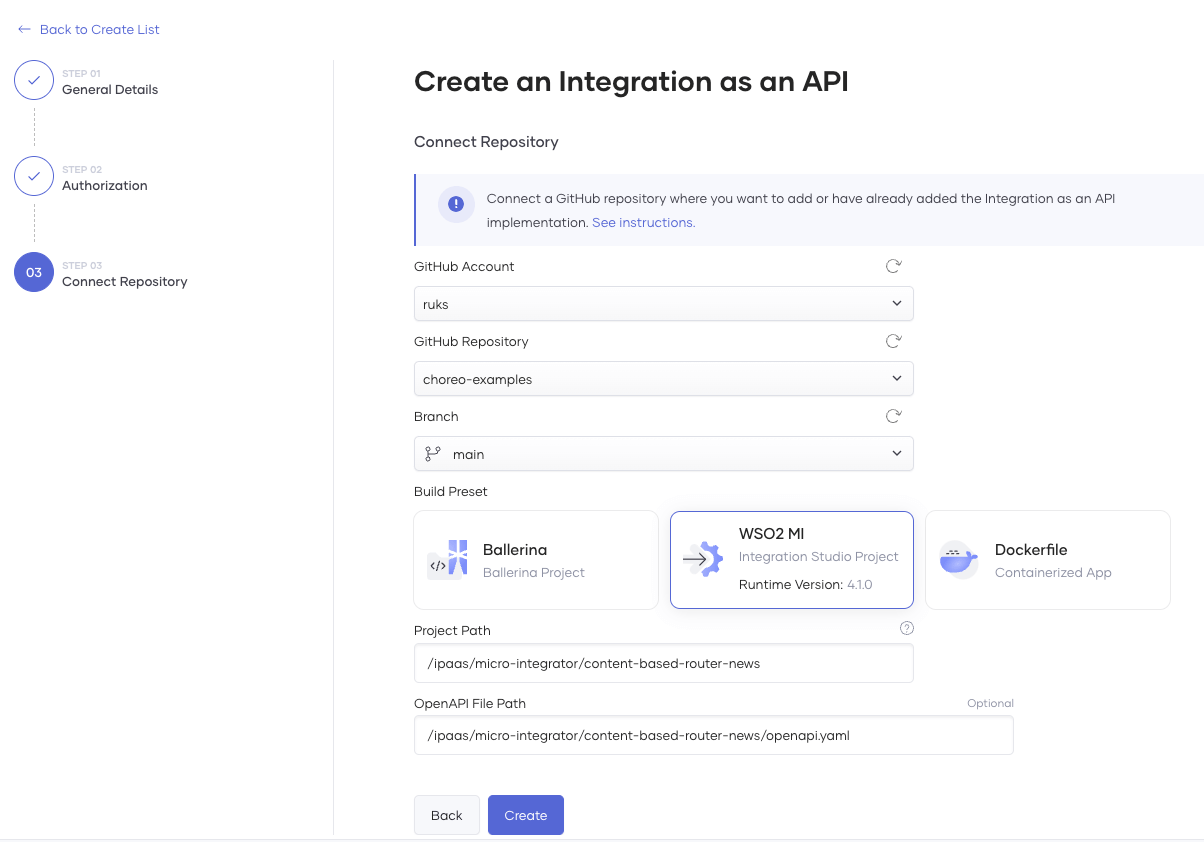
Figure 4: WSO2 Micro Integrator preset related configurations
After building your component in Choreo, you can deploy it to different environments like Development and Production. To do this, click the "Deploy Manually" button in the build area card, and select the environment you want to deploy it to. Once deployed, you can test your component and make any necessary adjustments before deploying it to the Production Environment. This ensures that your integration solution is thoroughly tested and working correctly before being released to production.
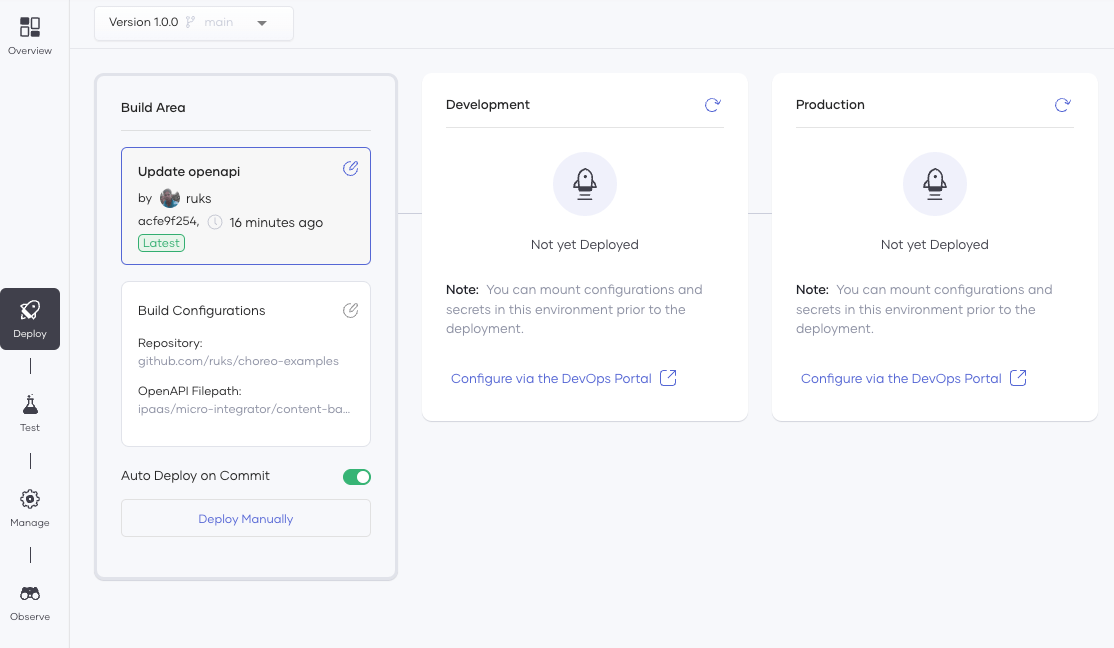
Figure 5: Deploy page of the created component
Once the deployment is successful, the status of the Development environment will be updated to reflect the latest changes.
src="https://wso2.cachefly.net/wso2/sites/all/2023/images/component-status-after-deploying-to-the-development-environment-six-1.png" />
Figure 6: Component status after deploying to the Development environment
In the Test tab of Choreo, you can test your Micro Integrator-based integration using various testing options available. One such option is the integrated Swagger console, which enables you to test and validate your APIs using sample requests and responses. You can also generate cURL commands to test your APIs from the command line or use tools like Postman.

Figure 7: Swagger test console for testing
After successful testing of your Integration component in Choreo, the next step is to configure additional API management capabilities. In the Manage tab of Choreo, you can access various tools and options to manage the lifecycle of your component. This includes documentation, rate limiting policies, and other features to optimize its use. By utilizing these capabilities, you can ensure that your component is well-documented and designed for efficient use.
Once you have completed testing and configuration of your Integration component, and are ready to make it available to external users, you can change its lifecycle state from "Created" to "Published" within the Choreo platform. This is a crucial step in making your component accessible to a wider audience.
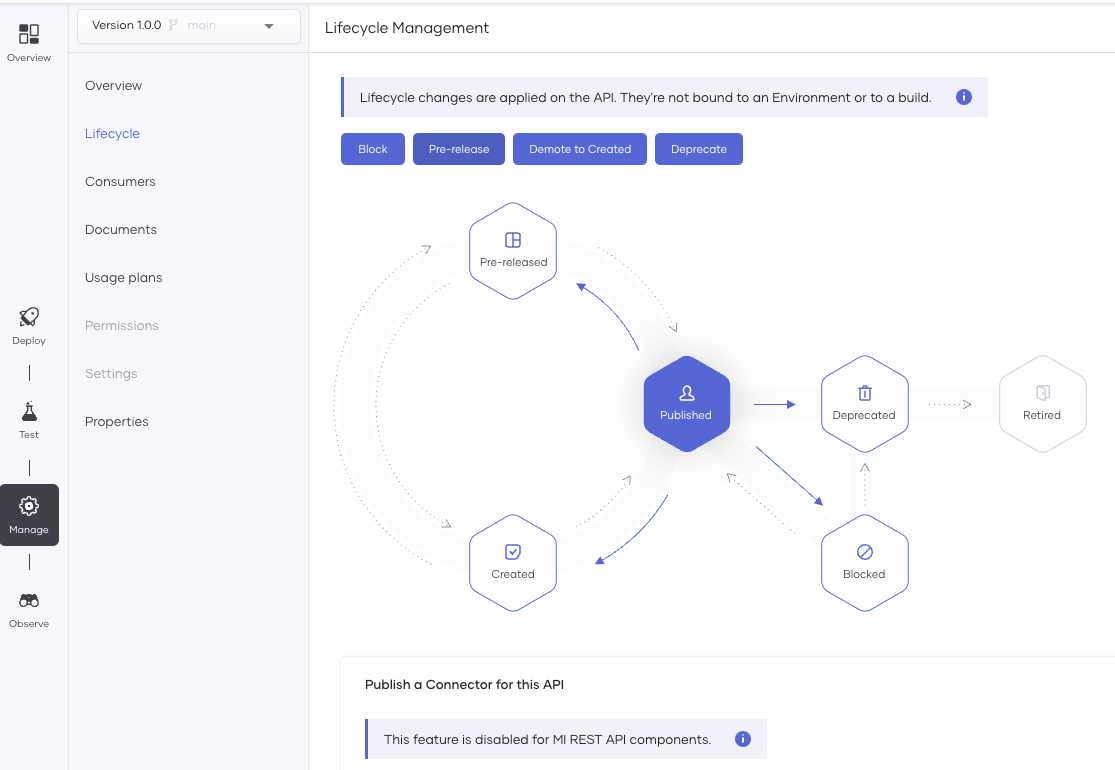
Figure 8: Component lifecycle
Monitoring is a crucial aspect of integration development, and Choreo offers several observability and API insights tools to help developers keep track of their integration components. By monitoring metrics such as throughput, latency, and logs, developers can gain valuable insights into their component's performance and identify any potential issues that may arise. Additionally, the Observe tab in Choreo provides real-time visibility into how the component is performing, allowing developers to make any necessary adjustments to improve its performance.
src="https://wso2.cachefly.net/wso2/sites/all/2023/images/observability-details-of-the-running-component-nine-1.png" />
Figure 9: Observability details of the running component
By navigating to the Analytics tab in Choreo, you can access a wealth of data about your API usage, including insights into traffic, usage patterns, and more. This data can be used to identify opportunities to optimize your API, as well as to troubleshoot any issues that may arise.
By monitoring and analyzing the metrics provided by Choreo's business analytics tools, developers can gain valuable insights into the performance of their managed APIs. These insights can help identify areas for optimization and potential issues, allowing for quick and effective intervention.
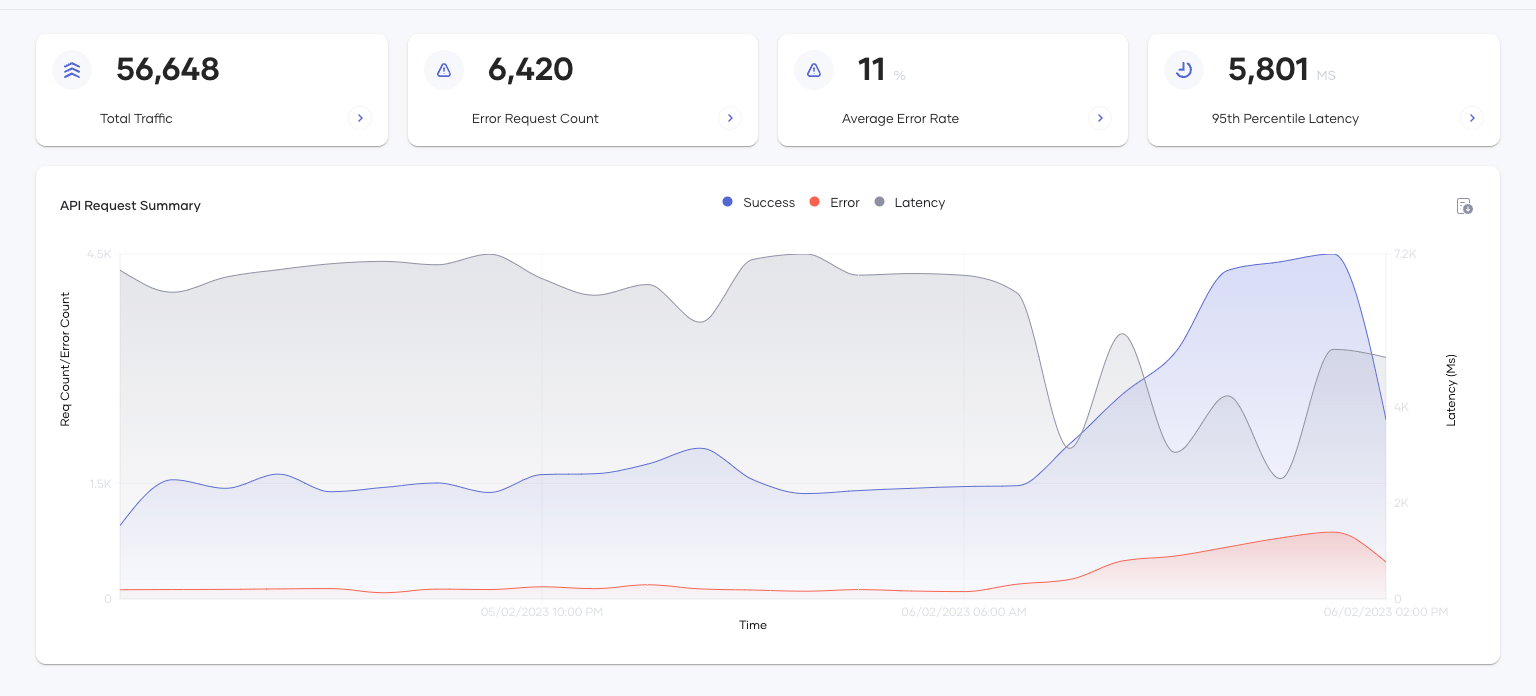
Figure 10: Business insights of the components
Conclusion
WSO2 Integration Studio is an open-source IDE that provides a range of integration technologies to build and deploy integration solutions more efficiently. Its user-friendly interface uses drag-and-drop visual flow design to create projects quickly, reducing errors and saving time. The testing and simulation capabilities help developers identify and fix issues before deployment.
Choreo is a cloud-based integration platform that simplifies the deployment and management of integration solutions across multiple environments. With Choreo, developers can easily deploy integrations built using WSO2 Integration Studio's broad range of integration technologies, including message brokers, API gateways, ESBs, and microservices. By leveraging Choreo's deployment features, developers can focus on building integration solutions while the platform handles the underlying architecture. This results in more efficient and secure integration development and deployment. Overall, WSO2 Integration Studio and Choreo together offer a powerful suite of tools for improving the integration development process.
Signup with Choreo to try out WSO2 Micro Integrator-based
Integrations today.