Tools
Tools enable AI agents to interact with external systems and perform actions during execution. WSO2 Integrator provides multiple ways to add and configure tools for an AI agent through a unified tool configuration experience.
This page describes the supported tool types, how to add them to an agent, and how each tool integration option works.
Add a tool
To add a tool to an agent, select the AI Agent node in the agent canvas and click the + button.
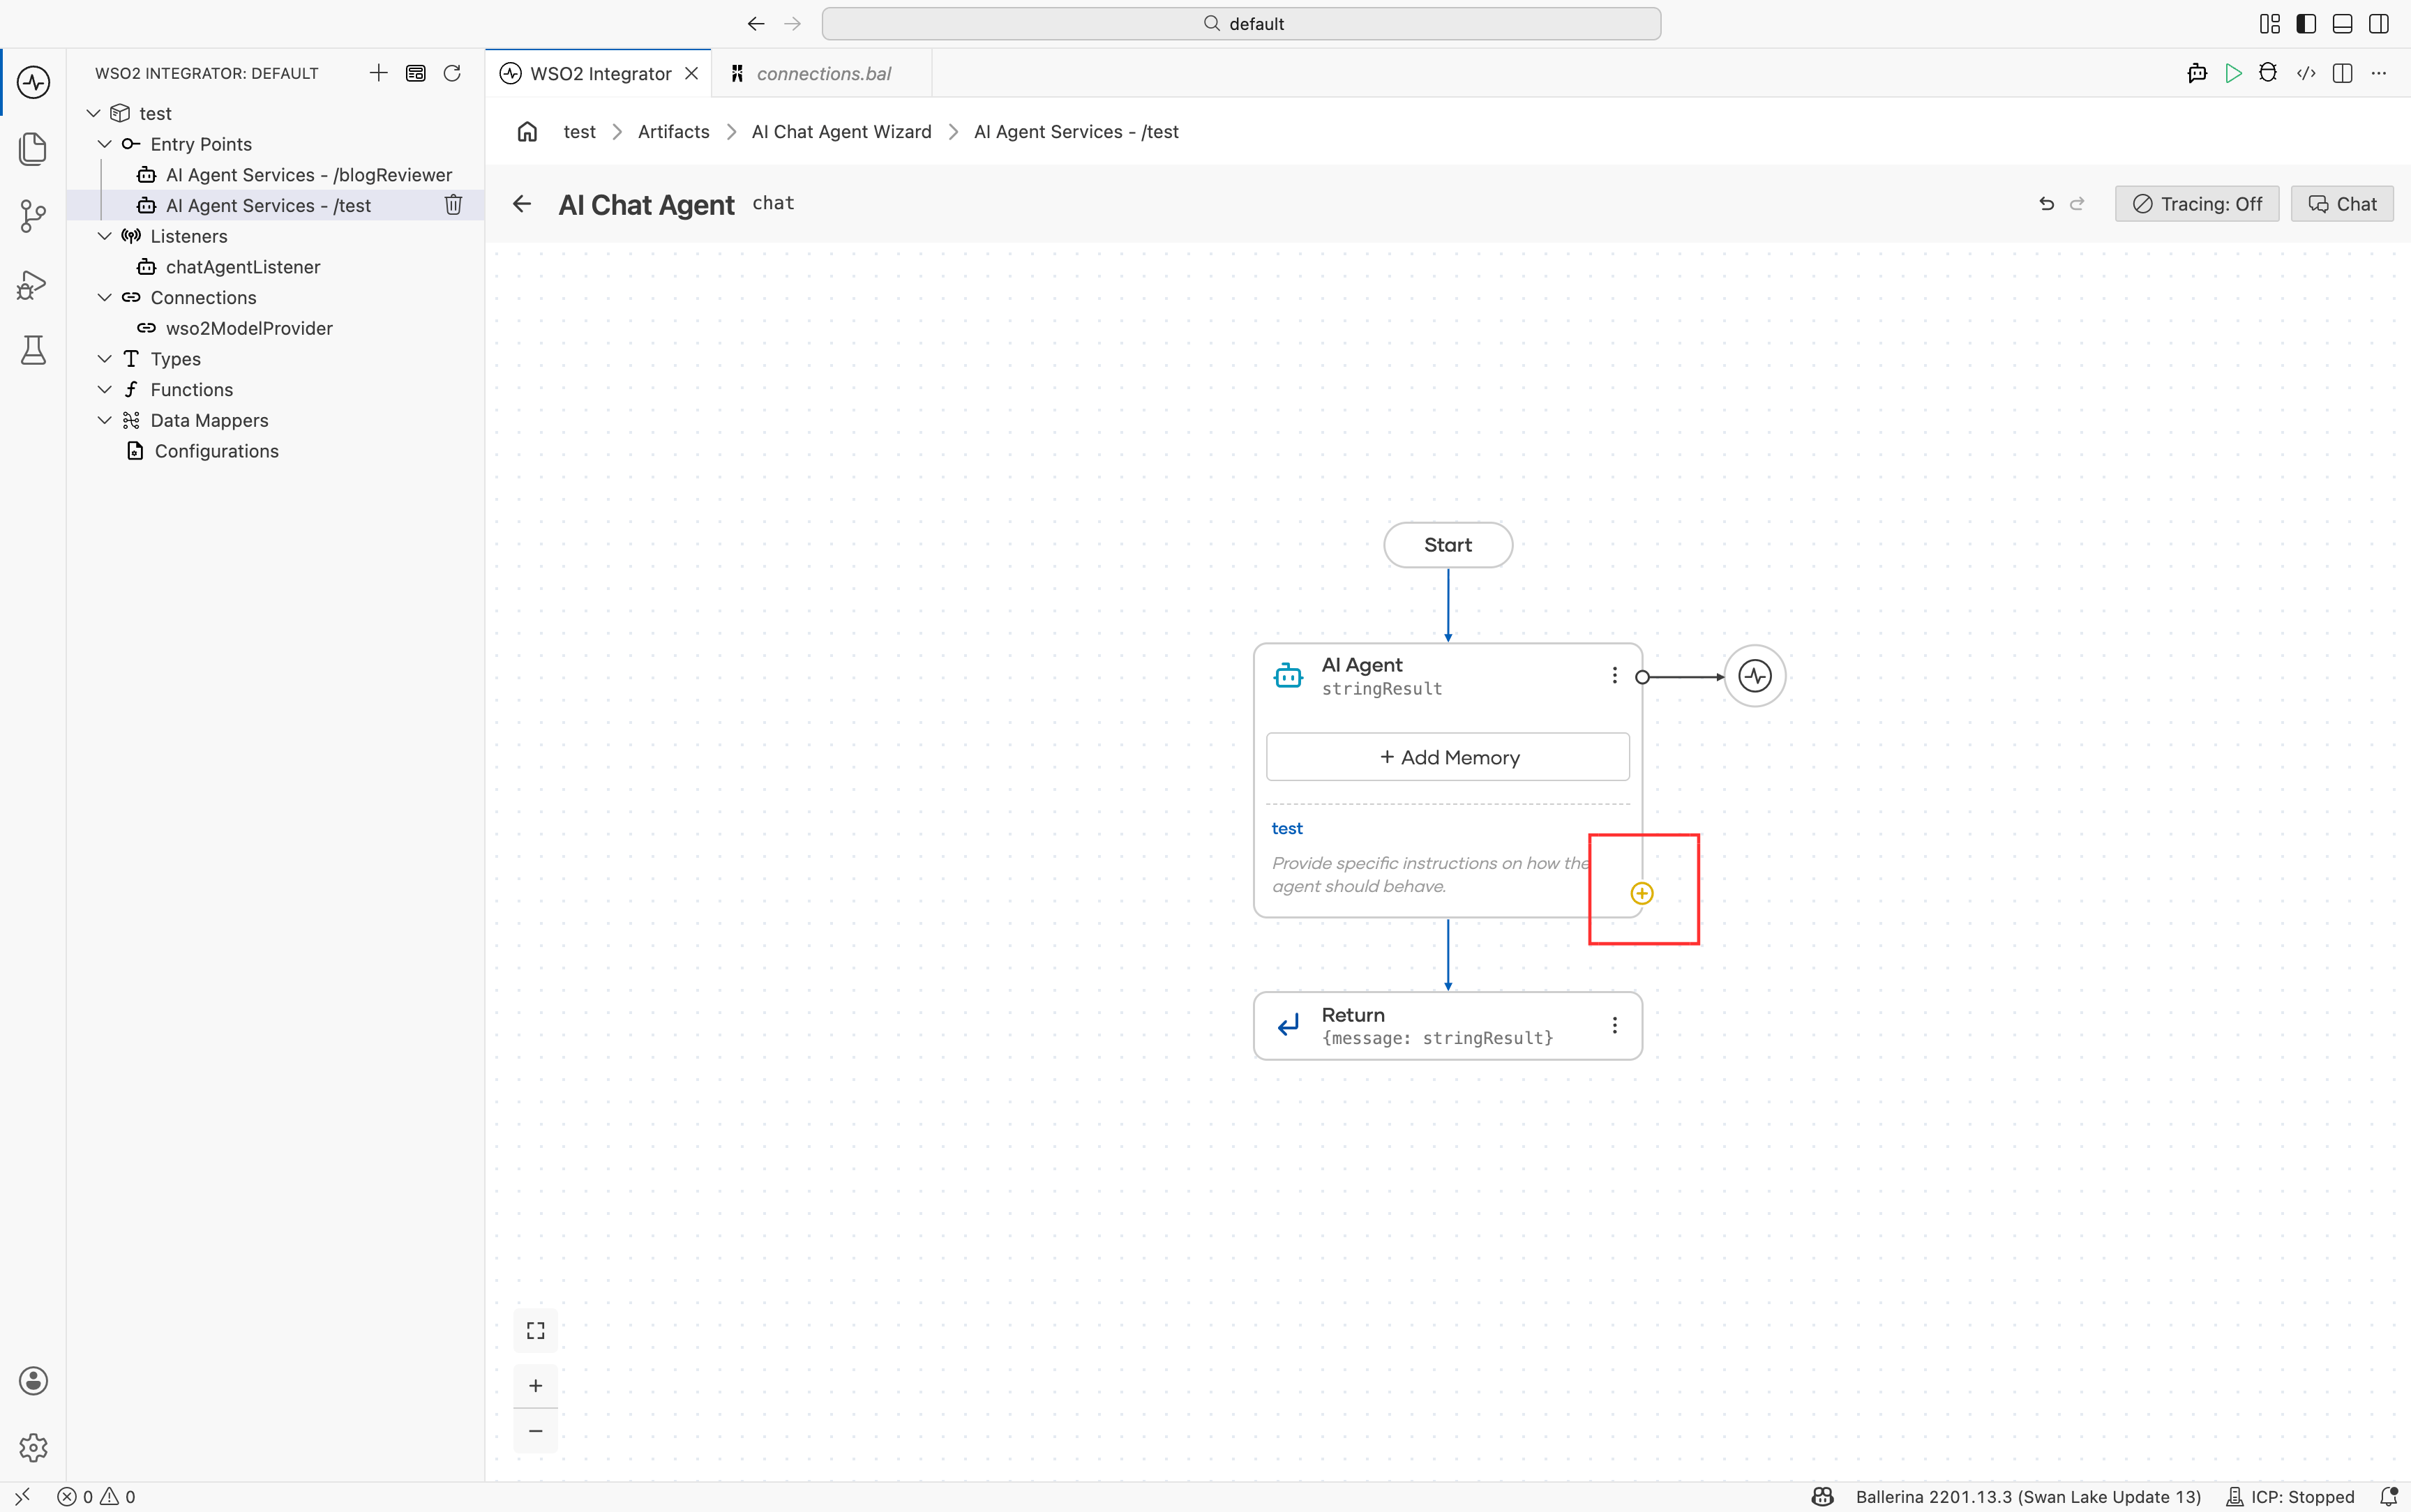
This opens the Add Tool panel, where you can choose how to add capabilities to the agent.
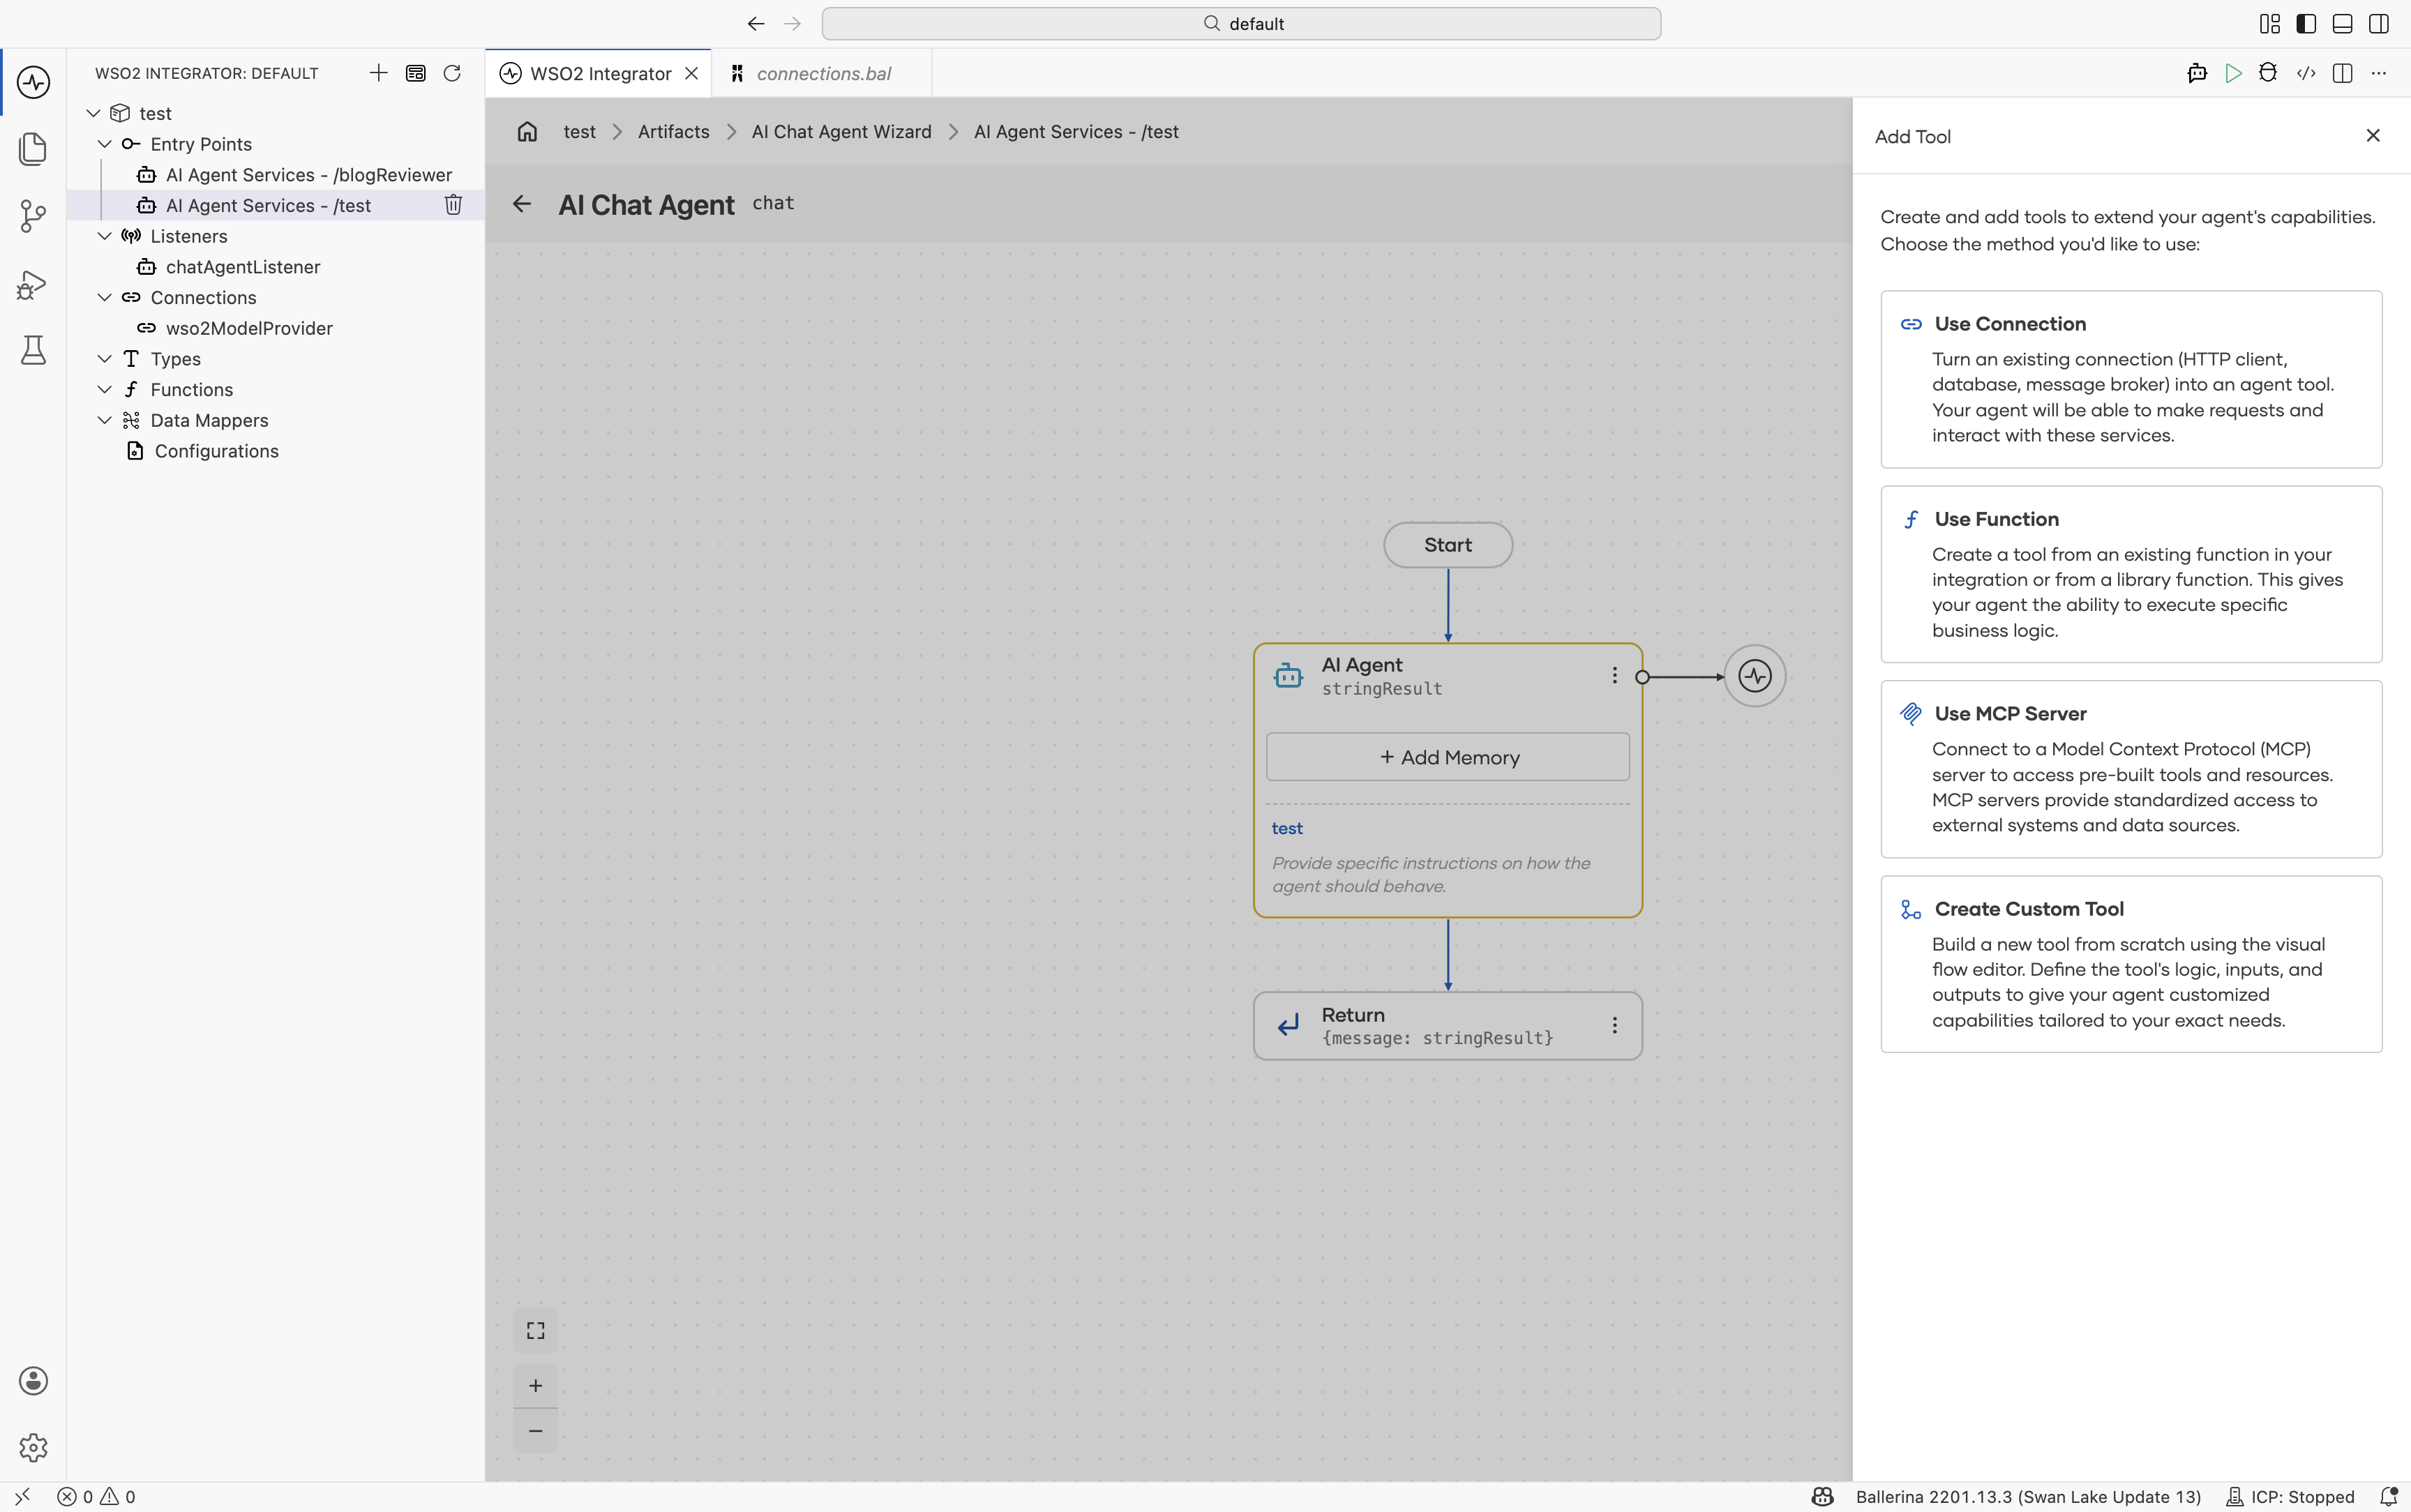
The following tool integration options are available:
| Option | Description |
|---|---|
| Use Connection | Use an existing WSO2 Integrator connector such as Salesforce, Gmail, MySQL, or GitHub. Each connector operation becomes available as an agent tool. |
| Use Function | Expose an existing project function or standard library function as an agent tool. |
| Use MCP Server | Connect to tools hosted on a remote MCP server, including custom, community, or SaaS MCP endpoints. |
| Create Custom Tool | Define a new tool by specifying its name, description, parameters, and return type directly from the UI. |
Each option opens a dedicated configuration panel for setting up the selected tool type.
1. Use connection
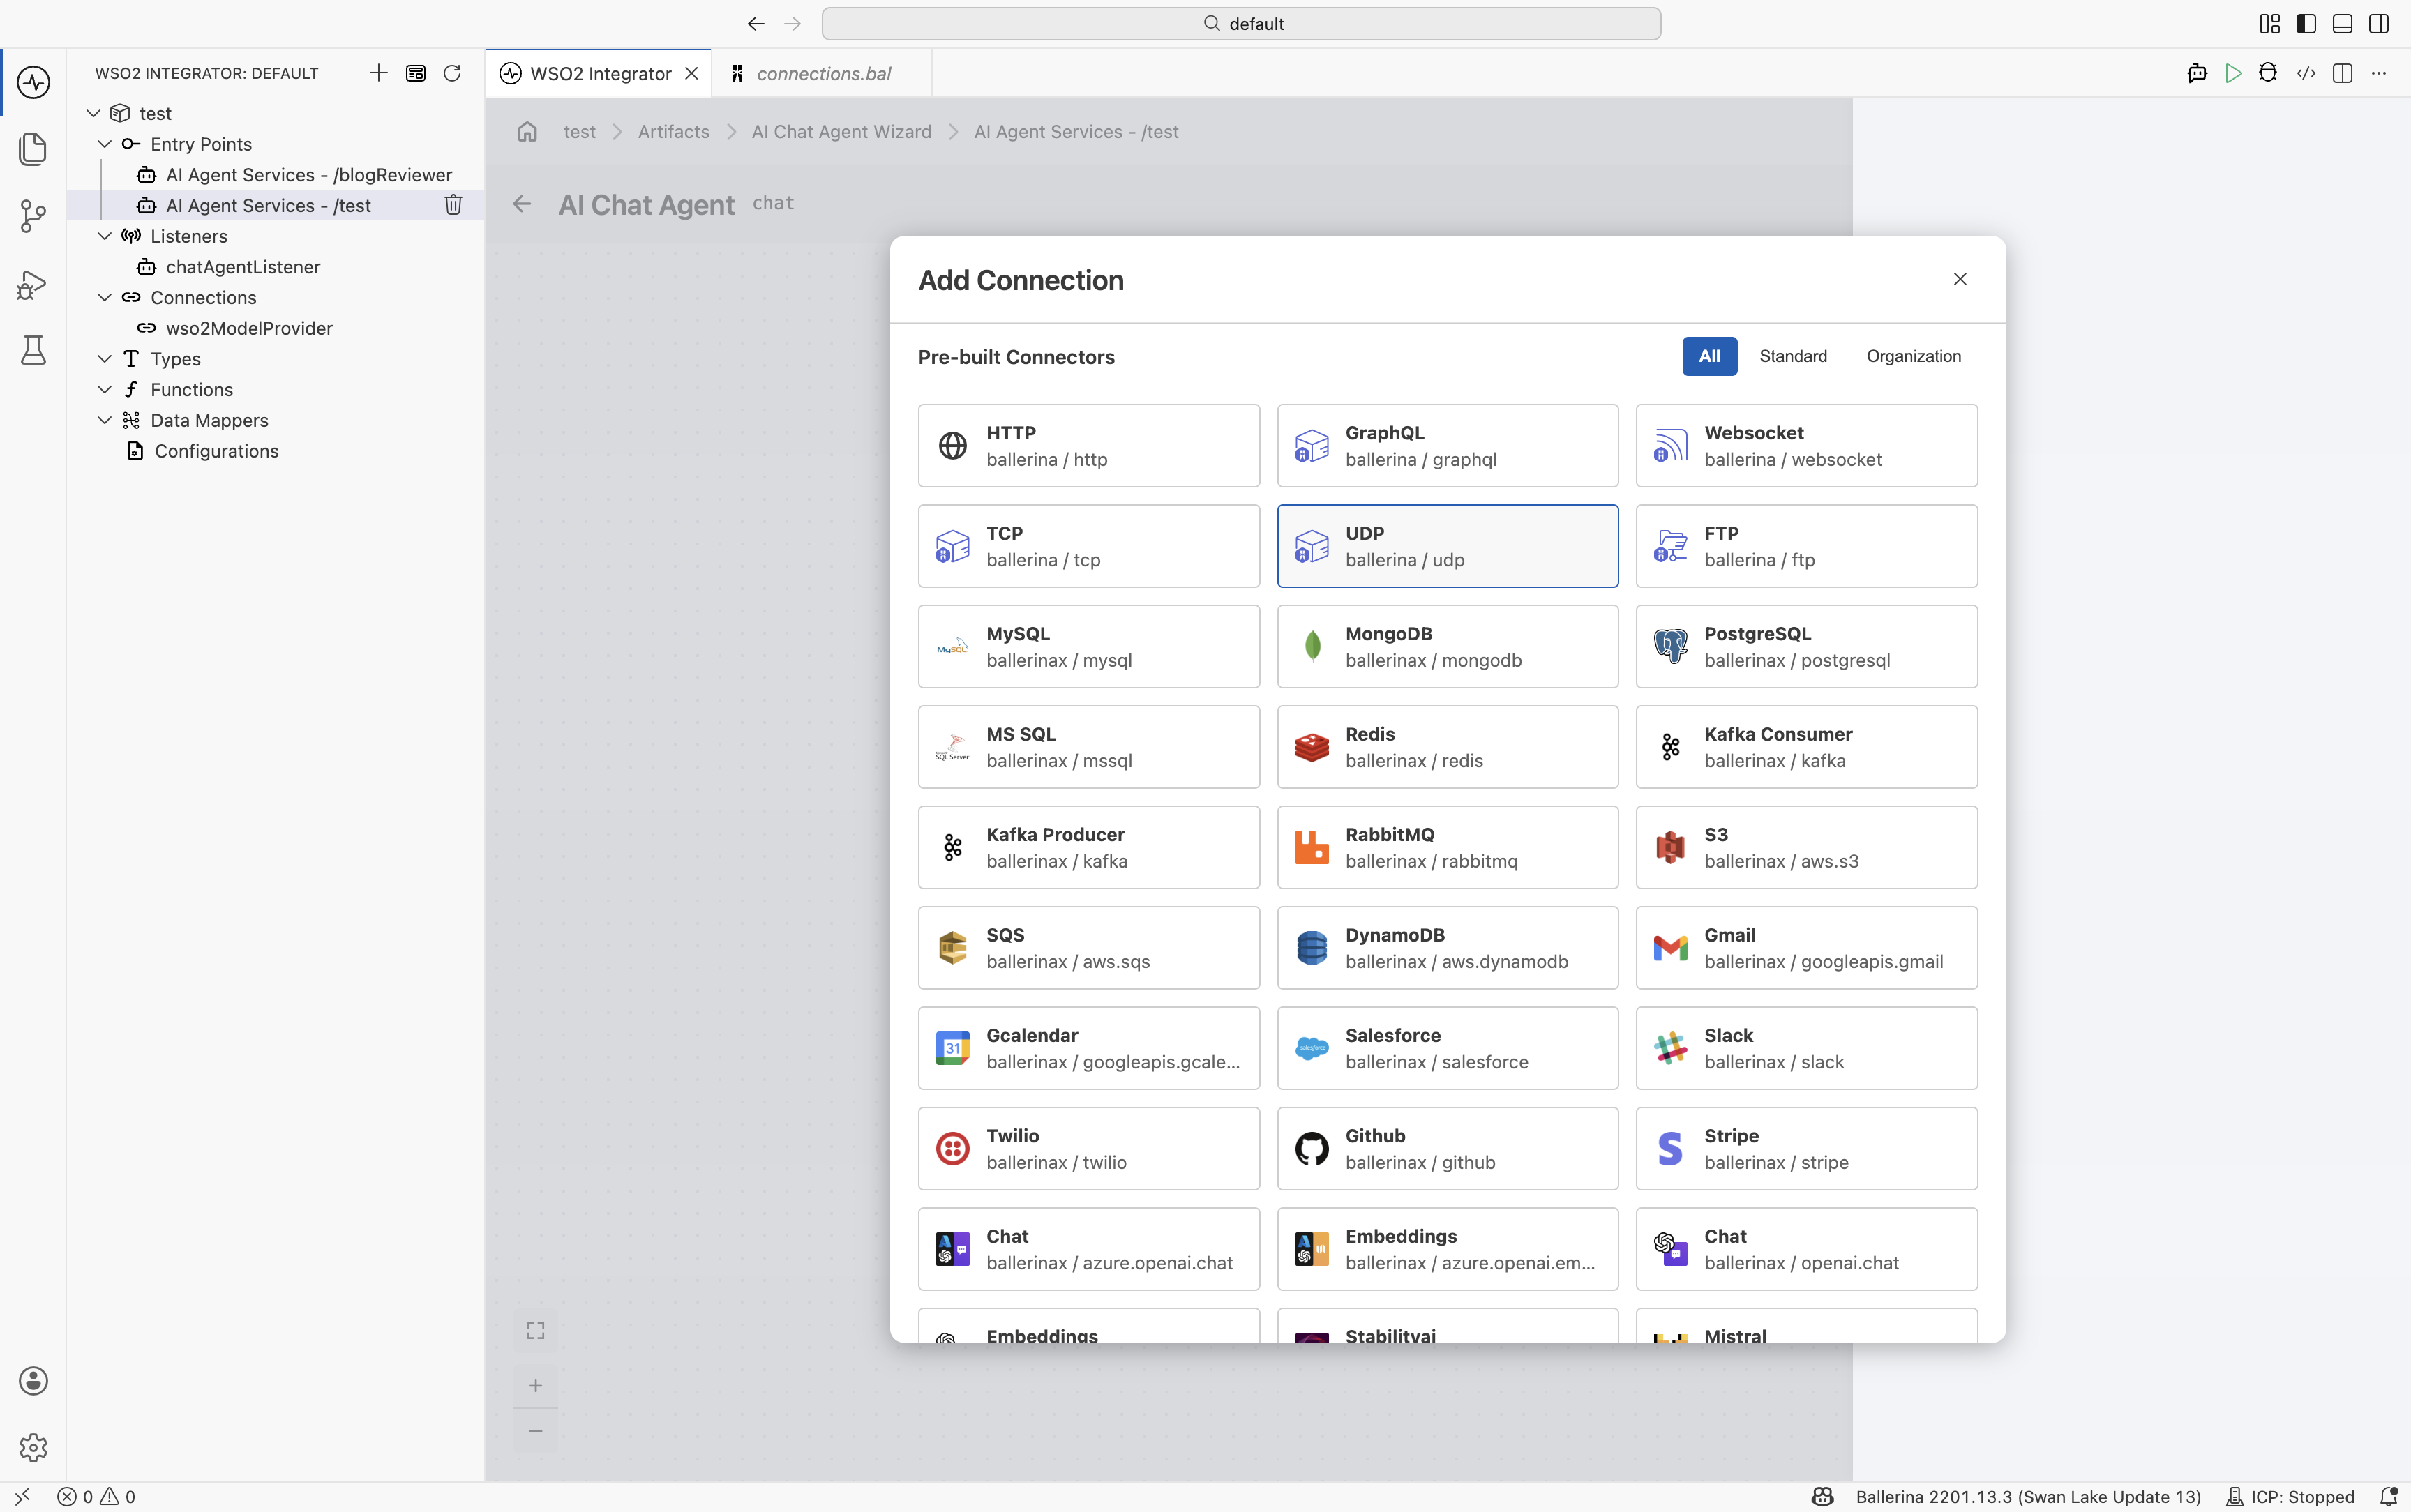
Selecting Use Connection opens the Add Connection dialog.
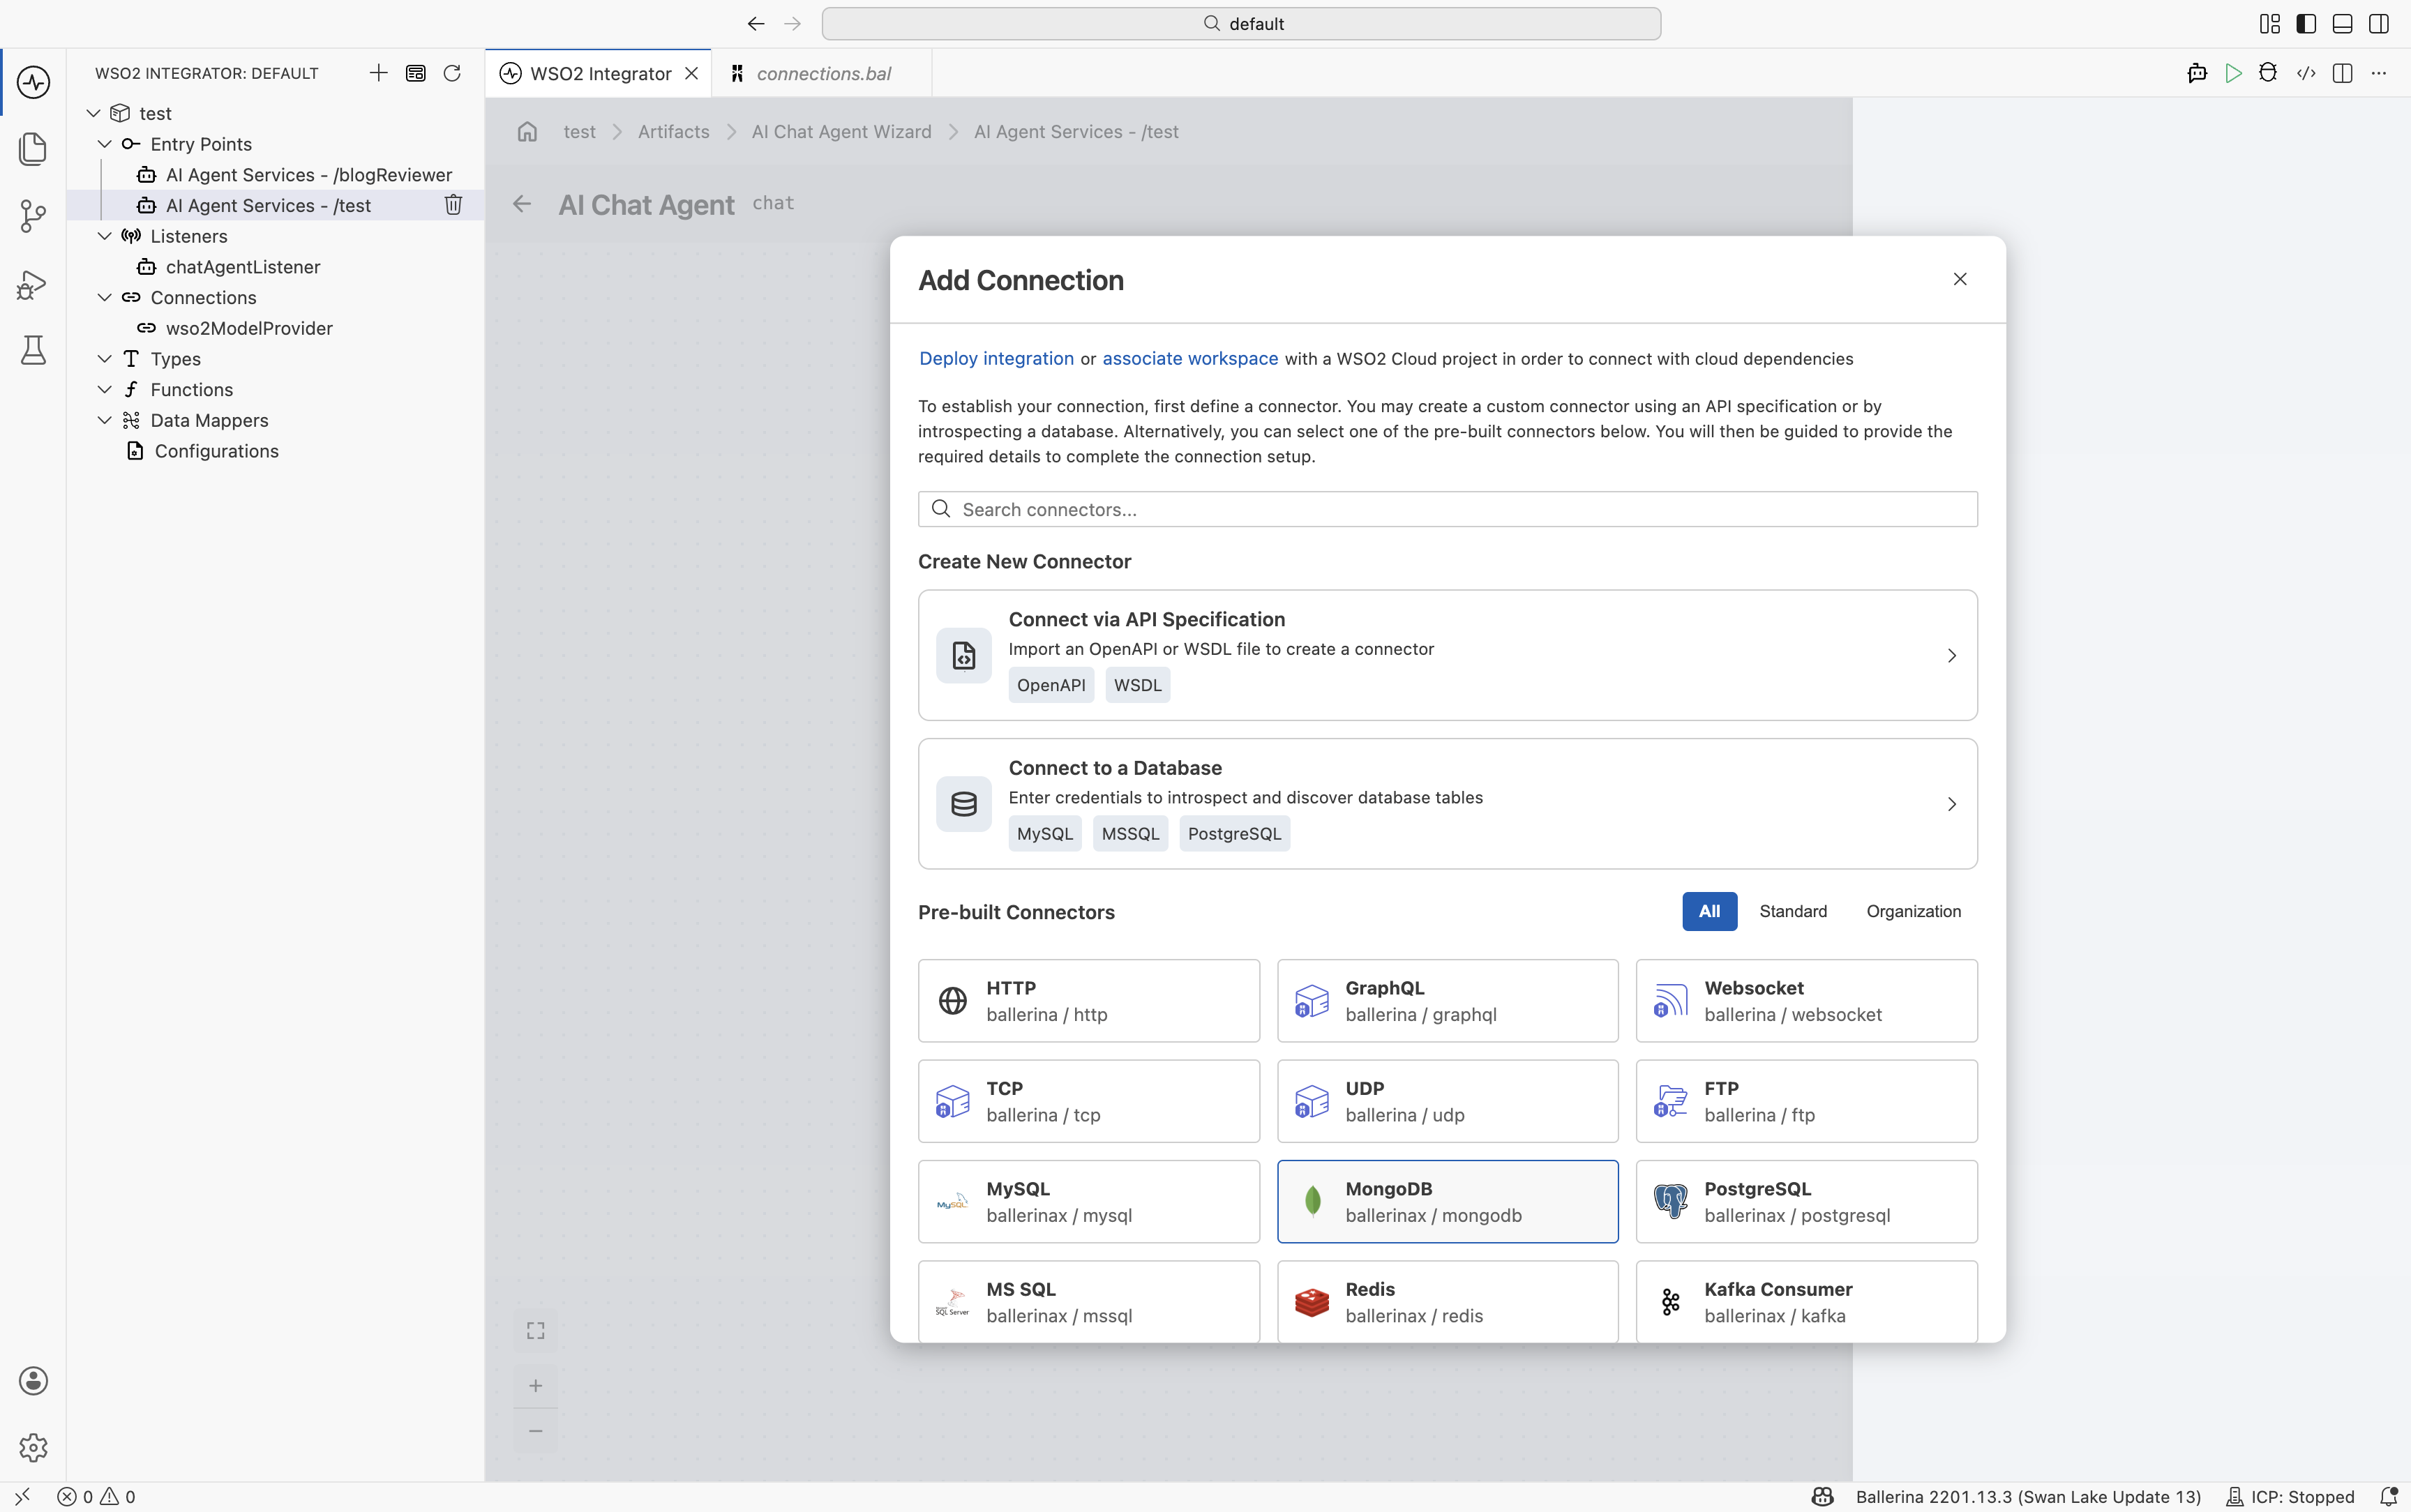
The dialog provides the following options for creating or selecting a connector:
| Option | Description |
|---|---|
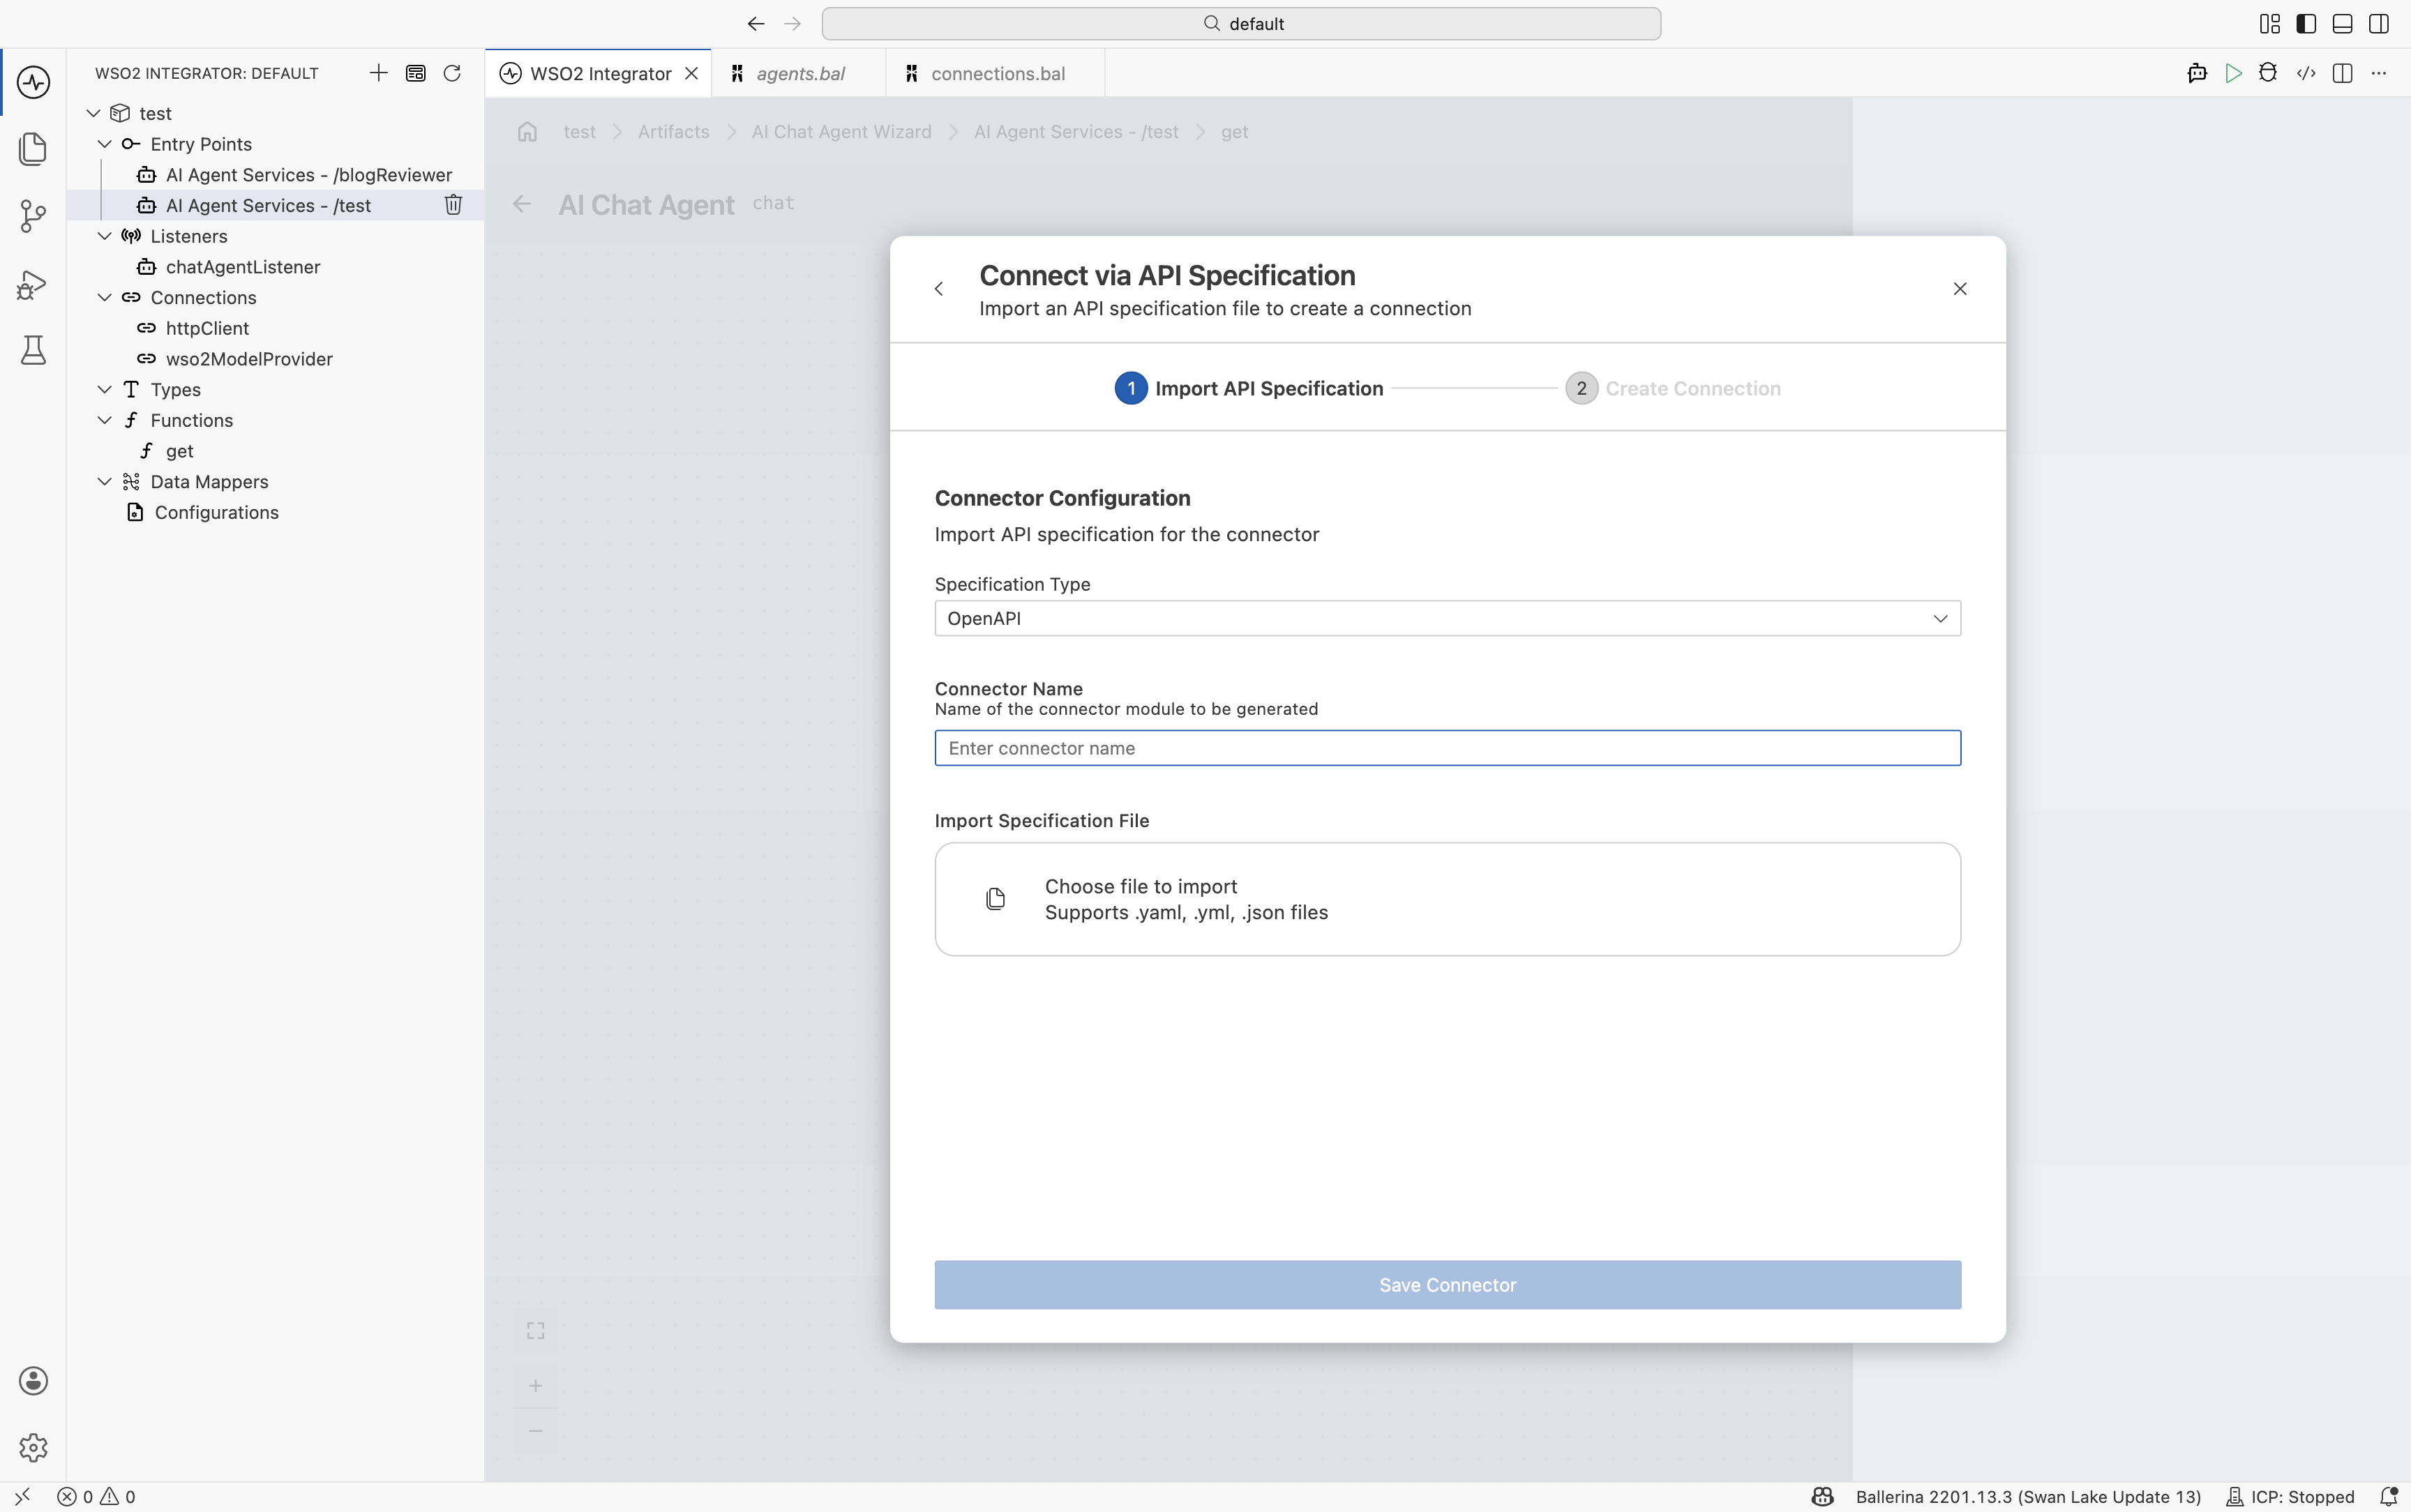
| Create New Connector → Connect via API Specification | Generate a connector using an OpenAPI or WSDL specification. |
| Create New Connector → Connect to a Database | Generate a connector by introspecting a database such as MySQL, MSSQL, or PostgreSQL. |
| Pre-built Connectors | Use an existing connector provided by WSO2 Integrator, such as HTTP, Salesforce, Gmail, or GitHub. |
The Pre-built Connectors section can be filtered using the All, Standard, and Organization tabs and includes AI-related connectors and integrations.
1.1 Connect via API specification
Select the specification type and import the API specification file.
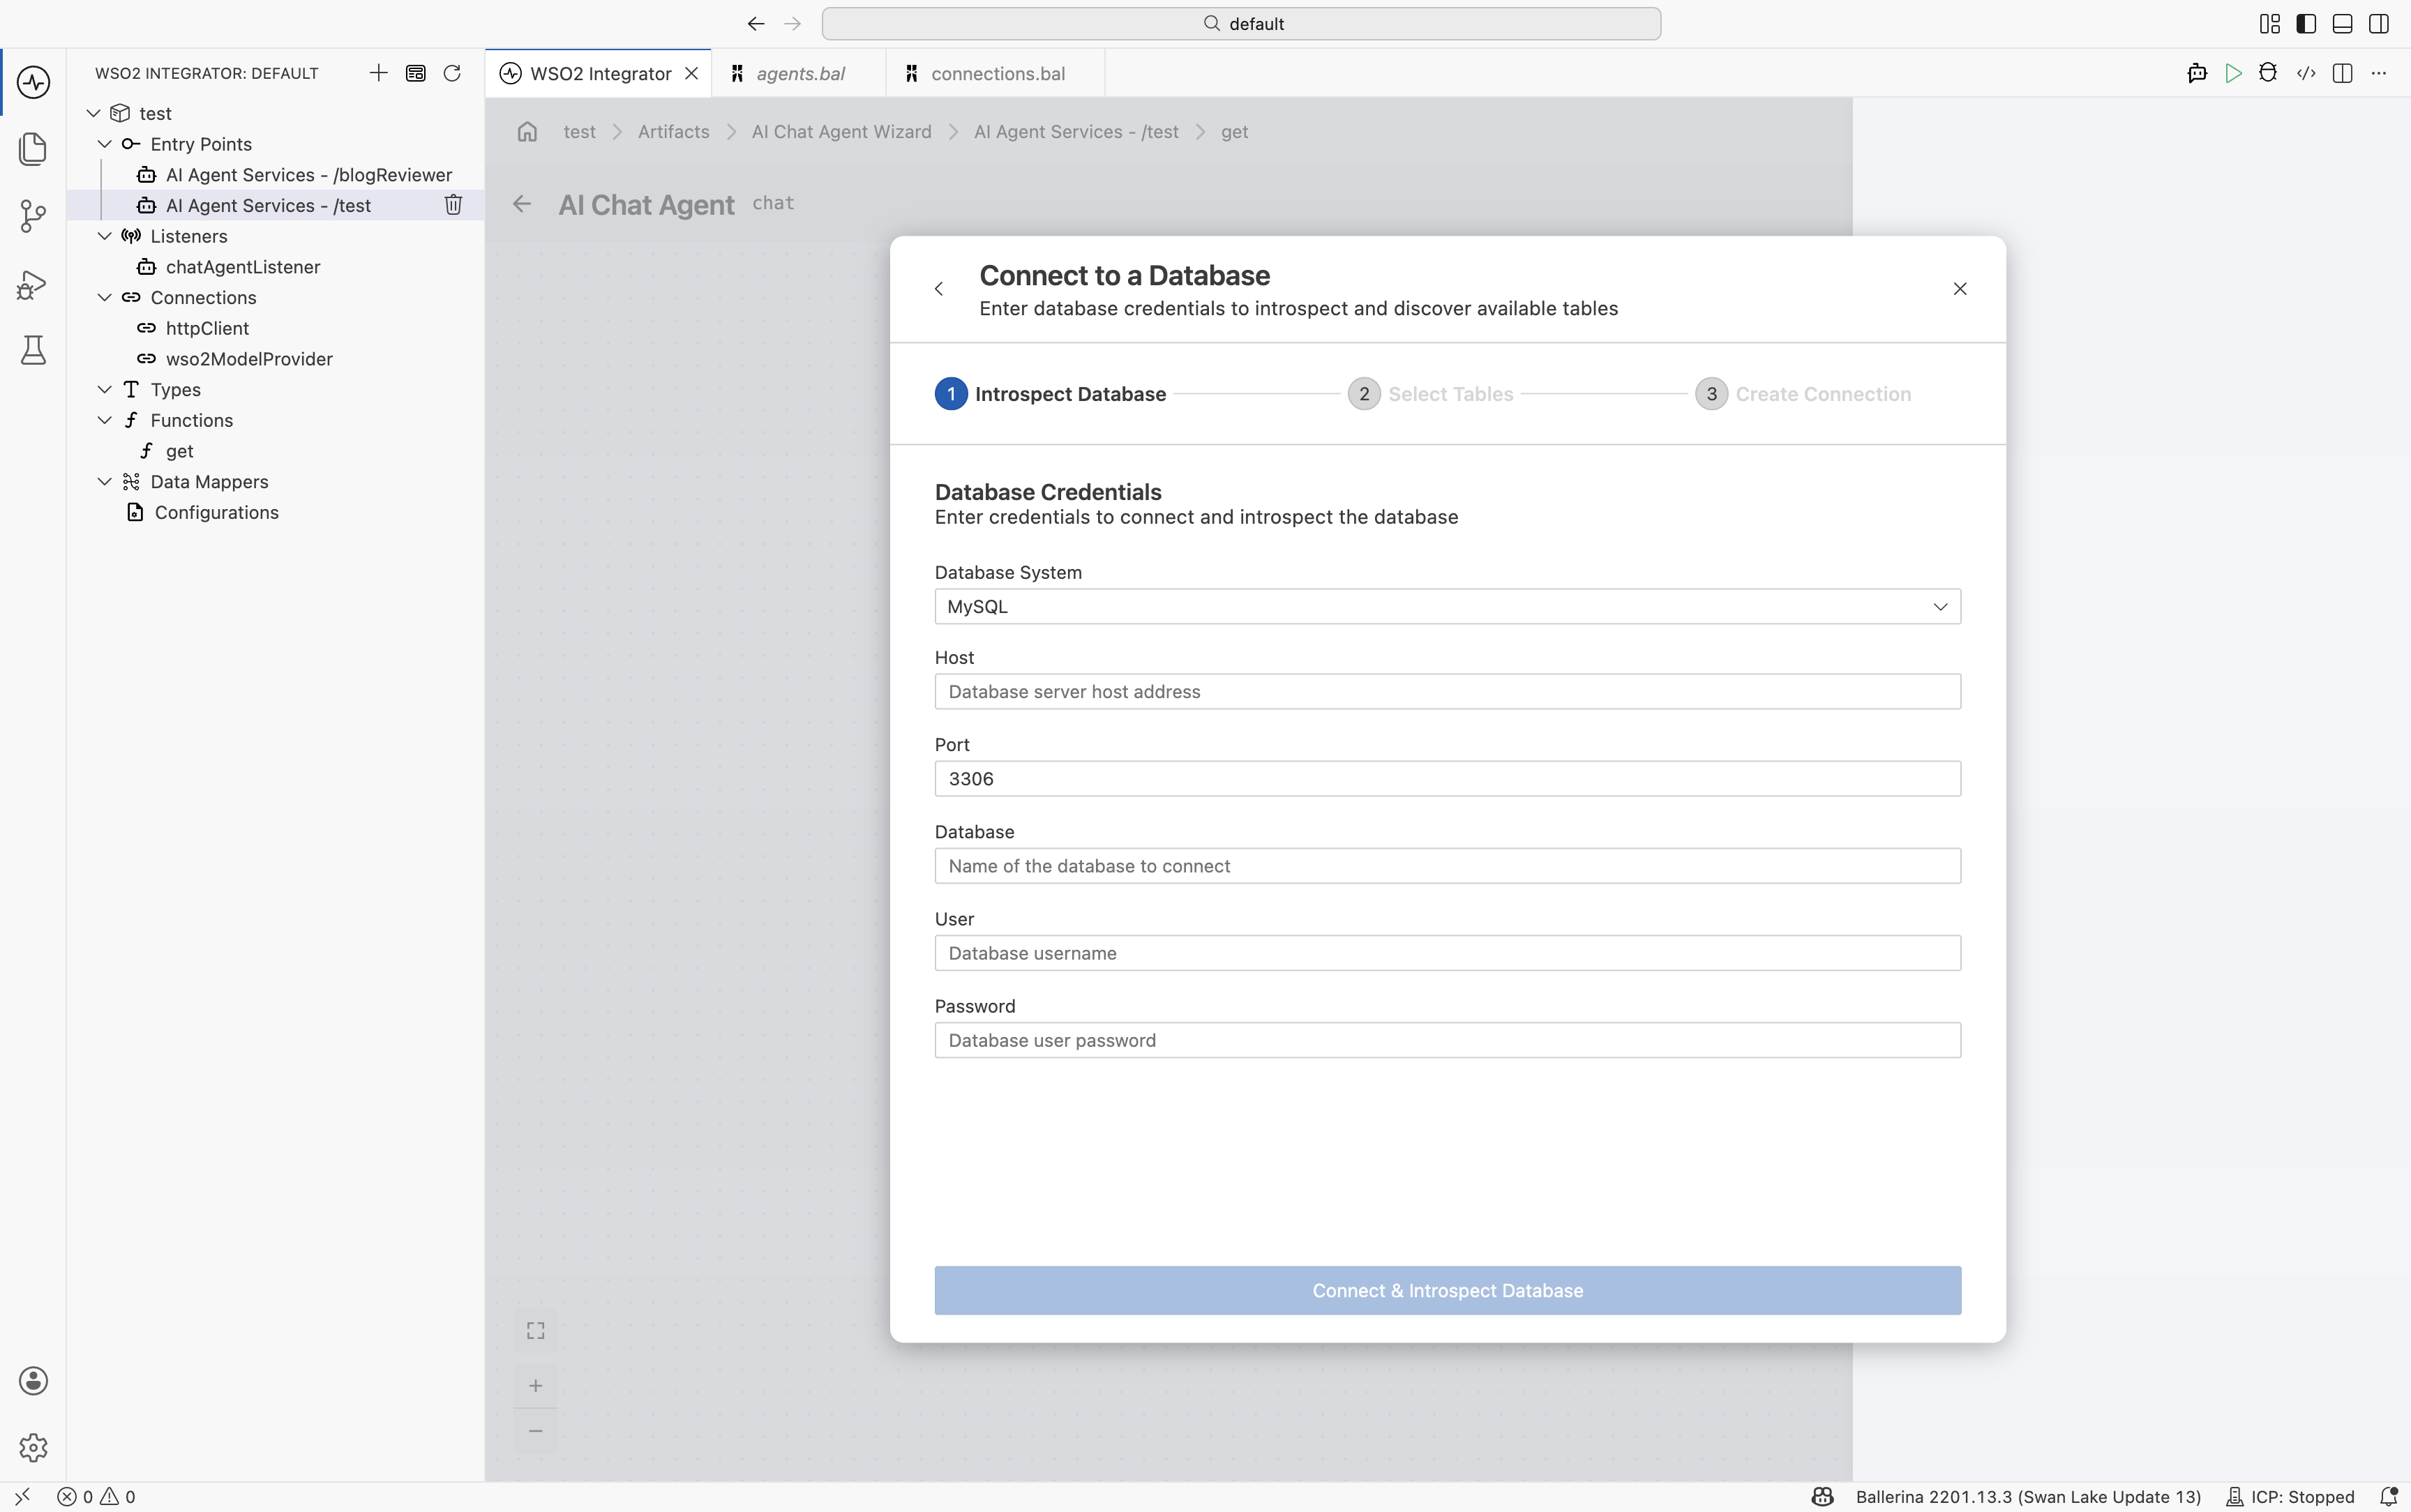
1.2 Connect to a database
Select the database type and provide the required connection details.
1.3 Use Pre-built connectors
Select the connector.
After selecting a connector, WSO2 Integrator displays the available operations. Select the operations that the agent should be allowed to invoke. Each selected operation becomes available as an agent tool.
The tool metadata, including descriptions, parameters, and input/output schemas, is automatically derived from the connector definition. You only need to provide the tool name.
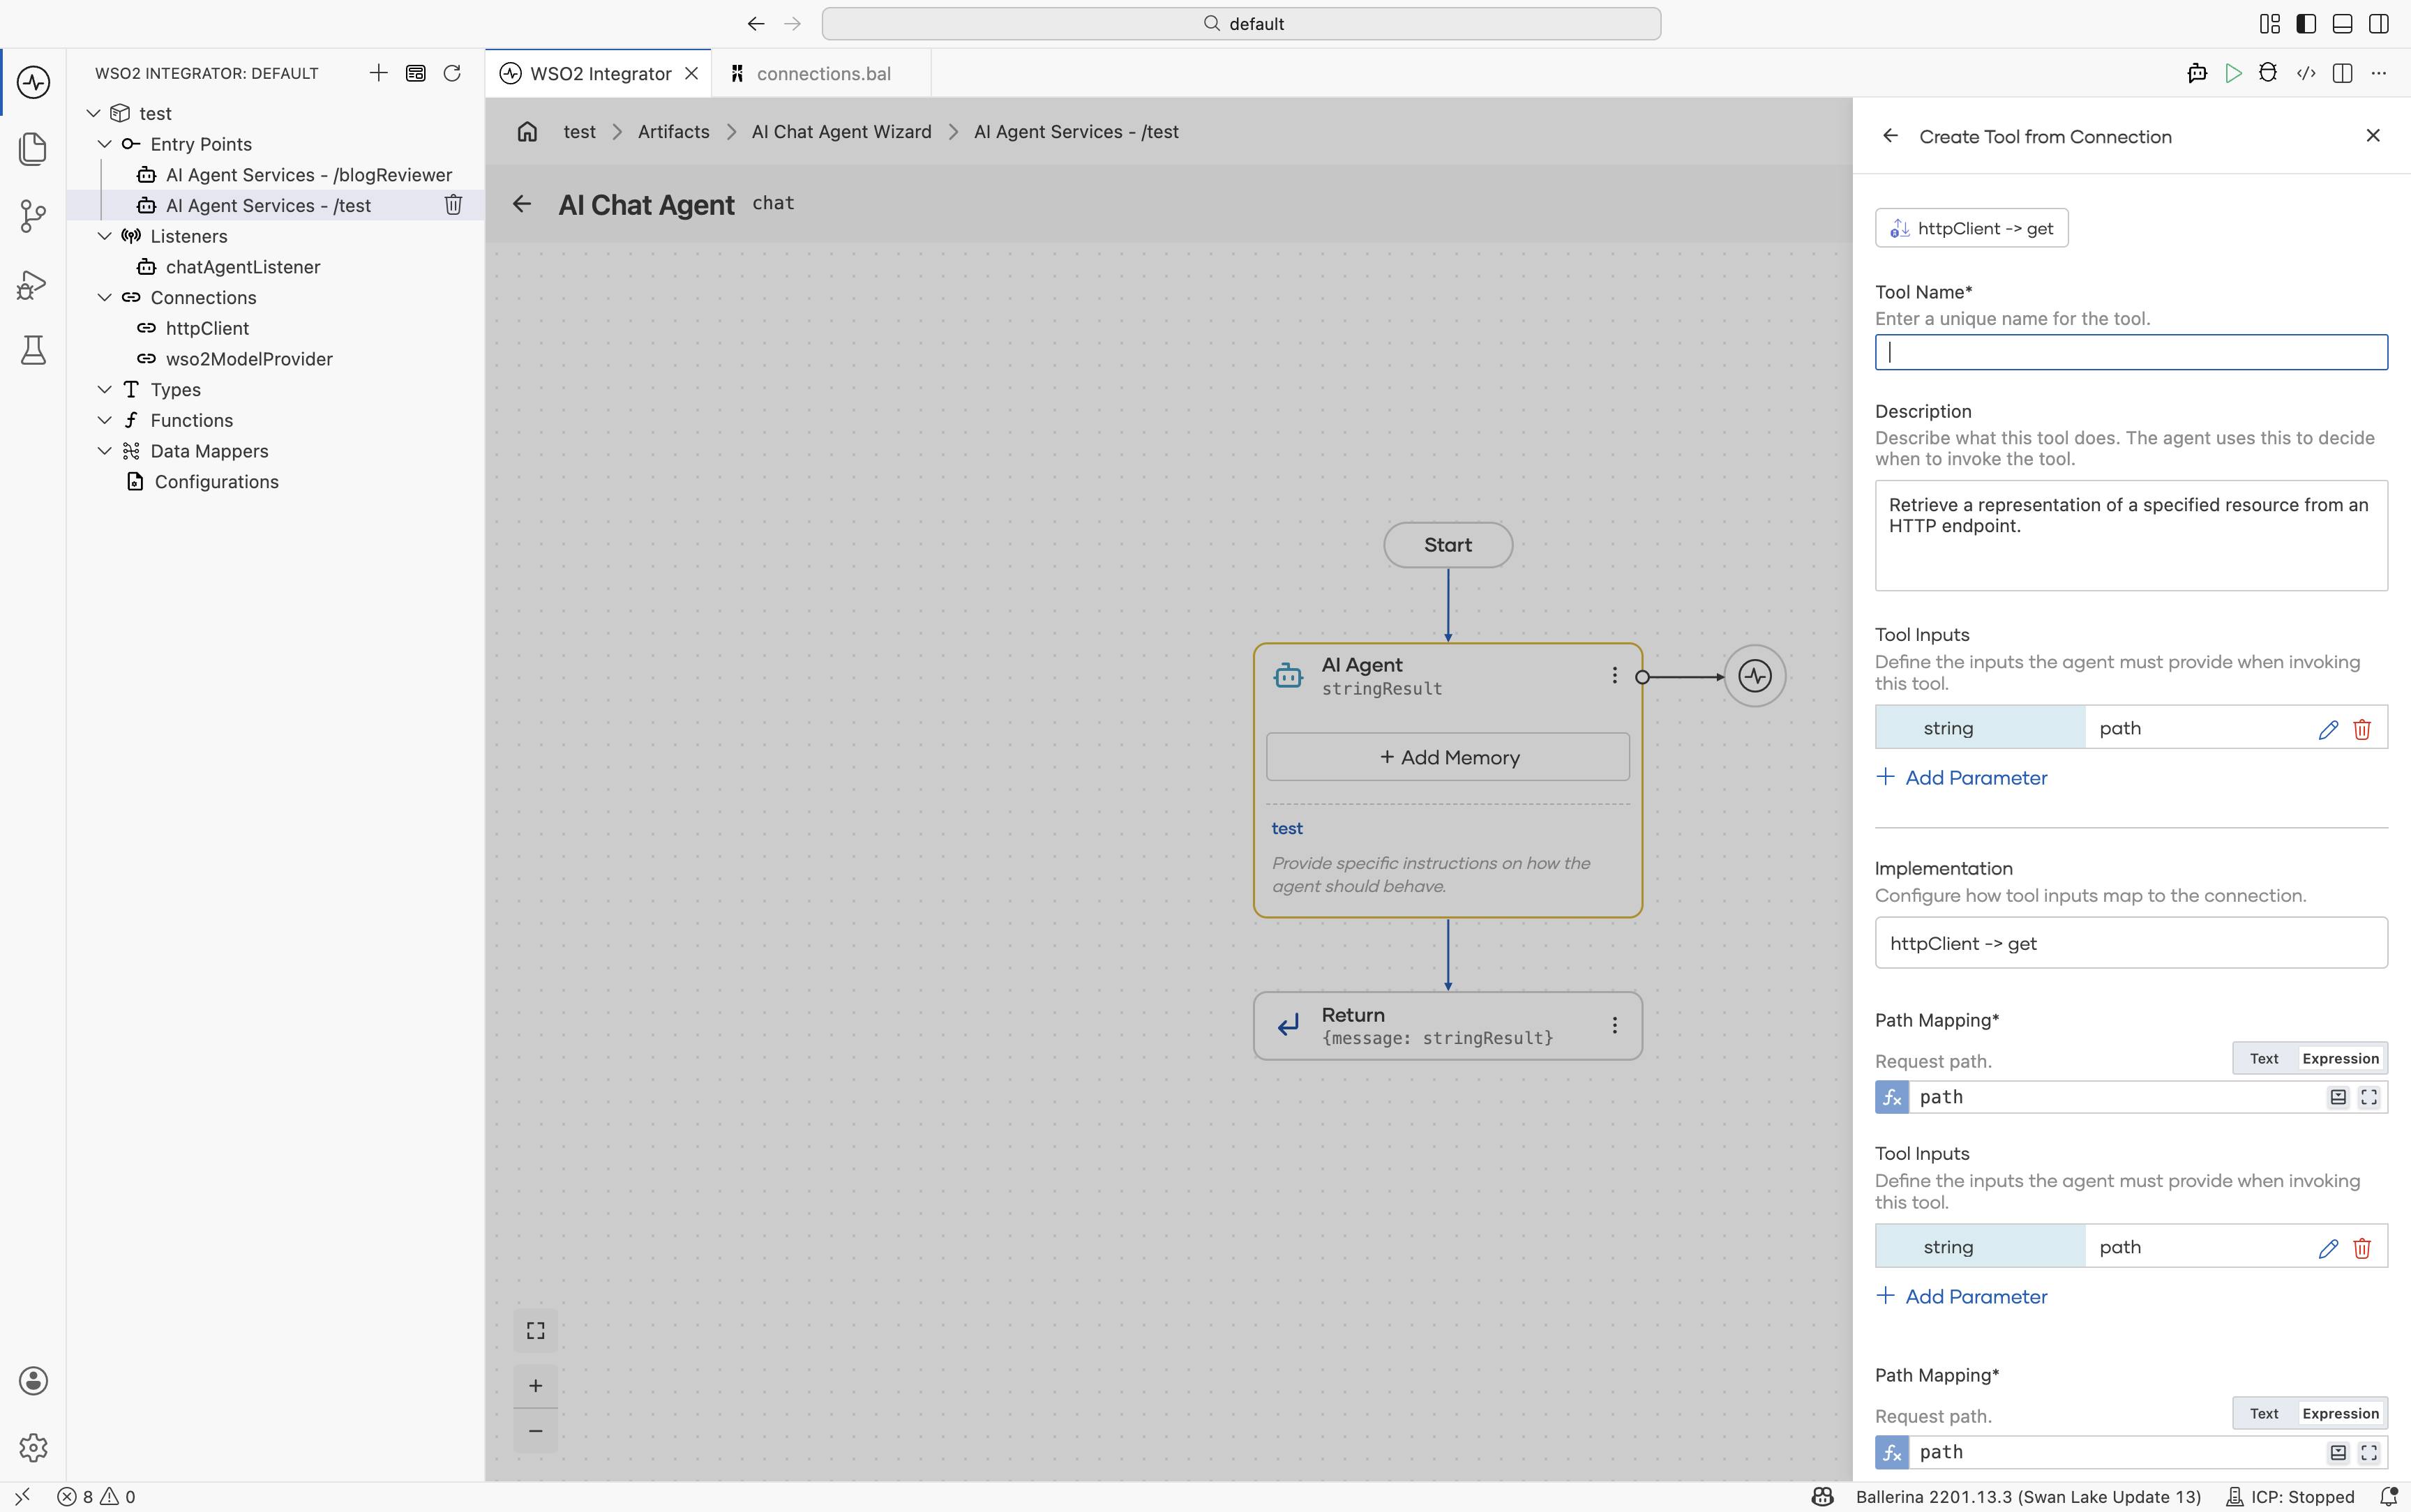
Use this option when a suitable pre-built or generated connector already exists, allowing the agent to interact with external systems without requiring additional wrapper code.
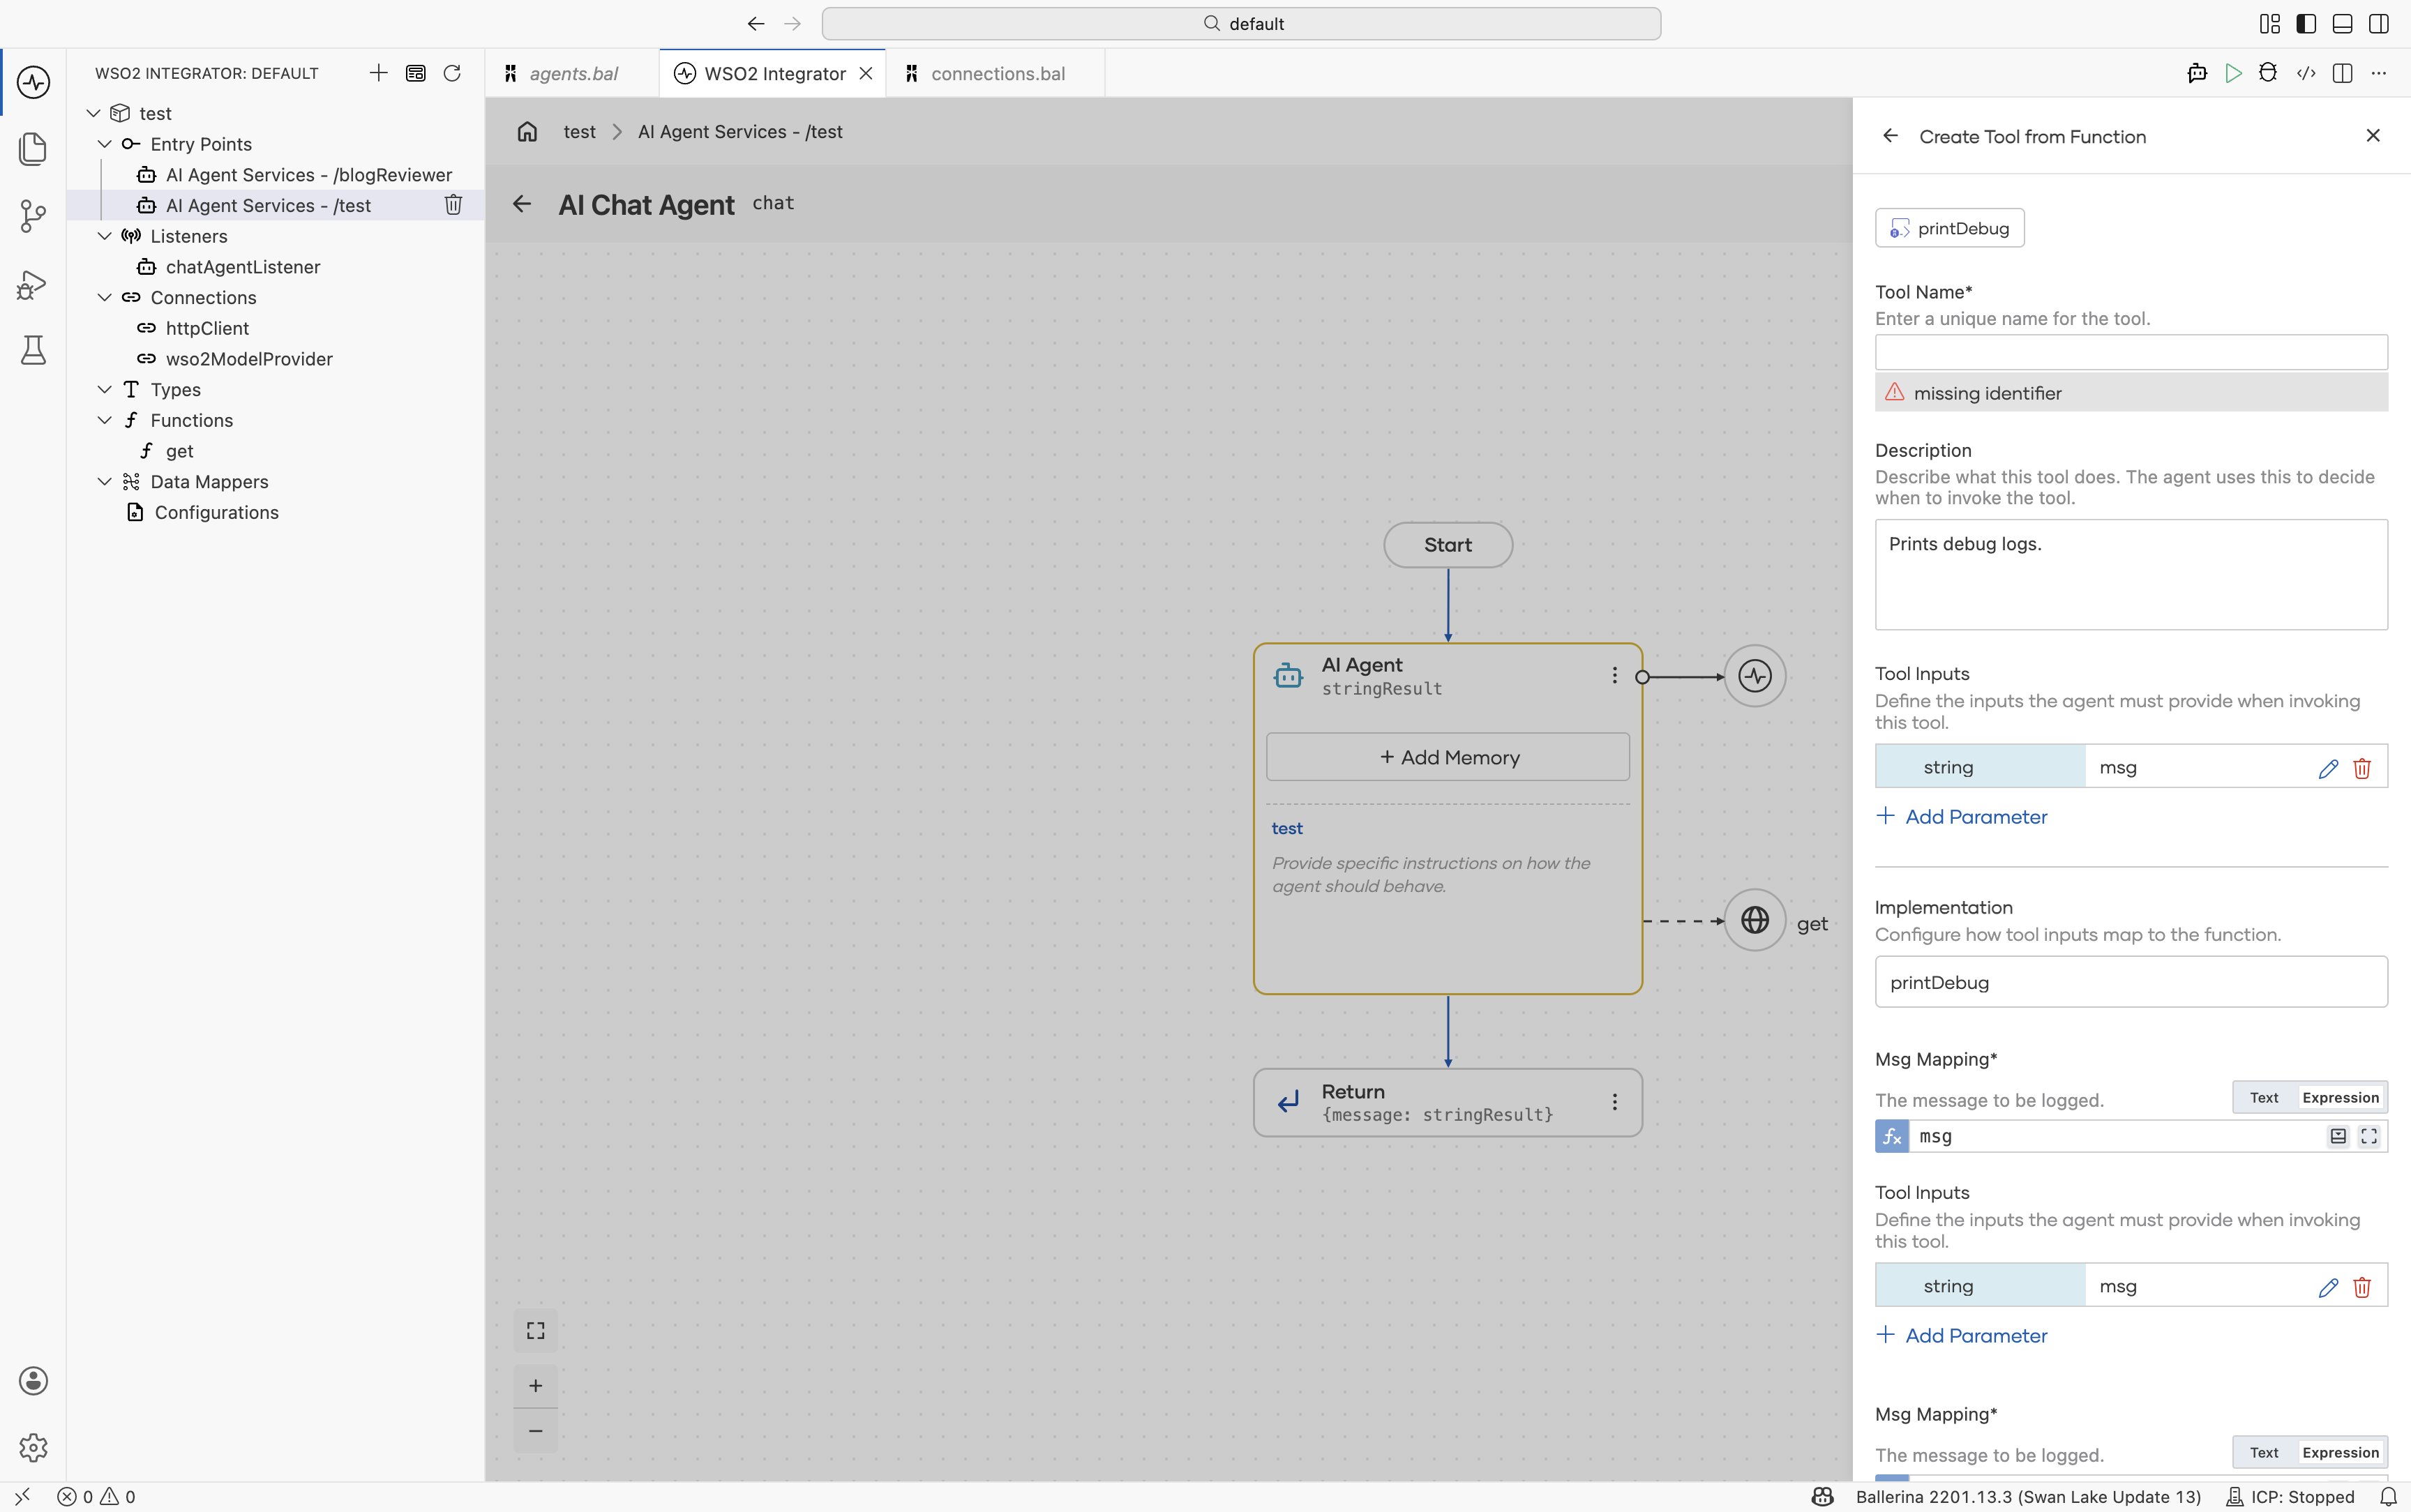
2. Use function
Selecting Use Function opens the Create Tool from Function panel. The panel groups available functions into three sections, each with separate search support using the search box at the top.
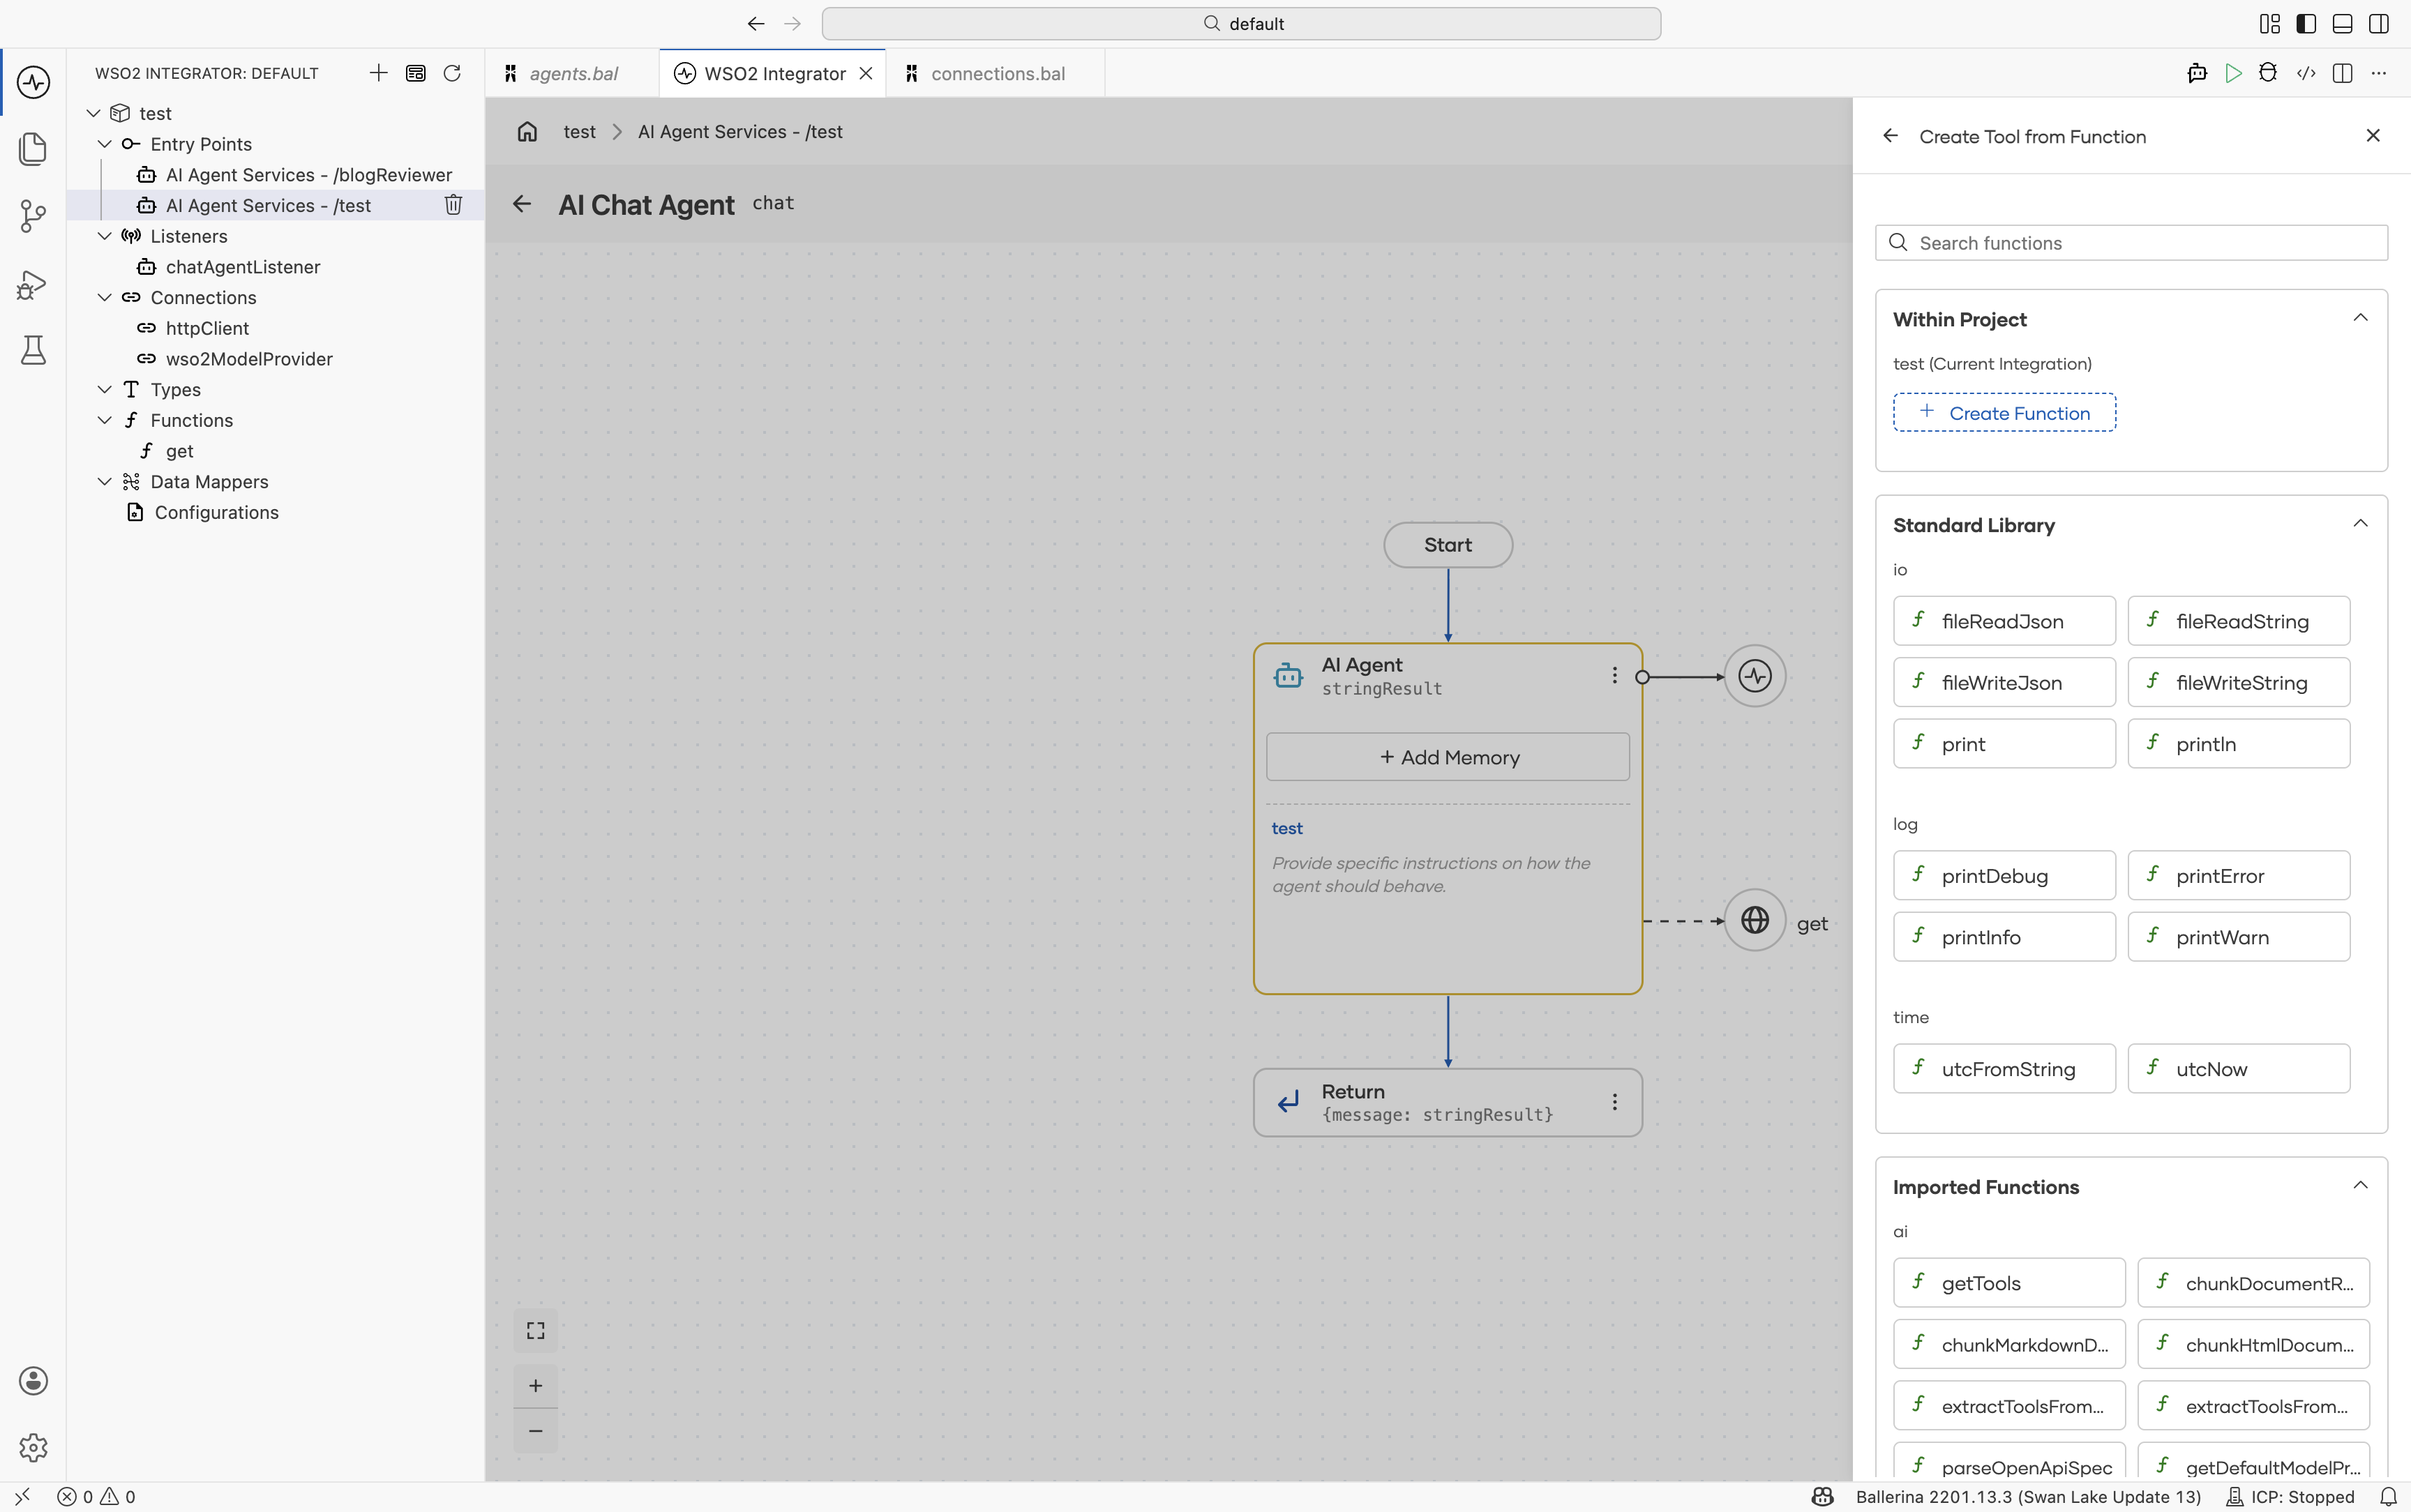
The dialog provides the following options for selecting a function:
| Group | Description |
|---|---|
| Within Project | Functions defined within your own project, including natural functions, can be added as tools with a single click. |
| Standard Library | A curated set of commonly used Ballerina utility functions organized by module. |
↳ io | fileReadJson, fileReadString, fileWriteJson, fileWriteString, print, println |
↳ log | printDebug, printError, printInfo, printWarn |
↳ time | utcFromString, utcNow |
| Imported Functions | Functions from modules already imported into your project, such as googleapis.gmail or salesforce. |
Select the functions that the agent should be allowed to invoke. Each selected function becomes available as an agent tool.
The tool metadata — including descriptions, parameters, and input/output schemas — is automatically derived from the function definition. You only need to provide a tool name.
3. Use MCP server
Selecting Use MCP Server opens the Add MCP Server panel.
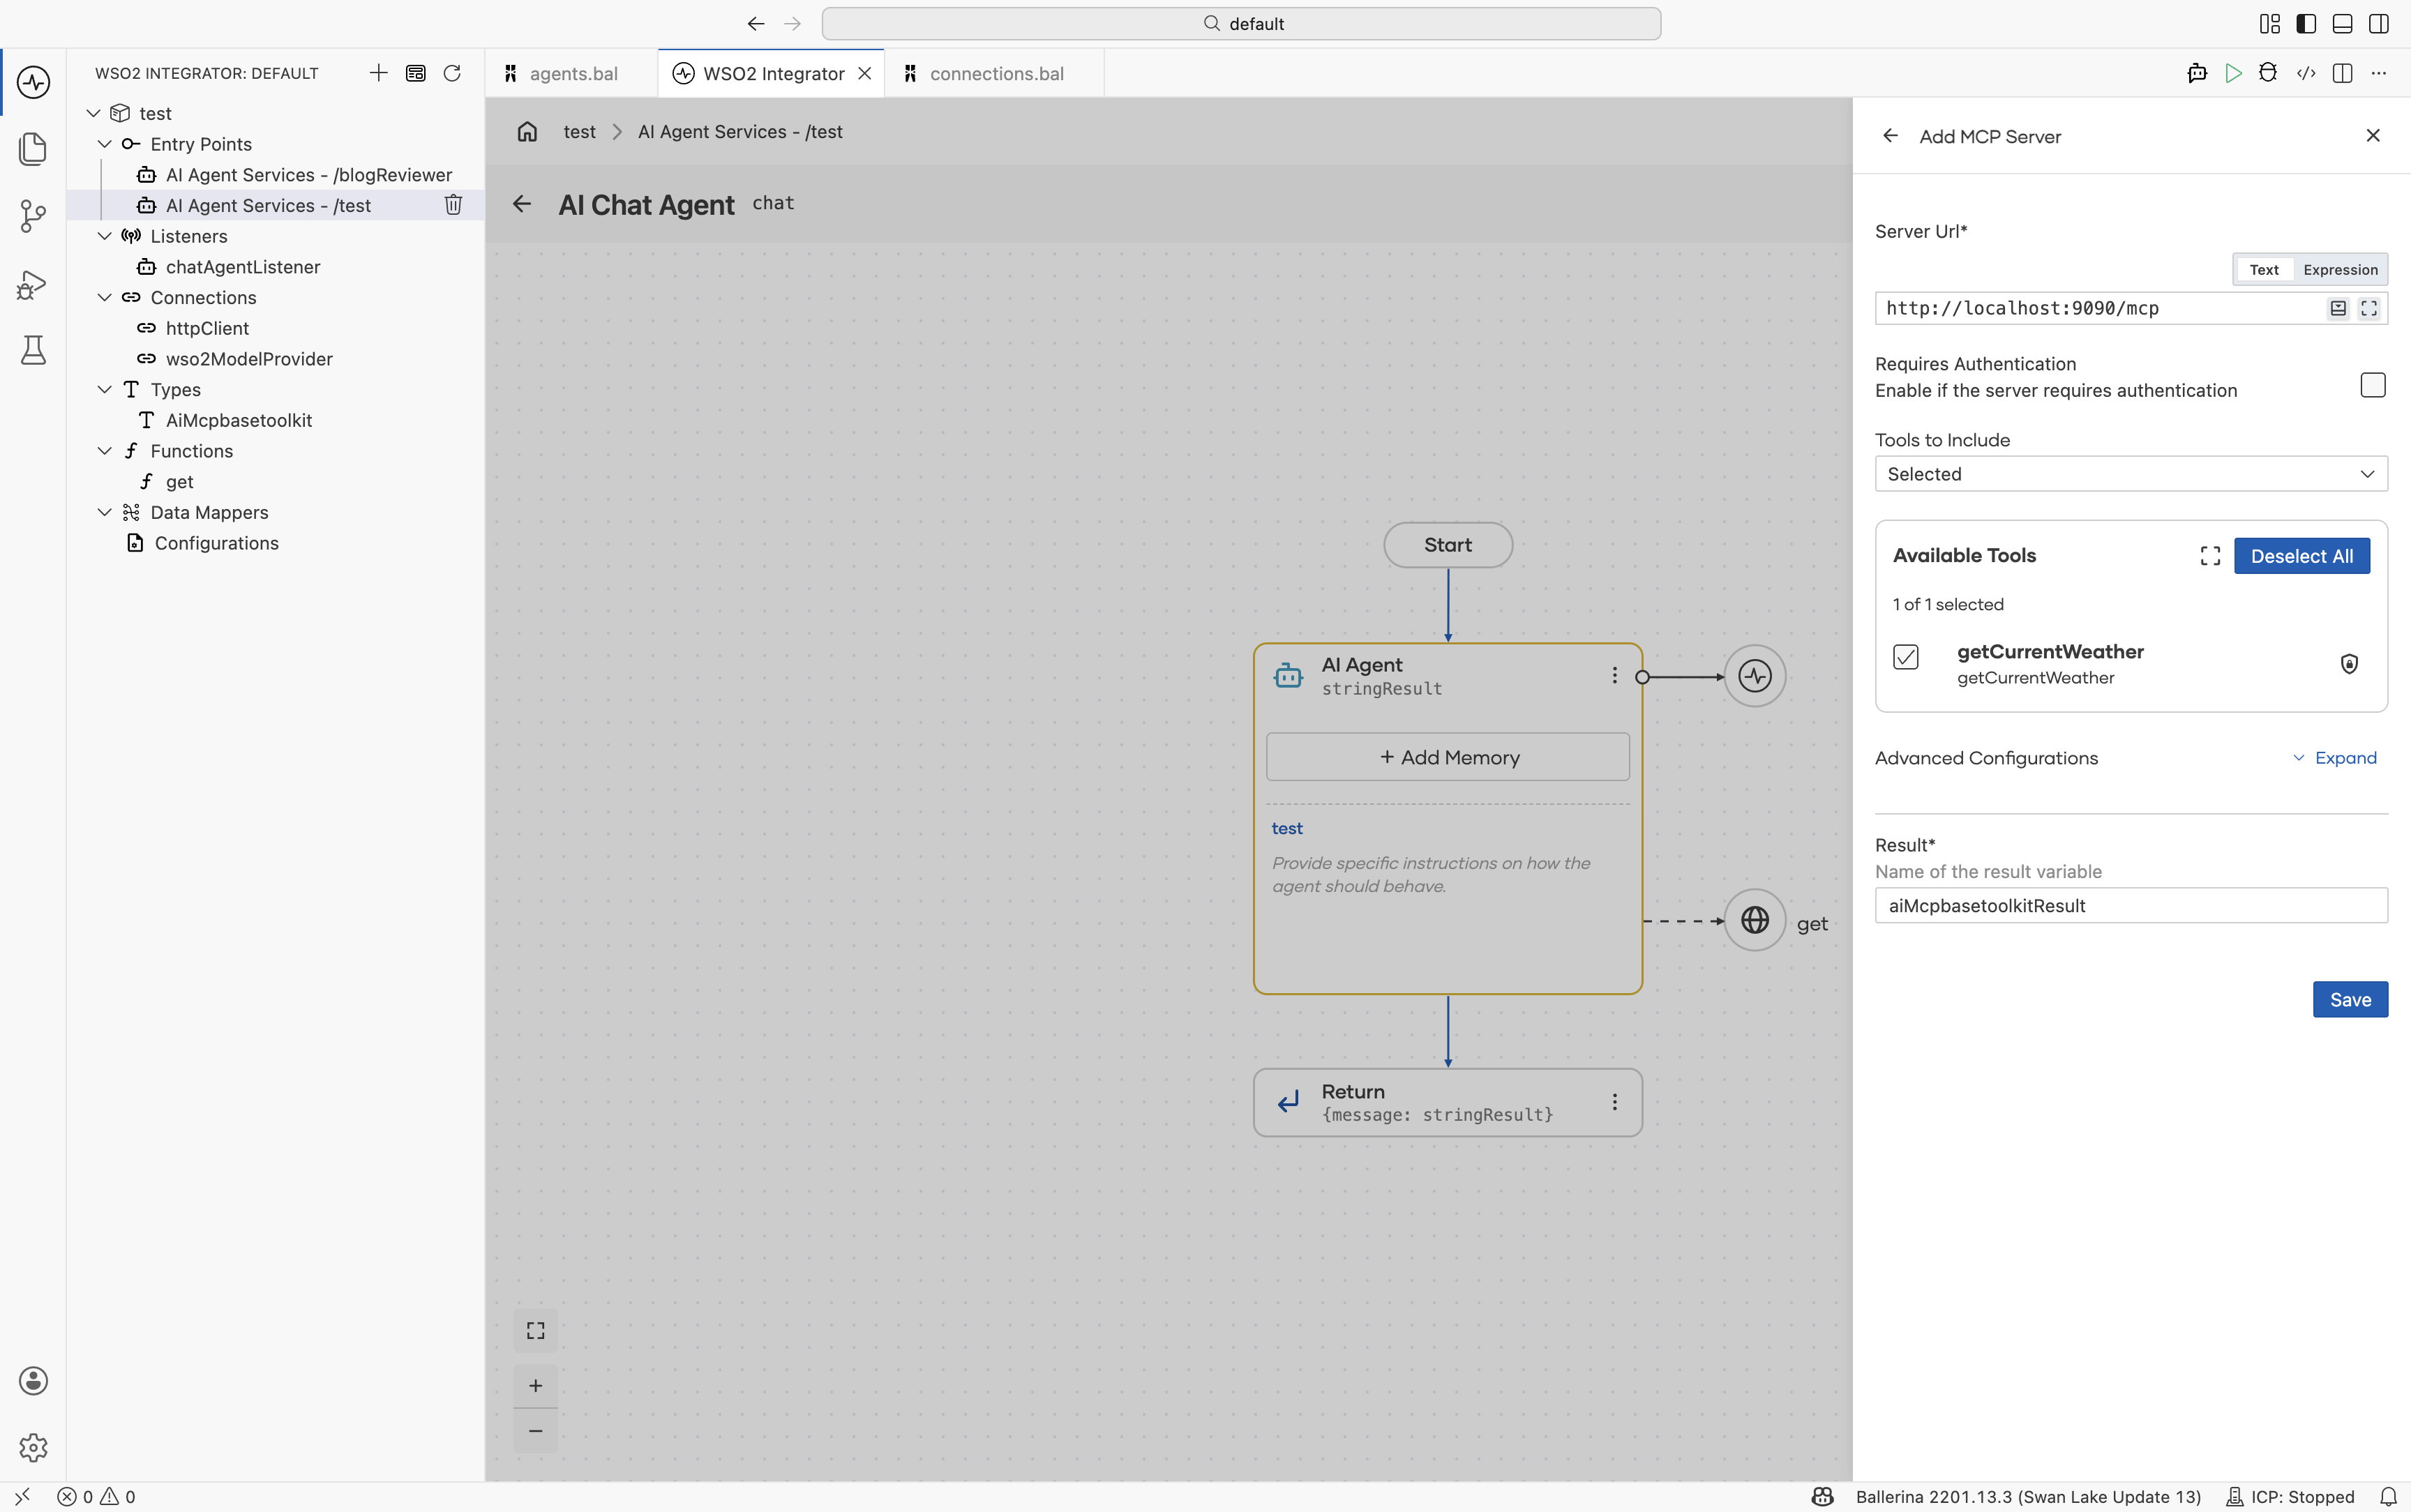
The dialog provides the following configuration for selecting a tool:
| Field | Description |
|---|---|
| Server URL | The MCP endpoint URL, for example http://localhost:9090/mcp or https://mcp.example.com. |
| Requires Authentication | Enable this option if the server requires authentication, then configure the required authentication settings. |
| Tools to Include | Select All to expose every tool advertised by the server, or choose a specific subset of tools by name. |
| Advanced Configurations | Additional HTTP client configurations. |
| Result | The name of the variable used to store the result returned by the MCP tool invocation. |
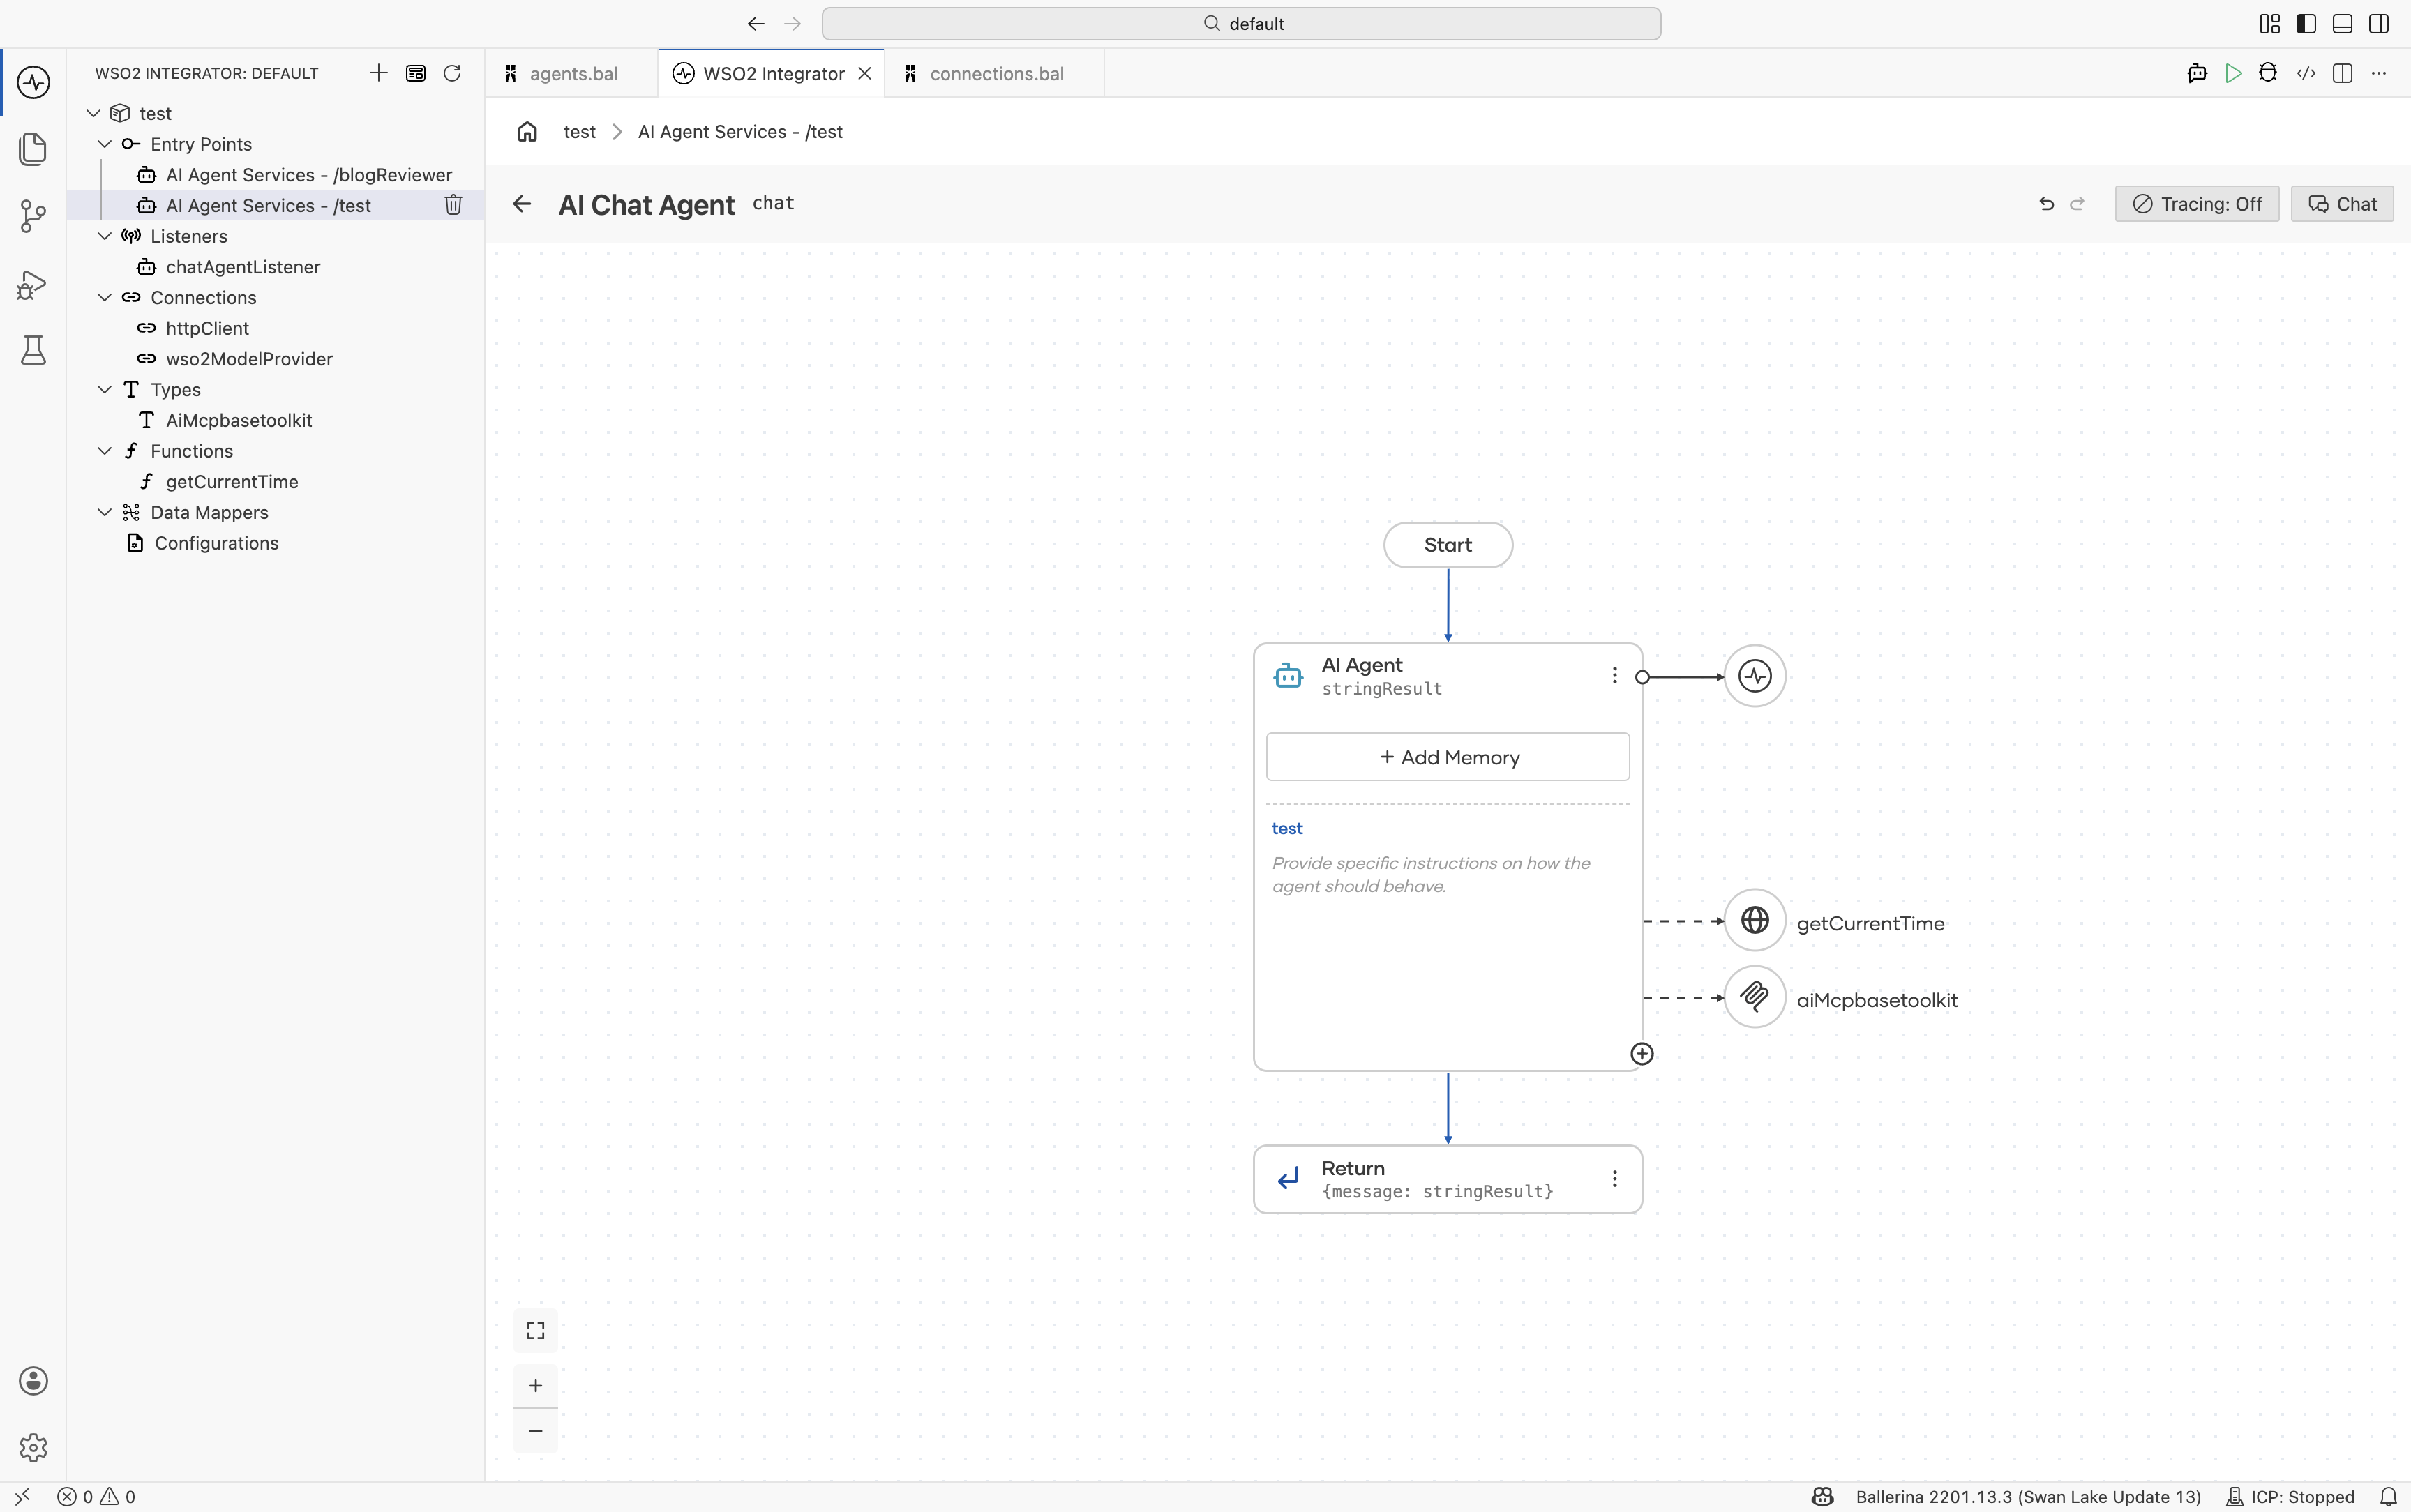
After saving, every tool exposed by the MCP server — or every tool selected in Tools to Include — becomes available to the agent. These tools appear alongside local function tools and are used transparently from the agent’s perspective.
Tip: A WSO2 Integrator project can also consume its own MCP service. See Exposing a Service as MCP.
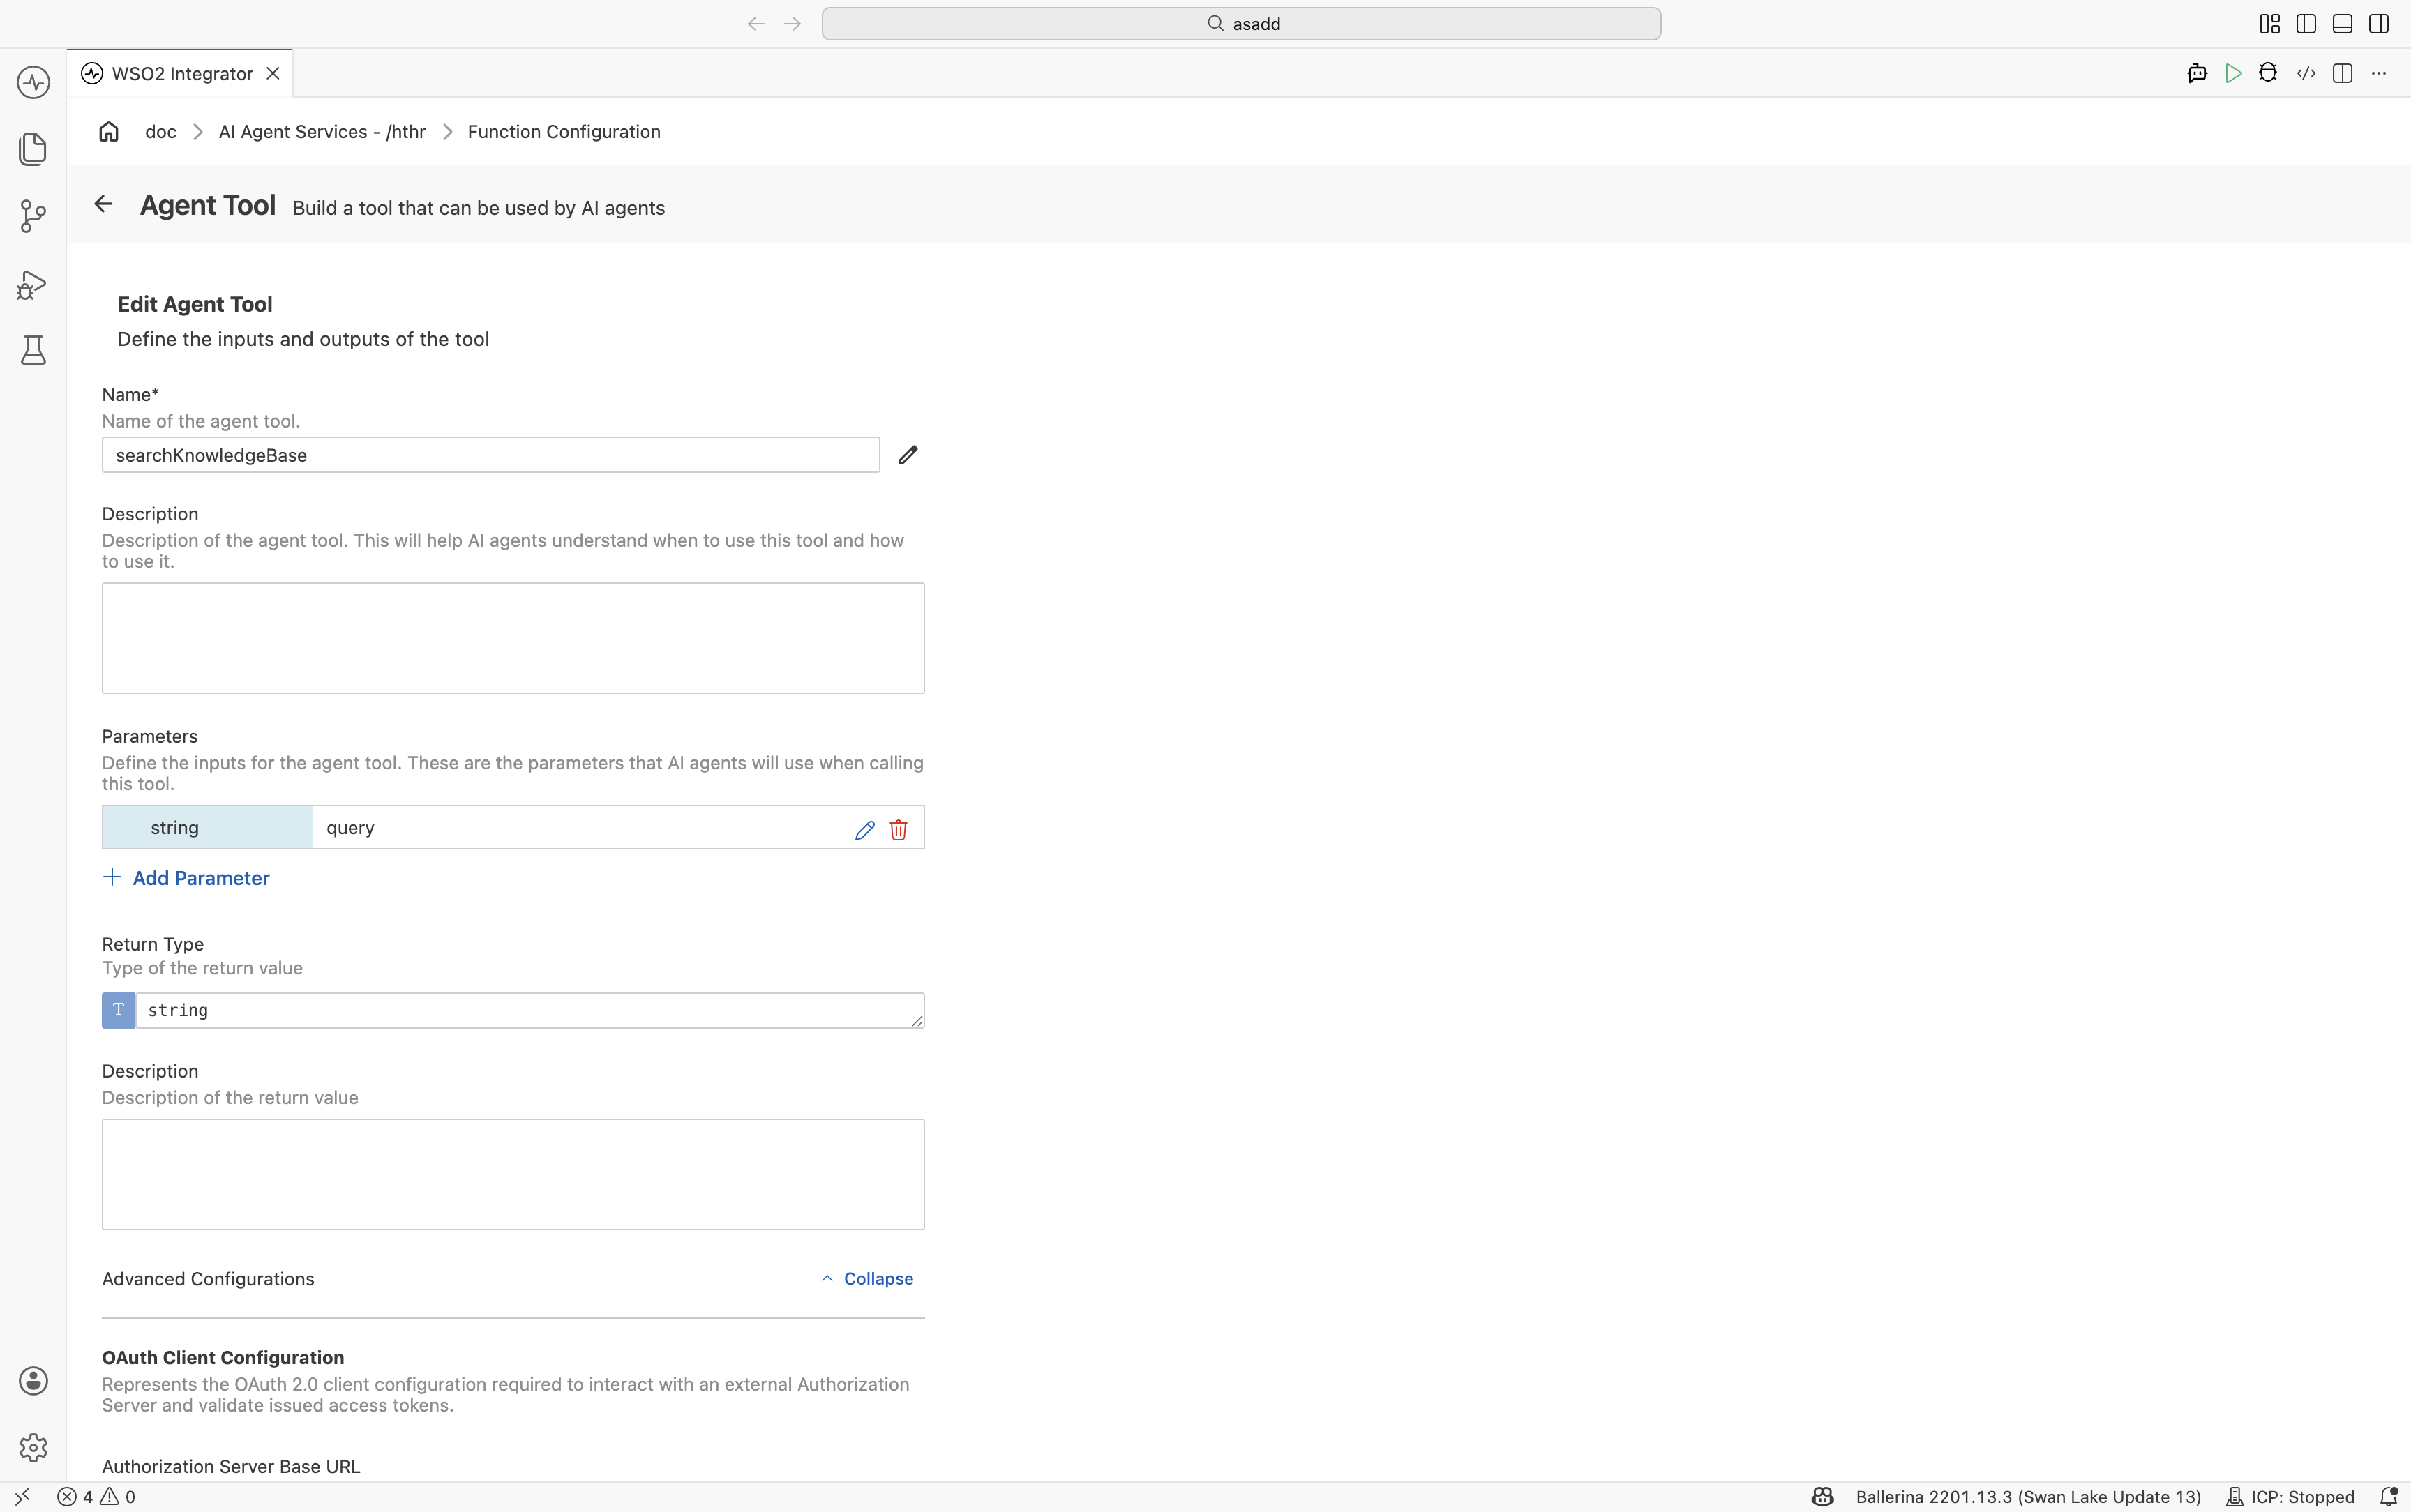
4. Create custom tool
Use this option when you want to define a tool before implementing its logic, or when the tool requires a fully custom structure.
Selecting Create Custom Tool opens the Create New Agent Tool dialog. This full-page dialog provides a structured interface for defining a custom tool.
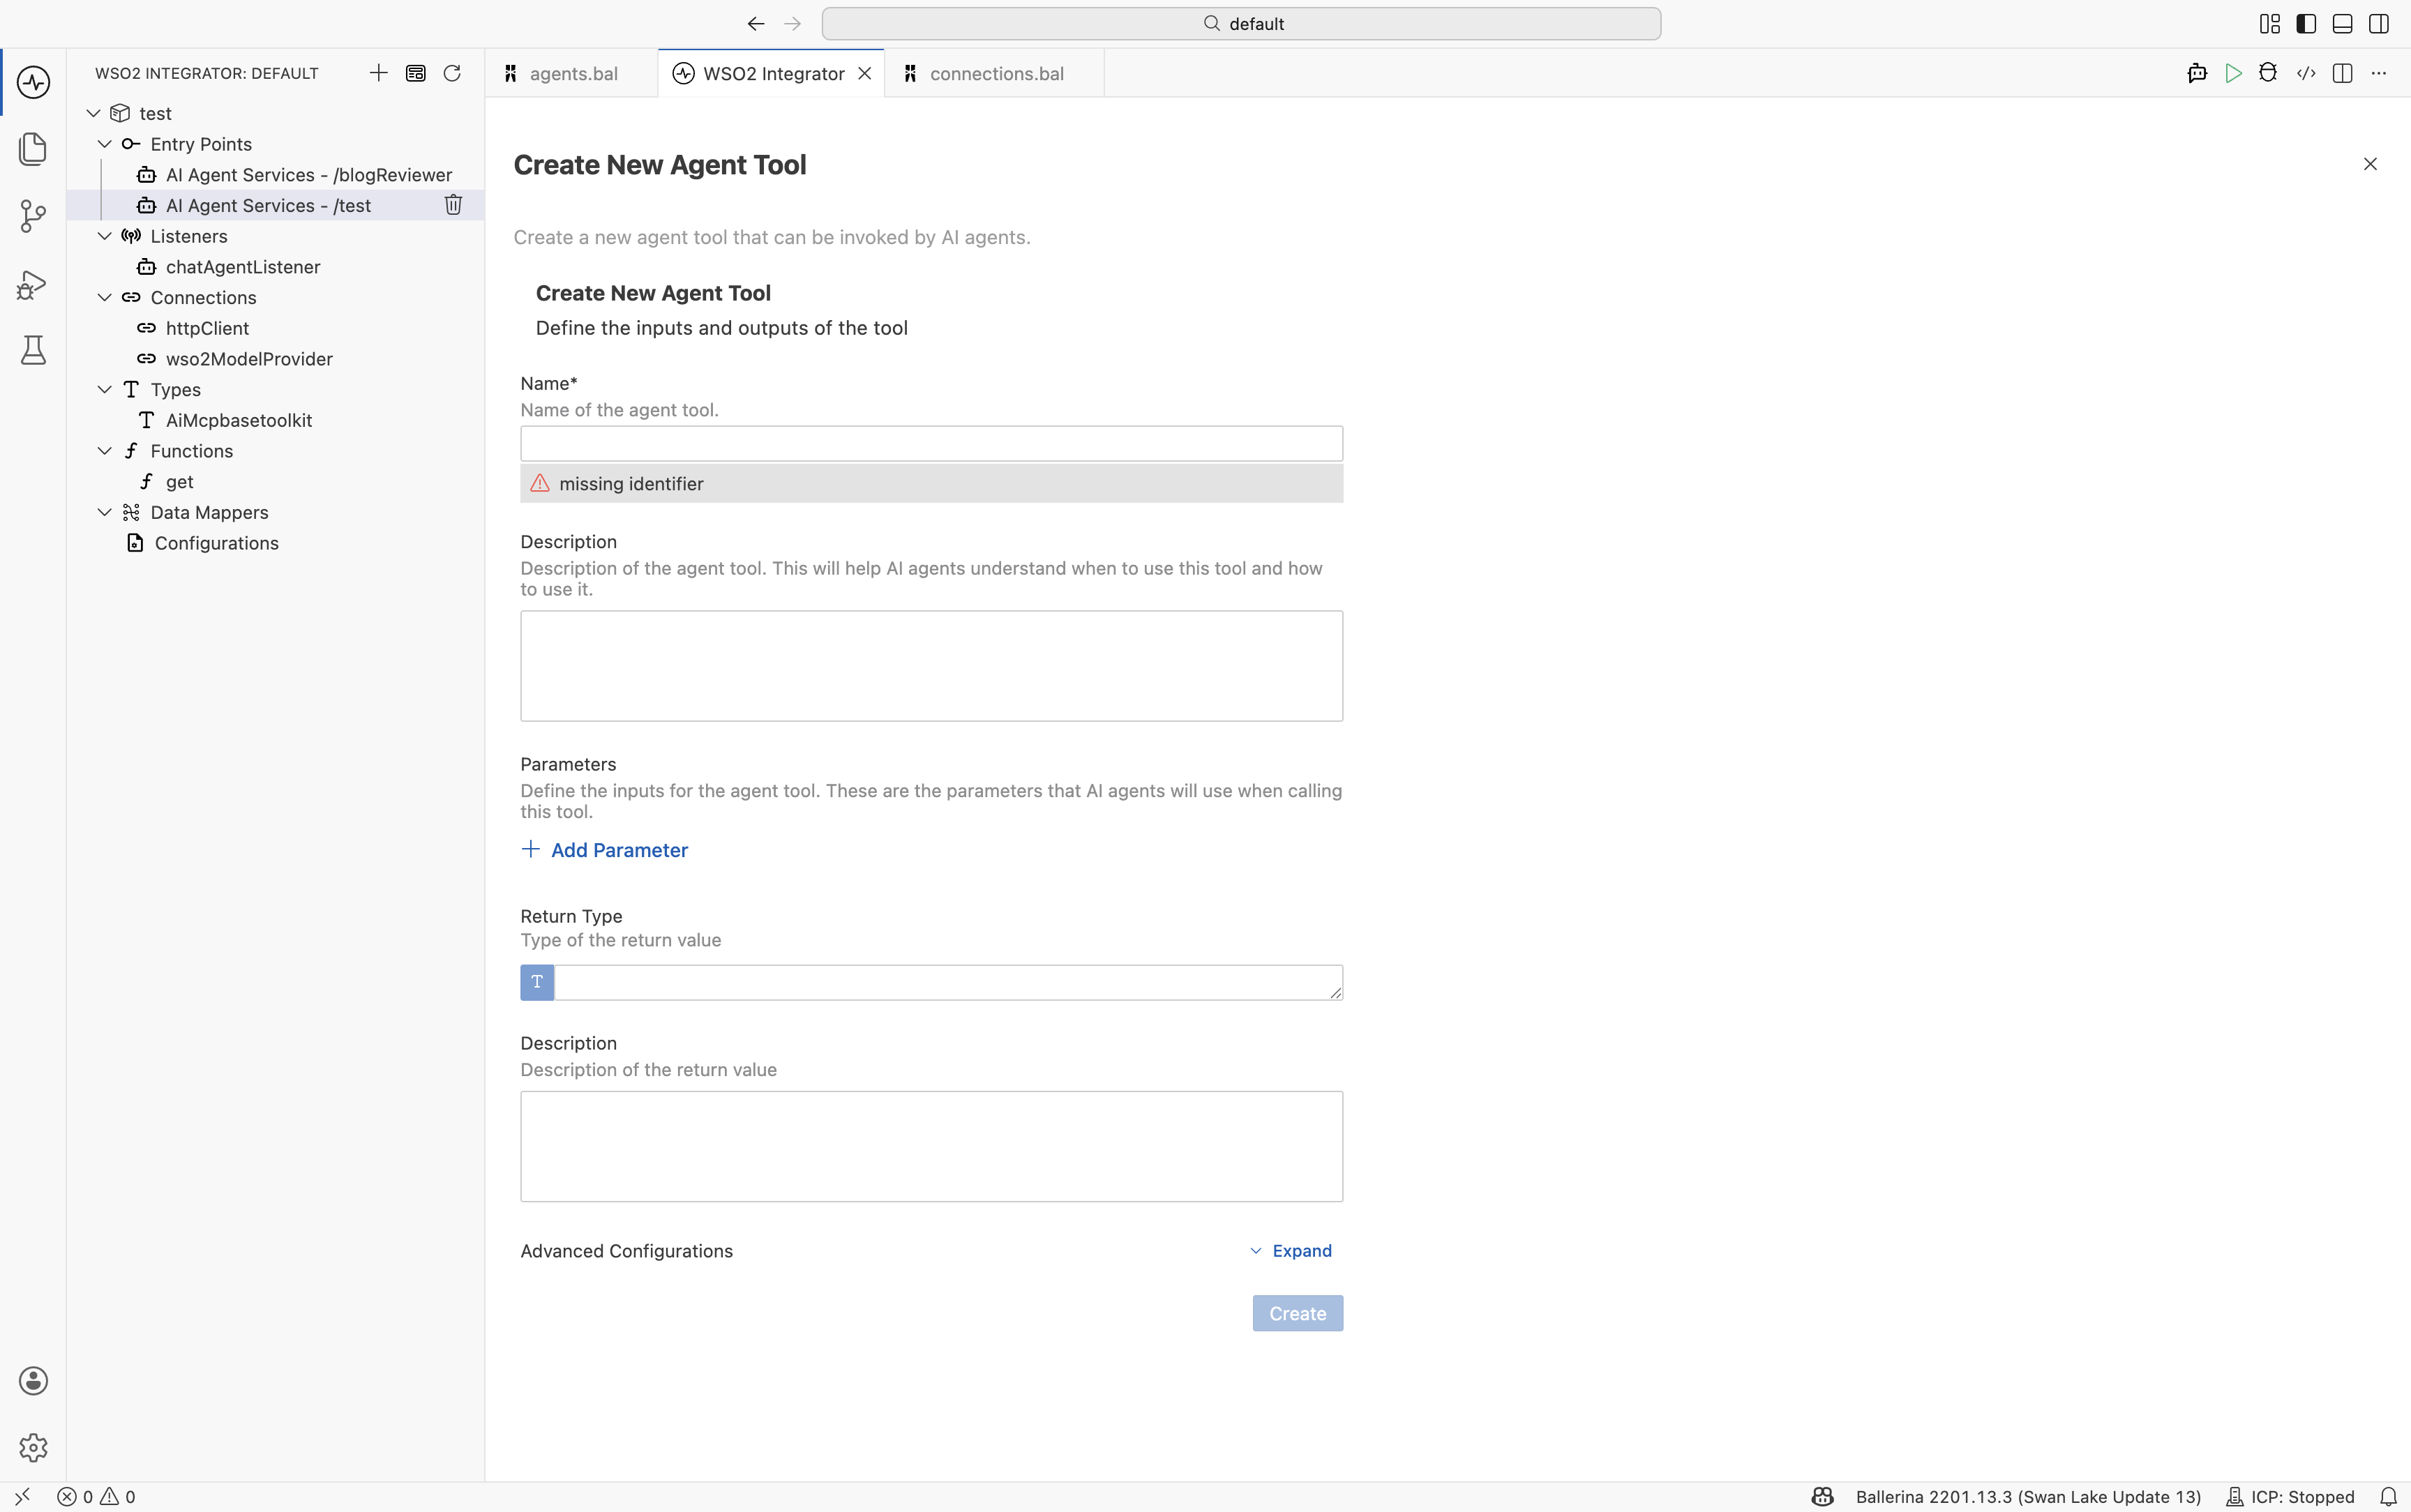
The dialog provides the following options for creating a function:
| Field | Required | Description |
|---|---|---|
| Name* | Yes | The name of the tool used by the LLM to identify and invoke it. |
| Description | No | Explains what the tool does and when the agent should use it. Although optional, providing a clear description significantly improves tool selection accuracy by the LLM. |
| Parameters | No | Defines the input parameters for the tool. Each parameter includes a name, type, and description. The descriptions help the LLM understand what values to provide. Selecting + Add Parameter adds a new parameter definition row. |
| Return Type* | Yes | Defines the Ballerina type returned by the tool. This determines the schema exposed to the LLM. Supported primitive types include string, int, float, decimal, boolean, and (). You can also select + Create New Type or Open Type Browser to use project-defined record types. |
| Description (return) | No | A short description of the return value. |
| Advanced Configurations | No | Additional settings such as visibility and Agent Identity client configuration. |
After clicking Create, WSO2 Integrator generates a stub function annotated with @ai:AgentTool. You can then implement the tool logic inside the generated function.
After adding a tool
The new tool appears in the agent’s right-side Tools panel and is included in every reasoning step from that point onward.
Toolkit
A toolkit is a class that bundles related tools. For example, a TaskManagerToolkit can expose addTask and listTasks. Toolkits are currently written in source view only (there is no dedicated UI yet). You create a single Ballerina class with tool methods and register the toolkit in the agent's tool list. The agent treats toolkit methods exactly like individual tools.
Use a toolkit when:
- A group of tools shares state, such as a connector, database client, or configuration value.
- You want to enable or disable a set of related tools as a unit.
- Ballerina Code
type Task record {|
    string description;
    time:Date dueBy?;
    time:Date createdAt = time:utcToCivil(time:utcNow());
    time:Date completedAt?;
    boolean completed = false;
|};

// A toolkit to manage a set of tasks.
public isolated class TaskManagerToolkit {
    *ai:BaseToolKit;

    private final map<Task> tasks = {};

    // The `getTools` method describes the tools provided by this toolkit.
    public isolated function getTools() returns ai:ToolConfig[] =>
        // The `ai:getToolConfigs` function generates tool configurations
        // for the specified tools.
        ai:getToolConfigs([self.addTask, self.listTasks]);

    // Tool to add a new task.
    @ai:AgentTool
    isolated function addTask(string description, time:Date? dueBy = ()) {
        lock {
            self.tasks[uuid:createRandomUuid()] = {
                description: description,
                dueBy: dueBy.clone()
            };
        }
    }

    // Tool to list all current tasks.
    @ai:AgentTool
    isolated function listTasks() returns map<Task> {
        lock {
            return self.tasks.clone();
        }
    }
}
Add the toolkit to the agent
Once you create the toolkit, open the agent in source view and add the toolkit to the tools configuration.
- Ballerina Code
import ballerina/ai;

TaskManagerToolkit taskManager = new TaskManagerToolkit();

final ai:Agent toolAgent = check new (
    systemPrompt = {role: string `tool`, instructions: string ``}, model = wso2ModelProvider, tools = [taskManager]
);
After adding the toolkit, the agent can invoke all tools exposed by the TaskManagerToolkit, including addTask and listTasks. Since the toolkit maintains shared state internally, all tool invocations operate on the same task collection managed by the toolkit instance.
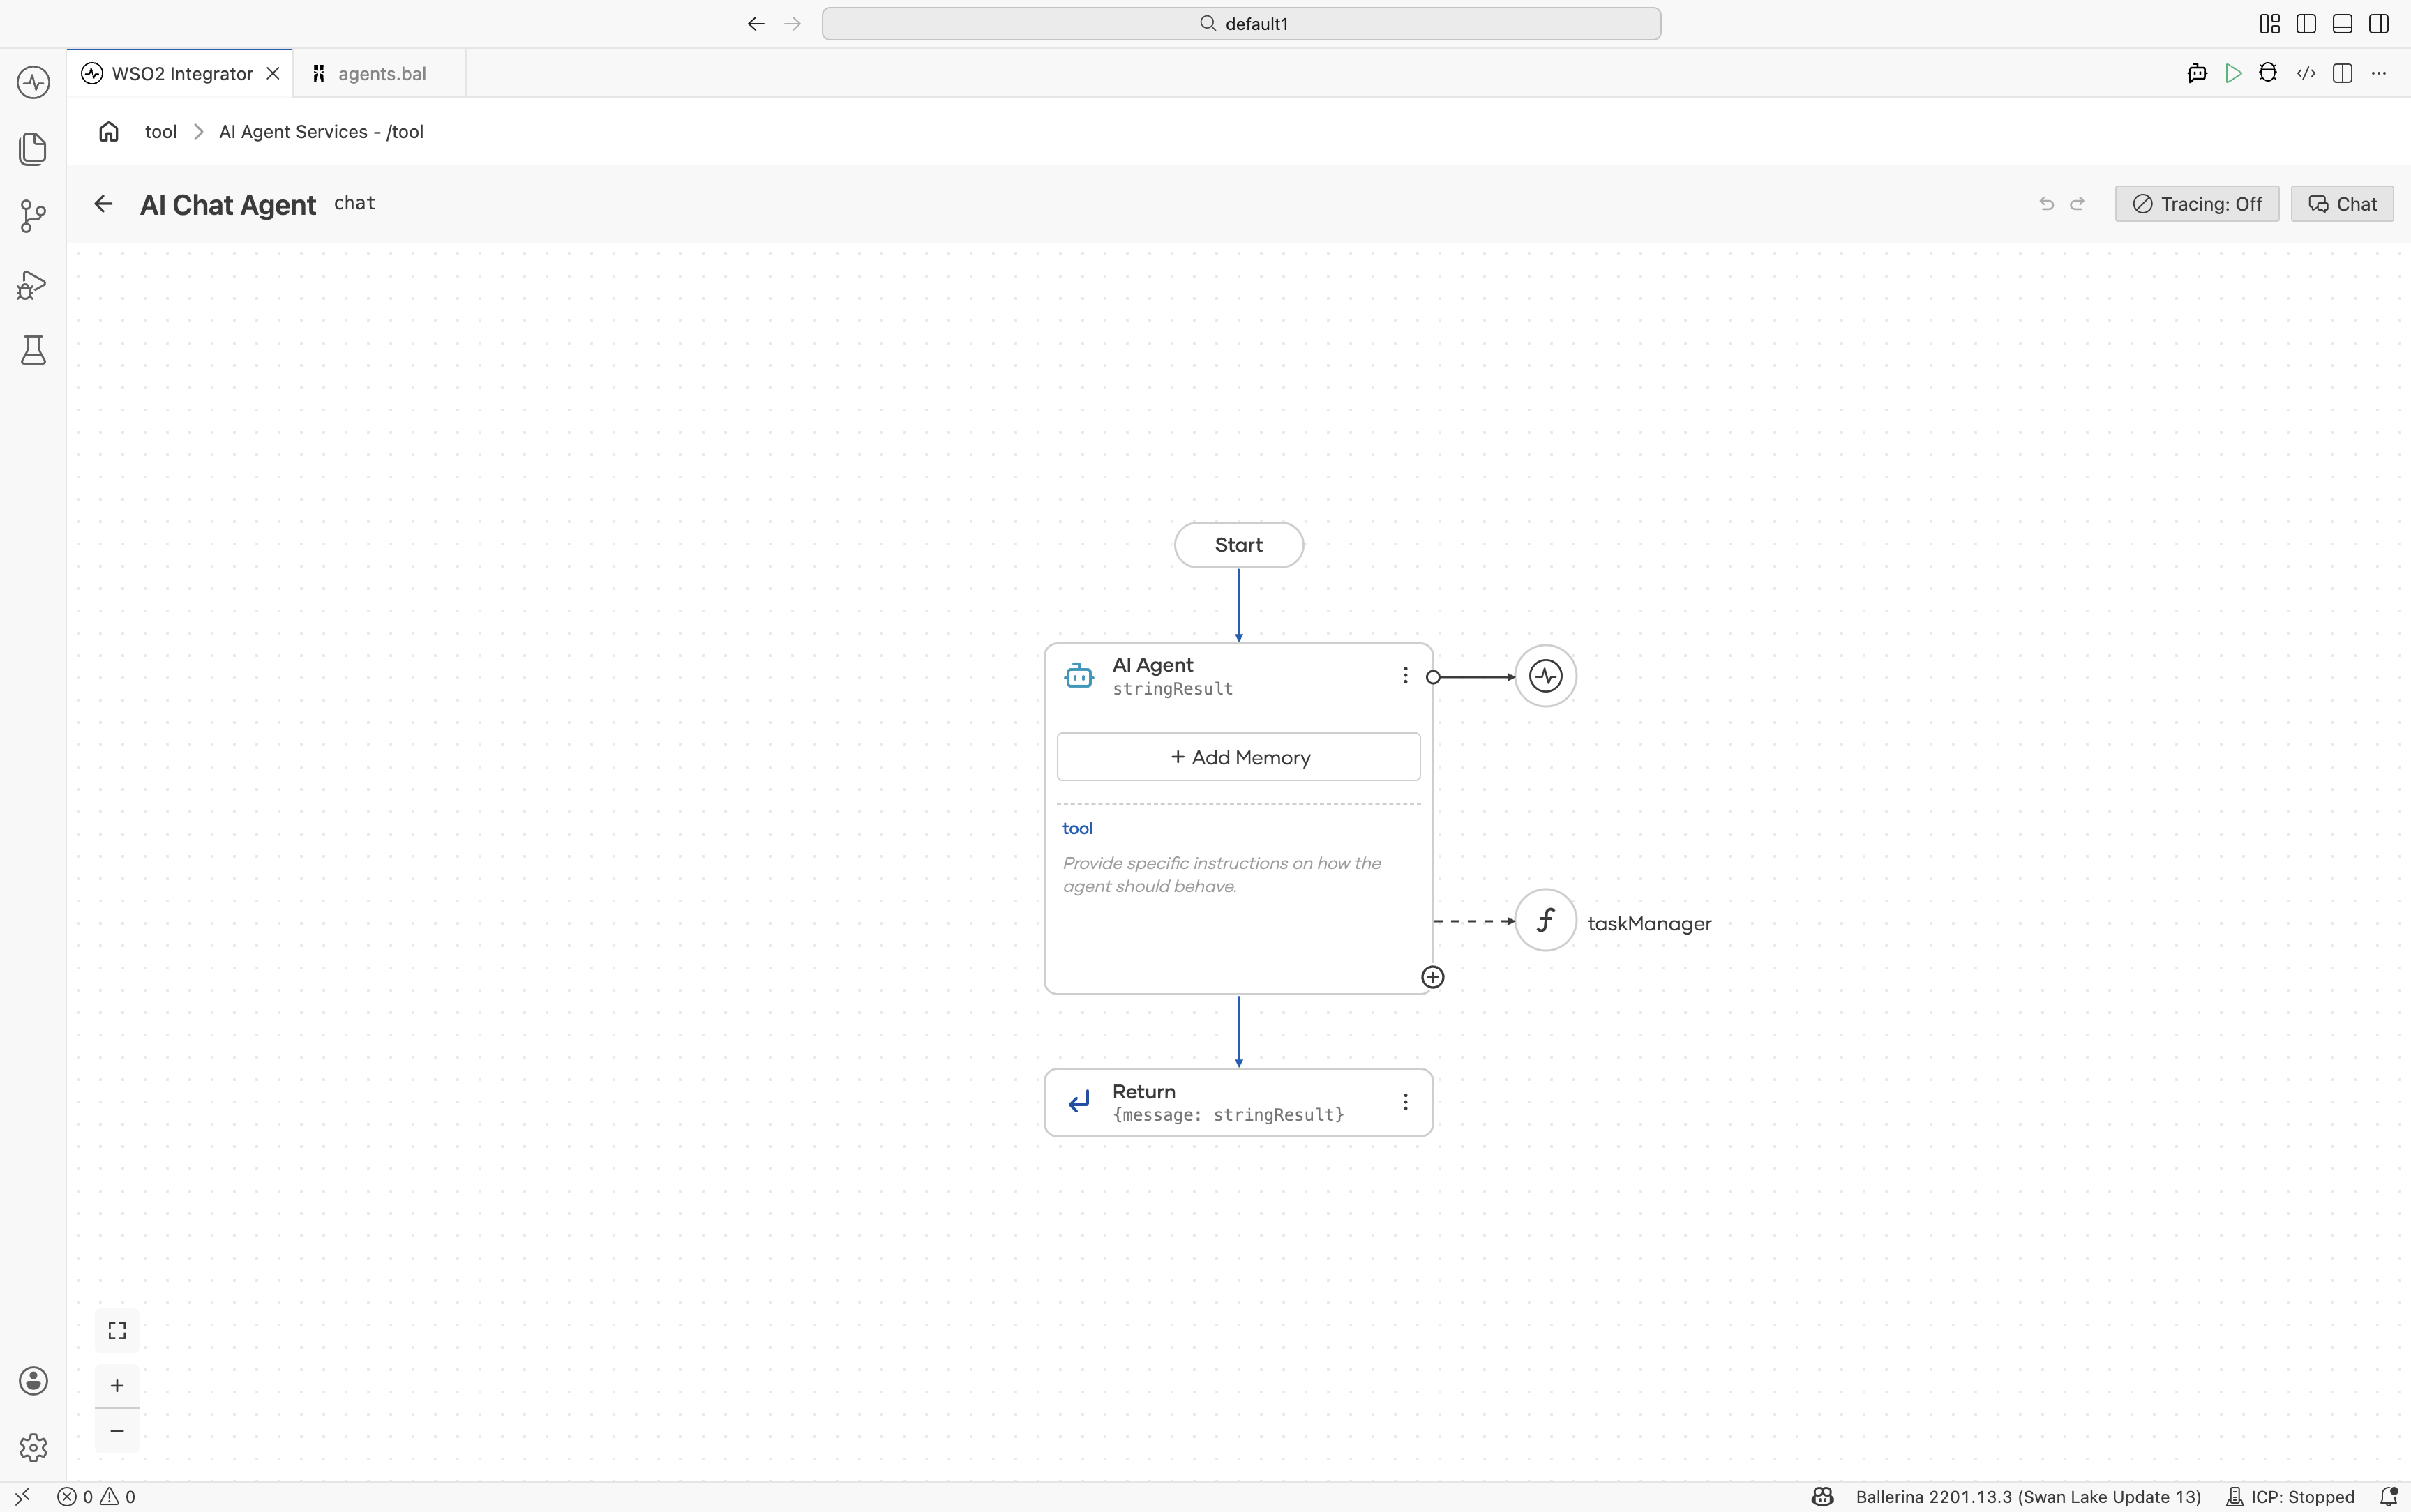
Configure an attached tool
Once a tool is attached, you can view, edit, or delete it by clicking the vertical ellipsis button of the attached tool.
To configure a tool, click Edit and configure the following fields.
| Field | Required | Description |
|---|---|---|
| Name | Yes | The name or identifier of the agent tool. |
| Description | No | A description of the agent tool. This helps AI agents understand when and how to use the tool. |
| Parameters | No | Defines the input parameters used when invoking the tool. |
| Return Type | Yes | Defines the type of value returned by the tool. |
| Return Description | No | A description of the value returned by the tool. |
| Advanced Configuration | No | Contains the agent authentication client configurations and additional security-related settings used to connect with external authorization servers. |
Advanced configuration
| Field | Required | Description |
|---|---|---|
| Authorization Server Base URL | No | The base URL of the OAuth 2.0 Authorization Server used to resolve authorization and token endpoints. |
| Client ID | No | The OAuth 2.0 client identifier issued for the application. |
| Client Secret | No | The OAuth 2.0 client secret issued for the application. |
| Redirect URI | No | The redirect URI registered for the OAuth client and used in the Authorization Code flow. |
| Required Scopes | No | The OAuth scopes required to invoke the tool. |
| Enable PKCE | No | Indicates whether PKCE (Proof Key for Code Exchange) is enabled for the Authorization Code flow. |
| Secure Socket | No | SSL/TLS-related configuration used for secure communication. |
What's next
- Memory — Make the agent’s tool calls remember earlier turns.
- Observability — See which tools the agent actually selects.
- Evaluations — Learn how to prevent regressions in AI agent quality.