Writing a Custom Inbound Authenticator for WSO2 Identity Server 5.3.0

- Gokul Balakrishnan
- Associate Lead Solutions Engineer - WSO2
The authentication framework that ships with WSO2 Identity Server 5.3.0 provides a way to decouple authentication functionality from the actual authentications protocols (e.g. SAML2, OpenID Connect, etc). In other words, the protocol-specific tasks such as parsing and validation are delegated to a protocol-specific component while the authentication framework only deals with a single format that it understands.
In this new approach, the logic for processing an inbound authentication request will be written as an OSGi component (pluggable Java artifacts) called an inbound authenticator. When deployed to the identity server, the authentication framework will automatically detect and enable these authenticators during runtime so that they can be used against an incoming authentication request based on the need.
As opposed to the previous identity server versions, there is just one servlet which will handle requests from the various types of authentication protocols: the “identity” servlet running on the context “identity”. If we consider a typical authentication scenario, when a certain request reaches this servlet, the authentication framework will engage the appropriate inbound authenticator based on its logic, i.e. whether or not a certain processor is able to handle this request. This authenticator will be responsible for handling all the protocol-specific tasks (such as validation), as well as for converting the request to a common format so that it can be passed on to the framework.
Receiving and parsing the request is only one part of the entire authentication step. So once an authenticator is chosen to convert the authentication request to the common Framework-understood format, the next step is to pick a Service Provider configuration in the Identity Server so that the actual authentication step is carried out based on the configuration, either through local and/or federated authenticators. Finally, the response is sent either to the calling party or redirected based on the requirement and so on.
The anatomy of an inbound authenticator
As explained above, an inbound authenticator is responsible for performing the following tasks:
- Parse the incoming authentication request from the server and see if it could be handled. Includes any validation steps as dictated by the protocol.
- If yes, convert that request into a format understood by the Identity Server’s authentication framework
- Pass the converted request (called an IdentityRequest) to the authentication framework
- When the framework responds with anIdentityResponse, convert it to a corresponding HTTP response
- Pass along the final HTTP response to the calling party
This flow can be illustrated in a sequence diagram as follows:
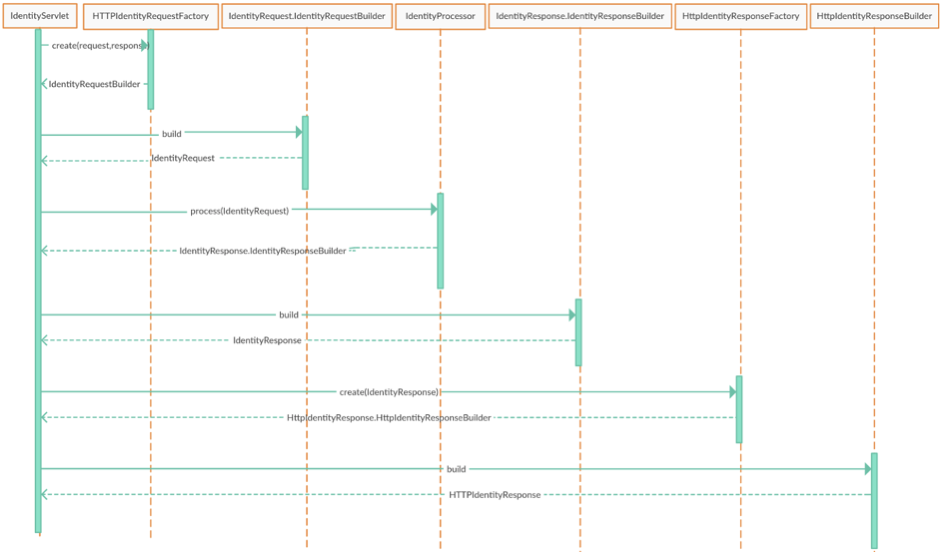
Figure 1
An explanation of each of the above major components is as follows:
IdentityServlet
This is the servlet provided by the Identity Server to which authentication requests are sent by the calling party. The servlet is part of the authentication framework, hence it is not protocol-aware. It will pass on requests it has intercepted to a suitable inbound authenticator based on its canHandle() logic (see below).
HTTPIdentityRequestFactory
Takes in a servlet request from the /identity servlet and provides a builder to an IdentityRequest instance (or an instance of a subclass of IdentityRequest) as the output. Contains a canHandle() method inherited from the parent class which dictates whether or not a certain servlet request can be handled by this particular class. This method has to be implemented by the developer designing the custom inbound authenticator.
IdentityRequestBuilder
This builder is responsible for building a concrete instance of IdentityRequest for the framework when needed. The reason that a builder is returned rather than a concrete instance of IdentityRequest is that IdentityRequest instances are treated as immutable within the framework. Hence, using builder classes offers the flexibility to have any custom parameter and set it as needed before the IdentityRequest instance is created on demand. It is common for such builder class to be inner classes of the concrete instance. For example, a class SomeSampleIdentityRequestBuilder can usually found within the class for SomeSampleIdentityRequestBuilder.
IdentityProcessor
This class is responsible for doing the actual processing of the onbound auth request. It does this by validating the IdentityRequest and passing it on to the authentication framework for validation. Its main functionality, which is carried out in the process() method (inherited from the IdentityProcessor superclass), can be summarised as follows:
In the in-flow (a fresh IdentityRequest coming from the /identity servlet):
- The business logic is carried out (for example, extracting and/or validating custom parameters, cookies etc set in the request)
- A MessageContext is created so that any needed properties can be preserved for the outflow
- Finally, the request is passed to the framework through the in-built method buildResponseForFrameworkLogin() with the created message context as a parameter. The response from the framework will then be sent again to the /identity framework.
In the out-flow (returning a processed response from the authentication framework, which was sent to the /identity servlet as described in the above case)
- Derive an instance of an AuthenticationResult object (which can be used to check if the authentication step specified in the corresponding SP is successful or not) through the processResponseFromFrameworkLogin() in-built framework method. If desired, separate IdentityResponse objects can be created for auth success and fail scenarios.
- Provide a response to the calling party through custom IdentityResponse and HTTP response implementations, as required.
IdentityResponseBuilder
This class is responsible for performing a similar task to the IdentityRequestBuilder, where it builds and returns either
- Return a concrete instance of a corresponding IdentityResponse
- Return a subclass of IdentityRequest if so implemented, which is capable of holding additional parameters as needed by the developer.
HTTPIdentityResponseFactory
This class does the opposite of the HTTPIdentityRequestFactory; it builds a HTTP response factory instance based on the common IdentityRequest format used by the authentication framework. Here, the HTTP response is specific to the protocol in use (for example, a SAML HTTP response will contain headers and fields as per the SAML spec).
HTTPIdentityResponseBuilder
Finally, this class builds a concrete HTTPIdentityResponse which will be used to provide a servlet response based on whatever logic has been written for the transport-level functionality. For example, based on the parameters set in the incoming IdentityResponse which was converted in the upper-level HTTPIdentityResponseFactory class, redirect URLs, cookies, headers etc can be set as needed.
The diagram below illustrates the overall flow, starting from the authentication request issued from the external Service Provider:
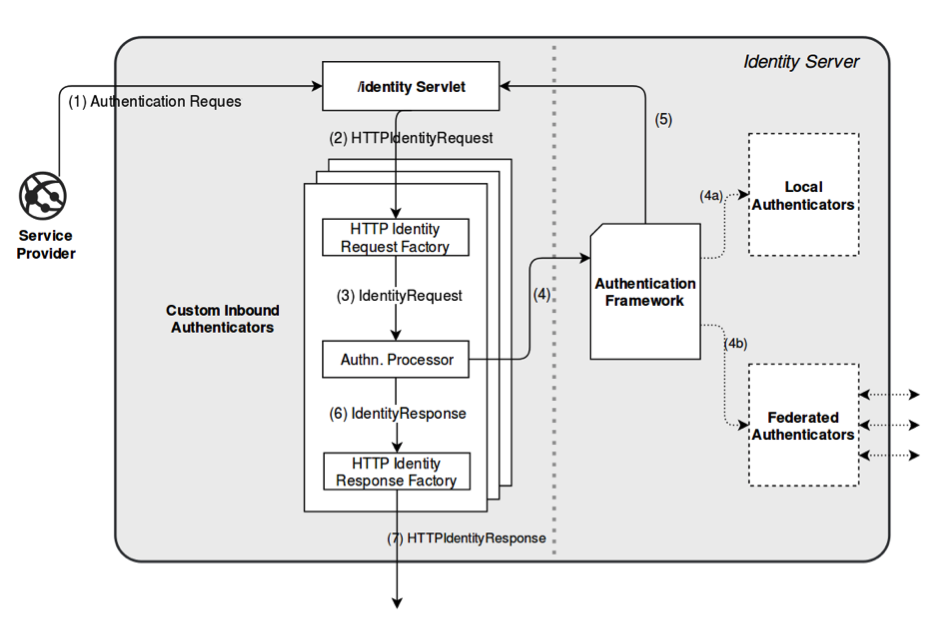
Figure 2
Service provider configuration
As is the case with other inbound authenticators, a custom inbound authenticator will also have to be engaged in the desired Service Provider for it to work. This step is the same as adding any other inbound authenticator like SAML2 SSO etc.
A point to note here is that it is possible to specify custom properties for the given protocol at this stage, and they can be picked up in the code-level later. An example would be setting a redirect URL in the SP configuration for a custom inbound authenticator and later retrieving this property and setting it in the HTTP response. In order to do this, the properties needed should be added to the property map in the subclass of AbstractInboundAuthenticatorConfig.
The UI elements for the authenticator in the SP configuration are populated through the properties passed to the getConfigurationProperties() method in the implemented subclass of AbstractInboundAuthenticatorConfig, which will also need to be incorporated in the custom inbound authenticator code. This class offers certain standard methods to be overridden, such as the name, friendly name. The ID of the relying party element, which is also specified here, is very important because it uniquely identifies the SP among all other SPs.
An inbound authenticator must override a method called getRelyingPartyId() in the processor class - this method will point to a unique ID to identify the authentication protocol the processor handles. For example, in the SAML inbound authenticator, the field “issuer” is set as the relying party ID. Hence, when we specify the ID of the relying party element in the SP configuration (again, this is “issuer” in the SAML SP-side configuration), this match is used to pick that particular SP configuration among others for a given authentication request for a protocol. This can be illustrated in a simplified manner as follows:

Figure 3
Sample custom inbound authenticator implementation
In order to illustrate the concepts discussed, let us consider a simple example (the code of which is hosted at [3]) where the authentication protocol that is to be handled by the sample authenticator contains a set of predefined input parameters that come part of the request. Namely, the canHandle() method of the HTTP request builder will return true of a certain parameter ‘customAuthRequest’ is found in the request. Quite simply, this is the same as a SAML request being validated.
Once the request has been intercepted by the identity servlet and passed on to the authenticator, a subclass of the IdentityRequest instance (CustomInboundRequest) is created and passed on to the processor (CustomInboundRequestProcessor), which constitutes the core functionality of the authenticator.
In the process() method of the request processor, the first operation is checking if the calling party is the identity servlet (i.e. a new request) or the authentication framework (i.e. the result of the processing step). This is achieved by checking if a session ID (which is generated by the framework as part of the authentication step) exists. If it does, the flow is treated as one coming from the framework and the parameters (e.g. redirect URL) picked up from the request are set to the response and then passed to the IdentityResponse builder. On the other hand, if it does not exist, then the incoming IdentityRequest is passed on to the framework. This session ID can be used to retrieve the message context so that properties set in the entry phase can be extracted for use in the exit phase if desired.
On the response path, the IdentityResponse generated by the Framework is then built and then converted into an HTTP response which could also be customised as desired.
Running the sample
The sample inbound authentication use-case could be demonstrated through the sample webapp hosted at [3]. The steps for this are as follows:
- Check out the code along with the sample webapp from the hosted location at [3]
- Run ‘mvn clean install’ on the custom-inbound-authenticator maven project to build the relevant OSGi bundle. This should be copied over to Identity Server 5.3.0’s dropins directory (i.e.
/repository/components/dropins ) - Deploy the web application under the “webapp” directory (TestApp) to a webapp container of your choice (e.g. Tomcat).
- In the Identity Server’s Service Provider configurations page, you will note that a new item has started appearing, namely “WSO2 Sample - Custom Inbound Configuration”.
- Provide values for the 2 fields, a redirect URL of your choice and a relying party string which should have the same value as the incoming parameter from the webapp’s login call (the one which has been set as the relying party ID. In the sample application, this string should be ‘custom-inbound’). The finished configuration should look as follows:
- Navigate to the web app page for the ‘TestApp’ application (e.g. https://localhost:8080/TestApp) and click on the Login button.
- Based on the SP settings, an outbound authentication mechanism should be triggered. Once the login process is complete, you will see that a redirect takes place to the URL specified in the SP configuration (as above), and the a URL parameter ‘token’ in the response contains an encoded token (namely, the Base64-encoded username), as written in the CustomInboundRequestFactory class in the processor code.
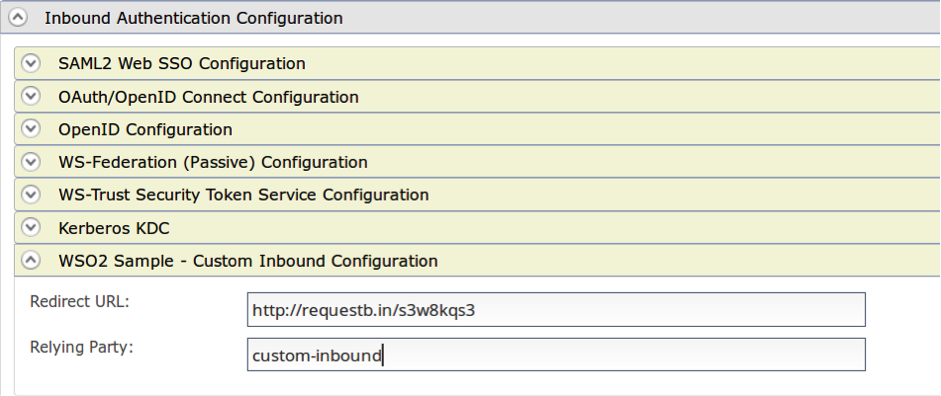
Figure 4
References
About Author
- Gokul Balakrishnan
- Associate Lead Solutions Engineer
- WSO2