End-to-End Capabilities of WSO2 Enterprise Integrator

- Vinod Kavinda
- Senior Technical lead - WSO2
WSO2 Enterprise Integrator is an all-in-one package for integration. It contains the enterprise service bus (ESB) profile for mediation and data services, the message broker profile to support reliable messaging, the business process profile for long running processes and the analytics profile for statistical requirements of the system. Let’s see how each of these components can be used in a real-world scenario.
Use case description
Most public organizations need to provide reports upon the request of journalists, analysts or the public. Let’s assume you have a website that allows people to make such requests and search for already published reports. The integration layer of this website needs to
- Accept requests, serve them reliably and make sure none of them are missed.
- Get certain reports approved
- Save the metadata of the report in a database that can be searched later
- Have a file server through which people can retrieve the documents. The original requester should be notified of his report too.
- Monitor the status of the system since this is a public facing system.
Figure 1 shows how the data flow happens between each integrator profile.

Figure 1: Data flow
Now let’s see how to implement the above use case using WSO2 Enterprise Integrator.
Configuring the message broker profile
To ensure all requests are reliably received and considered in the correct order, we can store them in a queue in the message broker profile. It behaves as a scalable, clusterable broker that supports asynchronous message delivery and guaranteed delivery. Using the JMS API, other components of the WSO2 Enterprise Integrator can connect to the message broker.
- Make a copy of WSO2 Enterprise Integrator and go to the bin folder.
- Start the broker using this command: ./broker.sh
- This will start the broker via AMQP on port 5675 by default. Go to the management console with this URL - https://127.0.0.1:9446/carbon/ - to ensure it has started correctly.
Configuring the enterprise service bus profile
The integrator profile has ESB and data services capabilities that accept requests with a high concurrency, mediates them and dispatches them using various protocols.
Setting up the message store and processor
You can use the message store processor pattern to ensure reliable messaging. This ensures successful delivery of the messages between unreliable systems with zero message loss by persisting them in a queue until they are processed. Refer to the WSO2 EIP guide to see other integration patterns we support.
You need to configure the message store in the integrator to store messages in the queue of the message broker profile.
-
Copy the following client libraries into the [EI_HOME]/lib folder.
- [EI_HOME]/wso2/broker/client-lib/andes-client-3.2.13.jar
- [EI_HOME]/wso2/broker/client-lib/geronimo-jms_1.1_spec-1.1.0.wso2v1.jar
-
The queue name and the connection details to the broker should be configured in [EI_HOME]/conf/jndi.properties. The configured file should look like below.
# register some connection factories
# connectionfactory.[jndiname] = [ConnectionURL]
connectionfactory.QueueConnectionFactory = amqp://admin:admin@clientID/carbon?brokerlist='tcp://localhost:5675'

# register some queues in JNDI using the form
# queue.[jndiName] = [physicalName]
#queue.MyQueue = example.MyQueue
queue.reports = reports

# register some topics in JNDI using the form
# topic.[jndiName] = [physicalName]
#topic.MyTopic = example.MyTopic
Now start the ESB server by running ./integrator.sh from the [EI_HOME]/bin folder. Go to the management console (https://localhost:9443/carbon) of the ESB profile to configure the message store.
Creating the message store
Let’s create a message store named ReportsStore. Select Add WSO2 MB Message Store from the Add Message Store store tab and fill in the fields as shown in figure 2. The source for the message store is available in the ReportsStore.xml file, which can be found within the zip file in the Appendix.
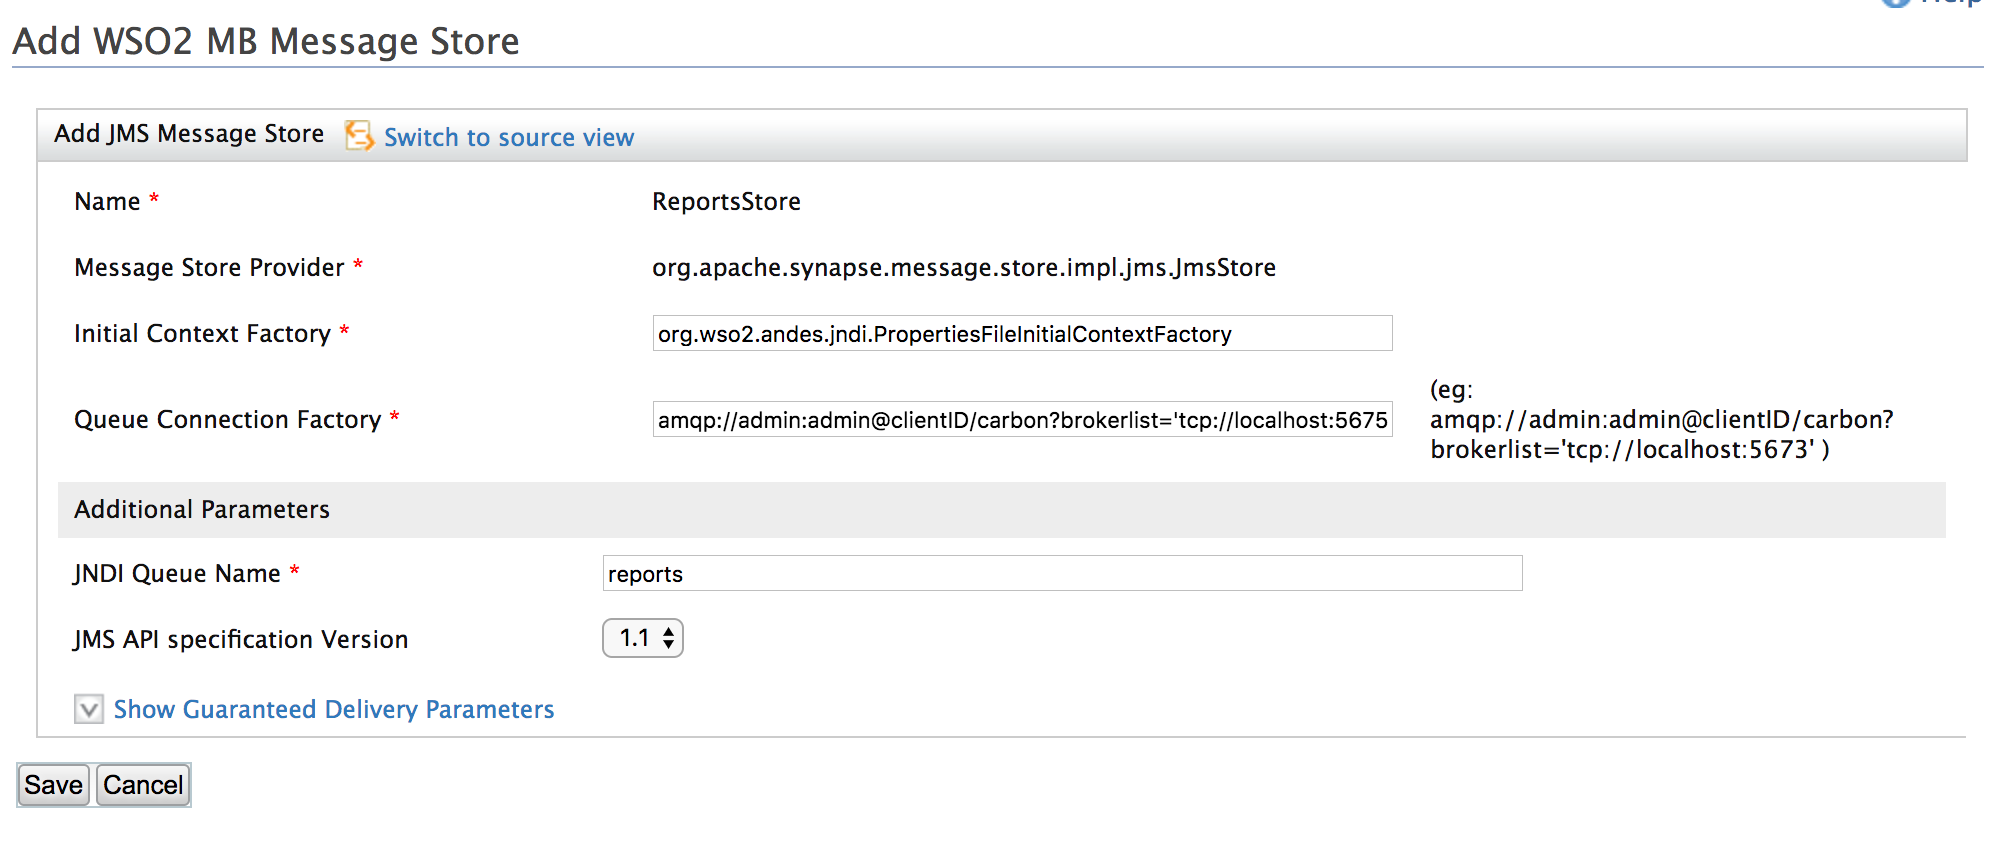
Figure 2: Adding a JMS message store
Creating the business process management endpoint
The messages should be forwarded to the business process management (BPM) profile. You can pre-configure the endpoints in the integrator so you can easily change it without affecting the main configuration. There are other parameters you can configure specific to this endpoint.
Let’s add an HTTP Endpoint to https://localhost:9445/bpmn/runtime/process-instances and name it BPMendpoint. Fill in the fields as shown in figure 3. Refer to the BPMendpoint.xml file, which can be found within the zip file in the Appendix.

Figure 3: Adding an HTTP endpoint
Creating the message processor
The message processors in WSO2 ESB can fetch data from message stores and mediate them. This means that the high loads of messages can be sent to the slow backends in a timely manner.
Now add a scheduled message forwarding processor named ReportsProcessor to process messages in the ReportsStore as shown in figure 4. This can consume messages from the message store and forward them to an endpoint at given time intervals. Refer to the ReportsProcessor.xml file, which can be found within the zip file in the Appendix, for the source code of the message processor.
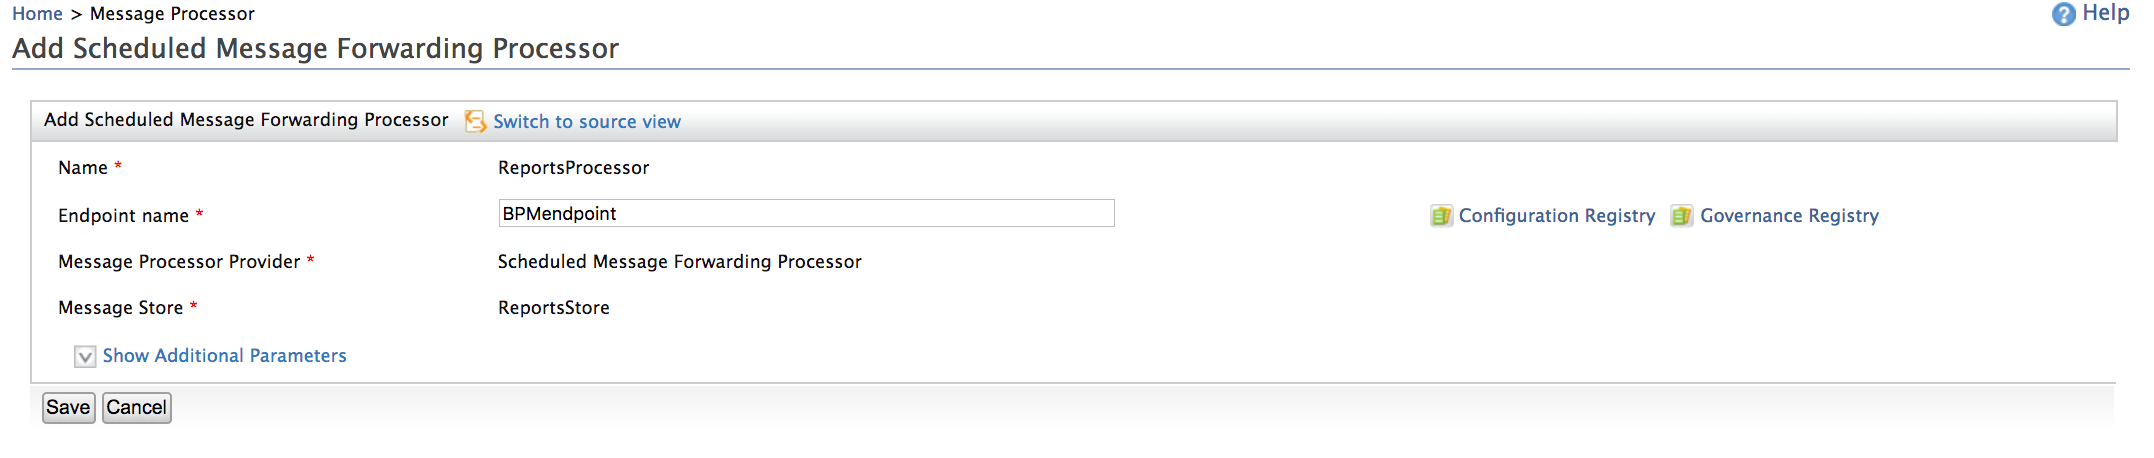
Figure 4: Adding the message processor
Adding an API
You need to expose the message store so that your website can forward requests to it. You need to transform the received message into the expected format using the business process profile before sending it to the message store since it’ll be directly transferred to the process engine by the message processor. You can use an API or a proxy service to do this. The API exposes REST APIs while the proxy service exposes SOAP service in WSO2 ESB. Let’s see how to use an API.
- Navigate to Service Bus > API and add a new API named ReportAPI with the context addReportRequest.
-
Click on Add Resource. This will open up four sections: Resources, In Sequence, Out Sequence and Fault Sequence.
- Resources: here you can specify which HTTP methods are exposed for this particular resource.
- In Sequence: when the API receives a request from a client, this is where the request mediation happens.
- Out Sequence: once a backend call is made from the In Sequence (using the send mediator), the response from the backend is sent to the Out Sequence so that the response path can be mediated from there.
- Fault Sequence: this is where you can specify how the error scenarios should be handled.
- Since the API should be able to accept a payload, we should define a POST resource. Tick the checkbox next to POST in the resources section.
- In the In Sequence you should transform the message and store it in the message store. Since no other backend calls are made in the sequence, you need to respond to the client as well.
-
Click on the
Define inlineIn Sequence window to add a new sequence to your API. Click Create. We need to design a sequence similar to Figure 5.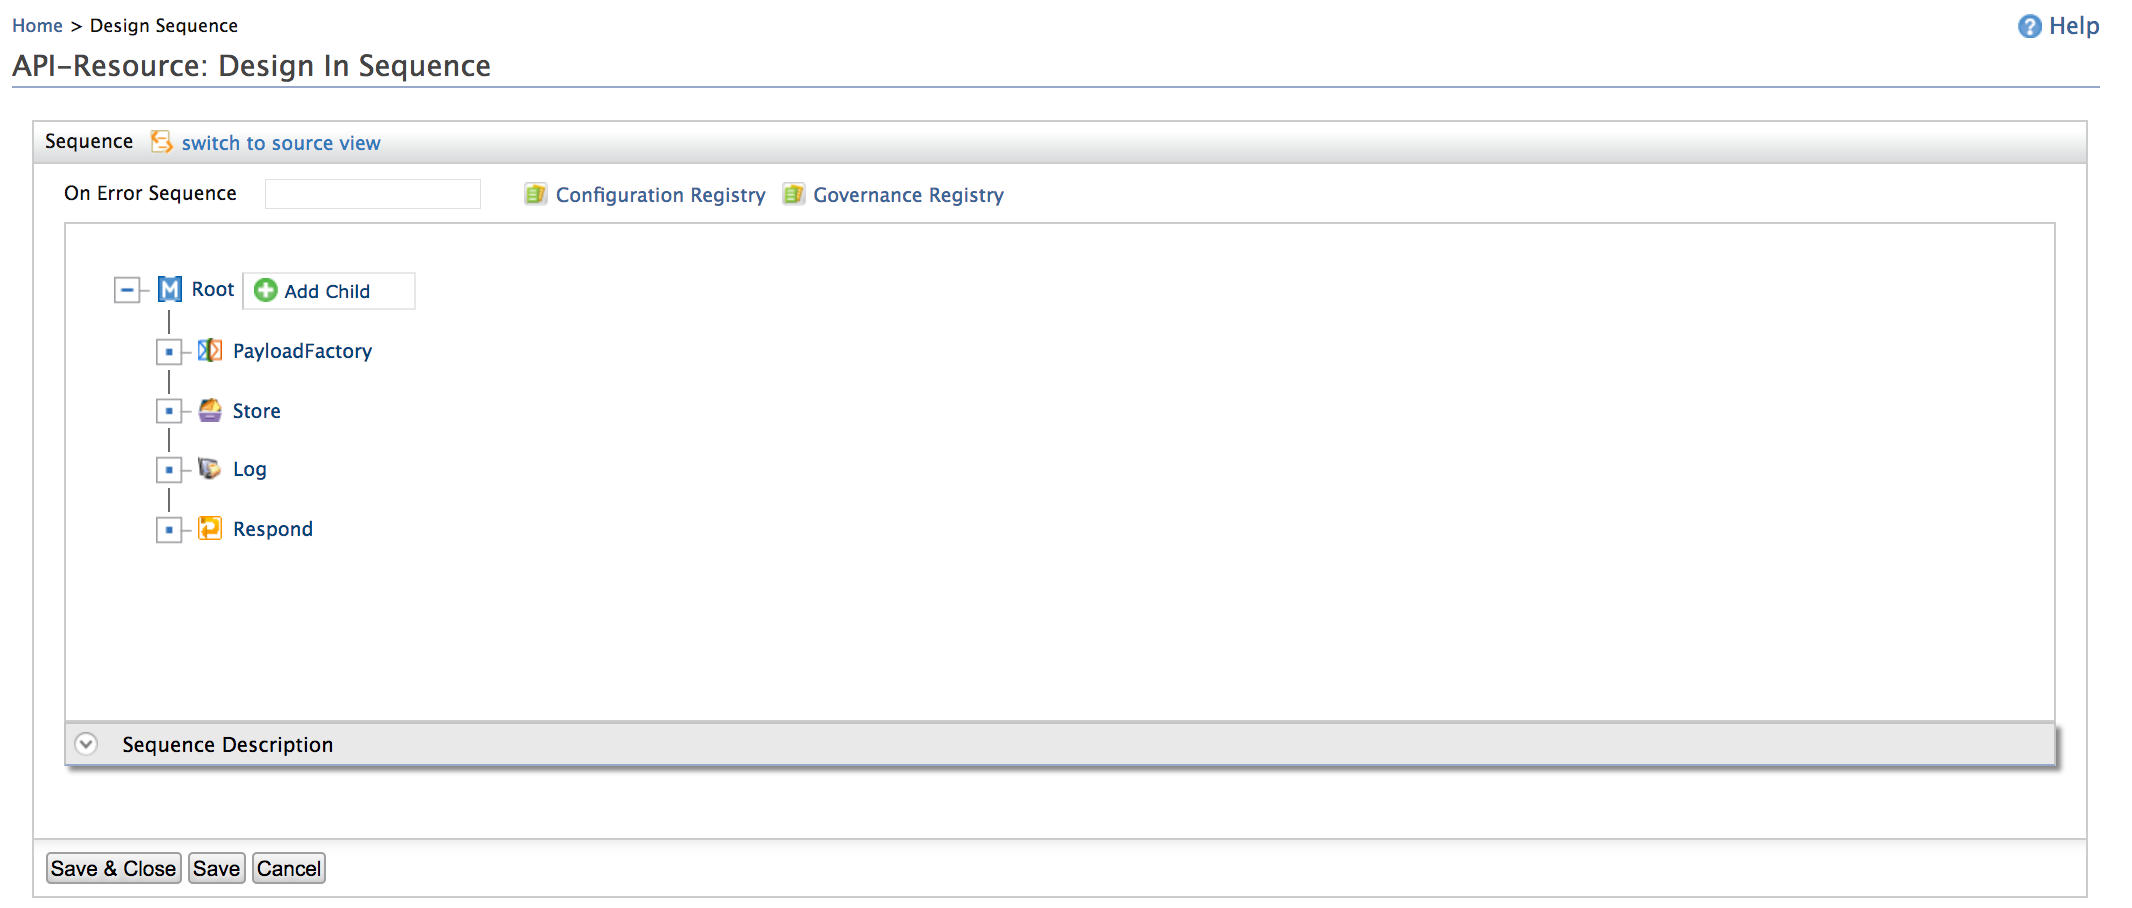
Figure 5: API in-sequence
Let’s see step by step, how our mediation logic works.
- The client side isn’t expecting any information after invoking the API so we can immediately respond to the caller about the success of the request with a “202 accepted” message. Click on Add child, select Property Mediator and fill in the fields as shown in figure 6 below.

Figure 6: Add FORCE_SC_ACCEPTED property
- Click on Root > Add child and add a PayloadFactory mediator. This mediator allows you to modify the message payload. The process server expects the payload in the following format:
{ "processDefinitionKey":"reportsProcess", "businessKey":"myBusinessKey", "tenantId": "-1234", "variables": [ { "name":"topic", "value":"Traffic data" }, { "name":"description", "value":"Traffic levels 2017"}, { "name":"email", "value":”[email protected]" }, { "name":"name", "value":"John Doe" }, { "name":"category", "value":"Transport" } ] } - You can’t ask the client (website) to send information in this specific format so you need to transform the message using the PayloadFactory mediator. You can expect a JSON message as shown below from the client side.
{ "topic":"Traffic data", "description" : "Traffic levels 2017", "name" : "John Doe", "email" : "[email protected]", "category" : "Transport" } - The logic to transform this message is shown in figure 7 below. Note that each variable is parameterized as $1,$2...etc. In the arguments section derivation logic for each argument is defined.
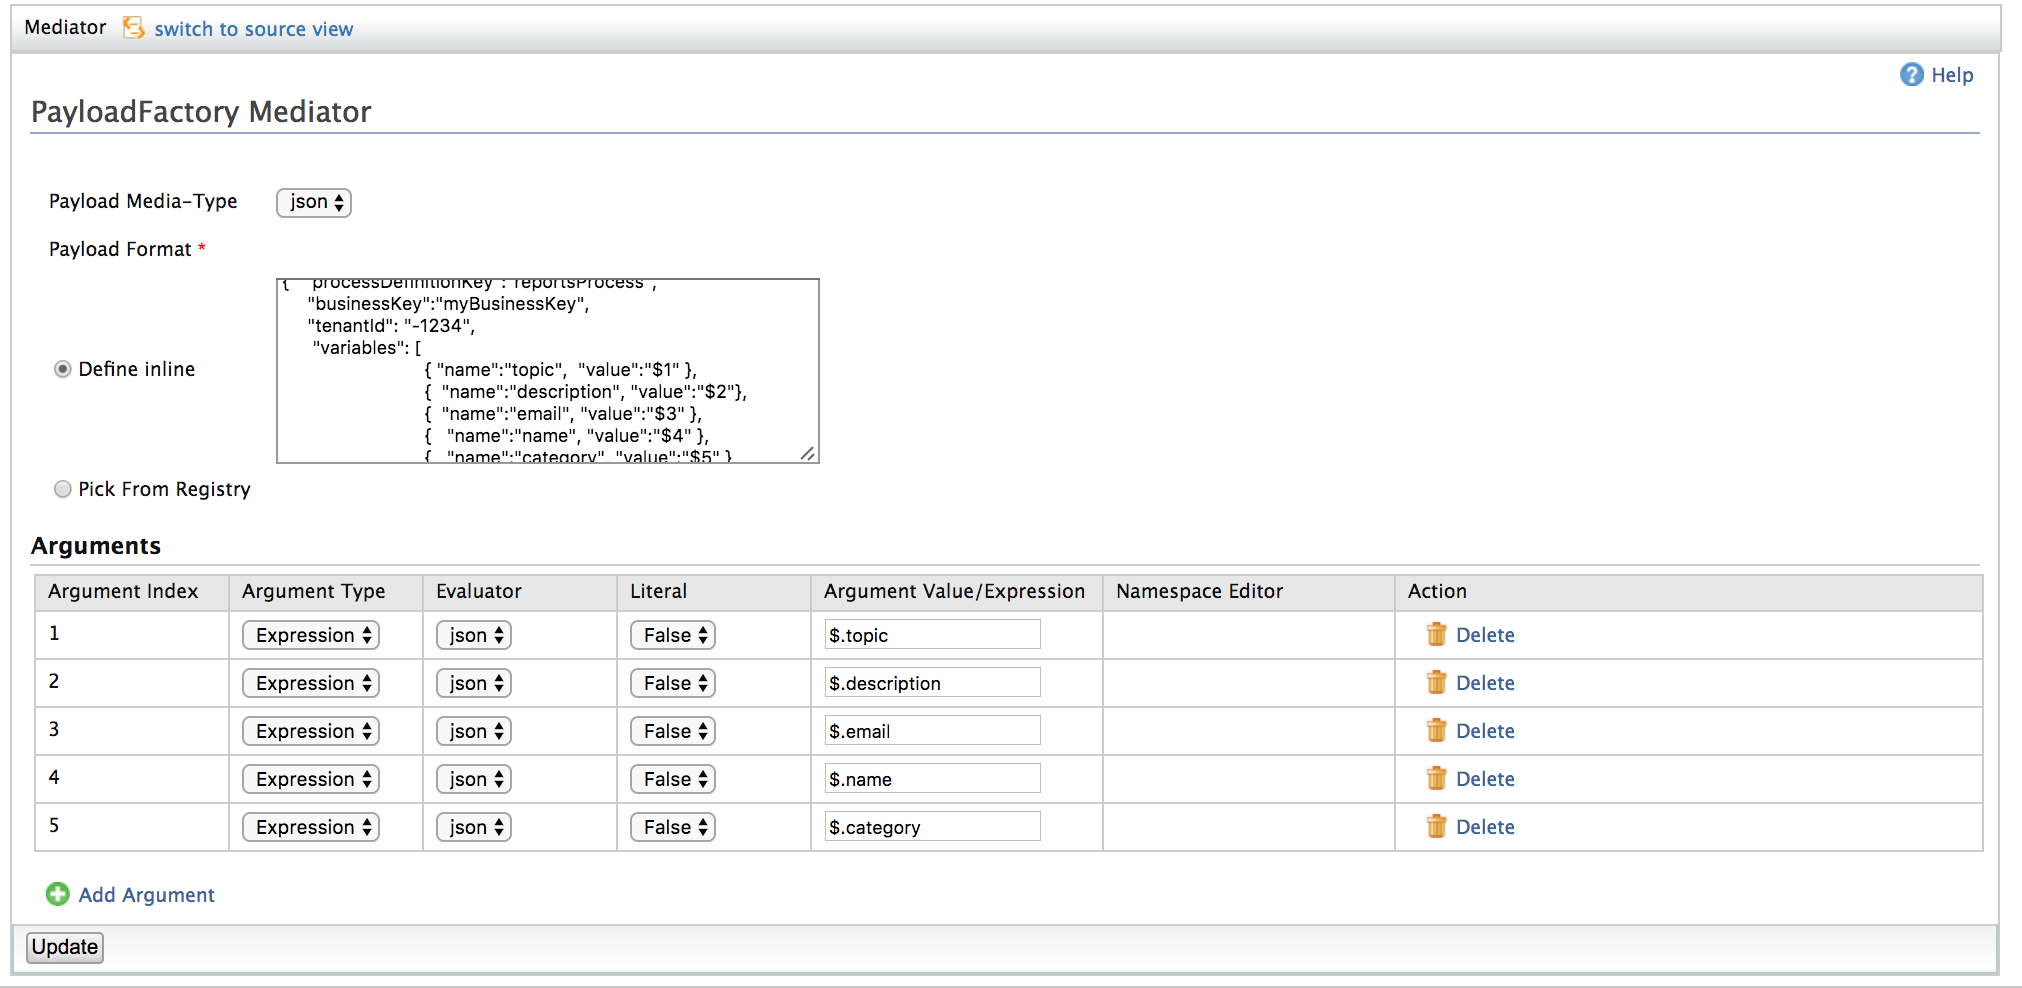
Figure 7: PayloadFactory mediator
- To store the message in the broker, add a store mediator next to the Payload mediator. Select ReportsStore as shown below.

Figure 8: Adding the previously created message store
- Add a simple log to inform of the successful message addition to the store. Add a Log mediator next to the Store mediator as shown in Figure 9.
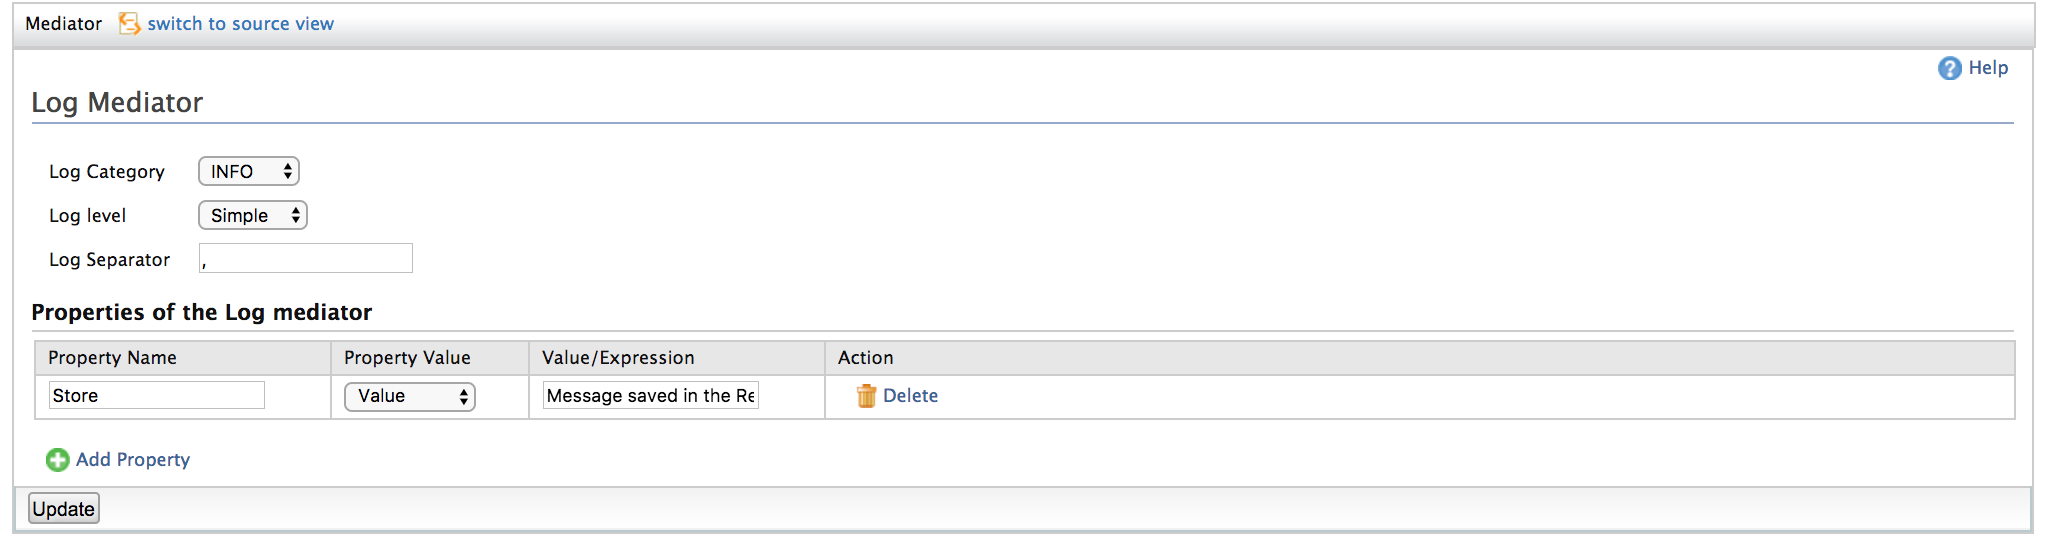
Figure 9: Log mediator
Now save the In Sequence and continue with the wizard to finish API creation. You don’t need to define the Out Sequence since nothing needs to be done after saving the message. You can configure the Fault Sequence if you need to do anything specific when an error occurs.
The full source for the API is available in the ReportAPI.xml file, which can be found within the zip file in the Appendix.
Setting up the dataservice
In this use case, you need to store the metadata of the generated reports in a database so it can be used to build a search component. The data services capabilities of WSO2 Enterprise Integrator augments service-oriented architecture development efforts by providing an easy-to-use platform for integrating data stores, creating composite data views, and hosting data services. It allows you to expose data services using both the XML and JSON formats. Let’s see how to expose a dataservice to store the generated reports’ metadata in a MySQL database as a REST service.
Since we’re going to save the data in a MySQL database, copy the MySQL database driver to [EI_HOME]/lib folder. Create a database called publishing and add the reports table using the following syntax.
CREATE TABLE publishing.reports (id INT NOT NULL AUTO_INCREMENT, filename VARCHAR(45), topic VARCHAR(45), category VARCHAR(45), description VARCHAR(45), PRIMARY KEY 'id');
This will generate the following schema table.

Figure 10: Reports table structure
Adding a datasource
Navigate to Configure > Datasources in the management console of the integrator profile and add a new datasource named PublishingService as shown in figure 11 below.
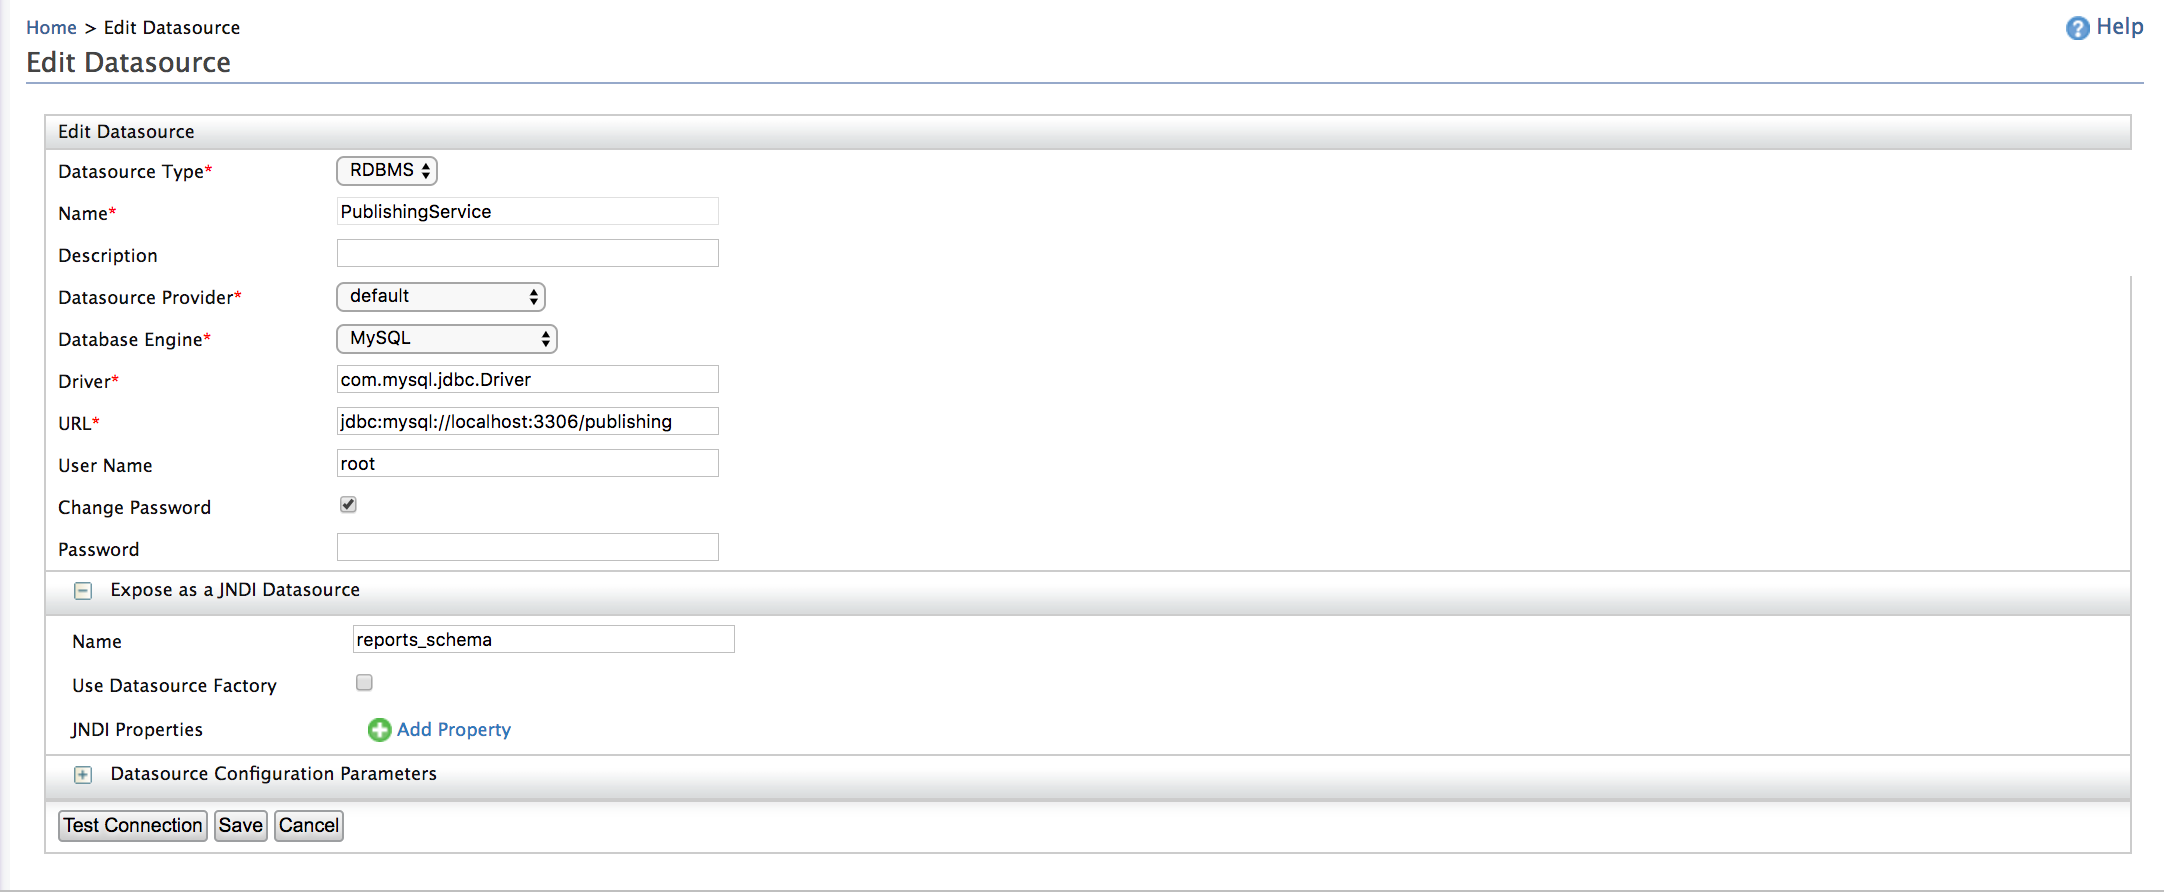
Figure 11: Add datasource
Adding the dataservice
Now you can create a dataservice that accepts requests and saves that information using the datasource you just created. You can create the dataservice step by step or let the management console generate it for you. Let’s see how to generate the dataservice.
Navigate to Manage > Dataservices > Generate. Fill in the fields as shown in figure 12 below.

Figure 12: Specify the datasource and database
Continue the wizard to finish generating the dataservice. This will expose a SOAP service for CRUD operations on the reports table. It is listed in the Deployed Services window as reports_DataService. You can expose the dataservice as a REST service as well.
To do that click on the service name in the deployed services list to open the service dashboard. Click on the Edit Data Service (wizard) link. Then click Next until you come to the Resources window. Click on Add New Resource. Fill in the fields as shown in figure 13 below.
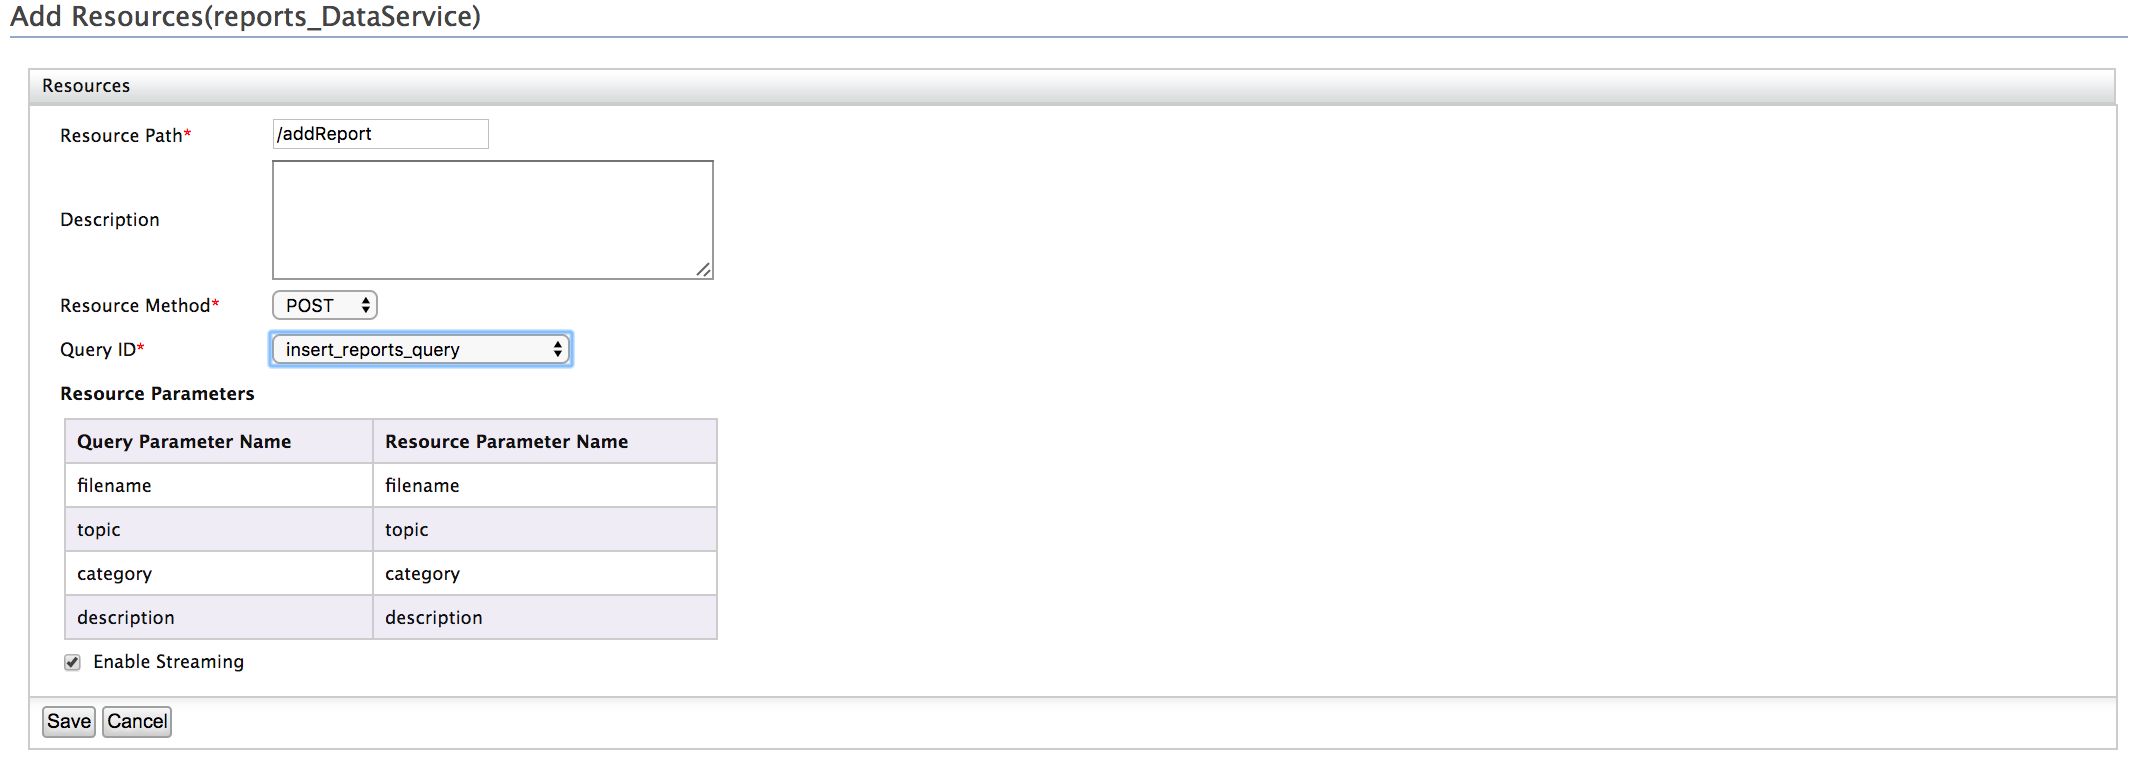
Figure 13: Add resources
Now your dataservice will appear in the service list of the management console. You can click the Try service button and see the expected input of the exposed SOAP service in our try it editor. Select the Insert operation. By looking at the request body, we can derive the expected body by the REST service. We have exposed the REST endpoint https://localhost:8280/services/reports_DataService/addReport which expects the following payload.
{ "_post_addreport" : {
                                     "filename":"traffic.pdf",
                                     "topic": "Traffic details",
                                     "category" : "Transport",
                                     "description" : "Road accidents in 2017"
                                  }
}
The XML source for the dataservice is available in the reports_DataService.dbs file, which can be found within the zip file in the Appendix.
Configuring the business process profile
The business process profile in WSO2 Enterprise Integrator supports both BPEL and BPMN 2.0 standards when defining business processes. BPEL processes are very good in modeling complex business processes and use SOAP services. BPMN processes are easier to develop and they are based on REST services.
Let’s model a BPMN process for the report creation workflow. This process runs through a manager approval if it’s under the Security category and then forwards to a clerk for report creation. The original requester will be notified of the completion or the rejection of the report creation. If the report is created, the dataservice in the integrator profile will be invoked to save the metadata of the report. Following is the BPMN diagram for our ReportProcess workflow.
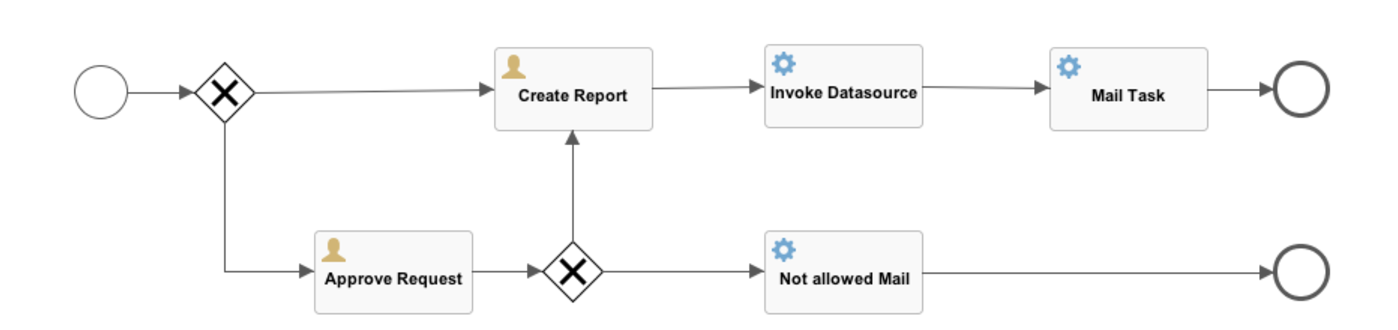
Figure 14: Report process BPMN diagram
In order to create this workflow, we need to have the BPMN editor shipped with WSO2 Enterprise Integrator tooling: an Eclipse based tooling component. See how you can start using the tooling package in the documentation. Create a new BPMN project from the Developer Studio dashboard. Using the BPMN editor you can drag the elements from the tool palette and configure it using its properties. Follow the steps below to create the workflow.
- Right click on your BPMN project and add a new BPMN diagram named ReportProcess. This will open up a BPMN editor window.
-
Drag a start event from the tool palette to start the workflow. Add the following form properties from the properties window of the start event.
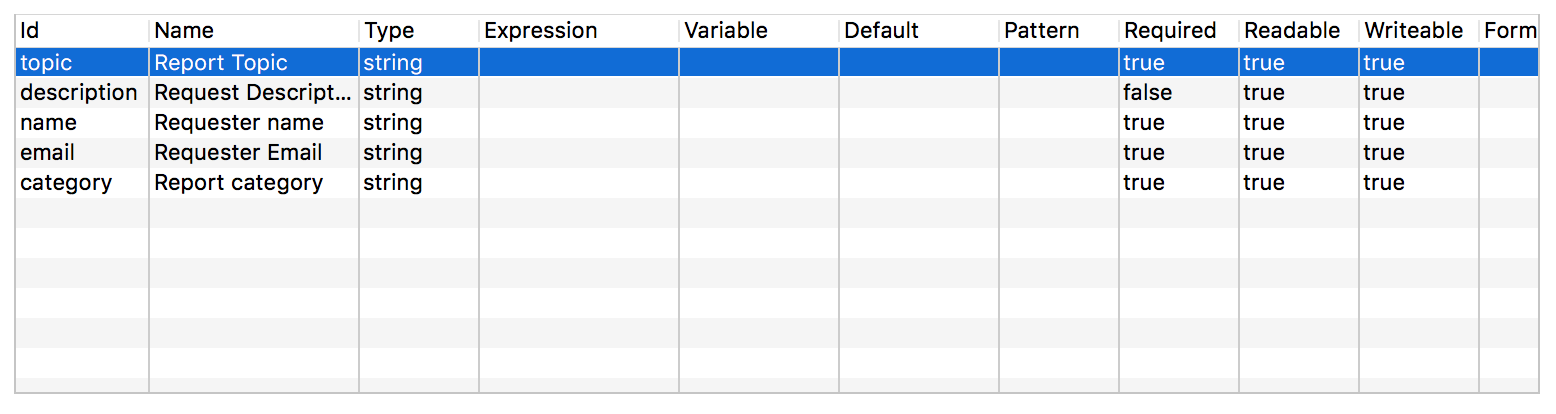
Figure 15: Start event form properties
- You need to decide whether manager approval is needed before report creation. For that add an exclusive gateway and add a connection from the start event.
-
Now add a user task to the model for report creation. In the Main config tab of the properties window, add clerk to the Candidate Groups box so that only users with the role “clerk” can claim and work on these tasks. Add the following form properties as well.

Figure 16: Create report task form properties
- Add a connection from the Exclusive Gateway to the Create Report user task. Specify the condition “${category != "security" && category != "other"}” in the main config tab.
-
Add another user task named Approve Request. The candidate group for this task should be manager. Add the following form properties for this task. Note that the approval property has true:Approved and false:Rejected with type ‘enum’ as form values.

Figure 17: Approve request task form properties
- Connect this user task from the Exclusive Gateway too. This time the condition in the main config tab should be “${category == "security" || category == "other"}”.
- Now add another Exclusive Gateway next to the Approve Request task to change the workflow based on the manager approval.
- Add an outgoing connection to the Create Report user task from the exclusive gateway. Add the condition “${approval == 'true'}” to that connection.
-
If a report request is rejected by a manager, we need to inform the requester of this. To do this, add a mail task and it’s main config properties as shown in Figure 18. Note how you can include variable values in the mail task.
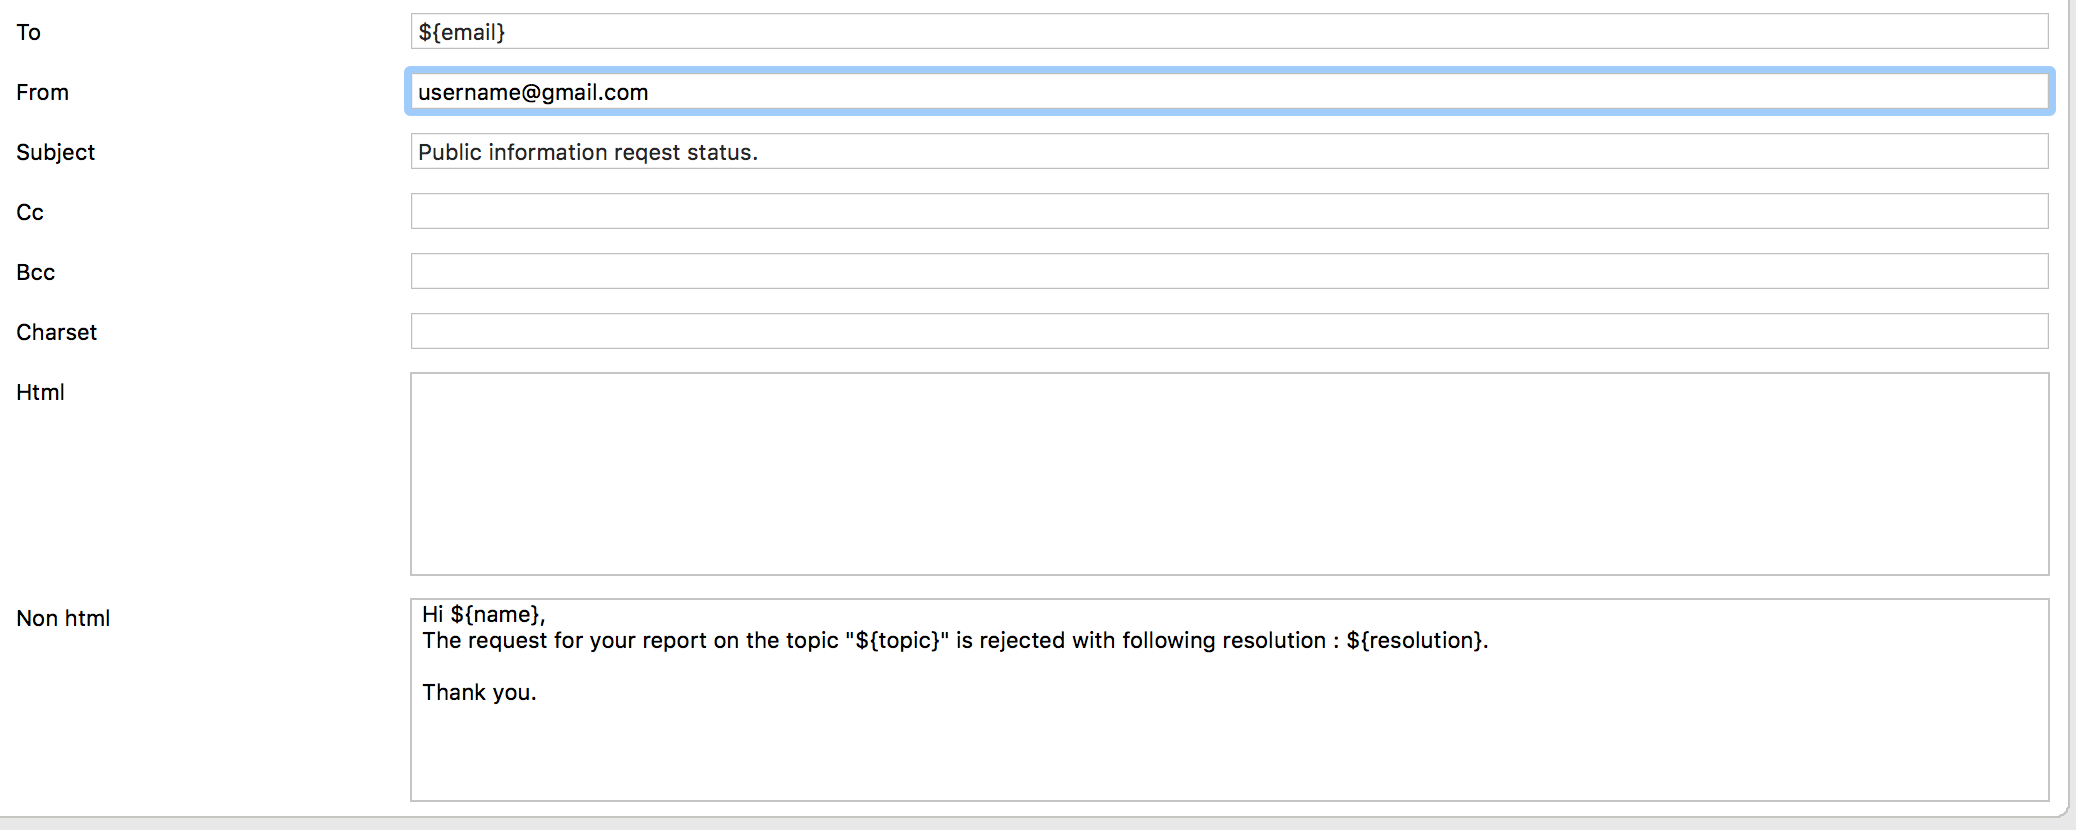
Figure 18: Mail task properties
- Now add another outgoing connection from the Exclusive Gateway to this mail task with the condition “${approval == 'false'}”.
- Since the process ends after a rejection of the request, add an end event from the mail task.
- If the manager accepts the report request, a user task will be created for a clerk to generate the report.
- Once the report is ready we need to persist its metadata. For that, we can invoke the dataservice we created in the integrator profile.
-
We can use the BPMN REST tasks for this. Drag a service task to the canvas. Connect it to the outgoing flow from the Create Report user task. Go to the main config tab of the properties. Add org.wso2.carbon.bpmn.extensions.rest.RESTTask as the java class. Add the following documentation elements.

Note how the variables are included in the input field.

Figure 19: BPMN REST task
-
Now we need to notify the report requester about the completion of his request. Add another mail task connecting to the service task. Configure the mail task as shown in figure 20 below.
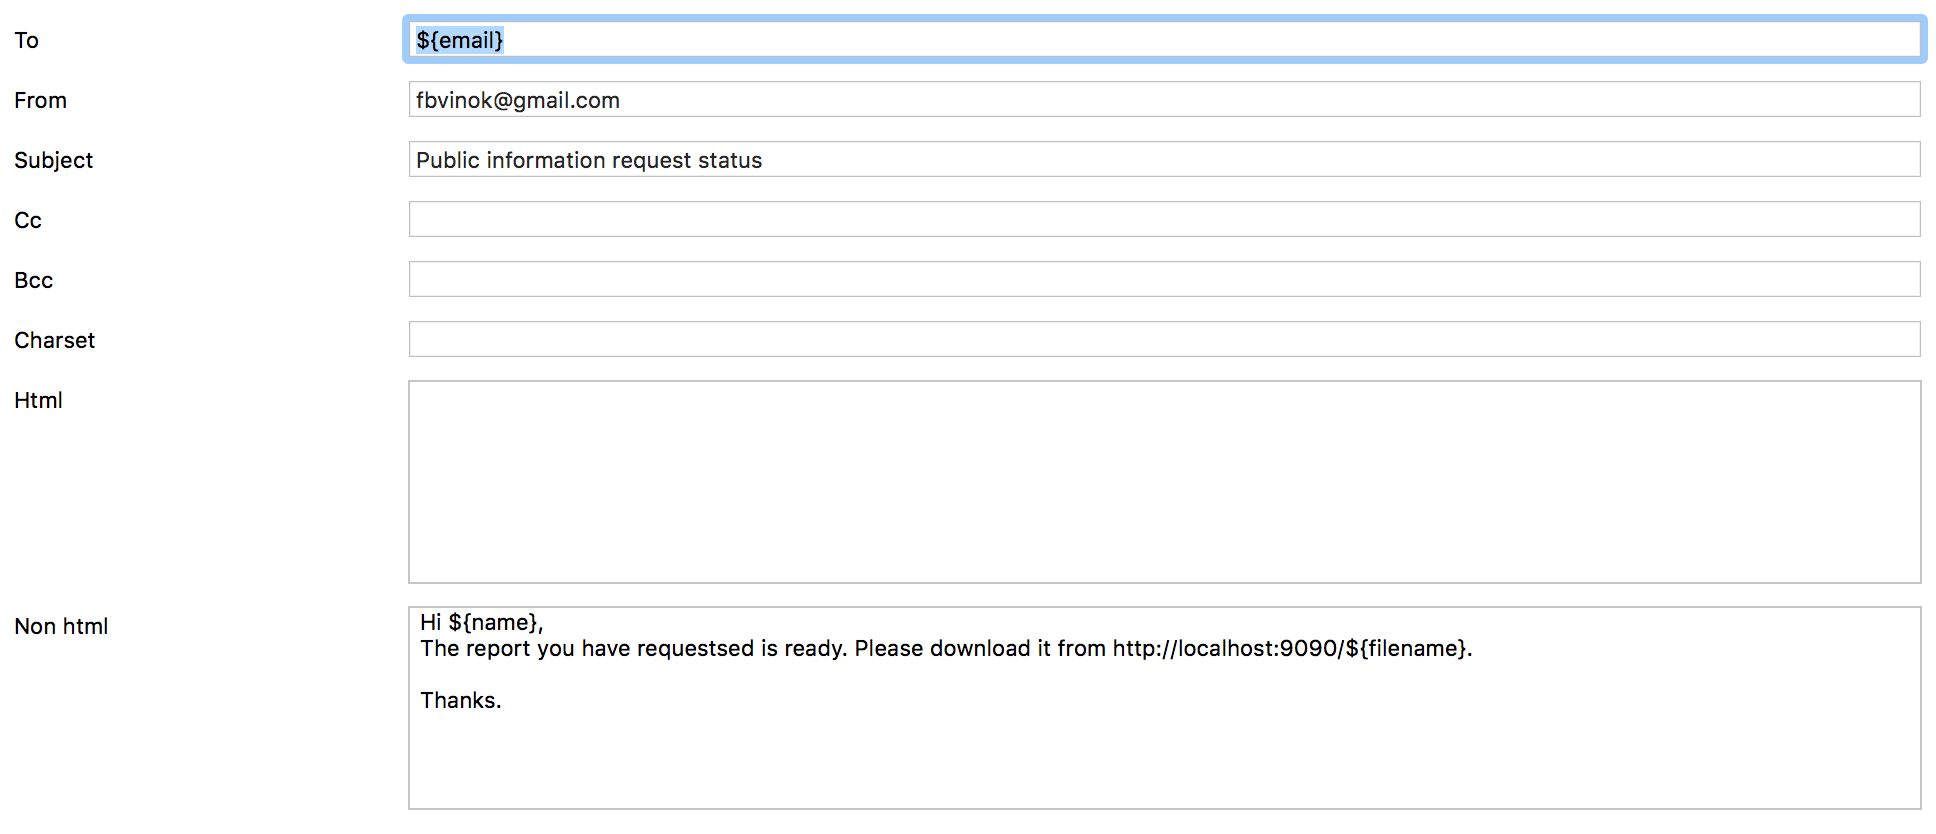
Figure 20: Confirmation mail task
- Add an end event to the above mail task to complete the BPMN process.
- Now go to the package explorer view, right click on our ReportsProcess and click Create Deployment Artifacts.
- Deploy the .bar archive to the business process profile from the management console.
- Create the two roles, manager and clerk, and add some users to those roles for testing.
This completes the configuration of the business process profile. The source for the BPMN process is available in the ReportsProcess.bpmn20.xml file, which can be found within the zip file in the Appendix.
Configuring the MSF4J profile
Now you’ll need to find a way to make the reports publicly available to the original requester. One of the easiest ways of sharing files is with a file server. WSO2 MSF4J is shipped with WSO2 Enterprise Integrator. With its lightweight, fast runtime and annotation-based programming model, an MSF4J service can be written to work as your file server and you can host it in a container based environment.
Following is the code snippet to accept requests in the URL format /fileserver/{filename} and returns the file with given name as the response. The files should be in the same folder for this to work. Refer to the file handling sample of the MSF4J github page for more details.
@Path("/fileserver")
public class FileServer {

    private static final java.nio.file.Path FILE_PATH = Paths.get(".");

    @GET
    @Path("/{filename}")
    public Response get(@PathParam("filename") String fileName) {
        File file = Paths.get(FILE_PATH.toString(), fileName).toFile();
        if (file.exists()) {
            return Response.ok(file).build();
        }
        return Response.status(Response.Status.NOT_FOUND).build();
    }
}
Configuring for analytics
The analytics profile in WSO2 Enterprise Integrator can be used to monitor the APIs, proxy services, and processes. The analytics profile comes with preconfigured settings that let it listen to the ESB profile by default.
Configuring the ESB profile to publish statistics
Enable the following properties in <ESB_Profile>/conf/synapse.properties file to enable data publishing from the ESB profile.
mediation.flow.statistics.enable=true
mediation.flow.statistics.tracer.collect.payloads=true
mediation.flow.statistics.tracer.collect.properties=true
Since we are exposing the ReportAPI to the public, let’s monitor this API from the analytics profile. In order to enable statistics, go to the APIs section and click Enable Statistics of the ReportAPI entry.
Monitoring the API
Take a copy of the WSO2 Enterprise Integrator distribution. Start the server by running the bin/ei-analytics.sh. Now select the APIs section from the left-hand panel. The analytics dashboard can be accessed from this URL: https://localhost:9444/portal/dashboards/ei-analytics/. Type ReportAPI in the search box and it will appear in the dropdown list. Now you can see the statistics of the ReportAPI from the dashboard.

Figure 21: Analytics dashboard - API requests

Figure 22: Analytics dashboard - Message flow
Testing the solution
Now we have a complete solution for a public report request processing system. Let’s see how it works.
- To simulate a report request, use the following cURL command to invoke the API that is exposed from the integrator profile. Change the email address to yours.
- The message will be saved to the broker profile by the message store mediator in the API. Log entry: Store = Message saved in the Reports Store.
- Then this message will be picked up by the message processor and sent to the business process profile. Log entry: Response = Response from BPM received upon successful submission of the request.
- Now log into the BPMN explorer (https://localhost:9445/bpmn-explorer/process) of the BPM profile as a manager role. Since our report category is security, there will be an Approve Request user task.
-
Go to the Tasks > Claimable view and claim the task. Add a resolution and approve or reject the task.
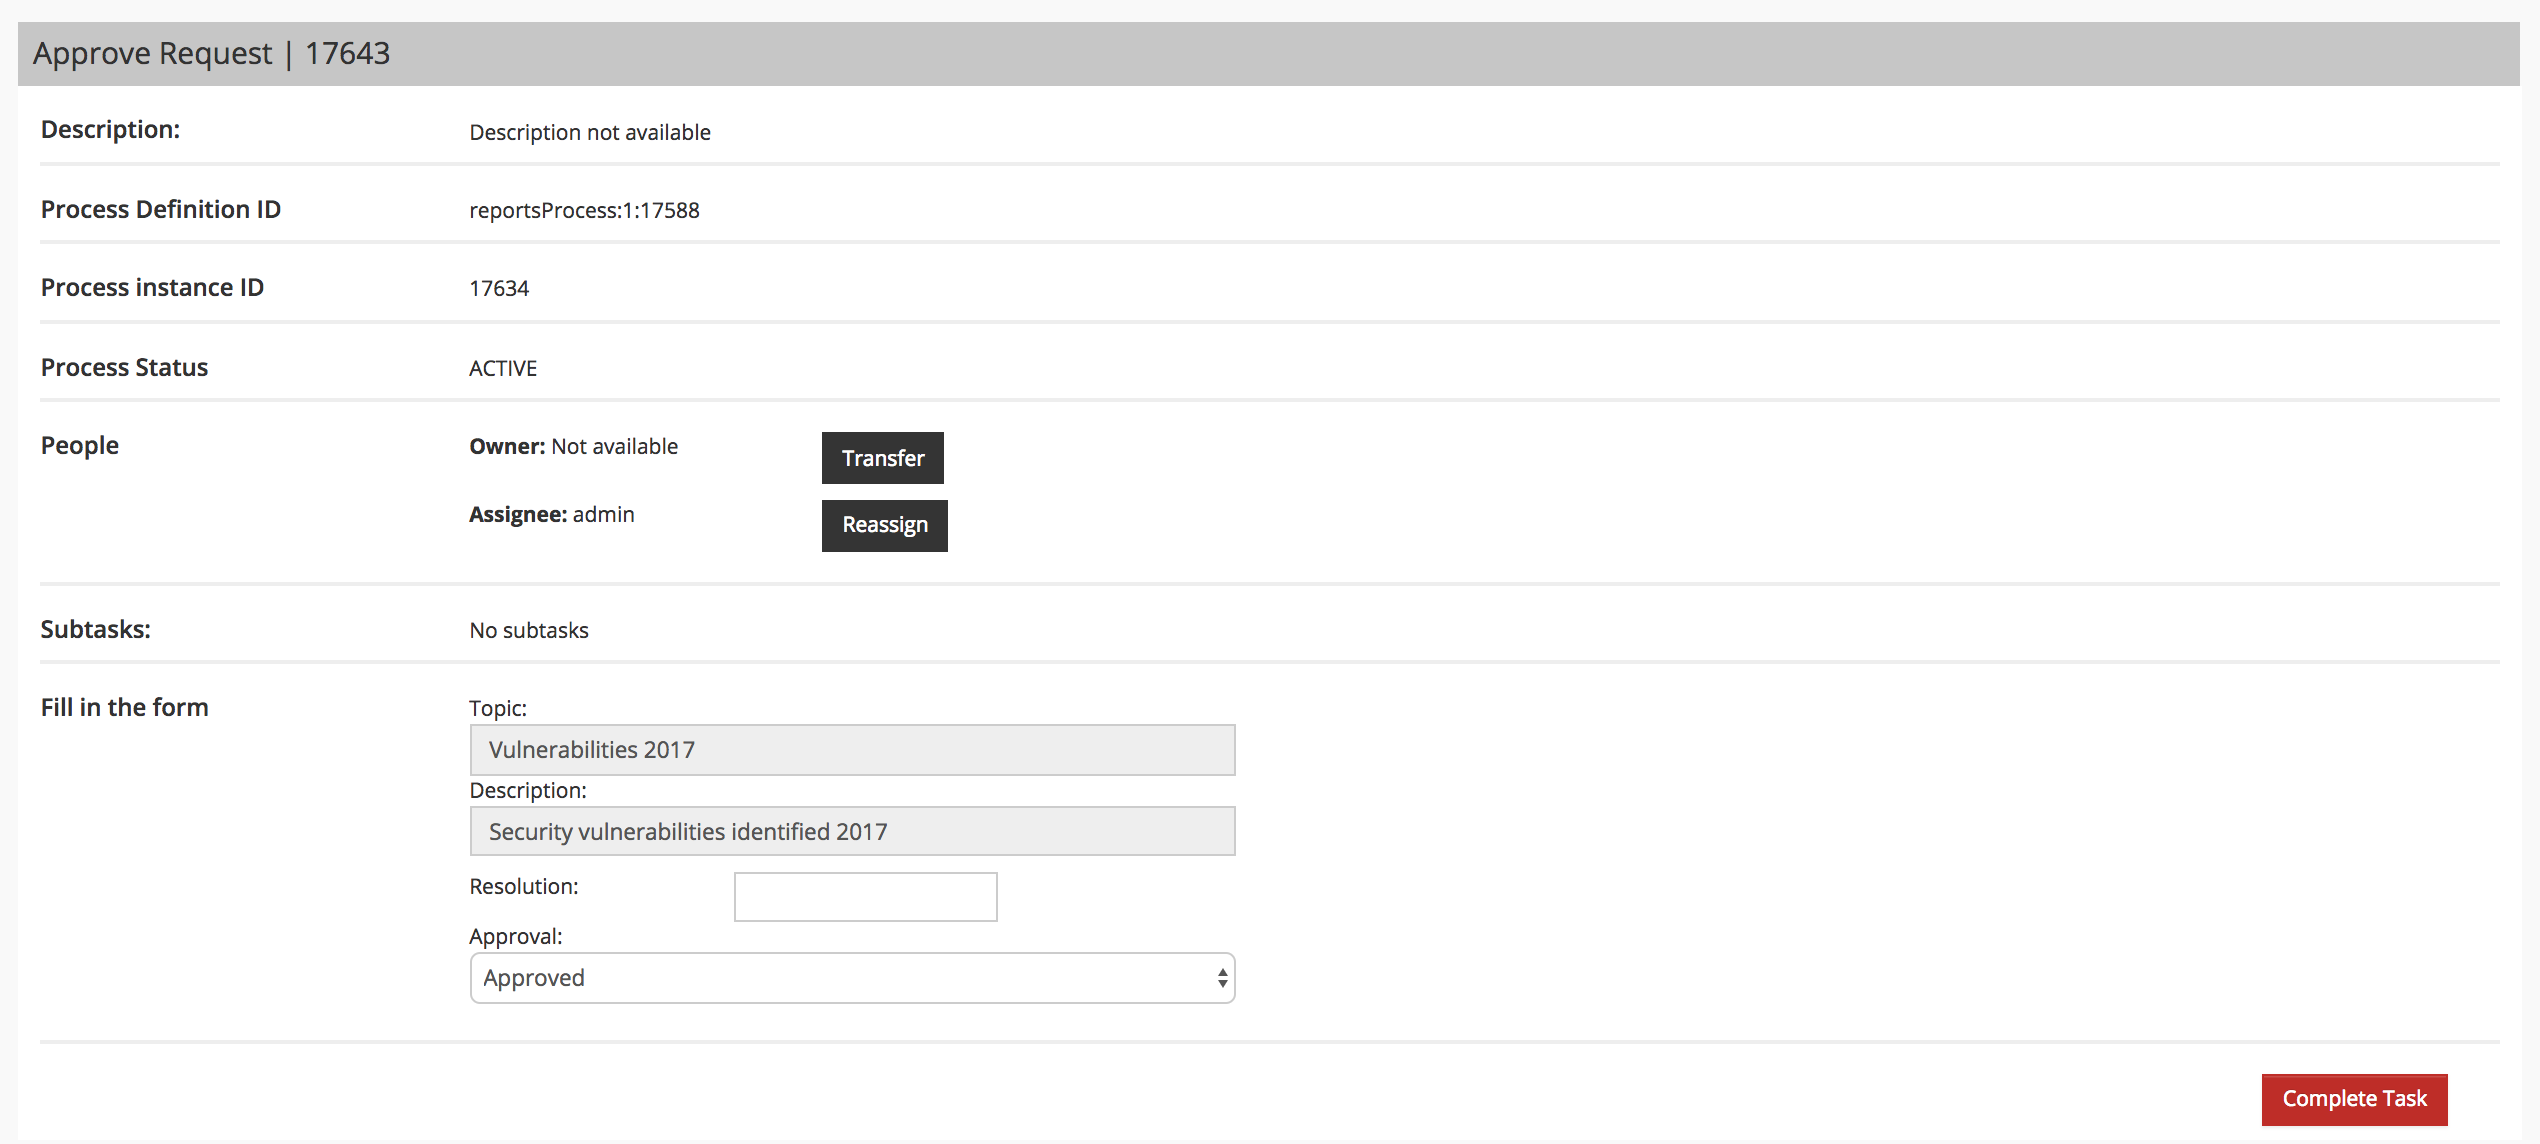
Figure 23: Approve requested user task
- If you reject the request, there will be an email with the rejection in your inbox.
-
If you approve the request, log in as a clerk role. Claim the Create Report task. If the tasks category is something other than Security or Other, you will directly get this user task.

Figure 25: Create report task
- You now need to generate the requested report and place the file in the folder that the MSF4J file server is listening to. Provide the same name in the report name field and complete the task.
- Now the process will invoke our dataservice in the integrator profile and also send a notification email to the requester.
- Check the reports table in the MySQL database. The metadata will be in the table.
-
There will also be an email with a link to the generated file. Click on that link, to download the report from the file server.

Figure 26: Report ready mail
curl -X POST \
  https://localhost:8280/addReportRequest \
  -H 'authorization: Basic YWRtaW46YWRtaW4=' \
  -H 'cache-control: no-cache' \
  -H 'content-type: application/json' \
  -H 'postman-token: 3f28b290-f5d6-e219-6a6f-d995afea226d' \
  -d '{
	"topic":"Vulnerabilities 2017",
	"description" : "Security vulnerabilities identified 2017",
	"name" : "John",
	"email" : "[email protected]",
	"category" : "security"
}'
We have now completed the end-to-end integration layer of our use case using the WSO2 Enterprise Integrator. You can check the analytics dashboard for the statistics of the APIs. Adding a user interface to make report requests and a search tool based on the database will provide you with a complete solution.
Conclusion
WSO2 Enterprise Integrator has all the components required for an integration layer, packaged in a single distribution. You can run each profile and configure it easily to suite your requirements using the graphical user interface. To summarize, the ESB profile provides mediation and data services capabilities, the message broker profile can be used for handling queues, the business profile is used for workflow support, the analytics profile is used to monitor the integration layer and the MSF4J profile is used to host microservices.
Appendix
About Author
- Vinod Kavinda
- Senior Technical lead
- WSO2