WSO2 Governance Registry JCR

Applies To
Introduction
WSO2 Governance Registry is a product that helps you to govern your enterprise SOA infrastructure. It provides capability for storing and managing meta data related to service artifacts as well as the artifacts themselves. There are two broad categories of artifacts found in the WSO2 Governance Registry, namely "resources" and "collections." JCR API is one such well known API among content repository vendors. Content Repository API for Java (JCR) is a specification for a Java platform API for accessing content repositories in an uniform manner and it defines an abstract model and a Java API for data storage and related services commonly used by content-oriented applications. WSO2 G-Reg JCR API is built on top of the repository side of G-Reg.
JCR overview
A JCR repository is composed of one or more persistent workspaces, each consisting of a directed acyclic graph of items where the edges represent the parent-child relation. Here a JCR Item is either a Node or a Property. A node can have zero or more child items. A property cannot have child items but can hold zero or more values. So in other words a workspace is a tree of nodes and properties. The nodes of a workspace form the structure of the stored data while the actual content is stored in the values of the properties. In JCR, you can store many types of data such as String, javax.jcr.Value, Boolean, Long, Double, Integer, InputStream, etc. into node properties.
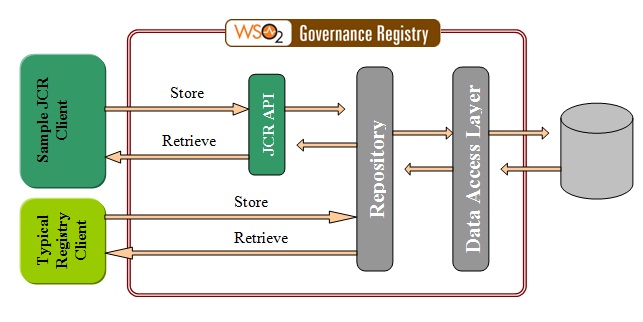
Following is the basic architecture diagram which shows how the JCR layer is connected with WSO2 Governance Registry.
So let's see some samples which illustrate how to use WSO2 Governance Registry through JCR layer. Before directly going in to samples of using the JCR API, let's first take a look at how to make the connection with a remote Registry instance and access the JCR Registry Repository.
A user can simply login to a repository by passing some credentials. Then the repository returns a JCR session instance with a persistent workspace.
First of all, you have to set up a client to access and use the JCR API. In the G-Reg distribution, you will find a sample jcr-client inside GREG_HOME/modules/samples.
So the following steps will illustrate how to set up and run your client.
Pre-requirements
1. Before getting the sample to work, you have to run 'ant' from GREG_HOME/bin. This copies all of the necessary libraries to their respective locations
Steps for running this sample
1. Execute the ant command (i.e. 'ant run') from the sample directory
2. Run the SampleJCRRegistryClient.java which contains a main method and login to the Registry and see how we can access registry through JCR layer
Following are some samples which shows different ways of using Governance Registry JCR API.
So, first of all, let's take a look at how to login to the repository.
This is how we login to the JCR repository and get a session instance.
 Session session = null;
 String username = "admin";
 String password = "admin";
 String serverURL = "https://localhost:9443/registry";
 Map<String,String> map = new HashMap<String,String>();
 map.put("registryURL",serverURL);
 map.put("userName",username);
 map.put("password",password);
 map.put("org.wso2.registry.jcr", "greg");
 try {
 RegistryRepositoryFactory rf = new RegistryRepositoryFactory();
 Repository repository = rf.getRepository(map);
 Credentials credentials = new SimpleCredentials("admin", new String("admin").toCharArray());
 session = repository.login(credentials);  // Returns a session instance
 Workspace workspace = session.getWorkspace(); // Can acquire the persistent workspace from the session instance
 } catch (RepositoryException e){
 // Handle the caught exception
 }
Sample 1 - Basic JCR operations, adding and removing nodes
This sample shows how to add a node and remove any item (a node or a property) by using the session instance (acquired after repository login as shown in the previous example).
Node rootNode = session.getRootNode().addNode("testroot"); // We can define a root
session.removeItem(node1.getPath());
} catch(RepositoryException e) {
// Handle the exception
}
// Here you can acquire a node type manager from the workspace
NodeTypeManager ntm = session.getWorkspace().getNodeTypeManager();
// Create a node type template fro which you can define your attributes for that particular node type
NodeTypeTemplate ntTemplate = ntm.createNodeTypeTemplate();
// Setting the node type name
ntTemplate.setName("nt:myFavourites");
// Registering the node type
ntm.registerNodeType(ntTemplate, true);
} catch(RepositoryException e) {
// Handle the exception
}
Here, in this sample, we can see how to save our various types of resources inside JCR properties.
We can save many types of data inside properties such as String, int, Calendar, InputStream, boolean, long, double, javax.jcr.Value, etc. Also you can directly acquire those types of properties by giving the exact absolute path (if you access it through a session), or you can simply ask the property by name directly from a particular node.
// For a given node, we can set a property. In this case, a simple string property
Node homeFolder = session.getRootNode().addNode("homeFolder","nt:folder");
homeFolder.setProperty("stringProp1","value1");
// Also, we can set properties other than Strings. Following shows how to set a Calendar property
Calendar cal = Calendar.getInstance();
cal.setTimeInMillis(System.currentTimeMillis());
Property prop2 = session.getRootNode().getNode("homeFolder").setProperty("calendarProp", cal);
// You can call a "get" on a node to access these properties
Calendar calen1 = ((Node) session.getItem("/homeFolder")).getProperty("calendarProp").getDate();
} catch(RepositoryException e) {
// Handle the exception
}
ValueFactory vf = session.getValueFactory();
Value[] values = new Value[3];
for (int i = 0; i < values.length; i++) { // Creates an array of Value instances
values[i] = vf.createValue("Value" + i);
}
session.getRootNode().getNode("homeFolder").setProperty("propValues", values);
// Also, you can simply do a "get" directly to iterate all these property values at once
PropertyIterator propItr = ((Node) session.getItem(homeFolder.getPath())).getProperties();
} catch(RepositoryException e) {
// Handle the exception
}
VersionManager versionMgr = session.getWorkspace().getVersionManager();
Node vn1 =
rootNode.addNode("node3", "mix:simpleVersionable").addNode("node4", "mix:simpleVersionable");
vn1.setProperty("prop1", "value1");
Version v1 = versionMgr.checkin(
rootNode.getPath() + "/node3/node4"); // Get a version before changing the value of "prop1".
vn1.setProperty("prop1", "value2");
// We can ask a node to restore it to a particular version
vn1.restore(v1, true);
// Following are two other ways of restoring to a version based on your occasion
// 2. We can also add a label to a version and restore it by the label name, which seems pretty handy as follows
} catch(RepositoryException e) {
// Handle the exception
}
This shows a simple way of querying repository content in JCR. Here, other than typical SQL kind of querying, JCR also provides a Query Object Model (QOM) to deal with repository content. This is a very simple, user friendly and less complex way of dealing with our repository as this is an object model. So everything realated to querying is handled by a QueryManager which can be acquired through the workspace.
QueryManager qm = workspace.getQueryManager();
QueryObjectModelFactory qf = qm.getQOMFactory();
String nodeName1 = "nodeName1";
String nodeName2 = "nodeName2";
String testNodeType = "nt:myFavourites";
String propertyName1 = "property1";
String propertyName2 = "property2";
Node n1 = rootNode.addNode(nodeName1, testNodeType);
n1.setProperty(propertyName1, "foo");
Node n2 =
session.save();
// To create a query, we need to specify a selector, a source and constraints such as “and”, “or”, “descendentNode”, etc.
QueryObjectModel qom = qf.createQuery(
qf.selector("nt:myFavourites", "s"),
qf.and(
qf.descendantNode("s", root_node.getPath()),
qf.or(
qf.propertyExistence("s", propertyName1),
qf.propertyExistence("s", propertyName2)
)
),
null,
null
);
QueryResult result = qom.execute();
// This result contains all nodes queried from the above query
} catch(RepositoryException e) {
// Handle the exception
}
Summary