Develop a Scheduled Task
WSO2 Developer Platform is a versatile integration platform that allows you to create various types of integrations depending on your requirements. If you need to automatically run a specific integration at regular intervals, you can use WSO2 Developer Platform to develop a scheduled task. This type of integration can automate the synchronization of data between different systems at specified intervals, reducing errors and improving productivity by eliminating the need for manual intervention.
This guide walks you through the steps to develop, deploy, test, and observe a scheduled task using WSO2 Developer Platform.
In this guide, you will:
- Develop a scheduled task to fetch the weather forecast for a specified location for the next 24 hours from the OpenWeatherMap API.
- Process the weather data into a specific format.
- Send the formatted data to a specified email address at a specific time every day.
Prerequisites
-
If you're signing in to the WSO2 Developer Platform Console for the first time, create an organization:
- Go to the WSO2 Developer Platform Console and sign in using your preferred method.
- Enter a unique organization name. For example,
Stark Industries. - Read and accept the privacy policy and terms of use.
- Click Create.
This creates the organization and opens the Project Home page of the default project created for you.
-
Fork the WSO2 Developer Platform samples repository, which contains the sample integration for this guide.
Repository File Structure
The sample code for this guide is in the
<sample-repository-dir>/weather-to-email-scheduled-taskdirectory. The following table describes the key files in the repository:File Path File Content Ballerina.toml Contains metadata about the project Dependencies.toml Lists the dependencies required for the project main.bal Contains the entry point of the project, including the main function types.bal Contains custom data types used in the project utils.bal Contains utility functions and helper functions used in the project -
Go to OpenWeatherMap and sign up to obtain an API key. For details, see the OpenWeatherMap documentation.
Step 1: Create a scheduled task component
- Go to the WSO2 Developer Platform Console and sign in. This opens the project home page.
- If you already have one or more components in your project, click + Create. Otherwise, proceed to the next step.
- Click the Scheduled Task card.
-
Click Authorize with GitHub to connect WSO2 Developer Platform to your GitHub account. If you haven't connected your GitHub repository to WSO2 Developer Platform, enter your credentials and select the repository you forked earlier to install the WSO2 Developer Platform GitHub App.
Alternatively, select the Use Public GitHub Repository option and paste the WSO2 Developer Platform samples repository URL in the Provide Repository URL field. However, enabling Auto Deploy requires authorizing the repository with the WSO2 Developer Platform GitHub App.
Note
The WSO2 Developer Platform GitHub App requires: - Read and write access to code and pull requests. - Read access to issues and metadata.
You can revoke access at any time. Write access is only used for sending pull requests; WSO2 Developer Platform will not push changes directly to your repository.
-
Enter the following information:
Field Description Organization Your GitHub account Repository WSO2 Developer Platform-samplesBranch mainComponent Directory weather-to-email-scheduled-task -
Select Ballerina as the build preset.
Tip
- Build preset specifies the type of build to run depending on the implementation of the component. It converts the integration code into a Docker image that can run on WSO2 Developer Platform cloud. If an integration is developed using WSO2 Integration Studio, select Micro Integrator as the build preset. If an integration is developed using the Ballerina language, select Ballerina as the build preset.
- Component Directory specifies the location of the project to build the component.
-
Enter a unique name and description for the component. You can use the following values:
Field Value Component Name WeatherToEmailDescription My first scheduled task -
Click Create. WSO2 Developer Platform initializes the component with the sample implementation and opens the Overview page of the component.
Now you can proceed to build and deploy the scheduled task.
Step 2: Build the scheduled task
- In the left navigation menu, click Build.
- In the Builds pane, click Build. This opens the Commits pane, where you can see all the commits related to the component.
-
Select the latest commit and click Build. This triggers the build process and displays the build progress in the Build Logs pane.
Info
The build process may take some time. Once complete, the build status will be listed in the Builds pane. Here, you will see the build status as Success.
Step 3: Deploy the scheduled task
- In the left navigation menu, click Deploy.
- In the Set Up card, click Configure & Deploy.
-
In the Configurations pane, specify values for the configurable variables:
Tip
The configurable variables populated here are defined in the sample Ballerina project used in this guide. To learn how to declare configurable variables in Ballerina, see the Ballerina documentation on declaring configurable variables.
Field Value apiKey The API key you obtained in the prerequisites section latitude Latitude of the location to get the weather forecast longitude Longitude of the location to get the weather forecast email The email address to receive the formatted weather forecast information Note
If you use Ballerina as the build preset and want to set a configurable variable as a secret, click the lock icon corresponding to the configurable variable. This marks it as a secret and conceals the input value.
For example, if you set the apiKey as a secret, its input value will be concealed. To update the input value later, click Update Secret Content and specify a new value.
-
Click Next.
-
Define a schedule to run the task. In this guide, set the schedule to receive the weather information daily at 8:00 AM UTC. Enter the following values:
Field Value Select Time Zone Select a time zone to schedule the task Select Range Day Every 1At 08:00Tip
To test and verify the task immediately, you can schedule the deployment to run in just a few minutes after you create it. However, to avoid unnecessary expenses, reschedule or stop the deployment once you test and verify.
-
Click Deploy. This deploys the scheduled task to the development environment and indicates the Scheduled Status as Active in the Development card.
You can test the scheduled task when it runs at the configured time.
Step 4: Test the scheduled task
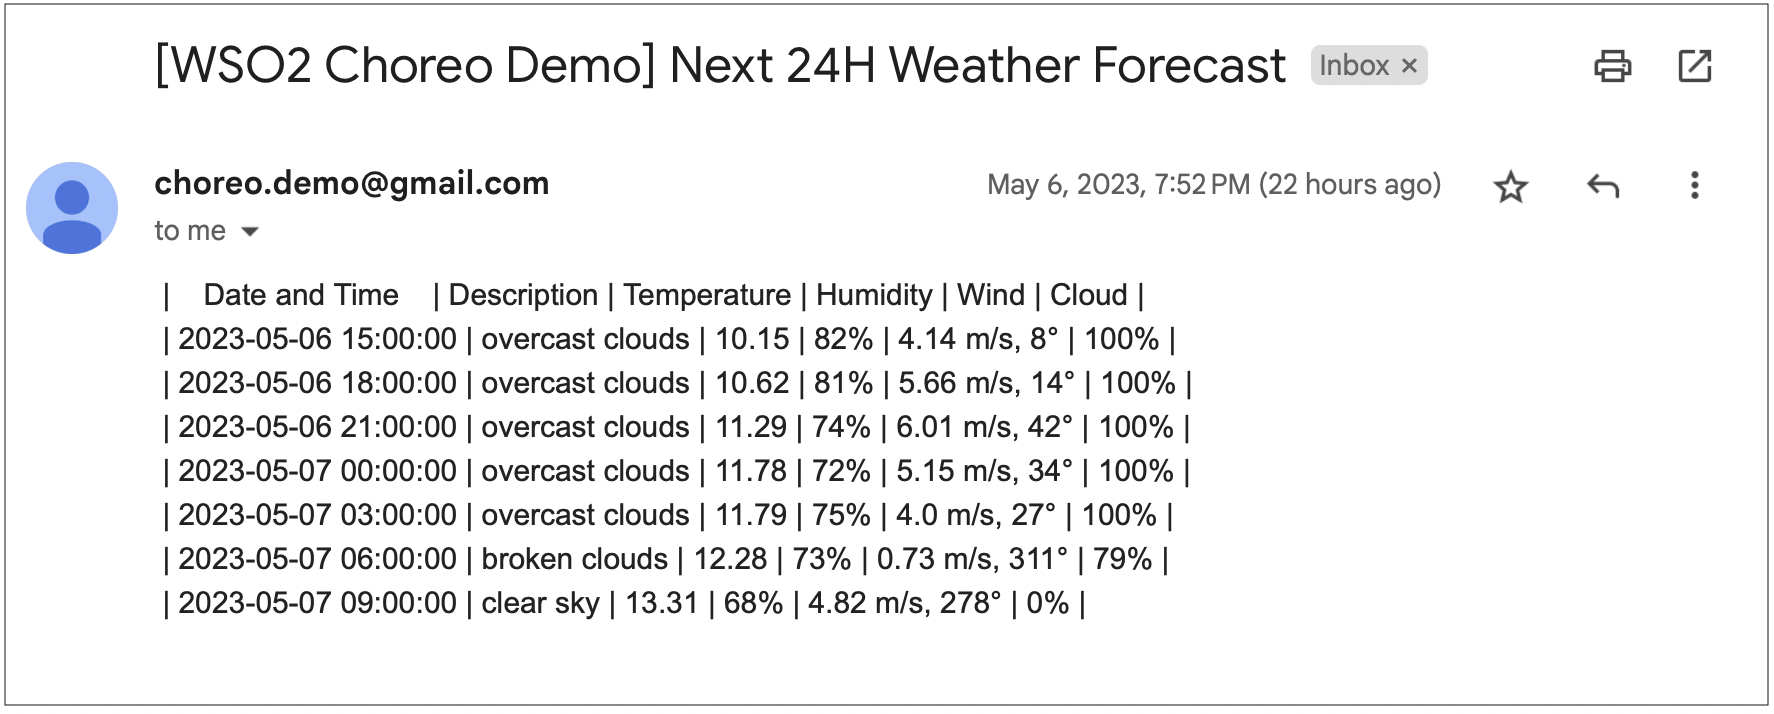
When the scheduled task runs at the configured time, an email with the subject [WSO2 WSO2 Developer Platform Demo] Next 24H Weather Forecast is sent from WSO2 Developer [email protected] to the email address specified as the email configurable variable value in Step 3.
If the scheduled task ran successfully, you should receive an email similar to the following:
Step 5: Observe the scheduled task
The observability view in WSO2 Developer Platform displays graphs that depict details such as throughput, latency, diagnostic data, and logs to identify and troubleshoot anomalies in components you deploy.
- In the left navigation menu, click Observability.
- Observe the following:
- The throughput and latencies of requests served over a given period.
- The logs generated over a given period.
- The flame graph (Diagnostics View) generated over a given period.
- The low-code diagram.
To learn more about the observability details you can view via WSO2 Developer Platform observability, see Observability Overview.
Step 6: Monitor executions
To track and monitor executions associated with the deployed scheduled task, go to the left navigation menu and click Execute.
Tip
The Execute view is applicable to both scheduled and manual tasks.
You can view the following information:
-
Total executions: The total number of executions within the past 30 days.

-
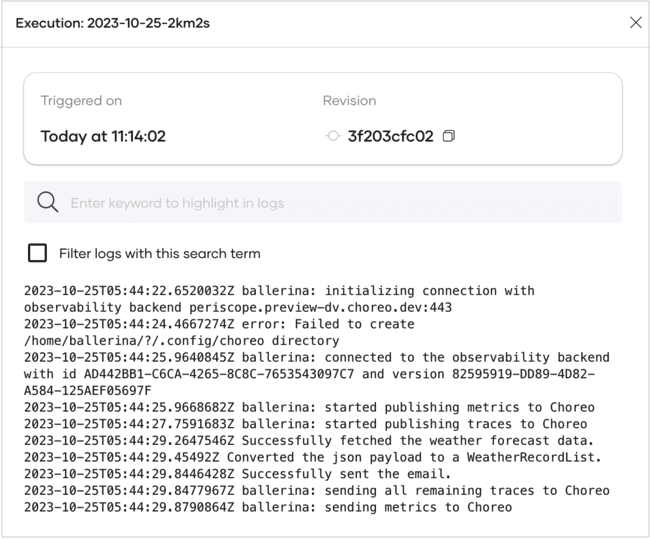
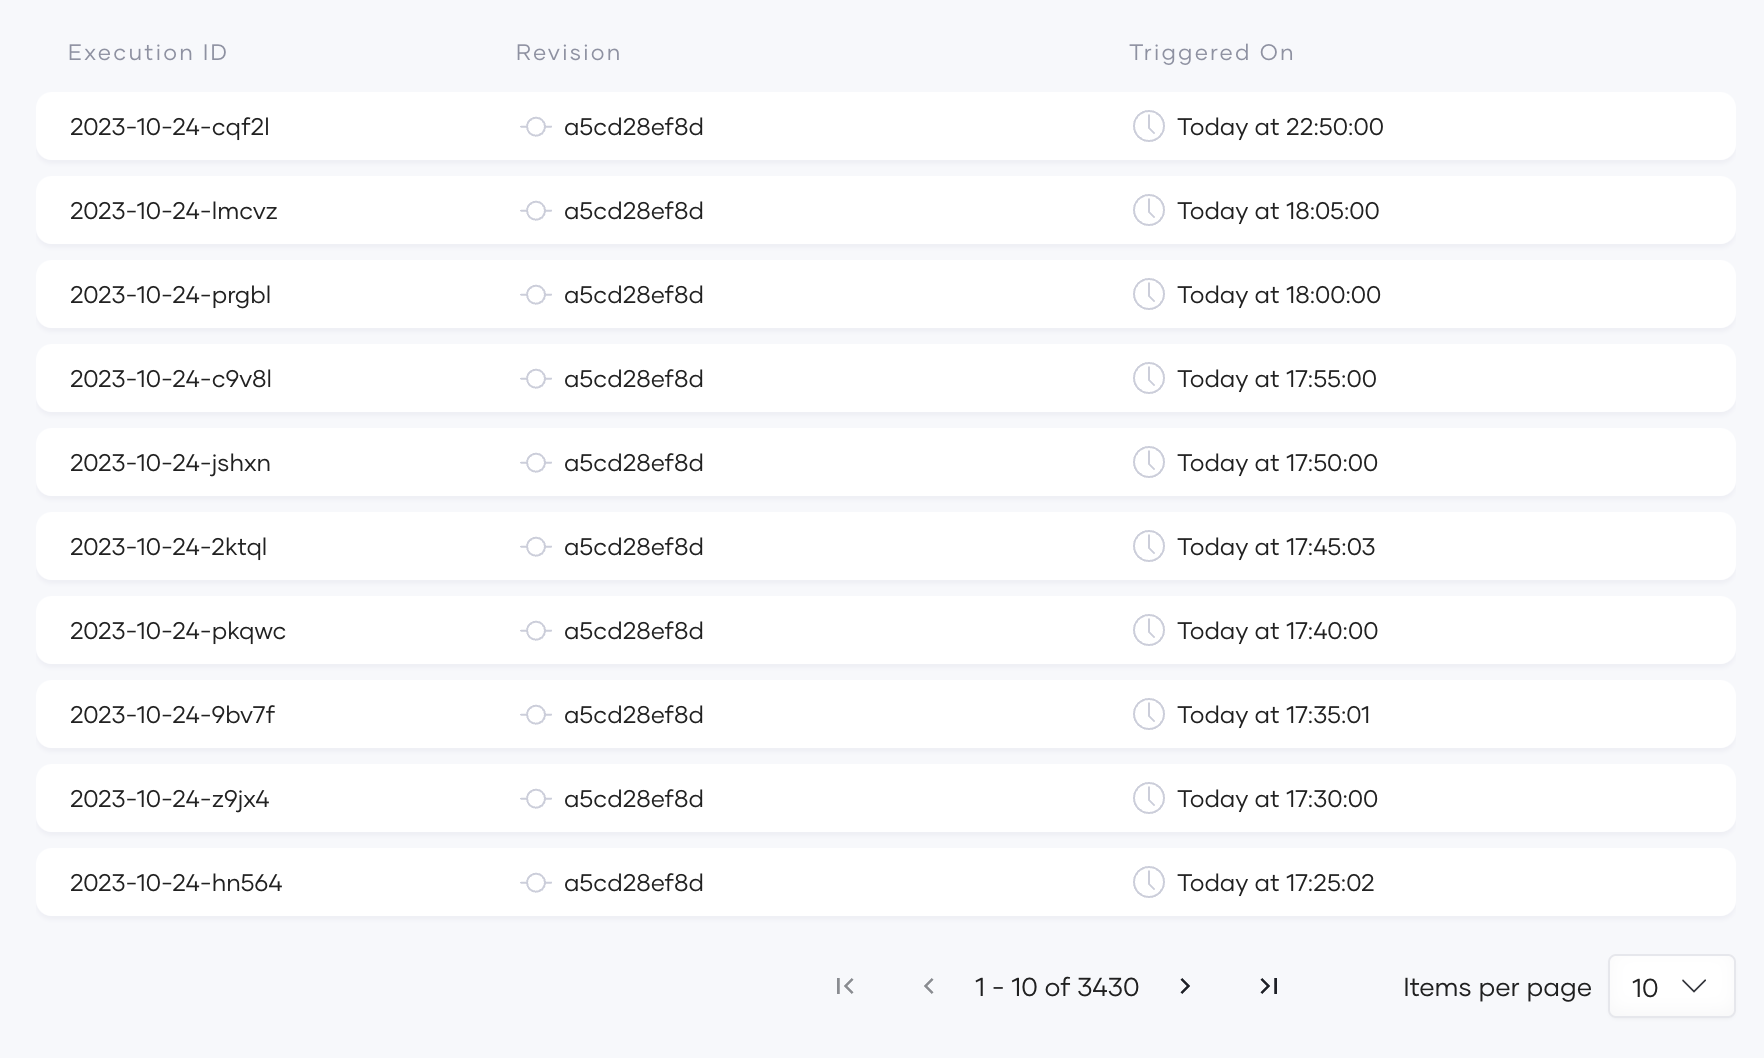
Execution history: The currently active executions and those that are already complete. You can view information such as the execution ID, the revision of the execution, and the time it was triggered.
-
Detailed execution logs: Click on an execution to view detailed logs related to it.
Info
It may take a few minutes for the logs to appear. You may need to manually refresh to view the latest logs.