Add MFA to your app
5 min
Multi-factor authentication (MFA) is a security mechanism that requires users to provide two or more forms of verification before granting access to an application. This adds an extra layer of security to your application and helps protect sensitive data from unauthorized access.
In this guide, we will look into enabling Email OTP as an MFA factor in your Next.js application. Email OTP is a simple and effective MFA method that sends a one-time passcode to the user's email address, which they must enter to complete the login process. You can configure SMTP settings in the Asgardeo Console by navigating to the Email & SMS tab > Email Provider section, but for this guide we will be using the default Asgardeo SMTP settings available out of the box.
First, let's set up Email OTP as an MFA factor by following the steps given below.
- Navigate to the Asgardeo Console and select your application under the Applications tab.
- Click on the Login Flow tab.
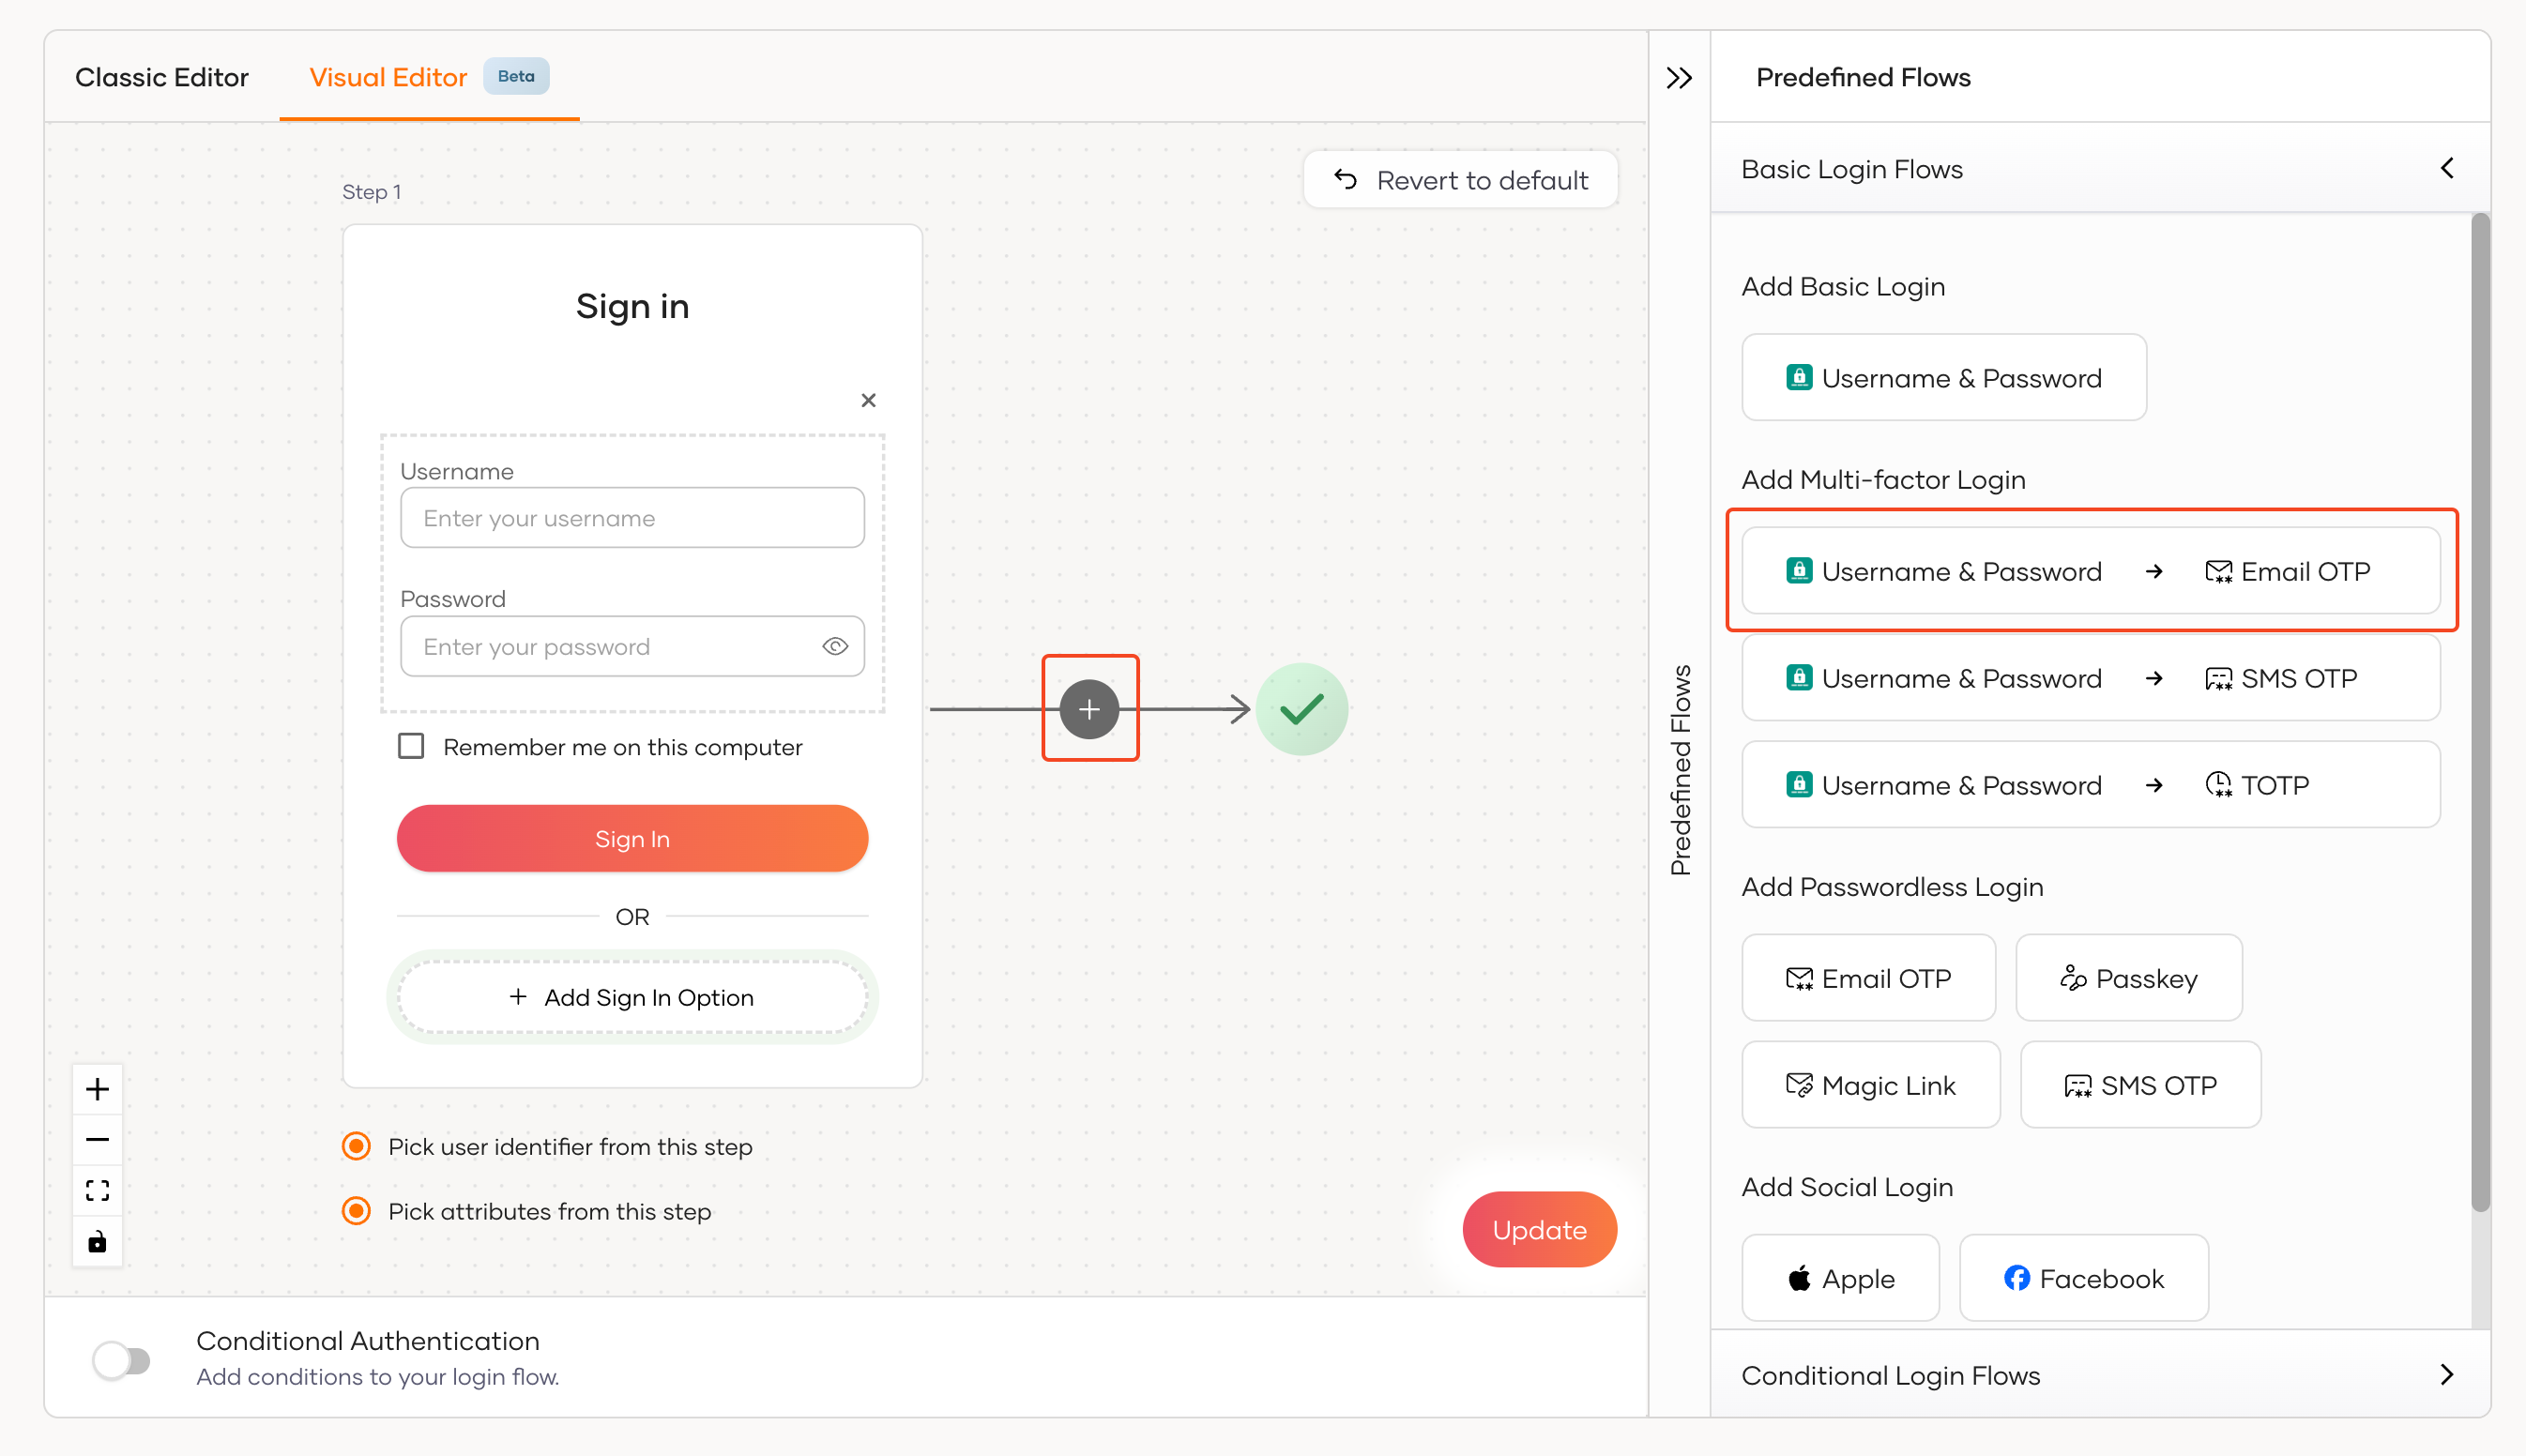
- Click on either the + button in the Visual Editor and select Email OTP from the pop-up prompt or click on Username & Password -> Email OTP button under the Predefined Flows > Basic Login Flows > Add Multi-factor Login section.
- Click on the Update button to save the changes.
Once Email OTP is added to the login flow as the second factor, we can proceed to integrate it into our Next.js application.
We will now read the Email OTP property value via the getEnvVariables
function in the authUtils.tsx
file under the /src/utils
directory. Navigate to this function and add the following lines.
const getEnvVariables = () => {
const organizationName = process.env.NEXT_PUBLIC_ORGANIZATION_NAME;
const scope = process.env.NEXT_PUBLIC_SCOPE;
const redirectUri = process.env.NEXT_PUBLIC_REDIRECT_URI;
const clientId = process.env.NEXT_PUBLIC_CLIENT_ID;
const clientSecret = process.env.NEXT_PUBLIC_CLIENT_SECRET;
const emailOtpAuthenticatorId = process.env.NEXT_PUBLIC_EMAIL_OTP_AUTHENTICATOR_ID;
if (!organizationName || !scope || !clientId || !clientSecret || !redirectUri || !emailOtpAuthenticatorId) {
throw new Error("Missing required environment variables");
}
return {
organizationName,
scope,
redirectUri,
clientId,
clientSecret,
emailOtpAuthenticatorId,
};
};
Next, let's create a utility function to handle the Email OTP authentication. This function will send a request to the Asgardeo /oauth2/authn
API to authenticate the user with the provided OTP code via the Email OTP authenticator as the second factor in the authentication flow.
In the authUtils.tsx
file, add the following function to handle the Email OTP authentication:
export const authenticateWithEmailOtp = async (flowId: string, emailOtp: string) => {
const { organizationName, emailOtpAuthenticatorId } = getEnvVariables();
const authnUrl = `https://api.asgardeo.io/t/${organizationName}/oauth2/authn`;
const requestBody = {
flowId,
selectedAuthenticator: {
authenticatorId: emailOtpAuthenticatorId,
params: {
OTPCode: emailOtp,
},
},
};
try {
const response = await fetch(authnUrl, {
method: "POST",
headers: {
"Content-Type": "application/json",
"Accept": "application/json",
},
body: JSON.stringify(requestBody),
});
const data = await response.json();
console.debug("Email OTP auth request response: ", data);
return data;
} catch (error) {
console.error("Email OTP authentication request failed:", error);
throw new Error('Email OTP authentication request failed');
}
};
With this function in place, we can create the page that the users will land on to enter the OTP code that they received via email. Create a new directory named emailotp
under /src/app/auth
directory.
mkdir -p src/app/auth/emailotp
Create a new file named page.tsx
using the following command.
touch src/app/auth/emailotp/page.tsx
Then add the following code:
"use client"
import { useState, FormEvent, useEffect } from 'react';
import { useRouter, useSearchParams } from 'next/navigation';
import { signIn } from 'next-auth/react';
import { authenticateWithEmailOtp } from '../../../utils/authUtils';
import SubmitButton from '../../../components/SubmitButton';
import FormContainer from '../../../components/FormContainer';
const EmailOTP = () => {
const searchParams = useSearchParams();
const [emailOtp, setEmailOtp] = useState<string>('');
const [error, setError] = useState<string>('');
const router = useRouter();
const [flowId, setFlowId] = useState<string | null>(null);
useEffect(() => {
// Retrieve flowId from sessionStorage
const storedFlowId = sessionStorage.getItem('flowId');
setFlowId(storedFlowId);
}, [searchParams]);
const handleSubmit = async (event: FormEvent) => {
event.preventDefault();
if (!emailOtp) {
setError('Please enter your Email OTP value.');
return;
}
if (!flowId) {
setError('Flow ID is missing.');
return;
}
const authnResponseData = await authenticateWithEmailOtp(flowId, emailOtp);
if (authnResponseData.flowStatus === "SUCCESS_COMPLETED") {
const code = authnResponseData.authData.code;
// Call NextAuth to handle the login process
const result = await signIn("credentials", {
redirect: false,
code,
});
if (result?.error) {
setError("Invalid Email OTP token");
} else {
// Redirect to dashboard on successful login
router.push("/");
}
}
};
return (
<FormContainer>
<h2 className='flex justify-center'>Enter Email OTP</h2>
{error && <p className="error">{error}</p>}
<form onSubmit={handleSubmit}>
<div>
<label htmlFor="emailOtp">Email OTP Value:</label>
<input
type="text"
id="emailOtp"
value={emailOtp}
onChange={(e) => setEmailOtp(e.target.value)}
required
className="input-field"
/>
</div>
<div className='flex justify-center'>
<SubmitButton label="Submit" />
</div>
</form>
</FormContainer>
);
};
export default EmailOTP;
Now that we have set up the Email OTP page, we can now utilize this in the UsernamePasswordForm
component. Navigate to the UsernamePasswordForm.tsx
file under the /src/components/auth
directory and add the following code to include the Email OTP page redirection logic.
import React, { useState, FormEvent } from 'react';
import { useRouter } from 'next/navigation';
import { basicAuthentication } from '../utils/authUtils';
import { signIn } from 'next-auth/react';
import SubmitButton from './SubmitButton';
interface UsernamePasswordFormProps {
flowId: string;
setError: (error: string) => void;
}
const UsernamePasswordForm: React.FC<UsernamePasswordFormProps> = ({ flowId, setError }) => {
const [credentials, setCredentials] = useState<{ email: string; password: string }>({ email: '', password: '' });
const router = useRouter();
const handleSubmit = async (event: FormEvent) => {
event.preventDefault();
if (!credentials.email || !credentials.password) {
setError('Please enter both email and password.');
return;
}
try {
// Step 2: Authenticate the user with credentials and get the authorization code
const authnResponseData = await basicAuthentication(flowId, credentials.email, credentials.password);
if (authnResponseData.flowStatus === "SUCCESS_COMPLETED") {
const code = authnResponseData.authData.code;
// Call NextAuth to handle the login process
const result = await signIn("credentials", {
redirect: false,
code
});
if (result?.error) {
setError("Invalid username or password");
} else {
// Redirect to dashboard on successful login
router.push('/');
}
} else if (authnResponseData.flowStatus === "INCOMPLETE" &&
authnResponseData.nextStep.authenticators[0].authenticatorId === process.env.NEXT_PUBLIC_EMAIL_OTP_AUTHENTICATOR_ID &&
authnResponseData.nextStep.messages[0].messageId === "EmailOTPSent") {
// Redirect to Email OTP page
router.push('/auth/emailotp');
} else {
setError("Authentication failed.");
}
} catch (error) {
console.error("Authentication error:", error);
setError("An error occurred during authentication.");
}
};
return (
<form onSubmit={handleSubmit}>
<div>
<label htmlFor="email">Email Address:</label>
<input
type="email"
id="email"
value={credentials.email}
onChange={(e) => setCredentials({ ...credentials, email: e.target.value })}
required
autoComplete="username"
className="input-field"
/>
</div>
<div>
<label htmlFor="password">Password:</label>
<input
type="password"
id="password"
value={credentials.password}
onChange={(e) => setCredentials({ ...credentials, password: e.target.value })}
required
autoComplete="current-password"
className="input-field"
/>
</div>
<div className='flex justify-center'>
<SubmitButton label="Submit" />
</div>
</form>
);
};
export default UsernamePasswordForm;
You can now test the Email OTP MFA factor in your Next.js application. When a user logs in with their email and password, they will be redirected to the Email OTP page to enter the OTP code sent to their email address. Upon successful verification, the user will be redirected to the home page.