Manage team members
10 min
In this step, we implement team member management functionality into Teamspace using WSO2 Identity Platform's SCIM APIs. This includes inviting new members to teams and adding existing team members.
Invite members
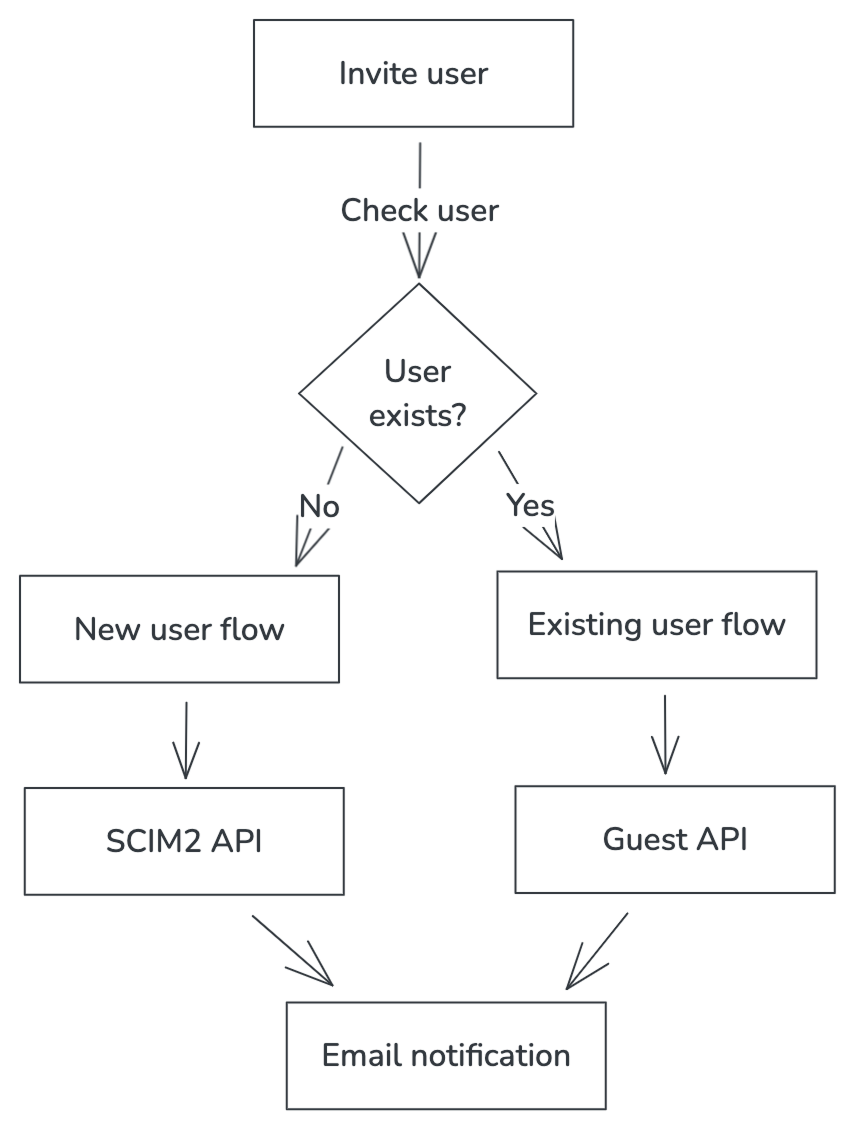
This invite-member flow handles both new and existing users. The flow is efficient in checking whether a user exists and proceeding accordingly. You can easily extend this flow by adding more properties or integrating additional business logic depending on your requirements.
Note
Read more on inviting users from parent organization.
The implementation in the app handles two scenarios:
- Inviting new users (Ask Password flow)
- Inviting existing users (Guest invitation)
WSO2 Identity Platform SDK provides InviteUser, UserList components to handle managing users and viewing users.
Replace the existing content of the app/page.tsx file with following content to add the Invite Users button.
'use client'

import {  SignedIn, SignedOut, SignInButton, SignOutButton, User, UserDropdown, UserProfile, SignUpButton,OrganizationSwitcher } from '@asgardeo/nextjs';
import Link from 'next/link';

export default function Home() {
  return (
    <div className="flex flex-col min-h-screen">
      {/* Header */}
      <header className="bg-white border-b border-gray-200 sticky top-0 z-50">
        <div className="max-w-7xl mx-auto px-4 sm:px-6 lg:px-8">
          <div className="flex justify-between items-center h-16">
            {/* Left - Branding or Nav (can add logo here) */}
            <div className="flex items-center space-x-4">
              <SignedIn>
                {/* Add logo or navigation for signed-in users if needed */}
                <Link href="/invite-users">
                  <button className="px-4 py-2 text-white rounded-full hover:opacity-90 transition" style={{ backgroundColor: "#FF7300" }}>
                    Invite Users
                  </button>
                </Link>
              </SignedIn>
              <SignedOut>
                <span className="text-sm text-gray-600">Team Space</span>
              </SignedOut>
            </div>

            {/* Right - User Actions */}
            <div className="flex items-center space-x-3">
              <SignedIn>
                <UserDropdown />
                <SignOutButton />
                  <Link href="/add-organizations">
                  <button className="px-4 py-2 text-white rounded-full hover:opacity-90 transition" style={{ backgroundColor: "#FF7300" }}>
                      Add Organizations
                    </button>
                  </Link>
                <OrganizationSwitcher />
              </SignedIn>
              <SignedOut>
                <SignInButton />
                <SignUpButton />
              </SignedOut>
            </div>
          </div>
        </div>
      </header>

      {/* Main Content */}
      <main className="flex-grow flex flex-col items-center justify-center text-center px-4 py-12 gap-6 bg-gray-50">
        <SignedIn>
          <User>
            {(user) => (
              <div className="text-lg font-medium text-gray-800">
                Welcome back, {user.userName || user.username || user.sub}
              </div>
            )}
          </User>
          <div className="mt-4">
            <UserProfile />
          </div>
        </SignedIn>
        <SignedOut>
          <p className="text-gray-700">You are not signed in. Please Sign In or Sign Up</p>
        </SignedOut>
      </main>
    </div>
  );
}
This code snippet adds a Invite Users button in the application.
Now since we need to display a Invite Users Page, the following can be done to integrate the WSO2 Identity Platform Next SDK with {{product_name}} and perform the user invite.
First, create an app route for the user invite page. Create a new file called app/invite-users/page.tsx and add the following code:
'use client';

import Link from 'next/link';
import {InviteUser} from '@asgardeo/nextjs';
import { useRouter } from 'next/navigation';

export default function InviteUsers() {
    const router = useRouter();

  return (
    <div className="min-h-screen flex items-center justify-center bg-gradient-to-br from-blue-50 via-background to-purple-50 p-4">
      <div className="w-full max-w-md">
                <InviteUser
          onSuccess={() => {
            router.push('/');
          }}
        />
        <div className="mt-8 text-center">
          <Link href="/" className="text-sm text-muted-foreground hover:text-foreground">
            ← Back to home
          </Link>
        </div>
      </div>
    </div>
  );
}
Save the changes and re-run the application in development mode if it is not running already.
Once the application is started, you will see the homepage of the application with the changes we made to include the Invite Users button.
Clicking on the Invite Users button will display the user invite page from the WSO2 Identity Platform SDK. Once you fill this information and click 'Continue' the user will be added in WSO2 Identity Platform.
View Members
Replace the existing content of the app/page.tsx file with following content to add the Invite Users button.
'use client'

import {  SignedIn, SignedOut, SignInButton, SignOutButton, User, UserDropdown, UserProfile, SignUpButton,OrganizationSwitcher } from '@asgardeo/nextjs';
import Link from 'next/link';

export default function Home() {
  return (
    <div className="flex flex-col min-h-screen">
      {/* Header */}
      <header className="bg-white border-b border-gray-200 sticky top-0 z-50">
        <div className="max-w-7xl mx-auto px-4 sm:px-6 lg:px-8">
          <div className="flex justify-between items-center h-16">
            {/* Left - Branding or Nav (can add logo here) */}
            <div className="flex items-center space-x-4">
              <SignedIn>
                {/* Add logo or navigation for signed-in users if needed */}
                <Link href="/invite-users">
                  <button className="px-4 py-2 text-white rounded-full hover:opacity-90 transition" style={{ backgroundColor: "#FF7300" }}>
                    Invite Users
                  </button>
                </Link>
                <Link href="/view-users">
                  <button className="px-4 py-2 text-white rounded-full hover:opacity-90 transition" style={{ backgroundColor: "#FF7300" }}>
                    View Users
                  </button>
                </Link>
              </SignedIn>
              <SignedOut>
                <span className="text-sm text-gray-600">Team Space</span>
              </SignedOut>
            </div>

            {/* Right - User Actions */}
            <div className="flex items-center space-x-3">
              <SignedIn>
                <UserDropdown />
                <SignOutButton />
                  <Link href="/add-organizations">
                  <button className="px-4 py-2 text-white rounded-full hover:opacity-90 transition" style={{ backgroundColor: "#FF7300" }}>
                      Add Organizations
                    </button>
                  </Link>
                <OrganizationSwitcher />
              </SignedIn>
              <SignedOut>
                <SignInButton />
                <SignUpButton />
              </SignedOut>
            </div>
          </div>
        </div>
      </header>

      {/* Main Content */}
      <main className="flex-grow flex flex-col items-center justify-center text-center px-4 py-12 gap-6 bg-gray-50">
        <SignedIn>
          <User>
            {(user) => (
              <div className="text-lg font-medium text-gray-800">
                Welcome back, {user.userName || user.username || user.sub}
              </div>
            )}
          </User>
          <div className="mt-4">
            <UserProfile />
          </div>
        </SignedIn>
        <SignedOut>
          <p className="text-gray-700">You are not signed in. Please Sign In or Sign Up</p>
        </SignedOut>
      </main>
    </div>
  );
}
This code snippet adds a View Users button in the application.
Now since we need to display a View Users Page, the following can be done to integrate the WSO2 Identity Platform Next SDK with WSO2 Identity Platform and perform the listing of users.
First, create an app route for the user view page. Create a new file called app/view-users/page.tsx and add the following code:
'use client';

import Link from 'next/link';
import {UserList} from '@asgardeo/nextjs';
import { useRouter } from 'next/navigation';

export default function CreateOrganizations() {
    const router = useRouter();

  return (
    <div className="min-h-screen flex items-center justify-center bg-gradient-to-br from-blue-50 via-background to-purple-50 p-4">
      <div className="w-full max-w-md">
                <UserList/>
        <div className="mt-8 text-center">
          <Link href="/" className="text-sm text-muted-foreground hover:text-foreground">
            ← Back to home
          </Link>
        </div>
      </div>
    </div>
  );
}
Save the changes and re-run the application in development mode if it is not running already.
Once the application is started, you will see the homepage of the application with the changes we made to include the View Users button.
Clicking on the View Users button will display the view user page from the WSO2 Identity Platform SDK.
With this guide, you've learnt to built a Next.js team management app with WSO2 Identity Platform for authentication, team management, and team switching. Enhance it further by adding branding or integrating more WSO2 Identity Platform features to fit your needs. 🚀