Weak access control
4 min
template: templates/complete-guide.html heading: Weak access control read_time: 4 min
A typical frontend app consists of several components. Given that the user is already logged in, the app should provide access to these components based on the user's role, such as Administrator, Employee, or Customer. The user interface elements and components should only be visible to, and accessible to, users with the appropriate roles or capabilities. If an unauthorized user can access restricted components, this poses a serious security risk, potentially leading to sensitive information leakage and other critical issues.
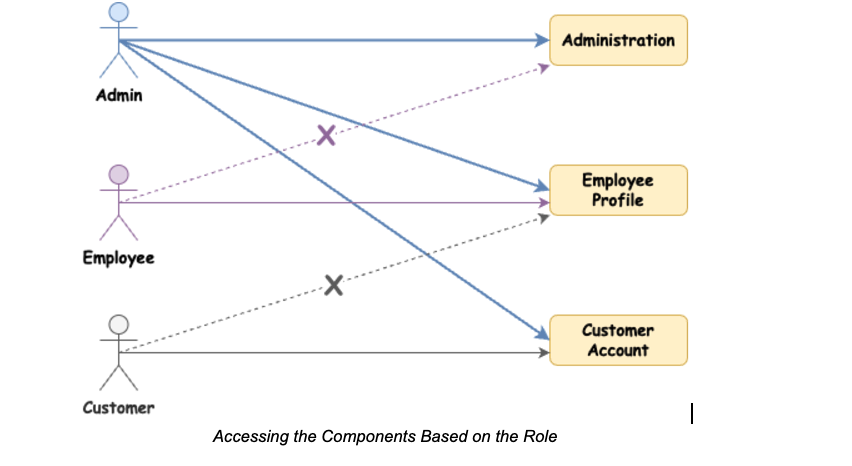
Additionally, bypassing access control by modifying the URL, internal application state, HTML page, or API requests can severely compromise the application's data confidentiality and integrity. For example, if a customer component is displayed at http://localhost:3000/customer, and an authenticated user can view admin components at http://localhost:3000/admin without being validated as an administrator, it represents a significant security flaw.
To implement secure access in your application, you need to implement an access control mechanism. Role-Based Access Control (RBAC) is one of the widely used access control mechanisms, another suitable option would be to use Attribute-Based Access Control (ABAC). RBAC grants access based on user roles, while ABAC provides more granular control by defining access based on user attributes.

The Role Based Access Control which the access to the application based on the user roles or any other suitable access control such as attribute-based access control which defines the access to the application based on the user attributes - granular level access control must be defined in the application. Let’s again take an example of WSO2 Identity Platform React SDK.
-
Return Roles from the IdP: The IdP should return user roles in the ID token. In WSO2 Identity Platform, include ‘roles’ as a requested attribute via the user attributes section in the application configuration and define a scope called roles and add the roles attribute.
-
Request Roles Using WSO2 Identity Platform SDK: In your React app, configure the WSO2 Identity Platform SDK to request the “roles” scope. This ensures the ID token returned by WSO2 Identity Platform includes the user's roles.
import { AuthProvider } from "@asgardeo/auth-react";

const authConfig = {
    clientID: "YOUR_CLIENT_ID",
    signInRedirectURL: "http://localhost:3000",
    signOutRedirectURL: "http://localhost:3000",
    baseUrl: "https://api.asgardeo.io/t/{org_name}",
    scope: [ "openid","profile", "roles"],
    ...
};
- Utilize the Returned Roles: Use the roles obtained from the ID token to define access controls for components in your application. Ensure that only users with the appropriate roles can access specific routes or components. Below are sample code segments that demonstrate how to retrieve the roles from the ID token and define UI elements based on those roles.
import { useAuthContext } from '@asgardeo/auth-react';

---
const { state, getDecodedIDToken } = useAuthContext();
const [ isResourcesAllowed, setIsResourcesAllowed ] = useState();

---
useEffect(() => {
  getDecodedIDToken().then((decodedIdToken) => {
    if (decodedIdToken?.application_roles === "React-App-Manager") {
      setIsResourcesAllowed(true);
    }
  }).catch((error) => {

  })
}, [getDecodedIDToken, state]);

---
<div className='center-panel' id='center-panel'>
  <a href='#/' className='nav active' id ='home' onClick={routeHomeChange}>Home</a>
  {
    state.isAuthenticated
    && <a href='#/' className='nav' id='resource' onClick={routeResourcesChange}>API Call</a>
  }
  {
    isResourcesAllowed
    && state.isAuthenticated
    && <a href='#/' className='nav' id='setting' onClick={routeSettingsChange}>Settings</a>
  }
</div>