Add identity verification with Onfido
Onfido is an identity verification service that allows users to securely verify their identity using a combination of biometric checks and government-issued identity documents such as passports, driver's licenses and national ID. This guide explains how you can use Onfido to perform identity verification in WSO2 Identity Platform.
Prerequisites
Before you begin, ensure you have the following:
-
An Onfido Account: An active administrative account on Onfido. Ensure that comparison checks are enabled to the account. For more details, refer to the Onfido Comparison Checks documentation.
-
WSO2 Identity Platform Account: Access to your WSO2 Identity Platform console with administrative privileges.
-
WSO2 Identity Platform Application: A registered application in WSO2 Identity Platform. You can register your own application or use this Onfido Sample Application.
-
WSO2 Identity Platform User Account: A user account with values set for the attributes that require verification.
Configure Onfido via the dashboard
Follow the following steps in Onfido to configure it to work with WSO2 Identity Platform.
Create an API token.
To create an API token:
-
Log in to the Onfido Dashboard.
-
Go to Settings > Developers > Tokens.
-
Click Generate API token.
-
Select Live as the environment and click Generate.
-
Copy the generated API token and store it securely for later use.
Set up a workflow in Onfido Studio.
Follow the steps below to set up a workflow:
-
On the Onfido Dashboard, navigate to Onfido Studio > Workflows.
-
Click New Workflow, provide a name, and click Create.
-
Click New Version to open the Workflow Builder.
-
Select to Create a new workflow.
-
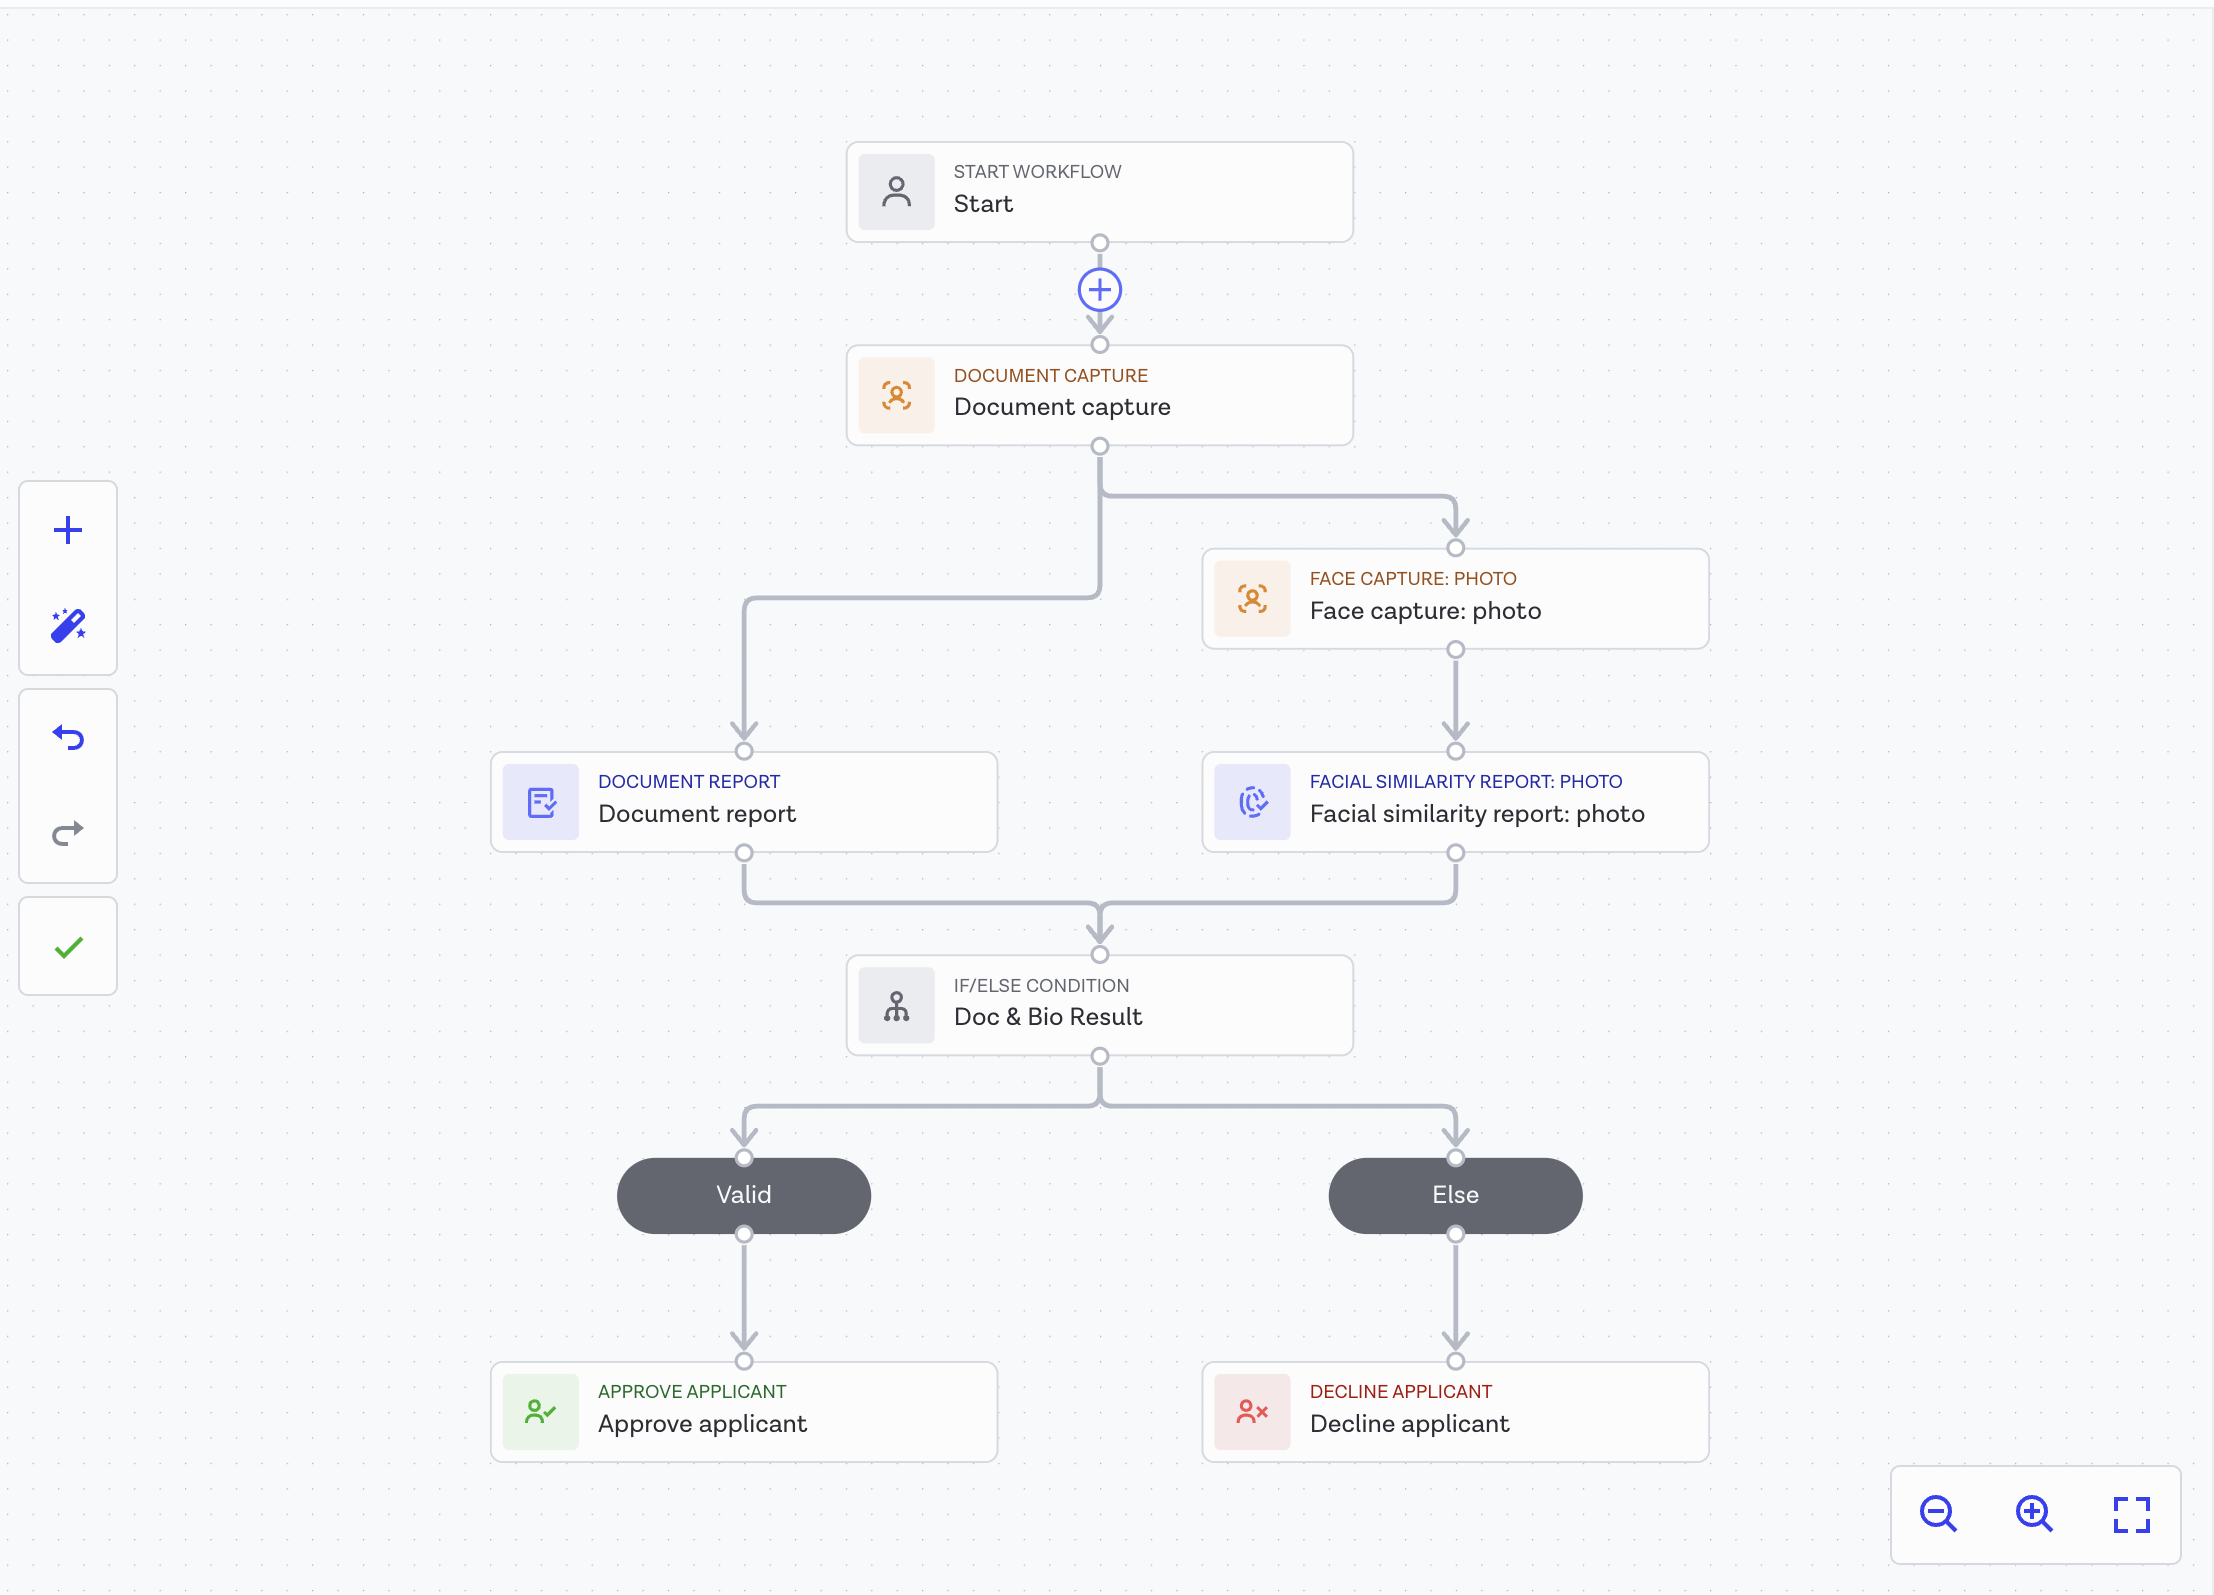
Use the drag-and-drop interface to build a workflow similar to the reference image.
In this example, we have created a basic workflow that includes document reports and face similarity reports for identity verification.
Note
The workflow must at least include document capture for verification. Optionally, you can integrate additional features such as face capture: photo, face capture: motion etc., based on your requirements.
-
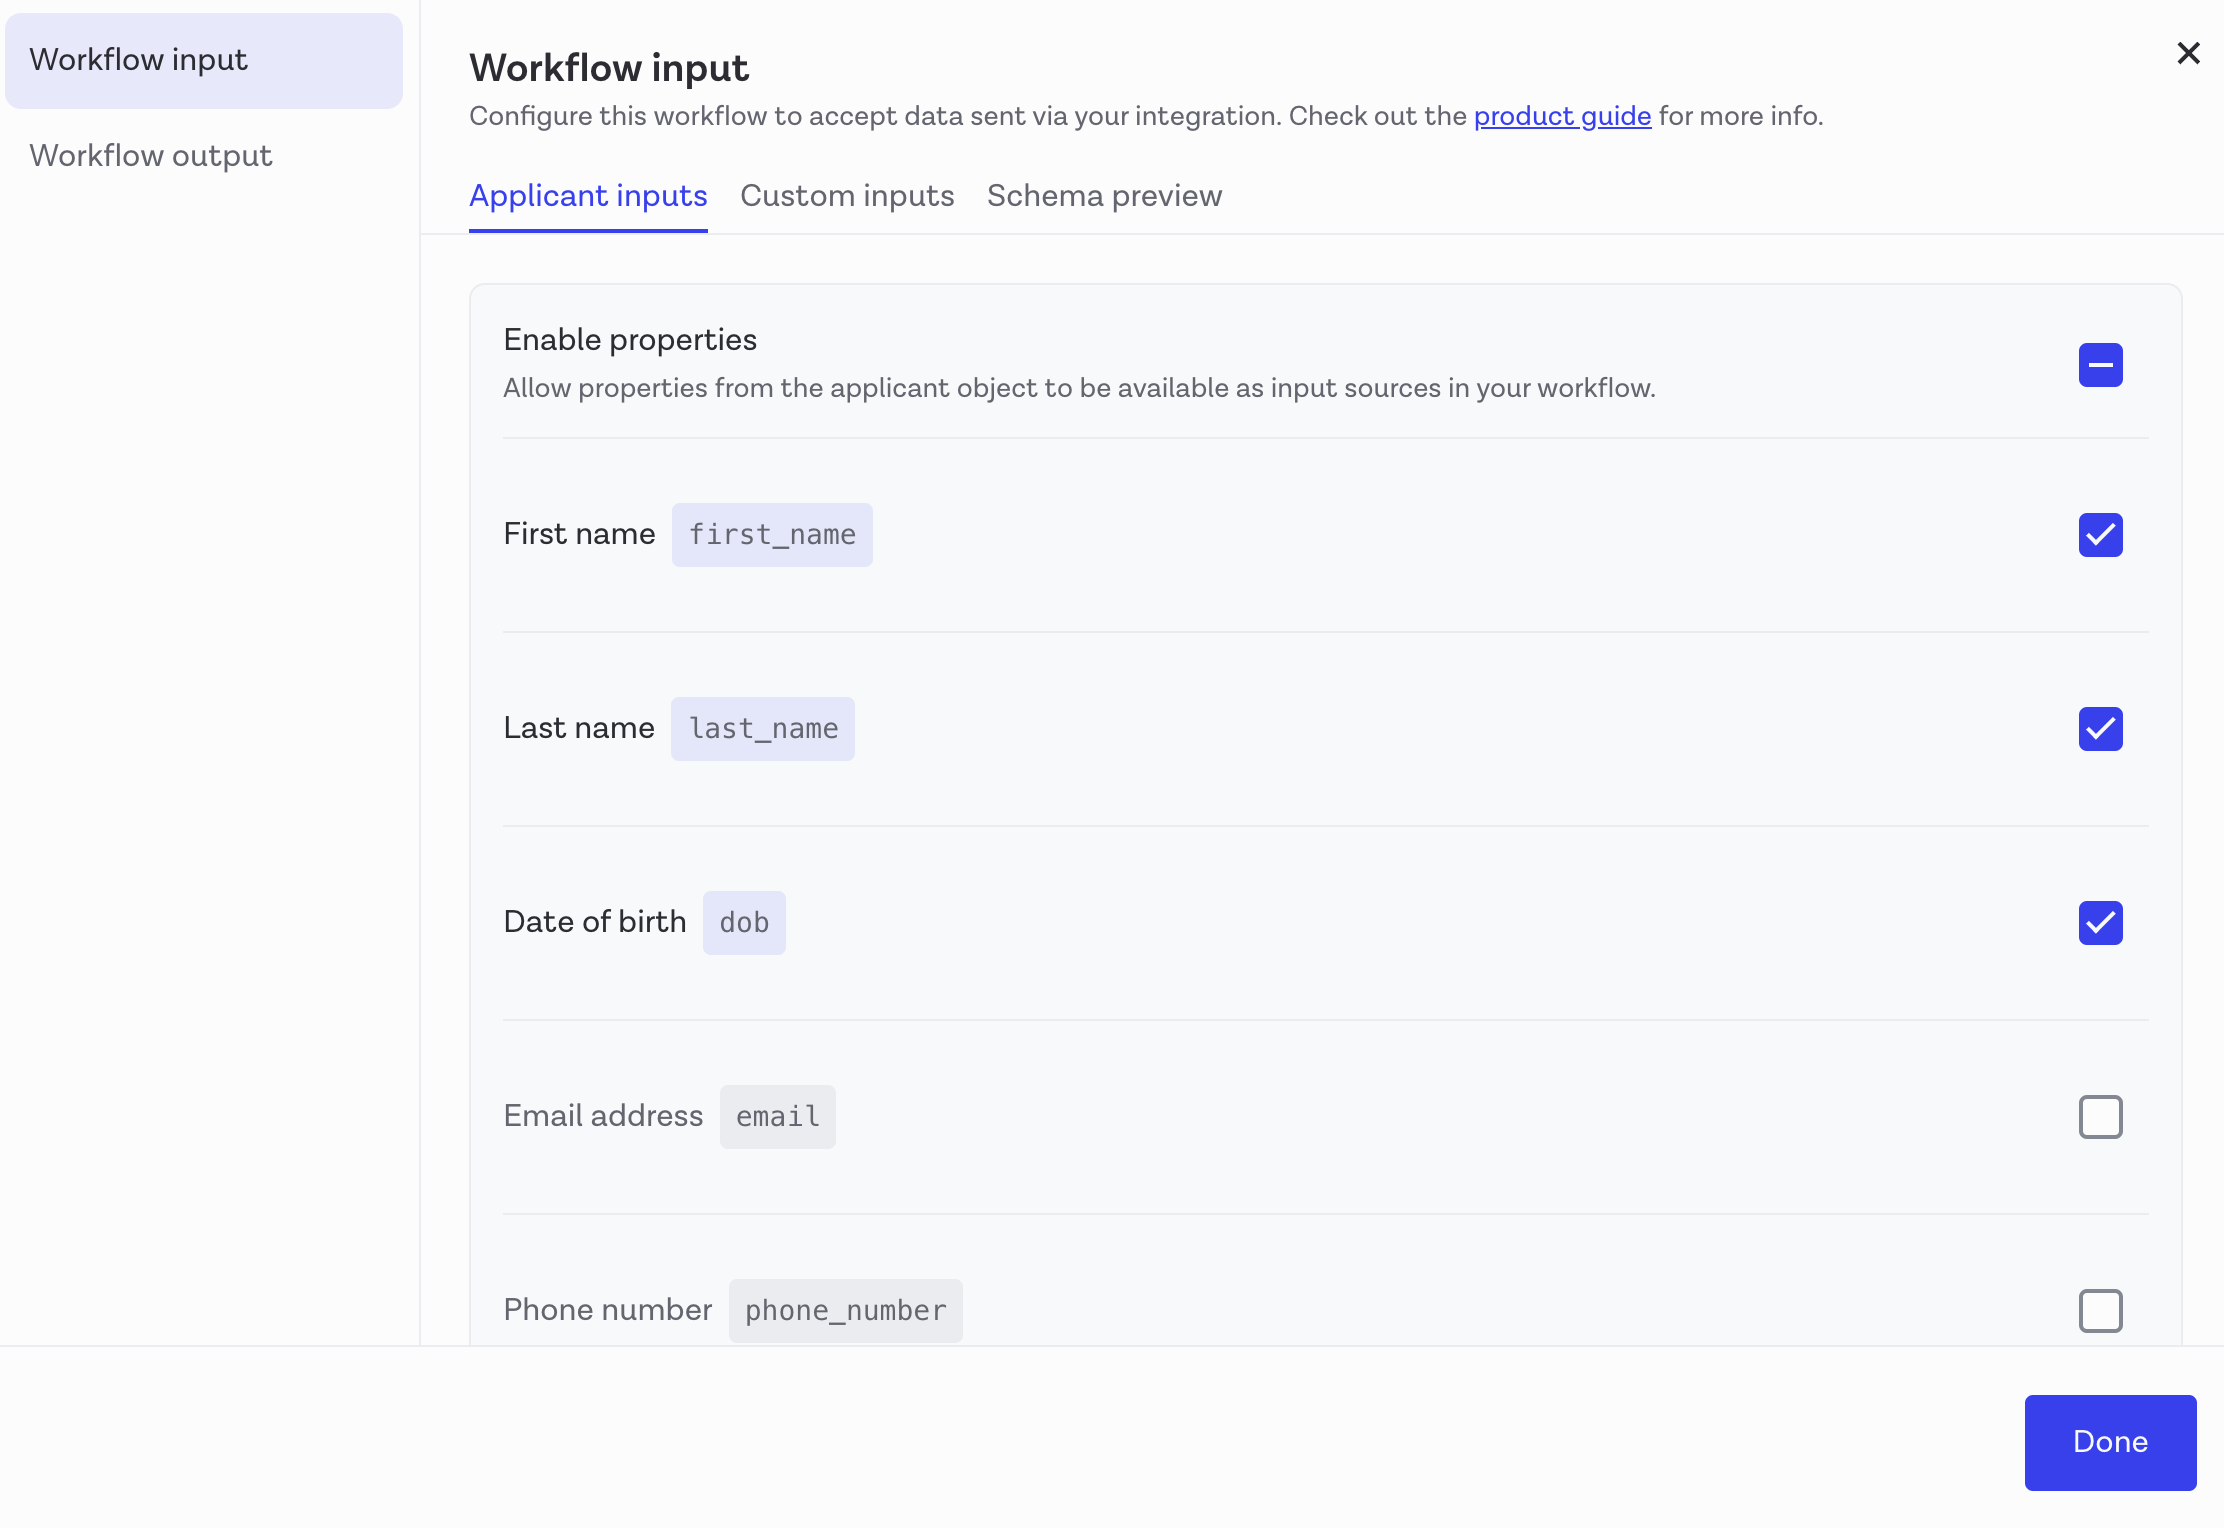
Configure the workflow to accept first name and last name as input attributes. For detailed instructions on setting up inputs, refer to the Onfido Studio workflow input documentation.
Note
If you wish to use the sample application, ensure that you also enable date of birth.
-
Set up the workflow outputs to include data comparison results from the document report. To do so,
-
Go to the Workflow Output section.
-
In the Configure tab, click Add custom property and create a new property named
data_comparisonand set its format toOther.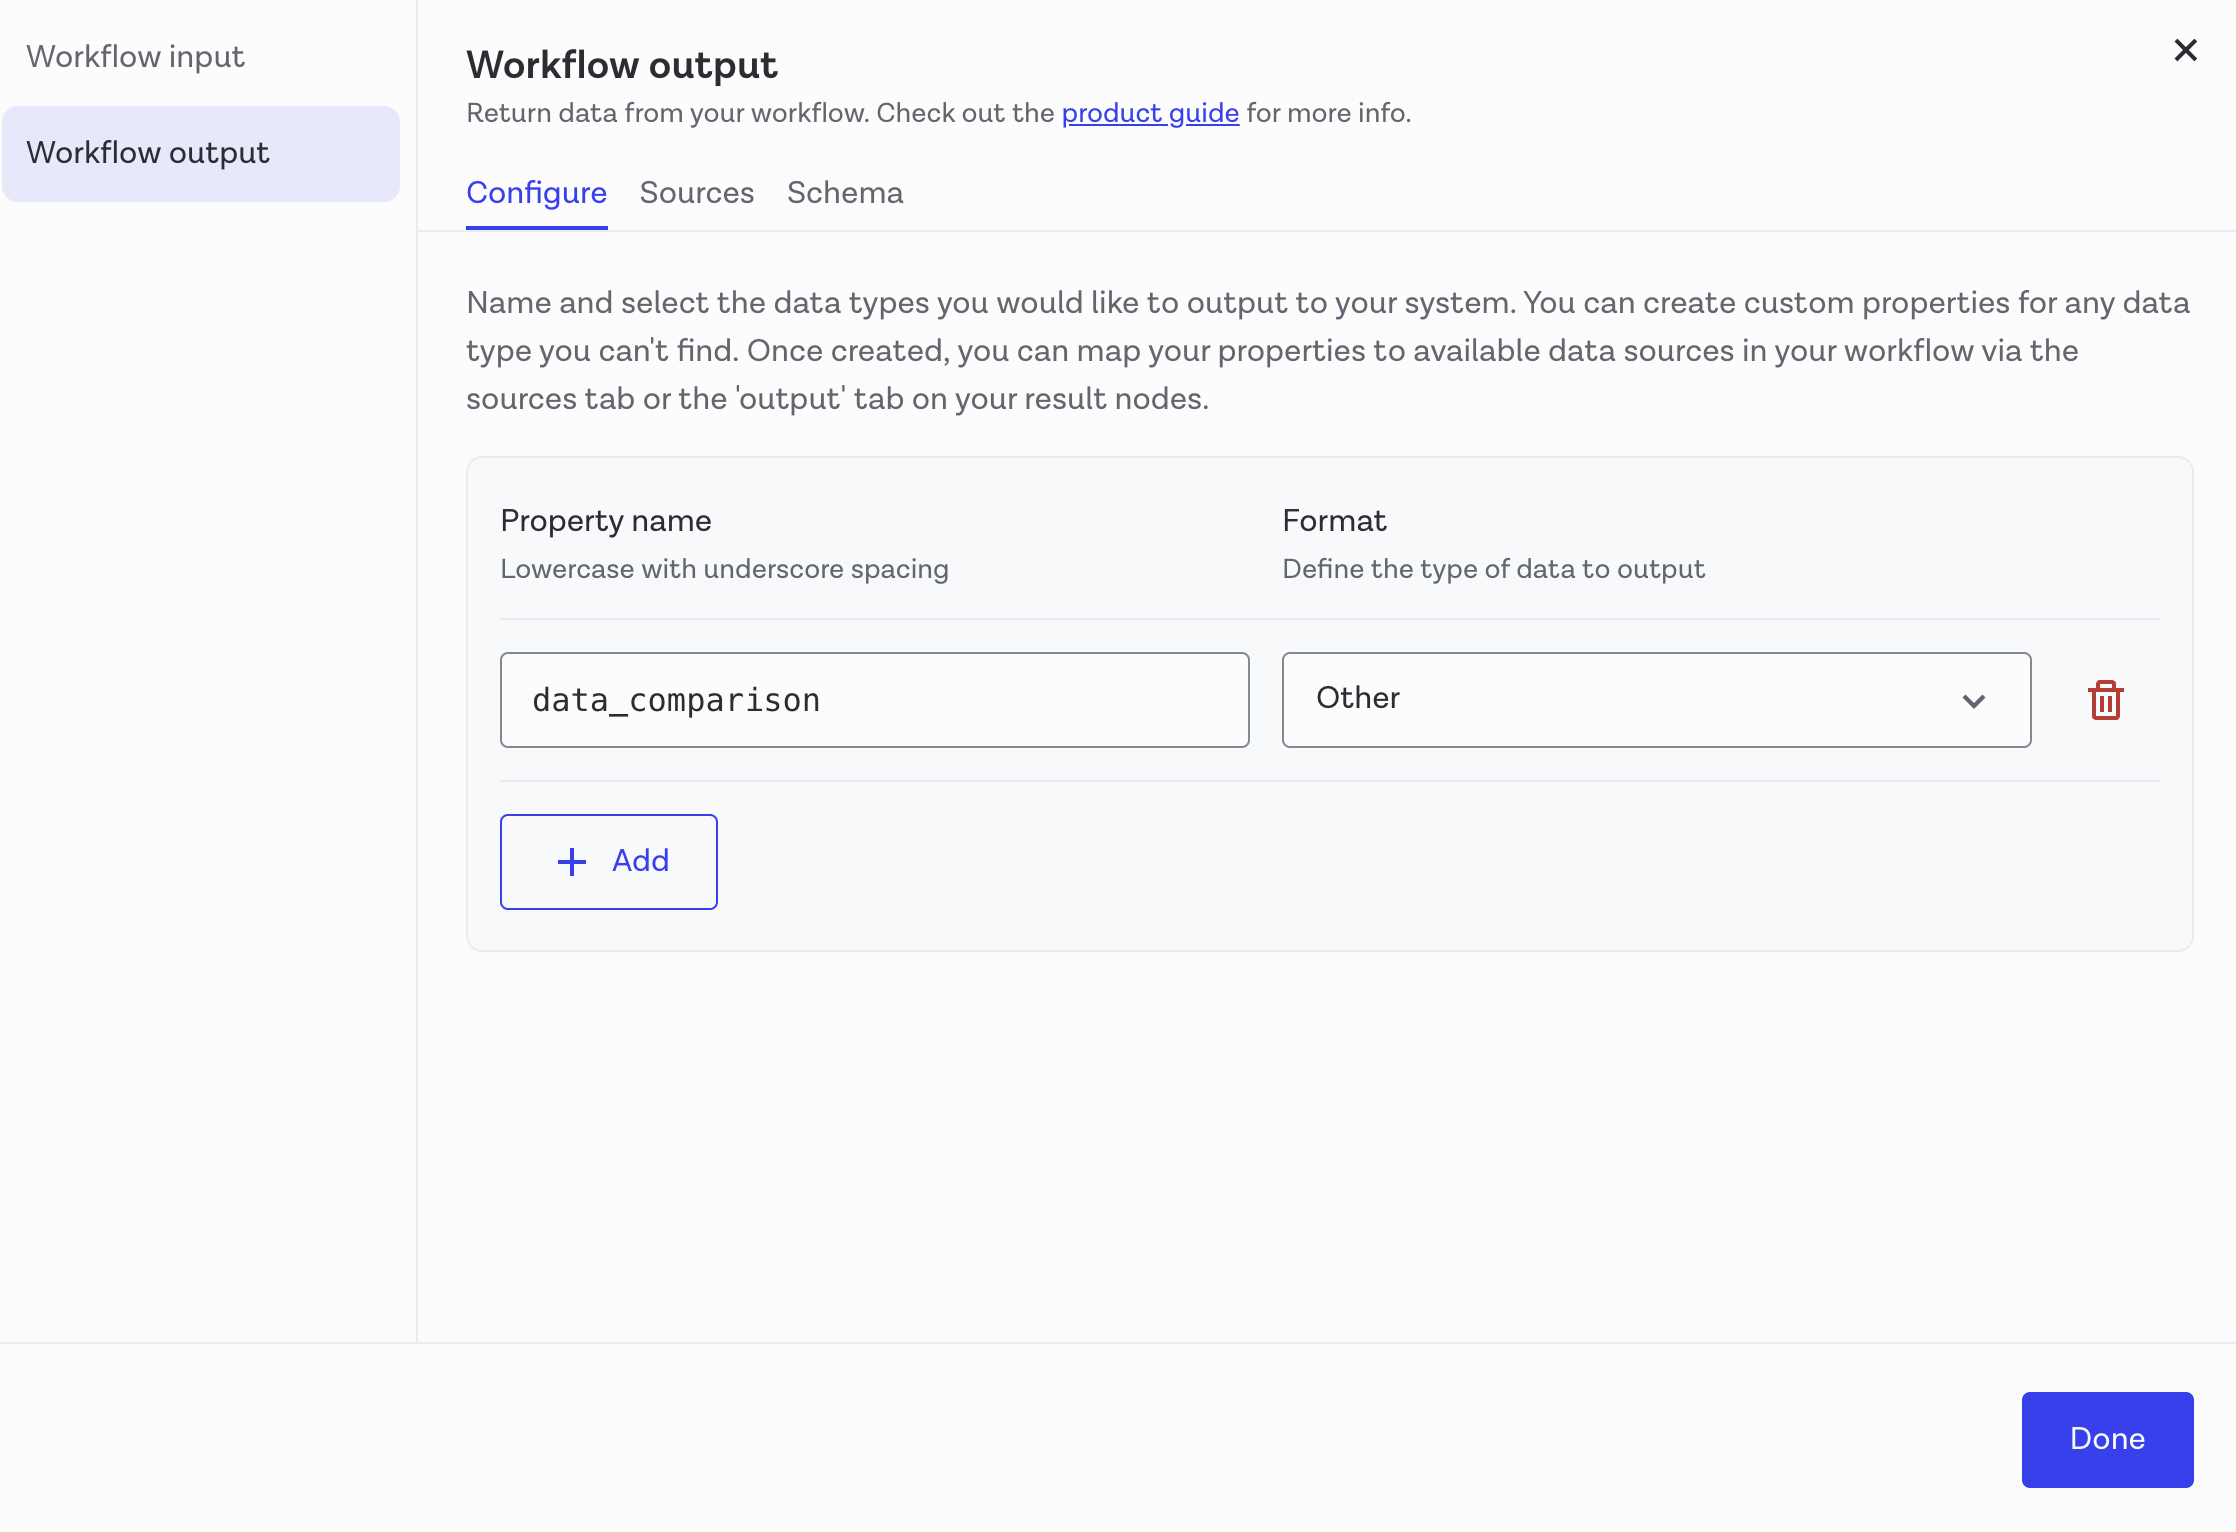
Note
Refer Onfido Studio workflow output documentation for more information.
-
Navigate to the Sources tab.
-
For both APPROVE APPLICANT and DECLINE APPLICANT, select Document report - Breakdown - Data comparison - Breakdown.
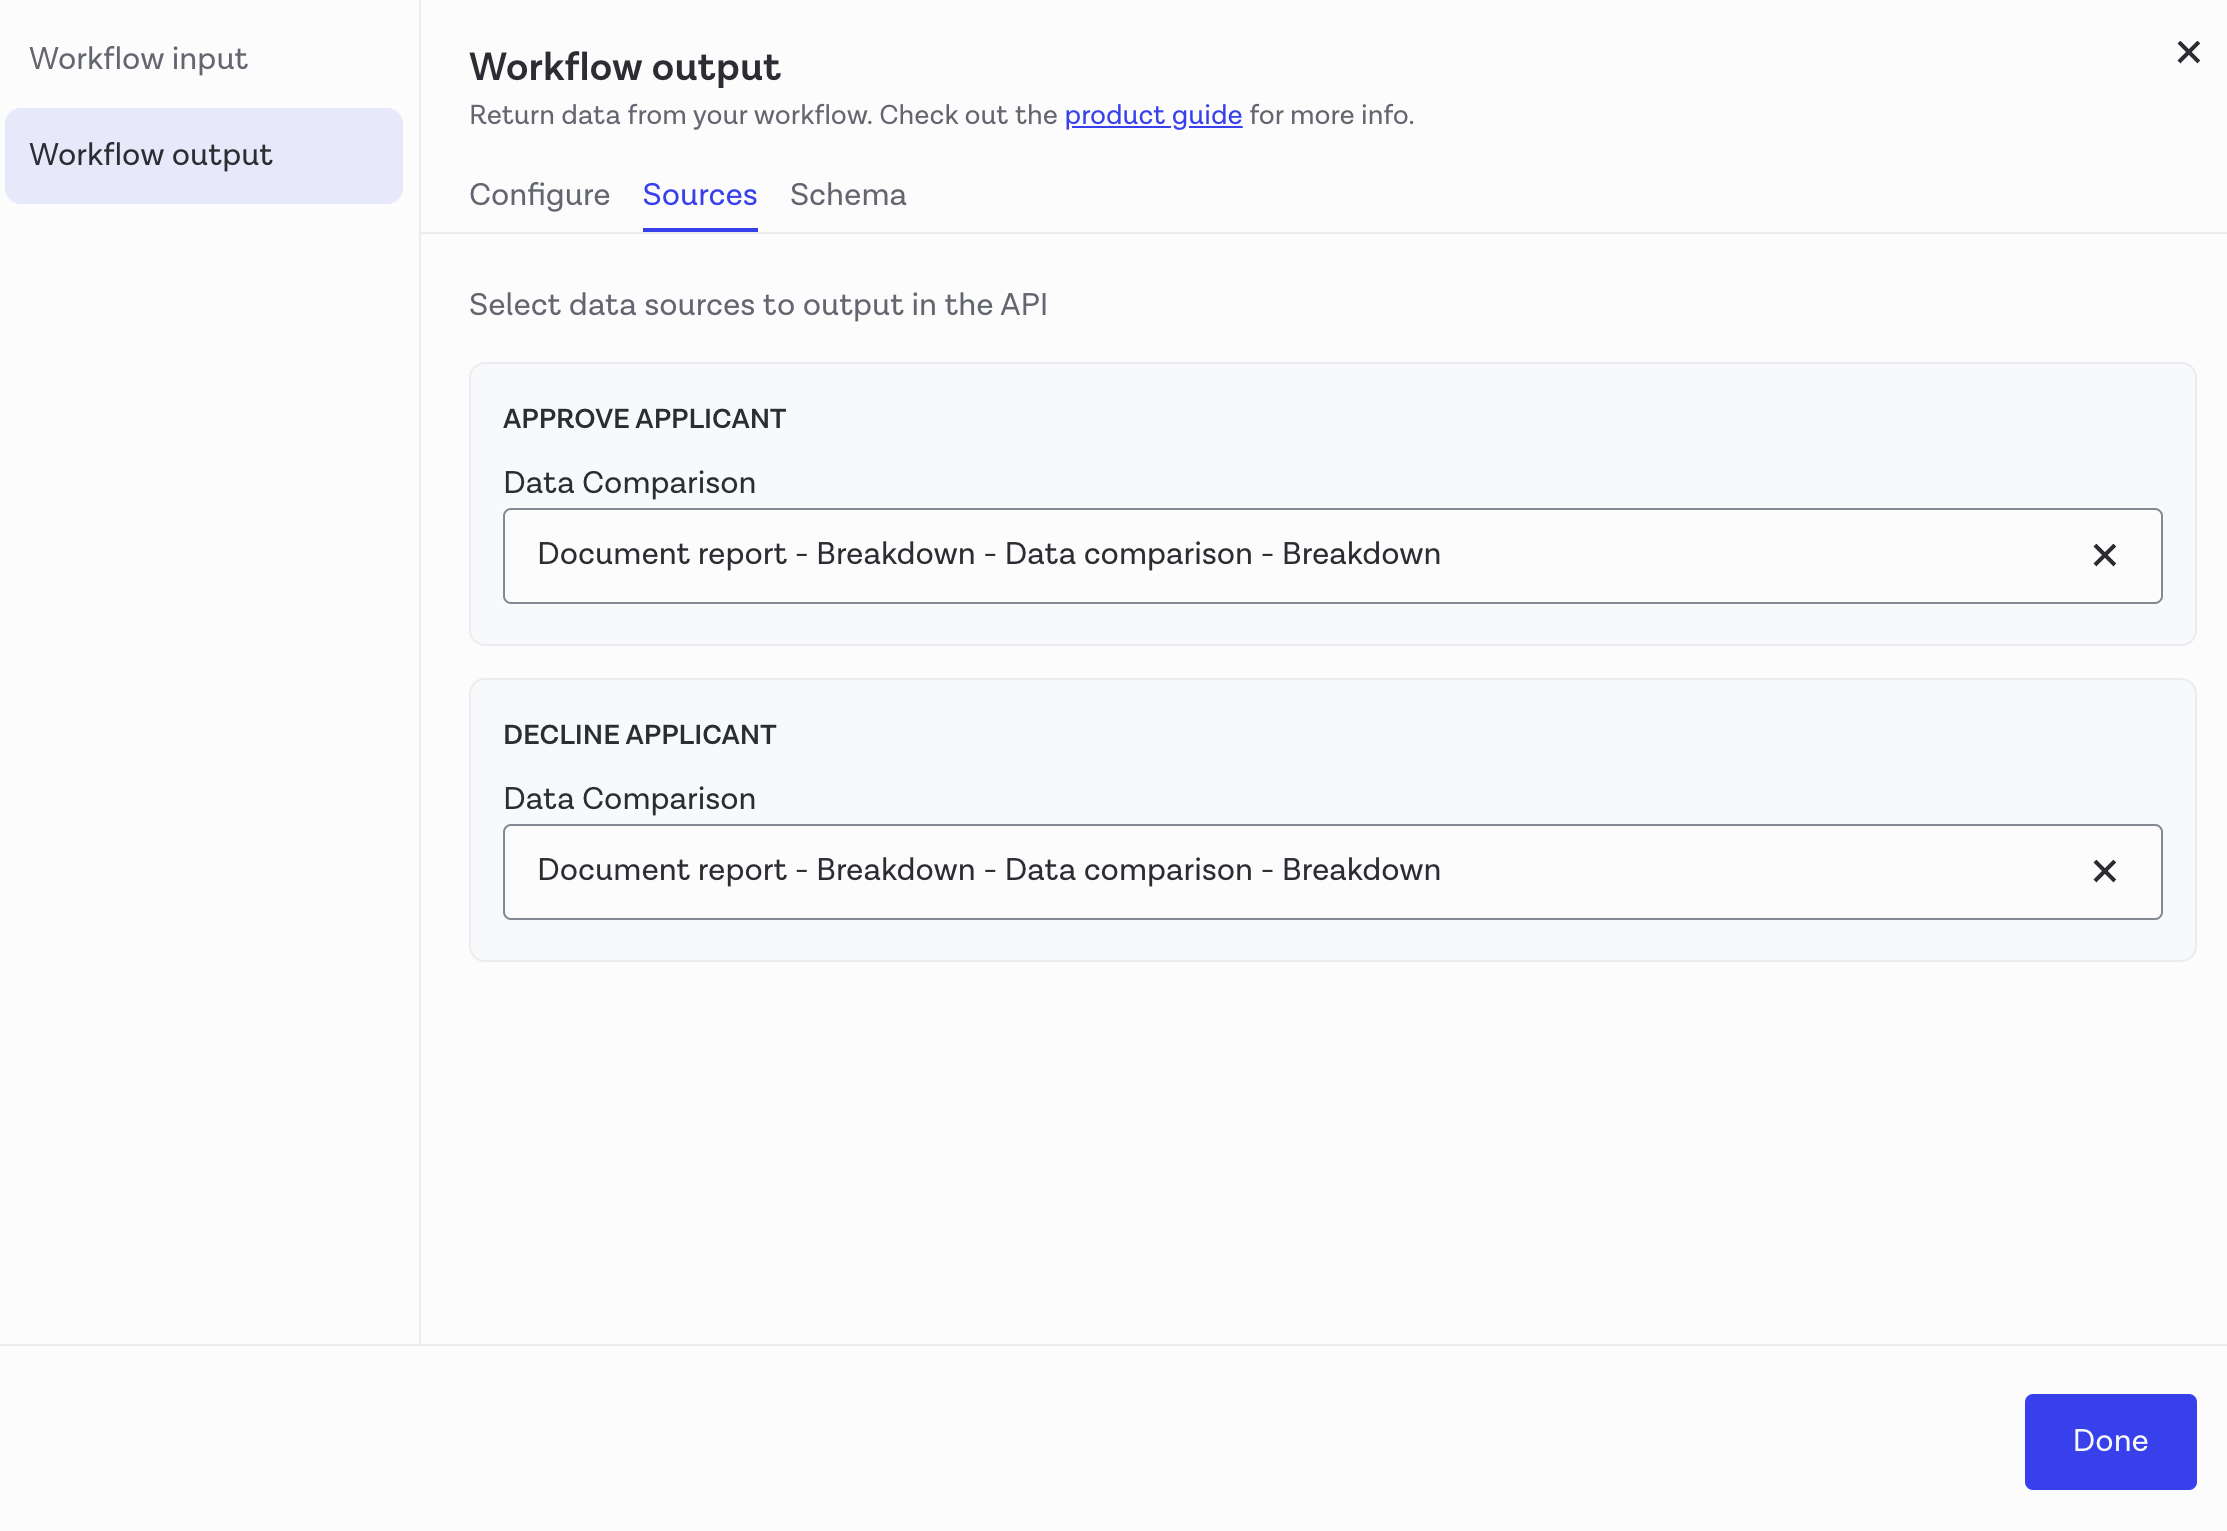
-
Click Done to finalize the configuration.
Note
To ensure the accuracy of user attribute verification, it is crucial to configure the output in the specified format. The verification status depends on the result of the data comparison combined with the workflow status. Additionally, make sure Comparison Checks are enabled in your Onfido account to receive these results in the webhook response. For more information, refer to Onfido's Comparison Checks documentation.
-
-
To specify the criteria for approving or declining an applicant, click on the if/else condition task block. Set the condition to check that both the document report and face capture report results are marked as
clear. If both are clear, the applicant can be approved. Otherwise, the application should be declined. - Copy the Workflow ID for later use when setting up Onfido with WSO2 Identity Platform.
- Click Save in the top-right corner.
Create a webhook token
Onfido provides webhooks to notify your system about changes in the status of identity verifications. Once Onfido is integrated, WSO2 Identity Platform can automatically update users' verification status based on notifications from Onfido. For more information, refer to the Onfido webhooks documentation.
Follow the steps below to create a webhook token:
-
On the Onfido Dashboard, navigate to Settings > Developers > Webhooks.
-
Click Create webhook.
-
Once you Add Onfido as a connection in WSO2 Identity Platform, a URL will be generated for the connection. Copy the URL from the Setup Guide tab of your Onfido connection in WSO2 Identity Platform.
-
Paste the copied URL into the webhook URL field and select only the workflow_run.completed event.
-
Click Save.
-
Copy the webhook token, as it will be needed to complete the webhook configuration in WSO2 Identity Platform.
Add Onfido as a connection in WSO2 Identity Platform
To register Onfido as a connection in WSO2 Identity Platform, follow the steps below.
-
Log in to the WSO2 Identity Platform Console as an administrator.
-
Navigate to Connections on the left-hand panel.
-
Click New Connection and select Onfido from the available templates.
-
Provide a Name for the connection (e.g., "Onfido Verification").
-
Enter the API Token and Workflow ID obtained from the Onfido Dashboard.
Note
The default regional base URL for Onfido API calls is
https://api.eu.onfido.com/v3.6. If you are using a different URL, update it accordingly. -
Click Create to save the configuration.
-
Complete the steps in Create a webhook token and obtain a webhook token.
-
Go to the Settings tab of the created connection and paste the webhook token under Webhook Token.
-
Click Update to save the changes.
Configure attribute mappings in WSO2 Identity Platform
Now that you have created a connection for Onfido in WSO2 Identity Platform, you need to make sure that the attributes used in Onfido are correctly mapped to the ones used in WSO2 Identity Platform. To do so,
-
On the WSO2 Identity Platform Console, go to Connections and select your Onfido connection.
-
Navigate to the Attributes tab in the Onfido connection.
-
Verify that first name and last name are already configured as mandatory attributes.
-
To add other attribute mappings:
-
Click Add Attribute Mapping.
-
Enter the External IDVP Attribute name used in Onfido.
-
Select the corresponding WSO2 Identity Platform Claim URI.
-
Click Add Attribute Mapping and then Update.
Note
If using the sample application, add the mapping
dob -> http://wso2.org/claims/dob.
The Onfido connection is now configured and ready for use. You can proceed to integrate it with your application.
Integrate Onfido into Your application
You may integrate Onfido into your application using the Onfido SDK. The Onfido SDK guides users through the verification process, including capturing and uploading documents or photos for biometric checks. The actual verification can then be handled by WSO2 Identity Platform's Identity Verification User APIs.
Note
For practical examples, refer to the Onfido Sample App.
Follow the steps below to integrate Onfido Identity Verification into your external application:
-
Import the Onfido SDK into your external application project. For more information, refer to the Onfido SDK documentation.
-
To initiate verification with Onfido, make a POST request to the
<Base URL>/api/users/v1/me/idv/verifyendpoint with the following payload.{ "idVProviderId": "<Onfido identity verification provider's ID>", "claims": [ "http://wso2.org/claims/givenname", "http://wso2.org/claims/lastname" ], "properties": [ { "key": "status", "value": "INITIATED" } ] }Note
- The
idVProviderIdcan be found in the Setup Guide page of the created Onfido connector. - It is mandatory to include the Claim URIs for first name and last name. Make sure to add any other claims that were configured with the Onfido connector for verification.
- The
-
The response may looks similar to the following:
{
"idVProviderId": "c8cf899b-****-****-8ce3-272d2cc642ad",
"claims": [
    {
        "id": "65b824c1-a20e-****-****-ce58c37e96b5",
        "uri": "http://wso2.org/claims/dob",
        "isVerified": false,
        "claimMetadata": {
            "onfido_applicant_id": "571c5fae-****-****-bdbf-7c00c7989159",
            "onfido_workflow_run_id": "fe1ee202-****-****-bfdc-82bacabd900c",
            "sdk_token": "******ciOiJFUzUxMiJ9.******AiOjE3Mjg5OTU5NzAsInBheWxvYWQiOnsiYXBwIjoiNTcxYzVmYWUtZjAwYS00ZGVjLWJkYmYtN2MwMGM3OTg5MTU5IiwiY2xpZW50X3V1aWQiOiJmYzJkNWNhOS1mZWZiLTRlMjktYTJmZC02YjFhOWYyZjkxZDIiLCJpc19zYW5kYm94Ijp0cnVlLCJpc19zZWxmX3NlcnZpY2VfdHJpYWwiOnRydWUsImlzX3RyaWFsIjp0cnVlLCJzYXJkaW5lX3Nlc3Npb24iOiJjYzZhODcwNy0wZDVjLTRmMDAtOWQ4NC0yOTEzYmVhYjc4NTUifSwidXVpZCI6InBsYXRmb3JtX3N0YXRpY19hcGlfdG9rZW5fdXVpZCIsImVudGVycHJpc2VfZmVhdHVyZXMiOnsidmFsaWRDcm9zc0RldmljZVVybHMiOlsiIl19LCJ1cmxzIjp7ImRldGVjdF9kb2N1bWVudF91cmwiOiJodHRwczovL3Nkay5vbmZpZG8uY29tIiwic3luY191cmwiOiJodHRwczovL3N5bmMub25maWRvLmNvbSIsImhvc3RlZF9zZGtfdXJsIjoiaHR0cHM6Ly9pZC5vbmZpZG8uY29tIiwiYXV0aF91aaaaaaJodHRwczovL2FwaS5vbmZpZG8uY29tIiwib25maWRvX2FwaV91cmwiOiJodHRwczovL2FwaS5vbmZpZG8uY29tIiwidGVsZXBob255X3VybCI6Imh0dHBzOi8vYXBpLm9uZmlkby5jb20ifX0.MIGIAkIBXBftJNFp5vxHb3IgSSD4IDkPtyqIjWg-qDVsziGBINdubAq37DMp1FBMFf6JyBx5JtBTGtHbEWyVRQpGjqtX66MCQgDVia6nMgq8o5jwW4e_Veb25jdGK55zSnY4kUuYt0kjI3Ep3eAo9pLecl-*****-WY-_TsxZFlHdS4xzNcl******",
            "onfido_workflow_status": "awaiting_input"
        }
    },
{
Use the
sdk_tokenandonfido_workflow_run_idextracted from the initiation response to launch the Onfido SDK in your application. -
After the user completes the document submission and face capture with the Onfido SDK, update the verification status by sending a POST request to
<Base URL>/api/users/v1/me/idv/verifyendpoint with the following payload. -
[Optional] To re-initiate the verification process when it is interrupted or paused (with a workflow status of
awaiting_input, indicating that Onfido is waiting for user input), send a POST request to<Base URL>/api/users/v1/me/idv/verify.
Note
Learn more about identity verification APIs in the documentation
Try it out
To test the integration, use the Onfido Sample Application and follow the setup instructions precisely as outlined in the sample application.
-
Log in to the sample application using the pre-configured WSO2 Identity Platform user account.
-
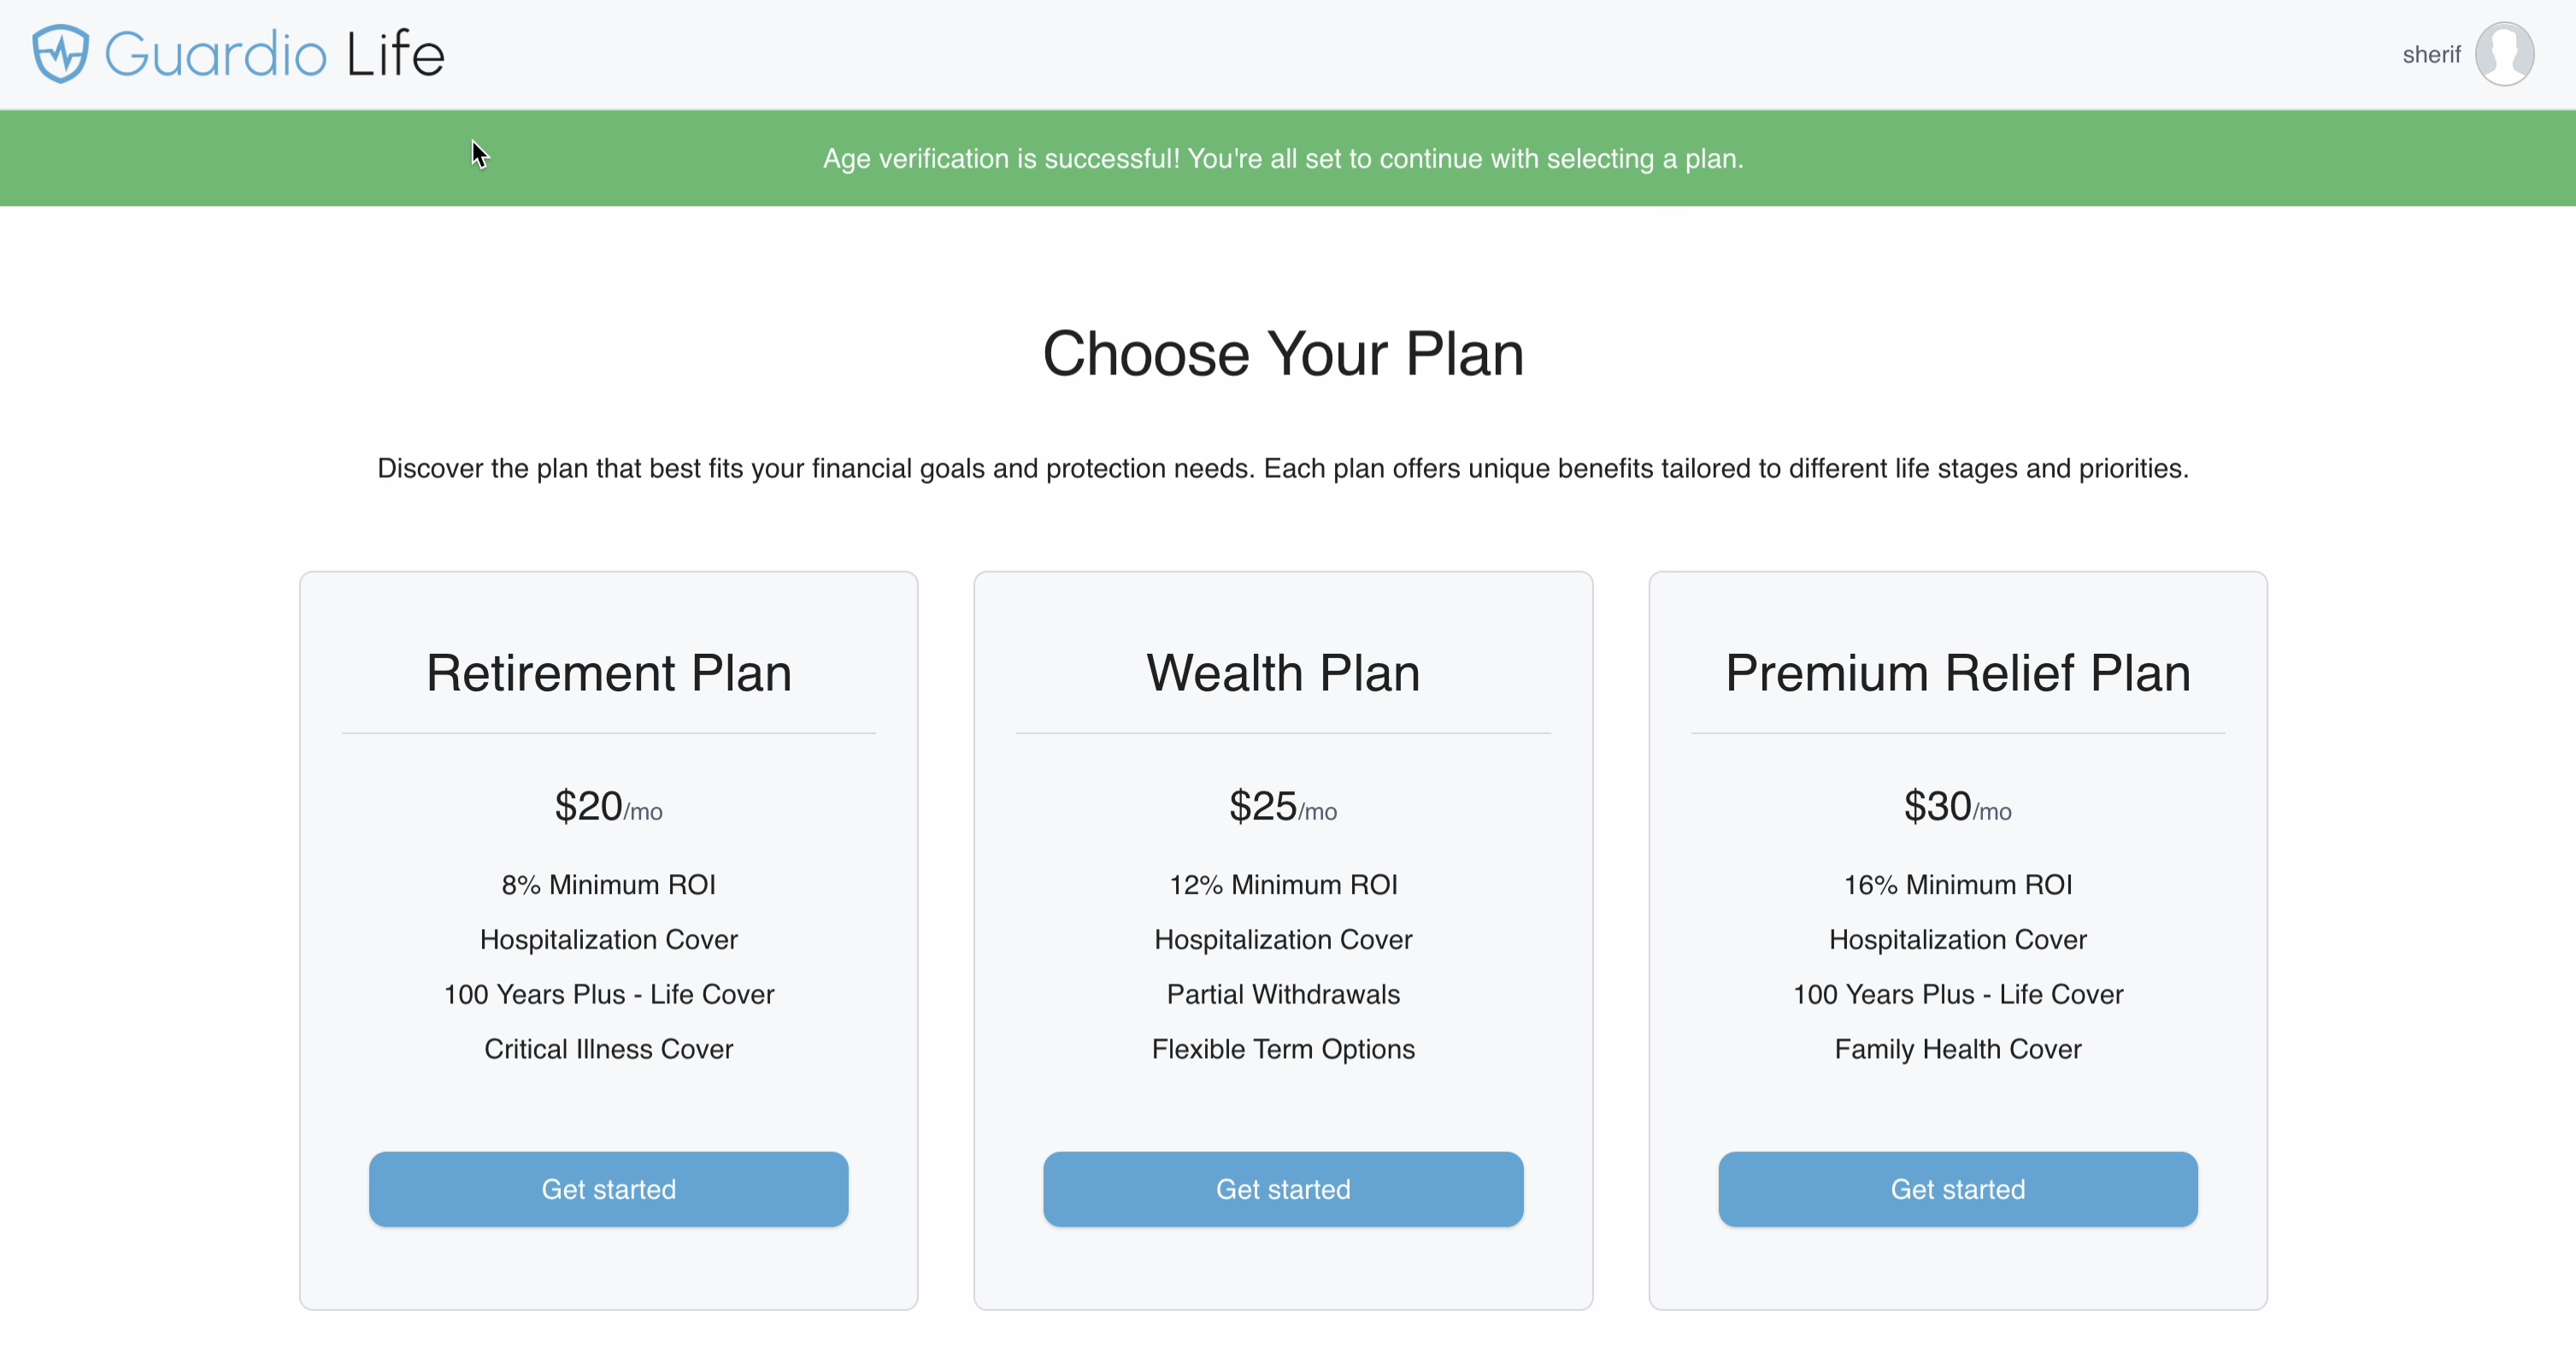
Click the Verify Age button to begin the age and identity verification process.

-
Follow the prompts from the Onfido SDK to upload documents and capture a selfie.
-
After submitting the documents, you will be redirected to a page displaying Age Verification in Progress!. Click Back to Home.
Note
The verification process typically takes 3-4 minutes.
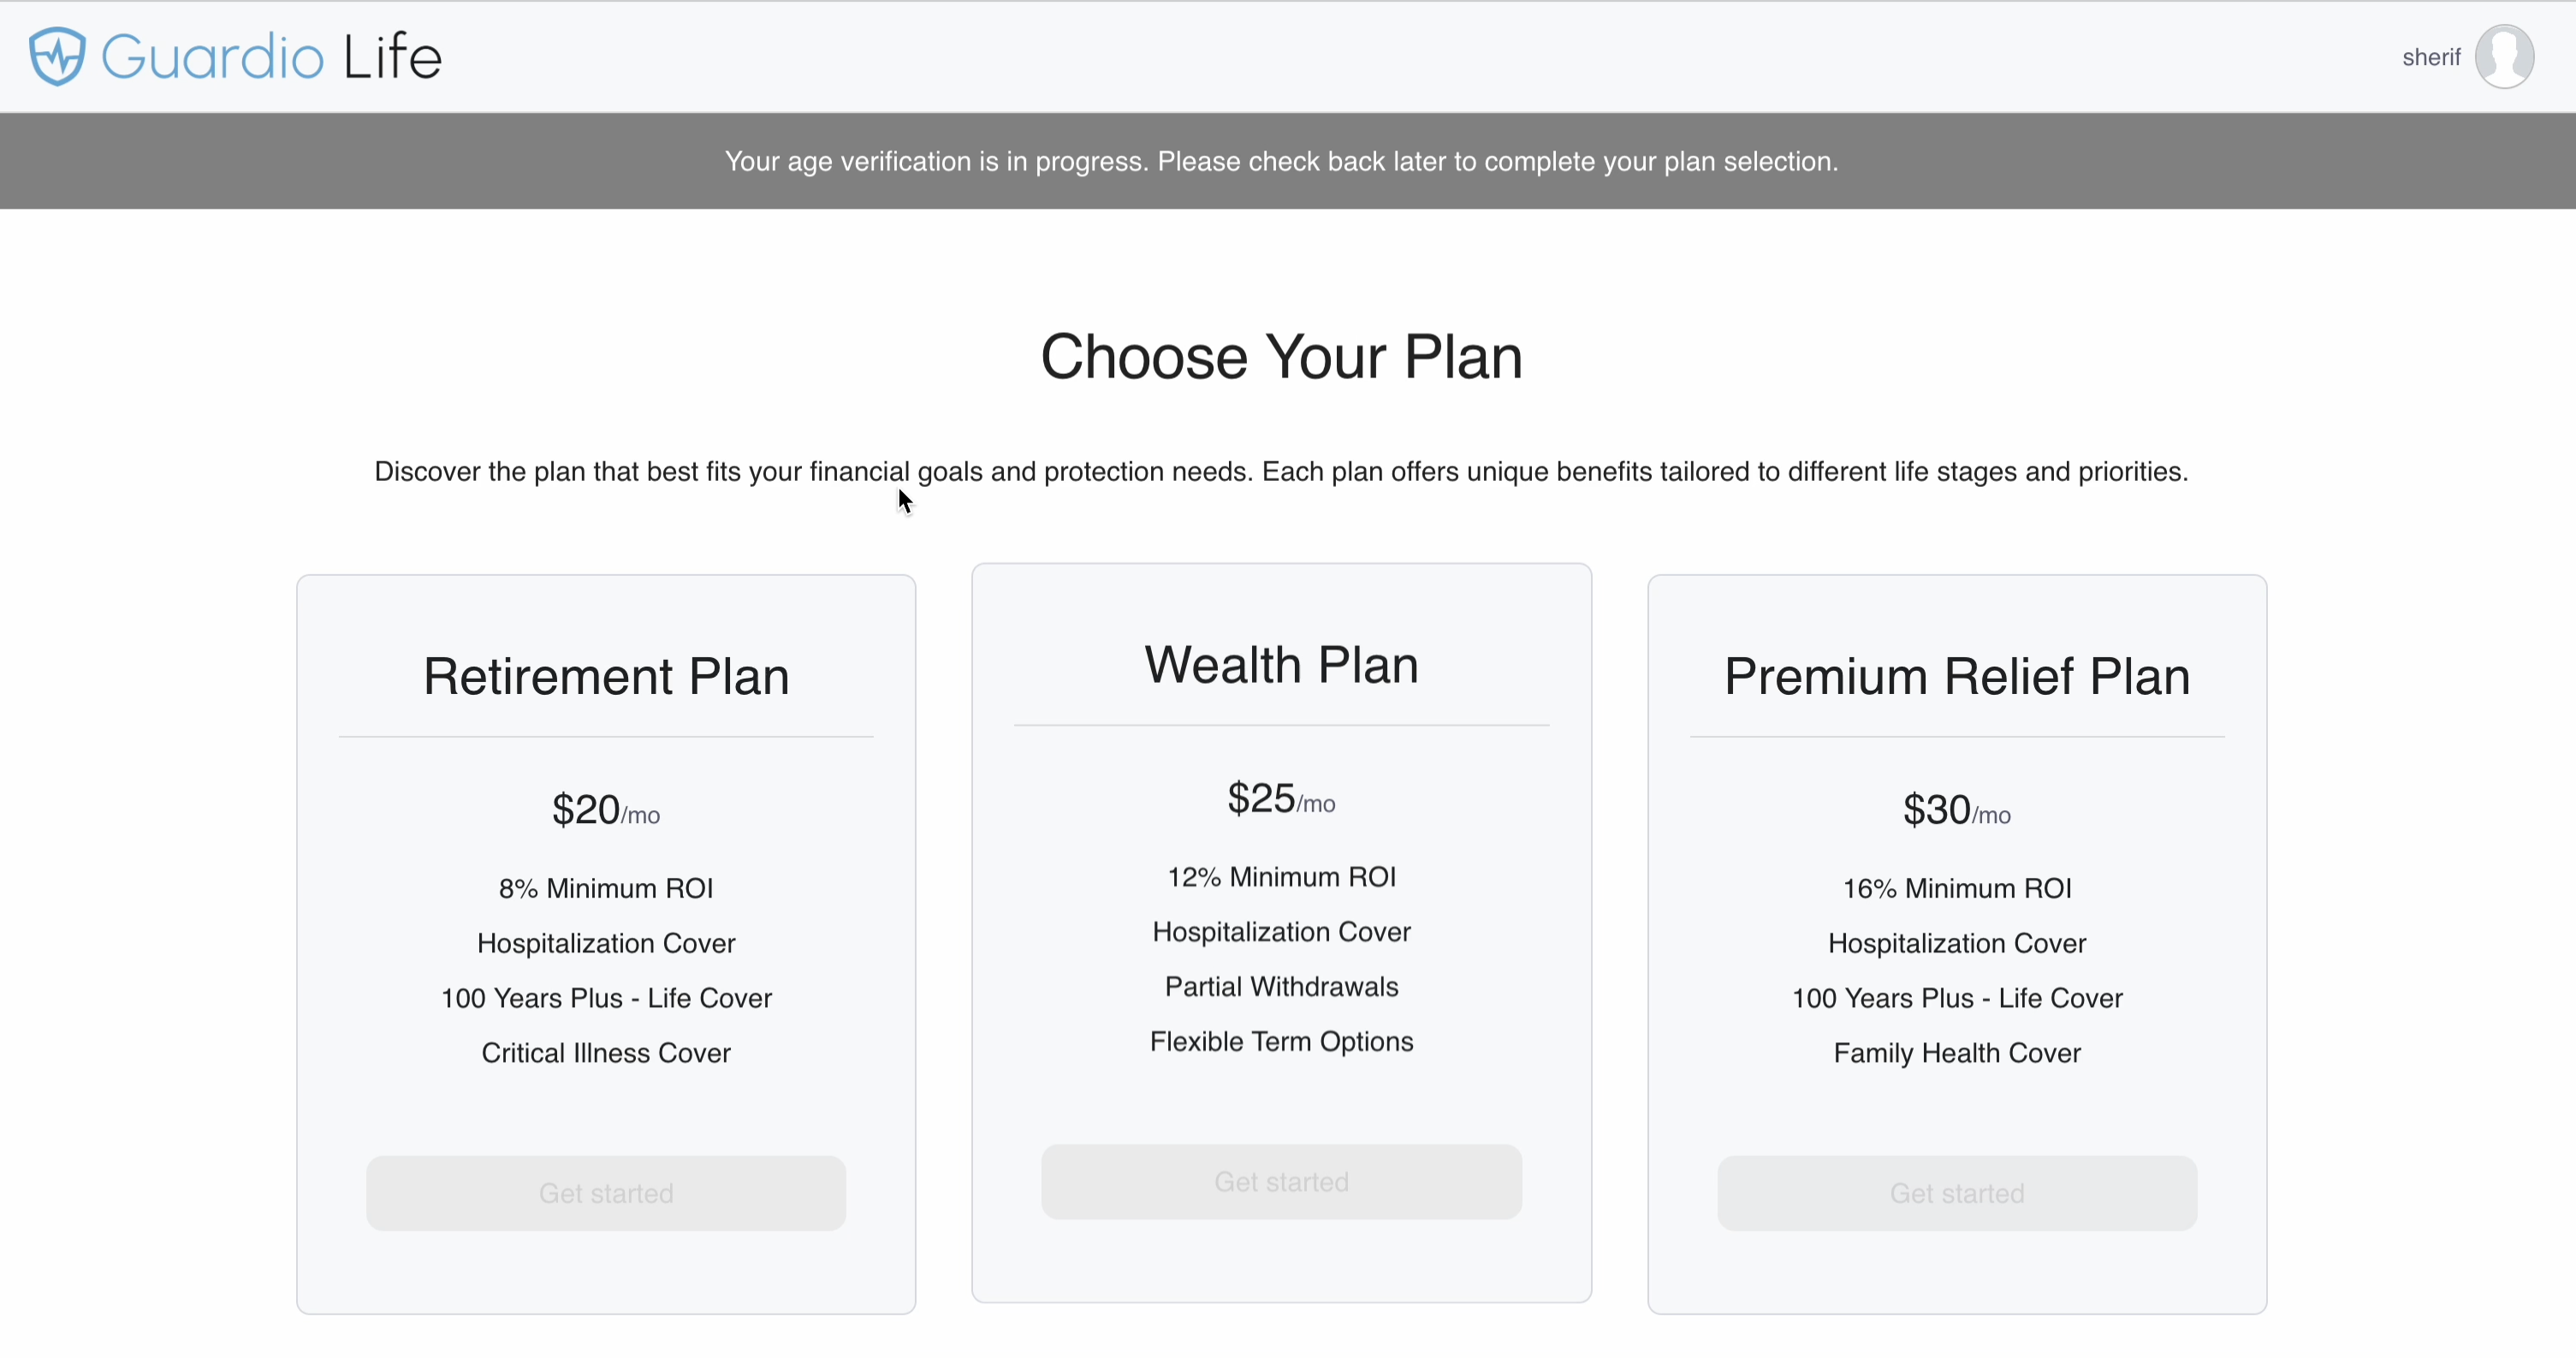
-
After waiting for 3-4 minutes, refresh the page and you will notice the verification has been successful.
Note
If you encounter an error message stating that age verification failed, it may be due to a mismatch between the provided First Name, Last Name, or Birth Date and the information extracted from the documents submitted during the Onfido verification process. In such cases, correct the information and try again.