Display logged-in user details
5 min
Displaying User Information
In this guide, we will display user information in two different places:
- On the home page to greet the user.
- To list down the user claims retrieved from the ID token.
Displaying User Info on the Home Page
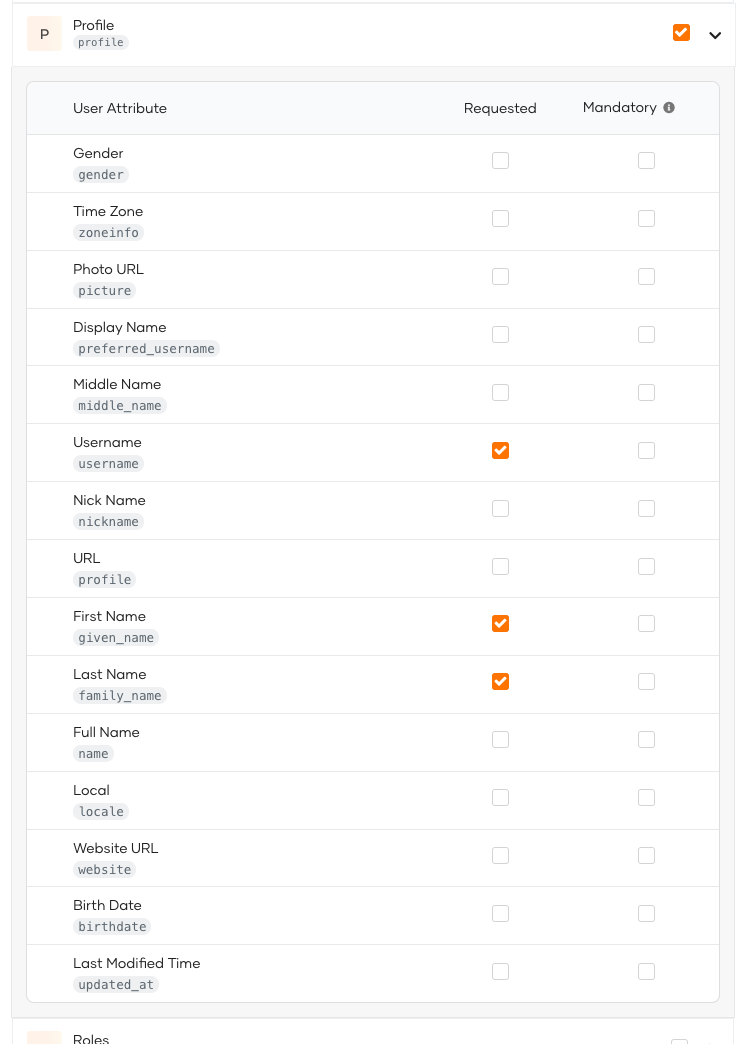
At the current state of the application, the user's name is not displayed on the home page. To display the user's details, such as first name and last name, we need to ensure that these claim values are returned in the ID token issued by WSO2 Identity Platform as follows.
- Log in to the WSO2 Identity Platform console and select the application you created.
- Go to the User Attributes tab.
- Select the given_name and family_name attributes under the Profile section.
- Click Update to save the changes.
Now that we have updated the application, we can navigate to the Home.razor file under the /Components/Pages directory and add the following code.
@page "/"
@implements IDisposable
@inject NavigationManager Navigation
@using Microsoft.AspNetCore.Components.Authorization
@using System.Security.Claims
@using Microsoft.AspNetCore.Authorization

<PageTitle>Home</PageTitle>

@if (claims.Any())
{
    givenName = claims.FirstOrDefault(c => c.Type == "given_name")?.Value;
    lastName = claims.FirstOrDefault(c => c.Type == "family_name")?.Value;

    if (!string.IsNullOrEmpty(givenName) && !string.IsNullOrEmpty(lastName))
    {
        <h1>Welcome @($"{givenName} {lastName}")!</h1>
        <p>You can now access the Counter, Weather, and User Claims tab.</p>
    }
}

<div class="nav-item px-3">
    <AuthorizeView>
        <Authorized>
            <form action="authentication/logout" method="post">
                <AntiforgeryToken />
                <input type="hidden" name="ReturnUrl" value="@currentUrl" />
                <button type="submit" class="btn btn-primary">
                    <span class="bi bi-arrow-bar-left-nav-menu" aria-hidden="true"></span> Logout @($"{givenName} {lastName}")
                </button>
            </form>
        </Authorized>
        <NotAuthorized>
            <button type="submit" class="btn btn-primary" onclick="window.location.href='/authentication/login';">
                <span class="bi bi-person-badge-nav-menu" aria-hidden="true"></span> Login
            </button>
        </NotAuthorized>
    </AuthorizeView>
</div>

@code {
    private string? currentUrl;
    private string? givenName;
    private string? lastName;

    private IEnumerable<Claim> claims = [];

    [CascadingParameter]
    private Task<AuthenticationState>? AuthState { get; set; }

    protected override void OnInitialized()
    {
        currentUrl = Navigation.Uri;
        Navigation.LocationChanged += OnLocationChanged;
    }

    protected override async Task OnInitializedAsync()
    {
        if (AuthState == null)
        {
            return;
        }

        var authState = await AuthState;
        claims = authState.User.Claims;
    }

    private void OnLocationChanged(object? sender, LocationChangedEventArgs e)
    {
        currentUrl = Navigation.Uri;
        StateHasChanged();
    }

    public void Dispose() => Navigation.LocationChanged -= OnLocationChanged;
}
The following are the changes that are made in the above code.
- Import necessary namespaces for authentication and authorization, enabling the use of authentication state and claims (ClaimsPrincipal).
- Implement user-specific content rendering by checking if the user has claims and displaying a personalized welcome message when the
given_nameandfamily_nameclaims are found. - Adds an authentication-based logout button inside an
<AuthorizeView>component, ensuring that authenticated users see the logout option while unauthenticated users see a login button. - Initialize
currentUrlwith the current navigation URI and subscribes toLocationChangedto updatecurrentUrldynamically when the route changes. - Implement authentication state retrieval inside
OnInitializedAsync(), assigning user claims from the authentication state, ensuring proper authorization-based UI updates. - Define
givenNameandlastNamevariables to store the user's first and last names, respectively, retrieved from the claims.
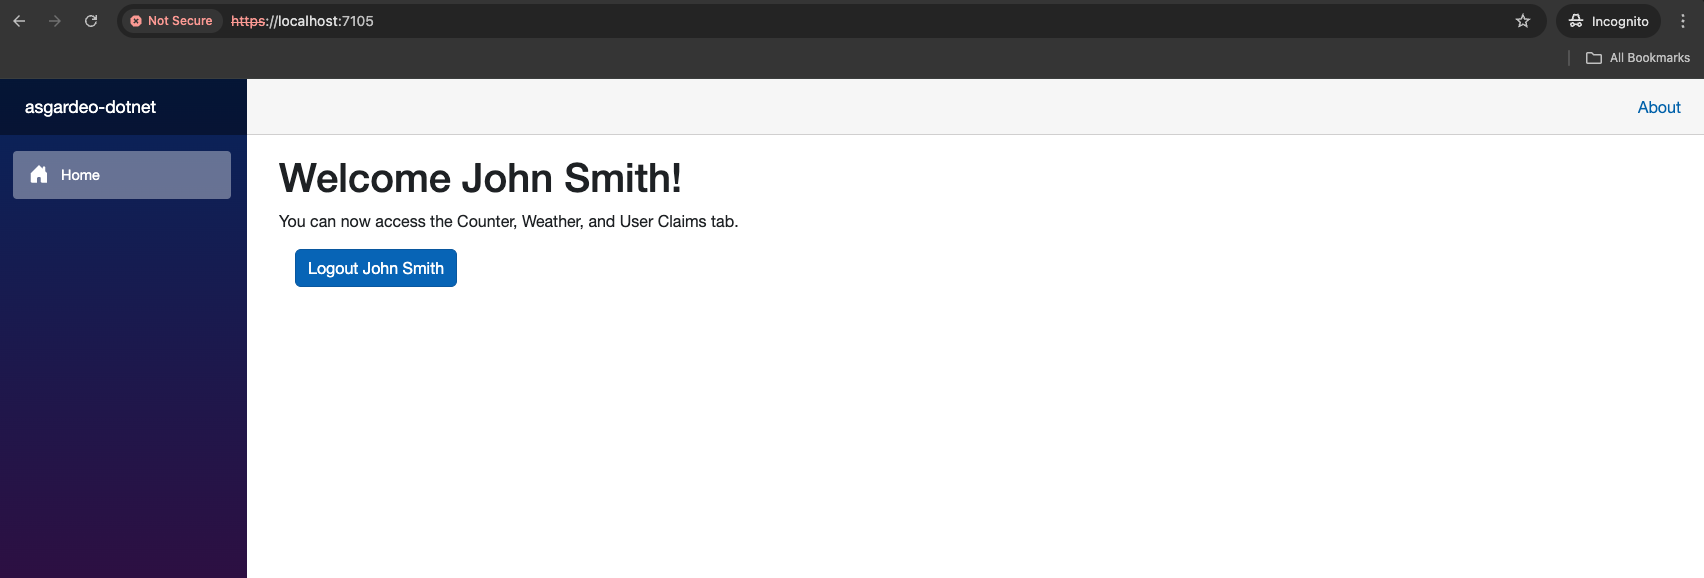
Once the above changes are applied, you will be able to see the user's name displayed on the home page after logging in.
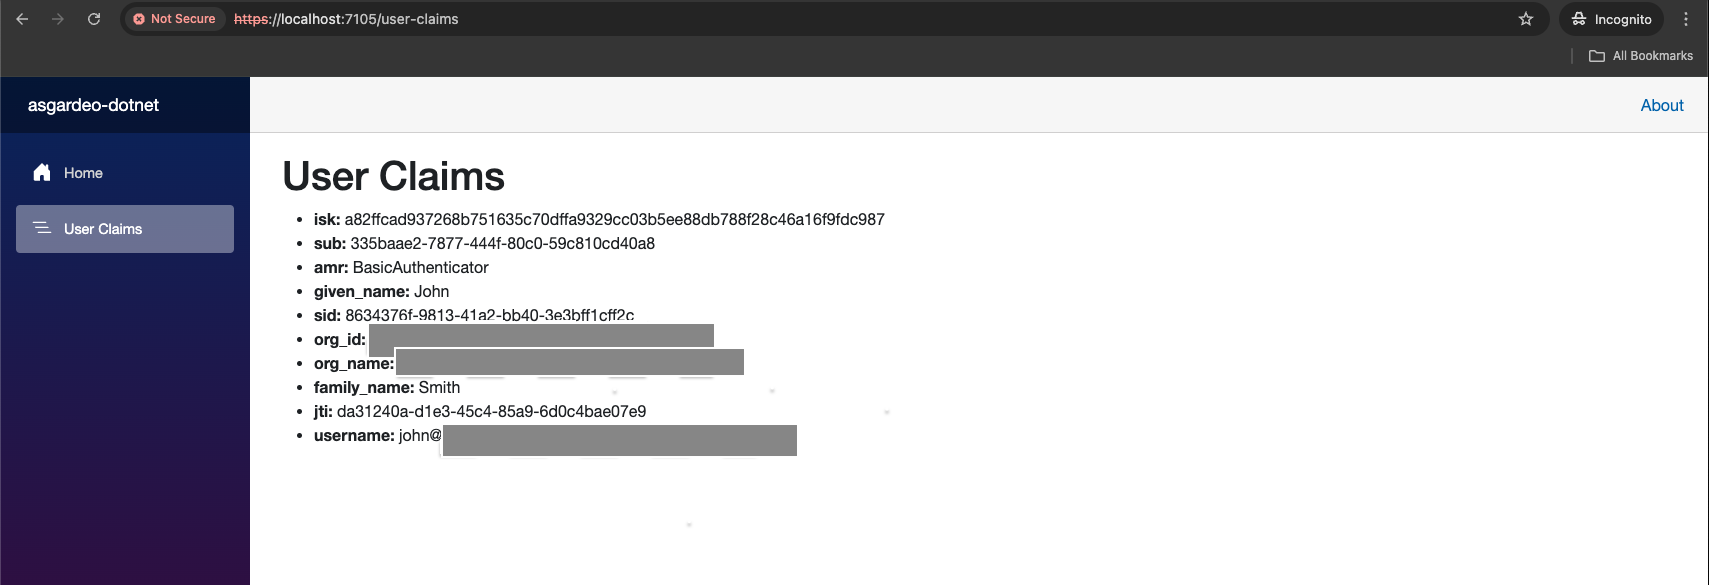
Listing User Claims
To list down the user claims retrieved from the ID token, let's first create a new page named UserClaims.razor using the following commands.
Then add the following code to display the user claims.
@page "/user-claims"
@using System.Security.Claims
@using Microsoft.AspNetCore.Components.Authorization

<PageTitle>User Claims</PageTitle>

<h1>User Claims</h1>

@if (claims.Any())
{
    <ul>
        @foreach (var claim in claims)
        {
            <li><b>@claim.Type:</b> @claim.Value</li>
        }
    </ul>
}

@code {
    private IEnumerable<Claim> claims = [];

    [CascadingParameter]
    private Task<AuthenticationState>? AuthState { get; set; }

    protected override async Task OnInitializedAsync()
    {
        if (AuthState == null)
        {
            return;
        }

        var authState = await AuthState;
        claims = authState.User.Claims;
    }
}
The above code block is similar to the one used in Home.razor. The HTML above will list all of the user’s claims retrieved from the ID token, looping through the list one by one.
Let's now add a navigation link to the UserClaims page in the NavMenu.razor file under the /Components/Layout directory.
@using Microsoft.AspNetCore.Components.Authorization

<div class="top-row ps-3 navbar navbar-dark">
    <div class="container-fluid">
        <a class="navbar-brand" href="">wso2-dotnet</a>
    </div>
</div>

<input type="checkbox" title="Navigation menu" class="navbar-toggler" />

<div class="nav-scrollable" onclick="document.querySelector('.navbar-toggler').click()">
    <nav class="nav flex-column">
        <div class="nav-item px-3">
            <NavLink class="nav-link" href="" Match="NavLinkMatch.All">
                <span class="bi bi-house-door-fill-nav-menu" aria-hidden="true"></span> Home
            </NavLink>
        </div>

        <AuthorizeView>
            <div class="nav-item px-3">
                <NavLink class="nav-link" href="user-claims">
                    <span class="bi bi-list-nested-nav-menu" aria-hidden="true"></span> User Claims
                </NavLink>
            </div>
        </AuthorizeView>
    </nav>
</div>
In the above code, we have used the AuthorizeView component to conditionally display UI elements based on the user's authentication and authorization state. This can be used to control access to specific sections of your Blazor UI. In this case, we want to protect the User Claims page.
You can now run the application, login and then navigate to the User Claims page to view the user claims.
In this step we have successfully displayed the logged-in user details on the home page and listed the user claims in a separate page. In the next step we will implement the functionality to access a protected API using the access token obtained during the authentication process.