Mastering React Auth: A Practical Guide to Secure User Authentication
Introduction to React authentication
Adding user authentication to your React application may not be the most exciting task, but it's essential to secure your app and protect user data. One approach is to build your own authentication system, which typically involves the following activities.
-
Build user interface components for login form, user profile, and logout.
-
Implement a backend Login API using Node.js/Express (or similar) with a connected database to store usernames, attributes, and password hashes. The Login API returns valid tokens (e.g., JWT) containing authentication status and user attributes.
-
Define secure routes using React Router or TanStack Router to protect the pages and components by redirecting unauthenticated users to the login interface.
-
Handle tokens securely by temporarily storing them locally such as in sessionStorage, Web Worker, or Service Worker and using token data to populate the user profile and manage sessions.
-
Invalidate sessions and tokens on logout or when the token expires.
Obviously, handling this manually is a lot and requires expertise to securely manage password hashes, craft JWT tokens, and process/store tokens in your application on top of core React concepts like useState, useEffect, and routing, which you already know.
The good news is that modern AI-powered coding tools and embeddable auth libraries can help you rapidly build the authentication system. However, you are still responsible for its long-term maintenance, including dependencies and security. This can become architecturally challenging if you later want to add more secure login options, such as passkeys, SMS- or email-based 2FA, or social login.
Another viable option, which this article explores, is integrating with an identity provider that offers most if not all of these capabilities out of the box. Next, let's review the key factors to consider, given the wide variety of identity providers available today.
Pick the right identity provider
When picking the right identity provider for your React app, it's important to look beyond just the technical features and consider how your choice will affect things in the long-run. You don't want to replace your authentication system every few years. Here are the top three aspects to evaluate:
-
Alignment and flexibility in the Long Run: Identity providers are available in multiple forms: cloud services you can instantly sign up for, open-source downloadable solutions you can host yourself, or proprietary platforms. Cloud-only providers with free tiers may seem ideal during early development but can incur high costs over time. Choosing a provider that offers multiple deployment options such as hosted cloud and downloadable open-source can provide long-term flexibility and reduce future migration risks.
-
Supported authentication options: Password-based authentication is widely used but increasingly considered insecure. Eventually, you'll need to add multi-factor authentication or fully transition to more secure options like passkeys or MagicLink. Identity providers shine here by offering these strong and adaptive authentication methods out of the box, letting you focus on your application without building backend login APIs from scratch.
-
Clean, component-driven SDK: Identity provider SDKs vary in developer experience. Some offer generic SDKs that provide portability but require understanding protocols like OpenID Connect and manually handling JWT tokens, which can be cumbersome. Others provide React hooks and providers that simplify token processing and protocol handling. The most powerful approach is SDKs with drop-in React components — ready-made login, logout, and user profile components that you can style and use like your own, while still exposing hooks for advanced customization.
Once you've picked the right identity provider for your goals, you can start integrating your React application, which typically involves the following three steps:
- Install your identity provider SDK by using
npmorpnpm. - Connect your application by creating a corresponding application in the identity provider.
- Add drop-in components for login and user profiles, and style them as needed.
Set up your React app
First, scaffold a simple React application. You can use any approach you prefer — we'll use Vite, as it provides a fast and minimal setup with everything needed to build this application.
Open a terminal and run the following command to create your React app.
If the setup completes successfully, access the application at http://localhost:5173 in your browser.
Install the React SDK
The next step is to install the React SDK, which provides the components and hooks required to integrate Asgardeo into your application. Make sure to stop the development server started in the previous step, then run the following command to add the React SDK to your project.
Connect React to Asgardeo
Now that we’ve installed the React SDK in our project, the next step is to connect the React application to Asgardeo. This involves two steps.
First, create an application in Asgardeo that represents the React application we just built.
-
In the Asgardeo Console, navigate to Applications > New Application.
-
Select React as the template and complete the wizard by providing:
- A suitable name ( e.g - asgardeo-react)
- An authorized redirect URL.( e.g - http://localhost:5173)
Note
The authorized redirect URL determines where Asgardeo should send users after they successfully log in. Typically, this will be the web address where your app is hosted. For this guide, we'll use http://localhost:5173, as the sample app will be accessible at this URL.
Once you have created the application in Asgardeo console, copy the following values from the Guide tab. You will need them to configure the React SDK.
-
Client ID – A unique ID for your application. Asgardeo uses this to identify login requests coming from your React application.
-
Base URL – The base URL of your Asgardeo organization. It usually looks like:
https://api.asgardeo.io/t/<your-organization-name>. The React SDK uses this URL to send login requests to the correct organization.
Next, configure the <AsgardeoProvider /> for your application to act as the context provider for the React SDK. To integrate it, wrap your root component in the main.jsx file with <AsgardeoProvider />. This makes the context created by the provider available throughout your application, so any component can access authentication state and related functions.
You also need to pass the Client ID and Base URL values you copied in the previous step to <AsgardeoProvider />, as shown in the code below. This completes the connection between your React application and the Asgardeo cloud.
import { StrictMode } from 'react'
import { createRoot } from 'react-dom/client'
import './index.css'
import App from './App.jsx'
import { AsgardeoProvider } from '@asgardeo/react'

createRoot(document.getElementById('root')).render(
  <StrictMode>
    <AsgardeoProvider
      clientId="PH-STARTyour-app-client-idPH-END"
      baseUrl="https://api.asgardeo.io/t/PH-STARTyour-organization-namePH-END"
    >
      <App />
    </AsgardeoProvider>
  </StrictMode>
)
Implement user login
In this step, we use the drop-in components provided by the Asgardeo React SDK to add user login and logout functionality.
Simply replace the contents of your App.jsx file with the following code.
import { SignedIn, SignedOut, SignInButton, SignOutButton } from '@asgardeo/react'
import './App.css'

function App() {
  return (
    <>
      <header>
        <SignedIn>
          <SignOutButton />
        </SignedIn>
        <SignedOut>
          <SignInButton />
        </SignedOut>
      </header>
    </>
  )
}
export default App
In the above code, we first import the drop-in components <SignedIn>, <SignedOut>
, <SignInButton />, and <SignOutButton /> from the Asgardeo React SDK.
We then use the <SignedIn> control component to check whether the current user is authenticated. If the user is signed in, we render the <SignOutButton /> component to display a logout button. When the user clicks it, the component automatically handles the logout process by sending the logout request to Asgardeo and removing the stored tokens behind the scenes.
Next, we use the <SignedOut> control component to check whether the user is not authenticated. If so, we render the <SignInButton /> component. This component constructs the login request and redirects the user to Asgardeo using the configured Client ID and Base URL. Once authentication is successful, Asgardeo redirects the user back to your application with the required tokens, which the SDK processes automatically to establish the authenticated user context without any additional code from you.
Now you can understand what happens behind the scenes when using these components, but the key takeaway is that this is essentially all the code required to implement fully functional login and logout capabilities in your application
You’re completely free to style these components using Tailwind or any other CSS library you prefer. Treat them like your own React components. The idea is simple: the SDK provides secure, production-ready authentication logic, while giving you full control over styling and customization.
Display user profile
Before we test our application, let’s also add some code to render the user profile of the logged-in user. Again, simply import and add <UserProfile /> component from Asgardeo React SDK as highlighted in the following code.
import { SignedIn, SignedOut, SignInButton, SignOutButton, UserProfile } from '@asgardeo/react'
import './App.css'

function App() {
  return (
    <>
      <header>
        <SignedIn>
          <SignOutButton />
        </SignedIn>
        <SignedOut>
          <SignInButton />
        </SignedOut>
      </header>
      <main>
        <UserProfile />
      </main>
    </>
  )
}
export default App
In the above code, we added the <UserProfile /> component, which provides a declarative way to display and update user profile information.
Alternatively, you can use <UserDropdown />, which shows a dropdown menu with built-in user details and sign-out functionality. The <User /> component offers a render-prop pattern, allowing you to access user profile information programmatically.
Now, we are ready to try-out our React application secured with Asgardeo. Let’s start the application again by running the following code.
Now, if you visit http://localhost:5173 in your browser, you should see your application, which will look like the screenshot below. For simplicity, we haven’t added any CSS styles yet.
Now, if you click the Login button, you will be redirected to the Asgardeo cloud, where you can sign in using a test user account. If you haven’t created a test user yet, you can follow this guide to set one up.
Once you authenticate with your test user credentials, you will be redirected back to the application, and your test user profile will be displayed, as shown in the screenshot below.
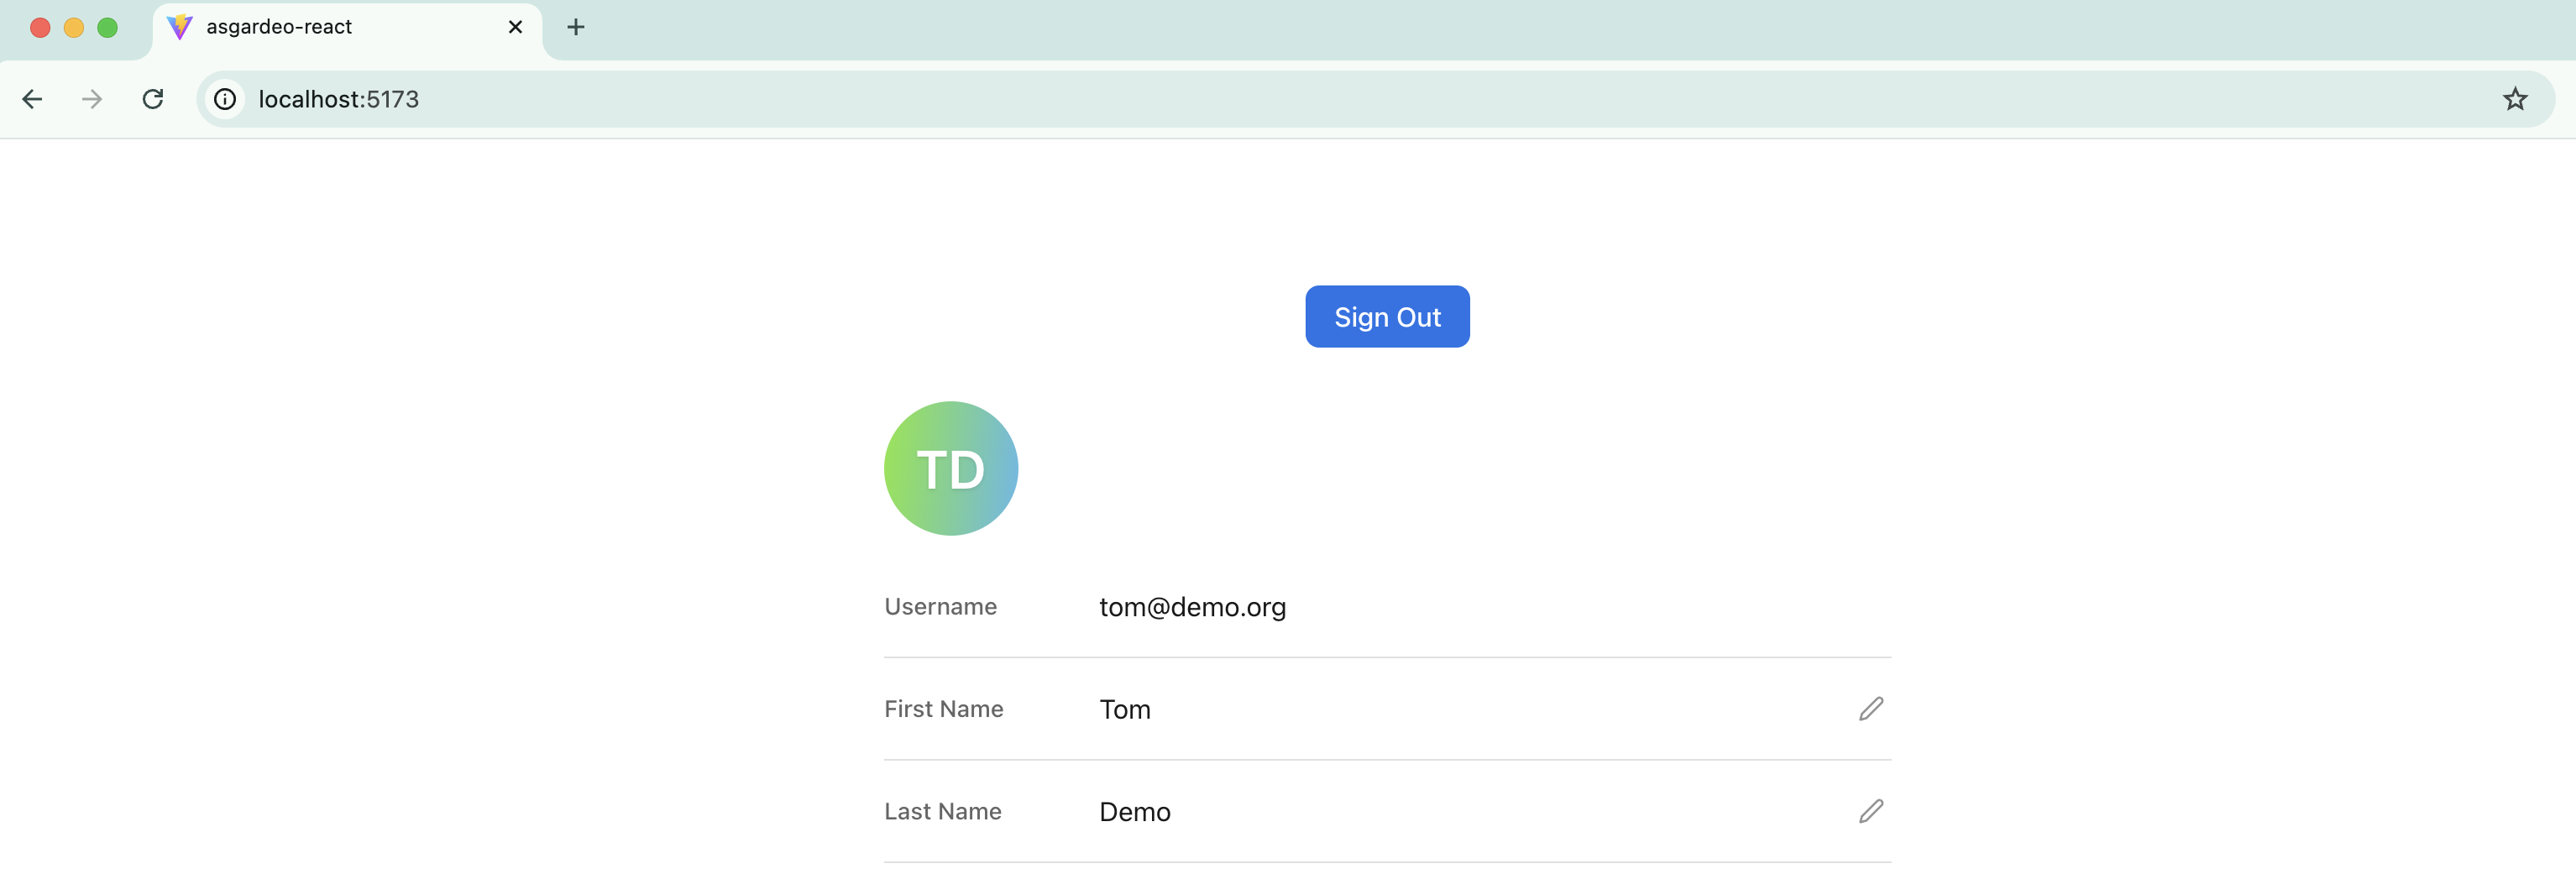
At this stage, we have successfully added user login, logout, and user profile functionality to your React application with minimal code, and confirmed that it works as expected.
Next, let’s explore how to call a protected backend HTTP API from your React application, a very common task in real-world apps for retrieving or updating server-side data.
Call a secured backend API
Since React is a client-side framework, your application is downloaded and runs entirely in the browser. Because of this, your app has to regularly make API calls to the backend API both to retrieve data and update state. As a React developer, this is one of the most common things you implement.
The de-facto standard for securing these APIs is OAuth2 access tokens and that is the right security mechanism that you should use to secure your backend APIs. This also means your application must obtain an OAuth2 access token for the currently logged-in user and include it when making secure API calls.
To give you a quick idea of what happens behind the scenes, although you don’t need to worry about it too much. The Asgardeo React SDK retrieves two tokens after a user successfully authenticates:
-
OpenID ID token – Meant for the application. It helps determine authentication state and retrieve user attributes.
-
OAuth2 access token – This token is sent with API requests when your application calls protected resources on behalf of the user.
As a React developer, you’re already familiar with the browser’s fetch API for calling HTTP endpoints. The Asgardeo React SDK allows you to access the OAuth2 access token and attach it as the Authorization header when making API calls.
However, you don’t even need to handle this manually. The SDK provides a utility HTTP client that automatically attaches the current OAuth2 access token to outgoing requests. This way, token handling is managed securely by the SDK.
Ideally, we would call a backend API that you created and secured with Asgardeo. To keep things simple, we’ll take a shortcut and call an endpoint exposed by Asgardeo itself.
In this section, we’ll use the SCIM 2.0 /Me endpoint, which returns the profile details of the logged-in user. The same approach applies when calling your own backend APIs, as long as they are secured with Asgardeo. Following React best practices, let’s first create a new component called MyProfile.jsx and add the following code.
import { useState } from 'react'
import { useAsgardeo } from '@asgardeo/react'

function MyProfile() {
    const { http, isSignedIn } = useAsgardeo();
    const [userData, setUserData] = useState(null);

    const getProfile = async () => {
        const response = await http.request({
            url: 'https://api.asgardeo.io/t/PH-STARTyour-organization-namePH-END/scim2/Me',
            method: 'GET',
            headers: {
                'Accept': 'application/json',
                'Content-Type': 'application/scim+json',
            },
        });
        setUserData(response.data);
    };

    if (!isSignedIn) {
        return <div>Please sign in to view your profile.</div>;
    }

    return (
        <div>
            <h2>My Profile</h2>
            <button onClick={getProfile}>Get My Profile</button>
            {userData && (
                <div>
                    <p> Given Name : {userData.name.givenName}</p>
                    <p> Family Name Name : {userData.name.familyName}</p>
                </div>
            )}
        </div>
    )
}

export default MyProfile;
In the above code apart from useState hook we have imported useAsgardeo hook which is provided by the Asgardeo React SDK and gives us access to authentication state and a built-in HTTP client.
Then we have received two important constants by calling the useAsgardeo hook.
- isSignedIn – tells us whether the user is authenticated.
- http – a secure HTTP client provided by the SDK. This automatically attaches the current OAuth2 access token to outgoing requests.
Then, we added a button. When the button is clicked, we call our API by executing the following function, which the function body closely resembles a standard fetch API call. And Finally, we simply display the user profile data.
Now that we have created the custom MyProfile component, we can import and use it in App.jsx, as shown in the following code.
import { SignedIn, SignedOut, SignInButton, SignOutButton } from '@asgardeo/react'
import MyProfile from './MyProfile'
import './App.css'

function App() {
  return (
    <>
      <header>
        <SignedIn>
          <SignOutButton />
        </SignedIn>
        <SignedOut>
          <SignInButton />
        </SignedOut>
      </header>
      <main>
        <MyProfile />
      </main>
    </>
  )
}
export default App
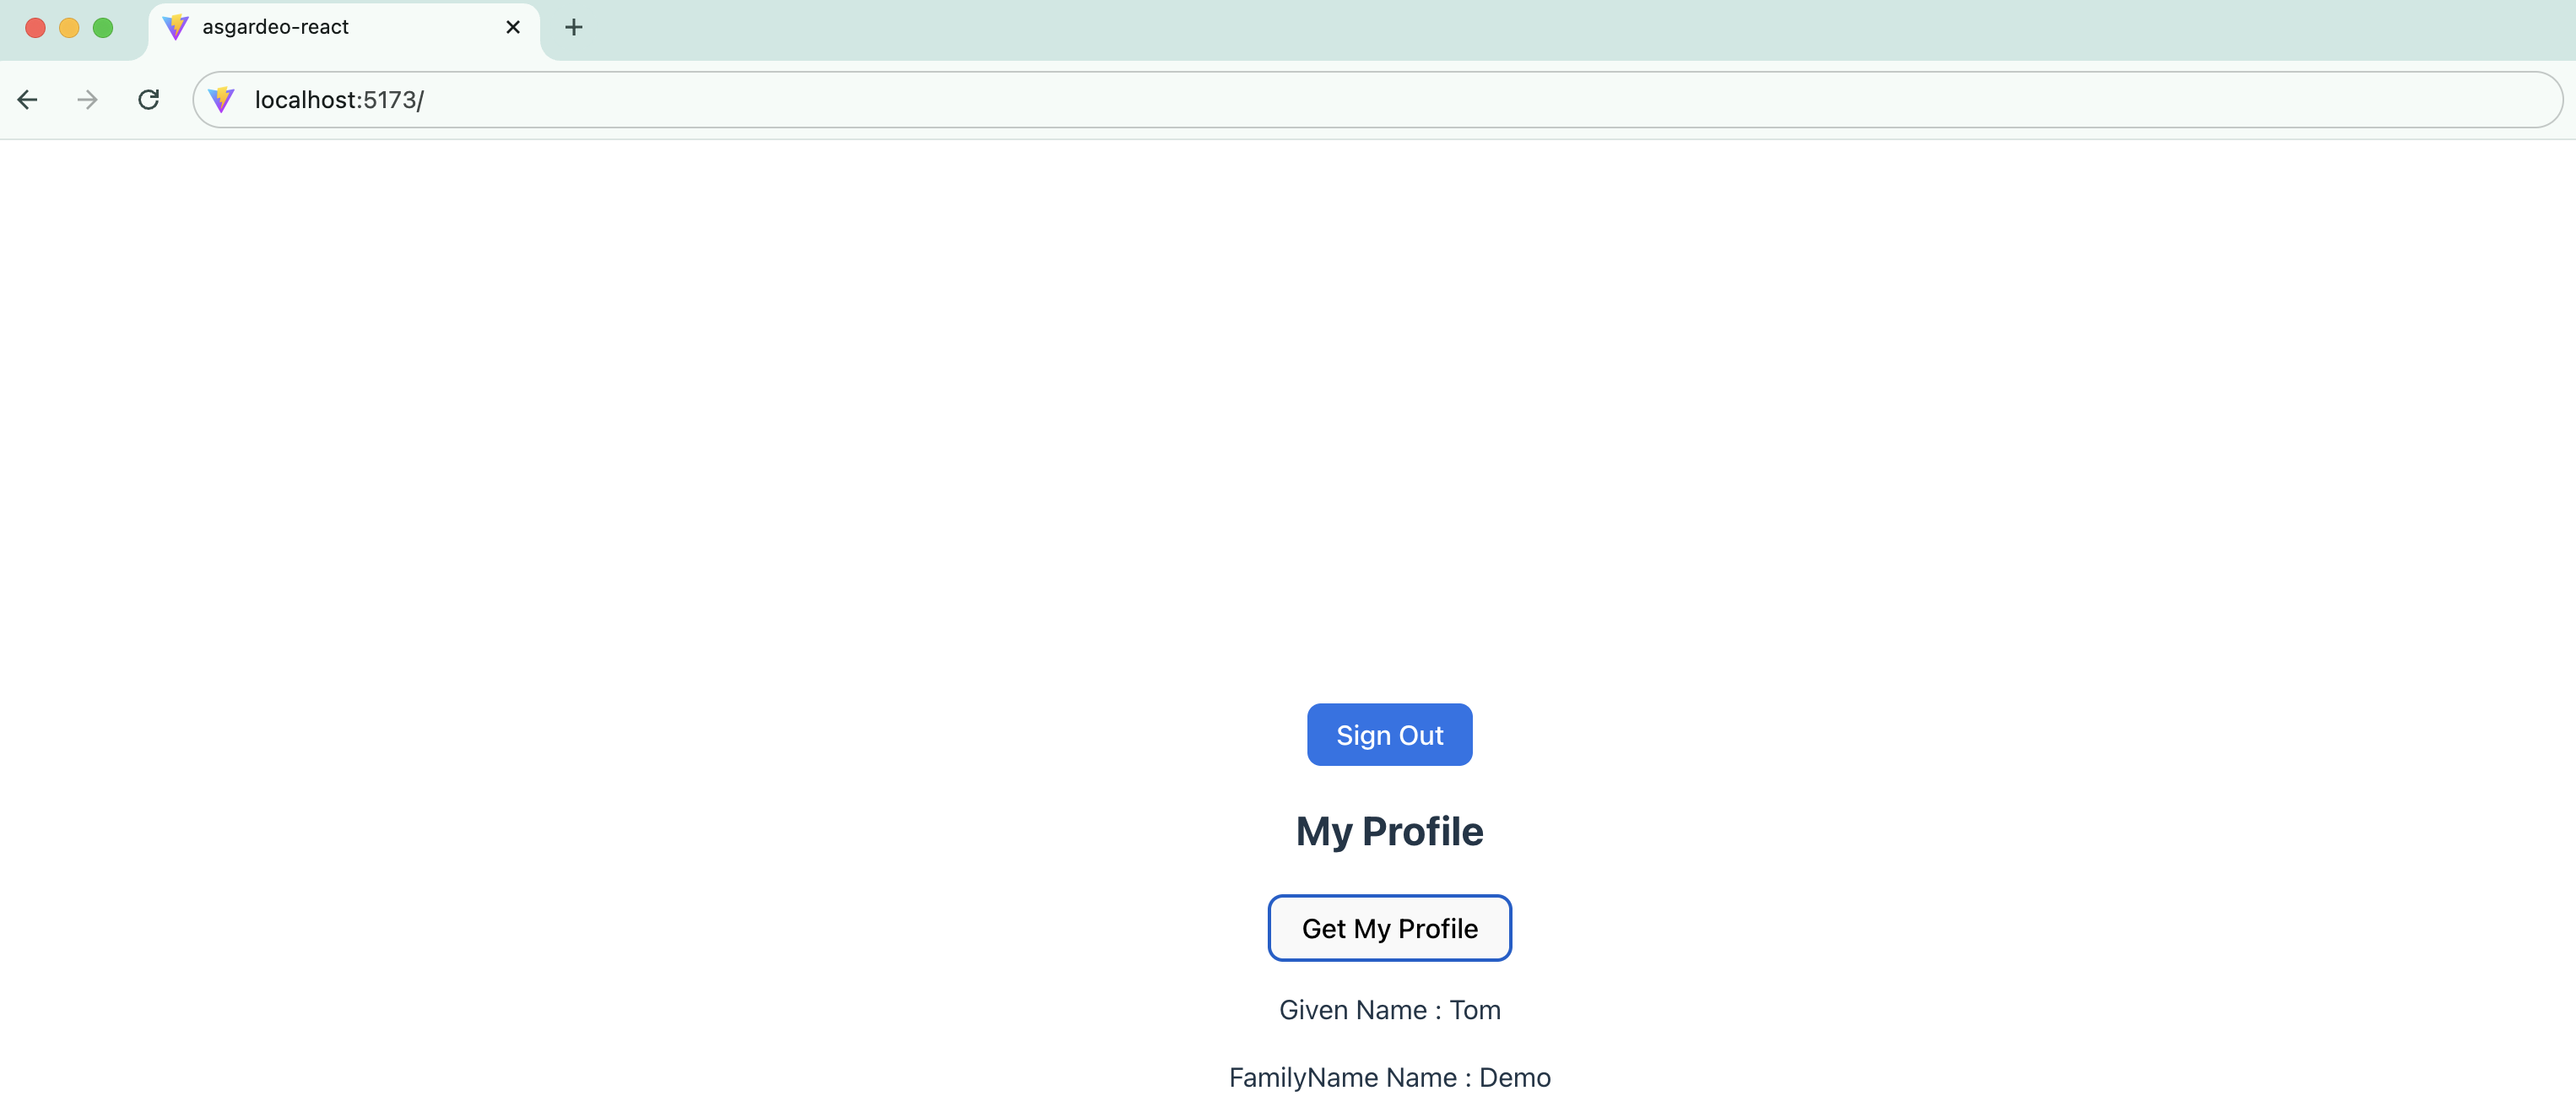
After revisiting your application and logging in successfully, you should see the Get My Profile button. When you click it, the profile details will be displayed as shown below.
Protect your app routes
In real-world React applications, it’s common to secure certain routes while keeping others public. Some paths should only be accessible to authenticated users.
The Asgardeo React SDK provides pluggable utilities that work with popular routing libraries such as React Router and TanStack Router. In this section, we’ll look at how to secure a route in our application using React Router.
First, install the following additional packages in your application.
Next, following common conventions, create a pages directory under src and add the following components:
-
MyProfile – Move the
MyProfile.jsxfile we created earlier into thesrc/pagesdirectory. -
Dashboard – Create a
Dashboard.jsxfile in thesrc/pagesdirectory and move the code fromApp.jsxinto it, adding one additional line as shown below.
import { SignedIn, SignedOut, SignInButton, SignOutButton, UserProfile } from '@asgardeo/react'
import { Link } from 'react-router-dom';

function Dashboard() {
    return (
        <header>
            <SignedIn>
                <SignOutButton />
            </SignedIn>
            <SignedOut>
                <SignInButton />
            </SignedOut>
            <p>
                <Link to="/profile">My Profile</Link>
            </p>
        </header>
    )
}
export default Dashboard
The only change in the above code is the <Link>component from React Router, which enables client-side navigation without a full page reload.
The next and final step is to define the routes and secure the protected paths. React Router supports several approaches, and here we’ll use the declarative method. Update your App.jsx file with the following code.
import { BrowserRouter, Routes, Route } from 'react-router-dom';
import { ProtectedRoute } from '@asgardeo/react-router';
import Dashboard from './pages/Dashboard';
import MyProfile from './pages/MyProfile';
import './App.css'

function App() {
  return (
    <header>
      <BrowserRouter>
        <Routes>
          <Route path="/" element={<Dashboard />} />
          <Route
            path="/profile"
            element={
              <ProtectedRoute>
                <MyProfile />
              </ProtectedRoute>
            }
          />
        </Routes>
      </BrowserRouter>
    </header>
  )
}
export default App
In the above code, we use the <BrowserRouter>, <Routes>, and <Route> components to define our routing. First, we configure the/root path to render the <Dashboard /> component.
Next, the <MyProfile /> component is wrapped with the <ProtectedRoute> component imported from @asgardeo/react-router. This component works together with React Router and tells the SDK that this route should only be accessible to authenticated users.
If a user is not authenticated, the SDK automatically redirects them to the login page.
Now, if you run and visit your application, you’ll see the dashboard screen. This time, instead of logging in first, click the My Profile link. You’ll be redirected to the login screen as before.
Once you authenticate, you’ll be redirected back, and clicking the “My Profile” link again will take you directly to the MyProfile page.
Conclusion
This guide showed how to secure a React application using Asgardeo and its React SDK without building custom authentication from scratch. By using ready-to-use components like <SignInButton />, <SignOutButton />, and <UserProfile />, you can quickly integrate authentication into any React project.
With the SDK, you can implement a complete authentication flow, securely call protected APIs via the useAsgardeo hook’s built-in HTTP client, and protect routes using <ProtectedRoute />. This approach delivers a production-ready authentication system while letting developers focus on building application features instead of dealing with security boilerplate.